


28/32YT56
Series
Owner's manual
TOSHIBA

?
For television
operation qu
er
ies,
please ring the
helpline…
R
emember...
2
Contents
SETTING UP
Safety precautions – Some do's and don'ts for you to be aware of 3
Installation and important information 4
The remote control – an at-a-glance guide 5
Connecting external equipment – a guide to connecting equipment to the back of the television 6
Side Connections and controls – switching on the television, standby, using the side controls,
headphone socket, connecting equipment to the side of the television 7
DIGITAL Tuning the television – initial tuning and programme sorting 8
DIGITAL Tuning the television – auto tuning, manual tuning 9
ANALOGUE Tuning the television – initial tuning and programme sorting, manual tuning 10
ANALOGUE Tuning the television – fine tuning 11
ANALOGUE Tuning the television – autostore, choosing a language 12
CONTROLS AND FEATURES
General controls – selecting programme positions, time display 13
Stereo and bilingual transmissions – stereo/mono or dual language broadcasts 13
Child lock – disabling the buttons on the television 13
Sound controls – volume, sound mute, balance, AVL, pseudo 14
Sound controls – equalizer, headphones 15
Picture format 16
Picture controls – picture mode (brightness, contrast, colour, sharpness, tint), tilt,
colour temperature 17
Picture controls – video noise reduction (VNR), picture format, VCR mode, blue background
still picture 18
DIGITAL Programme timers – setting the television to record 19
ANALOGUE Sleep timer – setting the television to turn off 19
DIGITAL Guide and information – using the on-screen information and programme guide 20
DIGITAL Parental controls – setting the pin, mode 21
DIGITAL Settings – setting favourites, locked programmes, encrypted programmes 22
DIGITAL Settings – audio languages, subtitles, reset TV, common interface 23
DIGITAL Settings – software version, auto upgrade, searching for new software 24
Input selection and AV connections – input and output sockets for connected equipment,
analogue switch off 25
TEXT SERVICES
DIGITAL Text and interactive services – general information 26
ANALOGUE Text – setting up and general information 26
ANALOGUE Text – control buttons 27
PROBLEM SOLVING
Questions and Answers – answers to some of the more common queries 28
Notes – for your own records 30
INFORMATION
Specifications and Accessories – technical information about the television, supplied accessories 32

3
Safety Precautions
.
,
Air Circulation
Do not
Heat Damage
Mains Supply
Do
This equipment has been designed and manufactured to meet international safety standards but, like any
electrical equipment, care must be taken to obtain the best results and for safety to be assured. Please read
the points below for your own safety. They are of a general nature, intended to help with all electronic
consumer products and some points may not apply to the goods you have just purchased.
Leave at least 10cm clearance around the television
to allow adequate ventilation. This will prevent
overheating and possible damage to the television.
Dusty places should also be avoided.
Damage may occur if the television is left in direct
sunlight or near a heater. Avoid places subject to
extremely high temperatures or humidity, or locations
where the temperature is likely to fall below 5 C (41 F).
The mains supply required for this equipment is
230v AC 50Hz. Never connect to a DC supply or
any other power source. DO ensure that the
television is not standing on the mains lead. DO
NOT cut off the mains plug from this equipment,
this incorporates a special Radio Interference Filter,
the removal of which will impair its performance. In
the UK, the fuse fitted in this plug is approved by
ASTA or BSI to BS1362. It should only be replaced
by a correctly rated and approved type and the
fuse cover must be refitted.
IF IN DOUBT PLEASE CONSULT A COMPETENT
ELECTRICIAN.
DO read the operating instructions before you
attempt to use the equipment.
DO ensure that all electrical connections (including
the mains plug, extension leads and interconnections between pieces of equipment) are
properly made and in accordance with the
manufacturers’ instructions. Switch off and
withdraw the mains plug before making or
changing connections.
DO consult your dealer if you are ever in doubt
about the installation, operation or safety of your
equipment.
DO be careful with glass panels or doors on
equipment.
DON'T remove any fixed cover as this may expose
dangerous voltages.
DON'T obstruct the ventilation openings of the
equipment with items such as newspapers,
tablecloths, curtains, etc. Overheating will cause
damage and shorten the life of the equipment.
DON'T allow electrical equipment to be exposed to
dripping or splashing or objects filled with liquids,
such as vases, to be placed on the equipment.
DON'T place hot objects or naked flame sources,
such as lighted candles or nightlights on, or close to
equipment. High temperatures can melt plastic and
lead to fires.
DON'T use makeshift stands and NEVER fix legs
with wood screws. To ensure complete safety
always fit the manufacturers’ approved stand,
bracket or legs with the fixings provided according
to the instructions.
DON'T listen to headphones at high volume, as
such use can permanently damage your hearing.
DON'T leave equipment switched on when it is
unattended, unless it is specifically stated that it is
designed for unattended operation or has a
standby mode. Switch off by withdrawing the plug
make sure your family know how to do this. Special
arrangements may need to be made for people
with disabilities.
DON'T continue to operate the equipment if you
are in any doubt about it working normally, or it is
damaged in any way – switch off, withdraw the
mains plug and consult your dealer.
ABOVE ALL – NEVER let anyone, especially
children, push or hit the screen, push
anything into holes, slots or any other
openings in the case.
NEVER guess or take chances with electrical
equipment of any kind – it is better to be safe
than sorry.
THE MAINS PLUG IS USED AS A
DISCONNECTING DEVICE AND THEREFORE
SHOULD BE READILY OPERABLE.
4
Installation and important information
Where to install
Please take note
EXCLUSION CLAUSE
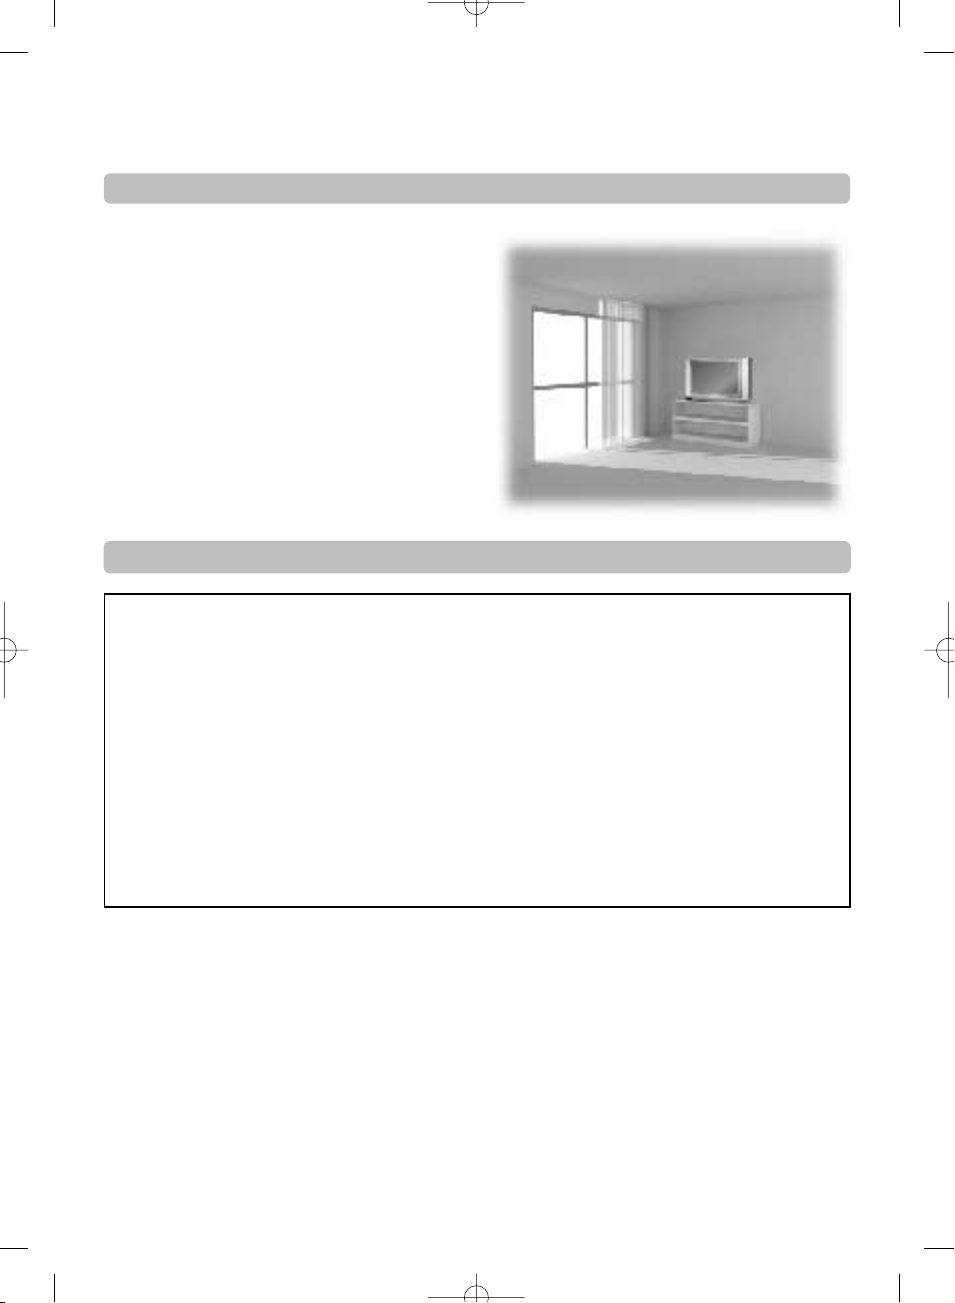
Locate the television away from direct sunlight and strong
lights, soft, indirect lighting is recommended for comfortable
viewing. Use curtains or blinds to prevent direct sunlight
falling on the screen.
Place on a sturdy platform, the mounting surface should be
flat and steady. It should then be secured to the wall with a
sturdy tie using the clip on the back of the television, this will
prevent it from falling over.
Make sure the television is located in a position where it
cannot be pushed or hit by objects and that small items
cannot be inserted into slots or openings in the case.
Toshiba shall under no circumstances be liable for loss and/or damage to the product caused by:
i) fire;
ii) earthquake;
iii) accidental damage;
iv) intentional misuse of the product;
v) use of the product in improper conditions;
vi) loss and/or damage caused to the product whilst in the possession of a third party;
vii) any damage or loss caused as a result of the owner’s failure and/or neglect to follow the instructions set out in the owner’s
associated equipment;
viii) any loss or damage caused directly as a result of misuse or malfunction of the product when used simultaneously with
associated equipment;
Furthermore, under no circumstances shall Toshiba be liable for any consequential loss and/or damage including but not limited
to the following, loss of profit, interruption of business, the loss of recorded data whether caused during normal operation or
misuse of the product.
If stationary images generated by text services, channel identification logos, computer displays, video games, on screen menus, etc.
are left on the television screen for any length of time they could become conspicuous, it is always advisable to reduce both the
brightness and contrast settings.
5
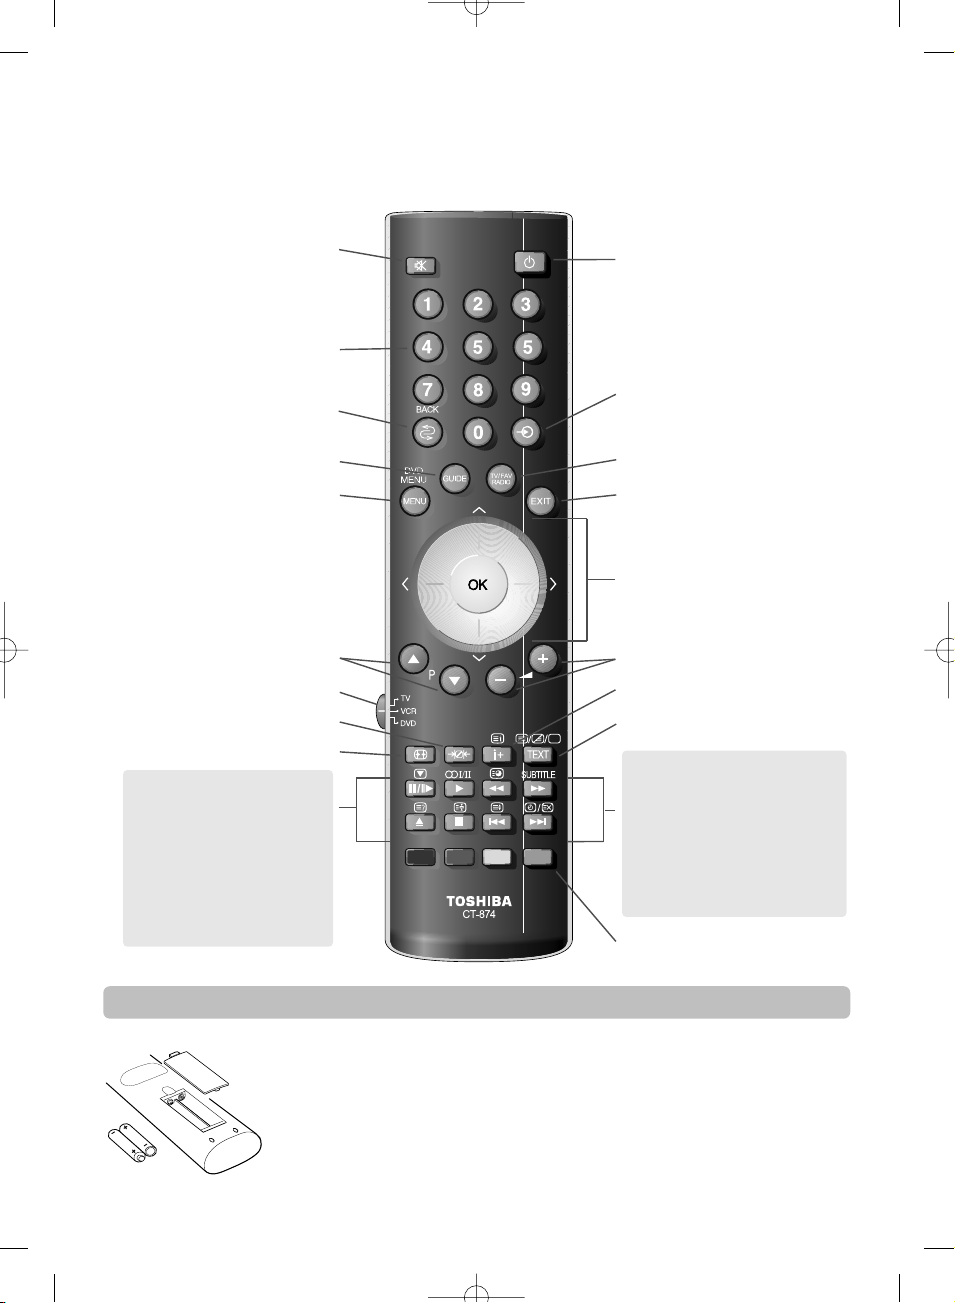
The remote control
UP
Inserting batteries and effective range of the remote
Simple at-a-glance reference of your remote control.
To alter the volume
To display digital on-screen information
To call up text services in analogue mode
and interactive services in digital mode
Text and interactive service control
buttons
To exit Menus
Selectable picture mode
To mute the sound
To select input from external sources
To select mode
Picture format
On-screen Menus
To change programme positions and
text pages
To display the digital on-screen
Programme Guide
To switch between TV, Radio and Favourite
programmes
Number buttons
To return to the previous programme
For On/Standby mode
When using a TOSHIBA VCR or DVD:
press
m
/
ll
r
to PAUSE/STEP
pressrto PLAY
pressqto REWIND
presssto FAST FORWARD
presswto EJECT
presspto STOP
press
l
q
to SKIP-REWIND
press
s
l
to SKIP-FORWARD
When using menus the arrows move the
cursor on the screen up, down, left or
right. OK to confirm your selection
When in TV mode:
u Still picture in digital mode
O
I/II
Stereo/bilingual transmissions
SUBTITLE
Digital Subtitles
8/9
Time display in analogue mode
When using the Programme Guide:
q
– 2 hours
s
+ 2 hours
l
q
– 24 hours
s
l
+ 24 hours
Remove the back cover to reveal the battery compartment and make sure the batteries are inserted
the right way round. Suitable battery types for this remote are AAA, IEC R03 1.5V.
Do not combine a used, old battery with a new one or mix battery types. Remove dead batteries
immediately to prevent acid from leaking into the battery compartment. Dispose of them in a
designated disposal area.
The performance of the remote control will deteriorate beyond a distance of five metres or outside an
angle of 30 degrees from the centre of the television. If the operating range becomes reduced the
batteries may need replacing.
IN
OUT
IN
OUT
6
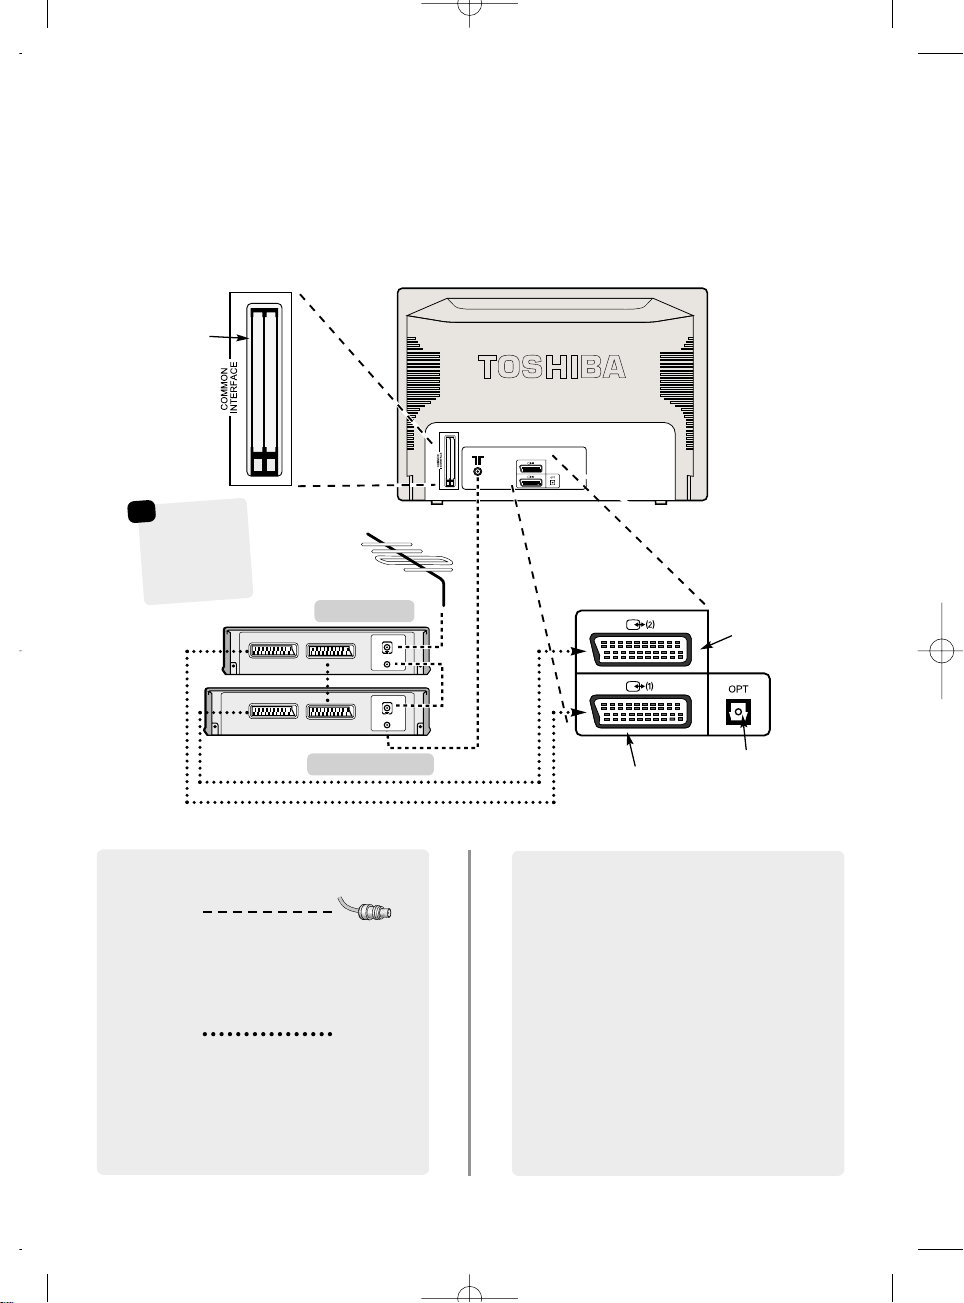
Connecting external equipment
B
WE RECOMMEND THAT YOU USE SCART LEADS IN
ADDITION TO AERIAL CABLES WHEREVER POSSIBLE
Aerial cables:
SCART leads:
media recorder
decoder*
SCART 1 (EXT 1)
SCART 2 (EXT 2)
Digital audio output
*
a decode
r
could be Digital
Satellite, Free to
Air or any other
compatible
decoder.
*
SAT
M
EDIA REC.
IN/OUT
T
V
Before connecting any external equipment, disconnect from the main power
is connected.
COMMON INTERFACE
The Common Interface is
for a Conditional Access
Module (CAM). There is
access for two CAMs.
Contact a service provider
The cover must be
removed before inserting
the CAM
☛
Connect the aerial to the socket on the rear of the
television. If you use a decoder* and/or a media recorder
it is essential that the aerial cable is connected through
the decoder and/or through the media recorder to the
television.
Connect the media recorder IN/OUT socket to the
television. Connect the decoder TV socket to the
television. Connect the media recorder SAT socket to the
decoder MEDIA RECORDER socket.
Before running Auto tuning put your decoder and media
recorder to Standby.
A wide variety of external equipment can be
connected to the back of the television, therefore
the relevant owners manuals for all additional
equipment must be referred to.
We recommend SCART 1 for a decoder and SCART 2 for
a media recordcer.
If connecting S-VIDEO equipment, set the INPUT for
EXT2S or EXT3S. See page 25.
If the television automatically switches over to monitor
external equipment, return to normal television by
pressing the desired programme position button. To
recall external equipment, press to select between
DTV, EXT1, EXT2, EXT2S, EXT3, EXT3S or ATV.
After first installation, press the MENU button on the remote
control to see the menus.
In digital mode the menu bar at the top of the screens will
show three different topics shown in symbols. As each
symbol is selected by pressing the Sor Rbutton on the
remote control, its respective options will appear below.
In analogue mode the menu appears as a list of five
topics. Press the Pand Q button to select an topic then
R
to see its options.
To use the options press the Pand Q button on the
remote control to move up and down through them and
OK, Sor Rto select the required choice. Follow the on
screen instructions. The functions of each menu are
described in detail throughout the manual.
7
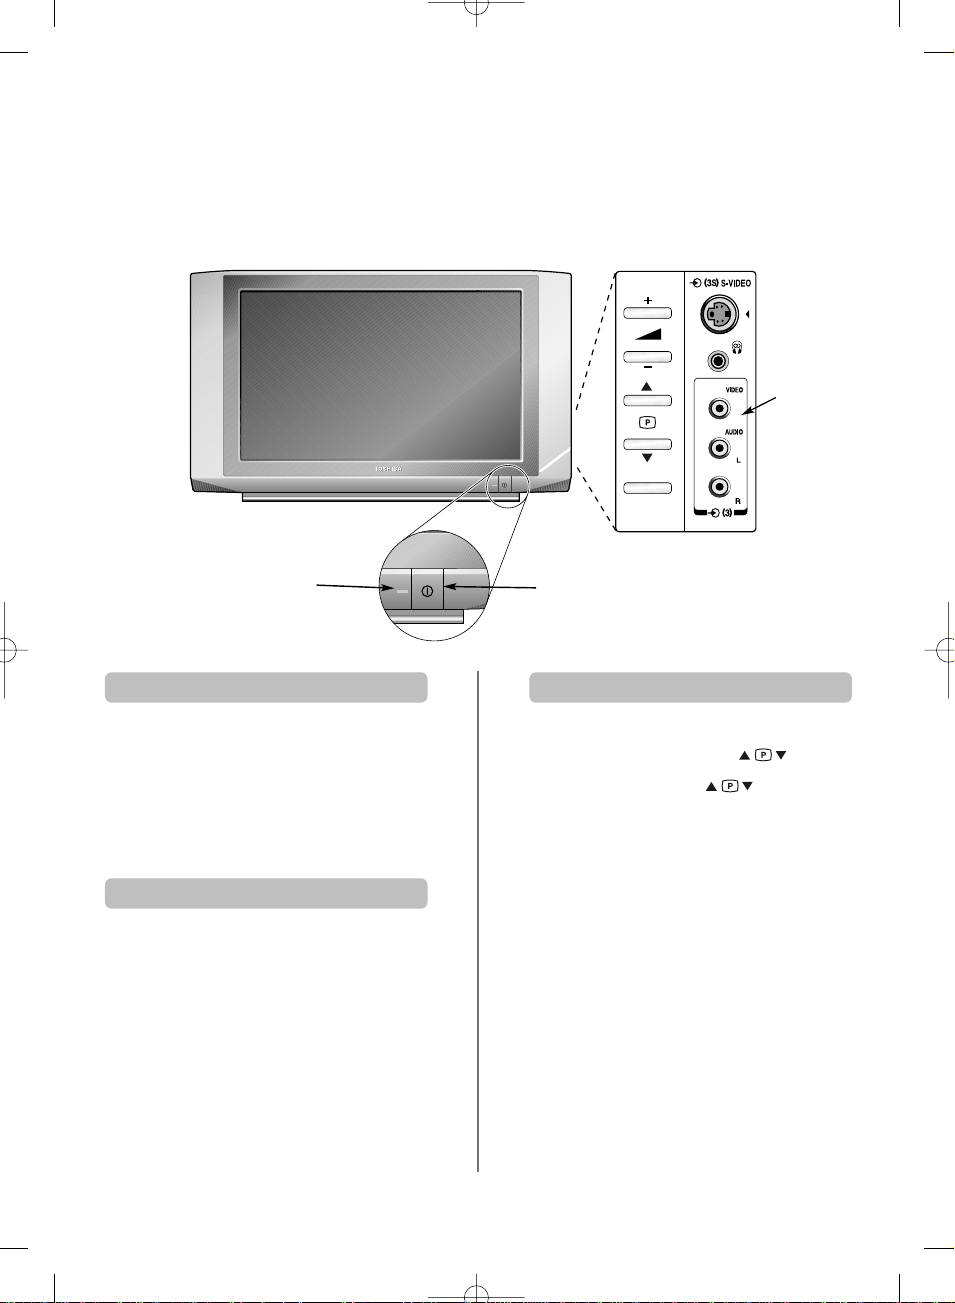
Connections and controls
If the power-on light is unlit press the POWER button on the
front of the television to switch the television on, a RED LED
will appear, then press a number button on the remote
control to see the screen.
To put the television into Standby press ion the remote
control, a GREEN LED will appear for a few seconds then
turn RED. To view the television press iagain or any of the
number buttons. The picture may take a few seconds to
appear.
A wide variety of external equipment can be connected via the sockets located on the side of the television.
Whilst all the necessary adjustments and controls for the television are made using the remote control, the
buttons on the side of the television may be used for some functions.
To alter the volume press
+j
—
.
To alter the programme position press .
Press MENU and
+j
—
and to control the
sound and picture options in analogue mode only.
Press MENU to finish.
When connecting mono sound equipment to EXT 3,
connect the audio output of the equipment to theL or R
socket on the television, then press
O
I/II
to select Dual I
for left mono or Dual II for right mono.
To select the Input, press
B
until the display shows EXT3
as described on page 25. The television will automatically
sense the type of signal.
Please always refer to the owner’s manual of the equipment
to be connected for full details.
Please note: Inserting the headphone jack will mute the
sound from all speakers.
Switching on
Using the remote control
Using the controls and connections
Power Button
RED – Power On
GREEN – Active Standby
INPUT 3
(EXT 3)
MENU
EXIT
Cancel
AUTO TUNING
Progress
Prog. Name Type UHF Quality
30 CBBC Channel 22 Good
46 Community 21 Poor
8
Digital tuning, programme sorting
Before switching on the television put your decoder and media recorder to Standby if they are connected
and ensure the aerial is connected. To set up the television use the buttons on the remote control as detailed
on page 5.
1
2
3
4
1
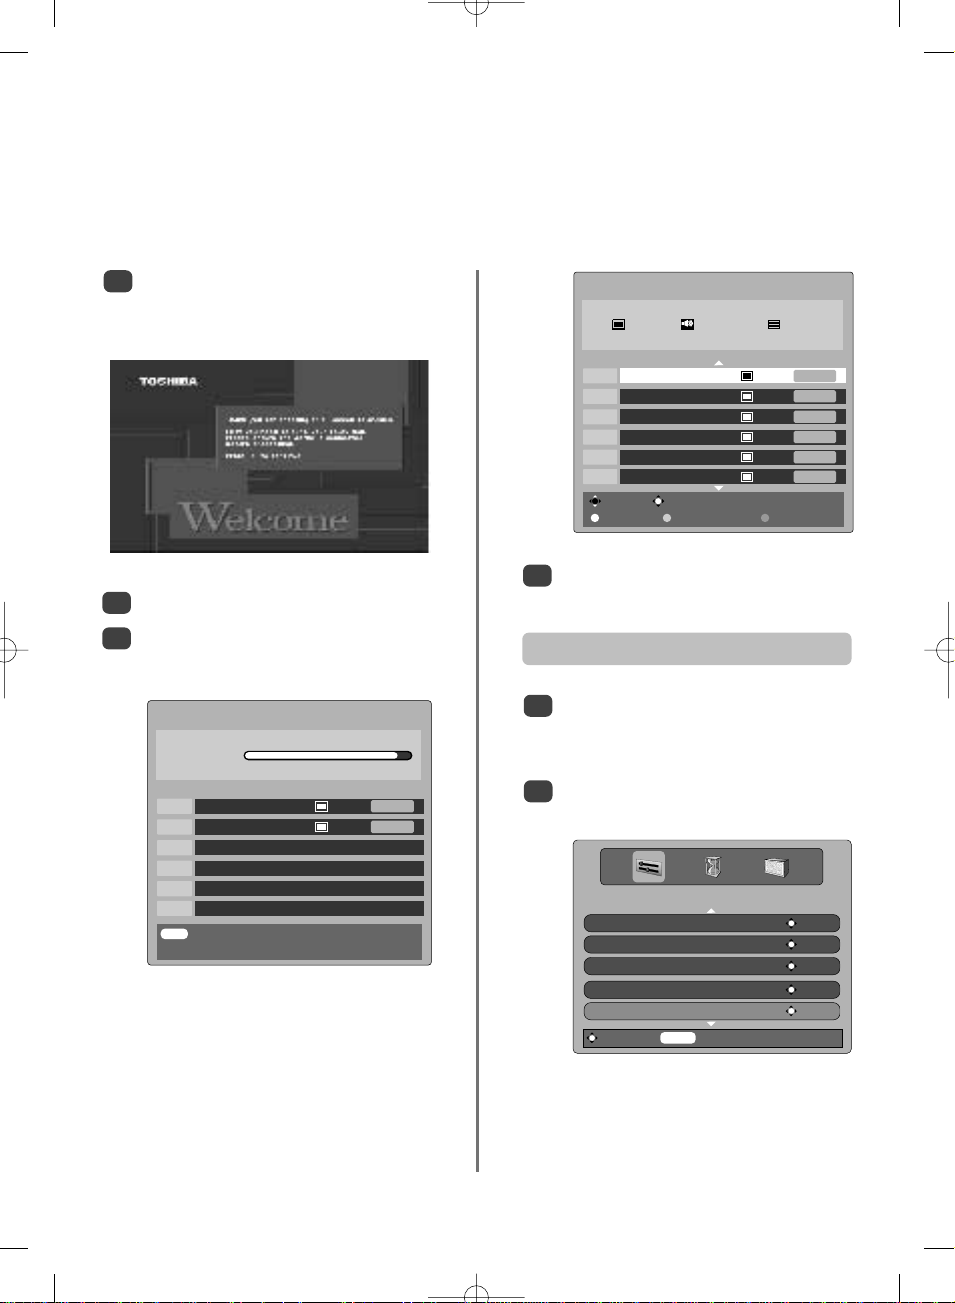
Press the power-on button, the Welcome screen
will appear. This screen will appear the first time
that the television is switched on and each time
the television is reset.
Use Q orPto move through the list to select a
programme then press OK to view.
The station order may be changed, for instance
if the picture is unclear or the signal is weak.
Press MENU, the SETUP MENU will appear on
screen.
Use Q to move down through the list and
highlight Programmes. Press OK.
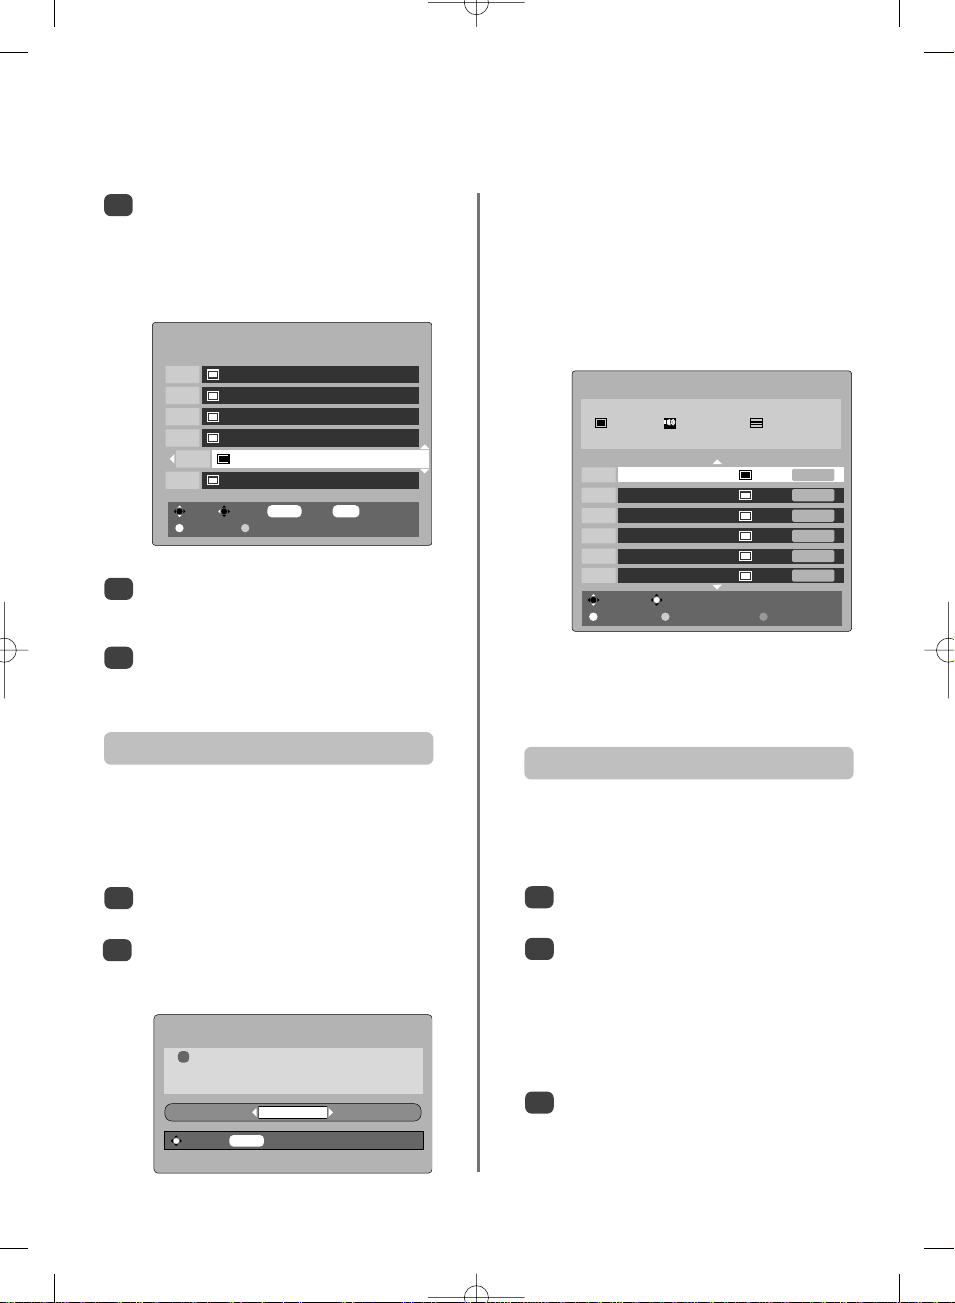
2
Press OK to start tuning.
The Auto tuning screen will appear and the
television will start to search for available stations.
The progress bar will move along the line.
You must allow the television to complete
the search.
When the search is complete the Auto tuning
screen will display the total number of services
found.
Change Watch
Page Up Page Down Sort
AUTO TUNING
19 programmes found
13 TV 6 Radio 0 Text
Press OK to watch programme
Prog. Name Type UHF Quality
1 BBC ONE 22 Good
2 BBC TWO 22 Good
3 BBC THREE 22 Good
10 BBC FOUR 21 Poor
30 CBBC Channel 22 Good
34 CBeebies 21 Poor
Programme sorting
SETUP MENU
TV Setup ENTER
Languages ENTER
Auto tuning ENTER
Manual tuning ENTER
Programmes ENTER
Watch TV
MENU
Watch TV
9
Digital programme sorting
continued
,
auto tuning, manual tuning
The station order may be changed, for instance
if the picture is unclear or the signal is weak,
using Programmes as previously described.
With the list of stations now showing use
Q orPto highlight the station you want to
move and press R.
The selected station will be moved to the right of
the screen.
Sort Store
MENU
Back
EXIT
Watch TV
Page Up Page Down
PROGRAMMES
Prog. Name
1 BBC ONE
2 BBC TWO
7 BBC THREE
10 BBC FOUR
30 CBBC Channel
31 CBeebies
4
3
5
Use Q orPto move through the list to your
preferred position. As you do so the other
stations will move to make room.
Press Sto store your move.
Repeat as necessary, then press EXIT.
1
2
3
Select Manual tuning from the SETUP MENU
and press OK.
Enter the multiplex number using the number
buttons. The television will automatically search
for that multiplex.
When the multiplex is found any channels not
currently on the programme list will be added
and the programme information at the top of
the screen will be updated.
Repeat as necessary. Press EXIT to finish.
This feature is available for service engineers or can be
used for direct channel entry if the multiplex channel
is known.
Manual tuning
The television will start to search for all available
stations.
You must allow the television to complete
the search.
When the search is complete the Auto tuning
screen will display the total number of services
found.
Auto tuning
1
Select the SETUP MENU and use Q to highlight
Auto tuning. Press OK.
A screen will appear warning that previous
digital programmes and settings will be deleted.
Press OK to continue with the Auto tuning.
2
Auto tuning will add any new services that are
broadcast, or can be used to completely re-tune
the television. All current programmes and settings, i.e.
favourites and locked programmes, will be lost.
WARNING
! All previous digital programmes and
settings will be deleted.
Continue?
YES
Select
MENU
Cancel
Change Watch
Page Up Page Down Sort
AUTO TUNING
23 programmes found
14 TV 8 Radio 1 Text
Press OK to watch programme
Prog. Name Type UHF Quality
1 BBC ONE 22 Good
2 BBC TWO 22 Good
3 BBC THREE 22 Good
10 BBC FOUR 21 Poor
30 CBBC Channel 22 Good
34 CBeebies 21 Poor

Analogue tuning and programme sorting,
manual tuning
The television can be tuned to all available analogue stations. Pressing Bsix times will put the television
into analogue mode. To return to digital viewing press
, DTV will appear on the screen.
B
NOTE: When the television is switched off the mode being viewed at the time will automatically be selected
when the television is switched back on.
Press Bto select analogue mode. The A. P. S.
1
screen will appear. This screen will appear the
first time that analogue mode is selected and
each time the television is re-tuned.
A. P. S.
PLEASE CHECK ANTENNA CABLE
AUTOSTORE
CONTINUE
LANGUAGE ENGLISH
EXIT : CANCEL
Press Q to highlight CONTINUE, then press Rto
22
start tuning.
The television will start to search for available
3
stations. The progress bar will move along
the line.
A. P. S.
A. P. S. IS RUNNING
PLEASE WAIT
PR CHANNEL NAME
04 C 32 CH 4
zx
EXIT : CANCEL
%50
PROGRAMME
1 BBC1 10 – – – – – 19 – – – – –
2 BBC2 11 – – – – – 20 – – – – –
3 ITV 12 – – – – – 21 – – – – –
4 CH 4 13 – – – – – 22 – – – – –
5 – – – – – 14 – – – – – 23 – – – – –
6 – – – – – 15 – – – – – 24 – – – – –
7 – – – – – 16 – – – – – 25 – – – – –
8 – – – – – 17 – – – – – 26 – – – – –
9 – – – – – 18 – – – – – 27 – – – – –
NAME INSERT
DELETE AUTOSTORE
With the list of stations now showing use Q or
4
to highlight the station you want to move and
press the GREEN button.
Use Q orPto move through the list to the
5
preferred position, as you do so the other stations
will move to make room, then press the GREEN
button again. The selected station will be moved
to the new position.
Repeat as necessary, then press EXIT.
If the television cannot be connected to a media
recorder/decoder with a SCART lead or if a
station on another system is required, a
programme position can be manually tuned in.
P
You must allow the television to complete
the search.
When the search is complete the television will
automatically select programme position 1. This
may not be a clear picture or the signal may be
weak, so the station order can be changed using
PROGRAMME which will appear on the screen.
10
Manual tuning
To allocate a programme position on the television for a
decoder and media recorder: turn the decoder on, insert a
pre-recorded film into the media recorder and press PLAY,
Press MENU and using Q select INSTALLATION,
1
then press R.
then manually tune.
MENU
SOUND
PICTURE x
FEATURE x
INSTALLATION x
PROGRAMME x
x

11
Analogue manual tuning
continued
,
fine tuning
The television can be tuned-in manually using INSTALLATION. For example: if the television cannot be
connected to a media recorder/decoder with a SCART lead or to tune-in a station on another System.
Using Q select PROGRAMME then press Rand
key in the programme position to be tuned with
the number buttons, we suggest Programme 0 for
a media recorder.
2
Use Q to select SEARCH then press R,
SEARCHING will flash and the television will
begin searching for channels.
Each signal will show on the television, if it is not
your media recorder press Rto restart the search.
When your media recorder signal is found, save
the selection by pressing Q until STORE is
highlighted, then press Rto save.
Repeat for each programme position to be tuned
then press EXIT to finish.
3
4
5
If the channel number is known the television will
search using this information. Using Rselect
CHANNEL as the TUNING MODE.
Select the PROGRAMME position number as in
Step 2, then enter the CHANNEL number.
Highlight SEARCH and press R.
To save the selection press Q until STORE is
highlighted, then press R.
6
Select the programme position, then press MENU
and select INSTALLATION.
Using Q highlight FINE TUNING, then use
S
or Rto adjust to get the best picture and sound.
To save the selection press Q until STORE is
highlighted, then press R.
1
2
3
7
8
Select the PROGRAMME position number, then
enter the FREQUENCY number. Highlight
SEARCH and press R.
To save the selection press Q until STORE is
highlighted, then press R.
NOTE: If the decoder is connected to the
television by SCART lead to EXT2, the DECODER
option in the INSTALLATION menu must be
selected.
10
11
9
f
e
INSTALLATION
PROGRAMME 00
BAND C
CHANNEL 28
STANDARD I
DECODER
FINE TUNING
z
zx
x
SEARCH SEARCHING
TUNING MODE CHANNEL
f
e
INSTALLATION
BAND C
CHANNEL 28
STANDARD I
DECODER
FINE TUNING
z
zx
x
SEARCH
TUNING MODE CHANNEL
STORE
f
e
INSTALLATION
BAND C
CHANNEL 28
STANDARD I
DECODER
FINE TUNING
z
zx
x
SEARCH
TUNING MODE CHANNEL
STORE
f
e
INSTALLATION
BAND C
CHANNEL 28
STANDARD I
DECODER
FINE TUNING
z
zx
x
SEARCH
TUNING MODE CHANNEL
STORE
f
e
INSTALLATION
BAND C
CHANNEL 28
STANDARD I
DECODER
FINE TUNING
z
zx
x
SEARCH
TUNING MODE CHANNEL
STORE
FINE TUNING should not be required unless there is
interference or a weak signal. It is only available when the
tuning mode is set to channel.
Fine tuning
INSTALLATION
PROGRAMME 02
FREQUENCY 527.18 MHZ
STANDARD I
DECODER
SEARCH SEARCHING
TUNING MODE FREQUENCY
STORE
The television will also search by frequency. Select
FREQUENCY as the TUNING MODE.

12
Analogue autostore
Autostore
1
Press MENU and using Q select PROGRAMME
then press R.
The PROGRAMME screen will appear on the
screen. Press the BLUE button to start
AUTOSTORE.
3
2
When the AUTOSTORE feature is selected all analogue
channels and settings will be lost, the television will return
to factory settings and then re-tune.
MENU
SOUND x
PICTURE x
FEATURE x
INSTALLATION x
PROGRAMME x
PROGRAMME
1 BBC1 10 – – – – – 19 – – – – –
2 BBC2 11 – – – – – 20 – – – – –
3 ITV 12 – – – – – 21 – – – – –
4 CH 4 13 – – – – – 22 – – – – –
5 – – – – – 14 – – – – – 23 – – – – –
6 – – – – – 15 – – – – – 24 – – – – –
7 – – – – – 16 – – – – – 25 – – – – –
8 – – – – – 17 – – – – – 26 – – – – –
9 – – – – – 18 – – – – – 27 – – – – –
NAME INSERT
DELETE AUTOSTORE
The A. P. S. screen will appear. Press Q to
highlight AUTOSTORE, then press Rto start
tuning.
The television will start to search for available
stations. The progress bar will move along
the line.
A. P. S.
A. P. S. IS RUNNING
PLEASE WAIT
PR CHANNEL NAME
04 C 32 CH 4
zx
%50
EXIT : CANCEL
You must allow the television to complete
the search.
When the search is complete the television will
automatically select programme position 1. This
may not be a clear picture or the signal may be
weak, so the station order can be changed using
the PROGRAMME menu.

General controls, time display,
stereo/bilingual transmissions, child lock
Selecting programme positions
To select a programme position use the numbered
buttons on the remote control.
Programme positions can also be selected using Pfand
Pe.
To display on-screen information i.e. programme position,
input mode or stereo/mono signal press . Press
again to clear.
To revert to the previous programme position press ^.
REMEMBER: To move between digital and analogue
modes, press Btill DTV appears on the screen for
digital, pressBrepeatedly to select analogue.
The Time Display – analogue only
The time display facility allows the current (text service)
time to be seen on the television screen.
Press
broadcast to see a time display from the broadcaster.
Press again to clear it from the screen.
whilst watching a normal television
8/9
Stereo and Bilingual transmissions
In analogue mode:
If stereo or dual language broadcasts are transmitted the
word Stereo or Dual will appear on the screen each time
programme positions are changed, disappearing after a
few seconds. If the broadcast is not in stereo the word
Mono will appear
.
Child lock
CHILD LOCK disables the buttons on the side of the
television. All buttons on the remote control can still be used.
This feature is available in digital and analogue modes.
If in digital mode, press MENU, using
1
Setup from the SETUP MENU, then press OK.
SETUP MENU
TV Setup ENTER
Languages ENTER
Auto tuning ENTER
Manual tuning ENTER
Programmes ENTER
Watch TV
MENU
Watch TV
A menu will appear on screen with SOUND,
2
PICTURE and FEATURE options. Using
the FEATURE menu and press R.
If in analogue mode, press MENU and using
3
select the FEATURE menu and press R.
MENU
SOUND x
PICTURE x
FEATURE x
INSTALLATION x
PROGRAMME x
PressQto choose CHILD LOCK and press Rto
4
select, a tick will appear in the box. Press OK.
Q
Q
select TV
select
Q
Stereo… Press
Bilingual… Bilingual transmissions are rare. If they are
transmitted the word Dual will display. Choose the
required programme number and if the word Dual
appears press
In digital mode:
I/II appears during channel change and the bar if the
current programme has more than one audio track.
Press OI/II to select between audio languages.
O
I/II
to select Stereo or Mono.
O
I/II
to select Dual 1, Dual 2 or Mono.
FEATURE
SLEEP TIMER OFF
CHILD LOCK
TXT LANGUAGE ENGLISH
LANGUAGE ENGLISH
EXT-2 OUTPUT TV
BLUE BACKGRND
When CHILD LOCK is selected, a reminder will
appear when any of the side panel buttons are
pressed. Once the television has been switched
off it can ONLY be brought out of standby using
the remote control.
13

SOUND
VOLUME
zx
BALANCE
z
zx
x
SOUND MODE STEREO
AVL
PSEUDO
EQUALIZER
x
H. PHONE x
STORE
14
Sound controls –
volume, sound mute, balance, AVL, pseudo
Volume
Press
j
+
or
j
—
to adjust the volume.
Sound Mute
Press konce to turn the sound off and again to cancel.
Sound controls
Press Rto select the SOUND option from the
main menu.
Sound balance
1
Press Qto highlight BALANCE and SorRto
adjust the settings.
Press Q to select STORE and then Rto save the
settings. Press EXIT to finish.
2
3
AVL – Auto Volume Limiter
AVL limits high volume levels and prevents the extreme
changes in volume that can occur when channels are
changed or a programme switches to a commercial.
1
2
3
Select the SOUND option from the main menu.
Use Q to highlight AVL then pressRto select, a
tick will appear in the box.
Press Q to select STORE and then Rto save the
selection.
MENU
SOUND
x
PICTURE x
FEATURE x
INSTALLATION x
PROGRAMME x
SOUND
VOLUME
zx
BALANCE
z
zx
x
SOUND MODE STEREO
AVL
PSEUDO
EQUALIZER
x
H. PHONE x
STORE
Pseudo
PSEUDO creates a synthetic sound effect for movies and
television shows recorded in mono.
1
2
In the SOUND menu use Q to highlight
PSEUDO then pressRto select, a tick will appear
in the box.
Press Q to select STORE and then Rto save the
selection.
All sound controls are available in both digital and analogue modes. To access the SOUND menu in
digital: press MENU and using
Q
select TV setup, press OK to bring up the SOUND option, press Rto
select. To access the SOUND menu in analogue: press MENU and using
Q
highlight SOUND, press
R
to select.

15
Sound controls
continued
–
equalizer, headphone
All sound controls are available in both digital and analogue modes. To access the SOUND menu in
digital: press MENU and using
Q
select TV setup, press OK to bring up the SOUND option, press Rto
select. To access the SOUND menu in analogue: press MENU and using Qhighlight SOUND, press
R
to select.
Equalizer
The EQUALIZER feature has a number of sound settings
to select from; THEATRE, SPEECH, MULTIMEDIA,
MUSIC. These settings are all preset and cannot be
altered. The PERSONAL setting can be altered and stored
to suit personal preference.
1
Select the SOUND option from the main menu.
Headphone
The HEADPHONE feature allows you to alter the sound
from headphones when connected to the socket on the
side of the television.
1
Select the SOUND option from the main menu.
2
Use Q to highlight EQUALIZER then pressRto
select.
2
Use Q to highlight H. PHONE then pressRto
select.
3
4
5
Press Q to highlight PRESET thenRto select
PERSONAL.
Using Pand Q select a frequency and then
S
and Rto adjust to suit personal taste.
Press Q to select STORE and then Rto save the
settings.
3
4
Using Pand Q select an option and then
S
and Rto adjust to suit personal taste.
Press Q to select STORE and then Rto save the
settings.
SOUND
VOLUME
zx
BALANCE
z
zx
x
SOUND MODE STEREO
AVL
EQUALIZER x
H. PHONE x
STORE
SOUND
VOLUME
zx
BALANCE
z
zx
x
SOUND MODE STEREO
AVL
EQUALIZER
x
H. PHONE x
STORE
H. PHONE
VOLUME
zx
BALANCE
z
zx
x
SOUND MODE STEREO
STORE
EQUALIZER
100 HZ
zx
300 HZ
zx
1000 HZ
zx
3000 HZ
zx
8000 HZ
zx
PRESET PERSONAL
STORE

16
Picture format
SUBTITLE
Depending on the type of broadcast being transmitted, programmes can be viewed in a number of formats.
Press the {button repeatedly to select between Auto, 4:3, Wide, Cinema, Subtitle and Super Live.
When Auto is selected the format being displayed is determined by the picture being broadcast.
CINEMA
When watching ‘letterbox format’
films/video tapes, this setting will
eliminate or reduce the black bars at
the top and bottom of the screen by
zooming in and selecting the image
without distortion.
When subtitles are included on a
letterbox format broadcast, this setting
will raise the picture to ensure that all
the text is displayed.
SUBTITLE
WIDE
Use this setting when watching a 16:9
broadcast.
Use this setting when watching a
widescreen DVD, widescreen video
tape or a 16:9 broadcast
(when available). Due to the range of
widescreen formats (16:9, 14:9,
20:9 etc.) black bars may be visible
on the top and bottom of the screen.
SUPER LIVE
Use this setting to view a true 4:3
broadcast.
4:3
Using the special functions to change the size of the displayed image (i.e. changing the height/width ratio) for the purposes of public display or
commercial gain may infringe on copyright laws.

f
e
PICTURE
COLOUR
zx
SHARPNESS
zx
TILT
z
zx
x
PICTURE MODE M
COLOUR TEMP. NORMAL
VNR AUTO
PICTURE FORMAT AUTO
STORE STORED
f
e
PICTURE
BRIGHTNESS
zx
CONTRAST
zx
COLOUR
zx
SHARPNESS
zx
TILT
z
zx
x
PICTURE MODE M
COLOUR TEMP. NORMAL
VNR AUTO
f
e
PICTURE
BRIGHTNESS
zx
CONTRAST
zx
COLOUR
zx
SHARPNESS
zx
TILT
z
zx
x
PICTURE MODE M
COLOUR TEMP. NORMAL
VNR AUTO
This television offers the choice of personalising the picture
style. Press mto view the different styles available:
PICTURE MODE 1 to 3 are preset options and
PICTURE MODE M stores your own settings:
Press Q to highlight PICTURE MODE and then
R
to select M.
Using Pand Q select Brightness, Contrast,
Colour and Sharpness, then Sand Rto adjust
to suit personal taste.
Press Q to select STORE and then Rto save the
settings. Press OK to finish.
Picture mode
2
3
4
Select the PICTURE option from the main menu.
1
17
Picture controls – picture mode, tilt,
colour temperature
The picture controls are available in both digital and analogue modes. To access the PICTURE menu in
digital: press MENU and using Qselect TV setup, press OK to bring up the PICTURE option, press Rto
select. To access the PICTURE menu in analogue: press MENU and using
Q
highlight PICTURE, press
R
to select.
In the PICTURE menu press Quntil COLOUR
TEMP is highlighted.
Press Rto select between NORMAL, WARM and
COOL to suit your preference.
1
Press Q to select STORE and then Rto save the
selection.
3
2
Colour Temperature increases the ‘warmth’ or ‘coolness’
of a picture by increasing the red or blue tint.
Colour Temperature
f
e
If the picture is not level it could be due to the earth’s
magnetic field and can be adjusted.
Press Q to select STORE and then Rto save the
settings.
Tilt
2
In the PICTURE menu press Q to highlight TILT
then Sand Rto adjust the setting.
1
PICTURE
BRIGHTNESS
zx
CONTRAST
zx
COLOUR
zx
SHARPNESS
zx
TILT
z
zx
x
PICTURE MODE M
COLOUR TEMP. NORMAL
VNR AUTO

f
e
PICTURE
COLOUR
zx
SHARPNESS
zx
TILT
z
zx
x
PICTURE MODE M
COLOUR TEMP. NORMAL
VNR AUTO
PICTURE FORMAT AUTO
STORE STORED
f
e
PICTURE
COLOUR
zx
SHARPNESS
zx
TILT
z
zx
x
PICTURE MODE M
COLOUR TEMP. NORMAL
VNR AUTO
PICTURE FORMAT AUTO
STORE
18
Picture controls
continued
– VNR, picture format,
VCR mode, blue background
Using Q select BLUE BACKGRND, then press
R
to select, a tick will appear in the box.
Press OK to finish.
2
3
Select the FEATURE option from the main menu.
1
The picture controls are available in both digital and analogue modes. To access the PICTURE menu in
digital: press MENU and using Qselect TV setup, press OK to bring up the PICTURE option, press Rto
select. To access the PICTURE menu in analogue: press MENU and using
Q
highlight PICTURE, press
R
to select.
In the PICTURE menu press Quntil PICTURE
FORMAT is highlighted.
Press Rto select between AUTO, 4:3, WIDE,
CINEMA, SUBTITLE and SUPER LIVE.
1
Press Q to select STORE and then Rto save the
selection. For more detailed information see
page 16.
3
2
The PICTURE FORMAT feature allows programmes to be
viewed in a number of formats depending on the type of
broadcast being transmitted.
Picture format
In the PICTURE menu press Quntil VNR is
highlighted.
Press Rto select between AUTO, MAX, MIN and
OFF. The differences may not always be noticeable.
1
2
VNR ‘softens’ the screen representation of a weak signal
to reduce the noise effect.
VNR – Video Noise Reduction
Select channel '0' on the television. VCR MODE
will now be added to the PICTURE menu.
Press Quntil VCR MODE is highlighted.
Press Rto select ON or OFF. Store to save the
selection.
1
3
2
When VCR Mode is set to ON, the picture on the screen is
locked into position. This stops any movement that might
be noticeable when viewing a picture from a VCR.
VCR Mode
When BLUE BACKGROUND is selected the screen will
turn blue and the sound will be muted when no signal
is received. A five minute countdown will be visible on
screen. If no signal is received during the five minute
period the television will switch to standby when the
countdown finishes.
Blue background
FEATURE
SLEEP TIMER OFF
CHILD LOCK
TXT LANGUAGE ENGLISH
LANGUAGE ENGLISH
EXT-2 OUTPUT TV
BLUE BACKGRND
Press uto hold an image on the screen. Press
u
again to cancel.
1
The STILL PICTURE feature allows a still image to be held
on the screen.
Still picture – digital only

19
Press Qto select Programme timers, then press
OK to select.Your TV must be on or in standby mode
when a programme timer to due to start.
You can press the STANDBY button whilst watching
a programme timer:
The TV will remain on until the timer ends, when it
will go into standby mode. You can press the
STANDBY button again to go into standby mode
immediately and cancel the timer.
This feature sets the television to record programmes. The
‘Repeat’ feature can be set to record ‘daily’ and ‘weekly’
to ensure a series of programmes are recorded.
Programme timers – digital
2
Press Qto select the first programme to be
recorded, then press OK. The SET TIMER menu
will now appear.
Press Pand Q to go through the list adding the
details of the programme to be recorded by using
the number buttons and Sand Rto make
selections.
3
4
When all the details have been entered press OK
to save the timer.
Auto-start VCR: If your Toshiba media recorder is AV link
compatible setting this feature to YES will auto start/stop
the recording at the correct time.
PLEASE NOTE: When a timed programme is about to
start recording, an information screen will appear, the
television will then automatically change to the required
channel. Cancelling this will also cancel the recording.
5
1
Press MENU and SorRto select the TIMER
MENU.
The television can be set to turn itself OFF after a
certain time.
Sleep timer – analogue
1
2
3
Press MENU and Por Q to select the FEATURE
menu.
Use Qto select SLEEP TIMER.
To set the number of minutes in which the
television will turn off press SorR. This will
increase/decrease in steps of 5 minutes.
The Timers
REMEMBER: When viewing in digital mode if analogue is required press Bsix times to put the television
into analogue mode. To return to digital viewing press Bto select DTV.
TIMER MENU
Programme timers ENTER
MENU
Back
EXIT
Watch TV
Choose Edit MENU
Back
Page Down Page Down Delete
PROGRAMME TIMERS
Programme Time Date Repeat
1
2
3
4
5
6
7
8
13.45 Sat, 21 Aug.
SET TIMER
Programme BBC FOUR 10
Date Sat, 21 Aug. 21/08
Start Time 13.45
End Time 14.45
Repeat ONCE
Auto-start VCR NO
Subtitles NONE
Audio Language ENGLISH
0 - 9 Enter Number
Save Timer
BACK Cancel
FEATURE
SLEEP TIMER 30
CHILD LOCK
TXT LANGUAGE ENGLISH
LANGUAGE ENGLISH
EXT-2 OUTPUT TV
BLUE BACKGRND

20
Press Pand Q to go through the list adding
details of the programme to be recorded by using
the number buttons and Sand Rto make
selections. Press OK to save.
5
Digital Programme Guide and
on-screen information
When viewing in digital mode the on-screen information and guide give access to programme details for all
available channels. Recording can also be set from both the information screen and guide.
Information
Select information by pressing , the
information screen will appear giving details of the
channel and programme currently being viewed.
1
13.45 Sat, 21 Aug.
Tune EXIT Watch TV TV/FAV Change progs
Page Up Page Down Showing also Languages
ALL
BBC ONE
BBC TWO
CBBC Channel
BBC THREE
BBC FOUR
U
13:35 Boxing: Olympic… x14:00 Olympic Grand…
014 minutes left
I/II
SPORTS
…Grandstand Quarter final places are at
stake in the Flyweight and Middleweight divisions.
Showing also Newsround starting in 9 minutes on CBBC Channel
…
Guide
Select the on-screen guide by pressing GUIDE , the
guide screen will appear highlighting details of the
channel and programme currently being viewed.
This may take a few moments to appear.
1
Press SorRfor information of other programmes
scheduled for the channel selected.
For details of other channels currently available,
press Pand Q to scroll up and down the
channel list. As the channel is selected details of
the programme currently being broadcast will
appear, then press SorR.
Press the button for more information about
the currently highlighted programme.
2
3
4
To see details of any of the other channels
currently available, press Pand Q to scroll up
and down the channel list. As the channel is
selected details of the programme currently being
broadcast will appear.
Pressing the YELLOW button will activate
Showing also, giving details of programmes
which have or are due to start on other channels.
To record the following programme, with the
information guide showing, press R. The Tune
option in the bottom section of the screen will
change to Record , press OK . The SET TIMER
screen will appear.
2
3
4
SET TIMER
Start Time 01:25
End T ime 02:55
Repeat ONCE
Auto -start VCR NO
Subtitles NONE
Audio Language ENGLISH
0 - 9 Enter Number Save Timer BACK Cancel
13.45 Sat, 21 Aug.
Olympic Grandstand
1 BBC ONE 14:00-15:15 Sat, 21 Aug.
10.03 Mon, 30 Sep.
Record i More info EXIT Watch TV TV/FAV Change progs
Page Up Page Down Timers
ALL PROGS
BBC ONE
BBC TWO
ITV 1
Channel 4
Five
ITV 2
BBC THREE
Teletext
BBC FOUR
Sky Travel
Monday
10:00 10:30 11:00 11:30
City Hospital Olympic Grandstand Barg
Teletubbies Wildlife on Their Trad The Daily P
Trisha This Morning
The Big Circus Frasier
The Wright Stuff Brainteaser
Emmer Sally Jessy Raphael Judge Judy
Spanish P ackage Deals Floyd on F Canary Isla
i
+
BBC ONE
BBC TWO
ITV 1
Channel 4
Five
ITV 2
BBC THREE
Teletext
BBC FOUR
Sky T ravel
Entrapment
003 ITV 1 20:00-22:00, Today
A beautiful jewel thief (Catherine Zeta Jones) ensnares professional burglar
Sean Connery in an audacious plan to rob $3 billion from a bank vault.
Sparks fly as a game of cat and mouse ensues.
Subtitles. Audio description.
City Hospital
This is BBC THREE
This is BBC FOUR
UKTV History
E4
Time Flyers Horizon
Big Brother Live
Time Flyers

PARENTAL CONTROL
Mode OFF
Change Pin ENTER
MENU
Back
EXIT
Watch TV
21
This feature locks various menus to prevent the television
being retuned or the settings being overridden.
Setting the PIN
Digital parental controls – setting the pin,
mode
There are a number of parental controls which can block specific channels being viewed, and which can only
be accessed with a security PIN code when in digital mode.
Once you've entered the PIN code once, you do not need to enter it again until next time you power-on TV.
To restore PIN code entry again (e.g. for parental controls on locked programmes) press STANDBY twice.
1
Press MENU and Rto select the FEATURE MENU.
Mode
1
In the PARENTAL CONTROL menu press Q to
select Mode.
2
Use Sor Rto choose between ON, OFF, LOCK
MENU and LOCK INSTALL.
When menus that have been locked are now
selected they will only become available when the
PIN is entered.
2
Use Q to select Parental Control then press OK.
Press Q to highlight Change Pin then press OK.
3
4
Using the number buttons enter a four digit
number, when these have been entered the screen
will ask you to confirm them by entering them
again.
5
Press MENU to go back to the Parental Control
screen. The PIN number is now set.
PARENTAL CONTROL
Mode OFF
Change Pin ENTER
MENU
Back
EXIT
Watch TV
CHANGE PIN
New PIN
* * * *
Confirm PIN – – – –
0 - 9 Enter PIN MENU
Back
EXIT
Watch TV
FEATURE MENU
Parental Control ENTER
Favourite and Locked Programmes ENTER
Favourites ALL
Common Interface Slots
NO MODULE
Software Upgrade ENTER
MENU
Back
EXIT
Watch TV

Locked Programmes stops the viewing of digital
channels, they can only be accessed by entering the PIN.
Locking programmes
1
From the FEATURE MENU press Q to select
Favourite and Locked Programmes.
Press Rrepeatedly to select the Locked
Programme list.
Use Pand Q to go through the list of channels
pressing OK to select the ones required, a
padlock will appear in the box.
2
3
Press EXIT to finish
When any of the channels in the Locked
Programme list are now selected the PIN must
be entered before they can be accessed.
4
5
Selecting Encrypted Programmes allows all encrypted
programmes to be shown in the programme list even if
they are not available to select.
Encrypted programmes
1
In the FEATURE MENU press Por Q to select
Encrypted Programmes.
Use Sor Rto select ON or OFF.
2
Deselect MENU Back
Page Up Page Down Lock all Unlock all
FAVOURITE AND LOCKED PROGRAMMES
Locked Programme: Yes
1 BBC ONE
2 BBC TWO
7 BBC THREE
10 BBC FOUR
30 CBBC Channel
31 CBeebies
22
Digital settings – favourite programmes,
locked programmes, encrypted programmes
Favourite Programmes creates a list of the digital
channels that are watched most. Four lists can be created,
these can be a mixture of television, text and radio channels.
Selecting favourite programmes
1
From the FEATURE MENU press Q to select
Favourite and Locked Programmes .
2
3
4
Use Pand Q to go through the list of channels
pressing OK to select the ones required, a tick will
appear in the box.
Press Rto select List 2. Follow the same
procedure to make the selection. When all
favourites have been selected press MENU to
return to the FEATURE menu.
Use Q to highlight Favourites and Sor Rto
select between ALL, TV, RADIO, FAV-1 and
FAV-2. The number of favourites available
depends on how many lists have been created.
2
Press EXIT.
Using thefPebuttons will now only access
those channels in Favourite List 1 when FAV-1 is
selected.
5
Select MENU Back
Page Up Page Down Select all Deselect all
FAVOURITE AND LOCKED PROGRAMMES
Favourite List 1: No
1 BBC ONE
2 BBC TWO
7 BBC THREE
10 BBC FOUR
30 CBBC Channel
31 CBeebies
FEATURE MENU
Parental Control ENTER
Favourite and Locked Programmes ENTER
Favourites FAV-1
Common Interface Slots
NO MODULE
Software Upgrade ENTER
MENU
Back
EXIT
Watch TV

23
Digital settings
continued
– audio languages,
subtitles, reset tv, common interface
This feature allows a programme or film to be viewed with
a choice of soundtrack language, provided they are
currently being broadcast.
Audio languages
1
From the SETUP MENU press Q to select
Languages.
This feature will show subtitles on the bottom of the
screen in the selected language provided they are being
broadcast.
Subtitles
1
2
From the LANGUAGES menu press Q to select
Subtitles.
Use Sor Rto select OFF, ENGLISH, WELSH or
GAELIC.
2
3
Press OK, then press Por Q to highlight Audio
Language.
Use Sor Rto select ENGLISH, WELSH or
GAELIC.
NOTE: If more than one soundtrack is available,
use
O
I/II
to select between them.
The Common Interface Slot, situated on the back of the
television, enables the insertion of a CAM (Conditional
Access Module) and card. These are purchased from a
service provider and allow additional broadcasts to be
viewed. For information see a service provider.
Common interface
1
2
Insert the CAM and card into the Common
Interface Slot, following the instructions provided
with the CAM. A box will appear on screen to
confirm that the CAM is loaded.
From the FEATURE MENU press Por Q to
select Common Interface Slots.
3
Details of the CAM should now be available. Use
OK to select it. If two CAMs are inserted use
S
or Rto select between the two.
Press MENU and then press Q until Reset TV is
highlighted.
Press OK to select. A screen will appear warning
that all digital settings will be lost, press OK to
continue.
The Welcome screen will appear, press OK to
continue, the television will then auto tune.
1
2
Selecting Reset TV will delete all stored digital channels
and settings. The television will return to factory settings
and then auto tune.
Reset TV
SETUP MENU
TV Setup ENTER
Languages ENTER
Auto tuning ENTER
Manual tuning ENTER
Programmes ENTER
Watch TV
MENU
Watch TV
LANGUAGES
Audio Language ENGLISH
Subtitles OFF
MENU
Back
EXIT
Watch TV
FEATURE MENU
Parental Control ENTER
Favourite and Locked Programmes ENTER
Favourites ALL
Common Interface Slots
NO MODULE
Software Upgrade ENTER
MENU
Back
EXIT
Watch TV

SOFTWARE UPGRADE
Version 1.0
Auto upgrade ON
Search for New Software ENTER
0 - 9 Enter PIN MENU
Back
EXIT
Watch TV
24
Digital settings
continued
– software upgrade
This feature can be used to check the version of software
currently installed.
Version
If Auto upgrade is selected the software will
automatically update as each version becomes available,
provided the television is on or in standby. If the television
is on, a screen prompt will appear showing the software
download taking place.
Auto Upgrade
1
From the FEATURE MENU press Por Q to
select Software upgrade. Press OK.
2
Press Por Q to select Version. Use Sor Rto
select. When the software has been updated there
will be a choice of two versions available.
SEARCHING FOR NEW SOFTWARE
Searching for a new software upgrade for
this TV.
Searching
EXIT
Stop
NO UPGRADE AVAILABLE
! There is no upgrade available
at this time.
Continue
1
2
In the SOFTWARE UPGRADE menu press Por
Q to select Auto upgrade.
Use Sor Rto select ON or OFF.
If preferred, software upgrades can be searched for
manually using Search for New Software.
Searching for new software
1
In the SOFTWARE UPGRADE menu press Por
Q to select Search for New Software.
2
Press OK. The television will automatically start
searching for a software upgrade, the progress bar
will move along the line.
If an upgrade is found the television will
automatically start downloading, if not a screen
will appear stating that an upgrade is unavailable.
SOFTWARE UPGRADE
Version 0.1
Auto upgrade OFF
Search for New Software ENTER
0 - 9 Enter PIN MENU
Back
EXIT
Watch TV
FEATURE MENU
Favourite and Locked Programmes ENTER
Favourites ALL
Common Interface Slots
NO MODULE
Software Upgrade ENTER
Encrypted Programmes OFF
MENU
Back
EXIT
Watch TV

Input selection and AV connections,
Analogue switch-off
25
Defining the INPUT and OUTPUT sockets so that the television recognises connected equipment. See page 6
for a clear view of the back connection recommendations.
From the FEATURE menu, press Q to select
EXT-2 OUTPUT.
Use Rto change the EXT2 OUTPUT option to:
TV = The last television programme selection.
EXT1 = The picture from equipment connected
to SCART 1.
DTV = The programme selection from digital
mode.
EXT3 = The picture from equipment connected to
the side input sockets.
This enables selection of the source to output from
SCART 2. For example, to record transmissions in stereo
from a stereo decoder – connect a stereo decoder to
SCART 1 and stereo media recorder to SCART 2, then
select EXT1 as the EXT2 output. The signal received
through SCART 1 will output directly through SCART 2.
Most media recorders and decoders send a signal
through the SCART lead to switch the television to the
correct Input socket. Alternatively press the external source
selection button
B
until the picture from connected
equipment is shown.
Use the Input Selection if the television does not switch
over automatically.
Input selection
OUTPUT signal selection for SCART 2
This is a digital television which is integrated to allow the
use of both digital and analogue services. However,
during the lifetime of this set it is very likely that
analogue services will be switched off to allow for more
new digital services.
This ‘switch-off’ will happen in a number of phases,
which will be advertised in your area well in advance.
It is recommended that at each phase the television is
re-tuned to ensure that existing and new digital
services can be viewed without disruption
(see Auto tuning page).
Analogue switch-off
1
1
2
Press Bto select EXT1, EXT2, EXT2S, EXT3 and
EXT3S.
To return to television mode press Bagain for
analogue mode then press Bagain to select
DTV for digital mode.
FEATURE
SLEEP TIMER OFF
CHILD LOCK
TXT LANGUAGE ENGLISH
LANGUAGE ENGLISH
EXT-2 OUTPUT EXT1
BLUE BACKGRND

26
Digital text and interactive services
and Analogue text
This television has a multi-page text memory,
which takes a few moments to load.
The digital text and interactive services are the
up-to-date way of viewing service information,
using computer-style formats, incorporating
pictures and interactive views.
They offer high quality on-screen images with
multi-colour photographic still images, advanced text and
graphics and are user-friendly. These services are free to
anyone with a digital television, however, they are not
available for all digital stations and are dependant on the
broadcaster.
Simply using the coloured buttons on the remote control
and P, Q, Sand Rmakes navigating pages and
pull-down menus quick and easy.
Digital text and interactive services
Using Digital interactive services
Analogue text
Select TXT LANGUAGE from the FEATURE
menu.
With Rchoose the required language then press
OK.
Before using the text services the required language must
be chosen.
1
2
To access digital interactive services press the
TEXT or RED button. It may take a few seconds to
load.
Using Pand Q highlight the required subject
and press OK.
Use the coloured buttons as instructed.
To return to normal viewing press TEXT.
1
2
3
FEATURE
SLEEP TIMER OFF
CHILD LOCK
TXT LANGUAGE ENGLISH
LANGUAGE ENGLISH
EXT-2 OUTPUT TV
BLUE BACKGRND
The TEXT
6
/ /
7
button
:
To view text services press TEXT. Pressing again will split
the screen in two with the television picture on one side
and text on the other. Press again to return to normal
viewing. Programmes cannot be changed until text is
cancelled.
The first text page shown will be the initial page.
Any text page can be accessed by entering the 3 digit
page number using the numbered buttons, pressing the
coloured buttons or pressing Pf(P) to advance to the
next page and P e(Q) to go back to the previous page.
Four coloured titles will appear at the base of the screen.
To access one of the four given subjects, press the
relevant coloured button on the remote control.
For further information on your particular text system(s),
see the broadcast text index page or, consult your local
Toshiba dealer.
Most channels that offer interactive services will show a
prompt, for example, "Press RED".

Press Tto access an initial page. The one displayed is
dependant on the broadcaster.
R
emember to cancel te
xt
before changi
n
g c
h
ann
e
ls
–
pres
s t
h
e
T
E
XT
button
t
wice.
*
27
Analogue text
continued
– control buttons
Below is a guide to the functions of the remote control analogue text buttons.
Enter the page number then press
8/9
, a normal
picture will be displayed. The television will indicate when
the page is present by displaying the page number at the
top of the screen. Press TEXT to view the page.
To display news flashes:
Select the news flash page for the chosen text service
(see the index page of text service). Press
8/9
. The
news flashes will be displayed as and when they are
broadcast. Press
8/9
again to cancel the display.
The news flash page must be cancelled before
changing programmes.
To display an initial page:
T
At times it is convenient to hold a page of text. Press
q
and qwill appear in the top left of the screen. The
page will be held on screen until the button is pressed
again.
To hold a wanted page:
q
To discover the solutions on quiz and joke pages press the
r
button.
To reveal concealed text:
r
Press TEXT (
6
//
7
) to display text. Press again to
superimpose text over a normal broadcast picture. Press
again to return to normal television viewing. Programmes
cannot be changed until you return to normal television.
To display a page of text:
To select a page whilst viewing a
normal page:
8/9
TEXT
Press sonce to enlarge the top half of the page, press
again to enlarge the bottom half of the page. Press again
to revert to normal size.
To enlarge the text display size:
s

A
Remove it by pressing .
Why is there a message permanently on the
screen?
Q
Below are the answers to some of the most common queries.
For more information go to www.toshiba.co.uk
A
Check the mains switch is on and check all
connections.
Check the television is not in standby mode.
Why is there no sound or picture?
Q
A
The channel has been selected in Locked
Programmes. See Digital Settings pages.
Why is the channel locked?
Q
A
LOCK MENUS is selected. See Parental Controls
page.
Why are the menus locked?
Q
A
Analogue mode is selected. Press Bto select
DTV.
Why is the DTV main menu unavailable?
Q
A
Check the volume has not been turned down or
that sound mute has not been selected.
Why is there a picture but no sound?
Q
A
Check that CHILD LOCK is not selected.
Why don't the controls on the side of the
television work?
Q
A
Check the SCART lead connection.
Why is there a good video picture but no sound?
Q
A
Make sure the VCR or DVD player is connected to
the television as shown on page 6, then select the
correct input by pressing B.
Why doesn't the video/DVD being played show
on screen?
Q
?
For television
operation queries,
please ring t
h
e
helpl
i
ne…
R
emember...
Q
uestions
and
A
nswers
28
A
Interference or a weak signal. Try a different
television station. FINE TUNING may help.
What can cause a poor analogue picture?
Q
A
Check the side switch on the remote control is in
TV mode.
Check the batteries aren’t dead or inserted incorrectly.
Why doesn't the remote control work?
Q
A
Subtitles are not currently being transmitted by the
broadcaster.
Why when digital subtitles have been selected
are they not showing on screen?
Q
A
The programme is currently being broadcast with
an English soundtrack only.
Why is the soundtrack in English when a
different audio language has been selected?
Q
A
Check that the balance in the SOUND menu
hasn’t been set to one side.
Why is the sound only coming from one speaker
when stereo sound is selected?
Q
A
Your subscription needs upgrading. Contact your
service provider.
Why are some of the digital channels
unavailable?
Q
A
Check the correct input has been chosen,
S-VIDEO or AV. See AV connections.
Why is the VCR/DVD picture in black and
white?
Q

29
Q
uestions
and
A
nswers
continued
A
Good performance of text depends on a good
strong broadcast signal. This normally requires a
roof or loft aerial. If the text is unreadable or garbled,
check the aerial. Go to the main index page of the text
service and look for the User Guide. This will explain the
basic operation of text in some detail. If further
information is needed on how to use text see the text
section.
Why are there problems with analogue text?
Q
A
The digital programme being viewed is not
broadcasting digital text. Try another digital
programme.
Why is there no digital text service?
Q
Cleaning the screen and cabinet…
Turn off the power, clean the screen and cabinet with a soft, dry cloth. We recommend that you do not use any proprietary polishes or
solvents on the screen or cabinet as this may cause damage.
Disposal…
The use of the symbol indicates that this product may not be treated as household waste. By ensuring this product is
disposed of correctly, you will help prevent potential negative consequences for the environment and human health, which
could otherwise be caused by inappropriate waste handling of this product. For more detailed information about recycling
A
Use the Master PIN code of 1276, then change to
a number of your choice. Ensure that no-one else
can use the Master PIN by removing the Owner’s Manual.
What can be done if the PIN number has been
forgotten?
Q
Cleaning the screen and cabinet…
Turn off the power, clean the screen and cabinet with a soft, dry cloth. We recommend that you do not use any proprietary polishes or
solvents on the screen or cabinet as this may cause damage.
Disposal…
The following information is only for EU member states
The use of the symbol indicates that this product may not be treated as household waste. By ensuring this product is
disposed of correctly, you will help prevent potential negative consequences for the environment and human health, which
could otherwise be caused by inappropriate waste handling of this product. For more detailed information about recycling
of this product, please contact your local city office, your household waste disposal service or the shop where you
purchased the product.

30
Notes
For your own records

31
Notes
For your own records

Specifications and accessories
Broadcast systems/channels
PAL-I UHF UK21-UK69
Video Input PAL, SECAM, NTSC 3.58/4.43
External connections
EXT1 Input 21-pin SCART RGB, A/V
EXT2 Input/Output 21-pin SCART Composite, S-video
Selectable output
EXT3 Input (side) 4 pin S-video
Phono jack Video
Phono jacks Audio L + R
Digital Audio Output Optical
Common Interface Two Modules
Tos hiba Information S ys tems (U.K .) L imited
C onsumer Produc ts Div ision,
Euro pean S ervice C entre,
Admiralty Way, Camb erley,
S urrey, G U15 3DT, U K
S pecifica tion is subjec t to c hange without notice.
Originate d by K ens a C reative S olutions, S altash, C ornwall.
©T os hiba I nform ation S yste ms (U. K. ) L imited
All rights rese rved.
R eproduction in whole o r part w ithout written permis sion is s trictly prohibited .
Printed on recyc led pa per. 10 0% C hlorine free.
Programme Positions 100
Stereo Nicam
2 carrier system
Visible Screen Size 28YT 66cm
(approx.) 32YT 76cm
Display 16:9
Sound output (at 10% distortion) Main 10W + 10W
Power consumption 28YT 130W
as specified in EN60107-1 : 1997 32YT 145W
Standby (approx.) 28YT <1W
32YT <1W
Dimensions 28YT 50cm (H) 81cm (W) 49cm (D)
(approx.) 32YT 56cm (H) 91cm (W) 54cm (D)
Weight (approx.) 28YT 41kg
32YT 61kg
Headphone socket 3.5mm stereo
Accessories Remote control
2 batteries
(AAA, IEC R03 1.5V)
 Loading...