Toshiba 28N23B, 28N23G, 29N23B, 29N23G Owner Manual

Contents |
|
For your safety ............................................. |
1 |
Remote Control Buttons.............................. |
3 |
Control Panel Buttons ................................. |
4 |
Antenna Connections .................................. |
4 |
Preparation .................................................. |
5 |
Before Switching on your TV ...................... |
5 |
Switching the TV ON/OFF ............................ |
6 |
Operating the TV .......................................... |
6 |
A.P.S. (Automatic Programming System) . 6 |
|
Operating with the buttons on the TV set .. |
6 |
Operating with Remote Control ................ |
7 |
Menu System ............................................... |
7 |
Sound Menu .............................................. |
8 |
Picture Menu ........................................... |
10 |
Feature Menu .......................................... |
11 |
Install Menu ............................................. |
12 |
Programme Menu ................................... |
13 |
Other Features ........................................... |
14 |
Teletext....................................................... |
16 |
To operate Teletext .................................. |
16 |
To select a page of Teletext ..................... |
16 |
To Select Index Page .............................. |
16 |
To Select Teletext with a TV Programme 16 |
|
Searching for a page while watching TV 16 |
|
To Select Double Height Text .................. |
16 |
To Reveal “concealed” Information ......... |
16 |
To Stop Automatic Page Change ............ |
17 |
Fastext ..................................................... |
17 |
To exit Teletext ......................................... |
17 |
To Display the Time ................................ |
17 |
Connect Peripheral Equipment ................ |
17 |
Via the Euroconnector ............................. |
17 |
RGB mode .............................................. |
17 |
Via Ant Input ............................................. |
17 |
Decoder ................................................... |
17 |
TV and Video Recoder (VCR) ................. |
18 |
Playback NTSC ....................................... |
18 |
Copy Facility ............................................ |
18 |
Search for and store the test signal |
|
of the video recorder ............................... |
18 |
Camera and Camcorder ........................ |
18 |
Back-AV output: ....................................... |
18 |
SVHS (via EXT.2) ..................................... |
18 |
Connect the decoder to the |
|
video recorder ......................................... |
18 |
Connecting Headphones ....................... |
20 |
Tips ............................................................. |
20 |
Specifications ............................................ |
21 |
For your safety
This equipment has been designed and manufactured to meet international safety standards but, like any electrical equipment, care must be taken if you are to obtain the best results and safety is to be assured. So, please read the points below for your own safety. They are of a general nature, intended to help you with all your electronic consumer products and some points may not apply to the goods you have just purchased.
Some “DOs” and “DON’Ts” for you
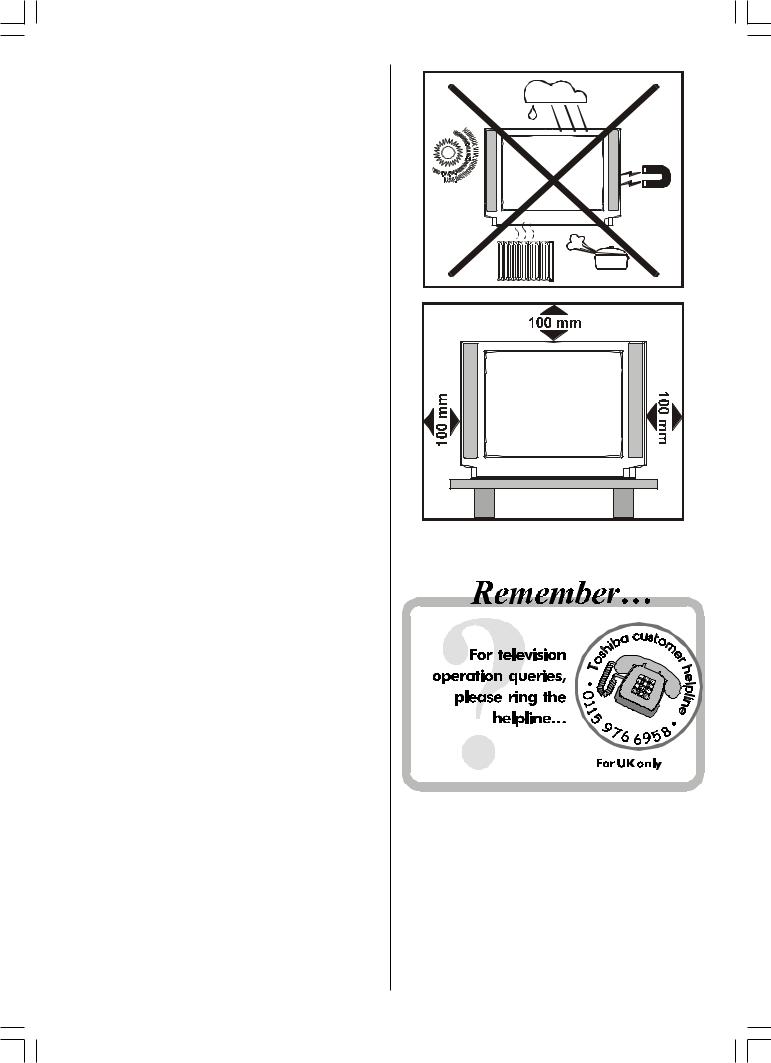
Air Circulation…
Leave at least 10cm clearance around the television to allow adequate ventilation. This will prevent the TV from overheating and consequential possible damage to the TV. Dusty places should also be avoided.
Heat Damage…
Damage may occur if you leave the TV in direct sunlight or near a heater. Avoid places subject to extremely high temperatures or humidity, or locations where the temperature is likely to fall below 5ºC (41ºF).
Mains Supply…
The mains supply required for this equipment is 230V AC, 50 Hz. Never connect to a DC supply or any other power source. DO ensure that the TV is not standing on the mains lead. DO NOT cut off the mains plug from this equipment, this incorporates a special Radio Interference Filter, the removal of which will impair its performance.
IF IN DOUBT PLEASE CONSULTA COMPETENT ELECTRICIAN.
DO…
DO read the operating instructions before you attempt to use the equipment.
DO ensure that all electrical connections (including the mains plug, extension leads and inter-connections between pieces of equipment) are properly made and in accordance with the manufacturers’ instructions.
Switch off and withdraw the mains plug before making or changing connections.
ENGLISH - 1 -
28N23B-7212&ENG-2143-AK37-UK-50045668.1p65 |
12.05.2006, 11:59 |
DO consult your dealer if you are ever in doubt about the installation, operation or safety of your equipment.
DO be careful with glass panels or doors on equipment.
DO NOT…
DON’T remove any fixed cover as this may expose dangerous voltages.
DON’T obstruct the ventilation openings of the equipment with items such as newspapers, table-cloths,
curtains etc. Overheating will cause damage and shorten the life of the equipment.
DON’T allow electrical equipment to be exposed to dripping or splashing or objects filled with liquids, such as vases, to be placed on the equipment.
DON’T place hot objects or naked flame sources, such as lighted candles or nightlights on, or close to the equipment. High temperatures can melt plastic and lead to fires.
DON’T use makeshift stands and NEVER fix legs with wood screws. To ensure complete safety, always fit the manufacturer’s approved stand or legs with the fixings provided according to the instructions.
DON’T listen to headphones at high volume, as such use can permanently damage your hearing.
DON’T leave equipment switched on when it is unattended, unless it is specifically stated that it is designed for unattended operation or has a standby mode. Switch off using the switch on the equipment and make sure your family know how to do this. Special arrangements may need to be made for infirm or
handicapped people.
DON’T continue to operate the equipment if you are in any doubt about it working normally, or it is damaged in any way – switch off, withdraw the mains plug and consult your dealer.
ABOVE ALL – NEVER let anyone, especially children, push anything into holes, slots or any other openings in the case – this could result in a fatal electric shock.
NEVER guess or take chances with electrical equipment of any kind – it is better to be safe than sorry.
ENGLISH - 2 -
28N23B-7212&ENG-2143-AK37-UK-50045668.2p65 |
12.05.2006, 11:59 |
|
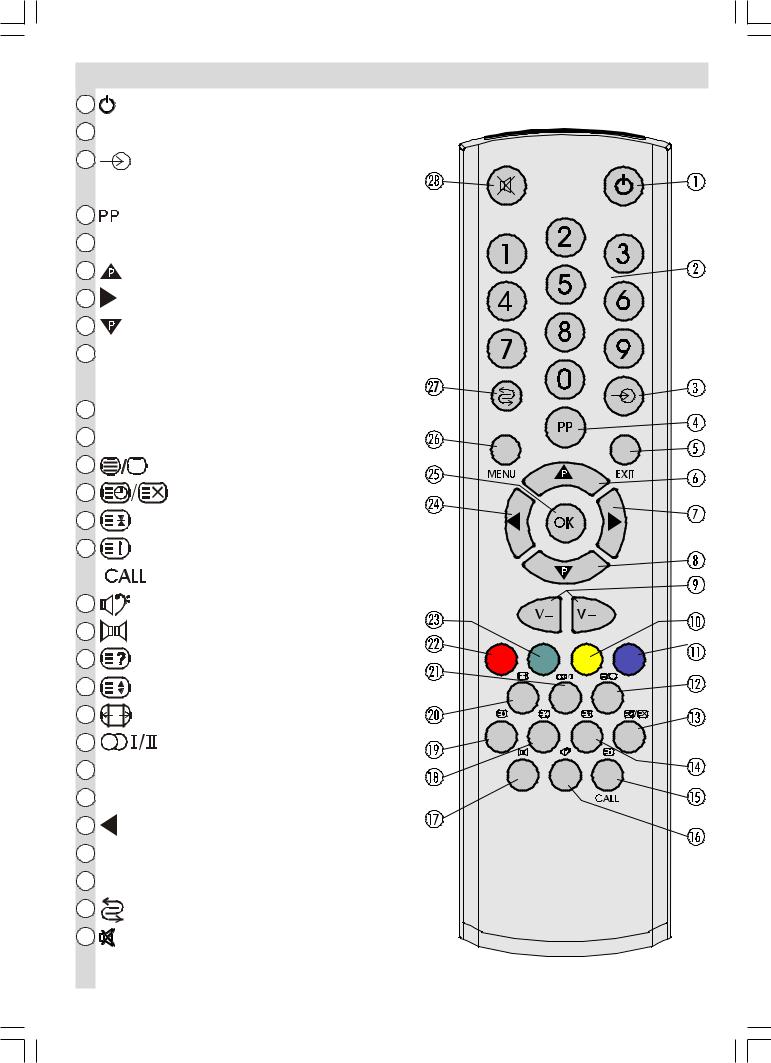
Remote Control Buttons |
|
|
= Stand By |
|
0 - 9 = Direct Program |
|
|
|
= External Source |
|
|
(AV-1, AV-2, F-AV, RGB, SVHS) |
|
|
= Personel Preference |
|
EXIT = TV / AV / Teletext / Menu Quit |
|
|
|
= Programme Up (Cursor Up) |
|
|
= Volume Up / Cursor Right |
|
|
= Programme Down (Cursor Down) |
|
|
V - / V + = Volume - / Volume + |
|
|
Cursor Left / Cursor Right |
|
|
Yellow = Feature Menu |
|
|
Blue = Install Menu |
|
|
= Teletext / Mix / Teletext Quit |
|
|
= Time / Update |
|
|
= Hold |
|
|
= Index Page |
|
|
= TV Status |
|
|
= No Function |
|
|
= No Function |
|
|
= Reveal |
|
|
= Expand |
|
|
= Picture Mode (Auto / 4:3 / 16:9) |
|
|
= Stereo / Mono / Dual I-II |
|
|
Red = Sound Menu |
|
|
Green = Picture Menu |
|
|
= Volume Down / Cursor Left |
|
OK = Okey |
|
|
MENU = Menu |
|
|
|
= Programme Swap |
|
|
= Mute |
|
|
ENGLISH - 3 - |
|
28N23B-7212&ENG-2143-AK37-UK-50045668.3p65 |
12.05.2006, 11:59 |
|
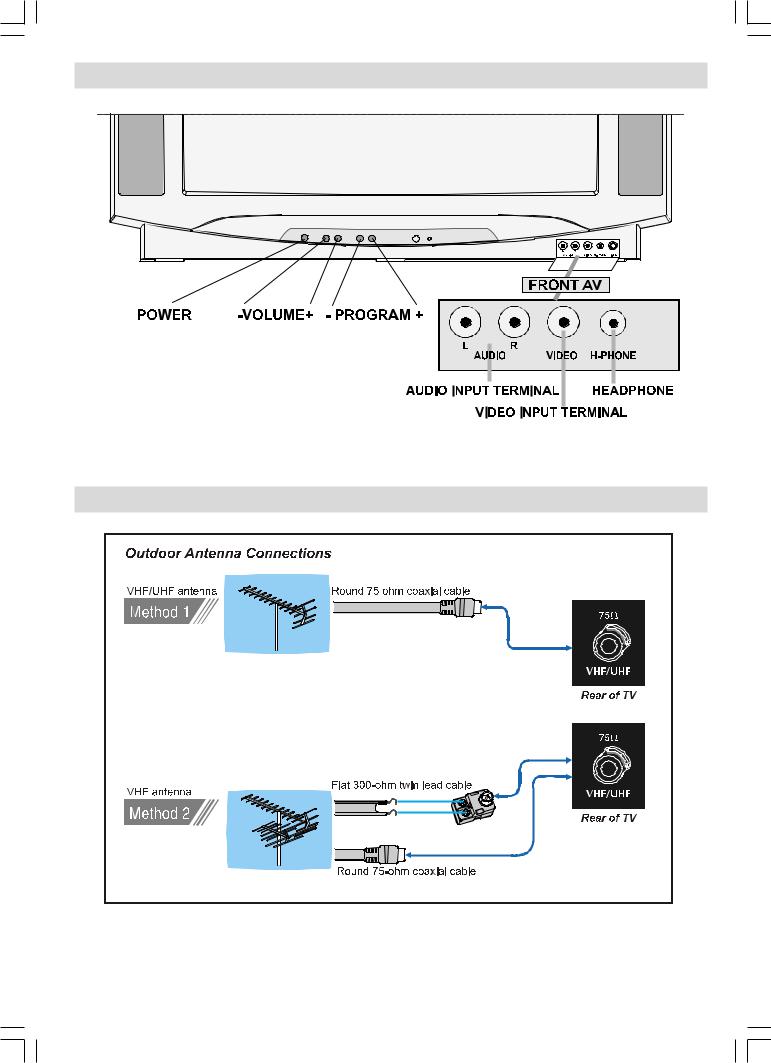
Control Panel Buttons
AntennaConnections
ENGLISH - 4 -
28N23B-7212&ENG-2143-AK37-UK-50045668.4p65 |
12.05.2006, 11:59 |
|
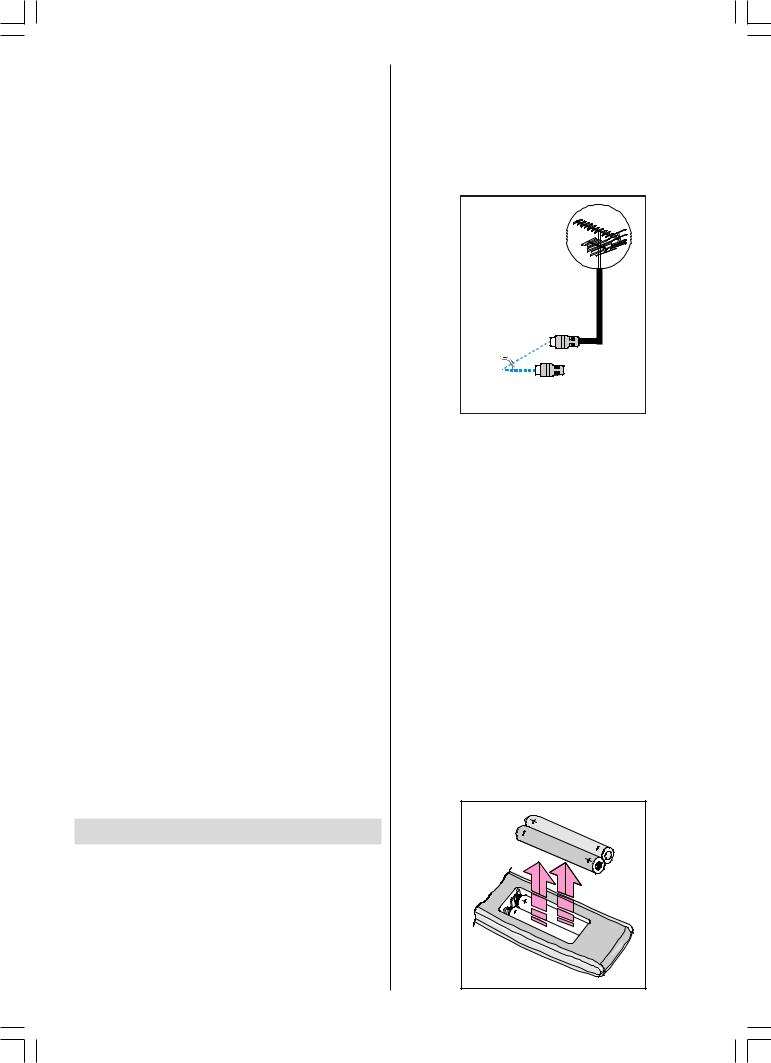
Connections to the RF input socket |
Preparation |
|
For ventilation, leave a space of at least 10 cm |
• Connect the aerial or cable TV plug to the RF |
free all around the set. To prevent any fault and |
input socket located at the back of the TV and |
unsafe situations, please do not place any |
connect the cable plug coming out from the TV |
objects on top of the set. |
out socket located at the devices (VCR, DVB |
Features |
etc.) to |
|
• It is a remote controlled colour television.
• 100 programmes from VHF, UHF bands or cable channels can be preset.
•It can tune cable channels.
•Controlling the TV is very easy by its menu driven system.
• It has Euroconnector socket for external |
|
|
|
|
|
|
|
|
|
|
|
|
|
|
|
||
devices (such as computer, video, video |
|
|
|
|
|
|
&$%/( 79 |
|
games, audio set, etc.) |
|
|
|
|
|
|
||
|
|
|
|
|
|
|
||
• Second Euroconnector socket is available. |
|
|
|
|
|
|
|
|
79 5($5 3$1(/ |
||||||||
• Nicam Stereo sound systems. |
How to connect other devices |
|||||||
• Full function Teletext (Fastext). |
||||||||
IMPORTANT: Switch off the TV before connect- |
||||||||
• It is possible to connect headphone. |
||||||||
ing any external device. |
||||||||
• Direct channel access. |
||||||||
Sockets for external connections are at the |
||||||||
• A.P.S. (Automatic Programming System). |
||||||||
back and front of the TV. For connection of other |
||||||||
|
||||||||
• All programmes can be named. |
devices via Euroconnector refer to the manu- |
|||||||
• Programme swapping between last watched |
als of the related devices. |
|||||||
two programmes. |
Inserting batteries in the remote |
|||||||
• Forward or backward automatic tuning. |
control handset |
|||||||
• Sleep timer. |
• Place the batteries in the right directions as |
|||||||
• Automatic sound mute when no transmission. |
||||||||
seen below. |
||||||||
• When no valid signal is detected, after 5 |
• Remove the battery cover located on the back |
|||||||
minutes the TV switches itself automatically to |
of the handset by gently pulling upwards from |
|||||||
stand-by mode. |
the indicated part. |
|||||||
• WSS (Wide Screen Signaling). |
• Insert two AAA (R03) or equivalent type batter- |
|||||||
• NTSC Playback. |
ies inside. |
|||||||
• SVHS (EXT.2) is available. |
• Replace the battery cover. |
|||||||
• Front AV in and Back AV out is available. |
|
Before Switching on your TV |
|
Power connection |
|
IMPORTANT: The TV set is designed to oper- |
|
ate on 230V AC, 50 Hz.. |
|
• After unpacking, allow the TV set to reach the |
|
ambient room temperature before you |
|
connect the set to the mains. |
|
ENGLISH - 5 - |
|
28N23B-7212&ENG-2143-AK37-UK-50045668.p65 |
12.05.2006, 11:59 |
NOTE: Remove batteries from remote control handset when it is not to be used for a long period.Otherwise it can be damaged due to any leakage of batteries.
•Do not throw your old batteries into a fire, dispose of them in a designated disposal area. Do not combine a used, old battery with a new one or mix battery types.
Switching the TV ON/OFF
To switch the TV on
Your TV will switch on in two steps:
1- Press the power button located on the front of the TV. Then the TV switches itself to standby mode and the RED LED located below the TV turns on.
2- To switch on the TV from stand-by mode either:
Press a digit button on the remote control so that a programme number is selected,
or,
Press Programme Up or Down buttons on the front of the TV or on the remote control, so that last switched off programme is selected.
By either ways the TV will switch on and the
RED LED will turn GREEN.
To switch the TV off
• Press the stand-by button on the remote control, so the TV will switch to stand-by mode and the GREEN LED will become RED,
or,
Press the power button located on the front of the TV, so the TV will switch off and the GREEN LED will turn off.
Operating the TV
You can operate your TV both using the remote control handset and onset buttons.
A.P.S. (Automatic Programming System)
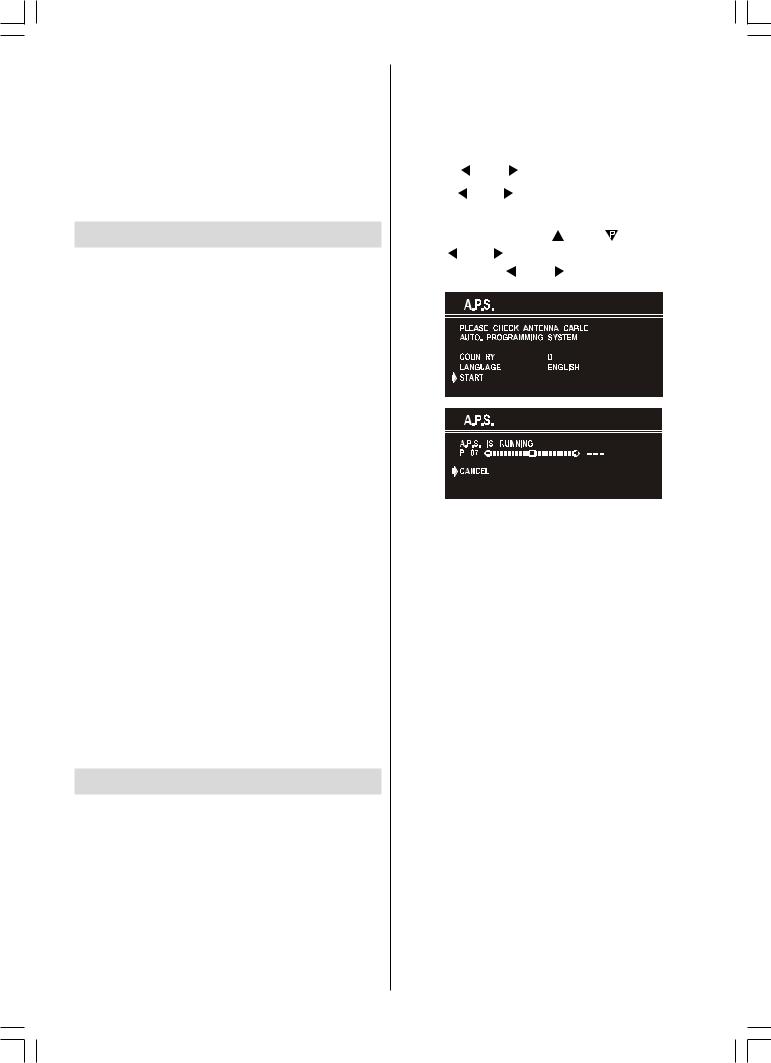
"PLEASE CHECK ANTENNA CABLE AUTO. PROGRAMMING SYSTEM" message will be displayed when you turn on your TV for the first time. APS, searches and sorts all channels and stores them automatically on your TV,
according to the transmission of programme systems in your area.
To cancel APS before starting, press EXIT button. First of all choose the "COUNTRY" and "LANGUAGE".
•Press “ ” or “
 ” button to select a country.
•Press “ ” or “
 ” button to select a language.
This, will effect the sort process in APS. To select “START” use “ “ or “
 ” button and press “
 ” or “
 ” button. To cancel APS during running press “
 ” or “
 ” button.
After APS is finalized, a programme list will appear on the screen. In the programme list you will see the programme numbers and names assigned to the programmes.
If you do not accept the locations and / or the programme names of programmes, you can change them in Programme menu.
Operating with the buttons on the TV set
Volume setting and programme selection can be made using the buttons on the front panel.
Volume Setting
•Press “VOLUME -” button to decrease volume or “VOLUME +” button to increase volume, so a volume level scale (slider) will be displayed at the middle of the bottom on the screen.
Programme Selecting
•Press “PROGRAM +” button to select the next program-me or “PROGRAM -” button to select the previous programme.
•By pressing both the “PROGRAM -” and “PROGRAM +” buttons at the same time you
can enter Main menu.
ENGLISH - 6 -
28N23B-7212&ENG-2143-AK37-UK-50045668.p65 |
12.05.2006, 11:59 |
Entering Main Menu |
select the last selected programme. This |
|||||||
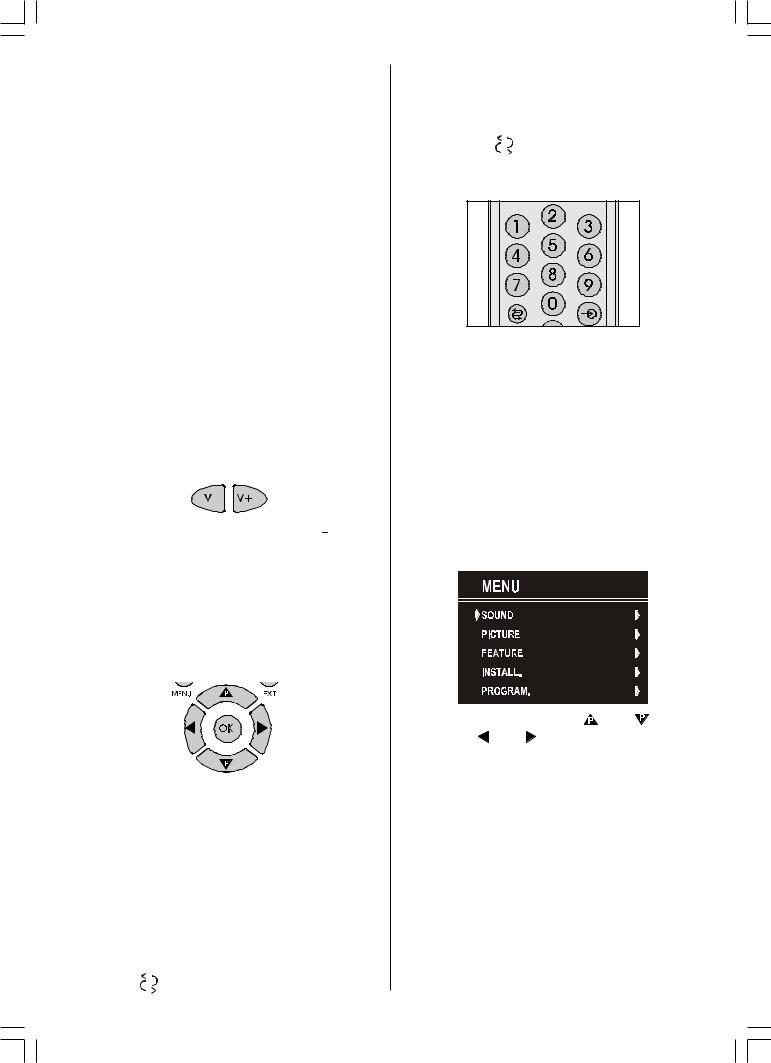
• Press "MENU" button to enter Main menu. In |
button provides swapping between last two |
|||||||
selected programmes. For example, select |
||||||||
the Main menu select sub-menu using |
||||||||
programme 8, then select programme 2. Now, |
||||||||
“PROGRAM -” or “PROGRAM +” button and |
||||||||
if you press " |
|
|
|
|
|
" button, programme 8 will be |
||
enter the sub-menu using “VOLUME -” or |
|
|
|
|
|
|||
|
|
|||||||
|
|
|
|
|||||
selected. If you press the same button again, |
||||||||
“VOLUME +” button. To learn the usage of the |
||||||||
programme 2 will be selected and so on. |
||||||||
menus, refer to the Menu System section. |
||||||||
|
|
|
|
|
|
|
||
Operating with Remote Control
The remote control handset of your TV is designed to control all the functions of the model you selected. The functions will be described in accordance with the menu system of your TV.
Functions of the menu system are described |
|
|||||||||||||
MenuSystem |
||||||||||||||
in Menu System section. |
||||||||||||||
Volume Setting |
Your TV has been designed with a menu sys- |
|||||||||||||
tem, to provide an easy manipulation of a |
||||||||||||||
Press “V+” button to increase volume. Press |
||||||||||||||
multi-function system. The TV is controlled by |
||||||||||||||
“V-” button to decrease volume. A volume level |
||||||||||||||
choosing the commands, which are displayed |
||||||||||||||
scale (slider) will be displayed at the middle of |
||||||||||||||
on the screen. |
||||||||||||||
the bottom on the screen. |
||||||||||||||
Press the "MENU" button. The Main menu will |
||||||||||||||
|
|
|
|
|
|
|
|
|
|
|
|
|
||
|
|
|
|
|
|
|
|
|
|
|
|
|
be displayed at the middle on the screen. |
|
|
|
|
|
|
|
|
|
|
|
|
|
|
All the selected items in this menu system is |
|
|
|
|
|
|
|
|
|
|
|
|
|
|
||
|
|
|
|
|
|
|
|
|
|
|
|
|
indicated with CYAN characters and with an |
|
|
|
|
|
|
|
|
|
|
|
|
|
|
||
Programme Selecting |
arrow on the leftside of items. |
|||||||||||||
(Previous or next programme)
• Press “ ” button to select the previous programme.
•Press “ “ button to select the next programme.
|
|
|
|
|
|
|
|
|
|
|
To select a sub-menu use “ “ or “ |
” button, |
||
|
|
|
|
|
|
|
|
|
|
|
||||
|
|
|
|
|
|
|
|
|
|
|
||||
|
|
|
|
|
|
|
|
|
|
|
and press “ ” or “ ” button. Each option can |
|||
|
|
|
|
|
|
|
|
|
|
|
also be selected with the coloured |
button on |
||
|
|
|
|
|
|
|
|
|
|
|
the remote control. |
|
||
Programme Selecting (direct access): |
|
|||||||||||||
MAIN MENU |
|
|
||||||||||||
Press digit button on the remote control hand- |
|
|
||||||||||||
The menu system is described below. |
||||||||||||||
set to select programmes between 0 and 9. TV |
||||||||||||||
The short way in order to enter the menus, |
||||||||||||||
will switch to the selected program after a |
||||||||||||||
short delay. |
press : |
|
|
|||||||||||
For a two digit program number enter the |
"Menu" Button, |
Main Menu. |
|
|||||||||||
second digit after pressing the first digit within |
Red Button, |
Sound Menu. |
|
|||||||||||
3 seconds. |
Green Button, |
Picture Menu. |
|
|||||||||||
|
|
|
|
|
|
|
|
|
|
|
|
|||
Programme Swapping |
Yellow Button, |
Feature Menu. |
|
|||||||||||
|
|
|
|
|
|
|
|
|
|
|
|
|||
• Press " |
|
|
|
" (programme swap) button to |
Blue Button, |
Install. Menu. |
|
|||||||
|
|
|
|
|||||||||||
|
|
|||||||||||||
|
|
|
||||||||||||
|
|
|
|
|
|
|
|
|
|
ENGLISH - 7 - |
|
|
||
28N23B-7212&ENG-2143-AK37-UK-50045668.7p65 |
12.05.2006, 11:59 |
 Loading...