

Page 1

Owners Manual
TOSHIBA
The power to open people’s eyes
28W23B/28W27B
Page 2

Contents
For your safety ............................................. 1
Remote Control Buttons ..............................3
Control Panel Buttons ................................. 4
Antenna Connections .................................. 4
Preparation ..................................................5
Before Switching on your TV ...................... 5
Switching the TV ON/OFF ............................ 6
Operating the TV.......................................... 6
A.P.S. (Automatic Programming System) .6
Operating with the buttons on the TV set..6
Operating with Remote Control ................ 7
Menu System ............................................... 7
Sound Menu .............................................. 8
Picture Menu ...........................................10
Feature Menu ..........................................11
Install Menu ............................................. 1 2
Programme Menu ...................................13
Other Features ........................................... 14
Teletext....................................................... 16
To operate Teletext ..................................16
To select a page of Teletext .....................16
To Select Index Page ..............................16
To Select Teletext with a TV Programme 16
Searching for a page while watching TV 1 6
To Select Double Height Text..................17
To Reveal “concealed” Information ......... 1 7
To Stop Automatic Page Change ............ 1 7
Fastext .....................................................17
T o exit Teletext .........................................17
To Display the Time ................................17
Connect Peripheral Equipment ................ 18
Via the Euroconnector.............................18
RGB mode .............................................. 1 8
Via Ant Input ............................................. 18
Decoder...................................................18
TV and Video Recoder (VCR) .................18
Playback NTSC .......................................1 8
Copy Facility ............................................18
Search for and store the test signal
of the video recorder ...............................18
Camera and Camcorder ........................20
Back-AV output: .......................................20
SVHS (via EXT .2) .....................................20
Connect the decoder to the video
recorder ...................................................20
Connecting Headphones .......................20
Tips .............................................................20
Specifications ............................................21
For your safety
This equipment has been designed and
manufactured to meet international safety
standards but, like any electrical equipment,
care must be taken if you are to obtain the best
results and safety is to be assured. So, please
read the points below for your own safety . They
are of a general nature, intended to help you
with all your electronic consumer products and
some points may not apply to the goods you
have just purchased.
Some “DOs” and “DON’Ts” for you
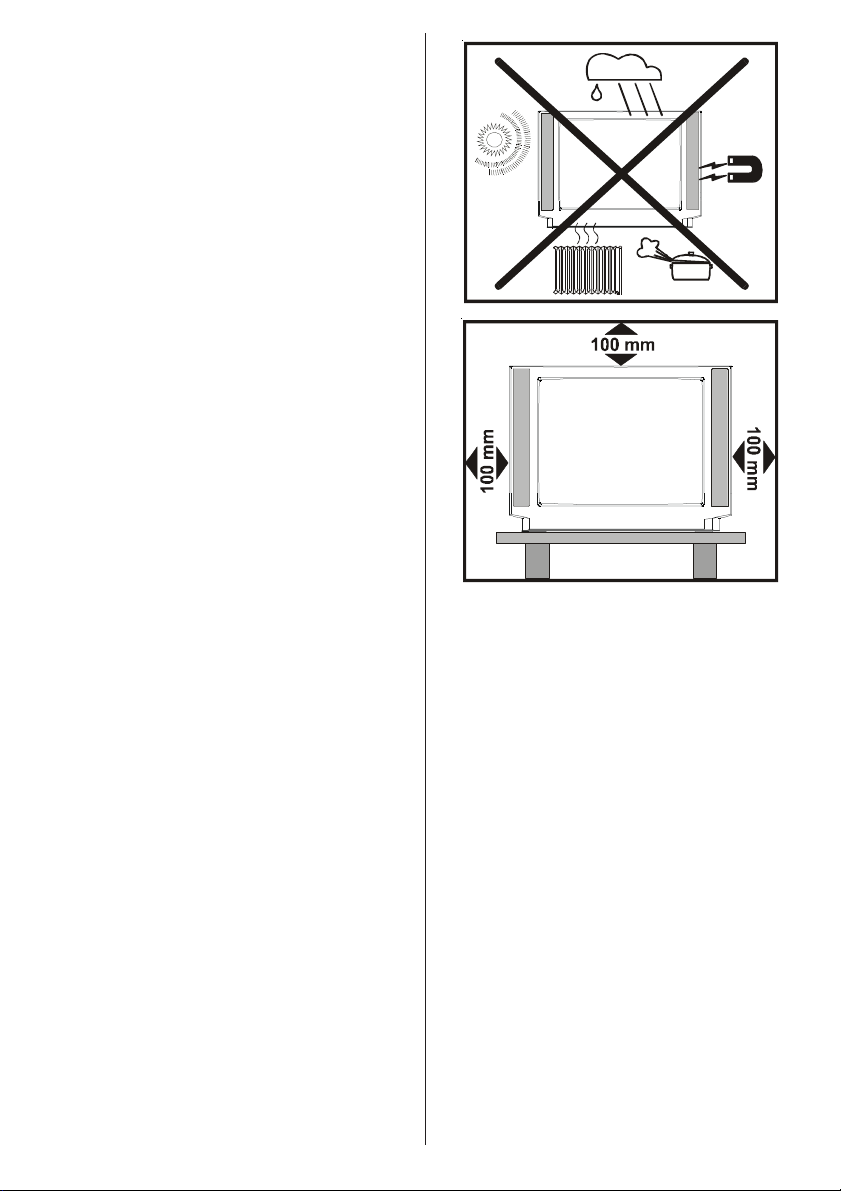
Air Circulation…
Leave at least 10cm clearance around the
television to allow adequate ventilation. This
will prevent the TV from overheating and consequential possible damage to the TV. Dusty
places should also be avoided.
Heat Damage…
Damage may occur if you leave the TV in direct
sunlight or near a heater. A void places subject
to extremely high temperatures or humidity, or
locations where the temperature is likely to fall
below 5ºC (41ºF).
Mains Supply…
The mains supply required for this equipment
is 230V AC, 50 Hz. Never connect to a DC
supply or any other power source. DO ensure
that the TV is not standing on the mains lead.
DO NOT cut off the mains plug from this equipment, this incorporates a special Radio Interference Filter, the removal of which will impair
its performance.
IF IN DOUBT PLEASE CONSUL T A
COMPETENT ELECTRICIAN.
DO…
DO read the operating instructions before you
attempt to use the equipment.
DO ensure that all electrical connections (including the mains plug, extension leads and
inter-connections between pieces of equipment) are properly made and in accordance
with the manufacturers’ instructions.
Switch off and withdraw the mains plug before
making or changing connections.
ENGLISH - 1 -
Page 3
DO consult your dealer if you are ever in doubt
about the installation, operation or safety of
your equipment.
DO be careful with glass panels or doors on
equipment.
DO NOT…
DON’T remove any fixed cover as this may
expose dangerous voltages.
DON’T obstruct the ventilation openings of the
equipment with items such as newspapers,
table-cloths,
curtains etc. Overheating will cause damage
and shorten the life of the equipment.
DON’T allow electrical equipment to be exposed to dripping or splashing or objects filled
with liquids, such as vases, to be placed on the
equipment.
DON’T place hot objects or naked flame
sources, such as lighted candles or nightlights on, or close to the equipment. High temperatures can melt plastic and lead to fires.
DON’T use makeshift stands and NEVER fix
legs with wood screws. To ensure complete
safety, always fit the manufacturer’s approved
stand or legs with the fixings provided according to the instructions.
DON’T listen to headphones at high volume,
as such use can permanently damage your
hearing.
DON’T leave equipment switched on when it
is unattended, unless it is specifically stated
that it is designed for unattended operation or
has a standby mode. Switch off using the
switch on the equipment and make sure your
family know how to do this. Special arrangements may need to be made for infirm or
handicapped people.
DON’T continue to operate the equipment if
you are in any doubt about it working normally ,
or it is damaged in any way – switch off, withdraw the mains plug and consult your dealer.
ABOVE ALL – NEVER let anyone, especially
children, push anything into holes, slots or
any other openings in the case – this could
result in a fatal electric shock.
NEVER guess or take chances with electrical
equipment of any kind – it is better to be safe
than sorry.
ENGLISH - 2 -
Page 4
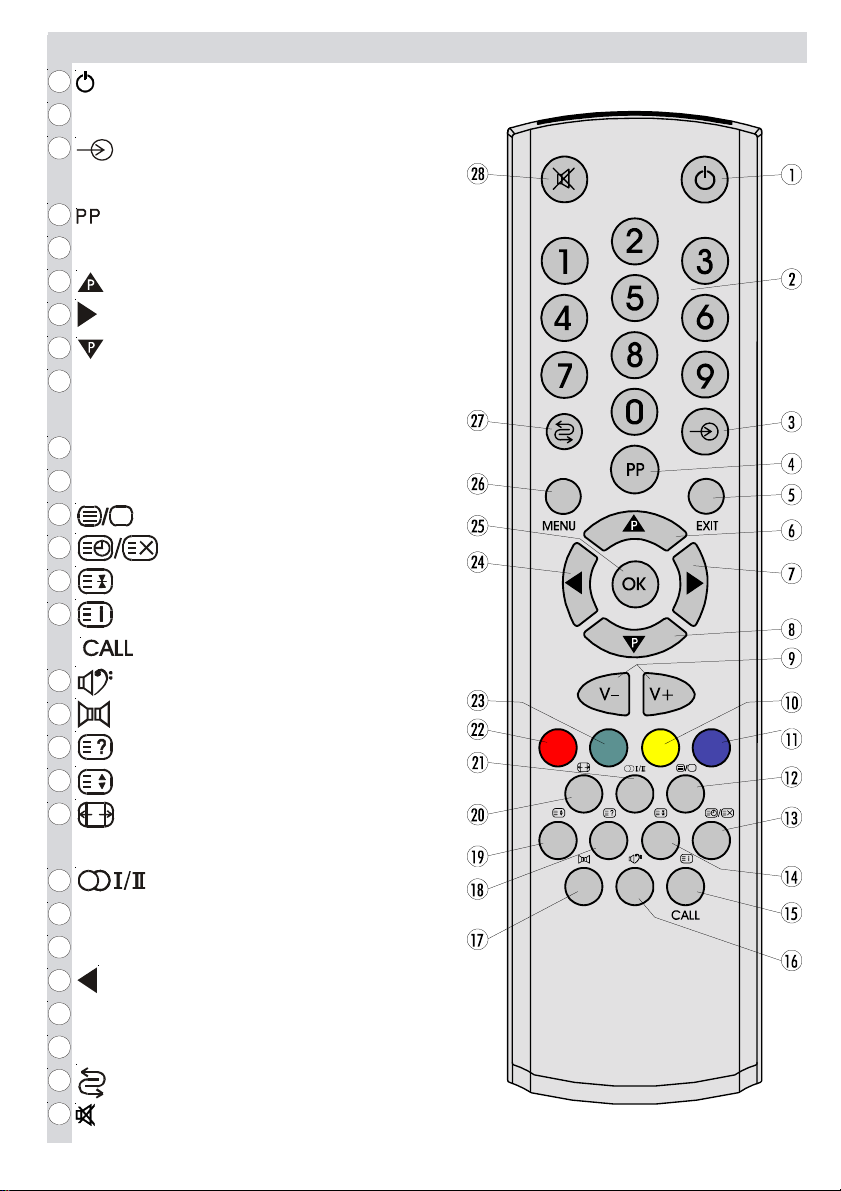
Remote Control Buttons
1
= Stand By
2
0 - 9 = Direct Program
3
= External Source
(AV-1, AV- 2, F-AV, RGB, SVHS)
4
= Personel Preference
5
EXIT = TV / AV / Teletext / Menu Quit
6
= Programme Up (Cursor Up)
7
= Volume Up / Cursor Right
8
= Programme Down (Cursor Down)
9
V - / V + = Volume - / Volume +
Cursor Left / Cursor Right
10
Yellow = Feature Menu
11
Blue = Install Menu
12
= Teletext / Mix / Teletext Quit
13
= Time / Update
14
= Hold
15
= Index Page
16
= No Function
17
= No Function
18
= Reveal
19
= Expand
20
= Picture Mode
(Auto / 4:3 / 16:9 / 14:9 / CINEMA / SUBTITLE)
21
= Stereo / Mono / Dual I-II
22
Red = Sound Menu
23
Green = Picture Menu
24
= Volume Down / Cursor Left
25
OK = Okey
26
MENU = Menu
27
= Programme Swap
28
= Mute
= TV St atus
ENGLISH - 3 -
Page 5
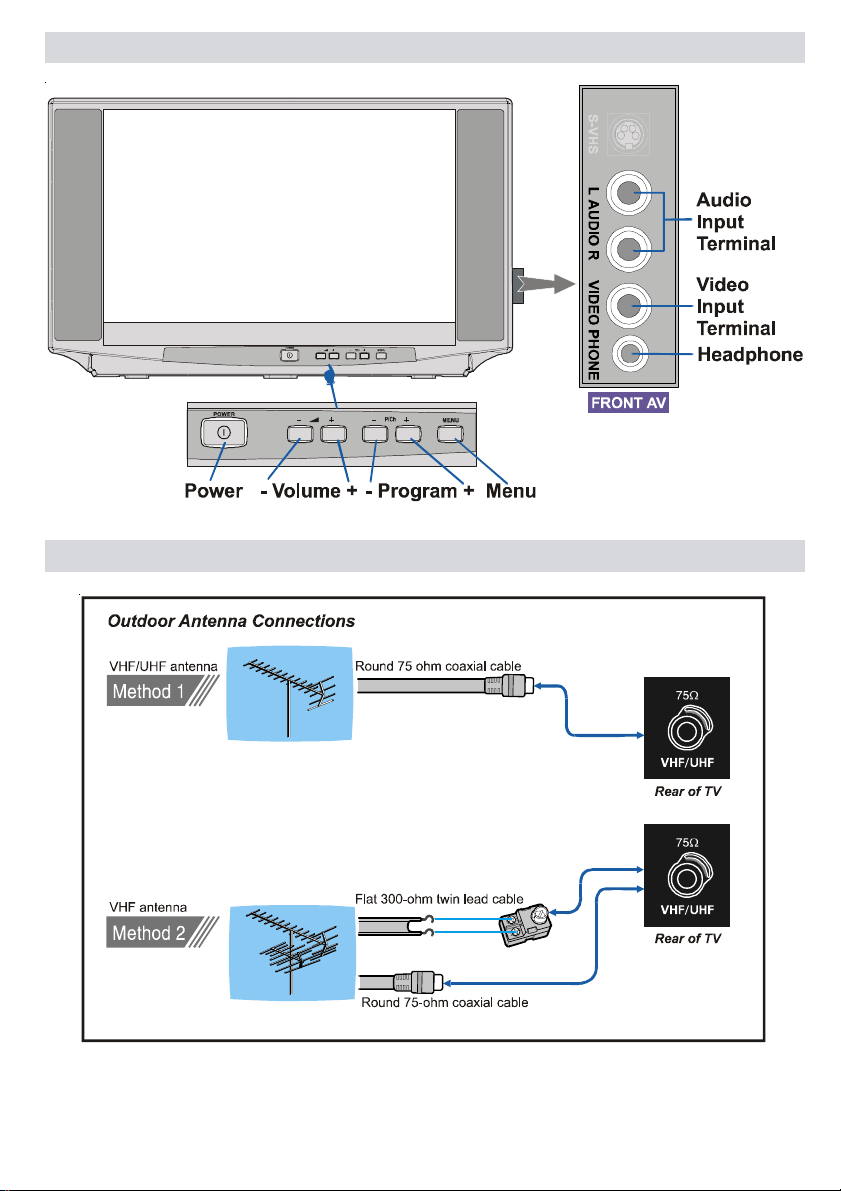
Control Panel Buttons
Antenna Connections
ENGLISH - 4 -
Page 6

Preparation
VHF/UHF
Ω
CABLE TV
For ventilation, leave a space of at least 10 cm
free all around the set. T o prevent any fault and
unsafe situations, please do not place any
objects on top of the set.
Features
• It is a remote controlled colour television.
• 100 programmes from VHF, UHF bands or
cable channels can be preset.
• It can tune cable channels.
• Controlling the TV is very easy by its menu
driven system.
• It has Euroconnector socket for external
devices (such as computer, video, video
games, audio set, etc.)
• Second Euroconnector socket is available.
• Nicam Stereo sound systems.
• Full function Teletext (Fastext).
• It is possible to connect headphone.
• Direct channel access.
• A.P.S. (Automatic Programming System).
• All programmes can be named.
• Programme swapping between last watched
two programmes.
• Forward or backward automatic tuning.
• Sleep timer.
• Automatic sound mute when no transmission.
• When no valid signal is detected, after 5
minutes the TV switches itself automatically to
stand-by mode.
• WSS (Wide Screen Signaling).
• NTSC Playback.
• SVHS (EXT.2) is available.
• Front AV in and Back AV out is available.
Connections to the RF input socket
• Connect the aerial or cable TV plug to the RF
input socket located at the back of the TV and
connect the cable plug coming out from the TV
out socket located at the devices (VCR, DVB
etc.) to this socket as well.
75
TV REAR PANEL
How to connect other devices
IMPORTANT: Switch off the TV before connect-
ing any external device.
Sockets for external connections are at the
back and front of the TV . For connection of other
devices via Euroconnector refer to the manuals of the related devices.
Inserting batteries in the remote
control handset
• Place the batteries in the right directions as
seen below.
• Remove the battery cover located on the back
of the handset by gently pulling upwards from
the indicated part.
• Insert two AAA (R03) or equivalent type batteries inside.
• Replace the battery cover.
Before Switching on your TV
Power connection
IMPORTANT: The TV set is designed to oper-
ate on 230V AC, 50 Hz..
• After unpacking, allow the TV set to reach the
ambient room temperature before you
connect the set to the mains.
ENGLISH - 5 -
Page 7
NOTE: Remove batteries from remote control
handset when it is not to be used for a long
period.Otherwise it can be damaged due to
any leakage of batteries.
• Do not throw your old batteries into a fire,
dispose of them in a designated disposal
area. Do not combine a used, old battery with
a new one or mix battery types.
Switching the TV ON/OFF
To switch the TV on
Your TV will switch on in two steps:
1- Press the power button located on the front
of the TV. Then the TV switches itself to
standby mode and the RED LED located
below the TV turns on.
2- To switch on the TV from stand-by mode
either:
Press a digit button on the remote control so
that a programme number is selected,
or,
Press Programme Up or Down buttons on the
front of the TV or on the remote control, so that
last switched off programme is selected.
By either ways the TV will switch on and the
RED LED will turn GREEN.
To switch the TV off
• Press the stand-by button on the remote
control, so the TV will switch to stand-by mode
and the GREEN LED will become RED,
or,
Press the power button located on the front of
the TV , so the TV will switch of f and the GREEN
LED will turn off.
Operating the TV
You can operate your TV both using the remote control handset and onset buttons.
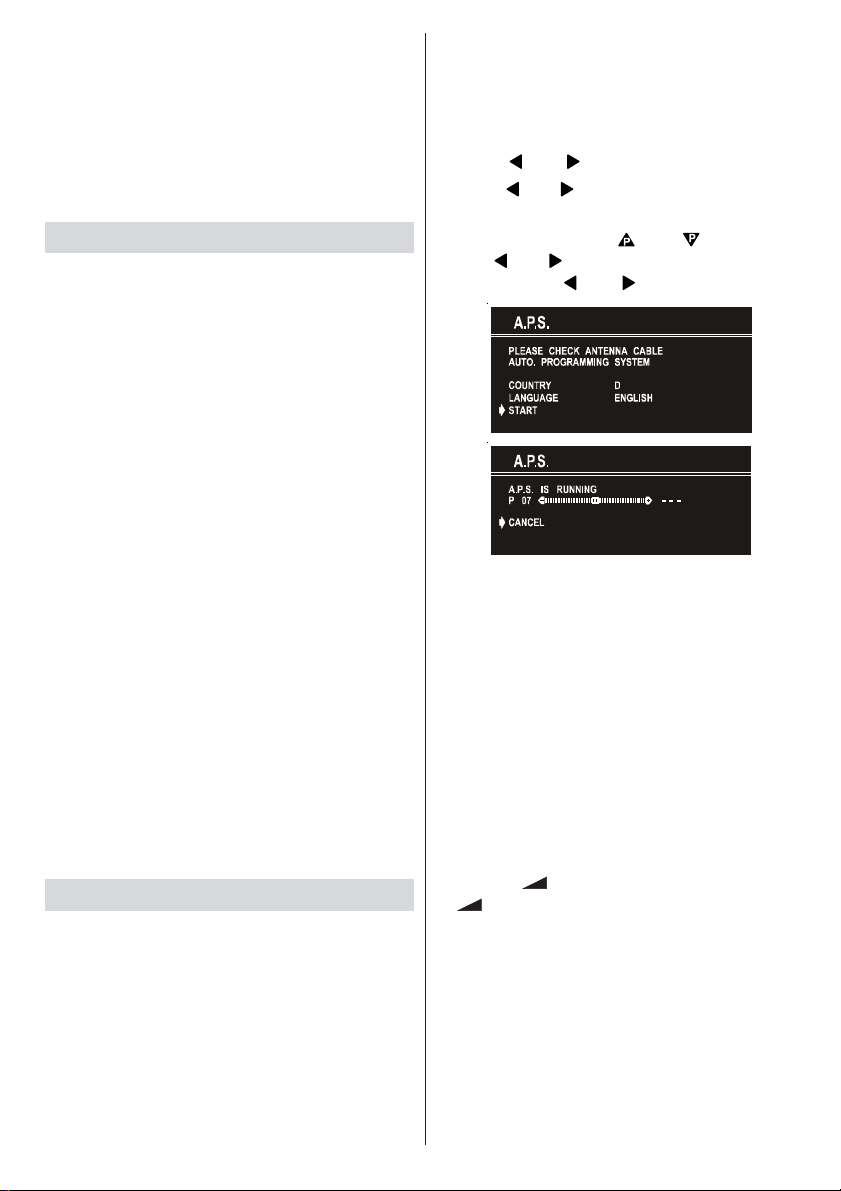
A.P.S. (Automatic Programming System)
"PLEASE CHECK ANTENNA CABLE AUTO.
PROGRAMMING SYSTEM" message will be
displayed when you turn on your TV for the first
time. APS, searches and sorts all channels
and stores them automatically on your TV,
according to the transmission of programme
systems in your area.
To cancel APS before starting, press EXIT
button. First of all choose the "COUNTRY" and
"LANGUAGE".
• Press “ ” or “ ” button to select a country.
• Press “
This, will effect the sort process in APS. To
select “START” use “
press “
running press “
After APS is finalized, a programme list will
appear on the screen. In the programme list
you will see the programme numbers and
names assigned to the programmes.
If you do not accept the locations and / or the
programme names of programmes, you can
change them in Programme menu.
” or “ ” button to select a language.
“ or “ ” button and
” or “ ” button. To cancel APS during
” or “ ” button.
Operating with the buttons on the TV set
Volume setting and programme selection can
be made using the buttons on the front panel.
Volume Setting
• Press “ +” button to increase volume, so a
“
volume level scale (slider) will be displayed at
the middle of the bottom on the screen.
Programme Selecting
• Press “P +” button to select the next program-
me or “- P” button to select the previous
programme.
• By pressing both the “- P” and “P +” buttons at
the same time you can enter Main menu.
” button to decrease volume or
ENGLISH - 6 -
Page 8

Entering Main Menu
• Press "MENU" button to enter Main menu. In
the Main menu select sub-menu using “P -”
or “P +” button and enter the sub-menu using
“- ” or “ +” button. To learn the usage of
the menus, refer to the Menu System section.
Operating with Remote Control
The remote control handset of your TV is designed to control all the functions of the model
you selected. The functions will be described
in accordance with the menu system of your
TV .
Functions of the menu system are described
in Menu System section.
Volume Setting
Press “V+” button to increase volume. Press
“V-” button to decrease volume. A volume level
scale (slider) will be displayed at the middle of
the bottom on the screen.
Programme Selecting
(Previous or next programme)
• Press “
ramme.
• Press “ “ button to select the next programme.
” button to select the previous prog-
button provides swapping between last two
selected programmes. For example, select
programme 8, then select programme 2. Now,
if you press "
selected. If you press the same button again,
programme 2 will be selected and so on.
" button, programme 8 will be
Menu System
Your TV has been designed with a menu system, to provide an easy manipulation of a
multi-function system. The TV is controlled by
choosing the commands, which are displayed
on the screen.
Press the "MENU" button. The Main menu will
be displayed at the middle on the screen.
All the selected items in this menu system is
indicated with CYAN characters and with an
arrow on the leftside of items.
Programme Selecting (direct access):
Press digit button on the remote control handset to select programmes between 0 and 9. TV
will switch to the selected program after a
short delay.
For a two digit program number enter the
second digit after pressing the first digit within
3 seconds.
Programme Swapping
• Press "
select the last selected programme. This
" (programme swap) button to
ENGLISH - 7 -
To select a sub-menu use “ “ or “ ” button,
and press “
also be selected with the coloured button on
the remote control.
” or “ ” button. Each option can
MAIN MENU
The menu system is described below.
The short way in order to enter the menus,
press :
"Menu" Button, Main Menu.
Red Button, Sound Menu.
Green Button, Picture Menu.
Yellow Button, Feature Menu.
Blue Button, Install. Menu.
Page 9

Menu button has two functions; first is opening
or closing the "MAIN MENU", and the second
is closing the sub-menu and then opening its
parent menu.
Sound Menu
To change sound settings
• Enter the Sound Menu directly, pressing the
Red button or,
• As you enter the main menu, sound will be
the first selected option. In the main menu,
select SOUND using “
enter the sound menu pressing “
button.
Setting Volume:
As you enter the sound menu, Volume will be
the first selected option.
• Press “
• Press “
Or you can directly change the volume settings
using “V-” (to increase) or “V+” (to decrease)
button.
” button to increase volume.
” button to decrease volume.
“ or “ ” button, then
” or “ ”
Selecting Mode
• Using “
• Press “
You can choose MONO, STEREO or DUAL
(I-II) mode, only if the selected channel supports that mode.
You can also change sound mode directly
pressing “
trol.
In case of bilingual broadcast (Dual Sound),
you can select original or dubbed language
using mode option.
Setting AVL
Automatic Volume Limiting (AVL) function
normalises sound to obtain fixed output level
between programs, having different sound
levels. Pressing “ ” or “ ” button will turn on
and off this feature.
“ or “ ” button select Mode.
” or “ ” button to change Mode.
” button on your remote con-
Setting Balance
It allows adjusting the distribution between
the left and right speakers.
• Using “
• Press “
ward.
• Press “ ” button to change balance leftward.
When balance control is in mid position, the
cursor is displayed with the two reciprocal
arrows.
“ or “ ” button select Balance.
” button to change balance right-
ENGLISH - 8 -
Setting Effect
You can use this feature to switch the sound
effect on and off. Pressing “
will turn on and off this feature. If the current
sound system is MONO and the sound effect
is set ON, then the sound will be heard as if it
is STEREO. If the current sound system is
STEREO, switching this effect on will make the
sound deeper. Switching it off will make no
change in MONO and STEREO.
” or “ ” button
Page 10

Equalizer
T o enter Equalizer sub-menu, select Equalizer
using “ “ or “ ” button, then enter Equalizer
menu pressing “
In MODE item there are five predefined and
one user defined options. These are USER,
CLASSIC, JAZZ, ROCK, POP and FLAT. The
predefined options can not be changed by the
user. If you change one of the frequency values
of the predefined options, the MODE is
switched automatically to USER option. The
USER option may be adjusted by the user.
The 5 items below the MODE are available to
adjust the sound settings in 5 frequency values: 120 Hz, 500 Hz, 1.5 kHz, 5 kHz and 10 kHz.
To change the values of 5 frequency options,
select one of the options by “
and then press “
“
” to decrease the value. In mid position,
cursor is displayed with the two reciprocal
arrows.
To store the Equalizer settings, press “
“
” button on “STORE” option. or;
Press “OK” button to store the Equalizer menu
settings.
During the store process all the items are
stored, moreover, the USER mode information
would not be lost. In other words, when the
user mode is selected again, after storing the
MODE with one of the predefined options, the
user definde frequency values would be set.
To Change Headphone Sound Settings
Pressing “
enter the Headphone menu. This is a submenu of Sound menu, and all options in this
” or “ ” button.
“ or “ ” button,
” to increase the value, or
” or
” or “ ” button on HEADPHONE,
ENGLISH - 9 -
menu are working as the same in the Sound
menu.
Setting Headphone Volume
• As you enter the Headphone sound menu,
Volume will be the first selected option.
• Press “
• Press “
Setting Headphone Balance
• When balance control is in mid position, the
cursor is displayed with the two reciprocal
arrows.
• Using “
• Press “
wards.
• Press “
wards.
Setting Headphone Mode
• Using “ “ or “ ” button select Mode.
Pressing “
current sound mode. (e.g.: If the current sound
mode is stereo, it will be stereo or visa versa).
In case of bilingual broadcast, you can select
original or dubbed language again using
mode menu. So when somebody listens to the
original language from the loudspeakers,
somebody else can listen to the dubbed language from headphone.
To Store the Settings
• To store menu settings press “OK” button in
menu. Also,
• Using “
“
volume and balance. The stored values will be
valid for all the programmes.
” button to increase volume.
” button to decrease volume.
“ or “ ” button select Balance.
” button to change balance right-
” button to change balance left-
” or “ ” button will change the
“ or “ ” button select Store. Press
” or “ ” button to store current headphone
Page 11

To Store the Settings
• Press “
store Sound menu settings.
• Press “OK” button to store sound menu
settings in sound menu.
” or “ ” button on “STORE” option to
Picture Menu
• To enter the Picture menu directly, press the
“GREEN” button, or
• Press "MENU" button, now you are in Main
menu. In the Main menu, select “PICTURE”
using “ “ or “ ” button, then enter the
Picture menu pressing “
” or “ ” button.
Setting Colour
• Using “
• Press “
• Press “
Setting Sharpness
• Using “
• Press “
• Press “
“ or “ ” button select Colour.
” button to increase colour level.
” button to decrease colour level.
“ or “ ” button select Sharpness.
” button to increase peaking level.
” button to decrease peaking level.
Setting Brightness
• As you enter the picture menu, Brightness will
be the first selected option.
• Press “
• Press “
Setting Contrast
• Using “
• Press “
• Press “
” button to increase brightness.
” button to decrease brightness.
“ or “ ” button select Contrast.
” button to increase contrast level.
” button to decrease contrast level.
ENGLISH - 10 -
Setting Hue
(During Playback NTSC system, this will appear in A V mode only when NTSC video source
is applied. Otherwise, HUE option is invisible
in Picture menu.):
• Using “ “ or “ ” button select Hue.
• Press “
• Press “
Center value is indicated with the two recipro-
cal arrows.
” button to increase hue level.
” button to decrease hue level.
Page 12

Mode
This item is used to change the picture size. By
pressing “ ” or “ ” button you may choose
one of these options: “4:3”, “16:9”, “14:9”, ”Cinema”, ”Subtitle”, and “AUTO”. It is also possible to change picture modes directly by
pressing button “ ” on your remote control.
•
4:3 This option forces the picture ratio to 4:3
mode.
• 16:9 This option forces the picture ratio to 16:9
mode.
• 14:9 This option forces the picture ratio to 14:9
mode.
•
Cinema This option forces the picture ratio to
Cinema mode.
• Subtitle This option forces the picture ratio to
Subtitle mode.
• AUTO This allows to change the picture mode
automatically, according to the transmission of
the selected channel. For example, your TV is
4:3 mode, but the transmission of that
channel is in 16:9 mode. If you select the
AUTO mode, the TV is switched to 16:9 mode
automatically. If the TV is in 4:3 mode and the
picture ratio of the channel is also 4:3, there
will be no affect selecting the picture mode to
AUTO mode.
WSS feature is only used in TV and F-AV
modes. For the Picture Mode selection in
AV-1 and AV-2 the pin 8 (of Scart) value is used.
In RGB and SVHS modes the Picture Mode can
be 4:3, 16:9, 14:9, Cinema or Subtitle, (Auto
mode is not available.).
When the menu appears on screen, picture
mode will automatically change to its default
tube mode (4:3 or 16:9) but it will turned to its
stored mode when the menu disappears.
To Store the Settings
Press “OK” button to store picture menu settings in picture menu or press “ ” or “ ” button on store option to store picture menu settings.
Feature Menu
• To enter the Feature menu directly, press the
“YELLOW” button, or
• Press "MENU" button, now you are in Main
menu. In the Main menu, select FEATURE
using “ “ or “ ” button. Then enter the
Feature menu pressing “
Sleep Timer
As you enter the Feature menu, SLEEP TIMER
will be the first selected option. Use “
button to change the Sleep Timer values between OFF, 0:15:00, 0:30:00, 0:45:00, 1:00:00,
1:15:00, 1:30:00, 1:45:00 and 2:00:00.
It is displayed on the upper right of the screen.
If sleep timer is activated it is displayed with the
TV status and erased with it after 3 seconds.
” or “ ” button.
” or “ ”
If there is left only one minute of the down
counting of the timer, it is displayed automatically on the upper right of the screen, and
ENGLISH - 11 -
Page 13

stayed there until finishing. Then TV goes
automatically to stand-by.
Child Lock
You can use this feature to prevent children
turning on TV or changing programs or adjustments etc. without remote control.
The CHILD LOCK feature can be set by “
” button to either ON or OFF. When OFF is
“
selected, there will be no difference in the
operation of your TV . When ON is selected, the
TV can only be controlled by the remote control
handset. In this case, the front panel buttons
(except the Switch On/Off button) will not work.
Selecting Menu Language
Menu language can be chosen by pressing
“
” or “ ” button on LANGUAGE item.
” or
using “ “ or “ ” button. Then enter the
Install menu pressing “
Selecting Programme
To select programme number, you can use
” or “ ” button or Digit Buttons.
“
Selecting Band
BAND, can be chosen either,
• “C” or “S”
Selecting Channel
CHANNEL can be changed by “
ton or by Digit Buttons.
” or “ ” button.
” or “ ” but-
AV-2 OUTPUT
From AV-2 OUTPUT, either TV or AV-1 can be
given. TV or AV-1 can be chosen by pressing
“
” or “ ” button on "AV-2 OUTPUT".
To Store Settings
In Feature menu all settings are stored automatically.
Install Menu
• To enter the Install menu directly, press the
BLUE button, or
• Press "MENU" button, now you are in Main
menu. In the Main menu, select “INSTALL.”
ENGLISH - 12 -
For band C,
01 - 17, 21 - 73, UK.
For band S,
01 - 41, for all channel tables.
Standard
The "Standard" setting is fixed to "I". Y ou cannot change this item's setting.
Selecting Search
To start the search process, press “
for forward search or “
search. SEARCH item blinks during search
process, since the process is stopped or signal is found. During search process the semitransparent menu background becomes
"BLUE". T o stop the search process “
button must be pressed again.
” button for backward
” button
” or “ ”
Page 14

Selecting Fine Tuning
You can use the Fine Tuning process for fine
adjustment (after coarse adjustment), if you are
not happy about the image on the screen.
Use “
until getting the best image on the screen.
In Channel option, normally the Fine Tuning
cursor is placed at the middle on the slider,
and this is indicated with the two reciprocal
arrows.
To Store Settings
Press “OK” button to store Install menu settings in Install menu or press “
ton on STORE option to store install menu
settings.
” or “ ” button on FINE TUNING item,
” or “ ” but-
Programme Menu
• Press "MENU" button, now you are in Main
menu. In the Main menu, select “PROGRAM.”
using “ “ or “ ” button. Then enter the
Programme menu pressing “
button.
” or “ ”
Programme Name has a name string with 5
characters. After A.P.S. process the Programme Names are set to:
• Frequency search "PR01" (programme
number),
• Channel search "C-01" or "S-01" (band and
channel number), as default.
At the bottom of the menu there is a programme sort functions section. Each function is
activated by color button (seen above). NAME
allows changing the programme name. By
DELETE you can delete programmes that you
decided. INSERT section is for inserting
programmes into another programme
spaces. By selecting A.P.S. section, A.P.S
menu will be available.
To change the name of a decided programme, that programme is selected and pressed
to the RED button (NAME). The first letter begins to blank on the selected name. T o change
that letter “
to select the other letters, “
be used. If the cursor is at the last letter of the
Programme Name, pressing “ ” button
moves the cursor at the beginning. On the
contrary, if the cursor is at the beginning of the
Programme Name, pressing “
moves the cursor at the end.
“ or “ ” button can be used, and
” or “ ” button can
” button
Moving cursor to four direction you can reach
30 programmes in the same page. By scrolling the pages up or down by pressing the
navigation buttons you can select all the
programmes in TV mode (except the AV
mode).
In menus, “
"Direction Up" and "Direction Down".
By cursor action, programme selection is done
automatically. Selected programme is displayed with “CYAN” characters. In order to
select programme is also possible by using
digit button. In this way programme selection
gets also automatically and after selection the
selected programme is displayed with cyan
characters. The TV Status is changed by the
programme selection too.
Programme Number is between 00 and 99.
“ or “ ” buttons are working like
ENGLISH - 13 -
After changing the name by pressing the RED
button (STORE) it is stored. After activating the
name process the “INSERT”, “DELETE” and
“A.P.S.” processes will be inactive and
"CANCEL" option will be valid. This option
cancels the name process, if the new name
do not want to be stored.
Page 15

When it is pressed to GREEN button (INSERT),
"NAME", "A.P.S." and "DELETE" functions are
erased, the selected programme (A) is displayed with green characters. From now on,
the automatic selection is canceled. Cursors
moves are indicated with “CYAN” characters.
With navigation buttons, the decided program
space (B) can be selected and by pressing
the green button again inserting is occurred to
that space (B).
It should be thought that Prog-00 is the lowest
programme (like Prog-100). If any programme is inserted to Prog-00, the programmes
under that programme space shift one up, and
Prog-99 is adjusted to the first frequency value
of VHF1 (44 MHz).
If Prog-00 is inserted to any programme
space, all the programmes under that space
shift one down and Prog-99 is erased, and
Prog-00 is adjusted to the first frequency value
of VHF1 (44 MHz).
"CANCEL" function cancels the activated "IN-
SERT" process.
For "DELETE" process it is pressed to yellow
button, (“NAME”, “INSERT” and “A.P.S.” func-
tions are inactive).
Pressing yellow button again erases the selected programme from the programme list,
and the programmes below shift one up. Prog00 is adjusted to the first frequency value of
VHF1 (44 MHz). Pressing blue button cancels
the activated “DELETE” process.
T o enter A.P.S. menu, press to the blue button.
To learn the features of this function.
Selecting A.P.S. section A.P.S. menu will be
available.
A.P.S.
A.P.S., searches and stores all channels automatically on your TV, according to the transmission of programme systems in your area.
If you enter the A.P.S. menu,you can automati-
cally programme the received channels in your
TV's programmes with A.P.S. (Automatic pro-
gramme system)
After displaying the PROGRAM menu, press
BLUE button to enter the A.P.S. menu.
Select COUNTRY with the “ “ or “ ”
button,then press the “
select the country you are now located.
Select LANGUAGE with the “
button,then press the “
select a menu language.
Select START with the “ “ or “ ” button,then
press the “
During A.P.S., "A . P . S. IS RUNNIG" will be
displayed.After A.P.S. is finalized, the "PRO-
GRAM." menu appears.
To cancel A.P.S., press the “ ” button.
” button to start A.P.S.
” or “ ” button to
“ or “ ”
” or “ ” button to
Other Features
TV Status
Programme Number, Programme Name (or
AV), (they are displayed on the upper left of the
screen) and Sleep Timer (shows the time left
on the upper right screen if enabled). In stereo
options the sound indicator is displayed with
them too. They are displayed after programme
change during 3 seconds.
Programme Number
Programme Name (5 characters)
These OSD’s are displayed when a new programme is entered by digit button, by pressing
"CALL" button, or “
"EXIT" button or "
Programme Swap
This button is used to reenter to the preceding
entered programme again. Pressing "
button consecutively allows to swap into two
last entered programmes.
“ or “ ” button, or by
" button or " " button.
"
ENGLISH - 14 -
Page 16

Personal Preferences (PP)
All the preset values will be restored, when
pressing "PP".
Sleep Timer Last Minute Indicator
It is displayed on the upper right of the screen.
If sleep timer is activated it is displayed with the
TV status and erased with it after 3 seconds.
If there is left only one minute of the down
counting of the timer, it is displayed automatically on the upper left of the screen, and stayed
there until finishing. Then TV goes automatically to stand-by.
Mute Indicator
It is placed in the upper middle of the screen
when enabled, and it stays there until it is disabled.
Sound Indicator
This is a stereo option. The alternatives of the
indicator are Mono, Stereo, Dual I and Dual II.
This indicator is displayed under the programme number indicator on the screen. "
button is used to select Mono or Stereo, or
Dual I or Dual II.
In Mono broadcast or in forced-mono (for stereo broadcast).
In Stereo broadcast.
If dual broadcast detected. Dual I is selected
in default and also can be selected after Dual
II by Remote Control.
If Dual II selected by Remote Control.
Picture Mode
The picture mode OSD is displayed below the
sound indicator, by TV Status OSD’s. According to the WSS data, inside of the OSD box
“4:3”, “16:9”, “14:9”, “CINE”, “SUBT” or “AUTO”
is written.
By pressing “
tive) the picture mode can be switched into
4:3, 16:9, 14:9, Cinema, Subtitle or Auto Mode.
” button (if Teletext is not ac-
To cancel mute, there is two alternative; the
first one is pressing to "
is set to the preceding value, and the second
one is increasing the volume level, thus it
starts at the minimum level to increase. By
"
decreasing the volume level in mute state,
mute will not be ignored, only the volume level
will decrease. If mute canceled after decreasing the volume level, the volume will valid with
the decreased level.
" button, thus volume
No-Signal
No-Signal Timer Indicator
It is displayed in the middle of the screen
when no valid signal detected. It shows the
remained time for the switching to the StandBy mode (it takes 5 minutes when any signal
detected or no any Remote Control command
is accessed). The indicator is displayed in 3
seconds when there is no valid signal.
After an Remote Control command (if No-Signal Timer is active) the timer stops and if no
signal detected again the timer is initialized to
5 minutes and starts 3 seconds later again to
count down.
It is not valid in AV mode.
ENGLISH - 15 -
Page 17

Blue Background During No-Signal
In case, no valid signal is detected (in TV or A V
mode) Blue Background is activated. During
search process Blue Background is not active.
But instead of it there is another feature given;
the semi-transparent menu background is
made blue.
Volume Bar
It is displayed in the lower middle of the
screen. When a volume command is received
(pressing V+ or V- by Remote Control or Front
panel) and no menu is active, it stays on the
screen for 3 seconds, after the last volume
command or until another command is received in between.
AV Modes
By pressing the “ “ button you can switch
your TV to A V modes (except being in T eletext).
Pressing this button will consecutively switch
the TV in one of the optional AV modes: AV-1,
AV-2, F-AV (Front AV), RGB (EXT.1) or SVHS
(EXT.2). AV-1 supports the RGB mode and
AV-2 supports SVHS mode unless there is an
SVHS socket.
In order to quit the A V mode press “EXIT”, digit
buttons or “
“ or “ ”.
Teletext
Teletext is an information system that displays
text on your TV screen. Using the T eletext information system you can view a page of information on a subject that is available in the list
of contents (index).
On screen display is not available in text mode.
Contrast, brightness or colour control is not
available, but volume control is available in text
mode.
To operate Teletext
• Select a TV station on which Teletext is being
transmitted.
• Press (TELETEXT) “ ” button. Usually
the list of contents (index) is displayed on the
screen.
ENGLISH - 16 -
To select a page of Teletext
• Press the appropriate digit buttons for the
required Teletext page number.
The selected page number is displayed at the
top left corner of the screen. The Teletext page
counter searches until the selected page
number is located, so that the desired page is
displayed on the screen.
• Press “
forward one page at a time.
• Press “ ” button to move the Teletext screen
backward one page at a time.
“ button to move the Teletext screen
To Select Index Page
• To select the page number of the index
(generally page 100), press “
“ button.
To Select Teletext with a TV Programme
• Press “ “ button. The text is now
superimposed over the programme on the
screen.
Searching for a page while watching TV
• While Teletext Mode is on, pressing “ “
will change the mode to TV, one more press
to “ “ will change the mode from TV to
the latest Teletext page we left. In the TV mode
enter a page number using digit keys. As you
enter digits first line of teletext page will appear on top screen and will remain there until
the requested page is found. Then teletext
line will be replaced by page number to indi-
Page 18

cate that page has been found. Now you can
display this teletext page pressing “
button.
To Select Double Height Text
• Press “ “ button for the top half of the
information page to be displayed in double
height text.
• Press “
the information page to be displayed in
double height text.
• Press “
page of normal height text.
“ button again for the bottom half of
“ button once more for the full
To Reveal “concealed” Information
• Pressing “ “ button once will reveal
answers on a quiz or games page.
• Pressing “ “ button again will conceal the
revealed answers.
To Stop Automatic Page Change
The teletext page you have selected may contain more information than what is on the
screen; the rest of the information will be displayed after a period of time.
• Press “ “ button to stop the automatic page
change.
• Press “ “ button again to allow the next
page to be displayed.
• Press “
selected Teletext page.
“ button to display the
• Press “
backward one page at a time.
“
For Fastext
The subject-heading for the information may
have a particular colour.
• Press an appropriate RED, GREEN, YELLOW
or BLUE button in order to reach the relevant
page quickly.
” button to move the Teletext screen
To exit Teletext
• Press “ ” button twice or press “EXIT”
button while Teletext mode is active. The
screen will switch to TV mode.
To Display the Time
• While watching a TV programme with Teletext
transmission press “
current time information, captured from
Teletext will be displayed at the upper middle
of the screen.
• If the programme being watched does not
have Teletext transmission, no iformation will
be displayed.
“ button. The
Fastext
Your CTV supports the 7 page Teletext system.
When the page number of any of the 7 pages in
memory is entered, the system will not search
for the requested page; instead it will display
the page automatically.
• Press “
forward one page at a time.
“ button to move the Teletext screen
ENGLISH - 17 -
Page 19

Connect Peripheral Equipment
There is a wide range of audio and video equipment that can be connected to your TV.
The following connection diagrams show you
where the different equipment should be connected at the back or the front side of the TV.
Via the Euroconnector
Your TV set has one or two Euroconnector
socket. If you want to connect peripherals (e.g.
video, decoder, etc.) which have Euroconnectors, to your TV, use EXT.1 and EXT.2 in-
puts.
If an external device is connected via Euroconnector sockets TV is switched to AV mode
automatically. If the signal is RGB then the RGB
OSD indicator is displayed on the screen.
RGB mode
If an equipment can output the RGB signals,
connect it to the AV-1 (EXT.1) terminal.
• Select the RGB mode to watch images from
that equipment.
• When not in the RGB mode, turn the RGB
signals output equipment off.
Via Ant Input
If you want to connect to your TV, peripherals
like video recorders or decoders, but the device
you want to connect does not have Euroconnector, you should connect it to the ANT input
of your TV set.
If the VCR is connected via antenna input it
is suggested to use the Programme 0.
Decoder
Cable TV offers you a wide choice of programs. Most of them are free, others are to be
paid for by the viewer . This means that you will
need to subscribe to the broadcasting
organisation whose programmes you wish to
receive. This organisation will supply you a
corresponding decoder unit to allow the
programmes to be unscrambled.
For further information ask your dealer. See
also the booklet supplied with your decoder.
Connect a decoder with an aerial socket to
the TV
• Connect the aerial cable.
Connect a decoder without an aerial
socket to the TV
• Connect the decoder to your TV with a
eurocable / RCA Jack Cable to EXT.1 and
EXT.2 / RCA Jack. When your decoder has a
Euroconnector / RCA Jack you can obtain
better picture quality if you connect a
eurocable / RCA Jack Cable to EXTERNAL /
RCA Jack.
TV and Video Recoder (VCR)
• Connect the Video Recorder to the ANT (antenna input) socket of the TV with the aerial
cable.
• Connect the Video Recorder to the AV-1 or
AV-2 terminal with the SCART cable, or connect it to the F-AV terminal with the audio and
video cables.
Playback NTSC
Connect NTSC VCR player to Euroconnector
at the back of the TV.
or,
Connect NTSC VCR player to RCA Jack at the
front of the TV .
Then, press “
F-AV, RGB or SVHS.
“ button to select AV-1, AV-2,
Copy Facility
Source selection for VCR recording.
• Select Features Menu in the Main Menu.
• Select AV-2 OUTPUT source pressing “
” button.
“
” or
Search for and store the test signal of the video recorder
• Unplug the aerial cable from the aerial socket
“ANT” of your video recorder.
• Switch on your TV and put the video recorder
on the test signal. (See the handbook for your
video recorder.)
• Enter the Tuning menu via the Install menu.
• Search for the test signal of your video
recorder in the same way as you searched for
ENGLISH - 18 -
Page 20

Connect Peripheral Equipment
29”- 33” REAR PANEL
ENGLISH - 19 -
Page 21

and stored the TV signals. See Tuning, Search
and Store TV channels. Store the test signal
under programme number 0.
• Replace the aerial cable in the aerial socket
“ANT.” of your video recorder once you have
stored the test signal.
Camera and Camcorder
To connect to Front-AV input (F-AV):
Connect your camera or camcorder at the front
side of your TV.
• Connect your equipment to the TV via VIDEO
(yellow), AUDIO R (red) and AUDIO L (white)
inputs. You should connect the jacks to the input in the same colour.
Back-AV output:
Connect your camera or camcorder at the back
side of your TV.
• Connect your equipment to the TV via VIDEO,
AUDIO R and AUDIO L inputs. You should
connect the jacks to the input in the same
colour. Back AV output outputs only the
information coming from the ANT. (aerial)
socket, so you can not output external sources
from Back AV output.
SVHS (via EXT.2)
If the equipment connected to your TV set supports S-Video (Y/C) output from Euroconnector, you can have a better picture quality by
selecting SVHS mode and connecting your
equipment to the EXT.2 terminal of TV. See
your equipment's booklet to check if your
equipment has such feature.
Connect the decoder to the video recorder
Some video recorders have a special
euroconnector for decoder.
• Connect a eurocable to the euroconnector of
your decoder and to the special euroconnector of your video recorder. See also the
handbook of your video recorder.
• To connect your video recorder to the TV, see
TV and Video Recorder section.
If you want to connect more equipment to your
TV, consult your dealer.
Connecting Headphones
Use the stereo headphone socket (HP) on the
lower right side of your TV, to connect headphones.
Tips
Care of the Screen
Clean the screen with a slightly damp, soft
cloth. Do not use abrasive solvents as they
may damage the TV screen coating layer
Poor Picture
Have you selected the correct TV system? Is
your TV set or house aerial located too close
to the loudspeakers, non-earthed audio
equipment or neon lights, etc. ?
Mountains or high buildings can cause double
pictures or ghost images. Sometimes you can
improve the picture quality by changing the
direction of the aerial.
Is the picture or Teletext unrecognisable?
Check if you have entered the correct frequency.
The picture quality may degrade when two
peripherals are connected to the TV at the
same time. In such a case, disconnect one of
the peripherals.
No Picture
Is the aerial connected properly? Are the plugs
connected tightly to the aerial socket? Is the
aerial cable damaged? Are suitable plugs
used to connect the aerial? If you are in doubt,
consult your dealer.
No Picture means that your TV is not receiving
any transmission. Have you pressed the correct keys on the remote control? Try once
more.
Sound
You can not hear any sound. Did you perhaps
interrupt the sound, pressing “ ” key? Are
external speakers connected to the TV?
Sound is coming from only one of the speakers. Is the balance set to one direction extreme? See SOUND menu.
ENGLISH - 20 -
Page 22

Remote Control
Your TV no longer responds to the remote
control. Press the “EXIT” button on the remote
control once more. Perhaps the batteries are
exhausted. If so you can still use the local keys
at the front of your TV .
Have you selected the wrong menu? Press
“EXIT” key to return to TV mode or press
“MENU” to return to the previous menu.
No solution:
Switch your TV set off and on. If this does not
work, call the service personnel; never attempt
to repair it yourself.
Specifications
TV BROADCASTING
PA L I/I’
RECEIVING CHANNELS
VHF (BAND I/III)
UHF (BAND U)
HYPERBAND
CABLE TV (S1-S20 / S21-S41)
NUMBER OF PRESET CHANNELS 100
CHANNEL INDICATOR
On Screen Display
RF AERIAL INPUT
75 Ohm (unbalanced)
OPERATING VOLTAGE
230V AC, 50 Hz.
AUDIO OUTPUT
Nicam Stereo
AUDIO OUTPUT POWER (W
2 x 10
) (%10 THD)
RMS.
POWER CONSUMPTION (W) (max.)
135
PICTURE TUBE
28“ 16:9 (72 cm)
DIMENSIONS (mm)
ENGLISH - 21 -
 Loading...