

Page 1
呏午䥂䄭⠱㥖㌳い䈩ⴱ㤷㤵ⵃ佖䕒⁐䅇䔭呆吭〵〵㔶ⴵ〱へ硸
〵⁈慺楲慮′〰㜠卡泽‱〺㈷㨰
19W330DB
COLOUR TELEVISION
OWNER’S MANUAL
Page 2

Contents
SETTI NG UP
Safety Precautions – Som e do's and don'ts for y ou to be aware of 2
Installation and important information 3
The remote cont rol – an at-a-glanc e guide 4
Connect ing ex ternal equipment – a guide to c onnect ing equi pment to the bac k of the television 5
Side Connect ions and c ontrols – s witching on the television, s tandby , us ing the s ide controls 7
Tuning the television – digit al tuning 8
Tuning the television – digit al programme s orting, auto tuning, manual tuning 9
Tuning the television – analogue tuning, programm e sorting 10
Tuning the television – analogue manual tuning 11
Tuning the television – AP S, choosing a language 12
CONTROLS AND FEATURES
Analogue general c ontrols – selec ting programme positions , time display 13
Stereo and bilingual t ransm iss ions – s tereo/ mono or dual language broadcasts 13
Child loc k – dis abling the buttons on the television 13
Pic ture format 14
Analogue picture c ontrols – pic ture mode (c ontrast , brightnes s, sharpness, c olour, hue) 15
colour temperat ure, room light ing
Analogue sleep tim er
On-sc reen informat ion 16
Digital programme guide and setting digital programm e t imer 17
Digital parental cont rols – s etting the pin, mode 18
Digital set tings – favourite programm es, loc ked programmes, encrypted programmes 19
Digital set tings - country and language, audio lan guages 20
Digital set tings c ontinued – s ubtit les, audio output reset tv, c omm on int erface, local tim e s ettings 21
Digital set tings c ontinued – version, auto upgrade and search for new software 22
Analogue sound cont rols – volume, sound mute, equalizer, balance, A VL, effect, 23
line out , headphone volume
Input select ion and AV connections – input and output soc ket s for connec ted equipment
PC M ode 25
PC Input Typic al Dis play Modes 26
TEXT SERVI CES
Digital tex t services 27
Analogue tex t 27
16
24
PROBLEM SOLVI NG
Quest ions and A nswers – ans wers to some of the more common queries 29
Notes – for y our own rec ords 31
INFORM ATION
Specificati ons and A ccess ories – tec hnic al informat ion about t he television,
supplied acces sories
19W330DB
33
English - 1 -
Page 3
Safety Precautions
This equipment has been designed and manufactured to meet international safety standards but, like any electrical
equipment, care must be taken to obtain the best results and for safety to be assured. Please read the points below for
your own safety. They are of a general nature, intended to help with all electronic consumer products and some points may
not apply to the goods you have just purchased.
Air Circulation
Leave more than 10cm clearance around the television to
allow adequate ventilation. This will prevent overheating
and possible damage to the television. Dusty places should
also be avoided.
Heat Damage
Damage may occur if the television is left in direct sunlight
or near a heater. Avoid places subject to extremely high
temperatures or humidity, or locations where the temperature is likely to fall below 5°C (41°F).
Mains Supply
IMPORTANT: The TV set is designed to operate on 12 V
DC. For this, an adaptor is used which gives 12 V
voltage. Connect this adaptor to a system that supplies 230 V AC 50Hz.
WARNING: Only connect the adaptor supplied with
this product.
Important Note; before use, please check that the low
voltage DC rating on the adaptor corresponds to the
DC voltage rating on the back cover of the LCD TV. If
not the same or in doubt, please contact your Toshiba
dealer or a competent electrician.
DO ensure that the television is not standing on the mains
lead. DO NOT cut off the mains plug from this equipment,
this incorporates a special Radio Interference Fil ter, the
removal of which will impair its performance. In the UK, the
fuse fitted in thi s plug is approved by ASTA or BSI to
BS1362. It should only be replaced by a correctly rated and
approved type and the fuse cover must be refitted. This set
requires an earthed supply. IF IN DOUBT PLEASE CONSULT A COMPETENT ELECTRICIAN.
Do
DO read the operating instructions before you attempt to
use the equipment.
DO ensure that all electrical connections (including the mains
plug, extension leads and interconnections between pieces
of equipment) are properly made and in accordance with the
manufacturers’ instructions. Switch off and withdraw the
mains plug before making or changing connections.
DO consult your dealer if you are ever in doubt about the
installation, operation or safety of your equipment.
DO be careful with glass panels or doors on equipment.
Do not
DON’T remove any fixed cover as this may expose dangerous voltages.
DON’T obstruct the ventilation openings of the equipment
with items such as newspapers, tablecloths, curtains, etc.
Overheating will cause damage and shorten the life of the
equipment.
DON’T allow electrical equipment to be exposed to dripping
or splashing or objects filled with liquids, such as vases, to
be placed on the equipment.
DON’T place hot objects or naked flame sources, such as
lighted candles or nightlights on, or close to equipment.
High temperatures can melt plastic and lead to fires.
DON’T use makeshift stands and NEVER fix legs with
wood screws. To ensure complete safety, always fit the
manufacturers’ approved stand, bracket or legs with the
fixings provided according to the instructions.
DON’T leave equipment switched on when it is unattended,
unless it is specifically stated that it is designed for unattended operation or has a standby mode. Switch off by
withdrawing the plug, make sure your family know how to do
this. Special arrangements may need to be made for people
with disabilities.
DON’T continue to operate the equipment if you are in any
doubt about it working normally, or it is damaged in any way
- switch off, withdraw the mains plug and consult your
dealer.
WARNING - excessive sound pressure from earphones or
headphones can cause hearing loss.
ABOVE ALL - NEVER let anyone, especially children,
push or hit the screen, push anything into holes, slots
or any other openings in the case.
NEVER guess or take chances with electrical equipment of any kind - it is better to be safe than sorry.
THE MAINS PLUG IS USED AS A DISCONNECTING DEVICE AND THEREFORE SHOULD BE READILY OPERABLE.
WARNING - The power adaptor may become hot during normal operation. This is not a malfunction. Please
make sure that the adaptor is not covered.
English - 2 -
Page 4
Installation and important information
Where to install
Locate the television away from direct sunlight and strong lights; soft,
indirect lighting is recommended for comfortable viewing. Use curtains
or blinds to prevent direct sunlight falling on the screen.
Place on a sturdy platform, the mounting surface should be flat and
It must then be secured to the wall with a sturdy tie using
steady.
the clip on the back of the television, this will prevent it from
falling over.
Make sure the television is located in a position where it cannot be
pushed or hit by objects and that small items cannot be inserted into
slots or openings in the case.
Please take note
EXCLUSION CLAUSE
Toshiba shall under no circumstances be liable for loss and/or damage to the product caused by:
i) fire;
ii) earthquake;
iii) accidental damage;
iv ) intentional misuse of the product;
v ) use of the product in improper conditions;
vi ) loss and/or damage caused to the product whilst in the possession of a third party;
vii ) any damage or loss caused as a result of the owner’s failure and/or neglect to follow the instructions set
out in the owner’s manual;
viii ) any loss or damage caused directly as a result of misuse or malfunction of the product when used
simultaneously with associated equipment;
Furthermore, under no circumstances shall Toshiba be liable for any consequential loss and/or damage
including but not limited to the following, loss of profit, interruption of business, the loss of recorded data
whether caused during normal operation or misuse of the product.
Note: A Toshiba wall bracket or stand, where available, must be used. If a non Toshiba wall bracket or stand
is used the products' BEAB approval will become void and the equipment is then used at the consumers own
risk.
If stationary images generated by text services, channel identification logos, computer displays, video games, on screen
menus, etc. are left on the television screen for any length of time they could become conspicuous, it is always advisable
to reduce both the brightness and contrast settings.
English - 3 -
Page 5
The remote control
GUIDE
TEXT
Standby mode
To select between analogue and digital TV,
To exit Menus
Tocalluptextservicesinmodeandinteractiveservicesinmode.
analogue
down,leftorright.toconfirmyourOK
When in TV mode:
Still picture
Stereo / bilingual transmissions
Time display in analogue mode
-2 hours
+2 hours
-24 hours
+24 hours
Simple at-a-glance reference of your remote control.
To mute the sound
To select TV programme number
To return to the previous programme
To display the on-screen
digital
To change programme positions and
Select to control your
Toshiba TV, DVD or VCR
Selectable picture mode
When using a Toshiba VCR or DVD :
press to PAUSE/STEP
press to PLAY
press to REWIND
press to FAST FORWARD
press to EJECT
press to STOP
press to SKIP-REWIND
press to SKIP-FORWARD
Inserting batteries and effective range of the remote
. in TV mode
Programme Guide
MENU
or an external source
No function
BACK
EXIT
On-screen menus
When using menus the direction buttons
move the cursor on the screen up,
selection
teletext pages
To alter the volume
To display on-screen information
digital
Picture format
CT-8003
SUBTITLE
SUBTITLE
Digital Subtitles
When using the Programme Guide
Remov e the back cover to reveal the battery compartment and ma ke sure the
batteries are inserted the right way round. Suitable battery types for this remote are
AAA, IEC R03 1.5V.
Do not combine a used, old battery with a new one or mix battery types. Remove dead
batteries immediately to prevent acid from leaking into the battery compartment.
Dispose of them in a designated disposal area.
Warning: Batteries must not be exposed to excessive heat such as sunshine, fire or
the like.
The performance of the remote control will deteriorate beyond a dis tance of fiv e
metres or outside an angle of 30 degrees from the centre of the television. If the
operating range becomes reduced the batteries may need replacing.
English - 4 -
Page 6
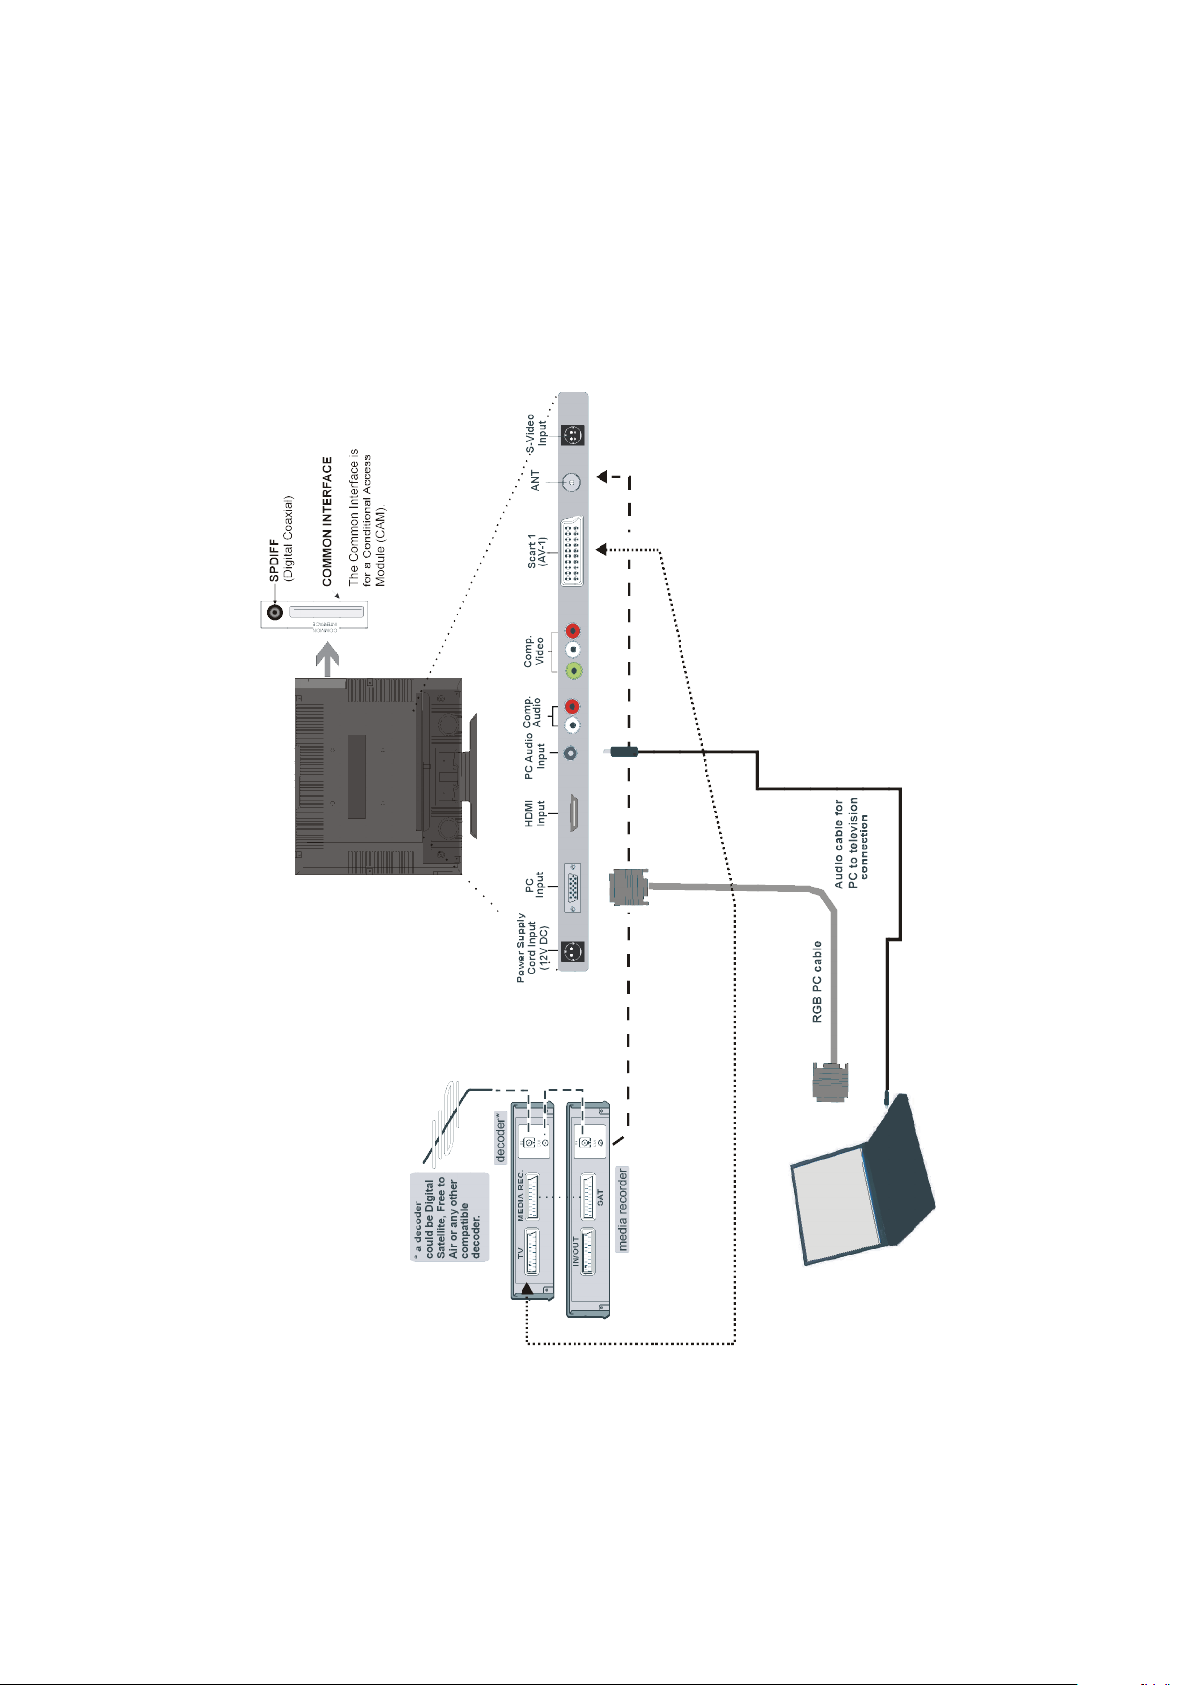
Connecting external equipment
Before connecting any external equipment, disconnect from the main power.
English - 5 -
Page 7
Connecting external equipment continued,
Aerial cables:
Connect the aerial to the socket on the rear of the television. If you use a decoder and/or a media recorder it is
essential that the aerial cable is connected through the
decoder and/or through the media recorder to the television.
SCART leads:
Connect the media recorder IN/OUT socket to the television. Connect the decoder
Connect the media recorder
MEDIA RECORDER socket.
Before running
your decoder and media recorder to
A wide variety of external equipment can be connected to
the back of the television, therefore the relevant owners
manuals for
If connecting S-VIDEO equipment, set the
S-Video. See page 24.
If the television automatical ly switches over to monitor
external equipment, return to normal television by pressing
the desired programme position button. To recall external
equipment, press
Video, PC, YPBPR, DTV
APS (AUTO PROGRAMMING SYSTEM) put
all additional equipment must be referred to.
TV socket to the television.
SAT socket to the decoder
Standby.
INPU T for
to select between TV, EXT1, S-
or HDMI.
Connecting the PC via PC input
• Power off both computer and TV before making any connections.
• Connect the PC cable to the PC input of your TV and to the
15-pin connector on the rear of your computer.
• Tighten the screws on the plugs until the connectors are
fastened securely.
• For PC sound, use stereo jack socket located at the rear
side of the TV.
High Definition
Your TV is capable of displaying High Definition pictures
from devices such as a High Definition Satellite Receiver
or DVD Player. These devices must be connected via the
HDMI socket or YPbPr (Component) sockets. These sockets can accept either 720p or 1080i signals.
PLEASE NOTE:
• Although this television is able to connect to HDMI equipment, it is possible that some equipment may not operate
correctly.
• HDMI cables should be less than 5m.
• It is recommended that approved HDMI cables up to 5m
long is used. If the unit has DVI output, a special conversion cable from DVI to HDMI will be required.
HDMI, the HDMI logo, and High Definition Multi Media Interface are trade marks, or registered trade marks of HDMI
licensing, LLC.
English - 6 -
Page 8
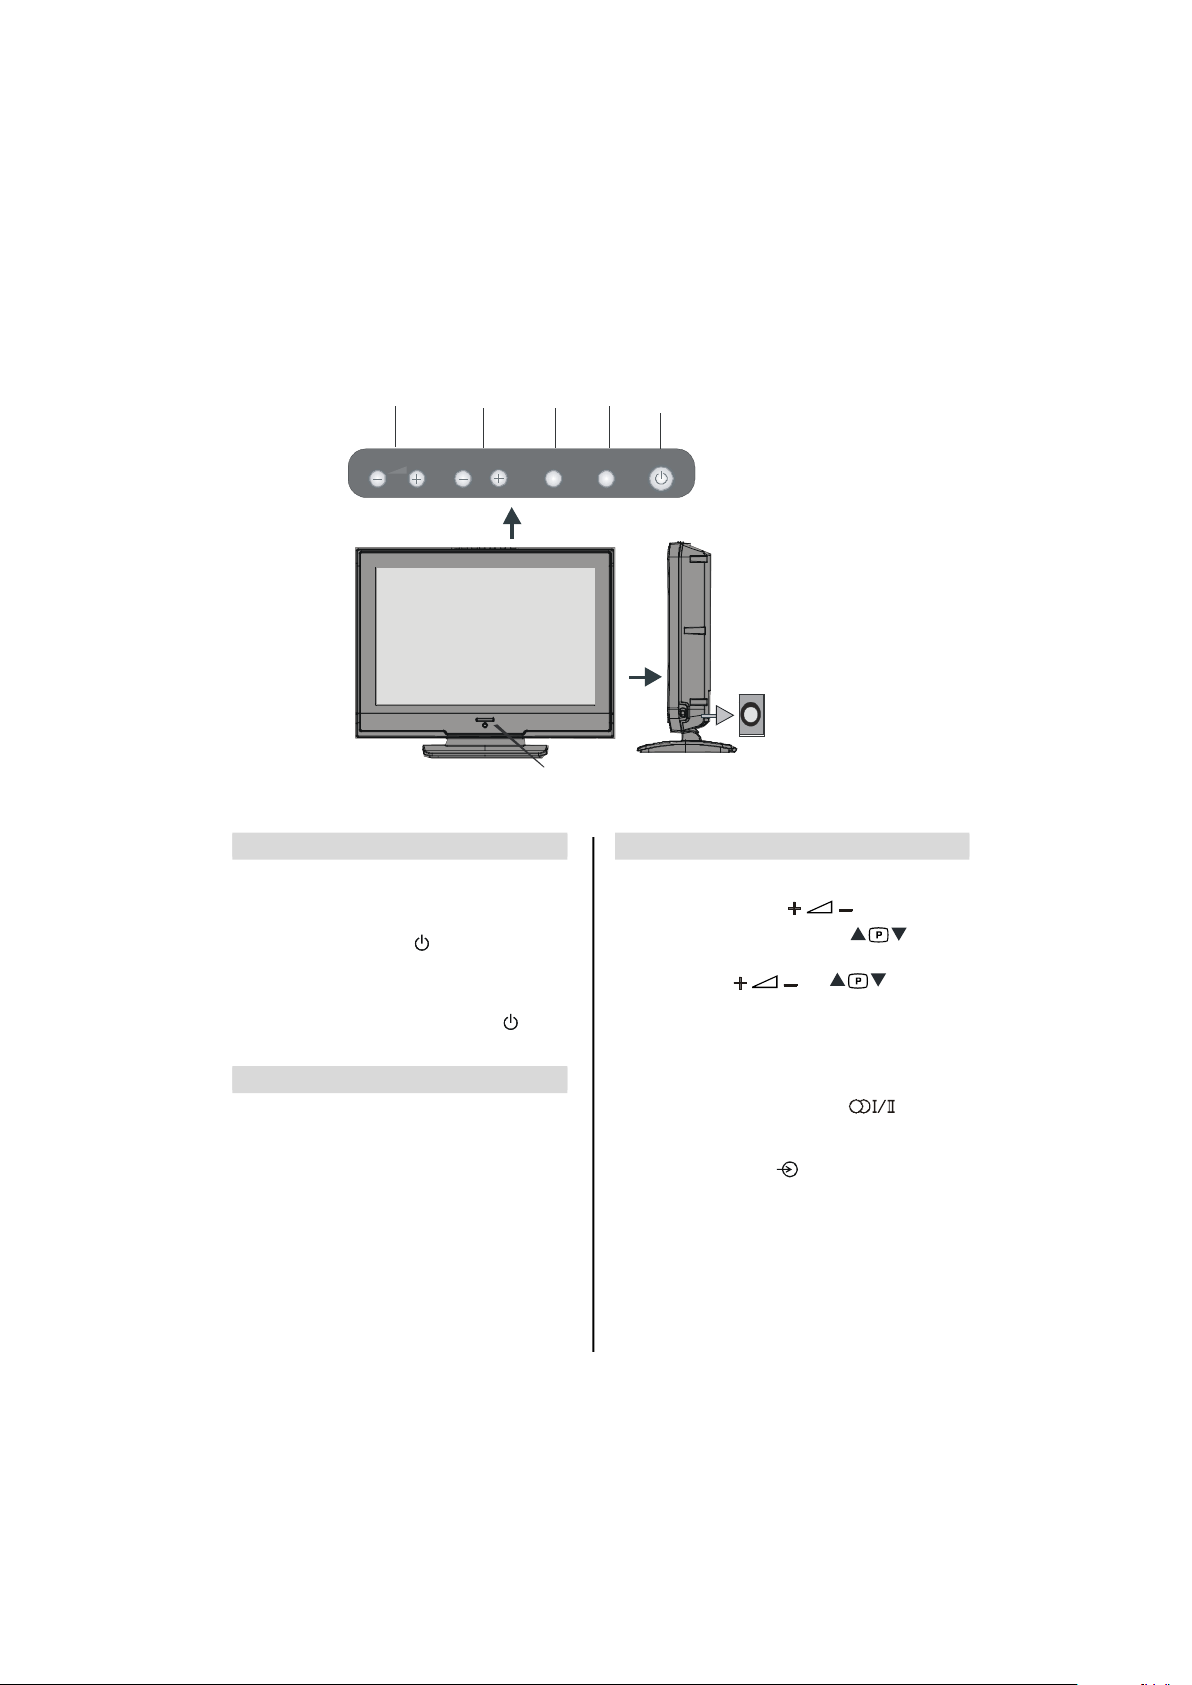
Connections and controls
Blue = Standby
ON/OFF
PROGRAMME
VOLUME
HEADPHONE
Whilst all the necessary adjustments and controls for the television are made using the remote control, the buttons on the
top of the television may be used for some functions.
POWER
TV/AV
UP / DOWN
UP / DOWN
MENU
TV/AVMENUP/CHVOLUME
JACK
LED
Switching on
If the standby LED is unlit, connect the mains plug to
the mains outlet. Press the Power button to switch the
television into standby. The blue LED will light.
To view the television, press
buttons on the remote control, or the
the TV. The blue LED will turn off and the picture will
appear after a few seconds.
To p ut the television into standby, pr ess
remote control, the blue LED will light.
or any of the number
P+ / P- buttons on
on the
Using the remote control
Press the MENU button on the remote control to see the
menus.
In
TV mode the menu appears as a group of icons each
for a menu option. Press the Up or Down button to
select a topic.
To use the options press the Right or
remote control to select. Use the Up and Down buttons
to select the required choice. Follow the on screen instructions. The functions of each menu are described in
detail throughout the manual.
OK buttons on the
Using the controls and connections
Using the control buttons on the top of the TV:
• To alter the volume press
• To alter the programme position press
of the TV.
MENU and and to control the
• Press
menu options.
MENU to finish.
• Press
When connecting mono sound equipment to
AV)
, connect the audio output of the equipment to the L or
R socket on the television, then press
I for the left mono, Dual II for the right mono, or stereo for
mono through both left and right speakers.
To select the Input, press
SOURCE menu as described on page 23. The television
will automatically sense the type of signal.
Please always refer to the owner’s manual of the equipment
to be connected for full details.
English - 7 -
until EXT2 is highlighted in
.
on the top
EXT2 (BACK-
select Dual
Page 9
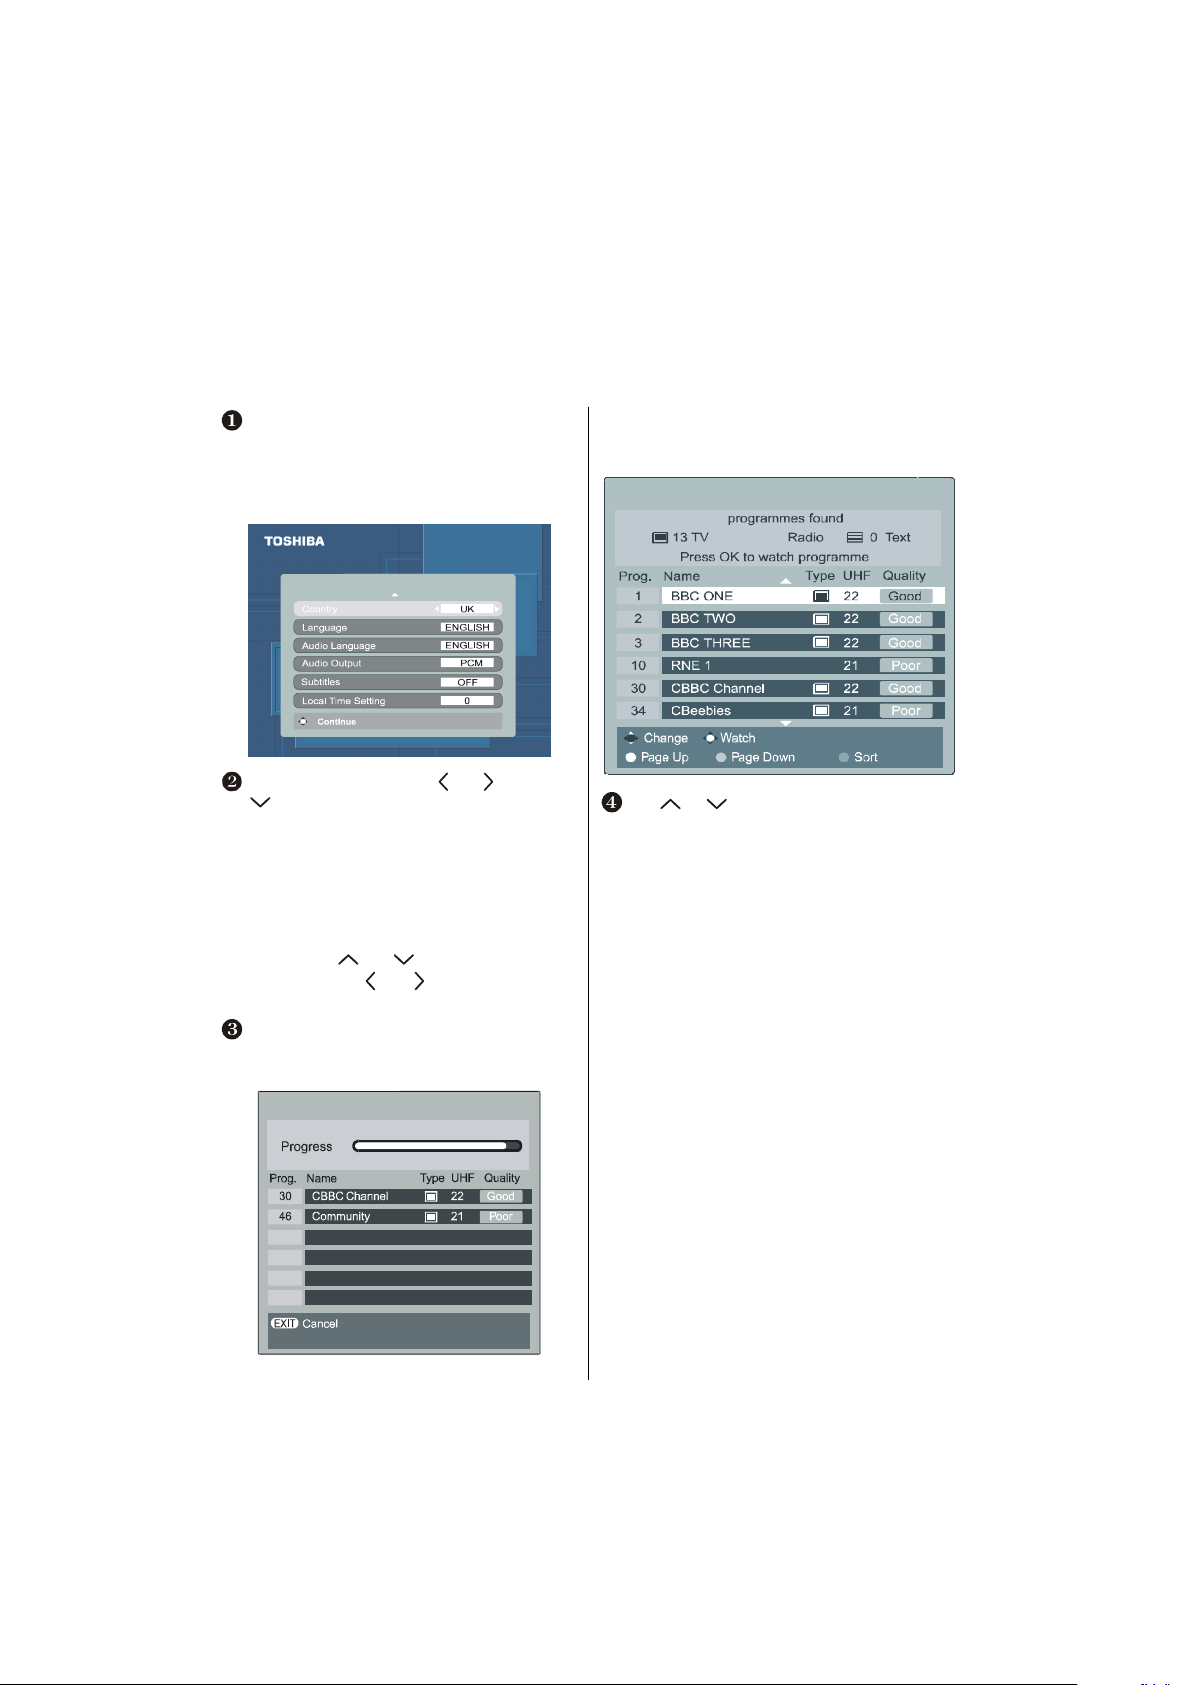
Digital Tuning
LOCAL OPTIONS
DTV AUTO TUNING
DTV AUTO TUNING
Before switching on the television put your decoder and media recorder to Standby if they are connected and ensure the
aerial is connected to your television. To set up the television use the buttons on the remote control as detailed on
Connect the mains plug and switch the TV into standby
using the top Power button. Press any numbered or
standby button on the remote control, the
tions
screen will appear. This screen will appear the
first time that the television is switched on and each
time the television is reset.
Select your Country by using or buttons. Use
to move down through the list.
Set your
Language and Audio Language out of the
options available.
You can also set
the subtitle language.
W hen completed, press
After auto-tuning has complete d, you may find the
time is not correct. In this case, you can adjust the
time by using
Time Setting,
time.
The Auto tuning screen will appear and the television will
start to search for available stations.
The progress bar will move along the line.
Subtitles OFF, as well as specifying
OK to start tuning.
and buttons to highlight Local
and and buttons to set the correct
Local Op-
You must allow the television to complete the search.
When the search is complete the Auto tuning screen will
display the total number of services found.
22
Use or to move through the list to select a
programme then press
9
OK to view.
page 4.
English - 8 -
Page 10
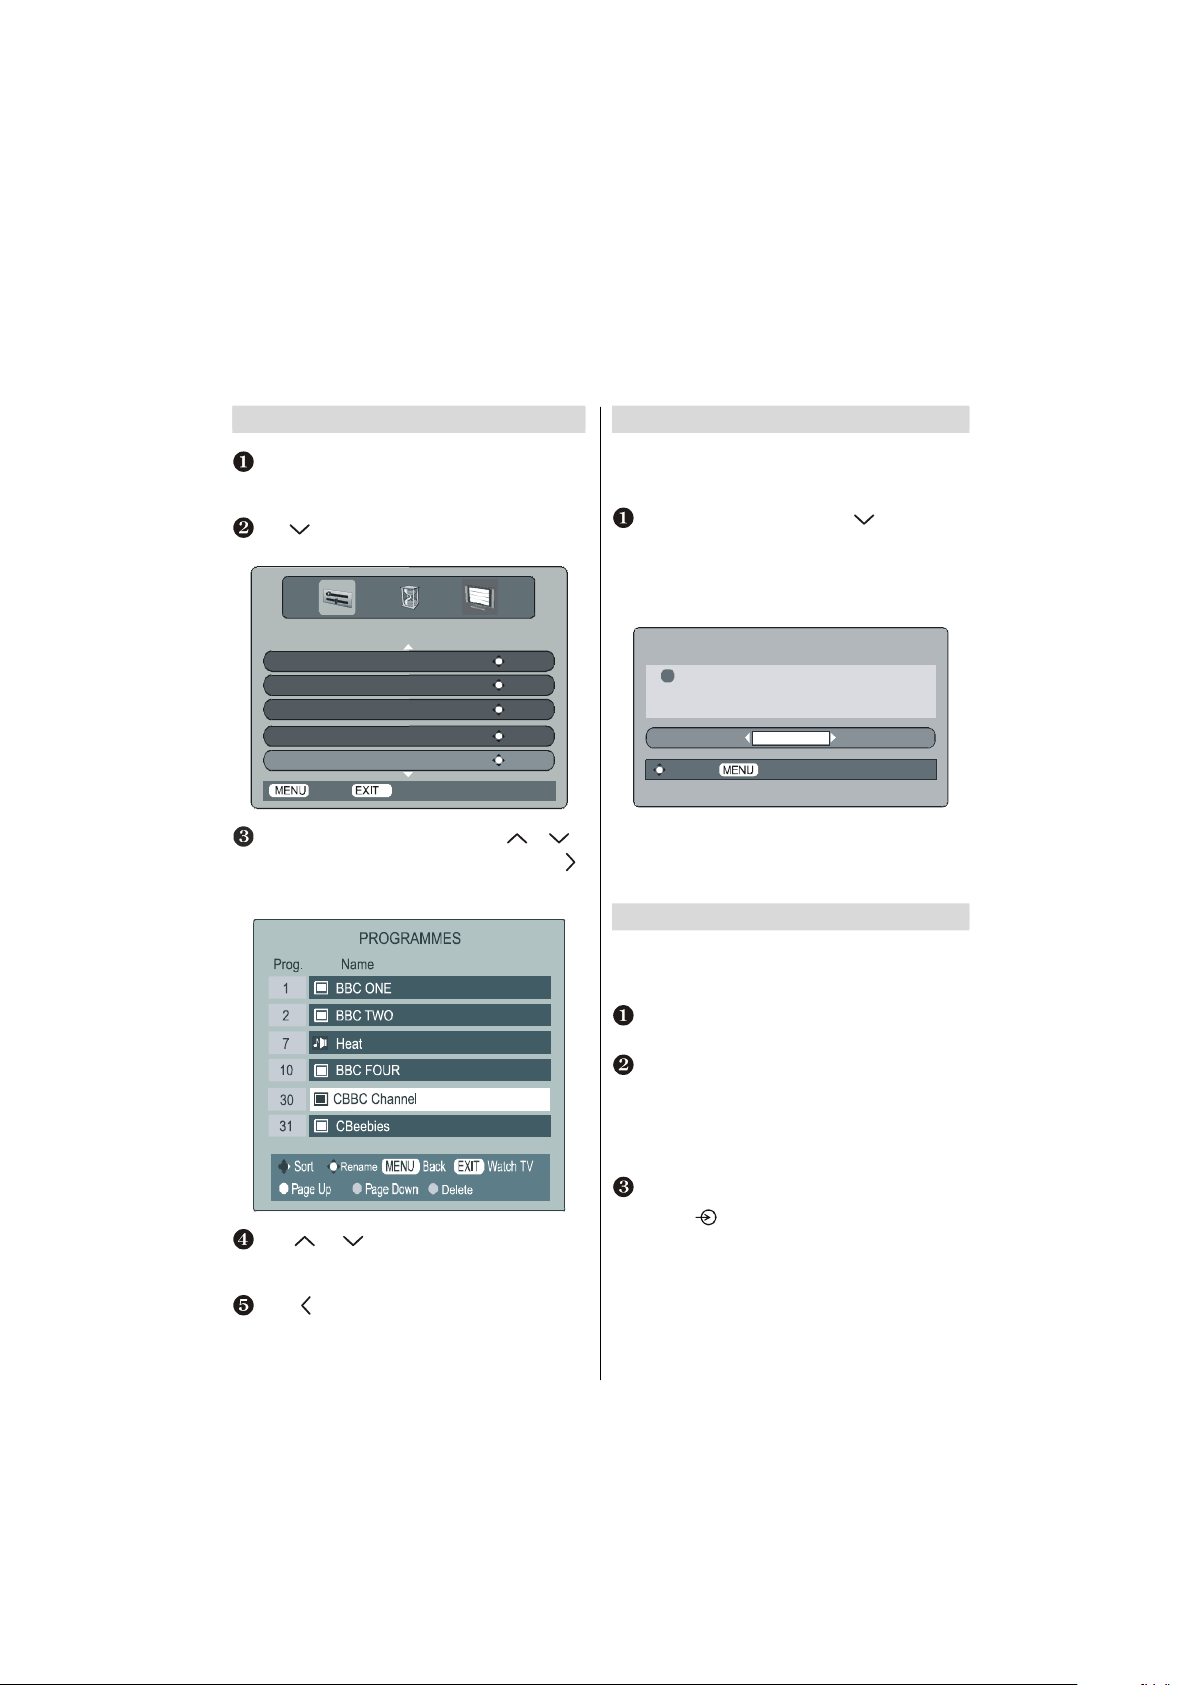
Digital programme sorting,
auto tuning, manual tuning
Programme sorting
The station order may be changed, for instance if the
picture is unclear or the signal is weak. Press
the
SETUP MENU will appear on the screen.
Use to move down through the list and highlight
Programmes. Press OK.
SETUP MENU
TV Setup ENTER
Local Options ENTER
Auto tuning ENTER
Manual tuning ENTER
Programmes ENTER
Back
With the list of stations now showing use or to
highlight the station you want to move and press
The selected station will be moved to the right of the
screen.
Use or to move through the list to your
preferred position. As you do so the other stations will
move to make room.
Press to store your move.
Repeat as necessary, then press
Watch TV
EXIT.
MENU,
Auto tuning
Auto tuning will completely re-tune the television. All cur-
rent programme sorting and settings, i.e. favourites and locked
programmes, will be lost.
Select the SETUP MENU and use to highlight the
Auto tuning. Press OK.
A screen will appear warning that previous digital
programmes and settings will be deleted.
Press
Th e televis ion will start to search for all availa ble
.
OK to continue with the Auto tuning.
WARNING
!
All previous digital programmes and
settings will be deleted.
Continue?
YES
Select Cancel
stations.You must allow the television to complete the
search. When the search is complete the
screen will display the total number of services found.
Manual tuning
The feature is available for service engineers or can be
used for direct channel entry if the multiplex channel is
known.
Select Manual Tuning from the SETUP MENU and
press
OK.
Enter the multiplex number using the number buttons.
The television will automatically search for that multiplex.
When the multiplex is found any channels not currently
on the programme list will be added and the programme
information at the top of the screen will be updated.
Repeat as necessary. Press EXIT to finish.
Note: Press to select between TV/DTV.
Auto tuning
English - 9 -
Page 11

Analogue Tuning and programme sorting
Auto. Programming System
Language English
Country UK
Auto. Programming System
Exit: Exit
P01
Program Table
Before switching on the television put your decoder and media recorder to Standby if they are connected and ensure the
aerial is connected to your television. To set up the television use the buttons on the remote control as detailed on
page 4.
W hen TV (Analogue TV) is selected for the first time;
the A.P.S. screen will appear.
Teletext region West Europe
Check the antenna cable
Start: Ok Exit: Exit
Use the Up or Down button to highlight the Language,
Country
and Teletext region items. Press the Left or
Right button to adjust the highlighted item. Then press
the
OK button to start tuning.
The television will start to search for available stations.
APS is running: 78%
You must allow the television to complete the search.
When the search is complete the television will automatically select programme position 1. This may not be a clear
picture or the signal may be weak, so the station order can
be changed using
program table which will appear on the
screen.
P01 BBC 1
P02 C 04
P03 P13
P04 P14
P05 P15
P06 P16
P07 P17
P08 P18
P09 P19
P10 P20
Delete
Name
P11
P12
Move
A.P.S
Exit: Exit
With the list of stations now showing use the Up or
Down button to highlight the station you want to move
and press the
GREEN button.
Use the Up or Down button to move through the list to
the preferred position, as you do so the other stations
will move to make room, then press the
GREEN button
again. The selected station will be moved to the new
position.
Repeat as necessary, then press
EXIT.
If the television cannot be connected to a media re-
corder/decoder with a SCART lead or if a station on
another
system is required, a programme position can
be manually tuned in (see page 11).
English - 10 -
Page 12

Analogue manual tuning
PROGRAMMING
Programme 4
Band S
The television can be tuned-in manually using INSTALL. For example: if the television cannot be connected to a media
recorder/decoder with a SCART lead or to tune-in a station on another
Manual tuning
To allocate a programme position on the television for a
decoder and media recorder: turn the decoder on, insert a
pre-recorded film into the media recorder and press PLAY,
then manually tune.
Press MENU and using the Up or Down button select
INSTALL menu. By pressing Up or Down button, select
Programming option and press Right button.
Using the Down button select Programme and key in
the programme position to be tuned with the number
buttons, we suggest
Programme 0 for a media recorder.
System.
Channel 30
Standard BG
Colour System PAL
Back: Menu Exit: Exit
Use the Down button to select Search then press the
Left or Right button to search. The television will begin
searching for channels.
Each signal will show on the television, if it is not your
media recorder press the Left or Right button to restart
the search.
When your media recorder signal is found, save the
selection by pressing the Down button until
highlighted, then press the Left/Right or OK button to
save.
Repeat for each
press
EXIT to finish.
Note: Press to select between TV or DTV.
programme position to be tuned then
Store is
English - 11 -
Page 13

Analogue APS, choosing a language
P01
Program Table
Exit: Exit
Auto. Programming System
Country UK
Auto. Programming System
Exit: Exit
FEATURES
Sleep Timer Off
Child Lock Off
APS (AUTOMATIC PROGRAMMING
SYSTEM)
When the APS (AUTOMATIC PROGRAMMING SYSTEM)
feature is selected all channels and settings will be lost, the
television will return to factory settings and then re-tune.
Press MENU and using the Up or Down button select
INSTALL menu. By using Up or Down buttons, select
PROGRAM TABLE and press Right button.
APS is running: 78%
P01 BBC 1
P02 C 04
P03 P13
P04 P14
P05 P15
P06 P16
P07 P17
P08 P18
P09 P19
P10 P20
Delete
Name
Move
A.P.S
P11
P12
The PROGRAM screen will appear on the screen. Press
the
BLUE button to select APS.
All prestored programs
will be deleted
Start: Ok Exit: Exit
Back: Menu
Press the Left or Right button to set the country..
Press the MENU button to cancel APS or the OK but-
ton to start.
You must allow the television to complete the
search.
When the search is complete the television will automatically select programme position 1. This may not be a clear
picture or the signal may be weak, so the station order can
be changed using
program table which will appear on the
screen. Instructions for use can be found on page 10.
Press EXIT to finish.
Choosing a language
The Language feature allows the menus to be shown in a
variety of languages.
Press MENU and using the Up or Do wn buttons,
select the Feature menu.
Press the Down button to highlight Language, then
use the Left or Right button to select the required
language.
Language English
Menu Colour Gray
Favorite Mode Off
Back:Menu Exit: Exit
English - 12 -
Page 14

Analogue general controls, time display, stereo/
FEATURES
Sleep Timer Off
Child Lock Off
bilingual transmissions, child lock
Selecting programme positions
To select a programme position use the numbered buttons
on the remote control.Programme positions can also be
selected using
and the top of the TV. Press
information i.e. program me position, stereo/mono signal
and picture format.To revert to the previous program me
position press
and buttons on the remote control
to display the on-screen
.
The Time Display
The time display facility allows the current (text service) time
to be seen on the television screen.
Press whilst watching a normal television broadcast to see a time display from the broadcaster.
Stereo and Bilingual transmissions
If stereo or dual language broadcasts are transmitted the
word Stereo or Dual will appear on the screen each time
programme positions are changed, disappearing after a few
seconds. If the broadcast is not in stereo the word Mono
will appear.
St er eo .. . Press to sel ec t Stere o or
Mono.Bilingual... Bilingual transmissions are rare. If they
are transmitted the word
quired programme number and if the word
press
In digital mode, a list of languages and audio formats may
be shown briefly (mono, stereo, multi-channel). Use the
to select Dual 1 or Dual 2.
button to select between them.
Dual will display. Choose the re-
Dual appears
Analogue TV menus will appear on the screen. Press
Up or Down button select the
the Down button to choose
Left or Right button to turn it on or off.
Language English
Menu Colour Opaque
Favorite Mode Off
Back:Menu Exit: TV
W hen Child Lock is selected, a reminder will appear
when any of the
television has been switched off it can ONLY be brought
out of standby using the remote control.
top buttons are pressed. Once the
FEATURES menu. Press
Child Lock and press the
Child lock
CHILD LOCK disables the buttons on the top of the televi-
sion. All buttons on the remote control can still be used.
SETUP MENU
TV Setup OK
Local Options
Auto tuning OK
Manual tuning OK
Programmes OK
Back Watch TV
OK
English - 13 -
Page 15

Picture format
Use this setting when watching a 16:9
Use this setting to view a true 4:3
Depending on the type of broadcast being transmitted, programmes can be viewed in different formats.Pres s
the
button repeatedly to select between Auto, Wide and 4:3.
When Auto is selected the format being displ ayed is determined by the picture being broadcast.
WIDE
4:3
Using the special functions to change the size of the displayed image (i.e. changing the height / width ratio) for the purposes
of public display or commercial gain may infringe on copyright laws.
broadcast
broadcast
.
.
English - 14 -
Page 16

Analogue Picture controls — picture mode, hue,
PICTURE
Picture Mode Bright
Back:Menu Exit: Exit
Contrast
PICTURE
Picture Mode Bright
Back:Menu Exit: Exit
Contrast
colour temperature, room lighting
Picture mode
This television offers the choice of personalising the picture
style. Press to view the different styles available:
MANUAL, BRIGHT, STANDARD and SOFT.
Select the PICTURE option from the main menu.
Brightness
Colour
Hue
Brightness
Colour
Sharpness
Press the Down button to highlight Picture Mode and
then
Right button to select a picture style.
When using Manual picture mode, use the Up and
Down buttons to select Contrast, Brightness, Sharp-
ness
and Colour, then Left and Right buttons t o
adjust to suit personal taste.
Press the Down button and select Reset to reset the
adjustments to factory default settings.
Hue
This item is displayed in PICTURE menu when the TV receives an NTSC signal.
In the PICTURE menu press the Down button until Hue
is highlighted.
Press the Left and Right buttons to adjust Hue to suit
your preference.
Colour Temperature
Colour Temperature increases the ‘warmth’ or ‘coolness’
of a picture by increasing the red or blue tint.
In the PICTURE menu press the Down button until
Colour Temp is highlighted.
Press the Left and Right but tons to select between
NORMAL, WARM and COOL to suit your preference.
Room Lighting
Room Lighting adjusts the screen lighting according to
your selection.
In the PICTURE menu press the Down button until
Room Lighting is highlighted.
Press the Left and Right buttons to select between
Bright, Movie or Nor mal. The differences may not
always be noticeable.
English - 15 -
Page 17

Timers On-screen information
FEATURES
Sleep Timer Off
Child Lock Off
Newsround starting in 9 minutes on CBBC Channel
Stake in the Fl eyweight and Midd leweight divisions .
When viewing in digital mode the on-screen information and guide
give access to programme details for all available channels.
Sleep timer - analogue
The television can be set to turn itself OFF after a certain
time.
Press MENU and or to select Features. Then
or OK to enter the menu.
press
To set the number of minutes in which the television will
turn off press
or . This will increase or decrease in
steps of 10 minutes.
Language English
Menu Colour Gray
Favorite Mode Off
Back:Menu Exit: Exit
Information
Select information by pressing , the information
screen will appear giving details of the channel and
programme currently being viewed.
13.45 Sat, 21 Aug.
14:00 Olympic Grand...
Quarter final places are at
BBC ONE
BBC TWO
CBBC Channel
BBC THREE
BBC FOUR
Showing also
13:35 Boxing Olumpic...
014 minutes l eft
...Grantstand
Page DownPage Up
Showing also Language
To see details of any of the other channels currently
available, press
or to scroll up/down the list.
As the channel is selected details of the programme
currently being broadcast will appear.
English - 16 -
Page 18

Change progs
Big Brother Live
Spanish Package Deals
10:00 10:30 11:00 11:30
TIMER MENU
Back Watch TV
SET
TIMER
Sat, 21 Aug
Digital programme guide and
setting digital programme timer
Guide
Select the on-screen guide by pressing GUIDE, the
guide screen will appear highlighting details of the channel
and programme currently being viewed.
This may take a few moments to appear.
10.03 Mon, 30 Sep.
ALL PROGS
BBC ONE
BBC TWO
ITV 1
CHANNEL 4
Five
ITV 2
BBC THREE
Teletext
BBC FOUR
Sky travel
UKTV History
E4
Record More Info
Page Up Page Down
City Hospital Olympic Grandstand
Teletubbies
The Wright Stuff
This is BBC THREE
This is BBC FOUR
Time Flyers
Press or for information of other progr ammes
scheduled for the channel selected.
For details of other channels currently available, press
or to scroll up and down the channel list. As the
channel is selected details of the programme currently
being broadcast will appear, then press
Press the button for more information about the
currently highlighted programme.
Press EXIT button to return to original programme.
5
Monday
Wildlife on
This MorningTrisha
Brainteaser
Sally Jessy Raphael
Time Flyers
Horizon
Watch TV
Timers
The Daily P
FrasierThe Big Circus
Judge Judy
Canary IslaFloyd on
or .
Programme timer - digital only
This feature will set the television to go to a specific channel
at a certain time. It can be used to view a particular programme,
or by setting the mode to daily or weekly, can be used to
view a series of programmes.
Press MENU and or to select the TIMER MENU.
Barg
Programme timers ENTER
Press to select Programme timers, then press
OK to select.
Press to select the first programme to be timed,
then press
on the screen.
Press and to go through the list adding the
details of th e program me to be timed by using the
number buttons and
OK. The SET TIMER menu will now appear
or to make selections.
Programme BBC FOUR 10
Date
Start T ime 13.45
End Time 14.45
Repeat ONCE
Subtitles NONE
When all of the details have been entered press OK to
5
. 21/08
save the timer.
PLEASE NOTE: W hen a timed programme is about to start,
an inform ation screen will appear offering the option of
watching or cancelling the programme. The menus and other
channels will not be available during the timed programme
unless the programme timer is cancelled.
English - 17 -
Page 19

Digital parental controls - setting the pin, mode
TURE MENU
arental Control
avourite and Lock
vourites
Back
ARENT
– –Exit– –
ARENT
There are a number of parental controls which can block specific channels being viewed, and which can only be accessed
with a security PIN code when in digital mode.
Once you’ve entered the PIN code, you do not need to enter it again until next time you power-on TV. To restore PIN code
entry again (e.g. for parental controls on locked programmes) press STANDBY twice.
Setting the PIN
Press MENU and to select FEATURE MENU.
FEA
P
F
Fa
Common Interface Slot
Software Upgrade
ed Programmes
Watch TV
Use to select Parental Control then press OK.
Press to highlight Change Pin then press OK.
P
AL CONTROL
Mode OFF
Change Pin
Back Watch TV
Using the number buttons enter a four digit number,
when these have been entered the screen will ask you
to confirm them by entering them again.
OK
OK
ALL PROGS
OK
OK
Mode
This feature locks various menus to prevent the television
being retuned or the settings being overridden.
In the PARENTAL CONTROL menu press to select
Mode.
P
AL CONTROL
Mode OFF
Change Pin OK
Back Watch TV
Use or to choose between ON, OFF, LOCK
MENU
and LOCK INSTALL.
When menus that have been locked are now selected,
they will only become available when the PIN is entered.
ON: Parental control settings are enabled (PIN code is
required for programme locks and cencorship).
LOCK INSTALL: As ON mode above, except that installation features such as auto-tuning and programme sorting
are also locked (PIN code is required).
LOCK MENU: As ON mode, except all menu functions are
locked (PIN code is required).
OFF: All lock settings are disabled (no PIN code is required).
DEFINE PIN NU MBER
New PIN
Confirm PIN
Press MENU to go back to the Parental Control screen.
The PIN number is now set.
English - 18 -
Page 20

Digital settings - favourite programmes,
OURIT E AND L
OCKED PROGRAMM ES
TURE MENU
Back
FAV
OCKED PROG RAMM ES
locked programmes, encrypted programmes
Selecting Favourite Programmes
Favourite Programmes creates a list of the digital chan-
nels that are watched most. Four lists
can be a mixture of television, text and radio channels.
From the FEATURE MENU press to select
Favourite and Locked Programmes and press OK.
FAV
Use or to go through the list of channels
pressing
OK to select the ones required, a tick will
appear in the box.
Press to select List 2. Follow the same procedure to
make the selection. When all favourites have been
selected press
Use to highlight Favourites and or to select
between
PROGS.
on how many lists have been created.
Pare ntal Control
Favourite and Loc k ed Programmes
Favourites
Common Interface Slot
Software Upgrad e OK
MENU to return to the FEATURE menu.
TV, RADIO, FAV-1, FAV-2, FAV-3,FAV-4, ALL
The number of favourites available depends
FEA
Watch TV
can be created, this
OK
OK
ALL PROG S
Locking Programmes
Locked programmes stops the viewing of selected digi-
tal
channels,which can only be accessed by entering the
PIN.
From the FEATURE MENU pres s to s elect
Favourite and Locked Programmes.
Press repeatedly to select the Locked Programme
list .
Use or to go th rough the list of channels
Press EXIT to finish.
When any of the channels in the Locked Programme
The lock only functions after the set is returned to
standby and switched out of standby again.
OK to select the required, a padlock will ap-
pressing
pear in the box.
OURIT E AND L
list are now selected the PIN must be entered before
they can be accessed.
Encrypted Programmes
Selecting Encrypted Programm es allows all encrypted
programmes to be shown in the programme list even if they
are not available to select.
In the FEATURE MENU press or to select
Encrypted Programmes.
Use or to select ON or OFF.
Press EXIT.
Using the
channels in
P buttons will only access those
Favourite List 1 when FAV-1 is selected.
English - 19 -
Page 21

LOCAL OPTIONS
Digital settings continued - country, language
LOCAL OPTIONS
and audio languages
Country
This feature allows you to select a country option for the
APS installation process.
From the SETUP MENU press to select LOCAL
OPTIONS.
SETUP MENU
TV Setup
Local Options
Auto tuning OK
Manual tuning OK
Programmes OK
Back Watch TV
Press OK, then use or to highlight the Coun-
try.
Use or to set your country.There are six
options to select.
OK
OK
Language
This feature will define the Menu language selection.
From the LOCAL OPTIONS menu press to select
Language item.
13.39
Back Watch TV
Use or to set your language.
Audio Languages
This feature allows a programme or film to be viewed with a
choice of soundtrack language, provided they are currently
being broadcast.
From the SETUP MENU press to select LOCAL
OPTIONS.
Back Watch TV
13.39
English - 20 -
SETUP MENU
TV Setup OK
Local Options
Auto tuning OK
Manual tuning OK
Programmes OK
Back Watch TV
Press OK, then use or to highlight the Audio
Language.
Use or to select Audio Language.
OK
Page 22

Digital settings continued - audio languages, subtitles,
LOCAL OPTIONS
TURE MEN U
avourites
rogrammes
Back
audio output, reset tv, common interface, local time
settings
Reset TV
Selecting Reset TV will delete all stored digital and analogue
channels and settings. The television will return to
factory settings and then auto tune.
Press MENU and then press until Reset TV is
highlighted.
13.39
Back Watch TV
Note: If more than one sountrack is available, use
button to select between them. This option is
dependent on transmission received.
Subtitles
This feature will show subtitles on the bottom of the screen
in the selected language provided they are being broadcast.
From the LOCAL OPTIONS menu press to select
Subtitles.
Use or to make a selection.
Local Time Setting
From the LOCAL OPTIONS menu press to
select Local Time Setting.
To adjust Local Time Setting, use or buttons.
Press OK to select. A screen will appear warning that all
previous settings will be deleting, press
tinue.
The digital welcome screen will appear, press
continue, the television will then auto tune.
Retune also analogue channels as described on page 11.
Common Interface
The Common Interface Slot, situated on the back of the
television, enables the insertion of a CAM (Conditional Access Module) and card. These are purchased from a service
provider and allow additional Pay per View broadcasts to be
viewed.
Insert the CAM and card into the Common Interface
slot, following the instructions provided with the CAM.
A box will appear on screen to confirm that the CAM is
loaded.
From the FEATURE MENU press or to select
Common Interface Slot.
OK to con-
OK to
Audio Output (Digital Coaxial)
From the LOCAL OPTIONS menu press to select
Audio Output.
Use or to set Audio Output to PCM or Bitstream.
This is dependent on transmission received.
NOTE: When Bitstream is selected, main TV speakers
will be muted and changing channels will revert the set
back to the Audio Output selection set in Local Options.
English - 21 -
FEA
Fa vourite and Lock ed Programmes ENTER
F
Common Interface Slot
Software Upgrad e ENTER
Encrypted P
Watch TV
Details of the CAM should now be available. Use OK to
select it.
ALL
OFF
Page 23

Digital settings continued - version, auto upgrade and
TURE MEN U
avourites
rogrammes
Back
SOFTW
ARE UPGR ADE
Search for New Software
Back
W
atch TV
SOFTW
ARE UPGR ADE
Search for New So ftware ENTER
Back
W
atch TV
Searching for a new software upgrade for
There is no upgrade available
searching for new software
Version
This feature can be used to check the version of software
currently installed.
From the FEATURE MENU press to select Soft-t-
ware Upgrade.
FEA
Favou rite and Lock ed Programmes ENTER
F
Common Interface Slot
Software Upgrad e ENTER
Encrypted P
Watch TV
Press or to select Version. Use or to
select. When the software has been updated there will
be a choice of two versions available. Press OK to
select.
Version 1.14
Auto upgrade ON
ALL
OFF
ENTER
Auto Upgrade
If Auto upgrade is selected the software will automatically
update as each version becomes available, provided the
television is on or in standby. If the television is on, a
screen prompt will appear showing the software download
taking place.
From the SOFTWARE UPGRADE menu press to
Auto Upgrade.
select
Use or to select ON or OFF..
Searching for new software
If prefered, software upgrades can be searched for manually using
If an upgrade is found the television will automatically
Search For New Software.
In the SOFTWARE UPGRADE menu press or
to select Search For New Software.
Version 1.14
Auto upgrade OFF
Press OK. The television will automatically start search-
ing for a software upgrade, the progress bar will move
along the line.
SEARCHI NG FOR NEW SOFTWARE
this TV .
Searching
Stop
start downloading, if not a screen will appear stating
that an upgrade is unavailable.
NO UPGRADEAVAILABLE
!
at this time.
Continue
This can take several minutes.
English - 22 -
Page 24

Analogue sound controls — volume, sound mute,
Volume
Balance 0
Back:Menu Exit: Exit
AVL On
Effect Off
Equalizer
Back:Menu Exit: Exit
Mode Flat
equalizer, balance, AVL, effect, line out,
headphone volume
Sound Controls
Sound Balance
Volume
Press or on the remote control or using the top
buttons on the TV to adjust the volume.
Sound Mute
Press on the remote control once to turn the sound off
and again to cancel.
Equalizer
The Equalizer feature has a number of sound settings to
select from;
settings are all preset and cannot be altered. The
setting can be altered and stored to suit personal preference.
Flat, Speech, Music, Personal and Jazz.These
Personal
Select the SOUND option from the main menu.
SOUND
Sound Mode Stereo
Use the Down button to highlight Equalizer then press
the
Right button to select mode.
Press the Right button to select the SOUND option
from the main menu.
Press the Down button to highlight Balance and Left or
Right button to adjust the settings. Press
OK to store
the settings.
Press EXIT to finish.
AVL - Auto Volume Limiter
AVL limits high volume levels and prevents the extreme
changes in volume that can occur when channels are changed
or a programme switches to a commercial.
In the SOUND menu press the Down button to highlight AVL.
Use the Left or Right button to turn AVL on or off.
OK to store the settings.
Press
Effect
Effect creates a synthetic sound effect for movies and
television shows recorded in mono.
In the SOUN D menu press the Down button to high-
Effect.
light
Use the Left or Right button to turn Effect on or off.
Press
OK to store the settings.
Line Out
In the SOUND menu press the Down button to highlight
Line-out.
Use the Left or Right button to turn Line-out on or off.
OK to store the settings.
Press
120 Hz
500 Hz
1.5 kHz
5 kHz
0
0
0
0
Using the Up and Down buttons select a frequency and
then Left and Right buttons to adjust to suit personal
taste. Press
OK to store the settings.
Press EXIT to return to TV..
English - 23 -
Headphone Volume
In the SOUND menu press the Down button to highlight
HP Volume.
Use the Left or Right button to adjust HP Volum e.
Press
OK to store the settings.
Page 25

SOURCE
S-Video
Input selection, AV connections
Settings for the INPUT and OUTPUT sockets so that the television recognises connected equipment. See page 5 and 6
for a clear view of the back connection recommendations and page 7 for the side connections.
Input selection
Use the Input Selection if the television does not switch
over automatically.
Press the external source selection button to se-
lect an input from the menu displayed.
TV
EXT1
PC
YPBPR
DTV
HDMI
Available source options are; TV, EXT1, S-Video,
PC, YPBPR, DTV or HDMI
Press the button on the remote control, or the TV/
AV button on the TV until the required input is highlighted. Either wait or press
.
OK to select.
English - 24 -
Page 26

PC Mode
GEOMETRY
Back:Menu Exit: Exit
PICTURE
Brightness
Back:Menu Exit: Exit
PC Picture Position and PC Picture menus are described below. The other menu items are identical to TV mode menus.
Please see the previous sections. For connections please refer to
page 5.
Autoposition
If you shift the picture horizontally or vertically to an unwanted position, use this item to put the picture into correct
place automatically.
Select the GEOMETRY option from the main menu.
H. position
V. position
Clock
Phase
Auto Adjustment
Press the Down button to highlight Autoposition and
then press the Right button
.
H Position
H (Horizontal) Position shifts the image horizontally to
right hand side or left hand side of the screen.
In the GEOMETRY menu press the Down button until H
Press the Left or Right button to adjust the value.
Position
is highlighted.
V Position
Clock
Clock adjustment corrects interference that appear as ver-
tical banding in dot intensive presentations like spreadsheets
or paragraphs or text in smaller fonts.
In the GEOMETRY menu press the Down button until
Dot Clock is highlighted.
Press the Left or Right button to adjust the value.
Phase
Depending on the resolution and scan frequency that you
input to the TV Set, you may see a hazy or noisy picture on
the screen. In such a case you can use this item to get a
clear picture by trial and error method.
In the GEOMETRY menu press the Down button until
Phase is highlighted.
Press the Left or Right button to adjust the value.
PC Picture controls
Contrast
Colour Temp Warm
Store
V (Vertical) Position shifts the image vertically towards the
top or bottom of the screen.
In the GEOMETRY menu press the Down button until V
is highlighted.
Position
Press the Left or Right button to adjust the value.
English - 25 -
Brightness, Contrast and Colour Temperature adjust-
ments in this menu are identical to adjustments defined in
TV picture menu.
Page 27

PC input typical display modes
Res o lutio n
Horizon tal Vertica l
1
2 800 600 56 VESA
3 800 600 60 VESA
4
5
6 800 600 72 VESA
7 800 600 75 VESA
8 10 24 768 60 VESA
9 10 24 768 70 VESA
10 1 0 2 4 768 75 VESA
11 1 2 8 0 720 60 VESA
12 1 2 8 0 768 60 VESA
640 480
640 480
640 480
Fre q u e ncy (Hz)Mod e
60 IBM, VGA
72 VESA
75 VESA
English - 26 -
Page 28

INSTALL
Programming
Back: Menu Exit: Exit
Digital and Analogue text services
Digital text and interactive services
The digital text and interactive services are the up-to-date
way of viewing service information, using computer-style
formats, incorporating pictures and interactive views.
They offer high quality on-screen images with multi-colour
photographic still images, advanced text and graphics and
are user-friendly. These services are free to anyone with a
digital television, however; they are not available for all
digital stations and are dependant on the broadcaster.
Simply using the coloured buttons on the remote control
and
, , and make navigating pages and pull-
down menus quick and easy.
Using Digital interactive services
Most channels that offer interactive services will show a
prompt, for example, “PRESS RED”.
To access digital interactive services press the TEXT or
RED button. It may take a few seconds to load.
Using or highlight the required subject and
OK.
press
Use the coloured buttons as instructed.
To return to normal viewing press TEXT..
Analogue Text Services
Before using the text services the required language region
must be chosen.
Select Txt. region from the INSTALL menu.
Press the Left or Right button to choose the required
language region.
After the teletext language is selected, press EXIT..
The Text button:
To view text services press . Press again to
superimpose text over a normal broadcast picture. Press
again to return to normal viewing. Programmes cannot be
changed until text is cancelled.
The first text page shown will be the
Any text page can be accessed by entering the 3 digit page
number using the numbered buttons, pressing the coloured
buttons or pressing
to go back to the previous page.
Subtitles are available on page 888.
Four coloured titles will appear at the base of the screen. To
access one of the four given subjects, press the relevant
coloured button on the remote control.
For further information on your particular text system(s),
see the broadcast text index page or, consult your local
Toshiba dealer.
Below is a guide to the functions of the remote control text
buttons.
to advance to the next page and
initial page.
To display an initial page:
Press to access an initial page. The one displayed is
dependant on the broadcaster.
To access sub-pages:
If a text page has sub-pages, press and enter the
subpage numbers 01,02,03 etc. which can be selected using
RED or GREEN buttons on the remote control. The
subpage selection is displayed at the bottom of the text
page.
APS
Txt. region West Europe
Program Table
To reveal concealed text:
To discover the solutions on quiz and joke pages press the
button.
English - 27 -
Page 29

Text services continued
To hold a wanted page:
At times it is convenient to hold a page of text. Press
and will appear in the top left of the screen. The page
will be held on screen until the button is pressed again.
To enlarge the text display size:
Press once to enlarge the top half of the page, press
again to enlarge the bottom half of the page. Press again to
revert to normal size.
To select a page whilst viewing a normal
page:
Enter the page number then press , a normal picture will be displayed. The television will indicate when the
page is present by displaying the page number at the top of
the screen. Press
to view the page.
English - 28 -
Page 30

C he ck th e vo lu m e h as n o t be en tu rn e d do w n or
Q u e stio n s
B e lo w ar e the a n sw e rs to s om e o f th e m o s t co m m on q ue rie s .Fo r m o re in fo rm a tio n, g o to w w w .to s h ib a .c o .u k
A nsw e rs
a n d
W hy is t he re no so un d o r p i c tu re ?
Q
C he ck th e m a in s s w itc h is o n a n d c he ck a ll
co n n e ctio n s .
A
C he ck th e te le vis io n i s n ot i n s ta nd by m o d e.
W hy is t he re a p ic t ur e b ut no so un d?
Q
th at s o un d m u te h as n ot b e e n s e le cte d .
A
W ha t c a n c a use a po o r p ict ur e ?
Q
In ter fe re n c e o r a we a k s ig na l. T ry a d iffe re n t
te le vis io n s ta tio n .
A
W hy d o esn 't th e v id e o /D V D b ei ng p la y e d
Q
sh ow o n s c re en ?
Ma ke s ure th e V C R o r D VD p la yer is co nn ec te d
to the te le vis io n a s s h ow n o n
A
s el e ct th e c o rr e c t i n p ut b y p re s si ng .
W hy is t he V C R /D V D p ic tu re in b la c k an d
Q
w hi te ?
C he ck th e co rre ct
S -V IDEO
A
W hy is t he re a g oo d v id eo p ic tu re b ut no
Q
so un d?
C he ck th e S C AR T le ad co n n ec ti o n .
A
W hy d o esn 't th e re m o te c o ntro l w o rk ?
Q
C he ck th e b a tter ie s ar en 't d e a d o r in s er te d
in co rre ctl y.
A
o r AV. S ee
in pu t
pa ge 5
h as b e en ch os e n ,
AV co nn e cti on s
, th en
.
W hy d o n't th e c on tro ls o n t he to p o f th e
Q
te le vi si on w o rk ?
C he ck th at
CH ILD L OC K
is n ot s e le cte d.
A
W hy is t h e so un d on ly c o mi ng fro m o ne
Q
sp ea k er w he n st er e o so un d is se le ct e d ?
C he ck th at th e b al an ce in the
h a sn 't b ee n s e t to o ne s i d e .
A
W hy a re th er e p ro bl em s w it h a na lo gu e t ex t
Q
se rv ic e?
G o o d p er for m a n ce o f th e a na lo gu e t e xt
d e pe nd s o n a g o o d s tro n g b ro a dc a st si gn al .
A
Th is n o rm a ll y r e q ui re s a ro of o r l o ft a e ri a l. If th e
te xt is u n rea d a b le o r g a rb le d, c h e ck th e a er ia l.
G o to th e
s er vic e a n d lo o k fo r th e
W hy is t h e t im e w ro ng ?
Q
P le as e ch ec k yo u h ave s el ec ted th e c o rre ct
co un try. G o to th e
ch ec k th e
A
O th erw is e , you c a n co rre ct th e ti m e u s in g t he
LO CAL TIM E S ETT IN G
m a in in de x p ag e o f th e a n al o g ue te xt
LO CAL OP TIO NS
CO UNT RY
U se r G u id e .
s et tin g (o n
(s e e
pa ge 20
S O UN D
pa ge 19
m e nu
m e nu an d
).
).
Cleaning the screen and cabinet...
Turn off the power, clea n the scree n and cabinet with a soft, dry cloth. We reco mme nd that you do not use
any pr opr ie tary pol is hes or solv ents on the scree n or cabine t as this may cause damage.
Disposal...
The foll ow ing info rma ti on is onl y for EU memb er state s.
The use of the symbo l indi cat es that this pr oduct may not be treat ed as househo ld waste. By
ensuri ng this product is disposed of corre ctl y, you will help prevent potent ia l nega ti ve consequenc es
for the env ironme nt and human heal th, whi ch coul d other wise be caused by ina ppropria te wast e
hand li ng of this produc t. For more det ai led infor mat io n about recyc li ng of this produc t, pleas e contact
your local cit y offi ce , your hous eho ld waste disposa l serv ice or the shop wh ere you purch ase d the
pr od uc t.
English - 29 -
Page 31

Analogue mode (TV) is s elected. Press to
forgotten?
Subtitles are not currently being transmitted by the
Questions
Below are the answers to som e of the mos t commo n queries .For more information go to www.toshiba.co.uk
Answers
and
Why is the DTV main menu unavailable?
Q
select DTV.
A
Why is the digita l channel locked ?
Q
The channel has been selected in the locked
program mes lis t, see
A
Why can only certain digital channels be viewed?
Q
Favo urite Mo de has been set to On. See page 19.
A
Why are some encrypted digital channels
unavailable?
Q
Your subscription needs upgrading. Contact your
servi ce provider.
A
Why is the soundtrack in English when a
Q
different audio language has been selected?
The programm e is currently be ing broadcast with
A
an Englis h soundtrack only.
What can be done if the PIN number has been
page 19 .
Q
A
Q
A
Q
Use the master pin code of 1276, then change to
a number of your choice.
A
Ensure that no-one else can us e the Mas ter PIN
by re moving the Owners manual.
Why is there no digital text service?
The digital program me being viewed is not
broadcas ting digital text. Try another digital
program me.
Why do I have black and grey bars in a 4:3
picture?
This is normal operation. The grey ba rs on the left
and right of picture are generated by the TV s et.
The black bars on the top and bottom of the
screen occur during a 16:9 broadcast.
Why when digital subtitles have been selected
Q
are they not showing on the screen?
broadcas ter.
A
English - 30 -
Page 32

Notes
For your own records
English - 31 -
Page 33

Notes
For your own records
English - 32 -
Page 34

Specifications and accessories
EXT-1
EXT-2 Input/Output
VHF E2-E12, S1-S41
UHF UK21-UK 69
VHF E2-E12, S1-S41
UHF E21-E69
19W330DB
Broadcast Systems / Channels Programme Positions
PAL I
PAL-B/G 2 carrier system
SECAM-L UHF F21-F69 (approx.) 19" diagonal
SECAM-D/K UHF R21-R69
DVB-T Broadca st Systems Sound Output
country
UK - 21-69
France 05-12 21-69
Germany 05-12 21-69
Italy exclude d 21-69
Spain - 21-69
Switzerland 05-12 21-69 (approx.) 480mm (W) 397mm (H) 175mm (D) (with stand)
Sweden 05-12 21-69
Finland 05-12 21-69
Greece 05-12 21-69 5,1 Kg (without stand)
Austria 05-12 21-69
Video Input
External Connections
Input / Output 21-pin Scart RGB, A/V (AA A, IEC R03 1.5V)
Input RCA jacks Component -Y/Pb/Pr VGA Cable
SVHS Input 4-pin S-video
VGA Input 15-Pin
HDMI Input HDMI Connection
Digital Output RCA jacks DTV Audio
(coaxial) PCM-AC3
VHF F1-F10, B-Q
VHF R1-R12
VHF UHF (at 10% distortion)
05-12
PAL, SECAM, NTSC 3.58/4.43
Audio L+R PC Audio Cable
Stereo
Visible Screen Size
Display
Screen Resolution
Power Consumption
(approx.) <1 W
Standby
Dimensions
(approx.) 5,5 Kg (with stand)
Weight
Headphone So cket
Accessories
100
Nicam, German
16:9
1440 x 900
2 x 3 R M S
50 W (max)
480mm (W) 35 2mm (H) 80mm (D) (without stand)
3.5mm stereo
Remote control
2 batteries
P Clip
DVB is a registered trade mark o f the DVB project.
English - 33 -
Page 35

European Service centre:
Toshiba Information Systems (U.K.) Ltd
Consumer Products Division
European Service Centre
Admiralty Way
Camberley
Surrey GU15 3DT
England
"Printed on Recycled Paper" "100% Chlorine free"
呏午䥂䄭⠱㥖㌳い䈩ⴱ㤷㤵ⵃ佖䕒⁐䅇䔭呆吭〵〵㔶ⴵ〱へ硸
〵⁈慺楲慮′〰㜠卡泽‱〺㈷㨰
50074235
 Loading...