

Page 1
SOLOGIC B931
USER GUIDE / HANDLEIDING
MANUEL D’UTILISATEUR / BEDIENUNGSANLEITUNG
MANUAL DE USUARIO / BRUKSANVISNING
MANUALE D’USO / MANUAL DO UTILIZADOR
V1.0 - 06/10
Page 2

To use ‘Caller ID’ (display caller), this service has to be activated on your phone line. Normally you need a
separate subscription from your telephone company to activate this function. If you don’t have the Caller ID
function on your phone line, the incoming telephone numbers will NOT be shown on the display of your
Om de ‘Nummerweergave’ te kunnen gebruiken, moet deze dienst geactiveerd zijn op uw telefoonlijn. Om deze
dienst te activeren, hebt U hiervoor meestal een apart abonnement van uw telefoonmaatschappij nodig. Indien
U geen nummerweergavefunctie hebt op uw telefoonlijn, zullen de inkomende telefoonnummers NIET op de
display van uw toestel verschijnen.
Pour utiliser la fonction ‘Caller ID/Clip’ (affichage de l’appelant), ce service doit être activé sur votre ligne
téléphonique. Généralement, vous avez besoin d’un abonnement séparé de votre compagnie de téléphone
pour activer cette fonction. Si vous n’avez pas la fonction ‘Caller ID - Affichage Appelant’ sur votre ligne
téléphonique, les numéros de téléphone entrants n’apparaîtront PAS sur l’écran de votre téléphone.
Zur Verwendung der ‘Rufnummernanzeige’ muss dieser Dienst erst für Ihre Telefonleitung freigegeben werden.
Zur Aktivierung dieser Dienstleistung benötigen Sie meistens ein separates Abonnement Ihrer
Telefongesellschaft.Wenn Sie für Ihre Telefonleitung keine Rufnummernanzeigefunktion haben, erscheinen
die eingehenden Telefonnummern NICHT im Display Ihres Gerätes.
Para poder usar la función “Identificación de llamadas,este servicio tiene que estar dado de alta en su línea
telefónica. Normalmente es necesario abonarse a dicho serviciopara que la compañía telefónica active esta
función. Si su línea telefónica no dispone de la funciónIdentificación de llamadas, la pantalla del aparato no
mostrará los números de teléfono de las llamadas entrantes.
För att använda funktionen "nummervisning" måste tjänsten vara aktiverad för din telefonlinje. Normalt behöver
du ett separat abonnemang från ditt telefonbolag för att kunna aktivera funktionen. Om
nummervisningsfunktionen inte finns för din telefonlinje kommer inkommande telefonnummer INTE visas på din
Per utilizzare la funzione „Caller ID" (visualizzazione chiamante), è necessario che questo servizio sia attivato
sulla propria linea telefonica. Generalmente, è necessario sottoscrivere un abbonamento separato con la
propria società telefonica, per poter attivare questa funzione. Se la propria linea telefonica non è dotata della
funzione „Caller ID", i numeri telefonici delle chiamate in arrivo NON verranno visualizzati sul display del proprio
In caso di chiamata entrante, suona soltanto il ricevitore e non la base.
Para utilizar a função "ID Chamador" (visualizar Chamador), este serviço terá de ser activado na sua linha
telefónica. Normalmente necessita de subscrever este serviço, à parte, com o seu operador de
telecomunicações, para poder activar esta função. Se não tiver contratado este serviço a função ID do
Chamador não estará disponível e por isso os números de telefone das chamadas entrantes não aparecerão
Important
telephone.
Belangrijk
Important
Wichtig
Importante
Viktigt
telefons display.
Importante
telefono.
Importante
no seu telefone.
UK To be connected to the public analogue telephone network.
NL Geschikt voor aansluiting op het openbare analoog geschakelde telefoonnetwerk.
F Il est destiné à être raccordé au réseau de télécommunication public.
D Kompatibel für den analogen Telefonanschluss.
ES Conexión a la red telefónica analógica
S For anslutning til det analoga nätverket.
IT Destinato ad essere collegato alla rete telefonica analogica pubblica.
PT Para efectuar a ligação com a rede pública analógica.
UK The features described in this manual are published with reservation to modifications.
NL De in deze handleiding beschreven mogelijkheden worden gepubliceerd onder voorbehoud van
wijzigingen.
F Les possibilités décrites dans ce manuel sont publiées sous réserve de modifications.
Page 3
D Die in dieser Bedienungsanleitung umschriebenen Möglichkeiten, werden vorbehaltlich Änderungen
publiziert.
ES Las características descritas en este manual pueden ser objeto de futuras modificaciones.
S Funktionerna i denna bruksanvisning publiceras med reservation för ändringar.
IT Le caratteristiche descritte nel presente manuale vengono pubblicate con riserva di modifica.
PT As características descritas neste manual são publicadas sob reserva de modificação.
UK Hereby, TOPCOM EUROPE N.V., declares that this device is in compliance with the essential
requirements and other relevant provisions of Directive 1999/5/EC. The Declaration of conformity
can be found on: http://www.topcom.net/cedeclarations.asp
NL Hierbij verklaart TOPCOM EUROPE N.V. dat het toestel in overeenstemming is met de essentiële
eisen en de andere relevante bepalingen van richtlijn 1999/5/EG. De conformiteitsverklaring kan
gevonden worden op: http://www.topcom.net/cedeclarations.asp
F Par la présente TOPCOM EUROPE N.V. déclare que l'appareil est conforme aux exigences
essentielles et aux autres dispositions pertinentes de la directive 1999/5/CE. La déclaration de
conformité peut être consultée sur : http://www.topcom.net/cedeclarations.asp
DE Hiermit erklärt TOPCOM EUROPE N.V., dass sich das Gerät in Übereinstimmung mit den
grundlegenden Anforderungen und den übrigen einschlägigen Bestimmungen der Richtlinie
1999/5/EG befindet. Die Konformitätserklärung finden Sie an der folgenden Stelle:
http://www.topcom.net/cedeclarations.asp
ES Por medio de la presente TOPCOM EUROPE N.V. declara que el dispositivo cumple con los
requisitos esenciales y cualesquiera otras disposiciones aplicables o exigibles de la Directiva
1999/5/CE. Puede encontrarse la Declaración de conformidad en:
http://www.topcom.net/cedeclarations.asp
S Härmed intygar TOPCOM EUROPE N.V. att denna enheten står I överensstämmelse med de
väsentliga egenskapskrav och övriga relevanta bestämmelser som framgår av direktiv 1999/5/EG.
Deklarationen om överensstämmelse finns på: http://www.topcom.net/cedeclarations.asp
IT Con la presente TOPCOM EUROPE N.V. dichiara che questo apparecchio è conforme ai requisiti
essenziali ed alle altre disposizioni pertinenti stabilite dalla direttiva 1999/5/CE. La dichiarazione di
conformità si trova su: http://www.topcom.net/cedeclarations.asp
PT TOPCOM EUROPE N.V. declara que este equipamento está conforme com os requisitos
essenciais e outras disposições da Directiva 1999/5/CE. A Declaração de Conformidade pode ser
encontrada em: http://www.topcom.net/cedeclarations.asp
UK This product works with rechargeable batteries only. If you put non-rechargeable
batteries in the handset and place it on the base/charger, the handset will be damaged and
this in NOT covered under the warranty conditions.
NL Dit product werkt alleen op herlaadbare batterijen. Als u niet herlaadbare batterijen in de handset stopt
en deze op de basis plaatst, zal de handset beschadigd raken. Deze beschadiging wordt NIET gedekt door
de garantie.
F Ce produit fonctionnement uniquement avec des piles rechargeables. Si vous mettez des piles non
rechargeables dans le combiné et si vous le placez sur la base, le combiné sera endommagé et ceci ne
sera PAS couvert par la garantie.
D Dieses Gerät darf nur mit Akkus betrieben werden. Wenn Sie das Mobilteil mit nicht wiederaufladbaren
Batterien bestücken und es auf die Basisstation stellen, wird das Mobilteil beschädigt und fällt nicht unter
die Garantie.
ES Este producto solo funciona con pilas recargables. Si pone pilas no recargables en el terminal y lo pone
en la base, el terminal se dañará, lo que NO está incluido en la garantía.
S Den här produkten fungerar endast med uppladdningsbara batterier. Om du sätter i ickeuppladdningsbara batterier i handenheten och placerar den på basenheten, kommer handenheten att
skadas. Sådana skador täcks INTE av garantin.
IT Questo prodotto funziona solo con batterie ricaricabili. Se si inseriscono batterie non ricaricabili nel
ricevitore portatile e lo si ripone sulla sua base, il portatile subirà dei danni e questi NON saranno coperti
dalla garanzia.
PT Este produto trabalha apenas com baterias recarregáveis. Se colocar baterias não recarregáveis no
portátil e o colocar sobre a base, este ficará danificado. Estes danos não são cobertos pelas condições da
garantia.
Page 4

Sologic B931
1 Safety advice
The following safety advice must always be followed before using electrical equipment.
Please read carefully through the following information concerning safety and proper use.
Make yourself familiar with all the functions of the equipment. Be careful to keep these advice
notes and if necessary pass them on to a third party.
Electrical safety and protection
• Do not operate the equipment if the mains plug, cable or the equipment itself is
damaged.
• If the equipment is dropped, then it must be checked by an electrician before further use.
• Dangerous voltages are present inside the equipment. Never open the housing or insert
objects through the ventilation holes.
• Do not allow liquids to get into the equipment. In case of emergency, pull out the plug
from the socket.
• Similarly, if a fault develops during use or before you start to clean the equipment, pull
the plug out if the socket.
• Do not touch the charger and plug contacts with sharp or metal objects.
• Do not carry out any modifications or repairs to the equipment yourself. Have repairs
done to the equipment or the mains cable only by a specialist service centre.
Unsatisfactory repairs can lead to considerable danger for the user.
• Children frequently underestimate the dangers associated with electrical equipment.
Therefore you must never leave children unsupervised in the vicinity of electrical
equipment.
• The equipment is not to be used in a damp room (e.g. bathrooms) or rooms where there
is a lot of dust.
• Equipment connected to the mains during a thunderstorm can be damaged by lightning.
Therefore you should pull the plug out of the mains socket during a storm.
• To completely disconnect the equipment from the electricity supply, the plug must be
removed from the socket. When doing this always pull on the plug itself and never on the
cable.
• Protect the mains cable from hot surfaces or other sources of damage and do not allow
it to become constrained.
• Check the mains cable regularly for any damage.
• Unwind the mains cable completely before use.
• Make sure that the mains cable does not represent a trip hazard.
• The operation of some medical devices may be affected.
• The handset may cause an unpleasant buzzing sound in hearing aids.
Fire safety
• The heat accumulated inside the equipment can lead to the defect and/or to the fire of
the equipment. Do not expose this equipment therefore to extreme temperature like:
– direct sun exposure and heater warmth.
– ventilation holes may not be covered.
Danger of explosion
• Never throw batteries in fire.
4 Sologic B931
Page 5

Sologic B931
Poisoning danger
• Keep batteries away from small children.
Note
• Only use the charger plug supplied. Do not use other chargers, as this may damage the
batteries cells.
• The wall outlet for the power supply must be close and accessible.
• Only use rechargeable batteries of the same type. Place the batteries with correct
polarity inside the battery compartment (polarity is marked inside the handset). Never
use normal non rechargeable batteries!
As this telephone cannot be used in case of a power cut, you should
use a mains-independent telephone for emergency calls, e.g. a mobile
phone.
2 Disposal of the device (environment)
At the end of the product lifecycle, you should not throw this product into the
normal household garbage but bring the product to a collection point for the
recycling of electrical and electronic equipments. The symbol on the product, user
guide and/or box indicate this.
Some of the product materials can be re-used if you bring them to a recycling point. By reusing some parts or raw materials from used products you make an important contribution to
the protection of the environment.
Please contact your local authorities in case you need more information on the collection
points in your area.
ENGLISH
3 Cleaning
Clean the telephone with a slightly damp cloth or with an anti-static cloth. Never use cleaning
agents or abrasive solvents.
4 ECO mode (low-radiation)
This cordless telephone (compliant with the DECT standard) facilitates low-radiation
operation. The radiation intensity of the radio signal between the base station and handset is
reduced to a minimum when the handset is on the base station. Only when the handset is
removed from the base station or a call is received does the radiation intensity of the radio
signal increase to the normal strength.
This does not mean that normal DECT radiation is harmful to health. The low-radiation mode
prevents unnecessary DECT radiation load when no communication is required between the
base station and handset.
For technical reasons, no additional handsets can be operated in low-radiation mode (an
additional handset that is not located in the immediate vicinity of the base station would
always be "searching for base station" due to the weak radio signal).
Low-radiation mode is enabled in the factory settings. Low-radiation mode is automatically
disabled if you log on an additional handset.
Sologic B931 5
Page 6
Sologic B931
B931
7,5V DC 300mA
17
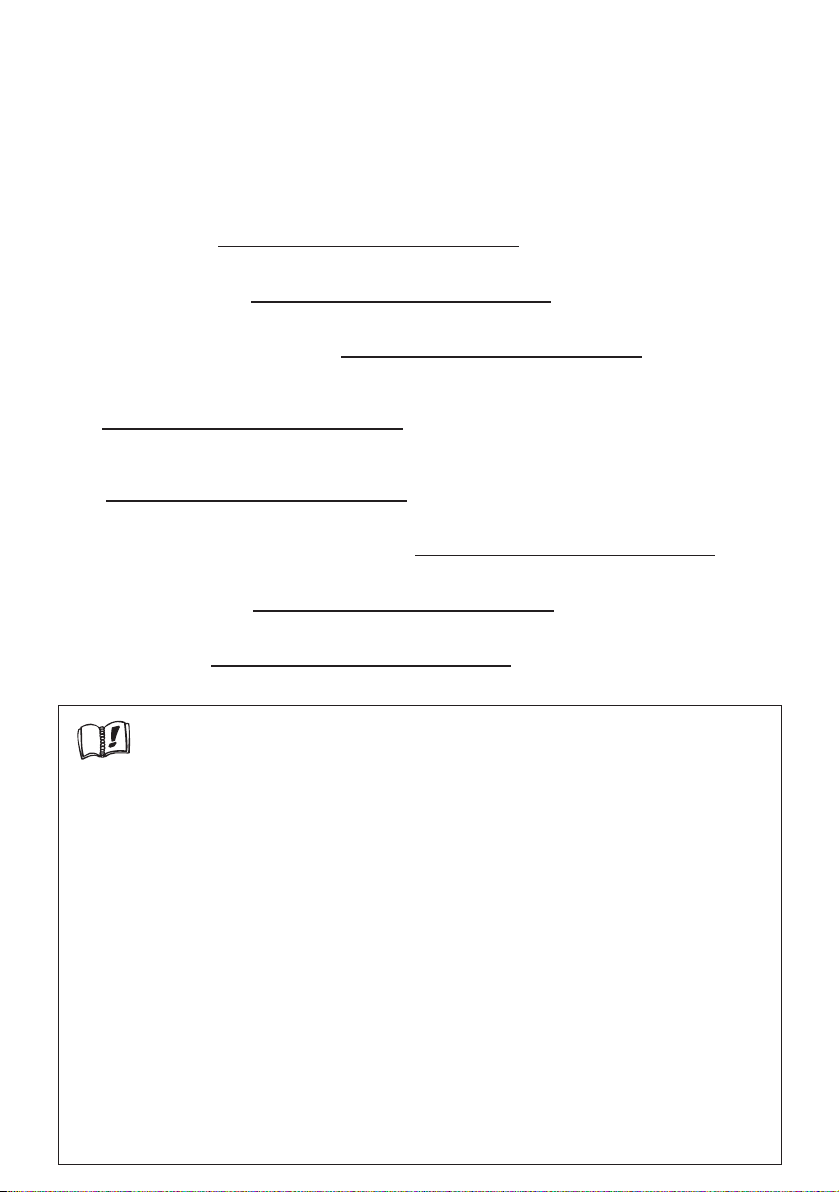
5Installation
Before you use the telephone for the first time, you must first make
sure the batteries are charged. If not, the telephone will not work
optimally.
5.1 Installing the base
For installation, do the following:
• Plug one end of the adaptor into the 230V outlet and the other end into the adapter jack
on the bottom of the base.
• Connect one end of the telephone cord with the wall phone jack and the other end to the
bottom of the base. Use the included telephone cord.
1
2
4
3
1. Power cable
2. Telephone wall outlet
3. Telephone cord
4. Bottom view of the base
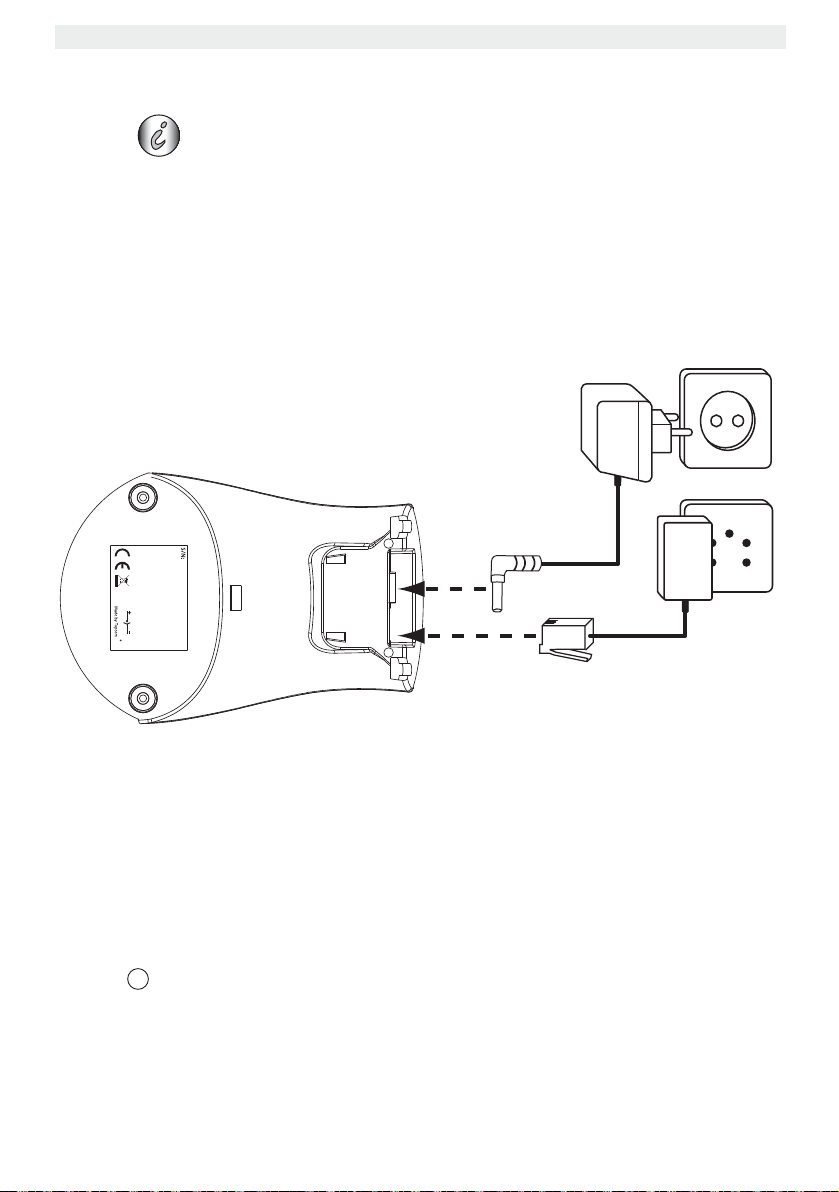
5.2 Installing the batteries
• Open the battery compartment (see below).
• Insert the batteries respecting the (+ and -) polarity.
• Close the battery compartment.
• Leave the handset on the base unit for 16 hours. The handset charging indicator
LED on the base unit will light up.
6 Sologic B931
Page 7
Sologic B931
Rechargeable
Batteries
Belt clip
Battery cover
Back view of handset
-
+
-
B 931
+
-
+
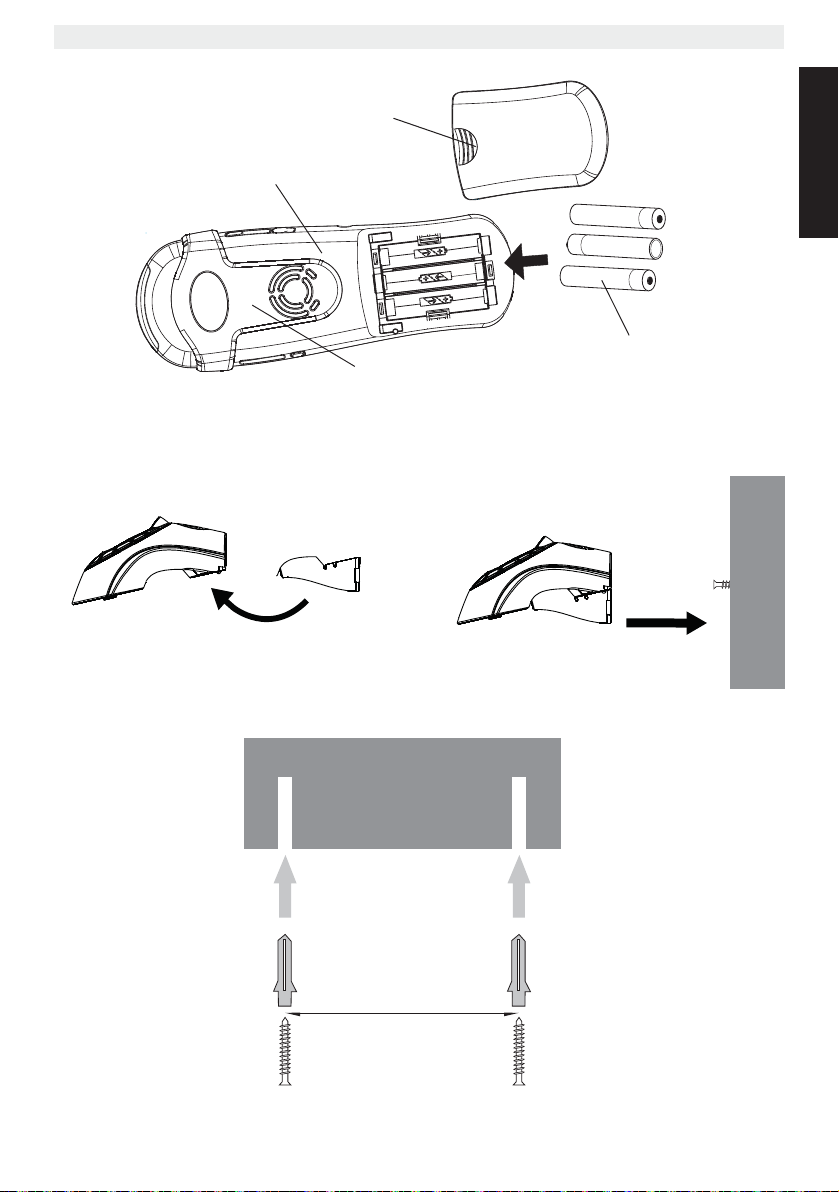
5.3 Wall mounting
You can hang the base against the wall by using the cradle. Attach the cradle onto the base.
ENGLISH
Drill the holes in the wall 6 cm apart.
Wall
Wall plug
6 cm
Screw
Sologic B931 7
Page 8
Sologic B931
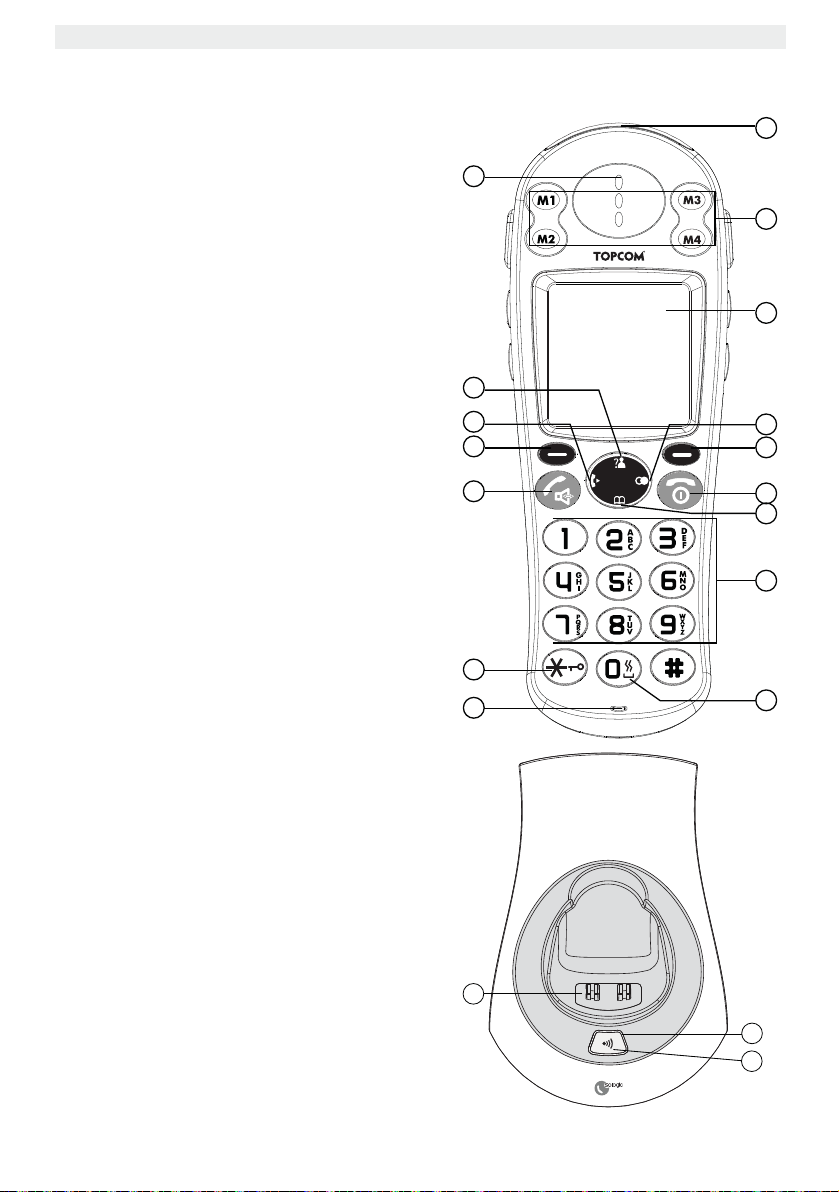
6 Getting to know your telephone
6.1 Keys / LED
Handset
1. Visual ringer
2. One-touch memories M1 - M4
3. Display
4. Right / redial / pause key
5. Right menu key
6. On hook / on-off key
7. Down / phonebook key
8. Alphanumeric keys
9. Shaker / visual ringer on key
10. Microphone
11. Keypad lock key
12. Off hook / handsfree key
13. Left menu key
14. Left / internal call key
15. Up / call log key
16. Earpiece
16
15
14
13
12
11
10
1
2
3
4
5
6
7
8
9
Base
17. Handset charging indicator (LED)
18. Paging key
19. Charge contacts
19
17
18
8 Sologic B931
Page 9
Sologic B931
13
17
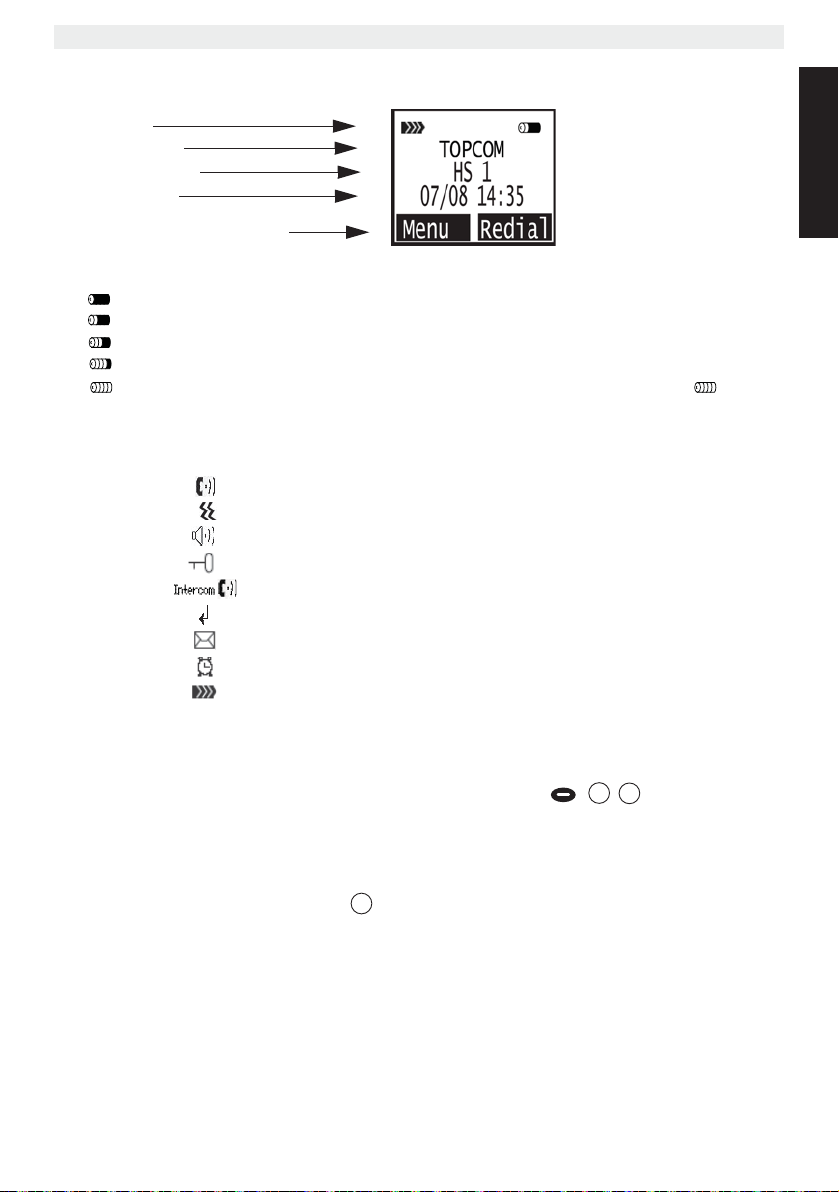
6.2 Display (LCD)
Icon line
Handset name
Handset number
Date and time
Soft menu/Option menu line
Battery indicator:
• The battery is fully charged
• The battery is 25% drained
• The battery is half drained (50%)
• The battery is 75% drained
• The battery is low. You will hear warning signals and the battery symbol on the
display will blink.
6.3 Icons
Off hook
Shaker and visual ring is on
Handsfree speaker on
Keypad locked
Internal call
New unanswered calls*
New voice mail message*
Alarm set
Signal icon, blinks when handset is too far from the base
ENGLISH
* Only when Caller ID is activated on your telephone line.
6.4 Display keys
Display keys (soft keys) are located directly under the display / . The function of
these 2 keys changes depending on the operation mode. The actual function is displayed as
text directly above the 2 menu keys.
5
6.5 Base LED
The handset charging indicator LED indicates the following status:
• Off: no base power connected or handset not in base for charging.
• On: handset charging.
Sologic B931 9
Page 10
Sologic B931
15
7
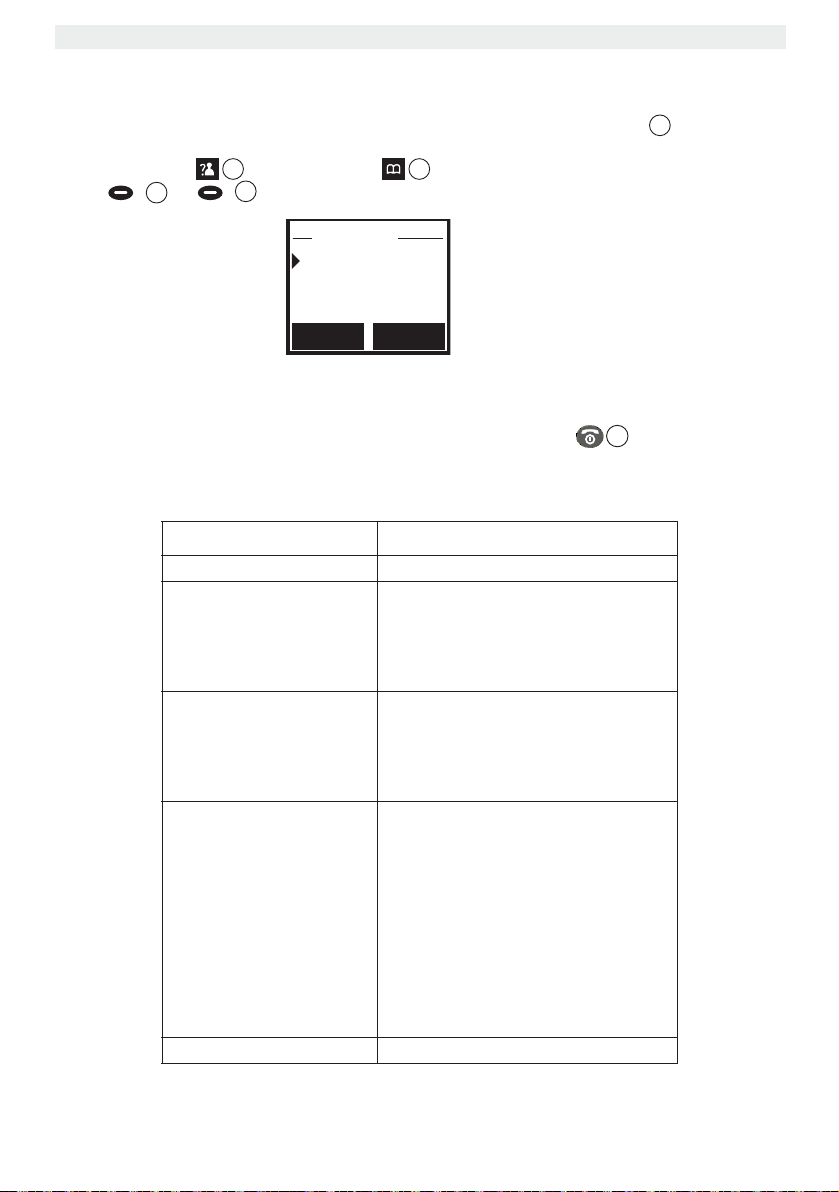
Select Back
Main Menu
CID Book
Phonebook
BS Settings
6
6.6 Navigating the menu
The handset has a menu system which is easy to use. Each menu leads to a list of options.
When the handset is switched On and in standby, press the left menu key to open the
main menu.
Press the up key or the down key to scroll to the menu option you want. Then
press or to select further options or confirm the setting displayed.
Exit or go back one level in the menu:
To go to the previous level in the menu, press ‘Back’.
To cancel and return to standby at any time, press the on/off key . If no button is
pressed for 15 seconds, the handset returns to standby automatically.
5
13
13
6.7 Menu overview
Menu Submenu items
CID Book
New
Edit
Phonebook
BS Settings
HS Settings
Registration Base 1 - 4
Delete
Delete All
PB Status
Terminate HS
Dial mode
Flash Time
Modify PIN
BS Reset
Alarm
Audio Setup
Ring Setup
Ton e Se t up
Language
HS Name
Auto Answer
LCD Contrast
Date & Time
Select base
HS Reset
10 Sologic B931
Page 11
Sologic B931
6
13
13
5
12
6
12
6
12
7
12
7 Handset operation
7.1 Turning the handset on/off
• To turn the handset on, press the on/off key or put the handset inside the base.
• To turn the handset off, press and hold down the on/off key , till the handset
switches off.
7.2 Setting the language
The telephone has 9 display languages.
To set the language, do the following:
• Press the Left menu button under ‘Menu’ .
• Press the up or down key
•Press ‘Select’ to confirm.
• Press the up or down key
•Press ‘Select’ to confirm.
• The language set appears on the display.
• Press the up or down key
like to use.
•Press ‘Save’ to confirm your selection or press ‘Back’ to leave the menu without
saving.
13
15
15
15
7
/ repeatedly until ‘HS Setting’ is selected.
7
/ repeatedly until ‘Language’ is selected.
7
/ repeatedly to select the language you would
7.3 Making Calls
7.3.1 External Call
• Press the off hook key .
• The call symbol appear on the display.
• You will hear the dial tone. Dial the telephone number you wish to call.
• The number appears on the display and is dialed.
• After finishing your call, press the on hook key to hang up.
6
ENGLISH
7.3.2 Number preparation
• Dial the telephone number you wish to call. You can correct the number by pressing the
‘Erase’ key.
• Press the off hook key .
• The call symbol appear on the display.
• The telephone number is dialed automatically.
• After finishing your call, press the on hook key or put the handset back on the
base unit to hang up.
7.3.3 Redialing the last number dialed
• Press the redial key .
• Press the off hook key . The number you last called is dialed automatically.
7.3.4 Redial one of the last 10 numbers dialed
• Press the redial key . The number you last called appears on the display.
• Press the up or down key / repeatedly until the desired number appears on
the display.
• Press the off hook key .
Sologic B931 11
4
4
15
Page 12
Sologic B931
6
12
6
15
7
12
6
13
15
• The number shown on the display is dialed automatically.
• After finishing your call, press the on hook key or put the handset back on the
base unit to hang up.
7.3.5 Calling a programmed number from the phonebook
The telephone has a phonebook in which you can store telephone number with name (See
also § “10 The phonebook”). To call a number from the phonebook:
• Press the phonebook key . The first number of the phonebook appears on the
7
display.
• Press the up or down key
15
7
/ repeatedly to select the telephone number you
want to call.
• Press the off hook key .
• The number shown on the display, is dialed automatically.
• After finishing your call, press the on hook key or put the handset back on the
base unit to hang up.
7.3.6 Flash signal
With the ‘Flash’ key you can use certain services on your external line such as “call
13
waiting” (if your telephone company offers this feature); or to transfer calls if you use a
telephone exchange (PABX). The flash key is a brief interruption of the line. You can use the
flash key during a call by pressing the left menu key ‘Flash’ . You can set the flash time
13
to short or long (see “12.1 Flash time setting”).
7.4 Receiving a Call
During internal or external incoming call, the handset will start to ring. You can change the
ring volume by pressing the up or down keys / .
• All subscribed handsets will ring when you receive a call.
• The telephone number of the caller appears on the display if you have Caller ID service
(CLIP). Consult your telephone company. The name of the caller also appears on the
display if:
– the number is programmed into the phonebook with name.
– the network sends the name together with the telephone number .
• Press the off hook key to accept the external call.
• OR Lift the handset off its base unit (if the auto answer option is active,
answer”
).
• During the conversation the symbol appear on the display and the call timer starts
to run.
• After finishing your call, press the on hook key to hang up or put the handset
back on the base unit.
see §“7.21 Auto
7.5 Redial list options
When scrolling through the redial list (see §“7.3.4 Redial one of the last 10 numbers dialed”)
you have the following options:
When the desired number is shown on the display press ‘More’ and select with the up
7
and down keys
•‘Add to PB’: to store the number into the phonebook memory. Press ‘Select’ to confirm.
Enter a name (See §“10.1 Adding a number and a name to the phonebook”) and press
12 Sologic B931
/ the following options:
Page 13
Sologic B931
13
13
12
15
15
5
‘Next’ . Edit the number and press ‘Next’. Select the desired ring melody and press
‘Save’ .
•‘Delete Call’: to delete an entry in the redial list. Press ‘Del’ to confirm.
•‘Delete All’: to delete all entries in the redial list. Press ‘Del’ to confirm.
7.6 Activate / deactivate handsfree function
This function allows you to communicate without having to pick up the handset. When you
are talking, press the handsfree key to activate the handsfree function.
Press the button again to deactivate the handsfree function.
12
When you are calling in handsfree mode and you want to change the
7
volume, press up or down key
/ repeatedly.
When you use the handsfree function for a long time, the batteries
will drain quickly !
7.7 ‘Out of range’ warning
If the handset is out of range of the base unit, a warning signal will sound.
•‘SEARCHING’ appears on the display and the symbol blinks on the display.
• Move closer to the base unit.
• As soon as you are back within range of the base unit, a signal sounds and the symbol
stops blinking.
7.8 Setting the speaker volume
Use the up and down keys / during conversation to set the volume of the
speaker. You can select from 5 levels.
The handsfree volume can be set the same way as above!
7
7.9 Call Duration Indicator on the Display
During an external call, the call duration is shown on the display:
E.g. “01:10:40“ for 1 hour, 10 minute and 40 seconds.
The call duration remains visible on the display for 5 seconds after each call.
ENGLISH
7.10 Turning off the microphone (mute)
To turn off the microphone during a call press the right menu key ‘Mute’ key. Now you
can speak freely without the caller being able to hear you. To activate the microphone again,
press the right menu key ‘Mute’ again.
5
7.11 Pause key
If you dial a telephone number and you would like to add a pause to this number, press the
pause/redial key at the desired place in the number.
When you dial or redial this number, the pause (3 seconds) is automatically included.
Sologic B931 13
4
Page 14
Sologic B931
8
7
15
7
13
5
7.12 Locating a misplaced handset (paging)
If you cannot find the handset, briefly press the paging key on the base unit.
All handsets subscribed on the base unit will ring so you can locate the misplaced handset.
To stop the signal, briefly press any key on any handset.
17
7.13 Using the alphanumeric handset keypad
Use the alphanumeric keypad to type text. To select a letter, press the corresponding
alphanumeric key . E.g. if you press the alphanumeric key ‘5’, the first character ‘j’
appears on the display. Press it repeatedly to select other characters from this key.
Press the ‘2’ key once to select the letter ‘a’. If you would like to select both ‘a’ and ‘b’ after
each other, first press the ‘2’ key once to select ‘a’, wait 2 seconds until the cursor moves to
the next position and then press the ‘2’ key twice to select ‘b’. You can delete characters
mistakenly typed by using the ‘Erase’ key. The character in front of the cursor will be deleted.
15
You can move the cursor by pressing the up and down keys
/ .
7.14 Setting the ring volume level on the handset
You can change the ring volume of an incoming call (internal and external) between 6 levels
(levels ‘1’ to ‘5’ and ‘Off’).
If you select level ‘Off’ the handset will not ring when a call is received.
Level ‘5’ is the highest level.
7.14.1 Setting the ring volume and Melody for Internal and external calls
• Press the ‘Menu’ key.
• Press the up or down key / repeatedly until ‘HS Settings’ is selected.
•Press ‘Select’ to confirm.
• Press the up or down key
•Press ‘Select’ to confirm.
•Select ‘INT Ring’ or ‘EXT Ring’ and press ‘Select’.
•Select ‘Melody’ or ‘Volume ’ and press ‘Select’.
• The current volume and melody is shown and hearable.
• Press the up or down key
•Press ‘Save’ to confirm your selection or press ‘Back’ to leave the menu without
saving.
15
15
7
7
/ repeatedly until ‘Ring Setup’ is selected.
/ repeatedly to select the desired volume/melody.
You can also change the ring volume during incoming call,
see “7.4 Receiving a Call”.
7.15 Setting the earpiece/handsfree volume
You can also use the menu to adjust the audio volume of the handsfree speaker and
earpiece:
• Press the ‘Menu’ key.
• Press the up or down key
•Press ‘Select’ to confirm.
• Press the up or down key
•Press ‘Select’ to confirm.
•Select ‘Speaker V.’ or ‘Earpiece V.’ and press ‘Select’
• Press the up or down key / repeatedly to select the desired volume.
14 Sologic B931
15
15
15
7
/ repeatedly until ‘HS Settings’ is selected.
7
/ repeatedly until ‘Audio Setup’ is selected.
.
13
7
Page 15

Sologic B931
13
5
11
13
5
15
7
13
•Press ‘Save’ to confirm your selection or press ‘Back’ to leave the menu without
saving.
7.16 Locking the key pad
You can lock the keypad to prevent involuntary key presses. When the keypad is locked it is
impossible to dial a telephone number, only the direct memory keys M1 - M4 can be used.
Also incoming calls can still be answered.
To activate keypad lock:
• Press and hold the keypad lock key for 5 seconds.
•‘HS Locked’ and the icon will appear on the display.
To deactivate keypad lock:
• Press the keypad lock key again for 5 seconds.
11
7.17 Turning key click on/off
You can set the handset to make a beep whenever you press a key.
• Press the left ‘Menu’ key.
• Press the up or down key / repeatedly until ‘HS Settings’ is selected.
•Press ‘Select’ to confirm.
• Press the up or down key
•Press ‘Select’ to confirm.
• Press the up or down key
•Select
–‘On’: turn on key click
–‘Off’: turn off key click
•Press ‘Save’ to confirm your selection or press ‘Back’ to leave the menu without
saving.
15
15
15
7
7
/ repeatedly until ‘Tone Setup’ is selected.
7
/ repeatedly until ‘Key Tone’ is selected.
ENGLISH
7.18 Range alarm
A beep will sound when the handset is out of the base range. You can turn this audible
warning on/off:
• Press the left ‘Menu’ key.
• Press the up or down key
•Press ‘Select’ to confirm.
• Press the up or down key
•Press ‘Select’ to confirm.
• Press the up or down key
•Select
–‘On’: turn on the range alarm
–‘Off’: turn off the range alarm
•Press ‘Save’ to confirm your selection or press ‘Back’ to leave the menu without
saving.
15
15
7
/ repeatedly until ‘HS Settings’ is selected.
7
/ repeatedly until ‘Tone Setup’ is selected.
/ repeatedly until ‘Range Alarm’ is selected.
5
7.19 Display contrast
To change the display contrast:
• Press the left ‘Menu’ key.
• Press the up or down key
•Press ‘Select’ to confirm.
Sologic B931 15
15
7
/ repeatedly until ‘HS Settings’ is selected.
Page 16
Sologic B931
13
15
7
1
• Press the up or down key / repeatedly until ‘LCD Contrast’ is selected.
•Press ‘Select’ to confirm.
• Press the up or down key / repeatedly to change the contrast between 0
(light) and 16 (dark).
•Press ‘Save’ to confirm your selection or press ‘Back’ to leave the menu without
saving.
15
15
7
7
5
7.20 Changing the handset name
You can change the handset name displayed on the handset during standby.
• Press the left ‘Menu’ key.
• Press the up or down key
•Press ‘Select’ to confirm.
• Press the up or down key
•Press ‘Select’ to confirm.
• Enter the new handset name and press ‘Erase’ to erase the characters in front of the
cursor.
•Press ‘Save’ to confirm your selection or press ‘Back’ to leave the menu without
saving.
13
15
15
7
/ repeatedly until ‘HS Settings’ is selected.
7
/ repeatedly until ‘HS Name’ is selected.
5
7.21 Auto answer
When there is an incoming call and the handset is on the base, the phone automatically takes
the line when lifted. This function can be turned on or off.
• Press the left ‘Menu’ key.
• Press the up or down key
•Press ‘Select’ to confirm.
• Press the up or down key / repeatedly until ‘Auto Answer’ is selected.
•Press ‘Select’ to confirm.
•Select
–‘On’: turn on the auto answer
–‘Off’: turn off the auto answer
•Press ‘Save’ to confirm your selection or press ‘Back’ to leave the menu without
saving.
13
15
7
/ repeatedly until ‘HS Settings’ is selected.
5
7.22 Turning visual ringer and shaker on/off
By turning on the visual ringer and shaker, the visual ring will blink and the handset will
vibrate during an incoming call.
• Press and hold the key until the icon appears to activate it.
• Press and hold the key until the icon disappears to deactivate it.
9
9
8 Handset reset
You can restore all handset settings back to default and erase all phonebook, call log, ring
volume/melodies, Audio setup, Tone setup, Alarm, language and redial entries. The LCD
contrast cannot be restored.
To restore the default settings:
• Press the left ‘Menu’ key.
• Press the up or down key
16 Sologic B931
15
7
/ repeatedly until ‘HS Settings’ is selected.
Page 17
Sologic B931
13
15
7
15
7
13
•Press ‘Select’ to confirm.
• Press the up or down key / repeatedly until ‘HS Reset’ is selected.
•Press ‘Select’ to confirm.
• Enter the pin code (0000).
•Press ‘Reset’ to confirm your selection or press ‘Back’ to leave the menu without
saving.
The default settings are:
Alarm: Off
Audio Setup: 3
INT/EXT Melody: Melody 3
INT/EXT Ring Volume: Volume 3
Key Tone: On
Range Alarm: On
Handset name: HS1
Time Format: 24 hours
Date Format: DD-MM
Phone Book: Empty
Call log: Empty
Redial list: Empty
Auto Answer: Off
Time and Date: 0:00 01-01
After a reset you have to turn on the handset again, see “7.1 Turning
the handset on/off”.
15
7
5
ENGLISH
9 Setting the clock and alarm
9.1 Date and time format
• Press the left ‘Menu’ key.
• Press the up or down key / repeatedly until ‘HS Settings’ is selected.
•Press ‘Select’ to confirm.
• Press the up or down key
•Press ‘Select’ to confirm.
• Press the up or down key
Format’.
•Press ‘Select’ to confirm.
• Use the up or down key
time format ‘12-Hour’ / ‘24-Hour’.
•Press ‘Save’ to confirm your selection or press ‘Back’ to leave the menu without
saving.
13
15
15
9.2 Setting the date and time
• Press the left ‘Menu’ key.
If you have Caller id on your telephone line and the operator sends date
and time, your clock will be set automatically on an incoming call.
Sologic B931 17
7
7
/ repeatedly until ‘Date & Time’ is selected.
/ repeatedly and select ‘Date Format’ or ‘Time
/ to select the date format ‘DD-MM’ / ‘MM-DD’ or
5
Page 18
Sologic B931
13
5
15
7
15
7
• Press the up or down key / repeatedly until ‘HS Settings’ is selected.
•Press ‘Select’ to confirm.
• Press the up or down key / repeatedly until ‘Date & Time’ is selected.
•Press ‘Select’ to confirm.
• Press the up or down key
•Press ‘Select’ to confirm.
• Enter the current date/time by the numeric keypad.
•Press ‘Save’ to confirm your selection or press ‘Back’ to leave the menu without
saving.
15
15
15
7
7
7
/ repeatedly and select ‘Set Date’ or ‘Set Time’.
9.3 Using the alarm feature
Set the date and time and use your handset to give you a reminder alarm. You can have
different alarm settings for each handset registered to your base. The alarm rings only at the
handset, not at the base or any other handset.
If one of the alarms is set, the alarm set icon appears in standby mode on the display.
When the alarm sounds, press any key to turn it off.
9.3.1 Set the alarm
• Press the left ‘Menu’ key.
• Press the up or down key / repeatedly until ‘HS Settings’ is selected.
•Press ‘Select’ to confirm.
• Press the up or down key
•Press ‘Select’ to confirm.
• Press the up or down key / repeatedly and select ‘On’ or ‘Off’.
•Press ‘Select’ to confirm.
• If you select ‘On’, the display indicates to enter the time in HH:MM format. Use the
numeric keypad to enter. Press ‘Next’ and the display will show ‘Snooze On/Off’. Press
the up or down key
•Press ‘Save’ to confirm your selection or press ‘Back’ to leave the menu without
saving.
13
15
15
/ to enable or disable the snooze functions.
7
7
/ repeatedly until ‘Alarm’ is selected.
5
If you choose ‘Snooze On’, the alarm will ring at regular intervals of 11
minutes. If you press the key when the alarm sounds, the option
will be switch to ‘Snooze Off’.
6
10 The phonebook
The phonebook allows you to memorise 50 telephone numbers and names. You can enter
names up to 12 characters length and numbers up to 20 digits length.
10.1 Adding a number and a name to the phonebook
• Press the left ‘Menu’ key.
• Press the up or down key / repeatedly until ‘Phonebook’ is selected.
•Press ‘Select’ to confirm.
• Press the up or down key
•Press ‘Select’ to confirm.
• Press the up or down key
•Press ‘Select’ to confirm.
18 Sologic B931
15
15
15
7
7
/ repeatedly until ‘New’ is selected.
7
/ repeatedly and select ‘On’ or ‘Off’.
Page 19
Sologic B931
7
13
5
12
7
13
5
15
7
• Enter the name by using the numerical keys (see also “7.13 Using the alphanumeric
handset keypad”).
•Press ‘Next’ and enter the desired number (up to 20 digits).
•Press ‘Next’ and select the desired ring melody associated with this number with the up
15
or down key
•Press ‘Save’ to confirm your selection or press ‘Back’ to leave the menu without
saving.
/ .
10.2 Looking up a number in the phonebook
• Press the phonebook key .
• Enter the first letter of the desired name via the alphanumeric keypad.
• The first name in the list with this letter appears on the display.
• Press the up or down key
• If the desired number appears on the display, the number will be automatically dialed by
pressing the off hook key .
7
15
7
/ to browse for other numbers in the phonebook.
10.3 Changing a name or number in the phonebook
• Press the left ‘Menu’ key.
• Press the up or down key / repeatedly until ‘Phonebook’ is selected.
•Press ‘Select’ to confirm.
• Press the up or down key
•Press ‘Select’ to confirm.
• Enter the first letter of the desired name via the alphanumeric keypad.
• The first name in the list with this letter appears on the display.
• Press the up or down key
• If the desired number appears on the display, press ‘Select’ to confirm.
• Edit the name by using the numerical keys (see also “7.13 Using the alphanumeric
handset keypad”.).
•Press ‘Next’ and edit the number.
•Press ‘Next’ and select the desired ring melody associated with this number with the up
15
or down key
•Press ‘Save’ to confirm your selection or press ‘Back’ to leave the menu without
saving.
/ .
15
15
15
7
7
/ repeatedly until ‘Edit’ is selected.
7
/ to browse for other numbers in the phonebook.
ENGLISH
10.4 Deleting one or all entries from the phonebook
• Press the left ‘Menu’ key.
• Press the up or down key / repeatedly until ‘Phonebook’ is selected.
•Press ‘Select’ to confirm.
• Press the up or down key
selected.
•Press ‘Select’ to confirm.
• The display shows ‘Confirm?’ You can press ‘Del’ or ‘Del All’ to delete or ‘Cancel’ to
exit.
Sologic B931 19
15
7
/ repeatedly until ‘Delete’ or ‘Delete All’ is
Page 20
Sologic B931
7
13
5
7
15
7
10.5 Phonebook status
The phonebook status shows the numbers of phonebook entries already stored.
• Press the left ‘Menu’ key.
• Press the up or down key
•Press ‘Select’ to confirm.
• Press the up or down key / repeatedly until ‘PB Status’ is selected.
•Press ‘Select’ to confirm.
15
15
7
/ repeatedly until ‘Phonebook’ is selected.
7
11 One-touch memories M1-M4
11.1 Storing a number under the one-touch memory
You can store up to 4 numbers in the direct memory keys M1 - M4. All the numbers will be
stores in the phonebook as well.
• Press one of the 4 memory keys (M1 - M4).
• The display will show ‘Number?’. Enter the desired number (up to 20 digits).
• Press the ‘Next’ soft key.
• Select the desired ring melody associated with this number with the up or down key
15
/ .
•Press ‘Save’ to confirm your selection or press ‘Back’ to leave the menu without
saving.
11.2 Viewing the one-touch memory numbers
The one-touch memory numbers are stored inside the phonebook as the 1st 4 entries.
• Press the phonebook key .
• Press the up or down key / to browse for other numbers.
11.3 Editing the one-touch memory numbers
Perform the same steps as described in “10.3 Changing a name or number in the
phonebook”
.
The one-touch memory names are stores in the phonebook as M1:, M2:,
M3:, and M4:. When you edit the name you can only add something like
‘M1: Home’ but you can’t delete the default name.
11.4 Deleting a one-touch memory number
Perform the same steps as described in “10.4 Deleting one or all entries from the phonebook”
12 Base operation
12.1 Flash time setting
You can set the flash time to short (100ms) or long (300ms). The time is set to 100ms by
default! However, if your system requires a longer flash time, you can change it:
• Press the left ‘Menu’ key.
• Press the up or down key
•Press ‘Select’ to confirm.
• Press the up or down key
20 Sologic B931
15
15
7
/ repeatedly until ‘BS Settings’ is selected.
7
/ repeatedly until ‘Flash Time’ is selected.
Page 21
Sologic B931
13
5
15
7
13
5
15
7
13
•Press ‘Select’ to confirm.
•Select
–‘Flash-1’: (short) to have a flash of 100ms
–‘Flash-2’: (long) to have a flash of 300ms
•Press ‘Save’ to confirm your selection or press ‘Back’ to leave the menu without
saving.
12.2 Changing the PIN code (system PIN code)
Certain functions are only available if you know the PIN code of the base.
The PIN code has 4 digits. The default PIN code setting is ‘0000’. If you would like to change
the PIN code and set your own secret code, do the following:
• Press the left ‘Menu’ key.
• Press the up or down key
•Press ‘Select’ to confirm.
• Press the up or down key
•Press ‘Select’ to confirm.
• Enter the current pin and press ‘Next’.
• Enter the new pin and press ‘Next’.
• Enter the new pin again and press ‘Save’ to store the new pin or press ‘Back’to
leave the menu without saving.
15
15
7
/ repeatedly until ‘BS Settings’ is selected.
7
/ repeatedly until ‘Modify PIN’ is selected.
13
5
12.3 Setting the dialing mode
There are two types of dialing modes that can be used on a telephone line:
• DTMF/Tone dialing (the most common)
• Pulse dialing (for older installations)
To change the dialing mode:
• Press the left ‘Menu’ key.
• Press the up or down key
•Press ‘Select’ to confirm.
• Press the up or down key
•Press ‘Select’ to confirm.
• Use the up or down key
•Press ‘Save’ to confirm or press ‘Back’ to leave the menu without saving.
15
15
7
/ repeatedly until ‘BS Settings’ is selected.
7
/ repeatedly until ‘Dial mode’ is selected.
/ to select ‘Tone’ or ‘Pulse’.
ENGLISH
12.4 Base reset
You can restore all Base settings back to default.
To restore the default settings:
• Press the left ‘Menu’ key.
• Press the up or down key
•Press ‘Select’ to confirm.
• Press the up or down key
•Press ‘Select’ to confirm.
• Enter the pin code (0000).
•Press ‘Reset’ to confirm your selection or press ‘Back’ to leave the menu without
saving.
Sologic B931 21
/ repeatedly until ‘BS Settings’ is selected.
15
7
/ repeatedly until ‘BS Reset’ is selected.
5
Page 22
Sologic B931
15
7
15
7
13
The default settings are:
Dial Mode: Tone
Flash time: Flash-1
PIN Code: 0000
13 Additional handsets and bases
You can subscribe up to 5 handsets on one base. Each handset can register to 4 base
stations and the user can select which base he wants to use. By default the handset 1 is
registered to the base unit 1.
13.1 Adding a new handset
This is only needed when you have deregistered a handset or when
you bought a new one.
Keep the paging key on the base unit pressed for 5 seconds. The base unit will stay
in subscribing mode for 3 minutes. Do the following to subscribe the handset:
• Press the left ‘Menu’ key.
• Press the up or down key
•Press ‘Select’ to confirm.
• Press the up or down key
• The handset will now search for a base end when it’s found the system PIN code (base
PIN code; default=’0000’) is asked.
• Enter the PIN code and and press ‘Select’.
• The standby screen will appear when successfully registered and handset name and
number will be shown.
17
15
15
Each handset can be subscribed to 4 different DECT base units. Each
base unit is assigned a number from ‘1’ to ‘4’ in the handset. When
you subscribe a new handset, you can assign a base unit number. It
is best to use ‘1’.
7
/ repeatedly until ‘Registration’ is selected.
7
/ to select a base (1-4).
13.2 Removing a handset
It is possible to cancel subscription of a handset to a base. You should do this if a handset is
damaged and has to be replaced by a new one.
You can only cancel subscription of another handset, not the
handset you are using to do the remove procedure.
• Press the left ‘Menu’ key.
• Press the up or down key
•Press ‘Select’ to confirm.
• Press the up or down key
•Press ‘Select’ to confirm.
• Enter the PIN code and press ‘OK’.
• Use the up or down key
handset or a non-existing handset, a warning tone will be heard.
•Press ‘Select’ to confirm your selection or press ‘Back’ to leave the menu.
15
7
/ repeatedly until ‘BS Settings’ is selected.
/ repeatedly until ‘Terminate HS’ is selected.
/ to select the handset. If you select the current
5
22 Sologic B931
Page 23
Sologic B931
7
14
6
12
6
12
6
13.3 Selecting a base unit
If your handset is subscribed to several base unit stations (max. 4), you must select a base
unit because the handset can only communicate with one base unit at a time.
• Press the left ‘Menu’ key.
• Press the up or down key
15
7
/ repeatedly until ‘HS Settings’ is selected.
•Press ‘Select’ to confirm.
• Press the up or down key repeatedly until ‘Select Base’ is selected.
•Press ‘Select’ to confirm.
• Use the up or down key
15
/ to select the base. If you select the current a non-
existing base, a warning tone will be heard.
• The display will show ‘Selected BSx’. Press the ‘Select’ key to confirm.
Caution: Before you can select a base unit, the handset must be
subscribed to the base first.
13.4 Using multiple handsets
These functions are only possible when more than one handset is
subscribed to the base.
13.4.1 Calling another handset
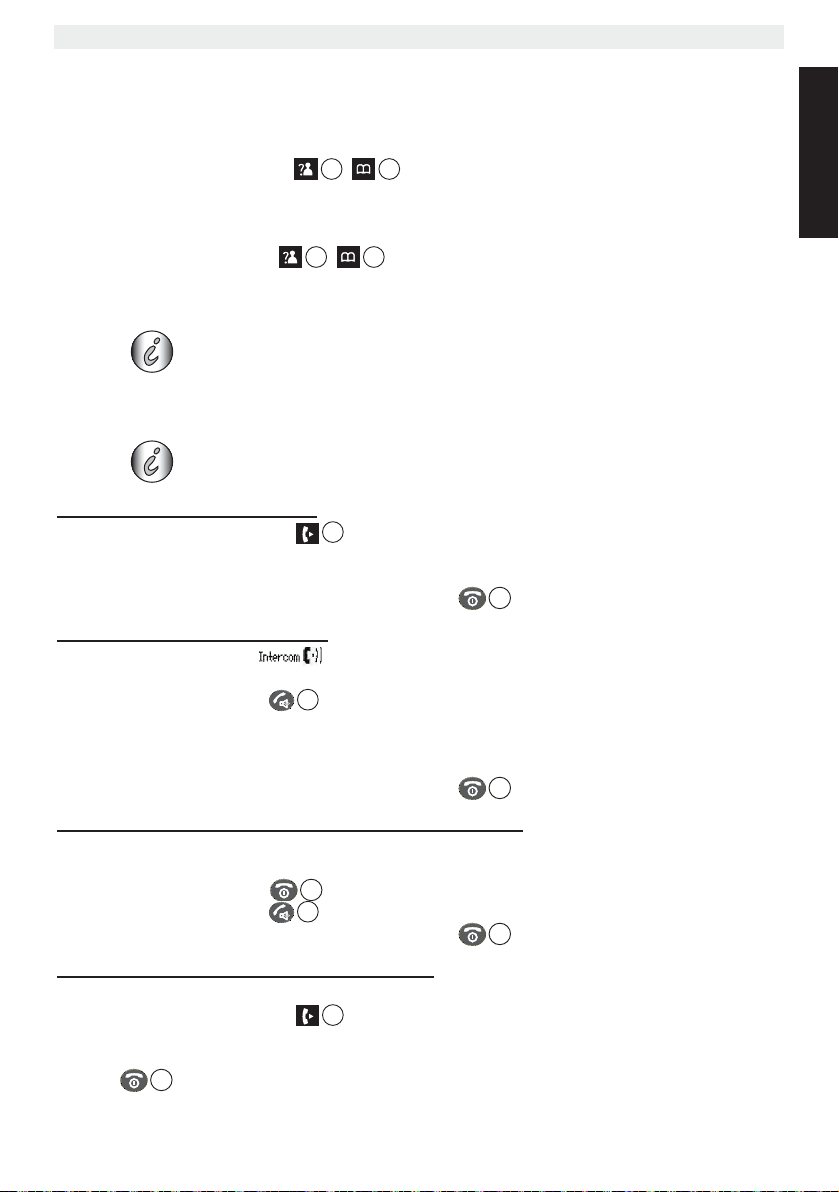
• Press the internal call key .
•‘Intercom 1 2 3 4 5” appears on the display.
• Dial the number of the handset you would like to call.
• After finishing your call, press the on hook key to hang up.
ENGLISH
13.4.2 Receiving an internal call
• The internal call icon and the number of the handset calling, appear on the
display.
• Press the off hook key to accept the internal call.
OR
• Lift the handset off its base (if the auto answer option is active, see §“7.21 Auto answer”)
• During the call, the handset number of the caller appear on the display.
• After finishing your call, press the on hook key to hang up.
13.4.3 Receiving an external call during an internal call
If you receive an external call during an internal call, you will hear a call waiting tone (double
beep) on both handsets being used for an internal call.
• Press the on hook key to end the internal call.
6
• Press the off hook key to accept the external call.
• After finishing your call, press the on hook key to hang up.
13.4.4 Transferring a call to another handset
• You have an external caller on the line.
• Press the internal call key . ‘Intercom 1 2 3 4 5’ appears on the display.
14
• Dial the number of the handset to which you would like to transfer the call.
• If the handset dialed answers, you can have an internal conversation. Press the on hook
key and the external call is transferred.
Sologic B931 23
6
Page 24
Sologic B931
14
11
15
15
• If the handset dialed does not answer, press the internal call key to speak to the
14
external caller again.
13.4.5 Conference call (two internal handsets and one external caller)
You can have a telephone conversation with one internal and one external caller at the same
time.
• While on the line with an external caller, press the internal call key . The external
14
line is put on hold.
• Dial the number of the handset you would like to include in the call. You can toggle
between Internal and External line by pressing the internal call key .
• Once the handset dialed answers, press the key.
• Now you are connected to the external and the internal caller and you can talk to them at
the same time (conference call).
14 Caller ID / CLIP
You can only use this service when you have a Caller ID / CLIP
subscription. Contact your telephone company for more information.
When you receive a call, the telephone number of the caller, the date and time appears on
the handset display. If the name is programmed in the phonebook, the name in the
phonebook is displayed!
The telephone can store 40 calls in a call list that can be reviewed later. When the memory
is full, the new calls automatically replace the oldest calls in the memory. The icon will be
shown if there are new unanswered calls in the call list. If the call list is empty and you press
the call log key , ‘Empty’ will be shown.
You can view the information of an incoming call:
• Press the call log key . The telephone number will be shown on the first line. The
name (if sent by the network or present in the phonebook memory) of the caller will be
shown on the 2nd line and date and time on the 3rd line. In the top right corner of the
screen you will see following icon followed by the call log sequence number:
– : Unread or unanswered call
– : Read or answered call
14.1 The call list
The calls received are stored in the call list (max. 40 numbers).
• Briefly press the call log key to view the most recent call.
OR
• Press the left ‘Menu’ key.
•Press ‘Select’ to confirm.
• The telephone number and name of the most recent caller appears on the display.
• The date and time the call was received are linked to each call.
24 Sologic B931
15
Page 25
Sologic B931
7
5
7
13
5
15
7
13
5
13
• Press up or down key / to browse other numbers on the list.
• If neither the up or down key
telephone will return to standby mode.
• After a call is received, the number of the caller remains on the display
for 15 seconds after the last ring.
15
15
7
/ is pressed for 1 minute, the
14.2 Calling a number from the call list
• Press the call log key to go into the call list.
• Press the up or down key
• Once the number is on the display, press the off hook key and the number is
dialed automatically.
15
15
7
/ to look up the desired number.
12
14.3 Storing a number from the call list in the phonebook
• Press the left ‘Menu’ key.
•Press ‘Select’ to confirm.
• Press the up or down key
•Press ‘More’ .
• Press the up or down key
•Press ‘Select’ to confirm.
•‘Name ?’ is displayed. Use the alphanumeric keys to add a name. Or if the name was
send by the network, you can edit it before saving. Press ‘Next’ to confirm.
• The telephone number is displayed. Edit the number if needed and press ‘Next’
again to store the entry into the phonebook .
• Select the desired ring melody associated with this number with the up or down key
15
/ .
•Press ‘Save’ to confirm your selection or press ‘Back’ to leave the menu without
saving.
5
15
15
7
/ to look up the desired number.
7
/ repeatedly until ‘Add to PB’ is selected.
5
ENGLISH
14.4 Deleting numbers from the call list
14.4.1 Deleting one number
• Press the left ‘Menu’ key.
•Press ‘Select’ to confirm.
• Press the up or down key
•Press ‘More’ .
• Press the up or down key
•Press ‘Select’ to confirm.
•Press ‘Del’ to erase or press ‘Cancel’ to leave the menu without saving.
14.4.2 Delete all numbers
• Press the left ‘Menu’ key.
•Press ‘Select’ to confirm.
• Press the up or down key
•Press ‘More’ .
• Press the up or down key
•Press ‘Select’ to confirm.
•Press ‘Del All’ to erase or press ‘Cancel’ to leave the menu without saving.
Sologic B931 25
5
5
/ to look up the desired number.
15
15
15
7
/ repeatedly until ‘Delete’ is selected.
7
/ to look up the desired number.
7
/ repeatedly until ‘Delete All’ is selected.
5
Page 26
Sologic B931
7
6
15 Voice mail indicator
This function only works if you have the voice mail or phone mail service and if the network
sends this indication along with the caller ID (CLIP) information!
When you receive a new message in your voice mail system, the icon + ‘MSG WTG ON’
will appear on the display. Once you have listened to your messages, the icon will
disappear.
If you want to remove the icon, press the call log key , then press and hold the
numerical key ‘4’. After that press the on-hook key to return to standby.
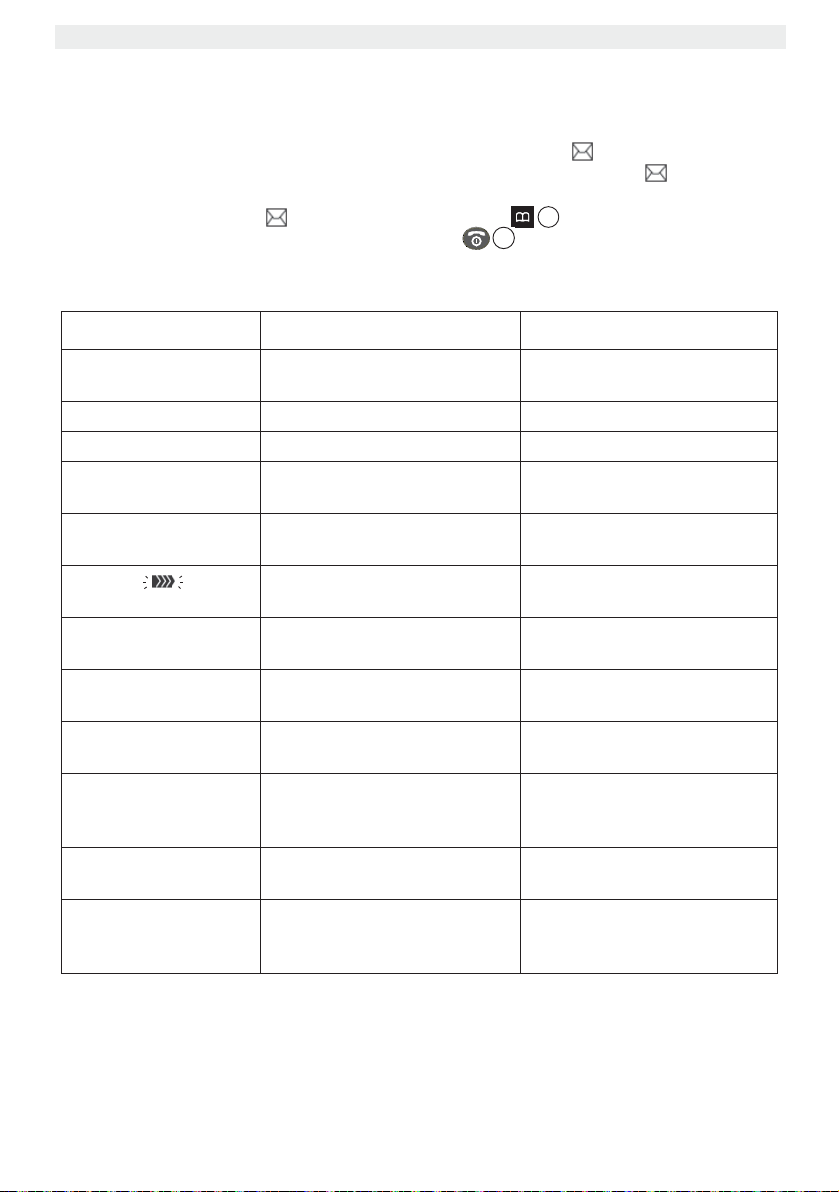
16 Trouble shooting
Symptom Possible cause Solution
No display; the display
stays dark
No tone Telephone cord badly
The icon flashes
Base or handset do not
ring
Tone is good, but
cannot make any
connection
Not possible to transfer
a call on PABX
Telephone does not
react to pressing the
keys
Batteries uncharged Check the position of the
batteries
Recharge the batteries
Handset turned off Turn on the handset
Check the telephone cord
connected or defect
The line is occupied by another
handset
Handset out of range Bring the handset closer to the
The base has no power supply Check the mains connection to
The handset is not registered to
the base
The ringing volume is zero or
low
The dialing mode is wrong Adjust the dialing mode (pulse/
The Flash Time is too short Change the Flash Time
Manipulation error Remove the batteries for at
connection
Wait until the other handset
hangs up
base
the base
Register the handset to the
base
Adjust the ringing volume
tone)
least 1 minute and put them
back in place
26 Sologic B931
Page 27

Sologic B931
17 Technical characteristics
Standard: DECT(Digital Enhanced Cordless Telecommunications)
GAP ( Generic Access Profile )
Frequency range: 1880 MHz to 1900 MHz
Number of channels: 120 duplex channels
Modulation: GFSK
Speech coding: 32 kbit/s
Emission power: 10 mW ( average power per channel )
Range: 300 m in open space / 50 m maximum in-house
Base power supply: In: 230V AC / 50Hz - Out: 7,5V DC / 300mA
Handset Batteries: 3 rechargeable batteries AAA, NiMh 600mAh
Handset standby time: 100 hours in standby
Handset talk time: 10 hours
Charging time: 16 hours
Dialing mode Tone / Pulse
Normal conditions of use: +5 °C to +45 °C
Flash time: 100ms or 300ms
18 Topcom Warranty
18.1 Warranty period
The Topcom units have a 24-month warranty period. The warranty period starts on the day
the new unit is purchased. There is no warranty on standard or rechargeable batteries (AA/
AAA type).
Consumables or defects causing a negligible effect on operation or value of the equipment
are not covered.
The warranty has to be proven by presentation of the original or copy of the purchase receipt,
on which the date of purchase and the unit-model are indicated.
ENGLISH
18.2 Warranty handling
A faulty unit needs to be returned to a Topcom service centre including a valid purchase note
and a filled in service return card.
If the unit develops a fault during the warranty period, Topcom or its officially appointed
service center will repair any defects caused by material or manufacturing faults free of
charge, by either repairing or exchanging the faulty units or parts of the faulty units. In case
of replacement, colour and model can be different from the original purchased unit.
The initial purchase date shall determine the start of the warranty period. The warranty period
is not extended if the unit is exchanged or repaired by Topcom or its appointed service
centre.
18.3 Warranty exclusions
Damage or defects caused by incorrect treatment or operation and damage resulting from
use of non-original parts or accessories are not covered by the warranty.
The warranty does not cover damage caused by outside factors, such as lightning, water and
fire, nor any damage caused during transportation.
Sologic B931 27
Page 28

Sologic B931
No warranty can be claimed if the serial number on the units has been changed, removed or
rendered illegible.
Any warranty claims will be invalid if the unit has been repaired, altered or modified by the
buyer.
This appliance may only be used with rechargeable batteries. If you want to replace the
originally included batteries, please check whether the batteries you use are suitable and
rechargeable. Alkaline batteries may under NO circumstances be used in the handsets.
If you use Alkaline batteries and place the handset on the basis, the batteries will heat up and
may explode. Any damage which may be caused cannot be recovered from the manufacturer
and the damage thus caused to the appliance is not covered by the warranty conditions. Any
repairs will be charged to you.
28 Sologic B931
Page 29

Sologic B931
NEDERLANDS
1 Veiligheidsadvies
Leef steeds de volgende veiligheidsmaatregelen na bij het gebruik van elektrische
apparatuur.
Lees de onderstaande informatie over veiligheid en een correct gebruik zorgvuldig door. Leer
alle functies van het toestel kennen. Bewaar deze instructies zorgvuldig en geef ze indien
nodig door aan derden.
Elektrische veiligheid en bescherming
• Gebruik het toestel niet als de stroomstekker, stroomkabel of het toestel zelf beschadigd is.
• Wanneer het toestel is gevallen, moet u het alvorens u het gebruikt laten nakijken door
een elektricien.
• In het toestel zijn gevaarlijke spanningen aanwezig. Open nooit de behuizing en steek
geen voorwerpen in de ventilatiegaten.
• Zorg ervoor dat het toestel niet in contact komt met water. Haal in geval van nood de
stekker uit het stopcontact.
• Haal ook de stekker uit het stopcontact als er een defect optreedt tijdens het gebruik of
voordat u het toestel gaat schoonmaken.
• Raak de laad- en stekkercontacten niet aan met scherpe of metalen voorwerpen.
• Voer zelf geen aanpassingen of reparaties uit aan het toestel. Laat reparaties aan het
toestel of de stroomkabel alleen uitvoeren door een gespecialiseerd
onderhoudscentrum. Slechte reparaties kunnen leiden tot een aanzienlijk gevaar voor
de gebruiker.
• Kinderen onderschatten vaak de gevaren van elektrische apparatuur. Laat kinderen
daarom nooit zonder toezicht in de buurt van elektrische apparatuur.
• Het toestel mag niet worden gebruikt in een vochtige ruimte (bv. badkamers) of ruimten
met veel stof.
• Apparaten die tijdens een onweersbui met het stopcontact verbonden zijn, kunnen door
blikseminslag worden beschadigd. Verwijder daarom de stekker uit het stopcontact
tijdens een onweer.
• Om het toestel volledig van de stroomvoorziening af te koppelen, moet u de stekker uit
het stopcontact trekken. Trek hierbij altijd aan de stekker zelf en nooit aan de kabel.
• Bescherm de stroomkabel tegen hete oppervlakken of andere schadelijke bronnen en
zorg ervoor dat de kabel niet klem komt te zitten.
• Controleer de stroomkabel regelmatig op schade.
• Rol de stroomkabel voor gebruik helemaal uit.
• Ga na of niemand over de stroomkabel kan struikelen.
• De werking van medische toestellen kan worden beïnvloed.
• De handset kan een onaangenaam zoemend geluid veroorzaken in hoorapparaten.
Brandveiligheid
• De warmte die zich in het toestel opbouwt, kan leiden tot een defect en/of brand in het
toestel. Stel dit toestel daarom niet bloot aan hoge temperaturen:
– direct zonlicht en de verwarming.
– de ventilatiegaten mogen niet bedekt worden.
Explosiegevaar
• Gooi de batterijen nooit in vuur.
Sologic B931 29
Page 30

Sologic B931
Vergiftigingsgevaar
• Houd de batterijen uit de buurt van kinderen.
Opmerking
• Gebruik uitsluitend de meegeleverde adapter. Gebruik geen andere laders, omdat dit de
batterijcellen kan beschadigen.
• Het wandstopcontact moet in de buurt en toegankelijk zijn.
• Gebruik alleen oplaadbare batterijen van hetzelfde type. Plaats de batterijen met de
juiste polariteit in het batterijgedeelte (de polariteit staat in de handset weergegeven).
Gebruik nooit normale niet-oplaadbare batterijen!
Omdat deze telefoon niet kan worden gebruikt tijdens een
stroomuitval, moet u een telefoon gebruiken die niet afhankelijk is van
het elektriciteitsnet bij noodgevallen, bv. een mobiele telefoon.
2 Het product afvoeren (milieu)
Na afloop van de levenscyclus van het product mag u het niet met het normale
huishoudelijke afval weggooien, maar moet u het naar een inzamelpunt brengen
voor recycling van elektrische en elektronische apparatuur. Dit wordt aangeduid
door het symbool op het product, in de handleiding en/of op de verpakking.
Sommige materialen waaruit het product is vervaardigd, kunnen worden hergebruikt als u ze
naar een inzamelpunt brengt. Door onderdelen of grondstoffen van gebruikte producten te
hergebruiken, levert u een belangrijke bijdrage aan de bescherming van het milieu.
Wend u tot de plaatselijke overheid voor meer informatie over de inzamelpunten bij u in de
buurt.
3 Reiniging
Reinig de telefoon met een vochtige of antistatische doek. Gebruik nooit reinigingsmiddelen
of agressieve oplosmiddelen.
4 ECO-modus (lage straling)
Deze draadloze telefoon (conform de DECT-norm) vergemakkelijkt de lagestralingswerking.
De stralingsintensiteit van het radiosignaal tussen het basisstation en de handset wordt
verminderd tot een minimum wanneer de handset in het basisstation staat. De intensiteit van
het radiosignaal wordt alleen naar de normale sterkte verhoogd wanneer de handset van het
basisstation wordt genomen of als er een oproep wordt ontvangen.
Dit betekent niet dat de normale DECT-straling schadelijk is voor de gezondheid. De lagestralingsmodus voorkomt een onnodige DECT-stralingsbelasting wanneer er geen
communicatie is vereist tussen het basisstation en de handset.
Om technische redenen kunnen er geen extra handsets in de lage-stralingsmodus worden
gebruikt (een extra handset die niet in de directe omgeving van het basisstation staat, zal
altijd "zoeken naar het basisstation" als gevolg van het zwakke radiosignaal).
De lage-stralingsmodus is actief in de fabrieksinstellingen. De lage-stralingsmodus wordt
automatisch uitgeschakeld als u een extra handset aanmeldt.
30 Sologic B931
Page 31

Sologic B931
NEDERLANDS
B931
7,5V DC 300mA
17
5Installatie
Controleer voordat u de telefoon voor het eerst gebruikt of de
batterijen zijn opgeladen. Als dat niet het geval is, werkt de telefoon
niet optimaal.
5.1 Het basisstation installeren
Volg deze stappen om de telefoonkabel aan te sluiten:
• Steek één uiteinde van de adapter in het 230 V-stopcontact en het andere uiteinde in de
adapteraansluiting op de onderkant van het basisstation.
• Steek de telefoonstekker in het telefoonstopcontact en de telefoonplug in de connector
aan de onderkant van het basisstation. Gebruik de meegeleverde telefoonkabel.
1
2
4
3
1. Stroomkabel
2. Telefoonstopcontact
3. Telefoonkabel
4. Onderaanzicht van het basisstation
5.2 De batterijen plaatsen
• Open het batterijvak (zie hieronder).
• Plaats de batterijen en let daarbij op de polariteit (+ en -).
• Sluit het batterijvak.
• Laat de handset 16 uur in het basisstation staan. De laadindicator
LED op het basisstation gaat branden.
Sologic B931 31
Page 32

Sologic B931
Achteraanzicht van handset
Batterijdeksel
-
+
-
B 931
+
-
+
Oplaadbare
batterijen
Riemclip
5.3 Aan de muur bevestigen
U kunt het basisstation met behulp van de houder aan de muur bevestigen. Plaats het
basisstation op de houder.
Boor op 6 cm van elkaar gaten in de muur.
Muur
Muurplug
6 cm
Schroef
32 Sologic B931
Page 33

NEDERLANDS
6 Uw telefoon leren kennen
17
18
19
Sologic B931
6.1 Toetsen / LED
Handset
1. Visuele beltoon
2. Snelgeheugentoetsen M1 - M4
3. Display
4. Rechts- / Nummerherhalings- /
Pauze-toets
5. Rechtermenutoets
6. Toets ophangen / Aan-Uit
7. Omlaag- / Telefoonboek-toets
8. Alfanumerieke toetsen
9. Toets Trilfunctie / Visuele beltoon
10. Microfoon
11. Toets voor toetsenbordvergrendeling
12. Toets Opnemen / Handenvrij
13. Linkermenutoets
14. Toets Links / Interne oproep
15. Omhoog- / Oproeplog-toets
16. Oortelefoon
16
15
14
13
12
11
10
1
2
3
4
5
6
7
8
9
Basisstation
17. Handset laadindicator (LED)
18. Paging-toets
19. Laadcontactpunten
Sologic B931 33
Page 34

Sologic B931
13
17
6.2 Display (LCD)
Regel met pictogrammen
Naam van de handset
Nummer van de handset
Dag en tijd
Regel voor Soft menu / Optiemenu
Batterij-indicator:
• De batterij is volledig opgeladen
• De batterij is 25% leeg
• De batterij is halfleeg (50%)
• De batterij is 75% leeg
• De batterij is bijna leeg. U hoort waarschuwingssignalen en het batterijsymbool
op de display knippert.
6.3 Pictogrammen
Opnemen
Trilfunctie en visuele beltoon aan
Luidspreker bij handenvrij aan
Toetsenbord vergrendeld
Interne oproep
Nieuwe onbeantwoorde oproepen*
Nieuw voicemailbericht*
Alarm aan
Pictogram signaaldetectie knippert wanneer de handset te ver
verwijderd is van het basisstation.
* Alleen wanneer nummerweergave op uw telefoonlijn is geactiveerd.
6.4 Displaytoetsen
Displaytoetsen (soft keys) bevinden zich direct onder de display . De functie van
deze 2 toetsen verandert naargelang de gebruiksmodus. De werkelijke functie wordt
weergegeven als tekst direct boven de 2 toetsen.
5
6.5 LED van het basisstation
De laadindicator LED geeft de volgende status weer:
• Uit: geen stroom op het basisstation aangesloten of de handset staat niet in het
basisstation om op te laden.
• Aan: handset is bezig met laden.
34 Sologic B931
Page 35

NEDERLANDS
6.6 Door het menu bladeren
15
7
5
Select Back
Main Menu
CID Book
Phonebook
BS Settings
De handset heeft een gebruiksvriendelijk menusysteem. Elk menu toont een lijst met opties.
Wanneer de handset wordt ingeschakeld en in de stand-bymodus staat, drukt u op de
linkermenutoets om het hoofdmenu te openen.
Druk op de toets omhoog of omlaag om naar de gewenste menuoptie te gaan.
Druk op of om de overige opties te selecteren of om de weergegeven
instelling te bevestigen.
Sluit af of ga één niveau terug in het menu:
Druk op ‘Terug’ (Back) om terug in het menu te gaan.
Druk op de aan-/uit-toets om op een willekeurig moment te annuleren en terug te
keren naar de stand-bymodus. Als er 15 seconden lang geen toets wordt ingedrukt, gaat de
handset automatisch terug naar stand-by.
13
13
6
6.7 Menuoverzicht
Menu Opties van het submenu
Caller ID
Toevoegen
Wijzig
Telefoonboek
Basis
Handset
Aanmelden Basis 1 - 4
Wis
Wis alles
Tel bk overz
Afm handset
Kiesmodus
Flash
Wijzig PIN
Reset basis
Wekker
Geluiden
Bel
To on t je s
Ta al
Handset naam
Auto aan
Contrast
Tijd & datum
Selec basis
HS reset
Sologic B931 35
Sologic B931
Page 36

Sologic B931
6
15
7
15
13
7
5
12
12
12
7 Werking van de handset
7.1 De handset in- en uitschakelen
• Schakel de handset in door op de aan-/uit-toets te drukken of door de handset in
het basisstation te plaatsen.
• Schakel de handset uit door de aan-/uit-toets ingedrukt te houden totdat de
handset wordt uitgeschakeld.
7.2 De taal instellen
De telefoon heeft 9 talen voor de display.
U kunt de taal als volgt instellen:
• Druk op de linkermenutoets onder ‘Menu’ (Menu).
• Druk herhaaldelijk op de toets omhoog of omlaag
Settings) is geselecteerd.
• Druk op ‘OK’ (Select) om te bevestigen.
• Druk herhaaldelijk op de toets omhoog of omlaag
is geselecteerd.
• Druk op ‘OK’ (Select) om te bevestigen.
• De taal wordt op de display weergegeven.
• Druk herhaaldelijk op de toets omhoog of omlaag
selecteren.
• Druk op ‘Bewaar’(Save) om uw keuze te bevestigen of druk op ‘Terug’ (Back)
om het menu zonder opslaan af te sluiten.
13
13
7.3 Oproepen maken
6
/ totdat ‘Handset’ (HS
7
/ totdat ‘Taal’ (Language)
15
/ om de gewenste taal te
7.3.1 Externe oproep
• Druk op de toets Opnemen .
• Het oproepsymbool verschijnt op de display.
• U hoort de kiestoon. Kies het telefoonnummer dat u wilt bellen.
• Het nummer wordt op de display weergegeven en wordt gekozen.
• Als de oproep is beëindigd, drukt u op de toets ophangen om op te hangen.
7.3.2 Voorbereiding van het nummer
• Kies het telefoonnummer dat u wilt bellen. U kunt het nummer corrigeren door op de
toets ‘Wissen’ (Erase) te drukken.
• Druk op de toets Opnemen .
• Het oproepsymbool verschijnt op de display.
• Het telefoonnummer wordt automatisch gekozen.
• Als de oproep is beëindigd, drukt u op de toets Ophangen of plaatst u de
handset terug in het basisstation om op te hangen.
7.3.3 Het laatst gekozen nummer opnieuw bellen
• Druk op de nummerherhalingstoets .
• Druk op de toets Opnemen . Het laatst gekozen nummer wordt automatisch
gekozen.
36 Sologic B931
4
6
6
Page 37

Sologic B931
NEDERLANDS
4
15
7
12
15
12
13
15
7
6
7.3.4 Een van de 10 laatst gebelde nummers opnieuw bellen
• Druk op de nummerherhalingstoets . Het laatst gekozen nummer verschijnt op de
display.
• Druk herhaaldelijk op de toets omhoog of omlaag
/ totdat het gewenste
nummer op de display wordt weergegeven.
• Druk op de toets Opnemen .
• Het telefoonnummer op de display wordt automatisch gekozen.
• Als de oproep is beëindigd, drukt u op de toets Ophangen of plaatst u de
6
handset terug in het basisstation om op te hangen.
7.3.5 Een geprogrammeerd nummer uit het telefoonboek bellen
De telefoon heeft een telefoonboek waarin u telefoonnummers met naam kunt opslaan (Zie
ook § “10 Het telefoonboek”). Een nummer uit het telefoonboek bellen:
• Druk op de toets voor het telefoonboek . Het eerste nummer van het telefoonboek
7
wordt op de display weergegeven.
7
• Druk herhaaldelijk op de toets omhoog of omlaag
/ om het telefoonnummer
dat u wilt bellen te kiezen.
• Druk op de toets Opnemen .
• Het telefoonnummer op de display wordt automatisch gekozen.
• Als de oproep is beëindigd, drukt u op de toets Ophangen of plaatst u de
6
handset terug in het basisstation om op te hangen.
7.3.6 R-signaal
Met de Flash-toets ‘R’ (Flash) kunt u bepaalde diensten op uw externe lijn gebruiken,
zoals “tweede oproep” (als uw telefoonmaatschappij deze dienst aanbiedt) of het
doorverbinden van oproepen als u een telefooncentrale (PABX) gebruikt. De Flash-toets is
een korte onderbreking van de lijn. U kunt de Flash-toets tijdens een oproep gebruiken door
op de linkermenutoets ‘R’ (Flash) te drukken. U kunt een korte of lange flashtijd instellen
13
(zie “12.1 De flashtijd instellen”).
7.4 Een oproep ontvangen
Tijdens een interne of externe inkomende oproep begint de handset te rinkelen. U kunt het
belvolume veranderen door op de toetsen omhoog of omlaag
• Alle aangemelde handsets bellen als u een oproep ontvangt.
• Het telefoonnummer van de beller wordt op de display weergegeven als
nummerweergave (CLIP) is ingeschakeld. Raadpleeg uw telefoonmaatschappij. De
naam van de beller wordt ook op de display weergegeven als:
– het nummer met naam in het telefoonboek is geprogrammeerd.
– het netwerk de naam samen met het telefoonnummer stuurt.
• Druk op de toets voor opnemen om de externe oproep te accepteren.
12
• OF Til de handset van het basisstation op (als de optie Automatische beantwoording
actief is, zie
zie §“7.21 Automatische beantwoording”
).
• Tijdens het gesprek wordt het symbool op de display weergegeven en begint de
oproeptimer
te lopen.
• Als de oproep is beëindigd, drukt u op de toets ophangen of plaatst u de handset
terug in het basisstation om op te hangen.
Sologic B931 37
/ te drukken.
Page 38

Sologic B931
13
15
13
12
7
7
7.5 Opties Nummerherhalingslijst
Wanneer u door de nummerherhalingslijst bladert (zie §“7.3.4 Een van de 10 laatst gebelde
nummers opnieuw bellen”), hebt u de volgende opties:
Als het gewenste nummer op de display wordt weergegeven, drukt u op ‘Meer’ (More)
7
en selecteert u met de toetsen omhoog en omlaag
•‘Copy tel.bk’ (Add to PB): om het nummer in het telefoonboek op te slaan. Druk op ‘OK’
(Select) om te bevestigen. Voer een naam in (Zie “10.1 Een nummer en naam aan het
telefoonboek toevoegen”) en druk op ‘Volgen’ (Next) . Bewerk het nummer en druk
op ‘Vol gen’ (Next). Selecteer de gewenste belmelodie en druk op ‘Bewaar’ (Save) .
•‘Wis oproep’ (Delete Call): om een invoer in de nummerherhalingslijst te wissen. Druk
op ‘Wis’ (Del) om te bevestigen.
•‘Wis Alles’ (Delete All): om alle invoeren in de nummerherhalingslijst te wissen. Druk op
‘Wis’ (Del) om te bevestigen.
/ de volgende opties:
13
7.6 De functie handenvrij activeren / deactiveren
Met deze functie kunt u bellen zonder dat u de handset hoeft vast te houden. Druk terwijl u
aan het praten bent op de toets voor handenvrij om de functie handenvrij te activeren.
Druk nog een keer op de toets om de functie handenvrij uit te schakelen.
Als u in de handenvrijmodus belt en u het volume wilt aanpassen,
druk dan herhaaldelijk op de toets omhoog of omlaag
Als u de handenvrijfunctie langere tijd gebruikt, kunnen de batterijen
sneller leeg raken!
12
15
/ .
7.7 Waarschuwing Buiten bereik (out of range)
Als de handset buiten bereik van het basisstation komt, weerklinkt er een
waarschuwingssignaal.
•‘ZOEKEN’ (Searching) wordt op de display weergegeven en het symbool knippert
op de display.
• Ga dichter bij het basisstation staan.
• Als u weer binnen bereik van het basisstation bent, weerklinkt er een signaal en stopt
het symbool met knipperen.
7.8 Het volume van de luidspreker instellen
Gebruik de toetsen omhoog en omlaag / tijdens een gesprek om het volume
van de luidspreker in te stellen. U kunt uit 5 niveaus kiezen.
Het volume voor handenvrij bellen kan op dezelfde manier worden
ingesteld.
15
7.9 Indicator voor gespreksduur op de display
Tijdens een externe oproep wordt de gespreksduur op de display weergegeven:
Bijvoorbeeld '01:10:40' voor 1 uur, 10 minuten en 40 seconden.
De gespreksduur blijft 5 seconden na elke oproep op de display staan.
38 Sologic B931
Page 39

Sologic B931
NEDERLANDS
5
4
17
15
7
15
7157
15
7
7.10 De microfoon uitschakelen (geluid uit)
Als u de microfoon tijdens een oproep wilt uitschakelen, drukt u op de rechtermenutoets
‘Mute’ (Mute) . U kunt nu vrij spreken zonder dat de beller u kan horen. Als u de microfoon
weer wilt activeren, drukt u nog een keer op de rechtermenutoets ‘Mute’ (Mute) .
5
7.11 Pauze-toets
Als u een telefoonnummer kiest en u wilt een onderbreking in dit nummer invoeren, druk dan
op de pauze-/nummerherhalingstoets op de gewenste plaats in het nummer.
Als u dit nummer (opnieuw) kiest, dan wordt de pauze (3 seconden) automatisch ingevoegd.
7.12 Een kwijtgeraakte handset zoeken (paging)
Als u de handset niet kunt vinden, drukt u kort op de toets Paging op het basisstation.
Alle handsets die op het basisstation zijn aangemeld bellen, zodat u de kwijtgeraakte
handset kunt lokaliseren. Stop het signaal door kort op een willekeurige toets op een
willekeurige handset te drukken.
7.13 Het alfanumerieke toetsenbord van de handset gebruiken
U kunt met het alfanumerieke toetsenbord tekst invoeren. Als u een letter wilt selecteren,
drukt u op de bijbehorende alfanumerieketoets . Als u bijvoorbeeld op de alfanumerieke
toets '5' drukt, wordt het eerste teken 'j' op de display weergegeven. Druk herhaaldelijk op
deze toets om andere tekens van deze toets te selecteren.
Druk één keer op de toets ‘2’ om de letter ‘a’ te selecteren. Als u de ‘a’ en ‘b’ na elkaar wilt
selecteren, druk dan eerst één keer op ‘2’ om ‘a’ te selecteren, wacht 2 seconden totdat de
cursor naar de volgende positie beweegt en druk daarna twee keer op de toets ‘2’ om ‘b’ te
selecteren. U kunt tekens die u per ongeluk hebt ingevoerd wissen met de toets ‘Wissen’
(Erase). Het teken voor de cursor wordt verwijderd. U kunt de cursor verplaatsen met de
toetsen omhoog en omlaag
/ .
8
7.14 Het belvolume op de handset instellen
U kunt het belvolume van een inkomende oproep (intern en extern) tussen 6 niveaus
wisselen (niveaus ‘1’ tot en met ‘5’ en ‘Uit’ (Off)).
Als u het niveau ‘Uit’ (Off) selecteert, belt de handset niet als er een oproep wordt ontvangen.
Niveau ‘5’ is het hoogste niveau.
7.14.1 Het belvolume en de melodie voor interne en externe oproepen instellen
• Druk op de toets ‘Menu’ (Menu).
• Druk herhaaldelijk op de toets omhoog of omlaag / totdat ‘Handset’ (HS
Settings) is geselecteerd.
• Druk op ‘OK’ (Select) om te bevestigen.
• Druk herhaaldelijk op de toets omhoog of omlaag
is geselecteerd.
• Druk op ‘OK’ (Select) om te bevestigen.
• Selecteer ‘Intern’ (INT Ring) of ‘Extern’ (EXT Ring) en druk op ‘OK’ (Select).
• Selecteer ‘Melodie’ (Melody) of ‘Volume’ (Volume) en druk op ‘OK’ (Select).
• Het huidige volume en de huidige melodie worden weergegeven en zijn hoorbaar.
• Druk herhaaldelijk op de toets omhoog of omlaag
volume / de gewenste melodie is geselecteerd.
Sologic B931 39
/ totdat ‘Bel’ (Ring Setup)
/ totdat het gewenste
Page 40

Sologic B931
13
5
15
7
7
15
7
11
11
15
7
15
7
15
7
• Druk op ‘Bewaar’(Save) om uw keuze te bevestigen of druk op ‘Terug’ (Back)
om het menu zonder opslaan af te sluiten.
U kunt het belvolume ook veranderen tijdens een inkomende oproep,
zie “7.4 Een oproep ontvangen”.
7.15 Volume oortelefoon/handenvrij instellen
U kunt het menu ook gebruiken om het geluidsvolume van de handenvrije luidspreker en
oortelefoon aan te passen:
• Druk op de toets ‘Menu’ (Menu).
• Druk herhaaldelijk op de toets omhoog of omlaag
Settings) is geselecteerd.
• Druk op ‘OK’ (Select) om te bevestigen.
• Druk herhaaldelijk op de toets omhoog of omlaag
Setup) is geselecteerd.
• Druk op ‘OK’ (Select) om te bevestigen.
• Selecteer ‘LS Volume’ (Speaker V.) of ‘Hoorn vol.’ (Earpiece V.) en druk op ‘OK’
(Select)
• Druk herhaaldelijk op de toets omhoog of omlaag / totdat het gewenste
volume is geselecteerd.
• Druk op ‘Bewaar’ (Save) om uw keuze te bevestigen of druk op ‘Ter ug’ (Back)
om het menu zonder opslaan af te sluiten.
13
.
13
/ totdat ‘Handset’ (HS
15
/ totdat ‘Geluiden’ (Audio
5
7.16 Het toetsenbord vergrendelen
U kunt het toetsenbord vergrendelen zodat er niet per ongeluk toetsen worden ingedrukt.
Wanneer het toetsenbord vergrendeld is, kan er onmogelijk een telefoonnummer worden
gevormd; enkel de snelgeheugentoetsen M1 - M4 kunnen worden gebruikt. Inkomende
oproepen kunnen ook nog worden beantwoord.
De toetsenbordvergrendeling activeren:
• Houd de toets voor toetsenbordvergrendeling 5 seconden ingedrukt.
•‘HS geblokk’ (HS Locked) en het pictogram wordt op de display weergegeven.
De toetsenbordvergrendeling uitschakelen:
• Houd de toets voor toetsenbordvergrendeling nogmaals 5 seconden
ingedrukt.
7.17 Toetsgeluid in-/uitschakelen
U kunt de handset zodanig instellen dat u een piep hoort als u op een toets drukt.
• Druk op de linkertoets ‘Menu’ (Menu).
• Druk herhaaldelijk op de toets omhoog of omlaag
Settings) is geselecteerd.
• Druk op ‘OK’ (Select) om te bevestigen.
• Druk herhaaldelijk op de toets omhoog of omlaag
Setup) is geselecteerd.
• Druk op ‘OK’ (Select) om te bevestigen.
• Druk herhaaldelijk op de toets omhoog of omlaag
Tone) is geselecteerd.
40 Sologic B931
/ totdat ‘Handset’ (HS
/ totdat ‘Toontjes’ (Tone
/ totdat ‘Toets’ (Key
Page 41

Sologic B931
NEDERLANDS
5
15
7
15715
7
15
7
15
7
15
7
13
15
7
15
7
• Selecteer
–‘Aan’ (On): om toetstonen in te schakelen
–‘Uit’ (Off): om toetstonen uit te schakelen
• Druk op ‘Bewaar’ (Save) om uw keuze te bevestigen of druk op ‘Ter ug’ (Back)
om het menu zonder opslaan af te sluiten.
13
7.18 Bereik
Er weerklinkt een pieptoon wanneer de handset buiten het bereik van het basisstation is. U
kunt deze functie in- of uitschakelen:
• Druk op de linkertoets ‘Menu’ (Menu).
• Druk herhaaldelijk op de toets omhoog of omlaag
Settings) is geselecteerd.
• Druk op ‘OK’ (Select) om te bevestigen.
• Druk herhaaldelijk op de toets omhoog of omlaag
Setup) is geselecteerd.
• Druk op ‘OK’ (Select) om te bevestigen.
• Druk herhaaldelijk op de toets omhoog of omlaag
Alarm) is geselecteerd.
• Selecteer
–‘Aan’ (On): om het bereik in te schakelen
–‘Uit’ (Off): om het bereik uit te schakelen
• Druk op ‘Bewaar’ (Save) om uw keuze te bevestigen of druk op ‘Ter ug’ (Back)
om het menu zonder opslaan af te sluiten.
13
/ totdat ‘Handset’ (HS
/ totdat ‘Toontjes’ (Tone
/ totdat ‘Bereik’ (Range
5
7.19 Contrast van de display
Het contrast van de display aanpassen:
• Druk op de linkertoets ‘Menu’ (Menu).
• Druk herhaaldelijk op de toets omhoog of omlaag
Settings) is geselecteerd.
• Druk op ‘OK’ (Select) om te bevestigen.
• Druk herhaaldelijk op de toets omhoog of omlaag
Contrast) is geselecteerd.
• Druk op ‘OK’ (Select) om te bevestigen.
• Druk herhaaldelijk op de toets omhoog of omlaag
passen tussen 0 (licht) en 16 (donker).
• Druk op ‘Bewaar’ (Save) om uw keuze te bevestigen of druk op ‘Terug’ (Back)
om het menu zonder opslaan af te sluiten.
/ totdat ‘Handset’ (HS
/ totdat ‘Contrast’ (LCD
/ om het contrast aan te
5
7.20 De naam van de handset wijzigen
U kunt de naam die tijdens stand-by op de handset wordt weergegeven wijzigen.
• Druk op de linkertoets ‘Menu’ (Menu).
• Druk herhaaldelijk op de toets omhoog of omlaag
Settings) is geselecteerd.
• Druk op ‘OK’ (Select) om te bevestigen.
• Druk herhaaldelijk op de toets omhoog of omlaag
(HS Name) is geselecteerd.
• Druk op ‘OK’ (Select) om te bevestigen.
Sologic B931 41
/ totdat ‘Handset’ (HS
/ totdat ‘Handset naam’
Page 42

Sologic B931
13
15
7
15
7
13
9
15
7
15
7
13
5
• Geef de nieuwe naam van de handset in en druk op ‘Wissen’ (Erase) om de tekens voor
de cursor te verwijderen.
• Druk op ‘Bewaar’ (Save) om uw keuze te bevestigen of druk op ‘Te rug’ (Back)
om het menu zonder opslaan af te sluiten.
5
7.21 Automatische beantwoording
Wanneer er een inkomende oproep is en de handset in het basisstation staat, neemt de
telefoon automatisch de oproep aan wanneer u hem oppakt. Deze functie kan in- of
uitgeschakeld worden.
• Druk op de linkertoets ‘Menu’ (Menu).
• Druk herhaaldelijk op de toets omhoog of omlaag
Settings) is geselecteerd.
• Druk op ‘OK’ (Select) om te bevestigen.
• Druk herhaaldelijk op de toets omhoog of omlaag
(Auto Answer) is geselecteerd.
• Druk op ‘OK’ (Select) om te bevestigen.
• Selecteer
–‘Aan’ (On): om de automatische beantwoording in te schakelen
–‘Uit’ (Off): om de automatische beantwoording uit te schakelen
• Druk op ‘Bewaar’ (Save) om uw keuze te bevestigen of druk op ‘Teru g’ (Back)
om het menu zonder opslaan af te sluiten.
/ totdat ‘Handset’ (HS
/ totdat ‘Auto aann’
5
7.22 Visuele beltoon en trilfunctie in- en uitschakelen
Wanneer u de visuele beltoon en trilfunctie inschakelt, zal de visuele beltoon knipperen
en zal de handset trillen tijdens een inkomende oproep.
• Om de functie in te schakelen, houdt u de toets ingedrukt totdat het pictogram
verschijnt.
• Om de functie uit te schakelen, houdt u de toets ingedrukt totdat het pictogram
verdwijnt.
9
1
8 Reset handset
U kunt alle instellingen van de handset opnieuw instellen op de standaardinstellingen en
telefoonboek, oproeplog, belvolume/-melodie, geluiden, beltoon, wekker, taal en alle
ingevoerde items wissen. Het LCD-contrast kan niet opnieuw worden ingesteld.
Om de standaardinstellingen terug te zetten:
• Druk op de linkertoets ‘Menu’ (Menu).
• Druk herhaaldelijk op de toets omhoog of omlaag
Settings) is geselecteerd.
• Druk op ‘OK’ (Select) om te bevestigen.
• Druk herhaaldelijk op de toets omhoog of omlaag
Reset) is geselecteerd.
• Druk op ‘OK’ (Select) om te bevestigen.
• Voer de pincode (0000) in.
• Druk op ‘Reset’ (Reset) om uw keuze te bevestigen of druk op ‘Te rug’ (Back)
om het menu zonder opslaan af te sluiten.
42 Sologic B931
/ totdat ‘Handset’ (HS
/ totdat ‘HS reset’ (HS
Page 43

Sologic B931
NEDERLANDS
15
7
15
15
7
13
13
15
7
De standaardinstellingen zijn:
Wekker: Uit
Geluiden: 3
Intern/Extern Melodie: Melodie 3
Intern/Extern Volume: Volume 3
Toetstoon: Aan
Bereik: Aan
Naam van de handset: HS1
Tijdformaat: 24 uur
Datumformaat: DD-MM
Telefoonboek: Leeg
Oproeplog: Leeg
Nummerherhalingslijst: Leeg
Automatische beantwoording: Uit
Tijd en datum: 0:00 01-01
Na een reset moet u de handset opnieuw inschakelen, zie “7.1 De
handset in- en uitschakelen”.
9 Klok en wekker instellen
9.1 Datum- en tijdformaat
• Druk op de linkertoets ‘Menu’ (Menu).
• Druk herhaaldelijk op de toets omhoog of omlaag
Settings) is geselecteerd.
• Druk op ‘OK’ (Select) om te bevestigen.
• Druk herhaaldelijk op de toets omhoog of omlaag
& Time) is geselecteerd.
• Druk op ‘OK’ (Select) om te bevestigen.
• Druk herhaaldelijk op de toets omhoog of omlaag
form’ (Date Format) of ‘Tijd form’ (Time Format).
• Druk op ‘OK’ (Select) om te bevestigen.
• Gebruik de toets omhoog of omlaag
MM) / ‘MM-DD’ (MM-DD) of het tijdformaat ‘12-uur’ (12-Hour) / ‘24-uur’ (24-Hour) te
selecteren.
• Druk op ‘Bewaar’ (Save) om uw keuze te bevestigen of druk op ‘Teru g’ (Back)
om het menu zonder opslaan af te sluiten.
15
7
/ om het datumformaat ‘DD-MM’ (DD-
/ totdat ‘Handset’ (HS
7
/ totdat ‘Dag & tijd’ (Date
/ en selecteer ‘Datum
5
9.2 Dag en tijd instellen
• Druk op de linkertoets ‘Menu’ (Menu) .
Als u nummerweergave op uw telefoonlijn hebt en de
telefoonmaatschappij verzendt datum en tijd, dan wordt uw klok
automatisch ingesteld voor een inkomende oproep.
• Druk herhaaldelijk op de toets omhoog of omlaag / totdat ‘Handset’ (HS
Settings) is geselecteerd.
• Druk op ‘OK’ (Select) om te bevestigen.
Sologic B931 43
Page 44
Sologic B931
15
15
7
5
15
7
15715
7
15
7
13
6
15
7
• Druk herhaaldelijk op de toets omhoog of omlaag / totdat ‘Dag & tijd’ (Date
& Time) is geselecteerd.
• Druk op ‘OK’ (Select) om te bevestigen.
• Druk herhaaldelijk op de toets omhoog of omlaag
datum’ (Set Date) of ‘Instel tijd’ (Set Time).
• Druk op ‘OK’ (Select) om te bevestigen.
• Voer de huidige datum/tijd met het numerieke toetsenbord in.
• Druk op ‘Bewaar’ (Save) om uw keuze te bevestigen of druk op ‘Ter ug’ (Back)
om het menu zonder opslaan af te sluiten.
13
7
/ en selecteer ‘Instel
9.3 De alarmfunctie gebruiken
Stel de datum en tijd in en gebruik uw handset om een herinneringsalarm in te stellen. U kunt
andere alarminstellingen instellen voor elke handset die op uw basisstation is aangemeld.
Het alarm gaat alleen af op de handset en niet op het basisstation of een andere handset.
Als een van de alarmen is ingesteld, dan wordt het pictogram voor alarm instellen in de
stand-bymodus op de display weergegeven.
Wanneer het alarm afgaat, drukt u op een willekeurige toets om het uit te zetten.
9.3.1 Het alarm instellen
• Druk op de linkertoets ‘Menu’ (Menu).
• Druk herhaaldelijk op de toets omhoog of omlaag
Settings) is geselecteerd.
• Druk op ‘OK’ (Select) om te bevestigen.
• Druk herhaaldelijk op de toets omhoog of omlaag
is geselecteerd.
• Druk op ‘OK’ (Select) om te bevestigen.
• Druk herhaaldelijk op de toets omhoog of omlaag
of ‘Uit’ (Off).
• Druk op ‘OK’ (Select) om te bevestigen.
• Wanneer u ‘Aan’ (On) selecteert, geeft de display aan om de tijd in HH:MM-formaat in te
voeren. Gebruik het numerieke toetsenbord om de tijd in te voeren. Druk op ‘Volgen’
(Next) en op de display verschijnt ‘Snooze aan/uit’ (Snooze On/Off). Druk op de toets
omhoog of omlaag
• Druk op ‘Bewaar’ (Save) om uw keuze te bevestigen of druk op ‘Teru g’ (Back)
om het menu zonder opslaan af te sluiten.
/ om de snooze-functies in of uit te schakelen.
/ totdat ‘Handset’ (HS
/ totdat ‘Wekker’ (Alarm)
/ en selecteer ‘Aan’ (On)
5
Wanneer u ‘Snooze aan’ (Snooze On) kiest, gaat de wekker om de 11
minuten af. Wanneer u op de toets drukt wanneer de wekker
afgaat, verandert deze optie in ‘Snooze uit’ (Snooze Off).
10 Het telefoonboek
In het telefoonboek kunt u 50 telefoonnummers en namen opslaan. U kunt namen van
maximaal 12 tekens en nummers van maximaal 20 cijfers invoeren.
10.1 Een nummer en naam aan het telefoonboek toevoegen
• Druk op de linkertoets ‘Menu’ (Menu).
• Druk herhaaldelijk op de toets omhoog of omlaag
44 Sologic B931
/ totdat ‘Telefoonboek’
Page 45

Sologic B931
NEDERLANDS
15
7
15
15
7
15
7
15
7
15
(Phonebook) is geselecteerd.
• Druk op ‘OK’ (Select) om te bevestigen.
• Druk herhaaldelijk op de toets omhoog of omlaag / totdat ‘Toevoegen’
(New) is geselecteerd.
• Druk op ‘OK’ (Select) om te bevestigen.
7
• Druk herhaaldelijk op de toets omhoog of omlaag
of ‘Uit’ (Off).
• Druk op ‘OK’ (Select) om te bevestigen.
• Voer de naam in door middel van de numerieke toetsen (zie ook “7.13 Het
alfanumerieke toetsenbord van de handset gebruiken”).
• Druk op ‘Volgen’ (Next) en voer het gewenste nummer (maximaal 20 cijfers) in.
• Druk op ‘Volgen’ (Next) en selecteer de gewenste melodie voor dit nummer met de
7
toets omhoog of omlaag
• Druk op ‘Bewaar’ (Save) om uw keuze te bevestigen of druk op ‘Ter ug’ (Back)
om het menu zonder opslaan af te sluiten.
/ .
13
/ en selecteer ‘Aan’ (On)
5
10.2 Een nummer opzoeken in het telefoonboek
• Druk op de toets voor het telefoonboek .
• |Voer de eerste letter van de gewenste naam via het alfanumerieke toetsenbord in.
• De eerste naam in de lijst met deze letter wordt op de display weergegeven.
• Druk op de toets omhoog of omlaag
telefoonboek te zoeken.
• Als het gewenste nummer op de display wordt weergegeven, wordt het nummer
automatisch gekozen door op de toets voor opnemen te drukken.
15
7
/ om andere nummers in het
12
10.3 Een naam of nummer in het telefoonboek wijzigen
• Druk op de linkertoets ‘Menu’ (Menu).
• Druk herhaaldelijk op de toets omhoog of omlaag / totdat ‘Telefoonboek’
(Phonebook) is geselecteerd.
• Druk op ‘OK’ (Select) om te bevestigen.
• Druk herhaaldelijk op de toets omhoog of omlaag
geselecteerd.
• Druk op ‘OK’ (Select) om te bevestigen.
• |Voer de eerste letter van de gewenste naam via het alfanumerieke toetsenbord in.
• De eerste naam in de lijst met deze letter wordt op de display weergegeven.
• Druk op de toets omhoog of omlaag
telefoonboek te zoeken.
• Als het gewenste nummer op de display wordt weergegeven, druk op 'OK' (Select) om
te bevestigen.
• Bewerk de naam door middel van de numerieke toetsen (zie ook “7.13 Het
alfanumerieke toetsenbord van de handset gebruiken”).
• Druk op ‘Volgen’ (Next) en bewerk het nummer.
• Druk op ‘Volgen’ (Next) en selecteer de gewenste melodie voor dit nummer met de
toets omhoog of omlaag
• Druk op ‘Bewaar’ (Save) om uw keuze te bevestigen of druk op ‘Ter ug’ (Back)
om het menu zonder opslaan af te sluiten.
Sologic B931 45
/ .
13
15
7
7
/ om andere nummers in het
/ totdat ‘Wijzig’ (Edit) is
5
Page 46

Sologic B931
15
7
15
7
15
7
15
7
7
10.4 Eén of alle invoeren uit het telefoonboek verwijderen
• Druk op de linkertoets ‘Menu’ (Menu).
• Druk herhaaldelijk op de toets omhoog of omlaag / totdat ‘Telefoonboek’
(Phonebook) is geselecteerd.
• Druk op ‘OK’ (Select) om te bevestigen.
• Druk herhaaldelijk op de toets omhoog of omlaag
‘Wis alles’ (Delete All) is geselecteerd.
• Druk op ‘OK’ (Select) om te bevestigen.
• Op de display verschijnt ‘Bevestig’ (Confirm?). U kunt drukken op ‘Wis’ (Del) of ‘Wis
alles’ (Del All) om te wissen of op ‘Stop’ (Cancel) om af te sluiten.
/ totdat ‘Wis’ (Delete) of
10.5 Telefoonboekoverzicht
Het telefoonboekoverzicht vermeldt de nummers die al in het telefoonboek zijn opgeslagen.
• Druk op de linkertoets ‘Menu’ (Menu).
• Druk herhaaldelijk op de toets omhoog of omlaag
(Phonebook) is geselecteerd.
• Druk op ‘OK’ (Select) om te bevestigen.
• Druk herhaaldelijk op de toets omhoog of omlaag
(PB Status) is geselecteerd.
• Druk op ‘OK’ (Select) om te bevestigen.
/ totdat ‘Telefoonboek’
/ totdat ‘Tel bk overz’
11 Snelgeheugentoetsen M1 - M4
11.1 Een nummer onder een snelgeheugentoets opslaan
U kunt in de directe geheugentoetsen M1 - M4 maximaal 4 nummers opslaan. Alle nummers
worden ook in het telefoonboek opgeslagen.
• Druk op een van de vier geheugentoetsen (M1 - M4).
• Op de display wordt ‘Nummer?’ (Number?) weergegeven. Voer het gewenste nummer
(maximaal 20 cijfers) in.
• Druk op de soft key ‘Volge n’ (Next).
• Selecteer de gewenste melodie voor dit nummer met de toets omhoog of omlaag
15
/ .
• Druk op ‘Bewaar’ (Save) om uw keuze te bevestigen of druk op ‘Ter ug’ (Back)
om het menu zonder opslaan af te sluiten.
13
5
11.2 De nummers onder de snelgeheugentoetsen bekijken
De nummers onder de snelgeheugentoetsen worden in het telefoonboek als de eerste 4
invoeren opgeslagen.
• Druk op de telefoonboek-toets .
• Druk op de toets omhoog of omlaag
46 Sologic B931
7
15
7
/ om andere nummers te zoeken.
Page 47

Sologic B931
NEDERLANDS
15
7157
5
15
7
15
7
13
5
11.3 De nummers onder de snelgeheugentoetsen bewerken
Volg dezelfde stappen als in “10.3 Een naam of nummer in het telefoonboek wijzigen”.
De nummers onder de snelgeheugentoetsen worden in het
telefoonboek opgeslagen onder de naam M1:, M2:, M3: en M4:.
Wanneer u de naam bewerkt, kunt u enkel iets toevoegen als ‘M1:
Thuis’, maar kunt u niet de standaardnaam wissen.
11.4 Een nummer onder de snelgeheugentoetsen wissen
Volg dezelfde stappen als in “10.4 Eén of alle invoeren uit het telefoonboek verwijderen”
12 De werking van het basisstation
12.1 De flashtijd instellen
U kunt een korte (100 ms) of lange (300 ms) flashtijd instellen. De tijd is standaard op 100
ms ingesteld! U kunt de tijd echter veranderen indien uw systeem een langere flastijd vereist:
• Druk op de linkertoets ‘Menu’ (Menu).
• Druk herhaaldelijk op de toets omhoog of omlaag
Settings) is geselecteerd.
• Druk op ‘OK’ (Select) om te bevestigen.
• Druk herhaaldelijk op de toets omhoog of omlaag
Time) is geselecteerd.
• Druk op ‘OK’ (Select) om te bevestigen.
• Selecteer
–‘Flash-1’: (kort) voor een flash van 100 ms
–‘Flash-2’: (lang) voor een flash van 300 ms
• Druk op ‘Bewaar’ (Save) om uw keuze te bevestigen of druk op ‘Ter ug’ (Back)
om het menu zonder opslaan af te sluiten.
13
/ totdat ‘Basis’ (BS
/ totdat ‘Flash’ (Flash
12.2 De PIN-code wijzigen (PIN-code van het systeem)
Bepaalde functies zijn alleen beschikbaar als u de PIN-code van het basisstation kent.
De PIN-code bestaat uit 4 cijfers. De standaardinstellingen voor de PIN-code is ‘0000’. Als u
de PIN-code wilt wijzigen en uw eigen geheime code wilt instellen, ga als volgt te werk:
• Druk op de linkertoets ‘Menu’ (Menu).
• Druk herhaaldelijk op de toets omhoog of omlaag
Settings) is geselecteerd.
• Druk op ‘OK’ (Select) om te bevestigen.
• Druk herhaaldelijk op de toets omhoog of omlaag
(Modify PIN) is geselecteerd.
• Druk op ‘OK’ (Select) om te bevestigen.
• Voer de huidige pin in en druk op ‘Vol gen’ (Next).
• Voer de nieuwe pin in en druk op ‘Vol gende’ (Next).
• Voer de nieuwe pin opnieuw in en druk op ‘Bewaar’ (Save) om de nieuwe pin te
bewaren of druk op ‘Terug’ (Back) om het menu zonder opslaan af te sluiten.
Sologic B931 47
/ totdat ‘Basis’ (BS
/ totdat ‘Wijzig PIN’
Page 48

Sologic B931
15
7
15
7
13
15715
7
13
5
12.3 De belmodus instellen
Er kunnen twee belmodi op een telefoonlijn worden gebruikt:
• DTMF/Toonkiezen (meest gebruikelijke)
• Pulskiezen (voor oudere installaties)
De belmodus veranderen:
• Druk op de linkertoets ‘Menu’ (Menu).
• Druk herhaaldelijk op de toets omhoog of omlaag
Settings) is geselecteerd.
• Druk op ‘OK’ (Select) om te bevestigen.
• Druk herhaaldelijk op de toets omhoog of omlaag
mode) is geselecteerd.
• Druk op ‘OK’ (Select) om te bevestigen.
15
• Druk op de toets omhoog of omlaag
selecteren.
• Druk op ‘Bewaar’ (Save) om uw keuze te bevestigen of druk op ‘Ter ug’ (Back)
om het menu zonder opslaan af te sluiten.
/ om ‘To on’ (Tone) of ‘Puls’ (Pulse) te
/ totdat ‘Basis’ (BS
7
/ totdat ‘Kiesmode’ (Dial
5
12.4 Reset basis
U kunt alle instellingen van het basisstation opnieuw instellen op de standaardinstellingen.
Om de standaardinstellingen terug te zetten:
• Druk op de linkertoets ‘Menu’ (Menu).
• Druk herhaaldelijk op de toets omhoog of omlaag
Settings) is geselecteerd.
• Druk op ‘OK’ (Select) om te bevestigen.
• Druk herhaaldelijk op de toets omhoog of omlaag
Reset) is geselecteerd.
• Druk op ‘OK’ (Select) om te bevestigen.
• Voer de pincode (0000) in.
• Druk op ‘Reset’ (Reset) om uw keuze te bevestigen of druk op ‘Te rug’ (Back)
om het menu zonder opslaan af te sluiten.
/ totdat ‘Basis’ (BS
/ totdat ‘Reset basis’ (BS
De standaardinstellingen zijn:
Kiesmodus: Toon
Flashtijd: Flash-1
PIN-code: 0000
13 Extra handsets en basisstations
U kunt maximaal 5 handsets aanmelden bij één basisstation. Er kunnen maximaal 4
basisstations per handset worden aangemeld en de gebruiker kan het gewenste basisstation
selecteren. Standaard is handset 1 aangemeld bij basisstation 1.
48 Sologic B931
Page 49

NEDERLANDS
13.1 Een nieuwe handset toevoegen
15
7
15
7
15
7
Dit is alleen nodig als u een handset hebt afgemeld of als u een
nieuwe hebt gekocht.
Sologic B931
Houd de Paging-toets op het basisstation gedurende 5 seconden ingedrukt. Het
basisstation blijft 3 minuten in de aanmeldstand. U kunt de handset als volgt aanmelden:
• Druk op de linkertoets ‘Menu’ (Menu).
• Druk herhaaldelijk op de toets omhoog of omlaag
(Registration) is geselecteerd.
• Druk op ‘OK’ (Select) om te bevestigen.
• Druk op de toets omhoog of omlaag
• De handset zoekt nu naar een basisstation en als er een station wordt gevonden, wordt
de PIN-code van het systeem (PIN-code basisstation; standaard=’0000’) gevraagd.
• Voer de PIN-code in en druk op ‘OK’ (Select).
• Het stand-byscherm wordt geopend als de aanmelding is gelukt; de naam en het
nummer van de handset worden weergegeven.
Elke handset kan bij maximaal 4 verschillende DECT-basisstations
worden aangemeld. Elk basisstation krijgt een nummer in de handset
toegewezen, van 1 tot en met 4. Als u een nieuwe handset aanmeldt,
kunt u een nummer van het basisstation toewijzen. Het is het beste
om 1 te gebruiken.
17
/ totdat ‘Aanmelden’
15
7
/
om een basisstation te selecteren (1-4).
13.2 Een handset verwijderen
U kunt de aanmelding van een handset bij een basisstation annuleren. Doe dat bijvoorbeeld
als een handset is beschadigd en door een nieuwe moet worden vervangen.
U kunt alleen de aanmelding van een andere handset annuleren, niet
de handset die u voor de verwijderingsprocedure gebruikt.
• Druk op de linkertoets ‘Menu’ (Menu).
• Druk herhaaldelijk op de toets omhoog of omlaag
Settings) is geselecteerd.
• Druk op ‘OK’ (Select) om te bevestigen.
• Druk herhaaldelijk op de toets omhoog of omlaag
(Terminate HS) is geselecteerd.
• Druk op ‘OK’ (Select) om te bevestigen.
• Voer de PIN-code in en druk op ‘OK’ (OK).
• Druk op de toets omhoog of omlaag
Wanneer u de huidige of een onbestaande handset selecteert, weerklinkt een
waarschuwingssignaal.
• Druk op ‘OK’ (Select) om uw keuze te bevestigen of druk op ‘Terug’ (Back) om
het menu af te sluiten.
13
15
7
/ om de handset te selecteren.
/ totdat ‘Basis’ (BS
/ totdat ‘Afm handset’
5
Sologic B931 49
Page 50
Sologic B931
15
7
13.3 Een basisstation selecteren
Als uw handset is aangemeld bij meerdere basisstations (maximaal 4), dan moet u een
basisstation selecteren, omdat de handset alleen met één basisstation tegelijkertijd kan
communiceren.
• Druk op de linkertoets ‘Menu’ (Menu).
• Druk herhaaldelijk op de toets omhoog of omlaag
Settings) is geselecteerd.
• Druk op ‘OK’ (Select) om te bevestigen.
• Druk herhaaldelijk op de toets omhoog of omlaag totdat ‘Selec basis’ (Select Base) is
geselecteerd.
• Druk op ‘OK’ (Select) om te bevestigen.
• Druk op de toets omhoog of omlaag
Wanneer u het huidige of een onbestaand basisstation selecteert, weerklinkt een
waarschuwingssignaal.
• Op de display verschijnt ‘Basisx’ (Selected BSx). Druk op ‘OK’ (Select) om te
bevestigen.
Opgepast! U kunt een basisstation pas selecteren als de handset bij het
basisstation is aangemeld.
15
7
/ om het basisstation te selecteren.
/ totdat ‘Handset’ (HS
13.4 Meerdere handsets gebruiken
Deze functies zijn enkel mogelijk wanneer meer dan een handset op het
basisstation is aangemeld.
13.4.1 Een andere handset bellen
• Druk op de interne oproep-toets .
• ‘Op de display verschijnt Intercom 1 2 3 4 5”.
• Kies het nummer van de handset die u wilt bellen.
• Als de oproep is beëindigd, drukt u op de toets ophangen om op te hangen.
13.4.2 Een interne oproep ontvangen
• Het pictogram voor interne oproep en het nummer van de handset die belt
worden op de display weergegeven.
• Druk op de toets voor opnemen om de interne oproep te accepteren.
OF
• Til de handset van het basisstation op (als de optie Automatische beantwoording actief
is, zie §“7.21 Automatische beantwoording”).
• Tijdens de oproep wordt het nummer van de handset van de beller op de display
weergegeven.
• Als de oproep is beëindigd, drukt u op de toets ophangen om op te hangen.
13.4.3 Een externe oproep ontvangen tijdens een interne oproep
Als u een externe oproep ontvangt tijdens een interne oproep, dan hoort u een wachttoon
(dubbele piep) op de twee handsets die voor de interne oproep worden gebruikt.
• Druk op de toets voor ophangen om de interne oproep te beëindigen.
• Druk op de toets voor opnemen om de externe oproep te accepteren.
• Als de oproep is beëindigd, drukt u op de toets ophangen om op te hangen.
14
6
12
6
6
12
6
50 Sologic B931
Page 51

Sologic B931
NEDERLANDS
14
14
11
15
15
15
13.4.4 Een oproep doorverbinden naar een andere handset
• U hebt een externe beller aan de lijn.
• Druk op de toets interne oproep . ‘Op de display verschijnt Intercom 1 2 3 4 5’.
14
• Kies het nummer van de handset waarnaar u de oproep wilt doorverbinden.
• Als de gekozen handset antwoordt, kunt u een intern gesprek voeren. Druk op de toets
voor ophangen en de externe oproep wordt doorverbonden.
• Als de gekozen handset niet antwoordt, drukt u op de toets interne oproep om
6
14
weer met de externe beller te praten.
13.4.5 Conferentiegesprek (twee interne handsets en één externe beller)
U kunt tegelijkertijd met één interne en één externe beller bellen.
• Druk terwijl u met een externe beller aan de lijn bent op de toets interne oproep .
De externe lijn wordt in de wacht gezet.
• Kies het nummer van de handset die aan de oproep moet meedoen. U kunt wisselen
tussen de interne en externe lijn door op de toets interne oproep te drukken.
• Als de gekozen handset antwoordt, druk dan op de toets .
• U bent nu met de externe en interne beller verbonden en u kunt met allebei praten
(conferentiegesprek).
14 Nummerweergave / CLIP
U kunt deze dienst alleen gebruiken als u een abonnement op
nummerweergave / CLIP hebt. Neem contact op met uw
telefoonmaatschappij voor meer informatie.
Als u een oproep ontvangt, dan wordt het telefoonnummer van de beller, de datum en de tijd
van de oproep op de display van de handset weergegeven. Als de naam in het telefoonboek
is geprogrammeerd, zal de naam uit het telefoonboek worden weergegeven!
De telefoon kan 40 oproepen opslaan in de oproeplijst die u later kunt bekijken. Als het
geheugen vol is, zullen de nieuwe oproepen automatisch de oudste oproepen in het
geheugen vervangen. Het pictogram verschijnt wanneer er nieuwe onbeantwoorde
oproepen in de oproeplijst zijn. Als de oproeplijst leeg is en u op de toets voor oproeplog
drukt, wordt 'Leeg' (Empty) weergegeven.
U kunt de informatie van een inkomende oproep bekijken:
• Druk op de toets voor oproeplog . Het telefoonnummer verschijnt op de eerste
regel. Als de naam door het netwerk is verzonden of in het geheugen van het
telefoonboek staat, wordt de naam op de 2e regel weergegeven, en de datum en tijd op
de 3e regel. Bovenaan in de rechterhoek van het scherm ziet u het volgende pictogram,
gevolgd door het volgnummer in de oproeplog:
– : Ongelezen of onbeantwoorde oproep
– : Gelezen of beantwoorde oproep
14.1 De oproeplijst
De ontvangen oproepen worden in de oproeplijst opgeslagen (max. 40 nummers).
• Druk kort op de toets voor oproeplog om de meest recente oproep te bekijken.
OF
Sologic B931 51
Page 52

Sologic B931
15
15
7
12
7
5
15
7
7
7
5
7
• Druk op de linkertoets ‘Menu’ (Menu).
• Druk op ‘OK’ (Select) om te bevestigen.
• Het telefoonnummer en de naam van de meest recente beller worden op de display
weergegeven.
• De datum en tijd waarop de oproep werd ontvangen worden bij elke oproep vermeld.
• Druk op de toets omhoog of omlaag
zoeken.
15
7
/ om andere nummers in de lijst te
• Als er gedurende 1 minuut niet op de toets omhoog of omlaag
7
wordt gedrukt, dan gaat de telefoon terug naar de stand-
bymodus.
• Als er een oproep is ontvangen, wordt het nummer van de beller nog 15
seconden na de laatste beltoon op de display weergegeven.
14.2 Een nummer bellen uit de oproeplijst
• Druk op de toets oproeplog om naar de oproeplijst te gaan.
• Druk op de toets omhoog of omlaag
• Als het nummer op de display staat, wordt het nummer automatisch gekozen als u op de
toets voor opnemen drukt .
15
/ om het gewenste nummer te zoeken.
14.3 Een nummer uit de oproeplijst opslaan in het telefoonboek
• Druk op de linkertoets ‘Menu’ (Menu).
• Druk op ‘OK’ (Select) om te bevestigen.
15
• Druk op de toets omhoog of omlaag
• Druk op ‘Meer’ (More) .
• Druk herhaaldelijk op de toets omhoog of omlaag
(Add to PB) is geselecteerd.
• Druk op ‘OK’ (Select) om te bevestigen.
• ‘Op de display wordt Naam?' (Name?) weergegeven. Gebruik de alfanumerieke toetsen
om een naam toe te voegen. U kunt de naam ook bewerken en daarna opslaan als de
naam via het netwerk werd verzonden. Press ‘Vol gen’ (Next) om te bevestigen.
• Het telefoonnummer wordt weergegeven. Bewerk zo nodig het nummer en druk
opnieuw op ‘Volgen ’ (Next) om de invoer in het telefoonboek op te slaan.
• Selecteer de gewenste melodie voor dit nummer met de toets omhoog of omlaag
15
/ .
• Druk op ‘Bewaar’ (Save) om uw keuze te bevestigen of druk op ‘Ter ug’ (Back)
om het menu zonder opslaan af te sluiten.
5
13
/ om het gewenste nummer te zoeken.
/ totdat ‘Copy tel.bk’
5
5
/
14.4 Nummers uit de oproeplijst wissen
14.4.1 Eén nummer verwijderen
• Druk op de linkertoets ‘Menu’ (Menu).
• Druk op ‘OK’ (Select) om te bevestigen.
15
• Druk op de toets omhoog of omlaag
• Druk op ‘Meer’ (More) .
• Druk herhaaldelijk op de toets omhoog of omlaag
is geselecteerd.
52 Sologic B931
/ om het gewenste nummer te zoeken.
15
/ totdat ‘Wissen’ (Delete)
Page 53

Sologic B931
NEDERLANDS
13
7
5
15
7
13
7
• Druk op ‘OK’ (Select) om te bevestigen.
• Druk op ‘Wis’ (Del) om te wissen of druk op ‘Stop ’ (Cancel) om het menu zonder
opslaan af te sluiten.
14.4.2 Alle nummers verwijderen
• Druk op de linkertoets ‘Menu’ (Menu).
• Druk op ‘OK’ (Select) om te bevestigen.
• Druk op de toets omhoog of omlaag
• Druk op ‘Meer’ (More) .
• Druk herhaaldelijk op de toets omhoog of omlaag
(Delete All) is geselecteerd.
• Druk op ‘OK’ (Select) om te bevestigen.
• Druk op ‘Wis alles’ (Del All) om te wissen of druk op ‘Stop’ (Cancel) om het
menu zonder opslaan af te sluiten.
15
/ om het gewenste nummer te zoeken.
5
/ totdat ‘Wis alles’
5
15 Voicemailindicator
Deze functie werkt alleen als uw voicemail is geactiveerd en als het netwerk deze indicatie
samen met de nummerweergave (CLIP) verzendt!
Als u een nieuw bericht via uw voicemail ontvangt, dan wordt het pictogram + ‘VM aan’
(MSG WTG ON) op de display weergegeven. Als u naar het bericht hebt geluisterd, verdwijnt
het pictogram .
Wanneer u het pictogram wilt verwijderen, drukt u op de toets voor oproeplog en
houdt u vervolgens de numerieke toets ‘4’ ingedrukt. Druk nadien op de toets voor ophangen
6
om terug te keren naar de stand-bymodus.
16 Problemen oplossen
Symptoom Mogelijke oorzaak Oplossing
Geen display; de display
blijft donker
Geen toon Telefoonkabel slecht
Het pictogram
knippert
Sologic B931 53
Batterijen zijn leeg Controleer de plaatsing van de
batterijen
Laad de batterijen op
Handset uitgeschakeld Schakel de handset in
Controleer de aansluiting van
aangesloten of defect
De lijn is bezet door een andere
handset
Handset is buiten bereik Breng de handset dichter in de
Het basisstation heeft geen
stroom
De handset is niet aangemeld
bij het basisstation
de telefoonkabel
Wacht totdat de andere
handset het gesprek heeft
beëindigd
buurt van het basisstation
Controleer de aansluiting van
de stroomkabel bij het
basisstation
Meld de handset aan bij het
basisstation
Page 54

Sologic B931
Basisstation of handset
laat geen beltoon horen
De toon is goed, maar
kan geen verbinding
maken
Niet mogelijk om een
gesprek naar de
binnencentrale (PABX)
door te schakelen
De telefoon reageert niet
op het indrukken van de
toetsen
Het beltoonvolume staat uit of
is te laag
De belmodus is fout De belmodus aanpassen (puls/
De flashtijd is te kort De flashtijd veranderen
Gebruikersfout Verwijder de batterijen
Pas het volume van de beltoon
aan
toon)
minstens 1 minuut en plaats ze
terug
17 Technische kenmerken
Standaard: DECT(Digital Enhanced Cordless Telecommunications)
GAP (Generic Access Profile)
Frequentiebereik: 1880 MHz tot 1900 MHz
Aantal kanalen: 120 duplexkanalen
Modulatie: GFSK
Spraakcodering: 32 kbit/s
Emissievermogen: 10 mW (gemiddeld vermogen per kanaal)
Bereik: 300 m in open ruimte / maximaal 50 m binnenshuis
Netspanning basisstation: In 230 V AC / 50 Hz - Uit: 7,5 V DC / 300 mA
Batterijen handset: 3 oplaadbare AAA-batterijen, NiMh 600 mAh
Stand-bytijd handset: 100 uur in stand-by
Gesprekstijd handset: 10 uur
Laadtijd: 16 uur
Belmodus Toon/Puls
Normaal gebruik: +5 °C tot +45 °C
Flashtijd: 100 ms of 300 ms
18 Topcom-garantie
18.1 Garantieperiode
Op de Topcom-toestellen wordt een garantie van 24 maanden verleend. De garantieperiode
gaat in op de dag waarop het nieuwe toestel wordt gekocht. Er is geen garantie op
standaard- of oplaadbare batterijen (type AA/AAA).
Kleine onderdelen of defecten die een verwaarloosbaar effect hebben op de werking of
waarde van het toestel worden niet gedekt door de garantie.
De garantie moet worden aangetoond door overlegging van het originele aankoopbewijs of
een kopie waarop de aankoopdatum en het toesteltype staan vermeld.
18.2 Afwikkeling van garantieclaims
Een defect toestel moet, samen met een geldig aankoopbewijs en een ingevulde
serviceretourkaart, worden teruggestuurd naar een Topcom-servicedienst.
54 Sologic B931
Page 55

Sologic B931
NEDERLANDS
Als het toestel tijdens de garantieperiode een defect vertoont, zal Topcom of een door
Topcom geautoriseerde servicedienst eventuele defecten die te wijten zijn aan materiaal- of
productiefouten gratis repareren door het defecte toestel of onderdelen ervan te repareren
of te vervangen. Wanneer het toestel wordt vervangen, kunnen de kleur en het model
afwijken van het oorspronkelijk gekochte toestel.
De oorspronkelijke aankoopdatum is bepalend voor het begin van de garantieperiode. De
garantieperiode wordt niet verlengd als het toestel wordt vervangen of gerepareerd door
Topcom of een door Topcom geautoriseerde servicedienst.
18.3 Garantiebeperkingen
Schade of defecten die te wijten zijn aan onjuist gebruik of bediening en schade die te wijten
is aan het gebruik van niet-originele onderdelen of accessoires worden niet gedekt door de
garantie.
De garantie dekt geen schade die te wijten is aan externe factoren, zoals bliksem, water en
brand, noch enige transportschade.
Er kan geen aanspraak worden gemaakt op de garantie als het serienummer op het toestel
gewijzigd, verwijderd of onleesbaar gemaakt is.
Garantieclaims zijn ongeldig wanneer het toestel door de koper werd gerepareerd, gewijzigd
of aangepast.
Dit apparaat mag alleen worden gebruikt met oplaadbare batterijen. Als u de oorspronkelijk
bijgeleverde batterijen wilt vervangen, let dan goed op of de batterijen die u gaat gebruiken
geschikt zijn en oplaadbaar zijn. Gebruik in GEEN geval alkalinebatterijen in de handsets.
Als u alkalinebatterijen gebruikt en de handset op het basisstation plaatst, worden deze
batterijen opgewarmd en kunnen ze exploderen. Mogelijke schade die zo wordt veroorzaakt
kan niet worden geclaimd bij de fabrikant. De hierdoor veroorzaakte schade aan het
apparaat valt niet onder de garantievoorwaarden. Eventuele reparaties worden in dat geval
aan u in rekening gebracht.
Sologic B931 55
Page 56

Sologic B931
1 Conseils de sécurité
Les conseils de sécurité suivants doivent toujours être respectés avant d'utiliser un appareil
électrique.
Veuillez lire attentivement les instructions suivantes relatives à la sécurité et à l'utilisation
correcte du produit. Familiarisez-vous avec toutes les fonctions de l'équipement. Veillez à
conserver ces conseils et, si nécessaire, transmettez-les à une autre personne.
Sécurité et protection électriques
• N'utilisez pas cet appareil si la fiche, le câble ou l'appareil lui-même est endommagé(e).
• Si l'appareil tombe, il doit être vérifié par un électricien avant d'être réutilisé.
• Des tensions dangereuses sont présentes dans l'appareil. N'ouvrez jamais le boîtier et
n'insérez jamais d'objets dans les orifices de ventilation.
• Ne laissez pas pénétrer de liquide dans l'appareil. En cas d'urgence, retirez la fiche de la prise.
• De même, si un problème apparaît pendant l'utilisation ou avant de commencer à le
nettoyer, retirez la fiche de la prise.
• Ne touchez pas les contacts du chargeur et de la fiche avec des objets pointus ou
métalliques.
• N'effectuez aucune modification ou réparation de l'appareil vous-même. Confiez toute
réparation de l'équipement ou du câble d'alimentation à un centre d'entretien spécialisé.
Des réparations non satisfaisantes peuvent entraîner des dangers considérables pour
l'utilisateur.
• Les enfants sous-estiment souvent les dangers associés aux équipements électriques.
Par conséquent, ne laissez jamais des enfants sans surveillance à proximité d'un
appareil électrique.
• L'appareil ne doit pas être utilisé dans une pièce humide (p. ex. salle de bains) ou très
poussiéreuse.
• Un appareil connecté au secteur pendant un orage peut être endommagé par la foudre.
Par conséquent, nous vous conseillons de débrancher la fiche d'alimentation en cas
d'orage.
• Pour déconnecter complètement l'appareil de l'alimentation électrique, enlevez la fiche
de la prise murale. Pour ce faire, tirez toujours sur la fiche elle-même, jamais sur le
câble.
• Protégez le câble d'alimentation des surfaces chaudes ou d'autres sources
d'endommagement et veillez à ce qu'il ne se coince pas.
• Vérifiez régulièrement le câble d'alimentation pour repérer tout dommage éventuel.
• Déroulez complètement le câble avant de l'utiliser.
• Assurez-vous que personne ne risque de trébucher dessus.
• Certains appareils médicaux risquent de ne plus fonctionner correctement.
• Le combiné peut provoquer un bourdonnement désagréable dans les prothèses
auditives.
Sécurité incendie
• La chaleur accumulée à l'intérieur de l'appareil peut entraîner une défaillance et/ou
mettre le feu à l'appareil. Par conséquent, n'exposez pas cet appareil à des
températures extrêmes provoquées par :
– une exposition directe au soleil ou à la chaleur d'un radiateur,
– une obstruction des orifices de ventilation.
56 Sologic B931
Page 57

Sologic B931
Risque d'explosion
• Ne jetez jamais les piles dans le feu.
Risques d'empoisonnement
• Gardez les piles hors de portée des enfants.
Remarque
• Utilisez uniquement la fiche du chargeur fournie. N'utilisez pas d'autres chargeurs au
risque d'abîmer les piles.
• La prise murale d'alimentation électrique doit se trouver à proximité et être accessible.
• Utilisez uniquement des piles rechargeables de même type. Placez les piles dans le
compartiment à piles en respectant les polarités (les polarités sont indiquées à l'intérieur
du combiné). N'utilisez jamais de piles non rechargeables !
Comme ce téléphone est indisponible en cas de coupure de courant,
vous devez utiliser un téléphone autonome pour passer des appels
urgents, un téléphone mobile par exemple.
2 Mise au rebut de l'appareil (environnement)
Au terme du cycle de vie de ce produit, ne le jetez pas avec les déchets ménagers
ordinaires ; déposez-le dans un point de collecte pour le recyclage des
équipements électriques et électroniques. Le symbole indiqué sur le produit, sur
le mode d'emploi et/ou sur la boîte est là pour vous le rappeler.
Certains matériaux qui composent le produit peuvent être réutilisés s'ils sont déposés dans
un point de recyclage. Le recyclage de certaines pièces ou matières premières de produits
usagés contribue fortement à la protection de l'environnement.
Pour toute information supplémentaire sur les points de collecte de votre région, contactez
les autorités locales.
FRANÇAIS
3 Nettoyage
Nettoyez le téléphone à l'aide d'un chiffon légèrement humide ou antistatique. N'utilisez
jamais de détergents ou de solvants abrasifs.
4 Mode ECO (faible rayonnement)
Ce téléphone sans fil (conforme à la norme DECT) permet un fonctionnement à faible
rayonnement. L'intensité du rayonnement du signal radio entre la station de base et le
combiné est réduite au minimum lorsque le combiné se trouve sur la station de base.
L'intensité du rayonnement du signal radio n'augmente pour atteindre sa puissance normale
que lors du retrait du combiné de sa base ou lors de la réception d'un appel.
Cela ne signifie pas pour autant que le rayonnement DECT normal est nocif pour la santé.
Le mode de faible rayonnement empêche tout rayonnement DECT inutile lorsque aucune
communication n'est nécessaire entre la station de base et le combiné.
Pour des raisons techniques, aucun combiné supplémentaire ne peut être utilisé en mode
de rayonnement faible (un combiné supplémentaire situé à proximité immédiate de la station
de base « rechercherait » celle-ci en permanence en raison de la faiblesse du signal radio).
Sologic B931 57
Page 58

Sologic B931
B931
7,5V DC 300mA
17
Le mode de faible rayonnement est activé en usine. Le mode de faible rayonnement est
désactivé automatiquement si vous branchez un combiné supplémentaire.
5Installation
Avant la première utilisation du téléphone, assurez-vous au préalable
que les piles sont chargées. À défaut, le téléphone ne fonctionnera
pas de manière optimale.
5.1 Installation de la base
Pour installer la base, procédez comme suit :
• Branchez une extrémité de l'adaptateur dans la prise de courant 230 V et l'autre
extrémité dans la prise d'adaptateur sous la base.
• Branchez une extrémité du câble téléphonique dans la prise téléphonique murale et
l'autre extrémité en dessous de la base. Utilisez le câble téléphonique fourni.
1
4
3
1. Câble d'alimentation
2. Prise murale du téléphone
3. Câble téléphonique
4. Vue du dessous de la base
5.2 Installation des piles
• Ouvrez le compartiment à piles (voir ci-après).
• Insérez les piles en respectant la polarité (+ et –).
• Refermez le compartiment des piles.
• Laissez le combiné sur la base pendant 16 heures. L'indicateur de charge du combiné
(LED) sur la station de base s'allume.
58 Sologic B931
2
Page 59

Sologic B931
rechargeables
Piles
Clip de
ceinture
Couvercle du compartiment des piles
Vue arrière du combiné
-
+
-
B 931
+
-
+
5.3 Montage mural
Vous pouvez suspendre la base au mur grâce au support. Fixez le support à la base.
Percez deux trous dans le mur, distants de 6 cm.
Mur
FRANÇAIS
Prise murale
6cm
Vis
Sologic B931 59
Page 60

Sologic B931
17
18
19
6 Présentation de votre téléphone
6.1 Touches et voyants lumineux
Combiné
1. Sonnerie visuelle
2. Touches mémoire M1 - M4
3. Écran
4. Touche Droite/Recomposition/Pause
5. Touche contextuelle droite
6. Touche Fin d'appel/Marche-Arrêt
7. Touche Bas/Répertoire
8. Touches alphanumériques
9. Touche Vibreur/Sonnerie visuelle
10. Micro
11. Touche de verrouillage du clavier
12. Touche Prise d'appel/Mains-libres
13. Touche contextuelle gauche
14. Touche Gauche/Appel interne
15. Touche Haut/Journal des appels
16. Écouteur
16
15
14
13
12
11
10
1
2
3
4
5
6
7
8
9
Base
17. Indicateur de charge du combiné (LED)
18. Touche Recherche
19. Contacts de charge
60 Sologic B931
Page 61

Sologic B931
5
13
17
6.2 Écran (LCD)
Ligne d'icônes
Nom du combiné
Numéro du combiné
Date et heure
Ligne de menus contextuels et d'options
Témoin de charge des piles :
• Les piles sont à pleine charge.
• Les piles sont entamées à 25 %.
• Les piles sont entamées à 50 %.
• Les piles sont entamées à 75 %.
• Les piles sont presque vides. L'appareil émet des signaux sonores d'avertissement
et le symbole de la batterie clignote à l'écran.
6.3 Icônes
Prise d'appel
Vibreur et sonnerie visuelle activés
Haut-parleur mains-libres activé
Clavier verrouillé
Appel interne
Nouveaux appels sans réponse*
Nouveau message vocal*
Alarme programmée
Icône de signal, clignote lorsque le combiné est trop éloigné de
la base
FRANÇAIS
* Uniquement si le service de présentation du numéro est activé sur votre ligne téléphonique.
6.4 Touches d'écran
Les touches d'écran (touches contextuelles) sont situées juste en dessous de l'écran
/ . Le rôle de ces 2 touches varie suivant le mode de fonctionnement. La fonction
en cours est affichée sous forme de texte juste au-dessus de chacune des 2 touches
contextuelles.
6.5 Voyant de la base
L'indicateur de charge du combiné (LED) indique l'état dans lequel se trouve la base :
• Éteint : la base n'est pas reliée à une prise de courant ou le combiné n'est pas sur la
base pour être rechargé.
• Allumé : le combiné est en charge.
Sologic B931 61
Page 62

Sologic B931
13
5
13
Select Back
Main Menu
CID Book
Phonebook
BS Settings
6.6 Navigation dans les menus
Le combiné intègre un système de menus très convivial. Chaque menu aboutit à une série
d'options.
Lorsque le combiné est allumé et en mode de veille, appuyez sur la touche de menu
contextuel gauche pour accéder au menu principal.
Appuyez sur la touche Haut ou sur la touche Bas pour sélectionner l'option de
menu souhaitée. Appuyez ensuite sur ou pour sélectionner d'autres options
ou pour valider le réglage affiché.
Pour quitter ou remonter d'un niveau dans le menu :
Pour revenir au niveau précédent dans le menu, appuyez sur 'Retour [Back]'.
Vous pouvez, à tout instant, annuler une action et revenir au mode de veille en appuyant sur
la touche Marche/Arrêt . Si aucune touche n'est enfoncée pendant 15 secondes, le
combiné revient automatiquement en mode de veille.
15
6
7
6.7 Organisation des menus
Menu Sous-menus
Liste App. [CID Book]
Ajout. fiche [New]
Modif. fiche [Edit]
Répertoire [Phonebook]
Réglages BS [BS
Settings]
Réglage comb [HS
Settings]
Enregistr. [Registration] Base 1 - 4
Supp. Fiche [Delete]
Tout supp. [Delete All]
Etat répert. [PB Status]
Sup. Combiné [Terminate HS]
Mode num. [Dial mode]
Temps "flash" [Flash Time]
Modifier PIN [Modify PIN]
RAZ base [BS Reset]
Alarme [Alarm]
Régl. audio [Audio Setup]
Régl mélodie [Ring Setup]
Réglage tona [Tone Setup]
Langue [Language]
Nom combiné [HS Name]
Réponse auto [Auto Answer]
Contraste [LCD Contrast]
Date &heure [Date & Time]
Select base
RAZ combiné [HS Reset]
62 Sologic B931
Page 63

Sologic B931
6
15
15
15
13
6
6
7 Utilisation du combiné
7.1 Activation ou désactivation du combiné
• Pour activer le combiné, appuyez sur la touche Marche/Arrêt ou placez le
combiné sur la base.
• Pour désactiver le combiné, appuyez sur la touche Marche/Arrêt et maintenez-la
enfoncée jusqu'à la mise hors tension du combiné.
7.2 Sélection de la langue
Le téléphone propose 9 langues d'affichage.
Pour régler la langue de votre choix, procédez comme suit :
• Appuyez sur la touche contextuelle gauche sous 'Menu’.
• Appuyez plusieurs fois sur la touche Haut ou Bas
'Réglage comb [HS Settings]'.
• Appuyez sur ‘Select’ pour confirmer.
• Appuyez plusieurs fois sur la touche Haut ou Bas
'Langue [Language]'.
• Appuyez sur ‘Select’ pour confirmer.
• La langue définie s'affiche à l'écran.
• Appuyez plusieurs fois sur la touche Haut ou Bas
langue de votre choix.
• Appuyez sur ‘Sauve [Save]’ pour valider votre sélection ou appuyez sur ‘Retour
[Back]’ pour quitter ce menu sans enregistrer.
5
13
13
/ pour sélectionner
/ pour sélectionner
/ pour sélectionner la
7.3 Composition d'un appel
6
7
7
7
FRANÇAIS
7.3.1 Appel externe
• Appuyez sur la touche Prise d'appel .
• Le symbole d'appel apparaît à l'écran.
• Vous entendez la tonalité d'invitation à numéroter. Composez le numéro de téléphone
que vous souhaitez appeler.
• Le numéro apparaît à l'écran et est composé.
• Lorsque vous avez terminé votre appel, appuyez sur la touche Fin d'appel pour
raccrocher.
7.3.2 Préparation d'un numéro
• Composez le numéro de téléphone que vous souhaitez appeler. Vous pouvez corriger le
numéro en appuyant sur la touche ‘Effac. [Erase]’.
• Appuyez sur la touche Prise d'appel .
• Le symbole d'appel apparaît à l'écran.
• Le numéro de téléphone est composé automatiquement.
• Lorsque vous avez terminé votre appel, appuyez sur la touche Fin d'appel ou
replacez le combiné sur la base pour raccrocher.
7.3.3 Recomposition du dernier numéro formé
• Appuyez sur la touche Recomposition .
• Appuyez sur la touche Prise d'appel . Le dernier numéro appelé est composé
automatiquement.
Sologic B931 63
12
12
4
12
Page 64

Sologic B931
15
6
7
15
6
13
13
15
12
6
7.3.4 Recomposition de l'un des 10 derniers numéros formés
• Appuyez sur la touche Recomposition . Le dernier numéro appelé apparaît à
4
l'écran.
7
• Appuyez plusieurs fois sur la touche Haut ou Bas
/ jusqu'à ce que le
numéro souhaité s'affiche à l'écran.
• Appuyez sur la touche Prise d'appel .
12
• Le numéro affiché sur l'écran est composé automatiquement.
• Lorsque vous avez terminé votre appel, appuyez sur la touche Fin d'appel ou
replacez le combiné sur la base pour raccrocher.
7.3.5 Appel d'un numéro programmé dans le répertoire
Le téléphone intègre un répertoire dans lequel vous pouvez mémoriser des numéros de
téléphone et un nom correspondant (Voir aussi § “10 Répertoire”). Pour appeler un numéro
à partir du répertoire :
• Appuyez sur la touche Répertoire . Le premier numéro du répertoire s'affiche sur
l'écran.
7
• Appuyez plusieurs fois sur la touche Haut ou Bas
/ pour sélectionner le
numéro de téléphone que vous voulez appeler.
• Appuyez sur la touche Prise d'appel .
12
• Le numéro affiché sur l'écran est composé automatiquement.
• Lorsque vous avez terminé votre appel, appuyez sur la touche Fin d'appel ou
replacez le combiné sur la base pour raccrocher.
7.3.6 Signal Flash
La touche 'R [Flash]' vous permet d'utiliser certains services sur votre ligne extérieure,
tels que "appel en attente" (si ce service est proposé par votre compagnie de téléphone) ou
de transférer les appels téléphoniques lorsque vous utilisez un autocommutateur privé
(PABX). La touche 'R [Flash]' produit une brève interruption de la ligne. Vous pouvez utiliser
cette touche pendant un appel en appuyant sur la touche contextuelle gauche ‘R [Flash]’
. Vous pouvez régler le 'Temps "flash" [Flash Time ]' sur court ou sur long (voir “12.1
Réglage du temps "flash"”).
7.4 Réception d'un appel
En cas d'appel entrant externe ou interne, le combiné se met à sonner. Vous pouvez modifier
le volume de la sonnerie en appuyant sur les touches Haut et Bas / .
• Tous les combinés enregistrés sonnent quand vous recevez un appel.
• Le numéro de téléphone de l'appelant s'affiche à l'écran si vous bénéficiez du service de
présentation du numéro (CLIP). Au besoin, veuillez consulter votre compagnie de
téléphone. Le nom de l'appelant s'affiche également à l'écran si :
– le numéro est programmé dans le répertoire avec un nom,
– le réseau envoie le nom en même temps que le numéro de téléphone.
• Appuyez sur la touche Prise d'appel pour accepter l'appel externe.
• OU Retirez le combiné de sa base (si l'option 'Réponse auto [Auto answer]' est activée –
voir §“7.21 Réponse auto”
• Pendant la conversation, le symbole s'affiche à l'écran et la minuterie d'appel
démarre.
• Lorsque vous avez terminé votre appel, appuyez sur la touche Fin d'appel ou
replacez le combiné sur la base pour raccrocher.
64 Sologic B931
).
7
Page 65

Sologic B931
13
15
12
15
7
15
7.5 Options de la liste des derniers numéros composés
Lorsque vous parcourez la liste des derniers numéros composés (voir §“7.3.4
Recomposition de l'un des 10 derniers numéros formés”), vous disposez des options
suivantes :
Quand le numéro souhaité est affiché à l'écran, appuyez sur ‘Plus [More]’et
7
sélectionnez avec les touches Haut et Bas
•‘Ajout Rep. [Add to PB]’ : pour mémoriser le numéro dans le répertoire. Appuyez sur
‘Select’ pour confirmer. Saisissez un nom (voir §“10.1 Ajout d'un numéro et d'un nom au
répertoire”) et appuyez sur ‘Suiv. [Next]’ . Corrigez le numéro si nécessaire et
appuyez sur ‘Suiv. [Next]’. Sélectionnez la mélodie de sonnerie souhaitée et appuyez
sur ‘Sauve [Save]’ .
•‘Supp. appel [Delete Call]' : pour supprimer une entrée de la liste des derniers
numéros composés. Appuyez sur ‘OK [Del]’ pour confirmer.
•‘Tout supp. [Delete All]' : pour supprimer toutes les entrées de la liste des derniers
numéros composés. Appuyez sur ‘OK [Del]’ pour confirmer.
13
/ l'une des options suivantes :
13
7.6 Activation/désactivation de la fonction Mains-libres
Cette fonction vous permet de communiquer sans avoir à décrocher le combiné. Pendant
que vous parlez, appuyez sur la touche Mains-libres pour activer la fonction Mainslibres.
Appuyez de nouveau sur la touche pour désactiver la fonction Mains-libres.
Lorsque vous appelez en mode Mains-libres et que vous souhaitez
modifier le volume, appuyez plusieurs fois sur la touche Haut ou Bas
12
/ .
FRANÇAIS
Lorsque vous utilisez la fonction Mains-libres pendant une longue
durée, les piles se déchargent rapidement !
7.7 Avertissement "Hors de portée"
Si le combiné se trouve hors de portée de la base, il émet un signal d'avertissement.
•‘Recherche [Searching]' s'affiche à l'écran et le symbole clignote sur l'écran.
• Dans ce cas, rapprochez-vous de la base.
• Dès que vous vous trouvez à nouveau à portée de la base, le combiné émet un signal et
le symbole cesse de clignoter.
7.8 Réglage du volume du haut-parleur
Utilisez les touches Haut et Bas / pendant la conversation pour régler le volume
du haut-parleur. Vous pouvez choisir parmi 5 niveaux.
Vous pouvez régler le volume du mode Mains-libres de la même façon.
7
7.9 Indication de la durée d'appel sur l'écran
Pendant un appel externe, la durée de l'appel est affichée sur l'écran :
Par exemple, "01:10:40" correspond à 1 heure, 10 minutes et 40 secondes.
La durée d'appel reste visible à l'écran pendant 5 secondes après chaque appel.
Sologic B931 65
Page 66

Sologic B931
5
17
8
7
15
7
7.10 Désactivation du micro (Secret)
Pour désactiver le micro pendant un appel, appuyez sur la touche contextuelle droite 'Secret
[Mute]’ . Vous pouvez alors parler librement sans que votre interlocuteur vous entende.
Pour réactiver le micro, appuyez de nouveau sur la touche contextuelle droite ‘Secret
[Mute]’ .
5
7.11 Touche Pause
Si vous composez un numéro de téléphone et que vous souhaitez ajouter une pause à ce
numéro, appuyez sur la touche Pause/Recomposition à la position adéquate dans le
numéro.
Lorsque vous composez ou recomposez ce numéro, une pause de 3 secondes est
automatiquement insérée.
4
7.12 Localisation d'un combiné égaré (fonction Recherche)
Si vous avez égaré un combiné, appuyez brièvement sur la touche Recherche de la
base.
Tous les combinés enregistrés sur la base vont alors sonner, ce qui vous permettra de
localiser le combiné égaré. Pour arrêter le signal, appuyez brièvement sur n'importe quelle
touche de n'importe quel combiné.
7.13 Utilisation du clavier alphanumérique du combiné
Servez-vous du clavier alphanumérique pour saisir du texte. Pour sélectionner une lettre,
appuyez sur la touche alphanumérique correspondante . Par exemple, si vous appuyez
sur la touche alphanumérique '5', le premier caractère 'j' s'affiche à l'écran. Appuyez
plusieurs fois de suite sur cette touche pour obtenir d'autres caractères.
Appuyez une fois sur la touche '2' pour obtenir la lettre 'a'. Si vous souhaitez obtenir
successivement 'a' et 'b', appuyez d'abord une seule fois sur la touche '2' pour obtenir 'a',
attendez 2 secondes jusqu'à ce que le curseur avance d'une place, puis appuyez deux fois
sur la touche '2' pour obtenir 'b'. Vous pouvez supprimer des caractères saisis par erreur en
utilisant la touche ‘Effac. [Erase]’. Le caractère présent devant le curseur sera effacé. Vous
15
pouvez déplacer le curseur en appuyant sur les touches Haut et Bas
/ .
7.14 Réglage du volume de sonnerie sur le combiné
Vous pouvez régler le volume de sonnerie d'un appel entrant (interne ou externe) sur l'un des
6 niveaux possibles (de 1 à 5 et 'Volume off [Off]').
Si vous sélectionnez ‘Volume off [Off]’, le combiné ne sonnera pas à la réception d'un
nouvel appel.
Le niveau '5' est le plus élevé.
7.14.1 Réglage du volume de sonnerie et de la mélodie pour des appels internes et
externes
• Appuyez sur la touche ‘Menu’.
• Appuyez plusieurs fois sur la touche Haut ou Bas / pour sélectionner
'Réglage comb [HS Settings]'.
• Appuyez sur ‘Select’ pour confirmer.
• Appuyez plusieurs fois sur la touche Haut ou Bas
mélodie [Ring Setup]'.
66 Sologic B931
15
7
/ pour sélectionner 'Régl
Page 67

Sologic B931
15
13
15
7
15
13
15
• Appuyez sur ‘Select’ pour confirmer.
• Sélectionnez ‘Appel Int [INT Ring]’ ou ‘Appel Ext [EXT Ring]’ et appuyez sur ‘Select’.
• Sélectionnez ‘Mélodie [Melody]’ ou ‘Volume’ et appuyez sur ‘Select’.
• Le volume et la mélodie actuels sont affichés et audibles.
7
• Appuyez plusieurs fois sur la touche Haut ou Bas
volume ou la mélodie souhaité(e).
• Appuyez sur ‘Sauve [Save]’ pour valider votre sélection ou appuyez sur ‘Retour
[Back]’ pour quitter ce menu sans enregistrer.
5
Vous pouvez également modifier le volume de la sonnerie lors d'un
appel entrant – voir “7.4 Réception d'un appel”.
/ pour sélectionner le
7.15 Réglage du volume de l'écouteur et du haut-parleur Mains-libres
Vous pouvez également utiliser le menu pour régler le volume audio du haut-parleur Mainslibres et de l'écouteur comme suit :
• Appuyez sur la touche ‘Menu’.
7
• Appuyez plusieurs fois sur la touche Haut ou Bas
'Réglage comb [HS Settings]'.
• Appuyez sur ‘Select’ pour confirmer.
• Appuyez plusieurs fois sur la touche Haut ou Bas
audio [Audio Setup]'.
• Appuyez sur ‘Select’ pour confirmer.
• Sélectionnez ‘Volume HP [Speaker V.]’ ou ‘Vol Ecoute [Earpiece V.]’ et appuyez sur
‘Select’
• Appuyez plusieurs fois sur la touche Haut ou Bas / pour sélectionner le
volume souhaité.
• Appuyez sur ‘Sauve [Save]’ pour valider votre sélection ou appuyez sur ‘Retour
[Back]’ pour quitter ce menu sans enregistrer.
13
.
5
/ pour sélectionner
15
/ pour sélectionner 'Régl.
7
FRANÇAIS
7.16 Verrouillage du clavier
Vous pouvez verrouiller le clavier pour éviter d'appuyer involontairement sur des touches.
Lorsque le clavier est verrouillé, il n'est plus possible de composer un numéro. Seules les
touches de mémoire directe M1 - M4 demeurent utilisables. Vous pouvez toutefois toujours
répondre aux appels entrants.
Pour activer le verrouillage du clavier :
• Maintenez la touche de verrouillage du clavier enfoncée pendant 5 secondes.
•‘Comb. bloqué [HS Locked]’ et l'icône apparaissent à l'écran.
Pour désactiver le verrouillage du clavier :
• Appuyez à nouveau sur la touche de verrouillage du clavier pendant
5 secondes.
11
11
7.17 Activation/désactivation du bip des touches
Vous pouvez régler le combiné pour qu'il émette un bip à chaque pression de touche.
• Appuyez sur la touche ‘Menu’ gauche.
7
• Appuyez plusieurs fois sur la touche Haut ou Bas
'Réglage comb [HS Settings]'.
• Appuyez sur ‘Select’ pour confirmer.
Sologic B931 67
/ pour sélectionner
Page 68

Sologic B931
15
15
13
5
15
15
15
7
13
15
15
15
• Appuyez plusieurs fois sur la touche Haut ou Bas / pour sélectionner
'Réglage tona [Tone Setup]'.
• Appuyez sur ‘Select’ pour confirmer.
• Appuyez plusieurs fois sur la touche Haut ou Bas
clavier [Key Tone]'.
• Sélectionnez
–‘On' : pour activer le bip des touches.
–‘Off' : pour désactiver le bip des touches.
• Appuyez sur ‘Sauve [Save]’ pour valider votre sélection ou appuyez sur ‘Retour
[Back]’ pour quitter ce menu sans enregistrer.
7
7
/ pour sélectionner 'Bip
7.18 Alarme "Hors de portée"
Un bip est émis lorsque le combiné est hors de portée de la base. Vous pouvez activer et
désactiver cet avertissement sonore comme suit :
• Appuyez sur la touche ‘Menu’ gauche.
7
• Appuyez plusieurs fois sur la touche Haut ou Bas
'Réglage comb [HS Settings]'.
• Appuyez sur ‘Select’ pour confirmer.
• Appuyez plusieurs fois sur la touche Haut ou Bas
'Réglage tona [Tone Setup]'.
• Appuyez sur ‘Select’ pour confirmer.
• Appuyez plusieurs fois sur la touche Haut ou Bas
alarme [Range Alarm]’.
• Sélectionnez
–‘On' : pour activer l'alarme "Hors de portée".
–‘Off' : pour désactiver l'alarme "Hors de portée".
• Appuyez sur ‘Sauve [Save]’ pour valider votre sélection ou appuyez sur ‘Retour
[Back]’ pour quitter ce menu sans enregistrer.
5
/ pour sélectionner
7
/ pour sélectionner
/ pour sélectionner ‘Niv.
7.19 Contraste de l'écran
Pour changer le contraste de l'écran :
• Appuyez sur la touche ‘Menu’ gauche.
7
• Appuyez plusieurs fois sur la touche Haut ou Bas
'Réglage comb [HS Settings]'.
• Appuyez sur ‘Select’ pour confirmer.
• Appuyez plusieurs fois sur la touche Haut ou Bas
‘Contraste [LCD Contrast]’.
• Appuyez sur ‘Select’ pour confirmer.
• Appuyez plusieurs fois sur la touche Haut ou Bas
contraste entre 0 (clair) et 16 (foncé).
• Appuyez sur ‘Sauve [Save]’ pour valider votre sélection ou appuyez sur ‘Retour
[Back]’ pour quitter ce menu sans enregistrer.
68 Sologic B931
5
13
/ pour sélectionner
7
/ pour sélectionner
7
/ pour modifier le
Page 69

Sologic B931
15
7
13
5
15
15
13
1
7.20 Modification du nom du combiné
Vous pouvez modifier le nom affiché sur le combiné en mode veille.
• Appuyez sur la touche ‘Menu’ gauche.
7
• Appuyez plusieurs fois sur la touche Haut ou Bas
'Réglage comb [HS Settings]'.
• Appuyez sur ‘Select’ pour confirmer.
• Appuyez plusieurs fois sur la touche Haut ou Bas / pour sélectionner 'Nom
combiné [HS Name]'.
• Appuyez sur ‘Select’ pour confirmer.
• Saisissez le nouveau nom du combiné et appuyez sur ‘Effac. [Erase]’ pour supprimer
les caractères présents devant le curseur.
• Appuyez sur ‘Sauve [Save]’ pour valider votre sélection ou appuyez sur ‘Retour
[Back]’ pour quitter ce menu sans enregistrer.
/ pour sélectionner
15
7.21 Réponse auto
Lorsque vous recevez un appel et que le combiné est sur la base, le téléphone prend
automatiquement la ligne dès qu'il est décroché. Cette fonction peut être activée ou
désactivée.
• Appuyez sur la touche ‘Menu’ gauche.
7
• Appuyez plusieurs fois sur la touche Haut ou Bas
'Réglage comb [HS Settings]'.
• Appuyez sur ‘Select’ pour confirmer.
• Appuyez plusieurs fois sur la touche Haut ou Bas
‘Réponse auto [Auto Answer]’.
• Appuyez sur ‘Select’ pour confirmer.
• Sélectionnez
–‘On' : pour activer la réponse automatique.
–‘Off' : pour désactiver la réponse automatique.
• Appuyez sur ‘Sauve [Save]’ pour valider votre sélection ou appuyez sur ‘Retour
[Back]’ pour quitter ce menu sans enregistrer.
5
/ pour sélectionner
7
/ pour sélectionner
FRANÇAIS
7.22 Activer/Désactiver la sonnerie visuelle et le vibreur
Lorsque cette fonction est activée, la sonnerie visuelle clignote et le combiné vibre lors
d'un appel entrant.
• Pour l'activer, maintenez enfoncée la touche jusqu'à ce que l'icône
apparaisse.
• Pour la désactiver, maintenez enfoncée la touche jusqu'à ce que l'icône
disparaisse.
9
9
8 Réinitialisation du combiné
Vous pouvez rétablir tous les paramètres par défaut du combiné et effacer toutes les entrées
du répertoire, du journal des appels, du volume de la sonnerie, des mélodies, du réglage
audio, du réglage de la tonalité, de l'alarme, de la langue et de la liste des derniers numéros
composés. Seul le contraste ne peut être réinitialisé.
Sologic B931 69
Page 70

Sologic B931
15
15
7
15
15
15
Pour rétablir les paramètres par défaut :
• Appuyez sur la touche ‘Menu’ gauche.
• Appuyez plusieurs fois sur la touche Haut ou Bas / pour sélectionner
'Réglage comb [HS Settings]'.
• Appuyez sur ‘Select’ pour confirmer.
• Appuyez plusieurs fois sur la touche Haut ou Bas
combiné [HS Reset]’.
• Appuyez sur ‘Select’ pour confirmer.
• Saisissez le code PIN (0000).
• Appuyez sur ‘R.A.Z. [Reset]’ pour valider votre sélection ou appuyez sur ‘Retour
[Back]’ pour quitter ce menu sans enregistrer.
Les paramètres par défaut sont les suivants :
Alarme [Alarm] : Off
Régl. audio [Audio Setup] : 3
Mélodie Int/Ext [INT/EXT Melody] : Mélodie 3
Volume Appel Int/Ext [INT/EXT Ring Volume] : Volume 3
Bip clavier [Key Tone] : On
Niv. alarme [Range Alarm] : On
Nom combiné [Handset name] : Combiné 1 [HS1]
Format H. [Time Format] : 24H [24-Hour]
Format date [Date Format] : JJ-MM [DD-MM]
Répertoire [Phone Book] : Vide [Empty]
Journal des appels [Call log] : Vide [Empty]
Liste d'app. [Redial list] : Vide [Empty]
Réponse auto [Auto Answer] : Off
Date &heure [Date & Time] : 0:00 01-01
5
13
7
/ pour sélectionner ‘RAZ
Après une réinitialisation, vous devez réactiver le combiné – voir “7.1
Activation ou désactivation du combiné”.
9 Réglage de l'horloge et de l'alarme
9.1 Format de la date et de l'heure
• Appuyez sur la touche ‘Menu’ gauche.
• Appuyez plusieurs fois sur la touche Haut ou Bas / pour sélectionner
'Réglage comb [HS Settings]'.
• Appuyez sur ‘Select’ pour confirmer.
• Appuyez plusieurs fois sur la touche Haut ou Bas
&heure [Date & Time]’.
• Appuyez sur ‘Select’ pour confirmer.
• Appuyez plusieurs fois sur la touche Haut ou Bas
date [Date Format]’ ou ‘Format H. [Time Format]’.
• Appuyez sur ‘Select’ pour confirmer.
• Utilisez la touche Haut ou Bas
MM [DD-MM]’ ou ‘MM-JJ [MM-DD]’ ou le format de l'heure ‘12H [12-Hour]’ ou ‘24H [24Hour]’.
70 Sologic B931
15
7
/ pour sélectionner le format de la date ‘JJ-
7
7
/ pour sélectionner ‘Date
7
/ pour atteindre ‘Format
Page 71

Sologic B931
13
13
15
15
15
13
15715
15
15
7
13
• Appuyez sur ‘Sauve [Save]’ pour valider votre sélection ou appuyez sur ‘Retour
[Back]’ pour quitter ce menu sans enregistrer.
5
9.2 Réglage de la date et de l'heure
• Appuyez sur la touche ‘Menu’ gauche.
Si vous bénéficiez du service de présentation du numéro sur votre ligne
téléphonique et que l'opérateur transmet la date et l'heure, votre
horloge sera automatiquement réglée lors d'un appel entrant.
• Appuyez plusieurs fois sur la touche Haut ou Bas
'Réglage comb [HS Settings]'.
• Appuyez sur ‘Select’ pour confirmer.
• Appuyez plusieurs fois sur la touche Haut ou Bas
&heure [Date & Time]’.
• Appuyez sur ‘Select’ pour confirmer.
• Appuyez plusieurs fois sur la touche Haut ou Bas
Date [Set Date]’ ou ‘Régl. heure [Set Time]’.
• Appuyez sur ‘Select’ pour confirmer.
• Saisissez la date et l'heure exactes à l'aide du clavier numérique.
• Appuyez sur ‘Sauve [Save]’ pour valider votre sélection ou appuyez sur ‘Retour
[Back]’ pour quitter ce menu sans enregistrer.
5
7
/ pour sélectionner
7
/ pour sélectionner ‘Date
7
/ pour atteindre ‘Régl.
9.3 Fonction d'alarme
Vous pouvez demander à votre combiné de faire retentir une alarme à une date et une heure
convenues. Vous pouvez définir une alarme différente sur chaque combiné enregistré sur
votre base. L'alarme ne sonne que sur le combiné concerné, pas sur la base ni sur un autre
combiné.
Si une des alarmes est activée, l'icône Alarme programmée apparaît sur l'écran en mode
de veille.
Lorsque l'alarme sonne, appuyez sur n'importe quelle touche pour l'arrêter.
9.3.1 Réglage de l'alarme
• Appuyez sur la touche ‘Menu’ gauche.
• Appuyez plusieurs fois sur la touche Haut ou Bas / pour sélectionner
'Réglage comb [HS Settings]'.
• Appuyez sur ‘Select’ pour confirmer.
7
• Appuyez plusieurs fois sur la touche Haut ou Bas
‘Alarme [Alarm]'.
• Appuyez sur ‘Select’ pour confirmer.
7
• Appuyez sur la touche Haut ou Bas
• Appuyez sur ‘Select’ pour confirmer.
• Si vous sélectionnez ‘On’, l'écran vous invite à saisir l'heure au format HH:MM. Utilisez
le clavier numérique. Appuyez sur 'Suiv. [Next]’, l'écran indique ‘Buzzer on/off
[Snooze On/Off]’. Appuyez sur la touche Haut ou Bas
désactiver la fonction Buzzer.
• Appuyez sur ‘Sauve [Save]’ pour valider votre sélection ou appuyez sur ‘Retour
[Back]’ pour quitter ce menu sans enregistrer.
5
/ et sélectionnez ‘On’ ou ‘Off’.
/ pour sélectionner
/ pour activer ou
FRANÇAIS
Sologic B931 71
Page 72

Sologic B931
6
15
15
15
7
13
5
7
15
12
15
15
Si vous sélectionnez ‘Buzzer on [Snooze On]’, l'alarme sonnera à intervalles réguliers de 11 minutes. Si vous appuyez sur la touche
lorsque l'alarme retentit, l'option deviendra ‘Buzzer off [Snooze Off]’.
10 Répertoire
Le répertoire vous permet de mémoriser 50 noms et numéros de téléphone. Les noms
peuvent comprendre jusqu'à 12 caractères et les numéros peuvent compter jusqu'à
20 chiffres.
10.1 Ajout d'un numéro et d'un nom au répertoire
• Appuyez sur la touche ‘Menu’ gauche.
7
• Appuyez plusieurs fois sur la touche Haut ou Bas
‘Répertoire [Phonebook]’.
• Appuyez sur ‘Select’ pour confirmer.
• Appuyez plusieurs fois sur la touche Haut ou Bas
‘Ajout. fiche [New]'.
• Appuyez sur ‘Select’ pour confirmer.
7
• Appuyez sur la touche Haut ou Bas
• Appuyez sur ‘Select’ pour confirmer.
• Entrez le nom à l'aide du clavier numérique (voir également “7.13 Utilisation du clavier
alphanumérique du combiné”).
• Appuyez sur ‘Suiv. [Next]’ et entrez le numéro correspondant (jusqu'à 20 chiffres).
• Appuyez sur ‘Suiv. [Next]’ et sélectionnez la mélodie de sonnerie que vous souhaitez
associer à ce numéro avec la touche Haut ou Bas
• Appuyez sur ‘Sauve [Save]’ pour valider votre sélection ou appuyez sur ‘Retour
[Back]’ pour quitter ce menu sans enregistrer.
/ et sélectionnez ‘On’ ou ‘Off’.
/ pour sélectionner
7
/ pour sélectionner
15
/ .
10.2 Recherche d'un numéro dans le répertoire
• Appuyez sur la touche Répertoire .
• Saisissez l'initiale du nom souhaité à l'aide du clavier alphanumérique.
• Le premier nom de la liste commençant par cette lettre s'affiche à l'écran.
7
• Appuyez sur la touche Haut ou Bas
dans le répertoire.
• Si le numéro souhaité apparaît à l'écran, appuyez sur la touche Prise d'appel
pour composer automatiquement ce numéro.
/ pour rechercher d'autres numéros
10.3 Modification d'un nom ou d'un numéro dans le répertoire
• Appuyez sur la touche ‘Menu’ gauche.
• Appuyez plusieurs fois sur la touche Haut ou Bas / pour sélectionner
‘Répertoire [Phonebook]’.
• Appuyez sur ‘Select’ pour confirmer.
• Appuyez plusieurs fois sur la touche Haut ou Bas
‘Modif. fiche [Edit]'.
• Appuyez sur ‘Select’ pour confirmer.
• Saisissez l'initiale du nom souhaité à l'aide du clavier alphanumérique.
• Le premier nom de la liste commençant par cette lettre s'affiche à l'écran.
72 Sologic B931
7
7
/ pour sélectionner
Page 73

Sologic B931
15
7
13
15715
15
7
15
7
15
7
13
5
• Appuyez sur la touche Haut ou Bas / pour rechercher d'autres numéros
dans le répertoire.
• Si le numéro recherché apparaît à l'écran, appuyez sur ‘Select’ pour confirmer.
• Modifiez le nom à l'aide du clavier numérique (voir également “7.13 Utilisation du clavier
alphanumérique du combiné”).
• Appuyez sur ‘Suiv. [Next]’ et modifiez le numéro.
• Appuyez sur ‘Suiv. [Next]’ et sélectionnez la mélodie de sonnerie que vous souhaitez
associer à ce numéro avec la touche Haut ou Bas
• Appuyez sur ‘Sauve [Save]’ pour valider votre sélection ou appuyez sur ‘Retour
[Back]’ pour quitter ce menu sans enregistrer.
5
7
15
/ .
10.4 Suppression d'une entrée ou de toutes les entrées du répertoire
• Appuyez sur la touche ‘Menu’ gauche.
• Appuyez plusieurs fois sur la touche Haut ou Bas
‘Répertoire [Phonebook]’.
• Appuyez sur ‘Select’ pour confirmer.
• Appuyez plusieurs fois sur la touche Haut ou Bas
Fiche [Delete]’ ou ‘Tout supp. [Delete All]’.
• Appuyez sur ‘Select’ pour confirmer.
• L'écran affiche ‘Confirmé ? [Confirm?]’. Vous pouvez appuyer sur ‘Supp. Fiche [Del]’
ou ‘Tout supp. [Del All]’ pour supprimer ou sur ‘Annul. [Cancel]’ pour quitter ce menu.
/ pour sélectionner
7
/ pour atteindre ‘Supp.
10.5 État du répertoire
L'état du répertoire indique le nombre d'entrées déjà mémorisées dans le répertoire.
• Appuyez sur la touche ‘Menu’ gauche.
• Appuyez plusieurs fois sur la touche Haut ou Bas / pour sélectionner
‘Répertoire [Phonebook]’.
• Appuyez sur ‘Select’ pour confirmer.
• Appuyez plusieurs fois sur la touche Haut ou Bas
répert. [PB Status]’.
• Appuyez sur ‘Select’ pour confirmer.
/ pour sélectionner ‘Etat
FRANÇAIS
11 Touches mémoire M1 - M4
11.1 Mémorisation d'un numéro sous une touche mémoire
Vous pouvez mémoriser jusqu'à 4 numéros sous les touches de mémoire directe M1 - M4.
Tous ces numéros seront également mémorisés dans le répertoire.
• Appuyez sur l'une des 4 touches mémoire (M1 - M4).
• L'écran affiche ‘Numéro ? [Number?]’. Entrez le numéro désiré (jusqu'à 20 chiffres).
• Appuyez sur la touche contextuelle 'Suiv. [Next]'.
• Sélectionnez la mélodie de sonnerie que vous souhaitez associer à ce numéro avec la
touche Haut ou Bas
• Appuyez sur ‘Sauve [Save]’ pour valider votre sélection ou appuyez sur ‘Retour
[Back]’ pour quitter ce menu sans enregistrer.
Sologic B931 73
/ .
Page 74

Sologic B931
15
15
15
13
15
11.2 Affichage des numéros des touches mémoire
Les numéros des touches mémoires sont mémorisés dans le répertoire sous les entrées 1 à 4.
• Appuyez sur la touche Répertoire .
• Appuyez sur la touche Haut ou Bas
7
7
/ pour rechercher d'autres numéros.
11.3 Modification des numéros des touches mémoire
Procédez comme décrit à la section “10.3 Modification d'un nom ou d'un numéro dans le
répertoire”.
Les noms des touches mémoire sont mémorisés dans le répertoire
sous 'M1:', 'M2:', 'M3:' et 'M4:'. Lorsque vous modifiez le nom, vous ne
pouvez ajouter que du texte comme ‘M1: Maison [Home]’, mais vous ne
pouvez supprimer le nom par défaut.
11.4 Suppression d'un numéro de touche mémoire
Procédez comme décrit à la section “10.4 Suppression d'une entrée ou de toutes les entrées
du répertoire”.
12 Utilisation de la base
12.1 Réglage du temps "flash"
Vous pouvez régler le temps "flash" sur court (100 ms) ou sur long (300 ms). Par défaut, le
temps "flash" est réglé sur 100 ms. Toutefois, si votre système a besoin d'un flash plus long,
vous pouvez modifier cette durée :
• Appuyez sur la touche ‘Menu’ gauche.
7
• Appuyez plusieurs fois sur la touche Haut ou Bas
‘Réglages BS [BS Settings]’.
• Appuyez sur ‘Select’ pour confirmer.
• Appuyez plusieurs fois sur la touche Haut ou Bas
‘Temps "flash" [Flash Time]’.
• Appuyez sur ‘Select’ pour confirmer.
• Sélectionnez
–‘Flash-1’ : (court) pour avoir un flash de 100 ms.
–‘Flash-2’ : (long) pour avoir un flash de 300 ms.
• Appuyez sur ‘Sauve [Save]’ pour valider votre sélection ou appuyez sur ‘Retour
[Back]’ pour quitter ce menu sans enregistrer.
5
/ pour sélectionner
7
/ pour sélectionner
12.2 Modification du code PIN (code PIN système)
Certaines fonctions ne sont accessibles qu'aux utilisateurs connaissant le code PIN de la
base.
Le code PIN compte 4 chiffres. Par défaut, le code PIN est réglé sur '0000'. Si vous souhaitez
modifier le code PIN et définir votre propre code secret, procédez comme suit :
• Appuyez sur la touche ‘Menu’ gauche.
7
• Appuyez plusieurs fois sur la touche Haut ou Bas
‘Réglages BS [BS Settings]’.
• Appuyez sur ‘Select’ pour confirmer.
74 Sologic B931
/ pour sélectionner
Page 75

Sologic B931
15
5
15
15
15
7
13
5
15
15
7
• Appuyez plusieurs fois sur la touche Haut ou Bas / pour sélectionner
‘Modifier PIN [Modify PIN]’.
• Appuyez sur ‘Select’ pour confirmer.
• Saisissez le code PIN actuel et appuyez sur ‘Suiv. [Next]’.
• Saisissez le nouveau code PIN et appuyez sur ‘Suiv. [Next]’.
• Saisissez à nouveau le nouveau code PIN et appuyez sur ‘Sauve [Save]’ pour
mémoriser le nouveau code PIN ou appuyez sur ‘Retour [Back]’ pour quitter ce
menu sans enregistrer.
7
13
12.3 Réglage du mode de numérotation
Deux modes de numérotation peuvent être utilisés sur une ligne téléphonique :
• Numérotation à tonalités/DTMF (la plus courante)
• Numérotation à impulsions (sur les installations plus anciennes)
Pour changer le mode de numérotation :
• Appuyez sur la touche ‘Menu’ gauche.
• Appuyez plusieurs fois sur la touche Haut ou Bas
‘Réglages BS [BS Settings]’.
• Appuyez sur ‘Select’ pour confirmer.
• Appuyez plusieurs fois sur la touche Haut ou Bas
‘Mode num. [Dial mode]’.
• Appuyez sur ‘Select’ pour confirmer.
• Appuyez sur la touche Haut ou Bas
ou ‘Décimal [Pulse]’.
• Appuyez sur ‘Sauve [Save]’ pour valider votre sélection ou appuyez sur ‘Retour
[Back]’ pour quitter ce menu sans enregistrer.
/ et sélectionnez ‘Freq vocales [Tone]’
7
/ pour sélectionner
7
/ pour sélectionner
12.4 Réinitialisation de la base
Vous pouvez réinitialiser tous les paramètres par défaut de la base.
Pour rétablir les paramètres par défaut :
• Appuyez sur la touche ‘Menu’ gauche.
7
• Appuyez plusieurs fois sur la touche Haut ou Bas
‘Réglages BS [BS Settings]’.
• Appuyez sur ‘Select’ pour confirmer.
• Appuyez plusieurs fois sur la touche Haut ou Bas
base [BS Reset]’.
• Appuyez sur ‘Select’ pour confirmer.
• Saisissez le code PIN (0000).
• Appuyez sur ‘R.A.Z. [Reset]’ pour valider votre sélection ou appuyez sur ‘Retour
[Back]’ pour quitter ce menu sans enregistrer.
5
13
/ pour sélectionner
/ pour sélectionner ‘RAZ
FRANÇAIS
Les paramètres par défaut sont les suivants :
Mode num. [Dial Mode] : Freq vocales [Tone]
Temps "flash" [Flash time] : Flash-1
Code PIN [PIN Code] : 0000
Sologic B931 75
Page 76

Sologic B931
17
15
15
15
7
15
7
13 Combinés et bases supplémentaires
Vous pouvez enregistrer jusqu'à 5 combinés sur une seule base. Chaque combiné peut être
enregistré sur 4 stations de base et l'utilisateur peut sélectionner la base qu'il souhaite
utiliser. Par défaut, le combiné 1 est enregistré sur la base 1.
13.1 Ajout d'un nouveau combiné
cette opération n'est nécessaire que si vous avez supprimé
l'enregistrement d'un combiné ou si vous en avez acheté un nouveau.
Appuyez sur la touche Recherche de la base pendant 5 secondes. La base reste en
mode d'enregistrement pendant 3 minutes. Il convient alors de procéder comme suit pour
enregistrer le combiné :
• Appuyez sur la touche ‘Menu’ gauche.
7
• Appuyez plusieurs fois sur la touche Haut ou Bas
‘Enregistr. [Registration]’.
• Appuyez sur ‘Select’ pour confirmer.
• Appuyez plusieurs fois sur la touche Haut ou Bas
base (1-4).
• Le combiné recherche une base et, lorsqu'il l'a trouvée, demande le code PIN du
système (code PIN de la base = ’0000’ par défaut).
• Entrez le code PIN et appuyez sur ‘Select’.
• L'écran de veille apparaît une fois l'enregistrement terminé et affiche le nom et le
numéro du combiné.
Chaque combiné peut être enregistré sur 4 bases DECT différentes.
Chaque base est associée à un numéro de '1' à '4' dans le combiné.
Lorsque vous enregistrez un nouveau combiné, vous pouvez
attribuer un numéro de base. Il est préférable d'utiliser le numéro '1'.
/ pour sélectionner
7
/ pour sélectionner une
13.2 Suppression d'un combiné
Il est possible d'annuler l'enregistrement d'un combiné sur une base. Cette opération peut
être nécessaire si un combiné est endommagé et doit être remplacé par un nouvel
exemplaire.
Vous pouvez uniquement annuler l'enregistrement d'un autre
combiné, pas celui du combiné que vous utilisez pour effectuer la
procédure d'annulation.
• Appuyez sur la touche ‘Menu’ gauche.
• Appuyez plusieurs fois sur la touche Haut ou Bas
‘Réglages BS [BS Settings]’.
• Appuyez sur ‘Select’ pour confirmer.
• Appuyez plusieurs fois sur la touche Haut ou Bas
Combiné [Terminate HS]’.
• Appuyez sur ‘Select’ pour confirmer.
• Saisissez le code PIN et appuyez sur ‘OK’.
76 Sologic B931
/ pour sélectionner
/ pour sélectionner ‘Sup.
Page 77

Sologic B931
15
5
15
15
14
6
6
• Appuyez sur la touche Haut ou Bas / pour sélectionner le combiné. Si
7
vous sélectionnez le combiné utilisé ou un combiné inexistant, un signal d'avertissement
retentit.
• Appuyez sur ‘Select’ pour valider votre sélection ou appuyez sur ‘Retour [Back]’
13
pour quitter ce menu.
13.3 Sélection d'une base
Si votre combiné est enregistré sur plusieurs bases (maximum 4), vous devez en
sélectionner une, car le combiné ne peut communiquer qu'avec une seule base à la fois.
• Appuyez sur la touche ‘Menu’ gauche.
7
• Appuyez plusieurs fois sur la touche Haut ou Bas
/ pour sélectionner
'Réglage comb [HS Settings]'.
• Appuyez sur ‘Select’ pour confirmer.
• Appuyez plusieurs fois sur la touche Haut ou Bas pour sélectionner ‘Select Base’.
• Appuyez sur ‘Select’ pour confirmer.
7
• Appuyez sur la touche Haut ou Bas
/ pour sélectionner la base. Si vous
sélectionnez la base utilisée ou une base inexistante, un signal d'avertissement retentit.
• L'écran affiche ‘Sel. Base* [Selected BSx]’. Appuyez sur la touche ‘Select’ pour
confirmer.
Attention : Avant de pouvoir sélectionner une base, vous devez au
préalable avoir enregistré le combiné sur la base.
13.4 Gestion de plusieurs combinés
Ces fonctions ne sont disponibles que si plusieurs combinés sont
enregistrés sur la base.
FRANÇAIS
13.4.1 Appel vers un autre combiné
• Appuyez sur la touche Appel interne .
•‘Interphone 1 2 3 4 5 [Intercom 1 2 3 4 5]' apparaît à l'écran.
• Tapez le numéro du combiné que vous voulez appeler.
• Lorsque vous avez terminé votre appel, appuyez sur la touche Fin d'appel pour
raccrocher.
13.4.2 Réception d'un appel interne
• L'icône d'appel interne et le numéro du combiné appelant s'affichent sur
l'écran.
• Appuyez sur la touche Prise d'appel pour accepter l'appel interne.
12
OU
• Retirez le combiné de sa base (si l'option Réponse auto (Auto answer) est activée – voir
§“7.21 Réponse auto”).
• Pendant l'appel, le numéro de combiné de l'appelant s'affiche à l'écran.
• Lorsque vous avez terminé votre appel, appuyez sur la touche Fin d'appel pour
raccrocher.
Sologic B931 77
Page 78

Sologic B931
6
6
14
6
14
13.4.3 Réception d'un appel externe pendant une communication interne
Si vous recevez un appel externe pendant une communication interne, vous entendez une
tonalité d'appel en attente (double bip) sur les deux combinés utilisés pour la communication
interne.
• Appuyez sur la touche Fin d'appel pour terminer la communication interne.
• Appuyez sur la touche Prise d'appel pour accepter l'appel externe.
12
• Lorsque vous avez terminé votre appel, appuyez sur la touche Fin d'appel pour
raccrocher.
13.4.4 Transfert d'un appel vers un autre combiné
• Vous êtes en ligne avec un correspondant externe.
• Appuyez sur la touche Appel interne . ‘Interphone 1 2 3 4 5 [Intercom 1 2 3 4 5]'
apparaît à l'écran.
• Tapez le numéro du combiné vers lequel vous voulez transférer l'appel.
• Si le combiné appelé répond, vous pouvez avoir une conversation interne. Appuyez sur
la touche Fin d'appel pour transférer l'appel externe.
• Si le combiné appelé ne répond pas, appuyez sur la touche Appel interne pour
14
reprendre la conversation avec le correspondant externe.
13.4.5 Conférence téléphonique (deux combinés internes et un correspondant externe)
Vous pouvez mener une conversation téléphonique avec un correspondant interne et un
correspondant externe en même temps.
• Lorsque vous êtes en ligne avec un correspondant externe, appuyez sur la touche
Appel interne . Votre correspondant externe est mis en attente.
14
• Tapez le numéro du combiné que vous voulez associer à la conversation. Vous pouvez
basculer entre la ligne interne et la ligne externe en appuyant sur la touche Appel
interne .
• Une fois que le combiné appelé répond, appuyez sur la touche .
11
• Vous êtes désormais en communication avec le correspondant interne et le
correspondant externe et vous pouvez leur parler en même temps (conférence
téléphonique).
14 Identification de l'appelant/CLIP
Cette fonction n'est disponible que si vous avez souscrit au service
de présentation du numéro ou CLIP. Contactez votre compagnie de
téléphone pour en savoir davantage.
Quand vous recevez un appel, le numéro de téléphone de l'appelant s'affiche sur l'écran du
combiné, ainsi que la date et l'heure de l'appel. Si le nom est programmé dans le répertoire,
c'est le nom du répertoire qui est affiché.
Le téléphone peut mémoriser 40 appels dans la liste d'appels, que vous pouvez consulter
ultérieurement. Quand la mémoire est pleine, les nouveaux appels remplacent
automatiquement les plus anciens appels conservés en mémoire. L'icône apparaît si la
liste d'appels contient de nouveaux appels sans réponse. Si la liste d'appels est vide lorsque
vous appuyez sur la touche Journal des appels , l'écran affiche 'Vide [Empty]'.
78 Sologic B931
15
Page 79

Sologic B931
15
15
15
15
15
15
5
15
7
5
5
15
7
Vous pouvez afficher les détails d'un appel entrant :
• Appuyez sur la touche Journal des appels . Le numéro de téléphone apparaît à la
première ligne. Le nom de l'appelant (s'il est envoyé par le réseau ou s'il figure dans la
mémoire du répertoire) s'affiche sur la deuxième ligne et la date et l'heure, sur la
troisième. Dans le coin supérieur droit de l'écran, apparaît l'icône suivante, suivie du
numéro d'ordre dans le Journal des appels :
– : Appel non lu ou sans réponse
– : Appel lu ou suivi d'une réponse
14.1 Liste d'appels
Les appels reçus sont mémorisés dans la liste d'appels (max. 40 numéros).
• Appuyez brièvement sur la touche Journal des appels pour afficher l'appel le plus
récent.
OU
• Appuyez sur la touche ‘Menu’ gauche.
• Appuyez sur ‘Select’ pour confirmer.
• Le numéro de téléphone et le nom du dernier appelant s'affichent à l'écran.
• Chaque appel est enregistré avec la date et l'heure de réception de l'appel.
• Appuyez sur la touche Haut ou Bas
liste.
• Si vous n'appuyez pas sur la touche Haut ou Bas
1 minute, le téléphone repasse en mode de veille.
• Après la réception d'un appel, le numéro de l'appelant reste visible sur
l'écran pendant 15 secondes après la dernière sonnerie.
15
7
/ pour consulter d'autres numéros de la
7
/ pendant
FRANÇAIS
14.2 Appel d'un numéro de la liste d'appels
• Appuyez sur la touche Journal des appels pour accéder à la liste d'appels.
7
• Appuyez sur la touche Haut ou Bas
• Une fois ce numéro affiché à l'écran, appuyez sur la touche Prise d'appel . Le
numéro est composé automatiquement.
/ pour rechercher le numéro souhaité.
14.3 Mémorisation d'un numéro de la liste d'appels dans le répertoire
• Appuyez sur la touche ‘Menu’ gauche.
• Appuyez sur ‘Select’ pour confirmer.
7
• Appuyez sur la touche Haut ou Bas
• Appuyez sur ‘Plus [More]’ .
• Appuyez plusieurs fois sur la touche Haut ou Bas
‘Ajout Rep. [Add to PB]’.
• Appuyez sur ‘Select’ pour confirmer.
•‘Nom ? [Name ?]' s'affiche. Utilisez les touches alphanumériques pour ajouter un nom.
Si le nom a été envoyé par le réseau, vous pouvez le modifier avant de l'enregistrer.
Appuyez sur ‘Suiv. [Next]’ pour confirmer.
• Le numéro de téléphone s'affiche. Modifiez le numéro si nécessaire et appuyez à
nouveau sur ‘Suiv. [Next]’ pour mémoriser l'entrée dans le répertoire.
• Sélectionnez la mélodie de sonnerie que vous souhaitez associer à ce numéro avec la
touche Haut ou Bas
Sologic B931 79
/ .
/ pour rechercher le numéro souhaité.
/ pour sélectionner
12
Page 80

Sologic B931
13
15
5
15
5
15
5
15
13
5
• Appuyez sur ‘Sauve [Save]’ pour valider votre sélection ou appuyez sur ‘Retour
[Back]’ pour quitter ce menu sans enregistrer.
5
14.4 Suppression de numéros de la liste d'appels
14.4.1 Suppression d'un numéro
• Appuyez sur la touche ‘Menu’ gauche.
• Appuyez sur ‘Select’ pour confirmer.
7
• Appuyez sur la touche Haut ou Bas
• Appuyez sur ‘Plus [More]’ .
• Appuyez plusieurs fois sur la touche Haut ou Bas
‘Supprimer [Delete]’.
• Appuyez sur ‘Select’ pour confirmer.
• Appuyez sur ‘OK [Del]’ pour supprimer ou appuyez sur ‘Annul. [Cancel] pour
quitter ce menu sans enregistrer.
14.4.2 Suppression de tous les numéros
• Appuyez sur la touche ‘Menu’ gauche.
• Appuyez sur ‘Select’ pour confirmer.
• Appuyez sur la touche Haut ou Bas
• Appuyez sur ‘Plus [More]’ .
• Appuyez plusieurs fois sur la touche Haut ou Bas
supp. [Delete All]’.
• Appuyez sur ‘Select’ pour confirmer.
• Appuyez sur ‘Tout supp. [Del All]’ pour supprimer ou appuyez sur ‘Annul.
[Cancel]’ pour quitter ce menu sans enregistrer.
13
/ pour rechercher le numéro souhaité.
7
/ pour sélectionner
7
/ pour rechercher le numéro souhaité.
7
/ pour sélectionner ‘Tout
15 Indicateur de boîte vocale
Cette fonction n'est opérationnelle que si vous disposez d'un service de messagerie vocale
et si le réseau envoie cette indication en même temps que la présentation du numéro (CLIP).
Lorsque vous recevez un nouveau message dans votre boîte vocale, l'icône et ‘Message
On [MSG WTG ON]’ s'affichent à l'écran. Une fois que vous avez écouté tous vos messages,
l'icône disparaît.
Si vous souhaitez supprimer l'icône , appuyez sur la touche Journal des appels et
maintenez la touche numérique ‘4’ enfoncée. Après quoi, appuyez sur la touche Fin d'appel
6
pour revenir au mode de veille.
16 Dépannage
Symptôme Cause possible Solution
Pas d'affichage ; l'écran
reste sombre
Pas de tonalité Câble téléphonique mal
80 Sologic B931
Piles déchargées Vérifiez la position des piles.
Rechargez les piles.
Combiné désactivé Activez le combiné.
Vérifiez la connexion du câble
raccordé ou défectueux
téléphonique.
7
Page 81

Sologic B931
L'icône clignote.
La ligne est occupée par un
autre combiné.
Combiné hors de portée Rapprochez le combiné de la
Attendez que l'autre combiné
soit raccroché.
base.
La base n'est pas alimentée. Vérifiez le raccordement
électrique de la base.
La base ou le combiné ne
sonne pas.
La tonalité est bonne
mais impossible d'établir
une connexion.
Impossible de transférer
Le combiné n'est pas
enregistré sur la base.
Le volume de la sonnerie est
désactivé ou faible.
Le mode de numérotation est
incorrect.
Le flash est trop court. Modifiez le flash.
Enregistrez le combiné sur la
base.
Réglez le volume de la
sonnerie.
Réglez le mode de
numérotation (impulsions/
tonalités).
un appel sur PABX
Le téléphone ne répond
pas lorsque vous
appuyez sur les touches.
Erreur de manipulation Retirez les piles pendant au
moins 1 minute, puis remettezles en place.
17 Caractéristiques techniques
Norme : DECT(Digital Enhanced Cordless Telecommunications)
GAP (Generic Access Profile)
Plage de fréquence : 1880 MHz à 1900 MHz
Nombre de canaux : 120 canaux duplex
Modulation : GFSK
Codage de la parole : 32 kbit/s
Puissance d'émission : 10 mW (puissance moyenne par canal)
Portée : 300 m en zone dégagée/50 m max. en intérieur
Alimentation de la base : Entrée : 230 V CA/50 Hz - Sortie : 7,5 V CC/300 mA
Piles pour le combiné : 3 piles rechargeables AAA, NiMh 600 mAh
Autonomie du combiné : 100 heures en veille
Temps de conversation avec
le combiné : 10 heures
Temps de charge : 16 heures
Mode de composition : Tonalités/Impulsions
Conditions normales d'utilisation : +5° C à +45° C
Temps "flash" : 100 ms ou 300 ms
FRANÇAIS
Sologic B931 81
Page 82

Sologic B931
18 Garantie Topcom
18.1 Période de garantie
Les appareils Topcom bénéficient d'une période de garantie de 24 mois. Celle-ci prend effet
le jour de l'achat du nouvel appareil. Il n'y a aucune garantie sur les piles standard ou
rechargeables (de type AA/AAA).
Les accessoires et les défauts ayant un effet négligeable sur le fonctionnement ou la valeur
de l'appareil ne sont pas couverts.
La garantie s'applique uniquement sur présentation de l'original ou d'une copie de la facture
sur laquelle figurent la date de l'achat et le modèle de l'appareil.
18.2 Mise en œuvre de la garantie
Tout appareil défectueux doit être retourné à un centre de service après-vente Topcom,
accompagné d'un ticket d'achat valable et d'une fiche de service dûment complétée.
En cas de panne pendant la période de garantie, Topcom ou son centre de service aprèsvente officiel résoudra gratuitement les dysfonctionnements dus à un vice de matière ou de
fabrication, en réparant ou en remplaçant les appareils ou les pièces défectueux. En cas de
remplacement, la couleur et le modèle peuvent être différents de ceux de l'appareil acheté
initialement.
La date d'achat initiale détermine le début de la période de garantie. Cette dernière n'est pas
prolongée si l'appareil est remplacé ou réparé par Topcom ou son centre de service aprèsvente officiel.
18.3 Exclusions de garantie
Les dommages et pannes causés par un mauvais traitement ou une utilisation incorrecte ou
résultant de l'utilisation de pièces et d'accessoires non originaux ne sont pas couverts par la
garantie.
La garantie ne couvre pas les dommages causés par des éléments extérieurs, tels que la
foudre, l'eau et le feu, ni les dommages encourus pendant le transport.
Aucune garantie ne pourra être invoquée si le numéro de série indiqué sur l'appareil a été
modifié, supprimé ou rendu illisible.
De même, aucune garantie ne pourra être sollicitée si l'appareil a été réparé ou modifié par
l'acheteur.
Cet appareil doit être utilisé avec des piles rechargeables uniquement. Si vous voulez
remplacer les piles fournies avec l'appareil, veuillez vérifier que les piles que vous utilisez
sont adaptées et rechargeables. N'utilisez PAS de piles alcalines dans les combinés.
Si vous utilisez des piles alcalines et que vous placez le combiné sur la base, les piles vont
chauffer et risquent d'exploser. Le fabricant ne sera pas tenu responsable des dommages
provoqués et ceux causés sur l'appareil ne seront pas pris en charge par la garantie. Toutes
les réparations seront à vos frais.
82 Sologic B931
Page 83

Sologic B931
1 Sicherheitshinweise
Folgende grundlegende Sicherheitshinweise müssen beim Einsatz von elektrischen Geräten
in jedem Fall berücksichtigt werden.
Bitte lesen Sie die folgenden Informationen für den sicheren und ordnungsgemäßen
Gebrauch aufmerksam durch. Machen Sie sich mit allen Funktionen des Geräts vertraut.
Bewahren Sie diese Hinweise sorgfältig auf, und geben Sie sie wenn nötig an andere
Benutzer weiter.
Sicherheitshinweise zum Schutz vor elektrischen Gefahren
• Das Gerät nicht in Betrieb nehmen, wenn der Netzstecker, das Netzkabel oder das
Gerät beschädigt ist.
• Falls das Gerät heruntergefallen ist, lassen Sie es erst von einem Fachmann prüfen,
bevor Sie es wieder in Betrieb nehmen.
• Im Inneren des Geräts treten gefährliche Spannungen auf. Niemals das Gehäuse öffnen
oder Gegenstände durch die Belüftungen einführen.
• Verhindern Sie, dass Flüssigkeit in das Gerät gelangt. Notfalls sofort den Netzstecker
ziehen.
• Den Netzstecker ebenfalls aus der Steckdose ziehen, wenn während des Betriebs
Störungen auftreten und vor dem Reinigen des Geräts.
• Die Lade- und Steckerkontakte nicht mit spitzen oder metallischen Gegenständen
berühren.
• Keine Änderungen oder Reparaturen am Gerät vornehmen. Reparaturen an Gerät oder
Kabel nur von einem Fachmann des Service-Zentrums durchführen lassen. Durch
unsachgemäße Reparaturen können erhebliche Gefahren für den Benutzer entstehen.
• Kinder unterschätzen häufig die Gefahren beim Umgang mit Elektrogeräten. Deshalb
dürfen Kinder nie unbeaufsichtigt in die Nähe von Elektrogeräten gelassen werden.
• Das Gerät darf nicht in Feuchträumen (z.B. Badezimmern) oder Räumen mit starkem
Staubanfall verwendet werden.
• Bei einem Gewitter können am Stromnetz angeschlossene Geräte durch Blitzeinschlag
beschädigt werden. Deshalb bei Gewitter immer den Netzstecker aus der Steckdose
ziehen.
• Um das Gerät vollständig von der Stromversorgung zu trennen, muss der Netzstecker
aus der Steckdose gezogen werden. Dabei immer am Stecker und niemals amKabel
anfassen.
• Netzkabel vor heißen Oberflächen oder anderen Gefahrenquellen schützen und nicht
einklemmen.
• Netzkabel regelmäßig auf eventuelle Schäden prüfen.
• Netzkabel zum Gebrauch vollständig abwickeln.
• Sicherstellen, dass das Netzkabel keine Stolpergefahr darstellt.
• Medizinische Geräte können in ihrer Funktion beeinflusst werden.
• Das Mobilteil kann in Hörgeräten einen unangenehmen Brummton verursachen.
DEUTSCH
Brandgefahren
• Die im Inneren des Geräts aufgestaute Hitze kann zum Defekt bzw. zum Brand des
Geräts führen. Dieses Gerät daher keiner extremen Temperatur aussetzen:
– direkte Sonneneinstrahlung und Heizungswärme vermeiden.
– Lüftungsschlitze des Geräts nicht verdecken
Sologic B931 83
Page 84

Sologic B931
Explosionsgefahr
• Batterien/Akkus niemals ins Feuer werfen.
Vergiftungsgefahr
• Halten Sie Batterien/Akkus außer Reichweite von kleinen Kindern.
Hinweis
• Nur den mitgelieferten Netzadapter verwenden. Keine fremden Adapter verwenden, da
die Akkuzellen beschädigt werden könnten.
• Die Steckdose zum Anschluss des Netzsteckers muss sich nahe beim Gerät befinden
und leicht zugänglich sein.
• Nur aufladbare Akkus des gleichen Typs verwenden. Akkus richtig gepolt einlegen
(Hinweise finden sind im Akku-Fach des Mobilteils). Niemals normale, nicht aufladbare
Batterien verwenden!
Da bei Stromausfall das Telefonieren mit diesem Gerät nicht möglich
ist, sollte im Falle eines Notrufs ein stromnetzunabhängiges Telefon,
z. B. ein Handy, verwendet werden.
2 Entsorgung des Geräts (Umweltschutz)
Verbrauchte und defekte Geräte sollten Sie nicht in den normalen Hausmüll
werfen, sondern an einer Sammelstelle für das Recycling von elektrischen und
elektronischen Geräten abgeben. Das Symbol am Gerät, in der
Bedienungsanleitung und/oder auf der Verpackung weist darauf hin.
Einige Materialien des Geräts können wiederverwertet werden, wenn man sie an einer
Recycling-Sammelstelle abgibt. Mit der Wiederverwertung einiger Teile oder Rohstoffe aus
gebrauchten Produkten leisten Sie einen wichtigen Beitrag zum Umweltschutz.
Wenden Sie sich bitte an Ihre lokalen Behörden, wenn Sie weitere Informationen über die
Sammelstellen in Ihrer Umgebung benötigen.
3 Reinigung
Reinigen Sie das Telefon mit einem leicht feuchten Lappen oder mit einem antistatischen
Tuch. Verwenden Sie niemals Reinigungs- oder Scheuermittel.
4 ECO-Modus (strahlungsarm)
Dieses schnurlose Telefon (in Übereinstimmung mit dem DECT-Standard) unterstützt den
strahlungsarmen Betrieb. Die Strahlungsintensität des Radiosignals zwischen der
Basisstation und dem Mobilteil wird auf ein Minimum reduziert, wenn sich das Mobilteil auf
der Basisstation befindet. Nur wenn das Mobilteil von der Basisstation entfernt oder ein Anruf
empfangen wird, steigt die Stahlungsintensität des Radiosignals auf die normale Stärke an.
Das bedeutet nicht, dass die normale DECT-Strahlung gesundheitsschädigend ist. Der
strahlungsarme Modus verhindert eine unnötige DECT-Strahlungsbelastung, wenn keine
Kommunikation zwischen der Basisstation und dem Mobilteil erforderlich ist.
Aus technischen Gründen können keine zusätzlichen Mobilteile im strahlungsarmen Modus
betrieben werden (ein zusätzliches Mobilteil, dass sich nicht in unmittelbarer Nähe der
84 Sologic B931
Page 85

Sologic B931
B931
7,5V DC 300mA
17
Basisstation befindet, wird aufgrund des schwachen Radiosignals immer die "Basisstation
suchen").
Der strahlungsarme Modus wird bei den Werkseinstellungen aktiviert. Der strahlungsarme
Modus wird automatisch deaktiviert, wenn Sie ein zusätzliches Mobilteil anmelden.
5 Inbetriebnahme
Bevor Sie das Telefon zum ersten Mal benutzen, stellen Sie sicher,
dass die Akkus aufgeladen sind. Anderenfalls funktioniert das
Telefon nicht optimal.
5.1 Basisstation installieren
Zur Installation gehen Sie folgendermaßen vor:
• Verbinden Sie das eine Ende des Netzadapters mit der Steckdose (230 V) und das
andere Ende mit der Adapterbuchse auf der Unterseite der Basisstation.
• Verbinden Sie das eine Ende des Telefonkabels mit dem Telefonwandanschluss und
das andere Ende mit dem Anschluss auf der Unterseite der Basisstation. Verwenden
Sie das mitgelieferte Telefonkabel.
1
4
3
1. Netzkabel
2. Telefonwandanschluss
3. Telefonkabel
4. Unterseite der Basisstation
5.2 Akkus einlegen
• Öffnen Sie das Akkufach (siehe unten).
• Legen Sie den Akku ein. Achten Sie dabei auf die Polarität (+ und -).
• Schließen Sie das Akkufach.
• Lassen Sie das Mobilteil 16 Stunden in der Basisstation. Die Mobilteil-Ladeanzeige
LED an der Basisstation leuchtet auf.
Sologic B931 85
2
DEUTSCH
Page 86

Sologic B931
Akkufachabdeckung
Rückseite des Mobilteils
-
+
-
B 931
+
-
+
Akkus
Gürtelclip
5.3 Wandmontage
Sie können die Basisstation mit der Wandaufhängung an der Wand montieren. Befestigen
Sie die Aufhängung an der Basisstation.
Bohren Sie im Abstand von 6 cm Löcher in die Wand.
Wand
Dübel
6 cm
Schraube
86 Sologic B931
Page 87

6 Funktionen des Telefons
17
18
19
Sologic B931
6.1 Tasten/LED
Mobilteil
1. Optisches Klingelzeichen
2. Kurzwahlspeicher M1 - M4
3. Display
4. Taste für Nach-rechts/
Wahlwiederholung/Pause
5. Rechte Menütaste
6. Taste für Auflegen/Ein-Aus
7. Taste für Nach-unten/Telefonbuch
8. Alphanumerische Tasten
9. Einschalttaste für Vibration/optisches
Klingelzeichen
10. Mikrofon
11. Tastatursperre
12. Taste für Gespräch annehmen/
Freisprechmodus
13. Linke Menütaste
14. Taste für Nach-links/Interner Anruf
15. Taste für Nach-oben/Anrufliste
16. Kopfhörer/Hörmuschel
16
15
14
13
12
11
10
1
2
3
4
5
6
7
8
9
DEUTSCH
Basisstation
17. Mobilteil-Ladeanzeige (LED)
18. Paging-Taste
19. Ladekontakte
Sologic B931 87
Page 88

Sologic B931
5
13
17
6.2 LCD-Display
Symbolzeile
Name des Mobilteils
Nummer des Mobilteils
Datum und Zeit
Menü/Optionsmenü-Zeile
Batterieanzeige:
• Der Akku ist voll aufgeladen.
• Der Akku ist zu 25 % verbraucht.
• Der Akku ist zur Hälfte verbraucht (50 %).
• Der Akku ist zu 75 % verbraucht.
• Der Akku ist fast leer. Es ertönen Warnsignale und das Akkusymbol im Display
blinkt.
6.3 Symbole
Gespräch angenommen
Vibration und optisches Klingelzeichen ist eingeschaltet
Freisprechfunktion ein
Tastatur gesperrt
Interner Anruf
Neue unbeantwortete Anrufe*
Neue Mailbox-Nachricht*
Alarm eingeschaltet
Signalsymbol, blinkt wenn das Mobilteil zu weit von der
Basisstation entfernt ist
* Nur wenn die Anruferkennung für Ihren Telefonanschluss aktiviert ist.
6.4 Displaytasten
Die Displaytasten (Menütasten) befinden sich direkt unter dem Display / . Die
Funktion dieser beiden Tasten ändert sich je nach Betriebsmodus. Die jeweilige Funktion
wird als Text direkt über den beiden Menütasten angezeigt.
6.5 LED der Basisstation
Die Mobilteil-Ladeanzeige-LED zeigt folgenden Zustand:
• Aus: Die Basisstation ist nicht an das Netz angeschlossen oder das Mobilteil befindet
sich nicht auf der Basisstation.
• Ein: das Mobilteil wird geladen.
88 Sologic B931
Page 89

6.6 Durch das Menü navigieren
13
15
5
Select Back
Main Menu
CID Book
Phonebook
BS Settings
Das Mobilteil verfügt über ein leicht zu bedienendes Menüsystem. Jeder Menüpunkt besteht
aus einer Reihe von Unterpunkten.
Um das Hauptmenü aufzurufen, drücken Sie die linke Menütaste bei eingeschaltetem
Mobilteil im Standby-Modus.
Drücken Sie die Nach-oben-Taste oder Nach-unten-Taste , um zur
gewünschten Menüoption zu blättern. Drücken Sie dann oder , um weitere
Menüpunkte aufzurufen oder um die angezeigte Einstellung zu bestätigen.
Menü verlassen oder eine Menüebene zurückgehen:
Drücken Sie „Zurück“ (Back), um zur nächsthöheren Menüebene zu wechseln.
Zum Abbrechen und Zurückkehren in den Standby-Modus, drücken Sie die Ein-/Aus-
6
Taste. Wenn 15 Sekunden lang keine Taste betätigt wird, kehrt das Mobilteil
automatisch in den Standby-Modus zurück.
7
6.7 Menü-Übersicht
Menü Untermenüpunkte
Anruferliste
Neuer Eintrag
Bearbeiten
Telefonbuch
BS-Einstellungen
MT-Einstellungen
Anmelden Basisstation 1 - 4
Löschen
Alle löschen
Speicherstatus
MT abmelden
Wahlverfahren
Flashzeit
PIN ändern
Zurücksetzen
Alarm
Audio-Einstellungen
Rufton-Einstellungen
Ton-Einstellungen
Sprache
MT-Name
Autom. Annahme
LCD-Kontrast
Datum & Zeit
Auswahl Basisstation
MT Zurücksetzen
Sologic B931 89
Sologic B931
13
DEUTSCH
Page 90

Sologic B931
6
15
7
15
7
13
15
7
12
6
12
6
4
12
7 Betrieb des Mobilteils
7.1 Mobilteil ein- und ausschalten
• Drücken Sie die Ein-/Aus-Taste oder stellen Sie das Mobilteil in die Basisstation,
um das Mobilteil einzuschalten.
• Zum Ausschalten des Mobilteils halten Sie die Ein-/Aus-Taste gedrückt, bis das
Mobilteil ausgeschaltet ist.
7.2 Sprache einstellen
Das Telefon verfügt über 9 Displaysprachen.
Gehen Sie zum Einstellen der Sprache folgendermaßen vor:
• Drücken Sie die linke Menütaste unter „Menü“ (Menu).
• Drücken Sie die Nach-oben- oder Nach-unten-Taste
Einstell.“ (HS Setting) ausgewählt ist.
• Drücken Sie „Wählen“ (Select) als Bestätigung.
• Drücken Sie die Nach-oben- oder Nach-unten-Taste
„Sprache“ (Language) ausgewählt ist.
• Drücken Sie „Wählen“ (Select) als Bestätigung.
• Die eingestellte Sprache erscheint im Display.
• Drücken Sie die Nach-oben- oder Nach-unten-Taste
gewünschte Sprache auszuwählen.
• Bestätigen Sie die Auswahl mit „Speich“ (Save) oder verlassen Sie das Menü mit
„Zurück“ (Back) ohne zu speichern.
5
7.3 Anrufe tätigen
6
/ mehrmals, bis „MT
13
/ mehrmals, bis
/ mehrmals, um die
13
7.3.1 Externer Anruf
• Drücken Sie die Taste Gespräch annehmen .
• Das Anrufsymbol erscheint im Display.
• Sie hören das Freizeichen. Wählen Sie die gewünschte Telefonnummer.
• Die Nummer erscheint im Display und wird gewählt.
• Um das Gespräch zu beenden, drücken Sie Auflegen-Taste .
7.3.2 Nummerneingabe
• Wählen Sie die gewünschte Telefonnummer. Korrigieren Sie die Nummer ggf. mit der
„Lösch.“-Taste (Erase).
• Drücken Sie die Taste Gespräch annehmen .
• Das Anrufsymbol erscheint im Display.
• Die Telefonnummer wird automatisch gewählt.
• Um das Gespräch zu beenden, drücken Sie die Auflegen-Taste oder stellen Sie
das Mobilteil wieder in die Basisstation.
7.3.3 Letzte Telefonnummer erneut wählen
• Drücken Sie die Taste Wahlwiederholung .
• Drücken Sie die Taste Gespräch annehmen . Die letzte Telefonnummer wird
automatisch gewählt.
90 Sologic B931
Page 91

Sologic B931
4
15
7
12
6
15
7
12
6
13
12
7.3.4 Eine der letzten 10 gewählten Nummern erneut wählen
• Drücken Sie die Taste Wahlwiederholung . Die zuletzt gewählte Nummer
erscheint im Display.
• Drücken Sie die Nach-oben- oder Nach-unten-Taste
/ mehrmals, bis die
gewünschte Nummer im Display angezeigt wird.
• Drücken Sie die Taste Gespräch annehmen .
• Die Telefonnummer im Display wird automatisch gewählt.
• Um das Gespräch zu beenden, drücken Sie die Auflegen-Taste oder stellen Sie
das Mobilteil wieder in die Basisstation.
7.3.5 Eine programmierte Nummer aus dem Telefonbuch anrufen
Das Telefon verfügt über ein Telefonbuch, in dem Sie Telefonnummern mit Namen
speichern können (siehe auch § “10 Das Telefonbuch”). So rufen Sie eine programmierte
Nummer aus dem Telefonbuch an:
• Drücken Sie die Telefonbuch-Taste . Die erste Nummer im Telefonbuch wird im
7
Display angezeigt.
• Drücken Sie die Nach-oben- oder Nach-unten-Taste
/ mehrmals, um die
gewünschte Telefonnummer auszuwählen.
• Drücken Sie die Taste Gespräch annehmen .
• Die Telefonnummer im Display wird automatisch gewählt.
• Um das Gespräch zu beenden, drücken Sie die Auflegen-Taste oder stellen Sie
das Mobilteil wieder in die Basisstation.
7.3.6 Flashsignal
Drücken Sie die „Flash“-Taste , um verschiedene Dienste wie „Anklopfen“ (call waiting)
13
(wenn dieser Dienst von Ihrem Telefonanbieter unterstützt wird) zu nutzen oder um Anrufe
weiterzuleiten, wenn Sie eine Telefonanlage (PABX) verwenden. Die Flashtaste unterbricht
kurzzeitig Ihre Verbindung. Sie können die Flashtaste während eines Gesprächs verwenden,
indem Sie die linke Menütaste „Flash“ drücken. Sie können die Flashzeit auf kurz oder
lang stellen (siehe “12.1 Flashzeiteinstellung”).
DEUTSCH
7.4 Einen Anruf empfangen
Bei einem internen oder externen eingehenden Anruf klingelt das Mobilteil. Sie können die
Ruftonlautstärke ändern, indem Sie die Nach-oben- oder Nach-unten-Taste /
drücken.
• Beim Empfang eines Anrufes klingeln alle angemeldeten Mobilteile.
• Die Telefonnummer des Anrufers erscheint im Display, sofern Sie über Anruferkennung
(CLIP) verfügen. Wenden Sie sich hierzu an Ihren Telefonnetzanbieter. Ferner wird der
Name des Anrufers im Display angezeigt, wenn:
– die Nummer im Telefonbuch mit dem Namen gespeichert ist.
– das Netzwerk den Namen zusammen mit der Telefonnummer überträgt.
• Drücken Sie die Taste Gespräch annehmen , um den externen Anruf
anzunehmen.
• ODER Nehmen Sie das Mobilteil aus der Basisstation (falls die Option zur
automatischen Anrufannahme aktiviert ist,
Gesprächsannahme”
).
• Während des Gesprächs werden das Symbol und die Anrufdauer im Display
angezeigt.
Sologic B931 91
siehe § “7.21 Automatische
15
7
Page 92

Sologic B931
6
13
7
13
12
12
15
15
7
• Um das Gespräch zu beenden, drücken Sie die Auflegen-Taste oder stellen Sie
das Mobilteil wieder in die Basisstation.
7.5 Optionen zu den Wahlwiederholungslisten
Beim Blättern durch die Wahlwiederholungsliste (siehe § “7.3.4 Eine der letzten 10
gewählten Nummern erneut wählen”) haben Sie folgende Optionen:
Wenn die gewünschte Nummer im Display angezeigt wird, drücken Sie „Mehr“ (More)
und wählen Sie mit der Nach-oben- und Nach-unten-Taste / die folgenden
15
Optionen:
•„Nr. speichern“ (Add to PB): um die Nummer im Telefonbuch zu speichern. Drücken Sie
„Wählen“ (Select) als Bestätigung. Geben Sie einen Namen ein (siehe § “10.1 Eine
Nummer und einen Namen im Telefonbuch speichern”) und drücken Sie „Weiter“ (Next)
. Bearbeiten Sie die Nummer und drücken Sie „Weiter“ (Next). Wählen Sie die
gewünschte Ruftonmelodie und drücken Sie „Speich“ (Save) .
13
•‘„Nr. löschen“ (Delete call): um einen Eintrag in der Wahlwiederholungsliste zu löschen.
Drücken Sie „Löschen“ (Del) als Bestätigung.
•‘„Alle lösch“ (Delete All): um alle Einträge in der Wahlwiederholungsliste zu löschen.
Drücken Sie „Löschen“ (Del) als Bestätigung.
7.6 Freisprechmodus aktivieren/deaktivieren
Mit dieser Funktion können Sie sprechen, ohne das Mobilteil abzunehmen. Drücken Sie
während eines Gesprächs die Freisprechtaste , um die Freisprechfunktion zu
aktivieren.
Drücken Sie die Taste erneut, um die Freisprechfunktion zu deaktivieren.
Wenn Sie im Freisprechmodus telefonieren und die Lautstärke
ändern möchten, drücken Sie mehrmals die Nach-oben- oder Nach-
7
unten-Taste
/ .
Wenn Sie die Freisprechfunktion längere Zeit nutzen, entlädt sich der
Akku schnell!
7.7 Warnung „Außer Reichweite“ (Out of range)
Wenn sich das Mobilteil außerhalb der Reichweite der Basisstation befindet, ertönt ein
Warnsignal.
• ‘Im Display wird „SUCHEN“ (Searching) angezeigt und das Symbol blinkt im
Display.
• Gehen Sie näher an die Basisstation heran.
• Wenn Sie sich wieder in der Reichweite der Basisstation befinden, ertönt ein Signal und
das Symbol blinkt nicht mehr.
7.8 Lautstärke des Lautsprechers einstellen
Während eines Gesprächs können Sie mit der Nach-oben- und Nach-unten-Taste /
die Lautstärke des Lautsprechers einstellen. Sie können 5 Stufen einstellen.
Die Lautstärke der Freisprechfunktion kann auf dieselbe Weise
eingestellt werden.
92 Sologic B931
Page 93

Sologic B931
5
4
15
15
7
7.9 Anzeige der Anrufdauer im Display
Während eines externen Anrufs wird die Anrufdauer im Display angezeigt:
Beispiel: „01:10:40“ für 1 Stunde, 10 Minuten und 40 Sekunden.
Die Anrufdauer ist noch 5 Sekunden nach jedem Anruf im Display sichtbar.
7.10 Mikrofon ausschalten (Stummschaltung)
Zum Ausschalten des Mikrofons während eines Gesprächs drücken Sie die rechte
Menütaste „Stummschalten“ (Mute) . Sie können dann sprechen, ohne dass der Anrufer
Sie hört. Um das Mikrofon wieder einzuschalten, drücken Sie die rechte Menütaste
„Stummschalten“ erneut.
5
7.11 Pausen-Taste
Wenn Sie eine Telefonnummer wählen und dieser Nummer eine Pause hinzufügen möchten,
drücken Sie die Pausen-/Wahlwiederholungs-Taste an der gewünschten Stelle in der
Nummer.
Wenn Sie die Nummer (erneut) wählen, wird die Pause (3 Sekunden) automatisch eingefügt.
7.12 Ein verlegtes Mobilteil suchen (Paging)
Wenn Sie das Mobilteil nicht finden, drücken Sie kurz die Paging-Taste an der
Basisstation.
Alle an der Basisstation angemeldeten Mobilteile klingeln, so dass Sie das verlegte Mobilteil
finden können. Zum Beenden des Signaltons drücken Sie kurz eine beliebige Taste an
einem Mobilteil.
17
7.13 Die alphanumerischen Tasten verwenden
Mit den alphanumerischen Tasten können Sie Text eingeben. Zum Auswählen eines
Buchstabens drücken Sie die entsprechende alphanumerische Taste . Wenn Sie z. B. die
alphanumerische Taste „5“ drücken, wird der erste Buchstabe „j“ im Display angezeigt.
Durch mehrmaliges Drücken wählen Sie die anderen Buchstaben dieser Taste aus.
Drücken Sie einmal die Taste „2“, um den Buchstaben „a“ auszuwählen. Wenn Sie die
Buchstaben „a“ und „b“ nacheinander auswählen möchten, drücken Sie die Taste „2“ einmal,
um „a“ auszuwählen. Warten Sie 2 Sekunden, bis der Cursor an die nächste Position gerückt
ist, und drücken Sie die Taste „2“ erneut, um „b“ auszuwählen. Mit der Taste „Löschen“
(Erase) können Sie versehentlich eingegebene Buchstaben löschen. Es wird der Buchstabe
vor dem Cursor gelöscht. Mit der Nach-oben- und Nach-unten-Taste
Sie den Cursor verschieben.
8
/ können
7
DEUTSCH
7.14 Ruftonlautstärke am Mobilteil einstellen
Sie können für die Ruftonlautstärke eines eingehenden Anrufs (intern und extern) 6 Stufen
(Stufen „1“ bis „5“ und „Aus“) einstellen.
Wenn Sie „Aus“ (Off) wählen, klingelt das Mobilteil nicht, wenn ein Anruf eingeht.
Stufe „5“ ist die höchste Stufe.
7.14.1 Einstellen der Ruftonlautstärke und -melodie für interne und externe Anrufe
• Drücken Sie die „Menü“-Taste.
• Drücken Sie die Nach-oben- oder Nach-unten-Taste
Einstell.“ (HS Setting) ausgewählt ist.
Sologic B931 93
/ mehrmals, bis „MT
Page 94

Sologic B931
15
7
15
7
13
5
15
7
15
7
13
15
7
13
• Drücken Sie „Wählen“ (Select) als Bestätigung.
• Drücken Sie die Nach-oben- oder Nach-unten-Taste / mehrmals, bis
„Rufton Einst“ (Ring Setup) ausgewählt ist.
• Drücken Sie „Wählen“ (Select) als Bestätigung.
• Wählen Sie „Rufton Int“ (INT RING) oder „Rufton Ext“ (EXT Ring) und drücken Sie
„Wählen“ (Select).
• Wählen Sie „Melodie“ (Melody) oder „Lautstärke“ (Volume) und drücken Sie „Wählen“
(Select).
• Die aktuelle Lautstärke und Melodie werden angezeigt und sind zu hören.
• Drücken Sie die Nach-oben- oder Nach-unten-Taste
gewünschte Lautstärke/Melodie auszuwählen.
• Bestätigen Sie die Auswahl mit „Speich“ (Save) oder verlassen Sie das Menü mit
„Zurück“ (Back) ohne zu speichern.
Sie können die Ruftonlautstärke auch während eines eingehenden
Anrufs ändern, siehe “7.4 Einen Anruf empfangen”.
/ mehrmals, um die
7.15 Einstellen der Hörmuschel/Freisprechlautstärke
Sie können die Lautstärke des Freisprech-Lautsprechers und der Hörmuschel ebenfalls über
das Menü anpassen:
• Drücken Sie die „Menü“-Taste.
• Drücken Sie die Nach-oben- oder Nach-unten-Taste
Einstell.“ (HS Setting) ausgewählt ist.
• Drücken Sie „Wählen“ (Select) als Bestätigung.
• Drücken Sie die Nach-oben- oder Nach-unten-Taste
„Audio Einst“ (Audio Setup) ausgewählt ist.
• Drücken Sie „Wählen“ (Select) als Bestätigung.
• Wählen Sie „Lautsp.lau.“ (Speaker V.) oder „Hörerlauts.“ (Earpiece V.) und drücken Sie
„Wählen“ (Select)
• Drücken Sie die Nach-oben- oder Nach-unten-Taste / mehrmals, um die
gewünschte Lautstärke auszuwählen.
• Bestätigen Sie die Auswahl mit „Speich“ (Save) oder verlassen Sie das Menü mit
„Zurück“ (Back) ohne zu speichern.
.
5
/ mehrmals, bis „MT
/ mehrmals, bis
7.16 Tastatur sperren
Sie können die Tastatur sperren, um ein unbeabsichtigtes Betätigen der Tasten zu
vermeiden. Wenn die Tastatur gesperrt ist, kann keine Telefonnummer gewählt werden, nur
die direkten Speichertasten M1 - M4 können verwendet werden. Auch eingehende Anrufe
können weiterhin angenommen werden.
So aktivieren Sie die Tastatursperre:
• Halten Sie die Taste Tastatursperre 5 Sekunden lang gedrückt.
•„Tastensperre“ und das Symbol werden im Display angezeigt.
So deaktivieren Sie die Tastatursperre:
• Drücken Sie nochmals die Tastatursperrtaste für 5 Sekunden.
94 Sologic B931
11
11
Page 95

Sologic B931
15
7
15
7
15
7
13
5
15715
7
15
7
13
5
15
7
7
15
7
7.17 Tastenton ein-/ausschalten
Sie können auf dem Mobilteil einen Tastenton einstellen, der bei jedem Drücken einer Taste
ertönt.
• Drücken Sie die linke „Menü“-Taste.
• Drücken Sie die Nach-oben- oder Nach-unten-Taste
Einstell.“ (HS Setting) ausgewählt ist.
• Drücken Sie „Wählen“ (Select) als Bestätigung.
• Drücken Sie die Nach-oben- oder Nach-unten-Taste
Einst“ (Tone Setup) ausgewählt ist.
• Drücken Sie „Wählen“ (Select) als Bestätigung.
• Drücken Sie die Nach-oben- oder Nach-unten-Taste
„Tastenton“ (Key Tone) ausgewählt ist.
• Wählen Sie
–‘„Ein“ (On): Tastenton einschalten
–‘„Aus“ (Off): Tastenton ausschalten
• Bestätigen Sie die Auswahl mit „Speich“ (Save) oder verlassen Sie das Menü mit
„Zurück“ (Back) ohne zu speichern.
/ mehrmals, bis „MT
/ mehrmals, bis „Ton
/ mehrmals, bis
7.18 Reichweitenalarm
Ein Signalton ertönt, wenn sich das Mobilteil außerhalb der Reichweite der Basisstation
befindet. Sie können diesen Warnton ein-/ausschalten:
• Drücken Sie die linke „Menü“-Taste.
• Drücken Sie die Nach-oben- oder Nach-unten-Taste
Einstell.“ (HS Setting) ausgewählt ist.
• Drücken Sie „Wählen“ (Select) als Bestätigung.
• Drücken Sie die Nach-oben- oder Nach-unten-Taste
Einst“ (Tone Setup) ausgewählt ist.
• Drücken Sie „Wählen“ (Select) als Bestätigung.
• Drücken Sie die Nach-oben- oder Nach-unten-Taste
„Reichweitenalarm“ (Range Alarm) ausgewählt ist.
• Wählen Sie
–‘„Ein“ (On): Reichweitenalarm einschalten
–‘„Aus“ (Off): Reichweitenalarm ausschalten
• Bestätigen Sie die Auswahl mit „Speich“ (Save) oder verlassen Sie das Menü mit
„Zurück“ (Back) ohne zu speichern.
/ mehrmals, bis „MT
/ mehrmals, bis „Ton
/ mehrmals, bis
DEUTSCH
7.19 Displaykontrast
So ändern Sie den Displaykontrast:
• Drücken Sie die linke „Menü“-Taste.
• Drücken Sie die Nach-oben- oder Nach-unten-Taste / mehrmals, bis „MT
Einstell.“ (HS Setting) ausgewählt ist.
• Drücken Sie „Wählen“ (Select) als Bestätigung.
15
• Drücken Sie die Nach-oben- oder Nach-unten-Taste
Kontrast“ (LCD Contrast) ausgewählt ist.
• Drücken Sie „Wählen“ (Select) als Bestätigung.
• Drücken Sie die Nach-oben- oder Nach-unten-Taste
Kontrast von 0 (hell) bis 16 (dunkel) einzustellen.
Sologic B931 95
/ mehrmals, bis „LCD
/ mehrmals, um den
Page 96

Sologic B931
13
5
15
7
15
7
13
5
15715
7
13
5
1
• Bestätigen Sie die Auswahl mit „Speich“ (Save) oder verlassen Sie das Menü mit
„Zurück“ (Back) ohne zu speichern.
7.20 Den Namen des Mobilteils ändern
Der auf dem Mobilteil angezeigte Mobilteil-Name kann im Standby-Modus geändert werden.
• Drücken Sie die linke „Menü“-Taste.
• Drücken Sie die Nach-oben- oder Nach-unten-Taste
Einstell.“ (HS Setting) ausgewählt ist.
• Drücken Sie „Wählen“ (Select) als Bestätigung.
• Drücken Sie die Nach-oben- oder Nach-unten-Taste
Name“ (HS Name) ausgewählt ist.
• Drücken Sie „Wählen“ (Select) als Bestätigung.
• Geben Sie den neuen Mobilteilnamen ein und drücken Sie „Löschen“ (Erase), um die
Zeichen vor dem Cursor zu löschen.
• Bestätigen Sie die Auswahl mit „Speich“ (Save) oder verlassen Sie das Menü mit
„Zurück“ (Back) ohne zu speichern.
/ mehrmals, bis „MT
/ mehrmals, bis „MT
7.21 Automatische Gesprächsannahme
Steht das Mobilteil bei einem ankommenden Anruf in der Basisstation, so wird das Gespräch
automatisch angenommen, sobald das Mobilteil von der Basisstation abgehoben wird. Diese
Funktion kann ein- oder ausgeschaltet werden.
• Drücken Sie die linke „Menü“-Taste.
• Drücken Sie die Nach-oben- oder Nach-unten-Taste
Einstell.“ (HS Setting) ausgewählt ist.
• Drücken Sie „Wählen“ (Select) als Bestätigung.
• Drücken Sie die Nach-oben- oder Nach-unten-Taste
Annahme“ (Auto Answer) ausgewählt ist.
• Drücken Sie „Wählen“ (Select) als Bestätigung.
• Wählen Sie
–‘„Ein“ (On): die automatische Annahme einschalten
–‘„Aus“ (Off): die automatische Annahme ausschalten
• Bestätigen Sie die Auswahl mit „Speich“ (Save) oder verlassen Sie das Menü mit
„Zurück“ (Back)
ohne zu speichern.
/ mehrmals, bis „MT
/ mehrmals, bis „Auto
7.22 Visuelles Klingelzeichen und Vibrationsalarm an-/ausschalten
Wenn Sie das visuelle Klingelzeichen und den Vibrationsalarm anschalten, blinkt das
visuelle Klingelzeichen und das Mobilteil vibriert, wenn ein Anruf eingeht.
• Halten Sie die -Taste gedrückt, bis das Zeichen zum Aktivieren erscheint.
• Halten Sie die -Taste gedrückt, bis das Zeichen zum Deaktivieren
verschwindet.
9
9
8 Zurücksetzen des Mobilteils
Sie können alle Mobilteileinstellungen zurücksetzen und alle Telefonbucheinträge, die
Anrufliste, die Ruftonlautstärke und -melodie, die Audio- und Toneinstellungen, den Alarm,
die Sprache und die Wahlwiederholungsliste löschen. Der LCD-Kontrast kann nicht
zurückgesetzt werden.
96 Sologic B931
Page 97

Sologic B931
15
7
15
7
13
5
15
7
15
7
15
7
7
So stellen Sie die Voreinstellungen wieder her:
• Drücken Sie die linke „Menü“-Taste.
• Drücken Sie die Nach-oben- oder Nach-unten-Taste / mehrmals, bis „MT
Einstell.“ (HS Setting) ausgewählt ist.
• Drücken Sie „Wählen“ (Select) als Bestätigung.
• Drücken Sie die Nach-oben- oder Nach-unten-Taste
„Zurücksetzen“ (HS Reset) ausgewählt ist.
• Drücken Sie „Wählen“ (Select) als Bestätigung.
• Geben Sie den Pin-Code ein (0000).
• Bestätigen Sie die Auswahl mit „Zurücksetzen“ (Reset) oder verlassen Sie das
Menü mit „Zurück“ (Back) ohne zu speichern.
Das Mobilteil hat folgende Voreinstellungen:
Alarm: Aus
Audio-Einstellungen: 3
INT./EXT. Melodie: Melodie 3
INT./EXT. Ruftonlautstärke: Lautstärke 3
Tastenton: Ein
Reichweitenalarm: Ein
Mobilteilname: HS1
Zeitformat: 24 Std.
Datumsformat: TT-MM
Telefonbuch: Leer
Anrufliste: Leer
Wahlwiederholungsliste: Leer
Automatische Gesprächsannahme: Aus
Zeit und Datum: 0:00 01-01
/ mehrmals, bis
Nach dem Zurücksetzen müssen Sie das Mobilteil erneut einschalten,
siehe “7.1 Mobilteil ein- und ausschalten”.
9 Uhrzeit und Alarm einstellen
9.1 Datums- und Zeitformat
• Drücken Sie die linke „Menü“-Taste.
• Drücken Sie die Nach-oben- oder Nach-unten-Taste
Einstell.“ (HS Setting) ausgewählt ist.
• Drücken Sie „Wählen“ (Select) als Bestätigung.
• Drücken Sie die Nach-oben- oder Nach-unten-Taste
„Datum & Zeit“ (Date & Time) ausgewählt ist.
• Drücken Sie „Wählen“ (Select) als Bestätigung.
• Drücken Sie die Nach-oben- oder Nach-unten-Taste
„Datumsformat“ (Date Format) oder „Zeitformat“ (Time Format) ausgewählt ist.
• Drücken Sie „Wählen“ (Select) als Bestätigung.
• Verwenden Sie die Nach-oben- oder Nach-unten-Taste
Datumsformat „TT-MM“ (DD-MM) / „MM-TT“ (MM-DD) oder das Zeitformat „12 Std.“ (12-
Hour) / „24 Std.“ (24-Hour) zu wählen.
Sologic B931 97
/ mehrmals, bis „MT
/ mehrmals, bis
/ mehrmals, bis
15
/ , um das
DEUTSCH
Page 98
Sologic B931
13
5
13
15
7157
15
7
13
5
15
7
15
7
15
15
7
• Bestätigen Sie die Auswahl mit „Speich“ (Save) oder verlassen Sie das Menü mit
„Zurück“ (Back) ohne zu speichern.
9.2 Datum und Uhrzeit einstellen
• Drücken Sie die linke „Menü“-Taste .
Wenn die Anruferkennung für Ihren Telefonanschluss aktiviert ist und
der Anbieter Datum und Uhrzeit übermittelt, wird die Uhr automatisch
bei einem eingehenden Anruf eingestellt.
• Drücken Sie die Nach-oben- oder Nach-unten-Taste
Einstell.“ (HS Setting) ausgewählt ist.
• Drücken Sie „Wählen“ (Select) als Bestätigung.
• Drücken Sie die Nach-oben- oder Nach-unten-Taste
„Datum & Zeit“ (Date & Time) ausgewählt ist.
• Drücken Sie „Wählen“ (Select) als Bestätigung.
• Drücken Sie die Nach-oben- oder Nach-unten-Taste
„Datum einst.“ (Set Date) oder „Zeit einst.“ (Set Time) ausgewählt ist.
• Drücken Sie „Wählen“ (Select) als Bestätigung.
• Geben Sie das aktuelle Datum/die aktuelle Uhrzeit über die Zifferntasten ein.
• Bestätigen Sie die Auswahl mit „Speich“ (Save) oder verlassen Sie das Menü mit
„Zurück“ (Back) ohne zu speichern.
/ mehrmals, bis „MT
/ mehrmals, bis
/ mehrmals, bis
9.3 Alarmfunktion verwenden
Sie können das Datum und die Uhrzeit einstellen und Ihr Mobilteil dazu verwenden, einen
Alarm als Erinnerung auszulösen. Sie können für jedes Mobilteil, das an der Basisstation
angemeldet ist, die Alarmfunktion einzeln einstellen. Der Alarm ertönt nur an dem jeweiligen
Mobilteil, nicht an der Basisstation oder einem anderen Mobilteil.
Wenn ein Alarm eingestellt wurde, wird im Display im Standby-Modus das Alarmsymbol
angezeigt.
Bei Ertönen des Alarms kann dieser mit einem beliebigen Knopf deaktiviert werden.
9.3.1 Wecker einstellen
• Drücken Sie die linke „Menü“-Taste.
• Drücken Sie die Nach-oben- oder Nach-unten-Taste / mehrmals, bis „MT
Einstell.“ (HS Setting) ausgewählt ist.
• Drücken Sie „Wählen“ (Select) als Bestätigung.
• Drücken Sie die Nach-oben- oder Nach-unten-Taste
„Alarm“ (Alarm) ausgewählt ist.
• Drücken Sie „Wählen“ (Select) als Bestätigung.
• Drücken Sie die Nach-oben- oder Nach-unten-Taste
(On) oder „Aus“ (Off).
• Drücken Sie „Wählen“ (Select) als Bestätigung.
• Wenn Sie „Ein“ (On) wählen, können Sie die Zeit im Format SS:MM eingeben.
Verwenden Sie dazu die Zifferntasten. Drücken Sie „Weiter“ (Next), dann erscheint
„Snooze An/Aus“ (Snooze On/Off) im Display. Drücken Sie die Nach-oben- oder Nachunten-Taste
/ , um die Snoozefunktion zu aktivieren oder zu deaktivieren.
/ mehrmals, bis
7
/ und wählen Sie „Ein“
98 Sologic B931
Page 99
Sologic B931
13
5
6
15
7
15
7
15
7
13
5
15
7
12
15
7
• Bestätigen Sie die Auswahl mit „Speich“ (Save) oder verlassen Sie das Menü mit
„Zurück“ (Back) ohne zu speichern.
Wenn Sie „Snooze An“ wählen, ertönt der Alarm alle 11 Minuten. Wenn
Sie die Taste während des Alarms drücken, können Sie „Snooze
Aus“ einstellen.
10 Das Telefonbuch
Im Telefonbuch können Sie 50 Telefonnummern und Namen speichern. Namen dürfen bis
zu 12 Zeichen und Nummern bis zu 20 Ziffern umfassen.
10.1 Eine Nummer und einen Namen im Telefonbuch speichern
• Drücken Sie die linke „Menü“-Taste.
• Drücken Sie die Nach-oben- oder Nach-unten-Taste
„Telefonbuch“ (Phonebook) ausgewählt ist.
• Drücken Sie „Wählen“ (Select) als Bestätigung.
• Drücken Sie die Nach-oben- oder Nach-unten-Taste
„Neuer Eintr.“ (New) ausgewählt ist.
• Drücken Sie „Wählen“ (Select) als Bestätigung.
• Drücken Sie die Nach-oben- oder Nach-unten-Taste
(On) oder „Aus“ (Off).
• Drücken Sie „Wählen“ (Select) als Bestätigung.
• Geben Sie den Namen über die Zifferntasten ein (siehe auch “7.13 Die
alphanumerischen Tasten verwenden”).
• Drücken Sie „Weiter“ (Next) und geben Sie die gewünschte Nummer ein (bis zu 20
Ziffern).
• Drücken Sie „Weiter“ (Next) und wählen Sie mit der Nach-oben- oder Nach-unten-Taste
15
/ die gewünschte Ruftonmelodie, die dieser Nummer zugeordnet werden
soll.
• Bestätigen Sie die Auswahl mit „Speich“ (Save) oder verlassen Sie das Menü mit
„Zurück“ (Back) ohne zu speichern.
/ mehrmals, bis
/ mehrmals, bis
7
/ und wählen Sie „Ein“
DEUTSCH
10.2 Eine Nummer im Telefonbuch aufrufen
• Drücken Sie die Telefonbuch-Taste .
• Geben Sie den ersten Buchstaben des gewünschten Namens über die
alphanumerische Tastatur ein.
• Im Display wird in der Liste der erste Name mit diesem Buchstaben angezeigt.
• Drücken Sie die Nach-unten- oder Nach-oben-Taste
nach anderen Nummern zu suchen.
• Wenn die gewünschte Nummer im Display angezeigt wird, können Sie die Nummer
durch Drücken der Taste Gespräch annehmen automatisch wählen.
7
/ , um im Telefonbuch
10.3 Einen Namen oder eine Nummer im Telefonbuch ändern
• Drücken Sie die linke „Menü“-Taste.
• Drücken Sie die Nach-oben- oder Nach-unten-Taste
„Telefonbuch“ (Phonebook) ausgewählt ist.
Sologic B931 99
/ mehrmals, bis
Page 100

Sologic B931
15
7
15
7
7
13
15715
7
15
7
15
7
• Drücken Sie „Wählen“ (Select) als Bestätigung.
• Drücken Sie die Nach-oben- oder Nach-unten-Taste / mehrmals, bis
„Ändern“ (Edit) ausgewählt ist.
• Drücken Sie „Wählen“ (Select) als Bestätigung.
• Geben Sie den ersten Buchstaben des gewünschten Namens über die
alphanumerische Tastatur ein.
• Im Display wird in der Liste der erste Name mit diesem Buchstaben angezeigt.
• Drücken Sie die Nach-unten- oder Nach-oben-Taste
nach anderen Nummern zu suchen.
• Wenn die gewünschte Nummer im Display angezeigt wird, drücken Sie „Wählen“
(Select) als Bestätigung.
• Ändern Sie den Namen über die Zifferntasten (siehe auch “7.13 Die alphanumerischen
Tasten verwenden”.).
• Drücken Sie „Weiter“ (Next) und ändern Sie die Nummer.
• Drücken Sie „Weiter“ (Next) und wählen Sie mit der Nach-oben- oder Nach-unten-Taste
15
/ die gewünschte Ruftonmelodie, die dieser Nummer zugeordnet werden
soll.
• Bestätigen Sie die Auswahl mit „Speich“ (Save) oder verlassen Sie das Menü mit
„Zurück“ (Back) ohne zu speichern.
5
/ , um im Telefonbuch
10.4 Einen oder alle Einträge im Telefonbuch löschen
• Drücken Sie die linke „Menü“-Taste.
• Drücken Sie die Nach-oben- oder Nach-unten-Taste
„Telefonbuch“ (Phonebook) ausgewählt ist.
• Drücken Sie „Wählen“ (Select) als Bestätigung.
• Drücken Sie die Nach-oben- oder Nach-unten-Taste
„Löschen“ (Delete) oder „Alle lösch.“ (Delete All) ausgewählt ist.
• Drücken Sie „Wählen“ (Select) als Bestätigung.
• Im Display erscheint „Bestätigen?“ (Confirm) Zum Löschen können Sie „Löschen“
(Del) oder „Alle lösch.“ (Del All) wählen oder „Abbre.“ (Cancel) zum Abbrechen.
/ mehrmals, bis
/ mehrmals, bis
10.5 Speicherstatus
Der Speicherstatus zeigt Nummer von Telefonbucheinträgen, die bereits gespeichert sind.
• Drücken Sie die linke „Menü“-Taste.
• Drücken Sie die Nach-oben- oder Nach-unten-Taste
„Telefonbuch“ (Phonebook) ausgewählt ist.
• Drücken Sie „Wählen“ (Select) als Bestätigung.
• Drücken Sie die Nach-oben- oder Nach-unten-Taste
„Speich.Stat.“ (PB Status) ausgewählt ist.
• Drücken Sie „Wählen“ (Select) als Bestätigung.
/ mehrmals, bis
/ mehrmals, bis
11 Kurzwahlspeicher M1 - M4
11.1 Eine Nummer im Kurzwahlspeicher speichern
Sie können bis zu 4 Nummern auf den direkten Speichertasten M1 - M4 speichern. Alle
Nummern werden ebenfalls im Telefonbuch gespeichert.
• Drücken Sie eine der 4 Speichertasten (M1 - M4).
100 Sologic B931
 Loading...