

Page 1
BUTLER 6040
USER GUIDE
1.3
Page 2
Important
To use ‘Caller ID’ (display caller), this service has to be activated on your phone line.
Normally you need a separate subscription from your telephone company to activate this
function. If you don’t have the Caller ID function on your phone line, the incoming telephone
numbers will NOT be shown on the display of your telephone.
To be connected to the public analogue telephone network.
The CE symbol indicates that the unit complies with the essential
requirements of the R&TTE directive.
The features described in this manual are published with reservation to modifications.
This product is in compliance with the essential requirements and other relevant provisions of the R&TTE directive 1999/5/EC.
The Declaration of conformity can be found on :
http://www.topcom.net/support/cedeclarations.php
Page 3

Topcom Butler 6040 3
Topcom Butler 6040
ENGLISH
1 Getting started 6
1.1 Installing the base 6
1.2 Installing the handset 6
1.3 If you have purchased a Twin/Triple version 7
2 Getting to know your telephone 7
2.1 Keys/LED 7
2.2 Icons 8
2.3 Base lights 9
2.4 Navigating the menu 9
2.5 Menu overview 10
3 Using the telephone 11
3.1 Switching the handset on/off 11
3.2 Changing the language 11
3.3 Making a call 11
3.4 Receiving a call 11
3.5 Handsfree mode 12
3.6 Adjust earpiece/handsfree volume 12
3.7 Redial a number from the list 12
3.8 Secrecy function (Mute function) 12
3.9 Locating a handset (paging function) 12
4 Phonebook 13
5 Caller Identification 16
6 Calls list 17
6.1 Delete calls list 17
7 Personalise the handset 18
7.1 Setting the date and time 18
7.2 Using the alarm feature 18
7.3 Ringtone and volume 18
7.4 Handset name 19
7.5 Background picture 19
7.6 Auto answer 19
7.7 Menu color 19
7.8 Key beeps 20
7.9 PABX access code 20
7.10 Backlight timeout 20
8 Base settings 20
8.1 Ringtone and volume 20
8.2 Handset priority 21
8.3 Line settings 21
8.4 System PIN 22
8.5 SIM country code settings 22
Page 4

4 Topcom Butler 6040
Topcom Butler 6040
9 SMS text messages 23
9.1 Writing and sending SMS messages 23
9.2 Viewing the saved and sent messages (outbox) 25
9.3 Viewing the list of received messages (Inbox) 25
9.4 User accounts 26
9.5 Allocating an SMS terminal number 28
9.6 Set SMS alert tone 28
9.7 Memory full 29
9.8 SMS Service center numbers 29
9.9 Changing templates 29
10 Additional handsets and bases 30
10.1 Adding a new handset 30
10.2 Removing a handset 30
10.3 Select a base 30
10.4 Using the intercom feature 31
11 Games 31
12 Infra red 32
13 Troubleshooting 32
14 Technical data 33
15 Default settings 33
16 Topcom warranty 34
16.1 Warranty period 34
16.2 Warranty handling 34
16.3 Warranty exclusions 34
Page 5

Topcom Butler 6040 5
Topcom Butler 6040
ENGLISH
Safety Instructions
• Only use the charger plug supplied. Do not use other chargers, as this may damage the
battery cells.
• Only insert rechargeable batteries of the same type. Never use ordinary,
non-rechargeable batteries. Insert rechargeable batteries so they connect to the right
poles (indicated in the battery compartment of the handset).
• Do not touch the charger and plug contacts with sharp or metal objects.
• The operation of some medical devices may be affected.
• The handset may cause an unpleasant buzzing sound in hearing aids.
• Do not place the basic unit in a damp room or at a distance of less than 1.5 m away from
a water source. Keep water away from the handset.
• Do not use the telephone in environments where there is a risk of explosions.
• Dispose of the batteries and maintain the telephone in an environment-friendly manner.
• As this telephone cannot be used in case of a power cut, you should use a
mains-independent telephone for emergency calls, e.g. a mobile phone.
• This telephone uses rechargable batteries. You have to dispose of the batteries in an
environment friendly manner according to your country regulations.
Disposal of the device (environment)
At the end of the product lifecycle, you should not throw this product into the normal
household garbage but bring the product to a collection point for the recycling of electrical
and electronic equipments. The symbol on the product, user guide and/or box indicate this.
Some of the product materials can be re-used if you bring them to a recycling point. By reusing some parts or raw materials from used products you make an important contribution to
the protection of the environment.
Please contact your local authorities in case you need more information on the collection
points in your area.
Cleaning
Clean the telephone with a slightly damp cloth or with an anti-static cloth. Never use cleaning
agents or abrasive solvents.
Page 6
6 Topcom Butler 6040
Topcom Butler 6040
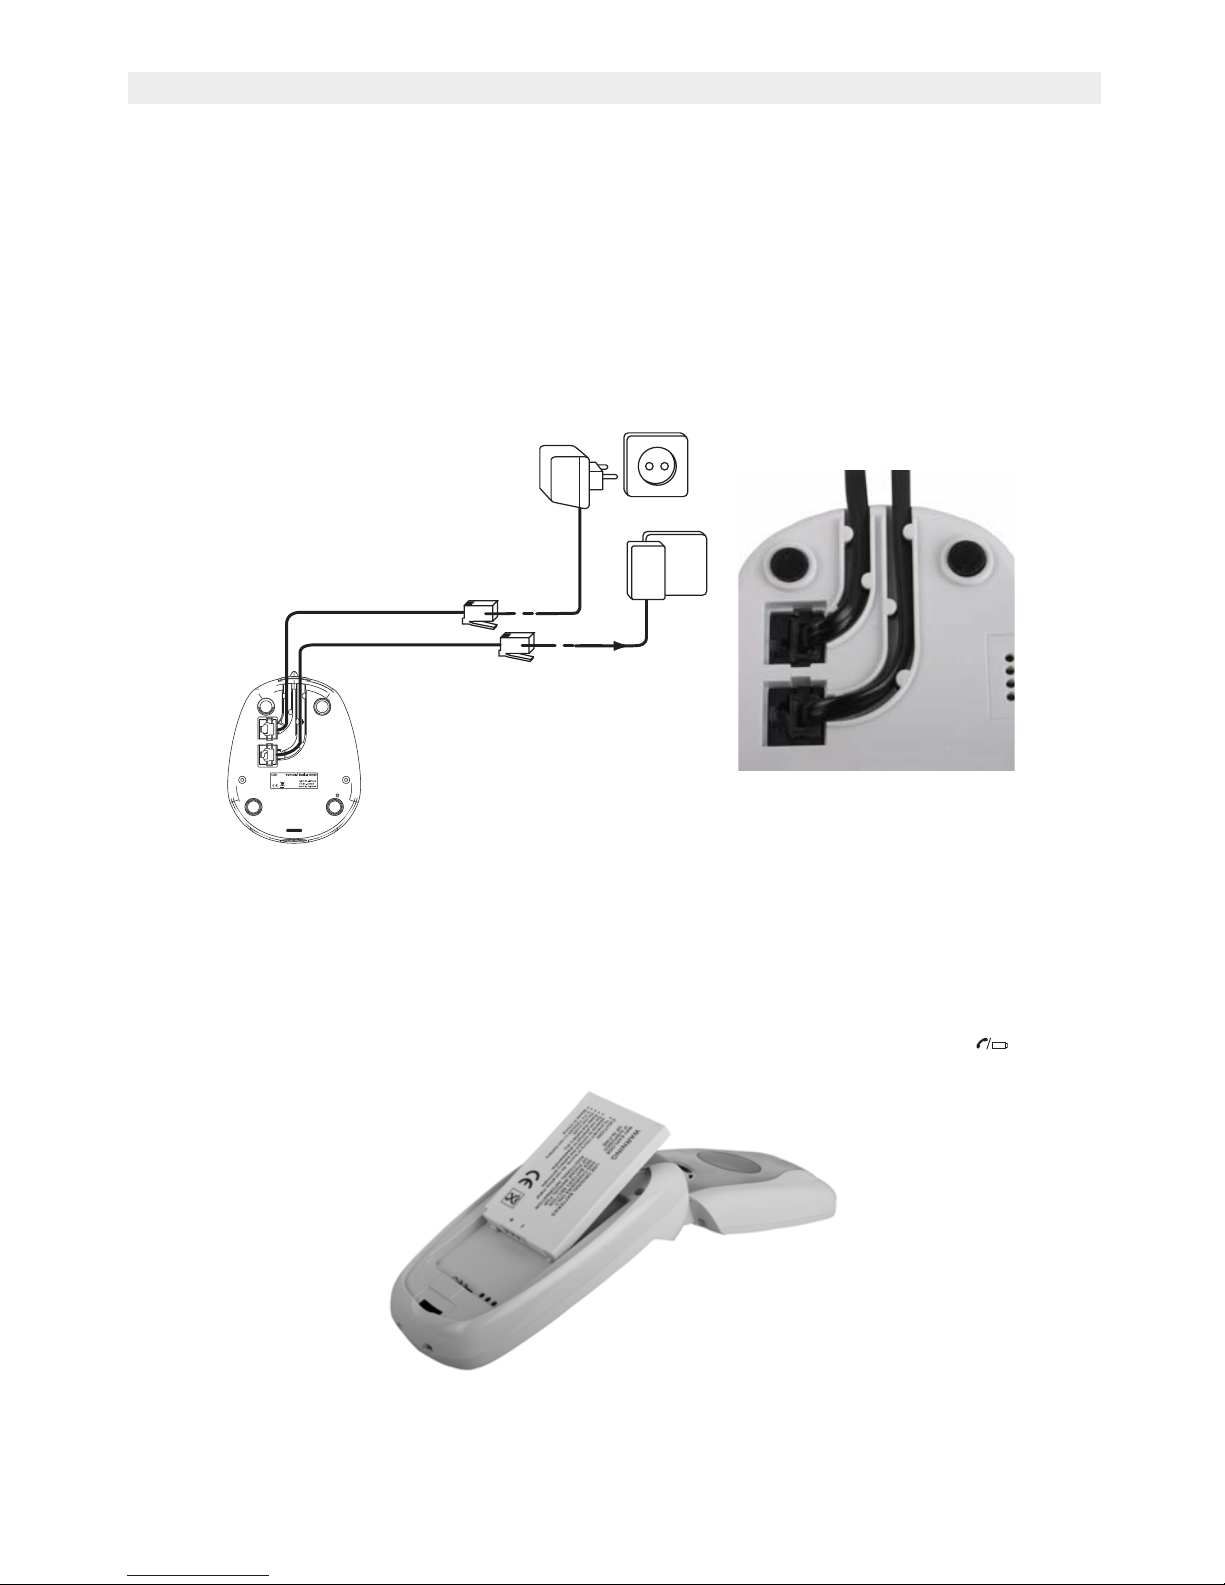
1 Getting started
1.1 Installing the base
For installation, do the following:
• Plug one end of the adaptor into the outlet and the other end into the adapter jack on the
bottom of the telephone.
• Connect one end of the telephone cord with the wall phone jack and the other end to the
bottom of the telephone.
• Put the telephone-and AC power line cord in the base quides as shown on the picture
below:
1.2 Installing the handset
• Open the battery compartment (see below).
• Insert the battery pack with copper pins below and text on battery visible as on picture
below.
• Close the battery compartment.
• Leave the handset on the base unit for 20 hours. The Line/Charge indicator (LED)
on the base unit will light up.
Before you use the telephone for the first time, you must first make sure the battery is
charged for 20 hours. If you do not do this, the telephone will not work optimally.
Telephone cord
Power cable
TEL
Battery pack
Back view of hand-set
Page 7
Topcom Butler 6040 7
Topcom Butler 6040
ENGLISH
1.3 If you have purchased a Twin/Triple version
If you have purchased a Twin or Triple version
• Plug one end of the adaptor into the outlet and the other end into the adapter jack on the
bottom of the charger.
• Insert the battries inside the handset
• Charge the handset for at least 20 hours.
2 Getting to know your telephone
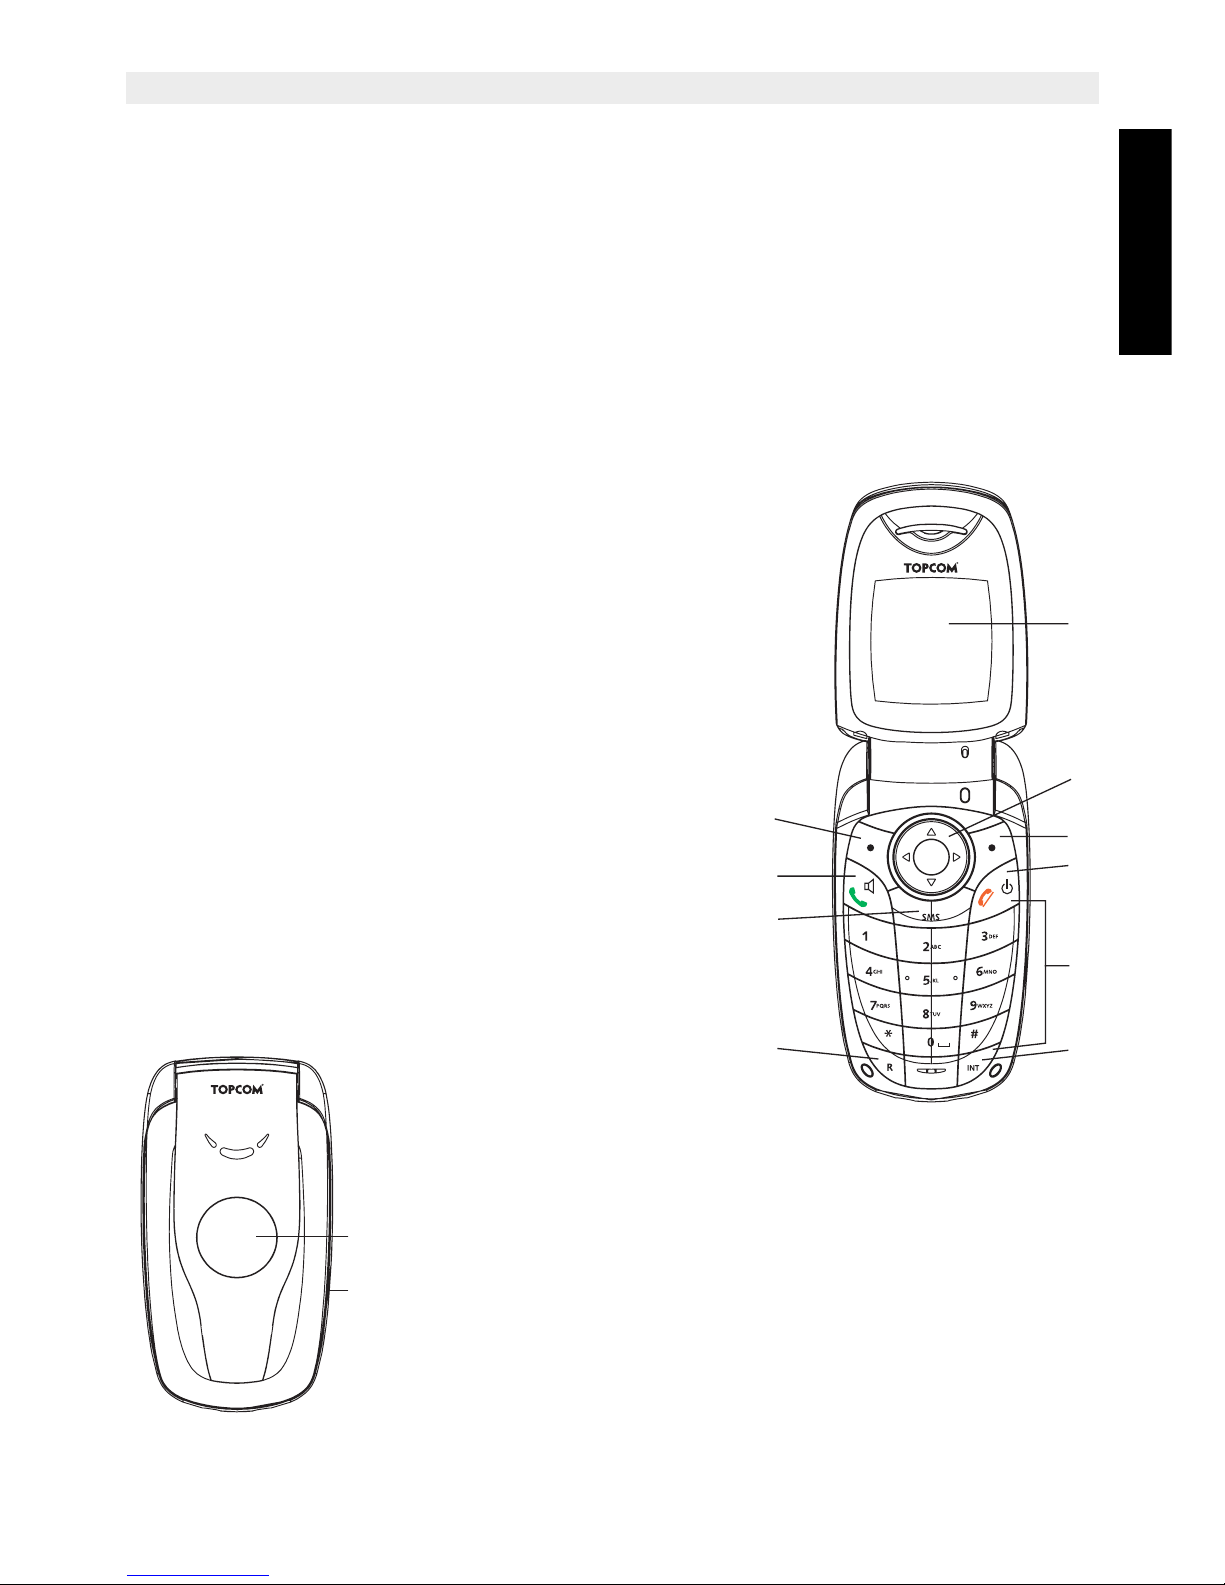
2.1 Keys/LED
Handset
1. Display 1
2. On-hook/on-off key
3. Off-hook/handsfree key
4. Soft Menu key 1
5. Soft Menu key 2
6. SMS key
7. Flash key
8. INT key
9. Infrared LED
10. Alphanumeric keys
11. Navigation key
Up: Redial list
Down: Call list
Left
Right
Middle: OK key
12. Display 2
1
11
5
2
10
8
4
3
6
7
12
9
Page 8
8 Topcom Butler 6040
Topcom Butler 6040
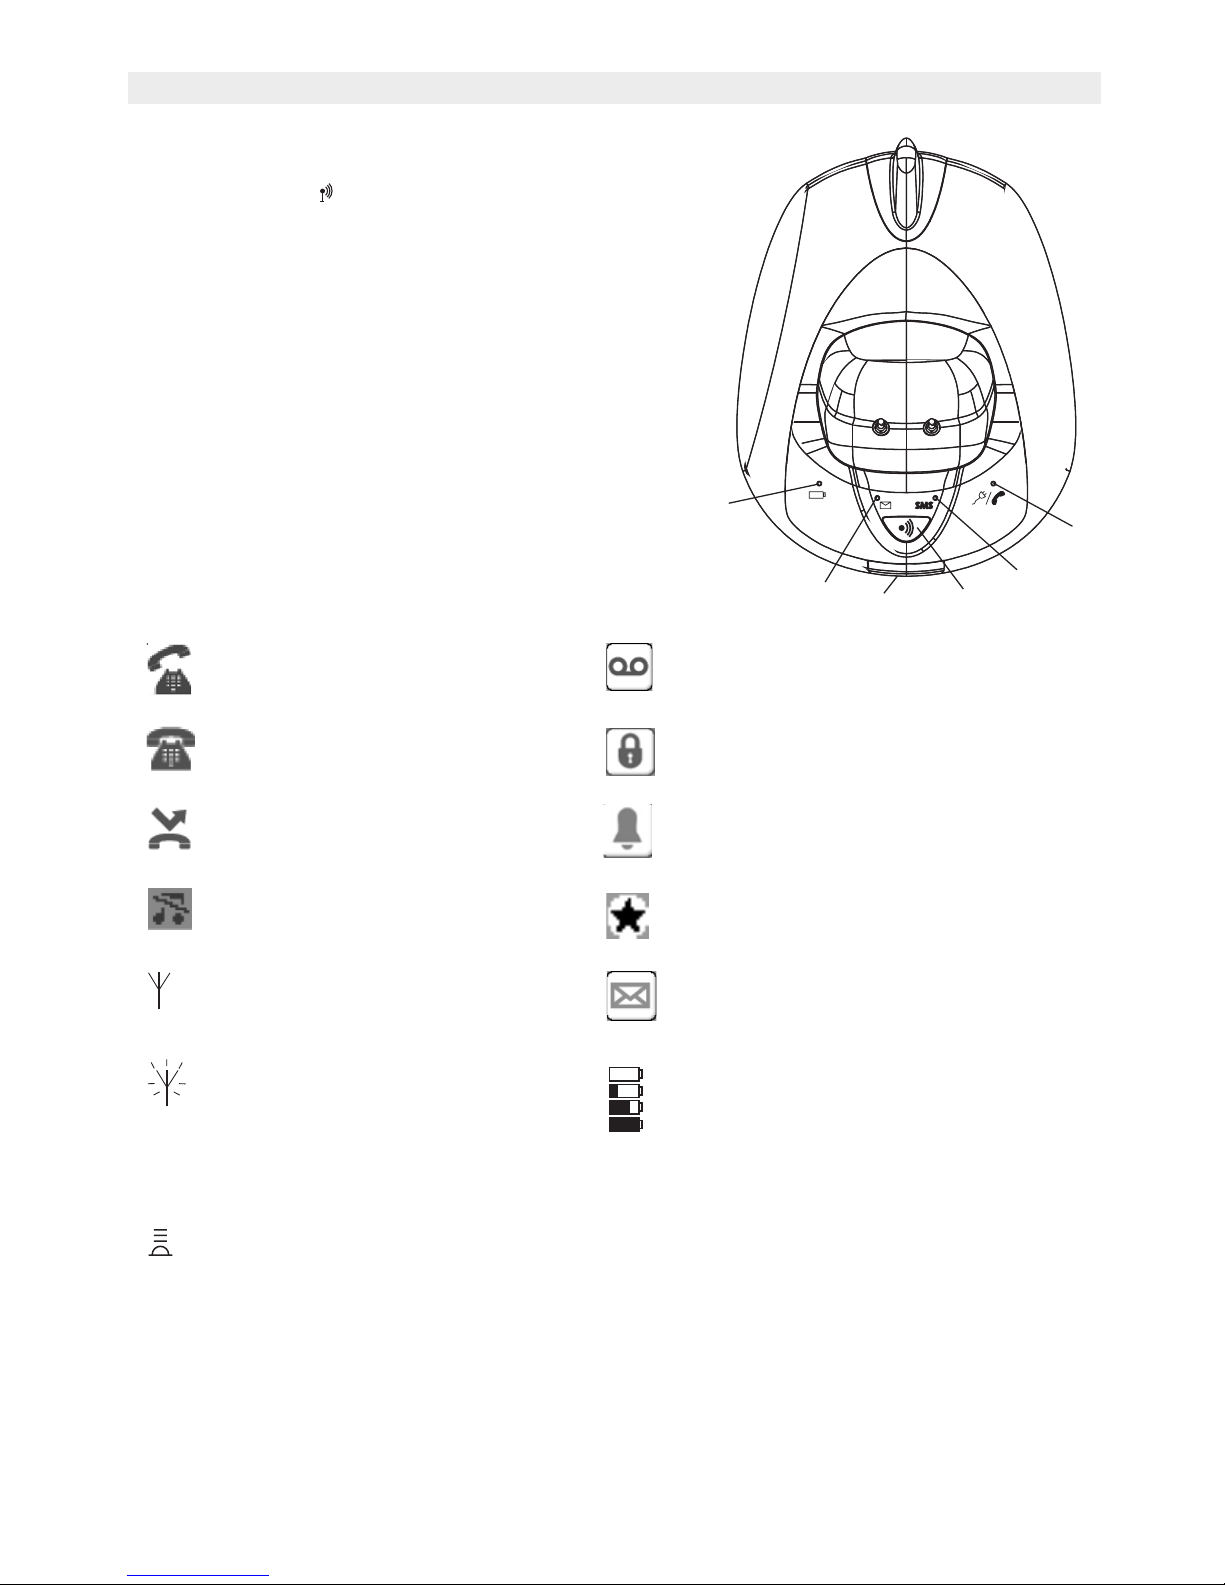
Base
13. Paging key
14. Simcard reader
15. In use/Power (LED)
16. New SMS LED
17. Missed calls LED
18. Handset on base LED
2.2 Icons
* If the Caller line identification service is available on the telephone line
** If the Phonemail service is available on the telephone line
*** If the SMS service is available on the telephone line
Call in progress New voice mail**
End Call Keypad locked
Missed calls in call list* Alarm set
Handset ringer volume OFF List contains unread or missed calls
not yet consulted
Within base range New SMS message received***
Handset not registered or out of
range
Battery status
Empty
Low battery
Medium
Full
Infrared is active
14
17
18
13
16
15
Page 9

Topcom Butler 6040 9
Topcom Butler 6040
ENGLISH
2.3 Base lights
* If the Phonemail service is available on the telephone line
2.4 Navigating the menu
The Butler 6040 has a menu system which is easy to use. Each menu leads to a list of
options. The menu map is shown on the following paragraph.
When the handset is switched on and in standby, press the option button under “MENU” to
open the main menu.
Press the or buttons to move to the menu option you want. Then press OK to select
further options or confirm the setting displayed.
Exit or go back one level in the menu
To the previous level in the menu, press BACK.
To cancel and return to standby at any time, press . If no button is pressed for 60 seconds,
the handset returns to standby automatically.
Missed calls indication
New SMS messages received
Handset on base
• Off: No base power connected
• ON: power connected
• Blinking slowly: Off hook or SIM card copy
• Blinking rapidly: during registration mode or Phonemail*
Page 10

10 Topcom Butler 6040
Topcom Butler 6040
2.5 Menu overview
Menu Submenu items
SMS New message
Inbox
Drafts
Outbox
Delete messages
Templates
Settings
Calls lists Received calls
Missed calls
Dialled calls
Delete calls List
Handset Ring volume
Handset name
Language
Menu Colour
Backlight timeout
Auto talk
Key beep
Access code
Activate IrDA
Backlight colour
Base settings Base ringtone
Base volume
Handset priority
Dial mode
Recall mode
RPAS Inhibition
SIM Country codes
System pin
Default settings
Time settings Alarm
Set date & time
Registration Register handset
Select base
De-register
Games Rabbit runner
Hector
Bowling
Insects hunt
Ti aqua
Page 11

Topcom Butler 6040 11
Topcom Butler 6040
ENGLISH
3 Using the telephone
3.1 Switching the handset on/off
• Press and hold to switch the handset off.
• Press again or place it in the base to switch the handset back on.
3.2 Changing the language
Enter the "Handset" menu in order to change the language:
•Select "Menu" with the left menu key .
• Press the navigator once and once.
•The "Handset" menu is selected. Select "OK". The screen displays the handset menu.
• Use the navigator key to scroll through the menu and select "Language". The and
arrows indicate that further options are available. To confirm the language press "OK".
The screen displays "English saved" if you have chosen English. Your handset's
menus will be in English.
• To return to the previous menu, select "Back".
3.3 Making a call
3.3.1 Direct dialling
• Press to obtain a line.
• Dial the number to be called.
• To hang up at the end of the call, press or close the handset.
3.3.2 Pre-dialling
With the pre-dialling feature you can enter and modify a number before making the call.
• Dial a number of up to 25 digits. Press the navigator key upwards and hold to insert a
pause. The screen displays a "P".
•Select "Clear" with the right menu key to correct. Press to initiate the call. The
screen displays: "Calling 123456789". To hang up at the end of the call, press or
close the handset.
3.3.3 Fast call
You can store a number from the phonebook under each numerical key 0-9 (see also 4
“Phonebook” how to do this).
To dial one of these numbers just press and hold the numerical key 0-9.
3.4 Receiving a call
When you receive an external call, the screen displays: "External Call".
To take the call:
• Press (if the handset is not on its base/charger)
or
Open the handset (if the Auto Talk option is active) (see 7.6 “Auto answer”).
• The call in progress icon appears on the screen. The call duration is displayed after
about 15 seconds.
Page 12

12 Topcom Butler 6040
Topcom Butler 6040
3.4.1 Adjusting the ring volume during incoming call
You can adjust the ring volume with the navigator key or while the telephone is ringing.
The ring volume is displayed on the screen. There are 5 volume levels as well as the option
of turning the ringer off altogether, in which case "Volume Off" is displayed and icon
appears. This information remains on screen for about 3 seconds, or until the key is
pressed.
3.5 Handsfree mode
Handsfree lets you talk to your caller without holding the handset. It also enables other
people in the room listen to both sides of your conversation.
Make a handsfree call
• Press twice. The display shows . Dial the number. Your call can be heard over the
handset’s loudspeaker.
• To switch back to the handset at any time, press again. Press to end the call. You
can switch any call to handsfree by pressing during the call.
3.6 Adjust earpiece/handsfree volume
During a normal or handsfree call, press or to select volume 1-5.
3.7 Redial a number from the list
You can redial up to 20 of the last numbers called. If you have stored a name in the
phonebook to go with the number, the name will be displayed instead (see 4 “Phonebook”).
Redial a number from the list:
• Press to enter the redial list. Scroll with or until the number you want is
displayed.
• Press to dial the number.
Note: You can also consult the called list by the menu (See § “6 Calls list”) for more
details.
3.8 Secrecy function (Mute function)
During conversation you can turn off the microphone so that the person on the other side of
the line will not hear you:
•Select ‘SECRECY’ using the left menu key to deactivate the microphone.
•‘SECRECY ON’ appears on the display
• Press the left menu key again to activate the microphone again
3.9 Locating a handset (paging function)
If you forgot where you left your handset you can press the paging key on the base. All
handset registered with the base will ring for about 30 seconds.
The LED on the base will flash. To stop the ringer, press any key on the handset.
Page 13

Topcom Butler 6040 13
Topcom Butler 6040
ENGLISH
4 Phonebook
Each handset can store up to 200 names and numbers. Names can be up to 16 characters
long and numbers up to 20 digits.
To add an entry
• Press right menu key ‘NAMES’.
• If the Phonebook is empty, select ‘Add Entry’ and press ‘OK’
OR
• If names have been stored, they are listed. Press ‘OPTIONS’. ‘Add Entry’ is
highlighted. Press ‘OK’.
• Use the keypad to enter the name, then press ‘OK’.
• Use the keypad to enter the number, then press ‘OK’. The screen shows the phonebook
name list.
• Press and hold ‘Back’ to return to standby.
To Dial an entry
• Press right menu key ‘NAMES’.
• Scroll or to the name you want or use the keypad to enter the first letter of the
name
• Press to dial the number.
Edit name and number
• Press right menu key ‘NAMES’.
• Scroll or to the name you want or use the keypad to enter the first letter of the
name
•Press ‘OPTIONS. Scroll to ‘Edit Entry’ and press ‘OK’.
• Edit Entry’screen is displayed. Press ‘CLEAR’ to delete or use or to position the
cursor. Use the keypad to change the name. Press ‘OK’.
• Edit the number and press ‘OK’. Display returns to the list of names.
• Press and hold ‘Back’ to return to standby.
View details
•Press NAMES then scroll or to the name you want, the press OPTIONS.
• Scroll to Show Details and press OK.
• Displays shows the name and number.
• Press and hold Back to return to standby.
Page 14

14 Topcom Butler 6040
Topcom Butler 6040
Delete an entry
•Press NAMES then scroll or to the name you want, then press OPTIONS.
• Scroll to Delete Entry and press OK.
•Press YES to confirm or NO to cancel.
• Press and hold Back to return to standby.
Select ringtone
You can choose which ringer melody is played when you receive a call from selected
numbers in the phonebook.
•Press NAMES then scroll or to the name you want, then press OPTIONS.
• Scroll to Ringtone and press OK. The Ringtone screen is displayed and the current
setting is highlighted.
• Scroll or to the ringtone you want. A sample is played. Press OK. The display
shows Ringtone Saved then returns to the phonebook list.
• Press and hold Back to return to standby.
Select a background colour
You can choose the background color on the small secondairy LCD when you receive a call
from a number stored in the phonebook:
•Press Names the scroll or to the name you want, then press OPTION
• Scroll to Backlight colour and press OK. The current color is highlighted.
• Scroll to the color you want and press OK
• Press and hold Back to return to standby
Fast Call
You can store 10 numbers from the phonebook under the keys 0-9. When you press and hold
the key 0-9, the number will be dialled autmatically. To store or delete the number:
•Press Names the scroll or to the name you want, then press OPTION
• Scroll to FastCall and press OK. The current list is shown.
• Scroll to the key you want and press Modify
•Press:
– Select number to store the number under this key
– Delete to delete the number stored under this key
• Press and hold Back to return to standby
Add a picture to a number
You can select a picture to be displayed on screen when you receive a call from a number
stored in the phonebook.
•Press NAMES then scroll or to the name you want, then press OPTIONS.
• Scroll to Picture and press OK
. The Picturescreen is displayed and the current
setting is highlighted.
Page 15

Topcom Butler 6040 15
Topcom Butler 6040
ENGLISH
• Scroll or to the picture you want and press VIEW. The picture is displayed. Press
BACK to return to the picture list or press USE to assign the picture to the entry you
have selected.
• Press and hold Back to return to standby.
Copy entry to another Butler 6040 handset
You can copy an entry to another Butler 6040 handset registered to your base.
•Press NAMES then scroll or to the name you want, then press OPTIONS.
• Scroll to Copy Entry and press OK. Select By IrDA to send it by infrared (see also
12 “Infra red” or To Handset and press OK. The Copy Entry screen shows all
registered handsets.
• Scroll to the handset you want to copy to, then press OK.
•Press OK again to copy another number or press and hold Back to return to standby.
Copy the compleet phonebook to another Butler 6040 handset
You can copy the whole phonebook to another Butler 6040 handset registered to your base.
•Press NAMES then OPTIONS.
• Scroll to Copy All Names and press OK. The Copy All Names screen shows all
registered handsets.
• Scroll to the handset you want to copy to, then press OK.
• Press and hold Back to return to standby.
Copy from SIM card
You can copy complete phonebook lists from compatible mobile phone SIM cards. The SIM
phonebook is copied to the handset you are using. Before you start copy from SIM card,
please make sure you have programmed the correct country codes ( see 8.5 “SIM country
code settings”)
• Insert the SIM card into the slot on the base as shown below:
Note:Only 3V sim cards can be used!
•Press NAMES then OPTIONS.
• Scroll to Copy From SIM and press OK. The Copy From SIM screen is displayed.
• Enter the SIM card PIN code if requested and press OK. During copying, the screen
shows the name of each entry as it is copied. When finished you see Done. If you enter
the wrong PIN twice, Copy SIM Failed is displayed and the screen returns to standby. If
the handset memory becomes full during copying the screen shows Memory Full. Not
All Copied.
• Press and hold Back to return to standby.
Page 16

16 Topcom Butler 6040
Topcom Butler 6040
Note: If the handset memory becomes full during copying, not all the entries will be
transferred. The maximum number of entries is 200. If your handset phonebook
already contains 160 entries, only the first 40 entries on the SIM card will be copied.
Your Butler 5500 checks all available directory memory spaces on your mobile SIM
card. During copying, the “handset on base” LED will flash. If you forget your PIN or
if the SIM card becomes locked because the wrong code has been entered, please
check with your mobile network provider how to unlock.
Any international numbers stored on your SIM card may be prefixed by ‘+’. The ‘+’ will
be automatically replaced by the international prefix ( see 8.5 “SIM country code
settings”).
You can copy the contents of several SIM cards, within the limit of 200 entries!
5 Caller Identification
!! This service only works when you have a Caller ID/Clip subscription. Contact your
telephone company !!
When you receive a call, the telephone number of the caller appears on the handset display.
The telephone can receive calls in both FSK and DTMF. You can also see his or her name
if it’s transmitted by the network. If the name is programmed in the Phone Book, the name in
the Phone Book is displayed!
The telephone can store 50 calls in a Call List (received and missed) that can be reviewed
later. When the memory is full, the new calls automatically replace the oldest calls in the
memory. Missed calls are signalled by an icon on the display and by the LED in the base.
To read the received calls:
There are 3 ways to show the missed calls:
1) To consult the missed call list when display shows the missed calls amounth during
standby:
•Press Read and scroll to the list with the navigator keys and . The missed calls that
you have not consulted are marked with a “
2) To consult missed calls after activating other telephone functions:
• Press and you will immidiatly see the Received call list (combination of received and
missed calls).
• Scroll to the list with the navigator keys or .
Press to dial a number or select ‘Options’ to delete the entry, see further details or add
the number to the phone book.
3) By the menu (See 6 “Calls list” below)
Page 17

Topcom Butler 6040 17
Topcom Butler 6040
ENGLISH
6 Calls list
Your Butler 6040 keeps a list of all your last calls.
• Received Calls: shows details of all recent callers.
• Missed Calls: shows details of calls that were not answered.
• Dialled Calls: list shows details of the last 20 calls made from your handset.
A combined total of 50 calls can be stored in the Received and Missed calls.
Missed and received calls
You can access the Calls list using the navigator button or the menu.
To use the navigator button:
• From the standby screen, press . New calls are indicated with an *. Press or to
scroll through the list. A beep is played when you reach the first and last calls in the list.
• Press to dial a number or OPTIONS to delete the entry, see further details or add the
number to the phonebook.
You can also consult the calls list by the menu:
•Press Menu
• Scroll to Calls list and press OK. Select Received calls or Missed calls
and press OK.
• If the name of the caller has been stored in the phonebook it is displayed.
Redial list:
Same as described at 3.7 “Redial a number from the list” you can also consult the called list
from the menu.
•Press Menu
• Scroll to Calls list and press OK. Select Dialled calls and press OK.
• Press to dial a number or OPTIONS then select:
– Delete: to delete the number.
– Show Details: if a name is displayed, this shows the number.
– Add entry: to create an entry in the phonebook. Enter the name, press OK. The
number is displayed.
– Press OK to store the number.
6.1 Delete calls list
•Press Menu
• Scroll to Calls list and press OK. Select Delete calls lists and press OK.
• Press or to select the list you want to delete:
Received Calls
Missed Calls
Dialled Calls
All Calls
•Press OK
•Press YES to delete or NO to cancel
Page 18

18 Topcom Butler 6040
Topcom Butler 6040
7 Personalise the handset
7.1 Setting the date and time
•Press Menu
• Scroll to Time settings and press OK. Select Set Date & Time and press OK.
• Enter the date (format: DD/MM).
• Confirm with OK
• Enter the time (format: HH:MM).
• Confirm with OK
7.2 Using the alarm feature
Set the date and time and use your Butler 6040 to give you a reminder alarm. You can have
a different alarm setting for each handset registered to your base. The alarm rings only at the
handset, not at the base or any other handset.
7.2.1 Set the alarm
•Press Menu
• Scroll to Time settings and press OK. Select Alarm and press OK.
•Select On/Off with the navigator and press OK. Using the navigator, choose one of the 3
types of setting: On Once, On Daily or Off. Confirm with OK. If you choose On Once or
On Daily the display will show:
TIME (24 hr):
00:00
Enter the time when you want the telephone to ring and confirm by pressing the OK key.
• To deactivate the Alarm function, select "Off" and confirm with "OK".
7.2.2 Setting the alarm tone
•Press Menu
• Scroll to Time settings and press OK. Select Alarm and press OK.
•Select Set Alarm Tone with the navigator and press OK.
• Scroll or to select the alarm tone (1-4) you want and press OK
7.3 Ringtone and volume
7.3.1 Ringtone
You can choose 15 different ringer melodies. You can set different melodies for internal and
external calls.
• From the standby screen, press MENU then scroll to Images and Sounds and press
OK. Scroll to Sounds and press OK.
•Press OK to highlight Resident ringings. Press OK to select External Calls. Or scroll
to Internal Calls, then press OK.
• Scroll and to the melody you want. During scrolling a sample is played. Press OK
to select or BACK to return to the previous menu.
• Press and hold BACK to return to standby.
Page 19

Topcom Butler 6040 19
Topcom Butler 6040
ENGLISH
7.3.2 Ringer volume
There are five handset ringer volume levels and off. If you select off, calls will still ring at the
base and your handset screen will indicate incoming calls.
•Press MENU then scroll to Handset and press OK. Press OK again to open the Ring
Volum e menu.
•Select External Calls or Internal Calls and press OK.
• The current setting is displayed. Press to increase or to decrease the volume.
Press OK to confirm.
• Press and hold BACK to return to standby.
7.4 Handset name
You can change the name displayed on the handset during standby (max. 8 characters long):
•Press MENU then scroll to Handset and press OK.
• Scroll to Handset Name and press OK.
• Enter the handset name you want. Press Clear to make a correction and OK to confirm.
• Press and hold BACK to return to standby.
7.5 Background picture
•Press MENU then scroll to Images and Sounds and press OK. Press OK again to open
the Image menu.
•Select Resident Wallpapers or Other Images and press OK.
• The current setting is displayed. Press or to scroll to the picture you want and
press View.
•Press Use to select or Back to return.
• Press and hold BACK to return to standby.
7.6 Auto answer
When there is an incoming call, the phone automatically takes the line when opened. This
function can be turned on or off:
•Press MENU then scroll to Handset and press OK.
• Scroll to Auto talk and press OK.
•Select On or Off and press OK to confirm or Back to return.
• Press and hold BACK to return to standby.
7.7 Menu color
•Press MENU then scroll to Handset and press OK.
• Scroll to Menu Colour and press OK.
•Select Blue, Green or Pink and press Save to confirm or Back to return.
• Press and hold BACK to return to standby.
Page 20

20 Topcom Butler 6040
Topcom Butler 6040
7.8 Key beeps
•Press MENU then scroll to Handset and press OK.
• Scroll to Key beep and press OK.
•Select On or Off and press OK to confirm or Back to return.
• Press and hold BACK to return to standby.
7.9 PABX access code
It’s possible to use your telephone with a PABX or a local telephone network. When dialling
telephone numbers from the phonebook list, you can add automatically the PABX access
code infront of the phonebook number.
•Press MENU then scroll to Handset and press OK.
• Scroll to Pabx Access code and press OK twice.
• Enter the PABX access code, e.g. ‘0’ and press OK.
• Scroll to ON and press OK.
• Press and hold BACK to return to standby.
7.10 Backlight timeout
When no key is press for the certain time, the backlight will be turned off to save battery
power. To change this time:
•Select Menu then scroll to Handset and press OK.
• Scroll to Backlight timeout and press OK.
• Select 15, 30 or 45 seconds and press Save.
• Press and hold Back to return to standby.
8 Base settings
8.1 Ringtone and volume
8.1.1 Ringtone
You can choose 5 different ringer melodies:
• From the standby screen, press MENU then scroll to Base settings and
press OK.
•Press OK again to enter the Base Ringtone menu.
• Scroll or to the melody you want. During scrolling a sample is played. Press OK to
select or BACK to return to the previous menu.
• Press and hold BACK to return to standby.
8.1.2 Ringer volume
There are five base ringer volume levels and Off.
• From the standby screen, press MENU then scroll to Base settings and press OK.
• Scroll to Base Volume and press OK.
• The current setting is displayed. Press to increase or to decrease the volume.
Press OK to confirm.
• Press and hold BACK to return to standby.
Page 21

Topcom Butler 6040 21
Topcom Butler 6040
ENGLISH
8.2 Handset priority
Normally, if you have more than one handset registered to your base, they all ring at the
same time. However, you can set one of them to ring before the others, so that calls can
always be answered at one handset first.
• From the standby screen, press MENU then scroll to Base settings and press OK.
• Scroll to Handset Priority and press OK. Display highlights All Handsets. Press OK
to select All Handsets
• to make all handsets ring together.
Or
• Scroll to Select Handset and press OK. Scroll or to the handset you want to ring
first. Press OK.
• Scroll or to select the number of rings at the handset before the other handsets
start ringing. Press OK to confirm.
8.3 Line settings
8.3.1 Dial mode
There are two types of dialling mode:
1) DTMF/tone dialling (the most common)
2) Pulse dialling (for older installations)
•Press MENU then scroll to Base Settings and press OK. Scroll to Dial Mode and press
OK.
• Press or to highlight Pulse or Ton e and press OK to confirm.
8.3.2 Flash time
•Press MENU then scroll to Base Settings and press OK. Scroll to Recall Mode and
press OK.
• Press or to highlight Recall 1 for short flash time (100ms) or Recall 2 for long flash
time (250ms) and press OK to confirm.
8.3.3 Ring pulse alerting signal (RPAS) on/off
Then you have callerID, the network send a short ring signal as an alerting signal before
sending the caller number. To avoid the telephone to ring during this first ring signal you have
to set the RPAS inhibitation to off.
•Select Menu then scroll to Base settings and press OK
• Scroll to RPAS inhibition and press OK
•Select Off to disable the phone to ring during the first ring burst, or On to enable the
ringing and press OK
• Press and hold Back to return to standby
Page 22

22 Topcom Butler 6040
Topcom Butler 6040
8.4 System PIN
The System PIN is used for registering and deregistering handsets and some other optional
settings. The default System PIN is 0000.
•Press MENU then scroll to Base Settings and press OK. Scroll to System Pin and
press OK.
• Enter the current PIN (Original setting 0000) and press OK.
• Enter the new PIN, press OK and enter it again.
•Press OK to confirm.
8.5 SIM country code settings
You can program the Butler 6040 how to convert telephone numbers stored on your sim card
when copying them to your handset phonebook memory (See § “4 Phonebook” ).
There are 3 rules how the convertion will be done:
1. If a number stored in the SIM card begins with '+' or '00', and the country code on the
SIM number matches with the programmed country code of the handset in this case,
those caracters are replaced by the programmed national code.
2. If a number stored in the SIM card begins with '+' or '00', and the country code on the
SIM number does not match with the programmed country code of the handset, in this
case, '+' is replaced by international code.
3. If a number stored in the SIM card does not begin with '+' or '00', in this case, nothing
is changed.
8.5.1 International code
•Press MENU then scroll to Base Settings and press OK. Scroll to SIM country setting
and press OK.
•Select International code
• Enter the international prefix
•Press OK to confirm.
Remark: If there is no International code programmed or SIM entry doesn’t have a
international code, the telephone number will be copied as it is without any changes.
The Country code and National code will be ignored.
8.5.2 Country code setting
•Press MENU then scroll to Base Settings and press OK. Scroll to SIM country setting
and press OK.
•Select Country code
• Enter the country code.
•Press OK to confirm.
Remark: If you add to the country code the area code, both will be removed when
copied. This way you can dial telephonenumbers without area code if needed.
Page 23

Topcom Butler 6040 23
Topcom Butler 6040
ENGLISH
8.5.3 National code
•Press MENU then scroll to Base Settings and press OK. Scroll to SIM country setting
and press OK.
•Select National code
• Enter the national code
•Press OK to confirm.
9 SMS text messages
You can send and receive SMSs with your Butler 6040 telephone. This section tells you how
to use the SMS feature.You can store a total of 50 SMS messages sent and received, each
with up to 160 characters.
9.1 Writing and sending SMS messages
•Press MENU then scroll to SMS and press OK.
OR
• Press the SMS key.
•Select New Message and press OK.
9.1.1 How to write an SMS
The standard method is the same method used to enter a name in the phonebook.
For example: when you want to enter the name ‘LUC’
Tap 5 three times to select ‘L’
Tap 8 two times to select ‘U’
Tap 2 three times to select ‘C’
To enter a space press ‘0’
To go quickly to the next letter, either press downwards on the navigator key , or wait for
the cursor to move on automatically.
For each key, the available characters appears at the top of the screen.
Press or to go to the next or previous line
Press or to go to the next or previous character
To change to upper case, press INT. To return to lower case press INT again.
You can also insert a symbole, Emoticon or template by pressing OPTION and select the
desired option.
To use SMS, this service has to be activated on your phone line.
Normally you need to call a special number to get a subscription from your
telephone company to activate this function. Please contact your telephone
company for this service.
Page 24

24 Topcom Butler 6040
Topcom Butler 6040
Remark:
• Emoticons are a fun, shorthand way of expressing your feelings.You can select
the most appropriate Emoticon from the grid and add them to your message.
• Templates are a selection of common, ready to use statements which are easy to
insert into your message. These are:Please call - I’ll be there at - What time will
you be home? - I’ll call you - Happy Birthday! You can change these templates and replace them with your own.See (See § “9.9
Changing templates” )
9.1.2 How to send an SMS
• Enter the message to be send
• When finished select OPTIONS. The following options appears beside above mentioned
options:
–Send To
– Save
–Notify
– Message Type
–OK
•Select Send To and press OK to confirm.
• Enter the correspondent’s number if you don’t want to use the phonebook memory
OR
Delete the number that appears on the display by pressing Clear and select Search to
search the number in the phonebook. Select the name by using the or keys.
•Select Send start sending the SMS. The display will show Sending SMS.
OR
Select Back to modify the message before sending it
OR
Press and hold Clear or Back to delete the message without sending or press . The
message is totally erased and the phone will return to standby
9.1.3 Save a message
• When finnished writing a message select Options and then Save.
• Confirm with OK. Your message is saved in the Draft list.
9.1.4 Notify message
When you send a message and you want to have a delivery notification, you have to turn this
function on. Some networks/operators always sends a delivery notification even when this
option is turned ON or OFF.
• When finished writing a message select Option and then Notify.
•Select ON to get a delivery notification or Off if you don’t want it and press OK.
Only works if the network support this function!
Page 25

Topcom Butler 6040 25
Topcom Butler 6040
ENGLISH
9.1.5 Message type
When you want to send a message as a e-mail, fax or text you have to set this parameter
first before sending the message. To set the message type:
• When finished writing a message select Option and then Message type.
•Select Text for standard SMS messages, Fax to send the text message to a fax or
Email and press OK.
9.2 Viewing the saved and sent messages (outbox)
The Draft contains all the messages you have sent. The draft contains all messages saved.
You can save up to 50 SMS messages. To read the draft or sent messages:
•Select Menu with the left menu key, select SMS, then confirm with OK.
•Select Draft or Outbox with the navigator, and confirm with OK.
• Select a message with the navigator (the beginning of the message is listed, with the
date and time it was written).
• To read the whole message, select Read.
• When you have opened the message, select Options. You can scroll through the
options with the navigator:
–Edit
–Send to
– Delete
–Notify
– User Name
– Message type
• If no message was selected for editing or sending, press Back to return to the Outbox/
Draft menu. To quit the menu, do a long press on Back with the right menu key.
9.3 Viewing the list of received messages (Inbox)
Your Butler 6040 telephone tells you when you have new messages: An icon is shown on
the screen, with the number of new messages still unread. The SMS LED on the base is lit.
A beep is emitted.
To read new messages as they come in:
•Select Read with the left menu key. The most recent message is listed first.
To read new messages after using other telephone functions:
•Select Menu with the left menu key.
•Select SMS, then confirm with OK.
•Select Inbox with the navigator and confirm with OK.
OR
• Press the SMS key.
• Select a message, then confirm with Read.
Only works if the network support this function!
Page 26

26 Topcom Butler 6040
Topcom Butler 6040
To answer, forward, or delete a received message:
•Select Options with the left menu key.
• Select the action (Reply, Forward or Delete) and confirm with OK.
• To quit the Inbox menu, press and hold Back
You can also call the number or store the number into the phonebook:
•Select Options with the left menu key.
• Select the action (Use number or Add entry) and confirm with OK.
• To quit the Inbox menu, press and hold Back
9.4 User accounts
With your Butler 6040 telephone you can create up to 4 different "user" accounts. You can
send and receive SMS messages with a user account. Messages received in a user account
are protected by a password. In order to receive SMSs in your personal user account, you
must give your correspondents the user account number that they need to add to your
standard telephonenumber (see § “9.4.2 Receiving SMS messages in a personal user
account” ).
9.4.1 Creating a user account
•Select Menu
•Select SMS menu by pressing OK
•Select Settings and confirm with OK
•Select Users and confirm with OK
•Select Add User and confirm with OK. Enter the user name and press OK.
• Enter a 4 digit pass word and press OK. Enter the password again to confirm and press
OK.
• You will get automatically a terminal number assigned. To see your terminal number
scroll to Terminal Number and press OK
•Select Back to return to previous menu
9.4.2 Receiving SMS messages in a personal user account
To receive SMS messages in your personal user account, you must give your user a terminal
number to your correspondents. To find your user number:
•Select SMS and confirm with OK.
•Select Settings with the navigator, then OK
•Select Users with the navigator, then OK. Your user name appears in the list.
• Select your user name with the navigator and confirm with OK. Enter your password and
confirm with OK.
•Select Terminal Number with the navigator and OK.
Your user number appears on the screen.You correspondents will need to add this user
number to your telephone number when they want to send SMSs to your personal user
account.E.g. If your personal user number is "1" and your telephone number is 123456789,
your correspondents should send their SMS messages to:1234567891! This is the number
you need to remember and give to your correspondents.
!! User accounts only works if the network support Sub-addressing !!
Page 27

Topcom Butler 6040 27
Topcom Butler 6040
ENGLISH
9.4.3 Changing an SMS user account number
User numbers are between 1 and 9 but during creating a user account the Butler 6040
assigns user numbers automatically, but you can change the number manually.
•Select Menu with the left menu key.
•Select SMS and confirm with OK
•Select Settings with the navigator and OK.
•Select Users with the navigator and confirm with OK.
• Your user name appears in the list. Select your user name and confirm with OK on the
left menu key.
• Enter your password (if the account is password protected).
• Confirm with OK on the left menu key.
•Select Terminal Number with the navigator and OK. Your user number appears on the
screen. Enter a new number and select OK with the left menu key. If the new number is
already assigned to another user, the handset beeps and the modification fails. If so,
enter another number.
9.4.4 Reading SMSs in your personal user account
When a new message comes in, your Butler 6040 emits a beep. The screen shows an
envelope, followed by the number of new messages.
•Select Read with the left menu key. In the SMS list, private messages are flagged with a
"p" in front of the name or number. After selecting a private SMS, the user name appears
on the screen.
• Enter the password and confirm with OK. You can now read the SMS.
9.4.5 Sending SMSs from your personal user account
Your Butler 6040 lets you send SMSs from a personal user account. Once you have written
the SMS:
•Select Options and then select User Name with the navigator and confirm with OK on
the left menu key.
• Select the account that you want to send the message from, and confirm with OK.
• Enter your password (if prompted) and confirm with OK.
•Select Send to with navigator and press OK.
• Enter the correspondent's telephone number, or look it up in the phonebook, and select
Send with the left menu key. If you select a “personal user account", the SMS will be
sent using your standard telephonenumber plus the user account number.E.g. If your
personal user number is "1" and your telephone number is 123456789, your
correspondents will receive an SMS from: 1234567891.
Note: Messages sent from a personal user account are stored in the Outbox. In the
outbox the messages are not protected by a password.
9.4.6 Deleting a personal user account
•Select SMS and confirm with OK.
•Select Settings with the navigator and press OK.
•Select Users and confirm with OK.
Page 28

28 Topcom Butler 6040
Topcom Butler 6040
•Select Delete User with the navigator and press OK. All the personal user accounts
appear on the screen.
• Using the navigator, select the account to be removed and press OK.
• Enter the system PIN (the factory setting is 0000), and select OK. The account is
deleted. All the SMS messages received by the account are deleted; those sent from the
account are still saved in the Outbox.
9.5 Allocating an SMS terminal number
It is possible for several SMS-enabled telephones to be connected up to the same line. So
that each telephone can continue to receive SMSs, they must be allocated different SMS
terminal numbers. This is network depending! To allocate a number:
• Press SMS.
•Select Settings with the navigator and press OK.
•Select Terminal Number with the navigator and press OK.
• The number "0" is pre-set. To change it: Enter the preferred number (from 0 to 9) and
confirm with OK.
If you have already created personal user accounts, your Butler 6040 will not allow you to
allocate a terminal number that corresponds to an existing user number. If two SMS-enabled
telephones connected up to the same line have the same terminal number, neither will be
able to receive SMSs. They must be given differing numbers.E.g. If you have already created
a user account with the number "3", you must allocate a terminal number other than "3".
If you keep the pre-set terminal number "0" in your Butler 5500 and your telephone number
is 123456789, your correspondents can continue to send you SMSs at 123456789. If you
give the terminal a number other than "0", you must tell your correspondents so that they can
continue to send you SMS messages: they will need to affix the terminal number to your
telephone number.E.g. If you give your Butler 5500 the terminal number "3" and your
telephone number is 12346789, your correspondents will need to send their SMSs to:
13456789 3.
9.6 Set SMS alert tone
Your handset can play a different melody, a morse beep or a discreet tone to announce a
new text message.
•Press SMS to open the SMS menu.
•Select Settings and press OK.
•Select SMS Alert. and press OK.
• Scroll to Set Alert and press OK.
• Select the type of alert you want and press OK to confirm or BACK to return to the
previous menu.
•Select ON or OFF and press OK to confirm the setting.
Page 29

Topcom Butler 6040 29
Topcom Butler 6040
ENGLISH
9.7 Memory full
When the memory is full, you get the screen message "Memory Full". You can no longer
send or receive SMSs. To continue to receive SMSs, you can delete some or all of the
messages. To delete all the messages stored in the "Inbox" and "Outbox":
•Select Menu and then SMS and confirm with OK.
•Select Delete Messages and press OK.
•Select All Messages with the navigator and press OK.
• The screen displays: All Messages: Confirm?. Confirm with OK or cancel with Back.
9.8 SMS Service center numbers
To send and receive SMS text messages you need the telephone number of your Network’s
SMS Centre. These numbers have been pre-loaded into the Butler 6040. You can also find
these numbers on the addendum sheet mentioned per country and per operator. If you
accidentally delete the SEND or RECEIVE SMS Service Centre numbers you will need to reenter them in order for your SMS Service to work.
9.8.1 To set the Receiving SMS Centre number
• From the standby screen, press SMS to open the SMS menu.
• Scroll to Settings and press OK.
•Press OK to open Service Centres menu.
• Scroll to Receiving Centre and select OK.
• The current stored number will be shown. Press Clear and enter the new number.
•Press OK to store the number.
9.8.2 To set and select the sending SMS Centre number
• From the standby screen, press SMS to open the SMS menu.
• Scroll to Settings and press OK.
•Press OK to open Service Centres menu.
• Scroll to Sending Centre and select OK.
• The current stored number will be shown. Press Clear and enter the new number.
•Press OK to store the number.
•Press Back to go to the Service Centres menu.
This centre number will be used to send a message!
9.9 Changing templates
• From the standby screen, press SMS to open the SMS menu. Scroll down to Templa tes
and press OK.
• Scroll to the template you want and press OK.
• Edit Template is highlighted. Press OK. Use CLEAR to delete characters or use the
navigator to move the cursor. Use the keypad to enter the new template then press
SAVE. The new template replaces the old one.
Page 30

30 Topcom Butler 6040
Topcom Butler 6040
9.9.1 Delete template
• From the standby screen, press SMS to open the SMS menu.
• Scroll down to Tem pla tes and press OK. Scroll to the template you want and press OK.
Scroll to Delete Template. Press OK.
10 Additional handsets and bases
You can subscribe up to 5 handsets on a Butler 5500 base. Each handset can register to 4
base stations and the user can select which base he wants to use.
10.1 Adding a new handset
Only needed when you have deregistered a handset or when you bought a new one !!
First put the base into registration mode:
• Press and hold the paging button on the base until you hear two beeps.
• The LED will start to blink on the base for 90 seconds. During that time the base is
ready to register a handset.
On the handset:
•Select Menu to open the menu.
•Select Registration with the navigator and press OK.
•Select Register Handset with the navigator and press OK.
• Select the number of the base to be associated with the handset (1 to 4). Confirm by
pressing OK.
• Enter the system PIN (0000 by default) and confirm with OK. A series of numbers
appears on the screen, representing the base ID. Confirm with 0K. Your handset is
registered.
10.2 Removing a handset
This procedure needs to be carried out on a different handset from the one you want to
uninstall.
•Select Menu by pressing the left menu key.
•Select Registration with the navigator and press OK.
•Select De-register with the navigator and press OK. Enter the system PIN (0000 by
default) and press OK.
• Select the handset to uninstall with the navigator and press OK.
10.3 Select a base
You can switch your Butler 6040 handset between bases. You can also set it to automatically
base select with the strongest signal. The handset must first be registered with each base
individually.
•Press MENU then scroll to Registration and press OK.
• Scroll to Select Base then press OK. The current base being used is highlighted.
• Select the base you want or select Automatic to connect to the base with the strongest
signal. Press OK.
Page 31

Topcom Butler 6040 31
Topcom Butler 6040
ENGLISH
Note: When you do Automatic base selection, the handset will only search in standby
for the strongest base when it’s out of range on the current base (not during
communication)!
10.4 Using the intercom feature
10.4.1 Calling an internal handset
•Press INT. The screen displays "Internal Call".
• Enter the internal handset number.
10.4.2 Transfer a external call to another handset
During a external call:
•Press INT.
• Enter the number of the handset you want to call. Your external correspondent is placed
on hold. When the internal correspondent answers, press to transfer the call. If the
internal correspondent doesn't answer, press INT to retrieve the external correspondent
or to go from one to the other.
10.4.3 Conference call
You can talk between 2 handset and a external line at the same time. During an external call:
•Press INT.
• Enter the number of the handset you want to call. Your external correspondent is placed
on hold.
• When the internal correspondent answers, press ‘#’ for 2 seconds. If the internal
correspondent doesn't answer, press INT to retrieve the external correspondent.
10.4.4 Taking an external call during an internal communication
When you are on intercom with another handset, you can still pick up outside calls.
To take an incoming call:
• Press . The internal communication is interrupted.
• Then press .You are in communication with the outside caller.
11 Games
The Butler 6040 has 5 games:
•Press MENU then scroll to Games and press OK.
• Select a game and press OK. Press START to display the game menu which includes
instructions.
•Press BACK to exit.
Page 32

32 Topcom Butler 6040
Topcom Butler 6040
12 Infra red
You can send and receive contact persons (V-cards 2.1 format) to/from another Infrared
device like a mobile phone or to a second handset (See “Copy entry to another handset” in
4 “Phonebook”).
You can also send and receive NSM ring tones (RNG format ).
To receive infrared data you have to activate the intrared:
•Select Menu then scroll to Handset and press OK
• Scroll to Activate IrDA and press OK
The phone will now be able to receive infrared signals for 2 munites. The icon will appear
on the screen to indicate this.
13 Troubleshooting
Symptom Possible cause Solution
No display Batteries uncharged Check the position of the
batteries
Recharge the batteries
Handset turned OFF Turn ON the handset
No tone Telephone cord badly
connected
Check the telephone cord
connection
The line is occupied by
another handset
Wait until the other handset
hangs up
The icon flashes
Handset out of range Bring the handset closer to
the base
The base has no power
supply
Check the mains connection
to the base
The handset is not registered
on the base
Register the handset on the
base
Base or handset do not ring The ringing volume is zero or
low
Adjust the ringing volume
Tone is good, but there is no
communication
The dialling mode is wrong Adjust the dialling mode
(pulse/tone)
Not possible to transfer a call
on PABX
The FLASH time is too short Set the unit to Long Flash
time
Telephone does not react to
pressing the keys
Manipulation error Remove the batteries and put
them back in place
Page 33

Topcom Butler 6040 33
Topcom Butler 6040
ENGLISH
14 Technical data
Standard: DECT (Digital Enhanced Cordless Telecommunications)
GAP (Generic Access Profile)
Frequency range: 1880 MHZ to 1900 MHz
Number of channels: 120 duplex channels
Modulation: GFSK
Speech coding: 32 kbit/s
Emission power: 10 mW (average power per channel)
Range: 300 m in open space /50 m maximum inhouse
Numbr of handsets: Up to 5
Powersupply base: 230V / 50 Hz / 35 mA 6,5V DC 180mA & 150mA
Model: SD35-405
Handset Batteries: Rechargeable battery pack 3,7V, 720mA Li-Ion
Handset autonomy: 100 hours in standby
Talk time: 10 hours
Charging time: 6-8 hours
Normal conditions of use: +5 °C to +45 °C
Dialling mode: Pulse / Tone
Flash time: 100 or 250 ms
15 Default settings
Handset name: B6040
Key beep: ON
Auto talk: ON
PABX code: Empty (Off)
Handset ring volume: 3
Ear volume: 3
Melody Handset: Internal calls = 1 and external = 5
Default picture: 1
Menu color: Blue
Base ring volume: 3
Base ringtone: 1
Pin code: 0000
Key lock: Off
SMS melody: On = Odeon
Page 34

34 Topcom Butler 6040
Topcom Butler 6040
16 Topcom warranty
16.1 Warranty period
The Topcom units have a 24-month warranty period. The warranty period starts on the day
the new unit is purchased. The warranty on batteries is limited to 6 months after purchase.
Consumables or defects causing a negligible effect on operation or value of the equipment
are not covered.
The warranty has to be proven by presentation of the original purchase receipt, on which the
date of purchase and the unit-model are indicated.
16.2 Warranty handling
A faulty unit needs to be returned to a Topcom service centre including a valid purchase note.
If the unit develops a fault during the warranty period, Topcom or its officially appointed
service centre will repair any defects caused by material or manufacturing faults free of
charge.
Topcom will at its discretion fulfil its warranty obligations by either repairing or exchanging
the faulty units or parts of the faulty units. In case of replacement, colour and model can be
different from the original purchased unit.
The initial purchase date shall determine the start of the warranty period. The warranty period
is not extended if the unit is exchanged or repaired by Topcom or its appointed service
centres.
16.3 Warranty exclusions
Damage or defects caused by incorrect treatment or operation and damage resulting from
use of non-original parts or accessories not recommended by Topcom are not covered by
the warranty.
Topcom cordless phones are designed to work with rechargeable batteries only. The
damage caused by the use of non-rechargeable batteries is not covered under warranty.
The warranty does not cover damage caused by outside factors, such as lightning, water and
fire, nor any damage caused during transportation.
No warranty can be claimed if the serial number on the units has been changed, removed or
rendered illegible.
Any warranty claims will be invalid if the unit has been repaired, altered or modified by the
buyer or by unqualified, non-officially appointed Topcom service centres.
Page 35

Page 36

visit our website
www.topcom.net
U8006507
 Loading...