

Page 1

TomTom Runner &
Multi-Sport
Reference Guide
1.8
Page 2

Contents
Welcome 4
What's new 5
What's new in this release ................................................................................................................... 5
Getting started 6
Your watch 7
About your watch ................................................................................................................................. 7
Wearing your watch ............................................................................................................................. 7
Cleaning your watch ............................................................................................................................ 8
The heart rate monitor ......................................................................................................................... 8
Using the desk dock ............................................................................................................................ 9
Using the bike mount ........................................................................................................................... 9
Watch status ...................................................................................................................................... 11
Performing a Reset ........................................................................................................................... 12
Activities 14
About activities .................................................................................................................................. 14
Starting an activity ............................................................................................................................. 14
Pausing and stopping an activity ....................................................................................................... 15
Choosing which metrics to display .................................................................................................... 15
Settings for Running activities ........................................................................................................... 17
Settings for Cycle activities ............................................................................................................... 17
Settings for Swimming activities ........................................................................................................ 17
Settings for Treadmill activities .......................................................................................................... 18
Training programs ............................................................................................................................. 20
About training programs ............................................................................................................... 20
none ............................................................................................................................................. 20
Goals ............................................................................................................................................ 20
Intervals ........................................................................................................................................ 21
Laps .............................................................................................................................................. 22
Zones ........................................................................................................................................... 22
Race ............................................................................................................................................. 25
Using the stopwatch .......................................................................................................................... 26
Tracking your activities ...................................................................................................................... 27
Settings 28
About settings .................................................................................................................................... 28
Clock .................................................................................................................................................. 28
Sensors ............................................................................................................................................. 28
Testing a heart rate sensor .......................................................................................................... 29
Phone ................................................................................................................................................ 29
Airplane mode ................................................................................................................................... 30
Options .............................................................................................................................................. 31
Profile ................................................................................................................................................ 31
Standards .......................................................................................................................................... 32
2
Page 3

Adding sensors 33
About sensors.................................................................................................................................... 33
External Heart Rate Monitor .............................................................................................................. 33
Cadence or Speed Sensor ................................................................................................................ 34
TomTom MySports account 38
TomTom MySports Connect 39
TomTom MySports mobile app 40
Addendum 41
Copyright notices 44
3
Page 4
Welcome
This Reference Guide explains everything you nee d to know about your new TomTom GPS Sports
Watch.
If you want a quick read of the essentials, we recomm end that you read the Getting started
covers downloading TomTom MySports Connect and using the desk dock.
After that, if you have a smartphone, you will probably want to download the TomTom MySports app
for free from your usual app store or by going to tomtom.com/app
Important: Before using the MySports app on your smartphone, you need to link your watch to your
MySports account using a computer. This needs t o be done only once.
For information about what you see on the watch, go t o:
Here are some good starting points:
What's new in this release
About your watch
Starting an activity
Training programs
Settings
Tip: There are also frequently asked questions (FAQs) at tomtom.com/support. Select your product
model from the list or enter a search term.
We hope you enjoy reading about and, most importantly, achieving your fitness goals using your new
TomTom GPS Sports Watch!
.
page. This
4
Page 5

What's new
What's new in this release
New Freestyle activity type
For TomTom Multi-Sport owners, you can select a freestyle, GPS enabled activity type for any
non-running, cycling or swimming activities, so you keep a clean history/totals for the main activity
types.
To learn more, go to About activities
New Race This Feature
Race against a specific activity using the MySports Race this button.
To learn more, go to Race
in this guide.
in this guide.
5
Page 6
Getting started
Before you start training, it's a good idea to charge your watch, download any software updates and
download QuickGPSfix.
Note: QuickGPSfix helps your watch get a GPS fix and find your location quickly.
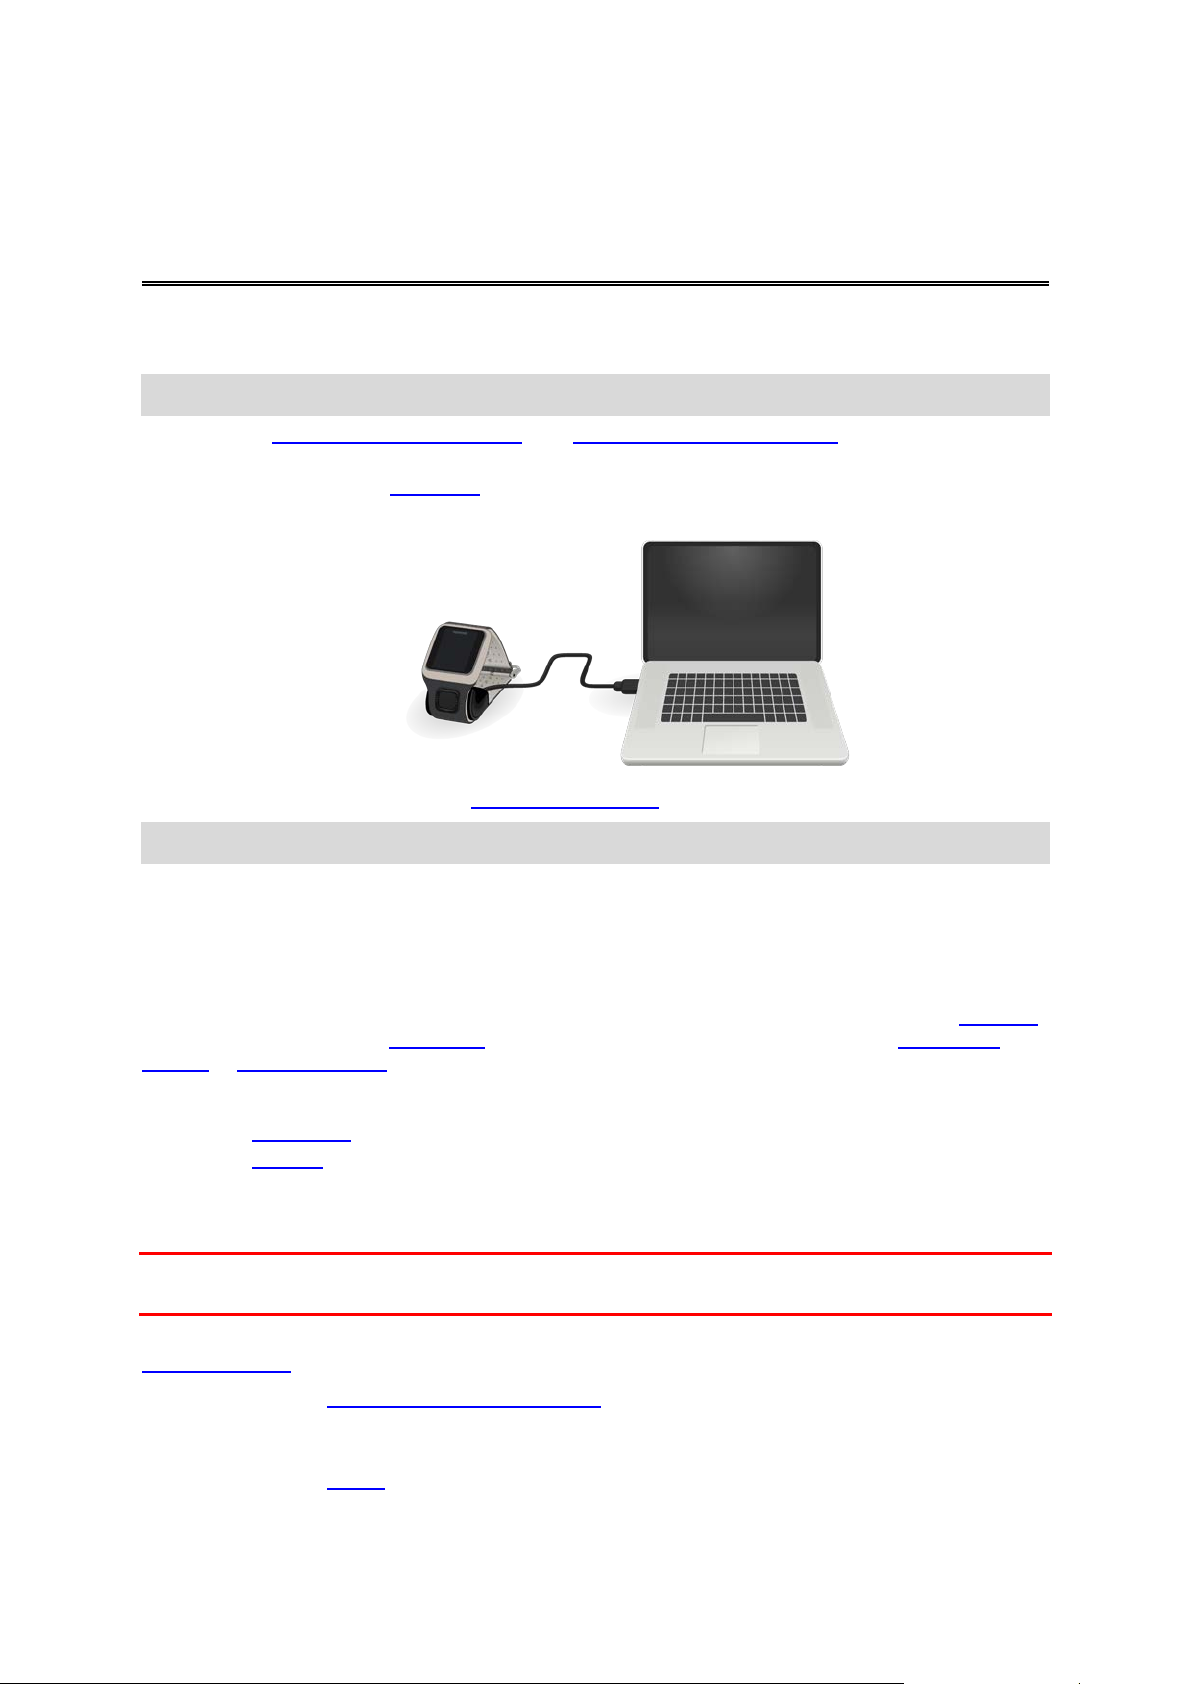
1. Download TomTom MySports Connect from tomtom.com/getstarted/sports and install it on your
computer. TomTom MySports Connect is availabl e for free.
2. Place your watch in the desk dock and connect the dock to your computer.
Follow the instructions that TomTom MySports Connect gives you.
After your watch is charged, you can start your first activity.
Tip: Your watch is fully charged when the battery ani m ation stops moving and shows a full battery.
You should connect your watch to your computer regularly to charge it, upload activities, download
software updates and download QuickGPSfix information.
Battery life
When the battery is fully charged, your watch can be used for up to 10 hours of activities that need
GPS reception, such as running and cycling. The b at tery is used more quickly if you use the backlight
on your watch frequently or all the time, or connect the watch to sensors, such as the Heart Rate
Monitor or Cadence Sensor.
The following tips will help your watch go longer on a battery charge:
Turn off night mode
Turn off sensors that you are not using. Your watch k eeps searching for sensors even if you are
not using a sensor.
TomTom MySports app
Important: Before using the MySports app on your s martphone, you need to link your watch to your
MySports account using a computer. This needs t o be done only once.
You can download the TomTom MySports app for free from your usual app store or by going to
tomtom.com/app
To learn more, go to TomTom MySports mobile app in this guide.
.
and touch the screen to turn on the backlight only when you need it.
Pairing your watch with your phone
To learn more, go to Phone
in this guide.
6
Page 7
Your watch
About your watch
When you use your watch, you start from the clock screen. This screen shows the time and date. The
hour number is shown slightly dimmed and the minut es ar e shown brighter so you can see the precise
time more clearly.
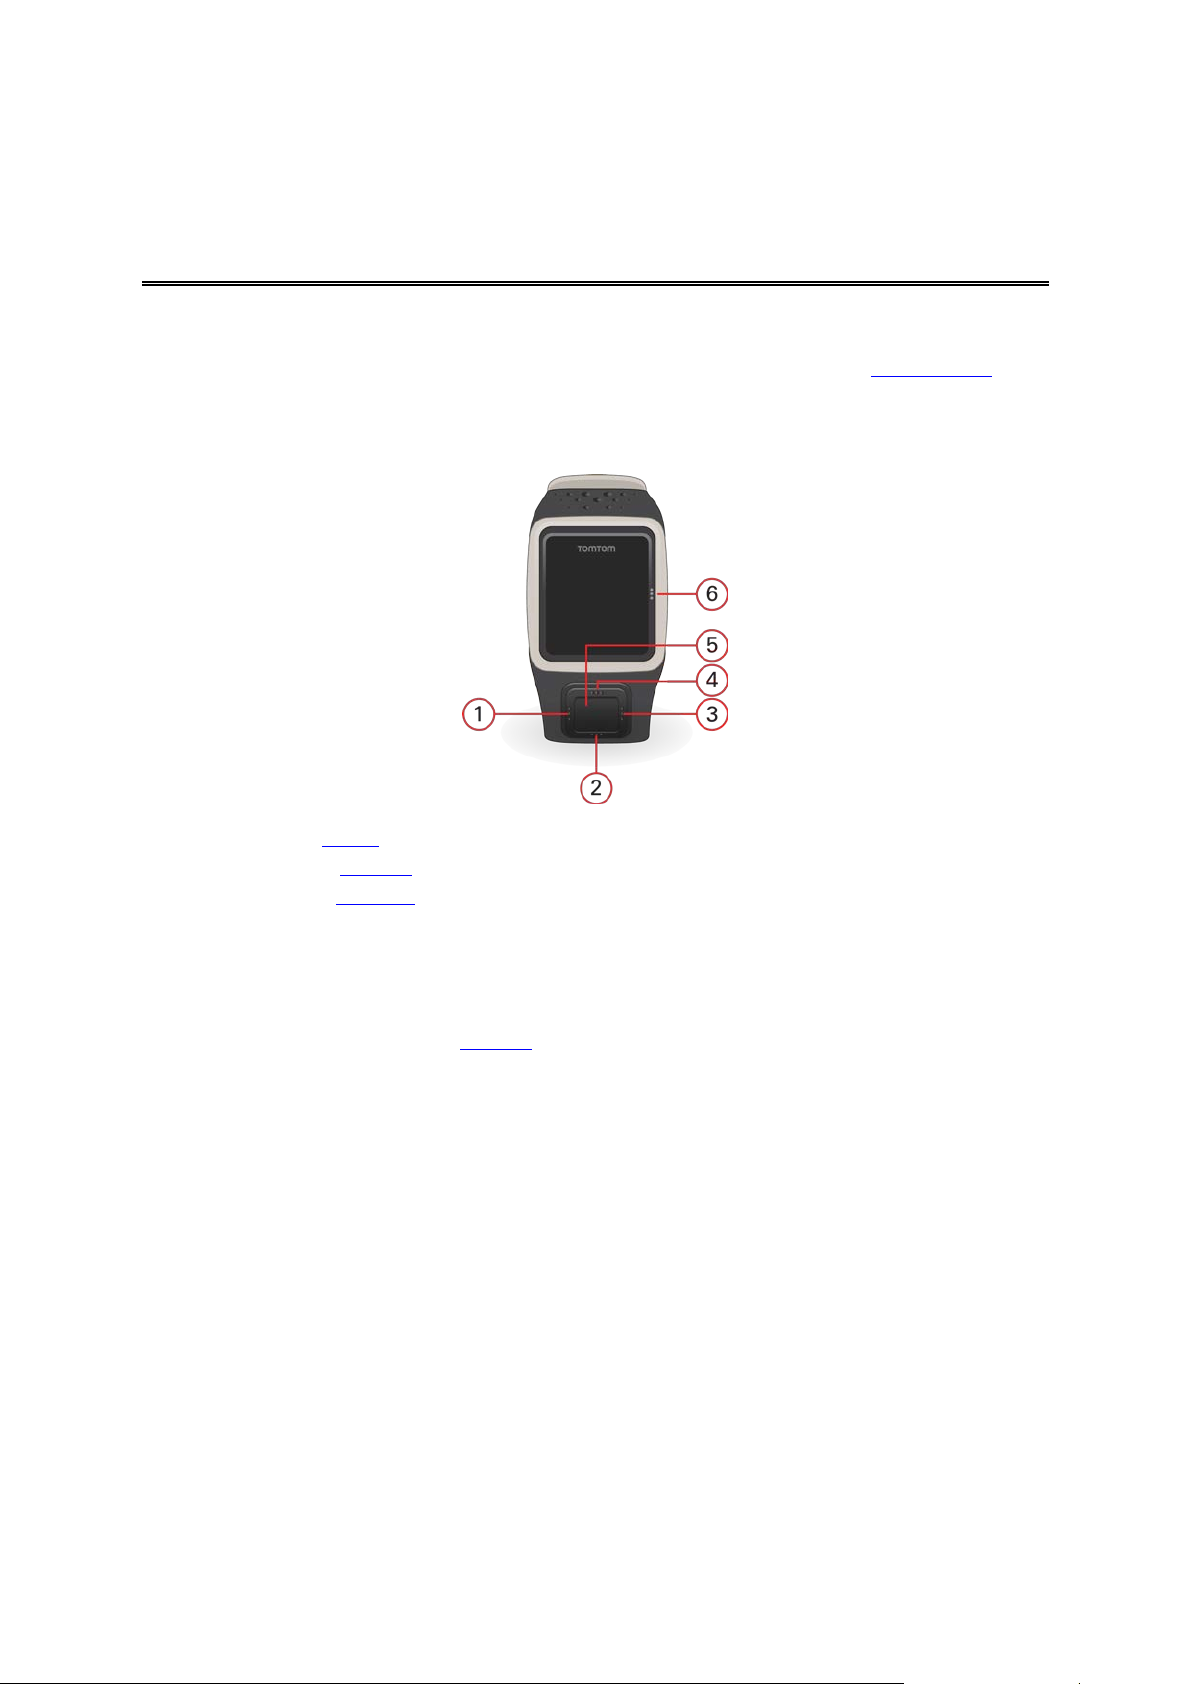
Use the button to move up, down, left or right to other screens on your watch.
1. Left - opens the Status screen.
2. Down - opens the Settings menu.
3. Right - opens the Activities menu.
4. Up - from the clock, moving up doesn't open another screen.
5. GPS receiver. While you train, the GPS receiver should face upwards.
6. Touch this area of the screen to turn on the backlight .
The clock screen shows the time and date. You can choose to show the time in 12 hour or 24 hour
format by moving down to open the Settings
Using your watch
Move up or down to select items in a menu.
Move right to select an item and open the menu for that item.
Move left to exit a menu.
To select an option in a menu, make sure it is highlighted when you leave the menu. Your watch
remembers the option you highlighted.
If an option in a menu switches on and off, move right to change the setting.
menu, then selecting Clock.
Wearing your watch
Built-in Heart Rate Monitor
The built-in Heart Rate Monitor in the TomTom Runner Cardio and the TomTom Multi-Sport Cardio
uses the reflection of light through the skin to pick up y our heartbeat. The way you wear your watch is
important because it can affect the performance of the Heart Rate Monitor:
7
Page 8
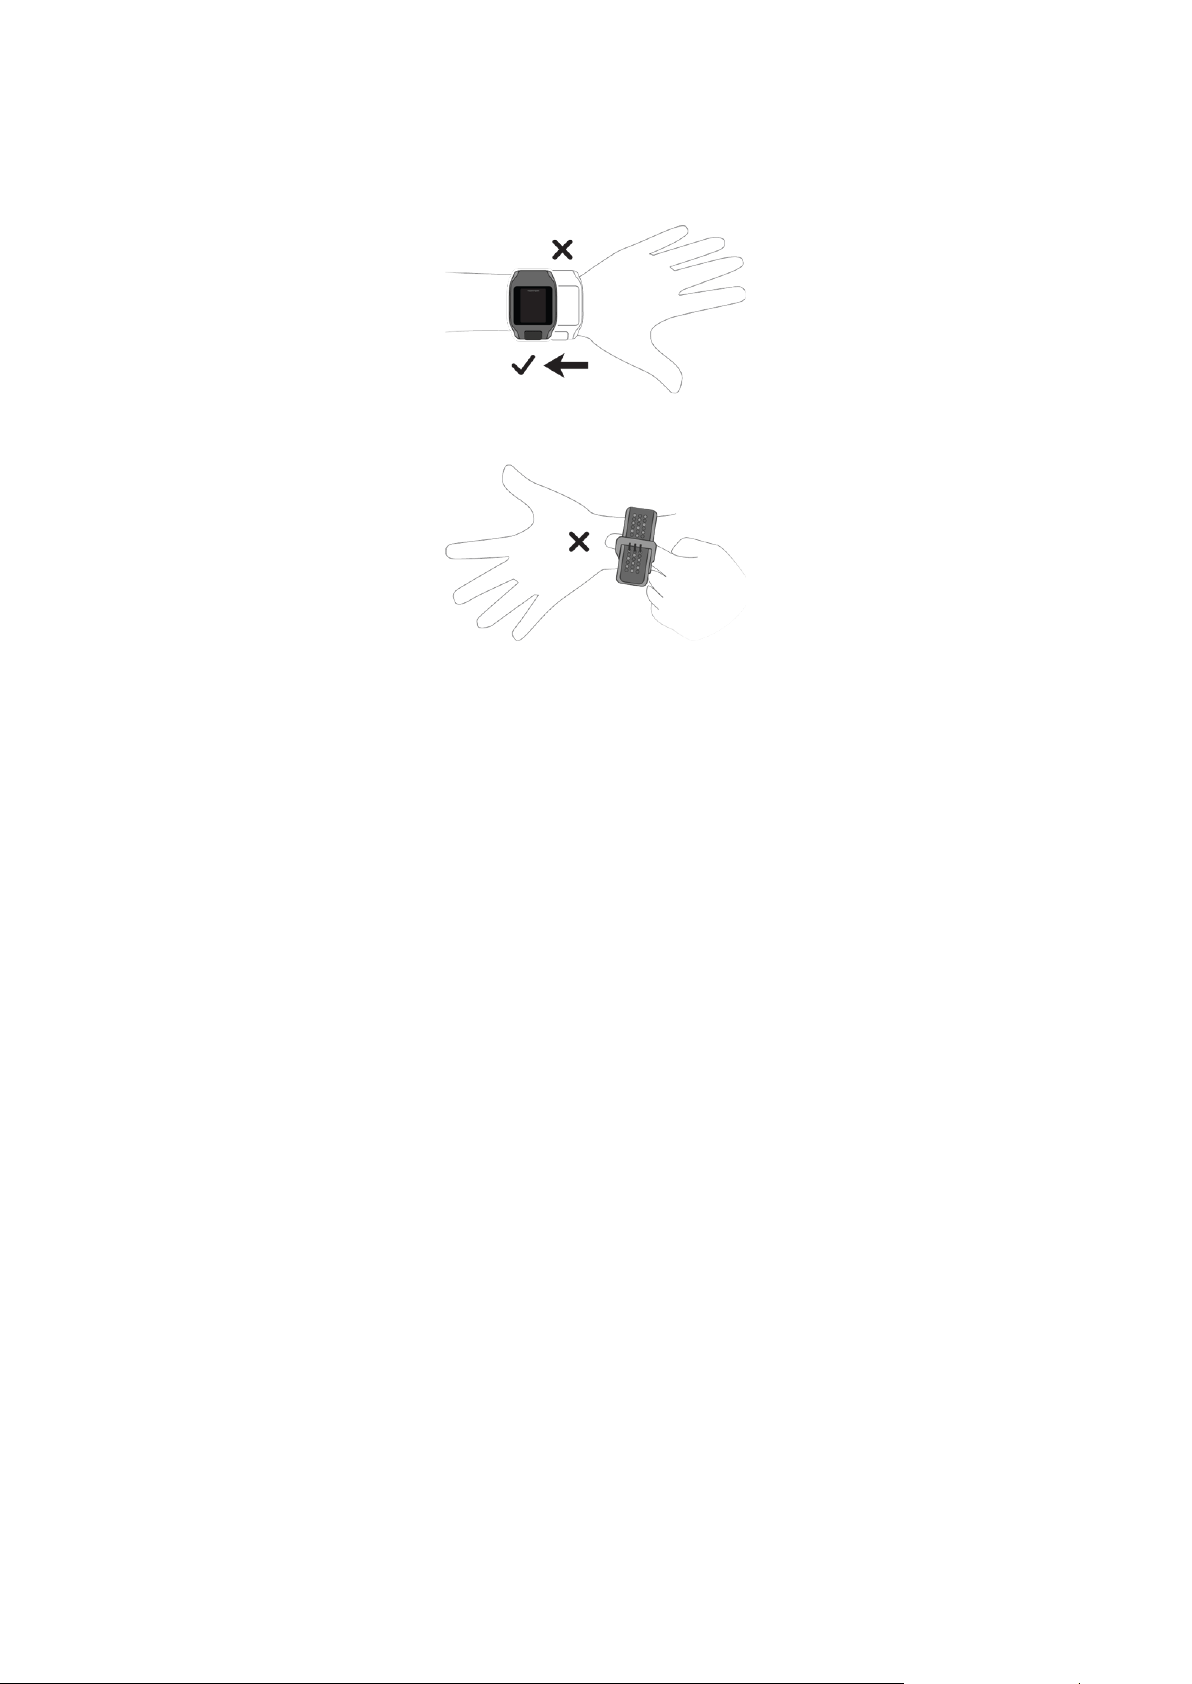
Wear the watch in the normal way, with the watch fa ce on t op of your wrist and the bottom of the
watch touching your skin, away from the wrist bone.
Do the strap up so that it is tight to your wrist without being uncomfortable.
You get the most accurate results from the heart rate monitor when you are warmed up.
Cleaning your watch
It is recommended that you clean your watch once a week if you use it frequently.
Wipe the watch with a damp cloth as needed. Use mild soap to remove oil or dirt.
Do not expose your watch to strong chemicals such as gasoline, cleaning solvents, acetone,
alcohol, or insect repellents. Chemicals can dam age the watch’s seal, case, and finish.
After swimming, rinse your watch with tap water and dry it with a sof t cloth.
If your watch has a built-in heart rate monitor, also do the following:
Clean the sensor area and connection pads with mild soap and water as needed.
Do not scratch the sensor area. Protect it from damage.
The heart rate monitor
If your watch has an integrated heart rate monitor, it can help you train more efficiently.
You can choose to use the built-in heart rate monitor, an external one mounted on your bike
handlebars for example, or not to use a monitor at all.
How the monitor works
Your heartbeat is measured by using light to measure changes in your blood flow. This is done on the
top of your wrist by shining light through the skin onto t he capillary veins just below the skin and
detecting the changing light reflections.
The performance of the heart rate monitor is not affected by skin type, body fat percentage or body
hair. It IS however affected by how you wear the watch on your wrist and by whether you have
warmed up or not.
Using the heart rate monitor
To get the best performance from the heart rate moni tor, follow these tips:
8
Page 9

Wear the watch in the normal way, with the watch fa ce on t op of your wrist and the bottom of the
watch touching your skin, away from the wrist bone.
Do the strap up so that it is tight to your wrist without being u ncomfortable.
You get the most accurate results from the heart rate monitor when you are warmed up.
Note: The monitor cannot measure your heart rate while you are sw i m mi ng.
Using the desk dock
You can use the desk dock when your watch is in the wrist stra p or you can remove your watch from
the wrist strap first.
To remove the watch from the wrist strap, hold the watch in one hand and lift the strap upwards, away
from the watch. The wrist strap pops off the front of the watch.
To place your watch in the desk dock, slide the watch into the dock, following the curve of the back of
the watch.
To remove your watch from the desk dock, push und erneath the screen of the watch. The watch will
slide out, following the curve of the back of the watch. Do not lift the watch from the top, as this can
damage the desk dock.
Using the bike mount
Note: The bike mount is included with some products and available as an accessory for others.
The bike mount consists of a holder for your watch and a handlebar strap to attach the clip to your
handlebars.
To use the bike mount, do the following:
1. Attach the handlebar strap to the back of the holder.
Tip: The strap has two holes so that it fits different sizes of handlebars. Select the hole that fits
your handlebars best.
9
Page 10

2. Place the strap on your handlebar and wrap it around t he bar.
3. Use the clip on the bottom of the holder to attach the handlebar strap to it.
The strap should now be attached securely aroun d the handlebar.
4. Remove your watch from the wrist strap and place it in t he holder. Make sure it clips securely into
place.
10
Page 11

5. Close the handlebar strap over the top of the watch, attaching it to the top of the holder using the
clip.
Watch status
From the clock screen, move left to open the stat us screen.
The status screen shows the following information:
Battery - the battery power left on your watch.
To charge the battery, place the watch in the desk dock and connect the dock to your computer
Storage - the amount of free space available on your watch.
If you are running out of space, connect your watch to your computer. TomTom MySports Connect
transfers the workouts or activities to your comput er. You can choose to have activities upload ed
automatically to your account on the TomTom My Sports website, or another website you have
chosen.
.
Tip: The history, which is the summary of your workout, remains on your watch.
QuickGPS - the status of the QuickGPSfi x information on your watch.
QuickGPSfix helps your watch find your precise location quickly so that you can start your activit y.
To update the QuickGPSfix information on your w atch, connect your watch to your computer.
TomTom MySports Connect automatically updates QuickGPSfix on your watch. QuickGPSfix
information is valid for three days after you do wnload it.
These symbols are used to show the status of QuickG PSfix:
QuickGPSfix on your watch is up to date.
QuickGPSfix on your watch is out of date. If the QuickGP S fix
information on your watch is out of date, your wat ch s till works as usual.
or
It may, however, take longer to get a GPS fix when you want to
activity.
start an
If you see this icon, you are using a very old version of the softwar e and
should update your watch as soon as possible.
Version - the software version number and serial number of y our watch. You may need this
information if you contact Customer Support. Every time you connect your watch to your computer, TomTom MySports Connect checks if a software update is available for your watch.
11
Page 12

Performing a Reset
Soft reset
A soft reset is performed each time you disconnect your GPS Sports watch from a wall charger or
computer.
To perform a soft reset on your watch, follow these steps:
1. Connect your watch to a wall charger or computer.
Wait until your watch shows a battery symbol.
If you are using a computer, wait until MySports Conn ect finishes updating your watch.
2. Disconnect your watch from the wall charger or com puter.
The software on your watch restarts. This performs a soft reset on your watch.
Recovery mode
The recovery mode allows you to reinstall the software on your watch without deleting any personal
data and settings.
To perform a reset on your watch using the recovery m ode, f ol l ow these steps:
1. Connect your GPS Sports watch to your computer an d wait unt i l M ySports Connect finishes
updating your watch.
2. On your watch, move DOWN but keep the button pressed.*
3. Disconnect the USB cable from your computer.*
4. Keep pressing the button until your watch shows a watch connected with a computer and
tomtom.com/reset.
5. Release the button and connect the USB cable to your comput er.
6. Click Update in MySports Connect.
* If the USB port on your computer is not easily accessible, connect the dock to the computer without
the watch. Then move down from the clock screen while you slide the watc h i nto the dock.
Factory reset
Important: When you perform a factory reset in MySp orts Connect, all personal data and settings,
including your export settings for MySports Connect , are deleted from your watch. This action cannot
be undone.
You should only use a factory reset as a last resort to resto re your watch or if you really want to
remove all your data and settings.
A factory reset reinstalls the software on your watch and this removes the following:
Your activities.
Your settings on the watch.
Your settings for uploading activities in MyS port s Connect.
Important: When you perform a factory reset, do not di sc onnect your watch before MySports Connect
has finished restoring your watch. This takes several minutes. Check any messages shown in
MySports Connect and on your watch before you disconnect your watch.
To perform a factory reset on your watch, follow these steps:
1. Connect your GPS Sports watch to your computer an d wait unt i l M ySports Connect finishes
updating your watch.
2. Expand SETTINGS in MySports Connect.
3. Click FACTORY RESET at the bottom of MySports Connect.
MySports Connect downloads the latest version of the soft ware for your watch.
4. Keep your watch connected when the window for My S port s Connect closes.
12
Page 13

MySports Connect installs the software on your watch.
5. Keep your watch connected when the window for My S port s Connect opens again.
6. Follow the instructions in MySports Connect to setup y our watch.
Note: The settings for exporting and uploading activities in MySports Connect are stored on your
watch. If you set up your watch to transfer activiti es t o additional sports websites or file formats,
you'll need to set these up again on the UPLOAD & EXPORT tab.
13
Page 14

Activities
About activities
In the activities menu, you can start one of the activ i t i es av ai l able on your watch:
Run
Cycle
Swim
Treadmill
Freestyle
Stopwatch
Note: Not all activities are available on all watches.
When you select Run, Cycle or Freestyle, your watch uses its internal GPS receiver to measure your
speed, and to record the route you have taken.
If your watch has a heart rate monitor and the heart r at e sensor
during your activity. This includes running, cy cling, treadmill, and freestyle.
When you select Swim or Treadmill, your watch uses its internal motion sensor to measure your
strides on the treadmill, and strokes and turns in the swimming pool. Your watch uses this information
to estimate your speed and the distance you have cov ered.
Select Freestyle when you want to do an activity other than runnin g, cycling or swimming. This means
that you can keep clean histories and totals for running, cycling and swimming.
Calories for the freestyle activity are based on heart r ate. For other activities, calories are linked to that
specific sport, but for freestyle, the watch doesn’t know which sport you are doing. Therefore when no
heart rate measurement is available, calories ar e not shown for the freestyle activity.
When you select Stopwatch, you can use your watch to show elapsed time, mark laps an d see times
for your current and previous laps.
is set to ON, your heart rate is shown
Starting an activity
To start an activity on your watch, do the following.
1. From the clock, move right.
2. Select one of the activities, then move right.
Run
Cycle
Swim
Treadmill
Freestyle
Stopwatch
Note: Not all activities are available on all watches.
3. For Run, Cycle and FreeStyle activities, unt il your watch has a GPS fix, you see the message
Please wait, and the GPS icon flashes in the bottom left hand corner of the screen. When it's
ready to start an activity, your watch shows the message GO and the GPS icon stops flashing.
14
Page 15

For Cycle activities, if y ou are using a cadence sensor, once your watch is connected to the
sensor, your watch shows the message GO. The c adence sensor is then used to provide speed
and distance information about your activity. Your watch may not have a GPS fix at this point. If
you would like to track the route of your activity, wait until the GPS icon stops flashing before
starting your activity.
Note: It can take a moment to find your GPS position, especially t he first time you use your
watch or if the QuickGPSfix information is not up t o date. Moving does not speed up getting a fix
so stay still and wait until your position has been found.
To ensure good GPS reception, make sure you are outdoors with a clear view of the sky. Large
objects such as tall buildings can sometimes interfere with reception.
If your watch has a heart rate monitor, you may see a m essage saying "Warm up" at the start of
an activity while your watch gets a GPS position. T hi s is because the monitor performs most
accurately when you are warmed up with good circulation in your arms.
From this screen, move in one of these directions to choose an option:
Right - start your activity, once your watch has a GPS fix.
Down - select a training program or set the inform ation displayed while you train.
Up - see your past activities.
Left - go back to the list of activities.
Move right to start your activity.
4. When you are doing an activity, your watch shows information, such as the distance, time, pace,
and heart rate if you have a monitor. Move up and down to change the information that you see.
5. You can pause the activity if you're just taking a break, or stop
the activity completely.
For each type of activity, you can select different training programs and select to see different
information while you are training.
Pausing and stopping an activity
During an activity, move left to stop the clock and pause your activity.
Note: If the activities screen Lock is on, you see a timer screen when you move left. Hold the button
until the timer screen has gone. Your activity is then paused or stopped. You can turn Lock on and
off in the Options settings.
To restart the activity again, move right.
To stop the activity completely, move left to pause the activity, then move left again.
Choosing which metrics to display
Before you start an activity you can choose a training program and also decide what information you
would like to see as you train.
While you train, three different metrics are avail able at any one time:
One main metric is shown in a larger figure in the main part of the screen.
Two minor metrics are shown in smaller figures at the top of the screen.
Changing the main metric
As you train, you can change the information shown by t he larger figure by moving up and down. The
text underneath the main metric shows which info rmation is currently being displayed.
Setting the minor metrics
Do the following to choose the information shown by t he smal ler figures:
1. From the activity start screen, move down to the Settings menu.
15
Page 16

2. Select Metrics, then move right.
. When your watch is trying to connect to the Heart Rate Monitor, the
3. Select Display, then move right.
4. Select Left or Right to set the metric shown on the left or the right.
5. Select the metric to be displayed from the list.
The metrics that are available depend on your curren t activity.
Some examples of metrics available:
Pace - your current pace.
Average pace - your average pace for the current activity.
Lap time - the length of time taken for the current lap .
Lap distance- the distance covered in the current lap.
Ascent - the total you have climbed while cycling. T his metric is only available if your watch has a
built-in barometric sensor.
Tip: Move left from the clock screen. If your watch has a serial number starting with "HD" or "HF,"
your watch has a barometric sensor.
Gradient - the degree of slope of the ground on whi ch you are cycling. This metric is only
available if your watch has a built-in barometric sensor.
Heart rate - your heart rate. This metric is only available if you have a Heart Rate Monitor
connected.
Speed, Pace or Both - for activities other than swimming, you can choose to see speed, pace or
both metrics at once.
SWOLF - this metric is only given for swimming activities. The S WOLF score is calculated by
adding the time in seconds and the number of strokes you make to swim one length of the pool.
SWOLF shows your swimming efficiency. The lower the score, the better. The word SWOLF is a
portmanteau of swimming and golf.
Icons on the screen
The following icons can be shown along the bottom of the screen while you are training:
This symbol shows the strength of GPS reception. While your watch is
looking for GPS satellites, the satellite images f lashes.
The heart symbol shows that your watch is connected to a Heart Rate
Monitor
heart flashes.
The chainring symbol shows that your watch is connect ed to a Cadence
Sensor. When your watch is trying to connect t o the Cadence Sensor, the
chainring flashes.
This symbol shows the battery status.
16
Page 17

Settings for Running activities
Before you start an activity you can choose a training program and also decide what information y ou
would like to see as you train.
There are a wide range of metrics that you can choose to see while running including calories, heart,
heart rate zone, and distance.
Note: To get help on choosing which metrics you want to see during an act i vity, see Choosing
which metrics to display.
To choose to see just one metric for speed, average speed, pace, or average pace, move down to the
Settings menu. Select Metrics, then move right. Select Speed, Avg. Speed, Pace, or Avg. Pace.
To choose to see speed, pace, or both metrics, move down to the Settings menu. Select Metrics,
then move right. Select Speed, then move right. Select Speed, Pace or Both.
Settings for Cycle activities
Note: Cycle is available on the TomTom Multi-Sport.
You can log your heart rate, speed, and location using the integrated sensors when cycling.
If you want to review your performance while cycling, in the interest of your own safety it is best to
mount the GPS watch using the supplied bike mount
bars.
so that you can keep both hands on the handle
If you want to review your heart rate while cycling, we recommend connecting an optional external
heart rate sensor so that you can review your heart r ate safely.
Setting the wheel size for use with a cadence sensor
If you are using a cadence sensor
, you should set the Wheel size setting to increase the accuracy of
the metrics provided by the sensor. This sett ing is the circumference of your rear tire in millimet ers
(mm).
To set your wheel size, do the following:
1. From the activity start screen, move down to open the Settings menu.
2. Select Wheel size, then move right.
3. Set the size so it's correct for your rear wheel.
To find the circumference of your rear wheel, you can either measure the wheel yourself using a tape
measure or look up the value in an online calculator. For example, on this site you can find the
circumference using the diameter of the wheel and the thickness of the tire:
www.bikecalc.com/wheel_size_math
For example, if your wheel size is 700c and the tires are 25 mm thick, the circumference is 2111 mm.
This is the value you should enter.
Note: To get help on choosing which metrics you want to see during an act i vity, see Choosing
which metrics to display.
Settings for Swimming activities
Note: TomTom Runner Cardio and TomTom Multi-Sport Cardio are water-resistant. You can swim
with these watches. However, the built-in Heart Rat e Monitor does not work under water.
Before you start a swimming activity, you should check two settings:
The Pool size setting for the pool in which you are swimming. Thi s setting is the length of the pool
in meters or yards.
17
Page 18

The Wrist setting for the wrist you wear your watch on.
As you swim, your watch registers your strokes and the number of turns you make in the pool. To
calculate the distance you have swum and your spee d, your watch uses the pool size and the number
of turns you have made. If the pool size is not accurate, the metrics for your swimming activity cannot
be worked out correctly. Your watch needs to know which wrist you wear your watch on so it can
register your strokes.
To change the Pool size and Wrist settings, do the following:
1. From the activity start screen, move down to open the Settings menu.
2. Select Pool size, then move right.
3. Set the size so it shows the correct length for the pool .
4. Move left to go back to the Settings menu.
5. Select Wrist, then move right.
6. Change the setting to the wrist on which you wear y our w atch, if necessary.
7. Move right to go immediately back to the activity screen.
When you select Swim, your watch does not use its internal GPS receiver.
To set other metrics, such as strokes, do the followin g:
1. From the activity start screen, move down to the Settings menu.
2. Select Display, then move right.
3. Select Left or Right to set the metric shown on the left or the right.
4. Select the metric to be displayed from the list, suc h as Strokes or Lengths.
Settings for Treadmill activities
Your height is set on the very first use of your watch. Before you start an activity on the treadmill for
the first time, you should check that your height has been set correctly. You can do this in your
TomTom MySports account or on your watch.
As you run on a treadmill, your watch registers the nu m ber of times you swing your arm back and forth
and how quickly. This matches the number of strides you make as you run. Your watch uses your
height to calculate the length of your stride, and from this the distance you have run and your pace.
To check your height on your watch, do the following:
1. From the clock, move down to open the Settings menu.
2. Select Profile, then move right.
3. Select Height, then move right.
4. Set your height.
Calibrating your watch for Treadmill activities
The distance measurements your watch makes for Treadmill activities are less accurate than for Run
activities. When you run outdoors, your watch us es GPS to measure the distance you cover.
If you calibrate your watch, the distance measurements for Treadmill activities become more acc urat e.
To calibrate your watch, do the following:
1. During your first Treadmill activity, run for a short time such as 1 m or 1 km, then pause your
watch and the treadmill.
To pause your watch, move left during the activity.
2. On your watch, move down to open the Settings menu.
3. Select Calibrate then move right.
4. Change the distance to 1 m or 1 km to match the distance shown on the treadmill.
5. Move right to go immediately back to the activity screen.
18
Page 19

Calibrating your watch at the end of a Treadmill activity
Every time you finish a Treadmill activity, your watch asks you if you want to calibrate the distance
measurement your watch has made with the distan ce measurement shown by the treadmill.
Select Yes to calibrate the distances. If you calibrate the distanc e, your activity record is more
accurate and the metrics for your training are mo re accurate.
Choosing other metrics to display
Note: To get help on choosing which metrics you want to see during an act i vity, see Choosing
which metrics to display.
To choose to see just one metric for speed, average speed, pace, or average pace, move down to t he
Settings menu. Select Metrics, then move right. Select Speed, Avg. Speed, Pace, or Avg. Pace.
To choose to see speed, pace, or both metrics, move down to the Settings menu. Select Metrics,
then move right. Select Speed, then move right. Select Speed, Pace or Both.
19
Page 20

Training programs
About training programs
For each type of activity, the following training programs are available:
None
Goals
Intervals
Laps
Zones
Race
From the clock screen, do the following to see the list of training programs:
1. Move right and then select your choice of activity.
2. Move right.
3. Move down and select Training.
4. Move right and choose a training program.
When you select a training program, your watch reme m bers which program you are using and any
options you have selected for that program.
Tip: If you want to start a program immediately after selecting it, move right to go st raight to the
activity screen.
none
How to get there: Activity screen > Move Down > Training > None
Select this option to do your activity without using a training program. In this mode, your watch records
your activity and shows metrics for your activity.
Goals
How to get there: Activity screen > Move Down > Training > Goals > Distance, Time or Calories
Select this option to set yourself training goals.
You can set yourself three types of goals:
Distance - select this option to set yourself a di st ance to cover in your activity.
Time - select this option to set yourself a duration for your a ct ivity.
Calories - select this option to set yourself a number of calories to burn during your activity. The
calories burned can be calculated more accuratel y if you set your profile
Watching your progress
To see an overview of your progress towards your goal, m ove right from the activity progress screen.
.
20
Page 21

This screen shows the percentage of your target you have rea ched and the remaining distance, time
or number of calories.
Tip: When running, you can head away from home until your progress reads 50% and then turn and
come back again.
Progress alerts
When training to a goal, your watch alerts you at t hese stages:
50%
90%
100%
110%
Intervals
How to get there: Activity screen > Move Down > Training > Intervals > Warmup, Work, Rest, # Sets,
or Cooldown.
Select this option to use interval training.
Interval training is short periods of exercise followed by rest. The main aim of interval training is t o
improve speed and cardiovascular fitness. For example, during a 20 minute walk-jog workout y ou
could do an 8 minute fast walk, followed by 3 sets of 1 mi nute running and 2 minutes walking, then a 5
minute walk to cool down.
For warm-up, work, rest and cool-down, you can set either a time or a distance. For sets, you choose
the number of sets you want to include in your interval training program.
Tip: If you move right after setting the warm-up details, you are t hen in the right place to set up the
rest of that interval set including work, rest, etc.
During interval training, you see an alert for the nex t stage of interval training:
21
Page 22

You see the name of what you are doing and how long this part of the set is in either time or distance.
You are also warned with beeps and buzzes when you need to switch to the next stage in your interval
training.
Laps
How to get there: Activity screen > Move Down > Training > Laps > Time, Distance, or Manual.
Select this option to measure your activity against set lap times, distances or by manually recording
when you complete a lap.
You can set up your watch to measure laps in three way s:
Time - select this option to set a duration for a lap. After you start your activity, your watch alerts
you when the time for each lap passes. If you set a lap t i me of 1 minute, your watch alerts you
each minute and the screen shows the number of laps co m pl eted.
Distance - select this option to set the length of a lap. After you start your activity, your watch
alerts you whenever you reach the target distance f or one lap. If you set a lap distance of 400 m,
your watch alerts you after each 400 m you cover and the sc reen shows the number of laps
completed.
Manual - select this option to record yourself when y ou complete a lap. To mark the end of a lap,
touch the right side of the watch screen, in the same place you touch to activate the backlight
Your watch shows the number of laps completed and alerts you that a lap is complete.
.
Zones
How to get there: Activity screen > Move Down > Training > Zones > Pace, Speed, Heart or
Cadence.
Select this option to train within a target zone.
You can select from the following training zones, depending on the activity:
Pace - select this option to set your target t i me per mi l e or kilometer. You can set your target time
and a minimum and maximum above and below the target that you allow yourself.
Speed - select this option to set your target speed and a margin above and below the target that
you allow yourself.
Heart - select this option to set your target heart rate using a custom heart rate zone or choose a
predefined heart rate zone. For your watch to be able to measure your heart rate, it must be
connected to a Heart Rate Monitor
.
Cadence - select this option to set your target cadence for your cycling activity. For your watch t o
be able to track your cadence, it must be connected to a Cad en ce Senso r. You can set your target
cadence and a margin above and below the target that you allow yourself. Not all watches are
able to connect to a cadence sensor.
22
Page 23

Setting a zone for Heart and Pace
If you want to set up a custom heart rate zone or a pace z one, choose a minimum and maximum as
shown below:
Setting a zone for Speed and Cadence
If you want to set up a speed or cadence zone, choose a target value and allowed percentage to
deviate as shown below:
Monitoring your progress
From the activity progress screen, move right t o see a graphical overview of how close your training is
to the zone you set. The graph shows if you are above or below your target zone and by how much,
throughout your activity.
You regularly receive alerts to tell you if you are in your zone or outside your zone:
If you are outside your training zone, an alert is playe d and the screen shows if you are above or
below your zone.
When you are back in your training zone, an alert is pl ayed and the screen shows a target symbol.
23
Page 24

Heart rate zones
Note: For your watch to be able to measure your heart rate, it must be connected to a Heart Rate
Monitor.
Your watch uses heart rate zone boundaries based on your age. Using TomTom MySports, you can
adapt these heart rate zone boundaries and they are then synchronized with your watch.
To train using a heart rate zone, do the following:
1. Move right from the clock screen and then select your choice of activity.
2. Move right.
3. Move down and select Training.
4. Move right and choose Zones.
5. Move right and choose Heart.
6. Move right and choose from the following heart rate zones:
Sprint - select this zone when using interval training.
Speed - select this zone for high tempo training to improve your speed and fitness.
Endure - select this zone for moderate to high tempo training to improve your lung and heart
capacity.
Fat Burn - select this zone for moderate tempo training that is great for weight loss.
Easy - select this zone for easy tempo training, mostly used f or warm-up and cool down.
Custom - select this option to set your own minimum and maximum heart rate.
Monitoring progress in a heart rate zone
Note: For your watch to be able to measure your heart rate, it must be connected to a Heart Rate
Monitor.
From the activity progress screen, move right t o sc roll through graphs showing how close your training
is to the zone you set. The graph shows if you are above or below your target zone and by how much,
throughout your activity.
The zone you are using is highlighted in white. Move right t o see t he heart rate zone summary.
24
Page 25

This graph, shown above, is a heart rate zone summary. It shows the percentage of time spent i n each
zone with your current zone highlighted in white.
This graph shows your heart rate over the last 2.5 minutes of activity.
Tip: You can view your progress in a heart rate zone ev en when you are using a Graphical Training
Partner like Race or Goal. During training, from the screen showing a main metric, move right to
see the graphical training screen. Move down to see the heart rate zone screens as described
above.
Race
How to get there: Activity screen > Move Down > Training > Race > Recent or MySports.
Select this option to race against one of your ten most recent act i vities or race against an activity from
the MySports website.
Tip: To add more races to the website, click RACE THIS on the activity details page for a
particular activity on the MySports website.
25
Page 26

Note: If your watch is already connected to the website and you make changes to your races, the
changes won’t get synchronized automatically - you need to disconnect and reconnect your watch.
The activity or race from the MySports website consists of a distance and a time.
When you use the Race training program, you can see if you are ahead or behind in the race and by
how much, as you train.
On your watch, move right from the activity screen t o see a representation of the race. The graphics
screen shows whether you, as shown by the black arrow, are pacing ahead or behind your previous
activity, as shown by the shaded arrow.
The distance at the top of the screen shows the rema i ning distance in the race, and the distance at the
bottom shows how much you are ahead or behind.
Your watch alerts you so you know whether you are in front (#1) or behind (#2) in your race. In this
example you are 23 meters (75 ft.) behind your previous activity and you have a remaining race
distance of 2.3 kilometers (1.4 mi).
Tip: To get information on adding previous activities to y our watch, go to tomtom.com/support and
read the FAQ.
Using the stopwatch
To use the stopwatch, do the following.
1. From the clock, move right.
2. Select Stopwatch, then move right.
Your watch shows an image of a stopwatch and the word "GO."
26
Page 27

3. Move right to start the stopwatch.
The stopwatch starts and shows the elapsed tim e.
4. To pause the stopwatch, move left. Move right to resume counting.
Tip: When paused, to see more of your previous laps, move down and move up.
5. To mark each lap, touch the right side of the watch screen whil e the stopwatch is running, or move
right.
The big number is the total elapsed time of all y our laps added together.
Your current lap time, for example lap 12 below, is sh own under the total elapsed time. Your
previous laps, here laps 11 and 10, are shown under your c urrent lap.
To see more of your previous laps, move down and move up.
6. To leave the stopwatch activity, move left two t i m es.
Tip: The stopwatch does not run in the background after y ou l eave the stopwatch activity. No
GPS information or activity information is stored.
Tip: To reset the stopwatch, leave the stopwatch activity and then go back into it again.
Tracking your activities
Whenever you train, your activity is logged by your watch for that type of activity. To see the summary
or history of your training for each type of activit y on your watch, do the following:
1. From the activity start screen, move up to open the History for that type of activity.
2. From the list, select the activity you want to look at. The list shows the date and time you
started the activity.
3. Move right.
Some basic information about the activity is sho wn. The information available depends on the
activity.
Transferring your activities to TomTom MySports
Connect your watch to your computer
another sports website that you choose, using T omTo m MySport s Conne ct. Y ou can also transfer
details about the activity to your computer in seve ral different file formats.
to transfer details of your activities to TomT om M ySports or
27
Page 28

Settings
About settings
From the clock screen, move down to open the Settings menu. Thes e settings determine the overall
behavior of your watch. For each activity, there are also settings related to that activity.
The following settings are available for your watch:
Clock
Sensors
Phone
Airplane mode
Options
Profile
Standards
These settings are available for activities:
Settings for Running activities
Settings for Cycle activities
Settings for Swim activities
Settings for Treadmill activities
Clock
From the clock screen, move down to open the Settings menu, then select Clock and move right to
open the Clock menu.
Alarm
Select Alarm to turn the alarm on and off and to set the alarm time.
When the alarm goes off, you can choose to stop it or sno oze. If you snooze the alarm, it goes off
again in 9 minutes.
Time
Select Time to set the time on your watch. The time is either set using t he 12- or 24-hour clock,
depending on the setting for 24HR.
Date
Select Date to set the date on your watch.
24HR
Select 24HR to switch between using the 12-hour clock and the 24-hour clock to di splay and set the
time. Move right to switch between ON and OFF for this setting.
Sensors
From the clock screen move down to open the Settings menu, the n select Sensors and move right to
open the Sensors menu.
You can turn on and off two types of sensors:
28
Page 29

Heart - this is a built-in or external heart rate monitor.
Bike - this is a cadence and speed sensor.
Tip: To help your watch last for up to 20% longer on a battery charge, turn off sensors that you are
not using. Your watch keeps searching for sensor s even if you are not using a sensor.
You can check if a heart rate monitor or sensor is working without having to start an activity. See
Testing a heart rate sensor
.
Testing a heart rate sensor
You can check if a heart rate monitor or sensor is working wit hout having to start an activity. Do the
following:
1. From the clock screen move down to open the Settings menu.
2. Select Sensors and move right to open the Sensors menu.
3. Select Heart and move right.
You see ON, OFF, or EXTERNAL. If the setting is set to ON or EXTERNAL, you see bpm, which
means that your heart rate is measured in beats per m inute.
You then see either your heart rate shown immediately or dashes which blink to show that your
watch is searching for the heart rate sensor.
Tip: When the heart rate is detected, the monitor stays acti ve for another 30 seconds in case you
want to start an activity right away.
Phone
For information as to why you should want to pair your watch with your phone or mobile device, see
TomTom MySports app
To pair your watch with a phone or mobile device, do the f ol l owing:
1. Make sure that your phone or mobile device is cl ose by.
2. On your phone, make sure that Bluetooth is enabled.
3. From the clock screen on your watch, move down t o open the Settings screen, then select Phone
and move right.
4. Move right to start pairing.
5. On your phone, start the MySports Connect app and tap t o connect.
.
6. When the name of your watch appears, tap on it.
7. On your phone, enter the pin number shown on the wa t ch, then tap Pair.
Your watch is now paired with your phone or mobile device.
29
Page 30

When pairing has been completed, you see a "Connected" message on your watch.
As long as you have the mobile app active or running in the background on your phone or mobile
device, the watch automatically tries to connect when it has a new activity to upload or when the
QuickGPSfix data is out of date.
If you open the MySports app on your phone and it is trying to connect to your watch, you may
need to wake up your watch by moving away from the clock screen. Move down, left or right from
the clock screen.
Synchronizing your activities
You can automatically upload your activities to your TomTom MySports account by using this sett i ng.
From the clock screen on your watch, move down t o open the Settings screen, then select Phone
and move right.
Select Sync. If automatic uploading is currently switched OFF, move up or down to switch automatic
uploading on.
Airplane mode
From the clock screen on your watch, move down t o open the Settings screen, select Airplane mode
and then move right.
Move up or down to switch on airplane or flight mode.
When airplane mode or flight mode is switched on, an airplane icon is shown on the clock screen and
all Bluetooth low energy (also known as BLE or Bluetoot h® Smart) connectivity is disabled.
To switch airplane mode off, move up or down again.
30
Page 31

Options
From the clock screen, move down to open the Settings menu, then select Options and move right to
open the Options menu.
Units
Select Units to set the distance and weight units used on your watch. You can select any combination
of miles or kilometers, and pounds or kilograms.
Click
Select Click to set what your watch does as you move through menus. Your watch can do the
following:
Make a clicking sound.
Vibrate/buzz for short time.
You can turn both on or off, or turn only one on.
Demo
Select Demo to turn the demo mode on and off. In demo mode, your watch behaves as if it has a GPS
fix and you are training, even if you are not. Any activi ties completed in demo mode are not added to
your history of activities.
Night
Select Night to turn the night mode on or off. If the night mode is on, the backlight
comes on and stays
on during an activity. When you stop the activity, the light goes off again.
Note: The battery will run down much more quickly than normal if you use t he night mode while
training.
Lock
Select Lock to turn the activity lock function on and off. The lock function prevents your current activity
from being paused or stopped
if you accidentally move left.
Profile
From the clock screen on your watch, move down to open the Settings menu, then select Profile and
move right to open the Profile menu.
Select the following options to set your data in each case:
Weight
Height
Age
Sex
Information from your profile is used for the followi ng:
To work out the number of calories you burn during an activity.
To set the target heart rates for you in the heart rat e t raining zones
your TomTom MySports account.
To work out your stride length if you are training on a t readmill.
. The zones are worked out by
Language
Select Language to set the language used for menus and messages on your watch.
31
Page 32

Standards
To see certification information on your watch, m ove down from the clock screen to open the Settings
menu.
Select Standards and then move right to scroll through the certification information.
32
Page 33

Adding sensors
About sensors
Sensors are external devices which you can link to y our watch to provide information about your
activity. Two types of sensors can be used with your watch:
External Heart rate monitor - this measures your heart rate as you t rain. The external TomTom
Heart Rate Monitor is included in some products and available as an accessory for others.
Cadence/Speed sensor - this measures your cadence and speed as you cycle. The TomTom
Cadence Sensor is included in some products and avai labl e as an accessory for others. TomTom
Runner does not support the Cadence Sensor.
Cadence
Cadence measures the rate at which you pedal in revolut i ons per minute (rpm). In a low gear, you may
have a very high cadence but a lower speed. In a high gear, you may have a low cadence but a higher
speed. Cyclists train to find the balance betwe en cadence and speed which allows them to cycle as
efficiently as possible.
External Heart Rate Monitor
To use the external TomTom Heart Rate Monitor with your watch, do the following:
1. Attach the monitor to the strap.
2. Attach the strap around your chest, so the monitor sits just above the base of your breastbone.
Make sure the monitor is the right way up so that the word "TomTom" is the right way up for
someone standing in front of you.
Tip: Wet the sensors on the inside of the strap before placing it around your chest. This makes it
easier for the monitor to pick up your heartbeat.
3. From the clock screen on your watch, move down.
4. Select Sensors then move right.
33
Page 34

5. Select Heart, then move right to turn it on.
6. When you begin an activity, your watch connects to t he m onitor and you see a heart icon at the
bottom of the screen.
When your watch is trying to connect to the monitor, the hea rt f l ashes.
If your watch finds more than one monitor the first time it tries to connect to your monitor, your
watch doesn't know which monitor to connect to. Move to a place where there are no other
monitors within range of your watch.
When you have connected to your monitor once, your watch always reconnects to your monitor.
While you train, you can choose to show your heart rate.
You can also use a training program to train to a target heart rate zone
.
You can also use the external Heart Rate Monitor with ot her B l uetooth® Smart Ready devices and
apps. See the documentation that comes with your pr oduct or app for more information.
To change the CR2032 battery in the monitor, use a coin t o open the back of the monitor. The battery
must be recycled or disposed of according to local laws a nd regulations.
Cadence or Speed Sensor
The TomTom Cadence/Speed Sensor consists of the following parts:
1. Spoke magnet
2. Crankarm magnet
3. Chainstay sensor
4. Cable ties
To use the TomTom Cadence/Speed Sensor with your watch, do the following:
1. Attach the chainstay sensor to the chainstay on your bi ke, using three of the cable ties provided.
Use two ties for the main body of the sensor and one tie for the smaller part of the sensor. You
may need to adjust the position of the sensors, so don't tighten the ties completely just yet.
34
Page 35

Important: The smaller part of the sensor needs to face the crankarms and should not be
attached to the top of the chainstay. You may have to tilt the main body of the sensor towards the
wheel depending on your bike. You should make this adj ust m ent after you have attached the
spoke magnet.
2. Attach the spoke magnet to one of the spokes on your bi ke. The magnet should face the chainstay
where you attached the chainstay sensor.
3. Adjust the position of the spoke magnet and the chain st ay sensor so that when the wheel turns
the spoke magnet passes the tip of the main body of the chainstay sensor.
Important: The distance between the chainstay sensor and the spoke magnet should not be
more than 2 mm when they pass each other. On some bike s y ou may have to tilt the main body
of the sensor towards the wheel.
35
Page 36

4. Attach the crankarm magnet to one of the crankarm s on your bike. The magnet should face the
chainstay where you attached the chainstay senso r.
Tip: Make sure the different parts of the Cadence/Speed S ensor are lined up correctly on your
bike. The spoke magnet should pass the main body of t he chai nstay sensor and the crank arm
magnet should pass the tip of the sensor.
Once you have adjusted the sensors to the right posit ion, tighten the cable ties so they are held
securely in place.
5. On your watch, set the wheel size
to help increase the accuracy of the metric s provided by the
sensor. The wheel size is the circumference of your tire in millimeters (mm).
6. Move your bike or its crankarm so that at least one of t he magnets passes the sensor. This
switches on the sensor.
7. From the clock screen, move down.
8. Select Sensors, then move right.
9. Select Bike, then move right to turn it on.
10. When you begin a workout, your watch connects to the sensor and you see an icon of a chainring
at the bottom of the screen.
When your watch is trying to connect to the Cadence/ S peed S ensor, the chainring flashes.
The first time your watch tries to connect to your sensor, if it finds more than one sensor, your
watch doesn't know which sensor to connect to. Move to a place where there are no other sensors
within range of your watch.
36
Page 37

When you have connected to your sensor once, your watch always reconnects to your sensor.
When the chainring icon has stopped flashing, your watch is ready to measure your speed and
cadence. For proper GPS tracking, wait until the GPS icon has also stopped flashing before you
start your cycle activity.
While you train, you can choose to show your current cadence or change the display to see your
cadence.
You can also use a training program to train to a target cadence zone
.
You can also use the Cadence Sensor with other Bluetooth® Smart Ready devices and apps. See the
documentation that comes with your product or app f or more information.
To change the CR2032 battery in the sensor, use a coin to open the back of the sensor. The battery
must be recycled or disposed of properly accordin g to local laws and regulations.
37
Page 38

TomTom MySports account
Your TomTom MySports account is a central storage location for all your training and fitness
information.
To create an account, click the button in TomTom MySports Connect, or go directly to the website:
mysports.tomtom.com
As you can see from the diagram below, you can transf er your activities to your MySports account
using either TomTom MySports Connect or the Tom Tom MySports app.
Important: Before using the MySports app on your smart phone, you need to link your watch to your
MySports account using a computer. This needs t o be done only once.
If you transfer your activities to your TomTom MySports account, you can store, analyze and view your
previous activities. You can view the routes you have taken and all the metrics associated with your
activities.
Using TomTom MySports Connect on your comp uter, you can also choose to transfer your activities t o
your account on other sports websites.
Note: If you use an export file format such as CSV, FIT or TCX files, you should not use the
TomTom MySports mobile app to transfer activities to other sports websites. However, any
automatic uploads using, for example RunKeep er, will work.
38
Page 39

TomTom MySports Connect
TomTom MySports Connect does the following:
Helps you set up your watch.
Updates the software on your watch when new versi ons become available.
Transfers your activity information to your TomTom M ySports account or another sports website
that you choose. We can currently transfer activity information to Endomondo, Strava, MapMyFit-
ness and RunKeeper.
TomTom MySports Connect can also transfer activity information to your computer in a number of
file formats.
Transfers any settings you make on TomTom MySports to your watch.
Updates the QuickGPSfix information on your watch.
Installing TomTom MySports Connect
You can download TomTom MySports Connect for f ree from here: tomtom.com/getstarted/sports
Once installed, connect your watch to your computer using the desk dock.
39
Page 40

TomTom M
ySports mobile app
The TomTom MySports mobile app does the following:
Transfers your activity information to your TomTom M ySports account automatically when in
range of your phone.
Note: You cannot use the MySports app to transfer activity information to other sports websites.
Transfers any settings you make on TomTom MySports to your watch.
Updates the QuickGPSfix information on your watch.
Provides an alternative to TomTom MySports Connect for transferring activity informatio n to your
MySports account and updating QuickGPSfix.
Supported phones and mobile devices
The TomTom MySports app is supported on the foll owing phones and mobile devices:
iPhone 4S or later
iPod touch 5th generation
iPad3 or later
All iPad mini.
Before using the TomTom MySports app
Important: Before using the MySports app on your smart phone, you need to link your watch to your
MySports account using a computer. This needs t o be done only once.
You can download the TomTom MySports app for free from your usual app store or by going to
tomtom.com/app
.
40
Page 41

Addendum
Warning
Always consult a physician before starting an exercise program. If you have a pacemaker or other
implanted electronic device, consult your physician before using this product.
The use of this product while exercising might distract from your surroundings or your activity.
How TomTom uses your information
Information regarding the use of personal information can be found at tomtom.com/privacy
.
Battery and Environmental information
This product uses a lithium polymer battery that is not user accessible or user replaceable. Do not
open the case or (attempt to) remove the battery. Substances in the product and/or battery may be
harmful to the environment or your health if disposed of improperly. The battery contained in the
product must be recycled or disposed of properly acc ording to the local laws and regulations and
always kept separate from household waste.
WEEE directive
The WEEE symbol on the product or its packaging indicates that this product shall not be treated as
household waste. In line with EU Directive 2012/19/ EU for waste electrical and electronic equipm ent
(WEEE), this electrical product must not be disp osed of as unsorted municipal waste. Please dispose
of this product by returning it to the point of sale or to your local municipal collection point for recycling.
By doing this you will help conserve the environment.
Battery operating temperatures
Operating temperatures: -20°C (-4°F) to 60° C (140°F). Do not expose to temperatures beyond this.
R&TTE directive
Hereby, TomTom declares that TomTom products and accessories are in compliance with the
essential requirements and other relevant prov i sions of EU Directive 1999/5/EC. The declaration of
conformity can be found here: tomtom.com/legal
.
41
Page 42

FCC information for the user
THE DEVICE COMPLIES WITH PART 15 OF THE FCC RULES
Federal Communications Commission (FCC) Statement
This equipment radiates radio frequency energy an d if not used properly - that is, in strict accordance
with the instructions in this manual - may cause interference to radio communications and telev ision
reception.
Operation is subject to the following two conditions: (1) this device may not cause harmful interf erence
and (2) this device must accept any interference, including interference that may cause undesired
operation of the device.
This device has been tested and found to comply with the limits for a Class B digital device, pursuant
to part 15 of the FCC rules. These limits are designed to provide reasonable protection against
harmful interference in a residential installation. This equipment generates, uses and can radiate radio
frequency energy and, if not installed and used in accordance with the instructions, may cause harmful
interference to radio communications. Howeve r, there is no guarantee that interference will not occur
in a particular installation. If this equipment does cause harmful interference to radio or television
reception, which can be determined by turning t he equipment off and on, the user is encouraged to try
to correct the interference by one or more of the following measures:
Reorient or relocate the receiving antenna.
Increase the separation between the equipment an d receiver.
Connect the equipment into an outlet on a circuit dif ferent from that to which the receiver is
connected.
Consult the dealer or an experienced radio/TV technician for help.
Changes or modifications not expressly approved by the party responsible for compliance could v oi d
the user's authority to operate the equipment.
FCC ID: S4L8RS00, S4L8RA0
IC ID: 5767A-8RS00, 5767A-8RA0
FCC RF Radiation Exposure Statement
The transmitters within this device must not be co -located or operating in conjunction with any other
antenna or transmitter.
This equipment complies with IC radiation exposure l imits set forth for an uncontrolled environment.
End users must follow the specific operating instructions for satisfying RF exposure compliance. To
maintain with IC RF exposure compliance requirem ents, please follow the operation instructions in t hi s
manual.
Responsible party in North America
TomTom, Inc., 24 New England Executive Park, Burlington, MA 01803
Tel: 866 486-6866 option 1 (1-866-4-TomTom)
Emissions information for Canada
Operation is subject to the following two conditions:
This device may not cause interference.
This device must accept any interference, including interference that may cause undesired
operation of the device.
42
Page 43

Operation is subject to the condition that t hi s dev i ce does not cause harmful interference.
This Class B digital apparatus complies with Canadian ICES-003.
The Country Code Selection feature is disabled for p roducts marketed in the US or Canada.
Equipment is certified to the requirements of RSS-210 for 2.4-GHz.
IMPORTANT NOTE
IC Radiation Exposure Statement:
This equipment complies with IC RSS-102 radiatio n exposure limits set forth for an uncon-
trolled environment.
This device and its antenna(s) must not be co-located or operating in conjunction with any
other antenna or transmitter.
Regulatory Compliance Mark
This product displays the Regulatory Complian ce Mark (RCM) to show that it complies with relevant
Australian regulations.
Notice for New Zealand
This product displays R-NZ to show it complies with r el evant New Zealand regulations.
Customer support contact
Australia: 1300 135 604
New Zealand: 0800 450 973
Model names
8RS00, 8RA0
43
Page 44

Copyright notices
© 2014 TomTom. All rights reserved. TomTom and the "two hands" logo are registered trademarks of
TomTom N.V. or one of its subsidiaries. Please see tomtom.com/legal
user license agreements applying to this product.
Linotype, Frutiger and Univers are trademarks of Linotype GmbH registered in the U.S. Patent and
Trademark Office and may be registered in certain other jurisdictions.
MHei is a trademark of The Monotype Corporation and may be registered in certain jurisdictions.
AES code
The software included in this product contains AES code under Copyright (c) 1998-2008, Brian
Gladman, Worcester, UK. All rights reserved.
License terms:
The redistribution and use of this software (with or without changes) is allowed without the payment of
fees or royalties provided that the following co nditions are adhered to:
Source code distributions include the above copyright notice, this list of conditions and the followin g
disclaimer.
Binary distributions include the above copyright notice, this list of conditions and the following
disclaimer in their documentation.
The name of the copyright holder is not used to endor se pr oducts built using this software without
specific written permission.
for limited warranty and end
Calorie calculations
Calorie calculations in this products are based on MET values from:
Ainsworth BE, Haskell WL, Herrmann SD, Meckes N, Bassett Jr DR, Tudor-Locke C, Greer JL, Vezina
J, Whitt-Glover MC, Leon AS. 2011 Compendium of Physical Activities: a second update of codes and
MET values. Medicine and Science in Sports and E xercise, 2011;43(8):1575-1581.
44
 Loading...