

Page 1
4
12
3
Lisbon_install_part1.pdf 01/03/2007 08:21:47
12
34
C
M
Y
CM
MY
K
CY
CMY
Page 2

Click!
23
67
Lisbon_install_part2.pdf 01/03/2007 08:22:12
1a 1b
45
C
M
Y
CM
MY
K
CY
CMY
Page 3
toc_US.fm Page 1 Thursday, March 1, 2007 9:16 AM
TomTom
RIDER
Page 4

toc_US.fm Page 2 Thursday, March 1, 2007 9:16 AM
TomTom RIDER
EN
ES
FR
English 8
Español 20
Français 32
Limited warranty for purchases
made outside of the USA and
Canada
44
Page 5
Lisbon.book Page 8 Thursday, March 1, 2007 8:39 AM
EN
What’s in the box
What’s in the
box
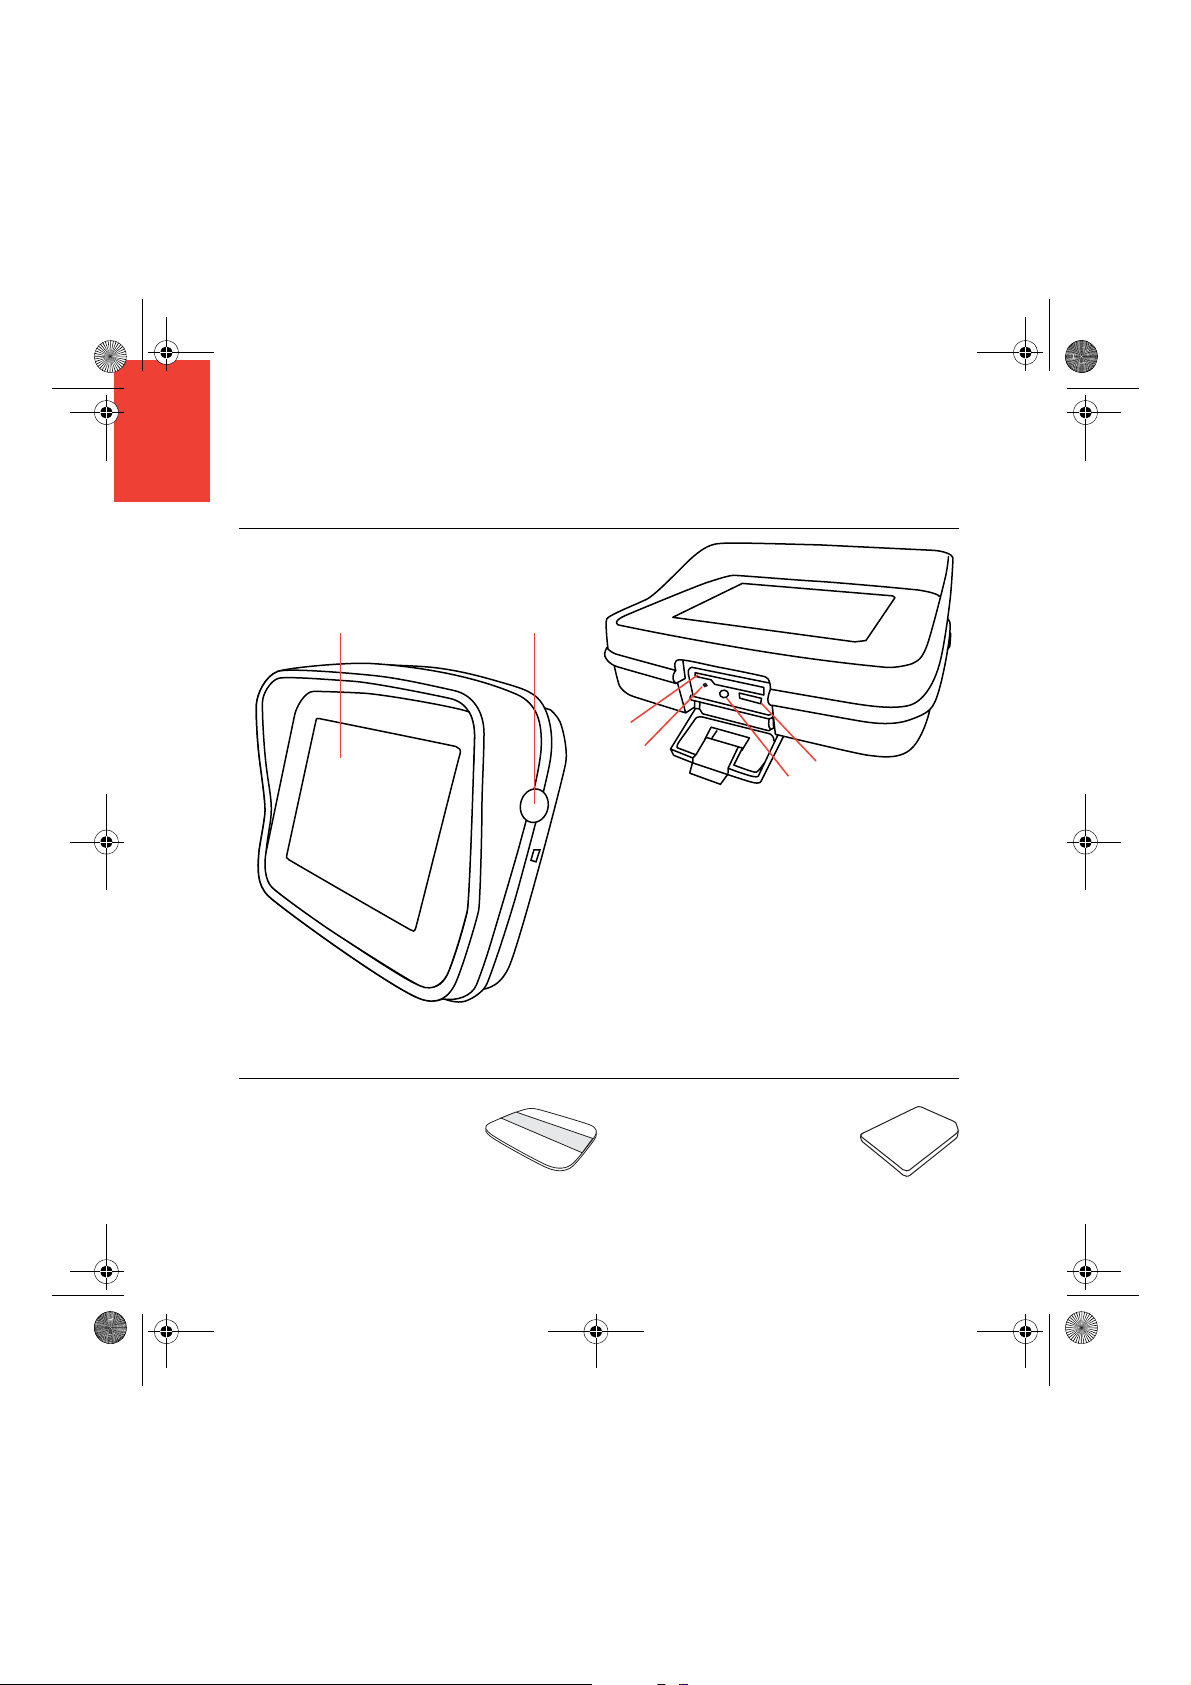
A Your TomTom RIDER
1
2
3
4
5
a Touchscreen
b On/Off button
c Memory card (SD card) slot
d USB connector
e Charging connector
f Reset button
B Your product code card C A memory card (SD card)
6
8
Page 6
Lisbon.book Page 9 Thursday, March 1, 2007 8:39 AM
What’s in the box
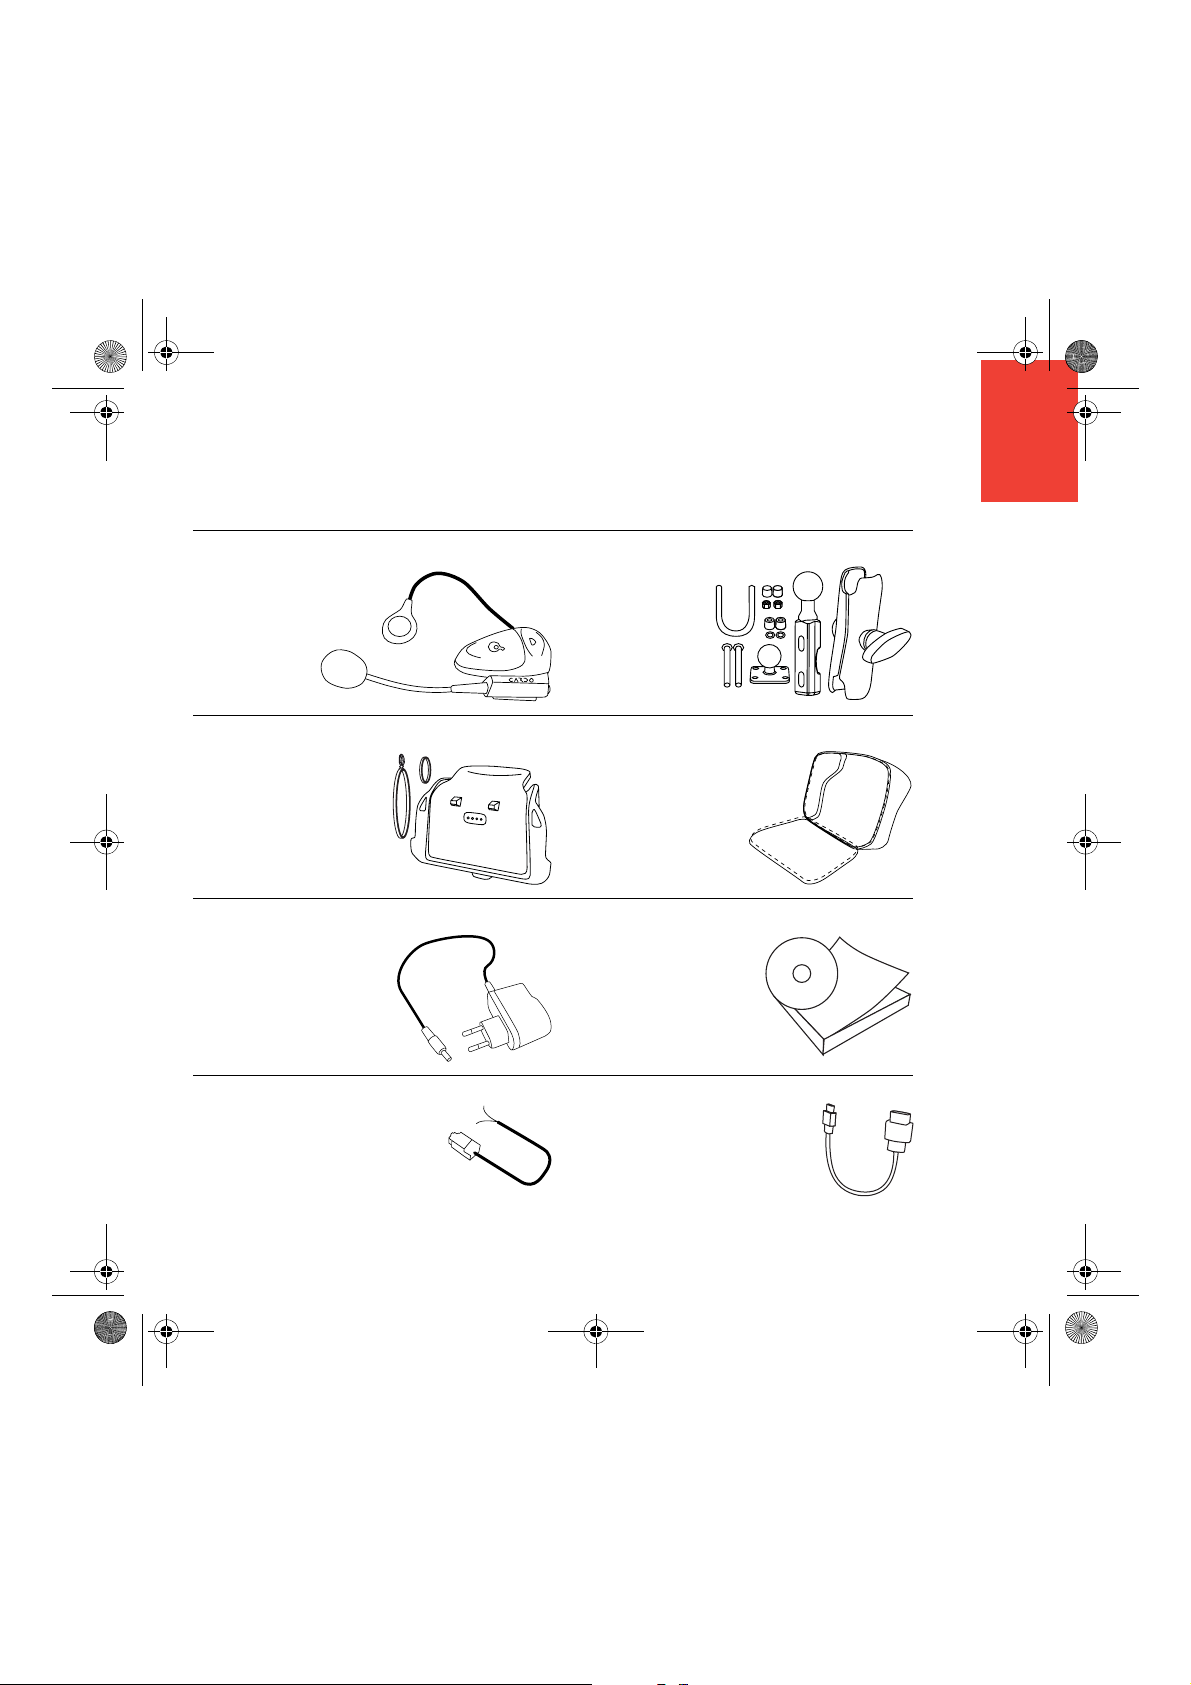
D Cardo scala-rider™ headset E RAM Mount™ mounting kit
F Holder and security strap G TomTom RIDER case
H Home charger I Documentation pack
EN
J Battery cable K USB cable
9
Page 7
Lisbon.book Page 10 Thursday, March 1, 2007 8:39 AM
EN
Using your TomTom RIDER
Using
your
TomTom
RIDER
Switching on
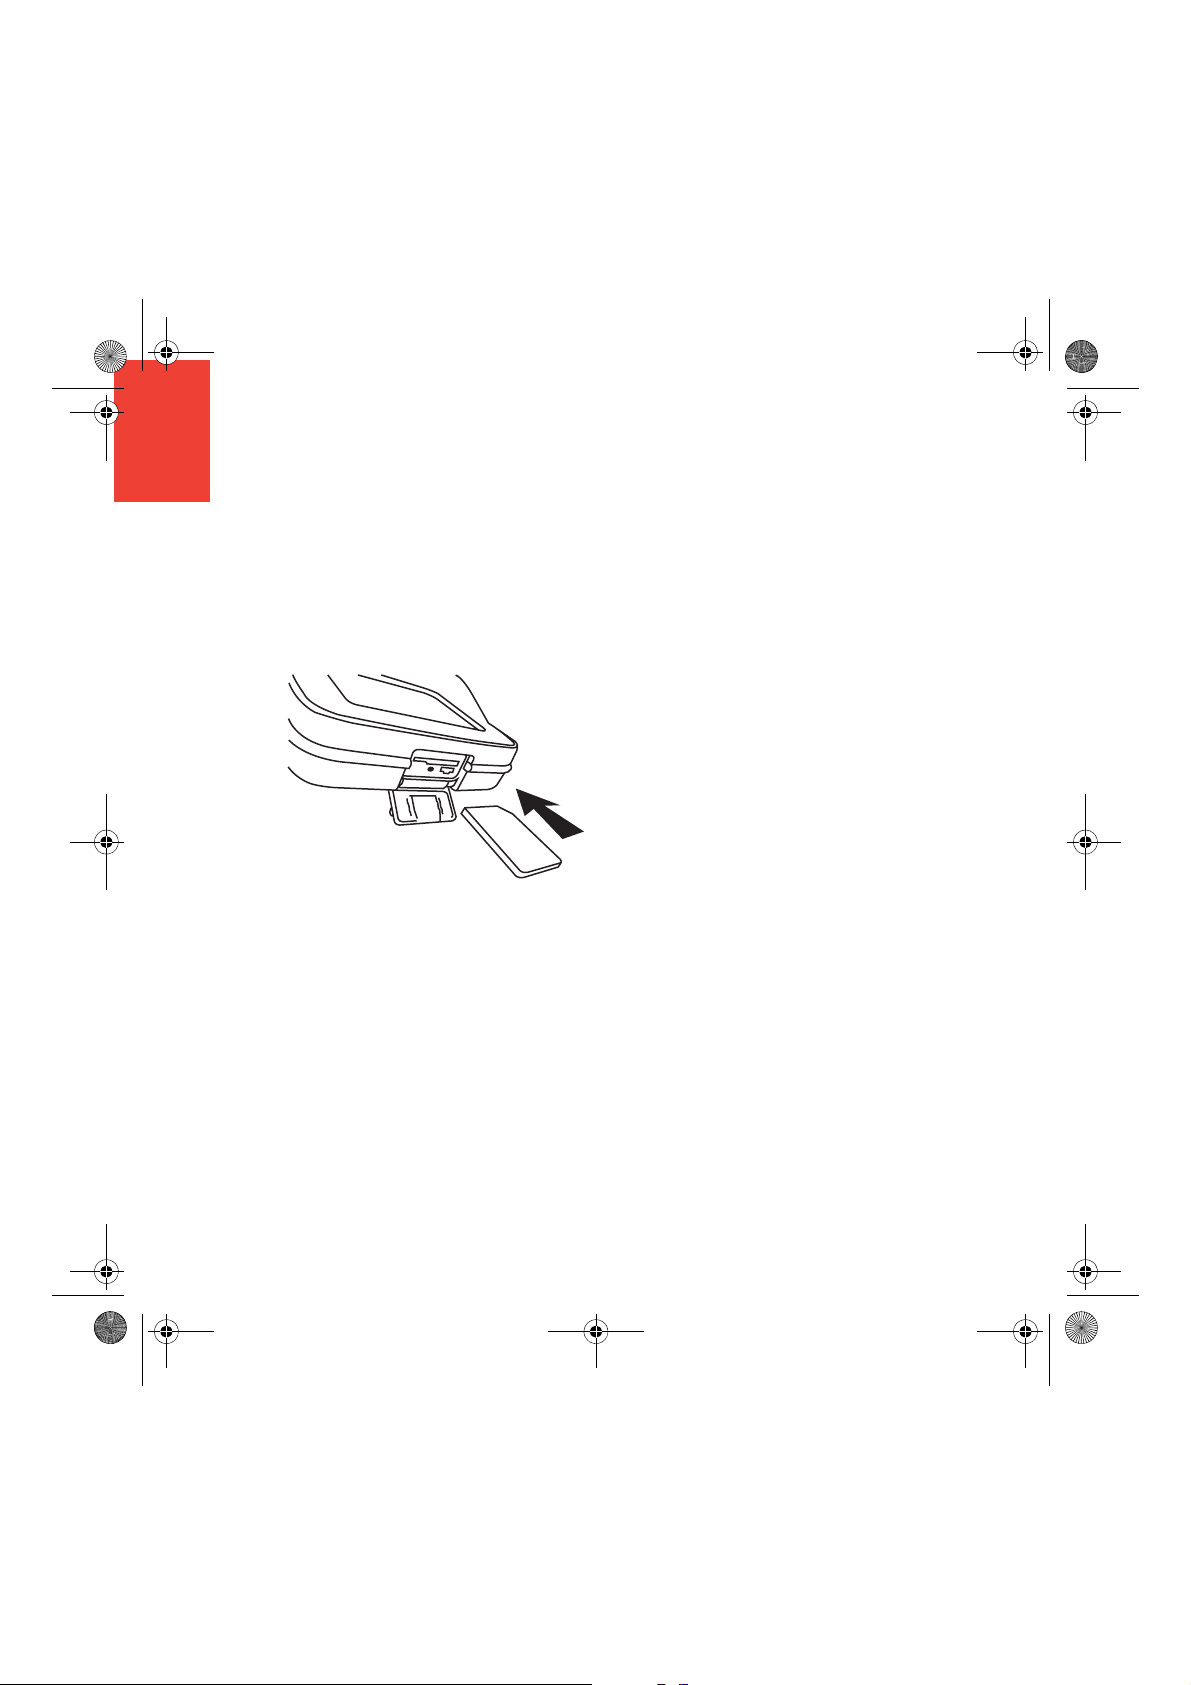
1. Open the compartment on the bottom of
your TomTom RIDER.
2. Push the memory card into the memory
card slot.
3. Press and hold the On/Off button for 2
seconds, or until your TomTom RIDER
starts.
The first time you switch on your
TomTom RIDER, it may take up to 20 seconds
to start. To switch off your TomTom RIDER,
press and hold the On/Off button for 2
seconds.
Setting up
First, you have to answer a few questions to
set up your device and your Cardo scalarider™ headset. Answer the questions by
tapping the screen. You will use the
touchscreen for everything you do with your
TomTom RIDER.
Follow the instructions to establish a
Bluetooth connection between your
TomTom RIDER and your Cardo scala-rider™
headset.
Once you have answered the questions, your
TomTom RIDER will display the Driving View.
The screen is shown in black and white until
your TomTom RIDER locates your current
position. Once this is done, the Driving View is
shown in full color.
10
Page 8
Lisbon.book Page 11 Thursday, March 1, 2007 8:39 AM
EN
Using your TomTom RIDER
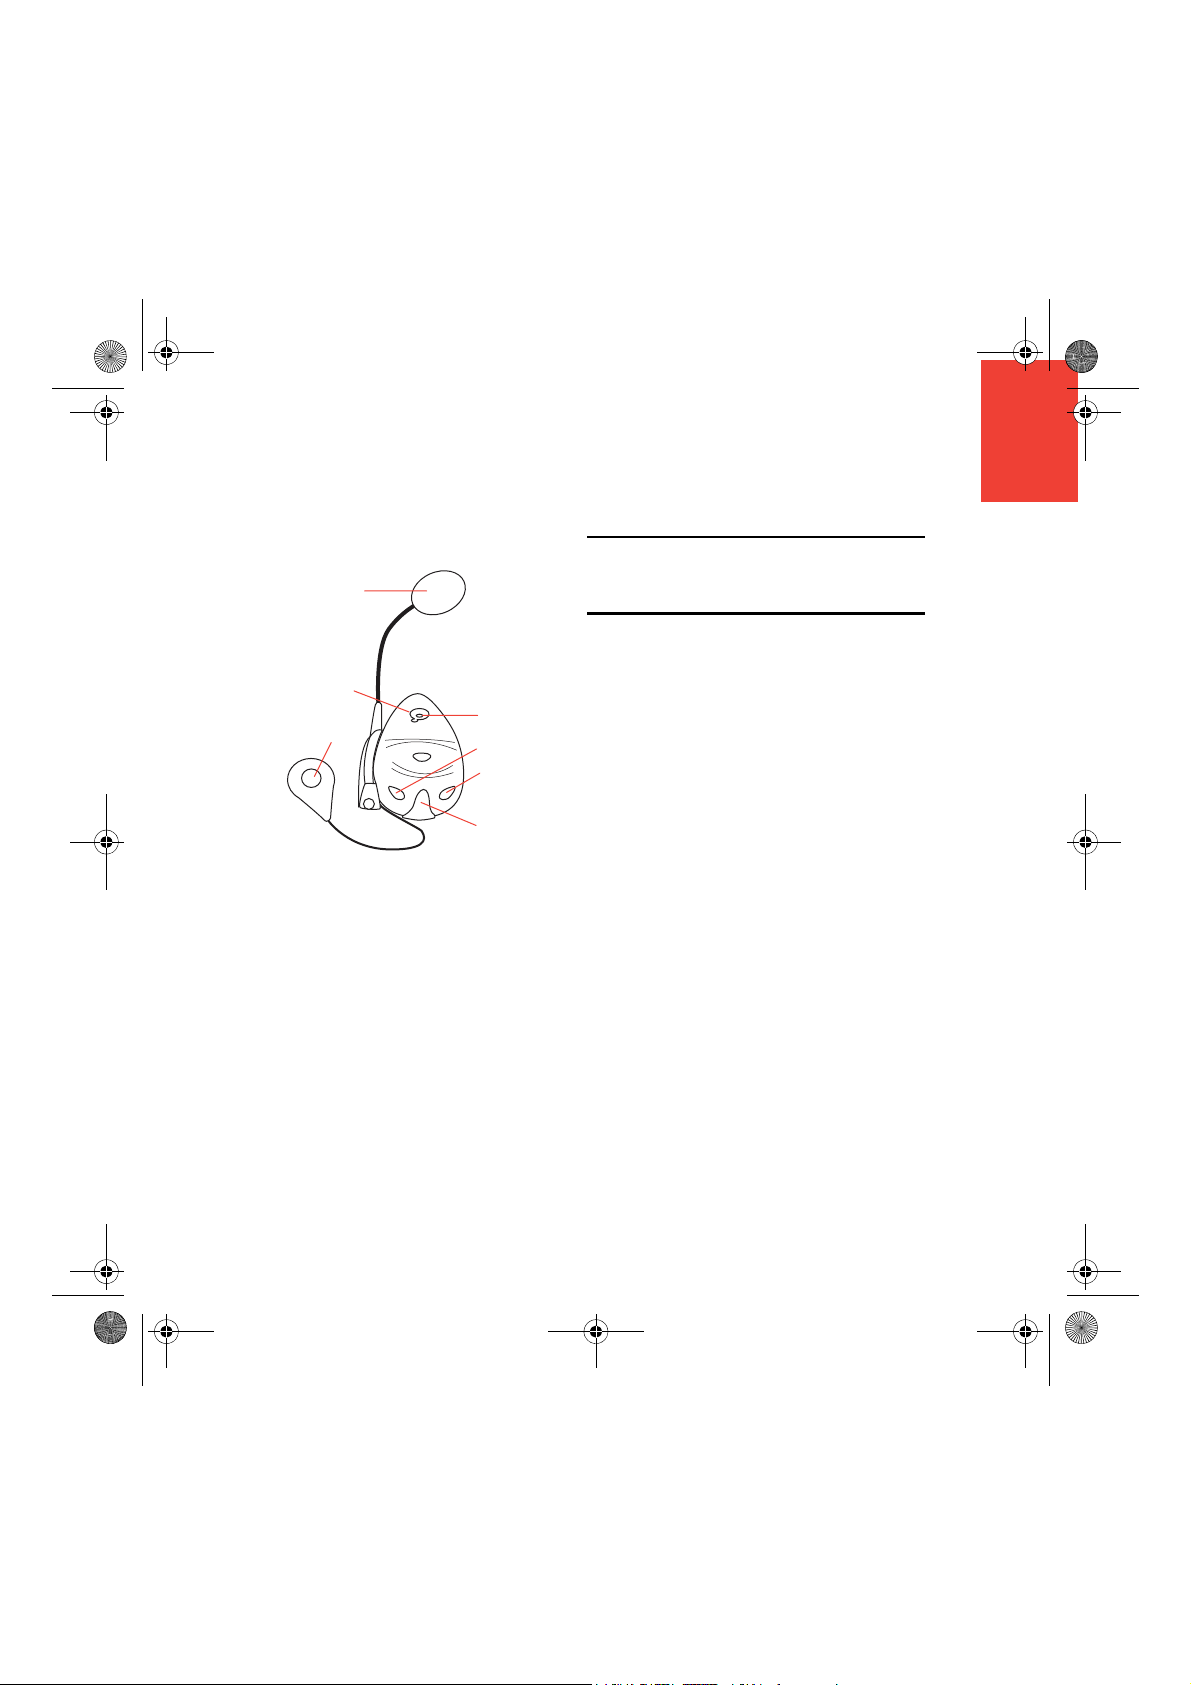
Cardo scala-rider™ headset
A
B
D
C
E
F
G
A Microphone
B On/Off button
C Speaker
D LED
E Volume down
F Volume up
G Charging connector
Before you can use your Bluetooth headset,
fully charge the headset using the charger
supplied with the headset.
Note: Make sure you use the correct charger. There
are different chargers for your TomTom RIDER and
your headset. Using the wrong charger may damage
the device.
Fully charging the headset takes between 2
and 3 hours. When charging, the LED is a
steady red. When charging is finished, the LED
turns off.
When the batteries are running low, an alert
tone is played.
Using your headset
To turn the headset on, press and hold the on/
off button for 6 seconds, until the LED flashes
blue 3 times. An ascending alert tone is
played. When the headset is on, the LED
flashes blue every 3 seconds.
To turn the headset off, press and hold the on/
off button for 3 seconds, until the LED flashes
red 3 times. A descending alert tone is played.
If you did not establish a Bluetooth connection
between your Bluetooth headset module and
your TomTom RIDER when you first turned
your RIDER on, you can establish the
connection at any time.
From the Main Menu, tap Change
Preferences. Tap Connect to headset and
follow the instructions to establish the
connection.
11
Page 9
Lisbon.book Page 12 Thursday, March 1, 2007 8:39 AM
EN
Using your TomTom RIDER
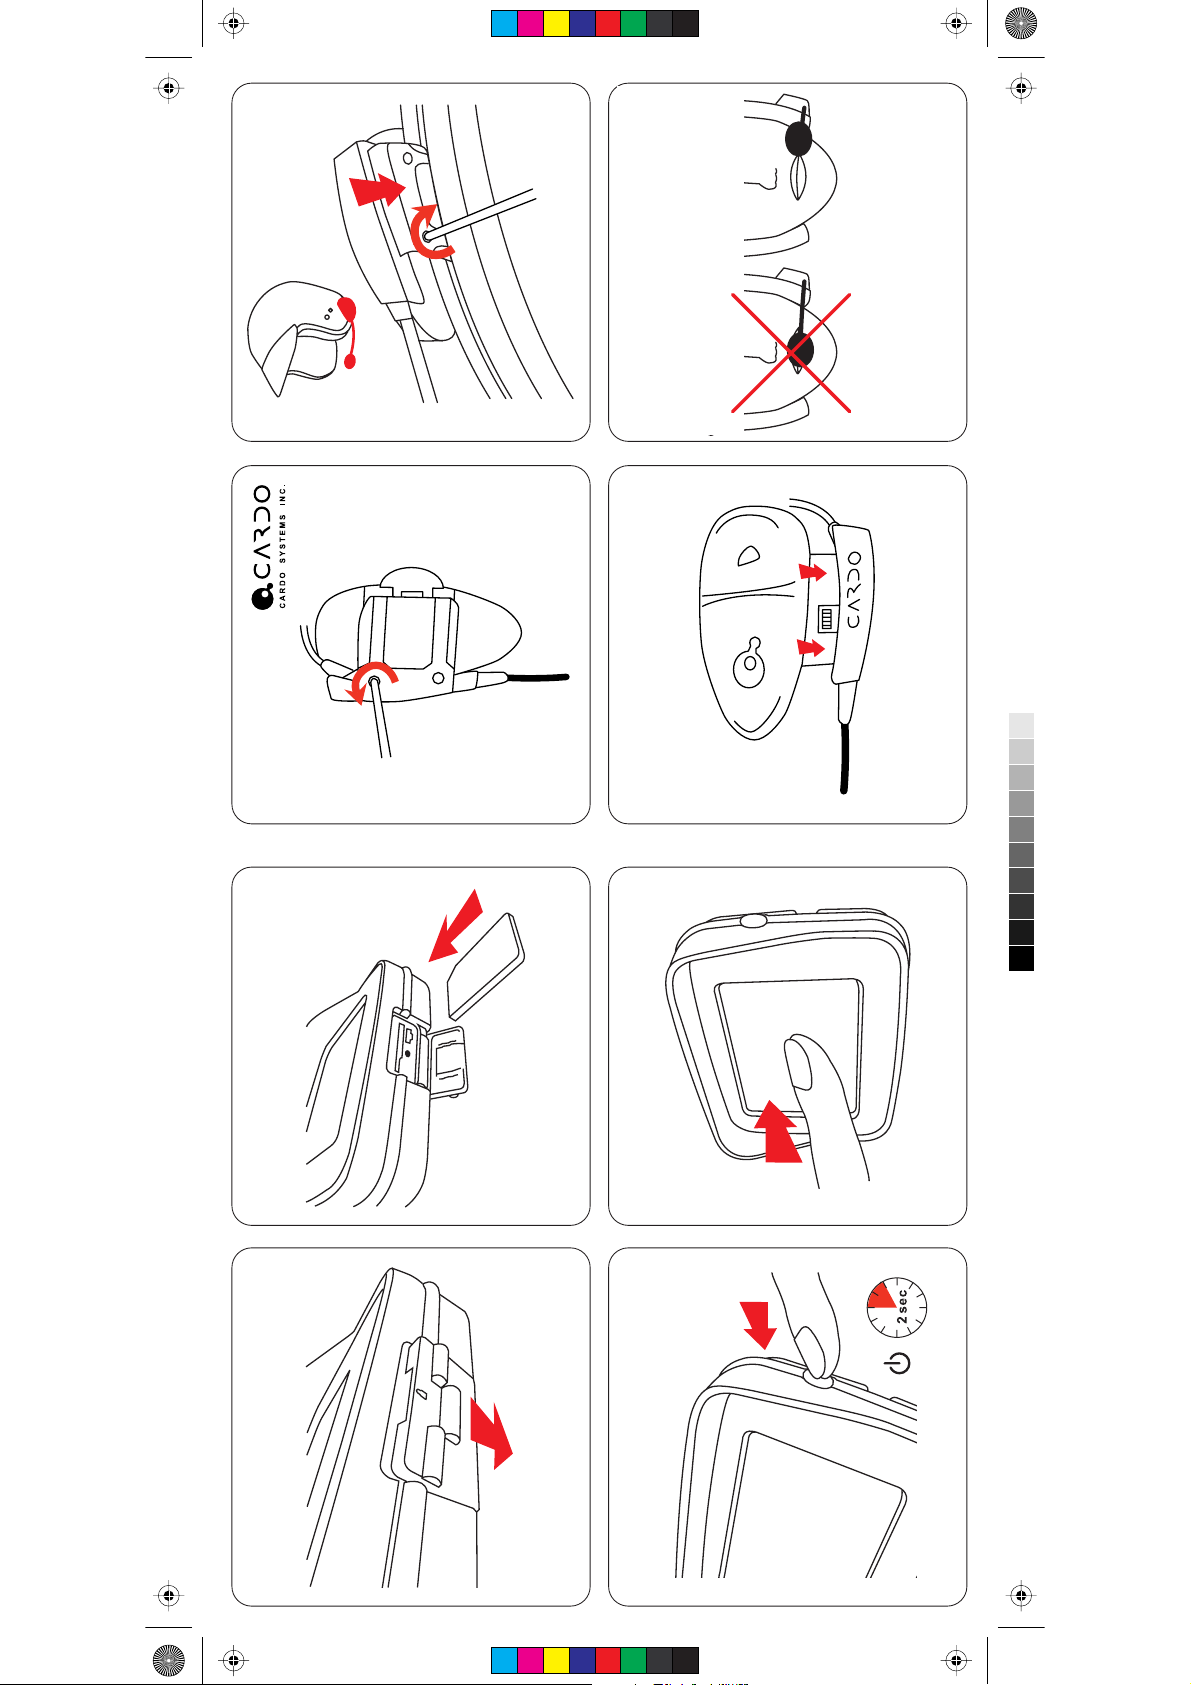
Attach your headset to your helmet as shown
in the Installation Poster. Make sure you
position the microphone correctly. For best
results, don’t position the microphone directly
in front of your mouth, position it just to the
side of your mouth.
Locating your current position
Your TomTom RIDER must be outside to be
able to locate your current position. The first
time you start your RIDER, it takes up to 5
minutes for the device to find your current
position.
In future, your position will be found much
faster, normally within a few seconds. If your
RIDER takes longer than 5 minutes to locate
your current position, make sure that you are
in an open place without tall buildings or trees
around you.
Your RIDER does not transmit your location,
so others cannot use it to track you while you
are driving.
Note: Before driving with your TomTom RIDER, we
recommend that you charge it fully using the home
charger.
Mounting your TomTom RIDER
Attach the RAM™ mount kit to your
motorcycle as shown on the Installation
Poster, then place your RIDER in the holder.
When you are attaching the mount kit to your
motorcycle, follow these guidelines:
• If you are unsure about attaching the
mount kit yourself, ask a professional to fit
it for you.
• Make sure that the mount kit does not
interfere with any of the controls on the
motorcycle.
• Always use the correct tools. If you use
unsuitable tools, you may damage or break
the mount kit.
• Do not overtighten nuts. You may crack
parts of the mount kit or damage your
handlebars if you overtighten the nuts.
• If you are using the u-bolt, don’t forget to
put the rubber caps provided over the
exposed threads.
Damage due to modifications, improper
installation, road hazards or accidents, are not
covered. Neither RAM nor TomTom shall be
liable for any injury, loss, or damage, direct or
consequential, arising out of improper
installation, or inability to use product. Before
use, the user must determine the suitability of
the product for its intended use. The user
assumes all risk and liability, whatsoever, in
connection with the mount.
12
Page 10
Lisbon.book Page 13 Thursday, March 1, 2007 8:39 AM
EN
Using your TomTom RIDER
Take care of your TomTom RIDER
It is important to take care of your RIDER and
to clean it correctly.
• Use a soft cloth to wipe the screen of your
RIDER; do not use any liquid cleaners.
• If your RIDER gets wet, dry it with a soft
cloth.
• Do not open the casing of your RIDER
under any circumstances. Doing so may be
dangerous and will invalidate your
warranty.
• Do not use the memory card (SD card) with
any device other than a TomTom device.
Other devices may damage the memory
card.
• Do not expose your RIDER to high or low
temperatures, which can cause permanent
damage. For example, don’t leave it in the
car on hot summer days or during cold
winter nights.
Back Up Your TomTom RIDER
It’s always a good idea to make a backup of the
contents of your TomTom RIDER. You can
make a backup using TomTom HOME. You
can install TomTom HOME using the CD that
came with your TomTom RIDER.
13
Page 11
Lisbon.book Page 14 Thursday, March 1, 2007 8:39 AM
EN
Making your first trip
Making your first trip
Planning a route with TomTom RIDER is very
simple. To plan your first route, follow the
steps below.
Note: You should always plan your journeys before
you start driving. It is dangerous to plan routes when
you are already moving.
1. Tap the screen to bring up the main menu.
2. Tap Navigate to...
For your first journey, we will navigate to an
address.
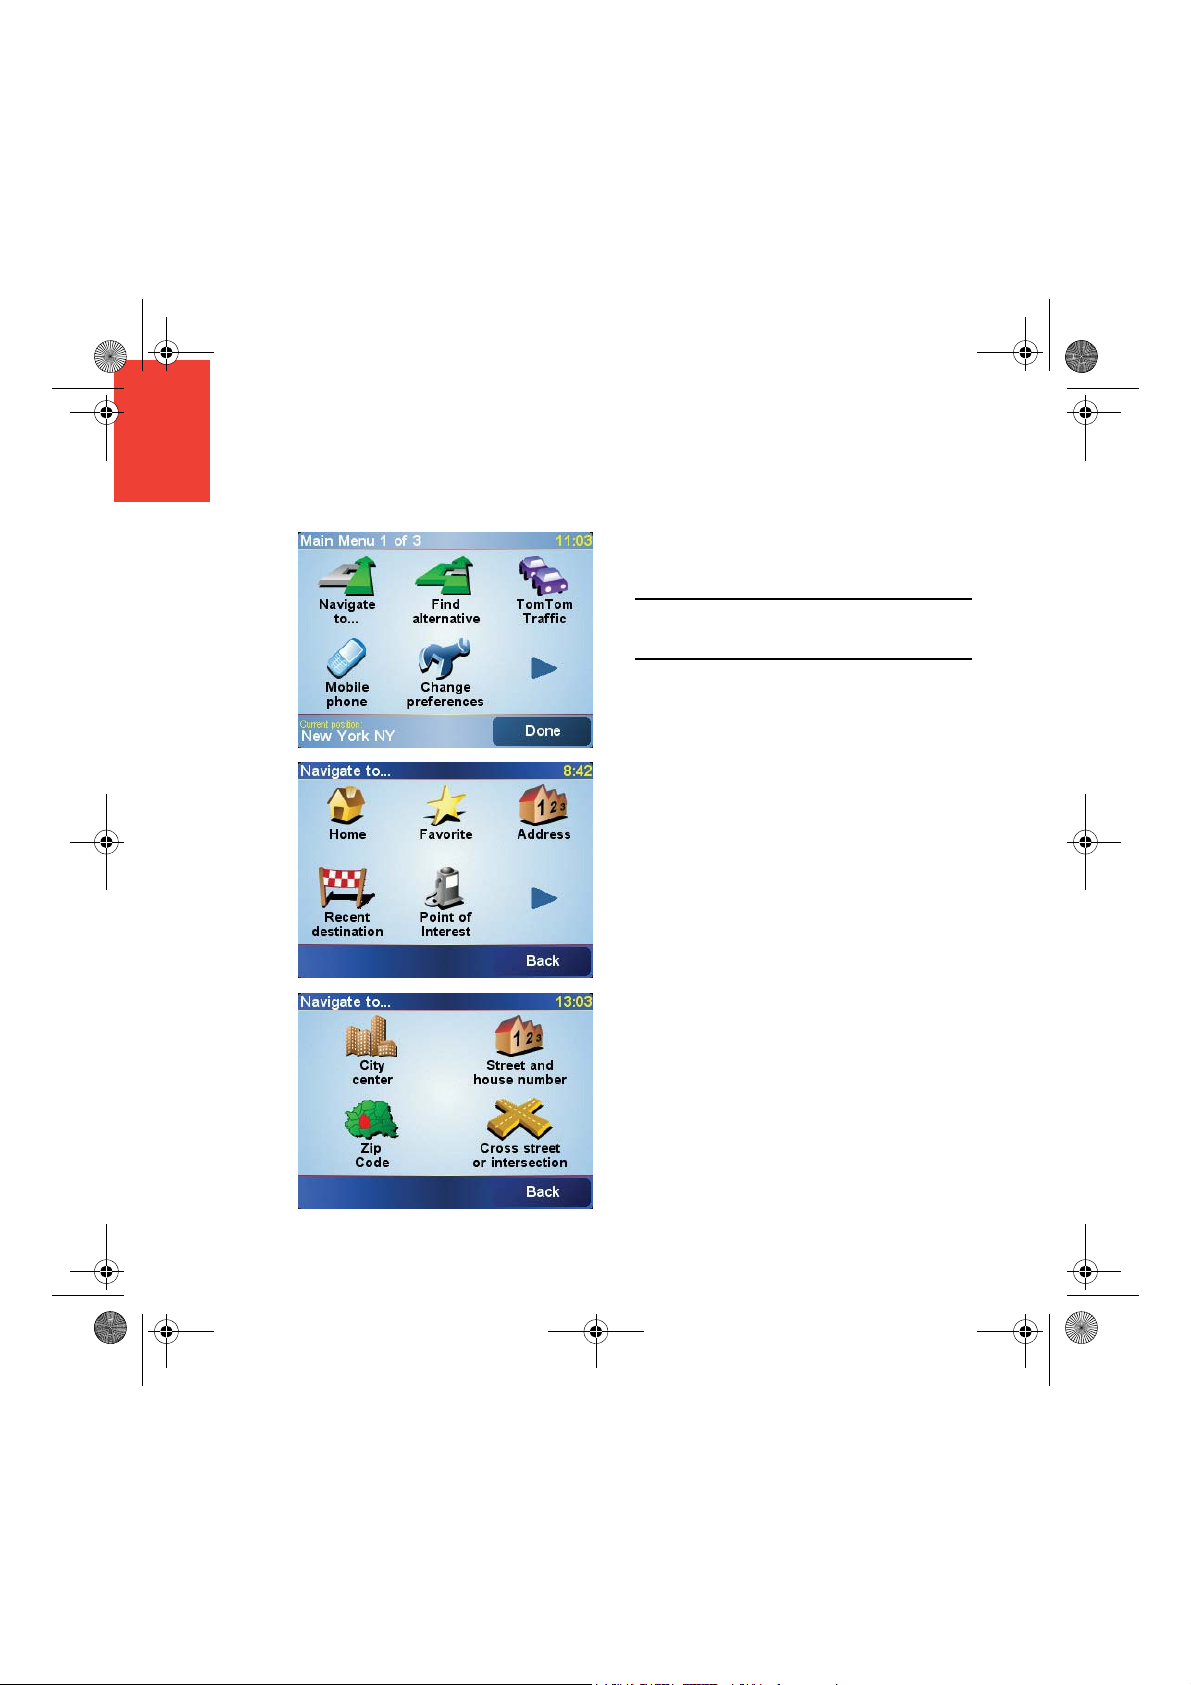
3. Tap Address.
When you enter an address, you can
choose from four options:
• City center - tap this button to set your
destination as the center of a city or
town.
• Street and house number - tap this
button to set an exact address as your
destination.
• ZIP code - tap this button to enter a ZIP
code as your destination (fully
supported only in UK and the
Netherlands).
• Cross street or intersection - tap this
button to set your destination as the
point where two streets meet.
For your first trip, we will enter an exact
address.
4. Tap Street and house number.
14
Page 12
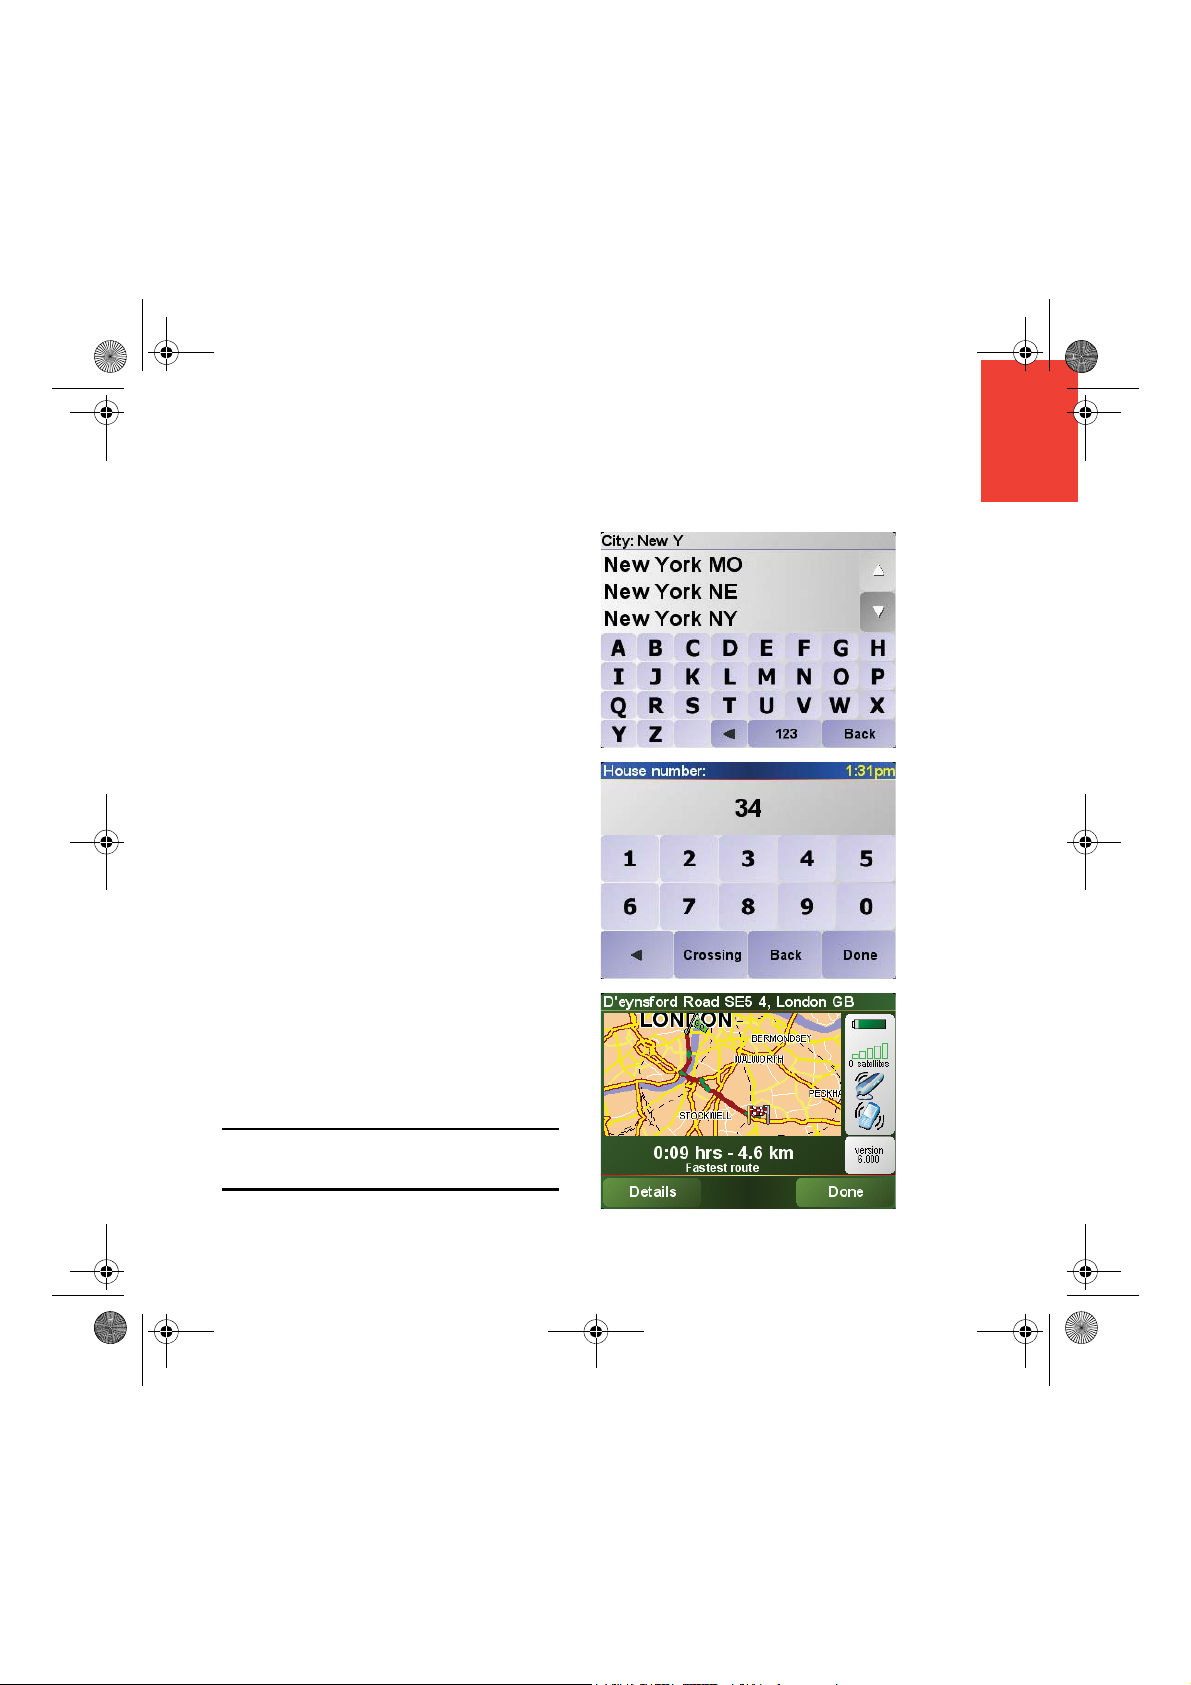
Lisbon.book Page 15 Thursday, March 1, 2007 8:39 AM
5. Start to type the name of the town where
you want to go.
As you type, the names of the towns that
match what you have typed are shown.
When your destination is shown in the list,
tap the name of the town to set the
destination.
6. Start to type the name of the street. Select
the street when it is shown in the list.
7. Now enter the house number of your
destination and then tap Done.
8. Your RIDER asks you whether you need to
arrive at a particular time.
Tap YES to enter an arrival time. Your
RIDER shows you whether you will arrive
on time.
9. When the route has been calculated, tap
Done.
TomTom RIDER will immediately start guiding
you to your destination with spoken
instructions and visual instructions on the
screen.
EN
Making your first trip
You should plan your route before you start
driving. While you are driving, only the driving
menu is displayed. For more information, see
this chapter: Menus on page 17.
Note: Before you can plan a route in this way,
TomTom RIDER must first locate your current
position.
15
Page 13

Lisbon.book Page 16 Thursday, March 1, 2007 8:39 AM
EN
Driving View
Driving View
A Buttons to zoom in and zoom out on your
position.
B Your current position.
C The name of the next major road or road
sign information, if applicable.
D The next instruction.
This area shows you what to do and when
you will have to do it.
Tap this area to repeat the last spoken
instruction and to change the volume.
E The name of the next street to turn onto.
F Information about your trip.
Normally this area shows the remaining trip
time, remaining distance, and arrival time.
To set which information is displayed, tap
Status bar preferences in the Preferences
menu.
G Indicator of the strength of the GPS signal.
16
Page 14
Lisbon.book Page 17 Thursday, March 1, 2007 8:39 AM
EN
Menus
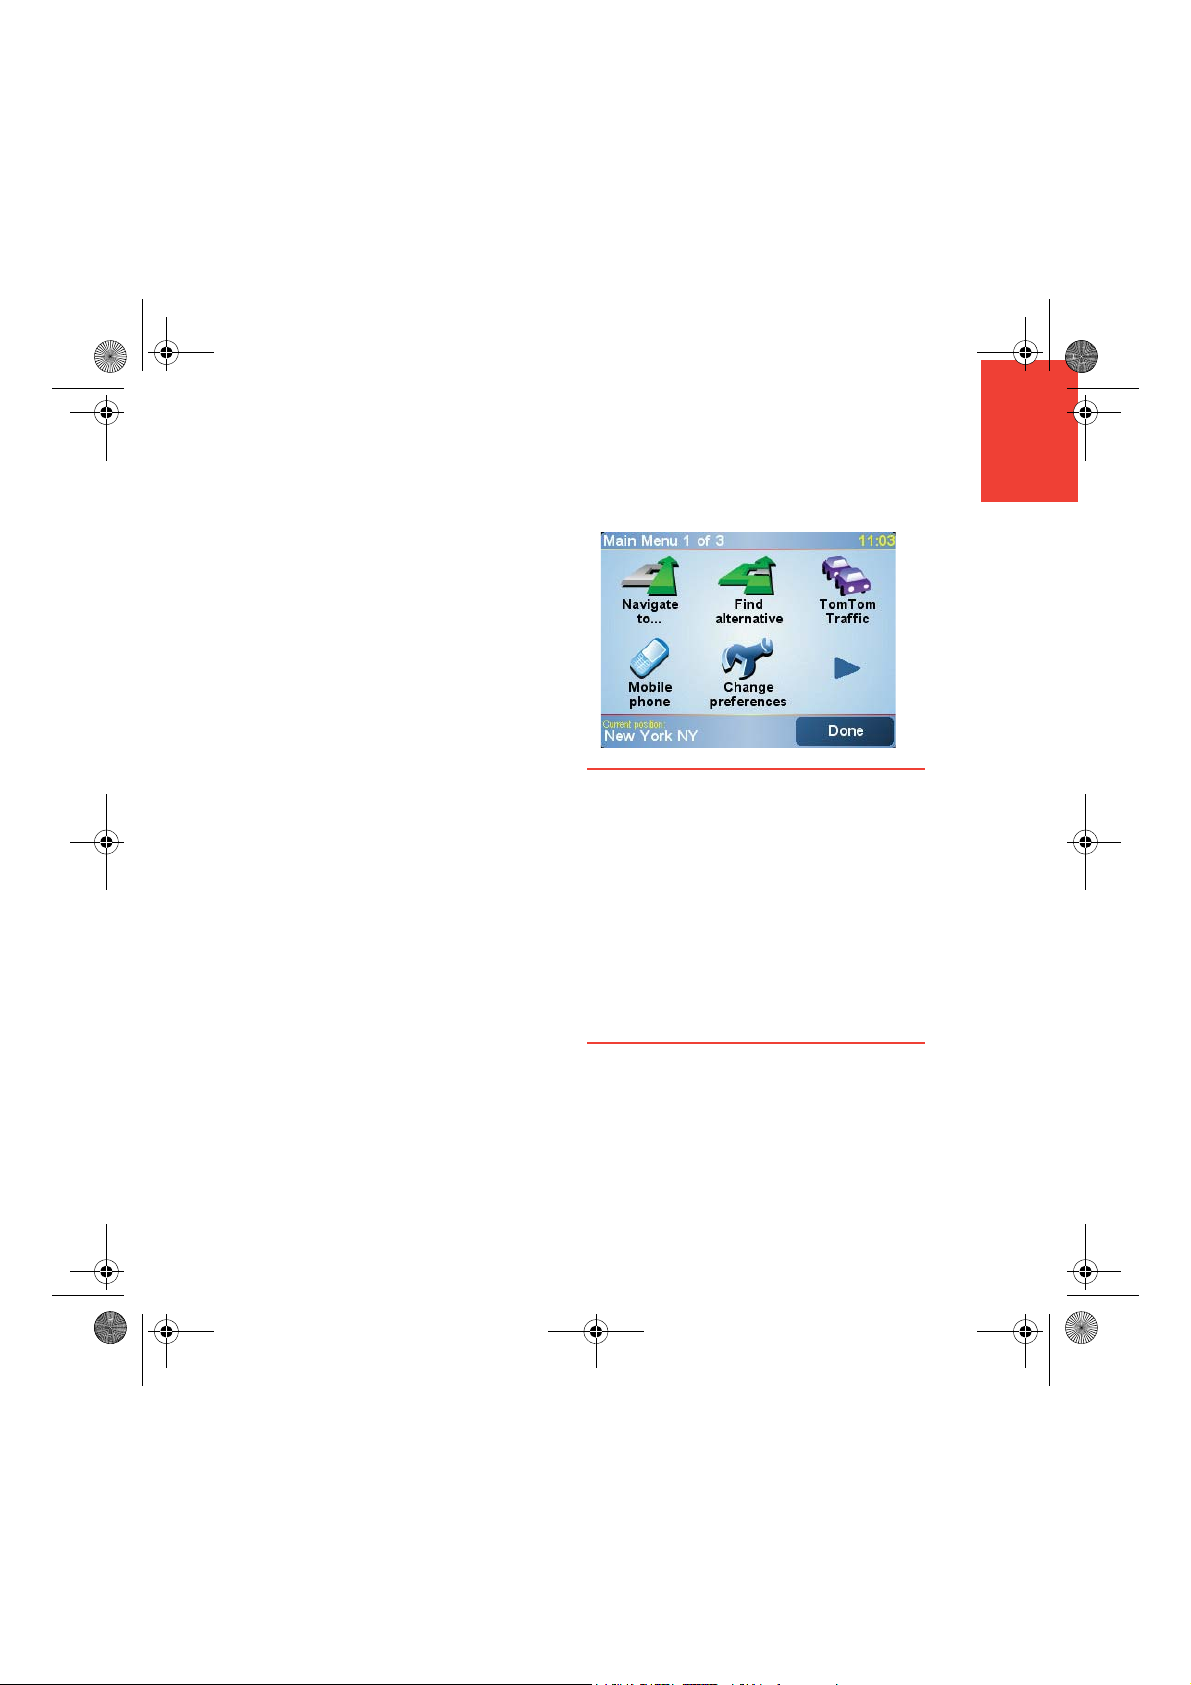
Main menu
Tap the screen at any time when
TomTom RIDER displays the Driving View to
open the Main Menu.
• Navigate to...
Tap this button to start planning a route.
• Find alternative...
Tap this button if you want to avoid part of
your route, travel via a specific location or
calculate an alternative route.
• TomTom Traffic
Tap this button to enable or disable traffic
information.
• Mobile phone
This button opens the mobile phone menu.
You can, for example, make calls, and write
or read messages.
• Change preferences
This button opens the Preferences menu.
You can change many things about the
way TomTom RIDER looks and behaves.
Menus
Hidden buttons and features
When you first start using your
TomTom RIDER, not all of the buttons will be
displayed in the menu.
Many buttons and some more advanced
features are hidden because you will not need
these features very often.
To show all buttons and features, tap Show
ALL menu options in the Preferences menu.
To hide these buttons again, tap Show fewer
menu options in the Preferences menu.
17
Page 15

Lisbon.book Page 18 Thursday, March 1, 2007 8:39 AM
EN
Menus
Driving menu
If you tap the screen when you are driving, the
driving menu is shown:
• Navigate to…
Tap this button to select a destination.
• Turn off sound / Turn on sound
Tap this button to turn the spoken
instructions on or off.
• Clear route
Tap this button to delete the route that is
currently planned. Your TomTom RIDER
will stop giving you directions.
Your position will still be shown in the
Driving View. You do not need to clear a
route before you plan a new route, or start
navigating to a new destination.
• Add favorite
18
Tap this button to add your current location
as a favorite. Your TomTom RIDER will use
the address of your current location as the
name of the favorite. Later, you can go back
and change the name of the favorite if you
wish.
This button is useful if you see something
interesting while you are driving. You can
add it as a favorite so that the location is
remembered by your TomTom RIDER.
Page 16

Lisbon.book Page 19 Thursday, March 1, 2007 8:39 AM
WARRANTOR
U.S. and Canadian Purchases: If you have made your purchase in
the United States or Canada, this Limited Warranty is granted by
and this Limitation of Liability is stipulated for the benefit of
TomTom Inc., 150 Baker Avenue Extension, Concord
Massachusetts 01742 (United States of America).
WHAT THIS WARRANTY COVERS
1) TomTom Inc. (“TomTom”) warrants to the original purchaser
(“you”) of the hardware with which this Limited Warranty is
included (“Hardware”) that the Hardware will be free from defects in
workmanship and materials under normal use (“Defects”) for a
period of one (1) year from the date that the Hardware was first
purchased by you (“Warranty Period”). During the Warranty Period
the Hardware will be repaired or replaced at TomTom’s choice
(“Limited Warranty”) without charge to you for either parts or
labour. This Limited Warranty covers the replacement of the
Hardware only. If the Hardware is repaired after the Warranty Period
has expired, the Warranty Period for the repair will expire six (6)
months after the date of repair.
WHAT THIS WARRANTY DOES NOT COVER
2) The Limited Warranty does not apply to normal wear and tear,
does not apply when the Hardware is opened or repaired by
someone not authorized by TomTom and does not cover repair or
replacement of any Hardware or part thereof damaged by: misuse,
moisture, liquids, proximity or exposure to heat and accident,
abuse, non-compliance with the instructions supplied with the
Hardware, neglect or misapplication. The Limited Warranty does
not cover physical damage to the surface of the Hardware. This
Limited Warranty does not cover any software that may accompany
or be installed on the Hardware. The Limited Warranty does not
cover the installation, removal or maintenance of the Hardware or
any costs related herewith.
HOW TO MAKE A WARRANTY CLAIM
3) In order to make a claim of a Defect, you must contact TomTom
during the Warranty Period at: 1-978-287-9555 or per email via
www.tomtom.com to explain the Defect and to obtain an RMA
number (Return Materials Authorization) if necessary. You must
return the Hardware during the Warranty Period, along with an
explanation of the Defect, to the address provided to you by
TomTom. If a defect arises and a valid claim under this Limited
Warranty is received by TomTom after the first one hundred and
eighty (180) days of the Warranty Period, TomTom is entitled to
charge you for any reasonable shipping and handling costs made in
connection with the repair or replacement of the Hardware. You
must comply with any other return procedures stipulated by
TomTom, if any.
YOUR LEGAL RIGHTS
4) This Limited Warranty gives you specific legal rights, and you
may also have other rights which vary from state to state and
jurisdiction to jurisdiction.
5) If any part of this Limited Warranty is held to be invalid or
unenforceable, the remainder of the Limited Warranty shall
nonetheless remain in full force and effect.
TomTom Limited Warranty
6) This Limited Warranty is the only express warranty made to you
and is provided in lieu of any other express warranties or similar
obligations (if any) created by any advertising, documentation,
packaging, or other communications.
7) Except for the Limited Warranty and to the maximum extent
permitted by applicable law, TomTom and its suppliers provide the
Hardware "AS IS AND WITH ALL FAULTS", and hereby disclaim all
other warranties and conditions, whether express, implied or
statutory, including, but not limited to, any (if any) implied
warranties, duties or conditions of: merchantability, noninfringement, quiet enjoyment, system integration, satisfactory
quality, fitness for a particular purpose, reliability or availability,
accuracy or completeness of responses, results, workmanlike
effort, lack of viruses, and reasonable care and skill, all with regard
to the Hardware, and the provision of or failure to provide support
or other services, information, software, and related content
through the Hardware or otherwise arising out of the use of the
Hardware. This exclusion does not apply to (i) any implied condition
as to title and (ii) any implied warranty as to conformity with
description. If applicable law requires any implied warranties with
respect to the Hardware, all such warranties are limited in duration
to ninety (90) days. Some states and/or jurisdictions do not allow
limitations on how long an implied warranty lasts, so the above may
not apply to you.
8) This Limited Warranty cannot be transferred to any other person.
LIMITATION OF LIABILITY
9) Neither TomTom nor its suppliers shall be liable to you or to any
third party for any indirect, incidental, consequential, special or
exemplary damages (including in each case, but not limited to,
damages for the inability to use the equipment or access data, loss
of data, loss of business, loss of profits, business interruption or the
like) arising out of the use of or inability to use the Hardware even if
TomTom has been advised of the possibility of such damages.
10) Notwithstanding any damages that you might incur for any
reason whatsoever (including, without limitation, all damages
referenced herein and all direct or general damages in contract or
anything else), the entire liability of TomTom and any of its
suppliers shall be limited to the amount actually paid by you for the
Hardware.
11) Notwithstanding the above, neither party's liability for death or
personal injury resulting from its own negligence shall be limited.
12) Some states and/or jurisdictions do not allow the exclusion or
limitation of incidental or consequential damages, so the above
limitations or exclusions may not apply to you.
TomTom Limited Warranty
19
Page 17

Lisbon.book Page 20 Thursday, March 1, 2007 8:48 AM
Contenido de la caja
Contenido de
la caja
ES
A El TomTom RIDER
1
2
3
4
a Pantalla táctil
b Botón de activación/desactivación
c Ranura para tarjeta de memoria (tarjeta SD)
d Conector USB
e Conector de carga
f Botón de reinicio
B Tarjeta con su código de producto C Una tarjeta de memoria (tarjeta SD)
6
5
20
Page 18

Lisbon.book Page 21 Thursday, March 1, 2007 8:48 AM
Contenido de la caja
D AuricularesCardo scala-rider™ E Kit de montajeRAM Mount™
F Soporte y correa de seguridad G Estuche de TomTom RIDER
H Cargador doméstico I Paquete de documentación
J Cable de batería K Cable USB
ES
21
Page 19

Lisbon.book Page 22 Thursday, March 1, 2007 8:48 AM
Utilización de su TomTom RIDER
Utilización de
su
TomTom
RIDER
Encendido
ES
1. Abra el compartimento de la parte inferior
de su TomTom RIDER.
2. Empuje la tarjeta de memoria hacia el
interior de la ranura para tarjeta de
memoria.
3. Mantenga pulsado el botón de activación/
desactivación durante dos segundos o
hasta que se inicie su TomTom RIDER.
La primera vez que encienda el
TomTom RIDER, puede tardar hasta 20
segundos en iniciarse. Para apagar el
TomTom RIDER, pulse y mantenga pulsado el
botón de activación/desactivación durante 2
segundos.
Instalación
En primer lugar, debe responder a algunas
preguntas para configurar su dispositivo y sus
auriculares Cardo scala-rider™. Responda a
las preguntas tocando la pantalla. Para todas
las operaciones que desee realizar con el
TomTom RIDER se utiliza la pantalla táctil.
Siga las instrucciones para establecer una
conexión Bluetooth entre su TomTom RIDER
y sus auriculares Cardo scala-rider™.
Cuando haya respondido a las preguntas, el
TomTom RIDER mostrará la Vista de
conducción.
La pantalla se mostrará en blanco y negro
hasta que el TomTom RIDER localice su
posición actual. Cuando lo haga, la Vista de
conducción se mostrará a todo color.
22
Page 20

Lisbon.book Page 23 Thursday, March 1, 2007 8:48 AM
Utilización de su TomTom RIDER
Auriculares Cardo scala-rider™
A
B
D
C
E
F
G
A Micrófono
B Botón de activación/desactivación
C Altavoz
D Indicador LED
E Bajar volumen
F Subir volumen
G Conector de carga
Antes de poder utilizar sus auriculares
Bluetooth, deberá cargarlos por completo con
ayuda del cargador suministrado con ellos.
Nota: Asegúrese de que utiliza el cargador
adecuado. Existen diferentes cargadores para su
TomTom RIDER y sus auriculares. Si utiliza un
cargador equivocado, es posible que dañe el
dispositivo.
La batería de los auriculares tarda entre 2 y 3
horas en cargarse por completo. Durante la
carga, el indicador LED permanecerá
iluminado en rojo. Una vez finalizada la carga,
el indicador LED se apagará.
Cuando se esté agotando la batería, se
escuchará un tono de aviso.
Uso de los auriculares
Para conectar los auriculares, manténgalo
pulsado el botón de activación/desactivación
durante 6 segundos, hasta que el indicador
LED parpadee 3 veces iluminado en color azul.
Se escuchará un tono de aviso ascendente.
Cuando los auriculares estén conectados, el
indicador LED parpadeará iluminado en azul
cada 3 segundos.
Para desconectar los auriculares, manténgalo
pulsado el botón de activación/desactivación
durante 3 segundos, hasta que el indicador
LED parpadee 3 veces iluminado en rojo. Se
escuchará un tono de aviso descendente.
Si no logró establecer una conexión Bluetooth
entre su módulo de auriculares Bluetooth y su
TomTom RIDER cuando encendió por primera
vez su RIDER, podrá establecerla en cualquier
otro momento.
ES
23
Page 21

Lisbon.book Page 24 Thursday, March 1, 2007 8:48 AM
Utilización de su TomTom RIDER
ES
En el menú principal, toque Cambiar
preferencias. Toque Conectar con auriculares
y siga las instrucciones para establecer la
conexión.
Acople los auriculares a su casco como se
muestra en el Installation poster. Asegúrese
de que coloca el micrófono en la posición
correcta. Para obtener mejores resultados, no
coloque el micrófono directamente delante de
la boca, sino a un lado de la misma.
Localización de su posición actual
Su TomTom RIDER debe estar al aire libre
para que pueda localizar su posición actual. La
primera vez que inicie su RIDER, el dispositivo
tardará cinco minutos en encontrar su
posición actual.
En el futuro encontrará su posición mucho
más rápidamente, normalmente en unos
pocos segundos. Si su RIDER tarda más de
cinco minutos en localizar su posición actual,
asegúrese de que está en un lugar abierto sin
edificios altos o árboles a su alrededor.
Su RIDER no transmite su posición y, por lo
tanto, otros no pueden utilizar la señal para
realizar un seguimiento de por dónde va
conduciendo.
Nota: Antes de conducir con su TomTom RIDER, le
recomendamos que lo cargue por completo con
ayuda del cargador doméstico.
Montaje de su TomTom RIDER
Acople el kit de montaje para RAM™ a su
motocicleta como se muestra en el Installation
poster y, a continuación, coloque su RIDER en
el soporte. Cuando esté acoplando el kit de
montaje a su motocicleta, siga estas
instrucciones:
• Si no está seguro de cómo acoplar el kit de
montaje, pida ayuda a un profesional para
que lo monte por usted.
• Asegúrese de que el kit de montaje no
interfiere con ningún control de la
motocicleta.
• Utilice siempre las herramientas
adecuadas. Si no lo hace, podría dañar o
romper el kit de montaje.
• No apriete las tuercas en exceso. Si lo
hiciera, podría romper alguna pieza del kit
de montaje o dañar el manillar.
• Si está utilizando el perno en forma de u, no
olvide colocar los tapones de goma
suministrados sobre las roscas que queden
expuestas.
Los daños que se produzcan a causa de
modificaciones, de una instalación incorrecta,
incidentes o accidentes en la carretera no
estarán cubiertos. Ni RAM ni TomTom
asumirán ninguna responsabilidad por
cualquier lesión, pérdida o daño directo o
producido como consecuencia de una
instalación incorrecta o de la imposibilidad de
24
Page 22

Lisbon.book Page 25 Thursday, March 1, 2007 8:48 AM
Utilización de su TomTom RIDER
utilización del producto. Antes de utilizarlo, el
usuario deberá determinar si el producto es
adecuado para su uso. El usuario asumirá
todos los riesgos y responsabilidades,
cualesquiera que sean, que estén relacionadas
con el montaje.
Cuide su TomTom RIDER
Es importante que cuide el RIDER y que lo
limpie correctamente.
• Use un paño suave para limpiar la pantalla
de su RIDER; no utilice ningún líquido
limpiador.
• Si su RIDER se moja, séquelo con un paño
suave.
• No abra la carcasa de su RIDER bajo ningún
concepto. Hacerlo podría resultar peligroso
y anularía la garantía.
• No utilice la tarjeta de memoria (tarjeta SD)
en un dispositivo que no sea TomTom. La
tarjeta de memoria podría resultar dañada
por otros dispositivos.
• No exponga el RIDER a temperaturas muy
altas o muy bajas, ya que podrían
producirse daños permanentes. Por
ejemplo, no lo deje en el coche en
calurosos días veraniegos o en frías noches
invernales.
TomTom RIDER
Siempre es una buena idea crear una copia de
seguridad del contenido del TomTom RIDER.
Puede crear una copia de seguridad utilizando
TomTom HOME. Podrá instalar TomTom
HOME utilizando el CD proporcionado con su
TomTom RIDER.
ES
Cree una copia de seguridad del
25
Page 23

Lisbon.book Page 26 Thursday, March 1, 2007 8:48 AM
El primer viaje
ES
El primer viaje
Planificar una ruta con TomTom RIDER es
muy simple. Para planificar la primera ruta,
siga estos pasos.
Nota: Siempre debería planificar sus viajes antes de
comenzar a conducir. Es peligroso planear las rutas
cuando ya está en marcha.
1. Toque la pantalla para abrir el menú
principal.
2. Toque Ir a...
Para su primer viaje, navegaremos hasta
una dirección.
3. Toque Dirección.
Al introducir una dirección, puede elegir
entre cuatro opciones:
• Centro ciudad - toque este botón para
establecer su destino como centro de
una ciudad.
• Calle y número de casa - toque este
botón para establecer una dirección
exacta como destino.
• Código postal - toque este botón para
introducir un código postal como
destino (función completa sólo en Reino
Unido y Países Bajos).
• Cruce o intersección - toque este botón
para establecer su destino como el
punto de cruce de dos calles
Para el primer viaje, introduciremos una
dirección exacta.
4. Toque Calle y número de casa.
26
Page 24

Lisbon.book Page 27 Thursday, March 1, 2007 8:48 AM
5. Comience introduciendo el nombre de la
población a la que desea ir.
A medida que escribe, se mostrarán los
nombres de las ciudades que coinciden
con lo que ha escrito. Cuando su destino
aparezca en la lista, toque el nombre de la
ciudad para establecer el destino.
6. Comience a escribir el nombre de la calle.
Seleccione la calle cuando se muestre en la
lista.
7. A continuación, introduzca el número de
casa de su destino y luego toque Hecho.
8. El RIDER le preguntará si necesita llegar a
una hora determinada.
Toque Sí para introducir una hora de
llegada. El RIDER le mostrará si llega
puntual.
9. Cuando se haya calculado la ruta, toque
Hecho.
TomTom RIDER comenzará a guiarle
inmediatamente hasta su destino utilizando
instrucciones habladas y visuales mostradas
en la pantalla.
Deberá planificar la ruta antes de emprender la
marcha. Durante la conducción, sólo se
mostrará el menú de conducción. Para
obtener más información, consulte el capítulo
Menús en la página 29.
El primer viaje
ES
Nota: Antes de poder planear una ruta,
TomTom RIDER debe ubicar su posición actual.
27
Page 25

Lisbon.book Page 28 Thursday, March 1, 2007 8:48 AM
Vista de conducción
ES
Vista de conducción
A Botones para ampliar y reducir su posición.
B Su posición actual.
C El nombre de la siguiente carretera
principal importante o información sobre
señalización de la carretera, si fuera
aplicable.
D La siguiente instrucción.
Esta zona muestra lo que debe hacer y
cuándo tendrá que hacerlo.
Toque esta zona para repetir la última
instrucción hablada y para cambiar el
volumen.
E El nombre de la próxima calle donde debe
girar.
F Información sobre su viaje.
Normalmente esta zona muestra la
duración restante del viaje, la distancia
restante y la hora de llegada. Para
establecer qué información debe
mostrarse, toque Preferencias de barra de
estado en el menú Preferencias.
G Indicador de la potencia de la señal de GPS.
28
Page 26

Lisbon.book Page 29 Thursday, March 1, 2007 8:48 AM
Menús
Menú principal
Toque la pantalla en cualquier momento
cuando TomTom RIDER muestre la Vista de
conducción para abrir el Menú principal.
• Ir a...
Toque este botón para comenzar a
planificar una ruta.
• Buscar alternativa...
Toque este botón si desea evitar parte de la
ruta, pasar por un lugar concreto o calcular
una ruta alternativa.
• TomTom Tráfico
Toque este botón para activar o desactivar
la información de tráfico.
• Teléfono móvil
Este botón abre el menú de teléfono móvil.
Permite, por ejemplo, hacer llamadas y
escribir o leer mensajes.
• Cambiar preferencias
Este botón abre el menú Preferencias.
Usted puede modificar muchas cosas en la
apariencia y el rendimiento de su
TomTom RIDER.
Menús
ES
Botones ocultos y funciones
Cuando use por primera vez el
TomTom RIDER, no se mostrarán todos los
botones en el menú.
Muchos botones y algunas funciones más
avanzadas están ocultos porque no necesitará
estas funciones con frecuencia.
Para ver todos los botones y funciones, toque
Mostrar TODAS opciones menú en el menú
Preferencias.
Para ocultar estos botones de nuevo, toque
Mostrar menos opciones de menú en el menú
Preferencias.
29
Page 27

Lisbon.book Page 30 Thursday, March 1, 2007 8:48 AM
Menús
ES
Menú de conducción
Si toca la pantalla cuando está conduciendo,
se muestra el menú de conducción:
• Ir a…
Toque este botón para seleccionar un
destino.
• Desactivar sonido/Activar sonido
Toque este botón para activar o desactivar
las instrucciones habladas.
• Borrar ruta
Toque este botón para eliminar la ruta
planificada actualmente. Su
TomTom RIDER dejará de darle
instrucciones.
Su posición continuará indicándose en la
Vista de conducción. No es necesario que
borre una ruta antes de planificar una
nueva o comenzar a navegar a un nuevo
destino.
• Añadir favorito
Toque este botón para añadir su ubicación
actual como favorito. TomTom RIDER
usará la dirección de su ubicación actual
como nombre del lugar favorito.
Posteriormente, podrá regresar y cambiar
el nombre del lugar favorito si lo desea.
Este botón es útil si ve algo interesante
mientras conduce. Puede añadirlo como
lugar favorito de manera que TomTom
RIDER recuerde su ubicación.
30
Page 28

Lisbon.book Page 31 Thursday, March 1, 2007 8:48 AM
GARANTE
Compras realizadas dentro de los EE.UU y Canadá: Si ha realizado
su compra dentro de los Estados Unidos o Canadá, TomTom Inc.,
150 Baker Avenue Extension, Concord Massachusetts 01742
(Estados Unidos de América) le otorga la presente Garantía
Limitada, quedando la presente Limitación de Garantía estipulada
en favor de la misma.
QUÉ CUBRE LA PRESENTE GARANTÍA
1) TomTom International B.V. (“TomTom”) garantiza al comprador
original (“Usted”) del hardware con el que se incluye la presente
Garantía Limitada (“Hardware”) la ausencia de defectos de
fabricación y de materiales del Hardware (“Defectos”) durante un
período de un (1) año en condiciones de uso normal a partir de la
fecha de compra de dicho Hardware (“Período de Garantía”).
Durante el Período de Garantía el Hardware podrá ser reparado o
sustituido, según estime conveniente TomTom (“Garantía
Limitada”), sin coste alguno a su cargo en piezas y mano de obra.
La presente Garantía Limitada cubre tan sólo la sustitución del
Hardware. Si se repara el Hardware una vez finalizado el Período de
Garantía, el Período de Garantía de la reparación concluirá pasados
los seis (6) meses posteriores a la fecha de reparación.
QUÉ NO CUBRE LA PRESENTE GARANTÍA
2) L a Gara ntía Limit ada no cubr e el de sgast e por uso no rmal, no es
de aplicación si personal no autorizado por TomTom abre o repara
el Hardware, y no cubre la reparación ni la sustitución del Hardware
o de cualquier parte del mismo que haya sufrido daños a causa de:
uso inadecuado, humedad, líquidos, proximidad o exposición a
fuentes de calor y accidente, abuso, manejo inadecuado según lo
dispuesto por las instrucciones que se facilitan junto con el
Hardware, negligencia o uso inapropiado. La Garantía Limitada no
cubre daños físicos sufridos por la superficie del Hardware. La
presente Garantía Limitada no cubre ningún tipo de software que
pudiera acompañar al Hardware o que se encontrara instalado en el
mismo. La Garantía Limitada no cubre la instalación, desinstalación
o mantenimiento del Hardware o cualquier coste relacionado con
estas operaciones.
CÓMO REALIZAR UNA RECLAMACIÓN RESPECTO A LA GARANTÍA
3) Para realizar una reclamación en relación a un Defecto, ha de
ponerse en contacto con TomTom durante el Período de Garantía
llamando al 1-978-287-9555 o por mail a través de
www.tomtom.com para explicar el Defecto y para obtener un
número RMA (Autorización para la Devolución de Materiales), en
caso necesario. Ha de devolver el Hardware durante el Período de
Garantía, junto con una explicación del Defecto, a la dirección
facilitada por TomTom. Si surge algún defecto y TomTom recibe
alguna reclamación al amparo de la presente Garantía Limitada una
vez transcurridos los primeros ciento ochenta (180) días del Período
de Garantía, TomTom podrá cobrarle los gastos razonables de
envío y transporte que surjan de la reparación o sustitución del
Hardware. Usted ha de atenerse a cualquier otro procedimiento de
devolución estipulado por TomTom, si lo hubiere.
SUS DERECHOS
4) La presente Garantía Limitada le confiere derechos específicos.
Del mismo modo, puede que usted sea titular de otros derechos
que podrán variar de un estado y de una jurisdicción a otra.
TomTom Garantía Limitada
5) Aun cuando alguna de las partes de la presente Garantía Limitada
fuera considerada inválida o de imposible aplicación, las partes
restantes de la misma continuarán en vigor.
6) La presente Garantía Limitada es la única garantía expresa
realizada a su favor y sustituye a cualquier otra garantía expresa u
obligaciones similares (si las hubiere) originadas por cualquier
publicidad, documentación, embalaje u otras comunicaciones.
7) Salvo en lo dispuesto por la Garantía Limitada y en la medida en
que la ley aplicable lo permita, TomTom y sus proveedores ofrecen
el Hardware "TAL CUAL Y CON TODOS LOS FALLOS QUE
PUDIERAN CONTENER", y rehúsan mediante la presente cualquier
otra garantía o condición, ya sea expresa, implícita o legal, incluida,
sin que suponga límite alguno, (si la hubiere) toda garantía implícita,
obligación o condición de: comerciabilidad, no infracción, disfrute,
integración de sistemas, calidad satisfactoria, adecuación para un
fin concreto, fiabilidad o disponibilidad, precisión o integridad de
respuestas, resultados, elaboración, ausencia de virus, habilidad y
cuidado necesario, todas ellas en relación con el Hardware, y la
prestación o no prestación de soporte u otros servicios,
información, software y contenido relacionado a través del
Hardware o de otro modo, que pudieran derivarse del uso del
mismo. Esta salvedad no es de aplicación (i) a ninguna condición
implícita de titularidad ni (ii) a ninguna garantía implícita de
conformidad con la descripción. Si la ley aplicable requiere
garantías implícitas en relación al Hardware, la duración de tales
garantías estará limitada a noventa (90) días. Algunos estados y/o
jurisdicciones no permiten la limitación de la duración de una
garantía implícita, por lo que puede que lo mencionado
anteriormente no le resulte de aplicación.
8) La presente Garantía Limitada no puede ser transferida a
terceros.
LIMITACIÓN DE RESPONSABILIDAD
9) Ni TomTom ni sus proveedores asumirán responsabilidad alguna
ante usted o ante terceros respecto a ningún daño indirecto,
incidental, consecuente, especial o ejemplar (entre los que se
incluyen, en cada caso, sin que suponga límite alguno, daños por
impericia en el uso del equipo o el acceso a los datos, pérdida de
datos, pérdida de negocio, lucro cesante, interrupción del negocio
o similares) derivado del uso o de la impericia en el uso del
Software y/o el Hardware, incluso cuando TomTom haya sido
avisado de la posibilidad de que se produzcan tales daños.
10) Con independencia de los daños de cualquier naturaleza que
haya podido sufrir (incluidos, sin limitación, todos los daños aquí
referidos y todos los daños directos o generales ya sean por
contrato o de otra naturaleza), la responsabilidad total de TomTom
y cualquiera de sus proveedores estará limitada al importe abonado
por usted por el Hardware.
11) Sin perjuicio de lo arriba mencionado, la responsabilidad de las
partes en caso de muerte o daños personales derivados de la
propia negligencia no tendrá carácter limitado.
12) Algunos estados y/o jurisdicciones no permiten la exclusión o
limitación de daños incidentales o consecuentes, por lo que puede
que las limitaciones o exclusiones arriba indicadas no le sean de
aplicación.
TomTom Garantía Limitada
31
Page 29

Lisbon.book Page 32 Thursday, March 1, 2007 9:01 AM
Contenu du coffret
Contenu du
coffret
A Votre TomTom RIDER
FR
1
2
3
4
a Écran tactile
b Bouton marche-arrêt
c Emplacement de carte mémoire (carte SD)
d Connecteur USB
e Connecteur de charge
f Bouton de réinitialisation
B Carte de code produit C Une carte mémoire (carte SD)
6
5
32
Page 30

Lisbon.book Page 33 Thursday, March 1, 2007 9:01 AM
Contenu du coffret
D Kit micro-oreillette Cardo scala-rider™ E Kit de fixation RAM Mount™
F Support et lanière de sécurité G TomTom RIDER housse
H Chargeur secteur I Documentation
FR
J Câble de batterie K Câble USB
33
Page 31

Lisbon.book Page 34 Thursday, March 1, 2007 9:01 AM
Utiliser votre TomTom RIDER
Utiliser
votre
TomTom
RIDER
Allumer
1. Ouvrez le compartiment en bas de votre
TomTom RIDER.
2. Insérez la carte mémoire dans son
emplacement.
FR
3. Maintenez le bouton marche/arrêt enfoncé
pendant 2 secondes ou jusqu'à ce que
votre TomTom RIDER démarre.
La première fois que vous allumez votre
TomTom RIDER, il peut prendre jusqu'à 20
secondes pour démarrer. Pour arrêter le
TomTom RIDER, maintenez le bouton
marche/arrêt enfoncé pendant 2 secondes.
Configuration
Vous devez d'abord répondre à quelques
questions pour configurer votre appareil et
votre kit micro-oreillette Cardo scala-rider™.
Répondez aux questions en sélectionnant la
réponse appropriée sur l’écran. C'est l'écran
tactile qui vous permet de tout faire avec votre
TomTom RIDER.
Suivez les instructions pour établir une
connexion Bluetooth entre votre
TomTom RIDER et votre kit micro-oreillette
Cardo scala-rider™.
Quand vous avez répondu aux questions,
votre TomTom RIDER affiche le Mode
Conduite.
L'écran s'affiche en noir et blanc jusqu'à ce que
votre TomTom RIDER situe votre position
actuelle. Ceci fait, le mode de pilotage s'affiche
en couleur.
34
Page 32

Lisbon.book Page 35 Thursday, March 1, 2007 9:01 AM
Utiliser votre TomTom RIDER
Kit micro-oreillette Cardo scala-rider™
A
B
D
C
E
F
G
A Microphone
B Bouton marche-arrêt
C Haut-parleur
D DEL
E Diminuer volume
F Augmenter volume
G Connecteur de charge
Avant de pouvoir utiliser votre kit microoreillette Bluetooth, veuillez le charger
complètement à l'aide du chargeur fourni.
À noter: Vérifiez que vous utilisez le chargeur
adéquat. Votre TomTom RIDER et votre kit microoreillette utilisent des chargeurs différents.
L'utilisation d'un chargeur non adapté risque
d'endommager l'appareil.
Le chargement complet du kit micro-oreillette
prend entre 2 et 3 heures. En cours de
chargement, la DEL reste rouge. Lorsqu'il est
terminé, elle s'éteint.
Un signal sonore se déclenche lorsque les
batteries s'affaiblissent.
Utilisation du kit micro-oreillette
Pour allumer le kit micro-oreillette, maintenez
enfoncé le bouton marche/arrêt pendant 6
secondes, jusqu'à ce que la DEL bleue clignote
trois fois. Un signal sonore allant crescendo se
fait entendre. Lorsque le kit micro-oreillette est
allumé, la DEL bleue clignote toutes les trois
secondes.
Pour éteindre le kit micro-oreillette, maintenez
enfoncé le bouton marche/arrêt pendant 3
secondes, jusqu'à ce que la DEL rouge
clignote 3 fois. Un signal sonore décroissant
se fait entendre.
Si vous n'avez pas réussi à établir une
connexion Bluetooth entre votre casque/
oreillette Bluetooth et votre TomTom RIDER
quand vous avez allumé votre RIDER au début,
vous pouvez très bien en établir une
ultérieurement, à tout moment.
FR
35
Page 33

Lisbon.book Page 36 Thursday, March 1, 2007 9:01 AM
Utiliser votre TomTom RIDER
FR
A partir du menu principal, touchez Modifier
les préférences. Touchez Connecter au
casque et suivez les instructions pour établir la
connexion.
Attachez votre kit micro-oreillette à votre
casque comme indiqué sur l'Installation
poster. Veillez à positionner correctement le
microphone. Pour un confort optimal, ne
positionnez pas le microphone directement en
face de votre bouche, mais sur le côté.
Localisation de votre position actuelle
Votre TomTom RIDER doit être à l'extérieur
pour pouvoir situer votre position actuelle. La
première fois que vous démarrez votre RIDER,
il peut s'écouler jusqu'à 5 minutes avant qu'il
ne trouve votre position actuelle.
Par la suite, la recherche de votre position
s'accomplit bien plus rapidement,
normalement en quelques secondes. S'il faut
plus de 5 minutes à votre RIDER pour situer
votre position actuelle, assurez-vous que vous
êtes dans un lieu dégagé, non environné
d'immeubles hauts ou de grands arbres.
Votre RIDER ne transmet pas votre position,
par conséquent d'autres ne peuvent s'en servir
pour vous suivre pendant que vous conduisez.
À noter: Avant de conduire avec votre
TomTom RIDER, nous vous conseillons de le charger
entièrement avec l'adaptateur secteur.
Monter votre TomTom RIDER
Installez le kit de RAM™ Mount sur votre moto
comme indiqué sur l'installation poster, puis
placez votre RIDER sur le support. Lorsque
vous installez le kit de fixation sur votre moto,
suivez ces recommandations :
• Si vous n'êtes pas sûr de savoir installer le
kit de fixation, faites appel à un
professionnel.
• Assurez-vous que le kit de fixation ne gêne
pas le fonctionnement de la moto.
• Utilisez toujours des outils adaptés. Si ce
n'est pas le cas, vous risquez
d'endommager ou de casser le kit de
fixation.
• Ne serrez pas trop les boulons. Vous
risqueriez d'endommager des pièces du kit
de fixation ou les guidons.
• Si vous utilisez l'étrier fileté, n'oubliez pas
de fixer les capuchons en caoutchouc
fournis sur les filetages apparents.
Les dommages dus à des modifications, une
installation inadéquate, les aléas ou les
accidents de la route ne sont pas couverts.
RAM ou TomTom ne sauraient être tenus
responsables des blessures, des pertes ou des
dommages, directs ou indirects, résultant
d'une installation inadéquate ou de
l'impossibilité d'utiliser le produit. Avant toute
utilisation, l'utilisateur doit déterminer si le
produit est réellement adapté à l'usage prévu.
36
Page 34

Lisbon.book Page 37 Thursday, March 1, 2007 9:01 AM
Utiliser votre TomTom RIDER
L'utilisateur assume les risques et les
responsabilités, quels qu'ils soient, liées au
montage du produit.
Prenez soin de votre TomTom RIDER
Il est important de prendre soin de votre
RIDER et de le nettoyer correctement.
• Utilisez un chiffon pour essuyer l'écran de
votre RIDER ; n’utilisez pas de produit de
nettoyage.
• Si votre RIDER est mouillé, l'essuyer avec
un chiffon propre.
• N'ouvrez pas la coque arrière de votre
RIDER quelles que soient les circonstances.
Le fait d'ouvrir lacoque arrière peut être
dangereux et annule la garantie.
• N'utilisez pas la carte mémoire (carte SD)
avec un appareil autre qu'un TomTom. Les
autres périphériques pourraient
endommager la carte mémoire.
• N'exposez pas votre RIDER à des
températures trop élevées ou trop basses,
qui risquent de l'endommager de façon
définitive. Par exemple, ne le laissez pas
dans une voiture la journée en plein été ou
la nuit en plein hiver.
Effectuez des sauvegardes de votre
TomTom RIDER
C'est toujours une bonne idée de faire une
sauvegarde du contenu de votre
TomTom RIDER. Vous pouvez faire une
sauvegarde en utilisant TomTom HOME. Vous
pouvez installer TomTom HOME à l'aide du CD
fourni avec TomTom RIDER.
FR
37
Page 35

Lisbon.book Page 38 Thursday, March 1, 2007 9:01 AM
Calcul d'un premier itinéraire
FR
Calcul d'un premier itinéraire
La planification d'un itinéraire est
extrêmement simple avec TomTom RIDER.
Pour planifier votre premier itinéraire,
procédez comme indiqué ci-dessous :
À noter: Vous devriez toujours planifier vos
déplacements avant de partir. Il est dangereux de
planifier des itinéraires pendant que vous conduisez.
1. Appuyez sur l’écran pour afficher le menu
principal.
2. Touchez Naviguer vers...
Pour votre premier déplacement, nous
naviguerons vers une adresse.
3. Touchez Adresse.
Pour entrer une adresse, vous avez le choix
entre quatre possibilités :
• Centre-ville - touchez ce bouton pour
définir un centre-ville comme
destination.
• Rue et numéro de rue - touchez ce
bouton pour définir une adresse précise
comme destination.
• Code postal - touchez ce bouton pour
entrer un code postal comme
destination (uniquement en Grande
Bretagne et aux Pays-Bas).
• Croisement ou intersection - touchez
ce bouton pour définir une intersection
entre deux rues comme point de
destination.
Pour votre premier voyage, vous entrerez
une adresse exacte.
38
Page 36

Lisbon.book Page 39 Thursday, March 1, 2007 9:01 AM
Calcul d'un premier itinéraire
4. Touchez Rue et numéro de rue.
5. Tapez le nom de la ville dans laquelle vous
désirez vous rendre.
Au fur et à mesure de votre frappe, les
noms des villes qui correspondent à ce que
vous avez déjà tapé s'affichent. Dès que
votre destination est affichée dans la liste,
touchez le nom de la ville pour la valider.
6. Commencez à taper le nom de la rue.
Sélectionnez la rue lorsqu'elle s'affiche
dans la liste.
7. Puis saisissez le numéro de rue de votre
destination et touchez Terminé.
8. Votre RIDER vous demande si vous devez
arriver à une heure précise.
Touchez OUI pour entrer une heure
d'arrivée. Votre RIDER vous indique si vous
arriverez à l'heure.
9. Lorsque l'itinéraire est calculé, touchez
Terminé.
TomTom RIDER commencera
immédiatement à vous guider vers votre
destination grâce aux instructions vocales et
aux instructions visuelles affichées à l'écran.
Vous devez planifier votre itinéraire avant de
vous mettre en route. Lorsque vous
conduisez, seul le menu de pilotage s’affiche.
Pour plus d'informations, reportez-vous à la
partie Menus en page 41.
FR
À noter: Avant de pouvoir planifier un itinéraire de
cette façon, TomTom RIDER doit d'abord localiser
votre position actuelle.
39
Page 37

Lisbon.book Page 40 Thursday, March 1, 2007 9:01 AM
Mode conduite
FR
Mode conduite
A Boutons pour effectuer un zoom avant ou
arrière sur votre position.
B Position actuelle
C Nom de la prochaine route principale ou
information sur le prochain panneau de
direction, le cas échéant.
D Instruction suivante
Cette zone indique ce qu'il faut faire et
quand.
Touchez cette zone pour répéter la dernière
instruction vocale et pour modifier le
volume du son.
E Nom de la prochaine rue à prendre
F Informations concernant votre trajet.
Normalement, cette zone indique la durée
de trajet restante, la distance encore à
parcourir et l'heure d'arrivée. Pour définir
les informations à afficher, touchez
Préférences de barre d'état dans le menu
Préférences.
G Indicateur de la puissance du signal GPS.
40
Page 38

Lisbon.book Page 41 Thursday, March 1, 2007 9:01 AM
Menus
Menu principal
Lorsqu'il est en mode conduite, vous pouvez à
tout moment toucher l'écran de votre
TomTom RIDER pour ouvrir le Menu principal.
• Naviguer vers...
Appuyez sur ce bouton pour commencer à
planifier un itinéraire.
• Rechercher un itinéraire bis...
Touchez ce bouton pour contourner une
partie de votre itinéraire, passer par un
endroit particulier ou emprunter un
itinéraire bis.
• TomTom Trafic
Appuyez sur ce bouton pour activer ou
désactiver les informations routières.
• Téléphone portable
Ce bouton ouvre le menu du téléphone
portable. Vous pouvez, par exemple,
émettre des appels, écrire ou lire des
messages.
• Modifier les préférences
Ce bouton ouvre le menu Préférences.
Vous pouvez apporter beaucoup de
changements à l'aspect et à la façon de
réagir de votre TomTom RIDER.
Menus
FR
Boutons et fonctionnalités cachés
Quand vous commencez à utiliser votre
TomTom RIDER, tous les boutons ne
s'affichent pas dans le menu.
De nombreux boutons et quelques
fonctionnalisés avancées sont cachés parce
que vous n'en aurez pas besoin très souvent.
Pour afficher l'ensemble des boutons et des
fonctionnalités, touchez Afficher TOUTES les
options dans le menu Préférences.
Pour masquer à nouveau ces boutons,
touchez Réduire les options de menu dans le
menu Préférences.
41
Page 39

Lisbon.book Page 42 Thursday, March 1, 2007 9:01 AM
Menus
FR
Menu de pilotage
Si vous appuyez sur l’écran en conduisant, le
menu de pilotage s’affiche :
• Naviguer vers...
Appuyez sur ce bouton pour sélectionner
une destination.
• Désactivation / activation du son
Cliquez sur ce bouton pour activer et
désactiver le son.
• Effacer itinéraire
Appuyez sur ce bouton pour supprimer
l’itinéraire actuellement planifié. Votre
TomTom RIDER s'arrêtera de vous donner
la direction.
Votre position reste quand même affichée
en mode de pilotage. Vous n’avez pas à
effacer un itinéraire avant d’en planifier un
nouveau ou de naviguer vers une nouvelle
destination.
• Ajouter aux favoris
Appuyez sur ce bouton pour ajouter votre
position actuelle aux favoris. TomTom
RIDER attribue l’adresse de votre position
actuelle au favori. Vous pouvez ensuite y
revenir et modifier le nom du favori si vous
le souhaitez.
Ce bouton est utile si vous voyez quelque
chose d'intéressant en conduisant. Vous
pouvez mémoriser l’endroit correspondant
dans TomTom RIDER en l’ajoutant à vos
favoris.
42
Page 40

Lisbon.book Page 43 Thursday, March 1, 2007 9:01 AM
GARANT
Achats aux USA et au Canada : Si vous avez effectué votre achat
aux États-unis ou au Canada, cette Garantie Limitée est accordée
par, et cette Limitation de Responsabilité stipulée pour, TomTom
Inc., 150 Baker Avenue Extension, Concord Massachusetts 01742
(États-unis d'Amérique).
CE QUI EST COUVERT PAR CETTE GARANTIE
1) TomTom Inc. (“TomTom”) certifie à l’acheteur original (« vous »)
du matériel qu’accompagne cette Garantie Limitée (« Matériel »)
que le Matériel est garanti contre tout vice de fabrication ou de
matériau lorsqu’il est utilisé dans des conditions normales
(« Vices ») pendant un (1) an à compter de la date où vous avez
acheté le matériel (« Période de Garantie »). Pendant la durée de la
Période de Garantie, le Matériel sera réparé ou remplacé, au choix
de TomTom (« Garantie Limitée ») sans frais de pièces ou de main
d’œuvre. Cette Garantie Limitée ne couvre que le remplacement du
matériel. Si le Matériel est réparé après l’expiration de la Période de
Garantie, la Période de Garantie pour la réparation expirera six (6)
mois suivant la date de la réparation.
CE QUI N'EST PAS COUVERT PAR CETTE GARANTIE
2) La Garantie Limitée ne couvre pas l’usure normale et l’usage
abusif, ne joue pas lorsque le Matériel a été ouvert ou réparé par
une personne non agréée par TomTom et ne couvre ni la réparation
ni le remplacement de tout ou partie du Matériel consécutifs à des
dommages résultant de : la mauvaise utilisation, la présence
d’humidité ou de liquides, la proximité ou l’exposition à une source
de chaleur, un accident, l’usage abusif, l’utilisation non conforme
aux instructions livrées avec le Matériel, la négligence ou
l’utilisation inadéquate. La Garantie Limitée ne couvre pas les
dommages physiques à la surface du Matériel. La présente Garantie
Limitée ne couvre pas le(s) Logiciel(s) qui est livré avec ou installé
sur le Matériel. La présente Garantie Limitée ne couvre pas
l’installation, l’enlèvement et la maintenance du Matériel ou les frais
qui y sont attachés.
COMMENT ACTIONNER LA GARANTIE
3) Pour introduire une réclamation pour Vice, vous devez contacter
TomTom au cours de la Période de Garantie au 1-978-287-9555 ou
par courriel via www.tomtom.com afin d'exposer la nature du Vice
et obtenir un numéro RMA d'autorisation de retour de matériel
(Return Materials Authorization) si nécessaire. Vous devez
retourner le Matériel au cours de la Période de Garantie,
accompagné des détails concernant le Vice, à l'adresse qui vous
sera communiquée par TomTom. Si vous constatez un Vice et si
vous faites parvenir à TomTom une réclamation valide selon les
termes de cette Garantie Limitée postérieurement aux cent quatrevingt (180) premiers jours de la Période de Garantie, TomTom peut
vous facturer les frais d'expédition et de manutention liés à la
réparation ou au remplacement du Matériel, dans les limites
raisonnables. Vous devez vous soumettre à toute autre procédure
de renvoi stipulée, le cas échéant, par TomTom.
VOS DROITS
4) Cette Garantie Limitée vous donne des droits spécifiques
reconnus par la loi et vous pouvez avoir d'autres droits qui varient
d'état à état ou d'une juridiction à l'autre.
TomTom Garantie Limitée
5) Si une partie de cette Garantie Limitée était déclarée nulle ou
inapplicable, les autres clauses de cette Garantie Limitée
conserveraient néanmoins toute leur force et leurs effets.
6) La présente Garantie Limitée est l'unique garantie expresse qui
vous est accordée et remplace toute autre garantie expresse ou
obligation similaire éventuelle figurant sur les publicités,
documentation, emballage ou autres communications.
7) Hormis la Garantie Limitée et dans les limites maximales
permises par la loi en vigueur, TomTom et ses Fournisseurs
proposent le Logiciel et le Matériel EN L'ÉTAT AVEC TOUS LEURS
DÉFAUTS et déclinent par la présente Garantie Limitée toute autre
garantie ou condition expresse, implicite ou statutaire, notamment
et sans aucune restriction, les garanties implicites (éventuelles), les
obligations ou les conditions de commerciabilité, de non
contrefaçon, de jouissance paisible, d'intégration au système, de
qualité satisfaisante, d'utilisation dans un but particulier, de fiabilité
ou de disponibilité, d'exactitude ou d'exhaustivité des réponses, des
résultats, des efforts professionnels, d'absence de virus et
d'absence de négligence pour le Logiciel et/ou le Matériel, et la
fourniture ou l'absence de fourniture de support ou autres services,
informations, logiciels et contenu associés par le Logiciel et/ou le
Matériel, ou résultant de l'utilisation du Logiciel et/ou du Matériel.
Cette exclusion ne s'applique (i) ni aux conditions implicites quant
au titre, (ii) ni à aucune garantie implicite de conformité à la
description. Si le droit applicable prévoit des garanties implicites
tenant au Logiciel et/ou au Matériel, lesdites garanties sont limitées
à quatre-vingt-dix (90) jours. Certains états et/ou juridictions ne
tolèrent pas de limitations de durée des garanties implicites, de
sorte que la limitation précitée peut ne pas vous concerner.
8) Cette Garantie Limitée n'est pas transférable.
LIMITATION DE RESPONSABILITE
9) Ni TomTom, ni ses fournisseurs, ne sont tenus responsables des
dommages ou pertes indirects, accessoires, spéciaux, accidentels,
exemplaires ou fortuits, (en ce compris, et de façon non exhaustive,
les dommages ou pertes liées à l'impossibilité d'utiliser
l'équipement ou d'accéder aux données, la perte de données, la
perte de chiffre d'affaires ou de bénéfices, l'interruption du travail ou
de l'occupation) que vous ou des tiers pourriez subir, et découlant
de l'utilisation ou de l'impossibilité d'utiliser le Logiciel et/ou le
Matériel, y compris dans les cas où TomTom aura été avisé de la
possibilité de tels dommages ou pertes.
10) Nonobstant les dommages ou pertes que vous pouvez avoir
subis pour une raison quelconque (y compris tout dommage décrit
ci-dessus et tout dommage direct ou général contractuel ou autre),
la responsabilité de TomTom et de ses fournisseurs est limitée au
montant que vous avez payé pour l’acquisition du Logiciel et/ou du
Matériel.
11) Nonobstant ce qui précède, la responsabilité de chacune des
parties pour préjudice mortel ou corporel causé par sa propre
négligence ne sera pas limitée.
12) Certains états et/ou juridictions n'acceptent pas l'exclusion ou la
limitation de responsabilité pour les préjudices indirects ou
accessoires, en conséquence de quoi les limitations décrites cidessus pourraient ne pas vous concerner.
TomTom Garantie Limitée
43
Page 41

Adddendum_Lisbon_US.fm Page 44 Thursday, March 1, 2007 9:06 AM
Addendum
Addendum
Important Safety Notices and Warnings
Global Positioning System
The Global Positioning System (GPS) is a satellite-based system that
provides location and timing information around the globe. GPS is
operated and controlled under the sole responsibility of the Government
of the United States of America which is responsible for its availability and
accuracy. Any changes in GPS availability and accuracy, or in
environmental conditions, may impact the operation of your
TomTom RIDER. TomTom does not accept any liability for the availability
and accuracy of GPS.
Use with Care
Use of TomTom RIDER for navigation still means that you need to drive
with due care and attention.
Aircraft and Hospitals
Use of devices with an antenna is prohibited on most aircraft, in many
hospitals and in many other locations. TomTom RIDER must not be used
in these environments.
Battery
This product uses a Lithium-Ion battery. Do not use it in a humid, wet and/
or corrosive environment. Do not put, store or leave your product in or
near a heat source, in a high temperature location, in strong direct sunlight,
in a microwave oven or in a pressurized container, and do not expose it to
temperatures over 60 C (140 F). Failure to follow these guidelines may
cause the Lithium-Ion battery to leak acid, become hot, explode or ignite
and cause injury and/or damage. Do not pierce, open or disassemble the
battery. If the battery leaks and you come into contact with the leaked
fluids, rinse thoroughly with water and seek medical attention
immediately. For safety reasons, and to prolong the lifetime of the battery,
charging will not occur at low (below 0 C/32 F) or high (over 45 C/113 F)
temperatures.
Temperatures: Standard operation: -10 C (14 F) to +55 C (131 F); short
period storage: -20 C (-4 F) to + 60 C (140 F); long period storage: -20 C (4 F) to +25C (77F).
Mounting TomTom RIDER
Extreme care must be taken when mounting TomTom RIDER on a
motorcycle. Read the description in the Quick Start Guide carefully before
mounting TomTom RIDER on your motorcycle. TomTom RIDER shall be
mounted in compliance with the relevant legislation and the vehicle
manufacturer's rules. Failure to mount TomTom RIDER correctly could
result in damage to your vehicle and serious injury to the vehicle rider and
other road users. TomTom RIDER is mounted on your motorcycle at your
own risk.
Battery cable
The power cable shall be routed to avoid sharp bends, abrasion,
overheating, exhaust gases and battery acids and other potential hazards.
It must not be strained nor distorted by e.g. excessive tightening of cable
ties. Ensure that all connections are mechanically and electrically safe and
secure. Keep away from heat sources and vehicle controls. It must not
THE LITHIUM-ION BATTERY CONTAINED IN THE
PRODUCT MUST BE RECYCLED OR DISPOSED OF
PROPERLY. USE YOUR TOMTOM ONLY WITH THE
SUPPLIED DC POWER LEAD (CAR CHARGER/BATTERY
CABLE) AND AC ADAPTER (HOME CHARGER) FOR
BATTERY CHARGING.
To recycle your TomTom RIDER unit please see your
local approved TomTom service center.
hinder the operation of safety equipment nor interfere with the driver’s
ability to control the vehicle.
SPECIAL NOTE REGARDING DRIVING IN CALIFORNIA
California Vehicle Code Section 26708 (a) (1) provides that "No persons
shall drive any motor vehicle with an object or material placed, displayed,
installed, affixed, or applied upon the windshield or side or rear windows."
Drivers in California should not use a suction mount on their windshield,
side or rear windows. TomTom Inc. bears no responsibility for any fines,
penalties or damage that may be incurred by disregarding this notice.
While driving in California, TomTom recommends the use of its Alternative
Mounting Kit, which includes options for mounting TomTom devices on
the dashboard and using the air vents. See www.tomtom.com for more
information about this mounting option.
Note: this section of the California Vehicle Code applies to anyone driving
in California, not just California residents.
FCC Information for the User
This product contains a transmitter which must not be co-located or
simultaneously operated in conjunction with any other transmitter.
Exposure to Radio Frequency Radiation
To comply with RF exposure requirements please maintain a separation
distance of at least 20 cm / 7 inches from any part of the product.
Radio and Television Interference
This equipment radiates radio frequency energy and if not used properly that is, in strict accordance with the instructions in this manual - may cause
interference to radio communications and television reception.
It has been tested and found to comply with the limits for a Class B digital
device pursuant to part 15 of the FCC Rules. These are designed to provide
reasonable protection against harmful interference in a residential
installation. However, there is no guarantee that interference will not occur
in a particular installation. If this equipment does cause harmful
interference to radio or television reception, which can be determined by
turning the equipment off and on, the user is encouraged to try to correct
the interference by one or more of the following measures:
• Reorient or relocate the receiving antenna.
• Increase the separation distance between the equipment and the
receiver.
• If you are using the equipment with a mains adapter, plug it into an
outlet which is on a different circuit from that to which the receiver is
connected.
• Consult an experienced radio/TV technician for help.
Important
This equipment was tested for FCC compliance under conditions that
included the use of shielded cables and connectors between it and the
peripherals. It is important that you use shielded cable and connectors to
reduce the possibility of causing radio and television interference.
Shielded cables, suitable for the product range, can be obtained from an
authorised dealer. If the user modifies the equipment or its peripherals in
any way, and these modifications are not approved by TomTom, the FCC
may withdraw the user’s right to operate the equipment. For customers in
the USA, the following booklet prepared by the Federal Communications
Commission may be of help: “How to Identify and Resolve Radio-TV
Interference Problems”. This booklet is available from the US Government
Printing Office, Washington, DC 20402. Stock No 004-000-00345-4.
FCC Declaration of Conformity
Tested to Comply with FCC Standards for Home or Office Use
TomTom RIDER has been tested to – and complies with – part 15 of the
FCC rules. Operation is subject to the following two conditions:
44
Page 42

Adddendum_Lisbon_US.fm Page 45 Thursday, March 1, 2007 9:06 AM
1. This device may not cause harmful interference.
2. This device must accept any interference received, including
interference that may cause undesired operation.
Responsible party in North America
TomTom, Inc., 150 Baker Avenue, Concord, MA 01742
Tel: 866 48-6866 option 1 (1-866-4-TOMTOM)
Emissions information for Canada
This Class B digital apparatus complies with Canadian ICES-003. Cet
appareil numérique de la classe B est conforme à la norme NMB-003 du
Canada.
Ctick
not entirely up-to-date. The information in this document is subject to
change without notice.
TomTom shall not be liable for technical or editorial errors or omissions
contained herein; nor for incidental or consequential damages resulting
from the performance or use of this material. This document contains
information protected by copyright. No part of this document may be
photocopied or reproduced in any form without prior written consent from
TomTom International B.V.
Part numbers
TomTom RIDER: 4K00.
N14644
This product displays the Ctick to show it complies with all
relevant Australian and New Zealand regulations.
This Document
Great care was taken in preparing this manual. Constant
product development may mean that some information is
100
Addendum
45
Page 43

copyrights_Lisbon_US.fm Page 46 Thursday, March 1, 2007 9:08 AM
Copyright notices
Copyright notices
© 2007 TomTom International B.V., The Netherlands.
Patents Pending. All rights reserved.
TomTom and the TomTom logo are registered trademarks of TomTom
International B.V., The Netherlands. All other trademarks are the property
of their respective owners.
Our end user license agreement and a limited warranty apply to this
product; they are included in this package. You can also review both at
www.tomtom.com/legal
Data Source
US - ©2007 NAVTEQ All Rights Reserved.
Canada - ©2007 NAVTEQ All Rights Reserved.
SoundClear™ acoustic echo cancellation software © A coustic
Technologies Inc.
Some images are taken from NASA’s Earth Observatory.
The purpose of NASA’s Earth Observatory is to provide a freely-accessible
publication on the Internet where the public can obtain new satellite
imagery and scientific information about our home planet.
The focus is on Earth’s climate and environmental change:
earthobservatory.nasa.gov/
46
Page 44

LimitedWarranty_non-US.fm Page 47 Thursday, March 1, 2007 9:09 AM
TomTom limited warranty
WARRANTOR
Non-U.S. and non-Canadian purchases: If you have made your
purchase outside the United States and Canada, this Limited
Warranty is granted by and this Limitation of Liability is stipulated
for the benefit of TomTom International B.V., Rembrandtplein 35,
1017 CT Amsterdam (The Netherlands).
WHAT THIS WARRANTY COVERS
1) TomTom International B.V. (“TomTom”) warrants to you that the
Hardware will be free from defects in workmanship and materials
under normal use (“Defects”) for a period of two (2) years from the
date that the Hardware was first purchased by you (“Warranty
Period”). During the Warranty Period the Hardware will be repaired
or replaced at TomTom’s choice (“Limited Warranty”) without
charge to you for either parts or labour. This Limited Warranty
covers the replacement of the Hardware only. If the Hardware is
repaired after the Warranty Period has expired, the Warranty Period
for the repair will expire six (6) months after the date of repair.
WHAT THIS WARRANTY DOES NOT COVER
2) The Limited Warranty does not apply to normal wear and tear,
does not apply when the Hardware is opened or repaired by
someone not authorized by TomTom and does not cover repair or
replacement of any Hardware or part thereof damaged by: misuse,
moisture, liquids, proximity or exposure to heat and accident,
abuse, non-compliance with the instructions supplied with the
Hardware, neglect or misapplication. The Limited Warranty does
not cover physical damage to the surface of the Hardware. This
Limited Warranty does not cover any software that may accompany
or be installed on the Hardware.
HOW TO MAKE A WARRANTY CLAIM
3) In order to make a claim of a Defect, you must contact TomTom
by email during the Warranty Period via www.tomtom.com to
explain the Defect and to obtain an RMA number (Return Materials
Authorization) if necessary. You must return the Hardware during
the Warranty Period, along with an explanation of the Defect, to the
address provided to you by TomTom. If a defect arises and a valid
claim under this Limited Warranty is received by TomTom after the
first one hundred and eighty (180) days of the Warranty Period,
TomTom is entitled to charge you for any reasonable shipping and
handling costs made in connection with the repair or replacement
of the Hardware. You must comply with any other return
procedures stipulated by TomTom, if any.
YOUR LEGAL RIGHTS
4) Some countries may not allow the exclusion or limitation of
damages. If any part of this Limited Warranty is held to be invalid or
unenforceable, the remainder of the Limited Warranty shall
nonetheless remain in full force and effect.
5) This Limited Warranty is the only express warranty made to you
and is provided in lieu of any other express warranties or similar
obligations (if any) created by any advertising, documentation,
packaging, or other communications.
6) Except for the Limited Warranty and to the maximum extent
permitted by applicable law, TomTom and its suppliers provide the
Hardware “AS IS AND WITH ALL FAULTS”, and hereby disclaim all
other warranties and conditions, whether express, implied or
statutory, including, but not limited to, any (if any) implied
warranties, duties or conditions of satisfactory quality, of fitness for
a particular purpose, of reliability or availability, of accuracy or
completeness of responses, of results, of workmanlike effort, of lack
of viruses, and of reasonable care and skill, all with regard to the
Hardware, and the provision of or failure to provide support or other
services, information, software, and related content through the
Hardware or otherwise arising out of the use of the Hardware. Also,
there is no warranty or condition of quiet enjoyment, quiet
possession, or non-infringement with regard to the Hardware. This
exclusion does not apply to (i) any implied condition as to title and
(ii) any implied warranty as to conformity with description.
7) This Limited Warranty does not affect any legal rights under
applicable national legislation governing the sale of consumer
goods.
8) This Limited Warranty cannot be transferred to any other person.
LIMITATION OF LIABILITY
9) Neither TomTom nor its suppliers shall be liable to you or to any
third party for any damages either direct, indirect, incidental,
consequential or otherwise (including in each case, but not limited
to, damages for the inability to use the equipment or access data,
loss of data, loss of business, loss of profits, business interruption
or the like) arising out of the use of or inability to use the Hardware
even if TomTom has been advised of the possibility of such
damages.
10) Notwithstanding any damages that you might incur for any
reason whatsoever (including, without limitation, all damages
referenced herein and all direct or general damages in contract or
anything else), the entire liability of TomTom and any of its
suppliers shall be limited to the amount actually paid by you for the
Hardware.
11) TomTom shall not be liable for (i) any fraud on the part of its
employees and/or agents; or (ii) any fraudulent misrepresentation
on the part of its employees and/or agents.
12) Notwithstanding the above, neither party’s liability for death or
personal injury resulting from its own negligence shall be limited.
TomTom limited warranty
47
 Loading...