

Page 1

TomTom BRIDGE
Reference Guide
14600
Page 2

Contents
Welcome to the TomTom BRIDGE 6
Starting the TomTom BRIDGE 8
Using gestures 9
Apps on the TomTom BRIDGE 10
Connecting the TomTom BRIDGE 11
About connecting TomTom BRIDGE ........................................................................... 11
Connect using Bluetooth ........................................................................................ 11
Connect using Portable Wi-Fi Hotspot ....................................................................... 12
Reconnecting your smartphone ............................................................................... 12
Unable to get a connection .................................................................................... 13
Features on the TomTom BRIDGE 14
Sleep settings ..................................................................................................... 14
Memory card slot ................................................................................................ 14
Transferring files to your device .............................................................................. 14
System bar ........................................................................................................ 15
Updating the software .......................................................................................... 15
Sending information to TomTom .............................................................................. 16
Clearing personal data .......................................................................................... 16
Taking a screenshot ............................................................................................. 16
2
Page 3

Language 18
Installing in your vehicle 19
Charging the TomTom BRIDGE 20
The TomTom BRIDGE is not starting 21
Caring for your TomTom navigation app 22
Getting help 23
Welcome to navigation with TomTom 25
About TomTom services 26
GPS reception 27
What's on the TomTom Navigation app screen 28
The map view..................................................................................................... 28
The guidance view ............................................................................................... 30
The route bar ..................................................................................................... 32
Distances and the route bar ............................................................................... 33
The quick menu .................................................................................................. 33
Navigation buttons............................................................................................... 33
Other buttons ..................................................................................................... 35
Volume control ................................................................................................... 36
Running in the background ..................................................................................... 36
Changing the text and button size ............................................................................ 36
Traffic 37
About TomTom Traffic .......................................................................................... 37
The route bar ..................................................................................................... 37
Looking at traffic on the map ................................................................................. 38
Looking at traffic on your route ............................................................................... 39
Traffic incidents ................................................................................................. 40
Advanced Lane Guidance ....................................................................................... 41
Time-dependent speed limits ................................................................................. 41
Using Quick Search 43
About search ...................................................................................................... 43
Planning a route to a POI using search ....................................................................... 43
Planning a route to a POI using online search .............................................................. 45
Entering search terms ........................................................................................... 47
Working with search results ................................................................................... 48
About ZIP codes .................................................................................................. 50
About mapcodes ................................................................................................. 50
List of POI type icons ............................................................................................ 50
3
Page 4

Planning a route 55
Planning a route to an address using search ................................................................ 55
Planning a route to a city center ............................................................................. 56
Planning a route to a POI using search ....................................................................... 58
Planning a route using the map ............................................................................... 60
Planning a route using My Places ............................................................................. 61
Planning a route using coordinates ........................................................................... 63
Planning a route using a mapcode ............................................................................ 64
Finding an alternative route ................................................................................... 65
Planning a route in advance ................................................................................... 66
Finding a parking lot ............................................................................................ 67
Finding a gas station ............................................................................................ 69
Changing your route 72
The Current Route Menu ....................................................................................... 72
Avoiding a blocked road ........................................................................................ 73
Types of route .................................................................................................... 74
Route features ................................................................................................... 74
Adding a stop to your route from your current route ..................................................... 74
Adding a stop to your route using the map ................................................................. 75
Deleting a stop from your route ............................................................................... 75
Reordering stops on a route ................................................................................... 75
My Routes 76
About My Routes ................................................................................................. 76
Saving a route .................................................................................................... 76
Navigating using a saved route ................................................................................ 76
Adding a stop to a saved route using the map .............................................................. 77
Deleting a route from My Routes .............................................................................. 78
Voice control (Speak & Go) 79
About voice control.............................................................................................. 79
Starting voice control ........................................................................................... 79
The voice control screen ....................................................................................... 80
Some tips for using voice control ............................................................................. 80
What you can use voice control for........................................................................... 81
Saying commands in different ways .......................................................................... 81
Entering an address using voice control ..................................................................... 82
Going home using voice control ............................................................................... 82
Going to a POI using voice control ............................................................................ 83
Changing a setting using voice control ....................................................................... 83
Safety Cameras 85
About safety cameras ........................................................................................... 85
Safety Camera warnings ........................................................................................ 85
Changing the way you are warned ............................................................................ 87
Reporting a new safety camera ............................................................................... 87
Confirm or remove a speed trap .............................................................................. 88
Updating locations for cameras and hazards ............................................................... 88
My Places 89
About My Places .................................................................................................. 89
4
Page 5

Setting your home location .................................................................................... 89
Changing your home location .................................................................................. 90
Adding a location from My Places ............................................................................. 91
Add a location to My Places from the map .................................................................. 91
Adding a location to My Places using search ................................................................ 91
Deleting a recent destination from My Places .............................................................. 92
Deleting a location from My Places ........................................................................... 92
Importing a POI list .............................................................................................. 92
Settings 94
Appearance ....................................................................................................... 94
Display ......................................................................................................... 94
Route Bar ...................................................................................................... 95
Guidance view ................................................................................................ 96
Automatic Zoom.............................................................................................. 96
Voices .............................................................................................................. 97
Voice Control ..................................................................................................... 98
Maps ................................................................................................................ 98
Route Planning ................................................................................................... 98
Sounds and Warnings ............................................................................................ 99
Warning type ................................................................................................. 99
Safety camera warnings .................................................................................... 99
Safety warnings .............................................................................................. 99
Units ............................................................................................................... 100
Language ......................................................................................................... 100
Getting Help 101
Help ............................................................................................................... 101
Using the External Camera app 103
Using the TomTom Music app 105
Addendum 106
Copyright notices 112
5
Page 6

This Reference Guide explains how to use the TomTom BRIDGE and the installed TomTom apps. The
Welcome to the TomTom BRIDGE
Reference Guide has the following sections:
The TomTom BRIDGE
The TomTom Navigation app
The TomTom Camera app
The TomTom Music app
Important: For other settings and operation instructions for the TomTom BRIDGE, and for
instructions about other apps installed on the TomTom BRIDGE, please refer to the applicable User
Documentation.
Version 14.600
6
Page 7

The TomTom BRIDGE
7
Page 8
The TomTom BRIDGE starts when it is in its dock and the dock has power. When the TomTom
Starting the TomTom BRIDGE
BRIDGE is not in its dock, you can also press the On/Off button until the device starts.
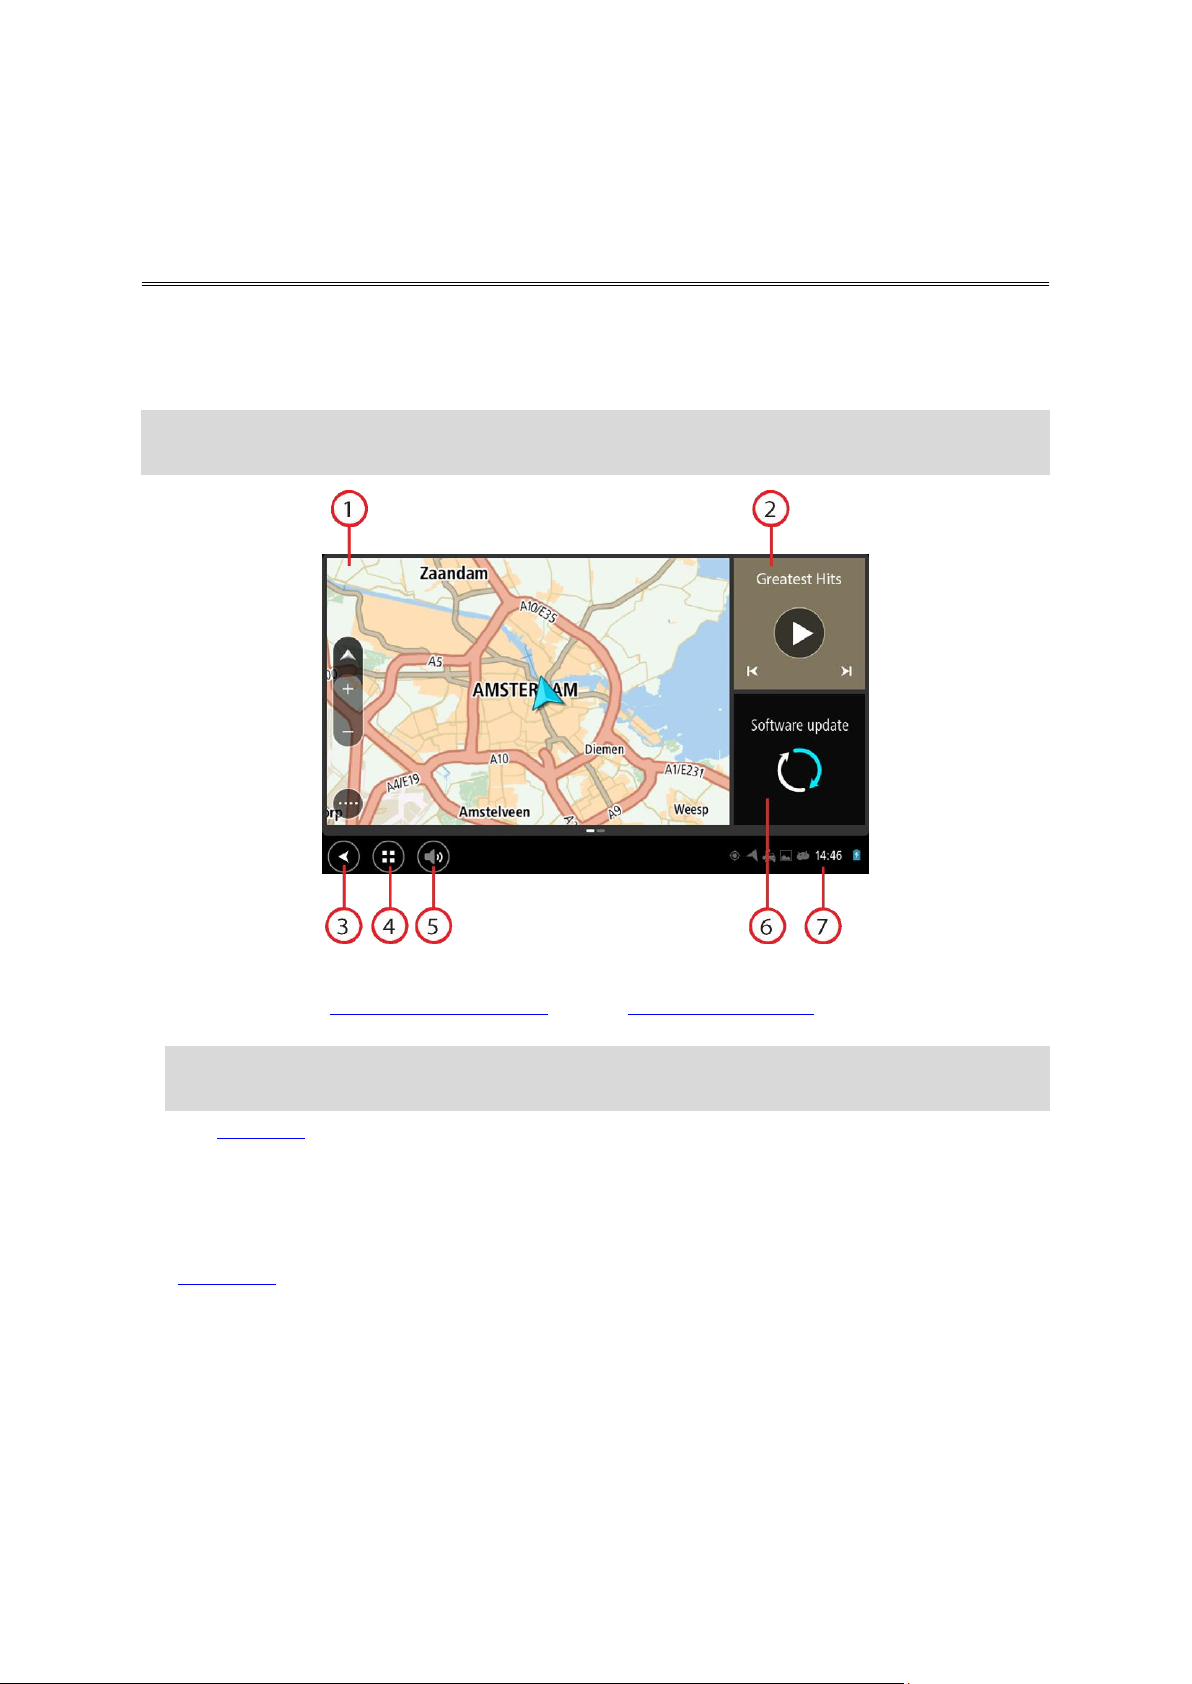
The TomTom BRIDGE home screen is shown.
Note: The TomTom navigation app home screen shown below is an example. The home screen on
the TomTom navigation app might look different and have different apps installed.
1. An app running as a widget.
For example the TomTom Navigation app and the External camera app can run in a widget on
the home screen. Select the widget to open the app.
Note: A widget is an app that runs in its own panel. You can select a widget to open the full
app.
2. The Music app running as a widget.
3. Back button.
Select this button to return to the previous screen that was open.
4. Home button.
Select this button to return to the device home screen.
5. System bar.
You can add shortcuts for your favorite apps to this bar.
6. Software update button.
Shortcut button to open the Software update app. This app lets you update the TomTom navigation app to the latest software version.
7. Status bar.
Touch this area to show app notifications and the device status.
8
Page 9
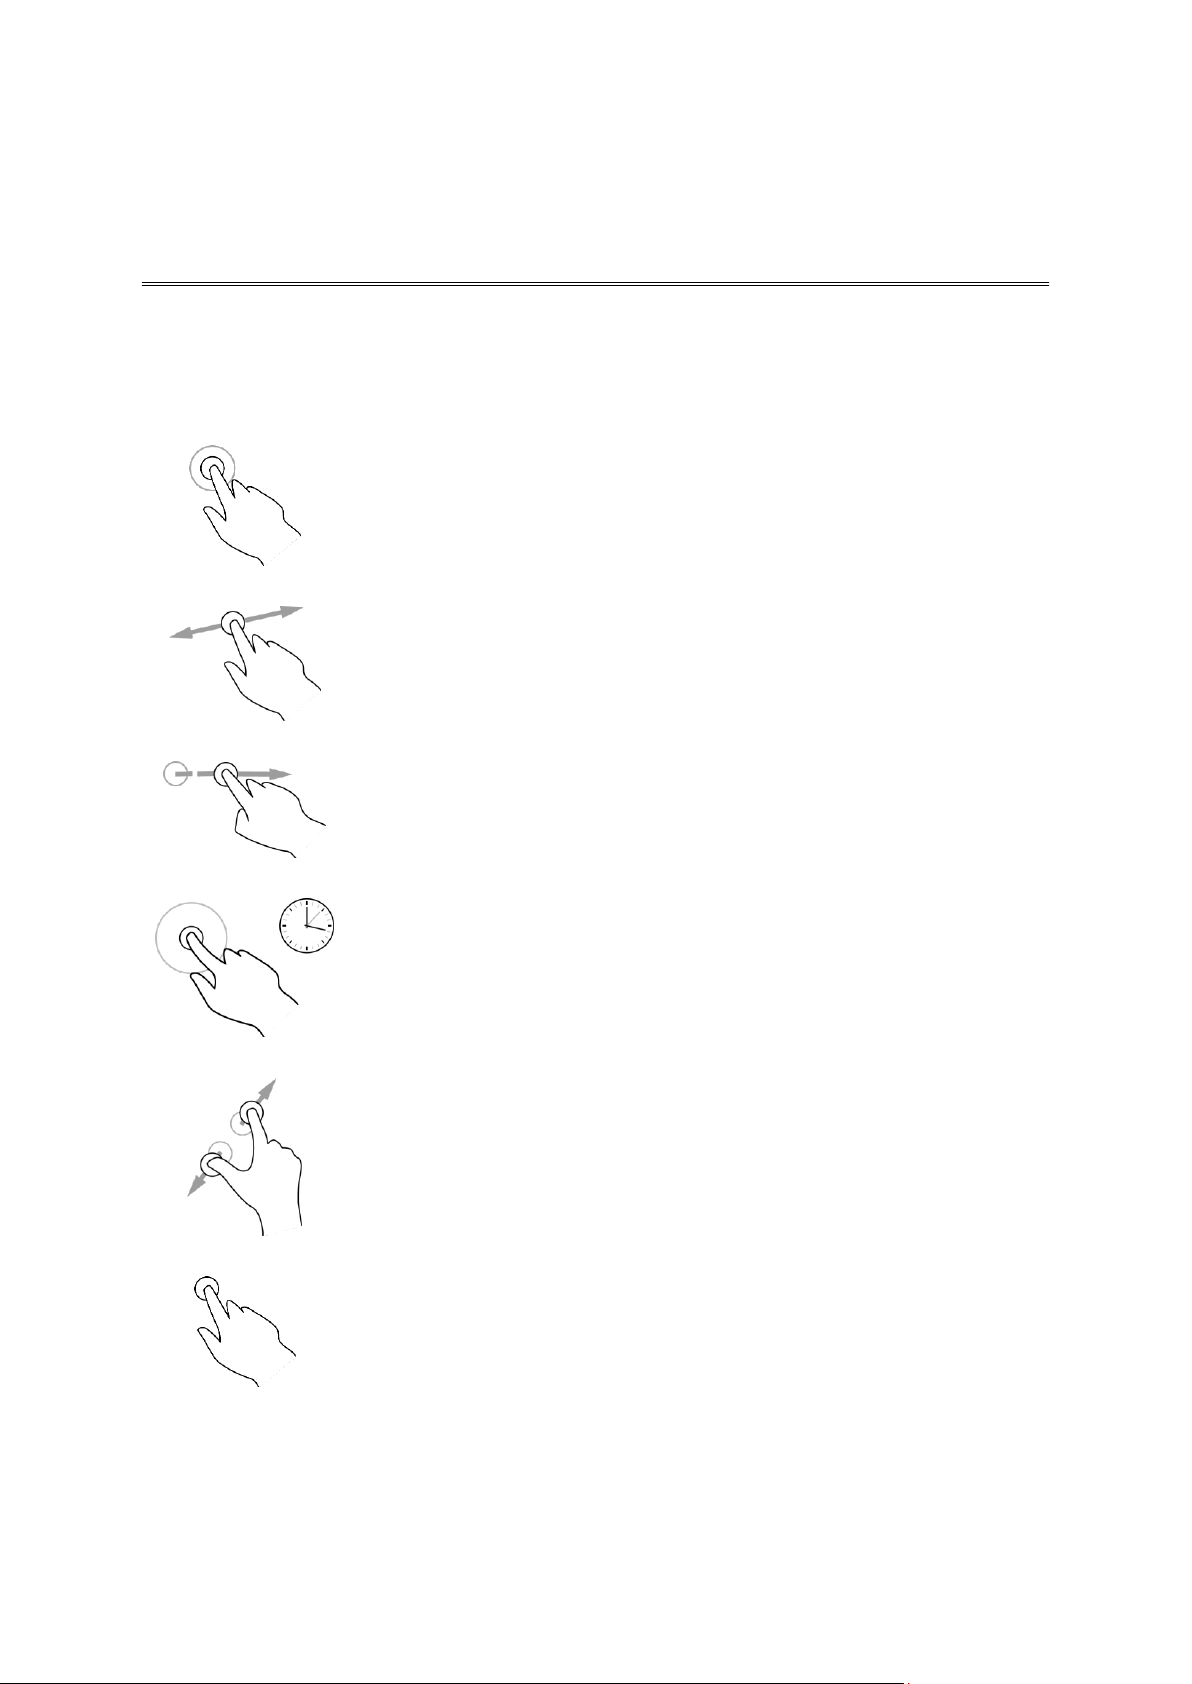
You use gestures to control your device.
Double tap
Touch one finger on the screen twice in rapid succession.
Example of when to use this: Zooming in.
Drag
Put one finger on the screen and move it across the screen.
Example of when to use this: Scrolling a screen.
Flick
Flick the tip of a single finger across the screen.
Example of when to use this: Scrolling a big distance on the screen.
Press and hold
Put one finger on the screen for more than one half second.
Example of when to use this: Selecting an item, or opening a pop-up menu
for an item.
Pinch to zoom
Touch the screen with your thumb and a finger. Move them apart to zoom
in or move them together to zoom out.
Example of when to use this: Zooming in and out on the screen.
Tap or select
Tap a single finger on the screen.
Example of when to use this: Selecting an item in a menu, or opening an
item.
Using gestures
This Reference Guide explains which gestures to use throughout the guide but here is a complete
list of all the gestures you can use.
9
Page 10

The TomTom BRIDGE is an Android-based device that has different apps installed on it. Some of the
Apps on the TomTom BRIDGE
apps will be standard Android apps, for example a browser, a clock and a photo-gallery. Specialised
apps could be added by the device owner, and TomTom has also added apps.
Note: The TomTom BRIDGE might be locked to prevent you from adding your own apps.
You can find other apps on the device by scrolling to the right. To see all the apps on the device,
select All apps.
You can also add up to two app quick-launch buttons to the device's System bar for apps you want
to use often.
10
Page 11

About connecting TomTom BRIDGE
Connecting the TomTom BRIDGE
TomTom BRIDGE connects to the internet using your smartphone so you can use the installed apps
and access TomTom services. Using your smartphone to connect means that data is sent and
received by your smartphone using your cellular service provider.
Your smartphone needs to be compatible with TomTom BRIDGE, and you must have a data plan from
a cellular service provider. Go to tomtom.com/connect for more information.
Important: You might have additional costs when you use your smartphone to connect TomTom
BRIDGE, especially if you are outside the area covered by your data plan. Check with your cellular
service provider for more information.
TomTom BRIDGE can be connected in one of the following ways:
Connection using Bluetooth tethering or Bluetooth hotspot.
Connection using Portable Wi-Fi hotspot.
Note: To update the TomTom BRIDGE software, use a normal Wi-Fi connection.
Depending on your phone's Operating System, these connection methods may have one of the
following names:
Personal Hotspot
Tethering and portable hotspot
The hotspot functions are likely already in your phone's Operating System, or you can download an
app to create one. Please check the user guide for your phone if you are having trouble finding the
settings.
Note: Some cellular service providers do not allow users to use a hotspot or Personal Area
Network (PAN). If your phone does not have the PAN function, you should contact your service
provider for more information.
For more help, go to tomtom.com/connect.
Connect using Bluetooth
To connect your TomTom BRIDGE to your smartphone using Bluetooth, do the following:
1. Turn on Bluetooth tethering or Bluetooth hotspot on your phone, and make sure your phone is
discoverable.
2. Press the Home button on your TomTom BRIDGE.
3. Select the Settings app.
4. Turn on Bluetooth.
5. Select Bluetooth, then select SEARCH FOR DEVICES.
The TomTom BRIDGE searches for your phone and shows it as an available device.
TipTomTom BRIDGE: If your cannot find your phone, make sure your phone is still "discoverable" or "visible" for other Bluetooth devices.
6. Select your phone from the list of available devices.
11
Page 12
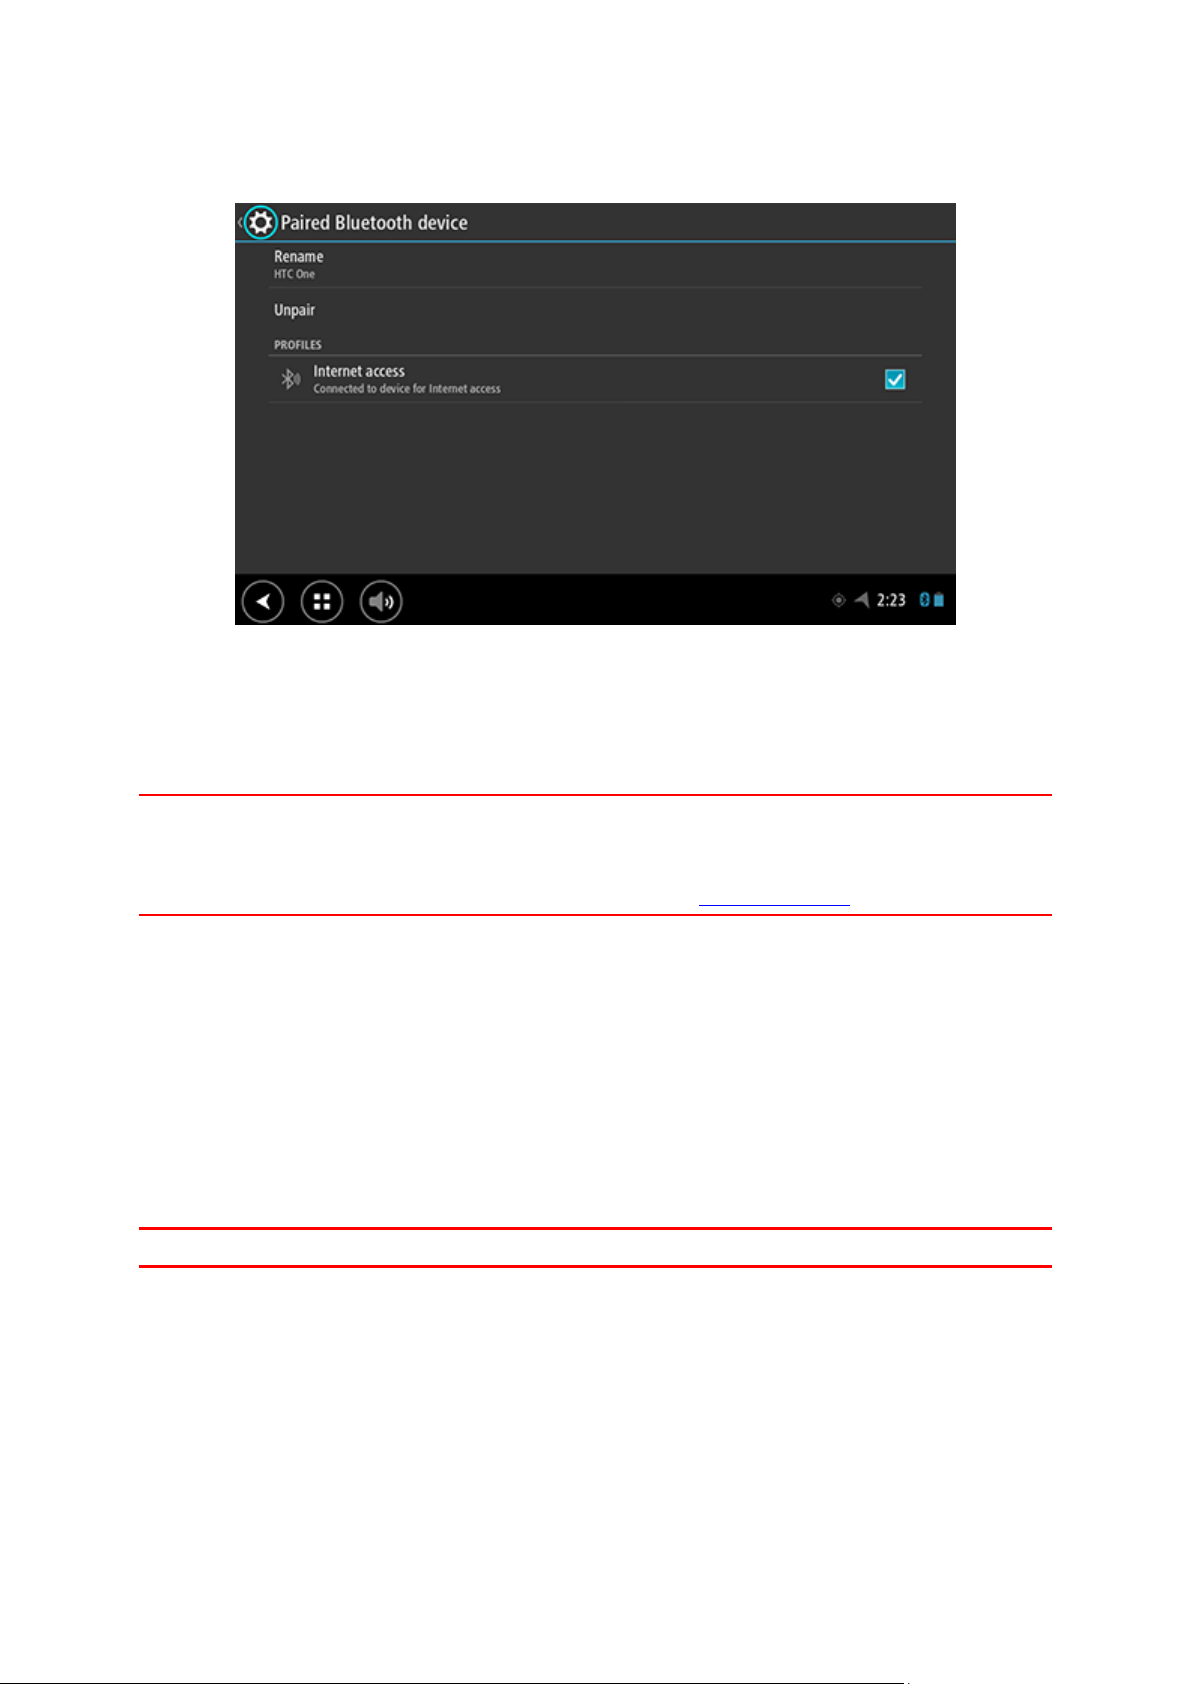
7. After you have connected your TomTom BRIDGE to your smartphone, you need to check the box
in the Bluetooth profile on the TomTom BRIDGE to enable internet access as shown below.
Your TomTom BRIDGE connects to TomTom services using your phone's internet connection.
TomTom services are now active.
The Bluetooth symbol in the Android Status Bar shows that Bluetooth is switched on.
Connect using Portable Wi-Fi Hotspot
Important: You might have additional costs when you use your smartphone to connect TomTom
BRIDGE, especially if you are outside the area covered by your data plan. Check with your cellular
service provider for more information.
Note: To update the TomTom BRIDGE software, use a normal Wi-Fi connection.
To connect TomTom BRIDGE to your smartphone using a Portable Wi-Fi Hotspot, do the following:
1. Switch on Portable Wi-Fi Hotspot on your phone. Make a note of the password for the Wi-Fi
connection.
2. Press the Home button on TomTom BRIDGE.
3. Select All apps.
4. Select the Settings app.
5. Turn on Wi-Fi.
6. Select Wi-Fi, then select your phone from the list of Wi-Fi sources.
7. Enter the password for the Wi-Fi connection, then select Connect.
TomTom BRIDGE connects to TomTom services using your phone's internet connection.
Note: Using a Portable Wi-Fi connection can drain your phone's battery quicker.
TomTom services are now active.
Reconnecting your smartphone
You do not need to do anything to reconnect your TomTom BRIDGE to your phone.
Your TomTom BRIDGE will remember your phone and will find it automatically when you have
Bluetooth tethering or Portable Wi-Fi hotspot switched on and you are in range of your device. If
you have a valid TomTom services subscription, the service starts automatically.
On the TomTom BRIDGE Status bar, check that the TomTom BRIDGE is connected to the internet.
12
Page 13

If you want to connect using another phone, you must connect using Bluetooth or connect using
Portable Wi-Fi hotspot for that phone.
Tip: If reconnecting automatically to your smartphone using Bluetooth does not work, you can
manually reconnect as described in Connect using Bluetooth.
Unable to get a connection
If your TomTom BRIDGE cannot connect to your phone, or you have no internet connection, check
the following:
Your phone is shown on your TomTom BRIDGE.
Your phone's Bluetooth tethering or Portable Wi-Fi hotspot is switched on.
Your data plan with your cellular service provider is active, and you can access the internet on
your phone.
13
Page 14

The TomTom BRIDGE uses the Android operating system. TomTom and the device owner have
Features on the TomTom BRIDGE
changed the operating system in the following ways:
Certain Android features have been disabled, either by TomTom or by the device owner. This
makes the device safer and easier to use while driving.
Some new features and apps have been added, both by TomTom and by the device owner.
These additions customize the device, making it relevant for the functions it will be used for.
The features added by TomTom are as follows:
Important: For other settings and operation instructions for the TomTom BRIDGE, and for
instructions about other apps installed on the TomTom BRIDGE, please refer to the applicable User
Documentation.
Sleep settings
You can choose when your TomTom BRIDGE goes to sleep if no apps are running or when it is
removed from its dock.
Open Display in the Android Settings app to see the following settings:
Sleep
Sets the delay time before your TomTom navigation app goes to sleep if no apps are running.
Stay awake when docked
Keeps your TomTom navigation app awake while it is docked and there is power.
Sleep automatically when disconnecting from power
Puts your TomTom navigation app to sleep when power is removed either from the dock or
directly from the TomTom navigation app.
Memory card slot
The TomTom BRIDGE has a memory card slot that is located on the bottom of the device. You can
use a memory card to access your personal files, for example photos or music files.
Transferring files to your device
You can transfer personal files, for example POI lists, photos or music files, to the TomTom BRIDGE
internal memory. This allows you to use apps on the device to view POIs, photos or play music.
You can also transfer files from the TomTom navigation app internal memory to your computer.
Note: Not all file types can be opened by the device.
Note: You can transfer files from a computer running one of the following operating systems:
- Windows 7 or higher
- Apple OS X 10.5 or higher
- Some Linux distributions of version 14.04 or higher.
To transfer files, follow these steps:
1. Connect the TomTom navigation app to your computer using the USB cable supplied with your
TomTom navigation app, then switch your TomTom navigation app on.
14
Page 15

Note: Use ONLY the USB cable supplied with your device. Other USB cables may not work.
Note: You cannot use the mount to connect your device to your computer.
Note: You should plug the USB cable directly into a USB port on your computer and not into a
USB hub or USB port on a keyboard or monitor.
2. On your computer, open a file manager program.
Your TomTom navigation app appears in your computer's file system as TomTom Bridge.
3. Open the TomTom navigation app Internal Storage folder.
4. Copy files from your computer to a folder on your TomTom navigation app, or from your
TomTom navigation app to your computer.
Tip: To keep the device organized, copy the files to a folder with a relevant name. For example, copy your music files to the Music folder.
5. Disconnect the TomTom navigation app from your computer.
TipTomTom navigation app: You can remove all the files you copied to the by clearing your
personal data.
System bar
The System bar is at the bottom of the screen and it contains quick-launch buttons, for example the
Back and Home buttons. You can add up to two extra buttons to this bar to quickly start apps that
you often use.
To add a quick-launch button for an app, do the following:
1. Select the Home button.
2. Select the Settings app.
3. In Settings, select System bar.
4. Under Quick Launch Buttons, select Assign app.
5. Select an app from the list to assign to a quick-launch button.
6. Select the Home button.
Your new quick-launch button is added to the System bar.
To remove a quick-launch button, do the following:
1. Select the Home button.
2. Select the Settings app.
3. In Settings, select System bar.
4. Under Quick Launch Buttons, select and hold the button you want to remove.
5. In the pop-up box that appears, select OK to remove the quick-launch button.
6. Select the Home button.
The quick-launch button is removed from the System bar.
Updating the software
The TomTom BRIDGE owner will periodically release new software updates.
Tip: When a software update is available, a notification appears in the Notification bar. Select
the bottom right corner of the device screen to open the Notification area.
When you have access to a Wi-Fi connection, you can update the software using the Software
update app.
Note: Software updates can only be downloaded using a Wi-Fi connection.
15
Page 16

To update the software on the device, do the following:
1. Select the Home button.
2. Select the Settings app.
3. In Wireless and networks, select Wi-Fi.
Select and connect to a Wi-Fi network.
4. Select the Home button.
5. Select the Software update app.
Your device automatically downloads and installs the software update.
Note: You may have to restart the device to install the software update.
Sending information to TomTom
When you first start the TomTom BRIDGE or you have reset the TomTom BRIDGE, you are informed
about how TomTom uses your information. This information includes your location, how you use the
services and information you enter. We learn how you use the device so we can continually
improve.
Go to the Your information app in the All apps menu to read about how TomTom uses your
information.
If you think that your information is not being used for the purpose for which you have provided it
to TomTom, contact us at tomtom.com/support.
You can find current and more detailed information at tomtom.com/privacy.
Clearing personal data
The TomTom BRIDGE stores your personal data as you use the apps installed on the device. All
photos and music you have transferred to the device is also personal data.
If you have finished using the device it is a good idea to clear your personal data before you pass
the device back to the owner.
To clear your personal data, do the following steps:
Note: Software updates can only be downloaded using a Wi-Fi connection.
1. If you are using a personal memory card, remove the memory card from its slot.
2. Select the Settings app.
3. Select Backup & reset.
4. Select Clear personal data.
5. Select Clear, then select Clear again.
Your device automatically switches off and clears your personal data.
Taking a screenshot
If you need to make a picture of the screen of the TomTom BRIDGE, for example to show the owner
an error that has occurred, do the following:
1. Press and hold the On/Off button until the pop-up menu is shown.
2. Select Take a screenshot from the pop-up menu.
A screenshot is taken of the screen behind the pop-up menu.
Tip: Open the Gallery app on your TomTom navigation app to view the screenshots you have
made.
3. Connect your TomTom navigation app to your computer and transfer the screenshots.
16
Page 17

The screenshots are in the pictures folder in the TomTom navigation app Internal Storage.
17
Page 18

The language used on the TomTom BRIDGE is also used in the apps installed on the device.
Language
To change the device language, do the following:
1. Select the Home button.
2. Select the Settings app.
3. Select Language & input, then select Language.
4. Select the language you want, then select OK.
Your device language changes.
18
Page 19

Use only the supplied dock and vehicle mount to hold the TomTom BRIDGE when you are using it in
Installing in your vehicle
your vehicle.
19
Page 20

The battery in the TomTom BRIDGE charges when you install the device in its dock and the dock is
Charging the TomTom BRIDGE
powered. You can also use a USB Home Charger.
You are warned when the battery level is low or critical. You lose your connection to the internet
when the battery level is low or critical. When the battery is empty, the device goes into sleep
mode.
Note: Charging your TomTom BRIDGE using your computer is not recommended. The voltage
output of computer USB ports varies by manufacturer.
20
Page 21

In rare cases, the TomTom BRIDGE may not start correctly or may stop responding.
The TomTom BRIDGE is not starting
First, check that the battery is charged. To charge the battery, connect your device to power or
install it in the dock. It can take up to 3 hours to fully charge the battery.
If this does not solve the problem, you can reset the device. To do this, press and hold the On/Off
button until your device begins to restart.
21
Page 22

It is important to take care of your device:
Caring for your TomTom navigation app
Do not open the casing of your device under any circumstances. Doing so may be dangerous and
will void the warranty.
Wipe or dry the screen of your device using a soft cloth. Do not use any liquid cleaners.
22
Page 23

You can get further help by going to tomtom.com/support.
Getting help
For warranty and privacy information, go to tomtom.com/legal.
23
Page 24

TomTom Navigation App
24
Page 25

This Section explains how you use the TomTom Navigation app.
Welcome to navigation with TomTom
Important: For other TomTom BRIDGE settings and operation instructions, and for instructions
about other apps installed on TomTom BRIDGE, please refer to the applicable User Documentation.
The navigation app is installed on the device, either as an app that you have to open, or as a
software widget on the Home screen. The widget has some limited functionality, for example you
can see your route and route instructions on the widget, but you can't plan a route.
Select the widget to open the full navigation app to use all the navigation features.
The Get going chapter is a great place to start. You'll learn all about starting up and setting up the
device, and using the navigation app to plan your first route. You'll see a quick introduction to
TomTom services, which includes Traffic & Safety Cameras. To help avoid traffic delays and get you
to your destination quicker, you can even use TomTom services on the routes you drive every day.
For information about what you see in the navigation app, go to:
What's on the screen
Using gestures
Main menu
25
Page 26

TomTom services give you real-time information about traffic and safety cameras on your route. To
About TomTom services
help avoid traffic delays and get you to your destination quicker, you can even use TomTom services
on the routes you drive every day.
To get TomTom Services on TomTom BRIDGE, connect TomTom BRIDGE to a network.
Note: TomTom services are not available in all countries or regions, and not all services are
available in all countries or regions. For more information on available services in each region, go
to tomtom.com/services.
26
Page 27

When you first start the navigation app, it may need a few minutes to find your GPS position and
GPS reception
show your current location on the map. Make sure you have GPS activated on your device.
Tip: The GPS settings are in the device's Settings app.
In areas where GPS reception is not possible, such as tunnels, your location may not be accurate.
Important: The navigation app cannot give you route instructions until it has received location data.
Some devices need a data connection to obtain a GPS location.
If your device has no GPS reception, the navigation app uses positioning information from Wi-Fi
networks or mobile phone towers. This information is used for route planning and to determine your
approximate location.
27
Page 28

The map view
What's on the TomTom Navigation app screen
The map view is shown when you have no planned route. Your actual location is shown as soon as
your device has found your GPS location.
You can use map view in the same way as you might look at a traditional paper map. You can move
around the map using gestures, and zoom using the zoom buttons.
Important: Everything on the map is interactive, including the route and the map symbols - try
selecting something and see what it does!
Tip: To open a pop-up menu for an item on the map, for example a route or a POI, select the
item to open the menu. To select a location on the map, select and hold the location until the
pop-up menu opens.
The map shows your current location and many other locations such as your My Places locations.
If you have not planned a route, the map is zoomed out to show the area around your location.
28
Page 29
If you have planned a route, your complete route is shown on the map. You can add stops to your
route directly from the map. When you start to drive, the guidance view is shown.
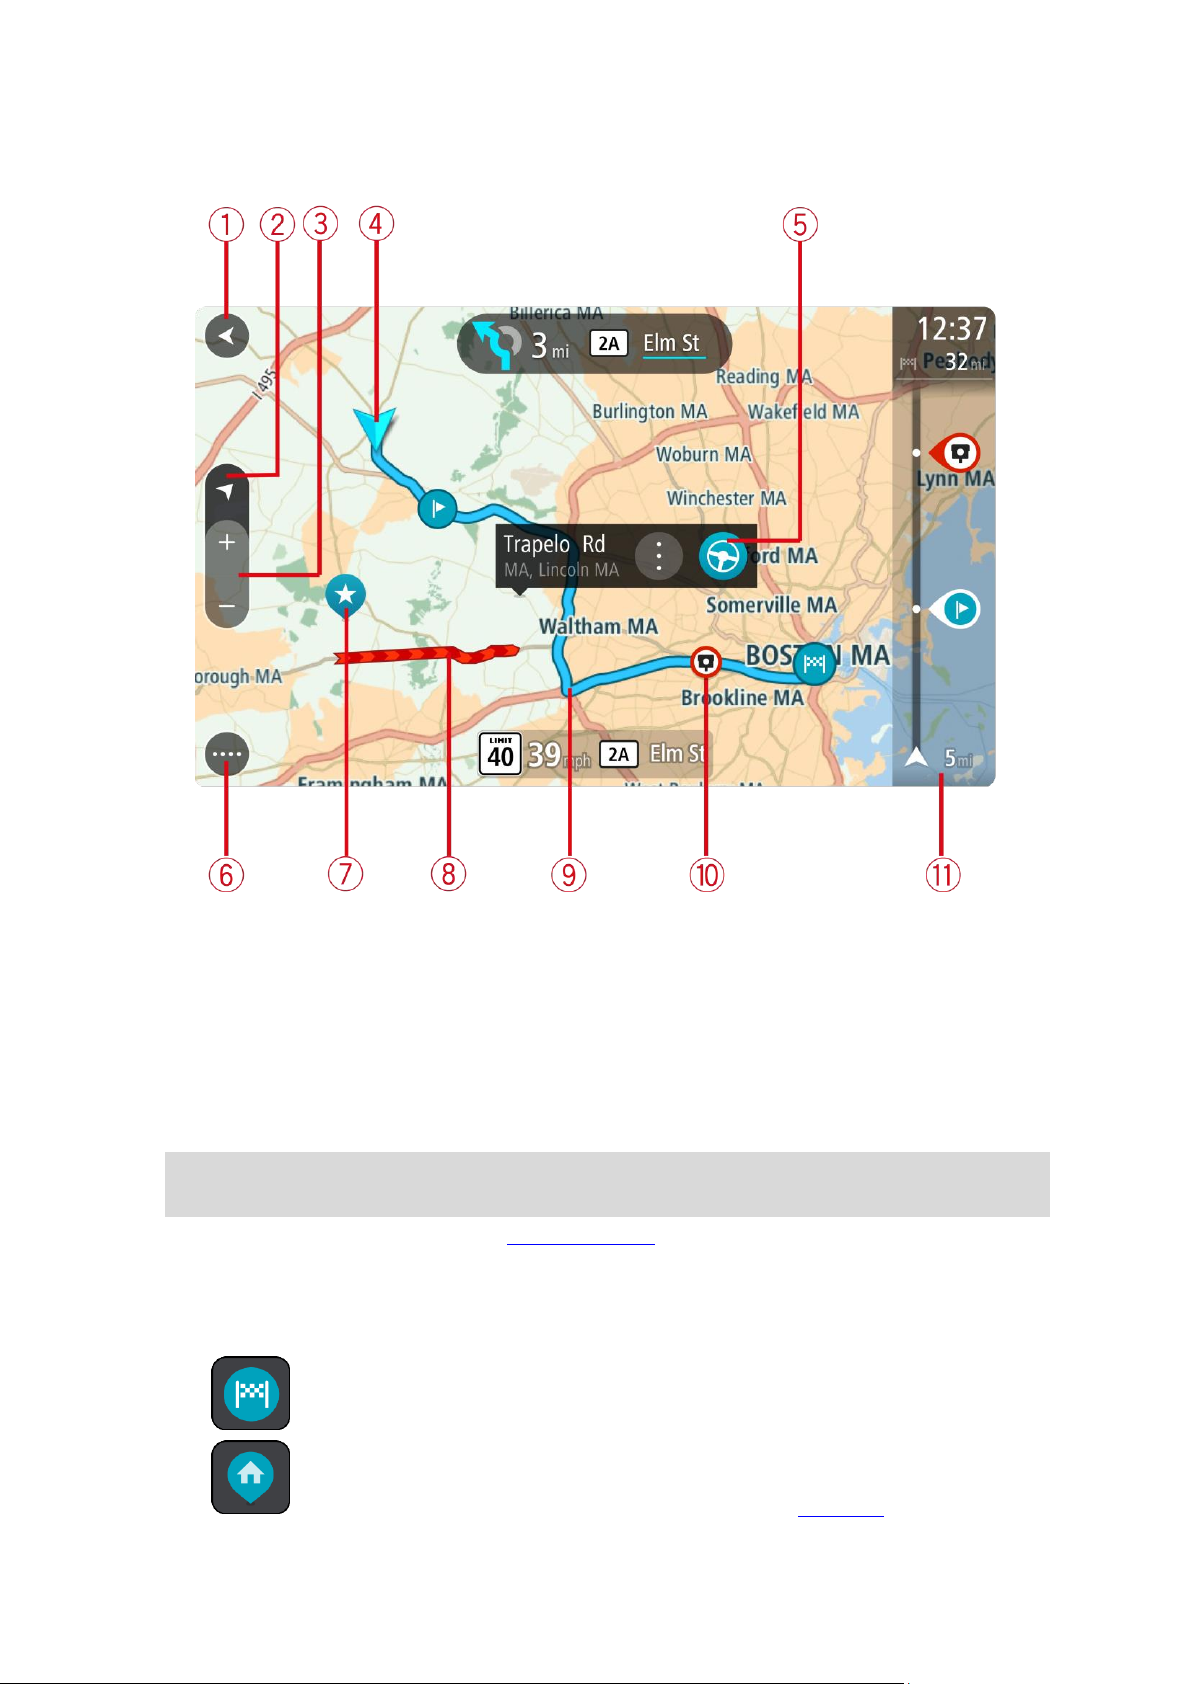
1. Back button. This button returns the map to an overview of your whole route or, if no route is
planned, moves the map to put your current location at the center.
2. Switch view button. Select the switch view button to change between the map view and the
guidance view.
When in map view, if you are driving, the small arrow rotates to show you your current driving
direction, with north being up.
3. Zoom buttons. Select the zoom buttons to zoom in and out.
4. Current location. This symbol shows your current location. Select it to add it to My Places or
search near your current location.
Note: If your TomTom navigation app cannot find your location using GPS or other methods,
the symbol appears gray.
5. Selected location. Press and hold to select a location on the map. Select the pop-up menu
button to show options for the location, or select the drive button to plan a route to the location.
6. Main Menu button. Select the button to open the Main Menu.
7. Map symbols. Symbols are used on the map to show your destination and your saved places:
Your destination.
Your home location. You can set your home location in My Places.
29
Page 30

A stop on your route.
A location saved in My Places.
Select a map symbol to open the pop-up menu, then select the menu button to see a list of
actions you can take.
8. Traffic information. Select the traffic incident to display information about the traffic delay.
9. Your route, if you have planned a route. Select the route to clear it, change the route type, add
a stop or save changes to your route.
10. Safety cameras on your route. Select a safety camera to display information about that camera.
11. Route bar. The route bar is shown when you have planned a route.
The guidance view
The guidance view is used to guide you along the route to your destination. The guidance view is
shown when you start driving. You see your current location and details along your route, including
3D buildings in some cities.
The guidance view is normally in 3D. To show a 2D map with the map moving in your direction of
travel, change the 2D and 3D default settings.
Tip: When you have planned a route and the 3D guidance view is shown, select the switch view
button to change to the map view and use the interactive features.
30
Page 31
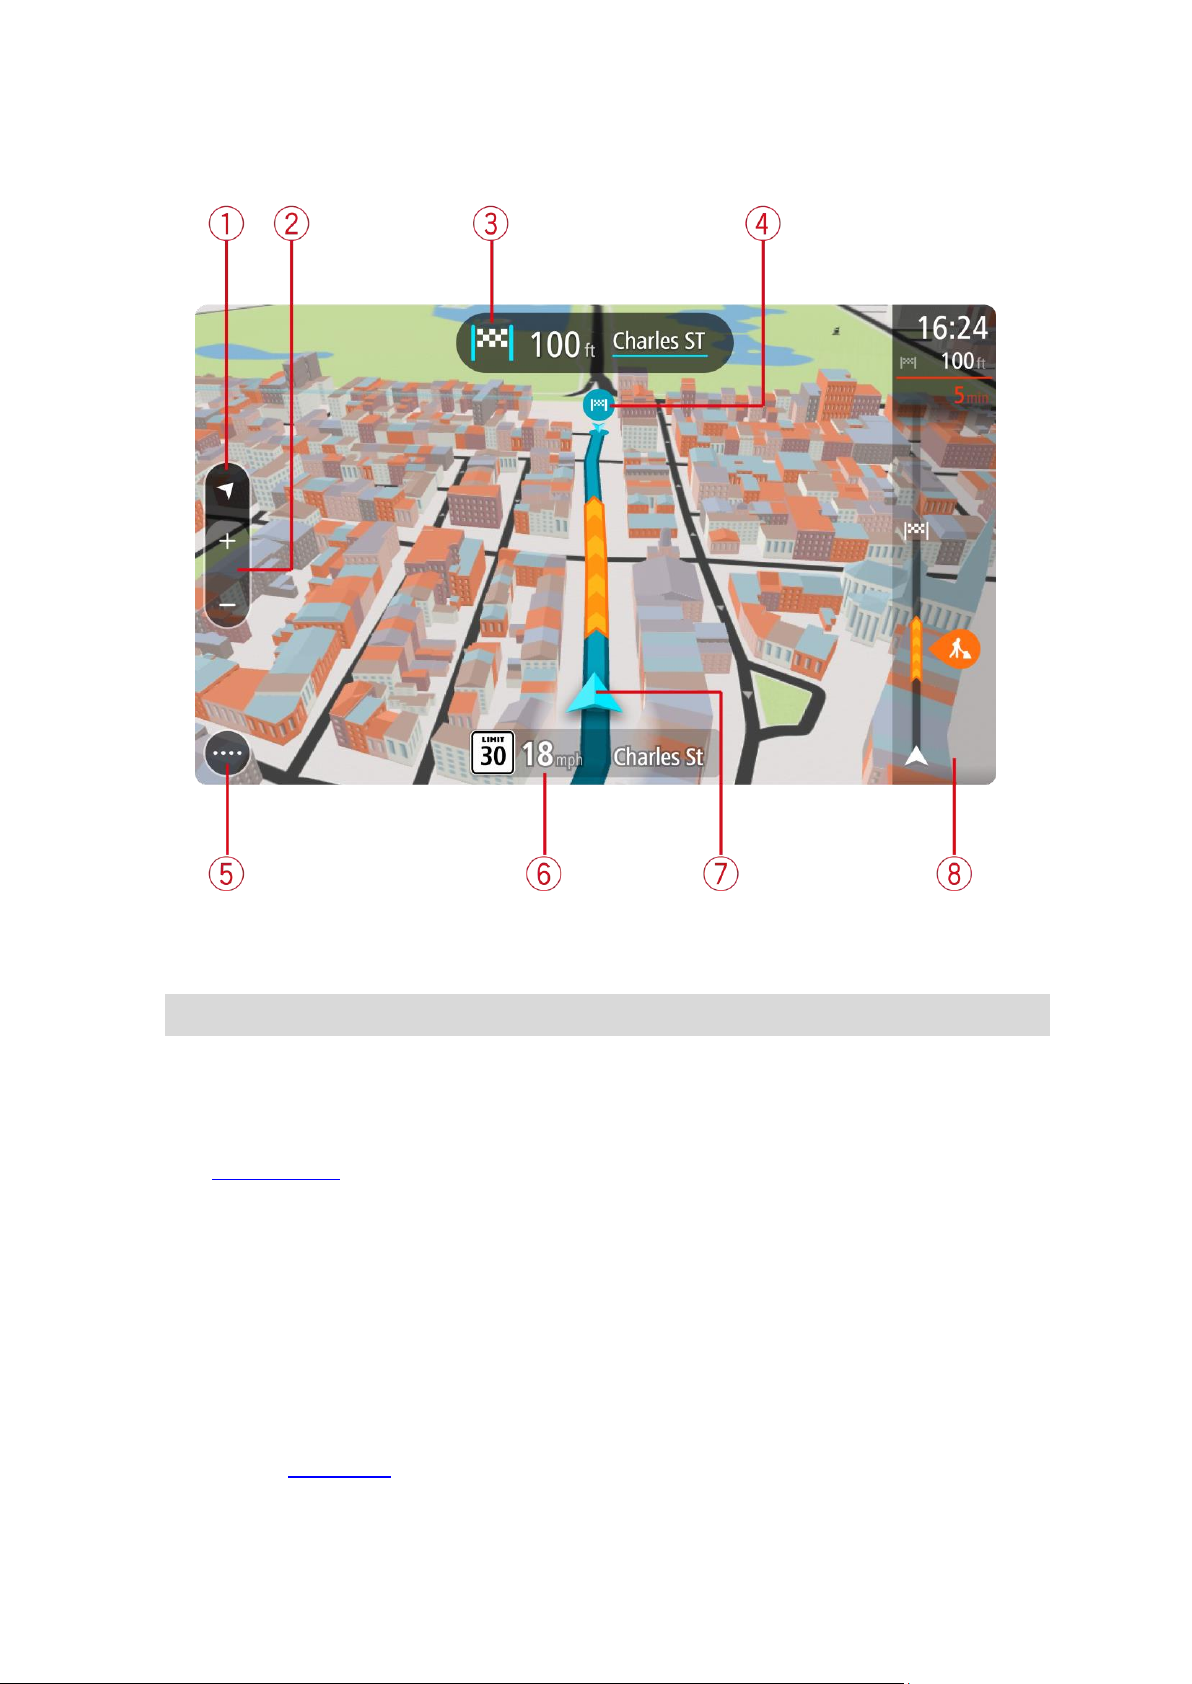
When your navigation device starts after sleeping and you have a route planned, you are shown the
guidance view with your current location.
1. Switch view button. Select the switch view button to change between the map view and the
guidance view.
2. Zoom buttons. Select the zoom buttons to zoom in and out.
Tip: On some devices you can also pinch to zoom in and out.
3. Instruction panel. This panel shows the following information:
The direction of your next turn.
The distance to your next turn.
The name of the next road on your route.
Lane guidance at some crossings.
4. Route symbols. Symbols are used on your route to show your starting location, your stops, and
your destination.
5. Main Menu button. Select the button to show the Main Menu.
6. Speed panel. This panel shows the following information:
The speed limit at your location.
Your current speed. If you drive more than 3 mph (5 km/h) over the speed limit the speed
panel turns red. If you drive less than 3 mph (5 km/h) over the speed limit the speed panel
turns orange.
The name of the street you are driving on.
7. Current location. This symbol shows your current location. Select the symbol or the speed panel
to open the quick menu.
31
Page 32

Note: If your TomTom navigation app cannot find your location using GPS or other methods,
The arrival information panel shows the following information:
The estimated time that you will arrive at your destination.
The length of time to drive to the destination from your current
location.
A parking button is shown near the destination flag when parking is
available near your destination.
Tip: If your destination is in a different time zone, you see a plus
(+) or a minus (-) sign and the time difference in hours and half
hours in the arrival information panel. The estimated time of arrival
is the local time at your destination.
If you have stops on your route, select this panel to change between
information about the next stop and your final destination.
You can choose the information you see on the arrival information panel.
Traffic status - if your TomTom navigation app isn't receiving any traffic
information, a symbol showing traffic with a cross appears underneath
the arrival information panel.
The bar uses symbols to show the following information:
The next two stops on your route.
Gas stations that are directly on your route.
TomTom Traffic including heavy rain or snow.
TomTom Safety Cameras and Danger Zones.
Rest stops directly on your route.
You can choose the information you see on your route.
The symbols are in the order that they occur on your route. For traffic
incidents, the symbol for each incident alternates between showing the
type of incident and the delay in minutes. Select a symbol to see more
information about a stop, an incident or a safety camera. If a symbol is
shown on top of another symbol, selecting the symbols zooms in on the
route bar to show each symbol separately. You can then select a symbol.
The total time delay due to traffic jams, weather, and other incidents on
your route, including information provided by IQ Routes, is shown above
the symbols.
For a complete list of incident types, see Traffic incidents.
The bottom of the route bar represents your current location and shows
the distance to the next incident on your route. In addition, you can
the symbol appears gray.
8. Route bar. The route bar is shown when you have planned a route.
Important: To see a wider route bar showing additional route information, change the setting
for Route Information.
The route bar
The route bar is shown when you have planned a route. It has an arrival information panel at the
top, and a bar with symbols underneath.
Important: To see a wider route bar showing additional route information, change the setting for
Route Information.
Note: The distance ahead shown by the route bar depends on the overall length of your route.
32
Page 33

choose to see the current time if you turn the setting on.
Note: To make the route bar more readable some incidents may not be shown. These incidents
Search
Select this button to search for an address, a place or a Point of Interest,
then plan a route to that location.
will always be of minor importance and only cause short delays.
The route bar also shows status messages, for example Finding fastest route or Playing route
preview.
Distances and the route bar
The distance ahead shown on the route bar depends on the length of your route, or the distance
remaining on your route.
For remaining distances longer than 31 miles (50 km), only the next 31 miles (50 km) is shown.
The destination icon is not shown.
Tip: You can scroll the route bar to see your whole route.
For remaining distances between 6 miles (10 km) and 31 miles (50 km), the complete distance is
shown. The destination icon is shown fixed at the top of the route bar.
For remaining distances of less than 6 miles (10 km) the complete distance is shown. The
destination icon moves down toward the chevron symbol as you get closer to your destination.
The top half of the route bar shows twice the distance of the bottom half, as shown in the following
examples:
A remaining distance of 31 miles (50 km) on the route bar is split into 21 miles (34 km) at the
top and 9 miles (16 km) on the bottom.
A remaining distance of 6 miles (10 km) on the route bar is split into 4 miles (6.6 km) at the top
and 2 miles (3.3 km) on the bottom.
The route bar is constantly updated as you drive.
The quick menu
To open the quick menu, select the current location symbol or the speed panel in the guidance
view.
You can then do any of the following:
Mark a location
Report a new safety camera
Avoid a blocked road
See your current location or your latitude/longitude if not on a named road.
Navigation buttons
On the map view or guidance view, select the Main Menu button to open the Main Menu.
The following navigation buttons are available in the Main Menu:
33
Page 34

Current route
Select this button to clear or change your planned route.
Report Safety
Camera
Select this button to report a safety camera.
Voice Recognition
Select this button to start voice recognition.
Tip: You can also say the wake-up phrase to start voice recognition.
My Places
Select this button to show your saved places.
My Routes
Select this button to show your saved routes.
Parking
Select this button to find parking lots/garages.
Gas Station
Select this button to find gas stations.
34
Page 35

Other buttons
Select this button to open the Settings Menu.
Select this button to open the Help Menu. The Help Menu contains a
guided tour and information about the navigation app.
Select this button to return to the previous screen.
Select this button to return to the map view or guidance view.
This symbol shows that your device is connected to TomTom services.
This symbol shows that your device is not connected to TomTom services.
Select this button to turn off voice instructions. You will no longer hear
spoken route instructions but you will still hear information such as traffic
information and warning sounds.
Tip: You can select the types of instructions you want to hear. Select
Voices in the Settings Menu and select the instructions you want to
hear.
Select this button to turn on voice instructions.
Select this button to reduce the brightness of the screen and display the
map in darker colors.
When driving at night or when driving through a dark tunnel, it is easier to
view the screen and less distracting for the driver if the brightness of the
screen is dimmed.
Tip: Your device automatically switches between day and night colors
depending on the time of day. To turn off this feature, select Appearance in the Settings menu and turn off Switch to night colors when
dark.
Select this button to increase the brightness of the screen and display the
map in brighter colors.
On the map or guidance view, select the Main Menu button to open the Main Menu.
The following buttons are available in the Main Menu screen, in addition to the navigation buttons:
35
Page 36

Volume control
On the map or guidance view, select the Main Menu button to open the Main Menu.
Select and slide the volume control to change the volume of voice instructions and warnings. If the
voice instructions are turned off, the volume control will still change the volume of the warnings.
Running in the background
The navigation app continues to run when it is in the background, for example when you are using
another app on the TomTom BRIDGE.
If the navigation app is running in the background and you are driving on a planned route, you will
continue to hear driving instructions.
Changing the text and button size
You can change the size of the text and the buttons you see on the screen, for example to make the
text easier to read and the buttons easier to use.
Note: This feature is only available on devices with a 6 inch / 15 cm or larger screen.
To change the size of the text and the buttons, select the Settings button in the Main Menu, then
select Appearance, then select Size of text and buttons. Your device must restart to apply the
change.
36
Page 37

About TomTom Traffic
Traffic
TomTom Traffic is a unique TomTom service providing real-time traffic information. For more
information about TomTom services, go to tomtom.com/services.
In combination with IQ Routes, TomTom Traffic helps you plan the optimum route to your
destination taking into account the current local traffic conditions and the weather.
Your navigation app regularly receives information about the changing traffic conditions. If traffic
jams or other incidents are found on your current route, your app will offer to replan your route to
try to avoid any delays.
The TomTom BRIDGE uses either a permanent connection or a smartphone connection to connect to
TomTom services.
Important: If you use your smartphone to connect to TomTom Services and you are outside of the
area covered by your cellular data plan, you may be liable for extra roaming charges while using
TomTom Services.
Note: TomTom services are not available in all countries or regions, and not all services are
available in all countries or regions. For more information on available services in each region, go
to tomtom.com/services.
The route bar
The route bar is shown when you have planned a route. It has an arrival information panel at the
top, and a bar with symbols underneath.
Important: To see a wider route bar showing additional route information, change the setting for
Route Information.
Note: The distance ahead shown by the route bar depends on the overall length of your route.
37
Page 38

The arrival information panel shows the following information:
The estimated time that you will arrive at your destination.
The length of time to drive to the destination from your current
location.
A parking button is shown near the destination flag when parking is
available near your destination.
Tip: If your destination is in a different time zone, you see a plus
(+) or a minus (-) sign and the time difference in hours and half
hours in the arrival information panel. The estimated time of arrival
is the local time at your destination.
If you have stops on your route, select this panel to change between
information about the next stop and your final destination.
You can choose the information you see on the arrival information panel.
Traffic status - if your TomTom navigation app isn't receiving any traffic
information, a symbol showing traffic with a cross appears underneath
the arrival information panel.
The bar uses symbols to show the following information:
The next two stops on your route.
Gas stations that are directly on your route.
TomTom Traffic including heavy rain or snow.
TomTom Safety Cameras and Danger Zones.
Rest stops directly on your route.
You can choose the information you see on your route.
The symbols are in the order that they occur on your route. For traffic
incidents, the symbol for each incident alternates between showing the
type of incident and the delay in minutes. Select a symbol to see more
information about a stop, an incident or a safety camera. If a symbol is
shown on top of another symbol, selecting the symbols zooms in on the
route bar to show each symbol separately. You can then select a symbol.
The total time delay due to traffic jams, weather, and other incidents on
your route, including information provided by IQ Routes, is shown above
the symbols.
For a complete list of incident types, see Traffic incidents.
The bottom of the route bar represents your current location and shows
the distance to the next incident on your route. In addition, you can
choose to see the current time if you turn the setting on.
Note: To make the route bar more readable some incidents may not be shown. These incidents
will always be of minor importance and only cause short delays.
The route bar also shows status messages, for example Finding fastest route or Playing route
preview.
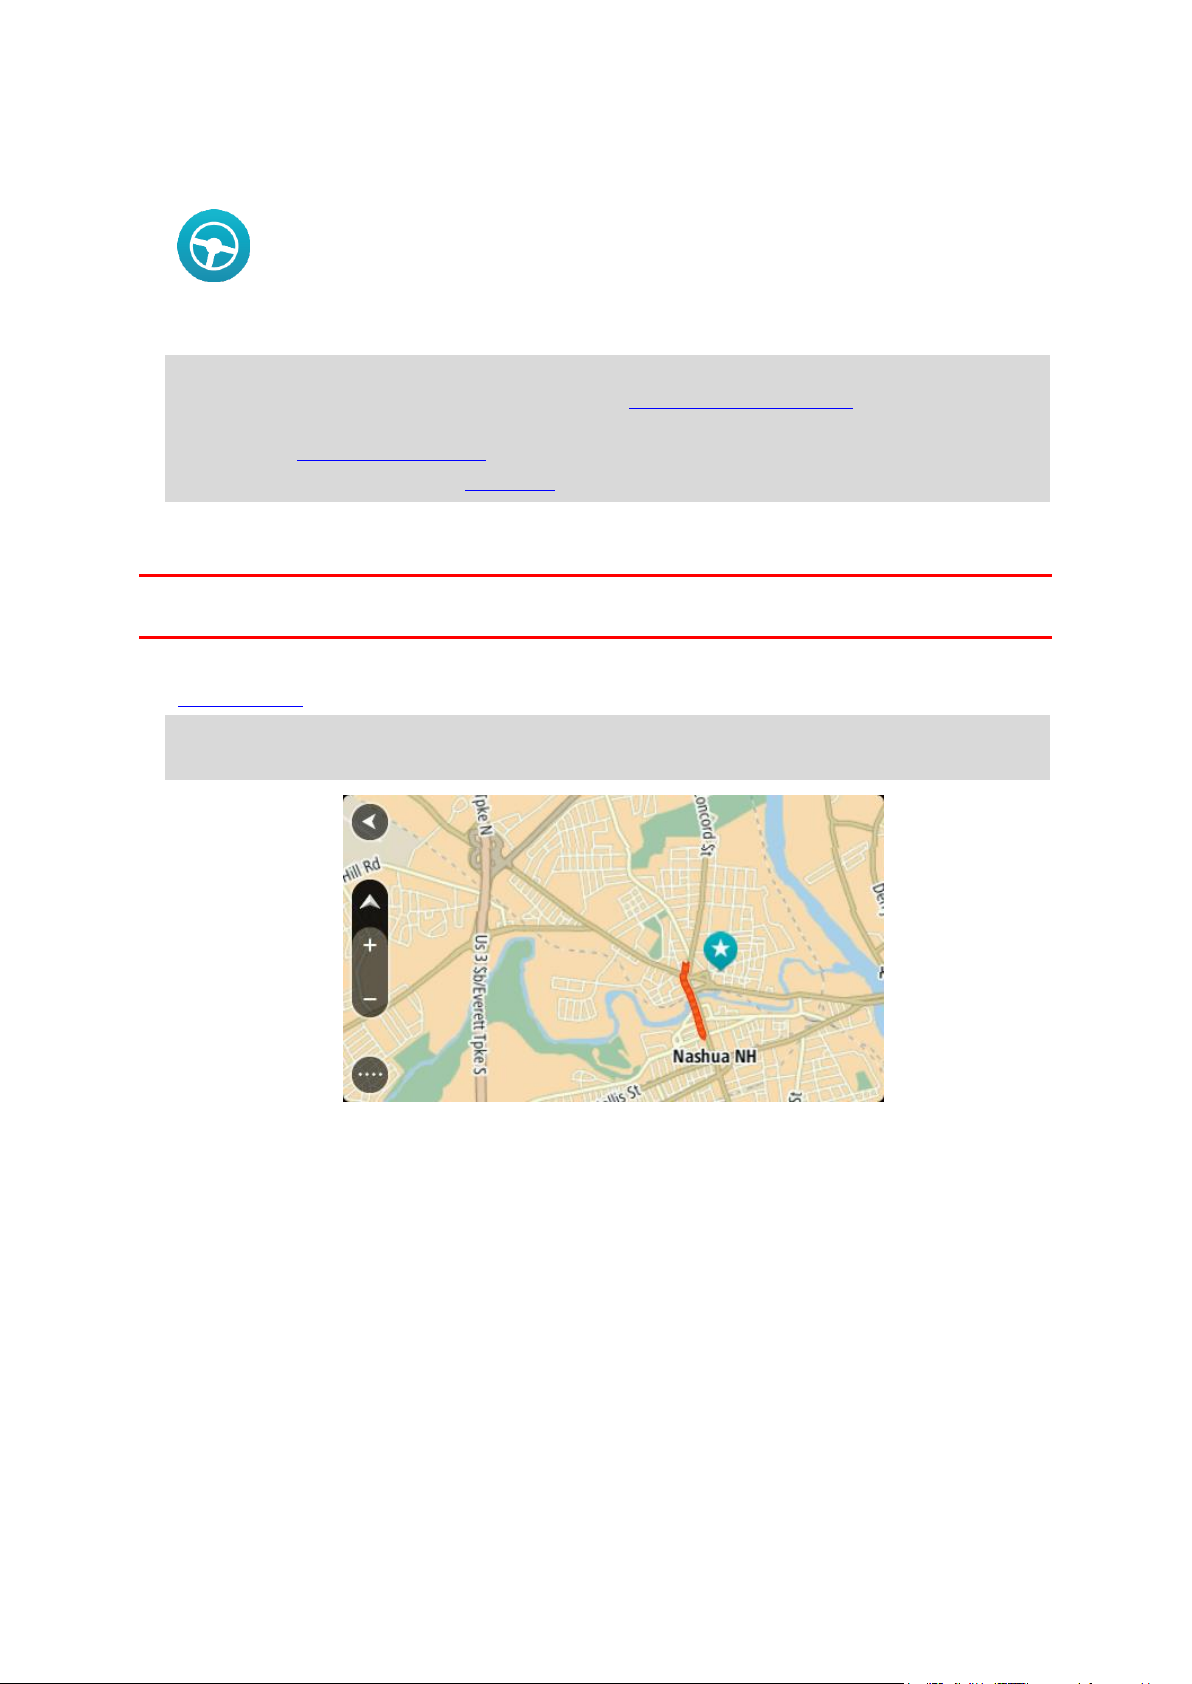
Looking at traffic on the map
Traffic incidents are shown on the map. If several traffic incidents overlap, the highest priority
incident is shown. For example, a road closure is higher priority than road work or a closed lane.
38
Page 39

Tip: Select an incident on the map to see more detailed information.
1. Traffic incident that affects your route in your direction of travel.
A symbol or number at the start of the incident shows the type of incident or the delay in
minutes, for example 5 minutes.
The color of the incident indicates the speed of traffic relative to the maximum allowed speed
at that location, with red being the slowest. The stripes on the traffic jam are also animated to
show the speed of the traffic, where appropriate.
For a complete list of incident types, see Traffic incidents.
Tip: You see weather symbols on the map if there is bad weather such as heavy rain or snow.
2. Traffic incident on your route but in the opposite direction of travel.
3. Traffic incidents on roads that are not visible at your current zoom level.
Looking at traffic on your route
Information about traffic incidents on your route is shown in the route bar on the right-hand side of
the map.
The route bar tells you about traffic delays while you are driving, using symbols to show you where
each traffic incident is located on your route.
Note: If your TomTom navigation app isn't receiving any traffic information, a symbol showing
traffic with a cross appears underneath the arrival information panel.
Note: To make the route bar more readable some incidents may not be shown. These incidents
will always be of minor importance and only cause short delays.
39
Page 40

To get more information about an incident, select an incident in the route bar. The map opens
Wind
Rain
Fog
Snow
Ice
Stationary traffic
Traffic lining up
Slow traffic
Unknown accident
zoomed in on the incident and a pop-up opens showing detailed information about the traffic
incident.
The information shown includes:
The type of traffic incident – general, accident, roadwork, lane closure or weather such as
heavy rain or snow.
The severity of the incident - slow traffic, traffic lining up or stationary traffic.
The delay time.
The length of the incident.
For a complete list of incident types, see Traffic incidents.
Select the back button to go back to the guidance view.
Traffic incidents
Traffic incidents and warnings are shown in the map view and in the route bar. Symbols shown in a
circle are traffic incidents. Checks are done to see if a faster route is available and your route is
replanned to avoid traffic incidents.
Traffic incident symbols:
40
Page 41

Unknown incident
Road work
Lane closure
Road closure
Advanced Lane Guidance
Note: Lane guidance is not available for all crossings or in all countries.
Advanced Lane Guidance helps you prepare for highway exits and crossings by showing the correct
driving lane for your planned route.
As you approach an exit or crossing, the lane you need is shown on the screen and in the instruction
panel.
Tip: To close the lane image, select anywhere on the screen or press the back button.
To turn lane images off, select the Settings button in the Main Menu, then select Appearance. Turn
off the Show previews of highway exits setting.
Time-dependent speed limits
Some speed limits change depending on the time of day. For example, you may see the speed limit
near schools decrease to 40 km/h or 25 mph in the morning from 08:00 a.m. - 09:00 a.m. and in the
afternoon from 3:00 p.m. - 4:00 p.m. Where possible, the speed limit shown in the speed panel
changes to show these variable speed limits.
Some speed limits change depending on driving conditions. For example, the speed limit will
decrease if there is heavy traffic, or the weather conditions are bad. These variable speed limits are
not shown in the speed panel. The speed shown in the speed panel is the maximum speed limit
allowed in good driving conditions.
41
Page 42

Important: The speed limit shown in the speed panel is only an indication. You must always obey
the actual speed limit for the road you are on and the conditions you are driving in.
42
Page 43
About search
Using Quick Search
You use search to find a wide range of places and then navigate to them. You can search for the
following:
A specific address, for example, 335 Madison Avenue, New York.
A partial address, for example, Madison Ave NY.
A type of place, for example, gas station or restaurant.
A place by name, for example, Starbucks.
A ZIP code, for example, 36925 York for York, Alabama.
A city to navigate to a city center, for example, Kingston, NY.
A POI (Point of Interest) near your current location, for example, restaurant near me.
Latitude and longitude coordinates, for example,
N 40°45′28″ W 73°59′09″.
Planning a route to a POI using search
Important: In the interest of safety and to avoid distractions while you are driving, you should
always plan a route before you start driving.
To plan a route to a POI type or a specific POI using search, do the following:
1. Select the Main Menu button to open the Main Menu.
2. Select Search.
The search screen opens with the keyboard showing.
3. Use the keyboard to enter the name of the place you want to plan a route to.
43
Page 44

Tip: If you press and hold a letter key on the keyboard, you get access to extra characters if
they are available. For example, press and hold the letter "e" to access characters 3 e è é ê ë
and more.
You can search for a POI (Point of Interest) type, such as a restaurant or tourist attraction.
Alternatively, you can search for a specific POI, for example "Rosie's Pizzeria."
Note: When searching, the whole map is searched. If you want to change how the search is
done, select the button to the right of the search box. You can then change where the search
is done, for example along the route or in a city.
4. As you type, suggestions based on what you have entered are shown in columns. You can
continue typing or select a suggestion.
Tip: To see more results, hide the keyboard or swipe the results list to scroll it.
Tip: You can switch between seeing the results on the map or in a list by selecting the
list/map button:
5. Select a POI type or an individual POI. If you selected a POI type, select a POI.
The location is shown on the map.
44
Page 45

6. To see more information about the POI, select the POI on the map and then select the pop-up
menu button. Select More Information on the pop-up menu.
You see more information about the POI such as the phone number, full address, and email.
7. To plan a route to this destination, select the drive button:
A route is planned and then guidance to your destination begins. As soon as you start driving,
the guidance view is shown automatically.
Tip: If your destination is in a different time zone, you see a plus (+) or a minus (-) sign and
the time difference in hours and half hours in the arrival information panel. The estimated
time of arrival is the local time at your destination.
Tip: You can add a stop to a route that you have already planned.
Tip: You can save a route using My Routes.
Planning a route to a POI using online search
Important: In the interest of safety and to avoid distractions while you are driving, you should
always plan a route before you start driving.
Note: Searching online is only available on connected devices. To search online on your TomTom
navigation app, you must be connected to TomTom services.
If you did a POI search but could not find the POI you were looking for, you can search TomTom
Places online. To find POIs by searching online, do the following:
1. Search for a POI using Search in the Main Menu.
45
Page 46

The search results are shown in two columns.
2. Select Search Places Online.
3. Use the keyboard to enter the name of the POI you want to find, then press the Search button
on the keyboard.
Tip: If you press and hold a letter key on the keyboard, you get access to extra characters if
they are available. For example, press and hold the letter "e" to access characters 3 e è é ê ë
and more.
You can search for a POI (Point of Interest) type, such as a restaurant or tourist attraction.
Alternatively, you can search for a specific POI, for example "Rosie's Pizzeria."
Note: When searching, you can search near your current location, in a town or city, or near
your destination. If you want to change how the search is done, select the button to the right
of the search box.
The search results are shown in a column.
Tip: To see more results, hide the keyboard or swipe the results list to scroll it.
Tip: You can switch between seeing the results on the map or in a list by selecting the
list/map button:
4. Select an individual POI from the list.
The location is shown on the map.
46
Page 47

5. To see more information about the POI, select the POI on the map and then select the pop-up
menu button. Select More Information on the pop-up menu.
You see more information about the POI such as the phone number, full address, and email.
6. To plan a route to this destination, select the drive button:
A route is planned and then guidance to your destination begins. As soon as you start driving,
the guidance view is shown automatically.
Tip: If your destination is in a different time zone, you see a plus (+) or a minus (-) sign and
the time difference in hours and half hours in the arrival information panel. The estimated
time of arrival is the local time at your destination.
Tip: You can add a stop to a route that you have already planned.
Tip: You can save a route using My Routes.
Entering search terms
Select Search in the Main menu to start searching for addresses and POIs. The search screen opens
showing the device keyboard and the following buttons:
Tip: Hide the device keyboard to show the whole search screen.
47
Page 48

1. Back button.
Whole map
Select this option to search the whole of your current map with no
limit to the search radius. Your current location is the center of the
search. The results are ranked by exact match.
Near me
Select this option to search with your current GPS location as the
search center. The results are ranked by distance.
In town or city
Select this option to use a town or city as the center for your search.
You need to enter the town or city name using the keyboard. When
you have selected the town or city from the results list, you can
search for an address or POI in that city.
Along route
When a route has been planned, you can select this option to search
along your route for a specific type of location, for example, gas
stations. When prompted, enter the type of location and then select it
in the right-hand column to carry out the search.
Near destination
When a route has been planned, you can select this option to use your
destination as the center for your search.
Latitude Longitude
Select this option to enter a pair of latitude longitude coordinates.
Select this button to go back to the previous screen.
2. Search input box.
Enter your search term here. As you type, matching addresses and POIs are shown.
Tip: If you press and hold a letter key on the keyboard, you get access to extra characters if
they are available. For example, press and hold the letter "e" to access characters 3 e è é ê ë
and more.
Tip: To edit, select a word you have already typed to place the cursor. You can then insert or
delete characters.
3. Type of search.
By default, the whole of the current map is searched. Once you have used search, the last
search type you selected is used. Select this button to change the type of search to any of the
following:
4. View button.
Select this button to return to the map view or guidance view.
5. List/map button.
Select this button to switch between showing the results in a list or showing the results on the
map.
6. Show/hide keyboard.
Select this button to show the keyboard. Hide the keyboard using the device's back function.
Tip: To cancel a search, select the map/guidance view button in the top right-hand corner of the
screen.
Working with search results
Your search results are shown in two columns.
48
Page 49

Address and city matches are shown in the left-hand column, and POIs, types of POIs and Places are
shown in the right-hand column.
Tip: To see more results, hide the keyboard or swipe the results list to scroll it.
Tip: You can switch between seeing the results on the map or in a list by selecting the
list/map button:
When you select an address from the list of search results, you can choose to show it on the map,
add a crossroad or plan a route to that chosen location. To get an exact address you can add the
house number.
If you show the result on the map, you can use the pop-up menu to add a location from My Places or
search near this location. If a route is already planned, you can add the location to your current
route.
49
Page 50

Note: The best search results are shown on the map. When you zoom in, the lower ranked search
Legal and financial services
Court house
ATM
Legal - Attorneys
Bank
Legal - other services
Food services
Convenience store
Fast food restaurant
Restaurant
Chinese restaurant
results are gradually shown.
About ZIP codes
You can search using a ZIP code to get closer to the area in which you want to find an address or
POI.
When you search using a ZIP code, your results include all the streets in a city district, the whole
town, or the towns and villages within that ZIP code area.
Note: If you search using a ZIP code you will not get a specific address in your results.
You do not have to use the state or province postal abbreviation or first change the state or
province because this is included in the ZIP code.
For example, a search for York in the whole map returns a long list of possible results. Adding a
space followed by the ZIP code narrows the results down to the York that you are looking for.
About mapcodes
In countries where roads and houses have no names or addresses, you can use a mapcode instead. A
mapcode represents a location.
Every location on Earth, including those in the sea, like islands and oil rigs, can be represented by a
mapcode. Mapcodes are short, and easy to recognize, remember and communicate. They are
precise to a few meters, which is good enough for every-day use.
Go to mapcode.com for instructions on how to find the mapcode for a location.
Mapcodes are more precise and more flexible than the address on a business card. You can choose a
location that you want to associate with your address, for example, the main entrance or the
entrance to a parking lot.
List of POI type icons
50
Page 51

Accommodation
Hotel or motel
Luxury hotel
Campground
Economy chain hotel
Emergency services
Hospital or clinic
Dentist
Police station
Veterinarian
Doctor
Fire station
Car-related services
Outside parking
Gas station
Parking garage
Car wash
Car dealer
Vehicle inspection center
Rental car facility
Electric/hybrid car
charging point(s)
Rental car parking
Car repair facility
Other services
Embassy
Pet services
Government office
Telecommunication
Company
Community service
51
Page 52

Post office
Pharmacy
Shopping center
Beauty services
Tourist information office
Shop
Education
College or university
School
Library
Convention center
Leisure
Casino
Winery
Theater
Tourist attraction
Movie Theater
Zoo
Concert hall
Amusement park
Museum
Exhibition center
Opera
Cultural center
Nightlife
Leisure center
Sport
Sports Park
Swimming pool
52
Page 53

Mountain peak
Water sports
Beach
Tennis court
Park or recreation area
Ice skating rink
Yacht basin or marina
Sports center
Stadium
Golf course
Religion
Church
Place of worship
Travel
Railroad station
Mountain pass
Airport
Scenic or panoramic view
Ferry terminal
ZIP code
Note: Not used in all
countries.
Border crossing
Residential area
Bus station
Gas station
Toll plaza
Electric/hybrid car
charging stations
Rest area
Truck stop
53
Page 54

City center
54
Page 55

Planning a route to an address using search
Planning a route
Important: In the interest of safety and to avoid distractions while you are driving, you should
always plan a route before you start driving.
To plan a route to an address using search, do the following:
1. Select the Main Menu button to open the Main Menu.
2. Select Search.
The search screen opens with the keyboard showing.
3. Use the keyboard to enter the name of the place you want to plan a route to.
Tip: If you press and hold a letter key on the keyboard, you get access to extra characters if
they are available. For example, press and hold the letter "e" to access characters 3 e è é ê ë
and more.
You can search for an address, town, city, ZIP code or mapcode.
Tip: To search for a specific city you can use the city's state code or ZIP code. For example,
searching for York will return many results. If you search for York AL or York 36925 then that
city will be at the top of the results. You can then search in the city.
Tip: When searching, the whole map is searched. If you want to change how the search is
done, select the button to the right of the search box. You can then change where the search
is done, for example, to being along the route or in a city.
4. As you type the address, suggestions are shown based on what you have entered. You can
continue typing or select a suggestion.
Towns and roads are shown on the left, POIs are shown on the right.
55
Page 56

Tip: To see more results, hide the keyboard or swipe the results list to scroll it.
Tip: You can switch between seeing the results on the map or in a list by selecting the
list/map button:
5. Select an address suggestion.
6. Enter the house number if you have one and haven't entered it already.
Tip: If you enter a house number that is not found, the number appears red. The nearest house
number that is found is shown in the Drive button. You can enter a new house number, or you
can select Drive to drive to the nearest house number.
7. Select Drive.
Your navigation device plans a route then starts to guide you to your destination. As soon as you
start driving, the guidance view is shown automatically.
Tip: If your destination is in a different time zone, you see a plus (+) or a minus (-) sign and
the time difference in hours and half hours in the arrival information panel. The estimated
time of arrival is the local time at your destination.
Tip: You can add a stop to a route that you have already planned.
Tip: You can save a route using My Routes.
Planning a route to a city center
Important: In the interest of safety and to avoid distractions while you are driving, you should
always plan a route before you start driving.
To plan a route to a city center using search, do the following:
56
Page 57
1. Select the Main Menu button to open the Main Menu.
2. Select Search.
The search screen opens with the keyboard showing.
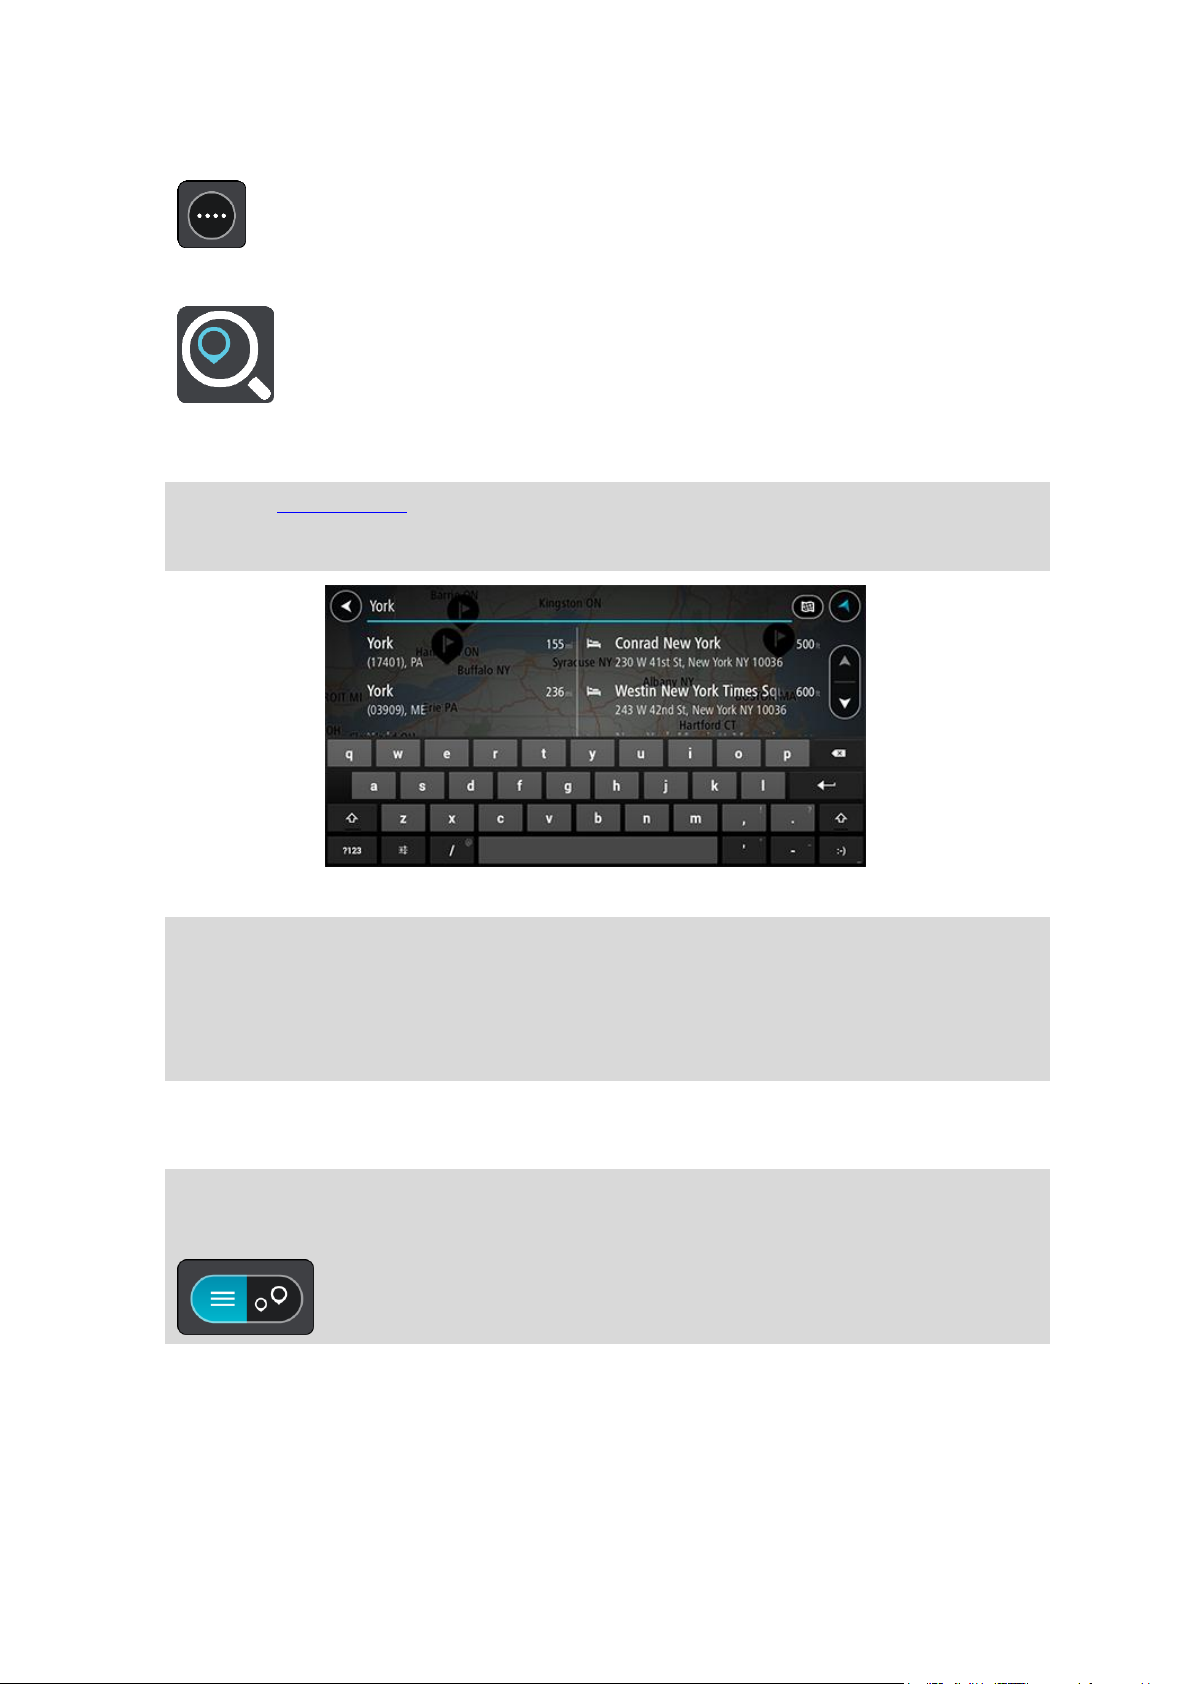
3. Use the keyboard to enter the name of the city or town you want to plan a route to.
Tip: If you press and hold a letter key on the keyboard, you get access to extra characters if
they are available. For example, press and hold the letter "e" to access characters 3 e è é ê ë
and more.
You can search for a town, city, or ZIP code.
Tip: To search for a specific city you can use the city's state code or ZIP code. For example,
searching for York will return many results. If you search for York AL or York 36925 then that
city will be at the top of the results. You can then search in the city.
Tip: When searching, the whole map is searched. If you want to change how the search is
done, select the button to the right of the search box. You can then change where the search
is done, for example, to being along the route or in a city.
4. As you type the address, suggestions are shown based on what you have entered. You can
continue typing or select a suggestion.
Towns and roads are shown on the left; POIs are shown on the right.
Tip: To see more results, hide the keyboard or swipe the results list to scroll it.
Tip: You can switch between seeing the results on the map or in a list by selecting the
list/map button:
5. Select the city in the left-hand column.
57
Page 58
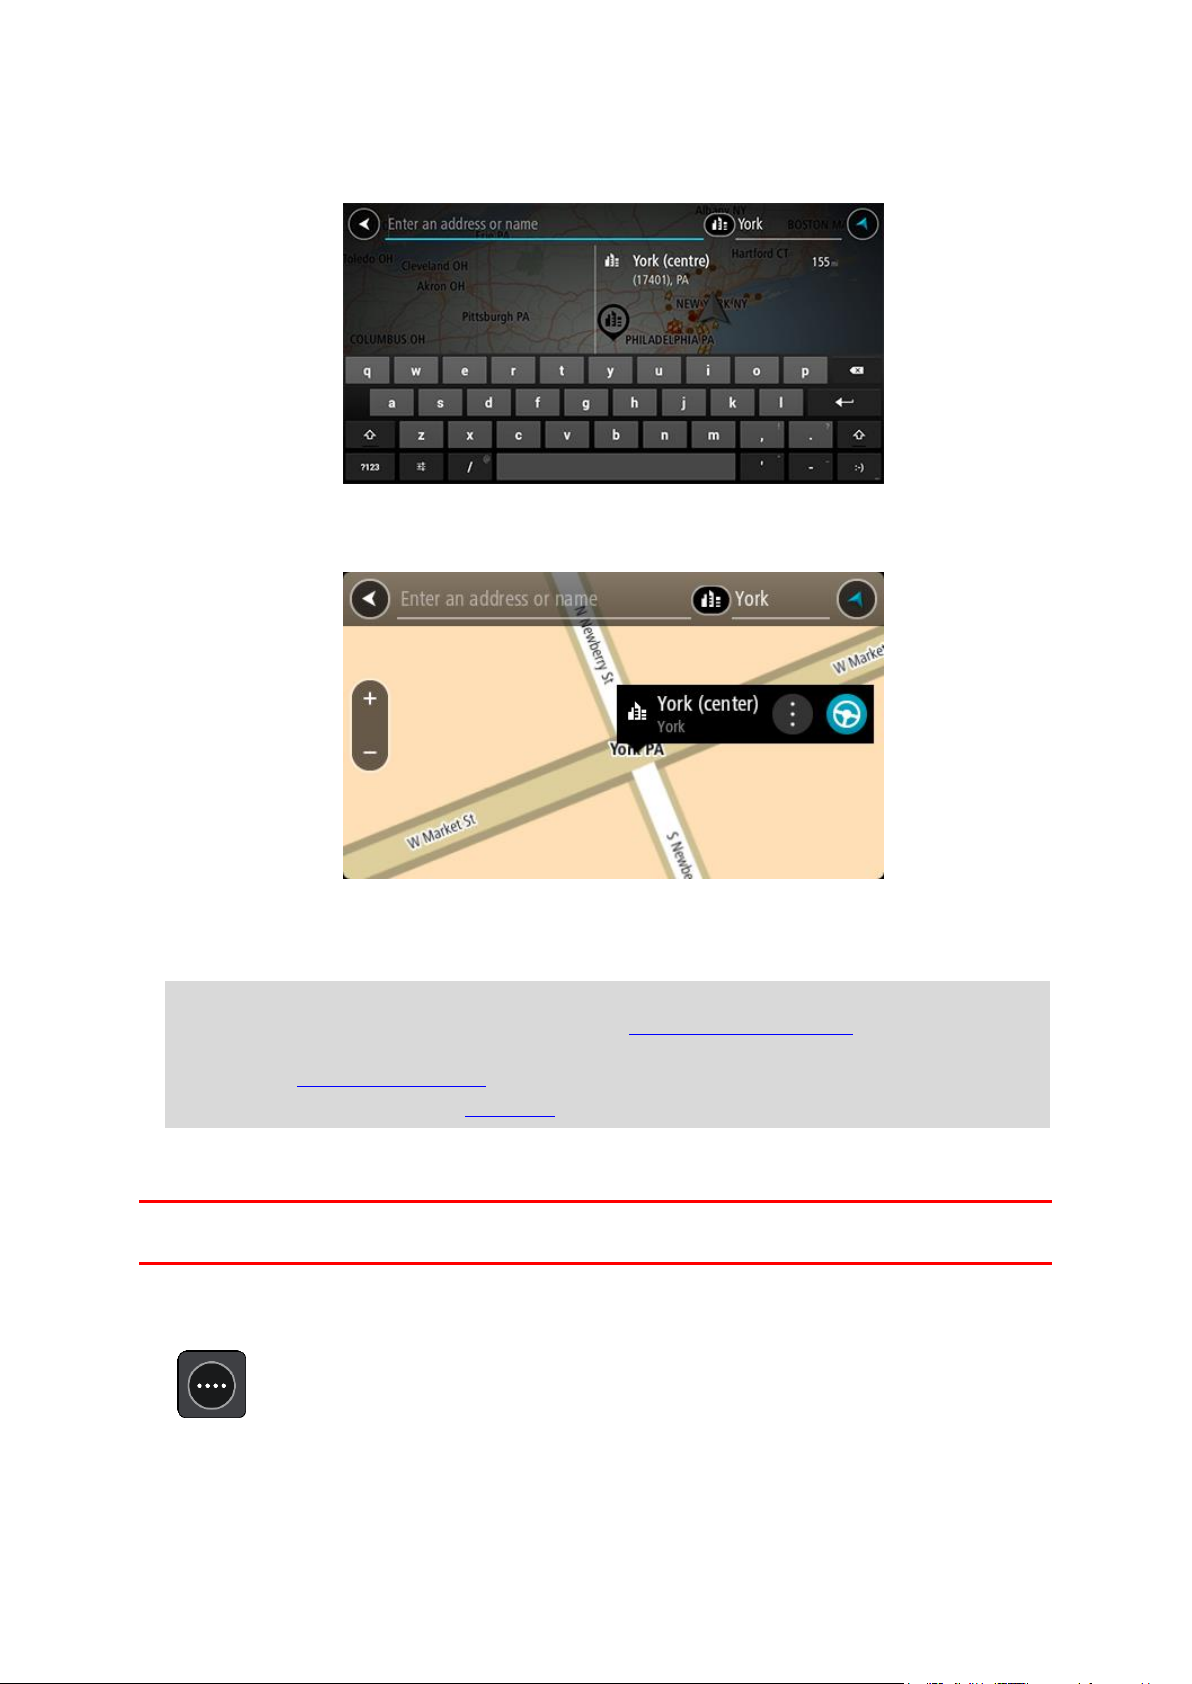
The city name is shown in the right side of the search input box, and the city center POI is
shown below in the right-hand column.
6. Select the city center POI.
The city center location is shown on the map.
7. Select Drive.
Your navigation device plans a route then starts to guide you to your destination. As soon as you
start driving, the guidance view is shown automatically.
Tip: If your destination is in a different time zone, you see a plus (+) or a minus (-) sign and
the time difference in hours and half hours in the arrival information panel. The estimated
time of arrival is the local time at your destination.
Tip: You can add a stop to a route that you have already planned.
Tip: You can save a route using My Routes.
Planning a route to a POI using search
Important: In the interest of safety and to avoid distractions while you are driving, you should
always plan a route before you start driving.
To plan a route to a POI type or a specific POI using search, do the following:
1. Select the Main Menu button to open the Main Menu.
58
Page 59

2. Select Search.
The search screen opens with the keyboard showing.
3. Use the keyboard to enter the name of the place you want to plan a route to.
Tip: If you press and hold a letter key on the keyboard, you get access to extra characters if
they are available. For example, press and hold the letter "e" to access characters 3 e è é ê ë
and more.
You can search for a POI (Point of Interest) type, such as a restaurant or tourist attraction.
Alternatively, you can search for a specific POI, for example "Rosie's Pizzeria."
Note: When searching, the whole map is searched. If you want to change how the search is
done, select the button to the right of the search box. You can then change where the search
is done, for example along the route or in a city.
4. As you type, suggestions based on what you have entered are shown in columns. You can
continue typing or select a suggestion.
Tip: To see more results, hide the keyboard or swipe the results list to scroll it.
Tip: You can switch between seeing the results on the map or in a list by selecting the
list/map button:
5. Select a POI type or an individual POI. If you selected a POI type, select a POI.
59
Page 60
The location is shown on the map.
6. To plan a route to this destination, select the drive button:
A route is planned and then guidance to your destination begins. As soon as you start driving,
the guidance view is shown automatically.
Tip: If your destination is in a different time zone, you see a plus (+) or a minus (-) sign and
the time difference in hours and half hours in the arrival information panel. The estimated
time of arrival is the local time at your destination.
Tip: You can add a stop to a route that you have already planned.
Tip: You can save a route using My Routes.
Planning a route using the map
Important: In the interest of safety and to avoid distractions while you are driving, you should
always plan a route before you start driving.
To plan a route using the map, do the following:
1. Move the map and zoom in until you can see the destination that you want to navigate to.
Tip: You can also select a map symbol to open the pop-up menu, then select the drive button
to plan a route to that location.
2. When you have found your destination on the map, select it by pressing and holding the screen
for about one second.
60
Page 61
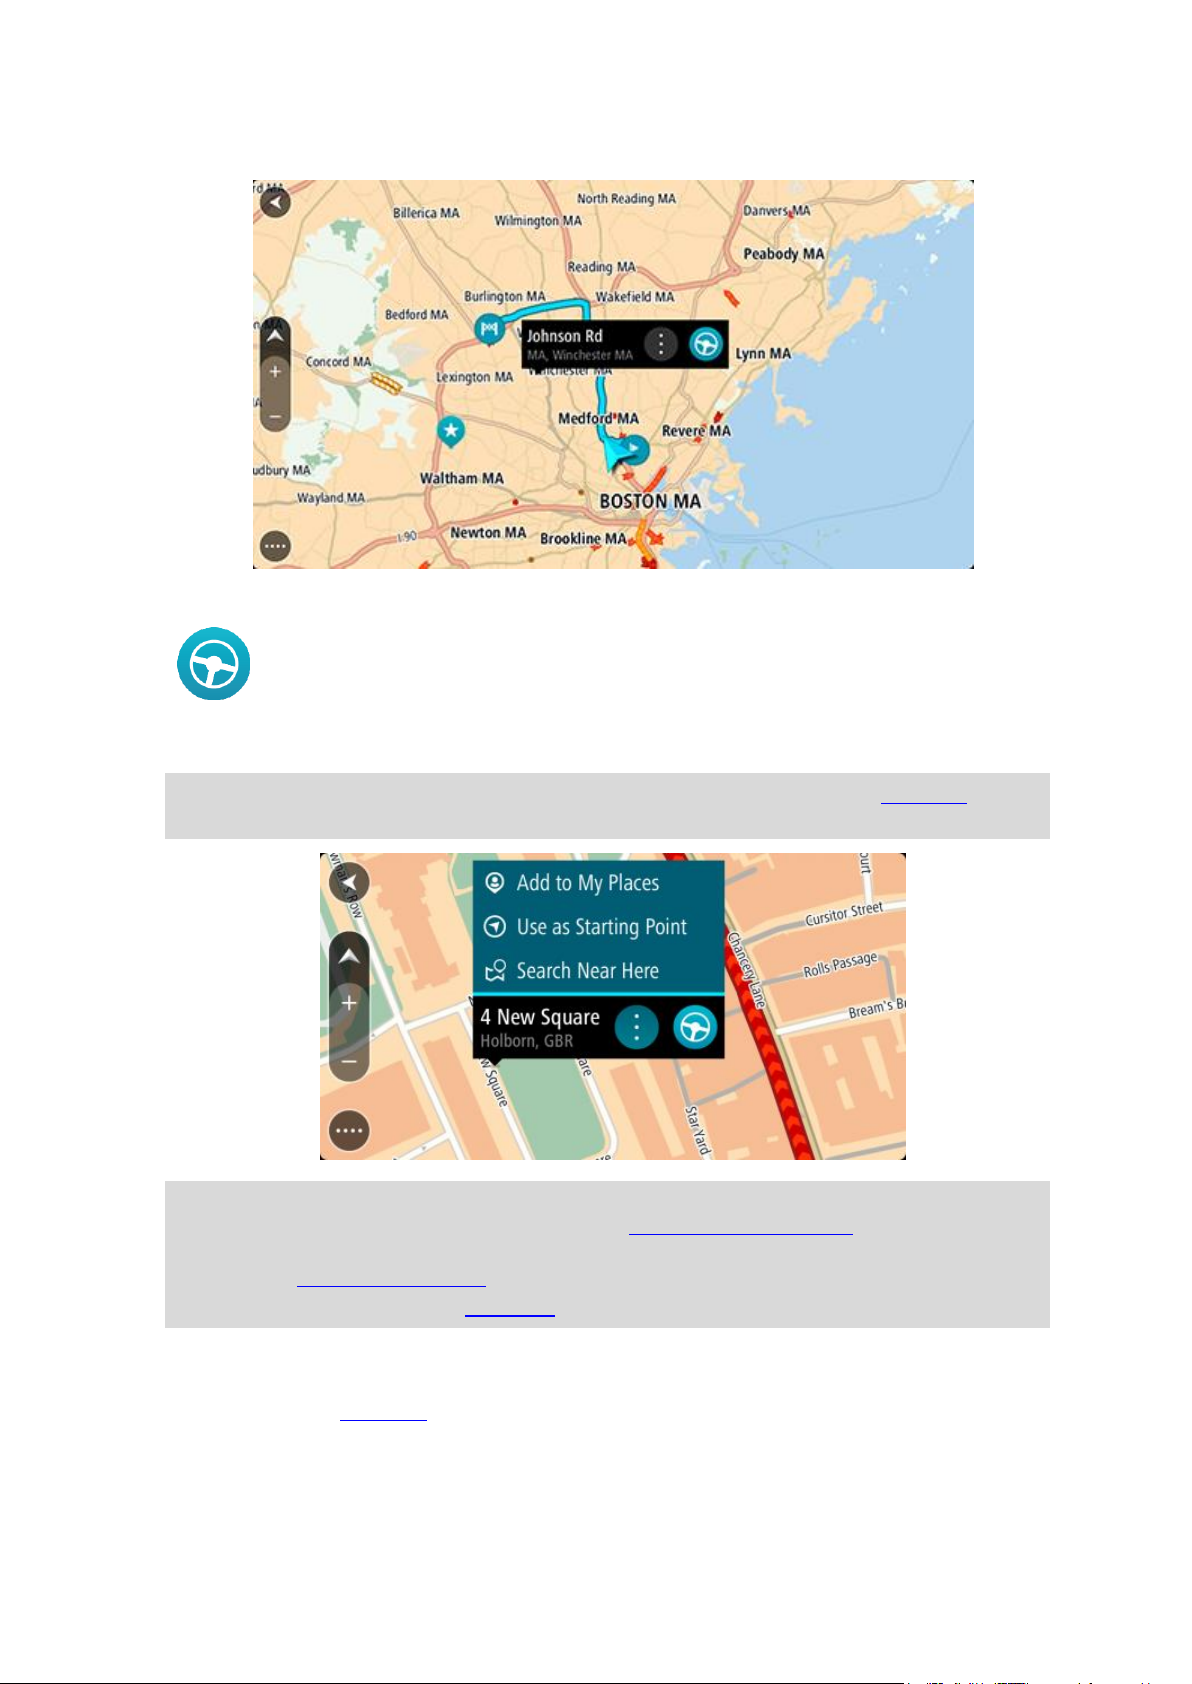
A pop-up menu shows the nearest address.
3. To plan a route to this destination, select the drive button:
A route is planned and then guidance to your destination begins. As soon as you start driving,
the guidance view is shown automatically.
Tip: You can use the location you selected in other ways, such as adding it to My Places, by
selecting the pop-up menu button.
Tip: If your destination is in a different time zone, you see a plus (+) or a minus (-) sign and
the time difference in hours and half hours in the arrival information panel. The estimated
time of arrival is the local time at your destination.
Tip: You can add a stop to a route that you have already planned.
Tip: You can save a route using My Routes.
Planning a route using My Places
To navigate to one of My Places from your current location, do the following:
61
Page 62
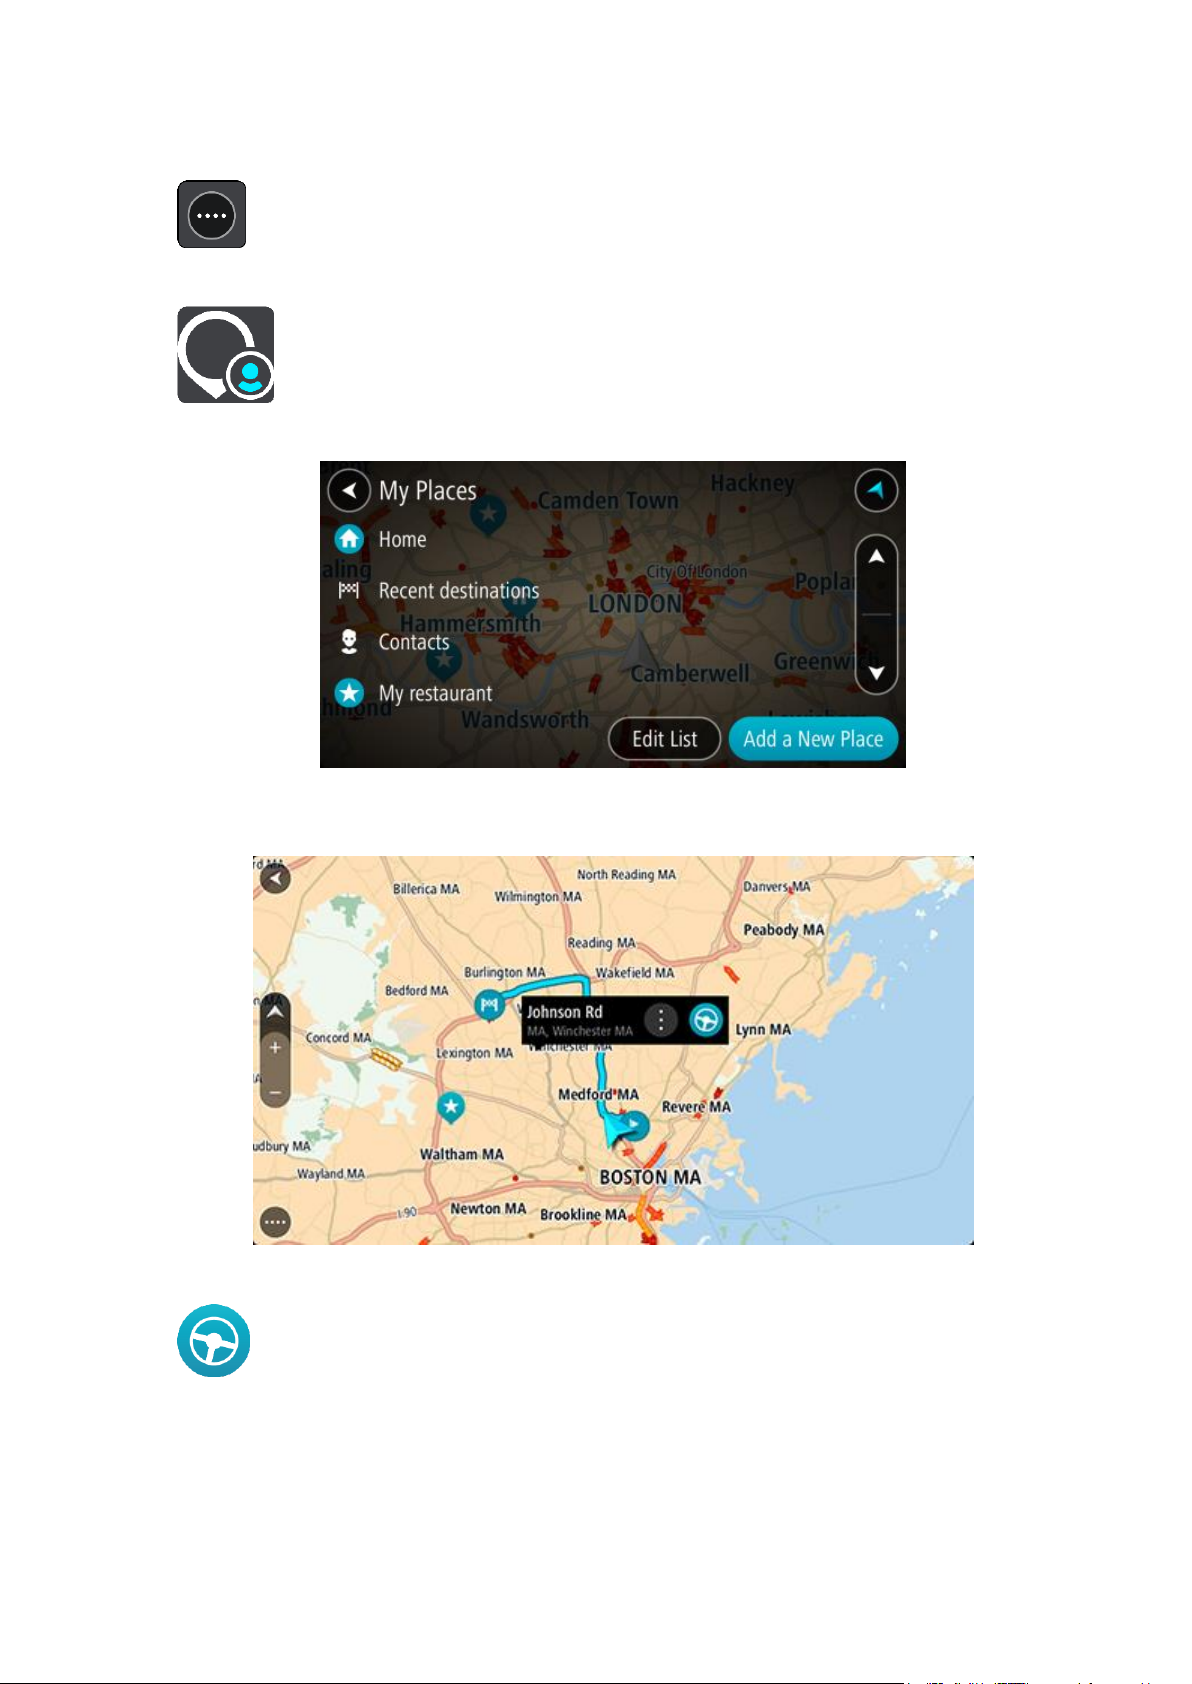
1. Select the Main Menu button to open the Main Menu.
2. Select My Places.
A list of all your Places opens.
3. Select the Place you want to navigate to, for example Home.
Your chosen Place is shown on the map with a pop-up menu.
4. To plan a route to this Place, select the drive button:
A route is planned and then guidance to your destination begins. As soon as you start driving,
the guidance view is shown automatically.
62
Page 63

Tip: If your destination is in a different time zone, you see a plus (+) or a minus (-) sign and
the time difference in hours and half hours in the arrival information panel. The estimated
time of arrival is the local time at your destination.
Tip: You can add a stop to a route that you have already planned.
Tip: You can save a route using My Routes.
Planning a route using coordinates
Important: In the interest of safety and to avoid distractions while you are driving, you should
always plan a route before you start driving.
To plan a route using a pair of coordinates, do the following:
1. Select the Main Menu button to open the Main Menu.
2. Select Search.
The search screen opens with the keyboard showing.
3. Select the type of search button to the right of the search box.
4. Select Latitude Longitude.
5. Type in your pair of coordinates. You can enter any of these coordinate types:
Decimal values, for example:
N 40.75773, W 73.985708
40.75773, -73.985708
Tip: For decimal values you don't have to use a letter to indicate the latitude and longitude. For locations west of the 0 meridian and locations south of the equator, use a minus
sign (-) before the coordinate.
Degrees, minutes and seconds, for example:
N 40°45′28″ W 73°59′09″
GPS standard coordinates, for example:
N 40 45.46 W 73 59.15
Note: The bar below the coordinates turns red if you enter coordinates that are not recognized
by your TomTom navigation app.
6. As you type in the coordinates, suggestions are shown based on what you have entered. You can
continue typing or select a suggestion.
Towns and roads are shown on the left; POIs are shown on the right.
Tip: To see more results, hide the keyboard or swipe the results list to scroll it.
63
Page 64

Tip: You can switch between seeing the results on the map or in a list by selecting the
list/map button:
7. Select a suggestion for your destination.
The location is shown on the map.
8. To plan a route to this destination, select the drive button:
A route is planned and then guidance to your destination begins. As soon as you start driving,
the guidance view is shown automatically.
Tip: If your destination is in a different time zone, you see a plus (+) or a minus (-) sign and
the time difference in hours and half hours in the arrival information panel. The estimated
time of arrival is the local time at your destination.
Tip: You can add a stop to a route that you have already planned.
Tip: You can save a route using My Routes.
Planning a route using a mapcode
Important: In the interest of safety and to avoid distractions while you are driving, you should
always plan a route before you start driving.
To plan a route using a mapcode, do the following:
1. Select the Main Menu button to open the Main Menu.
2. Select Search.
The search screen opens with the keyboard showing.
3. Type in your mapcode. You can enter any of these mapcode types:
International, for example, S8VXZ.PJZ2.
Country-specific, for example, USA WW6G.S9GT.
Alternative country-specific, for example, DC LQ.FR or DC JJ.1B2.
Tip: All the mapcodes in this example are for the same location - the US Capitol building in
Washington DC, USA. See About mapcodes for information on how to get a mapcode for a
location.
4. As you type in the mapcode, suggestions are shown based on what you have entered. You can
continue typing or select a suggestion.
Towns and roads are shown on the left, POIs are shown on the right.
64
Page 65

Tip: To see more results, hide the keyboard or swipe the results list to scroll it.
Tip: You can switch between seeing the results on the map or in a list by selecting the
list/map button:
5. Select a suggestion for your destination.
6. Select Drive.
A route is planned and then guidance to your destination begins. As soon as you start driving,
the guidance view is shown automatically.
Tip: If your destination is in a different time zone, you see a plus (+) or a minus (-) sign and
the time difference in hours and half hours in the arrival information panel. The estimated
time of arrival is the local time at your destination.
Tip: You can add a stop to a route that you have already planned.
Tip: You can save a route using My Routes.
Finding an alternative route
Important: In the interest of safety and to avoid distractions while you are driving, you should
always plan a route before you start driving.
To find an alternative route, do the following:
1. Plan a route as usual.
2. On the map view, select the route itself.
3. Select the pop-up menu button to open the menu.
4. Select Alternative Route and then select Find alternative.
Up to three alternative routes are shown on the map view. Each alternative route shows the
difference in travel time in a balloon.
Tip: Information from the Lifetime Traffic service is used when calculating alternative routes.
Any route that is 50% longer in time than the original route is not shown.
5. Select your chosen route by tapping on the time balloon.
6. Select Let's go.
7. Guidance to your destination begins. As soon as you start driving, the guidance view is shown
automatically.
Note: You can also find alternative routes by selecting Current Route in the main menu,
followed by Find Alternative.
65
Page 66

Planning a route in advance
You can plan a route in advance before you drive it. You can save the route as part of your My
Routes list.
To plan a route in advance, do the following:
1. Select the Main Menu button to open the Main Menu.
2. Select Search.
The search screen opens with the keyboard showing.
3. Use the keyboard to enter the name of the location you want to use as a starting point.
4. Select an address or POI suggestion.
5. Select Show on Map.
6. Select the pop-up menu button.
A pop-up menu shows a list of options.
7. Select Use as Starting Point.
8. Repeat the search steps to choose your destination, and then select the drive button in the
pop-up menu:
Your route is planned using your chosen starting point and destination. The estimated time of
arrival is shown at the top of the route bar.
Tip: If you don't want to use search to choose your starting point and destination, go to the
map view and press and hold to select a location.
Tip: Stops, POIs, Places and the destination can all be selected as starting points using their
pop-up menus.
66
Page 67

Changing the starting point to be your current location
1. Select the starting point of the route in the map view.
2. Select the pop-up menu button.
A pop-up menu shows a list of options.
3. Select Remove Starting Point.
Your route is replanned with your current location as the starting point.
Changing the starting point into a stop
1. Select the starting point on the route in the map view.
2. Select the pop-up menu button.
A pop-up menu shows a list of options.
3. Select Change to a Stop.
Your route is replanned with the starting point changed into a stop.
Finding a parking lot
To find a parking lot, do the following:
1. Select the Main Menu button to open the Main Menu.
67
Page 68
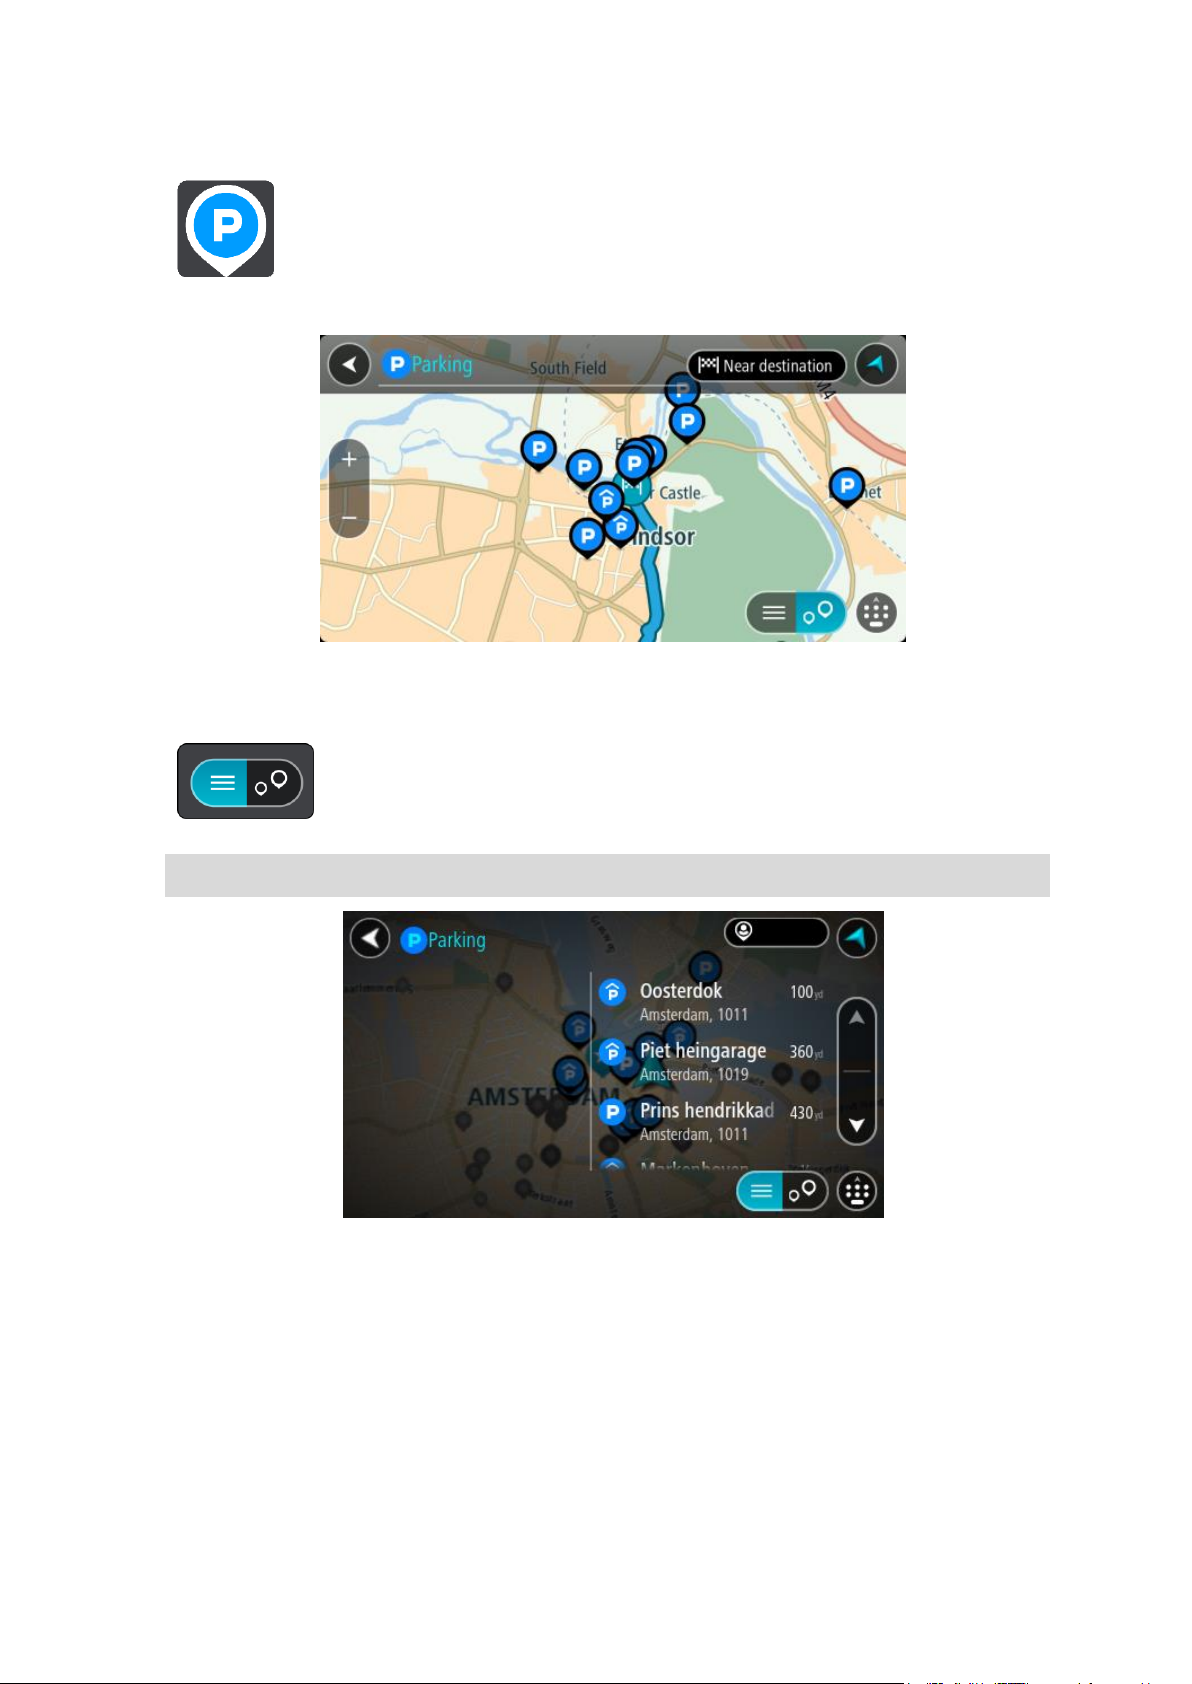
2. Select Parking.
The map opens showing the locations of parking lots.
If a route is planned, the map shows parking lots near your destination. If a route isn't planned,
the map shows parking lots near your current location.
You can change the screen to show a list of parking lots by pressing this button:
You can select a parking lot from the list to locate it on the map.
Tip: You can scroll down the list of results using the scroll bar on the right side of the screen.
68
Page 69

If you want to change how the search is done, select the button to the right of the search box.
You can then change where the search is carried out, for example, to search near you or the
whole map.
3. Select a parking lot from the map or the list.
A pop-up menu opens on the map showing the name of the parking lot.
4. To plan a route to your chosen parking lot, select the drive button:
A route is planned and then guidance to your destination begins. As soon as you start driving,
the guidance view is shown automatically.
Tip: You can add a parking lot as a stop on your route by using the pop-up menu.
Finding a gas station
To find a gas station, do the following:
1. Select the Main Menu button to open the Main Menu.
69
Page 70

2. Select Gas Station.
The map opens showing the locations of gas stations.
If a route is planned, the map shows gas stations along your route. If a route isn't planned, the
map shows gas stations near your current location.
You can change the screen to show a list of gas stations by pressing this button:
You can select a gas station from the list to locate it on the map.
Tip: You can scroll down the list of results using the scroll bar on the right side of the screen.
70
Page 71

If you want to change how the search is done, select the button to the right of the search box.
You can then change where the search is carried out, for example, to search near you or the
whole map.
3. Select a gas station from the map or the list.
A pop-up menu opens on the map showing the name of the gas station.
4. To plan a route to your chosen gas station, select the drive button:
A route is planned and then guidance to your destination begins. As soon as you start driving,
the guidance view is shown automatically.
Tip: You can add a gas station as a stop on your route by using the pop-up menu. A gas station
that is a stop on your route has a blue icon.
71
Page 72

The Current Route Menu
Clear Route
Select this button to clear the currently planned route.
The Current Route Menu closes and you return to the map view.
Find Alternative
You see this button when you have planned a route. Select this button to
show up to three alternative routes on the map view.
Avoid Blocked Road
Select this button to avoid an unexpected obstacle that is blocking the
road on your route.
Avoid Toll Roads
and More
Select this button to avoid some types of route features that are on your
currently planned route. These include ferries, toll roads and unpaved
roads.
Show Instructions
Select this button to see a list of turn-by-turn text instructions for your
planned route.
The instructions include the following:
The street name.
Up to two road numbers shown in road signs whenever available.
An instruction arrow.
An instruction description.
The distance between two consecutive instructions.
Exit number.
Add Stop to Route
Select this button to add a stop to your currently planned route. You can
also add a stop to your route directly from the map.
Changing your route
When you have planned a route, select the Current Route button in the Main Menu to open the
Current Route Menu.
The following buttons are available in the Current Route Menu:
72
Page 73
Add to My Routes
If you plan a new route that has not already been saved, you see this
button. Select this button to save this route as part of your My Routes list.
Save Changes to
Route
If you make a change to a My Route, you see this button. Select this
button to save the changes.
Change Route Type
Select this button to change the type of route used to plan your route.
Your route will be recalculated using the new route type.
Reorder Stops
Select this button to see the lists of stops for your current route. You can
then change the order of the stops on your route.
For a route without stops, you can also select this button to reverse your
route.
Drive to Route
Select this button to plan a route from your current location to the
starting point of a My Route. The starting point is converted to a stop.
Play Route Preview
Select this button to watch a preview of your planned route.
Stop Route Preview
Select this button to stop the preview of your planned route.
Avoiding a blocked road
If there is a blocked road on your route you can change your route to avoid it.
1. In the guidance view, select the current location symbol or the speed panel.
Tip: The speed panel is only shown when you have started driving on your route.
2. Select Avoid Blocked Road.
A new route is found that avoids the blocked road. You may be shown up to two alternatives
depending on the road network between you and your destination.
The new route is shown on the map view with the difference in travel time in a balloon.
Note: It may not be possible to find an alternative route around the blocked road if none
exists.
73
Page 74

3. Select the new route by selecting the time balloon.
4. Select Let's go.
Guidance to your destination resumes avoiding the blocked road. As soon as you start driving,
the guidance view is shown automatically.
Types of route
Select Change Route Type to change the type of route planned to your current destination. Your
route is recalculated using the new route type.
You can select the following types of route:
Fastest route - the fastest route to your destination. Your route is constantly checked taking
into account the traffic conditions.
Shortest route - the shortest route to your destination. This may take much longer than the
fastest route.
Most eco-friendly route - the most fuel-efficient route.
Avoid interstate highways - this type of route avoids all highways.
Walking Route - this type of route is optimized for walking.
Bicycle Route - this type of route is optimized for bicycles.
You can set the default route type in the Settings Menu.
Route features
You can choose to avoid some features that are on your currently planned route. You can avoid the
following route features:
Toll Roads
Ferries and car shuttle trains
Carpool Lanes
Unpaved Roads
Note: Carpool lanes are sometimes known as High Occupancy Vehicle Lanes (HOV lanes) and are
not present in every country. To travel on these lanes, you may need to have more than one
person in the car, for example, or the car may need to use environmentally-friendly fuel.
If you choose to avoid a route feature, a new route is planned.
In Route Planning in the Settings Menu, you can set how each route feature is handled when a new
route is planned.
Adding a stop to your route from your current route
1. In the Main Menu, select Current Route.
2. Select Add Stop to Route.
The map view is shown.
3. To select a stop, do one of the following steps:
Zoom in on the map, then press and hold to select a location. In the pop-up menu, select
Add to Current Route.
Select Search and search for a location. When you have found a location, select the Add
Stop to Route button.
Your route is recalculated to include your stop.
74
Page 75

Adding a stop to your route using the map
1. Press the switch view button to show the map.
Your complete route is shown on the map.
2. Zoom in on the map, then press and hold to select a location.
3. Select the pop-up menu button.
4. Select Use in Route.
5. Select Add to Current Route.
Your route is recalculated to include your stop.
Deleting a stop from your route
1. Press the switch view button to show the map.
Your complete route is shown on the map.
2. In the route bar, press the stop you want to delete.
The map zooms in to the stop and shows a pop-up menu.
Tip: If you select the wrong stop, press the back button to return to the map.
3. Select Delete This Stop.
The stop is deleted and your route is recalculated.
Reordering stops on a route
Note: If you have a route with no stops, you can use this button to reverse the route.
1. In the map view, select the route.
Tip: Zoom in on the route to make it easier to select.
1. Select the pop-up menu button.
2. Select Manage Stops, then Reorder Stops.
The map view is shown with the route cleared. The destination and all the stops are shown on
the map.
3. Select the stops one by one in the order you wish to drive them.
The symbols change to a flag as you select each stop.
4. Select your destination.
Your route is recalculated with the stops in the changed order.
75
Page 76

About My Routes
My Routes
My Routes provides an easy way to create saved routes with optional stops, sometimes known as an
itinerary. You can use My Routes to save, retrieve and edit routes.
You may want to use My Routes in one or more of the following situations:
While working - Your job involves driving several routes with multiple stops on a daily basis.
Your routes can change and you need to be flexible and be able to change the order of your
stops or change the planned route.
While on vacation - You are going on vacation and want to plan and save a route. Your route
includes scenic roads, stops at various hotels, and other places like tourist attractions.
While commuting to work - You want to add one or two regular stops between home and work.
Your route back home in the evening is the reverse of your route to work in the morning.
You can add the route that you have planned on the map to your My Routes list by selecting it.
Saving a route
1. Plan a route using the steps described in Planning a route.
Tip: If you cannot see your planned route on the map view, select the back button to show
your route.
2. Select the route.
3. Select the pop-up menu button to open the menu.
4. Select Manage Route, then Add to My Routes.
The name of the route is shown in the edit screen.
5. Edit the name of the route so that you can easily recognize it.
6. Select Done to save your route in the My Routes list.
Tip: You can also save a route using the Add to My Routes button in the Current Route menu.
Navigating using a saved route
To navigate using a previously saved route, do the following:
76
Page 77
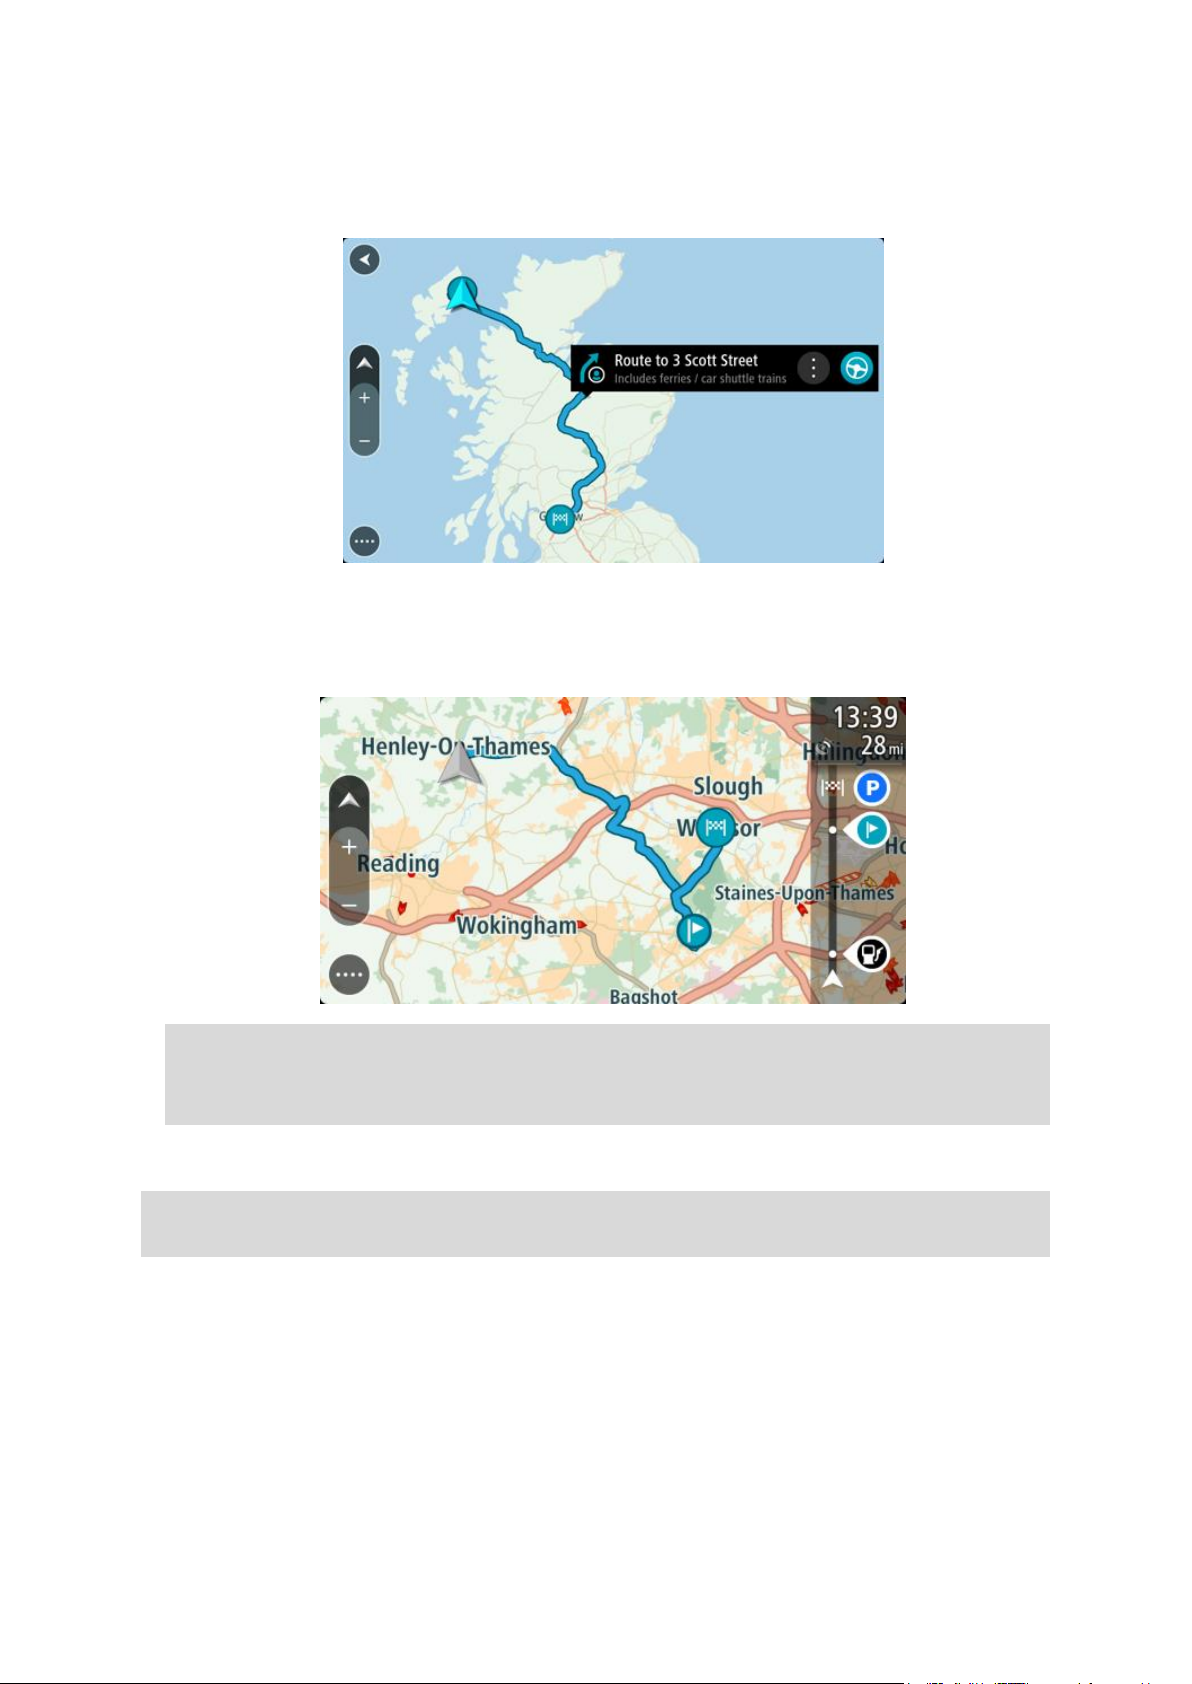
1. In the Main Menu, select My Routes.
2. Select a route from your list.
The route is shown on the map view.
3. To navigate to the start of the saved route, select Drive.
The starting point of the saved route is converted to your first stop and then the route is
planned. Guidance to your destination begins from your current location. As soon as you start
driving, the guidance view is shown automatically.
Tip: There are two other ways to navigate using a saved route:
Select the starting point of the route. When the pop-up menu opens, select Change to a Stop.
Alternatively, select Drive to Route in the Current Route menu.
Adding a stop to a saved route using the map
Note: You can also press and hold a location on the map and select Add to Current Route from
the pop-up menu.
1. Press the switch view button to show the map.
Your complete route is shown on the map.
2. Select the route.
77
Page 78
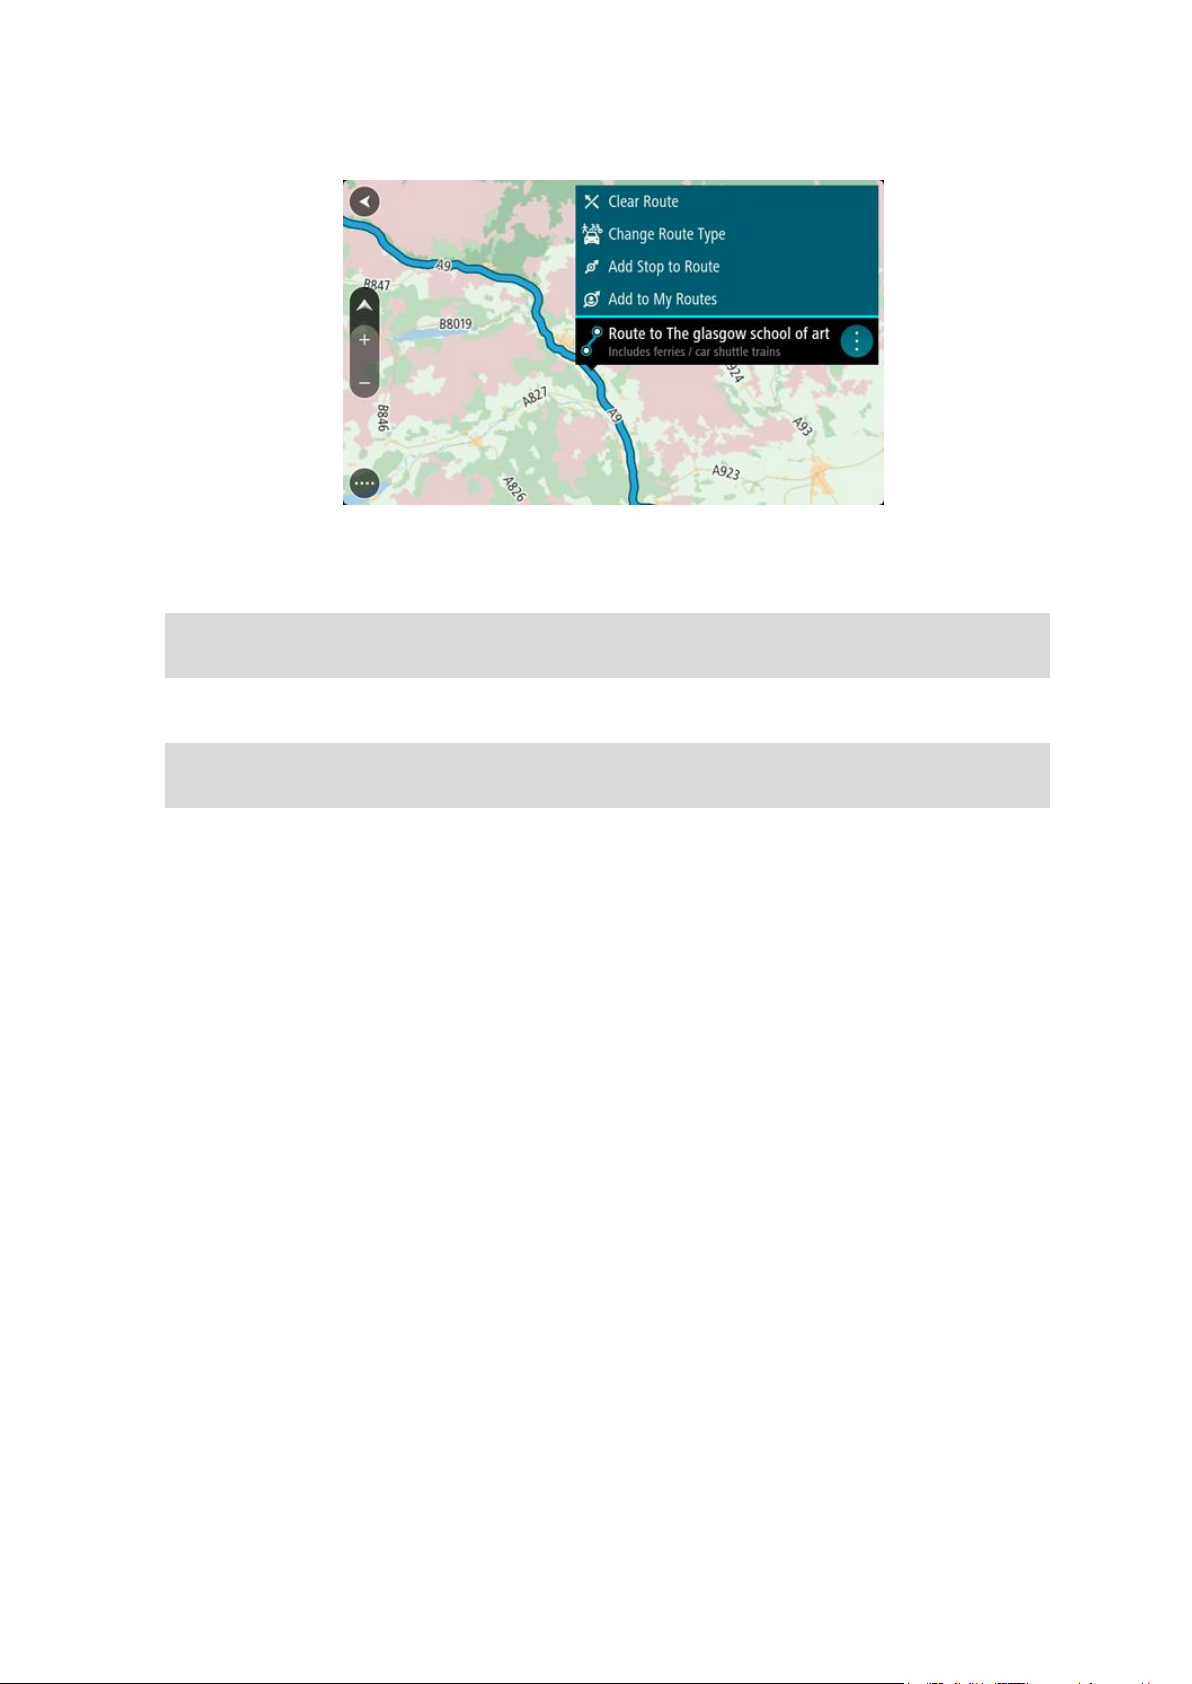
3. Select the pop-menu button to open the menu.
4. Select Manage Stops.
5. Select Add Stop to Route.
6. Select your new stop on the map.
Tip: If you know the name of your new stop, you can use Search to select your stop instead of
using the map.
7. Select the Add Stop button to add this location as a stop.
Your route is recalculated to include your stop.
Tip: To update the saved route in your My Routes list with the changes, select the route on the
map, then select Save Changes to Route in the pop-up menu.
Deleting a route from My Routes
1. In the Main Menu, select My Routes.
2. Select Edit List.
3. Select the routes you want to delete.
4. Select Delete.
78
Page 79
About voice control
Voice control (Speak & Go)
Note: Voice control is only available when your TomTom BRIDGE is in the dock and the micro-
phone is connected.
Instead of selecting items on the screen to control your TomTom BRIDGE, you can use your voice to
control your TomTom navigation app.
You can use voice control to control many of the navigation features on your TomTom navigation
app or to change settings. For example, you can change the screen to day colors or decrease the
volume just by using your voice.
Voice control is active in the map view, the guidance view, and the voice control screen.
Important: Voice control requires a voice that speaks street names. When there is no voice that
speaks street names installed and selected on your TomTom BRIDGE, this feature is not available.
To select a voice that reads aloud street names, select Voices in the Settings menu, then select
Choose a voice and select a Computer voice that reads aloud street names.
Starting voice control
In map view or guidance view, say the wake-up phrase to start voice control. The wake-up phrase is
"Hello, TomTom".
Tip: Voice control is off by default. You can turn the wake-up phrase on or off in the settings
menu.
Alternatively, you can select Voice Control in the Main Menu:
When voice control is ready to use, you see the voice control screen and your TomTom navigation
app says "I'm listening." Speak when you hear the beep.
Note: If the volume control is set to 20% or lower, the volume automatically changes to 50% when
you start voice control.
79
Page 80

The voice control screen
1. Examples of what you can say.
Tip: Say "All commands" to see a list of commands you can say. Alternatively, select Help in
the Main menu, then select Voice control and then select Which commands can I say?.
2. The status of voice control on your TomTom navigation app. You can speak when your TomTom
navigation app says "I'm listening" and you see the microphone symbol in the left corner.
The status message tells you if voice control cannot understand what you said and gives you
instructions about using voice control. At the same time, voice control reads aloud the message.
3. The microphone symbol shows you when you can speak:
This symbol shows you that voice control is ready to listen. Speak when you hear the
beep.
This symbol shows you that voice control is busy.
4. The microphone monitor. While you are speaking the microphone monitor shows how well voice
control can hear your voice:
A light blue bar means voice control can hear your voice.
A red bar means your voice is too loud for voice control to recognize individual words.
A dark blue bar means your voice is too quiet for voice control to recognize individual
words.
Some tips for using voice control
You can help your TomTom navigation app understand what you are saying by following these tips:
Mount your TomTom navigation app about an arm's length in front of you, away from speakers
or air vents.
80
Page 81

Reduce background noise such as voices or the radio. If there is excessive road noise, you may
need to speak in the direction of the microphone.
Speak fluently and naturally as though speaking to a friend.
When saying an address, try not to pause between parts of the address or add extra words.
Say "number one" or "number two" and not "one " or "two" when selecting an item from a list
such as a house number.
Try not to correct mistakes, for example "Number four, oh I mean number five."
Important: Voice control on your TomTom navigation app is specifically for native speakers of the
selected language who have a neutral accent. If you have a strong local or foreign accent, voice
control may not understand everything that you say.
What you can use voice control for
To view the complete list of available commands, select Help in the Main menu, then Voice control
and then Which commands can I say?.
When voice control is on, you can also say "All commands" to view the list of available commands.
Here are some of the commands you can say when voice control is active:
Global commands
"Help," "Back," and "Cancel"
Navigation and route
"Go home" and "Travel via home"
"Go to a parking lot" and "Go to a gas station"
"Go via a parking lot" and "Go via a gas station"
"Display My Places" and "Recent destinations"
"Travel via a recent destination," and "Travel via a saved place"
"Report safety camera"
"When will I get there?"
"Mark the current location"
"Add current location to My Places"
"Clear route"
"What's the next instruction?"
Device settings
"Volume 70%", "Volume up", and "Volume down"
"Mute", and "Sound on"
"Instructions on", and "Instructions off"
"Day colors", and "Night colors"
"2D view", and "3D view"
"Zoom in", and "Zoom out"
Saying commands in different ways
Your TomTom navigation app recognizes many more words than just the ones you see in the list of
commands, so try some of your own words. You can say other words that have the same meaning,
for example you can say the following words:
"OK," "Correct" or "Right" instead of "Yes" when you want to confirm what you said.
"Navigate to," "Look for" or "Nearest" instead of "Drive to" when you want to drive to a gas
station.
"Cancel" or "Delete" instead of "Clear" when you want to clear your current route.
81
Page 82

Entering an address using voice control
Note: If spoken address entry is not supported in your current country, voice control is stopped
and the address entry screen is shown. You can enter the address in the normal way using the
keyboard.
The following example shows how to use voice control to plan a journey to an address or a location:
1. In map view or guidance view, say the wake-up phrase "Hello, TomTom" to start voice control.
The voice control screen is shown and your TomTom navigation app says "I'm listening." When
voice control is ready to listen, you see a microphone icon in the bottom left corner and you
hear a beep.
2. Say "Go to an address" or "Go to a saved location."
Tip: Say "All commands" to see a list of commands you can say. Alternatively, select Help in
the Main menu, then select Voice control and then select Which commands can I say?.
For some commands, your TomTom navigation app repeats what you say and asks for confirmation.
3. If the command is correct, say "Yes."
If the command is incorrect, say "No" and repeat the command after you hear "I'm listening."
4. Say the address or location.
You can also say the name of a place or a city centre. Your TomTom navigation app repeats
what you say and asks for confirmation.
Important: Say "number one" or "number two" and not "one " or "two" when selecting an item
from a list such as a house number.
5. If the address or location is correct, say "Yes."
If the address or location is incorrect, say "No" and repeat the address after you hear "I'm
listening."
Tip: If you want to change the house number or street you can say "Change house number" or
"Change street."
Your TomTom navigation app plans a route from your current location to your destination.
Tip: To stop voice control, say "Cancel." To go back one step, say "Back."
Tip: Your TomTom navigation app recognizes places and street names when they are spoken in
the local language using local pronunciation. You cannot enter ZIP codes using voice control.
Going home using voice control
The following example shows how to use voice control to plan a trip to your home location:
1. In map view or guidance view, say the wake-up phrase "Hello, TomTom" to start voice control.
The voice control screen is shown and your TomTom navigation app says "I'm listening." When
voice control is ready to listen, you see a microphone icon in the bottom left corner and you
hear a beep.
2. Say the command "Drive home."
Tip: Say "All commands" to see a list of commands you can say. Alternatively, select Help in
the Main menu, then select Voice control and then select Which commands can I say?.
82
Page 83

For some commands, your TomTom navigation app repeats what you say and asks for confirmation.
3. If the command is correct, say "Yes."
If the command is incorrect, say "No" and repeat the command after you hear "I'm listening."
Your device plans a route from your current location to your home location.
Tip: To stop voice control, say "Cancel." To go back one step, say "Back."
Going to a POI using voice control
The following example shows how to use voice control to plan a trip to a gas station:
1. In map view or guidance view, say the wake-up phrase "Hello, TomTom" to start voice control.
The voice control screen is shown and your TomTom navigation app says "I'm listening." When
voice control is ready to listen, you see a microphone icon in the bottom left corner and you
hear a beep.
2. Say the command "Drive to a gas station."
Tip: Say "All commands" to see a list of commands you can say. Alternatively, select Help in
the Main menu, then select Voice control and then select Which commands can I say?.
For some commands, voice control repeats what you say and asks for confirmation.
If a route is planned, a list of gas stations along your route is shown. If a route isn't planned, a
list of gas stations near your current location is shown.
3. Say the number of the gas station you want to use, for example, "number three."
Voice control repeats what you say and asks for confirmation.
4. If the command is correct, say "Yes."
If the command is incorrect, say "No" and repeat the command after you hear "I'm listening."
Your TomTom navigation app plans a route from your current location to the gas station.
Tip: To stop voice control, say "Cancel." To go back one step, say "Back."
Changing a setting using voice control
For example, to change the volume do the following:
1. In the map view, say the wake-up phrase "Hello, TomTom" to start voice control.
The voice control screen is shown and your TomTom navigation app says "I'm listening." When
voice control is ready to listen, you see a microphone icon in the bottom left corner and you
hear a beep.
2. Say the command "Volume 50%."
Tip: Say "All commands" to see a list of commands you can say. Alternatively, select Help in
the Main menu, then select Voice control and then select Which commands can I say?.
For some commands, your TomTom navigation app repeats what you say and asks for confirmation.
3. If the command is correct, say "Yes."
If the command is incorrect, say "No" and repeat the command after you hear "I'm listening."
The volume on your TomTom navigation app changes to 50%.
83
Page 84

Tip: To stop voice control, say "Cancel." To go back one step, say "Back."
84
Page 85

About safety cameras
Symbol shown on
map
Symbol shown in
route bar
Description
Safety camera - this type of camera checks the
speed of passing vehicles and is fixed in one
place.
Safety Cameras
The Safety Cameras service warns you about the following camera locations:
Fixed safety camera locations.
Speed trap locations.
Speed trap hotspots.
Average safety camera locations.
Speed enforcement zones.
Red light camera locations.
Traffic restriction cameras.
The Safety Cameras service also warns you about the following safety hazards:
Accident blackspot locations.
Traffic jams.
The TomTom BRIDGE uses either a permanent connection or a smartphone connection to connect to
TomTom services.
Important: If you are outside of the area covered by your cellular data plan, you may be liable for
extra roaming charges while using TomTom Services.
Note: TomTom services are not available in all countries or regions, and not all services are
available in all countries or regions. For more information on available services in each region, go
to tomtom.com/services.
Safety Camera warnings
Safety camera warning sounds are played for the most common types of safety camera. To change
the way you are warned about speed cameras, select Sounds & Warnings in the Settings menu.
Warnings are given as you approach a safety camera. You are warned in several ways:
A symbol is shown in the route bar and on your route on the map.
Your distance to the safety camera is shown in the route bar.
You hear a warning sound as you get near the camera.
While you are approaching a camera or driving in an average speed zone, your speed is
monitored. If you drive more than 5 km/h or 3 mph over the speed limit the route bar turns red.
If you drive less than 5 km/h or 3 mph over the speed limit the route bar turns orange.
Tip: In the map view or guidance view, you can select a safety camera symbol in the route bar to
see the type of camera, the maximum speed and also the length of an average speed zone. In the
map view, you can also select a safety camera that is shown on your route.
85
Page 86

Symbol shown on
map
Symbol shown in
route bar
Description
Speed trap - this type of camera checks the
speed of passing vehicles and can be moved to
different locations.
Speed trap hotspots - this type of warning shows
places where speed traps are often used.
Average speed safety cameras - these types of
cameras measure your average speed between
two points. You are warned at the start and end
of the average speed zone.
While you are driving in an average speed zone,
your average speed is shown, instead of your
current speed. The distance to the end of the
area is shown in the route bar.
Speed enforcement zones - these zones can
contain multiple safety cameras.
You are warned at the start and end of a speed
enforcement zone. While you are driving in a
speed enforcement zone, your current speed is
shown, and the visual warning is shown in the
route bar.
Red light camera - this type of camera checks
for vehicles breaking traffic rules at traffic
lights. There are two types of red light safety
cameras - those which check if you drive through
a red light and those which check for driving
through a red light together with speeding.
Traffic restriction - this type of warning warns
you about restricted roads.
Accident hotspot - this type of warning is given
for a place where road traffic accidents have
historically been concentrated.
You are warned at the start and end of the
accident hotspot. While you are driving in an
accident hotspot, your current speed is shown.
When you are in the hotspot, the visual warning
continues to be shown in the route bar.
Traffic jams - warnings are given in the route
bar for traffic jams.
86
Page 87
Changing the way you are warned
To change the way the navigation app warns you about speed cameras, select the Sounds and
Warnings button in the Settings Menu.
You can then set how you want to be warned for the different types of cameras and safety hazards.
You can change settings for whether you want to be warned, never warned or warned only if you
are speeding.
For example, to change how you are warned when you approach a safety camera, do the following:
1. Select Sounds and Warnings in the Settings Menu.
2. Select Safety camera warnings.
3. Select Safety cameras.
4. Select one of the following warning options:
Always.
Only when speeding.
Never.
5. Select the back button.
Tip: To turn off all audible warnings, select Settings, followed by Sounds and Warnings and then
turn off Warning sounds.
Reporting a new safety camera
If you pass a new safety camera that you were not warned about, you can report it instantly.
Note: To report a safety camera, your device must have a cellular data connection.
You can report a safety camera in two ways:
Using the quick menu to report a safety camera
1. Select the current location symbol or the speed panel in the guidance view.
2. Select Report Safety Camera from the pop-up menu.
You see a message thanking you for adding the camera.
Tip: If you make a mistake when reporting a camera, select Cancel in the message.
The safety camera is saved on your device automatically, and is also sent to other users.
Using the Main Menu to report a safety camera
1. Select the Main Menu button to open the Main Menu.
87
Page 88

2. Select Report Safety Camera.
You see a message thanking you for adding the camera.
Tip: If you make a mistake when reporting a camera, select Cancel in the message.
The safety camera is saved on your device automatically, and is also sent to other users.
Confirm or remove a speed trap
You can confirm the presence of a speed trap or remove a speed trap if it is no longer present.
1. Just after you pass a speed trap, in the route bar you are asked if the camera was still there.
2. Select Yes if the speed trap is still there.
3. Select No if the speed trap has been removed.
If you select No, the speed trap is removed from your map.
Updating locations for cameras and hazards
The locations of safety cameras can change frequently. New cameras can also appear without
warning and the locations for other hazards, such as accident hotspots, may also change.
When connected to TomTom services, all camera updates for fixed safety camera and speed trap
locations are received in real time. You do not need to do anything to receive updates – they are
sent to your navigation app automatically.
88
Page 89

About My Places
My Places
My Places provides an easy way to select a location without the need to search for the location each
time. You can use My Places to create a collection of useful addresses.
The following items are always in My Places:
Home - Your home location can be your home address or somewhere you often visit, such as
your office. This feature provides an easy way to navigate there.
Recent destinations - Select this button to select your destination from a list of locations you
have recently used as destinations. These also include your stops.
You can add a location to My Places directly in My Places, by selecting a location from the map, by
searching for a location or by marking a location.
Your home location, marked locations, and the locations that you have added appear in a list in My
Places and are shown with a marker on the map.
Setting your home location
You can set your home location in the following ways:
Setting your home location using My Places
1. In the Main Menu, select My Places.
2. Select Home.
3. To select a home location, do one of the following:
Zoom in on the map at the location you want to select. Press and hold to select the loca-
tion, then select the home location symbol.
Select the Search button and search for a location. Select a location to set as home. Select
Set home location.
89
Page 90
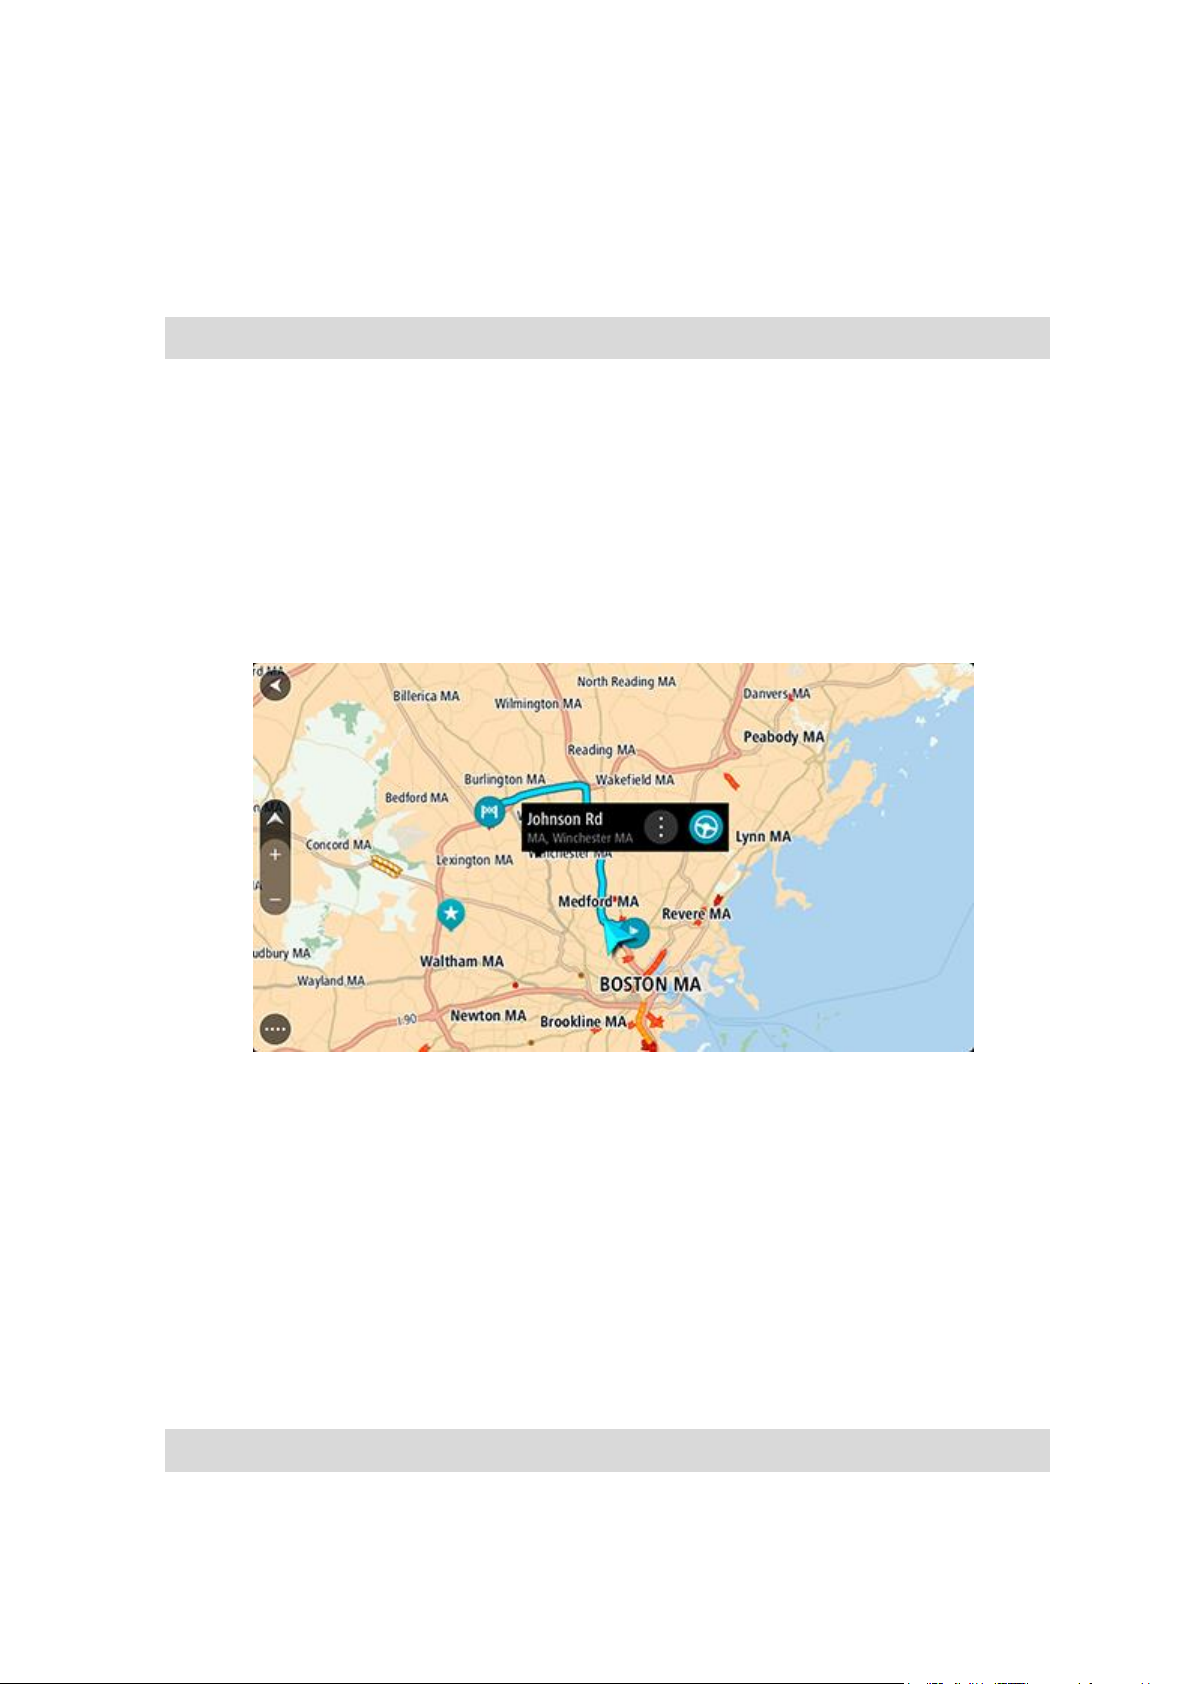
Setting your home location using the map
1. In the Map View, move the map and zoom in until you can see your home location.
2. Select the location by pressing and holding the screen for about one second.
A pop-up menu shows the nearest address.
1. Open the pop-up menu and select Add to My Places.
2. In the name bar, enter the name "Home".
Note: "Home" must have a capital letter H.
3. Select Add.
Your home location is shown on the map.
Changing your home location
You can change your home location in the following ways.
Changing your home location using My Places
1. In the Main Menu, select My Places.
2. Select Home.
Your home location is shown on the map, with a pop-up menu.
3. Select Edit Location.
4. To select a new home location, do one of the following:
Zoom in on the map at the location you want to select. Press and hold to select the loca-
tion, then select the home location symbol.
Select the Search button and search for a location. Select a location to set as home. Select
Set home location.
Changing your home location using the map
1. In the Map View, move the map and zoom in until you can see your home location.
2. Select the location by pressing and holding the screen for about one second.
A pop-up menu shows the nearest address.
1. Open the pop-up menu and select Add to My Places.
2. In the name bar, enter the name "Home".
Note: "Home" must have a capital letter H.
3. Select Add.
90
Page 91

Your home location is changed to the new location.
Adding a location from My Places
1. In the Main Menu, select My Places.
2. Select Add a new place.
3. To select a location, do one of the following:
Zoom in on the map at the location you want to select. Press and hold to select the loca-
tion, then select the add location symbol.
Search for a location. Select Show on Map, then select the add location symbol.
The name of the location appears in the edit screen.
4. Edit the name of the location so you can easily recognize it.
5. Select Done to save your location in the My Places list.
Add a location to My Places from the map
1. Move the map and zoom in until you can see the destination that you want to navigate to.
2. Press and hold to select the location.
3. Select the pop-up menu button.
4. Select Add to My Places.
The name of the location is shown in the edit screen.
5. Edit the name of the location so you can easily recognize it.
6. Select Done to save your location in the My Places list.
The location you added is shown with a marker on the map.
Adding a location to My Places using search
1. In the Main Menu, select Search.
2. Search for a location.
91
Page 92

3. Select the location then select Show on map.
4. When the map view shows the location, select the pop-up menu button.
5. Select Add to My Places.
The name of the location appears in the edit screen.
6. Edit the name of the location so you can easily recognize it.
7. Select Done to save your location in the My Places list.
Deleting a recent destination from My Places
1. In the Main Menu, select My Places.
2. Select Recent Destinations.
3. Select Edit List.
4. Select the destinations you want to delete.
5. Select Delete.
Deleting a location from My Places
1. In the Main Menu, select My Places.
2. Select Edit List.
3. Select the locations you want to delete.
4. Select Delete.
Importing a POI list
You can find collections of POIs on the internet and upload these POI collections to My Places by
transferring the files to your device. A POI collection might contain, for example, campgrounds or
restaurants for the area you are traveling in and provides an easy way to select a location without
the need to search for the location each time.
Your TomTom BRIDGE uses .OV2 files for POI collections.
To import an .OV2 file to your TomTom BRIDGE, follow these steps:
1. Connect the TomTom BRIDGE to your computer using the USB cable supplied with your device,
then switch your device on.
Note: Use ONLY the USB cable supplied with your device. Other USB cables may not work.
Note: You cannot use the mount to connect your device to your computer.
Note: You should plug the USB cable directly into a USB port on your computer and not into a
USB hub or USB port on a keyboard or monitor.
2. On your computer, open a file manager program.
Your device appears in your computer's files system as TomTom Bridge.
3. Open your device's Internal Storage folder, then open the Locations folder.
4. Copy the .OV2 files from your computer to the Locations folder.
The .OV2 file is imported and you see the message New place list added.
Tip: If your .OV2 file also has an associated icon file, you can also copy that file to the Locations folder. The icon file is used for the POI location pins on the map.
5. Select My Places in the main menu.
Your new POI list is shown in the Places list.
6. Select your new POI list.
92
Page 93

Your new POI list opens showing all the POIs in the list. Select the map view to see the POIs on
the map.
93
Page 94
Appearance
Settings
Select Settings in the Main Menu, then select Appearance.
On this screen, you can change these settings:
Display
Select Display to change the appearance of the display.
Route bar
Select Route bar to change the information you see in the route bar.
Guidance view
Select Guidance view to change the information you see in the guidance view.
Automatic zoom
Select Automatic zoom to change how you view a crossing as you drive.
Automatic map view switching
By default, automatic changing of views is on. This means, for example, that your TomTom
navigation app shows the map view when an alternative route is being suggested, along with
several other sets of circumstances. Also, for example, that your TomTom navigation app shows
the guidance view when you start driving and you start to accelerate. Select this setting if you
want to turn off automatic changing between guidance view and map view.
Show previews of highway exits
Select this setting to control the full screen preview when you approach highway exits.
Display
Select Settings in the Main Menu, then select Appearance.
Theme color
Select Theme color to change the accent color used in the menus, buttons and icons.
Brightness
Select Brightness to change the following settings:
Day brightness
Move the slider to adjust the brightness level of the screen during the day.
Night brightness
Move the slider to adjust the brightness level of the screen during the night.
Select Switch to night colors when dark to automatically switch to night colors when it gets dark.
94
Page 95
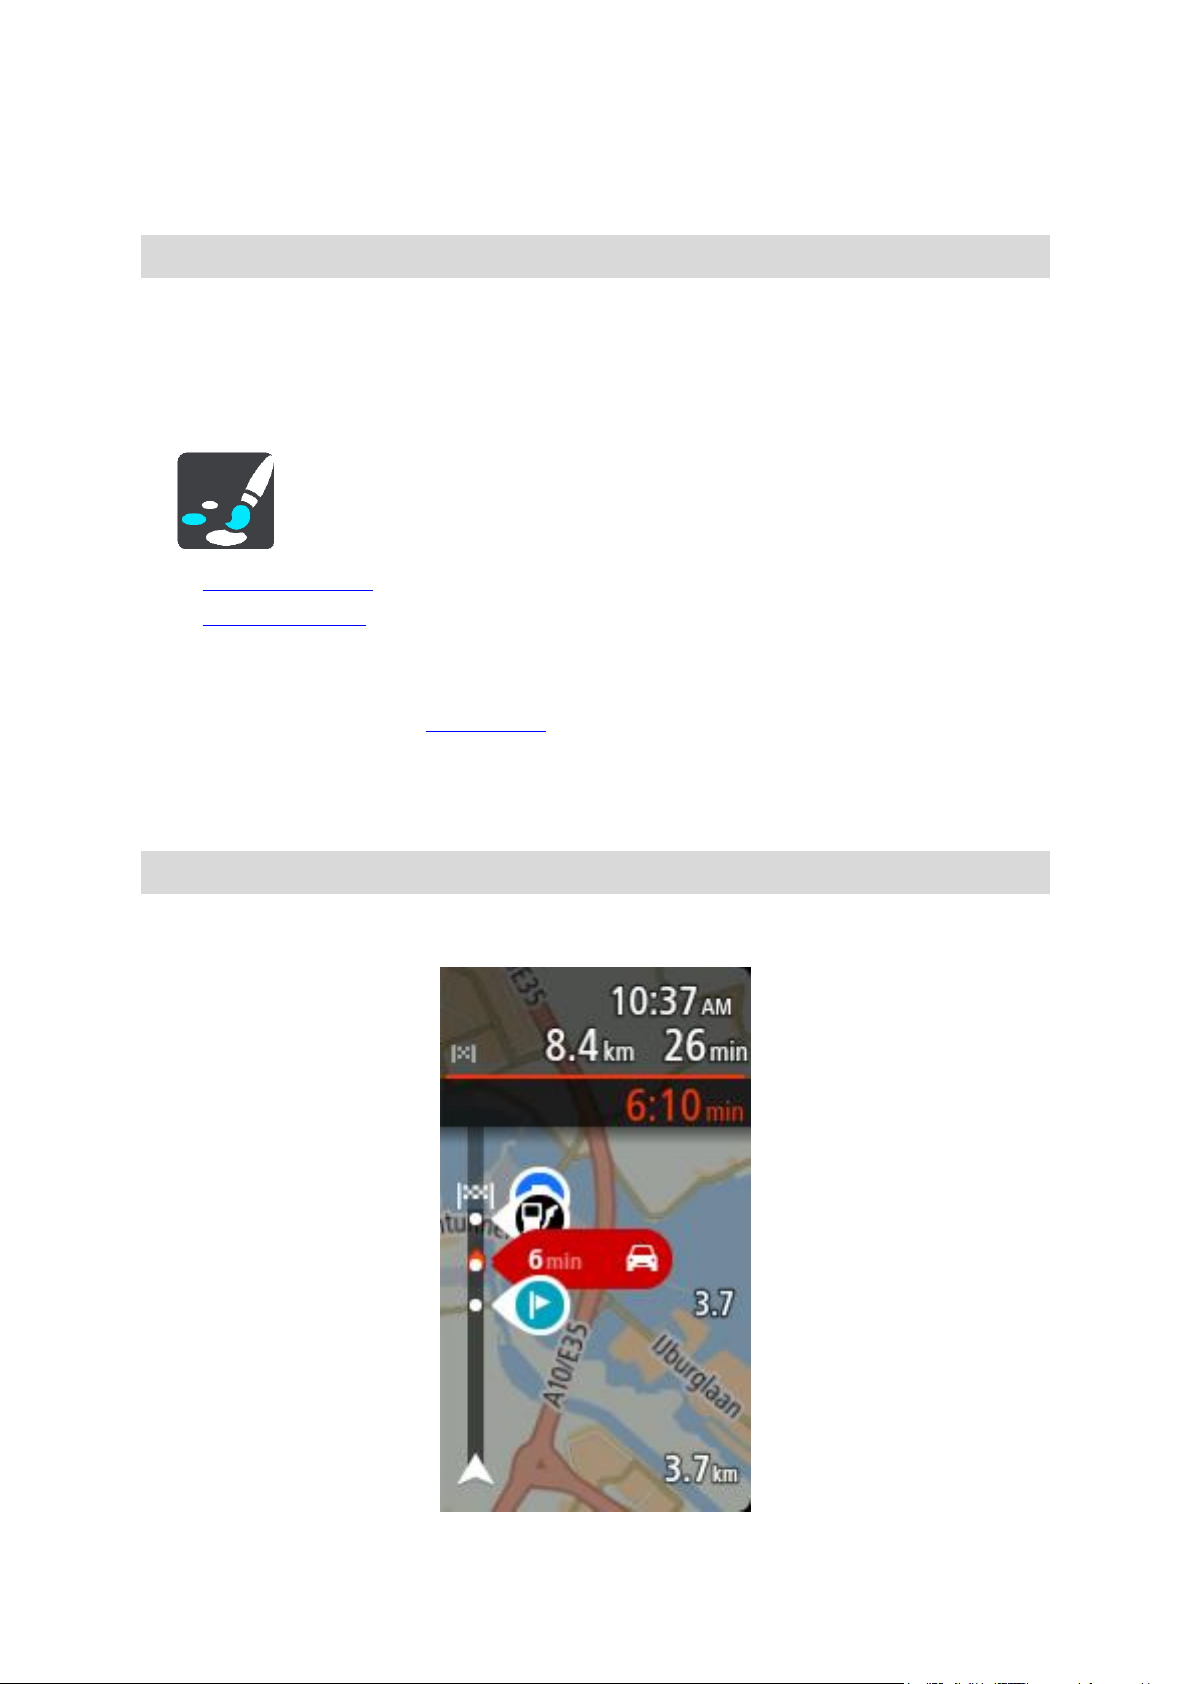
Size of text and buttons
Select Size of text and buttons to change the size of the text and the buttons you see on the
screen.
Note: This feature is only available on devices with a 6 inch / 15 cm or larger screen.
Drag the slider to change the text and button size to small, medium or large, then select Apply this
change. Your TomTom navigation app restarts and applies the change.
Route Bar
Select Settings in the Main Menu, then select Appearance.
Select Arrival information to change the arrival information you see in the route bar.
Select Route information to change the route information you see on the route bar.
Show current time
Select this setting to show the current time in the guidance view. When switched on, the current
time is shown at the bottom of the route bar.
Show wide route bar if possible
The wide route bar is not shown by default. You can select this setting to turn on the wide route bar
in the guidance view.
Note: The wide route bar can only be shown if the screen is wide enough.
When the wide route bar is shown, you see more information about your route. For example, you
see time and distance to traffic and more.
95
Page 96

Arrival information
Select Arrival information to change the following settings:
Show remaining distance
Select this setting to show the remaining distance left to travel in the arrival information panel
during navigation.
Show remaining time
Select this setting to show the remaining time left to travel in the arrival information panel
during navigation.
Switch between distance and time automatically
Select this setting to control the automatic switching between remaining distance and remaining time in the arrival information panel.
Show arrival information for
Use this setting to control whether you want to see information about the destination or the
next stop in the arrival information panel.
Tip: To find out where the different panels are in the guidance view or map view, see What's on
the screen.
Route Information
You can choose to see any of the following in the route bar:
Parking
Select this setting to see parking lots and parking.
Gas stations
Select this setting to see gas stations on your route.
Stops
Select this setting to see stops on your route.
Rest areas
Select this setting to see rest areas on your route.
Guidance view
Select Settings in the Main Menu, then select Appearance.
Show current street name
This setting displays the name of the street you driving along on the guidance view.
Guidance view style
Select this setting to choose from 3D or 2D versions of the guidance view. Both the 2D and 3D
guidance views move in your direction of travel.
Automatic Zoom
Select Settings in the Main Menu, then select Appearance.
96
Page 97

Select Automatic zoom to change settings for the automatic zoom in Guidance view when you
approach a turn or a junction. Zooming in can make the turn or junction easier to drive.
Zoom in to next turn
All the turns and junctions on your route are shown zoomed in to the maximum level.
Based on road type
The turns and junctions on your route are shown zoomed in to the standard level for the type of
road you are on.
None
None of the turns and junctions on your route are shown zoomed in.
Voices
Select Settings in the Main Menu, then select Voices.
Choosing a voice
Select Choose a voice to change the voice that gives spoken directions and other route instructions.
A wide range of voices are available. There are computer voices which can read street names and
other information directly from the map and there are recorded voices which have been recorded
by actors.
Note: Computer voices are not available in all languages.
If you need a computer voice and your language is unavailable, then you are asked to choose from
a list of installed computer voices available for the country you are in.
Instruction settings
Read aloud early instructions
For example, if you turn on this setting, you could hear early instructions such as "After 2 mi
take the exit right" or "Ahead, turn left."
Note: When a recorded voice is chosen, you see only this setting because recorded voices
cannot read out road numbers, road signs, etc.
Read aloud road numbers
Use this setting to control whether road numbers are read aloud as part of navigation instructions. For example, when road numbers are read aloud, you hear "Turn left onto A100."
Read aloud road sign information
Use this setting to control whether road sign information is read aloud as part of navigation
instructions. For example, "Turn left onto A302 Bridge Street towards Islington."
Read aloud street names
Use this setting to control whether street names are read aloud as part of navigation instructions. For example, when street names are read aloud, you hear "Turn left Graham Road towards Hackney."
Read aloud foreign street names
Use this setting to control whether foreign street names are read aloud as part of navigation
instructions, such as "Turn right Champs Élysées." For example, an English computer voice can
read and pronounce French street names but pronunciation may not be completely accurate.
97
Page 98

Voice Control
Note: Voice control is only available when your TomTom BRIDGE is in the dock and the micro-
phone is connected.
Select Settings in the Main Menu, then select Voice Control.
Start voice control when I say "Hello TomTom"
Select this setting to start voice control when you say the wake-up phrase.
Use voice to accept an alternative route
Use this setting to control the ability to accept an alternative route by using your voice. When
an alternative route can save you time, the number of minutes is also spoken and not just
shown on the screen.
Maps
Select Settings in the Main Menu, then select Maps.
Changing the map
Select a map that you want to use.
Route Planning
Select Settings in the Main Menu, then select Route Planning.
When a faster route is available
If a faster route is found while you are driving, TomTom Traffic can replan your trip to use the
faster route. Select from the following options:
Always take the fastest route
Ask me so I can choose
Don't ask me
Always plan this type of route
The types of route you can choose from are as follows:
Fastest route - the route which takes the least time.
Shortest route - the shortest distance between the locations you set. This may not be the
quickest route, especially if the shortest route is through a town or city.
Most eco-friendly route - the most fuel-efficient route for your trip.
Avoid interstate highways - this type of route avoids all highways.
Walking route - a route designed for making the trip on foot.
98
Page 99

Bicycle route - a route designed for making the trip on a bicycle.
Avoid on every route
You can choose to avoid ferries and car shuttle trains, toll roads, carpool lanes, and unpaved roads.
Set how your TomTom should manage each of these road features when the device calculates a
route.
Carpool lanes are sometimes known as High Occupancy Vehicle Lanes (HOV) and are not present in
every country. To travel on these lanes, you may need to have more than one person in the car, for
example, or the car may need to use environmentally-friendly fuel.
Sounds and Warnings
Select Settings in the Main Menu, then select Sounds & Warnings.
On this screen, you can change the sounds and warnings settings.
Warning type
Warning type
You can choose the type of warnings you want to hear when you are driving:
Read-aloud warnings
Hear spoken warnings and warnings sounds.
Warning sounds
Hear only warning sounds.
None
No warning sounds are given.
Safety camera warnings
Select Settings in the Main Menu, then select Sounds & Warnings.
Select Safety camera warnings. You can then set how you want to be warned for the different
types of cameras and safety hazards. You can change settings for advance warning time and
whether you want to be warned, never warned or warned only if you are speeding.
Safety warnings
Select Settings in the Main Menu, then select Sounds & Warnings.
99
Page 100

Select Safety warnings. You can then set how you want to be warned for the different types of
danger zones and safety hazards. You can change settings for advance warning time and whether
you want to be warned, never warned or warned only if you are speeding.
Danger zones
This type of warning is only given in France where you are only warned about danger zones.
Accident hotspots
This type of warning is given for a place where road traffic accidents have historically been
concentrated.
Risk zones
This type of warning is only given in France where you are only warned about danger zones.
Traffic jams
Traffic jam warnings in the route bar are part of TomTom Traffic. You can choose never to be
warned or to be warned when approaching a jam too quickly.
When speeding
This warning is given as soon as you exceed the speed limit by more than 5 km/h or 3 mph.
When you are speeding, the speed panel also turns red in the guidance view.
Units
Select Settings in the Main Menu, then select Language & Units.
On this screen, you can change the following settings:
Distance
Select this setting to choose the units used on your device for features such as route planning. If
you want the units to be set by the GPS, select Automatic.
Language
The language used on the TomTom BRIDGE is also used in the apps installed on the device. For
example, the language used for buttons and menus in the navigation app is the same as the
language you selected in your device settings.
You can change the device language in Language & input in the TomTom BRIDGE Settings app.
If you change the device language, the voice used for spoken directions and other route instructions
in the navigation app might not be compatible with the new device language. Go to Voices in the
Settings menu and download a compatible voice.
Important: Some voices are large files that can take a long time to download. To prevent excess
data charges we recommend you download a voice over a Wi-Fi connection.
100
 Loading...