

Page 1

TomTom Bandit
Reference Guide
1.4
Page 2

Contents
Welcome 5
Welcome ............................................................................................................ 6
What's new in this release ........................................................................................ 7
TomTom videos .................................................................................................... 8
Product Safety Information ...................................................................................... 9
TomTom Bandit 10
TomTom Bandit Quick Start.................................................................................... 11
Removing the Batt-Stick .................................................................................... 11
Installing the Batt-Stick ..................................................................................... 12
Charging your TomTom Bandit ............................................................................ 14
Inserting a memory card .................................................................................... 15
Setting up ..................................................................................................... 16
Installing the basic mount .................................................................................. 16
Installing the 360 pitch mount............................................................................. 17
Switching your TomTom Bandit on and off .............................................................. 20
Recording ...................................................................................................... 21
Video highlights .............................................................................................. 21
Your TomTom Bandit ............................................................................................ 23
Getting started ............................................................................................... 23
About your TomTom Bandit ................................................................................ 23
What's on the screen ........................................................................................ 25
Icons shown on the screen ................................................................................. 25
Charging your TomTom Bandit ............................................................................ 26
Inserting a memory card .................................................................................... 27
Video and Photo modes and settings ..................................................................... 27
TomTom Bandit status ...................................................................................... 29
Switching your TomTom Bandit on and off .............................................................. 30
Connecting to the Mobile app ............................................................................. 31
Resetting your TomTom Bandit ........................................................................... 31
Updating your camera software ........................................................................... 31
Caring for your TomTom Bandit ........................................................................... 32
Deleting videos and photos, and formatting the memory card ...................................... 33
Accessing your videos and photos ......................................................................... 33
Viewing metrics on your TomTom Bandit ............................................................... 33
Using peripherals ................................................................................................ 35
Installing the basic mount .................................................................................. 35
Installing the 360 pitch mount............................................................................. 36
Using the bike mount ....................................................................................... 38
Using the optional remote control ........................................................................ 39
Using lens covers ............................................................................................. 40
Adding sensors ................................................................................................ 42
Recording videos ................................................................................................. 45
About recording videos ..................................................................................... 45
Recording a video ............................................................................................ 45
Video highlights .............................................................................................. 46
Adding a manual highlight .................................................................................. 46
Taking photos ..................................................................................................... 48
About taking photos ......................................................................................... 48
Taking single photos ......................................................................................... 48
Taking burst photos ......................................................................................... 49
Settings ............................................................................................................ 50
About settings ................................................................................................ 50
About Bluetooth .............................................................................................. 50
2
Page 3

About Wi-Fi ................................................................................................... 50
About QuickGPSFix .......................................................................................... 51
General settings .............................................................................................. 51
Batt-Stick 56
About the Batt-Stick............................................................................................. 57
Removing the Batt-Stick ........................................................................................ 58
Installing the Batt-Stick ........................................................................................ 60
Charging your TomTom Bandit ................................................................................ 62
Inserting a memory card ........................................................................................ 63
Transferring data from the Batt-Stick ....................................................................... 64
Bandit Mobile App 65
About the TomTom Bandit Mobile app ....................................................................... 66
Connecting to the Mobile app ................................................................................. 67
Log in to TomTom MySports ................................................................................... 68
Disconnecting from the Mobile app ........................................................................... 69
What's on the screen ............................................................................................ 70
Video settings .................................................................................................... 71
Photo settings .................................................................................................... 72
Video highlights .................................................................................................. 73
My Library ......................................................................................................... 74
Viewing a video or photo in My Library .................................................................. 75
Adding a highlight to a video .............................................................................. 75
Adjusting a highlight ........................................................................................ 75
Uploading your photos ...................................................................................... 76
Deleting a video, photo or a highlight ................................................................... 76
Creating a story using the mobile app ....................................................................... 77
Settings for Create a Story ................................................................................. 77
Shaking your mobile to create a video ................................................................... 77
Manually selecting your video highlights ................................................................ 79
Editing your video story .................................................................................... 80
Uploading your video story ................................................................................. 81
Camera status .................................................................................................... 82
Preferences ....................................................................................................... 83
App Settings .................................................................................................. 83
Data Settings.................................................................................................. 83
Help us improve .............................................................................................. 83
About ........................................................................................................... 83
Bandit Studio 84
About Bandit Studio ............................................................................................. 85
Log in to TomTom MySports ................................................................................... 86
What's on the screen ............................................................................................ 87
Working with the memory card ............................................................................... 88
Importing videos and photos from your computer ......................................................... 89
Working with Originals .......................................................................................... 90
Adding a highlight to a video .............................................................................. 90
Working with Highlights ........................................................................................ 91
Video highlights .............................................................................................. 91
Using or deleting a highlight ............................................................................... 92
Adjusting a highlight ........................................................................................ 92
Creating your video story....................................................................................... 93
Editing your video story .................................................................................... 94
Updating Bandit Studio ......................................................................................... 95
Studio Settings ................................................................................................... 96
3
Page 4

Addendum and Copyright 97
Addendum ......................................................................................................... 98
Copyright notices ............................................................................................... 103
4
Page 5

Welcome
5
Page 6

This Reference Guide explains everything you need to know about your new TomTom Bandit. Using
Welcome
your TomTom Bandit you can easily record your action adventures by doing the following:
Record videos.
Automatically and manually add highlights to your videos.
Easily create video stories from your highlights and share your action adventures using the
Bandit Mobile app and Bandit Studio.
Use your smartphone to quickly and easily publish your video stories online within moments of
the action.
Take single photos or burst photos.
If you want a quick read of the essentials, we recommend that you read TomTom Bandit Quick
Start.
To create your video story and share your videos and photos on the move, download the Bandit
Mobile app and Bandit Studio from tomtom.com/cam.
Don't forget to login with a TomTom MySports account using the Mobile app, then update your
TomTom Bandit with the latest firmware.
To quickly get to know your TomTom Bandit, go to:
Product Safety Information
About your TomTom Bandit
Using the universal mount
Recording a video
Taking single photos
Settings
Bandit Mobile App
Bandit Studio
Tip: There are also frequently asked questions (FAQs) at tomtom.com/support. Select your
product model from the list or enter a search term.
We hope you enjoy reading about and, most importantly, having fun with your new TomTom Bandit!
6
Page 7

Introducing Bandit Studio
What's new in this release
Bandit Studio is the easy way to view your videos and photos, and to create your video story, on
your computer.
See Bandit Studio in this Guide for full details.
Connect an external microphone
You can now connect the optional TomTom Bandit external microphone to your TomTom Bandit.
The external microphone will give better sound quality than the built-in microphone.
See External Microphone in for more details.
Rotating the camera image
You can choose to rotate the videos and photos your camera makes by 180 degrees. This allows you
to mount the camera upside down.
See Image settings for more details
Metrics on the camera screen
You can now view metrics on your camera screen while recording a video or taking photos.
Note: Metrics are only shown when the camera is not connected to the Bandit Mobile app.
See Viewing metrics for more details.
Flight or Airplane mode
Flight or Airplane mode switches off your camera's Wi-Fi and Bluetooth connections to make the
camera safe in areas that have restrictions for these types of connections.
See Flight mode for more details.
GLONASS satellites
Your TomTom Bandit now uses GLONASS satellites as well as GPS satellites.
Bandit Mobile app
The Bandit Mobile app has been updated to make it easier to use. Update to the latest version now!
See Bandit Mobile app in this Guide for full details.
7
Page 8

You can find many videos on our YouTube channel to help you learn about your new TomTom Bandit
TomTom videos
and other TomTom products.
Visit the official TomTom Bandit YouTube Channel to learn more about your TomTom Bandit.
Visit www.youtube.com/user/TomTomOfficial/videos to find out more about TomTom products!
8
Page 9

Before you use your TomTom Bandit, please read all the safety precautions carefully. Failure to
Product Safety Information
follow the guidelines and instructions could result in an accident or collision that causes death or
serious injury and/or damage to your TomTom Bandit.
Obey all local laws and pay close attention to your surroundings before and while using your
TomTom Bandit. Never adjust or check your TomTom Bandit while operating a bicycle, a
motorcycle, a car, or any other vehicle type.
Only use approved accessories made specifically for your TomTom Bandit.
Always wear a helmet and protective gear that is appropriate for your activity.
Make sure your TomTom Bandit is secure before you start every activity. Regularly check the
security of the mount. If the activity involves shocks or vibration, use a lanyard to prevent loss
of the TomTom Bandit if the mount fails.
Never mount your TomTom Bandit in such a way that will obstruct or impair your view. Any
major impact (for example, dropping or bumping) may damage your TomTom Bandit.
Your TomTom Bandit may get hot. Certain parts of your TomTom Bandit could (in rare cases)
cause skin irritation.
Do not use or store your TomTom Bandit in a hot places such as a car, or in dusty, humid or
steamy places for extended periods of time.
With the standard white lens cover your TomTom Bandit is splash-proof. If you want to use the
TomTom Bandit in water or underwater to depths down to 40 m (5 ATM), or for activities on the
water surface, for example surfing, install the optional Dive (IPX8) black lens cover. If any
abnormality is found during use, switch off your TomTom Bandit immediately. Water inside your
TomTom Bandit or Batt-Stick can cause damage and could cause an explosion or fire.
The reliability of the camera when you use it under water depends on water pressure, depth
changes, water contamination, water saltiness, water temperature, and other environmental
factors. Moving the camera vigorously under water at a depth of 40 m (5 ATM) is advised
against. If the camera is subjected to vigorous movement underwater, TomTom cannot guarantee that the camera will still function in its full capacity.
Keep your TomTom Bandit lens cover and Batt-Stick clean, especially the seals. Check the lens
cover and Batt-Stick seals for debris, damage and cracks. Small debris and cracks can cause
leakage and may damage your TomTom Bandit.
After every use in water or near sand, mud or other foreign materials, rinse the outside of your
TomTom Bandit with clean water. After cleaning, dry the camera with a clean, dry and lint-free
cloth. On the Batt-Stick, open the external contact cap and dry both the contacts and the cap.
Not doing this can cause corrosion or camera failure.
9
Page 10

TomTom Bandit
10
Page 11
Removing the Batt-Stick
TomTom Bandit Quick Start
You must remove the Batt-Stick to insert a memory card or to use a different Batt-Stick. You can
also use its USB connector to charge the Batt-Stick and transfer files to a computer.
Important: If you remove the Batt-Stick or lens cover be extra careful not to let dirt or water enter
the TomTom Bandit or the Batt-Stick. Only remove the Batt-Stick or lens cover in clean and dry
conditions.
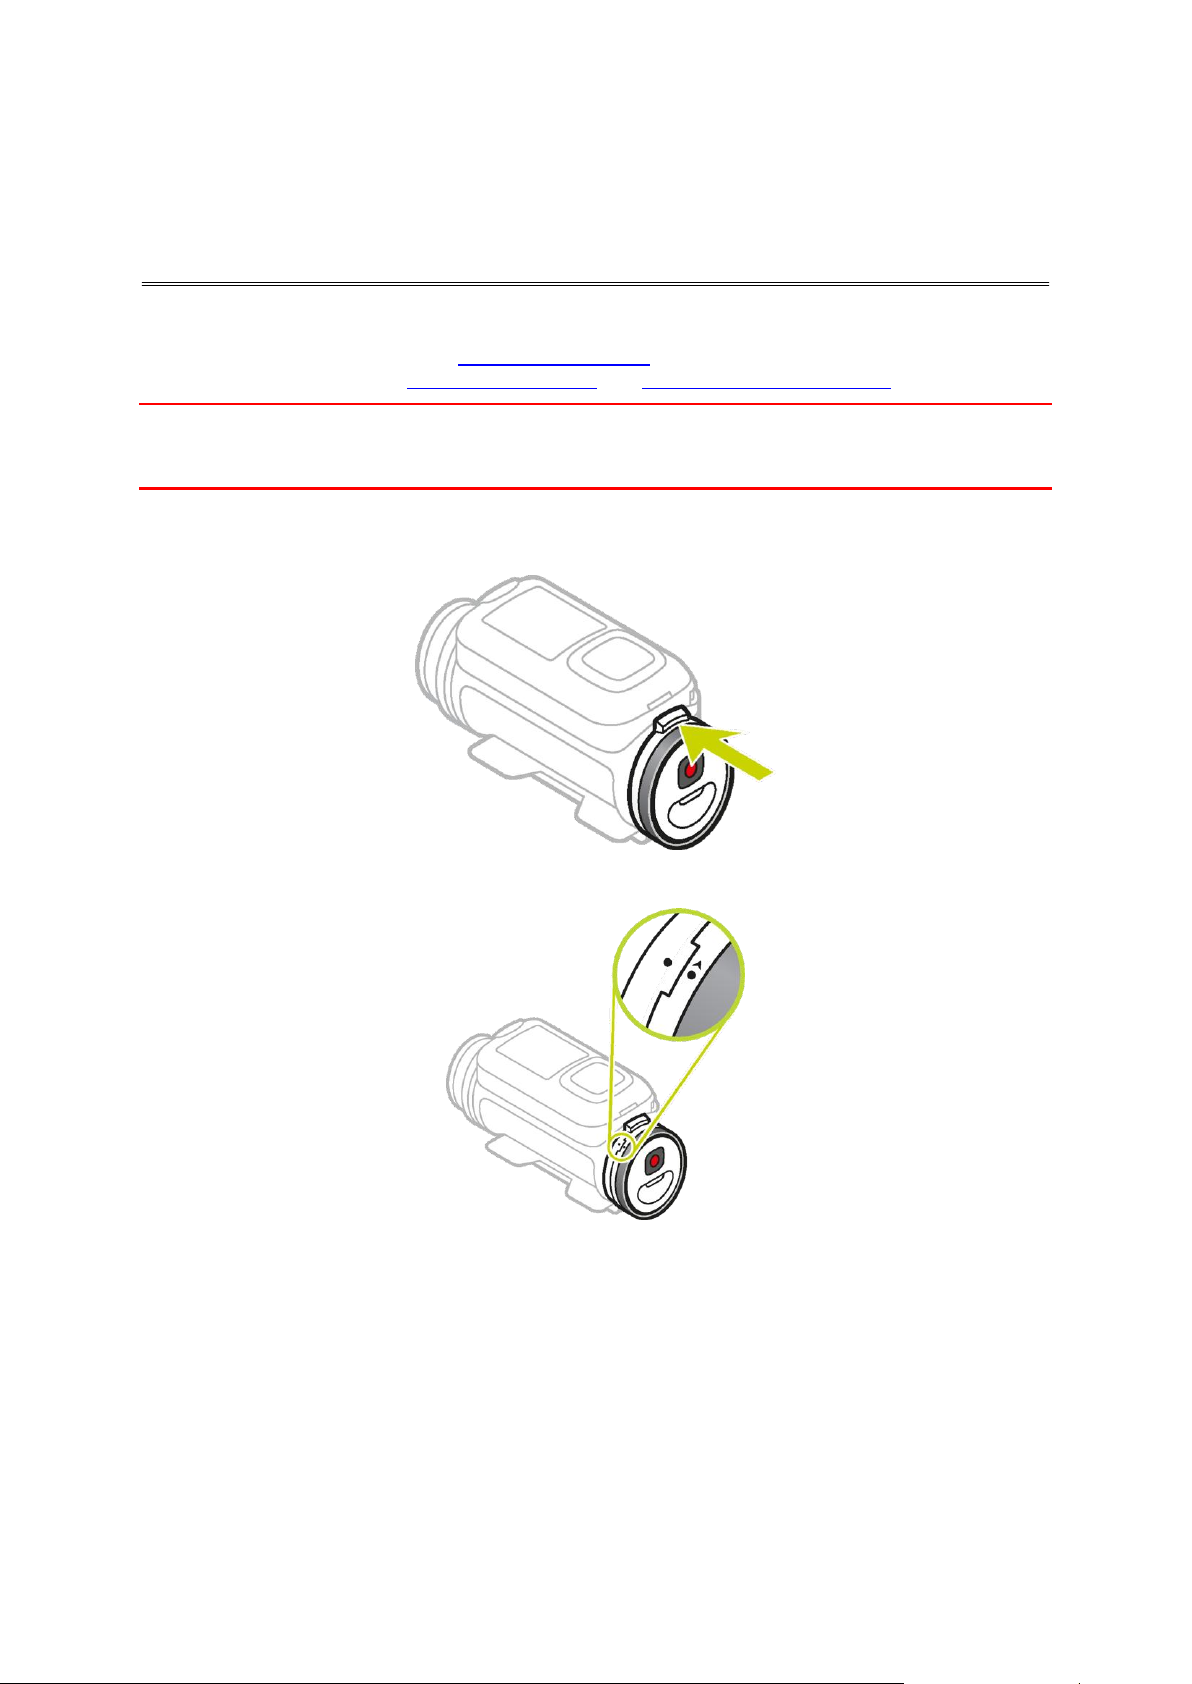
To remove the Batt-Stick, follow these steps:
1. Press the release lever of the Batt-Stick.
2. While holding the lever turn the cap anti-clockwise until you see two dots aligned.
11
Page 12

3. Pull the Batt-Stick out.
Installing the Batt-Stick
Inserting the Batt-stick
Important: If you remove the Batt-Stick or lens cover be extra careful not to let dirt or water enter
the TomTom Bandit or the Batt-Stick. Only remove the Batt-Stick or lens cover in clean and dry
conditions.
To insert the Batt-Stick, follow these steps:
4. Insert the Batt-Stick into the camera.
5. Make sure the two dots align and are close together.
Important: If you see only one dot when the Batt-Stick is inserted do not try to turn it. You
must first put the Batt-Stick in the unlocked position before you can insert it correctly.
12
Page 13
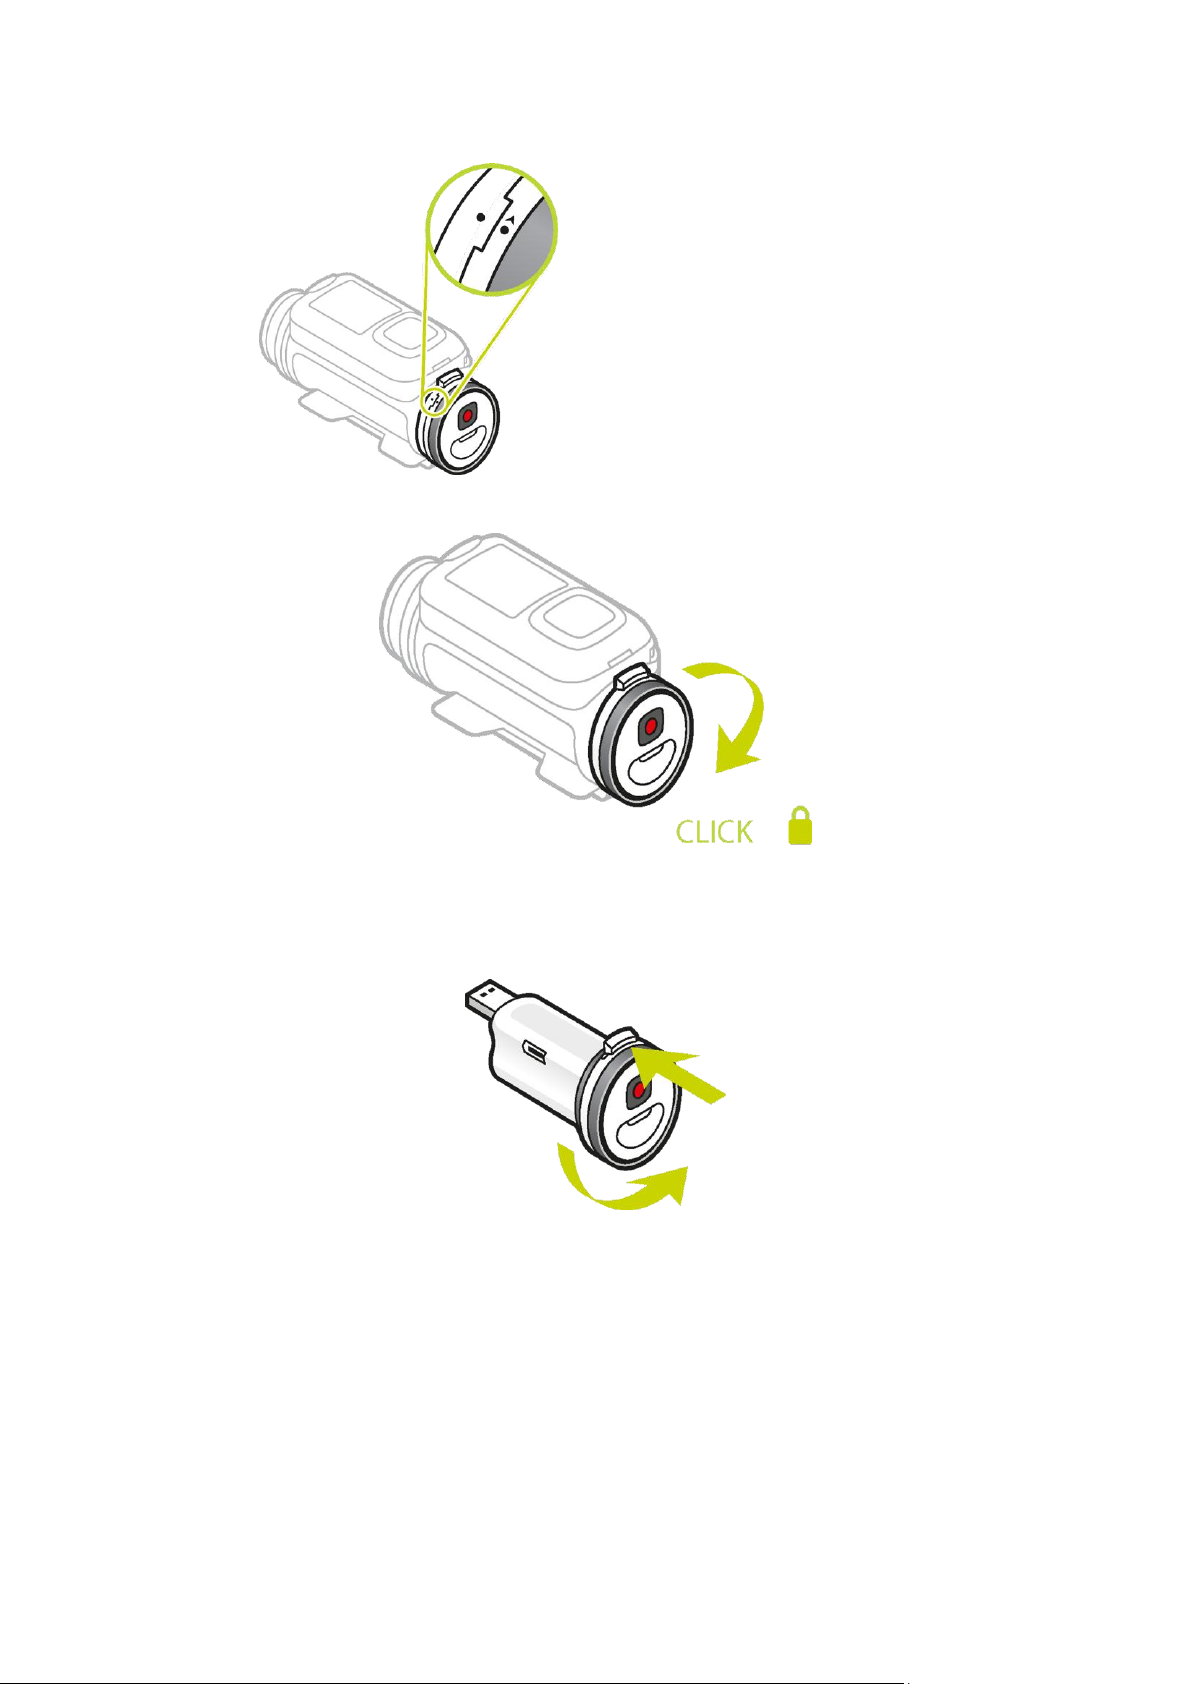
6. Turn the cap clockwise to lock the Batt-Stick into the camera.
Unlocking the Batt-Stick
To put the Batt-Stick in the unlocked position follow these steps:
1. Hold the Batt-Stick and press the release lever while turning the cap anti-clockwise.
13
Page 14
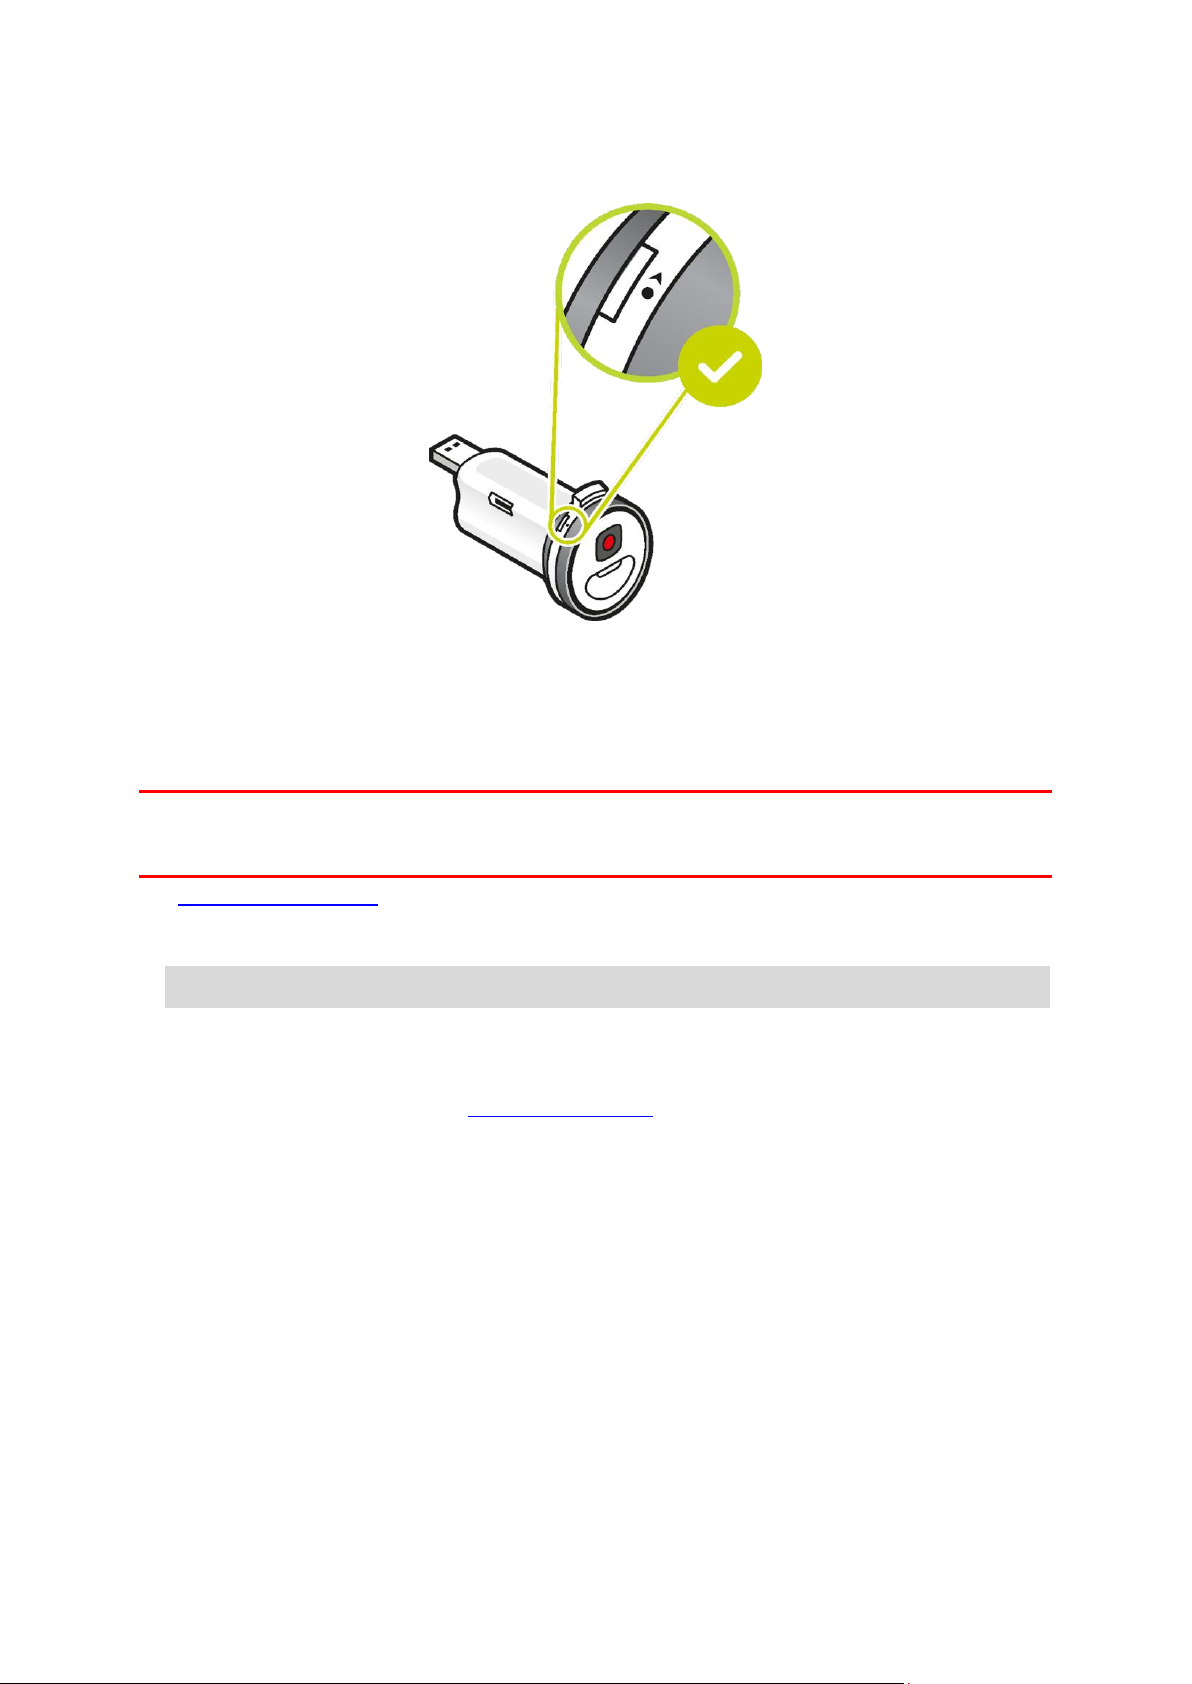
2. When you see a dot and arrow to the left of the release lever the Batt-Stick can be inserted as
described above.
Charging your TomTom Bandit
You can charge your TomTom Bandit in the following two ways:
Charging the Batt-Stick using a USB socket
Important: If you remove the Batt-Stick or lens cover be extra careful not to let dirt or water enter
the TomTom Bandit or the Batt-Stick. Only remove the Batt-Stick or lens cover in clean and dry
conditions.
1. Remove the Batt-Stick from the TomTom Bandit.
2. Insert the Batt-Stick USB connector into your computer's USB socket or a standard USB
wall-charger.
Tip: While the Batt-Stick is charging, the LEDs show the charge level and one LED flashes.
3. To see the power level of the Batt-Stick, remove the USB connector from the USB charging
socket, then press the ON button.
The LEDs light up to show the power level.
4. When the Batt-Stick is charged, install the Batt-Stick into the TomTom Bandit.
14
Page 15
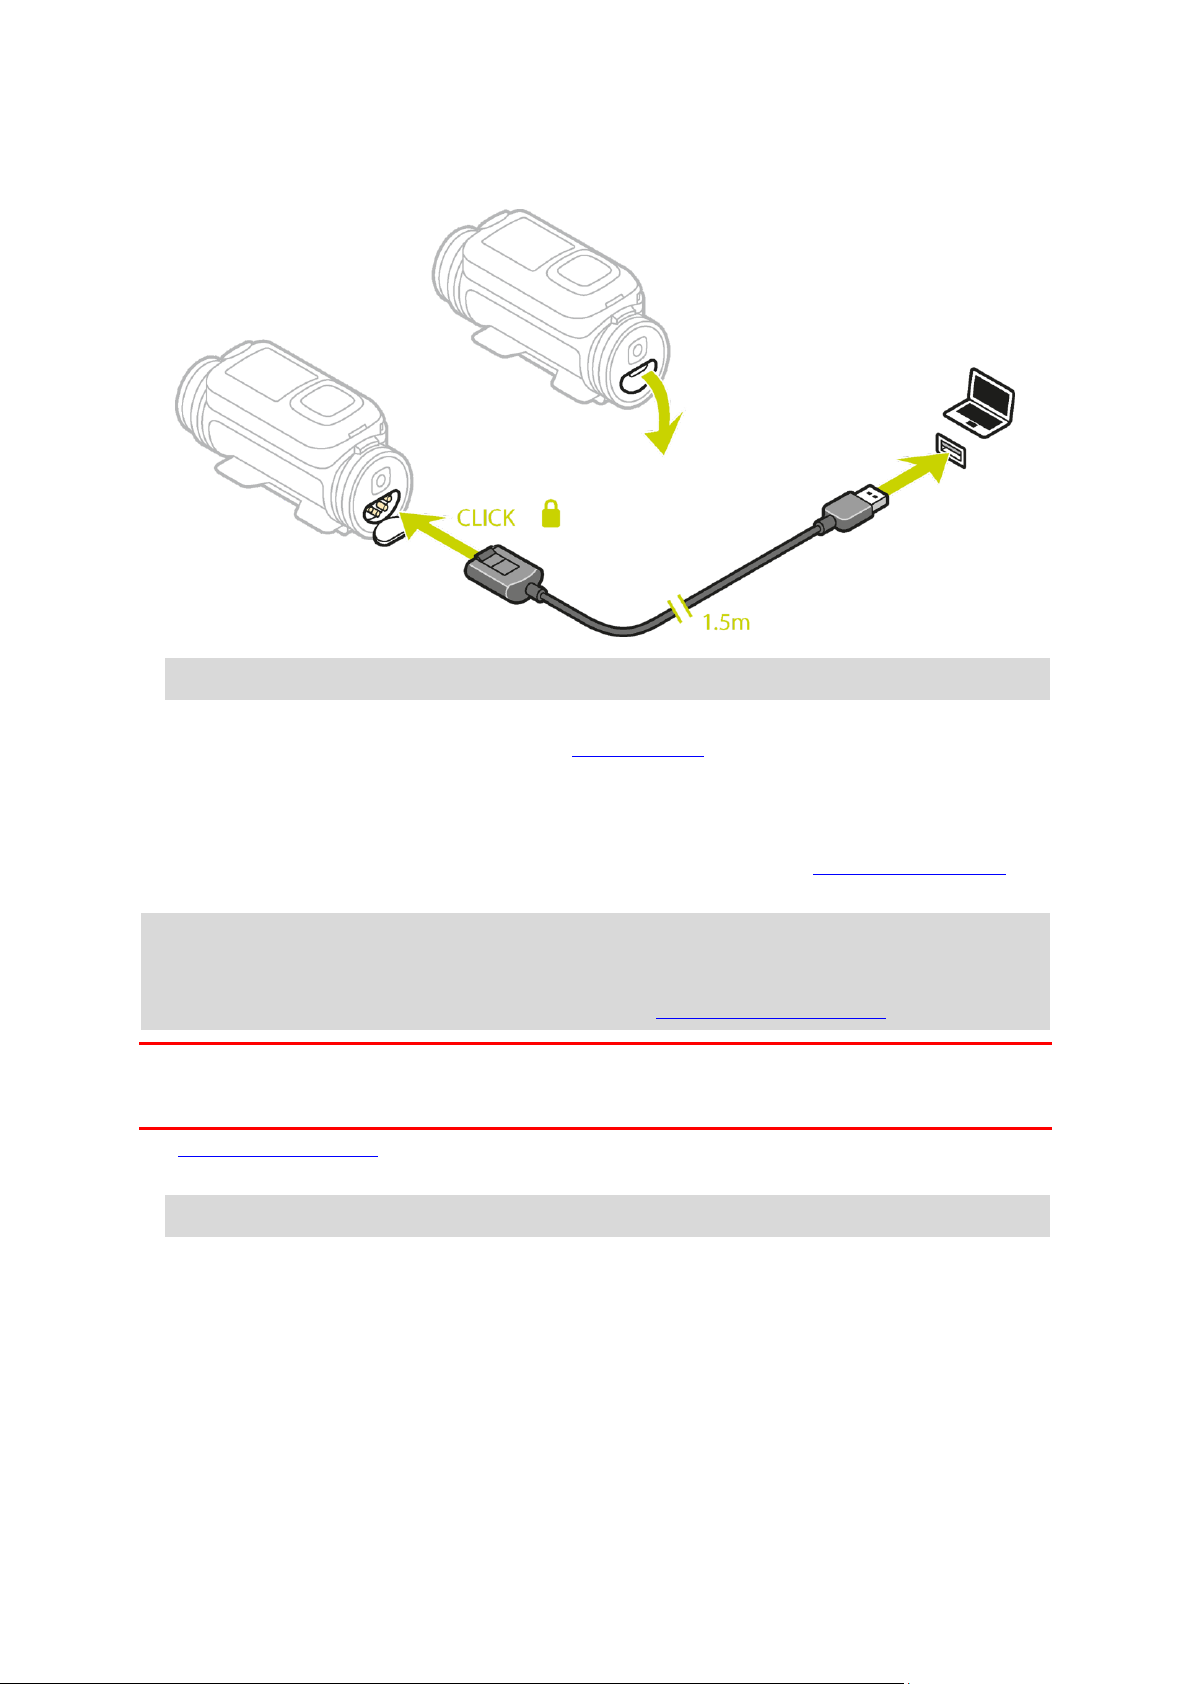
Charging the TomTom Bandit using the optional power cable
1. Open the connector cap on the back of the Batt-Stick.
Tip: You don't have to remove the Batt-Stick from the TomTom Bandit.
2. Connect the power cable to the Batt-Stick connector and to a USB socket.
You can see the battery power level on the STATUS screen in the SETTINGS menu.
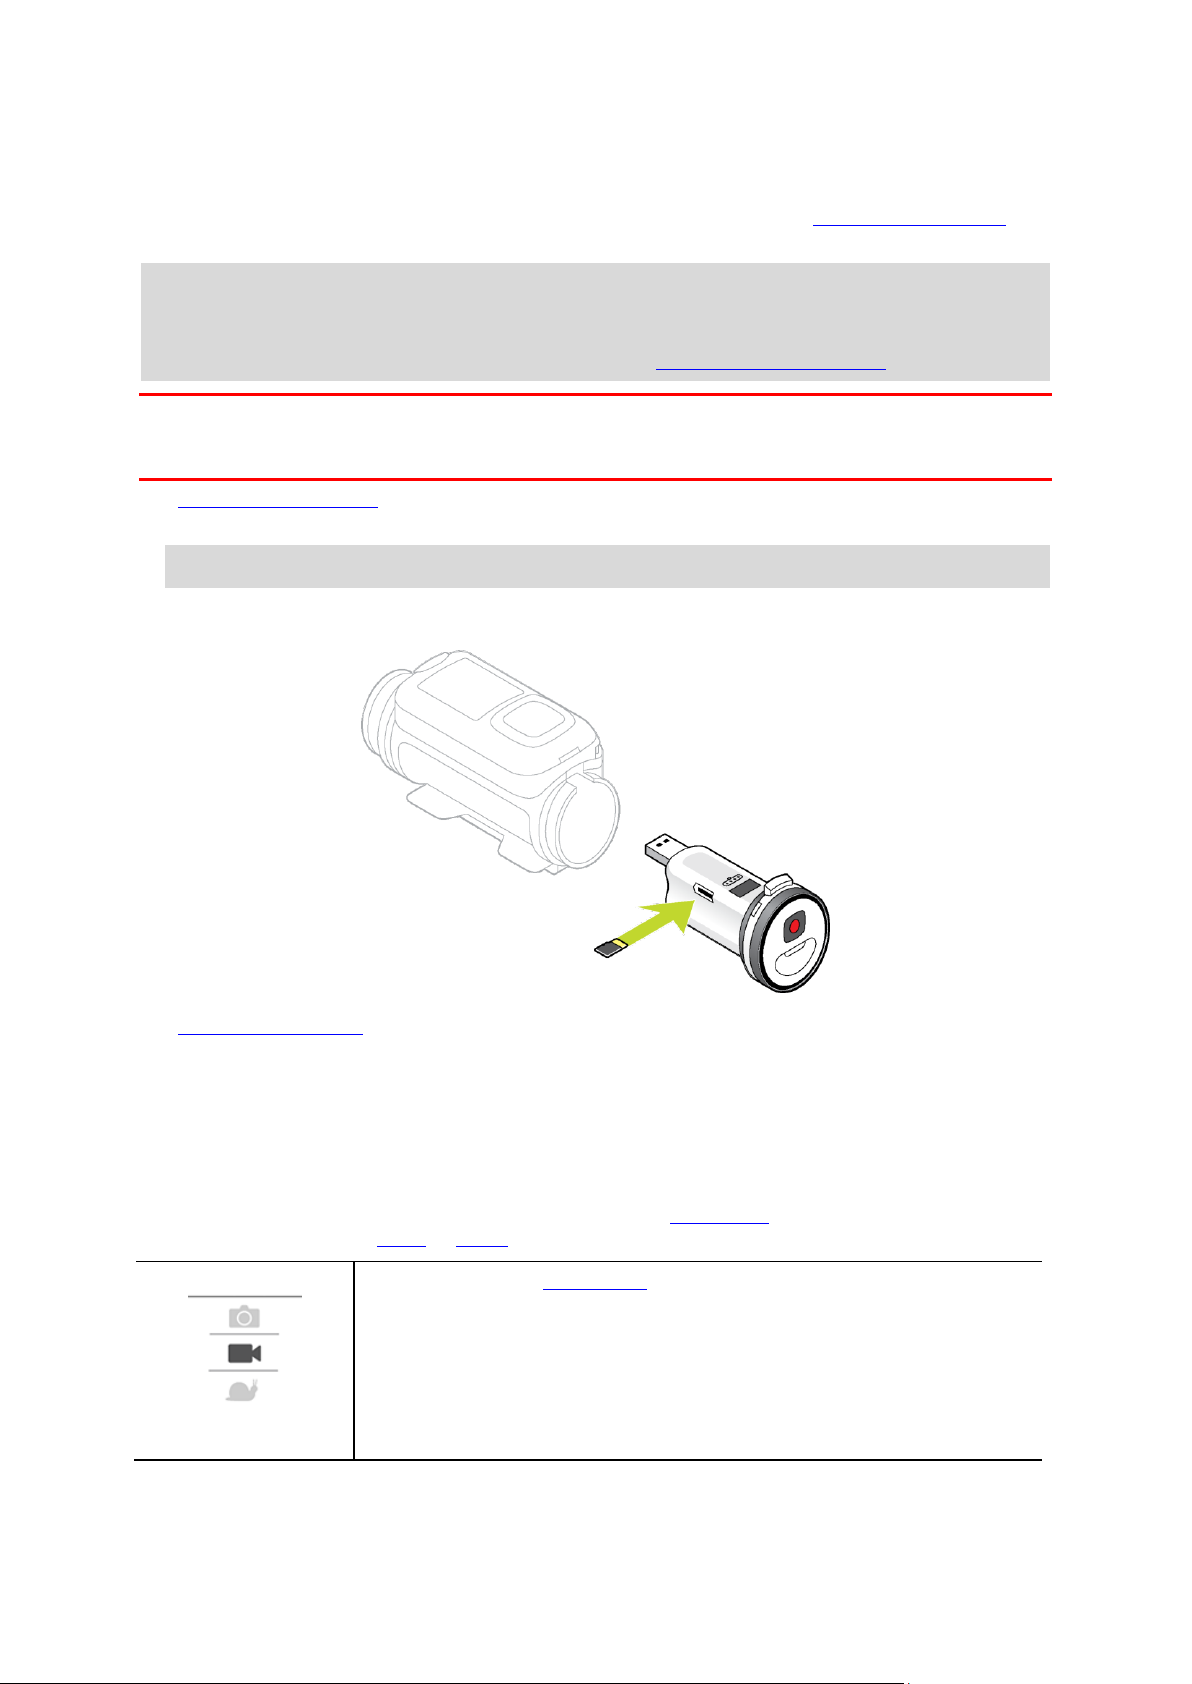
Inserting a memory card
The photos you take and the videos you record are stored on a microSD card that is located in the
Batt-Stick. Use a microSD card that is a Class 10 standard or higher. Go to tomtom.com/support for
a list of approved compatible microSD cards.
Note: If you insert a microSD card that is too slow to work with your TomTom Bandit, the
TomTom Bandit shows you a message and you are asked to use a compatible microSD card.
Tip: MicroSD cards can degrade over time, and performance may decrease as the microSD card
fills up. To maintain performance, you should regularly format your microSD card.
Important: If you remove the Batt-Stick or lens cover be extra careful not to let dirt or water enter
the TomTom Bandit or the Batt-Stick. Only remove the Batt-Stick or lens cover in clean and dry
conditions.
1. Remove the Batt-Stick from the TomTom Bandit.
2. Insert the microSD card into the memory card slot in the Batt-Stick.
Important: The microSD card must be inserted with the contacts facing up.
15
Page 16
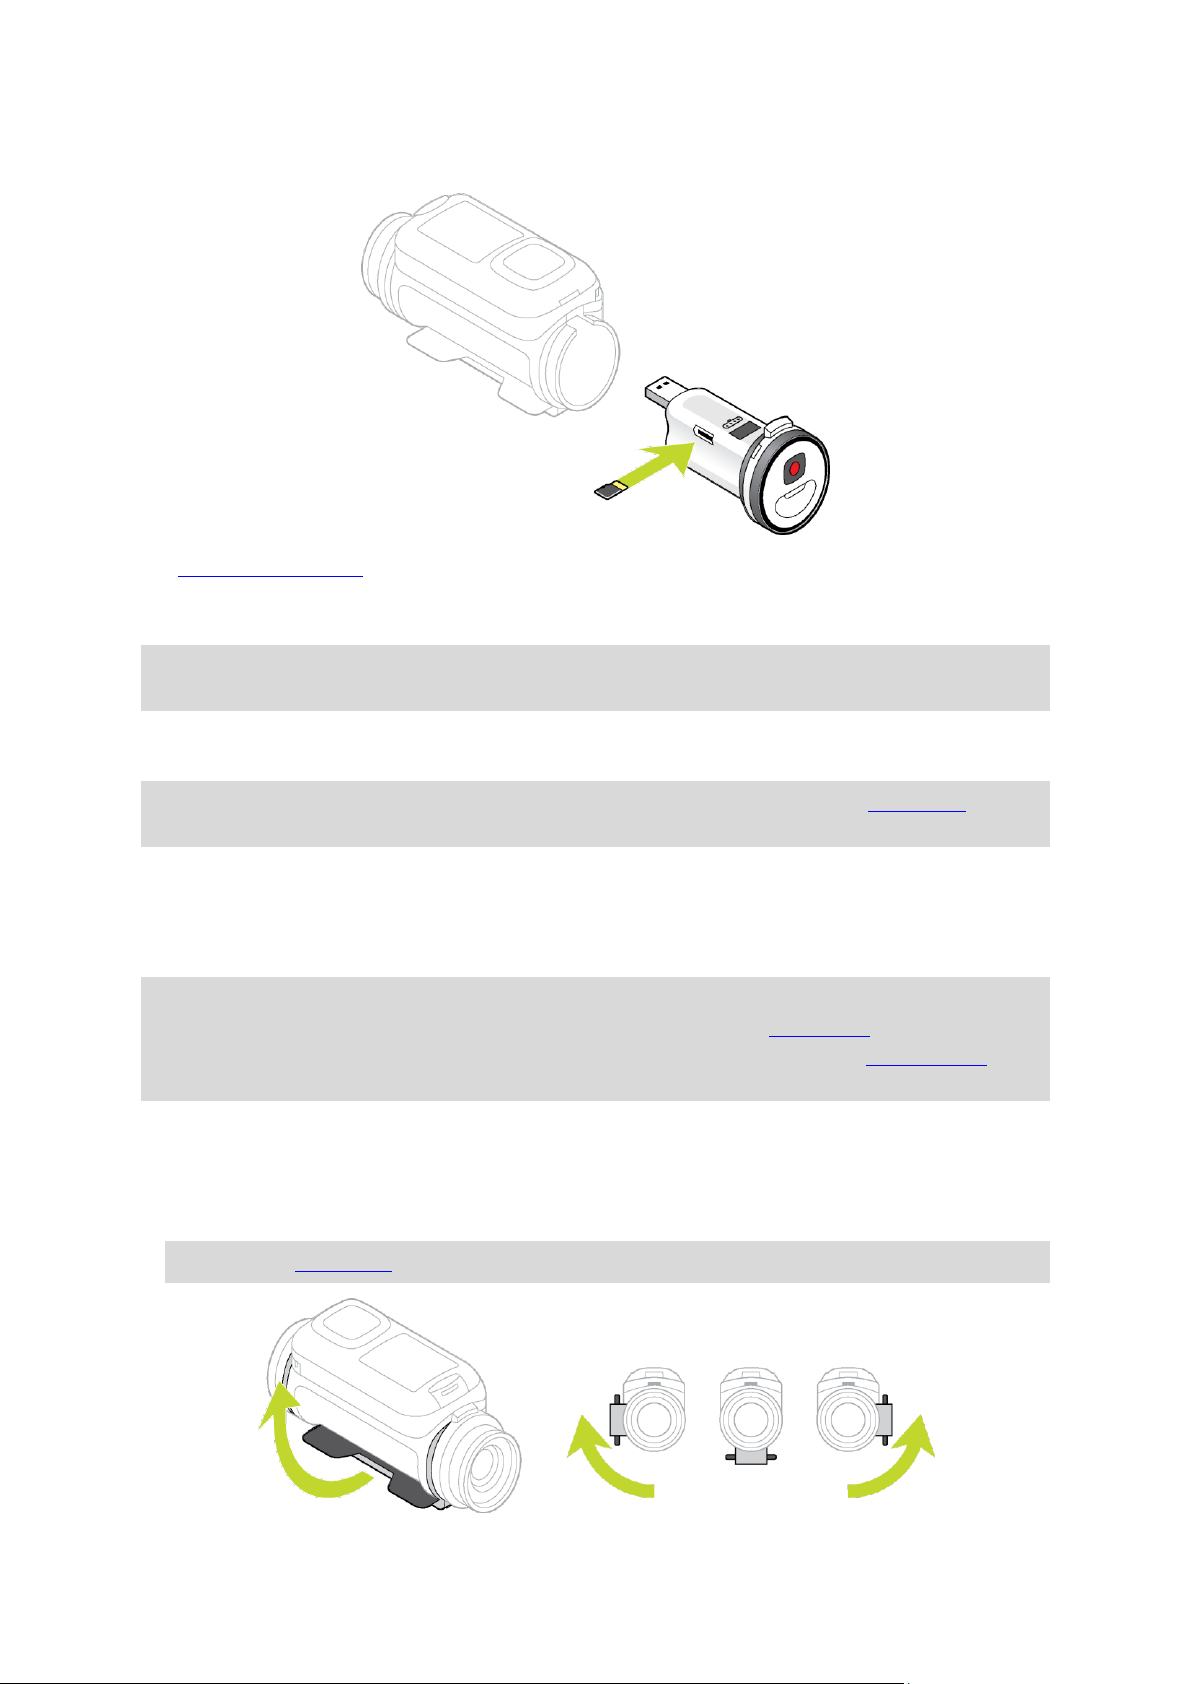
3. Install the Batt-Stick into the TomTom Bandit.
Setting up
Note: The language you choose will be used for all text on the screen. You can always change the
language later in Language in the Camera settings menu.
When you first switch on your TomTom Bandit, you have to answer a few questions to set it up.
Answer the questions by pressing the button to move up, down, left or right on the screen.
Tip: You do not need to connect your TomTom Bandit to the internet or to the Mobile app to set
it up for first use.
Installing the basic mount
The basic mount kit lets you mount your TomTom Bandit on a helmet or other flat or slightly curved
surface. Flat and curved basic mounts are supplied.
Tip: Additional mounts are available as accessories.
Tip: To install your TomTom Bandit on handlebars, use the optional bike mount.
Tip: You can also install your TomTom Bandit upside down. Set the ROTATION image setting to
180 to turn the image 180 degrees.
1. Before you install a mount, find the best position for your TomTom Bandit.
Attach the mount only to a smooth and hard surface. The mount won't securely attach to
porous, textured or soft surfaces.
To mount the TomTom Bandit at different angles and on the left or right side of a helmet, you
can turn the TomTom Bandit's base more than 180 degrees around the body.
Tip: Use the Mobile app live viewfinder to set the TomTom Bandit to the correct view.
16
Page 17
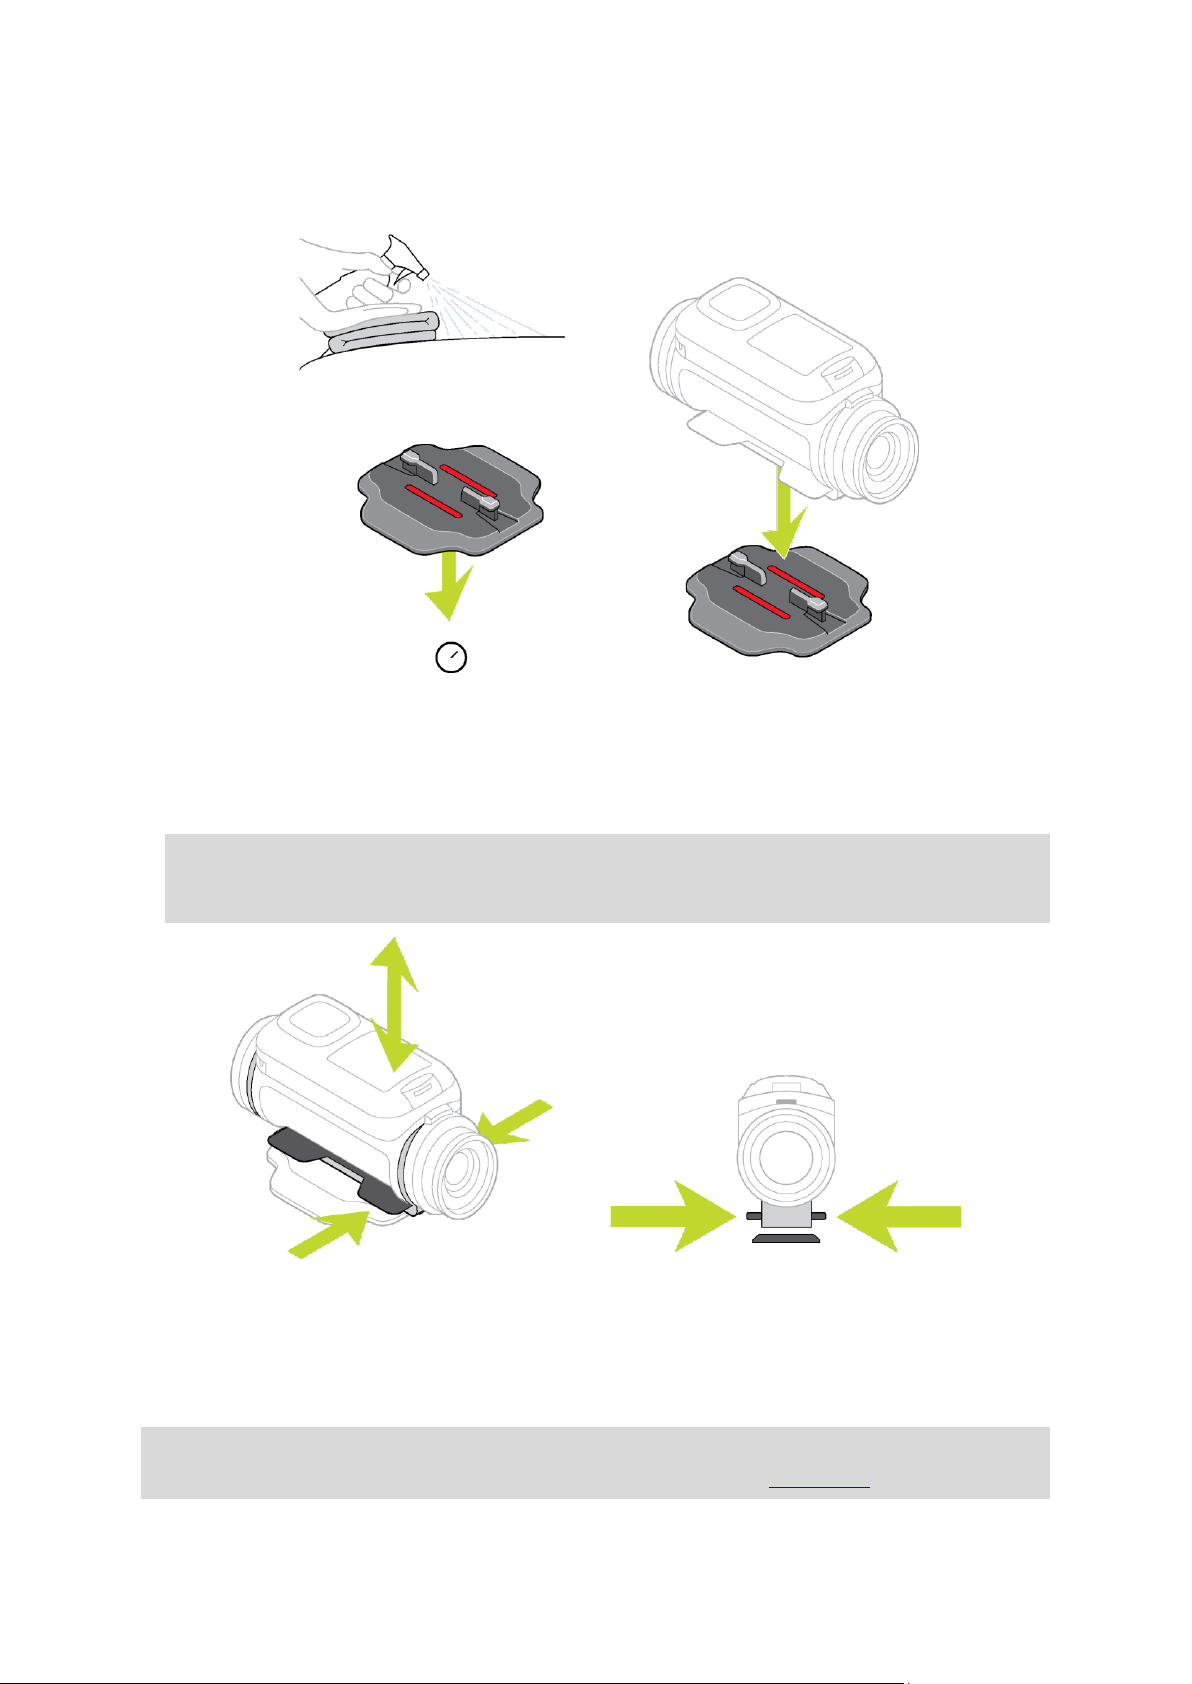
2. Clean the area where you want to install the basic mount.
Wax, oil, dirt and moisture reduce adhesion, which can result in a weak bond. Make sure that
the area is completely dry.
3. Make sure the mount is aligned in the correctly direction then, in dry, room-temperature
conditions, attach the mount. Push the mount firmly down on to the surface.
The mount won't securely attach if you install it in damp and cold conditions.
4. Wait 24 hours for the adhesive to cure.
5. Install the TomTom Bandit on the mount. Make sure the TomTom Bandit is secure.
Important: Make sure your TomTom Bandit is secure before you start every activity. Regularly
check the security of the mount. If the activity involves shocks or vibration, use a lanyard to
prevent loss of the TomTom Bandit if the mount fails.
Installing the 360 pitch mount
The 360 pitch mount kit lets you mount your TomTom Bandit on a helmet or other flat or slightly
curved surface. Flat and curved mount bases are supplied. Once installed, you can easily adjust the
direction and angle of your TomTom Bandit.
Tip: Additional mounts are available as accessories.
Tip: To install your TomTom Bandit on handlebars, use the optional bike mount.
17
Page 18

Tip: You can also install your TomTom Bandit upside down. Set the ROTATION image setting to
180 to turn the image 180 degrees.
1. Before you install a mount, find the best position for your TomTom Bandit.
Attach the mount only to a smooth and hard surface. The mount won't securely attach to
porous, textured or soft surfaces.
To install the TomTom Bandit at different angles and on the left or right side of a helmet, you
can turn the TomTom Bandit's base more than 180 degrees around the TomTom Bandit body.
Tip: Use the Mobile app live viewfinder to set the TomTom Bandit to the correct view.
2. Clean the area where you want to install the mount.
Wax, oil, dirt and moisture reduce adhesion, which can result in a weak bond. Make sure that
the area is completely dry.
3. In dry, room-temperature conditions, attach the mount base. Push the mount base firmly down
on to the surface.
The mount base won't securely attach if you install it in damp and cold conditions.
4. Wait 24 hours for the adhesive to cure.
18
Page 19
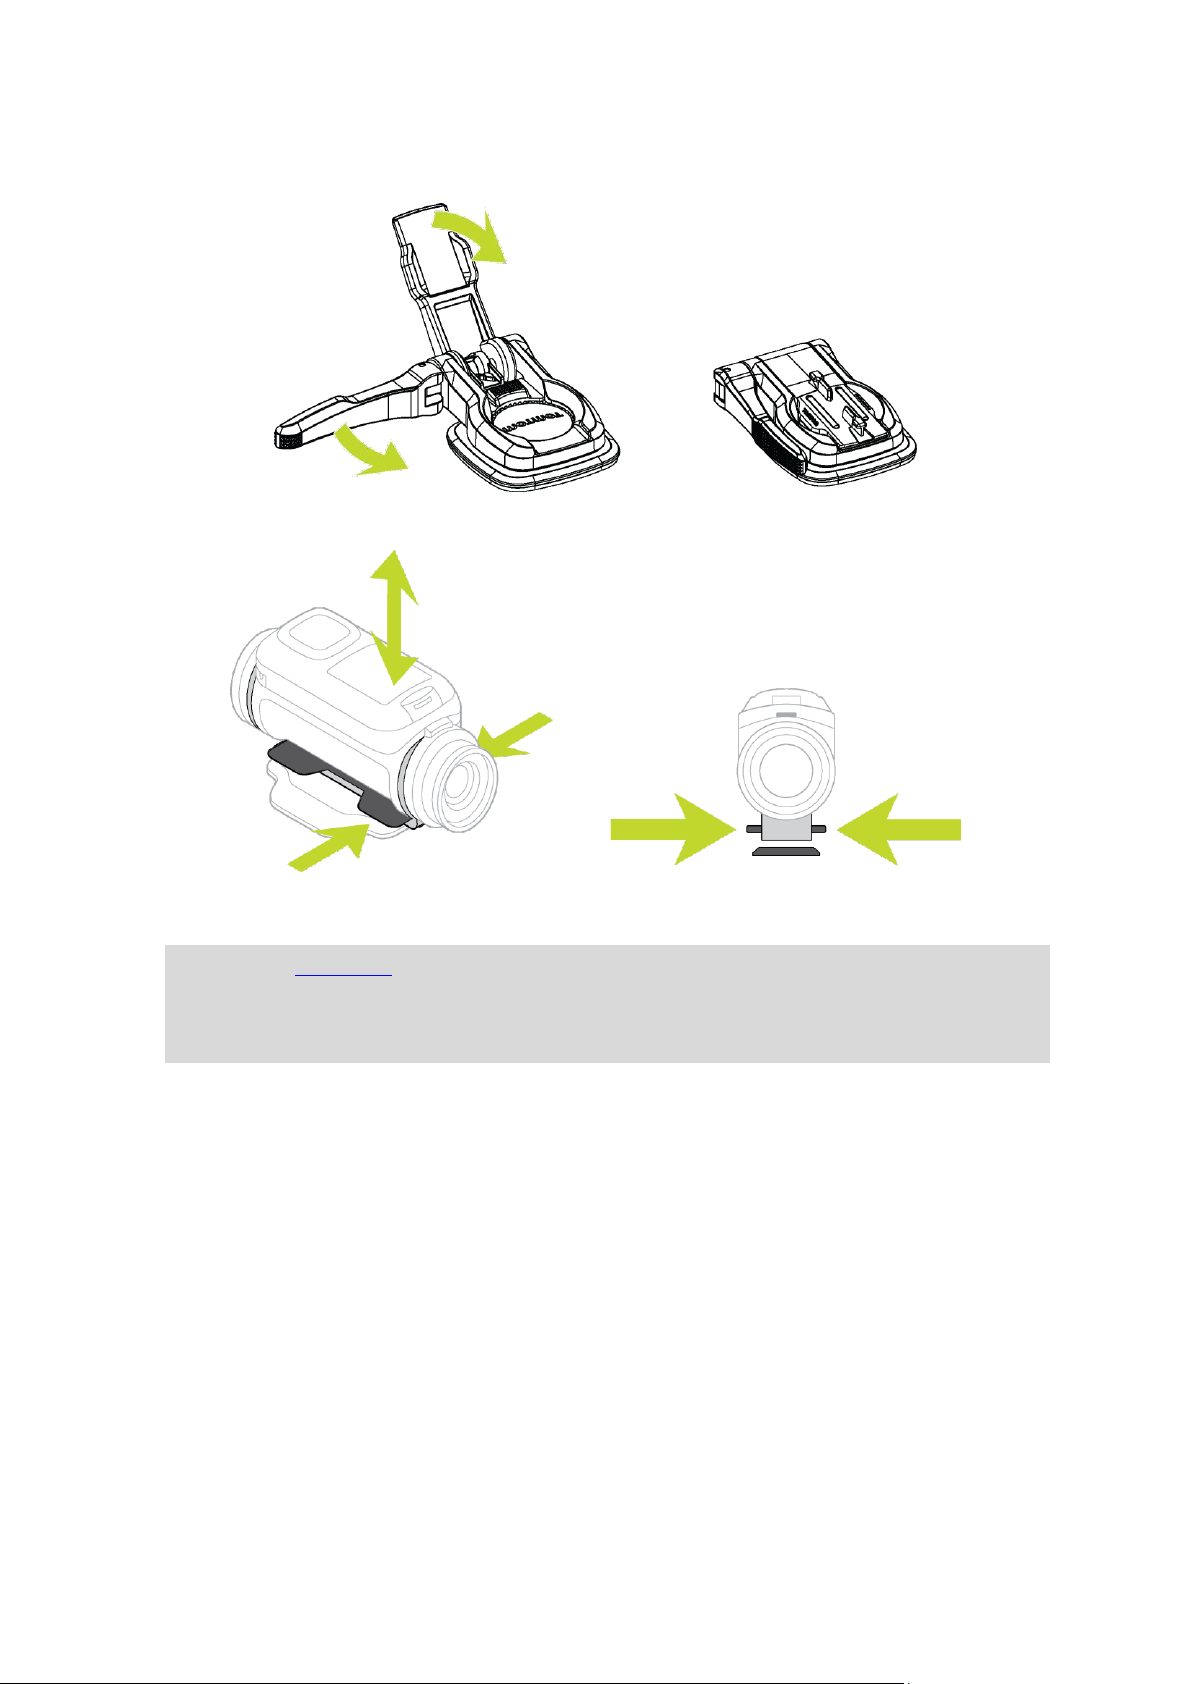
5. Install the 360 pitch mount on the mount base. Push down the TomTom Bandit plate to lock the
pitch mount on the base.
6. Install the TomTom Bandit on the 360 pitch mount. Make sure the TomTom Bandit is secure.
7. Adjust the position of the TomTom Bandit, then push the pitch mount lever to the closed
position to lock the pitch mount.
Tip: Use the Mobile app live viewfinder to set the TomTom Bandit to the correct view.
Important: Make sure your TomTom Bandit is secure before you start every activity. Regularly
check the security of the mount. If the activity involves shocks or vibration, use a lanyard to
prevent loss of the TomTom Bandit if the mount fails.
19
Page 20
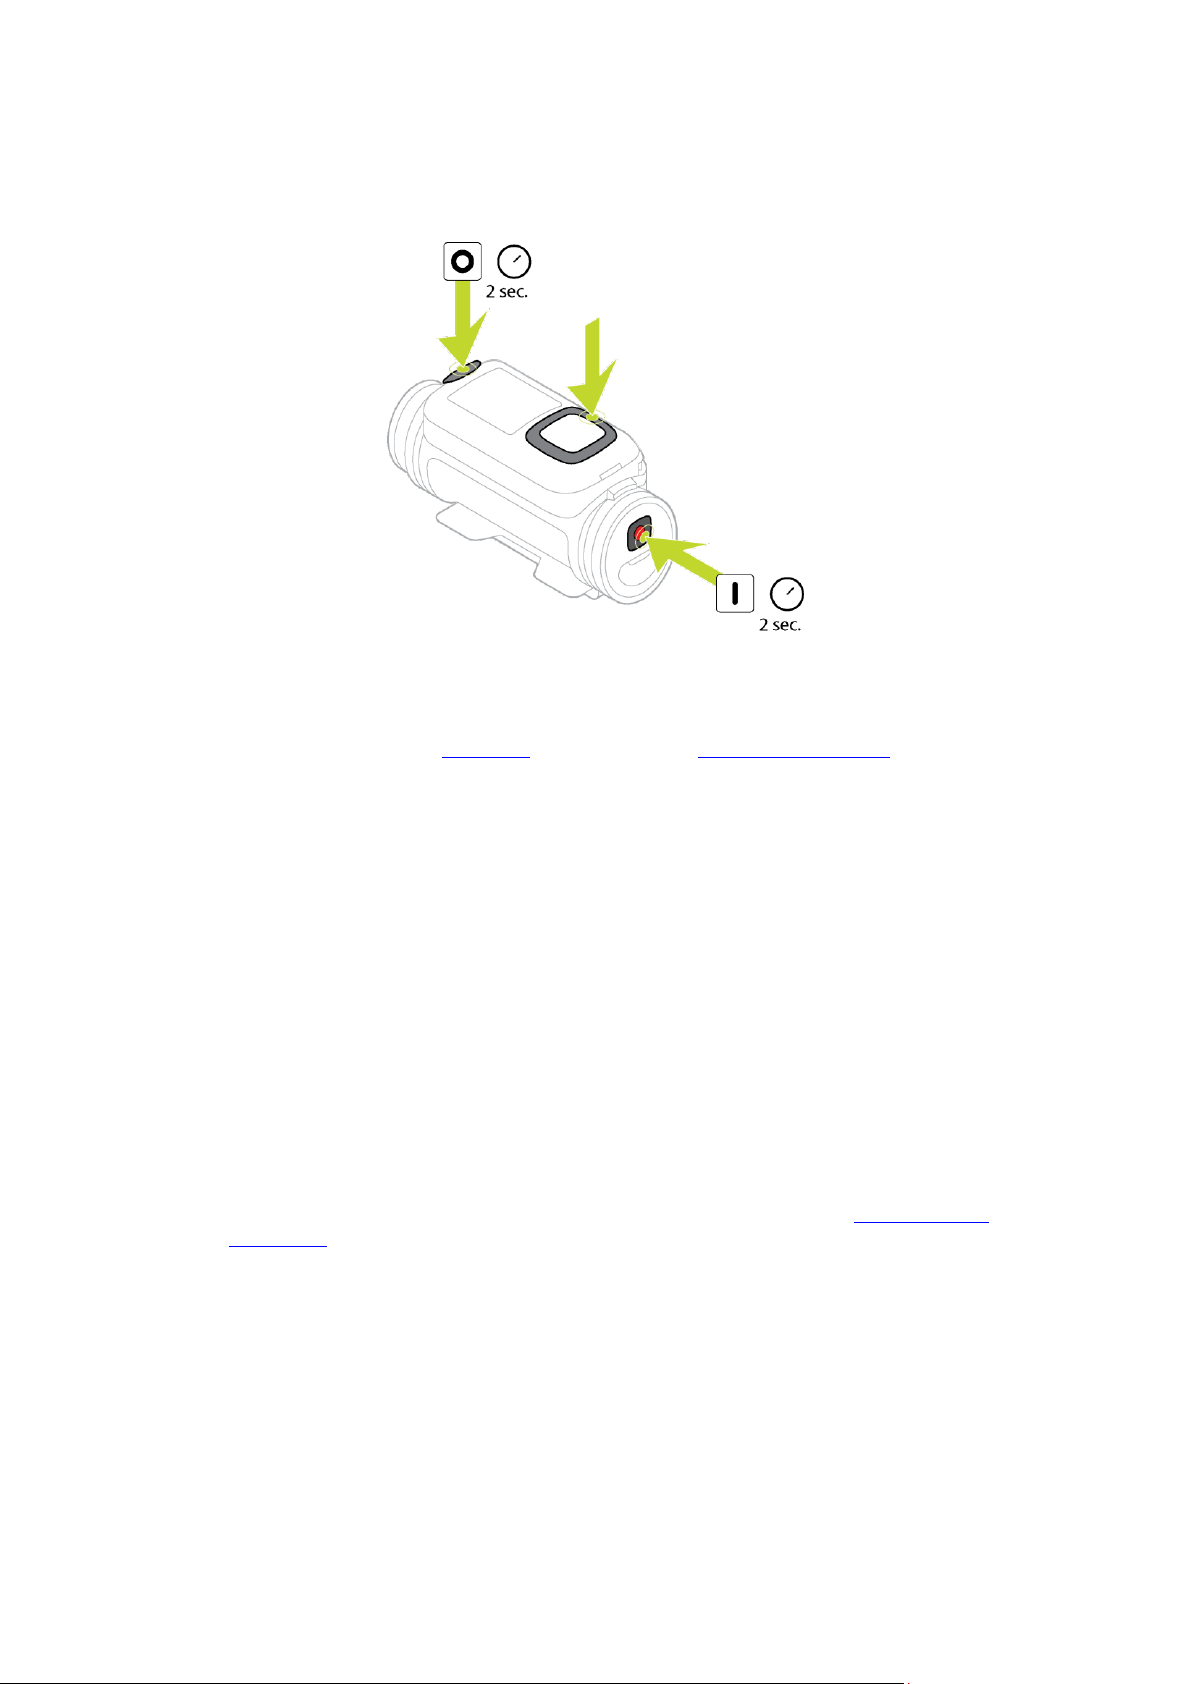
Switching your TomTom Bandit on and off
Your TomTom Bandit can be on, off, or in standby. You can only switch the TomTom Bandit on and
off using the buttons on the TomTom Bandit.
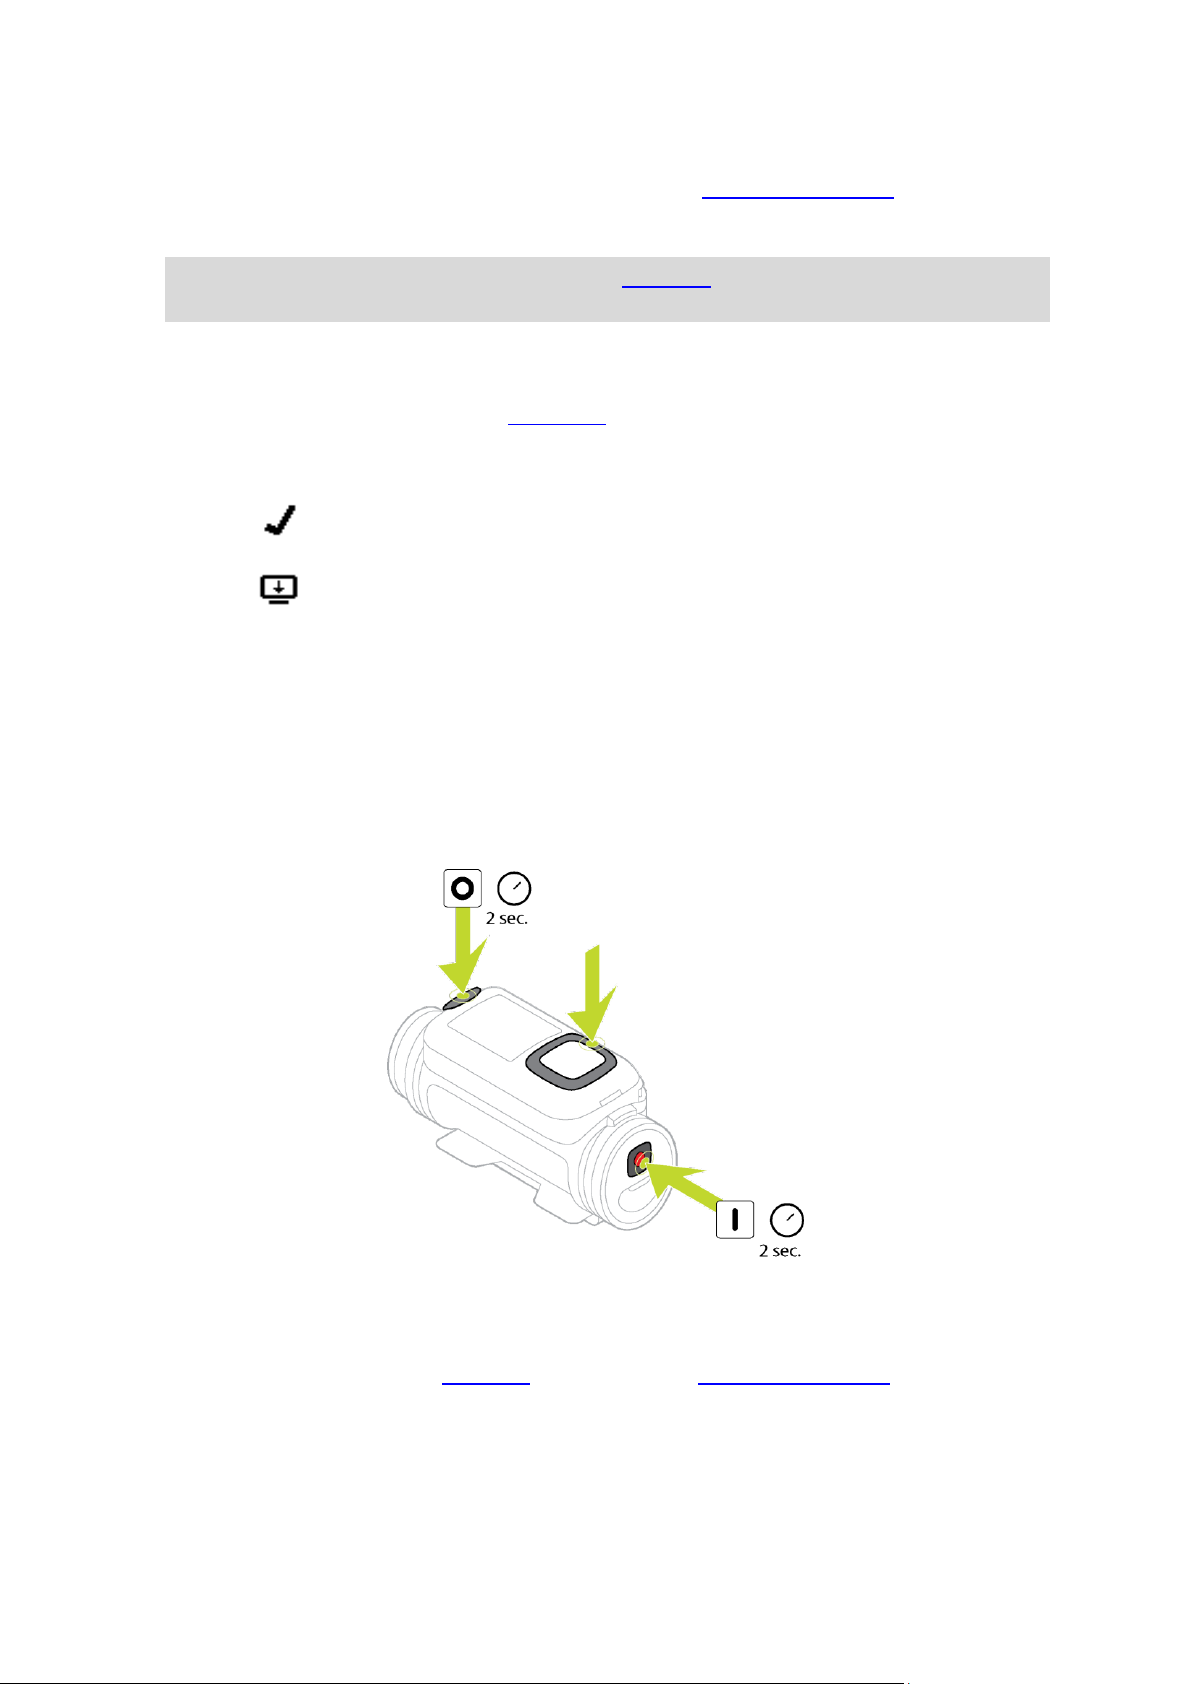
Switching on your TomTom Bandit
Press the START button at the back of the TomTom Bandit for 2 seconds to switch your TomTom
Bandit on. The TomTom logo is shown, and the red LEDs flash and you hear the start-up sound. If no
microSD card is inserted into the Batt-Stick, you are asked to insert a memory card so that the
TomTom Bandit can switch on.
If the TomTom Bandit is in standby mode, press the control button to wake up the TomTom Bandit.
The TomTom Bandit stays on during the following conditions:
The TomTom Bandit is recording a video or you are taking photos.
You are using the screen to set-up the TomTom Bandit.
You are operating the TomTom Bandit from your mobile phone using Wi-Fi or Bluetooth.
Switching off your TomTom Bandit
Press the STOP button at the front of the TomTom Bandit for 2 seconds to switch it off. The red
LEDs flash and you hear the shut-down sound.
The TomTom Bandit will automatically shut down if the battery power becomes too low.
Standby
To save power the TomTom Bandit automatically switches to standby after a few minutes if it's not
being used.
You can wake up the TomTom Bandit by pressing the control button, using the remote control, or
using the Mobile app. If you press the START button, the TomTom Bandit will start recording or
taking photos, depending on the mode you have set.
The TomTom Bandit switches off after two hours in standby.
20
Page 21
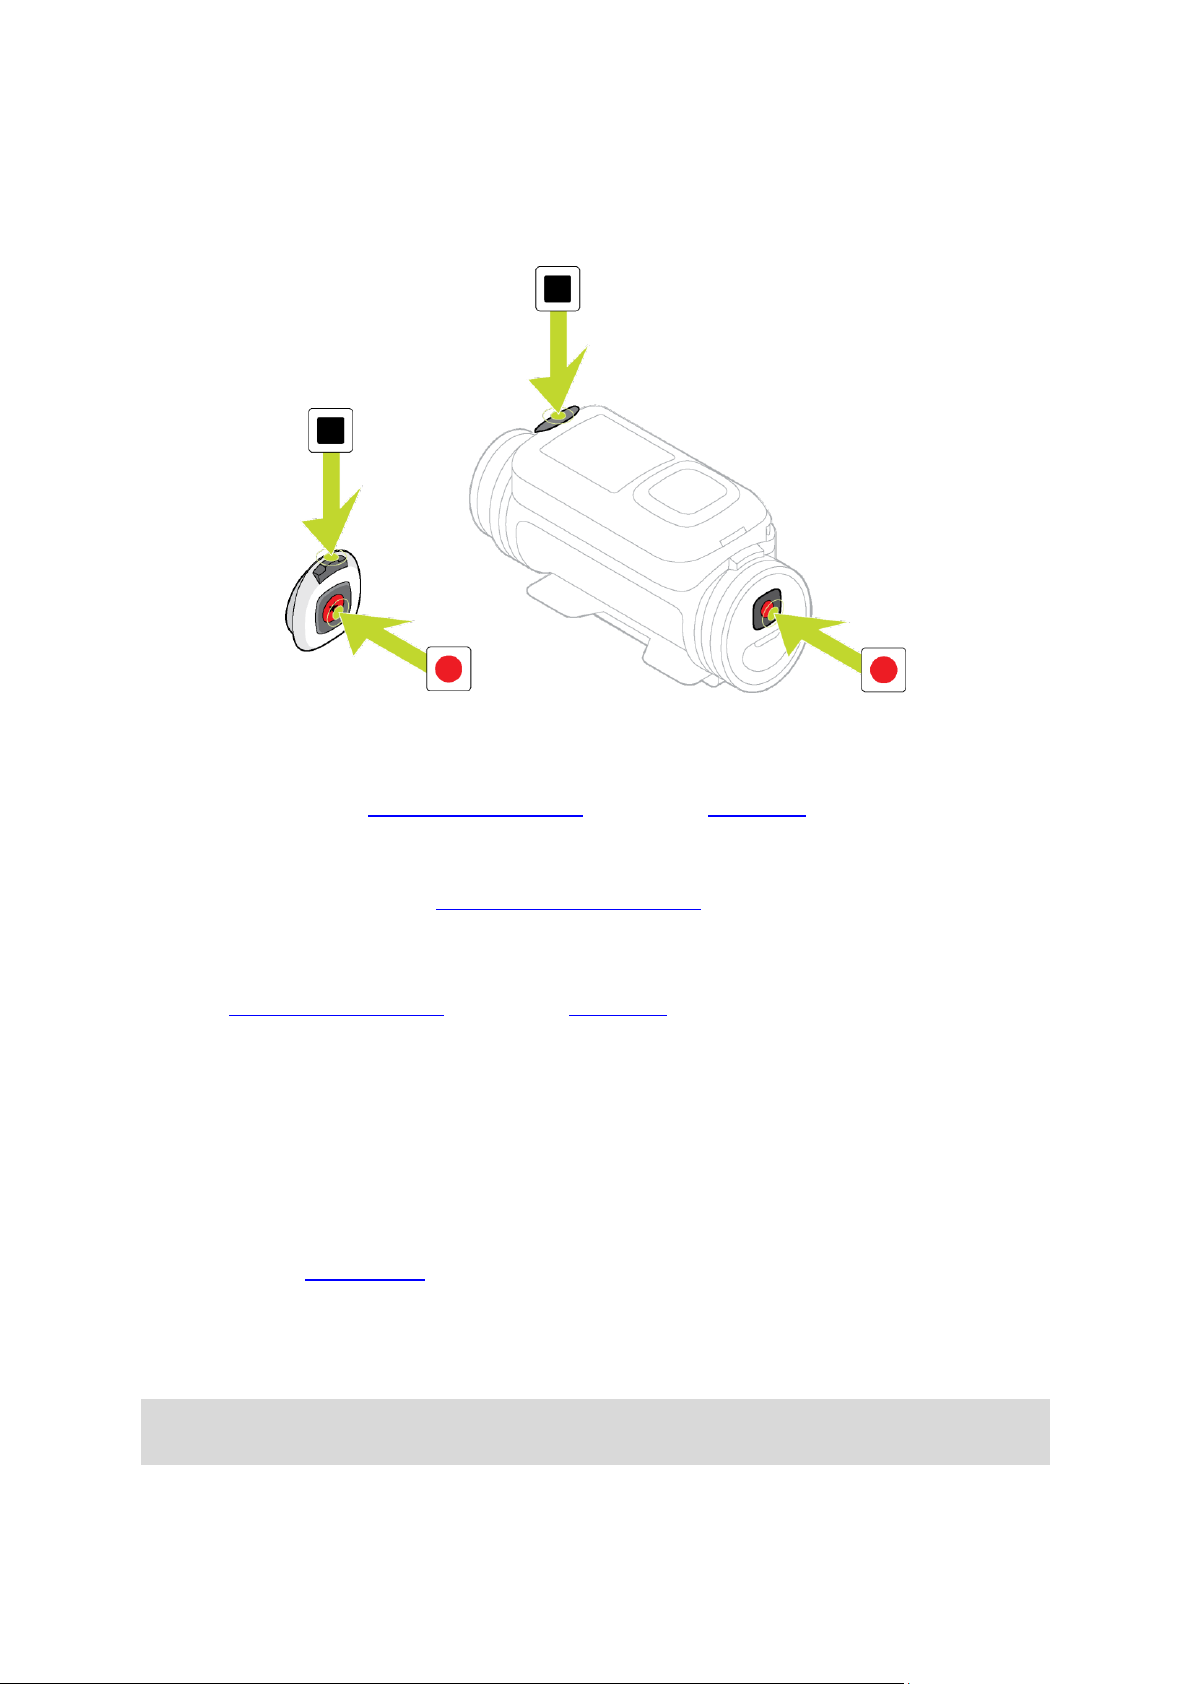
Recording
Your TomTom Bandit has separate START and STOP buttons, both on the TomTom Bandit and on the
remote control. Separate buttons make it easy to start recording, add video highlights and stop
recording because the function of the buttons is always the same.
Start recording
When your TomTom Bandit is switched on or in standby mode, press the START button to start
recording in your currently selected mode, for example video recording or photo burst. You can also
start recording using the optional remote control, or using the Mobile app.
You hear a beep sound when recording starts, then the red LEDs in the START and STOP buttons
flash continuously.
Press the START button again to manually highlight your video.
Stop recording
Press the STOP button to stop recording and go back to standby mode. You can also stop recording
using the optional remote control, or using the Mobile app.
You hear a beep sound when recording stops, and the red LEDs in the START and STOP buttons stop
flashing.
Video highlights
Highlights are added to your video while you are recording. A highlight marks an exciting part of
your action video, for example high speed, a jump or even a beautiful view that you might like to
view later and add to your video story. A video can contain many highlights.
The highlights let you easily playback your video, create your video story and share your video using
the Mobile app or Bandit Studio. Your highlights are shown separately from the video they are in.
Each single highlight marks a 6 second length of video.
The highlights are added to your video using inputs from built-in sensors, external sensors, or
manually, to highlight the most exciting parts of the action. The highlights from built-in and
external sensors are added automatically.
Tip: You can also add highlights to your video when you view it in the Mobile app or Bandit
Studio, and you can adjust the position and duration of a highlight.
The following highlights and their symbols are used:
21
Page 22
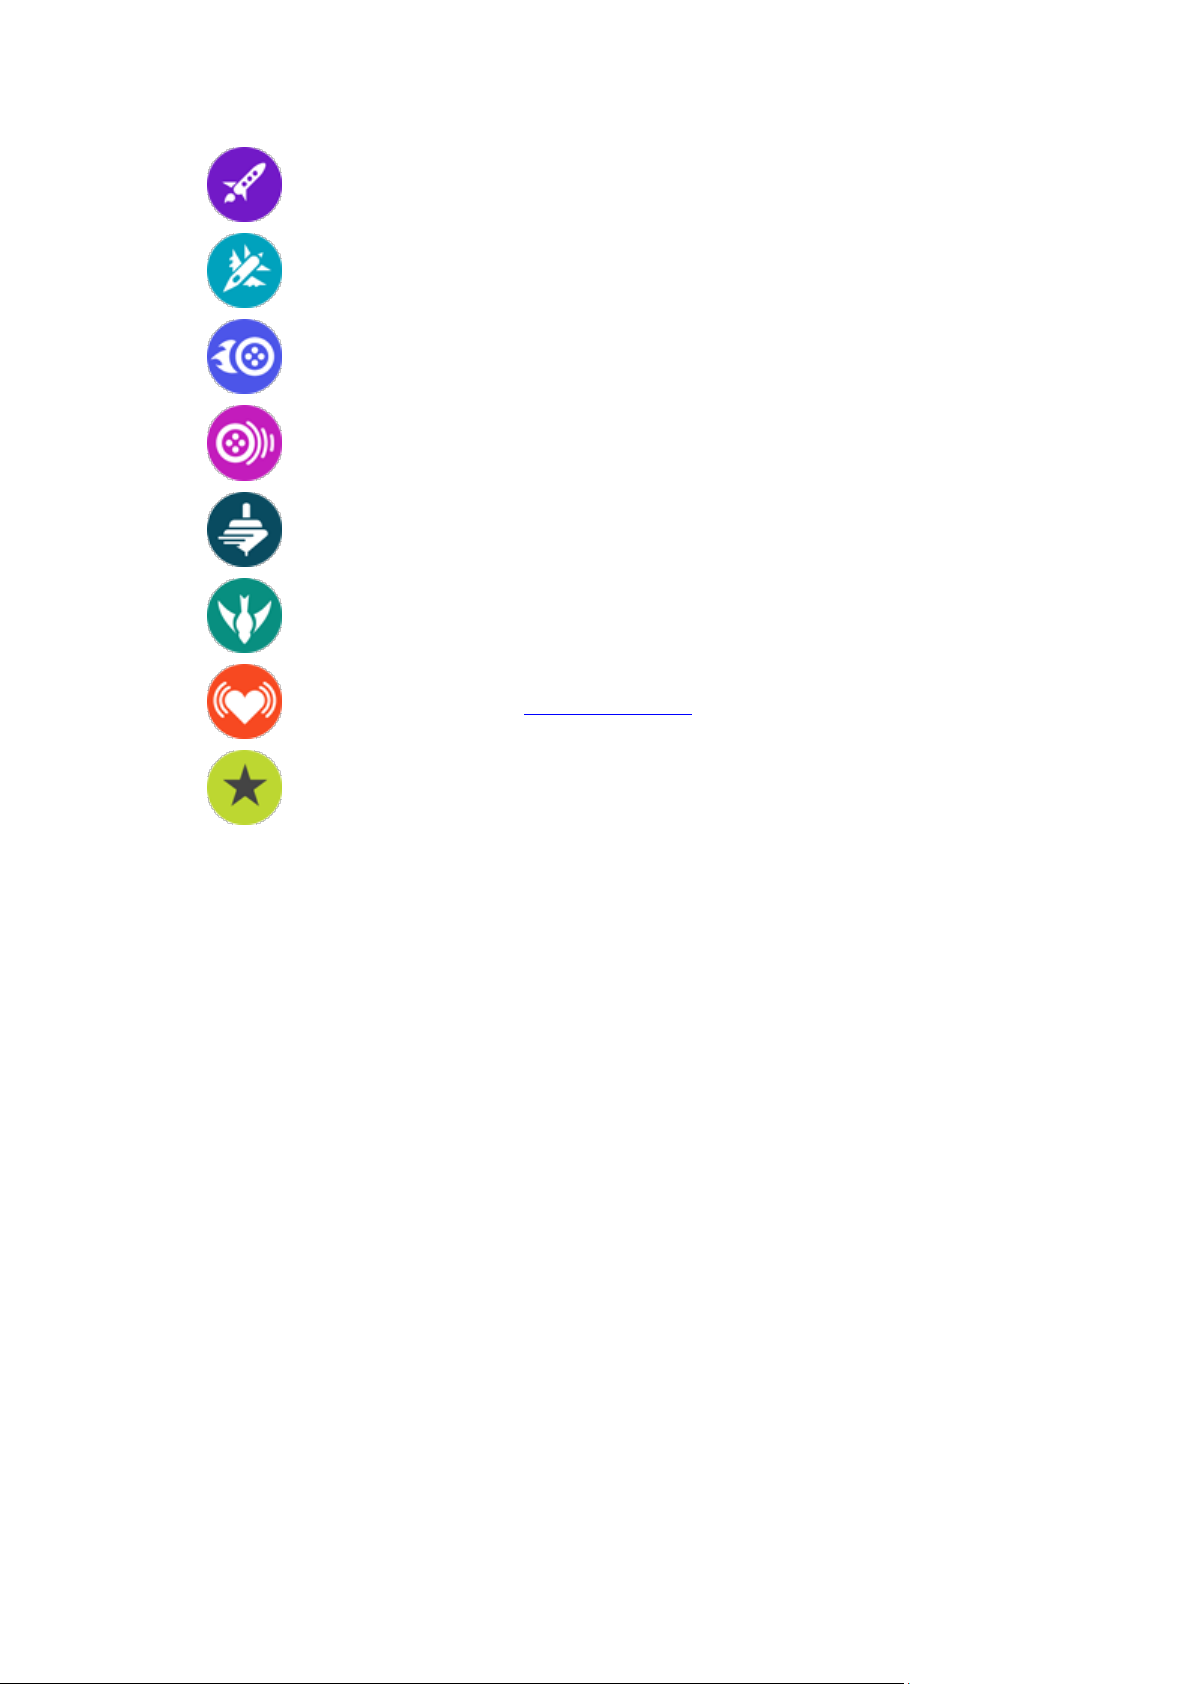
Speed.
G-force.
Maximum acceleration.
Maximum deceleration.
Maximum rotation.
Maximum vertical speed.
Heart rate from a heart rate monitor.
Manual highlight.
22
Page 23

Getting started
Your TomTom Bandit
Before you start making videos, it's a good idea to charge your TomTom Bandit, then download any
software updates and download QuickGPSfix.
Updating your camera software
You can update your camera software and QuickGPSfix using the Mobile app or Bandit Studio.
Note: QuickGPSfix helps your TomTom Bandit get a GPS fix and find your location quickly.
Battery life
When the battery is fully charged, your TomTom Bandit can be used for up to three hours of
recordings with GPS reception. The video resolution and frame rate used to record videos also
affects battery life: a recording at a higher resolution or frame rate will use more power.
The TomTom Bandit enters standby mode when it has not be used for a short time. After two hours
the TomTom Bandit automatically switches off.
TomTom Bandit Mobile app
You can download the TomTom Bandit Mobile app for free from your usual app store or by going to
tomtom.com/cam.
To learn more, go to Mobile App in this guide.
Connecting your TomTom Bandit to your smartphone
To learn more, go to Phone settings in this guide.
TomTom Bandit Studio
You can download Bandit Studio for free by going to tomtom.com/cam.
To learn more, go to Bandit Studio in this guide.
About your TomTom Bandit
Your TomTom Bandit is a modular construction that is easily disassembled so you can swap parts,
for example to install a new Batt-Stick or replace the lens cover.
23
Page 24
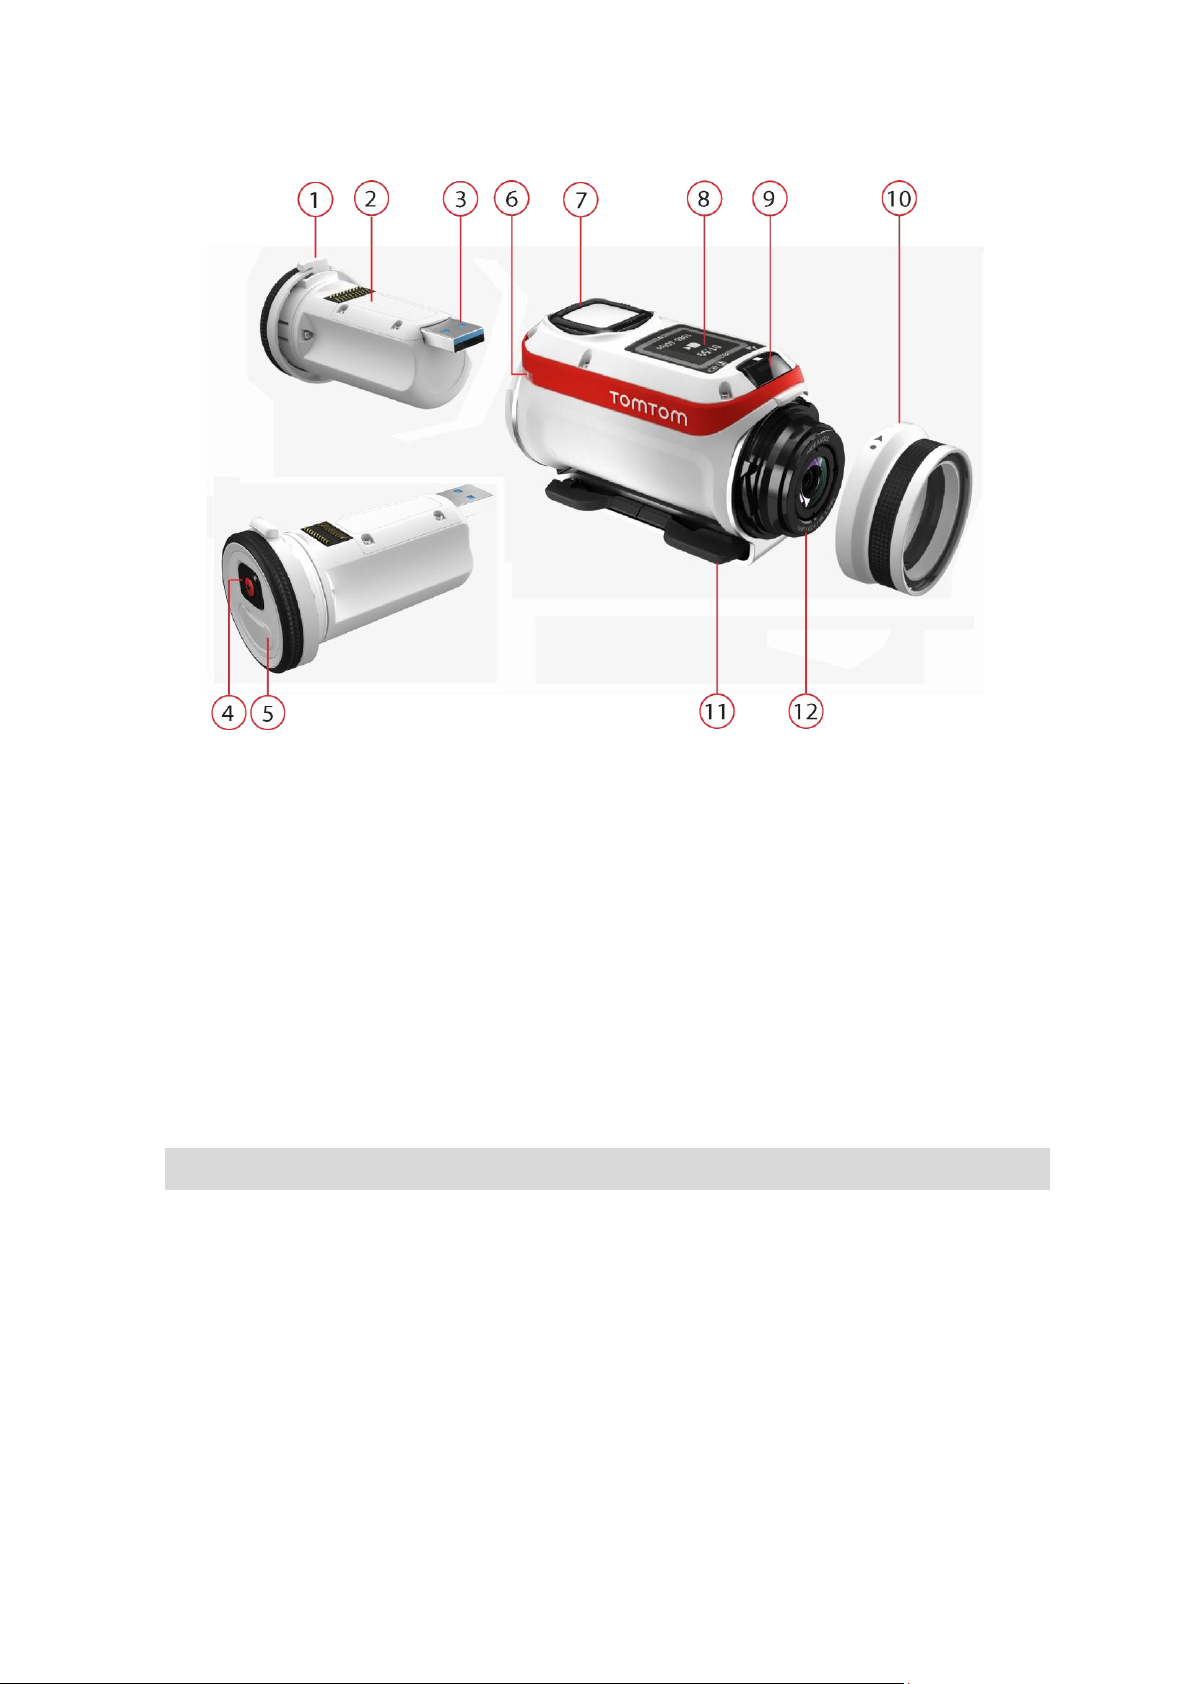
1. Batt-Stick 1900 mAh.
2. Battery power indicator. With the Batt-Stick removed, press the ON button to see the battery
level.
3. USB 3.0 connector for charging and data transfer.
4. ON, START and manual highlighting button.
5. Connector with cap for optional power cable and external audio cable.
6. Attachment for a lanyard.
7. Control button to move up, down, left or right to other screens on the TomTom Bandit display:
Move up or down to select items in a menu.
Move right to select an item and open the menu for that item.
Move left to exit a menu.
To select an option in a menu, make sure it is highlighted when you leave the menu. Your
TomTom Bandit remembers the option you highlighted.
If an option in a menu switches on and off, move right to change the setting.
Note: The control button is disabled when you use the TomTom Bandit deep underwater.
8. Screen.
9. STOP and OFF button.
10. Lens cover.
The standard white lens cover is splash-proof (IPX7). If you want to use the TomTom Bandit in
water or underwater to depths down to 40 m (5 ATM), or for activities on the water surface, for
example surfing, install the optional Dive (IPX8) black lens cover.
11. Rotatable mount rings with quick-release.
12. Lens (a lens cover must always be fitted to protect the lens).
24
Page 25

What's on the screen
Camera Status
screen
The Camera Status screen is shown when you are not recording videos or
photos. This screen shows the mode and the specific settings you have
selected.
Mode screen
The Mode screen lets you choose the mode you want to use. The modes
are Photo, Video, Slow Motion, Time Lapse, and Cinematic.
Recording screen
The Recording screen is shown when you are recording a video or taking
photos. The screen shows you the remaining time you can still record, and
the time you have already recorded, or the number of photos taken.
Settings screen
The Settings screen lets you change the settings for the selected mode
and the general settings for the TomTom Bandit.
Selecting Status will show you the status of the TomTom Bandit.
Video and Photo
settings
For each Video and Photo mode you can set different settings to
customize the video or photo. For example, you can set the frame rate,
the lens angle, and the scene.
General settings
The General settings set the options for the TomTom Bandit, for example
Language, Units and Sound.
This icon shows the number of GPS satellites that have been located. 4
bars are required to fix the camera's GPS location.
This icon shows that a Heart Rate Monitor is connected to your TomTom
Bandit.
This icon shows that a memory card is inserted.
The battery status icon.
This icon shows that the video or photo image is rotated 180 degrees.
This icon shows that the camera exposure is set to Bright or Night.
The TomTom Bandit screen lets you select the type of video or photo you want to record, and lets
you change the settings for each video and photo mode. You move to other screens using the
control button by doing the following:
Move up or down to select items in a menu.
Move right to select an item and open the menu for that item.
Move left to exit a menu.
To select an option in a menu, make sure it is highlighted when you leave the menu. Your
TomTom Bandit remembers the option you highlighted.
If an option in a menu switches on and off, move right to change the setting.
Note: The control button is disabled when you use the TomTom Bandit deep underwater.
You can see the following screens:
Icons on the screen show the status of various camera features and connected sensors.
Icons shown on the screen
The following icons on the screen show the status of various camera features and connected
sensors:
25
Page 26
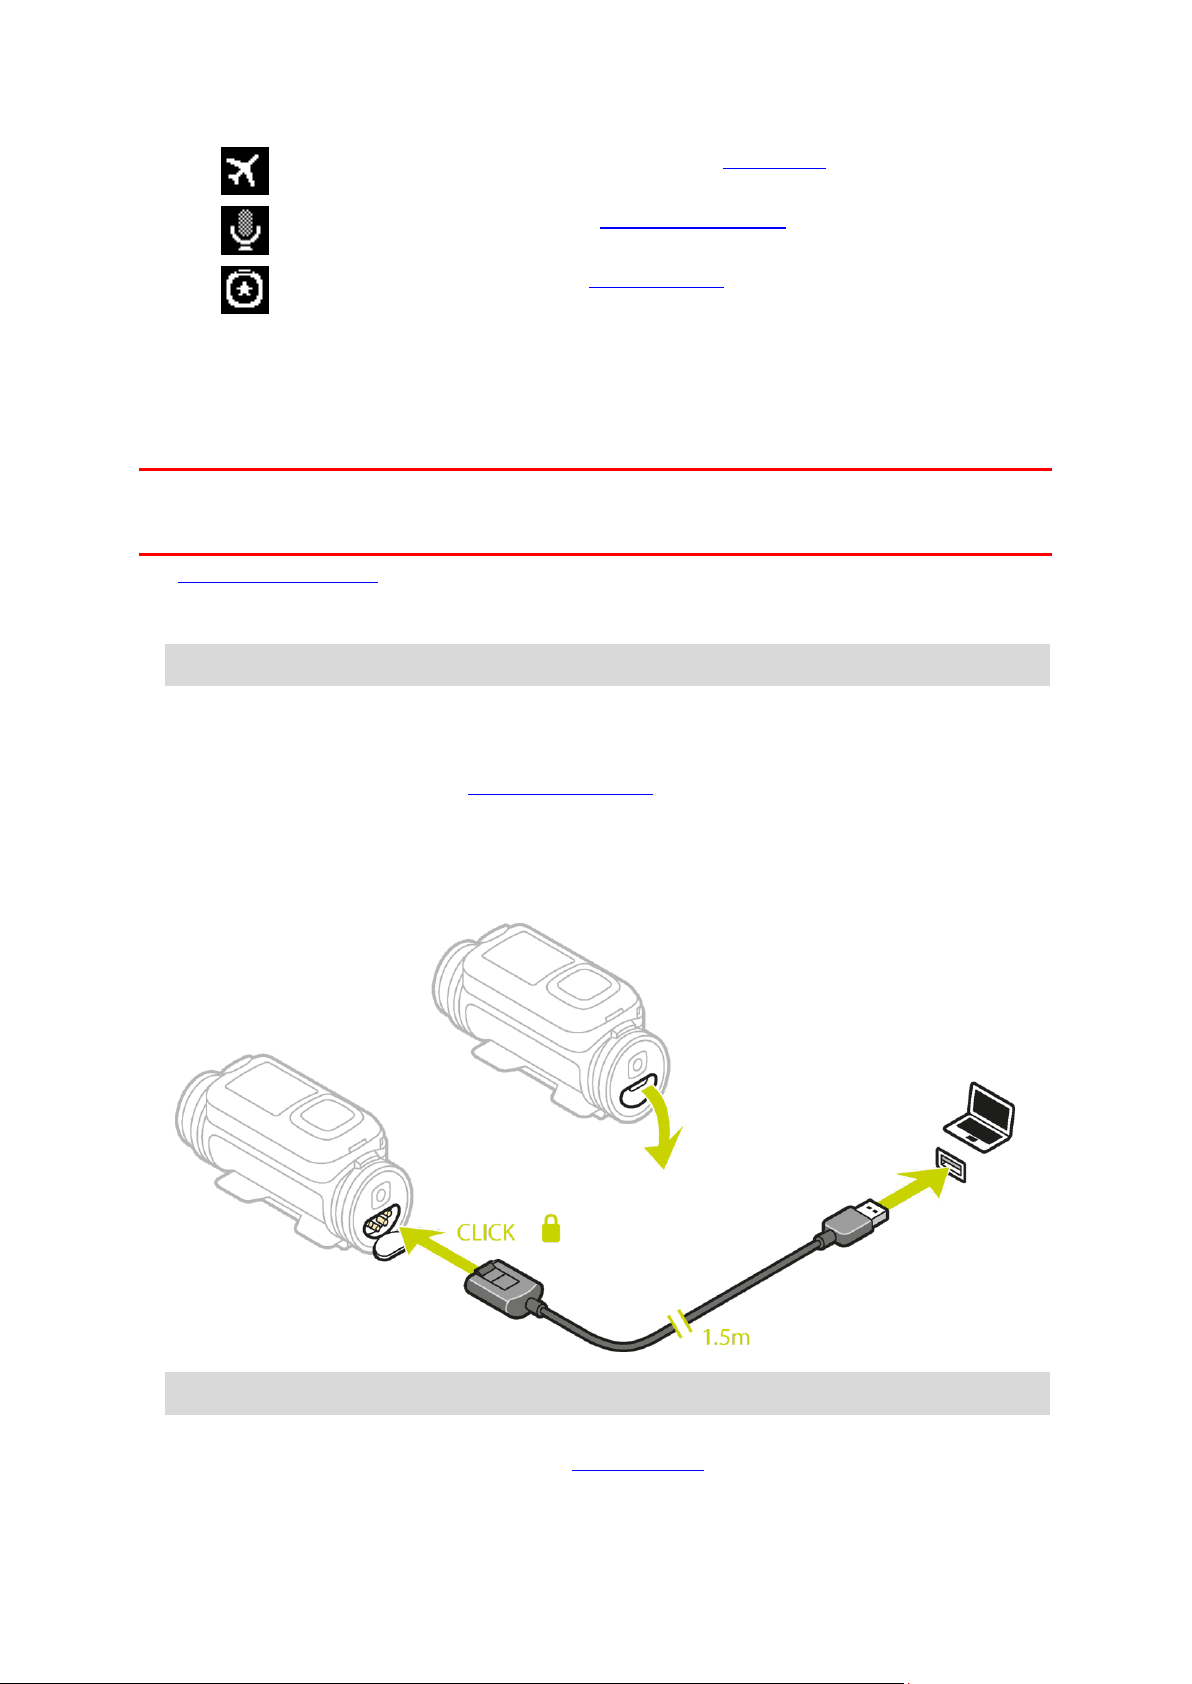
This symbol shows that the camera is in flight mode.
This symbol shows that an external microphone is connected to your
TomTom Bandit.
This symbol shows that a remote control is connected to your TomTom
Bandit.
Charging your TomTom Bandit
You can charge your TomTom Bandit in the following two ways:
Charging the Batt-Stick using a USB socket
Important: If you remove the Batt-Stick or lens cover be extra careful not to let dirt or water enter
the TomTom Bandit or the Batt-Stick. Only remove the Batt-Stick or lens cover in clean and dry
conditions.
1. Remove the Batt-Stick from the TomTom Bandit.
2. Insert the Batt-Stick USB connector into your computer's USB socket or a standard USB
wall-charger.
Tip: While the Batt-Stick is charging, the LEDs show the charge level and one LED flashes.
3. To see the power level of the Batt-Stick, remove the USB connector from the USB charging
socket, then press the ON button.
The LEDs light up to show the power level.
4. When the Batt-Stick is charged, install the Batt-Stick into the TomTom Bandit.
Charging the TomTom Bandit using the optional power cable
1. Open the connector cap on the back of the Batt-Stick.
Tip: You don't have to remove the Batt-Stick from the TomTom Bandit.
2. Connect the power cable to the Batt-Stick connector and to a USB socket.
You can see the battery power level on the STATUS screen in the SETTINGS menu.
26
Page 27
Inserting a memory card
Video
Normal high-quality video mode.
The photos you take and the videos you record are stored on a microSD card that is located in the
Batt-Stick. Use a microSD card that is a Class 10 standard or higher. Go to tomtom.com/support for
a list of approved compatible microSD cards.
Note: If you insert a microSD card that is too slow to work with your TomTom Bandit, the
TomTom Bandit shows you a message and you are asked to use a compatible microSD card.
Tip: MicroSD cards can degrade over time, and performance may decrease as the microSD card
fills up. To maintain performance, you should regularly format your microSD card.
Important: If you remove the Batt-Stick or lens cover be extra careful not to let dirt or water enter
the TomTom Bandit or the Batt-Stick. Only remove the Batt-Stick or lens cover in clean and dry
conditions.
1. Remove the Batt-Stick from the TomTom Bandit.
2. Insert the microSD card into the memory card slot in the Batt-Stick.
Important: The microSD card must be inserted with the contacts facing up.
3. Install the Batt-Stick into the TomTom Bandit.
Video and Photo modes and settings
Each video and photo mode has its own settings.
TomTom Bandit modes
Select a mode directly on the TomTom Bandit or from the Mobile App. When you have selected a
mode you can change the video or photo settings for the mode.
27
Page 28
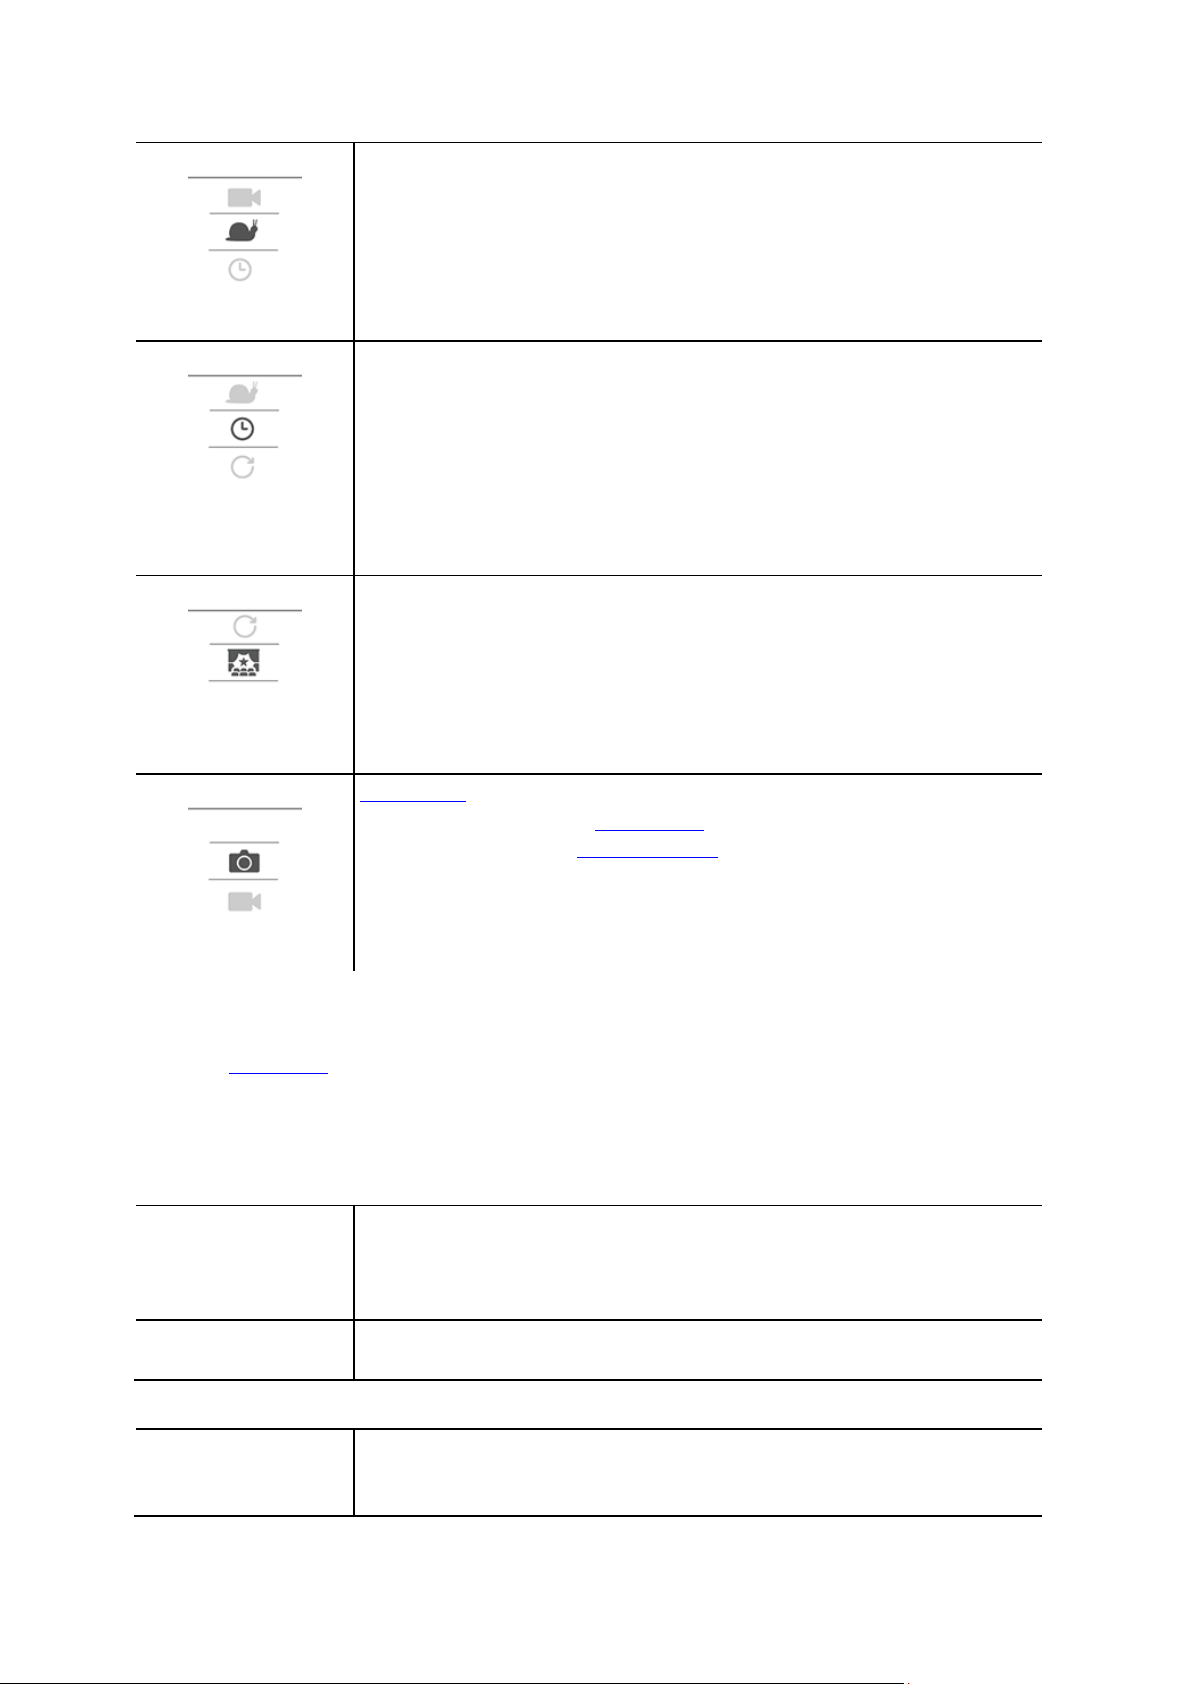
Slow Motion
Videos are recorded at a multiple of the normal frame rate (2x, 4x, or 8x),
but the video is saved with the normal frame rate (30 fps) for playback,
which results in slow motion video.
Audio and sensor data are also recorded in the slow motion mode. The
available slow motion rate depends on the video resolution you choose.
Timelapse
When in TIMELAPSE MODE, the TomTom Bandit records a time-lapse video
directly as a video recording at the currently set resolution and at the
normal frame rate.
You can choose the interval between recording. Time-lapse recording
stops when the battery level is low, when the memory card is full or when
you press the STOP button.
No audio or sensor information is recorded during a time-lapse video, but
GPS information is recorded at the start of the video if a signal is
available.
Cinematic
CINEMATIC is the highest resolution mode, capturing video at 4K or 2.7K.
For normal use, you should find that 1080p offers sufficiently high quality
video.
Photo
Photo mode has the following options:
Normal - For taking a single photo.
Burst - For taking a series of photos in a very short time.
Size
1080p at 30 fps
1080p at 60 fps
720p at 60 fps
720p at 120 fps
View
Wide
Normal
Size
1080p at 2x speed
720p at 4x speed
WVGA at 6x speed
Video settings
Each video mode has its own settings. You can change settings directly on the TomTom Bandit or by
using the Mobile App.
From the Camera Status screen, move down to the SETTINGS menu and select the mode settings for
your current video mode, for example VIDEO or SLOW MO. Move right, then select the settings you
want to change.
Video settings
Slo Motion settings
28
Page 29
View
Wide
Normal
Cinematic settings
Size
4k at 15 fps
2.7k at 30 fps
Size
4k at 15 fps
4k at 30 fps
1080p at 15 fps
1080p at 30 fps
Interval
1s, 5s, 10s, 15s, 30s, 60s
Size
16 MP
Size
8 MP
16 MP
Burst
Up to 10 photos in 1 s
Up to 10 photos in 2 s
Timelapse settings
Photo settings
Use the photo settings to select a photo mode. Once a mode has been chosen, you can then select
settings for that photo mode. You can change settings directly on the TomTom Bandit or by using
the Mobile App.
From the Camera Status screen, move down to the SETTINGS menu and select PHOTO. Move right
to select a mode, for example BURST, then select the settings you want to change.
NORMAL settings
BURST settings
Image settings
The image settings let you choose the scene lighting and the image rotation. The settings are
applied to all video or photo modes.
From the Camera Status screen, move down to the SETTINGS menu and select IMAGE. Move right to
select one of the following settings:
Tip: You can only access the image settings on the TomTom Bandit.
Scene
Auto (default) automatically adjusts the camera exposure for the detected lighting conditions.
Bright sets the camera exposure for bright lighting conditions.
Night sets the camera exposure for low lighting conditions.
Rotation
You can choose to rotate the videos and photos your camera makes by 180 degrees. This allows you
to mount the camera upside down.
TomTom Bandit status
From the Camera Status screen, move down to open the SETTINGS screen. Select STATUS then
move right.
29
Page 30
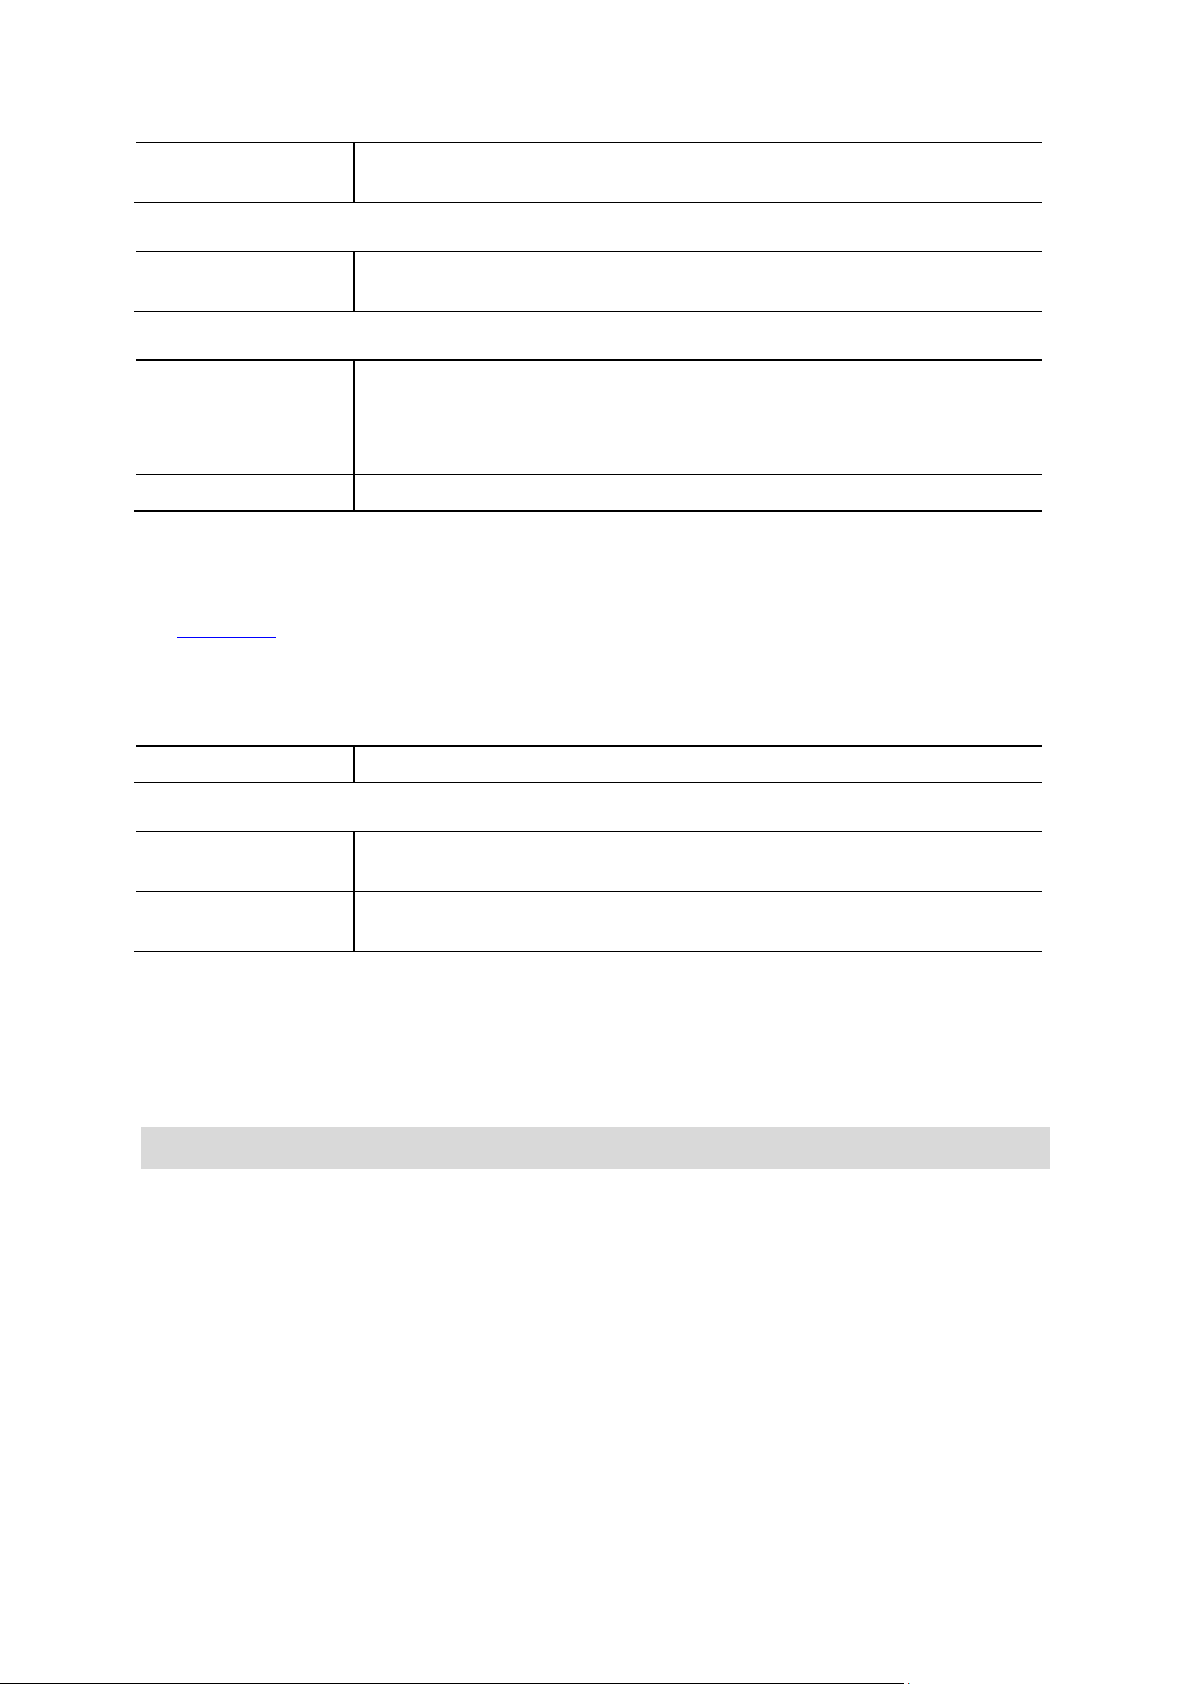
The status screen shows the following information:
QuickGPSfix on your TomTom Bandit is up-to-date.
QuickGPSfix on your TomTom Bandit is out-of-date. If the QuickGPSfix
information on your TomTom Bandit is out-of-date, your camera still
works as usual. It may, however, take longer to get a GPS fix when
you want to start an activity.
Battery - the battery power left on your TomTom Bandit. Charge the Batt-Stick if the power is
low.
Storage - the amount of free space available on your TomTom Bandit.
Tip: If you are running out of space, connect the Batt-Stick to your computer and transfer
some files.
QuickGPS - the status of the QuickGPSfix information on your TomTom Bandit.
QuickGPSfix helps your TomTom Bandit find your precise location quickly so that you can start
your activity. To automatically update the QuickGPSfix information on your TomTom Bandit,
connect your TomTom Bandit to the Mobile app. QuickGPSfix information is valid for three days
after you download it.
These symbols are used to show the status of QuickGPSfix:
Version - the software version number of your TomTom Bandit. You may need this information
if you contact Customer Support.
Serial number - The serial number of your TomTom Bandit.
Switching your TomTom Bandit on and off
Your TomTom Bandit can be on, off, or in standby. You can only switch the TomTom Bandit on and
off using the buttons on the TomTom Bandit.
Switching on your TomTom Bandit
Press the START button at the back of the TomTom Bandit for 2 seconds to switch your TomTom
Bandit on. The TomTom logo is shown, and the red LEDs flash and you hear the start-up sound. If no
microSD card is inserted into the Batt-Stick, you are asked to insert a memory card so that the
TomTom Bandit can switch on.
If the TomTom Bandit is in standby mode, press the control button to wake up the TomTom Bandit.
The TomTom Bandit stays on during the following conditions:
The TomTom Bandit is recording a video or you are taking photos.
30
Page 31

You are using the screen to set-up the TomTom Bandit.
You are operating the TomTom Bandit from your mobile phone using Wi-Fi or Bluetooth.
Switching off your TomTom Bandit
Press the STOP button at the front of the TomTom Bandit for 2 seconds to switch it off. The red
LEDs flash and you hear the shut-down sound.
The TomTom Bandit will automatically shut down if the battery power becomes too low.
Standby
To save power the TomTom Bandit automatically switches to standby after a few minutes if it's not
being used.
You can wake up the TomTom Bandit by pressing the control button, using the remote control, or
using the Mobile app. If you press the START button, the TomTom Bandit will start recording or
taking photos, depending on the mode you have set.
The TomTom Bandit switches off after two hours in standby.
Connecting to the Mobile app
The Mobile app will not start until you have connected your smartphone to your TomTom Bandit
using Wi-Fi.
Tip: For iOS only. If your smartphone is Bluetooth Smart (BLE) capable, Wi-Fi is switched on and
off automatically by the Mobile app. Wi-Fi is also switched off when it isn't used for a while.
Follow these steps to connect your TomTom Bandit to your smartphone, and start the Mobile app:
1. Switch on your TomTom Bandit.
2. From the Camera Status screen, move up to turn on the TomTom Bandit's Wi-Fi connection.
The name of the Wi-Fi connection and the password are shown on the screen.
3. On your smartphone, go to the phone's Wi-Fi settings screen then select the TomTom Bandit
Wi-Fi connection from the network list.
4. Enter the password shown on the TomTom Bandit screen.
Your phone connects to the TomTom Bandit. On the TomTom Bandit, the screen shows Con-
nected to device.
5. Start the Mobile app.
The Mobile app starts and shows the Viewfinder screen.
Resetting your TomTom Bandit
To reset your TomTom Bandit, do the following:
From the Camera Status screen on your TomTom Bandit, move down to open the SETTINGS screen.
Select GENERAL then select OPTIONS.
Select RESET to choose from two reset options:
RESET ALL resets your TomTom Bandit to the factory settings and restarts the TomTom Bandit.
Note: A reset does not delete your photos and videos stored on the microSD card.
RESET WIFI generates a new Wi-Fi name and password.
Updating your camera software
To receive updates, first register your TomTom Bandit with a TomTom MySports account using the
Mobile app or Bandit Studio.
You can install updates on your TomTom Bandit in the following ways:
31
Page 32

Install updates directly to your TomTom Bandit from the Mobile app.
Transfer updates to your Batt-Stick from Bandit Studio, then install the Batt-Stick in your
TomTom Bandit.
Install updates using the Mobile app
1. Connect your smartphone to your TomTom Bandit using Wi-Fi.
2. Open the Bandit Mobile app.
If an update is available it is transferred to your TomTom Bandit in the background. When the
update is ready to install you see a message on the app.
Tip: To see if your TomTom Bandit has the latest software installed, select the app menu
button then select Camera Status. You see a green cross next to Camera software version if
your camera has up-to-date software.
3. Restart your TomTom Bandit.
4. Follow the instructions on the screen to install the update.
Install updates using Bandit Studio
1. Make sure your Bandit has sufficient battery charge.
2. Remove the Batt-Stick from your TomTom Bandit.
3. Start Bandit Studio on your computer.
1. Insert the Batt-Stick USB connector into a USB port on your computer.
2. In Bandit Studio, select the settings menu button.
If an update is available the screen displays Update next to the Camera firmware version.
3. Select Update.
The Mobile app transfers the update to your Batt-Stick.
4. Install the Batt-Stick in the TomTom Bandit.
5. Switch on the TomTom Bandit.
6. Follow the instructions on the screen to install the update.
QuickGPSFix updates
In the following situations, your TomTom Bandit uses QuickGPSFix to help find your position:
The TomTom Bandit hasn't been used for a long time.
The TomTom Bandit has been out of GPS coverage for more than one week.
The TomTom Bandit is restarted more than 500 km away from your previous position.
QuickGPSfix contains information about satellite positions which helps your TomTom Bandit find
your position faster.
Tip: QuickGPSFix information is updated automatically from the Mobile app.
Caring for your TomTom Bandit
It is recommended that you clean your camera once a week if you use it frequently.
Important: If you remove the Batt-Stick or lens cover be extra careful not to let dirt or water enter
the TomTom Bandit or the Batt-Stick. Only remove the Batt-Stick or lens cover in clean and dry
conditions.
Wipe the camera with a damp cloth as needed. Use mild soap to remove oil or dirt. If the
camera is very dirty, rinse it in cold or lukewarm water.
Clean the lens cover and the lens using a cloth and spray specifically made for cleaning camera
lenses.
32
Page 33

Tip: You can use the TomTom micro-fibre camera bag to clean the lens and lens cover.
Do not expose your camera to strong chemicals such as petrol, cleaning solvents, acetone,
alcohol, or insect repellents. Chemicals can damage the camera's seals, case, and finish.
After using your camera in water, rinse your TomTom Bandit with clean water and dry it with a
soft cloth. On the Batt-Stick, open the external contact cap and dry both the contacts and the
cap.
Deleting videos and photos, and formatting the memory card
You can delete individual or all videos and photos from the microSD card, or you can format the
microSD card:
DELETE - This option deletes the last recorded video or photo from the microSD card.
DELETE ALL - This option deletes all videos, photos and sensor data from the microSD card, but
does not delete data that is not in the same folder.
FORMAT SD - This option formats the microSD card and deletes all data from the microSD card.
Delete the last recorded video or photo
1. In the SETTINGS menu, select GENERAL then STORAGE.
2. Select DELETE, then select YES.
The last recorded video or photo is deleted.
Delete all videos and photos
1. In the SETTINGS menu, select GENERAL then STORAGE.
2. Select DELETE ALL.
3. Select YES.
All videos and photos are deleted.
Format the memory card
Important: Formatting the memory deletes ALL data from the microSD card.
1. In the SETTINGS menu, select GENERAL then STORAGE.
2. Select FORMAT SD.
3. Select YES.
The microSD card is formatted and all data is deleted.
Accessing your videos and photos
Your videos, photos and highlights are stored on the memory card that is inserted in the Batt-Stick.
The easiest way to create a video story using your photos and highlights is to use the Bandit Mobile
app or Bandit Studio.
The Bandit Mobile app connects to your TomTom Bandit using a Wi-Fi connection. You can use the
app to create and upload your video story while moving, directly from your camera.
Bandit Studio is installed on a computer. You must remove the Batt-Stick from your TomTom
Bandit and insert the Batt-Stick USB connector into your computer's USB socket.
Note: When your Batt-Stick is connected to your computer you can also access your videos and
photos in a file explorer.
Viewing metrics on your TomTom Bandit
During recording or when taking photos, move right from the Camera Status screen to view the
Metrics screen. Move up or down to view the different metrics available, for example a heart-rate
monitor. Move right again to select the actual metrics measured by the sensor or device.
33
Page 34

You see two metrics which vary depending on which mode you are using. The text underneath each
metric shows which information is currently being displayed.
Some examples of metrics available:
SD card - minutes remaining at the top of the screen, minutes already recorded shown at the
bottom of the screen.
Speed mode - maximum speed shown at the top of the screen, current speed at the bottom of
the screen.
Heart rate - maximum heart rate shown at the top of the screen, current heart rate at the
bottom of the screen using the optional heart rate monitor.
Note: Your TomTom Bandit also has built-in sensors that record metrics that are stored with the
video file. You cannot view these metrics on your TomTom Bandit.
34
Page 35

Installing the basic mount
Using peripherals
The basic mount kit lets you mount your TomTom Bandit on a helmet or other flat or slightly curved
surface. Flat and curved basic mounts are supplied.
Tip: Additional mounts are available as accessories.
Tip: To install your TomTom Bandit on handlebars, use the optional bike mount.
Tip: You can also install your TomTom Bandit upside down. Set the ROTATION image setting to
180 to turn the image 180 degrees.
1. Before you install a mount, find the best position for your TomTom Bandit.
Attach the mount only to a smooth and hard surface. The mount won't securely attach to
porous, textured or soft surfaces.
To mount the TomTom Bandit at different angles and on the left or right side of a helmet, you
can turn the TomTom Bandit's base more than 180 degrees around the body.
Tip: Use the Mobile app live viewfinder to set the TomTom Bandit to the correct view.
2. Clean the area where you want to install the basic mount.
Wax, oil, dirt and moisture reduce adhesion, which can result in a weak bond. Make sure that
the area is completely dry.
35
Page 36

3. Make sure the mount is aligned in the correctly direction then, in dry, room-temperature
conditions, attach the mount. Push the mount firmly down on to the surface.
The mount won't securely attach if you install it in damp and cold conditions.
4. Wait 24 hours for the adhesive to cure.
5. Install the TomTom Bandit on the mount. Make sure the TomTom Bandit is secure.
Important: Make sure your TomTom Bandit is secure before you start every activity. Regularly
check the security of the mount. If the activity involves shocks or vibration, use a lanyard to
prevent loss of the TomTom Bandit if the mount fails.
Installing the 360 pitch mount
The 360 pitch mount kit lets you mount your TomTom Bandit on a helmet or other flat or slightly
curved surface. Flat and curved mount bases are supplied. Once installed, you can easily adjust the
direction and angle of your TomTom Bandit.
Tip: Additional mounts are available as accessories.
Tip: To install your TomTom Bandit on handlebars, use the optional bike mount.
Tip: You can also install your TomTom Bandit upside down. Set the ROTATION image setting to
180 to turn the image 180 degrees.
1. Before you install a mount, find the best position for your TomTom Bandit.
Attach the mount only to a smooth and hard surface. The mount won't securely attach to
porous, textured or soft surfaces.
To install the TomTom Bandit at different angles and on the left or right side of a helmet, you
can turn the TomTom Bandit's base more than 180 degrees around the TomTom Bandit body.
Tip: Use the Mobile app live viewfinder to set the TomTom Bandit to the correct view.
2. Clean the area where you want to install the mount.
36
Page 37

Wax, oil, dirt and moisture reduce adhesion, which can result in a weak bond. Make sure that
the area is completely dry.
3. In dry, room-temperature conditions, attach the mount base. Push the mount base firmly down
on to the surface.
The mount base won't securely attach if you install it in damp and cold conditions.
4. Wait 24 hours for the adhesive to cure.
5. Install the 360 pitch mount on the mount base. Push down the TomTom Bandit plate to lock the
pitch mount on the base.
6. Install the TomTom Bandit on the 360 pitch mount. Make sure the TomTom Bandit is secure.
7. Adjust the position of the TomTom Bandit, then push the pitch mount lever to the closed
position to lock the pitch mount.
37
Page 38

Tip: Use the Mobile app live viewfinder to set the TomTom Bandit to the correct view.
Important: Make sure your TomTom Bandit is secure before you start every activity. Regularly
check the security of the mount. If the activity involves shocks or vibration, use a lanyard to
prevent loss of the TomTom Bandit if the mount fails.
Using the bike mount
The optional bike mount kit lets you mount your TomTom Bandit on the handlebars of a bike or
other tube-shaped component of a similar size.
Install the bike mount only on a clean and dry surface. Wax, oil, dirt and moisture will reduce grip,
causing the mount to move.
Tighten the bike mount clamps securely by hand. Install the TomTom Bandit on the bike mount then
adjust the TomTom Bandit's position to get the correct view.
Tip: Use the Mobile app live viewfinder to set the TomTom Bandit to the correct view.
Tip: You can also install your TomTom Bandit upside down. Set the ROTATION image setting to
180 to turn the image 180 degrees.
Tighten the clamps a little more using a hexagon key. Do not overtighten the clamps or you might
damage the bike mount.
Important: Make sure your TomTom Bandit is secure before you start every activity. Regularly check
the security of the mount. If the activity involves shocks or vibration, use a lanyard to prevent loss
of the TomTom Bandit if the mount fails.
38
Page 39

Using the optional remote control
The remote control can be used to start and stop recording, and to manually add highlights to your
video. Use the remote control when you can't easily or safely reach your TomTom Bandit.
You can hold the remote control in your hand, or you can attach it to a place you can easily reach.
Note: The remote uses Bluetooth Smart to connect to your TomTom Bandit, and can only be used
with one TomTom Bandit at a time.
Connecting the remote control
1. From the Camera Status screen on your TomTom Bandit, move down to open the SETTINGS
menu.
2. Select GENERAL, then move right.
3. Select CONNECT, then move right.
4. Select REMOTE, then move right.
5. Move up or down to turn it on.
6. On the remote control, press the ON button for 3 seconds until the LED flashes green three
times.
The remote control is connected to the TomTom Bandit.
Tip: You can also use the Mobile app live viewfinder as a remote control.
The remote control can only be used with one camera at a time. If you want to connect your remote
control to a different camera, repeat the instructions above with the remote control in range of the
new camera.
Using the remote control to record a video
To wake up the remote control, press the ON button (button 1) for 3 seconds until the LED (3)
flashes green three times.
Press the START button (button 2) to start recording. The LED (3) flashes one time.
Press the START button (button 2) to add a highlight to your video.
Press the ON button (button 1) to stop recording. The LED (3) flashes one time.
39
Page 40

Remote control straps and mounts
The remote control wrist strap fits over a bare wrist. The strap extension can be used to make the
wrist strap longer so it fits over the arm of a winter coat, for example during snow sports. The
straps can also be used to secure the remote control to a handle bar, a selfie stick, or any suitable
location.
Note: The remote control is splash-proof and should not be submerged in water.
Changing the battery in the remote control
The remote control uses a button cell CR2032 battery.
To change the battery do the following:
1. Twist the remote button anticlockwise to remove it from its black base.
2. Using a coin, turn the battery cover anticlockwise a small amount until it unlocks, then remove
it.
3. Gently lever out the battery cell.
4. Replace the battery with a new one.
5. Install the cover turn it clockwise with a coin until it locks.
6. Twist the remote button clockwise into its black base.
Using lens covers
The standard white lens cover is splash-proof (IPX7). If you want to use the TomTom Bandit in water
or underwater to depths down to 40 m (5 ATM), or for activities on the water surface, for example
surfing, install the optional Dive (IPX8) black lens cover.
Note: When using the Dive IPX8 black lens cover, the microphone and barometer are concealed
and will not work with this lens cover.
To remove the lens cover, press the release button and turn the lens cover anticlockwise.
40
Page 41

To install a lens cover, put the lens cover on the TomTom Bandit lens and turn it clockwise until it
locks.
Important: Store the lens cover in its storage bag when you are not using it.
Important: To prevent damage to the TomTom Bandit lens, never use the TomTom Bandit without a
lens cover.
Important: Clean the lens cover and the lens using a cloth and spray specifically made for cleaning
camera lenses.
Important: Check the lens cover and Batt-Stick seals for debris, damage and cracks. Small debris
and cracks can cause leakage and may damage your TomTom Bandit.
41
Page 42

Adding sensors
Speed.
G-force.
Maximum acceleration.
Maximum deceleration.
Maximum rotation.
Maximum vertical speed.
Heart rate from a heart rate monitor.
Manual highlight.
About sensors
Sensors are used by your TomTom Bandit to record data simultaneously with your video files. This
makes it easier for you to find the highlights in the video when reviewing it.
Note: Your TomTom Bandit stores all sensor data in the video file.
The following two types of sensors are available for your TomTom Bandit:
Built-in sensors
For more information about built-in sensors, see Sensors in your camera.
External sensors
External sensors are external devices that you can link to your TomTom Bandit to provide extra
information about your activity.
You can attach an external heart rate monitor using a Bluetooth Smart (BLE) connection. This sensor
measures your heart rate during your sport or activity. The external TomTom Heart Rate Monitor is
available as an accessory.
Your TomTom Bandit connects to external sensors when recording starts. When recording stops the
sensor is disconnected.
Sensors in your TomTom Bandit
Your TomTom Bandit has built-in sensors that record the following metrics:
42
Page 43

The GPS location is also recorded.
The metrics data are stored with your videos, and can be seen as video highlights in the Mobile app
or Bandit Studio and added as an overlay to your video story.
You can also use external sensors, for example a heart-rate monitor, to enhance your action
metrics.
An optional external mono microphone can also be connected to your TomTom Bandit.
The heart rate monitor
To use the external TomTom Heart Rate Monitor with your TomTom Bandit, do the following:
1. Attach the monitor to the strap.
2. Attach the strap around your chest, so the monitor sits just above the base of your chest bone.
Make sure the monitor is the right way up so that the word 'TomTom' is the right way up for
someone standing in front of you.
Tip: Wet the sensors on the inside of the strap before placing it around your chest. This makes
it easier for the monitor to pick up your heartbeat.
3. From the Camera Status screen on your TomTom Bandit, move down to open the SETTINGS
screen.
4. Select GENERAL then select CONNECT.
5. Select SENSORS then move right.
6. Select HEART, then move right to turn it on.
7. When you begin an activity, your TomTom Bandit connects to the monitor and you see a heart
icon at the top of the screen.
The first time your TomTom Bandit tries to connect to your monitor, if it finds more than one
monitor, your TomTom Bandit doesn't know which monitor to connect to. Move to a place where
there are no other monitors within range of your TomTom Bandit.
When you have connected to your monitor once, your TomTom Bandit always reconnects to your
monitor.
43
Page 44

You can also use the external Heart Rate Monitor with other Bluetooth® Smart Ready devices and
apps. See the documentation that comes with your product or app for more information.
To change the CR2032 battery on the monitor, use a coin to open the back of the monitor. The
battery must be recycled or disposed of according to local laws and regulations.
Note: The TomTom Heart Rate Monitor is not waterproof.
44
Page 45

About recording videos
Recording videos
You can use your TomTom Bandit to record videos in the following modes:
VIDEO - Use this mode to record normal high-quality videos.
SLOW MO - This mode records slow-motion videos at high-quality.
TIMELAPSE - This mode creates videos from time-lapse recordings taken at set intervals.
CINEMATIC - Very high quality video mode for the video specialist.
You can select the mode using the control button on the TomTom Bandit, or you can use the Mobile
app.
Each video mode has its own range of settings.
Recording a video
You can start and stop a video recording either directly from the TomTom Bandit, or by using the
remote control, or from the Mobile app.
Tip: You can also manually add highlights to your video.
Note: If your TomTom Bandit is connected to the Mobile app, you can only use the app to change
TomTom Bandit settings.
Record a video using only the TomTom Bandit or the remote control
1. Press the START button on the TomTom Bandit or remote control.
The TomTom Bandit beeps and the red LEDs flash to show that recording has started.
The TomTom Bandit screen shows the recording time and the video mode.
Tip: Move right on the TomTom Bandit screen to see the time remaining that you can video.
The time remaining depends on the space available on the microSD card, and the video mode
you are using.
2. When videoing, press the START button to manually add highlights to your video.
3. Press the STOP button to stop the recording.
The TomTom Bandit beeps and the red LEDs stop flashing.
4. Edit and upload your videos using the Mobile app or Bandit Studio.
Record a video using the Mobile app
1. Connect the Mobile app to your TomTom Bandit.
2. Press the START button on the TomTom Bandit or the record button in the Mobile app.
The TomTom Bandit beeps and the red LEDs flash to show recording has started.
The TomTom Bandit screen shows the recoding time and the video mode.
3. When videoing, press the START button on the TomTom Bandit or the highlight button on the
app to manually add highlights to your video.
4. Press the STOP button on the TomTom Bandit or the record button in the Mobile app to stop the
recording.
The TomTom Bandit beeps and the red LEDs stop flashing.
5. Edit and upload your videos using the Mobile app.
45
Page 46

Video highlights
Speed.
G-force.
Maximum acceleration.
Maximum deceleration.
Maximum rotation.
Maximum vertical speed.
Heart rate from a heart rate monitor.
Manual highlight.
Highlights are added to your video while you are recording. A highlight marks an exciting part of
your action video, for example high speed, a jump or even a beautiful view that you might like to
view later and add to your video story. A video can contain many highlights.
The highlights let you easily playback your video, create your video story and share your video using
the Mobile app or Bandit Studio. Your highlights are shown separately from the video they are in.
Each single highlight marks a 6 second length of video.
The highlights are added to your video using inputs from built-in sensors, external sensors, or
manually, to highlight the most exciting parts of the action. The highlights from built-in and
external sensors are added automatically.
Tip: You can also add highlights to your video when you view it in the Mobile app or Bandit
Studio, and you can adjust the position and duration of a highlight.
The following highlights and their symbols are used:
Adding a manual highlight
You can add a highlight manually to your video when something exciting or memorable happens,
either before or after the event.
Manually highlight your video when something happens that automatic highlighting might not
detect, for example a beautiful view, the high point of a walk or being with your friends.
Tip: You can also add highlights to your video when you view it in the Mobile app or Bandit
Studio, and you can adjust the position and duration of a highlight.
46
Page 47

To manually add a highlight while recording a video, press the START button on the TomTom Bandit
or the remote control, or the highlight button on the Mobile app.
If you are using the TomTom Bandit without the Mobile app, when you have manually added a
highlight, the screen shows a star symbol and the message New highlight.
47
Page 48

About taking photos
Mode
Resolution
Capture rate
Field of view
NORMAL
16 MP
Single photo
Wide
BURST
16 MP
10 photos in 1 s
10 photos in 2 s
Wide
BURST
8 MP
10 photos in 1 s
10 photos in 2 s
Wide
Taking photos
You can use your TomTom Bandit to take photos in the following modes:
Normal - A single photo is taken.
Burst - A series of photos are taken in a very short time.
You can select the mode using the control button on the TomTom Bandit, or you can use the Mobile
app.
Each photo mode has its own range of settings.
Photo Mode Summary
Photos are saved in JPEG format.
Taking single photos
You can take a photo either directly from the TomTom Bandit, or by using the remote control, or
from the Mobile app.
To take single photos, select NORMAL mode, either directly on the TomTom Bandit or from the
Mobile app.
Note: If your TomTom Bandit is connected to the Mobile app, you can only use the app to change
TomTom Bandit settings.
Take a photo using only the TomTom Bandit or the remote control
1. Select NORMAL photo settings on the TomTom Bandit.
2. Press the START button on the TomTom Bandit or remote control.
The TomTom Bandit beeps and the red LEDs flash to show that a photo is being taken.
The TomTom Bandit beeps again when the photo is saved.
The TomTom Bandit screen shows the number of photos taken.
Tip: Move right on the TomTom Bandit screen to see the time remaining that you can video or
how many photos you can take. The time remaining depends on the space available on the
microSD card, and the photo mode you are using.
3. Edit and upload your photos using the Mobile app or Bandit Studio.
Take a photo using the Mobile app
1. Connect the Mobile app to your TomTom Bandit.
2. Select Single photo on the Mobile app.
3. Press the START button on the TomTom Bandit or the record button in the Mobile app.
48
Page 49

The TomTom Bandit beeps and the red LEDs flash to show that a photo is being taken.
The TomTom Bandit beeps again when the photo is saved.
4. Edit and upload your photos using the Mobile app.
Taking burst photos
You can take burst photos either directly from the TomTom Bandit, or by using the remote control,
or from the Mobile app.
To take burst photos, select BURST mode, either directly on the TomTom Bandit or from the Mobile
app.
Note: If your TomTom Bandit is connected to the Mobile app, you can only use the app to change
TomTom Bandit settings.
Take burst photos using only the TomTom Bandit or the remote control
1. Press the START button on the TomTom Bandit or remote control.
The TomTom Bandit beeps and the red LEDs flash to show that photos are being taken.
The TomTom Bandit beeps again when the photos are saved.
The TomTom Bandit screen shows the number of photos taken.
Tip: Move right on the TomTom Bandit screen to see the time remaining that you can video.
The time remaining depends on the space available on the microSD card, and the photo mode
you are using.
2. Edit and upload your photos using the Mobile app or Bandit Studio.
Take burst photos using the Mobile app
1. Connect the Mobile app to your TomTom Bandit.
2. Press the START button on the TomTom Bandit or the record button in the Mobile app.
The TomTom Bandit beeps and the red LEDs flash to show that photos are being taken.
The TomTom Bandit beeps again when the photos are saved.
3. Edit and upload your photos using the Mobile app.
49
Page 50

About settings
Settings
Note: You can also change settings using the Mobile App on your smartphone.
To change settings that you use frequently such as the TomTom Bandit mode, move left from the
Camera Status screen.
To access other settings that you may need to change less frequently, use the Settings menu. These
settings determine the overall behaviour of your TomTom Bandit, and are used to adjust the mode
settings for each photo and video mode.
From the Camera Status screen, move down to open the SETTINGS menu. The Settings menu has
the following items:
VIDEO or PHOTO - Use these settings to adjust the mode settings for the Photo or Video mode
you have selected.
GENERAL - These settings determine the overall behaviour of your camera
STATUS - This screen shows you the general status of your camera.
About Bluetooth
Your TomTom Bandit uses the Bluetooth 4.0 specification for Bluetooth Smart, which is also known
as Bluetooth Low Energy or BLE.
BLE is used for the following:
1. Connections to external sensors that support BLE.
2. Connection to the remote control.
3. Waking up the TomTom Bandit using the remote control.
4. Using your smartphone to switch the TomTom Bandit's Wi-Fi connection on when the TomTom
Bandit is not connected and is not easily accessible. (Apple iOS only.)
Note: On the TomTom Bandit, Bluetooth is always switched on.
About Wi-Fi
What is Wi-Fi used for?
Wi-Fi is used to connect your TomTom Bandit to your smartphone. The Mobile app uses the Wi-Fi
connection for the viewfinder, video and photo play back, creation of your video story, and for
sharing your media.
Switching Wi-Fi on
Tip: For iOS only. If your smartphone is Bluetooth Smart (BLE) capable, Wi-Fi is switched on and
off automatically by the Mobile app. Wi-Fi is also switched off when it isn't used for a while.
Follow these steps to connect your TomTom Bandit to your smartphone, and start the Mobile app:
1. Switch on your TomTom Bandit.
2. From the Camera Status screen, move up to turn on the TomTom Bandit's Wi-Fi connection.
The name of the Wi-Fi connection and the password are shown on the screen.
50
Page 51

3. On your smartphone, go to the phone's Wi-Fi settings screen then select the TomTom Bandit
Wi-Fi connection from the network list.
4. Enter the password shown on the TomTom Bandit screen.
Your phone connects to the TomTom Bandit. On the TomTom Bandit, the screen shows Con-
nected to device.
5. Start the Mobile app.
The Mobile app starts and shows the Viewfinder screen.
About QuickGPSFix
In the following situations, your TomTom Bandit uses QuickGPSFix to help find your position:
The TomTom Bandit hasn't been used for a long time.
The TomTom Bandit has been out of GPS coverage for more than one week.
The TomTom Bandit is restarted more than 500 km away from your previous position.
QuickGPSfix contains information about satellite positions which helps your TomTom Bandit find
your position faster.
Tip: QuickGPSFix information is updated automatically from the Mobile app.
General settings
These settings determine the overall behaviour of your TomTom Bandit.
Connect
Note: You can also change settings using the Mobile App on your smartphone.
From the Camera Status screen on your TomTom Bandit, move right then move down to open the
SETTINGS menu. Select GENERAL then select CONNECT.
Use these settings to connect your TomTom Bandit to your smartphone, a remote control or an
external sensor.
Phone - Settings - Camera
The Mobile app will not start until you have connected your smartphone to your TomTom Bandit
using Wi-Fi.
Tip: For iOS only. If your smartphone is Bluetooth Smart (BLE) capable, Wi-Fi is switched on and
off automatically by the Mobile app. Wi-Fi is also switched off when it isn't used for a while.
Follow these steps to connect your TomTom Bandit to your smartphone, and start the Mobile app:
1. Switch on your TomTom Bandit.
2. From the Camera Status screen, move up to turn on the TomTom Bandit's Wi-Fi connection.
The name of the Wi-Fi connection and the password are shown on the screen.
3. On your smartphone, go to the phone's Wi-Fi settings screen then select the TomTom Bandit
Wi-Fi connection from the network list.
4. Enter the password shown on the TomTom Bandit screen.
Your phone connects to the TomTom Bandit. On the TomTom Bandit, the screen shows Con-
nected to device.
5. Start the Mobile app.
The Mobile app starts and shows the Viewfinder screen.
51
Page 52

Remote
The remote control can be used to start and stop recording, and to manually add highlights to your
video. Use the remote control when you can't easily or safely reach your TomTom Bandit.
You can hold the remote control in your hand, or you can attach it to a place you can easily reach.
Note: The remote uses Bluetooth Smart to connect to your TomTom Bandit, and can only be used
with one TomTom Bandit at a time.
Connecting the remote control
1. From the Camera Status screen on your TomTom Bandit, move down to open the SETTINGS
menu.
2. Select GENERAL, then move right.
3. Select CONNECT, then move right.
4. Select REMOTE, then move right.
5. Move up or down to turn it on.
6. On the remote control, press the ON button for 3 seconds until the LED flashes green three
times.
The remote control is connected to the TomTom Bandit.
Tip: You can also use the Mobile app live viewfinder as a remote control.
Sensors
You can connect and then turn on and off an external sensor, for example a heart rate monitor.
You can check if a heart rate monitor or other sensor is working without having to start an activity.
See Testing a heart rate sensor lower down in this topic.
Connecting a sensor and switching it on
1. From the Camera Status screen on your TomTom Bandit, move down to open the SETTINGS
menu.
2. Select GENERAL, then move right.
3. Select CONNECT, then move right.
4. Select SENSORS, then move right.
5. Select HEART, then move right, followed by moving up or down to turn it ON.
Switching a sensor off
Follow the same steps as shown above but select OFF for step 5.
Testing a heart rate sensor
You can check if a heart rate monitor or sensor are working without having to start an activity. Do
the following:
1. From the Camera Status screen on your TomTom Bandit, move down to open the SETTINGS
menu.
2. Select GENERAL, then move right.
3. Select CONNECT, then move right.
52
Page 53

4. Select SENSORS, then move right.
5. Select HEART then move right.
You see ON, OFF or EXTERNAL. If the setting is set to ON or EXTERNAL you see bpm which
means that your heart rate is measured in beats per minute.
You then see either your heart rate shown immediately or dashes which blink to show that your
watch is searching for the heart rate sensor.
Tip: When the heart rate is detected, the monitor stays active for another 30 seconds in case
you want to start an activity straight away.
External Microphone
You can connect and then turn on and off the optional TomTom Bandit external microphone. The
external microphone will give better sound quality than the built-in microphone.
Connecting an external microphone
1. Follow the instructions that came with the external microphone to connect the microphone to
the TomTom Bandit.
2. From the Camera Status screen on your TomTom Bandit, move down to open the SETTINGS
menu.
3. Select GENERAL, then move right.
4. Select CONNECT, then move right.
5. Select EXT MIC, then move right, followed by moving up or down to turn it ON.
Switching an external microphone off
Follow the same steps as shown above but select OFF for step 5.
Camera
Note: You can also change settings using the Mobile App on your smartphone.
From the Camera Status screen on your TomTom Bandit, move down to open the SETTINGS menu.
Select GENERAL then select CAMERA.
Use these settings to select the general options for your TomTom Bandit, such as language and
units.
Language
Select LANGUAGE to set the language used for menus and messages on your TomTom Bandit.
Units
Select UNITS to set the units to KM (metric) or Miles (imperial).
Beep
Select BEEP to switch the buzzer sound on the TomTom Bandit ON or OFF.
When the TomTom Bandit is out of your sight, for example when mounted on your helmet, the
buzzer tells you when the TomTom Bandit has started and stopped recording, when the power is
switched on or off, and for notifications.
You may wish to turn the buzzer off if you need silence when recording, for example, when in a
landscape with wildlife.
Note: This setting does not control the audio recordings made while videoing.
53
Page 54

Light
Select LIGHT to switch the screen backlight ON or OFF.
Tip: Switch the backlight off to save battery power.
Reset
Select RESET to choose from two reset options:
RESET ALL resets your TomTom Bandit to the factory settings and restarts the TomTom Bandit.
Note: A reset does not delete your photos and videos stored on the microSD card.
RESET WIFI generates a new Wi-Fi name and password.
Storage
Using the STORAGE settings you can delete items from the microSD card and format the memory
card.
Deleting the last file
This selection deletes only the last file that was recorded and stored on the microSD card since the
TomTom Bandit was switched on. If no file was stored since the TomTom Bandit was last switched
on, then no file is deleted.
1. From the Camera Status screen on your TomTom Bandit, move down to open the SETTINGS
menu.
2. Select GENERAL then select STORAGE.
3. Select DELETE LAST.
Deleting all photos and videos
This selection deletes all the photos and videos you made with your TomTom Bandit from the
microSD card.
1. From the Camera Status screen on your TomTom Bandit, move down to open the SETTINGS
menu.
2. Select GENERAL then select STORAGE.
3. Select DELETE ALL.
Formatting the memory card
This selection formats your microSD card.
Important: Formatting a microSD card deletes all files stored on the memory card.
Note: When a microSD card is formatted by the TomTom Bandit, the volume name is chosen by
the TomTom Bandit, for example "TOMTOMCAM" and you cannot change the name.
1. From the Camera Status screen on your TomTom Bandit, move down to open the SETTINGS
menu.
2. Select GENERAL then select STORAGE.
3. Select FORMAT SD.
Flight Mode
When flight mode or airplane mode is switched on, an aeroplane icon is shown on the camera screen
and all Wi-Fi and Bluetooth connectivity is disabled.
Select flight MODE to switch flight/aeroplane mode on the TomTom Bandit ON or OFF.
54
Page 55

About
The About screen contains standards and legal information that is applicable to the TomTom
Bandit.
55
Page 56

Batt-Stick
56
Page 57

The Batt-Stick provides power for your TomTom Bandit and storage space for all your videos and
About the Batt-Stick
photos. When the Batt-Stick is inserted into the TomTom Bandit and locked, it forms a waterproof
seal.
The Batt-Stick contains TomTom Bandit battery and holds the microSD card. The USB connector is
used to charge the Batt-Stick and to transfer files to a computer. There is also an external
connector for an optional power cable.
Important: If you remove the Batt-Stick or lens cover be extra careful not to let dirt or water enter
the TomTom Bandit or the Batt-Stick. Only remove the Batt-Stick or lens cover in clean and dry
conditions.
Tip: Additional Batt-Sticks are available as accessories. Carry additional Batt-Sticks with you so
you always have enough power for your TomTom Bandit. Always keep the waterproof cover on a
Batt-Stick when the Batt-Stick isn't being used.
1. Batt-Stick lock.
2. TomTom Bandit connector.
3. microSD card slot.
4. USB 3.0 connector for charging and data transfer.
5. Connector with rubber cap for optional power cable and external audio cable.
6. TomTom Bandit ON, START and manual highlighting button.
7. Batt-Stick seal.
8. Battery power indicator.
57
Page 58

You must remove the Batt-Stick to insert a memory card or to use a different Batt-Stick. You can
Removing the Batt-Stick
also use its USB connector to charge the Batt-Stick and transfer files to a computer.
Important: If you remove the Batt-Stick or lens cover be extra careful not to let dirt or water enter
the TomTom Bandit or the Batt-Stick. Only remove the Batt-Stick or lens cover in clean and dry
conditions.
To remove the Batt-Stick, follow these steps:
1. Press the release lever of the Batt-Stick.
2. While holding the lever turn the cap anti-clockwise until you see two dots aligned.
58
Page 59

3. Pull the Batt-Stick out.
59
Page 60

Inserting the Batt-stick
Installing the Batt-Stick
Important: If you remove the Batt-Stick or lens cover be extra careful not to let dirt or water enter
the TomTom Bandit or the Batt-Stick. Only remove the Batt-Stick or lens cover in clean and dry
conditions.
To insert the Batt-Stick, follow these steps:
1. Insert the Batt-Stick into the camera.
2. Make sure the two dots align and are close together.
Important: If you see only one dot when the Batt-Stick is inserted do not try to turn it. You
must first put the Batt-Stick in the unlocked position before you can insert it correctly.
60
Page 61

3. Turn the cap clockwise to lock the Batt-Stick into the camera.
Unlocking the Batt-Stick
To put the Batt-Stick in the unlocked position follow these steps:
1. Hold the Batt-Stick and press the release lever while turning the cap anti-clockwise.
2. When you see a dot and arrow to the left of the release lever the Batt-Stick can be inserted as
described above.
61
Page 62

You can charge your TomTom Bandit in the following two ways:
Charging your TomTom Bandit
Charging the Batt-Stick using a USB socket
Important: If you remove the Batt-Stick or lens cover be extra careful not to let dirt or water enter
the TomTom Bandit or the Batt-Stick. Only remove the Batt-Stick or lens cover in clean and dry
conditions.
1. Remove the Batt-Stick from the TomTom Bandit.
2. Insert the Batt-Stick USB connector into your computer's USB socket or a standard USB
wall-charger.
Tip: While the Batt-Stick is charging, the LEDs show the charge level and one LED flashes.
3. To see the power level of the Batt-Stick, remove the USB connector from the USB charging
socket, then press the ON button.
The LEDs light up to show the power level.
4. When the Batt-Stick is charged, install the Batt-Stick into the TomTom Bandit.
Charging the TomTom Bandit using the optional power cable
1. Open the connector cap on the back of the Batt-Stick.
Tip: You don't have to remove the Batt-Stick from the TomTom Bandit.
2. Connect the power cable to the Batt-Stick connector and to a USB socket.
You can see the battery power level on the STATUS screen in the SETTINGS menu.
62
Page 63

The photos you take and the videos you record are stored on a microSD card that is located in the
Inserting a memory card
Batt-Stick. Use a microSD card that is a Class 10 standard or higher. Go to tomtom.com/support for
a list of approved compatible microSD cards.
Note: If you insert a microSD card that is too slow to work with your TomTom Bandit, the
TomTom Bandit shows you a message and you are asked to use a compatible microSD card.
Tip: MicroSD cards can degrade over time, and performance may decrease as the microSD card
fills up. To maintain performance, you should regularly format your microSD card.
Important: If you remove the Batt-Stick or lens cover be extra careful not to let dirt or water enter
the TomTom Bandit or the Batt-Stick. Only remove the Batt-Stick or lens cover in clean and dry
conditions.
1. Remove the Batt-Stick from the TomTom Bandit.
2. Insert the microSD card into the memory card slot in the Batt-Stick.
Important: The microSD card must be inserted with the contacts facing up.
3. Install the Batt-Stick into the TomTom Bandit.
63
Page 64

The photos you take and the videos you record are stored on a microSD card that is located in the
Transferring data from the Batt-Stick
Batt-Stick. The best way to view your videos, photos and highlights is by using the Mobile app and
Bandit Studio.
If you want to make space on your microSD card, you can move your videos and photos from your
Batt-Stick to your computer and view them later in Bandit Studio.
1. Remove the Batt-Stick from the TomTom Bandit.
2. Insert the Batt-Stick USB connector into a USB port on your computer.
3. On your computer, open a file manager program.
Your TomTom Bandit appears in your computer's file system as a Removable Disk.
4. Open the DCIM folder to find your videos and photos.
5. Move your files to your computer.
Tip: Don't forget to make a back-up of your files.
6. Install the Batt-Stick in the TomTom Bandit.
64
Page 65

Bandit Mobile App
65
Page 66

The TomTom Bandit Mobile app is the easy way to view your videos and photos, and to create your
About the TomTom Bandit Mobile app
video story within minutes of the action.
You can also use the Mobile app to change video and photo modes on your TomTom Bandit, to start
and stop recording, and to take photos.
You can use the Mobile app to login to a TomTom MySports account. This allows you to register your
TomTom Bandit and get software and QuickGPSFix updates.
Note: You cannot use the TomTom Bandit Mobile app until your TomTom Bandit is connected to
your smartphone using Wi-Fi.
You can download the TomTom Bandit Mobile app for free from your usual app store or by going to
tomtom.com/cam.
Supported operating systems
The TomTom Bandit Mobile app is available for Apple iOS7 and higher, and for Android 4.4 and
higher.
Important: Because of limitations in some operating systems, not all Mobile app features are
available on all operating systems.
66
Page 67

The Mobile app will not start until you have connected your smartphone to your TomTom Bandit
Connecting to the Mobile app
using Wi-Fi.
Tip: For iOS only. If your smartphone is Bluetooth Smart (BLE) capable, Wi-Fi is switched on and
off automatically by the Mobile app. Wi-Fi is also switched off when it isn't used for a while.
Follow these steps to connect your TomTom Bandit to your smartphone, and start the Mobile app:
1. Switch on your TomTom Bandit.
2. From the Camera Status screen, move up to turn on the TomTom Bandit's Wi-Fi connection.
The name of the Wi-Fi connection and the password are shown on the screen.
3. On your smartphone, go to the phone's Wi-Fi settings screen then select the TomTom Bandit
Wi-Fi connection from the network list.
4. Enter the password shown on the TomTom Bandit screen.
Your phone connects to the TomTom Bandit. On the TomTom Bandit, the screen shows Con-
nected to device.
5. Start the Mobile app.
The Mobile app starts and shows the Viewfinder screen.
67
Page 68

Login to TomTom MySports and register your TomTom Bandit to get software updates and
Log in to TomTom MySports
QuickGPSFix updates from TomTom.
You can login to TomTom MySports with an existing account, or you can create a new account.
1. Select Preferences in the menu.
2. Select Log in.
3. Enter your email address and password of your existing account, or create a new account.
4. Follow the on-screen instructions to register your TomTom Bandit and get updates.
68
Page 69

You can disconnect your TomTom Bandit from the Mobile app in the following ways:
Disconnecting from the Mobile app
On your TomTom Bandit move right to the DISCONNECT screen, then move left to YES.
On your Mobile, close the Mobile app.
The TomTom Bandit Wi-Fi connection is switched off. Your smartphone will revert to a Wi-Fi
connection available in your area.
Note: You cannot use the Mobile app when there is no Wi-Fi connection to your TomTom Bandit.
69
Page 70

The TomTom Bandit Mobile app shows the Viewfinder screen when the app starts.
What's on the screen
1. Menu button.
Select this button to open the menu. From the menu you can open the Library, create your
video story, and change Mobile app preferences.
2. Live Viewfinder.
The live viewfinder shows the live image from the TomTom Bandit. Use the image to help you
frame your video or photo when your TomTom Bandit is mounted out of sight or in a position
that's difficult to reach.
Tip: Turn your smartphone to landscape to view the viewfinder in full-screen mode. The video
and photo settings are not shown in full-screen mode.
3. Remote Control button.
Use this button to start and stop the TomTom Bandit.
4. Video highlighting button.
Use this button to manually add highlights to your action video. Your highlights let you easily
create your video story.
Tip: Automatic highlighting is always on.
5. Video and photo settings.
These settings let you change the video and photo modes and settings.
6. TomTom Bandit information.
The information shows you the battery level of the Batt-Stick, and the space on the memory
card.
70
Page 71

Each video mode has its own settings. You can change settings directly on the TomTom Bandit or by
Size
1080p at 30 fps
1080p at 60 fps
720p at 60 fps
720p at 120 fps
View
Wide
Normal
Size
1080p at 2x speed
720p at 4x speed
WVGA at 6x speed
View
Wide
Normal
Size
4k at 15 fps
2.7k at 30 fps
Size
4k at 15 fps
4k at 30 fps
1080p at 15 fps
1080p at 30 fps
Interval
1s, 5s, 10s, 15s, 30s, 60s
Video settings
using the Mobile App.
From the Camera Status screen, move down to the SETTINGS menu and select the mode settings for
your current video mode, for example VIDEO or SLOW MO. Move right, then select the settings you
want to change.
Video settings
Slo Motion settings
Cinematic settings
Timelapse settings
71
Page 72

Use the photo settings to select a photo mode. Once a mode has been chosen, you can then select
Size
16 MP
Size
8 MP
16 MP
Burst
Up to 10 photos in 1 s
Up to 10 photos in 2 s
Photo settings
settings for that photo mode. You can change settings directly on the TomTom Bandit or by using
the Mobile App.
From the Camera Status screen, move down to the SETTINGS menu and select PHOTO. Move right
to select a mode, for example BURST, then select the settings you want to change.
NORMAL settings
BURST settings
72
Page 73

Highlights are added to your video while you are recording. A highlight marks an exciting part of
Speed.
G-force.
Maximum acceleration.
Maximum deceleration.
Maximum rotation.
Maximum vertical speed.
Heart rate from a heart rate monitor.
Manual highlight.
Video highlights
your action video, for example high speed, a jump or even a beautiful view that you might like to
view later and add to your video story. A video can contain many highlights.
The highlights let you easily playback your video, create your video story and share your video using
the Mobile app or Bandit Studio. Your highlights are shown separately from the video they are in.
Each single highlight marks a 6 second length of video.
The highlights are added to your video using inputs from built-in sensors, external sensors, or
manually, to highlight the most exciting parts of the action. The highlights from built-in and
external sensors are added automatically.
Tip: You can also add highlights to your video when you view it in the Mobile app or Bandit
Studio, and you can adjust the position and duration of a highlight.
The following highlights and their symbols are used:
73
Page 74

My Library shows the videos, photos and highlights that are on your TomTom Bandit. You can view
The menu button.
Select this button to show the menu.
The filter button.
Select this button to show the filters you can use to find the videos,
photos or highlights you want.
Tip: You can also swipe left to show the filters.
Select video highlight button.
Select this button to select the video highlight for your story. Open the
Create a Story screen to see your selected video highlights.
Upload video, photo or highlight button.
Select this button to upload a video, photo or highlight from your TomTom
My Library
your complete videos or just see your video highlights.
Tip: The videos and photos remain on your TomTom Bandit until you delete them.
74
Page 75

Bandit to your phone.
Delete a video, photo or highlight button.
Swipe left on a video, photo or highlight to show the delete button. Select
the button to delete the video or photo from your TomTom Bandit.
Viewing a video or photo in My Library
1. Select Videos, Photos or Highlights from the menu.
2. Select a video, a photo or a highlight.
The selected video or highlight starts to play in the video player.
The selected photo is shown in the viewer.
Tip: Turn your smartphone to landscape to view the video or photo in full-screen mode.
Tip: If you are viewing a video, select a highlight to play the video from that highlight.
3. Swipe left or right to see the previous or next video, photo or highlight.
4. Swipe up to close the viewer.
Adding a highlight to a video
If some important moments in your video have not been highlighted, you can manually add
highlights to the video so those moments will also become part of your video story.
1. Select Videos from the menu.
2. Select the video you want to add a highlight to.
The video starts playing in the video player.
3. Turn your phone to landscape to view the video in full-screen mode.
4. When the video is at the moment that you want add a highlight, select the highlight button at
the top right-hand corner of the screen.
A highlight is added to your video. You can see the highlights as green dots in the video time-bar
at the bottom of the video player.
Tip: If you cannot see the video time-bar, tap the screen to show the bar.
Adjusting a highlight
Sometimes a highlight tag misses the most exciting part of your video. You can adjust the start and
finish points of the highlight, and its duration, as follows:
1. Select Highlights from the menu.
2. Select the highlight that you want to adjust.
The highlight starts playing in the video player.
3. Turn your phone to landscape to view the video in full-screen mode so it is easier to edit.
4. You can adjust the highlight using its time-bar in the following ways:
Slide the start dot to the point that you want your highlight to start.
Slide the end dot to the point that you want your highlight to end.
75
Page 76

Slide the highlight symbol to move the whole highlight towards the start or the end.
Your highlight is automatically saved.
Uploading your photos
If you just want to upload a complete video or a photo to you phone, follow this procedure:
1. Select Videos, Photos or Highlights from the menu.
2. Select a video, a photo or a highlight.
The selected video or highlight starts to play in the video player.
The selected photo is shown in the viewer.
Tip: Turn your smartphone to landscape to view the video or photo in full-screen mode.
3. Select the upload button to upload the video, photo or highlight to your phone's gallery.
Deleting a video, photo or a highlight
1. Select Videos, Photos or Highlights from the menu.
2. Swipe left on the video, photo or highlight that you want to delete.
3. Select the delete button.
4. Select Yes to delete your video, photo or highlight from your TomTom Bandit.
76
Page 77

You can create a video story from highlights in your TomTom Bandit videos. The highlights were
Creating a story using the mobile app
added automatically and manually when the video was recorded, but you can also add highlights to
a video using the Mobile app.
Using the Mobile app, you can create your story in different ways. The easiest and quickest is to just
shake to edit and let your smartphone do the work, but you can also create a video story yourself.
Settings for Create a Story
The Create a Story settings are used to set the duration of your video story, and to set the date
range of the videos used to create your story.
Select Create a story from the menu, then select the settings button.
Duration
Select the maximum duration of your video story that is created when you shake your phone.
Remember that a long video will have a large file size and will take a longer time to upload and
share.
Date range
Select the maximum date range from which video highlights are selected to create your video story.
Shaking your mobile to create a video
Note: You must have highlights in your videos to be able to create a video story.
77
Page 78

1. Select Create a story from the menu.
2. Shake your phone to create a video story.
The Mobile app creates a video story from your video highlights. The video plays in the video
player.
78
Page 79

Tip: Turn your phone to landscape to view the video in full-screen mode.
You can now edit and share your video story.
Manually selecting your video highlights
Note: You must have highlights in your videos to be able to create a video story.
1. Select Highlights from the menu.
2. Select a highlight.
The highlight plays in the viewer.
Tip: You can adjust the duration of the highlight and its start and end points.
79
Page 80

3. If you want to use the highlight in your video story, select the select video button.
4. Select more highlights to add to your video story.
5. Select Create a story from the menu.
Tip: You can also select the confirmation bar that appears when you select a highlight.
The Mobile app creates a video from your video highlights. The video plays in the video player.
Tip: Turn your phone to landscape to view the video in full-screen mode.
You can now edit and share your video story.
Editing your video story
After you have created your video story from your highlights, either by shaking or manually, you can
edit your video story.
1. To edit the order of the highlights used to create your video story, select and hold a highlight
moment from the highlight bar then move it left or right using the buttons that appear.
2. To delete a highlight moment from the highlight bar, select the highlight then select the delete
button.
3. To add a highlight, scroll to the end of your video story and select the + button to manually
select video highlights.
Your highlights are added to the end of your video story.
4. Select the sound button to switch off the sound from the selected highlight.
5. Select Add an overlay to add metrics to the selected highlight. (This feature is only available on
iOS devices.)
80
Page 81

6. Select Add a soundtrack to add a music track to your video story.
7. Select the Share button.
Your video story is created and saved in your phone's video gallery. From the gallery you can
upload your video story to your chosen website.
Uploading your video story
When you have created your video story select the Share button. Your video story is transferred to
your phone's video gallery. From the gallery you can upload your video story to your chosen website.
Tip: Save your video story locally on your phone, then upload it later when you have a Wi-Fi
connection to a network. Your video story will upload quicker and in a higher quality, and you
won't have mobile data charges.
81
Page 82

This screen shows information about your TomTom Bandit. You may be asked to go to this screen
Camera status
during a call to TomTom Customer Support.
82
Page 83

App Settings
Preferences
Highlight units
Select the units for the metrics that are shown with your highlights.
Data Settings
Choose to download camera updates and QuickGPSFix updates using only Wi-Fi, or using Wi-Fi and
your mobile data connection.
Important: Using mobile data to download updates will use your data connection and may cost you
money.
Help us improve
We will continually improve the TomTom Bandit mobile app and introduce new features. To help us,
you can share anonymous information about your app and how you use it.
About
This is an information screen rather than a setting and shows you information about the TomTom
Bandit and the Mobile app.
83
Page 84

Bandit Studio
84
Page 85

Bandit Studio is the easy way to view your videos and photos, and to create your video story, on
About Bandit Studio
your computer. You can import videos and photos directly from your Batt-Stick, or from a location
on your computer.
Note: You can only import video files that have been created on a TomTom Bandit.
You can use Bandit Studio to log in to a TomTom MySports account. This allows you to register your
TomTom Bandit and get software and QuickGPSFix updates.
You can download Bandit Studio for free by going to tomtom.com/cam.
Supported operating systems
Bandit Studio is available for Apple iOS X 10.7 and higher, and for Microsoft Windows 7 and higher.
85
Page 86

Log in to TomTom MySports and register your TomTom Bandit to get software updates and
Log in to TomTom MySports
QuickGPSFix updates from TomTom.
You can log in to TomTom MySports with an existing account, or you can create a new account.
1. Select the settings button.
2. Select Log In.
3. Enter your email address and password for your existing account, or create a new account.
4. Follow the on-screen instructions to register your TomTom Bandit.
86
Page 87

When you start Bandit Studio, you see your new files on your Batt-Stick, and your already imported
What's on the screen
files.
Bandit Studio has the following four screens:
Originals
Original files are the video and photo files that you have already imported from your memory card.
These files are stored in your personal videos folder on your computer.
Highlights
The highlights shown are the highlights in the video files that are shown in Originals. You can select
the highlights you want to use in your video story, and you can adjust the highlights.
My Story
My Story shows the highlights you have selected to create your video story. You can edit your video
story and add music and overlays. The Share feature lets you easily create and share your video
story.
Memory card
Memory card shows the video and photo files on your memory card. The memory card can either be
in a Batt-Stick or in a card reader. When Studio detects a TomTom Bandit memory card, the
memory card screen is shown automatically.
Your new files that are ready to import are shown, and the files that you have already imported to
Studio but did not yet delete from your memory card.
87
Page 88

The memory card screen shows the video and photo files on your memory card. The memory card
Working with the memory card
can either be in a Batt-Stick or in a card reader. When Studio detects a TomTom Bandit memory
card, the memory card screen is shown automatically.
Tip: You can disable the automatic start option in Studio Settings.
Double-click on a file to play it or view it in a larger screen. Select the full-screen button in the
lower right corner of the viewer to view the video or photo in full-screen mode.
Your new files that are ready to import are shown in your New Files list. The files that you have
already imported but did not yet delete from your memory card are shown in your Already
Imported list.
Select a file in your New Files list, then select Import to copy the files to your computer. The file
will be shown in the Originals screen.
Tip: You can select multiple files to import in one time.
If you select and import a file from your Already Imported list, you are asked if you want to import
it as a duplicate.
After your file is imported, you are asked if you want to delete the file from the memory card.
88
Page 89

If you have moved your videos and photos from your Batt-Stick to your computer, you can import
Importing videos and photos from your computer
them into Bandit Studio as follows:
1. Open Bandit Studio on your computer.
2. Select File then Import.
3. Find your TomTom Bandit .MP4 video files in your computer's file system.
Note: You can only import video files that have been created on a TomTom Bandit.
4. Select the video or photo file you want to import.
Tip: You can select multiple files.
5. Select Open.
Your files are imported into Bandit Studio and appear in the Originals screen.
89
Page 90

Original files are the video and photo files that you have already imported from your memory card
Working with Originals
or from your computer. These files are stored in your personal videos folder on your computer.
Double-click on a file to play it or view it in a larger screen. Select the full-screen button in the
lower right corner of the viewer to view the video or photo in full-screen mode. You can also add
highlights to your videos.
Right-clicking on a file shows the following options:
Delete - Deletes your file from the folder on your computer.
Show in Explorer - Opens the folder on your computer that contains the file.
Adding a highlight to a video
If some important moments in your video have not been highlighted, you can manually add
highlights to the video so those moments will also become part of your video story.
1. Double-click on a video to play it in a larger screen.
2. When the video is at the moment that you want add a highlight, select the highlight button at
the top right-hand corner of the screen.
A highlight is added to your video. You can see the highlights as green dots and markers in the
video time-bar at the bottom of the video player.
3. Select the back button to return to the Originals screen.
Your highlights are automatically saved in your video.
90
Page 91

Highlights are added to your video while you are recording. You use the highlights to create a video
Speed.
G-force.
Maximum acceleration.
Maximum deceleration.
Maximum rotation.
Maximum vertical speed.
Heart rate from a heart rate monitor.
Working with Highlights
story. The highlights from all your original videos files are shown. The symbol on the highlight shows
the type of highlight.
Double-click on a highlight to play it in a larger screen. Select the full-screen button in the lower
right corner of the viewer to view the highlight in full-screen mode.
You can adjust a highlight so it includes the most exciting part of the action.
Video highlights
Highlights are added to your video while you are recording. A highlight marks an exciting part of
your action video, for example high speed, a jump or even a beautiful view that you might like to
view later and add to your video story. A video can contain many highlights.
The highlights let you easily playback your video, create your video story and share your video using
the Mobile app or Bandit Studio. Your highlights are shown separately from the video they are in.
Each single highlight marks a 6 second length of video.
The highlights are added to your video using inputs from built-in sensors, external sensors, or
manually, to highlight the most exciting parts of the action. The highlights from built-in and
external sensors are added automatically.
Tip: You can also add highlights to your video when you view it in the Mobile app or Bandit
Studio, and you can adjust the position and duration of a highlight.
The following highlights and their symbols are used:
91
Page 92

Manual highlight.
Add the highlight to your video story.
Export the highlight as an MP4 file.
Delete the highlight.
Using or deleting a highlight
Click on a highlight to select it, then choose one of the following actions:
Tip: You can also right-click on a highlight to show these actions.
Adjusting a highlight
Sometimes an automatic highlight tag misses the most exciting part of your video. You can adjust
the start and finish points of the highlight, and its duration as follows:
1. Double-click on a highlight to play it in a larger screen
2. You can adjust the highlight using its time-bar in the following ways:
Slide the start dot to the point that you want your highlight to start.
Slide the end dot to the point that you want your highlight to end.
Slide the highlight symbol to move the whole highlight towards the start or the end.
3. Select the back button to return to the Highlights screen.
Your highlight changes are automatically saved.
92
Page 93

Your video story is created from your video highlights. You can either create your video story in two
Creating your video story
ways:
You can select highlights yourself using the Highlights screen.
You can use the I Feel Lucky button on the My Story screen to let Bandit Studio select your
highlights.
When your highlights are selected and added, your video is shown in the editing mode so you can
edit your video.
You can play your video by clicking the preview window. Select a highlight to play the video from
that point.
The delete button deletes your video story. The highlights are not deleted and can be found in the
Highlights screen.
93
Page 94

Editing your video story
Your video story is created from your video highlights. You can edit your video story before you
share it.
1. To edit the order of the highlights used to create your video story, click and drag a highlight
along the highlight bar to the place you want in your video story.
2. To delete a highlight from the highlight bar, select the highlight then select the delete button.
3. To add a highlight, scroll to the end of your video story and select the + button to manually
select video highlights.
Your highlights are added to the end of your video story.
4. Select the sound button to switch off the sound for the selected highlight.
5. Select the overlay button to add metrics to the selected highlight.
6. Select Select a soundtrack to add a music track to your video story.
7. Select the Share button.
Your video story is created and saved as an MP4 file on your computer. You can upload your
video to your chosen website.
94
Page 95

1. Select the settings button.
Updating Bandit Studio
If a Bandit Studio update is available the screen displays Update next to the Studio version
number.
2. Select Update.
The Bandit Studio update is downloaded to computer.
3. Follow the instructions on the screen to install the update.
95
Page 96

The settings page shows information about your TomTom Bandit and Bandit Studio. You can update
Studio Settings
both the camera software and Bandit studio from this page, and choose general settings.
Language
Select your preferred language. Restart Bandit Studio to see your chosen language.
Units
Select the units for the metrics that are shown with your highlights.
Privacy
We continually improve Bandit Studio and introduce new features. To help us, you can share
anonymous information about Studio and how you use it.
Auto Start
Bandit Studio starts when you either insert the Batt-Stick USB connector into a USB port on your
computer, or you insert the memory card from a Batt-Stick into a card-reader on your computer.
96
Page 97

Addendum and Copyright
97
Page 98

Product and Safety Information
Addendum
Before using your Bandit Action Camera, please carefully read all the safety precautions
below. Failure to adhere to the guidelines and instructions set out below, in the Quick Start
Guide and the Reference Guide could result in an accident or collision resulting in death or
serious injury and/or a reduction in the performance of your Bandit Action Camera.
Abide by all local laws and pay close attention to your surroundings before and during
shooting. Never operate or check your Bandit Action Camera when operating a bicycle, motorcycle, car, or any other motorised vehicle.
Never operate a vehicle while operating your Bandit Action Camera with a strap. The strap
may become stuck and it may cause a collision, falling, accident, injury or death.
If using your Bandit Action Camera with a helmet mount or strap (or any other accessory),
always select accessories that meet the applicable safety standard. Choose the right helmet
for your activity.
Pay close attention when mounting your Bandit Action Camera to prevent it from falling or
being damaged. Never mount your Bandit Action Camera in such a way that will obstruct
or impair the user’s view. Any major impact (for example, dropping or bumping) may damage your Bandit Action Camera.
Your Bandit Action Camera may get hot. The parts of your Bandit Action Camera could (in
rare cases) cause skin irritation. Do not use or store your Bandit Action Camera in hot place
such as an automobile, in a dusty, humid, or steamy place for an extended period of time.
Your Bandit Action Camera is waterproof. However, TomTom does not guarantee waterproof
ability in all conditions. Pay close attention when using your Bandit Action Camera in rain,
snow, or by a body of water. If any abnormality is found during use, turn your Bandit Action
Camera off immediately.
Do not use your Bandit Action Camera submerged in water or whilst carrying out activities
on the water without the waterproof lens cover. The waterproof lens cover will keep the
entire camera waterproof up to 40m (5 ATM) in static conditions.
The reliability of the camera when you use it under water depends on water pressure, depth
changes, water contamination, water saltiness, water temperature, and other environmental factors. Moving the camera vigorously under water at a depth of 40 m (5 ATM) is not advisable. If the camera is subjected to vigorous movement underwater, TomTom cannot
guarantee that the camera will still function to its full capacity.
Keep your Bandit Action Camera’s lens cover and Batt-Stick clean. Small debris can cause a
leak and/or damage your Bandit Action Camera.
After every use in water or near sand, mud or other foreign materials, rinse the outside of
the camera casing with non-salt water. After cleaning, dry the camera with a clean, dry and
lint free cloth. Not doing this can cause corrosion or camera failure.
Failure to follow these steps each time you use your Bandit Action Camera can result in
leaks that may damage or destroy your Bandit Action Camera. Water will damage both the
camera and the battery, which could cause an explosion or fire.
Scratches and cracks to the waterproof rubber will allow water to penetrate into your
Bandit Action Camera.
98
Page 99

Global Positioning System (GPS) and Global Navigation Satellite System (GLONASS)
The Global Positioning System (GPS) and Global Navigation Satellite System (GLONASS) systems are
satellite-based systems that provide location and timing information around the globe. GPS is
operated and controlled by the Government of the United States of America, which is solely
responsible for its availability and accuracy. GLONASS is operated and controlled by the Government
of Russia, which is solely responsible for its availability and accuracy. Changes in GPS or GLONASS
availability and accuracy, or in environmental conditions may impact the operation of this device.
TomTom disclaims any liability for the availability and accuracy of GPS or GLONASS.
How TomTom uses your information
Information regarding the use of personal information can be found at tomtom.com/privacy.
Battery and Environmental information
This product uses a lithium polymer battery that is not user accessible or user replaceable. Do not
open the case or (attempt to) remove the battery. Substances in the product and/or battery may be
harmful to the environment or your health if disposed of improperly. The battery contained in the
product must be recycled or disposed of properly according to the local laws and regulations and
always kept separate from household waste.
WEEE directive
The wheelie bin symbol on the product or its packaging indicates that this product shall not be
treated as household waste. In line with EU Directive 2012/19/EU for waste electrical and
electronic equipment (WEEE), this electrical product must not be disposed of as unsorted municipal
waste. Please dispose of this product by returning it to the point of sale or to your local municipal
collection point for recycling. By doing this you will help conserve the environment.
R&TTE directive
Hereby, TomTom declares that TomTom products and accessories are in compliance with the
essential requirements and other relevant provisions of the EU Directive 1999/5/EC. The declaration
of conformity can be found here: tomtom.com/legal.
Battery operating temperatures
Operating temperatures for camera battery: -20°C (-4°F) to 40°C (104°F). Do not expose to
temperatures beyond this.
99
Page 100

FCC information for the user
THE DEVICE COMPLIES WITH PART 15 OF THE FCC RULES
Federal Communications Commission (FCC) Statement
This equipment radiates radio frequency energy and if not used properly - that is, in strict
accordance with the instructions in this manual - may cause interference to radio communications
and television reception.
Operation is subject to the following two conditions: (1) this device may not cause harmful
interference and (2) this device must accept any interference, including interference that may
cause undesired operation of the device.
This device has been tested and found to comply with the limits for a Class B digital device,
pursuant to part 15 of the FCC rules. These limits are designed to provide reasonable protection
against harmful interference in a residential installation. This equipment generates, uses and can
radiate radio frequency energy and, if not installed and used in accordance with the instructions,
may cause harmful interference to radio communications. However, there is no guarantee that
interference will not occur in a particular installation. If this equipment does cause harmful
interference to radio or television reception, which can be determined by turning the equipment off
and on, the user is encouraged to try to correct the interference by one or more of the following
measures:
Reorient or relocate the receiving antenna.
Increase the separation between the equipment and receiver.
Connect the equipment into an outlet on a circuit different from that to which the receiver
is connected.
Consult the dealer or an experienced radio/TV technician for help.
Changes or modifications not expressly approved by the party responsible for compliance could void
the user's authority to operate the equipment.
This transmitter within this device must not be co-located or operating in conjunction with any
other antenna or transmitter.
FCC ID: S4L4LB00, S4L4LB01, S4L4LBA2
IC: 5767A-4LB00, 5767A-4LB01, 5767A-4LBA2
Radiation Exposure Statement for the CAMERA:
This device meets the government’s requirements for exposure to radio waves. This device is
designed and manufactured not to exceed the emission limits for exposure to radio frequency (RF)
energy set by the Federal Communications Commission of the U.S. Government.
The exposure standard for wireless device employs a unit of measurement known as the Specific
Absorption Rate, or SAR. The SAR limit set by the FCC is 1.6W/kg. *Tests for SAR are conducted
using standard operating positions accepted by the FCC with the device transmitting at its highest
certified power level in all tested frequency bands.
A minimum separation distance of 1.2 cm must be maintained between the user’s body and the
device, including the antenna during body-worn operation to comply with the RF exposure
requirements in Europe.
Responsible party in North America
TomTom, Inc., 24 New England Executive Park, Suite 410, Burlington, MA 01803
Tel: 866 486-6866 option 1 (1-866-4-TomTom)
100
 Loading...