

Page 1
LAR-82B
MANUEL D’UTILISATION
USER MANUAL
MANUAL DEL USARIO
HANDLEIDING
1
11
DIM
USB
LAR-82B
USB
21
33
Lire attentivement la notice avant d’utiliser l’appareil
Before operating this product, please read user manual completely
Lea atentamente el manual del usuario antes de utilizar el aparato
Lees de handleiding door voordat u deze eenheid gebruikt
Page 2

1
INTRODUCTION
Cher Client,
En choisissant cet appareil, vous avez fait le premier pas
vers le plaisir de l’écoute musicale. Maintenant, c’est le
moment de vous dévoiler comment optimiser les
fonctions de cet équipement.
Tout d’abord, il est important de savoir comment
écouter de la musique à un niveau sonore sans danger,
suffisamment fort et clair, non tonitruant et sans
distorsion – et surtout un son qui n’abîme pas l’ouïe.
Le son peut être trompeur. Au fil du temps, votre
"niveau de confort auditif" s'adapte à des volumes plus
élevés.
Ce qui parait être un «niveau sonore normal» peut
s’avérer être trop fort et nuisible.
Pour avoir un niveau de son sans danger :
Réglez la commande de volume à un niveau bas
Augmentez doucement le son jusqu’à l’entendre de
façon claire et confortable, sans distorsion.
SUR CE MANUEL
Ce produit est doté de nombreuses fonctions qui
facilitent son utilisation et assurent une bonne réception.
Cependant elles ne sont pas toutes évidentes.
Ce guide d’utilisation est conçu pour vous aider à profiter
pleinement du potentiel de ce produit.
Nous vous recommandons de vous familiariser avec les
fonctions et leur manipulation en lisant entièrement ce
manuel avant de commencer à utiliser l’appareil. Il est
particulièrement important de lire et respecter les
"précautions" indiquées sur la page suivante et dans les
autres paragraphes.
1. PRECAUTIONS
Lire attentivement ce guide de l’utilisateur
avant installation et utilisation.
AVERTISS EME NT:
POUR REDUIRE LE RISQUE DE CHOC ELECTRIQUE, NE PAS
ENLEVER LE COUVERCLE (OU L'ARRIERE). AUCUNE PIECE
N'EST NÉCESSAIRE À L’UTILISATEUR. CONTACTER UNE
PERSONNE QUALIFIEE POUR TOUTE REPARATION
1. Maintenez le volume au plus faible afin de rester
concentrer sur le trafic sur les conditions routières pour
une meilleure sécurité de conduite.
2. Ne pas ouvrir le couvercle et ne pas toucher les
composants exposés à l’extérieur de l’appareil, seuls des
techniciens qualifiés peuvent le faire.
3. Ne pas exposer l’appareil à la lumière directe du soleil
ou près d’objets qui dégagent de la chaleur pour éviter
d’endommager l’appareil.
4. Si votre voiture a été exposée au soleil pendant un
certain temps, veuillez baisser la température de
l'intérieur du véhicule avant de faire fonctionner
l’appareil.
5. Si la batterie est débranchée, déchargée ou changé la
mémoire sera effacée et doit être reprogrammée.
L’appareil doit être installé en position horizontale pour
de meilleure performance d’utilisation.
6. Ne pas placer l’appareil dans un endroit humide qui
pourrait affecter le capteur de l’appareil.
7. L'appareil ne doit pas être exposé à des gouttes ou des
éclaboussures.
8. Nettoyer le panneau et le boîtier à l'aide d'un chiffon
doux et sec uniquement, n’appliquer aucun type de
solvant, d’alcool et de vaporisateurs.
IMPORTATEUR EXCLUSIF
Ce produit a été importé par la société LEMA SAS
La soussignée, société LEMA SAS, déclare que l'équipement radioélectrique du type AUTORADIO LAR-82B est conforme
à la directive 2014/53/UE.
Le texte complet de la déclaration UE de conformité est disponible sur demande à l'adresse internet suivante:
www.tokai.fr (rubrique contacts)
Pour toute question, merci d’envoyer votre demande à :
LEMA S.A.S.
28, Boulevard Zéphirin Camélinat
92230 GENNEVILLIERS FRANCE
Page 3
2
Attention ! Ce logo apposé sur le produit indique qu’il s’agit d’un appareil dont le
traitement en tant que déchet rentre dans le cadre de la directive 2002/96/CE du 27
janvier 2003, relative aux déchets d’équipements électriques et électroniques (DEEE).
Ce symbole signifie que les produits électriques et électroniques usagées ne doivent pas
être mélangés avec les déchets ménagers généraux. Un système de collecte séparé est
prévu pour ces produits.
Si vous souhaitez mettre cet appareil au rebut, ne le jetez pas dans une poubelle
ordinaire !
La présence de substances dangereuses dans les équipements électriques et électroniques peut avoir des
effets potentiels sur l’environnement et la santé humaine dans le cycle de retraitement de ce produit.
Ainsi, lors de la fin de vie de cet appareil, celui-ci ne doit pas être jeté avec les déchets municipaux non triés.
Les appareils électriques et électroniques doivent être traités séparément et conformément aux lois en
vigueur en matière de traitement, de récupération et de recyclage adéquats de ces appareils.
Des systèmes de reprise et de collecte sont mis à votre disposition par les collectivités locales (déchetteries)
et les distributeurs. Veuillez contacter votre administration locale pour plus de renseignements. Vous avez
l’obligation d’utiliser les systèmes de collecte sélectivemise àvotre disposition.
Si votre appareil électrique et électronique usagé comporte des piles ou des accumulateurs, veuillez les
mettre séparément et préalablement au rebut conformément à la législation locale en vigueur.
En veillant à la mise au rebut correcte de ce produit, vous contribuerez à assurer le traitement, la
récupération et le recyclage nécessaires de ces déchets, et préviendrez ainsi les effets néfastes potentiels de
leur mauvaise gestion sur l’environnement et la santéhumaine.
Page 4

3
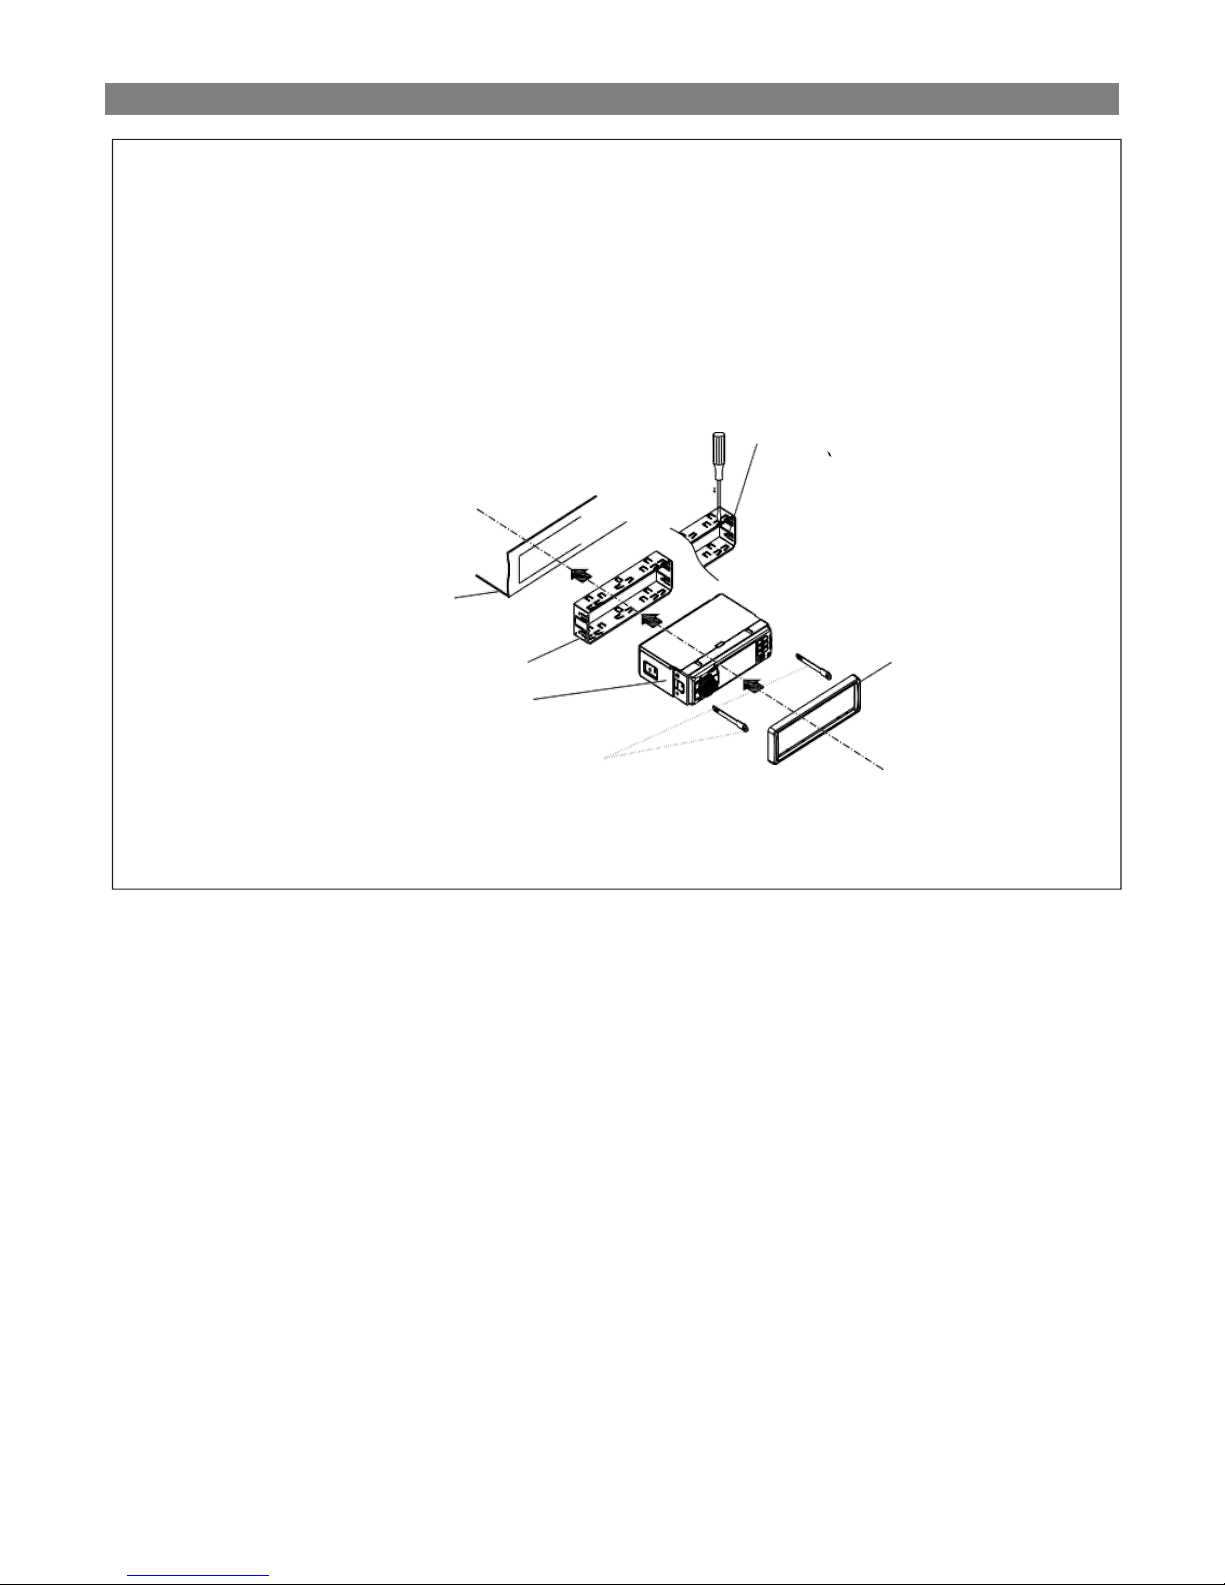
2. INSTALLATION DE L’APPAREIL
Il s'agit d'une méthode d'installation à système anti-vol. L'appareil est équipé d’un châssis de montage
métallique.
Veuillez effectuer les connexions telles que l'alimentation, les haut-parleurs et l'antenne conformément aux
exigences du manuel d'instructions, puis installer le châssis métallique de montage dans la voiture selon le
schéma illustré ci-dessous.
Plier les pattes dans la gaine
de montage contre le tableau de
bord avec un tournevis
TABLEAU DE BORD
CHASSIS DE MONTAGE
APPAREIL PRINCIPAL
CADRE DE FINITION
Pour retirer l’unité principale du châssis de montage, insérez
les clés d’extraction gauche et droite de l’appareil. Ensuite
tirez le châssis hors de la gaine de montage comme illustré
sur le schéma.
Page 5

4
3. DESCRIPTION DE L’ARRIERE DE L’APPAREIL
ROUGE SORTIE RCA SORTIE RCA BLANC
PRISE HAUT PARLEUR AVANT DROITE PRISE HAUT PARLEUR AVANT GAUCHE
BLEU
ANTENNE ELECTRIQUE
PRISE ANTE NNE CONNECTEUR ISO
CONNECTEUR ISO FIXE
CONNECTEUR A
CONNECTEUR B
1.
1. HAUT PARLEUR ARRIERE DROITE (+)
2.
2. HAUT PARLEUR ARRIERE DROITE (-)
3.
3. HAUT PARLEUR AVANT DROITE (+)
4. Mémoire +12V
4. HAUT PARLEUR AVANT DROITE (-)
5.
5. HAUT PARLEUR AVANT GAUCHE (+)
6.
6. HAUT PARLEUR AVANT GAUCHE (-)
7. 12V ‘ACC)
7. HAUT PARLEUR ARRIERE GAUCHE (+
8. Masse
8. HAUT PARLEUR ARRIERE GAUCHE
(-)
Page 6
5
18
4
5 6
8
9 10
3
1
2
D
IM
11
12
14
USB
LAR-82B
19
7
13 16 15
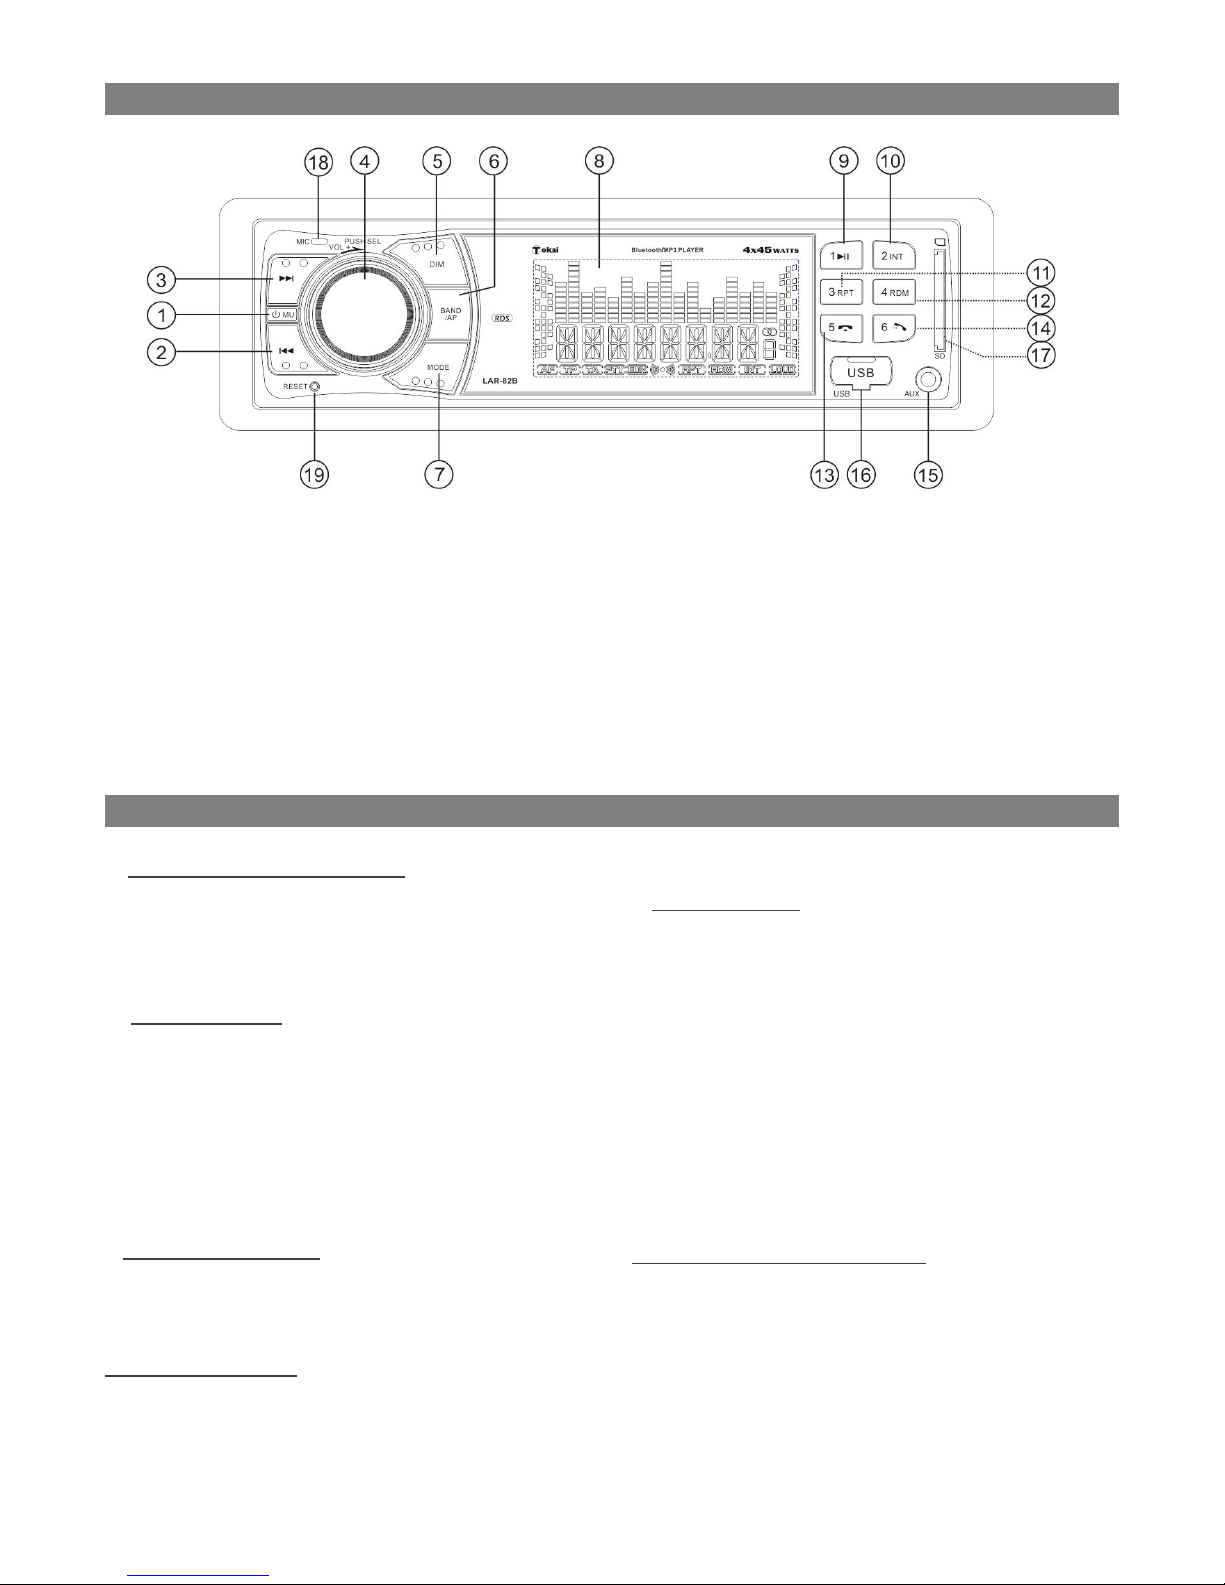
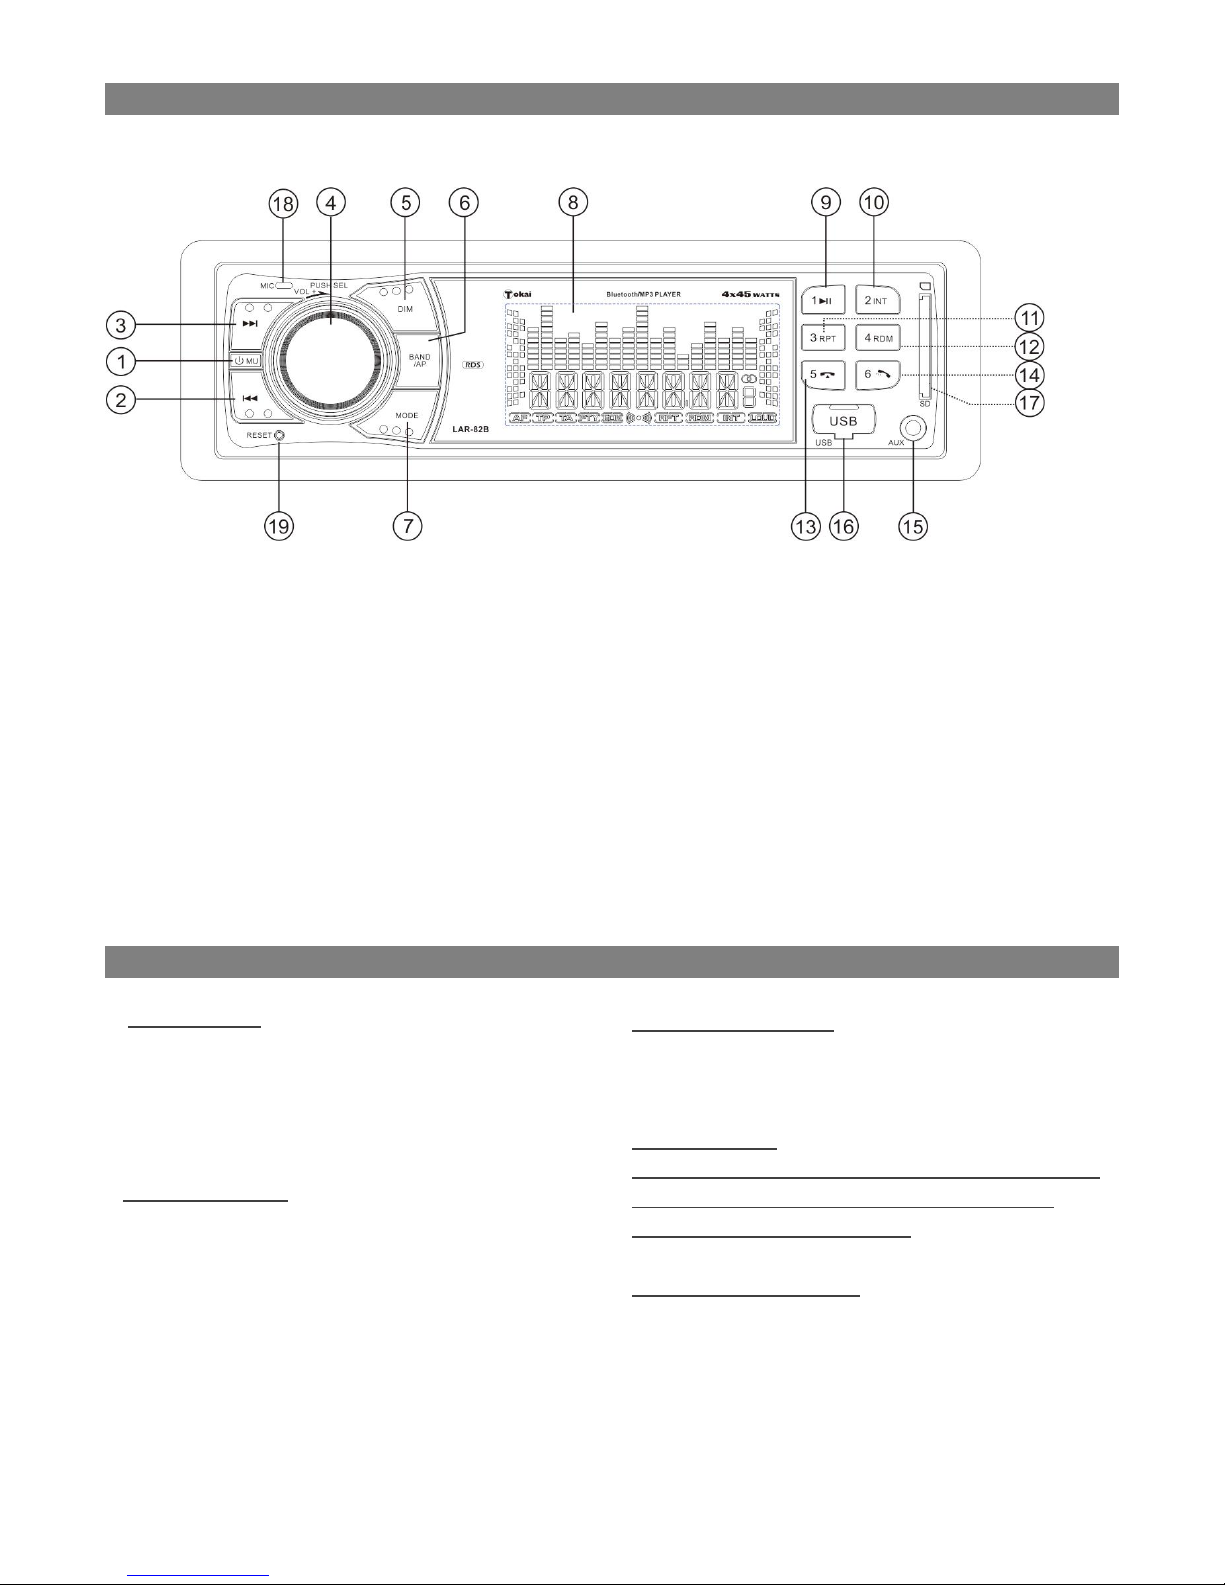
4. DESCRIPTION DE L’APPAREIL
1.Touche POWER /MODE
2. Touche
|<<
3.Touche
>>|
4. Touche SELECTION & VOLUME
5. Touche DIM
6. Touche BAND/AP
7. Touche MODE
8. Ecran LCD
9. Touche
1/>||
10. Touche
2/INT
11. Touche 3/REPETITION
12. Touche 4/LECTURE ALEATOIRE
13. Touche 5/-10/RACCROCHER
14. Touche 6/+10/APPEL
15. Prise auxiliaire
16. Port USB
17. Entrée Carte Mémoire
18. Micro BLUETOOTH
19. Touche RESET
5. FONCTIONS DES COMMANDES
1. Allumer et éteindre l’appareil
Lorsque l’appareil est éteint, il peut être mis en marche
en appuyant sur n’importe quel bouton. Lorsque
l’appareil est allumé, appuyez et maintenez le bouton
POWER plus d’une seconde pour l’éteindre.
2. Sélection MODE
Appuyez sur le bouton MODE pour sélectionner le mode
source souhaité comme suit :
--> RADIO --> USB (après insertion d’une clé USB) -->
SD/MMC (après insertion de la carte SD) --> AUX --> BT.
Quand il n’y a pas de support multimédia el une clé USB
ou une carte SD, ces modes sont ignorés.
3. Réglage du VOLUME
Tournez le bouton VOLUME pour régler le niveau du
volume pendant la lecture.
4. Fonction SOURDINE
Appuyez sur la touche MUTE pour couper le son. Appuyez
une seconde fois pour rétablir le son immédiatement.
Vous pouvez également tourner le bouton VOLUME.
5. Réglages sonores
Appuyez brièvement sur SEL et à plusieurs reprises pour
sélectionner le mode sonore, BASS (Basses), TRE (Treble
Aigus), BAL (Balance) et FAD (Fader Equilible
avant/arrière), LOUD ON/LOUD OFF (Loudness), EQ OFF
(CLASSIC, POP, ROCK), DX LOCAL, STEREO/MONO, TA
ON/OFF (informations routières), AF ON/OFF (Fréquences
alternatives), AREA EUROPE/USA.
Pour chaque mode, le temps d’attente est de 2 secondes
environ, et lorsque le temps d’attente est passé,
l’affichage repasse au mode précédent.
6.Affichage et réglage de l’horloge
1) Maintenez le bouton SEL appuyé pour afficher l’heure
sur l’écran
2) Puis maintenez appuyer le bouton SEL jusqu’à ce que
l’heure clignote sur l’écran. Tournez le bouton VOLUME
pour régler les heures, puis appuyez brièvement sur le
bouton SEL pour régler les minutes comme
précédemment et enfin maintenez le bouton SEL appuyé
Page 7

6
pour confirmer le réglage.
7. Réglage de la luminosité de l’écran
Appuyez sur la touche DIM pour régler la luminosité de
l’écran, plus ou moins claire
8. Réinitialisation de l’appareil
Avant la première utilisation, après remplacement de la
batterie du véhicule ou après changement des
branchements, l’appareil doit être réinitialisé. Appuyer
sur le bouton RESET avec un objet pointu. Cette
opération efface le réglage de l’horloge et de certaines
données enregistrées.
6. FONCTIONNEMENT DE LA RADIO
1.Sélection de la bande de fréquence
Appuyez brièvement et à plusieurs reprises sur le bouton BAND pour sélectionner la bande radio comme suit:
FM1 -> FM2 -> FM3 -> MW1 -> MW2.
2. Recherche de stations radio manuelle ou automatique
Appuyez brièvement sur la touche
|<<ou>>|
pour chercher automatiquement une station radio à fort signal.
Appuyez pendant 1 seconde sur la touche
|<<ou>>|
pour activer la recherche manuelle, puis appuyez brièvement sur
ces touches pour chercher la station souhaitée.
L’appareil repasse en mode AUTO si aucune opération n’a été effectuée dans les 3 secondes en mode recherche
manuelle.
3. Mémorisation de stations ou rappel des stations présélectionnées
Appuyez plus d’une seconde sur une touche numérique de 1 à 6 buttons pour mémoriser la station radio dans la
bande de fréquence cours. Appuyez brièvement sur l’une des touches numériques de 1-6 pour rappeler les stations
programmées. L’appareil peut stocker jusqu’à 30 stations de radio.
4. Recherche automatique des stations
Appuyez longuement sur le bouton BND pour activer la fonction de stockage automatique. L'appareil scanne la
bande et présélectionne les stations avec le plus fort signal.
Lorsque l'opération de stockage automatique est terminée, la radio exécute le Balayage des stations préréglées.
5. Touche AF (FREQUENCES ALTERNATIVES)
Appuyez pendant plus de 2 secondes sur le bouton SEL pour atteindre le mode AF ON/OFF.
Lorsque vous activez cette fonction, AF s’affiche à l’écran.
Les indicateurs de la fonction AF sont les suivants :
Lorsque l’indicateur est éteint : le Mode AF est désactivé.
Lorsque l’indicateur AF s’affiche : le Mode AF est activé et les Info RDS sont reçues.
Lorsque l’indicateur AF clignote: vous commutez en Mode AF et les informations RDS ne sont pas encore reçues.
Quand le mode AF est activé, la radio vérifie la force des signaux AF en permanence. L’intervalle de temps entre
chaque vérification des fréquences alternatives dépend de la force du signal de la station en cours, cela varie de
quelques minutes pour une station dont la réception est bonne à quelques secondes pour une station dont la
réception est faible. Chaque fois qu’une nouvelle AF est trouvée le système bascule sur cette
fréquence pour un lapse de temps très court, et la NOUVELLE FREQUENCE apparaît pendant 1 à 2 secondes. Ce lapse
de temps est quasiment inaudible dans le cas d’un programme normal.
En mode FM, quand la fonction AF est activée, la recherche automatique (SEEK), le balayage (SCAN), et la mémorisation
(AUTO MEMORY) ne fonctionnent qu’avec des programmes RDS uniquement.
6. Fonction TA (Informations Routières)
Page 8

7
Lorsque la fonction TA est activée (TA s’affiche à l'écran), le système recherche une station radio qui retransmet les
infos routières TA SEEK s'affiche sur l'écran LCD pendant un moment.
Quand des informations routières sont transmises:
1) Si l'appareil est en mode USB ou SD, il passe temporairement en mode RADIO.
2) Si le volume est inférieur à 20, le volume passe automatiquement au niveau 20, et revient à son mode et le niveau de
volume précédent lorsque le bulletin d'informations routières est terminé.
Si le volume est ajusté lors de l'annonce de la circulation, seul le volume des informations routières est valide.
7. MODE USB
1. Lecture USB / Carte SD/MMC
Pour lire un périphérique USB, insérez la clé USB dans le port compatible USB. Le système se met en mode USB
automatiquement et la lecture du premier fichier démarre.
Pour lire une carte SD/MMC, insérez la carte SD/MMC dans la fente compatible pour carte mémoire. Le système se
met automatiquement en mode CARTE MEMOIRE et la lecture du premier fichier démarre.
Note: Lorsqu’une carte SD/MMC et un périphérique USB sont connectés à l’appareil en même temps, la priorité est
donnée au dernier périphérique inséré.
2. Recherche pistes Avant/Arrière & Recherche rapide Avant/Arrière
Appuyez sur la touche
|<<ou>>|
pour mettre en lecture la plage précédente ou suivante.
Appuyez longuement sur la touche
|<<ou>>|
pour effectuer le retour rapide ou l’avance rapide sur la piste en cours
de lecture.
3. Avancer de 10 pistes Avant/Arrière- Sélectionner un dossier Avant/Arrière
Appuyez sur les touches 5/-10 ou 6/+10 pour avancer de 10 pistes vers l’avant ou vers l’arrière.
Appuyez et maintenez les touches 5/-10 ou 6/+10 pour sélectionner et mettre en lecture le dossier suivant ou
précédent.
4. Touche
1/>||
Pendant la lecture, appuyez sur la touche
1/>||
pour suspendre la lecture. En mode pause, appuyez sur le bouton
1/>||
pour redémarrer la lecture. Appuyez longuement sur cette touche pour revenir à la lecture de la 1ère piste du dossier
en cours de lecture.
5. Fonction SCAN
Pendant la lecture, appuyez sur le bouton INT brièvement pour lire les 10 premières secondes de chaque piste,
appuyez sur le bouton INT pour annuler la fonction INT et de conserver la lecture de la piste sélectionnée.
6. Fonction REPETITION
Pendant la lecture, appuyez sur le bouton RPT brièvement pour répéter la piste en cours de lecture, et l'écran LCD
affiche RPT ONE.
Appuyez sur le bouton RPT deux fois pour lire les pistes dans l'album plusieurs fois, et l'écran LCD affiche RPT DIR.
Appuyez trois fois pour répéter toutes les pistes, et l'écran LCD affiche RPT ALL.
7. Fonction lecture aléatoire
Pendant la lecture, appuyez brièvement sur la touche RDM pour lire toutes les pistes dans un ordre aléatoire.
Appuyez de nouveau pour annuler la fonction lecture aléatoire.
8. Recherche pistes
Appuyez sur la touche AP pour activer le mode de recherche PISTE, l'écran LCD affiche TRK***. Le nombre de 0
Page 9

8
dépend du nombre de pistes contenues dans le périphérique. (Exemple : si le nombre de plages est inférieur à 100 et
supérieur à 9, TRK 00 s’affichera).
Ensuite, tournez le bouton VOL pour sélectionner le numéro du chiffre qui clignote entre 0 à 9. Ensuite, appuyez sur
le bouton SEL pour confirmer et le 2ème chiffre se met à clignoter. Suivez les instructions ci-dessus afin de
sélectionner le numéro du 2ème chiffre. Une fois la sélection terminée, appuyez sur le bouton SEL pour confirmer et
mettre en lecture la piste sélectionnée.
8. MODE BLUETOOTH
Avant d'utiliser la fonction Bluetooth, votre LAR-82B doit d'abord être couplé avec votre périphérique Bluetooth.
«Apparier» signifie établir la connexion entre deux appareils Bluetooth tel qu'un téléphone mobile, tablettes, PC
etc.... Votre appareil Bluetooth conservera l'identification unique de votre LAR-82B dans son système.
Appuyez sur la touche MODE de l’appareil pour entrer en mode BLUETOOTH.
1. Appariement
Activez la fonction BLUETOOTH de votre téléphone mobile. Entrez en mode recherche d’appareils Bluetooth. Une fois
la recherche effectuée, votre téléphone mobile affichera les appareils Bluetooth trouvés. Sélectionnez votre
autoradio. L’écran affichera CONNECT, puis BT ON et PHONE.
(mot de passe suivant : 0000, si nécessaire)
2. Connexion et déconnexion
Utilisez votre téléphone mobile pour vous connectez ou vous déconnectez
Dans le statut de connexion, trouvez l'appareil Bluetooth couplé et connecté, puis appuyez sur le bouton de
déconnexion de faire la déconnexion.
Dans le statut de déconnexion, trouver l'appareil Bluetooth apparié et déconnecté, puis appuyez sur le bouton de
connexion afin rétablir la connexion.
Lorsque vous mettez l’appareil en marche, l’autoradio recherche le dernier téléphone mobile apparié et connecté.
Note : PHONE apparaît sur l’écran LCD en statut connecté.
En statut connecté: les fichiers audio contenus dans votre téléphone mobile sont transférés sur votre AUTORADIO
BLUETOOTH ainsi que les appels que vous passez et les appels que vous recevez.
3. Passer un appel en statut connecté
Pour passer un appel, appuyez sur la touche TEL et composer un numéro téléphone directement à partir de votre
téléphone portable.
4. Prendre, rejeter ou terminer un appel.
1. Lorsque le téléphone sonne, appuyez brièvement sur la touche TEL pour prendre l’appel.
2. Lorsque le téléphone sonne, appuyez brièvement sur la touche HANG UP pour rejeter l’appel.
3. Lorsque vous parlez au téléphone, appuyez brièvement sur la touche HANG UP pour finir un appel.
5. Réglage du volume pendant l’appel
Tout en parlant, utilisez la commande de volume pour régler le niveau volume, mais ce niveau de volume ne sera pas
sauvegardé.
6. Composer ou recevoir un appel lorsque l'appareil est en mode veille
Si l'autoradio est en mode veille ou hors tension et que vous passez ou recevez un appel, l'autoradio se mettra en
marche automatiquement. Une fois l'appel terminé, la radio repasse en mode veille.
Page 10
9
7. Mode A2DP
Une fois votre téléphone mobile et votre autoradio Bluetooth appariés, si votre téléphone mobile peut mettre en
lecture des fichiers audio et vidéo et a la fonction A2DP (Advanced Audio Distribution Profile) il peut ainsi diffuser les
données audio et vidéo de votre téléphone portable sur votre autoradio (pour certains portables, vous devrez
préalablement vous reconnectez à l’autoradio).
En mode A2DP, si votre téléphone portable est compatible AVRCP (The Audio/Video Remote Control Profile), les
fonctions , , PLAY/PAUSE, MUTE (SOURDINE), ont les mêmes fonctionnalités qu’en mode MEDIA (Les touches retour
rapide et avance rapide ne sont pas disponibles).
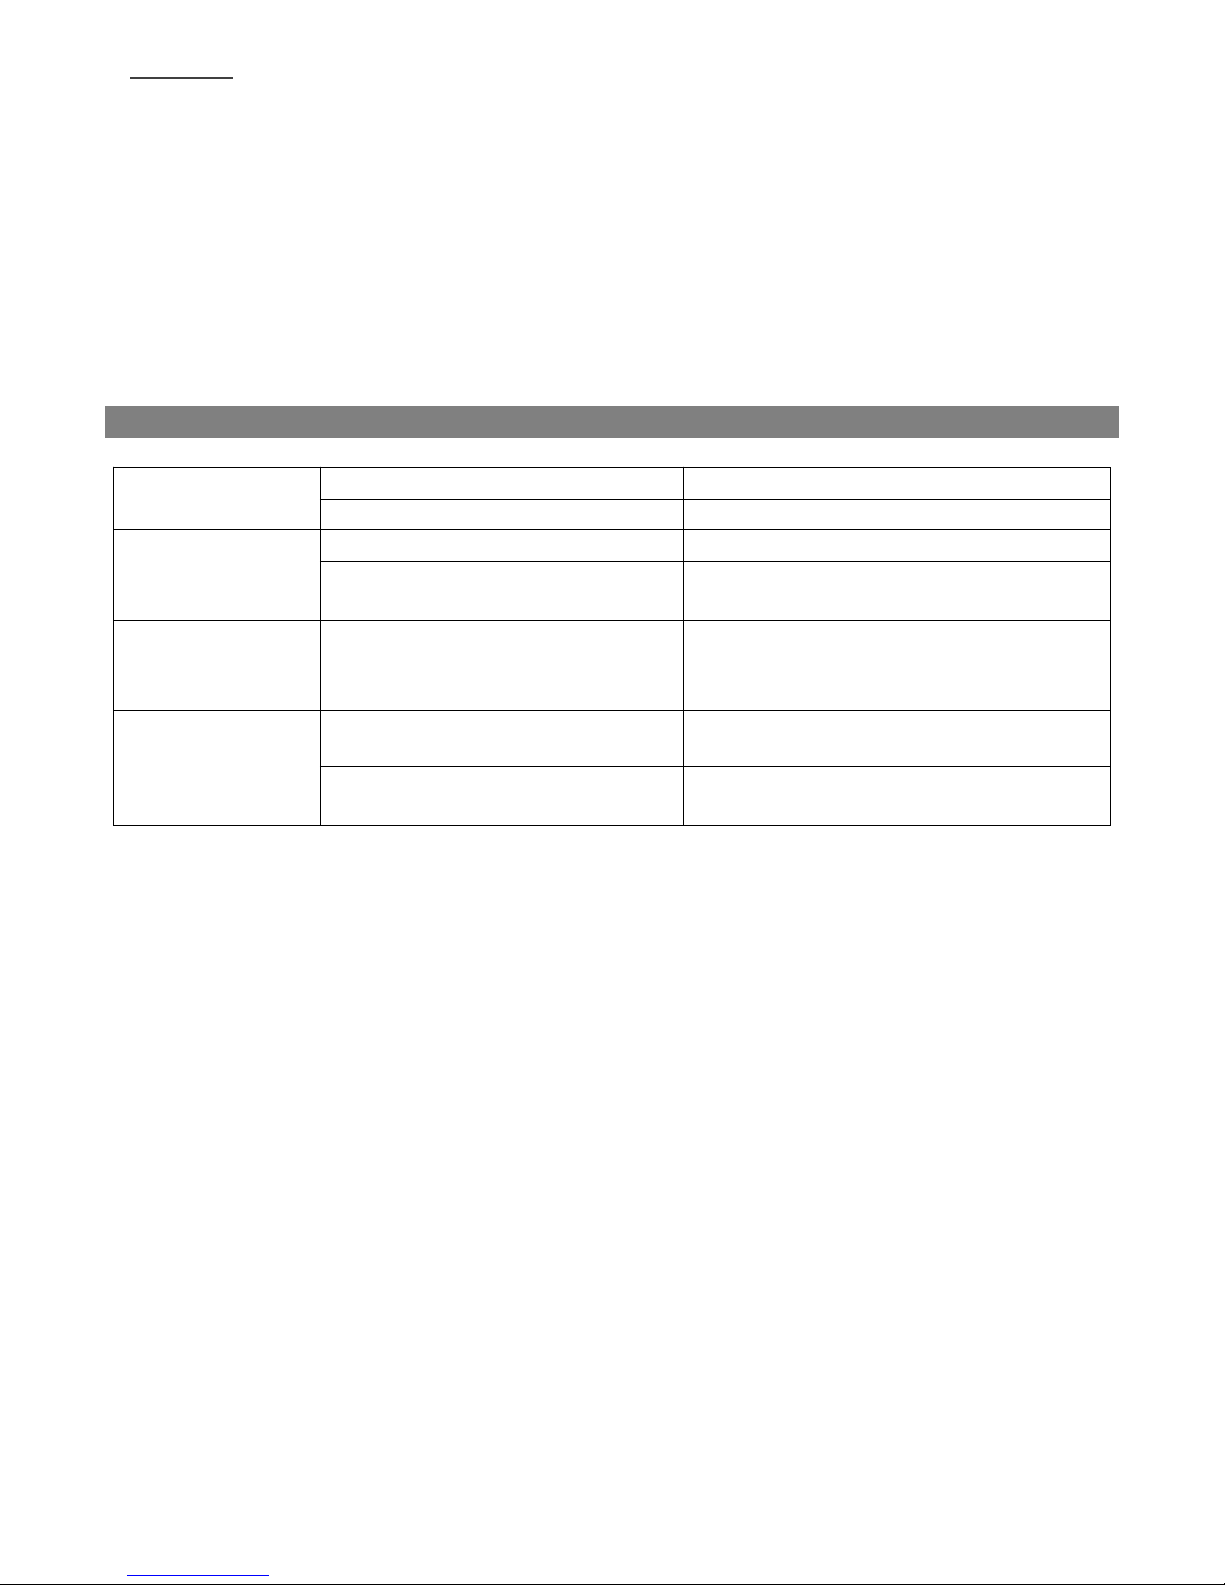
9. GUIDE DE DEPANNAGE
Pas d’alimentation
Le contact de la voiture n’est pas mis.
Mettez le contact.
Le fusible a grillé.
Changer le fusible.
Pas de son
Le volume est au minimum.
Régler le niveau du volume.
Le branchement n’est pas correctement
effectué.
Vérifier le branchement.
La radio ne fonctionne
pas
Le câble antenne est mal branché
Les signaux sont trop faibles
Vérifier le branchement du câble
Réglez une station de radio avec un signal plus fort.
LECTURE USB/SD
IMPOSSIBLE
Vous avez mal connecté votre périphérique
Insérez une nouvelle fois votre périphérique
Votre périphérique SD, USB ou les fichiers
sont endommagés
Essayer avec une autre carte SD / ou clé USB
contenant des fichiers MP3
Page 11

10
10. SPECIFICATIONS TECHNIQUES
GENERAL
Alimentation électrique Masse de polarité négative DC 12V.
Consommation Max.10A
Sortie de puissance 4X 45Watts (mesurée à DC 14.4V)
Nombre de canaux 2 canaux STEREO.
Dimensions 178[L] X 120 [P] X 50[H]mm.
SECTION FM
Portée de fréquence 87.5MHz - 108MHz
Sensibilité effective 3uV.
Fréquence I.F 10.7MHz.
SECTION AM
Portée de fréquence 522KHz - 1620KHz
Sensibilité effective 40dB.
Signal bruit 40dB
SORTIE DE LIGNE RCA
Sortie 1000mV @ MAX.
LECTURE DE MMC/SD ou USB
Système Système audioMP3
Caractéristiques de fréquence 20Hz -100Hz <=5dB
10 KHz-20 KHz <=5dB.
Signal/bruit (MMC/SD & USB) 50dB [1 KHz].
Les spécifications et le design de l’appareil peuvent être soumis à modifications sans préavis.
Page 12

11
Dear Customer,
Selecting fine audio equipment such as the unit you
have just purchased is only the start of your musical
enjoyment. Now it is time to consider how you can
maximize the fun and excitement your equipment
offers.
We want you to get the most out of your equipment
by playing it at a safe level. One that lets the sound
come through loud and clear without annoying
blaring or distortion - and, most importantly,
without affecting your sensitive hearing.
Sound can be deceiving. Over time your “hearing
comfort level” adapts to higher volumes of sound.
So what sounds “normal” can actually be loud and
harmful to your hearing.
Guard against this by setting your equipment at a
safe level BEFORE your hearing adapts.
To establish a safe level:
. Start your volume control at a low setting
. Slowly increase the sound until you can hear it
comfortably and clearly, and without distortion we
want you listening for a lifetime.
Once you have established a comfortable sound level:
set the dial and leave it there.
About this manual
This product features a number of sophisticated
functions ensuring superior reception and operation.
All are designed for the easiest possible use, but
many are not self-explanatory.
This operation manual is intended to help you
benefit fully from their potential and to maximize
your listening enjoyment.
We recommend that you familiarize yourself with
the functions and their operation by reading through
the manual before you begin using this product. It is
especially important that you read and observe the
«precaution «on the next page and in other sections.
In this operation manual, the Basic Operation for
each sound source is outlined at the beginning of its
explanation, covering simple operation for that
source, such as merely playing music.
1. PRECAUTIONS
Read through this instruction manual before installation
and use.
CAUTION: TO REDUCE THE RISK OF ELECTRIC SHOCK, DO
NOT REMOVE COVER (OR BACK). NO USER SERVICEABLE
PARTS INSIDE. REFER SERVICING TO QUALIFIED SERVICE
PERSONNEL.
1. Keep the volume at the lowest level to maintain
concentration on traffic & road conditions for enhanced
driving safety.
2. Do not touch the power plug with wet hand.
3. If your car has been exposed to the sun for a while,
please lower the temperature inside the vehicle before
operating the unit.
4. If the battery is disconnected, discharged or changed
the memory will be erased and must be reprogrammed.
The appliance must be installed in a horizontal position
for better performance use.
5. Do not open the cover or touch any of the components
exposed out of the unit, only for qualified technicians.
6. Do not expose the unit under direct sunlight or nearby
objects that radiate heat to avoid damage to the unit.
7. Do not place the unit in moist and humid conditions,
which affect the pick-up of the unit.
8. Clear the panel and case with soft dry cloth only, do
not apply any kind of thinner, alcohol or sprays.
EXCLUSIVE IMPORTER
This product has been imported by LEMA SAS
The undersigned company LEMA SAS , said that the radio equipment of the type RADIO LAR12 complies with Directive
2014/53 / EU.
The full text of the EU declaration of conformity is available on request at following website : www.tokai.fr ( contacts
section ). For any questions, thank you to send your request to:
LEMA S.A.S.
28, Boulevard Zéphirin Camélinat
92230 GENNEVILLIERS FRANCE
Page 13
12
2. UNIT INSTALLATION
This is an anti-theft installation method.
The main unit wears a METAL MOUNTING SLEEVE.
Please connect the wiring, eg, the Power Supply, the Speakers and the Antenna according to the
requirements of this Instruction Manual, then install the metal mounting sleeve into the car as per the
diagram illustrated below.
Bend the tabs on the metal mounting
sleeve against the DASHBOARD with
a screwdriver
DASHBOARD
METAL MOUNTING SLEEVE
UNIT CHASSIS
PLASTIC TRIM RING
To remove the unit out of the metal mounting sleeve,
insert the two supplied KEYS into the left and right side slots of
the chassis at the same time. Then pull thechassis out of the
metal mounting sleeve as shown in the right illustration.
Page 14

13
3. WIRING CONNECTION
RED RCA OUTPOUT RCA OUTPUT WHITE
FRONT RIGHT SPEAKER JACK FRONT LEFT SPEAKER JACK
BLUE
AUTO ANTENNA OUTPUT
ANTENNA JACK ISO SOCKET
ISO SOCKET SKETCH
CONNECTOR A
CONNECTOR B
1.
1. REAR RIGHT SPEAKER (+)
2.
2. REAR RIGHT SPEAKER (-)
3.
3. FRONT RIGHT SPEAKER (+)
4. Mémoire +12V
4. FRONT RIGHT SPEAKER (-)
5.
5. FRONT LEFT SPEAKER (+)
6.
6. FRONT LEFT SPEAKER (-)
7. 12V ‘ACC)
7. REAR LEFT SPEAKER (+
8. Masse
8. REAR LEFT SPEAKER (-)
Page 15

14
18
4
5 6
8
9 10
3
1
2
D
IM
11
12
14
USB
LAR-82B
19
7
13 16 15
4. LOCATION OF CONTROLS
1.
POWER & MUTE button
2.
|<< button
3.
>>| button
4.
SEL &VOLknob
5.
DIM button
6.
BAND/AP button
7.
MODE button
8.
LCD
9.
1/>|| button
10.
2/INT button
11.
3/RPT button
12.
4/RDM button
13.
5/-10/HANG UP button
14.
6/+10/TEL button
15.
AUX IN jack
16.
USB socket
17.
Card slot
18.
BT MIC(microphone)
19.
RESET button
5. FUNCTIONS OF THE CONTROLS
1. POWER ON/OFF
Press any button to turn on the unit. When the unit is power ON, press and hold the power button for more than 1
second, the unit goes into power off mode.
2. MODE FUNCTION
Press MODE button to change function mode as follows :
--> RADIO --> USB (after inserting USB stick) --> SD/MMC (after inserting SD card) --> AUX --> BT.
When there is no media (USB/CARD) that mode will be skipped.
3. VOLUME
Turn the VOLUME knob to increase or decrease the volume.
4. MUTE FUNCTION
Press MUTE button to eliminate or resume sound immediately during playback.
To resume the sound immediately you can also turn VOL knob to resume the sound
5. SOUND MODE
Press SEL button briefly and repeat to select mode of VOL (volume), BASS, TRE (treble), BAL (balance) and FAD (fader),
Page 16

15
LOUD ON/OFF, EQ OFF (CLASSIC, POP, ROCK), DX, STEREO/MONO, TA ON/OFF, AREA EUROPE/USA. In each mode the
waiting time is 2 seconds and when the waiting time is over, it will return to the last display mode.
6. DISPLAY AND SETTING THE CLOCK
1) Press and hold SEL button to display time on the LCD
2) The press and hold SEL button again until the time flashes on the LCD. Turn the VOL knob to adjust the HOUR and
biefly press SEL button to change the position to adjust the MINUTE. Press and hold SEL button to confirm the
setting.
7. LCD DISPLAY
Press DIM button to adjust the background dark ou bright.
8. RESET
Before operating the unit for the first time, or after replacing the car battery or changing the connections, you must
reset the unit. Press this button with a cuspidal object. This operation will erase the clock setting and some stored
contents.
6. RADIO OPERATION
1. To select radio band
Press BAND button briefly and repeatedly to select a desired radio band in sequence and circulation as follows:
-->FM1-->FM2-->FM3-->MW1-->MW2->
2. To search for radio station manually or automatically
Press >>| or |<< button briefly to automatically tune up/down for a radio station with a strong signal.
Press and hold >>| or |<< button for 1 seconds switch to MANUAL seeking mode, then Press >>| or |<< button briefly
to manually tune up/down for your desired radio stations step by step.
It will automatically switch to AUTO mode if no operation was done in about 3 secondsin the MANUAL seeking mode.
3. To store current station or turn on a preset one
1.
Press oneof the 6 number buttons and hold for more than 1 second to store the current station inthe preset
memory bank of the number button for the current band. In this way the unit can store 30 preset stations.
2.
Press one of the 6 number buttons briefly to turn on the preset station stored in the preset memory bank of the
number button for the currentband.
4. To scan for each preset station or auto search for the strongest stations
When pressing and holding BND button for more than 1 second, the radio searches from the current frequency and
checks the signal strength level until the 6 strongest stations are found. And then the 6 strongest stations are preset
to the corresponding preset memory numbered bank. The auto-storage operation is implemented in the each
selected band. When the auto-storage operation is finished, the radio executes Preset scan.
5. AF [ALTERNATIVE FREQUENCIES]BUTTON
When pressed briefly, AF switching mode is selected and the state of AF switching mode is displayed by AF segment
in display.
Segment off: AF switching mode off.
Page 17

16
Segment on: AF switching mode on, and has RDS information.
Segment flashing: AF switching mode on, but RDS information is not received yet.
When AF switching mode is selected, the radio checks the signal strength of AF all the time.
The interval of checking time of each AF depends on the signal strength of the current station, from a few minutes
for strong station to a few seconds for weak station. Every time that new AF is stronger than current station, it
switches over to that frequency for a very short time, and the NEW FREQUENCY is displayed for 1-2 seconds. Because
the mute time of AF switching or checking time is very short, it is almost inaudible in case of normal program.
During FM mode, when AF is on, SEEK, (SCAN), AUTO-MEMORY function can only receive and save RDS program.
6. TA [TRAFFIC ANNOUNCEMENT] BUTTON
When TA mode is on (TA is displayed on LCD), it will begin to seek TA station and TA SEEK will be displayed on LCD for
a while.
When traffic announcement is transmitted:
1).
If the unit is in SD, USB mode, it will switch to radio mode temporarily.
2).
If volume level is below 20, volume level is raised to 20, and returns to its previous mode and volume level when
the traffic announcement is over.
If volume is adjusted during traffic announcement, only the traffic announcement volume is valid
* When TA is on, SEEK, (SCAN), AUTO MEMORY function can be received or saved only when traffic program
identification code has been received.
7. USB & SD OPERATION
1.
To insert or pull out SD card or USB stick
When needing to playback SD or USB music, insert SD card or USB stick into the card slot or USB socket, the playing
mode will be changed into SD or USB mode. When SD card and USB stick are both inserted into the slot or socket, the
playing mode will be changed into the mode of the latter one and the play the first track of SD or USB.
2.
Toselect next or previous track to play
Press >>| or |<< button to select next or previous track to play.
3.
Toplay fast forward or backward
Press and hold >>| or |<< button to play fast forward or backward.
4.
Toplay previous or next 10th track/previous or next folder
Press 5/-10 or 6/+10 button to play previous or next 10th track; Press and hold 5/-10 or 6/+10 button to play previous or
next folder.
5.
How to use 1/>|| button
During playback, press 1/>|| button to pause playback. When in pause mode, press 1/>|| button to play again.
Press and hold 1/>|| button to select the first track to playback.
6.
Toscan tracks
During playback, press INT button briefly to play the first 10 seconds of each track, press INT button again to cancel INT
function and retain playing the track currently selected.
7.
Torepeat track(s)
During playback, press RPT button briefly to play the current track repeatedly, and the LCD will display RPT ONE.
Page 18

17
Press RPT button twice to play the tracks in the directory repeatedly, and the LCD will display RPT DIR.
Press RPT button thrice to RPT ALL function, and the LCD will display RPT ALL.
8.
Toplay tracks in random
During playback, press RDM button briefly to play all tracks in random. Press it again to cancel RDM function.
9.
Tracks search
Press and hold AP button, it will activate TRACK SEARCH mode . The LCD will display TRK *** . Then rotate VOL knob to
input track numbers.
For example, you want to play TRK 108, first inputting number 1,then inputting number 0( after 0 jumps to high position),
finally inputting number 8. With all of the numbers input press SEL button for confirmation and playback.
Note: During inputting track numbers, briefly press the AP button to delete the wrong input numbers.
8. BLUETOOTH
1.
Pairing
Turn on Bluetooth mode of mobile phone, then select the function for Finding Bluetooth Device and enter it. After
finishing finding, it will show the name of Bluetooth Device if found, select it and enter it, then the LCD of the car audio
system will display CONNECT, BT ON and PHONE one by one.
(Password “0000" if necessary)
2.
Connection or disconnection
A) Use mobile phone to do connection or disconnection
1) In connection status, find the paired and connected Bluetooth Device,then press the disconnection button to
do disconnection.
2) In disconnection status, find the paired and disconnected Bluetooth Device, then press the connection
button to do connection.
B) When powering on (after Acc of the car was switched off), the unit will search and connect the last
connected mobile phoneautomatically.
Note:
(1) PHONE appears on LCD only when in connection status.
(2) In connection status: Mobile phone transfers to car audio player whenever a dialing takes place; Mobile phone
transfers to car audio player whenever receiving a call.
3.
Dialing when in connection status
To make a call simply press the TEL button and enter the number you wish to call using the mobile phone.
4.
Accept/ Reject/ End Call
During ringing, press TEL button to accept the call.
During ringing, press HANG UP button to reject the call.
During talking, press HANG UP button to end the call.
5.
Talking volume level setting
While talking, use volume control to adjust volume level, but this volume level can not be saved.
6.
Dialing or receiving calls while the unit is in sleep mode
When the car radio is in standby mode (Acc on and Power off), when dialing or receiving a call, the car radio will power
Page 19

18
on automatically. After the call is completed, the radio will revert to standby mode.
7.
A2DPMODE
To transfer the audio of a file played by Mobile Phone to the Car Audio Player If the mobile phone supports A2DP
and could play audio or video files, when the Mobile Phone plays an audio file(For some Mobile Phones, you must
first select Play by BT ), the playback will be transfered to the Car Audio Player.
In A2DP mode, if the Bluetooth device of the Mobile Phone supports AVRCP, the functions of the >>|, |<< and
PLAY/PAUSE buttons are the same as one in media mode(no fast forward/backward functions for the >>|/|<<
buttons). The other buttons normally available in media mode are not available.
9.TROUBLE SHOOTING
NO POWER OR NO
SOUND
The car’s ignition switched off
If the power supply is properly connected to the car
accessory, switch your ignition key to ACC or ON
Cable is not correctly connected.
Check connection.
Fuse is burnt
Replace the fuse.
MUCH NOISE IN
BROADCASTS
Station or signal is too weak.
Select other stations of stronger signal level.
PRESET STATION IS
RESET
Battery cable is not correctly
connected.
Connect the battery cable to the terminal that is
always live.
USB or SD CARD IS
CONNECTING BUT NO
SOUND
USB or SD card connection is not
good.
Take it out and insert again.
USB or SD car is damaged or no
music file inside.
Change to another USB or SD or record music inside
it.
Page 20

19
10.TECHNICAL SPECIFICATIONS
GENERAL
Supply Voltage DC 12V Negative Ground
Current Consumption Max.10A
Power Output 45Watts x 4 (at DC14.4V)
Number of Channels 2 STEREO channels
Unit Dimensions 178(W) x 120(D) x 50(H) mm
FM SECTION
Frequency Range 87.5MHz - 108MHz
Effective Sensitivity 3uV.
I.F Frequency 10.7 MHz
AM SECTION
Frequency Range 522KHz - 1620KHz
Effective Sensitivity 40dB.
Signal to noise 40dB
RCA LINE OUT
Output 1000mV@MAX.
SD or USB PLAYBACK
System MP3 audio system
Frequency Characteristics 20Hz-100 <= 5dB
10KHz-20KHz <= 5dB
Signal to Noise(MMC/SD & USB) 50dB (1KHz)
IMPORTANT: Due to continual revision and improvement on our products
design, specifications are subject to change without further notice.
Page 21

20
Page 22

21
1. ANTES DEL USO
ESTIMADO CLIENTE
El haber seleccionado un equipo bueno de audio tal como la unidad que acaba de comprar, es sólo elcomienzo de
su disfrute musical. Ahora es tiempo de considerar cómo puede maximizar la diversión y emoción que su equipo le
ofrece.
Queremos que usted obtenga el mayor rendimiento que su equipo facilita en un nivel seguro. El primero es que
permite que el sonido llegue de forma alta y clara sin que retumbe molestando ni distorsione- y, lo más importante,
sin afectar la sensibilidad de su oído.
El sonido puede ser engañoso. Al mismo tiempo que escucha en un “nivel confortable”, el oído se adapta a
volúmenes más altos de sonido. Con ello el sonido “normal” puede realmente ser alto y dañino para su oído.
Protéjase contra esto ajustando su equipo en un nivel seguro ANTES que su oído se adapte.
Para establecer un nivel seguro:
-
Comience con el control del volumen en un ajuste bajo.
-
Lentamente, incremente el sonido hasta que pueda escucharlo confortable y claramente, y sin distorsión, dado
que nosotros queremos que lo escuche durante unavida.
Una vez que haya establecido un nivel de sonido confortable:
- Ajuste el dial y déjelo allí.
Tómese un minuto para hacer esto, le ayudará a prevenir daños o pérdidas auditivas en el futuro. Después de todo,
nosotros lo que queremos es que lo escuche toda la vida.
ACERCA DE ESTE MANUAL
Este producto está caracterizado por un número de sofisticadas funciones asegurando suprema recepción y
operatividad. Todo está diseñado para el manejo más sencillo, pero muchas funciones no son explicativas por sí
mismas.
Este manual de instrucciones intenta ayudarle para que se beneficie completamente de su potencial y para
maximizar el disfrute de lo que escuche.
Nosotros recomendamos que se familiarice con las funciones y su operatividad a través de la lectura del manual
antes de comenzar a utilizar este producto. Es especialmente importante que lea y observe las “precauciones” más
abajo.
En este manual, el funcionamiento básico de cada fuente de sonido es reseñado al principio de su explicación,
cubriendo las operaciones sencillas para esa fuente, tales como la mera reproducción de música.
Page 23

22
2. PRECAUCIÓN
1. Lea el manual en su totalidad antes de instalar y usar el producto.
2. No abra la cubierta o toque ninguno de los componentes expuestos fuera de la unidad, sonsólo para personal
cualificado.
3. No exponga la unidad a la luz directa del sol o cerca de objetos que desprendan calor para evitar daños en la
unidad.
4. No coloque la unidad en condiciones de humedad, dado que tendrán un efecto de recogida en launidad.
5. Limpie el panel y la carcasa únicamente con un trapo suave y seco, no aplique ningún tipo de limpiador, alcohol o
espráis.
6. Elaparato no debe ser expuesto a goteoso salpicaduras ni objetos llenos de líquido, tales como vasos, deben
colocarse sobre elaparato.
IMPORTADOR EXCLUSIVO
La sociedad LEMA SAS importó este producto
La abajo firmante, sociedad LEMA SAS, declara que el equipamiento radioelectrónico del tipo AUTORRADIO LAR12 se
ajusta a la Directiva 2014/53/UE.
El texto completo de la declaración UE de conformidad está disponible sobre demanda a la siguiente dirección Internet:
www.tokai.fr (rúbrica contactos)
Por toda la cuestión, gracias de enviar su demanda a:
LEMA S.A.S.
28, Boulevard Zéphirin Camélinat
92230 GENNEVILLIERS FRANCE
Page 24

23
Atención! Este juego de logo sobre el producto quiere decir que el reciclaje de este
aparato viene dentro del marco de la Directiva 2002/96/CE del 27 de enero de 2003
concernir la Basura (el Gasto) de Equipo Eléctrico y Electrónico (WEEE).
Su producto está marcado con este símbolo. Significa que los productos eléctricos y
electrónicos usados no deberían mezclarse con los residuos domésticos generales.
Existe un sistema de recogida independiente para estos productos.
Si quiere desechar este equipo, ¡por favor no utilice el cubo de la basura habitual!
- Los equipos eléctricos y electrónicos usados deberían tratarse por separado de acuerdo con la
legislación que requiere un tratamiento, una recuperación y un reciclaje adecuados de los equipos
eléctricos y electrónicos usados. Tras la puesta en práctica por parte de los estados miembros, los
hogares de particulares dentro de los estados de la Unión Europea pueden devolver sus equipos
eléctricos y electrónicos a los centros de recogida designados sin coste alguno. (Por favor, póngaseen
contacto con su autoridad local para obtener másdetalles).
- Si sus equipos eléctricos o electrónicos usados tienen pilas o acumuladores, por favor deséchelos por
separado con antelación según los requisitos locales.
-
Al desechar este producto correctamente, ayudara a asegurar que los residuos reciban el tratamiento,
la recuperación y el reciclaje necesarios, previniendo de esta forma posibles efectos negativos en el
medio ambiente y la salud humana que de otra forma podrían producirse debido a una manipulación
de residuos inapropiada.
Page 25

24
2. MÉTODO DE INSTALACIÓN
Este es un método de instalación antirrobo con la unidad principal protegida por una CAJA METÁLICA DE
INSTALACIÓN. Por favor haga la conexión de alimentación, altavoces y antena de acuerdo con los
requerimientos del libro de instrucciones. Luego instale la caja metálica de instalación como se indica a
continuación.
Doble las lengüetas del metal de la
carcasa de montaje contra el
SALPICADERO con un destornillador
SALPICADERO
CAJA METALICA INSTALACIÓN
CHASIS UNIDAD
EMBELLECEDOR DE PLÁSTICO
Para quitar la carcasa de montaje metálica de montaje,
inserte las dos LLAVES suministradas en las ranuras izquierda
y derecha del chasis al mismo tiempo. Luego tire de la
carcasa de la unidad hacia fuera como se muestra en la
Page 26

25
3. CABLEADO DEL ALTAVOZ
ROJO SALIDA RCA SALIDA RCA BLANCO
AZUL
TOMA DE ANTENA FIXEDE ISO CONECTOR
CONECTOR FIJO-ISO
CONNECTOR A
CONNECTOR B
1.
1. REAR RIGHT SPEAKER (+)
2.
2. REAR RIGHT SPEAKER (-)
3.
3. FRONT RIGHT SPEAKER (+)
4. Mémoire +12V
4. FRONT RIGHT SPEAKER (-)
5.
5. FRONT LEFT SPEAKER (+)
6.
6. FRONT LEFT SPEAKER (-)
7. 12V ‘ACC)
7. REAR LEFT SPEAKER (+
8. Masse
8. REAR LEFT SPEAKER (-)
FRONT RIGHTT SPEAKER JACK
FRONT RIGHTT SPEAKER JACK
ANTENA
ELECTRICA
Page 27
26
4. LOCALIZATION DE LOS CONTROLES
1. BOTON ON/OFF-MODO
2. BOTON
|<<
3. BOTON
>>|
4. BOTÓN SEL (SELECT) Y BOTÓN CONTROL VOL
5. BOTON DIM
6. BOTON BAND/AP
7. BOTON MODO
8. DISPALY LCD
9. BOTON
1/>||
10. BOTON
2/INT
11. BOTON 3/ REPETICIÓN
12. BOTON 4/ REPRODUCCIÓN ALEATORIA
13. BOTON 5/-10/COLGAR
14. BOTON 6/+10/ LLAMADA
15. ENTRADA JACK AUX
16. USB
17. MMC/SD
18. Micro BLUETOOTH
19. BOTON RESET
5. FUNCION DE LOS CONTROLES
1. Botón POWER
Cuando la cámara está apagada, se puede iniciar
pulsando cualquier botón. Cuando el dispositivo está
encendido, mantenga presionado el botón de encendido
más de un segundo para apagarlo.
2.MODO 2. Selección
Pulse el botón MODE para seleccionar el modo de fuente
deseada de la siguiente manera:
-> RADIO -> USB (después de insertar una llave USB) -> SD
/ MMC (después de insertar la tarjeta SD) -> AUX -> BT.
Cuando no hay un soporte multimedia EL, una tarjeta de
memoria USB o SD, estos modos se ignora
3. AJUSTE EL VOLUMEN
GIRE VOLUME PARA AJUSTAR EL NIVEL DE VOLUMEN
DURANTE LA REPRODUCCI N.
4. Función MUTE
Pulse el botón MUTE para silenciar el sonido. Pulse de
nuevo para restaurar el sonido inmediatamente.
También puede girar VOLUMEN.
5. Configuración de sonido
Brevemente pulse SEL varias veces para seleccionar el
modo de sonido, BASS (Bajo), TRE (Agudos Agudos), BAL
(balance) y FAD (atenuador Equilible delantero / trasero),
LOUD ON / LOUD OFF (Sonoridad), EQ OFF (clásico, pop,
rock), DX LOCAL STEREO / MONO, TA ON / OFF
Page 28

27
(información de tráfico), AF ON / OFF (frecuencias
alternativas), la área de Europa / EE.UU..
Para cada modo, el tiempo de espera es de 2 segundos, y
cuando ha pasado el tiempo de espera, la pantalla vuelve
al modo anterior
6.Affichage entorno y el reloj
1) Mantenga pulsado el botón SEL para visualizar la hora
en la pantalla
2) A continuación, pulse y mantenga pulsado el botón SEL
hasta que la hora destelle en la pantalla. Gire VOLUME
para ajustar las horas, a continuación, pulse brevemente
el botón SEL para ajustar los minutos que el anterior y,
finalmente, mantenga presionado el botón SEL para
confirmar el ajuste.
7. Ajustar el brillo de la pantalla
Pulse el botón DIM para ajustar el brillo de la pantalla,
más o menos clara
8. RESET
Antes de empezar a trabajar con el aparato la primera
vez o después de haber cambiado la batería haga un
RESET. Perderá la información de la hora /reloj y otros
contenidos en memoria.
6. FUNCIONAMIENTO DE LA RADIO
1. Selección de la banda de frecuencia
Pulse repetidamente el botón BAND brevemente y para seleccionar la banda de radio de la siguiente manera:
FM1 -> FM2 -> FM3 -> MW1 -> MW2.
2. Las estaciones de radio de búsqueda manual o automática
Presione brevemente el | << o >> | para buscar automáticamente una emisora con señal fuerte.
Mantenga la posición durante 1 segundo en el | << o >> | para activar la búsqueda manual, pulse brevemente
Pulse para encontrar la emisora deseada.
La cámara vuelve al modo AUTO si no se realizan operaciones dentro de 3 segundos en el modo de búsqueda
manual.
3. Memorizar las emisoras o estaciones de carga de presets
Presione más de un segundo en una tecla numérica de 1 a 6 botones para almacenar la emisora en
Durante banda de frecuencia. Pulse brevemente una de las teclas numéricas 1-6 para recuperar las emisoras
programado. El dispositivo puede almacenar hasta 30 emisoras de radio.
4. sintonización automática
Pulse y mantenga pulsado el botón BND para activar la operación de almacenamiento automático.
El dispositivo escanea banda y pre-selecciona las emisoras de la señal más fuerte.
Una vez finalizada la operación de almacenamiento automático, la radio ejecuta el preajuste.
5. Botón AF (frecuencia alternativa)
Pulse durante más de 2 segundos SEL para llegar al modo / OFF AF ON.
Cuando se activa esta función, AF aparece en la pantalla.
AF indicadores son:
Cuando el indicador está apagado: el modo AF está desactivado.
Cuando el indicador muestra AF: modo AF está activada y la información RDS se recibe.
Si el indicador parpadea AF: se cambia al modo AF y la información RDS no se recibe todavía.
Cuando se activa el modo AF, la radio comprueba la intensidad de las señales AF permanentes. El intervalo de tiempo
entre comprobar cada frecuencia alternativa depende de la intensidad de la señal de la emisora actual, esto varía
de
a pocos minutos de una estación con buena recepción de unos segundos para una estación de
Page 29

28
la recepción es débil. Cada vez que un nuevo AF se encuentra el sistema cambia en este
frecuencia para un período muy corto de tiempo, y la nueva frecuencia aparecen durante 1 a 2 segundos. este lapso
el tiempo es casi inaudible en caso de programa normal.
En el modo FM, cuando se activa AF, la búsqueda automática (SEEK), exploración (SCAN), y la memoria (AUTO MEMORY)
sólo funcionan con programas RDS solamente .
6. TA (Información Calle)
Cuando la función TA está activada (TA se visualiza en la pantalla), el sistema buscará una emisora de radio que
retransmite TA SEEK información de tráfico se visualiza en la pantalla LCD durante un tiempo.
Cuando la información de tráfico se transmite:
1) Si el dispositivo está en modo USB o SD, se cambia temporalmente al modo de radio.
2) Si el volumen es inferior a 20, el volumen automáticamente en el nivel 20, y vuelve al modo y el nivel de volumen
anterior cuando el anuncio de tráfico ha terminado.
Si se ajusta el volumen durante el anuncio de tráfico, sólo el volumen de información de tráfico es válida.
7. MODO USB
1. USB / SD / MMC
Para reproducir un dispositivo USB, inserte la unidad USB en el puerto USB compatible. El sistema entra en el modo USB
de forma automática y el primer archivo empieza a reproducirse.
Para leer una tarjeta SD / MMC, inserte la tarjeta SD / MMC en la ranura para tarjeta de memoria compatible.
El sistema deentra automáticamente en modo Tarjeta de memoria y reproducción de las primeras aperturas de
archivos.
Nota: Cuando una tarjeta SD / MMC y dispositivo USB están conectados al dispositivo, al mismo tiempo, la prioridad es
dado el último dispositivo que se inserta.
2. Buscar un seguimiento de avance / retroceso y búsqueda rápida hacia adelante / atrás
Presione | << o >> | con el fin de leer la pista anterior o siguiente.
Mantenga pulsado el | << o >> | para llevar a cabo el rebobinado rápido o el avance rápido de la pista actual
lectura.
3. Delantero 10 pistas registro de avance / Back Seleccionar delantero / trasero
Pulse el 5/6 o -10 / + 10 para ir hacia delante 10 pistas hacia delante o hacia atrás.
Mantenga pulsado el 5/6 o -10 / + 10 para seleccionar y leer la siguiente carpeta o
anterior.
4. Botón
1/>||
Durante la reproducción, presione el 1 /> || para pausar la reproducción. En el modo de pausa, pulse 1 /> ||
para reiniciar el juego. pulsación larga en este botón para volver a reproducir la primera pista del archivo que se está
reproduciendo.
5. SCAN
Durante la reproducción, pulse el botón INT brevemente para reproducir los primeros 10 segundos de cada pista,
pulse el botón para cancelar la función INT INT y seguir jugando la pista seleccionada.
Page 30

29
6. La función de repetición
Durante la reproducción, pulse el botón RPT brevemente para repetir la pista actual, y la pantalla LCD
aparece RPT ONE.
Pulse el botón RPT dos veces para reproducir las pistas en el álbum varias veces, y la pantalla LCD muestra RPT DIR.
Presione tres veces para repetir todas las pistas, y las pantallas LCD RPT ALL.
7. Reproducción aleatoria
Durante la reproducción, presione RDM para reproducir todas las pistas en orden aleatorio.
Presione de nuevo para cancelar la reproducción aleatoria.
8. buscar pistas
Pulse el botón AP para activar el modo de búsqueda PISTA, la pantalla LCD muestra TRK ***. El número de 0
depende del número de pistas de contenidos en el dispositivo. (Ejemplo: si el número de pistas es de menos de 100 y
por encima de 9, 00 mostrará TRK).
A continuación, gire el botón VOL para seleccionar el número de serie intermitente entre 0 a 9. A continuación, pulse
SEL para confirmar y el segundo dígito parpadeará. Siga las instrucciones anteriores para
seleccionar el segundo dígito del número. Una vez que la selección se haya completado, pulse el botón SEL para
confirmar y para reproducir la pista seleccionada.
8. MODO BLUETOOTH
Antes de utilizar Bluetooth, el LAR-82B primero debe estar emparejado con el dispositivo Bluetooth.
El "emparejamiento" significa establecer la conexión entre dos dispositivos Bluetooth, como teléfonos móviles, tablets,
PCs etc .... El dispositivo Bluetooth conservará la identificación única de su LAR-82B en su sistema.
Pulse MODE en la unidad para entrar en el modo Bluetooth.
1. Emparejamiento
Active la función Bluetooth de su teléfono móvil. Entre en el modo de búsqueda de dispositivos Bluetooth. Una vez
la investigación, el teléfono móvil mostrará los dispositivos Bluetooth encontrados. seleccionar
estéreo de automóvil. La pantalla CONNECT, entonces y BT PHONE.
(0000 Tras la contraseña si es necesario)
2. Entrar y Salir
Utilice su teléfono móvil para iniciar la sesión o cerrar la sesión
En el estado de conexión, encontrar el dispositivo Bluetooth emparejado y conectado, a continuación, pulse el botón
Desconectar para desconectarse.
En el estado de desconexión, encontrar el dispositivo Bluetooth emparejado y fuera de línea y pulse el botón
Conexión para volver a conectar.
Cuando se enciende la unidad, la unidad buscará la última emparejado y conectado el teléfono móvil.
Nota: Aparece teléfono en la pantalla LCD en el estado en línea.
Estado de conexión: los archivos de audio en su teléfono móvil se transfieren a su RADIO
Bluetooth y las llamadas
3. Coloque estado de la llamada conectada
Para realizar una llamada, pulse la tecla TEL y marcar directamente desde su teléfono
teléfono móvil.
Page 31
30
4. Tomemos, rechazar o finalizar una llamada.
1. Cuando el teléfono suena, pulse el botón para tomar la llamada TEL.
2. Cuando suene el teléfono, pulse la tecla COLGAR para rechazar la llamada.
3. Cuando se habla en el teléfono, pulse la tecla COLGAR para finalizar una llamada.
5. Ajustar el volumen durante la llamada
Mientras habla, utilice el control de volumen para ajustar el nivel de volumen, pero el nivel de volumen no lo hará
guardado.
6. Realizar o recibir una llamada cuando el dispositivo está en modo de espera
Si el dispositivo está en modo de espera o apagado y que usted puede realizar o recibir una llamada, la radio se
encenderá automáticamente. Después de finalizar la llamada, la radio volverá al modo de espera.
7. Modo A2DP
Una vez que su teléfono móvil y estéreo de automóvil Bluetooth emparejados, si el teléfono móvil puede establecer
la reproducción de archivos de audio y vídeo y el A2DP (Advanced Audio Distribution Profile) que puede difundir
audio y vídeo desde su teléfono móvil a la radio del coche (para algunos ordenadores portátiles, se quiere
antes de volver a conectar la radio).
el modo de A2DP, si su teléfono móvil es compatible con AVRCP (El / Video Perfil de control remoto de audio), el
funciones, Reproducir / Pausa, MUTE (SILENCIO) tienen la misma funcionalidad en el modo de medios (llaves
avance rápido y rápido no están disponibles).
9. GUÍA DE REPARACIÓN
No hay ernergia
No se pone el contacto del coche.
Ponga el contacto.
El fusible se ha fundido.
Cambiar el fusible.
No hay sonido
El volumen está como mínimo
Regular el nivel del volume.
No se efectúa correctamente la conexión.
Comprobar la conexión.
La radio no funciona
Se conecta mal el cable antena
Las señales son demasiado escasas
Comprobar la conexión del cable
Regule una estación de radio con una señal más
fuerte
LECTURA USB/SD
IMPOSIBLE
Conectó mal su periférico
Inserte de nuevo su periférico
Su periférico SD, se daña a USB o los ficheros
Inserte de nuevo su periférico
Page 32

32
10. ESPECIFICACIONES
GENERALES
VOLTAJE 12V DC MASA NEGATIVA
CONSUMO 10 A MAX
POTENCIA SALIDA 4X45W (A 14.4v)
NUM. DE CANALES 2 STEREO
DIMENSIONES 178[W] X 120 [D] X 50[H] mm.
SECCION FM
RANGO FRECUENCIA 87.5 MHZ -108 MHZ
SENSIBILIDAD EFECTIVA 3uV
FRECUENCIA IF 10.7MHZ
SECCION AM
RANGO DE FRECUENCIA 522 KHZ-1620KHZ
SENSIBILIDAD EFECTIVA 40 dB
FRECUECNIA IF 450 KHZ
SALIDA
SALIDA RCA 1000mV @ MAX.
USB O MMC-SD
SISTEMA MP3
FRECUENCIA-CARACTERISTICAS 20Hz -100Hz <=5dB 10KHz-20KHz <=5dB.
SEÑAL-RUIDO (MMC-SD & USB) 50 dB (1KHz)
IMPORTANTE: debido a continuas revisiones y mejoras en el diseño de nuestros productos, las especificaciones están
sujetas a cambio sin previo aviso.
Page 33

33
INTRODUCTIE
Geachte klant,
Door te kiezen voor dit apparaat, heb je de eerste stap in
de richting van het plezier van het luisteren naar muziek
genomen. Nu is het tijd om te laten zien hoe de functies
van het apparaat te optimaliseren.
Ten eerste is het belangrijk om te weten hoe je naar
muziek luisteren op een geluidsniveau zonder gevaar, luid
en duidelijk, niet donderende zonder vervorming - en in
het bijzonder een geluid dat geen gehoor niet beschadigt.
Geluid kan misleidend zijn. Na verloop van tijd, je 'horen'
comfortniveau 'past zich aan hogere volumes.
Wat lijkt op een "normale ruis" zijn kan blijken te sterk en
schadelijk.
Om een geluidsniveau veilig zijn:
• Stel het volume op een laag niveau
• Verhoog langzaam het volume totdat duidelijk en
comfortabel horen zonder vervorming.
OP DEZE HANDLEIDING
Dit product heeft vele functies die het gebruik ervan te
vergemakkelijken en te zorgen voor een goede ontvangst.
Maar ze zijn niet allemaal duidelijk.
Deze handleiding is bedoeld om u te helpen optimaal te
profiteren van de mogelijkheden van dit product.
Wij raden u aan vertrouwd te raken met de functies en
de werking ervan volledig Lees deze handleiding voordat
u het apparaat. Het is vooral belangrijk om te lezen en
volg de "voorzorgsmaatregelen" te vinden op de
volgende pagina en in andere hoofdstukken.
1. VOORZORGSMAATREGELEN
Lees deze handleiding voor installatie en
gebruik.
WAARSCHUWING:
OM HET RISICO OP ELEKTRISCHE SCHOKKEN,
DEKSEL (OF RUG) NIET VERWIJDEREN. GEEN
RUIMTE MOET USER. Een gekwalificeerde VOOR
ONDERHOUD
1. Houd het volume op de lagere orde om
geconcentreerd te blijven op het verkeer op de weg
voorwaarden voor een grotere veiligheid.
2. Open de afdekking van de onderdelen blootgesteld
aan de buitenkant van het apparaat, alleen
gekwalificeerde technici kan niet aanraken.
3. Niet blootstellen aan zonlicht of in de buurt van
voorwerpen die warmte uitstralen om schade aan het
apparaat te voorkomen richten.
4. Als uw auto is blootgesteld aan de zon voor een tijdje,
dan kunt u lager de temperatuur in het voertuig voordat
u het apparaat.
5. Als de accu losgekoppeld wordt, afgevoerd of
gewijzigd het geheugen worden gewist en moeten
opnieuw worden geprogrammeerd.
Het apparaat moet horizontaal voor betere prestaties
gebruik worden geïnstalleerd.
6. Gebruik het apparaat niet in een vochtige omgeving
die de sensor van de camera kunnen beïnvloeden.
7. Het apparaat mag niet worden blootgesteld aan
spatwater.
8. Reinig het paneel en de behuizing met een zachte,
droge doek, geen oplosmiddelen, alcohol en sprays niet
van toepassing.
EXCLUSIEF IMPORTEUR
Dit product is ingevoerd door de LEMA SAS
Ondergetekende bedrijf LEMA SAS, zei dat de radioapparatuur van het type RADIO LAR-82B is in overeenstemming met
Richtlijn 2014/53/EU.
De volledige tekst van de EU-verklaring van overeenstemming is op verzoek verkrijgbaar op het volgende internetadres:
www.tokai.fr (contacten sectie)
Voor eventuele vragen, dank u om uw aanvraag te sturen naar:
LEMA S.A.S.
28, Boulevard Zéphirin Camélinat
92230 GENNEVILLIERS FRANCE
Page 34

34
Warnung ! Dieses Logo am Produkt bedeutet, dass das Recycling dieses Geräts im Rahmen von
Richtlinien 2002/96/CE vom
27. Januar 2003 in Bezug auf Abfall von elektrischen und elektronischen Anlagen (WEEE) kommt.
Dieses Symbol bedeutet, dass gebrauchte elektrische und elektronische Produkte nicht mit
allgemeinem Hausabfall gemischt werden dürfen. Es gibt ein separates Sammlungssystem für
diese Produkte.
Wenn Sie dieses Gerät entsorgen möchten, benutzen Sie bitte nicht normale Mülltonne!
- Das Vorhandensein von gefährlichen Substanzen in den elektrischen und elektronischen Anlagen kann
potenzielle Konsequenzen auf die Umwelt und Menschgesundheit in dem Kreislauf von
Wieder-Bearbeitung dieses Produkts haben.
- Deshalb darf dieses Produkt am Ende seiner Lebensdauer nicht mit anderem nicht-recycelnten Abfall
entsorgt werden. Gebrauchte elektrische und elektronische Anlagen müssen separat und gemäss
Gesetzen behandelt werden, die geeignete Behandlung, Wiedergewinnung und Recycling von
gebrauchten elektrischen und elektronischen Anlagenfordern.
- Lokale Autoritäte und Händler haben besondere Verfahren für das Zweck von Sammlung und Recycling
dieses Produkts erstellt (kontaktieren Sie bitte Ihre lokale Autorität für Details). Sie verpflichten sich,
das auswählbare Abfall-Sammlungs-System, das von Ihrer lokalen Autorität aufgestellt sind, zu
benutzen.
- Wenn Ihre gebrauchte elektrische oder elektronische Anlage Batterien oder Akku hat, entsorgen Sie
bitte dies separate gemäss lokalen Anforderungen.
- Bei richtiger Entsorgung dieses Produkts stellen Sie sicher, dass der Abfall sich erforderlicher
Behandlung, Wiedergewinnung und Recycling unterzieht und deshalb potenzielle negative Effekte auf
die Umwelt und Menschgesundheit verhindert, die ansonsten wegen unrichtiger Abfallbehandlung
entstehenkönnten.
Page 35

35
2. INSTALLATIE
Dit is een methode voor het installeren antidiefstalsysteem. Het apparaat is voorzien van een metalen
montageframe.
Maak de aansluitingen zoals voeding, luidsprekers en antenne in overeenstemming met de eisen van de
handleiding, en installeer dan de metalen montuur in de auto volgens de onderstaande afbeelding.
Indien nodig deze tanden omploolen
INSTRUMENTENBORD
FOEDRAAL
HOOFDEENHEID
FRAME FINISH
Pour retirer l’unité principale du châssis de montage, insérez
les clés d’extraction gauche et droite de l’appareil. Ensuite
tirez le châssis hors de la gaine de montage comme illustré
sur le schéma.
Page 36

36
3. WIRE AANSLUITING
ROOD REC OUT RCA OUT WIT
BLAUW
ANTENNE CONNECTOR ISO CONNECTOR
ISO ONNECTOR
CONNECTOR A
CONNECTOR B
1.
1.LUIDSPREKER RECHTSACHTER (+)
2.
2. LUIDSPREKER RECHTSACHTER
(-)
3.
3. LUIDSPREKER RECHTSVOOR (+)
4. GEHEUGEN +12 V
4. LUIDSPREKER RECHTSVOOR (-)
5.
5. LUIDSPREKER LINKSVOOR (+)
6.
6. LUIDSPREKER LINKSVOOR (-)
7. + (NAAR CONTACTSLEUTEL) 12V
7. LUIDSPREKER LINKSACHTER (+)
8. Massa
8. LUIDSPREKER LINKSACHTER (-)
LUIDSPREKER RECHTSVOOR
LUIDSPREKER LINKSVOOR
ELEKTR
ANTENNE
Page 37

37
4. DESCRIPTION DE L’APPAREIL
1. POWER /MODE
2. Knop
|<<
3. Knop
>>|
4. Knop SELECTION & VOLUME
5. Knop DIM
6. Knop BAND/AP
7. Knop MODE
8. LCD Display
9. Knop
1/>||
10. Knop
2/INT
11. Knop 3/REPEAT
12. Knop 4/RANDOM
13. Knop 5/-10/GESPREK BEËINDIGEN
14. Knop 6/+10/EEN GESPREK BEANTWOORDEN
15. VOORSTE AUX IN
16. USB-poort
17. SD Kaart-Gleuf
18. MICROFOON BLUETOOTH
19. RESET Knop
5. BEDIENING
1. POWER ON/OFF
Houd deze toets om het apparaat aan en uit. Ook dit
toestel kan worden ingeschakeld door op een
willekeurige toets.
2. MODE
Door deze toets in te drukken kan de gebruiker de
RADIO-modus of de CD/MP3-speler modus selecteren.
De TUNER/USB/SD/AUX/BT.
3. VOLUME UP/DOWN
Draai VOLUME om het volume tijdens het afspelen aan te
passen.
4. MUTE
Als je gewoon op deze toets kort, zal het geluid te
dempen. Om terug te keren naar klinkt, drukt u kort op
het weer.
5. SELECTEREN
Druk de SEL knop te draaien kunnen
VOL/BASS/TREB/BAL/FAD/LOUD ON/OFF, EQ OFF
(CLASSIC, POP, ROCK), DDX LOCAL, STEREO/MONO, TA
ON/OFF, AF ON/OFF), AREA EUROPE/USA worden
afgesteld. Om andere functies te selecteren moet u kort
op de SEL-knop drukken tot de gewenste functie op de
display wordt weergegeven.
6. WEERGEVEN EN INSTELLEN VAN DE KLOK
1) Houd de SEL knop om de tijd op het scherm weer te
geven
Page 38
38
2) Druk vervolgens op en houd de SEL knop tot de tijd
knippert op het scherm. Draai VOLUME om de uren in te
stellen, vervolgens kort op de toets SEL om de minuten
zoals hierboven uiteengezet en ten slotte houdt u de
SEL-knop ingedrukt om de instelling te bevestigen.
7. LCD HELDERHEID
Druk op de DIM-knop de helderheid van het scherm,
meer of minder duidelijk aan te passen
8. RESET
De Reset-knop (24) zit op de behuizing
De Reset-knop moet worden ingedrukt om de volgende
redenen:
• Wanneer het toestel voor het eerst wordt geïnstalleerd
en alle bekabeling is aangesloten.
• Als de functieknoppen niet goed werken.
• Als het error-symbool op de display wordt
weergegeven.
6. WERKING VAN DE RADIO
1. KNOP BANDKEUZE (BAND)
Ledere band wordt cyclisch afgezocht naar zenders door de toets FM1---FM2---FM3---MW(AM)1---MW(AM)2 in te
drukken
2. AUTOMATISCH OF HANDMATIG AFSTEMMEN
(HOGERE FREQ
>>|
OF LAGERE FREQ
|<<
)
Als deze knoppen kort worden ingedrukt, worden ze gebruikt voor de SEEK-zoekmodus.
Als ze langer dan 1 sec worden ingedrukt, worden ze gebruikt voor de HANDMATIGE-zoekmodus
3. VOORKEURZENDERS (1,2,3,4,5,6)
Zes genummerde preset knoppen opslaan en het oproepen zenders voor elke band.
Het opslaan van een zender:
1. Selecteer een band (indien nodig)
2. Kies een zender
3. Houd een preset-knop langer dan een seconde. Voorkeurzender nummer verschijnt op het display wanneer het
station wordt opgeslagen.
Roep een zender:
1. Selecteer een band (indien nodig)
2. Druk op een preset-toets minder dan een seconde tot de opgeslagen zender te selecteren.
4. AUTO SEEK SEARCH TUNING
Houd de BND-knop om de automatische opslag operatie te activeren. Het apparaat scant
band en pre-selecteert de stations met het sterkste signaal.
Wanneer de werking automatisch opslaan is voltooid, voert de radio de voorinstelling.
5. AF Knop
Druk langer dan 2 seconden op SEL om de AF-ON / OFF-modus te bereiken.
Wanneer u deze functie inschakelt, verschijnt AF op het scherm.
AF-indicatoren zijn:
Als het lampje uit is: De AF-modus is uitgeschakeld.
Wanneer de AF indicator geeft aan: AF-functie is ingeschakeld en de RDS informatie wordt ontvangen.
Wanneer de AF knippert: u overschakelt naar de AF-modus en RDS informatie is nog niet ontvangen.
Als de AF-modus is geactiveerd, de radio controleert de sterkte van de permanente AF-signalen. Het tijdsinterval tussen
controleer elke alternatieve frequentie is afhankelijk van de signaalsterkte van de huidige zender, dit varieert van
Page 39

39
een paar minuten op een zender met goede ontvangst van een paar seconden tot een station
ontvangst is zwak. Elke keer dat een nieuwe AF wordt gevonden de schakelaars systeem op deze
frequentie voor een zeer korte periode, en nieuwe frequentie wordt gedurende 1 tot 2 seconden. dit lapse
tijd bijna onhoorbaar bij normaal programma.
In de FM-modus, wanneer AF is ingeschakeld, het automatisch zoeken (SEEK), scannen (SCAN), en het geheugen (AUTO
MEMORY) werken alleen met alleen RDS-programma's.
6. TA functie (VERKEERSBERICHTEN)
Als de TA-modus is geactiveerd en een verkeersbericht wordt uitgezonden
– zal, als het toestel op de CD/MP3-modus staat, tijdelijk worden overgeschakeld naar de radio-modus;
– zal het volume, als het onder het drempelniveau ligt, worden verhoogd tot het drempelniveau;
– zal, wanneer het TA-station wordt ontvangen, het TP-segment op de LCD-display gaan branden
7. USB/SD/MMC
1. Lecture USB / Carte SD/MMC
Om een USB-apparaat af te spelen, plaatst u de USB-stick in de USB-compatibele poort. Het systeem gaat in de
USB-modus
automatisch en het eerste bestand begint te spelen.
Om een SD / MMC-kaart te lezen, plaatst u de SD / MMC-kaart in het slot compatibele geheugenkaart. het systeem
gaat automatisch MEMORY CARD-modus en het spelen van het eerste bestand wordt gestart.
Opmerking: Wanneer een SD / MMC-kaart en USB-apparaat worden aangesloten op het apparaat tegelijkertijd bij
voorrang
gezien de laatste apparaat gestoken
2. Zoek tracks vooruit / achteruit en snel vooruit / achteruit
Druk op | << of >> | om de vorige of volgende track te lezen.
Houd de | << of >> | terugspoelen of snel vooruit het huidige nummer uit te voeren
lezing.
3. Forward 10 tracks Forward / Back-Select voor / achter opnemen
Druk op de 5/6 of -10 / + 10 om vooruit te gaan 10 tracks vooruit of achteruit.
Houd de 5/6 of -10 / + 10 om te selecteren en lees de volgende map of het
Vorige
4. Toets 1 /> ||
Tijdens het afspelen, drukt u op de 1 /> || om het afspelen te onderbreken. In de pauzestand op 1 /> ||
om het spel opnieuw te starten. Druk lang op deze knop om terug te keren naar het spelen van het eerste nummer van
het huidige bestand.
5. SCAN
Tijdens het afspelen, drukt u kort op de INT-knop om de eerste 10 seconden af te spelen van elk nummer,
druk op de knop om de INT INT-functie te annuleren en blijven spelen de geselecteerde track.
6. REPEAT-knop ‘RPT’ (herhalen)
Wanneer deze knop wordt ingedrukt, wordt de indicatie ‘RPT’ weergegeven en wordt de geselecteerde track steeds
opnieuw afgespeeld, tot de Repeat-functie wordt uitgeschakeld door ‘RPT’ opnieuw te drukken.
Page 40

40
7. RANDOM- knop ‘RDM’ (willekeurige volgorde)
Wanneer deze knop wordt ingedrukt wordt de indicatie ‘RDM’ weergegeven, en worden de tracks van de cd in
willekeurige volgorde gespeeld in plaats van in de normale volgorde. Druk de ‘RDM’-knop opnieuw in om de
SHUFFLE-functie uit te schakelen.
8. Zoek tracks
Druk op de knop AP om de zoekmodus TRACK activeren, het LCD-scherm TRK ***. Het aantal 0
afhankelijk van het aantal sporen in de inrichting. (Voorbeeld: als het aantal sporen is minder dan 100 en
hoger dan 9, wordt 00 weergegeven TRK).
Draai de VOL knop om het aantal knipperende getal tussen 0 tot 9. Druk vervolgens op selecteren
SEL om te bevestigen en het tweede cijfer knippert. Volg de bovenstaande instructies om
selecteert u het tweede cijfer van het nummer. Zodra de selectie voltooid is, drukt u op de SEL knop om te bevestigen
en om de geselecteerde track af te spelen
8. BLUETOOTH
Avant d'utiliser la fonction Bluetooth, votre LAR-82B doit d'abord être couplé avec votre périphérique Bluetooth.
«Apparier» signifie établir la connexion entre deux appareils Bluetooth tel qu'un téléphone mobile, tablettes, PC
etc.... Votre appareil Bluetooth conservera l'identification unique de votre LAR-82B dans son système.
Appuyez sur la touche MODE de l’appareil pour entrer en mode BLUETOOTH.
1. Het aansluiten van de telefoon naar het apparaat
Schakel de Bluetooth-functie van uw mobiele telefoon. Voer zoekmodus van Bluetooth-apparaten. eenmaal
het onderzoek, zal uw mobiele telefoon de Bluetooth-apparaten gevonden weer te geven. kiezen
autoradio. Het display CONNECT, dan ON en BT PHONE.
(Naar aanleiding van het wachtwoord 0000 indien nodig)
2. Login en Logout
Gebruik uw mobiele telefoon om in te loggen of meld u af
In de status van de verbinding, vindt de gekoppeld en verbonden Bluetooth-apparaat, druk op de knop
verbreken de verbinding te verbreken.
In de ontkoppeling status vind het gekoppelde Bluetooth-apparaat en offline en druk op de knop
Aansluiting te verbinden.
Wanneer u het toestel inschakelt, zal het toestel de laatste gekoppeld en aangesloten mobiele telefoon te zoeken.
Opmerking: PHONE wordt weergegeven op het LCD-scherm in de online status.
Status verbonden: de audiobestanden in uw mobiele telefoon worden overgebracht naar uw RADIO
BLUETOOTH en de gesprekken die je maakt en de gesprekken die u ontvangt
.
3. Om te bellen
Als u wilt bellen, drukt u op de knop TEL en direct te bellen vanaf je telefoon
mobiele telefoon
4. Neem weigeren of een gesprek te beëindigen.
1. Als de telefoon overgaat, drukt u op de knop om het gesprek TEL nemen.
2. Wanneer de telefoon overgaat, drukt u op de knop HANG UP om het gesprek te weigeren.
3. Wanneer we spreken over de telefoon, drukt u op de knop HANG UP om een gesprek te beëindigen.
Page 41

41
5. Het volume aanpassen tijdens het gesprek
Al pratend, gebruikt u de volumeknop om het volume aan te passen, maar het volume zal niet
opgeslagen.
6. Bellen of een oproep ontvangt wanneer het apparaat in standby-modus
Als het apparaat in stand-by of uit te schakelen en dat u belt of een oproep ontvangt, zal de radio automatisch
ingeschakeld. Na het beëindigen van de oproep, zal de radio terug naar de standby-modus.
7. Audio streaming (A2DP)
Zodra uw mobiele telefoon en Bluetooth car stereo gematched, als uw mobiele telefoon kunt instellen
afspelen van audio- en videobestanden en de A2DP (Advanced Audio Distribution Profile) hij kan verspreiden
audio en video van uw mobiele telefoon naar uw autoradio (voor sommige laptops, zul je
voordat u weer naar de radio).
A2DP-modus, als uw mobiele telefoon ondersteunt AVRCP (De Audio / Video Remote Control Profile), de
functies, afspelen / pauzeren, MUTE (MUTE) hebben dezelfde functionaliteit in MEDIA modus (sleutels terug
Snel en snel vooruit zijn niet beschikbaar).
9. PROBLEMEN OPLOSSEN
Geen voeding
De auto ontsteking is niet gezet.
Zet het contact aan.
De zekering is doorgebrand.
Vervang de zekering.
Geen geluid
Het volume staat uit.
Regel het volume.
De verbinding is niet goed gemaakt.
Controleer de verbinding.
De radio werkt niet
De antenne kabel zit los
De signalen zijn te zwak
Controleer de kabelverbinding
Stem af op een zender met een sterker signaal.
PLAY USB / SD
ONMOGELIJK
Je hebt niet aangesloten apparaat
Plaats uw apparaat opnieuw
SD-apparaat, USB of bestanden beschadigd
Probeer een andere SD / of USB-stick met
MP3-bestanden
Page 42

42
10. SPECIFICATIONS TECHNIQUES
ALGEMEEN
Stroomtoevoer 12V DC (10.8-15.6V toelaatbaar)
Zekering 10A
Stroom output 4X 45Watts
Afmeting 178 X 120 X 50mm.
TUNER FM
Frequentiebereik 87.5-108 MHz
Gevoeligheid 3μV
TUNER AM
Frequentiebereik 522-1620 kHz
Gevoeligheid 32 dB
RCA OUTPUT
Output 1000mV @ MAX.
MMC/SD ou USB SPELLER
Systèm Audio MP3
Frequency 20Hz -100Hz <=5dB
10 KHz-20 KHz <=5dB.
Verhouding Signaal – Ruis (SNR 50dB [1 KHz].
Op de technische specificaties en het ontwerp kunnen worden verbeteringen worden aangebracht zonder dat dit
wordt medegedeeld.
 Loading...