

Page 1
MANUEL D'UTILISATION
USER MANUAL
Lire attentivement la notice avant d'utiliser l'appareil
Before operating this product, please read user manual completely
Français-English
LAR-100B
1
13
R
LAR-100B
R
Page 2

FR-1
CHER CLIENT
En choisissant cet appareil, vous avez fait le premier pas vers le plaisir de l’écoute musicale. Maintenant,
c’est le moment de vous dévoiler comment optimiser les fonctions de cet équipement.
Tout d’abord, il est important de savoir comment écouter de la musique à un niveau sonore sans danger,
sufsamment fort et clair, non tonitruant et sans distorsion – et surtout un son qui n’endommagera pas l’ouïe.
Avec le temps si vous exposez vos oreilles à des bruits de forte intensité, votre audition peut s’adapter et
donnera l’impression que le volume a été réduit. Ce qui vous semble normal peut s’avérer devenir nuisible.
Pour avoir un niveau de son sans danger :
• Réglez la commande de volume à un niveau bas
• Augmentez progressivement le niveau sonore jusqu’à ce que vous entendiez confortablement,
clairement et sans distorsion.
Une fois que vous avez établi un niveau d’écoute confortable, laissez-le ainsi.
Prenez une minute pour cette opération an d’éviter d’endommager votre ouïe dans le futur. Ce que nous
vous souhaitons, c’est que vous protiez pendant des années du plaisir d’écouter.
SUR CE MANUEL
Ce produit est doté de nombreuses fonctions qui facilitent son utilisation et assurent une bonne réception.
Cependant elles ne sont pas toutes évidentes.
Ce guide d’utilisation est conçu pour vous aider à proter pleinement du potentiel de ce produit.
Nous vous recommandons de vous familiariser avec les fonctions et leur manipulation en lisant entièrement
ce manuel avant de commencer à utiliser l’appareil. Il est particulièrement important de lire et respecter
les “précautions” indiquées ci-dessous.
Les Opérations de base pour chaque source audio seront clairement mises en évidence dans ce manuel.
PRÉCAUTIONS
1. Lire attentivement ce guide de l’utilisateur avant installation et utilisation.
2. Ne pas ouvrir le couvercle et ne pas toucher les composants exposés à l’extérieur de l’appareil, seuls
des techniciens qualiés peuvent y le faire.
3. Ne pas exposer l’appareil à la lumière directe du soleil ou près d’objets qui dégagent de la chaleur
pour éviter d’endommager l’appareil.
4. Ne pas placer l’appareil dans un endroit humide qui pourrait affecter le capteur de l’appareil.
5. L’appareil ne doit pas être exposé à des gouttes ou des éclaboussures.
6. Nettoyer le panneau et le boîtier à l’aide d’un chiffon doux et sec uniquement, n’appliquer aucun type
de solvant, d’alcool et de vaporisateurs.
1. AVANT DE COMMENCER
Page 3
FR-2
Sortie Préampli:
Rouge (Droit) Blanc (Gauche)
ANTENNE ÉLÉCTRIQUE:
FIL BLEU
CONNECTEUR A
4. MEMOIRE (+12V)
7. BATTERIE (+12V)
8. MASSE (-)
NOTE: (CONNECTEUR A N°7) doit être connecté à la clef de contact du véhicule an d’éviter le
déchargement de la batterie lorsque l’appareil est utilisé pendant une période prolongée.
CONNECTEUR B
1. HP ARRIERE DROIT (+)
2. HP ARRIERE DROIT (-)
3. HP AVANT DROIT (+)
4. HP AVANT DROIT (-)
5. HP AVANT GAUCHE (+)
6. HP AVANT GAUCHE (-)
7. HP ARRIERE GAUCHE (+)
8. HP ARRIERE GAUCHE (-)
Si votre voiture n’a pas de connecteur ISO, vous pouvez l’acquérir dans n’importe quel magasin
d’accessoires de voiture.
Conseils avant l’installation de l’appareil
• Avant toute installation, vérier si tous les branchements sont corrects.
• Installer l’appareil dans un endroit non gênant et non risqué pour le conducteur ou le passager
en cas d’arrêt brusque du véhicule.
• Ne pas installer l’appareil dans un endroit soumis à de fortes vibrations.
• Éloigner l’appareil du soleil, d’une source de chaleur, de la poussière ou de la saleté.
• N’utiliser que les pièces fournies avec l’appareil pour garantir une installation adéquate.
L’utilisation de pièces non conformes risque d’entraîner un mauvais fonctionnement de
l’appareil.
• Veiller toujours à enlever la façade avant d’installer votre autoradio.
Note : Vérier que l’angle d’installation ne dépasse pas 30° du plan horizontal an d’assurer un
fonctionnement optimal de l’appareil.
A
B
8642
7531
84
7
CONNECTEUR
ANTENNE
G (BLANC) D (ROUGE)
SORTIE PRÉAMPLI
CONNECTEUR ISO
ANTENNE BLUETOOTH
CONNECTER A UN
MICROPHONE EXTERNE
ANTENNE ELECTRIQUE (BLEU)
FUSIBLE 10A
2. INSTALLATION DE L’APPAREIL
Page 4
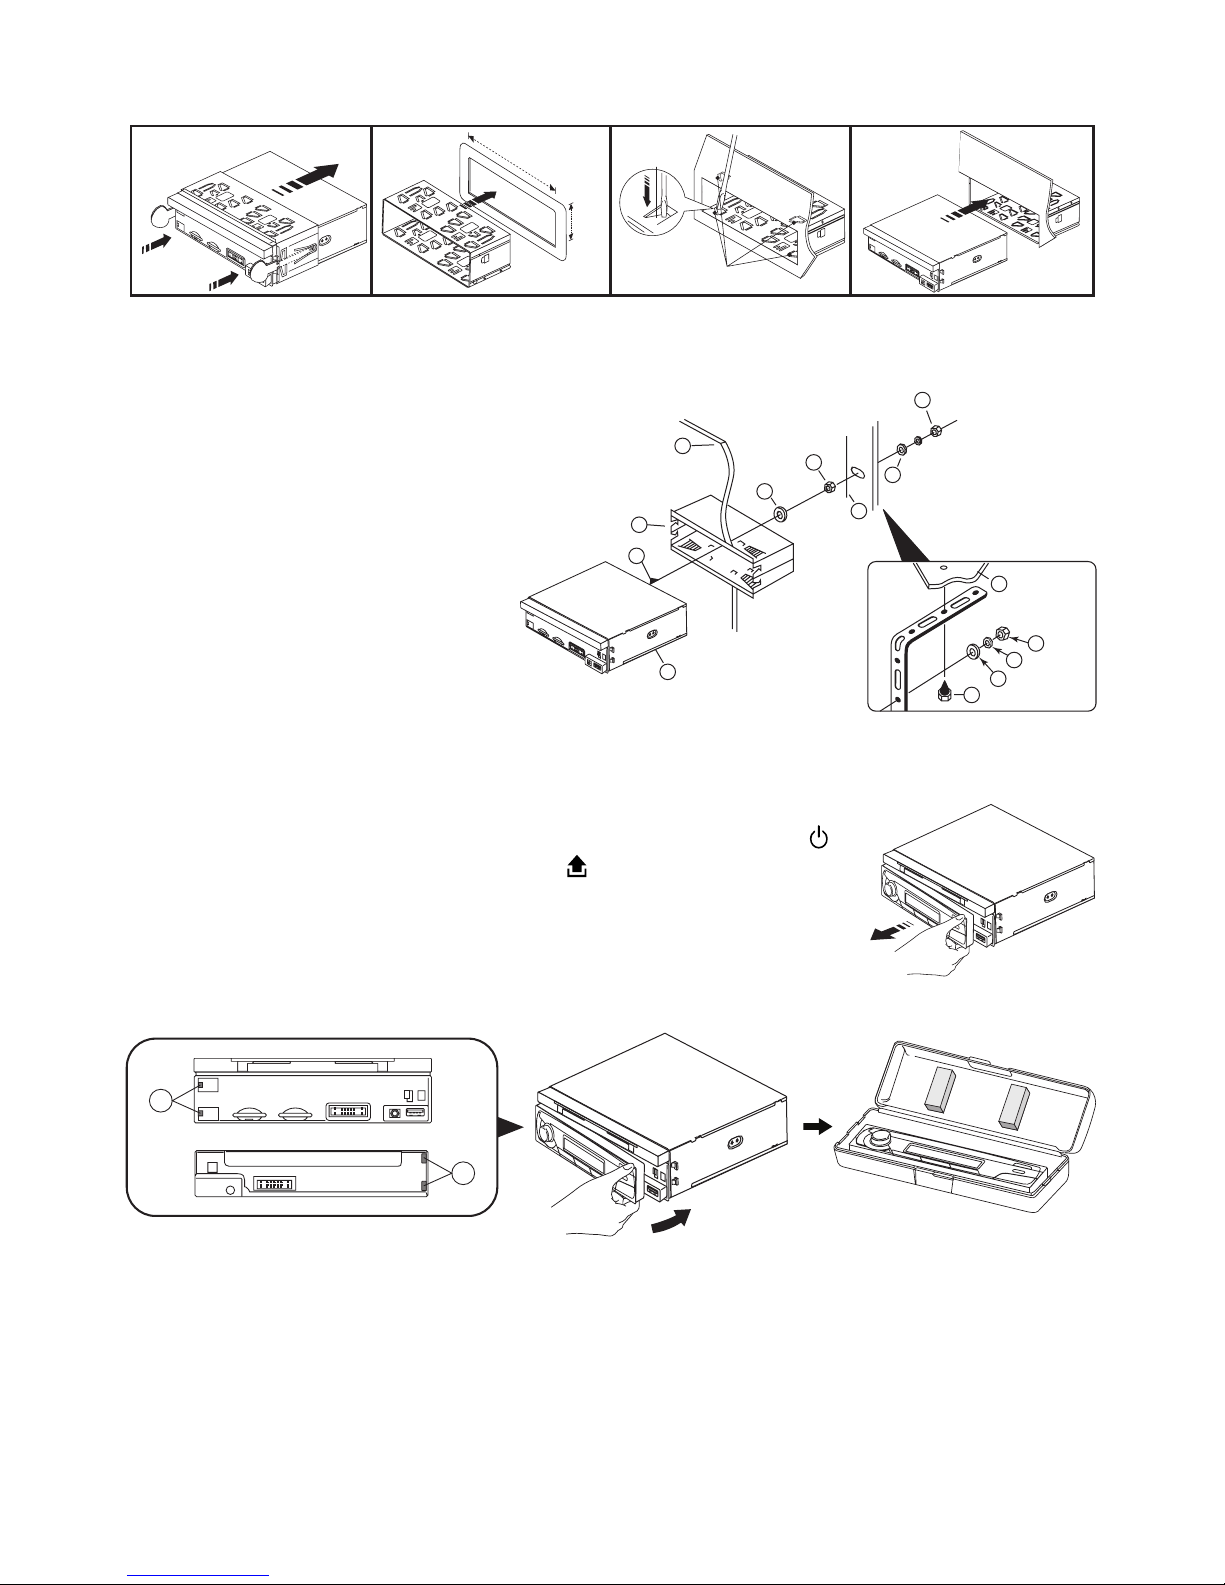
FR-3
ILLUSTRATION DE MONTAGE
ACCESSOIRES DE MONTAGE
1. UNITE PRINCIPALE
2. FOURREAU
3. TABLEAU DE BORD
4. ECROU HEX
5. RONDELLE
6. RONDELLE PLATE
7. CARROSSERIE
8. BARETTE DE MONTAGE ARRIERE
9. VIS
10. BOULON HEX. M5X15
Façade détachable
Le panneau avant de cet appareil peut être détaché pour éviter le vol de l’appareil.
Pour retirer la façade
Éteignez l’appareil avant d’enlever la façade en appuyant sur la touche .
Appuyer sur la touche d’éjection de la façade (15). Tirez le côté droit
vers vous an de retirer complètement la façade. (Voir illustration)
Remarque: Veillez à ne pas laisser tomber la façade quand vous la détachez
de l’appareil.
A
B
Notes:
• Assurez-vous d’attacher la façade avant dans le bon sens car elle ne peut être xée à l’envers.
• Lorsque vous retirez ou replacez la façade détachable, faites attention de ne pas exercer de pression
sur l’afchage ou sur les touches de commande, sous peine d’obtenir un mauvais fonctionnement de
l’appareil. Il peut être facilement xé en appuyant légèrement contre l’appareil.
Lorsque vous souhaitez transporter la façade utilisez l’étui façade qui vous est fournie.
2
182mm
53mm
3
4
TAP
1
1
2
Plier ces
griffes si nécessaire
Enlever les 2 vis de
blocage
10
7
2
3
4
4
4
5
5
6
6
8
9
1
Dashboard
B
Page 5

FR-4
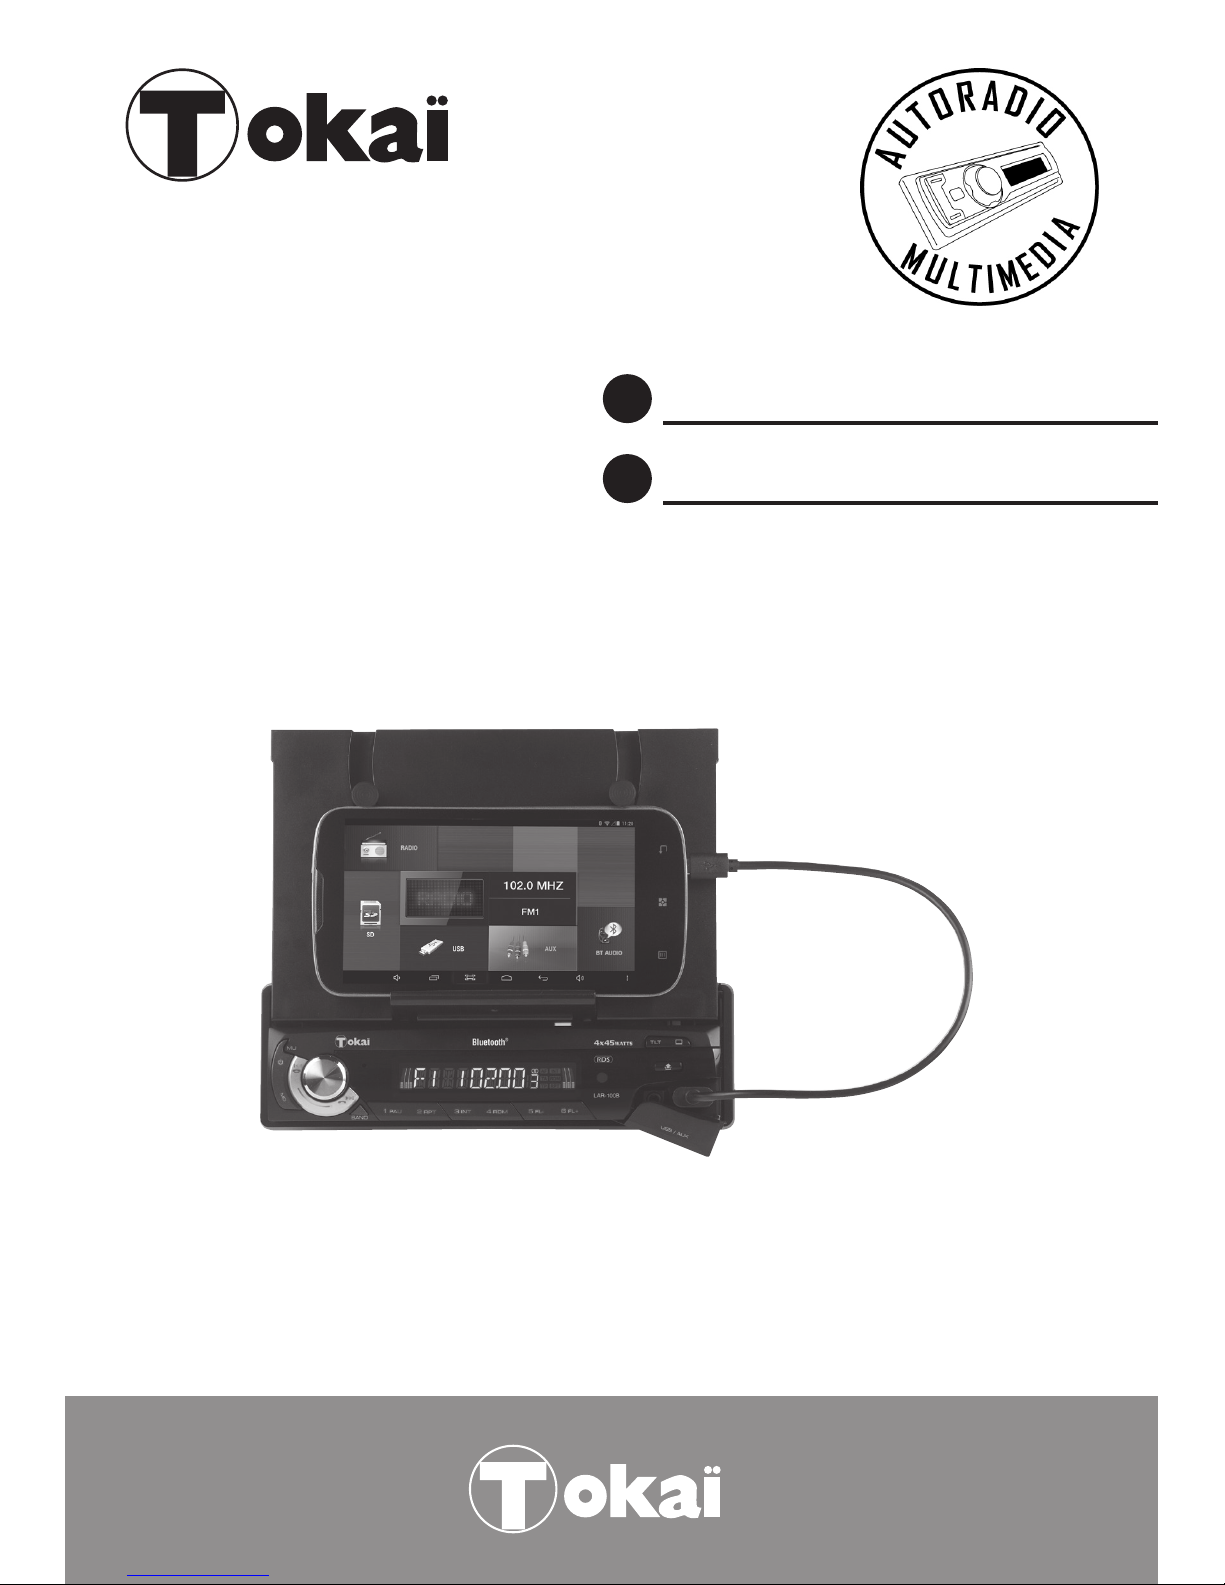
FIXATION DU SMARTPHONE & DE LA TABLETTE
Pour faire sortir le support motorisé escamotable pour Smartphone tablette, appuyez sur la touche .
Appuyez sur les 2 touches arrière an de relever les 2 bras de maintien pour Smartphone /tablette.
Vous noterez que celles –ci sont réglables de bas en haut en fonction de la taille de votre Smartphone
ou de votre tablette.
Grâce au socle et aux bras de maintien vous pourrez xer confortablement votre Smartphone ou votre
tablette contre le support pour un maintien optimal.
Pour rabattre le support escamotable, rabattez les bras de maintien et appuyez sur la touche .
1
23 45 6
Note importante : le support escamotable peut accueillir les Smartphones à partir de 4’’ et les
tablettes jusqu’à 7.85’’.
Réglage de l’inclinaison du support
Appuyez sur le bouton TILT à plusieurs reprises pour choisir l’angle d’inclinaison souhaitée.
NETTOYAGE DES CONNECTEURS
L’appareil ne fonctionnera pas correctement si les connecteurs de l’unité principale et de la façade sont sales.
An d’éviter que cela n’arrive, nettoyez le connecteur
de temps en temps. Pour cela, détachez la façade
en appuyant sur le bouton (15) et nettoyez avec
un coton-tige imbibé d’alcool blanc ou d’un nettoyant
spécial connecteur comme cela est illustré ci-contre.
Nettoyez délicatement chaque broche en évitant d'endommager les points de connexions.
Arrière de la
façade
Unité principale
Coton tige
Page 6
FR-5
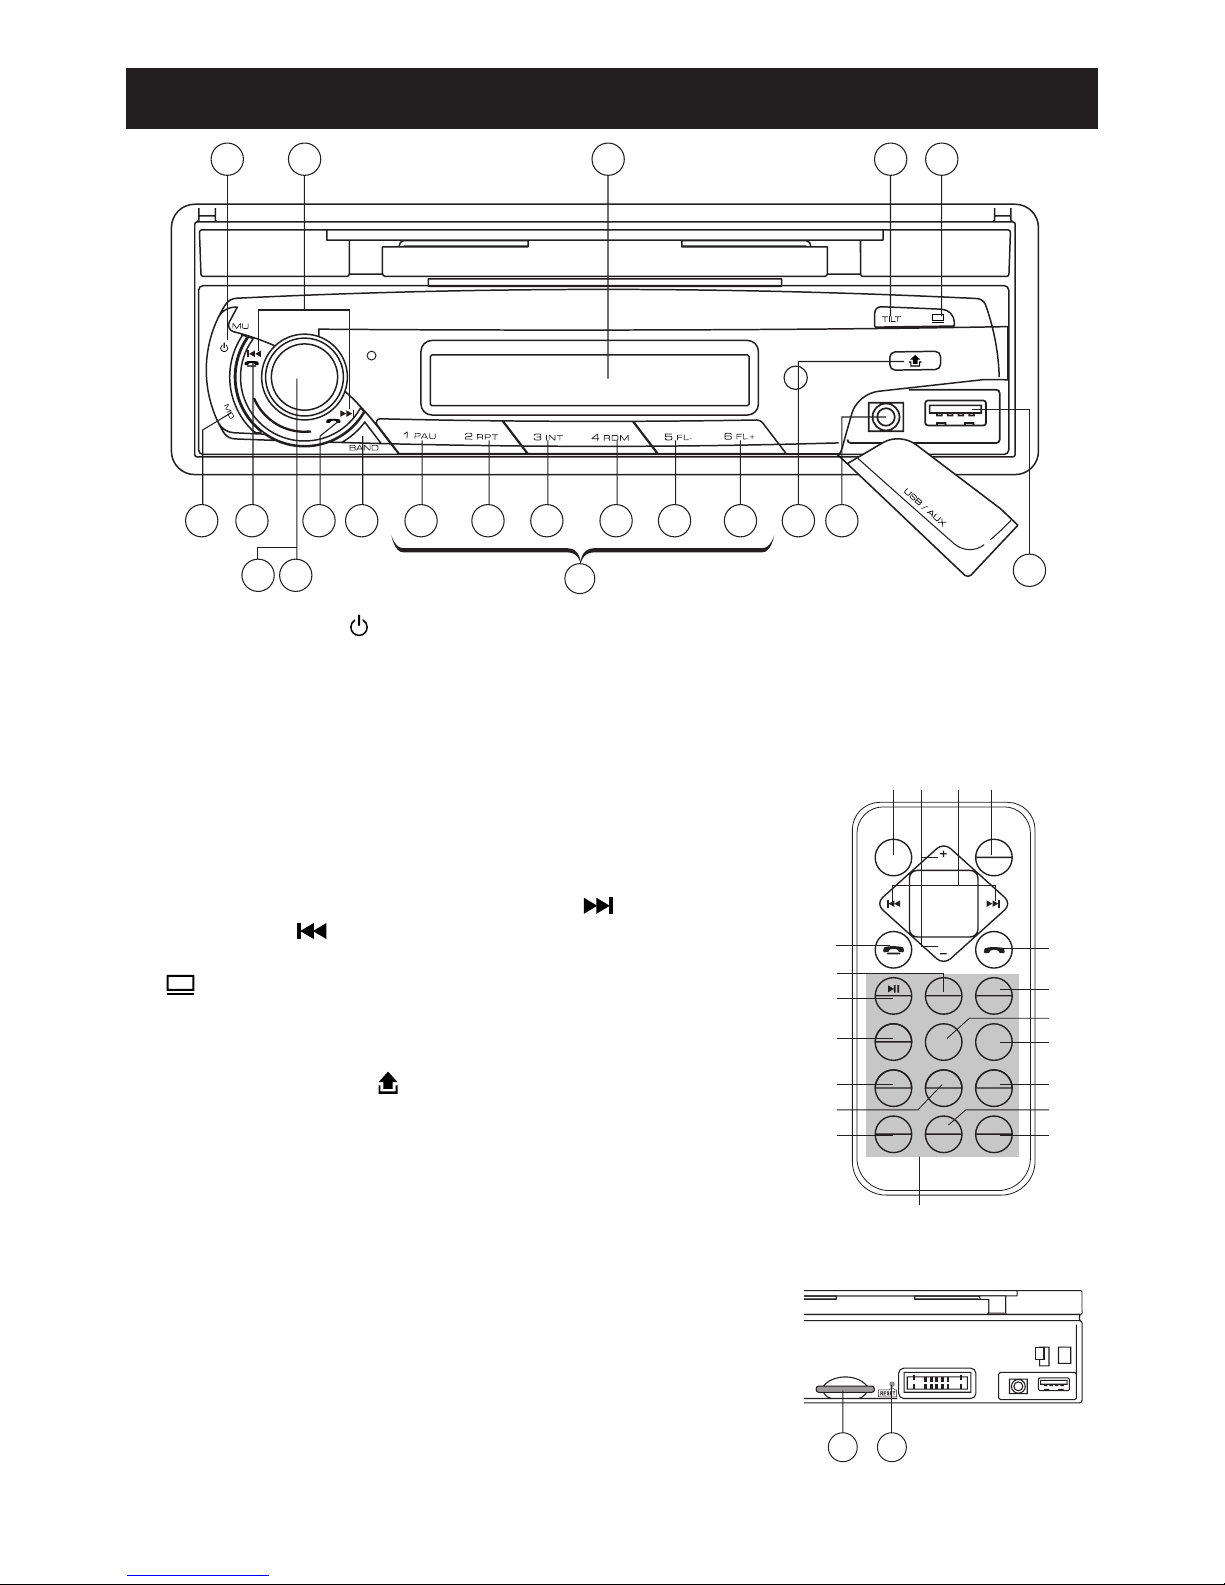
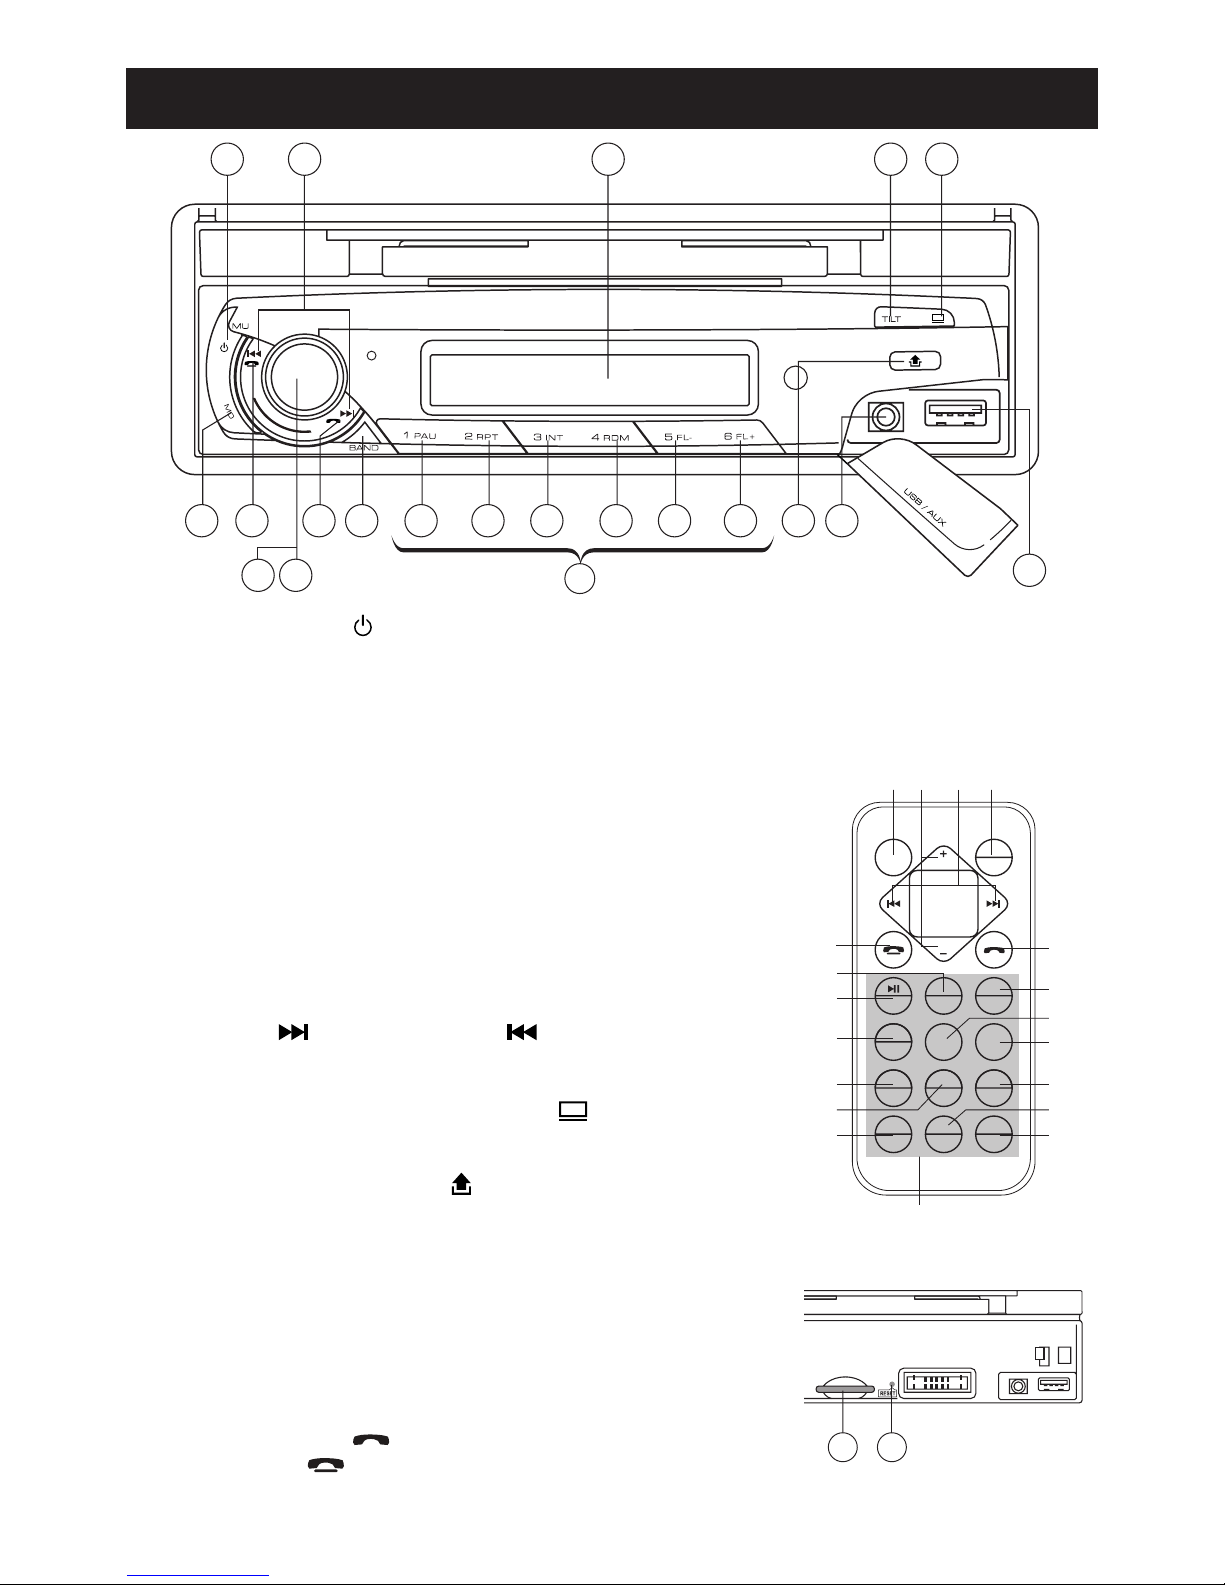
1. TOUCHE POWER & SOURDINE (MU)
2. & 3. BOUTON VOLUME & FONCTION SELECTION:
Réglage des BASSES/AIGUES/BALANCE/ Équilibre avant/arrière/Liste d’appels/Afcheur/ Volume
initial/ADJ/VOLUME TA/EON/AF/PTY/ DSP / TA SEEK / PI SOUND / RETUNE / MASK DPI
4. STATIONS PREREGLEES
5. FONCTION AF (FREQUENCES ALTERNATIVES)
6. FONCTION TA (CIRCULATION ROUTIERE)
7. FONCTION PTY (TYPE DE PROGRAMME)
8. EQUALIZER (DSP)
9. TOUCHE MODE / LOUDNESS (INTENSITE SONORE)
10. TOUCHE BANDE/ENTRER
11. REGLAGE AUTOMATIQUE ou MANUEL ( Recherche
vers l’avant/ Recherche vers l’arrière/ PISTE/TOUCHE
RECHERCHE)
12. SORTIR/REPLACER LE SUPPORT ESCAMOTABLE MO-
TORISE
13. TILT : REGLAGE DE L’INCLINAISON DU SUPPORT
14. ECRAN LCD
15. TOUCHE RELACHE
16. TOUCHE PAUSE
17. TOUCHE REPETITION
18. TOUCHE INTRO
19. TOUCHE LECTURE ALEATOIRE
20, 21. DOSSIER PRECEDENT/SUIVANT (UNIQUEMENT MP3/
WMA)
22. PORT COMPATIBLE USB
23. FENTE CARTE MEMOIRE
24. PRISE AUXILIAIRE
25. TOUCHES NUMERIQUES 1,2,3,4,5,6
26. TOUCHE DECROCHER
27. TOUCHE RACCROCHER
28. TOUCHE RESET
1610
32
9 27 26 17 18 19 20 21
14 1213111
4
(1-6)
2415
22
1610
32
14 1213111
4
(1-6)
23 28
2415
22
POWER
RDM
PTY AF TA
TUNE/SEEK
VOL
VOL
MODE
LOUD
RPT INT
231
897
DSP BAND SEL
0#
*
56
4
1 9
4
311
27
16
26
18
21
6
10
2
20
17
19
7
8
5
(1,2,3,4,5,6)
25 (1,2...,9,0,
*
,#)
14 1213111
(1-6)
23 28
2415
22
3. EMPLACEMENT DES COMMANDES
Page 7
FR-6
4. FONCTIONNEMENT GENERAL DES COMMANDES
1. BOUTON POWER ON/OFF & MUTE (Mise en marche /éteindre l’appareil & Fonction SOURDINE)
Appuyez longuement sur le bouton POWER pour allumer ou éteindre l’appareil .
Lorsque l’appareil est allumé, appuyer sur le bouton MU pour activer ou désactiver la fonction MUTE (SOURDINE).
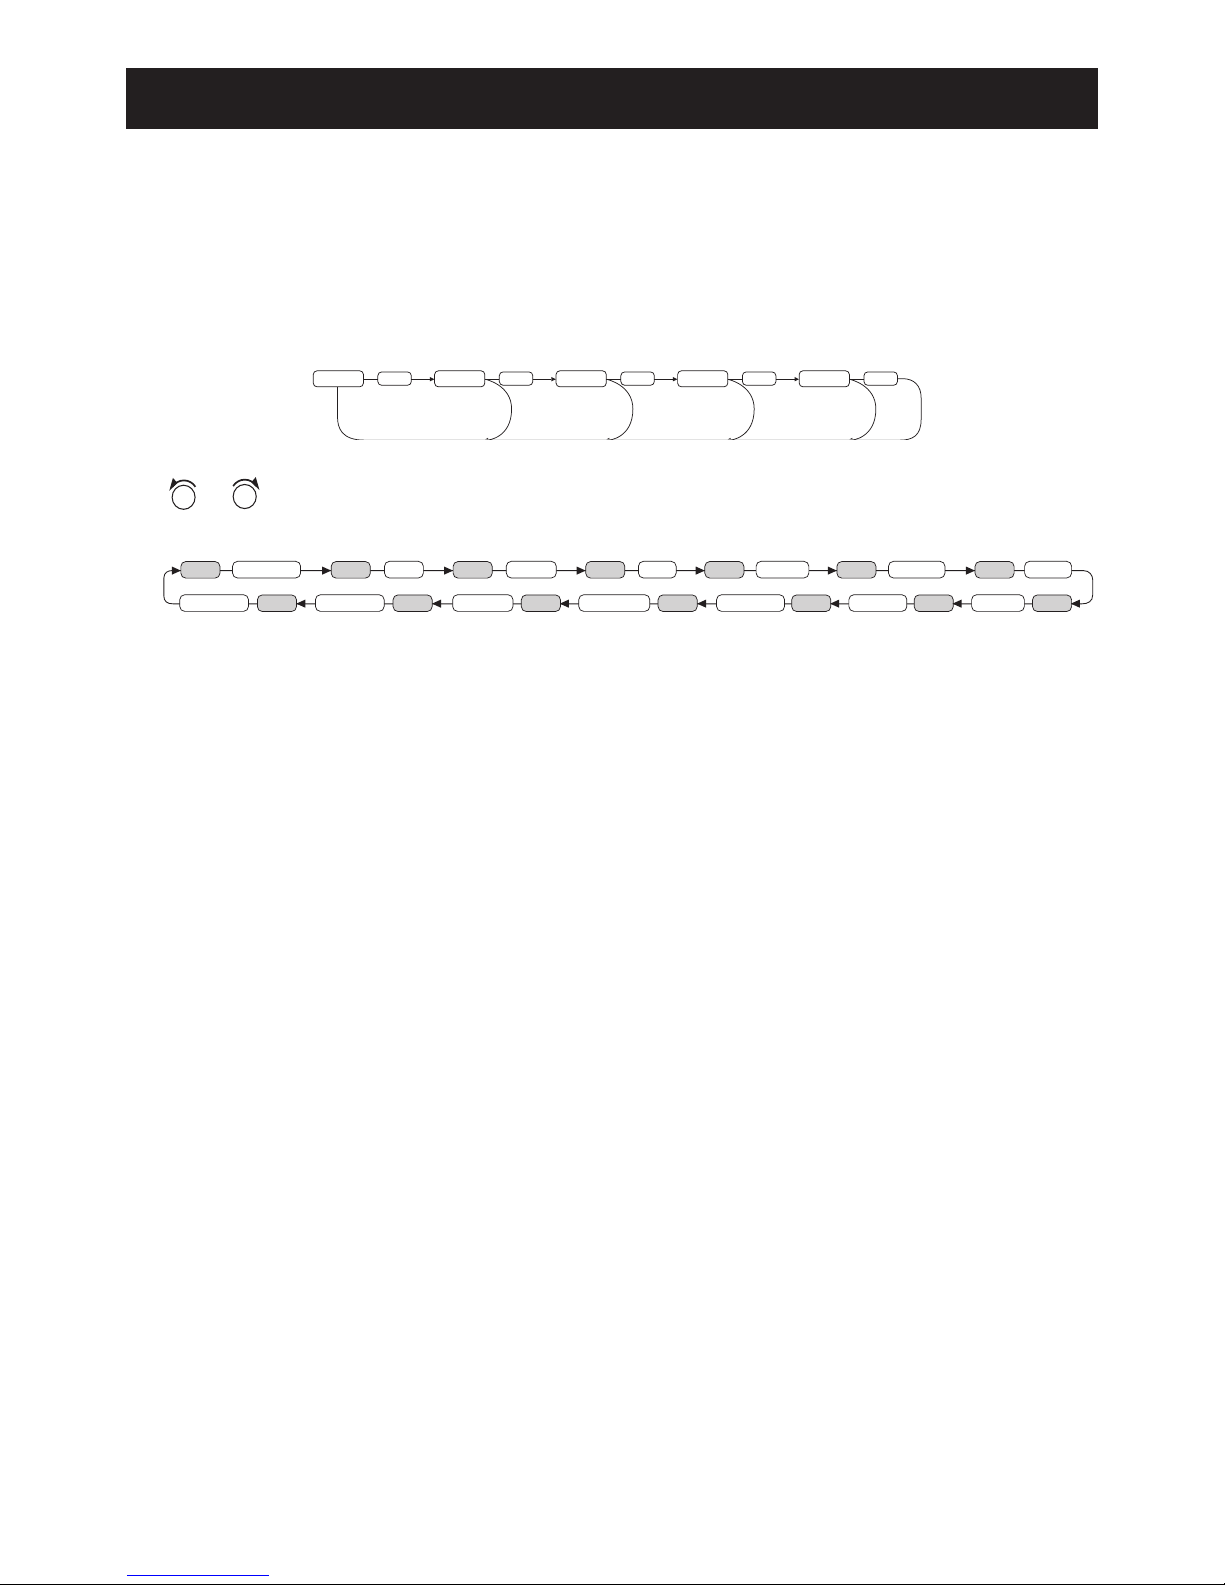
2. BOUTON SELECTION & VOLUME
3. En tournant le bouton de VOLUME (3) d’un coté ou de l’autre, vous pouvez régler les fonctions suivantes : VOLUME
/ BASS / TREBLE/ BALANCE / FADER.
Pour sélectionner d'autres fonctions, appuyez brièvement sur le bouton "VOL" et plusieurs fois pour sélectionner
une autre option de réglages parmi celles qui suivent :
Figure 1 : Réglages sonores
1 3
2
4
2
5
2
6
2
2
Tournez le bouton de VOLUME vers la droite ou vers la gauche pour augmenter ou diminuer le volume en tournant
VOLVOL
ou
VOLVOL
. Ces boutons peuvent être utilisés pour ajuster les graves, aigus, balance et fader.
Appuyez longuement sur le bouton VOL an d’ajuster les options ci-dessous énumérées :
CALL LIST
SEL
2 sec.
SEL
DISP
SEL
IN VOL
SEL
ADJ
SEL
PTY OFF
SEL
DSP NONE
SEL
TA VOL
SEL
TA OFF
SEL
EON ON
SEL
AF ON
SEL
TA ALARM
SEL
RETUNE L
SEL
MASK DPI
SEL
PI MUTE
CALL LIST : Liste d’appels (voir page 7)
DISP : AFFICHAGE
Cette fonction vous permet d’afcher les informations telles que les fréquences radio, l'horloge, la piste et d'autres
informations en fonction du mode de lecture.
IN VOL : volume initial
Tourner le bouton VOL pour régler le niveau de volume initial lors de la mise sous tension de l’appareil.
ADJ
Permet d’ajuster l’horloge. Tournez le bouton de VOLUME dans le sens horaire pour régler les heures et dans le
sens antihoraire pour régler les minutes.
TA VOL
Tourner le bouton VOL pour régler le volume sonore lors de la transmission des annonces trac.
EON
Tourner le bouton de VOL pour activer ou désactiver la fonction EON.
LA FONCTION RDS
RDS (Radio Data System) est un système d’informations numériques radio développé et introduit par l’EBU (European
Broadcasting Union). Transmis sur le canal des émissions normales FM, Le RDS offre une variété d’informations
telles le nom des stations, le programme et les informations sur le trac, ainsi que des fonctions utiles comme la
syntonisation automatique des meilleurs signaux disponibles dans le programme choisi..
- Fonction "AF-REG"
Lorsque la fonction AF/REG est sélectionnée, l’appareil vérie constamment la force du signal des fréquences
alternatives.
- Fonction "REGIONALE ACTIVEE"
Lorsque la fonction AF/REG est sélectionnée, l’appareil vérie constamment la force du signal des fréquences
alternatives.
- Fonction "REGIONALE DESACTIVEE"
Cette fonction n'est plus prise en compte lorsqu'une recherche de station est effectuée
Fonction PTY (programme type)
Vous pouvez sélectionner le mode PTY en tournant le bouton de volume comme ci-dessous :
PTY OFF/NEWS/AFFAIRS/INFO/SPORT/EDUCATE/DRAMA/CULTURE/SCIENCE/VARIED/POP M/ROCK M/EASY
M/LIGHT M/CLASSICS/OTHER M/WEATHER/FINANCE/CHILDREN/SOCIAL/RELIGION/PHONE IN/TRAVEL/
LEISURE/JAZZ/COUNTRY/NATION M/OLDIES/FOLK M/DOCUMENT.
DSP : égaliseur
Tourner le bouton du volume pour régler l’équaliseur : CLASSIQUE, ROCK, POP, FLAT.
Fonction TA ALARM/SEEK
Page 8

FR-7
• Mode Recherche TA:
Lorsque la station radio écoutée ne reçoit pas d’informations Trac “TP” pendant 5 secondes, cette fonction permet
de passer automatiquement une autre station qui n’a pas les mêmes types de programmes mais diffuse des Annonces Trac “TA”.
• Mode ALARME TA:
Si vous sélectionnez ce système, quand il n’y a pas le signal TP, la radio ne recherche aucune station alternative
mais elle émet un signal (ALARME) pour signaler l’absence du signal TP.
SON PI
Lorsque les 2 stations avec identication de programme différente (PI) codes sont sur la même fréquence:
SON: La radio passe sur un autre canal pendant quelques secondes et revient en arrière une nouvelle fois.
MUTE: La radio est coupée
RETUNE L/S
Retune L: temps de recherche automatique pour les Infos Trac: 90 sec.
Retune S: temps de recherche automatique pour les Infos Trac: 30 sec.
MASK DPI
MASK DPI: masque les stations avec des types de programmes différents
MASK ALL: masque les stations avec des types de programmes différents et non RDS.
4. PREREGLAGE DES STATIONS (1, 2, 3, 4, 5, 6)
Vous pouvez mémoriser 6 stations de radio dans chaque bande de fréquence radio et pour rappeler une station
mémorisée appuyez une fois sur la touche numérique correspondante à la position de la station.
Pour mémoriser une station de radio:
1. Sélectionnez une bande de fréquence radio si nécessaire.
2. Réglez une station de radio sur la bande en cours.
3. Appuyez longuement sur l’une des touches numériques de 1 à 6 pour effectuer la mémorisation. Lorsque la
station est mémorisée le numéro de la mémorisation s’afche.
Rappeler une station radio:
1. Sélectionnez une bande de fréquence radio si nécessaire
2. Appuyez brièvement sur touche de présélection pour rappeler la station de radio mémorisé au préalable.
Note: Cet appareil est équipé d’une mémoire intégrée C. I. (Circuits intégrés) pour enregistrer les paramètres de
l’utilisateur tels que les préréglages des stations et les réglages des paramètres audio.
Pour annuler ces réglages, passer en mode radio, appuyez longuement sur le bouton “1” (sans relâcher), suivie
de la touche MD. L’appareil redémarre automatiquement après 5 secondes.
5. Fonction AF/REG (Fréquences Alternatives)
Se référer à la section SELECTION, fonction : ‘Fréquences alternatives’.
6. Fonction 'TA' (Informations routières)
Se référer à la section SELECTION, fonction : 'TA' (informations routières)
7. Fonction 'PTY' (Type de programme)
Se référer à la section SELECTION, fonction : 'PTY' (type de programme)
8. EGALISEUR (DSP)
Appuyez sur DSP pour choisir entre les modes d'égaliseur (classique, rock, pop, at).
9. MODE/ TOUCHE LOUDNESS (MD/LD)
• MODE: Vous pourrez sélectionner les fonctions suivantes : AUX/TUNER/USB/SD/AD2P.
• LOUDNESS (intensité sonore): en appuyant sur cette touche plus de deux secondes, vous pourrez sélection-
ner le mode LOUDNESS.
10. SÉLECTEUR DE BANDES (BD)
Chaque bande est sélectionnée en appuyant successivement sur cette touche FM1/FM2/FM3 ---MW(AM)
1---MW(AM) 2.
11. RÉGLAGE DES STATIONS AUTOMATIQUE OU MANUEL / RECHERCHE AVANT OU RECHERCHE ARRIÈRE
(A) MODE RADIO
Appuyez brièvement an d’activer la fonction « Recherche Automatique ». Une longue pression (de +1 seconde)
active la « Recherche Manuelle ».
(B) MODE MP3/ WMA
Appuyez & maintenez les touches / pour activer les fonctions “SAUT DE PLAGE AVANT” ou
“SAUT DE PLAGE ARRIERE”. Une pression de plus de 2 secondes active la « recherche avant » ou la «
recherche arrière ».
12. OUVRIR/FERMER LE SUPPORT MOTORISE ESCAMOTABLE
Appuyez sur le bouton OPEN pour faire sortir le support Smartphone/Tablette.
Page 9

FR-8
13. REGLAGE DE L’INCLINAISON DU SUPPORT SMARTPHONE/TABLETTE
Appuyez sur le bouton TILT plusieurs reprises pour choisir l'angle d'inclinaison souhaitée.
14. AFFICHEUR LCD
L’afcheur indique les fonctions activées et en cours de lecture.
15. TOUCHE POUR EJECTER LA FACADE
Appuyez sur cette touche pour éjecter la façade.
COMMANDES MP3/WMA
16. Touche PAUSE
Durant la lecture, appuyez sur la touche PAUSE (16) ‘PAU’ pour arrêter momentanément la lecture. Appuyez de
reprendre la lecture.
FONCTION SAUT DE PLAGE AVANT/ARRIERE - RECHERCHE RAPIDE AVANT/ARRIERE (11)
Appuyez brièvement sur la touche / durant la lecture pour aller au morceau désiré.
Appuyez longuement sur ces touches pour effectuer une recherche rapide dans le chier en cours de lecture.
Lorsque le passage recherché est trouvé, relâchez la touche ou . La lecture reprend normalement.
17. Touche REPETITION
Lorsque vous appuyez sur la touche RPT, ‘RPT’ apparait à l’écran. Le chier en cours de lecture est répété jusqu’à
ce que vous appuyiez une nouvelle fois sur la touche RPT pour désactiver le mode répétition.
18. Touche INTRO
Appuyez sur la touche INT pour mettre en lecture les premières secondes de chaque morceau. Appuyez une nouvelle
fois pour désactiver la fonction INTRO.
19. TOUCHE RDM - Lecture en mode aléatoire
Appuyez que cette touche si vous souhaitez lire votre support multimédia ( USB/CARTE MÉMOIRE) dans un ordre
aléatoire. Pour désactiver le mode lecture aléatoire, appuyer à nouveau sur la touche ‘RDM’.
20-21. Répertoire précédent / Répertoire suivant (en mode MP3/WMA).
Connexion à un lecteur portable MP3
22. Entrée auxiliaire
La prise auxiliaire vous permet de connecter facilement et simplement la plupart des lecteurs portables MP3.
23. Port compatible USB & Lecteur de carte mémoire compatible SD
Votre autoradio est équipé d’un port USB et d’un lecteur de carte mémoire SD. Les chiers MP3 ou WMA stockés
sur ces supports multimédia seront mis en lecture par votre autoradio.
1. Branchez votre support de stockage USB dans le port compatible USB.
Remarque: Un câble USB est utilisé pour la connexion entre l'appareil et le périphérique externe tel qu’un Smart-
phone ou une tablette en mode chargement.
2. Si vous désirez brancher une carte mémoire, insérez- la dans le lecteur de carte mémoire voir le schéma ci-
dessous :
3. Le lecteur passe automatiquement à la source utilisée et démarre la lecture.
4. Pour le contrôle de la lecture des chiers MP3-WMA contenus dans votre support USB ou votre carte SD, veuillez
vous référer à la section précédente «Comment sélectionner un chier MP3/WMA».
Note: En raison d’une grande diversité de clé USB et de cartes SD qui ont parfois des fonctions spéciques au
fabricant, nous ne pouvons pas garantir que tous les supports seront reconnus et que toutes les fonctions, en théorie
possible, opèreront correctement avec cet appareil.
• Ne pas utiliser des disques durs USB sur l’appareil.
Page 10

FR-9
Application ICONTU
L'appareil prend en charge l’application téléphone mobile androïde. Vous pouvez télécharger à partir de la plateforme
de téléchargement d’applications de votre mobile l'application nommée "icontu" sur le téléphone mobile et installez-le.
Cette application pourra contrôler votre autoradio via Bluetooth.
Remarque: le logiciel "icontu" est un logiciel générique, veuillez vous référer aux fonctions de votre autoradio.
Le microphone de l’appareil doit être connecté au dispositif de façon à utiliser les fonctionnalités Bluetooth. En outre, un
téléphone mobile doit prenant en charge la transmission de données Bluetooth.
Raccorder le téléphone à l'appareil
• Activez la fonction Bluetooth sur votre téléphone mobile et entrez en mode recherche d’appareil Bluetooth. Une fois
la recherche effectuée, votre téléphone mobile afchera les appareils Bluetooth trouvés. Sélectionnez votre autoradio
qui apparaitra sous le nom CAR AUDIO.
• Si une fenêtre vous demandant d’entrer un mot de passe s’afche, entrez le mot de passe suivant : 1234. Reconrmez
la connexion une fois de plus si nécessaire. Après un couplage réussi ‘CONN OK’ apparaît brièvement sur l'afcheur.
Décrocher / raccrocher un appel
Lorsqu’il y a un appel entrant vous entendrez le signal d’appel via votre téléphone mobile, tandis que le numéro d’appel
s’afchera sur l’écran de votre autoradio.
• Pour prendre un appel, appuyez sur le bouton “ ” de l’appareil.
• Pour terminer un appel appuyez sur le bouton “ ” de l’appareil.
Rejeter un appel
• Lorsque le téléphone sonne, appuyez brièvement sur la touche “ ” pour rejeter l’appel.
Pour appeler
• L’autoradio et votre téléphone mobile doivent être connectés en Bluetooth.
• Composer le numéro de téléphone que vous souhaitez appeler avec votre téléphone mobile.
• Le conducteur peut utiliser l’appareil comme un kit main libres.
Liste des appels
• Appuyez et maintenez le bouton VOLUME [SEL] pour sélectionner le mode «Liste d’appels».
‘CALL LIST' s’afche sur l’écran LCD. Appuyez sur le bouton BAND (10) pour conrmer.
• Faites tourner le bouton de Volume pour sélectionner “IN CALL” appels entrants ou “OUT CALL” appels émis.
• Appuyez sur la touche BAND (10) pour conrmer.
• Tourner le bouton du volume pour afcher la liste des appels.
La liste des appels afchera les 20 derniers appels entrants ou émis.
Remarque: La fonction « Liste d’appels » sera activée une fois le téléphone mobile connecté en Bluetooth.
Liste de contacts
Vous pouvez sélectionner jusqu’à 20 contacts de votre répertoire téléphonique et les transférer du téléphone portable à
l’autoradio via Bluetooth. Ainsi vous pourrez appeler vos contacts à partir de votre autoradio.
Remarques:
• Vous ne pouvez pas transférer via Bluetooth vos contacts depuis votre mobile connecté à votre autoradio avec les
téléphones APPLE ®.
• Consultez le manuel de fonctionnement de votre téléphone mobile pour transférer vos contacts via Bluetooth car cela
diffère selon les marques de téléphones.
• Chaque contact transféré est déposé à la suite à partir de l’emplacement de mémorisation PB01 à PB20.
Liste de contacts
Appuyez longuement sur le bouton VOLUME [SEL] pour sélectionner le mode «liste d’appels». “Call list” s’afche sur
l’écran LCD.
• Tourner le bouton de volume pour sélectionner “PH BOOK”.
• Appuyez sur le bouton BAND pour conrmer.
• Tourner le bouton de volume pour faire apparaître le nom et le numéro du contact (de PB01 à PB20).
• Appuyez sur le bouton
“ ” de l’appareil pour sélectionner et composer le numéro d’appel.
Suppression de la liste des appels et Liste de contacts
Lorsque votre téléphone mobile et votre autoradio sont connectés, appuyez à plusieurs reprises sur le bouton [MD]
pour sélectionner “BT Mode“.
Appuyez et maintenez enfoncé le bouton “ ” situé sur l’appareil jusqu’à ce que RESET s’afche à l’écran. La
connexion Bluetooth de votre téléphone mobile est coupée et la liste des appels et la liste des contacts contenus dans
votre autoradio seront supprimées.
5. MODE BLUETOOTH
Page 11

FR-10
Fonction Audio-Streaming (A2DP)
• Votre autoradio possède la fonction A2DP (Advanced Audio Distribution Prole) et peut ainsi diffuser les données
audio de votre téléphone portable sur votre autoradio.
• Assurez-vous que votre mobile et l’autoradio sont connectés.
Sur votre téléphone portable, sélectionnez un chier audio et démarrez la lecture.
A2DP s’afchera sur l’écran de votre autoradio. Le chier est mis en en lecture via les hauts parleurs de votre l’autoradio.
Remarques:
• Sur le téléphone mobile, il peut éventuellement être nécessaire de basculer la lecture via le casque stéréo Bluetooth.
Pour plus d’informations, consultez le manuel de fonctionnement de votre téléphone mobile
• WAvec certains téléphones mobiles, l’appareil ne commute pas automatiquement sur le mode A2DP. Dans ce cas,
vous passez en mode A2DP en appuyant sur la touche MD à plusieurs reprises jusqu’à la mention BT MUSIC ou
A2DP s’afche à l’écran.
Fonction AVRCP (Audio Video Remote Control Prole): Prol de contrôle audio/vidéo à distance
L’appareil utilise le prol AVRCP facilitant ainsi le contrôle de la lecture des chiers audio.
• Avec le bouton Preset 1 (16) sur l’appareil, vous pouvez arrêter et / ou redémarrer la lecture des chiers audio du
téléphone mobile.
• Avec les boutons ou de votre autoradio, vous pouvez sélectionner le chier audio précédent ou suivant
du téléphone mobile.
28. TOUCHE RESET
La touche Reset (28) se trouve sur la façade interne de l’appareil. La touche RESET doit être utilisée dans les cas
suivants:
• Installation initiale de l’appareil, après avoir branché tous les câbles
• Défaut de fonctionnement de toutes les touches
• Symbole d’erreur afché.
Page 12

FR-11
GENERAL
Alimentation élecrique DC 12V (autorisé 10.8-15.6V)
Impédance d'enceinte 4 ou 8 Ohm
Consommation Max.10A
Sortie de puissance 4X 45Watts (mesurée à DC 14.4V)
SECTION FM
Portée de fréquence 87.5-108 MHz
Sensibilité effective 2.8 uV.
Séparation stéréo 30 dB
Rapport du signal sur bruit 50 dB
Pas de fréquence 50 kHz
SECTION MW (AM)
Portée de fréquence 522-1620 KHz
Sensibilité effective 32 dB
SORTIE DE LIGNE RCA
Sortie 1.5V (max.)
Impédance 10k Ohm
LECTURE MP3/WMA
Rapport Signal/Brouillage > 60 dB
Séparation Canal > 50 dB (1KHz)
Réponse en fréquence 20Hz - 20KHz
Les spécications et le design de l’appareil peuvent être soumis à modications sans préavis.
6. CARACTERISTIQUES TECHNIQUES
Page 13

FR-12
Attention ! Ce logo apposé sur le produit indique qu’il s’agit d’un appareil dont le
traitement en tant que déchet rentre dans le cadre de la directive 2002/96/CE du 27
janvier 2003, relative aux déchets d’équipements électriques et électroniques (DEEE).
Ce symbole signie que les produits électriques et électroniques usagées ne doivent pas
être mélangés avec les déchets ménagers généraux. Un système de collecte séparé
est prévu pour ces produits.
Si vous souhaitez mettre cet appareil au rebut, ne le jetez pas dans une poubelle ordinaire !
La présence de substances dangereuses dans les équipements électriques et électroniques peut avoir
des effets potentiels sur l’environnement et la santé humaine dans le cycle de retraitement de ce produit.
Ainsi, lors de la n de vie de cet appareil, celui-ci ne doit pas être jeté avec les déchets municipaux non
triés. Les appareils électriques et électroniques doivent être traités séparément et conformément aux lois
en vigueur en matière de traitement, de récupération et de recyclage adéquats de ces appareils.
Des systèmes de reprise et de collecte sont mis à votre disposition par les collectivités locales (déchetteries)
et les distributeurs. Veuillez contacter votre administration locale pour plus de renseignements. Vous avez
l’obligation d’utiliser les systèmes de collecte sélective mise à votre disposition.
Si votre appareil électrique et électronique usagé comporte des piles ou des accumulateurs, veuillez les
mettre séparément et préalablement au rebut conformément à la législation locale en vigueur.
En veillant à la mise au rebut correcte de ce produit, vous contribuerez à assurer le traitement, la
récupération et le recyclage nécessaires de ces déchets, et préviendrez ainsi les effets néfastes potentiels
de leur mauvaise gestion sur l’environnement et la santé humaine.
Cet appareil est conforme aux exigences imposées par la
Directive Européenne 2006 / 95 CE (Directives sur la Compatibilité
Electromagnétique et Basse Tension)
7. MISE AU REBUT EN FIN DE VIE
Page 14

EN-13
Selecting ne audio equipment such as the unit you have just purchased is only the start of your musical
enjoyment. Now it is time to consider how you can maximize the fun and excitement your equipment offers.
We want you to get the most out of your equipment by playing it at a safe level. One that lets the sound
come through loud and clear without annoying blaring or distortion - and, most importantly, without affecting
your sensitive hearing.
Sound can be deceiving. Over time your hearing “comfort level” adapts to higher volumes of sound. So
what sounds «normal” can actually be loud and harmful to your hearing.
Guard against this by setting your equipment at a safe level BEFORE your hearing adapts.
To establish a safe level:
• Start your volume control at a low setting
• Slowly increase the sound until you can hear it comfortably and clearly, and without distortion we want
you listening for a lifetime.
Once you have established a comfortable sound level:
• Set the dial and leave it there.
Take a minute to do this now; it will help to prevent hearing damage or loss in the future. After all, we
want you listening for a lifetime.
ABOUT THIS MANUAL
This product features a number of sophisticated functions ensuring superior reception and operation. All
are designed for the easiest possible use, but many are not self-explanatory.
This operation manual is intended to help you benet fully from their potential and to maximize your
listening enjoyment.
We recommend that you familiarize yourself with the functions and their operation by reading through
the manual before you begin using this product. It is especially important that you read and observe the
“precaution” as follows.
In this operation manual, the Basic Operation for each sound source is outlined at the beginning of its
explanation, covering simple operation for that source, such as merely playing music.
PRECAUTION
1. Read through this instruction manual before installation and use.
2. Do not touch the power plug with wet hand.
3. Switch off the main power when the unit is not in use. (Disconnect the power plug from the power outlet
when you do not intend to use the unit for a prolonged period of time.)
4. Do not open the cover or touch any of the components exposed out of the unit, only for qualied
technicians.
5. Do not expose the unit under direct sunlight or nearby objects that radiate heat to avoid damage to the unit.
6. Do not place the unit in moist and humid conditions, which affect the pick-up of the unit.
7. Clear the panel and case with soft dry cloth only, do not apply any kind of thinner, alcohol or sprays.
1. BEFORE OPERATION
Page 15

EN-14
WIRE CONNECTION
LINE OUT:
RED (RIGHT) WHITE (LEFT)
ANTENNA WIRE: BLUE
CONNECTOR A
4. MEMORY +12V
7. +12V (TO IGNITION KEY)
8. GROUND
Note: (connector A no. 7) must be connected by car ignition
key in order to avoid that car battery being drained when
the car will be not used for long period.
CONNECTOR B
1. REAR RIGHT SPEAKER (+)
2. REAR RIGHT SPEAKER (-)
3. FRONT RIGHT SPEAKER (+)
4. FRONT RIGHT SPEAKER (-)
5. FRONT LEFT SPEAKER (+)
6. FRONT LEFT SPEAKER (-)
7. REAR LEFT SPEAKER (+)
8. REAR LEFT SPEAKER (-)
Note: If your car does not have ISO connector, you can procure it from any car accessory shop
A
B
8642
7531
84
7
ANTENNA
CONNECTOR
L (WHITE) R(RED)
LINE OUT
ISO CONNECTOR
BLUETOOTH ANTENNA
CONNECT TO
EXTERNAL MICROPHONE
ANTENNA WIRE (BLUE)
FUSE 10A
2. WIRE CONNECTION
Page 16

EN-15
INSTALLATION
PRECAUTIONS
• Choose the mounting location carefully so that the unit will not interfere with the normal driving functions
of the driver.
• Avoid installing the unit where it would be subject to high temperatures, such as from direct sunlight
or hot air from the heater, or where it would be subject to dust, dirt or excessive vibration.
• Use only the supplied mounting hardware for a safe and secure installation.
• Be sure to remove the front panel before installing the unit.
NOTE: Inclination angle for car radio installation must not exceed 30˚ otherwise the front panel will not open.
Note: Keep the release key in a safe place as you may need it in future to remove the unit from the car.
TO SUPPORT THE UNIT
1. UNIT
2. RELEASE CASE
3. DASH BOARD
4. HEX NUT
5. LOCK WASHER
6. PLAIN WASHER
7. CAR BODY
8. REAR SUPPORT STRAP
9. TAPPING SCREW
10. M5 X 15 HEX BOLT
2
182mm
53mm
3
4
TAP
1
1
2
Bend these
claws, if necessary
release screw and
bracket
10
7
2
3
4
4
4
5
5
6
6
8
9
1
Dashboard
2. WIRE CONNECTION & INSTALLATION
Detaching and attaching the front panel
The front panel of this unit can be detached in order to prevent the unit from
being stolen.
DETACHING THE FRONT PANEL
Before detaching the front panel, be sure to press the button to OFF rst. Then
press the button and detach the panel by pulling it towards you as illustrated.
Note: Be sure not to drop the panel when detaching it from the unit.
A
B
Notes:
• Make sure that the front panel is in the right way up when attaching it to the unit as it cannot be attached
upside down.
• Do not press the front panel hard against the unit when attaching it. It can be easily attached by pressing
it lightly against the unit.
• When you carry the front panel with you, put it in the supplied front panel case.
• Do not press hard or give excessive pressure to the display window of the front panel when attaching
it to the unit.
B
Page 17

EN-16
FIXING THE SMARTPHONE & TABLET ON THE MOUNT
1. To slide the retractable motorized mount for Smartphone/ tablet press .
2. Press the 2 rear buttons to lift up the 2 holding arms for Smartphone/ tablet.
3. You will notice that they are adjustable upwards depending on the size of you Smartphone or tablet.
4. Thanks to the stand and the holding arms you can comfortably x you Smartphone or tablet against
the mount for an optimum support.
5. To put back the retractable motorized mount, fold down the holding arms and press the button .
1
23 45 6
Important note: The adjustable mount can accommodate Smartphone from 4” and Tablet up to 7.85”.
UPPER DISPLAY PANEL TILT ANGLE
Press TILT button repeatedly to choose the desired tilt angle.
CLEANING THE CONNECTOR
The unit may not function properly if the connectors between the unit and the front panel are contaminated with dirt. In order to prevent this from happening,
detach the front panel by pressing the button and
clean the connector from time to time.
Clean the connector with a cotton swab together with
contact cleaner as illustrated. Be sure to clean them
carefully pin by pin and make sure not to damage the
connecting points.
Rear of front panel
Main unit
Cotton Swab
Page 18
EN-17
1. POWER ON/OFF ( ) / MUTE (MU)
2. FUNCTION SELECT BUTTON: CONTROLS FOR BASS/TREBLE/BALANCE/FADER /
CALL LIST / DISPLAY / INITIAL VOLUME / ADJ / TA VOL / EON / AF / TA / PTY / DSP / TA SEEK /
PI SOUND / RETUNE / MASK DPI
3. VOL UP/VOL DOWN BUTTON: CONTROLS FOR BASS/TREBLE/BALANCE/FADER /
CALL LIST / DISPLAY / INITIAL VOLUME / ADJ / TA VOL / EON /
AF / TA / PTY / DSP / TA SEEK / PI SOUND / RETUNE /
MASK DPI
4. PRESET STATIONS (1,2,3,4,5,6)
5. ‘AF’ FUNCTION (ALTERNATIVE FREQUENCIES)
6. ‘TA’ FUNCTION (TRAFFIC ANNOUNCEMENT)
7. ‘PTY’ FUNCTION (PROGRAM TYPE)
8. EQUALIZER (DSP)
9. MODE/LOUDNESS BUTTON (MD)
10. BAND/ENTER BUTTON (BAND)
11. AUTOMATIC OR MANUAL TUNING
(FREQ UP OR FREQ DOWN /TRACK /
SEARCH BUTTON)
12. OPEN/CLOSE UPPER PANEL DISPLAY
FOR HOLD MOBILE PHONE / TABLET ( )
13. UPPER PANEL DISPLAY TILT ANGLE (TILT)
14. LCD DISPLAY
15. PANEL RELEASE BUTTON ( )
16. PAUSE BUTTON
17. REPEAT BUTTON
18. INTRO BUTTON (Preview all Tracks)
19. RANDOM BUTTON
20, 21. PREVIOUS/NEXT FOLDER (MP3/WMA Files only)
22. USB PORT
23. SD CARD SLOT
24. FRONT AUX IN
25. PHONE NUMBER
26. ANSWER A CALL ( )
27. END A CALL ( )
28. RESET BUTTON
1610
32
9 27 26 17 18 19 20 21
14 1213111
4
(1-6)
2415
22
1610
32
14 1213111
4
(1-6)
23 28
2415
22
POWER
RDM
PTY AF TA
TUNE/SEEK
VOL
VOL
MODE
LOUD
RPT INT
231
897
DSP BAND SEL
0#
*
56
4
1 9
4
311
27
16
26
18
21
6
10
2
20
17
19
7
8
5
(1,2,3,4,5,6)
25 (1,2...,9,0,
*
,#)
14 1213111
(1-6)
23 28
2415
22
3. LOCATION OF PARTS AND CONTROLS
Page 19

EN-18
4. GENERAL OPERATION
1. POWER ON/OFF / MUTE (MU)
Press and hold this key to switch the unit on and off. Also this unit can be turned on by pressing any key.
If you just press this key briey, it will turn to MUTE. To return to sound, press it briey again.
2. SELECT
3. VOLUME UP/DOWN
Turning the VOL knob Right or Left (3), you can adjust VOL/BASS/TREB/BAL/FAD. To select other functions, press
the “VOL” knob shortly until the desired functions is shown on the display. Figure 1 shows how control functions are
selected using the “VOL” knob.
1 3
2
4
2
5
2
6
2
2
Fig. 1 Selection of sound control functions
1. VOL 2. SEL 3. BAS 4. TRE 5. BAL 6. FAD
Turning the VOL knob Right or Left. Increase or decrease the volume by turning
VOLVOL
or
VOLVOL
. These buttons can be
used to adjust the BASS, TREBLE, BALANCE and FADER.
CALL LIST
SEL
2 sec.
SEL
DISP
SEL
IN VOL
SEL
ADJ
SEL
PTY OFF
SEL
DSP NONE
SEL
TA VOL
SEL
TA OFF
SEL
EON ON
SEL
AF ON
SEL
TA ALARM
SEL
RETUNE L
SEL
MASK DPI
SEL
PI MUTE
Press and hold VOL knob to adjust CALL LIST/DISPLAY/INITIAL VOLUME/ADJUST TIME/TA VOLUME/EON/
ALTERNATIVE FREQUENCIES/TRAFFIC ANNOUNCEMENT/PROGRAM TYPE/DSP SOUND/TA ALARM/
PI MUTE/RETUNE/ MASK DPI
CALL LIST (see page 7)
DISPLAY
Display informations such as radio frequencies, clock, track and other informations depending on the playing MODE.
IN VOL
Turn VOL knob to adjust Initial Volume level using this mode.
ADJ
Can adjust clock time. Turn VOL knob clockwise to set hours and counter clockwise to set minutes.
TA VOL
Turn VOL knob to adjust TA Volume (The volume level when Trafc announcement is transmitted).
EON
Turn VOL knob to select EON condition, ON or OFF.
USING THE RDS FUNCTION
What is RDS?
The RDS (Radio Data System) is a digital information system developed by the EBU (European Broadcast Union).
Piggy-backed on normal FM broadcasts, RDS offers a variety of information services and automatic retuning functions
for RDS-compatible car stereos.
‘AF/REG’ function (ALTERNATIVE FREQUENCIES)
When AF/REG mode is selected, the radio checks the signal strength of the AF all the time.
– Regional mode ON:
AF switching or PI SEEK is implemented to the station which have all PI codes same as current station. REG seg-
ment is turned on, in LCD display.
– Regional mode OFF
The regional code in the format of PI code is ignored when AF switching or PI SEEK is implemented.
‘TA’ function (TRAFFIC ANNOUNCEMENT)
When pressed momentarily, it is activated as TA mode on or off
When TA mode is on and trafc announcement is transmitted
– When the unit is operating other than FM-RDS mode such as USB, SD or AUX etc, it will switch to FM-RDS mode
temporarily.
– If the volume level was under the threshold point, it will be raised to the threshold point.
– When TP station is received, TP segment is turned on in LCD display.
‘PTY’ function (PROGRAM TYPE)
You can select PTY mode by turning Volume knob as below.
PTY OFF/NEWS/AFFAIRS/INFO/SPORT/EDUCATE/DRAMA/CULTURE/SCIENCE/VARIED/POP M/ROCK M/EASY
M/LIGHT M/CLASSICS/OTHER M/WEATHER/FINANCE/CHILDREN/SOCIAL/RELIGION/PHONE IN/TRAVEL/
LEISURE/JAZZ/COUNTRY/NATION M/OLDIES/FOLK M/DOCUMENT
Page 20

EN-19
DSP
Turn VOL knob to select DSP mode (Classic, POP, Rock, Flat)
TA ALARM/SEEK
TA SEEK mode:
When newly turned station does not receive TP information for 5 sec., the radio retunes to next station which has
not the same station (PI) as the last station, but has the TP information.
In TA seek mode, the current station can be changed to the completely different station because the unit searches
TP station when the eld strength of the current station is very weak, or the current station has no TP signal.
TA ALARM mode:
Any automatic retune mode is not activated, just can hear Beep sound.
PI MUTE/SOUND
Action when 2 stations with different programme identication (PI) codes are on the same frequency:
SOUND: The radio switches to the new channel for a few seconds and then switches back again
MUTE: The radio is muted
RETUNE L/S
RETUNE L: Select 90 seconds as the initial time of automatic TA search.
RETUNE S: Select 30 seconds as initial time.
MASK DPI/ALL
MASK DPI: masked only the AF which has different PI.
MASK ALL: masked the AF which has different PI and NO RDS signal with eld strength.
4. PRESET STATIONS (1,2,3,4,5,6)
Six numbered preset buttons store and recall stations for each band.
Storing a station:
1. Select a band (if needed)
2. Select a station
3. Hold a preset button longer than one second. Preset station number appears in the display when station is
saved.
Recall a station:
1. Select band (if needed)
2. Press a preset button for less than one second to select stored station.
Note: This unit is equipped with built-in memory I.C. (Integrated Circuits) to save user settings such as tuner
preset stations and audio control settings. To cancel these settings, switch to Radio mode, press and hold button
“1” for 2 seconds (do not release button) followed by pressing MD button. Unit will automatically restart after 5
seconds.
5. ‘AF/REG’ function (ALTERNATIVE FREQUENCIES)
Operation: See the SEL button of the ‘AF/REG’ function (ALTERNATIVE FREQUENCIES) section.
6. ‘TA’ function (TRAFFIC ANNOUNCEMENT)
Operation: See the SEL button of the ‘TA’ function (TRAFFIC ANNOUNCEMENT) section
7. ‘PTY’ function (PROGRAM TYPE)
Operation: See the SEL button of the ‘PTY’ function (PROGRAM TYPE) section
8. EQUALIZER (DSP)
Press DSP to select between (Classic, Rock, POP, Flat) equalizer modes.
9. MODE/LOUDNESS BUTTON (MD)
By pressing this key, user can select. AUX/TUNER/USB/SD/A2DP mode.
LOUDNESS: By pressing this key longer than 2 sec., you can select LOUDNESS mode.
10. BAND BUTTON (BD)
Each band is toggled cyclically by pressing this key FM1---FM2---FM3---MW(AM)1---MW(AM)2.
11. AUTOMATIC OR MANUAL TUNING (FREQ UP OR FREQ DOWN )
(A) RADIO MODE
When pressed momentarily, these keys are operated as SEEK tuning mode.
When pressed longer than 1 sec., they are operated as MANUAL tuning mode.
(B) MP3/WMA PLAYER MODE
When pressed momentarily, they are operated as TRACK UP or TRACK DOWN mode.
When pressed longer than 1 sec., they are operated as CUE or REVIEW mode.
12. OPEN/CLOSE UPPER PANEL DISPLAY
Press the OPEN button for hold the mobile phone.
13. UPPER PANEL DISPLAY TILT ANGLE
Press TILT button repeatedly to choose the desired tilt angle.
Page 21

EN-20
14. LCD DISPLAY
The Liquid Crystal Display will display the current state of the unit.
15. PANEL RELEASE BUTTON
Press button and the front panel will detached.
MP3/WMA CONTROL
16. PAUSE BUTTON
During “PLAY”, press (16) ‘PAU’ button to “PAUSE”. Press it again to resume play.
TRACK/SEARCH BUTTON (11)
FORWARD AND REVERSE TRACK SEARCH (or changing songs)
Press the SKIP button ( or ) during play to go to the desired track(song).
....REVERSE ....FORWARD
Press and hold the SKIP button (
or
) during play to scan the disk at high speed. When the desired music section
of the disk is found, release the button. Normal play will resume.
17. REPEAT BUTTON
When this button is pressed, ‘RPT’ indication is displayed and play of the selected track will be continually repeated until
the Track repeat mode is cancelled by pressing ‘RPT’ button again.
18. INTRO BUTTON (Preview all Tracks)
When this button is pressed, ‘INT’ indication is displayed and the rst several seconds of each track of the disk are
played. Press again to stop intro and listen to track.
19. RANDOM BUTTON
When this button is pressed, ‘RDM’ indication is displayed and each track of the disk are played in random instead
of normal progression. To cancel RANDOM mode, press ‘RDM’ button again.
20, 21. FOLDER DOWN/UP (In case of MP3/WMA les)
M5: Folder down / M6: Folder up
Connecting it to Portable MP3 Player
22. FRONT AUX IN
Convenient easy to use front “AUX IN” input jack, allows easy connection of Portable Media and digital MP3 Players.
23, 24. USB PORT / SD MEMORY CARD
The device is equipped with a USB interface and a memory card reader for SD cards. MP3 or WMA les stored on
these media can be played.
1. Plug your USB storage medium into the USB port.
Note: A USB cable is used for the connection between the headunit and the external device such as Smart-phone
or Tablet during charging mode.
2. If you use a memory card, insert it into the memory card reader.
3. The player automatically switches to the input used and starts playback.
4. See the section on operations common for audio les on how to control USB or memory card playback.
Note:
• DuetothegreatvarietyofdeviceswithUSBandSDcardinterfacesthatsometimeshavemanufacturer-specic
functions, we cannot guarantee that all media will be recognized and that all operational functions will be available with this device.
• YoucannotoperateUSBharddrivesonthedevice.
Page 22

EN-21
HOW TO USE BLUETOOTH IN YOUR CAR AUDIO
Instructions for App “icontu” with Car Audio
• Through the smart phone PLAY STORE download software “icontu”.
• Install the software on your smartphone: “icontu”.
• The smart phones “icontu” can controls CAR RADIO in bluetooth connection.
Note:software“icontu”isgenericsoftware,pleaserefertoCARRADIOfunctions.
The microphone unit must be connected to the device in order to use the Bluetooth functions. In addition a mobile phone
is required that supports the Bluetooth data transmission.
Connecting the telephone to the device
• Activate the Bluetooth function on your mobile phone and conduct a search for Bluetooth devices. After a successful
search the entry CAR AUDIO appears for the device in the display of the mobile phone.
• Select this entry for the connection and for the subsequent password request enter the password 1234 for the device.
You may possibly have to conrm the connection structure once more.
After a successful coupling CONN OK appears briey in the device’s display.
Call accept/end
With an incoming call you hear the call signal via your mobile phone, whilst in the device’s display is shown the call number.
•
You accept an incoming call by the “ ” button on the device.
• You end the call by pressing the “ ” button on the device.
Rejecting a call
• With an incoming call press the “ ” button on the device to reject the call.
To call
• The device and the mobile phone must be connected.
• Dial the telephone number that you want to call from your mobile phone.
• The driver can use the device as hands-free kit.
Caller lists
• Push and hold [SEL] Volume knob to select Call list mode. “Call list” shows on LCD. Press [BD]ENT button to
conrmed.
• Rotate Volume to select “IN CALL” or “OUT CALL” to display. Press [BD]ENT button to conrm.
• Rotate Volume knob to show the call list.
• Call list can shows the last 20 IN or OUT calls.
Note:
• TheCallListfeaturewillbeactivatedoncethemobilephoneisconnectedwiththecarradioviaBluetooth.
Telephone book:
You can transfer up to 20 contacts (Telephone book entries) from the connected mobile phone to the device and thus
dial and call the contact from the device.
Notice:
• YoucannottransferviaBluetoothyourcontactsfromyourconnectedmobiletoyourcarradiowithAPPLE® phones.
• DetailsforthetransferenceofthecontactviaBluetoothcanbeobtainedfromtheoperatinginstructionsofyourmobile
phone.
• EachtransferredcontactisledinthememoryslotPB01. The contacts that have already been transferred are auto-
maticallyledonememoryslotfurther(PB02, etc).
• Push and hold [SEL] Volume knob to select Call list mode. “Call list” shows on LCD. Rotate the volume knob to select
“PH BOOK”. Press [BD]ENT button to conrmed.
• Rotate the Volume knob to appears the name and number (PB01-PB20).
• Press the
“ ”
button on the device to select the dialled call number.
Deleting the caller lists and telephone book entries
When the mobile phone’s bluetooth was connected with device, press [MD] button repeatedly to select “BT mode”.
Press and hold the “ ” button on the device until RESET appears in the display. The Bluetooth connection to the
mobile phone is severed and all telephone book entries and caller lists on the device are deleted.
Audio streaming (A2DP)
The device uses the A2DP prole (Advanced Audio Distribution Prole) and therefore can playback your mobile phone’s
audio data.
• Select an audio le from your mobile phone and start the playback.
In the device’s display appears the entry A2DP and the audio data will be played back via the speakers connected to
the device.
5. BLUETOOTH
Page 23

EN-22
NOTICE:
• OnthemobilephoneitmaypossiblybenecessarytoswitchplaybackviatheBluetoothstereoheadset.Consultthe
operating manual of your mobile phone for more information.
• WithafewmobilephonesthedevicedoesnotautomaticallyswitchtotheA2DPmode.Inthiscaseyouswitchtothe
A2DPmodebypressingtheMD button several times until the notice BT MUSIC or A2DP appears in the display.
AVRCP (Audio Video Remote Control Prole)
The device uses the AVRCP prole thus facilitating the control of audio devices.
• With the Preset 1(16) button on the device you can stop and/or restart the playback of audio les on the mobile phone.
• With the buttons or on the device you can access the previous or next audio le on the mobile phone.
28. RESET
Reset button (28) is placed on the housing.
The reset button is to be activated for the following reason:
• Initial installation of the unit when all wiring is completed.
• All the function button do not operate.
• Error symbol on the display.
Page 24

EN-23
MP3/WMA PLAYER SECTION
Signal to Noise Ratio > 60 dB
Channel Separation > 50 dB (1kHz)
Frequency Response 20Hz - 20 kHz
TUNER (FM)
Frequency range 87.5-108 MHz
Sensitivity 2.8 µV
Stereo separation 30 dB
Signal to noise ratio 50 dB
Channel step 50 kHz
TUNER MW(AM)
Frequency range 522-1620 KHz
Usable sensitivity 32 dB
LINE-OUT
Output 1.5V (max.)
Impedance 10k Ohm
GENERAL
Power Supply 12V DC (10.8-15.6V allowable)
Speaker impedance 4 or 8 ohm
Output power 45W x 4CH
Fuse 10A
Note: Specication and the design are subject to possible modication without notice due to improvements.
6. TECHNICAL SPECIFICATIONS
Page 25

EN-24
Warning! This logo set on the product means that the recycling of this apparatus comes
within the framework of the Directive 2002/96/CE of January 27, 2003 concerning the
Waste of Electrical and Electronic Equipment (WEEE).
This symbol means that used electrical and electronic products should not be mixed
with general household waste. There is a separate collection system for these products.
If you want to dispose of this equipment, please do not use the ordinary dust bin!
- The presence of dangerous substances in the electrical and electrical and electronic equipments can have
potential consequences on the environment and human health in the cycle of reprocessing this product.
- Therefore, at the end of its lifetime, this product shall not be disposed with other non-recycled waste.
Used electrical and electronic equipment must be treated separately and in accordance with legislation
that requires proper treatment, recovery and recycling of used electrical and electronic equipment.
- Local authorities and resellers have set special procedures for the purpose of collecting and recycling
this product (please contact your local authority for further details). You have the obligation to use the
selective waste collection systems put in place by your local authority.
- If your used electrical or electronic equipment has batteries or accumulators, please dispose of these
separately beforehand according to local requirements.
- By disposing of this product correctly you will help ensure that the waste undergoes the necessary
treatment, recovery and recycling and thus prevent potential negative effects on the environment and
human health which could otherwise arise due to inappropriate waste handling.
This unit complies with European Council Directive 2006/95
CE (Electromagnetic Compatibility & Low Voltage Directives)
7. END OF LIFE DISPOSAL
Page 26

www.tokai.fr
LAR-100B
R
 Loading...