

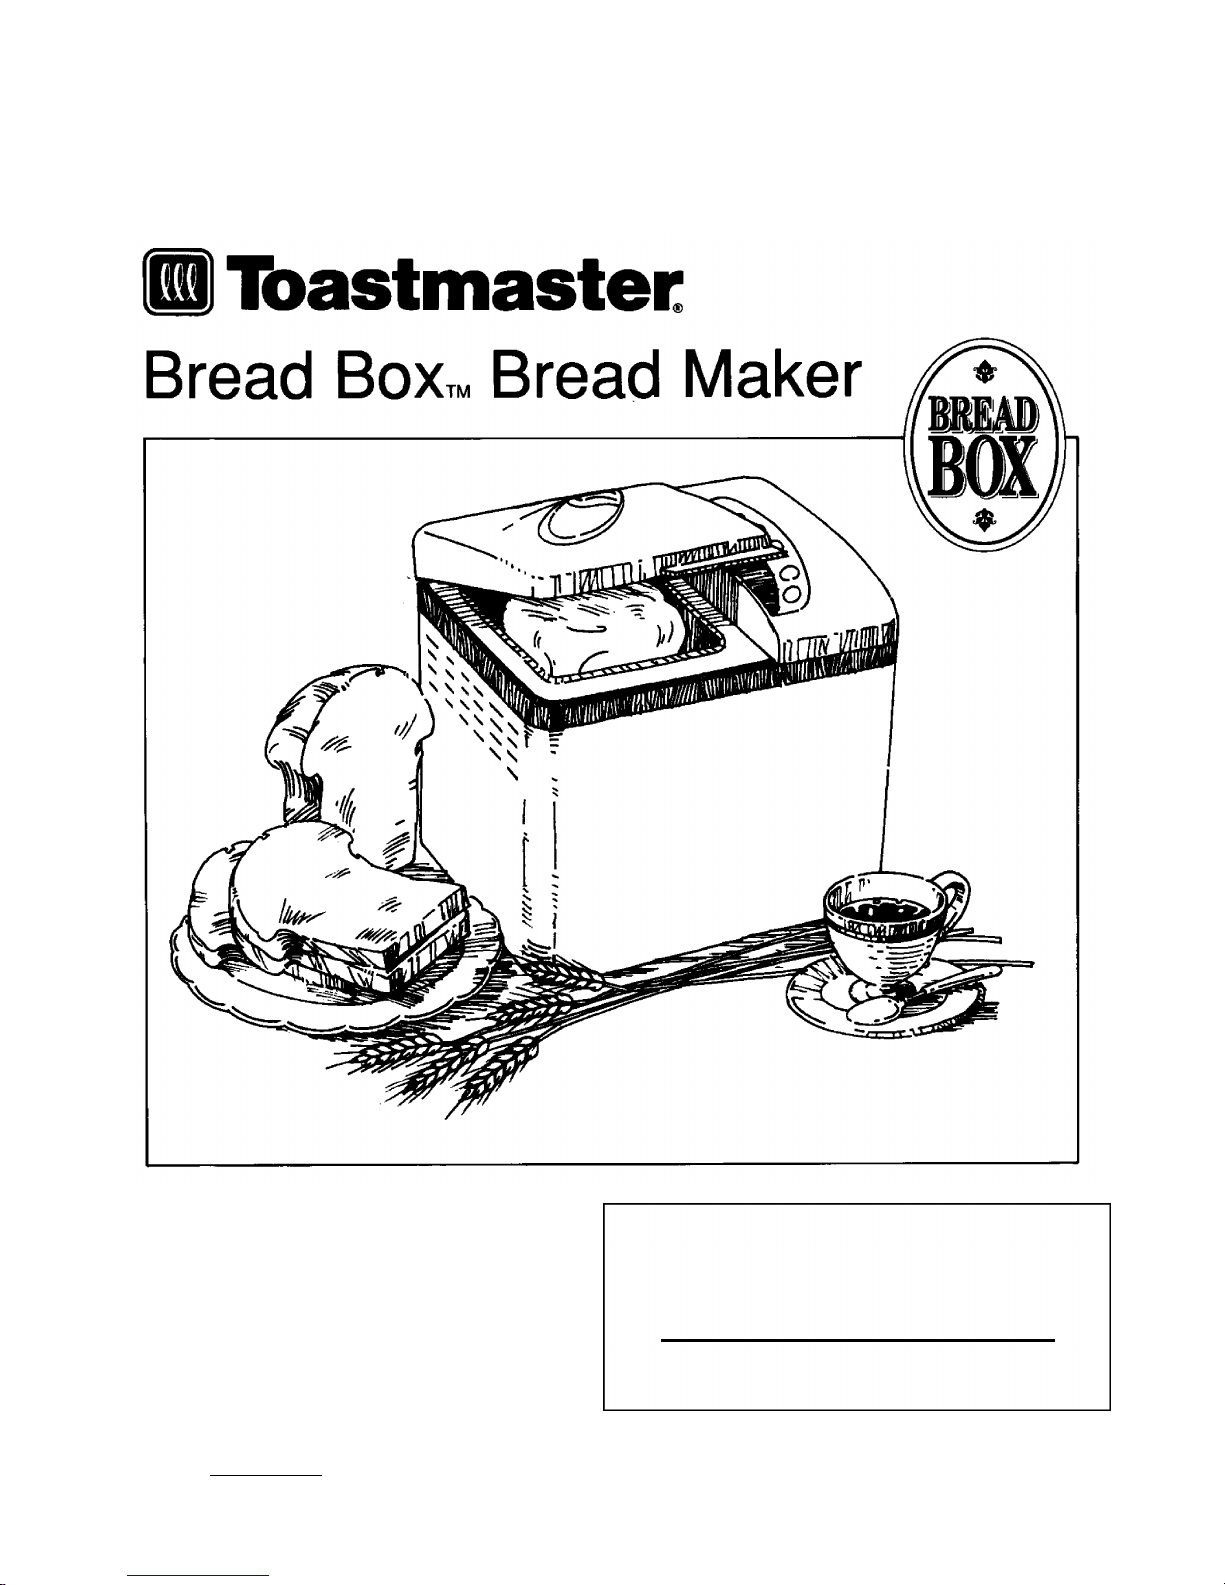
Page 1
READ AND SAVE THESE INSTRUCTIONS
Use and Care Guide
Recipe Book
Model 1196
WARNING: A risk of fire and electrical shock exists in all electrical appliances
and may cause personal injury or death. Please follow all safety instructions.
?? QUESTIONS ??
Before Contacting Your Retailer Call
TOLL-FREE 1-800-947-3744
and talk to one of Toastmaster’s
Bread Box™Experts.
Page 2

Page 3

IMPORTANT SAFEGUARDS
When using electrical appliances, basic safety precautions should always be followed to reduce the risk
of fire, electric shock and injury to persons, including the following:
•
Read all instructions before using the appliance.
•
To protect against electrical shock do not immerse cord, plug, or appliance in water or other liquid,
(see instructions for cleaning).
•
Do not touch hot surfaces. Always use oven mitts when handling the hot bread pan or bread.
•
Close supervision is necessary when this appliance is used near children.
•
This appliance not for use by children.
•
Unplug the unit from outlet when not in use and before cleaning. Allow to cool before attaching or
removing parts.
•
Avoid touching moving parts.
•
Do not operate the appliance with a damaged cord or plug or after the appliance malfunctions, or has
been dropped or damaged in any manner. Return the appliance to the nearest authorized service
center for examination, repair, electrical or mechanical adjustment.
•
Do not use outdoors.
•
Do not let cord hang over edge of the table or counter or touch hot surfaces.
•
Do not place on or near hot gas or electric burner, or in a heated oven.
•
To disconnect, grip the plug and pull out from the wall outlet. Never pull on the cord.
•
Do not use the appliance for other than the intended use.
•
This product is intended for household use only.
•
Use accessory attachments only if recommended by Toastmaster Inc.
SAVETHESE INSTRUCTIONS
THIS PRODUCT FOR HOUSEHOLD USE ONLY
CAUTION: A short power supply cord is provided to reduce the risk of personal injury resulting from
becoming entangled in or tripping over a longer cord.Extension cords are ava i l a ble from local hardwa r e
stores and may be used if care is exercised in their use. If an extension cord is required, special care
and caution is necessary.Also, the cord must be (1) marked with an electrical rating of 125V. and at
least 13A., 1625W., and (2) the cord must be arranged so that it will not drape over the countertop or
tabletop where it can be pulled on by children or tripped over accidentally.
ELECTRIC POWER: If electric circuit is overloaded with other appliances, your bread maker may not
operate properly.Breadmaker should be operated on a separate electrical circuit from other operating
appliances.
POLARIZED PLUG: This appliance has a polari zed plug (one blade is wider than the other). As a
s a fe t y feature to reduce the risk of electric shock, this plug is intended to fit in a polarized outlet only
one way. If the plug does not fit fully in the outlet, reverse the plug. If it still does not fit, contact a
q u a l i f i e d electrician. Do not attempt to defeat this safety feature.
- 3 -
Page 4

BEFOREYOUR FIRST USE
Carefully unpack the breadmaker and remove all packaging materials.To remove any dust that may
h ave accumulated during packaging, wipe the bread pan, kneading blade and the outside of the
b r e a d m a ke r with a clean, damp cloth. Do not use harsh or abra s i ve cleaners on any part of the
b r e a d m a ke r.
Warning: Do not immerse the cord, plug, bread pan or base in water or other liquid. Do not use metal
scouring pads on any part or parts of the breadmaker because pieces of the pad may break off and
touch electrical parts, creating a risk of electric shock.
Place the bread machine on a dry, stable surface away from bu rners and away from areas where
c o o k i n g grease or water may splatter onto it.
After placing the bread pan in the breadmaker, move it to the back of the counter, away from the edge.
Plug the breadmaker into a 120 volt 60 Hz AC only outlet.
IMPORTANT SAFETY TIPS
•
Keep the breadmaker out of the reach of infants and children, especially while it is hot. If any control
pads are accidentally touched, the operation may stop.
•
Place the breadmaker at least 2 inches away from walls.
•
Do not cover the breadmaker with towels or any other material because steam would not be able to
escape.
•
Do not remove the bread pan or insert your hand into the bread pan during operation. If you need to
remove the bread pan before operation is complete, first press the STOP pad to stop operation of the
breadmaker.
•
Unplug unit and allow to cool. Remove any flour, bread crumbs or other materials from the inside of
the inner case using a damp sponge or cloth or a small, portable vacuum cleaner.
•
This breadmaker will bake up to a 1
Do not exceed the recommended ingredient capacity of the breadmaker.If you do so, the bread may
not mix or bake correctly and the breadmaker may be damaged.The maximum amount of flour to be
used for the BAKE settings is approximately 3 cups.The maximum amount of prepackaged bread-
maker bread mixes is 3 cups.The maximum amount for the DOUGH setting is 3
•
Handle the bread pan with care. Remove the bread pan by turning clockwise and pulling straight
up on the handle. Do not turn or shake the bread pan while taking it out. If the bread pan is
d a m a g e d or bent, the temperature sensor will not work properly.Handle hot bread pan using pot
holders or oven mitts.
1
⁄
2
pound loaf of bread.
1
⁄
2
cups flour.
- 4 -
Page 5

TABLE OF CONTENTS
IMPORTANT SAFEGUARDS . . . . . . . . . . . . . . . . . . . . . . . . . . . . . . . . . . . . . . . . . . . . . . . . . . . . . . 3
BEFOREYOUR FIRST USE . . . . . . . . . . . . . . . . . . . . . . . . . . . . . . . . . . . . . . . . . . . . . . . . . . . . . . . 4
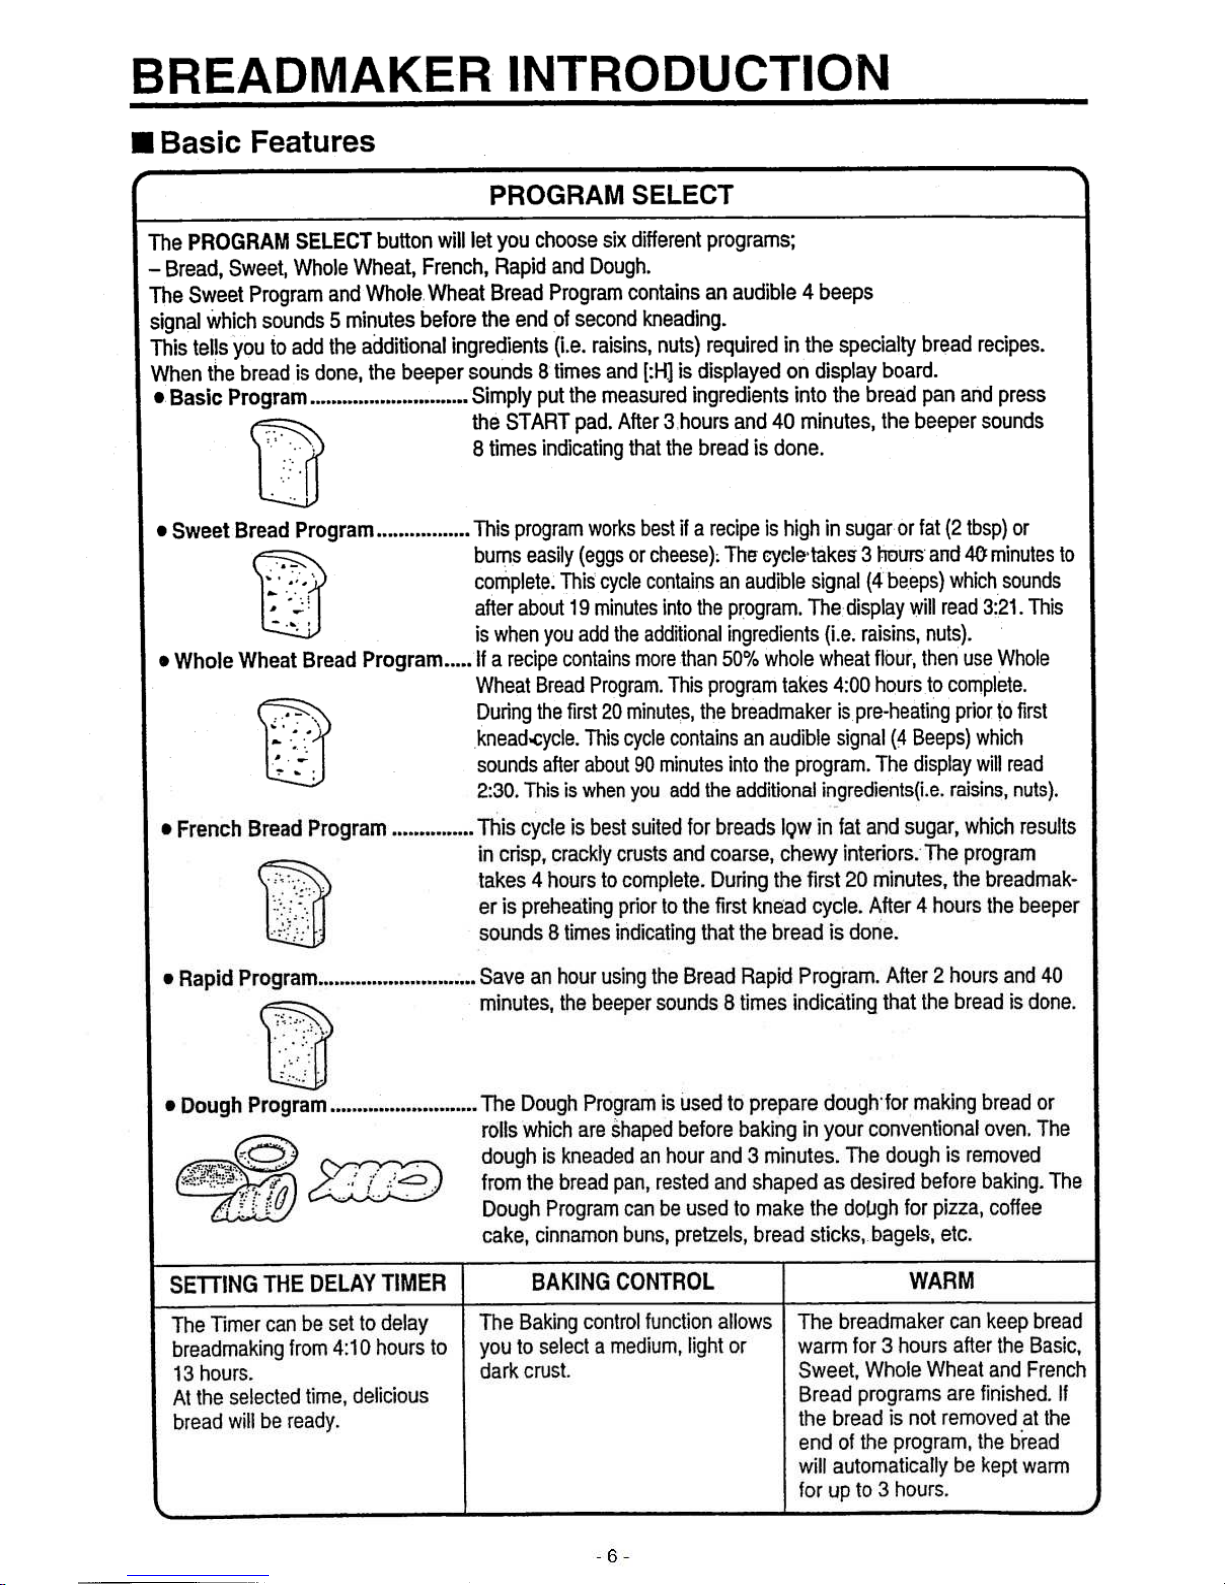
BREADMAKER INTRODUCTION . . . . . . . . . . . . . . . . . . . . . . . . . . . . . . . . . . . . . . . . . . . . . . . . 6~9
•
Basic features . . . . . . . . . . . . . . . . . . . . . . . . . . . . . . . . . . . . . . . . . . . . . . . . . . . . . . . . . . . . 6
•
Program specification . . . . . . . . . . . . . . . . . . . . . . . . . . . . . . . . . . . . . . . . . . . . . . . . . . . . . . 7
•
Parts and functions . . . . . . . . . . . . . . . . . . . . . . . . . . . . . . . . . . . . . . . . . . . . . . . . . . . . . . . . 8
•
Control panel . . . . . . . . . . . . . . . . . . . . . . . . . . . . . . . . . . . . . . . . . . . . . . . . . . . . . . . . . . . . 9
INSTALLATION AND SAFETY PRECAUTIONS . . . . . . . . . . . . . . . . . . . . . . . . . . . . . . . . . . . .10~11
HOWTO CLEAN . . . . . . . . . . . . . . . . . . . . . . . . . . . . . . . . . . . . . . . . . . . . . . . . . . . . . . . . . . . . . . 12
INGREDIENTS . . . . . . . . . . . . . . . . . . . . . . . . . . . . . . . . . . . . . . . . . . . . . . . . . . . . . . . . . . . . . 13~15
•
Yeast . . . . . . . . . . . . . . . . . . . . . . . . . . . . . . . . . . . . . . . . . . . . . . . . . . . . . . . . . . . . . . . . . 13
•
Flour . . . . . . . . . . . . . . . . . . . . . . . . . . . . . . . . . . . . . . . . . . . . . . . . . . . . . . . . . . . . . . . . . . 13
•
Fat . . . . . . . . . . . . . . . . . . . . . . . . . . . . . . . . . . . . . . . . . . . . . . . . . . . . . . . . . . . . . . . . . . . 14
•
Liquids . . . . . . . . . . . . . . . . . . . . . . . . . . . . . . . . . . . . . . . . . . . . . . . . . . . . . . . . . . . . . . . . 14
•
Lemon Juice . . . . . . . . . . . . . . . . . . . . . . . . . . . . . . . . . . . . . . . . . . . . . . . . . . . . . . . . . . . . 15
•
Cinnamon and Garlic . . . . . . . . . . . . . . . . . . . . . . . . . . . . . . . . . . . . . . . . . . . . . . . . . . . . . 15
•
Salt . . . . . . . . . . . . . . . . . . . . . . . . . . . . . . . . . . . . . . . . . . . . . . . . . . . . . . . . . . . . . . . . . . . 15
•
Substitutes . . . . . . . . . . . . . . . . . . . . . . . . . . . . . . . . . . . . . . . . . . . . . . . . . . . . . . . . . . . . . 15
•
Bread Mixes . . . . . . . . . . . . . . . . . . . . . . . . . . . . . . . . . . . . . . . . . . . . . . . . . . . . . . . . . . . . 16
OPERATION . . . . . . . . . . . . . . . . . . . . . . . . . . . . . . . . . . . . . . . . . . . . . . . . . . . . . . . . . . . . . . . 17~21
•
Programming (Basic, Whole Wheat, French and Rapid Bread) . . . . . . . . . . . . . . . . . . . . 17~19
•
Programming the Delay Timer . . . . . . . . . . . . . . . . . . . . . . . . . . . . . . . . . . . . . . . . . . . . . . . 19
•
Programming Sweet and Whole Wheat Breads . . . . . . . . . . . . . . . . . . . . . . . . . . . . . . . . . . 20
•
Programming Dough . . . . . . . . . . . . . . . . . . . . . . . . . . . . . . . . . . . . . . . . . . . . . . . . . . . . . . 21
•
Baking Control . . . . . . . . . . . . . . . . . . . . . . . . . . . . . . . . . . . . . . . . . . . . . . . . . . . . . . . . . . 21
•
Crust Treatments . . . . . . . . . . . . . . . . . . . . . . . . . . . . . . . . . . . . . . . . . . . . . . . . . . . . . . . . 21
CUTTING AND STORING YEAST PRODUCTS . . . . . . . . . . . . . . . . . . . . . . . . . . . . . . . . . . . . . . . 22
COOKBOOK GUIDE (RECIPES) . . . . . . . . . . . . . . . . . . . . . . . . . . . . . . . . . . . . . . . . . . . . . . . 23~60
•
Breads . . . . . . . . . . . . . . . . . . . . . . . . . . . . . . . . . . . . . . . . . . . . . . . . . . . . . . . . . . . . . 25~42
•
Doughs . . . . . . . . . . . . . . . . . . . . . . . . . . . . . . . . . . . . . . . . . . . . . . . . . . . . . . . . . . . . . 43~60
BEFORE REQUESTING SERVICE . . . . . . . . . . . . . . . . . . . . . . . . . . . . . . . . . . . . . . . . . . . . . . 61~65
•
Problems and Solutions . . . . . . . . . . . . . . . . . . . . . . . . . . . . . . . . . . . . . . . . . . . . . . . . . . . 61
•
Service Information . . . . . . . . . . . . . . . . . . . . . . . . . . . . . . . . . . . . . . . . . . . . . . . . . . . . . . . 61
•
Before Requesting Service . . . . . . . . . . . . . . . . . . . . . . . . . . . . . . . . . . . . . . . . . . . . . . 62~63
•
Questions and Answers . . . . . . . . . . . . . . . . . . . . . . . . . . . . . . . . . . . . . . . . . . . . . . . . . . . 64
•
Display Signals . . . . . . . . . . . . . . . . . . . . . . . . . . . . . . . . . . . . . . . . . . . . . . . . . . . . . . . . . . 65
SPECIFICATIONS . . . . . . . . . . . . . . . . . . . . . . . . . . . . . . . . . . . . . . . . . . . . . . . . . . . . . . . . . . . . . 65
- 5 -
Page 6
Page 7
Page 8
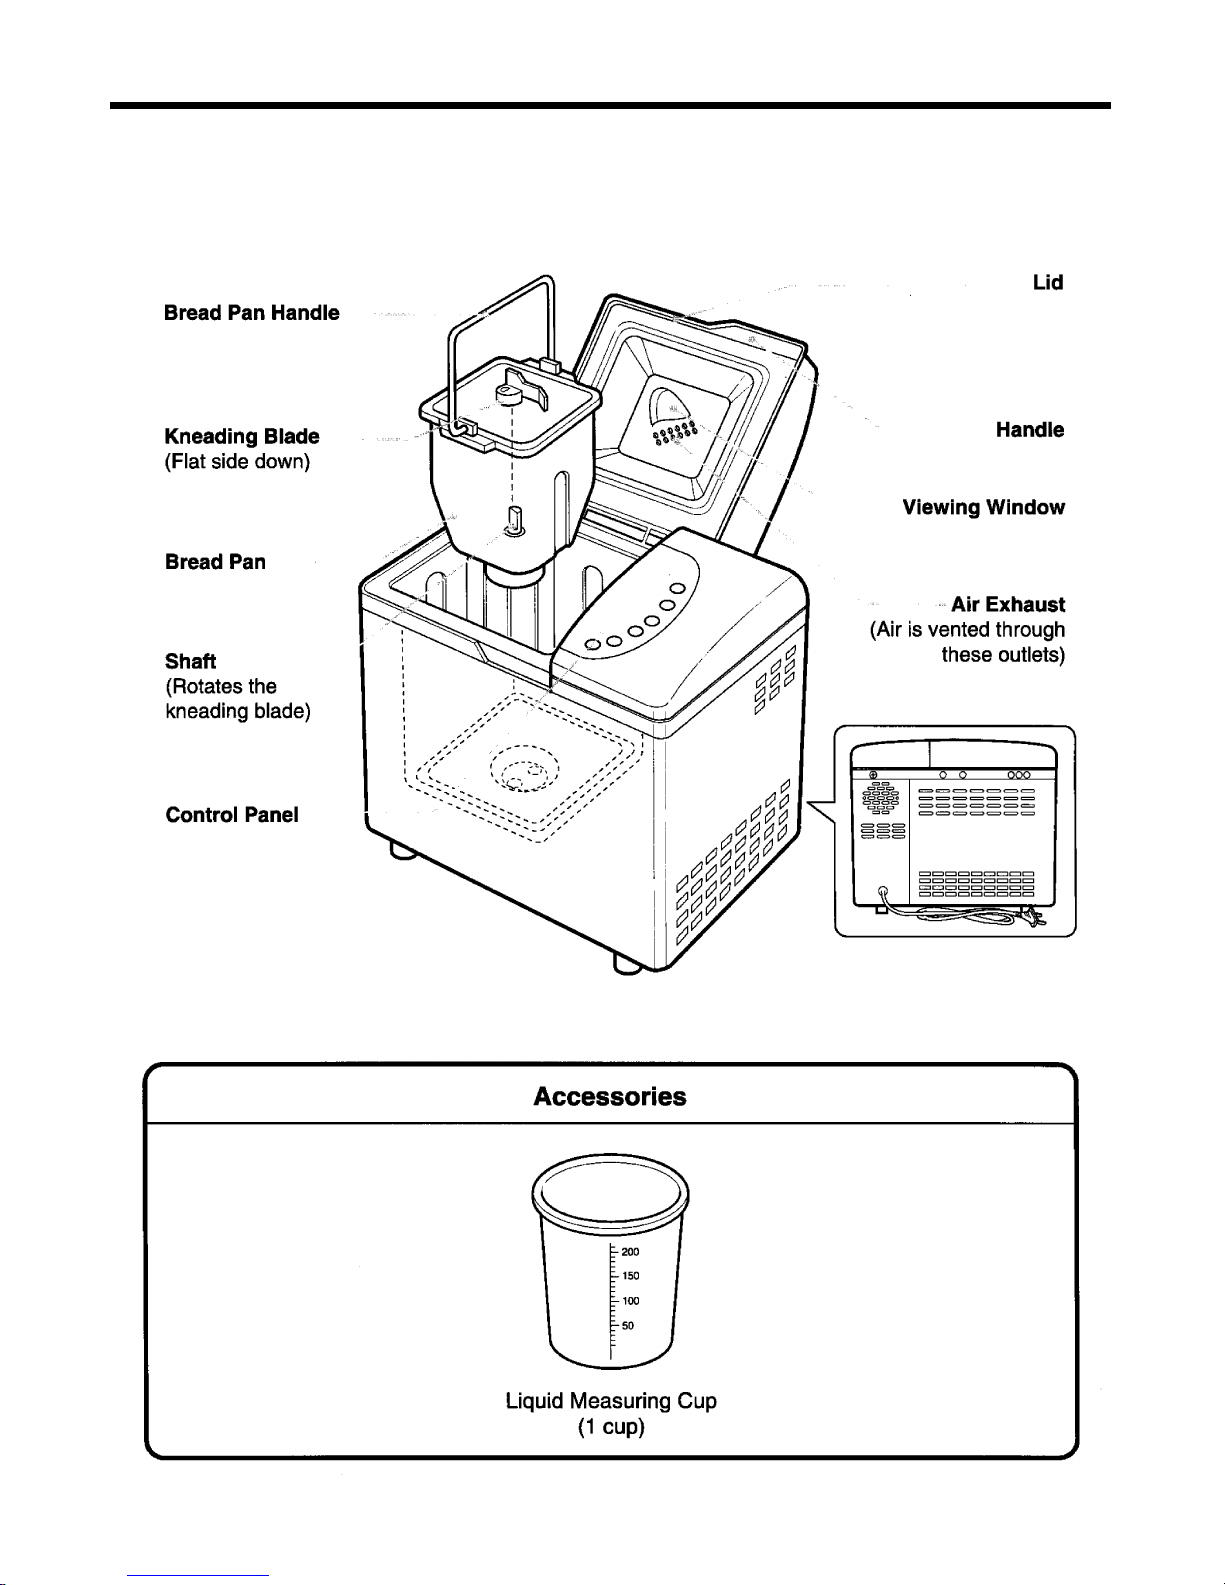
R Parts and Functions
- 8 -
Page 9
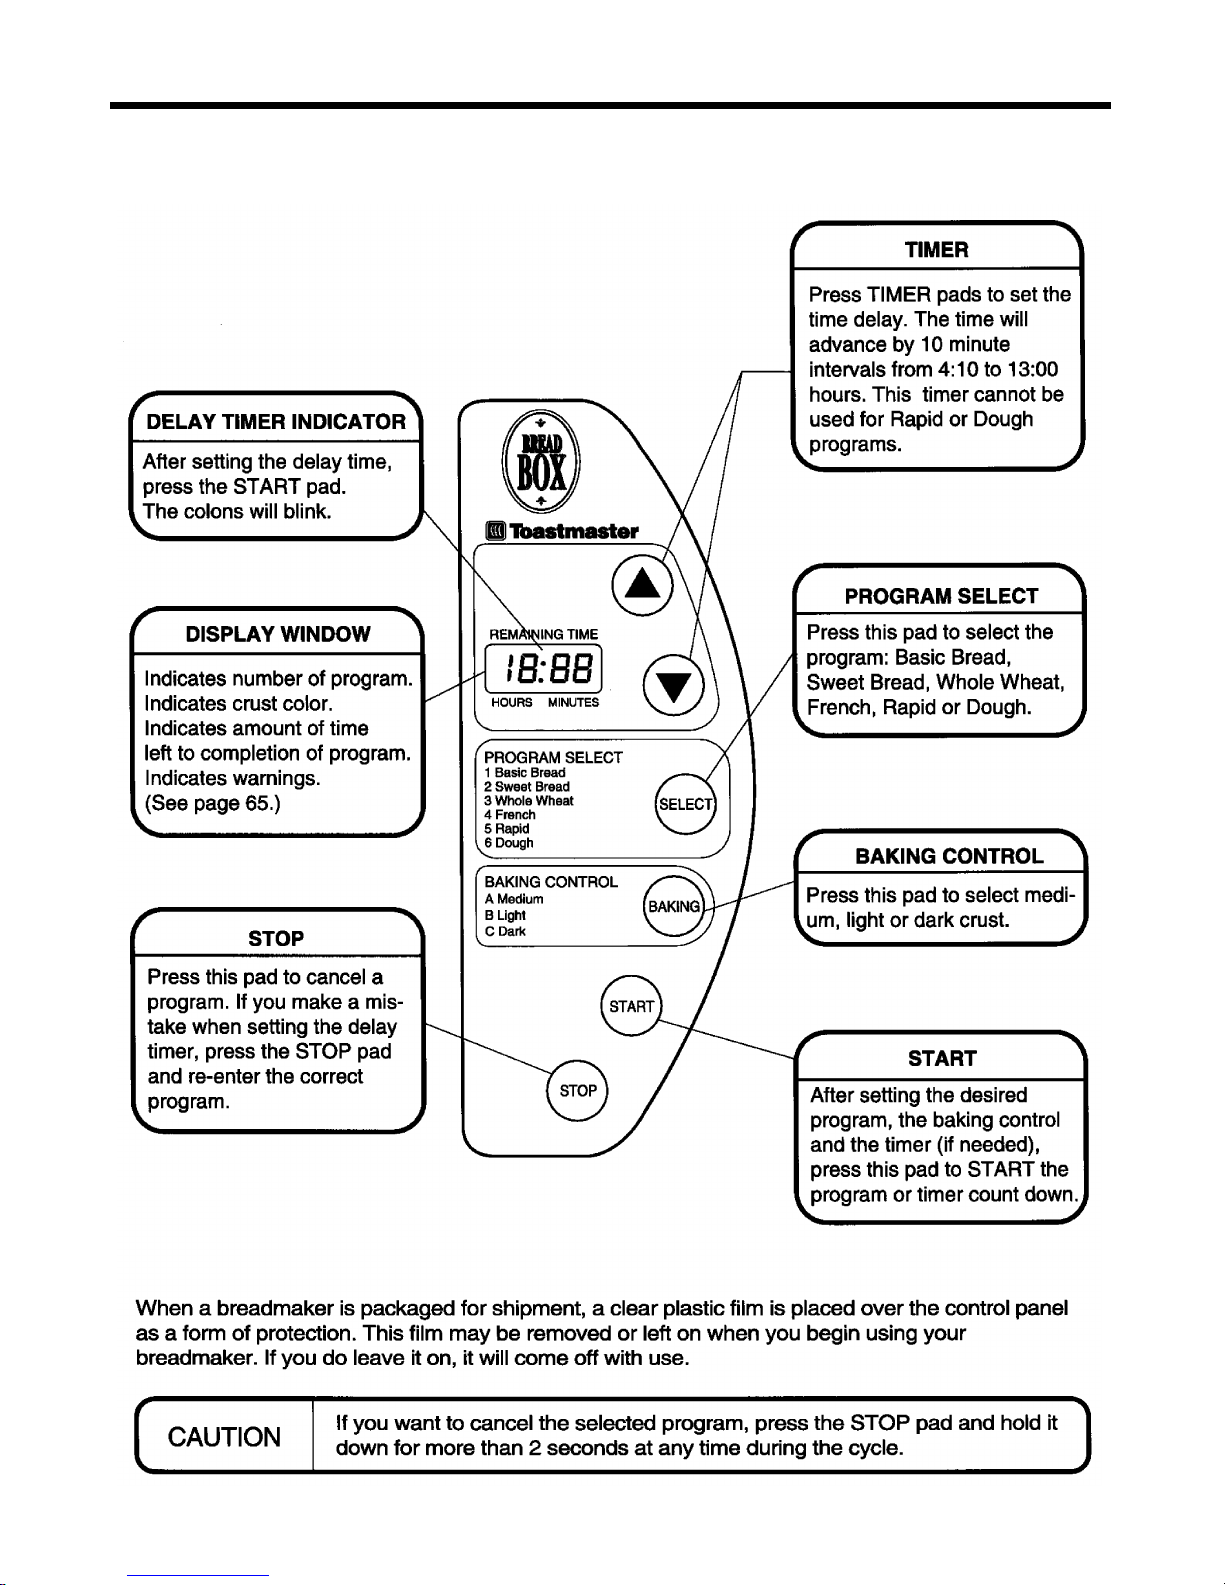
R Control Panel
- 9 -
Page 10
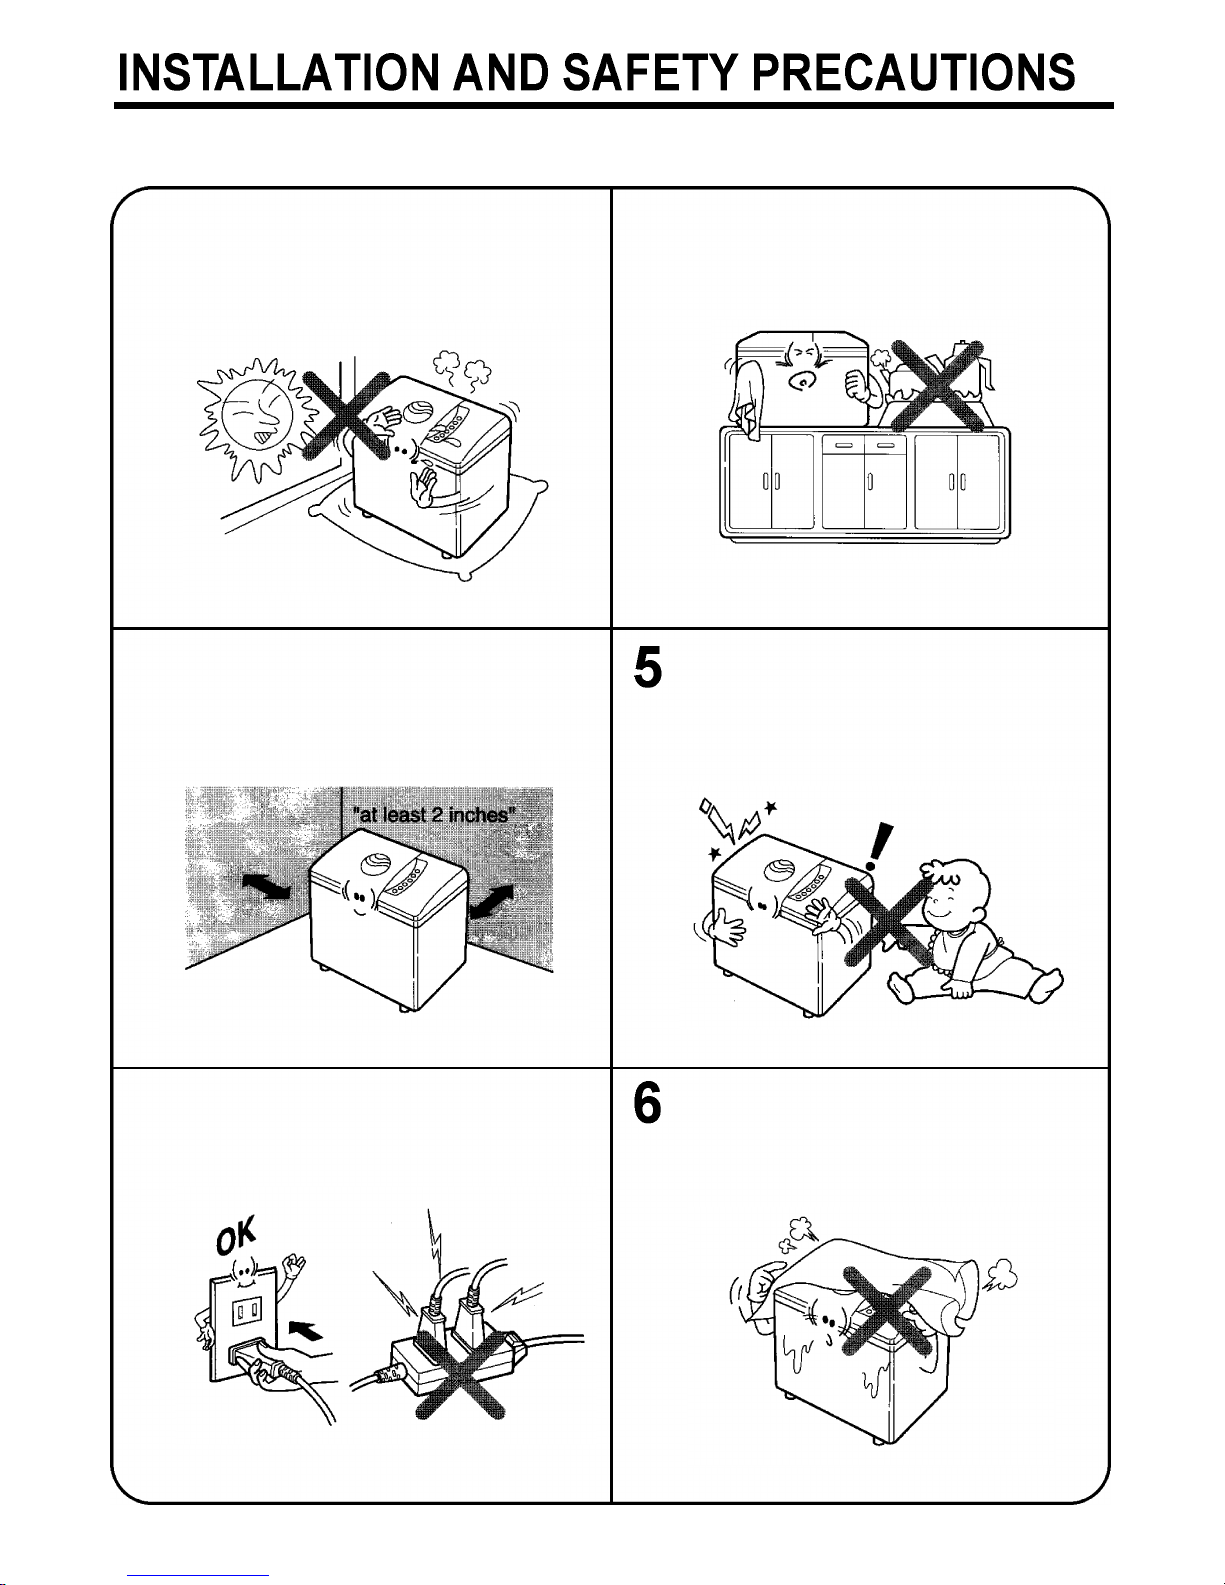
Read this manual and follow these simple safety precautions before using this appliance.
The breadmaker should be placed on a
1
heat resistant surface and away from
direct sunlight.
Allow at least 2 inches clearance on all
2
sides of the breadmaker when it is in
use.
Do not use the breadmaker near a
4
source of heat or where it is unstable.
Keep the breadmaker away from babies
and children.They may touch the control
pads or hot surfaces during operation.
Plug the breadmaker into a properly
3
wired wall outlet (120V/60Hz only).
Do not cover the breadmaker with anything, or put anything in the breadmaker
(except the bread pan) because this may
cause a fire or a malfunction.
- 10 -
Page 11
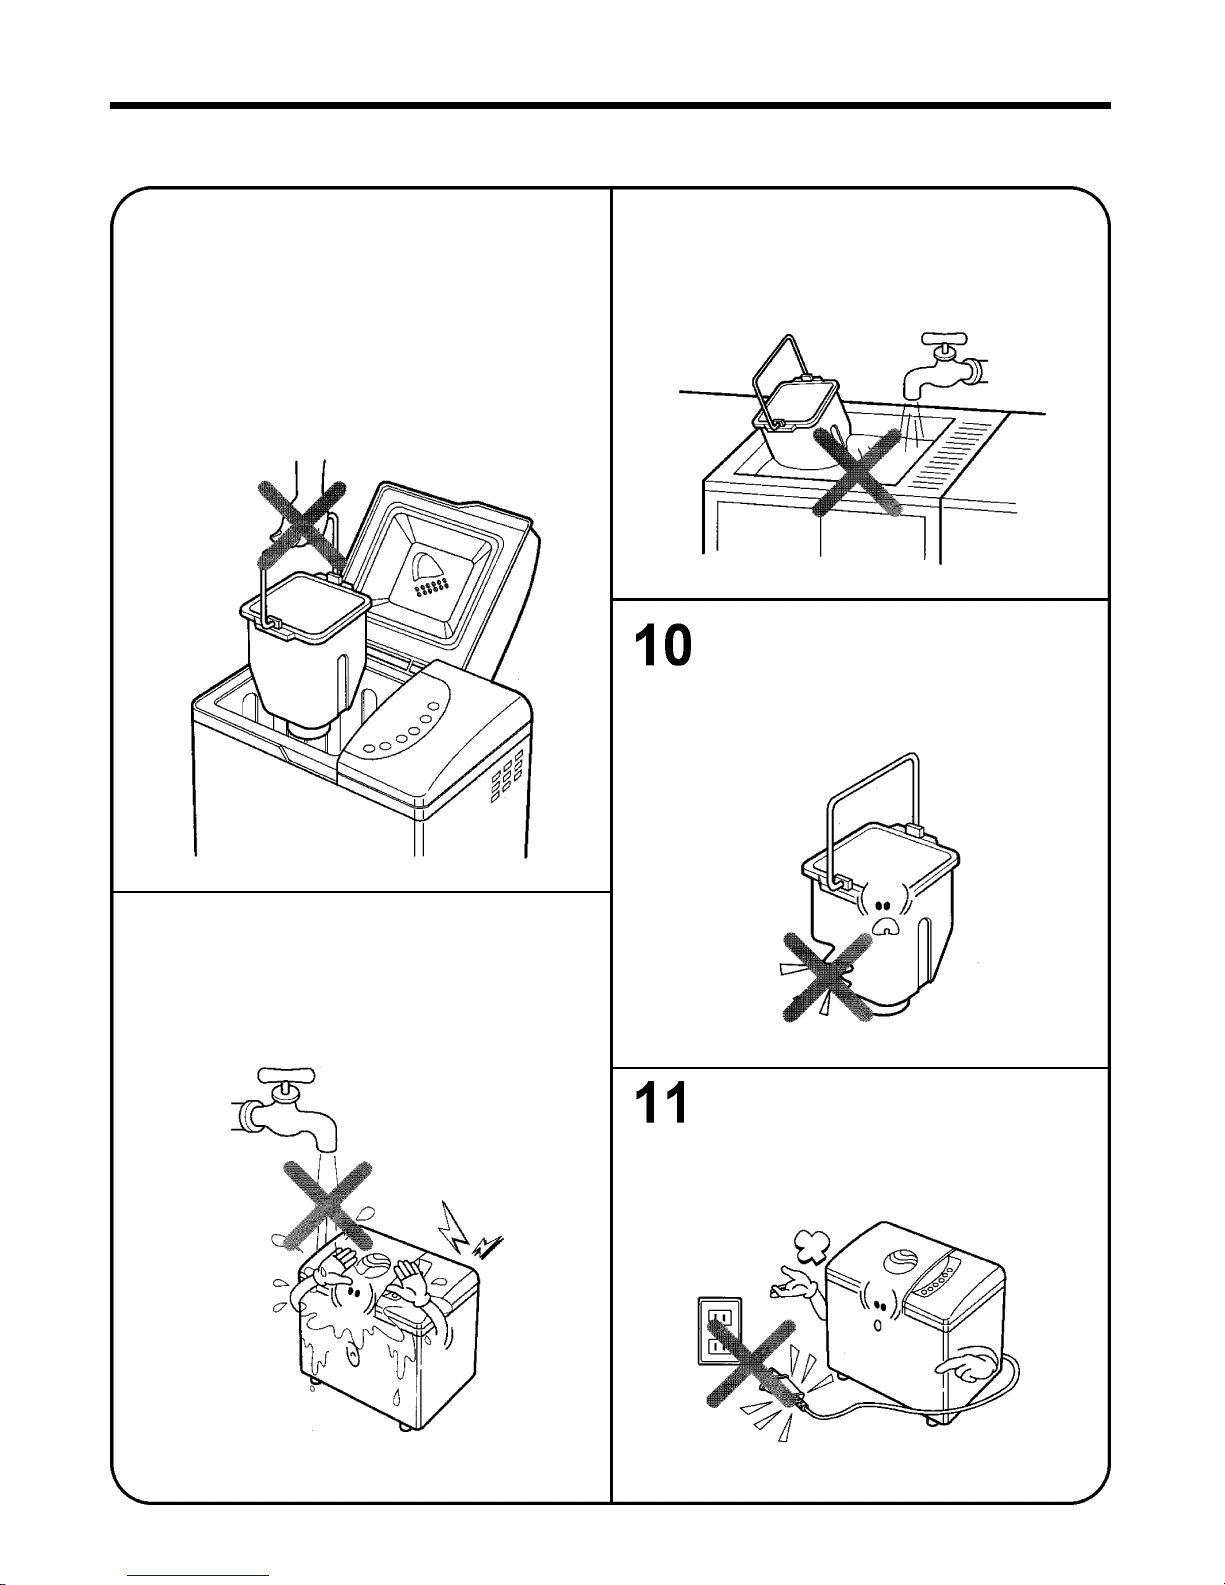
Do not open the lid or remove the bread
7 9
pan during operation.
The lid may be only opened on the Sweet
Bread or Whole Wheat Bread program to
add extra ingredients at the indicated
time (beeper sounds 4 times). Lifting the
lid during operation will allow warm air to
escape, thereby hindering the RISE and
BAKE stage.
Do not immerse the bread pan in water.
It may cause the shaft to malfunction.
Wipe pan with a damp cloth to clean.
Do not dent or damage the bread pan.
The breadmaker will not operate
properly if it is damaged.
8
Never immerse the breadmaker, cord or
plug in water.
This would be very dangerous.
Be sure to disconnect the power cord
by pulling out the plug, and allow the
breadmaker to cool down before
storing.
- 11 -
Page 12
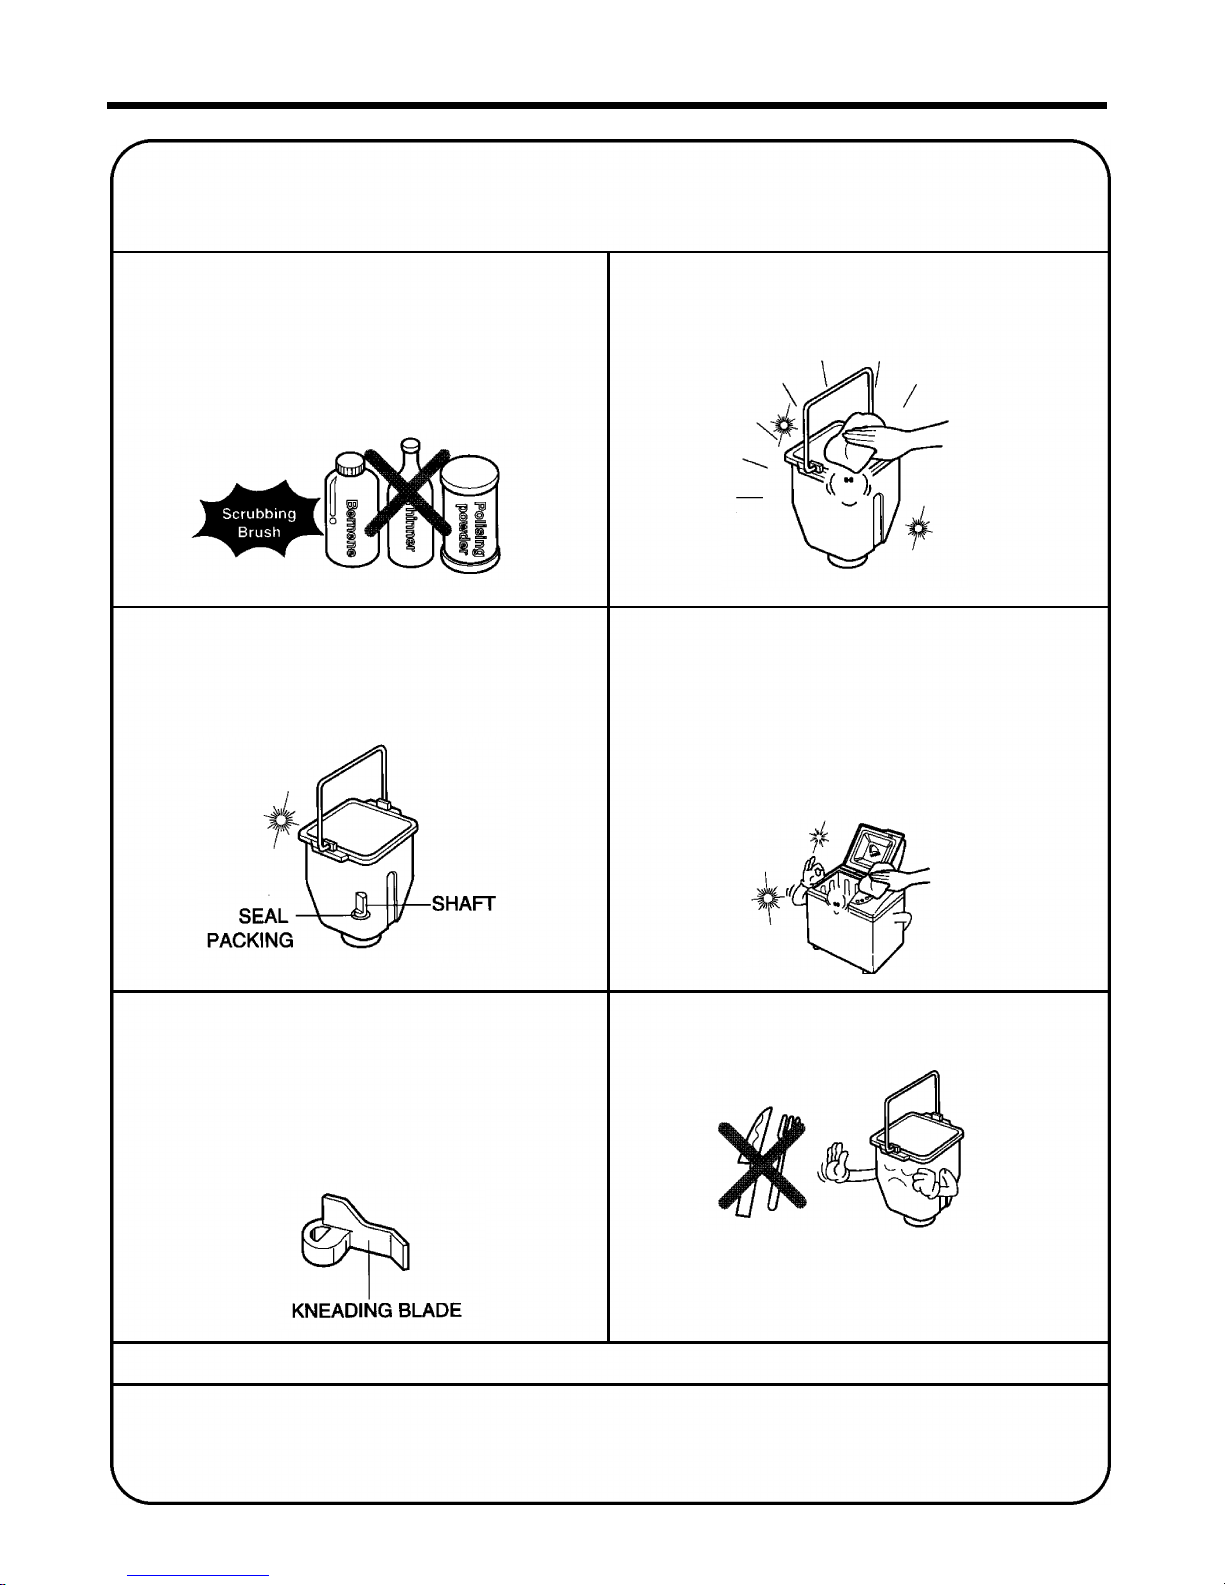
HOW TO CLEAN
CLEANING (Always unplug unit)
ANY SERVICING REQUIRING DISASSEMBLY, OTHER THAN THE CLEANING DESCRIBED
BELOW, SHOULD BE PERFORMED BY AN AUTHORIZED SERVICE REPRESENTATIVE.
• Avoid using any cleaning agent other than
dish detergent.
• Do not use steel wool or other abrasive
materials.
• Do not wash the removable parts in the
dishwasher.
• Wipe the shaft with a soft cloth or sponge to
prevent damage to the seal packing. Allow to
dry before storing the pan inside the breadmaker.
• Do not immerse the bread pan in water.Wipe
clean with a damp cloth, then dry thoroughly.
• Wipe the exterior with a damp dish cloth after
each use. Do not immerse in water or splash
with water.
• After using, cool and wipe out crumbs or flour
from the oven interior with a dampened washcloth. A dampened, small soft brush may also
be used.
• It is not necessary to remove the kneading
blade for cleaning. But if you wish to, it must be
removed after each use.
• To remove, fill the pan with hot soapy water
and allow it to soak for 20 minutes. Wash it
with a soft brush or cloth and dry thoroughly.
• Be sure breadmaker is completely cooled before storing.
• All removable parts should be thoroughly cleaned and dried.
• Store breadmaker with lid closed.
• Do not use metal utensils inside the bread
pan.They will damage the non-stick coating in
the pan.
NOTE: The non-stick coating may change color
after prolonged use.This is caused by moisture
and steam, and in no way affects performance.
STORING
- 12 -
Page 13

INGREDIENTS
Congratulations! You have just acquired a TOASTMASTER Bread Box™.Toastmaster Inc. has
become a household name you can count on as has RED STAR®Yeast and TOASTMASTER have
combined their efforts to provide the exciting recipes in this cookbook. Many hours of developing and
testing these recipes were necessary to assure you, the home baker, a variety of delicious homemade
breads. This bread box will bake up to a 1
of flour.
While some of you have been baking breads using traditional methods for years, others may have no
experience at all. Actually, neither group has an advantage over the other since using a bread machine
is a completely new concept in bread making. To achieve optimum results, please take a few minutes
and read the following information before you even shop for the ingredients. All ingredients except
water should be at room temperature.
R Yeast:The Number One Ingredient
1
⁄
2
pound loaf of fresh bread containing approximately 3 cups
RED STAR®Active DryYeast was used in developing all the recipes in this book. However, RED STAR
QUICK-RISE™Yeast may also be used. We found that we did not have to vary the amount used when
we substituted one for the other in this TOASTMASTER Bread Box™.
Follow Package directions if using Bread Machine Yeast.
Because yeast can grind against itself and become ve ry fine, it is packaged by weight and not by
vo l u m e. A
1
⁄
4
oz. package of RED STAR®Yeast contains approximately 2
1
⁄
4
level teaspoons of yeast.
The activity of yeast will deteriorate when it is exposed to oxygen, moisture or warmth.Therefore, yeast
needs to be stored airtight and refrigerated or frozen.Yeast is granular and comes to room temperature
very quickly.
Yeast ferments sugar to leaven bread.White sugar, brown sugar, and honey may be interchanged
equally. Since honey is a liquid, decrease the water by the same amount as the honey added.
Sugar is the favorite food of yeast, too much sugar will cause the yeast to over-react, especially in a
bread machine program.The yeast will have a feeding frenzy and then become lethargic.The loaf of
bread will be small and dense. D ried fruits also contri bute sugar to the bread dough. Resist the
t e m p t a t i o n to add more than specified in the recipe.
Artificial sweeteners may not be used because the yeast cannot react with them.
R Flour: Bread Flour Is Essential
All types of flour are affected by a variety of factors, such as milling grades, moisture content, length of
s t o rage and manu fa c t u ring processes.Adjustments to the recipes may need to be made to compensate
for climactic changes in each region to ensure an excellent loaf every time.
®
Bread flour is a definite necessity. Milled from hard winter or spring wheat, it has a higher protein
c o n t e n t that makes it more durable than all-purpose flour.The protein, when mixed with liquid,
becomes gluten. When kneaded, gluten becomes elastic and gives the bread better stru c t u r e. I n
c o n t ra s t , a l l - p u rpose flour, milled from a combination of soft and hard wheat, becomes elastic too
e a s i l y for use in a bread machine and quickly loses its ability to stretch well. As a result, bread made
from all-purpose flour will be small and dense. Several well-known mills now market bread flour. It is
labeled bread flour on the package and is available at grocery stores.
Wheat is the only grain that contains the type of protein that becomes elastic when kneaded. Other
flours, such as rye, barley, oats, soy, rice, and buckwheat, add flavor and fiber to breads, but do not
add structure to the dough.Therefore, wheat flour is essential as a base when making breads with
other flour ingredients.
- 13 -
Page 14

Be careful when adding wheat germ, vegetables, fruits, nuts, and liquid milk to recipes that you do not
exceed the amount listed.These products, if used in amounts which exceed the recipe directions, may
inhibit the rising of the bread.
Vital Wheat Gluten is produced by processing white flour one more step. White flour contains both
p r o t e i n and starch, and mills now can remove most of the starch leaving only the protein (gluten).This
is more expensive, but is used only in small amounts as an additive to regular flour.When gluten is
added to recipes containing whole grain flours, it improves the volume and shape of the loaf significantly.
Usually 1 teaspoon per cup of flour will make a difference. If more than a tablespoon per cup of flour is
used, however, the bread may be tough. Many grocery stores stock gluten in the flour section. Health
food stores and nutrition centers also usually carry this item.
To measure flour, spoon into measuring cup and level off with a bread knife. DO NOT:tap the cup,
pack the flour into the cup, or sift the flour.
Flour is best kept in an airtight container. If you need to store flour for a long period of time, keep it in
an airtight container in the freezer, not the refrigerator.Refrigerators tend to dry out flour.Whole grain
wheat flours, which have a higher oil content, will become rancid much more quickly than white flour
and should always be kept in the freezer regardless of the length of time you intend to store the flour.
Be sure, however, to allow all flours to return to room temperature before placing in the machine.
As a good rule of thumb, check the dough ball after the first 5 minutes of the initial kneading cycle. The
ball should be round, smooth-textured, soft and slightly tacky to the touch. If it does not form a ball and
is more like a batter, add 1 tablespoon of flour at a time until the appropriate consistency is reached. If
the mixture is too dry to form a ball or forms more than one ball, add 1 teaspoon of water and allow it
to absorb into mixture. Add more water if necessary.
R Fat: Dough Enhancer And Conditioner
Shortening is an American term for fat used in recipes.The recipes in this book use vegetable oil. Solid
shortening, butter or margarine may be substituted in equal proportion. Divide into small pieces before
placing in the machine. There will not be any noticeable flavor difference.The crust may be a little
crisper with butter. Margarine tends to make the crust a little rougher. Light or whipped margarine does
not work well.
R Liquids: Activate The Yeast And Bind The Dough
“Liquid” means all the wet ingredients used in the recipe.Traditional bread bakers have been taught
correctly that warm liquid (110~115°F) will activat e dry yeast. However, when yeast is used in a bread
machine, the liquid temperature most likely to provide a good environment for the yeast is 80°F. With
this temperature, the yeast activates gradually to accommodate the program of the machine. When
higher temperatures are used, not only does the yeast activate too quickly, but also the entire dough
becomes too warm. If the temperature of the dough is over 100°F during the rising times, the yeast
becomes very lethargic and is not able to work effectively.
When bread is kneading,the dough should be a soft, tacky ball. More flour, one tablespoon at a time,
may be added after 5 minutes of kneading if the dough is too wet. More liquid may also be added, one
teaspoon at a time, if the dough is too dry.If the bread falls during the baking cycle and/or is quite
coarse, reduce the total liquid amount.
When the machine is set on the delay timer, reduce the amount of liquid in most recipes by 1~3
teaspoons depending on the recipe and size of loaf and be sure the liquid is very cold.
- 14 -
Page 15

Eggs are also considered part of the total liquid amount. One egg should measure
add additional water to equal
a d d i t i o n a l water to equal
1
⁄
4
1
⁄
8
cup per egg. An egg white is equal to
cup. Eggs need to be at room temperature before putting them in the
1
⁄
8
c u p. If it does not, add
1
⁄
4
cup. If it does not,
machine. If eggs are taken directly from the refrigerator, place them in a bowl of warm water to take off
the chill before cracking. DO NOT USE EGGS OR ANY PERISHABLE FOOD WITH THE DELAYED
SETTING.
Recipes which require nonfat dry milk can be substituted with liquid milk equally. Omit the dry milk
completely.You may also replace part or all of the water in the recipe with milk. Dry milk, like liquid
milk, will make the interior structure have a more velvety texture. Fresh milk is not recommended with
the delayed setting.
R Lemon Juice: Dough Enhancer
Lemon juice contains acidic acid, a natural dough enhancer.The addition of lemon juice (or vinegar
which also contains acidic acid) may help improve the overall structure of your loaf. (Only you, the
baker, will know it is there!)
R Cinnamon And Garlic: Not True Friends Of Yeast
Previously, cinnamon and sugar were sprinkled on dough before it was rolled up jelly roll fashion.
Adding it to the dough in a bread machine presents a problem. Cinnamon reacts with bread dough as
meat tenderizer reacts with meat. It breaks down the structure. Although it smells wonderful as it is
baking, the flavor is dissipated in the baking process.
DO NOT ADD MORE THAN LISTED IN THE RECIPE.
Garlic inhibits yeast activity. DO NOT ADD MORE garlic than that listed in the recipe. For more garlic
flavor use a spread for the bread rather than adding it to the dough.
R Salt: Regulates Yeast Activity
Salt is necessary to control the activity of yeast, disciplining it to work slowly and steadily.Without salt,
yeast acts very rapidly and gives out too quickly. Salt also strengthens the structure of the dough. If too
little or no salt is used, the bread will rise rapidly and then fall either before the baking or as soon as
the baking begins; the texture will also be coarse and uneve n . Some salt substitutes will wo rk
e f fe c t i ve l y.
R Substitutes
In our test kitchen, we experimented with several ingredient substitutions.We have found the following
substitutions to be acceptable, but caution that your results may vary significantly from ours.
MILK
Coffee creamer may be substituted for dry milk in equal proportions.
Liquid milk may be substituted for water in up to equal proportions. Make sure the milk is warmed to
80°F. The dry milk may be eliminated altogether.The loaf will be slightly smaller.The crust will be much
softer.
LEMON JUICE
Vinegar may be substituted for lemon juice in equal proportions.
SUGAR
One half the amount of sugar will produce both a slightly smaller loaf and a much lighter colored crust.
Honey may be substituted for sugar in equal proportions. You will need to reduce the liquid by the
same amount.
Brown sugar may be substituted for white sugar in equal proportions.
Yeast NEEDS sugar and so, no artificial sweetener should be used.
- 15 -
Page 16
SALT
Salt-free recipes were not successful.
Salt substitutes did produce an acceptable loaf. However, the breads texture was somewhat more
coarse.
EGG
Egg beaters may be used as directed on the carton.
Two egg whites may be substituted for one egg.
REMEMBER, all egg products must be at room temperature.
R Bread Mixes
Use mixes labeled for 1-1
1
⁄
2
pound loaves. For best results use the RAPID Program. If using the delay
timer, use the BASIC BREAD program.When baking a mix with a high sugar content such as
Cinnamon Raisin or Apple Walnut, use the Sweet cycle.
Layer ingredients in bread pan in the following sequences:
If additional assistance is needed, expert help is available from Toastmaster (1-800-947-3744) or from
RED STAR®YEAST (1-800-445-4746 #4).
- 16 -
Page 17

OPERATION
R Programming-Basic, Sweet,Whole Wheat, French and Rapid Bread
Open the lid and remove the bread
1
pan turning the bread pan clockwise
and then pulling straight up, using the
handle.
Mount the kneading blade on the
2
shaft.
Place all ingredients in the bread pan.
3
Make sure not to omit any ingredients.
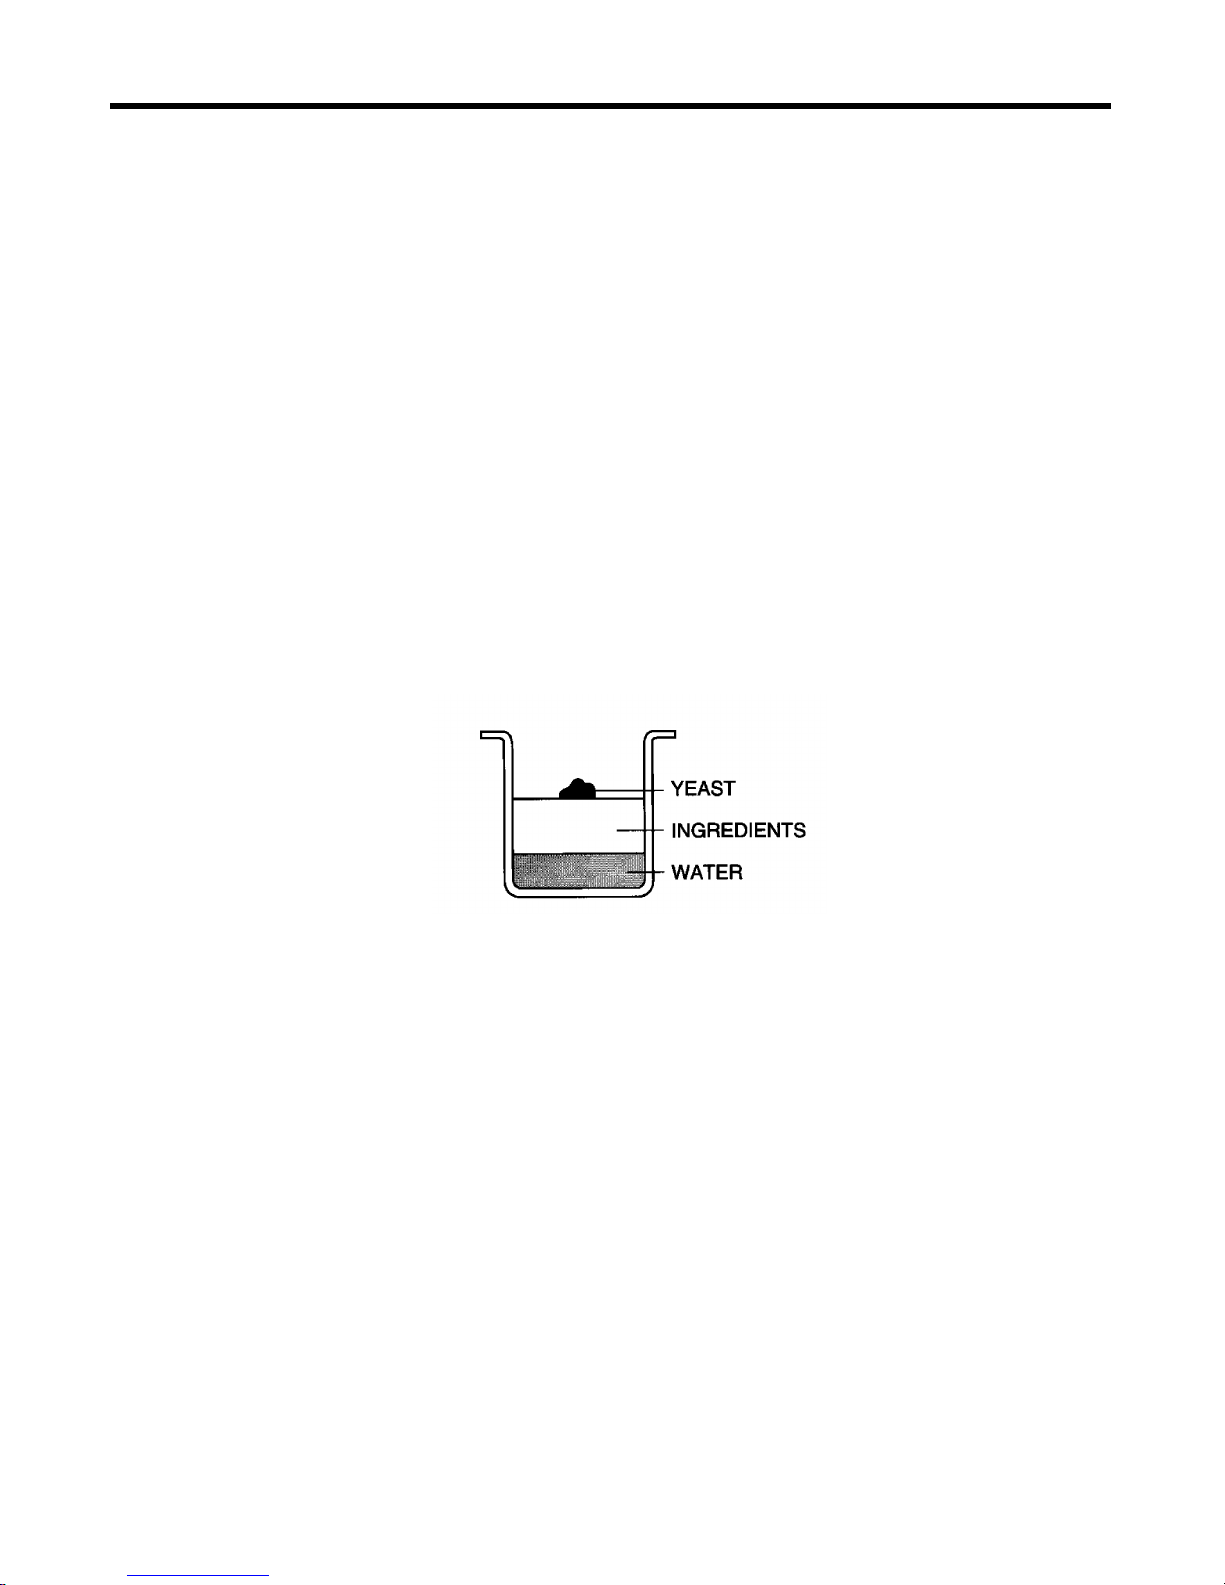
NOTE: When using the timer, add the yeast
last on top of the flour and away from
the liquid. This is critical for good
results.
Place the bread pan in the bread-
4
maker and turn counterclockwise.
- 17 -
Page 18
Close the lid slowly and tightly using
5
the handle. Plug in the breadmaker.
The display indicator will light up.
Press the START pad.
5
Notice that the time left for the bread
to be finished is displayed 3:40 and is
counting down (2:40 for Bread Rapid).
For the Whole Wheat and French
cycle the time displayed will be 4:00.
The first 20 minutes will be pre-heat
time to warm the ingredients and
allow the flour time to absorb water.
Select the desired Program and
6
Baking Control (medium, light, or dark
crust).The program and baking control
indicator should light up in the display
window.
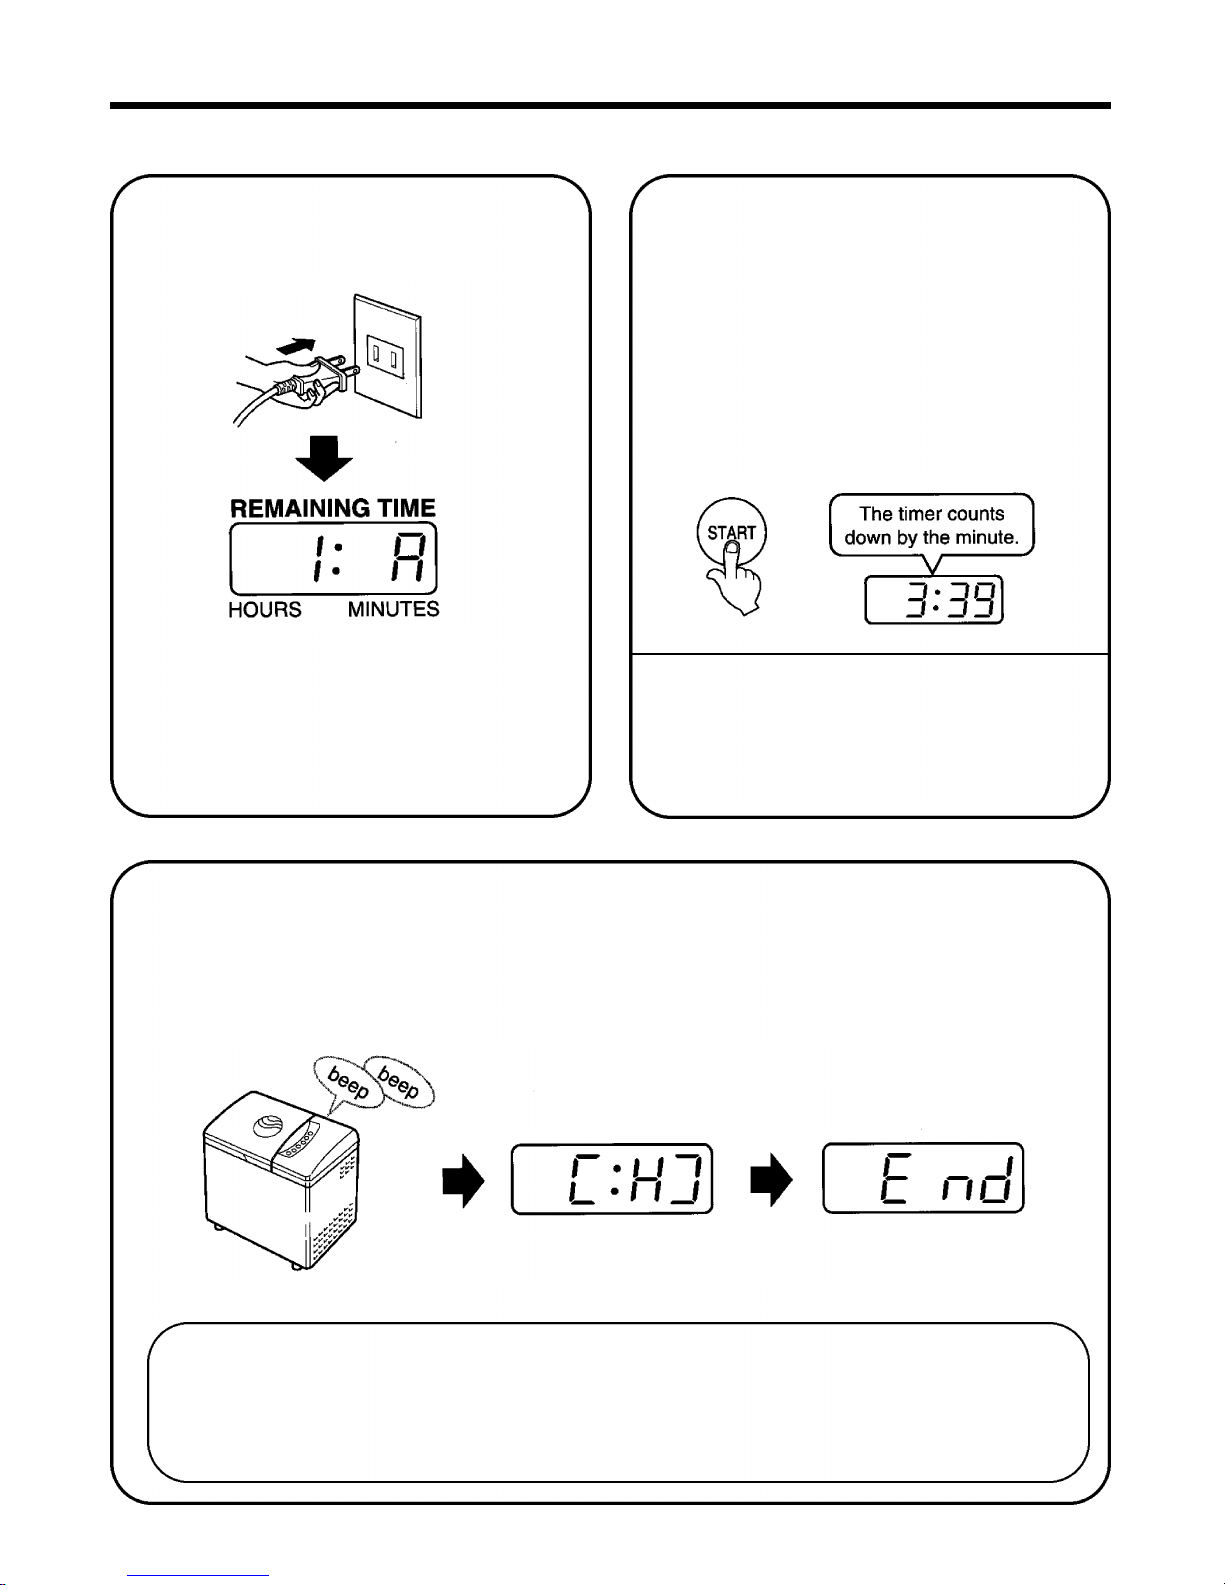
The beeper will sound 8 times indicating the bread is done and cooled.After bread is done, if
8
you do not take the bread out of the breadmaker immediately, the bread is kept warm for 3
hours displaying [:H] on the remaining time (Not in rapid or dough cycle). After 3 hours. [End]
is displayed.
CAUTION: Do not touch the Breadmaker,
because it is very hot during baking. Do not
open the lid during operation. Heat will
escape and final result may be altered.
NOTE: The beeper sounds 4 times when baking is complete, cooling then proceeds.When
serving bread that is just baked, press the STOP pad first, then take the bread out form the
bread pan. (Be sure to use oven mitts, because the pan is ve ry hot.) Dissipate heat by
p l a c i n g a towel or other cloth under the bread before cutting.Turn the loaf on its side and cut
with a serrated knife.
- 18 -
Page 19
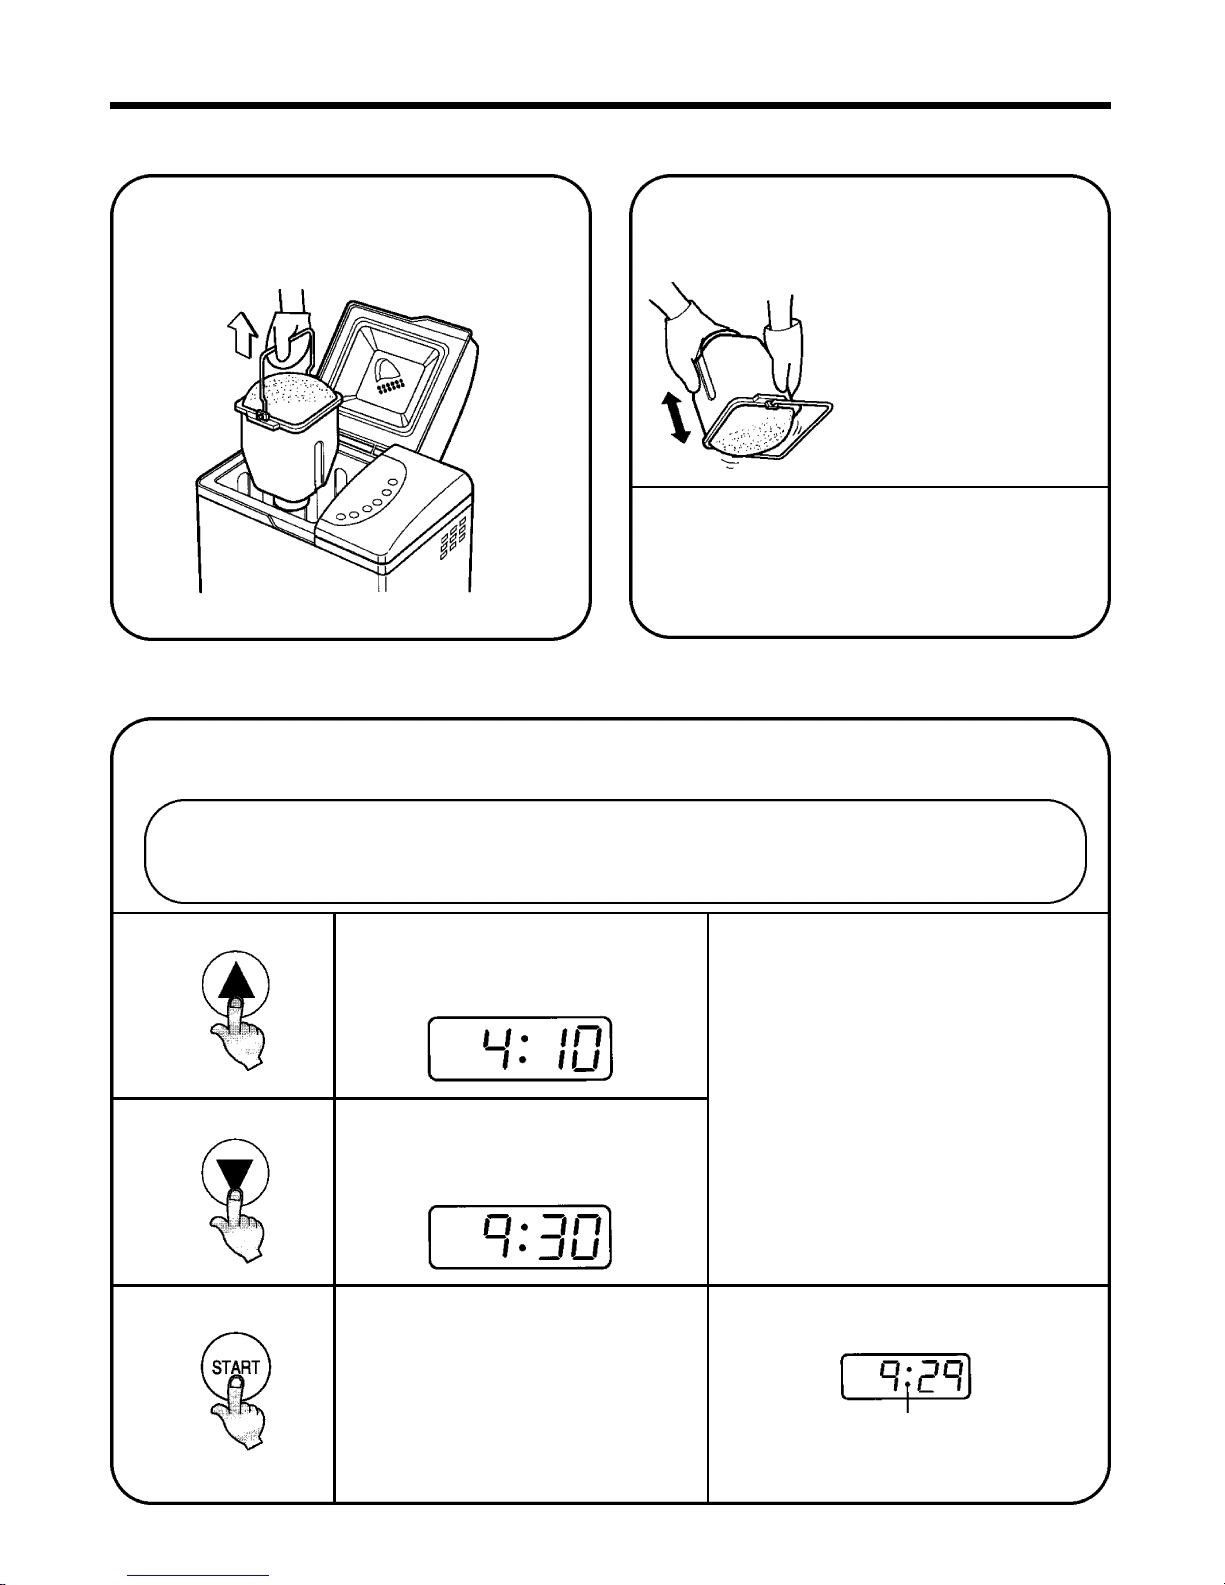
Press the STOP pad and remove the
9
bread pan using oven mitts.
Turn the bread pan upside down and
10
CAUTION:
• The bread pan, kneading blade and bread
will be very hot.
• Always unplug after each use.
shake the bread pan several times
to release the bread.
Place the bread on a
wire rack to cool and
allow the steam to
escape. Be sure to
remove the kneading
blade from the bread.
R Programming the DailyTimer
Set the timer for however long you want to wait before the bread is done (from 4:10 to 13 hours, in
10 minute intervals).
EXAMPLE: It is 9:00 p.m. now.The bread should be ready at 6:30 a.m. the next morning.
Set the timer for 9:30, because there are 9 hours and 30 minutes between 9:00 p.m. and
6:30 a.m.
1. When pressed, the time will
advance in 10 minute increments.
2. When constant pressure is
applied to the pad, the time will
advance quickly.
(Basic, Sweet,Whole Wheat and French Only)
NOTE: If you pass the desired
delay time, push the (¨) pad to
go back. Continually pressing the
() pad will advance the time
faster up to 13:00.
This is the longest that the timer
may be delayed. It will then count
down in 1 minute increments to
3:40, then it will start. On French
and Whole Wheat, it will start at
4:00.
3. Press the START pad and the
timer is set, and the colon
blinks. After one minute, 9:29 is
displayed, and the timer
continues to count down.
Colon will blink
- 19 -
Page 20
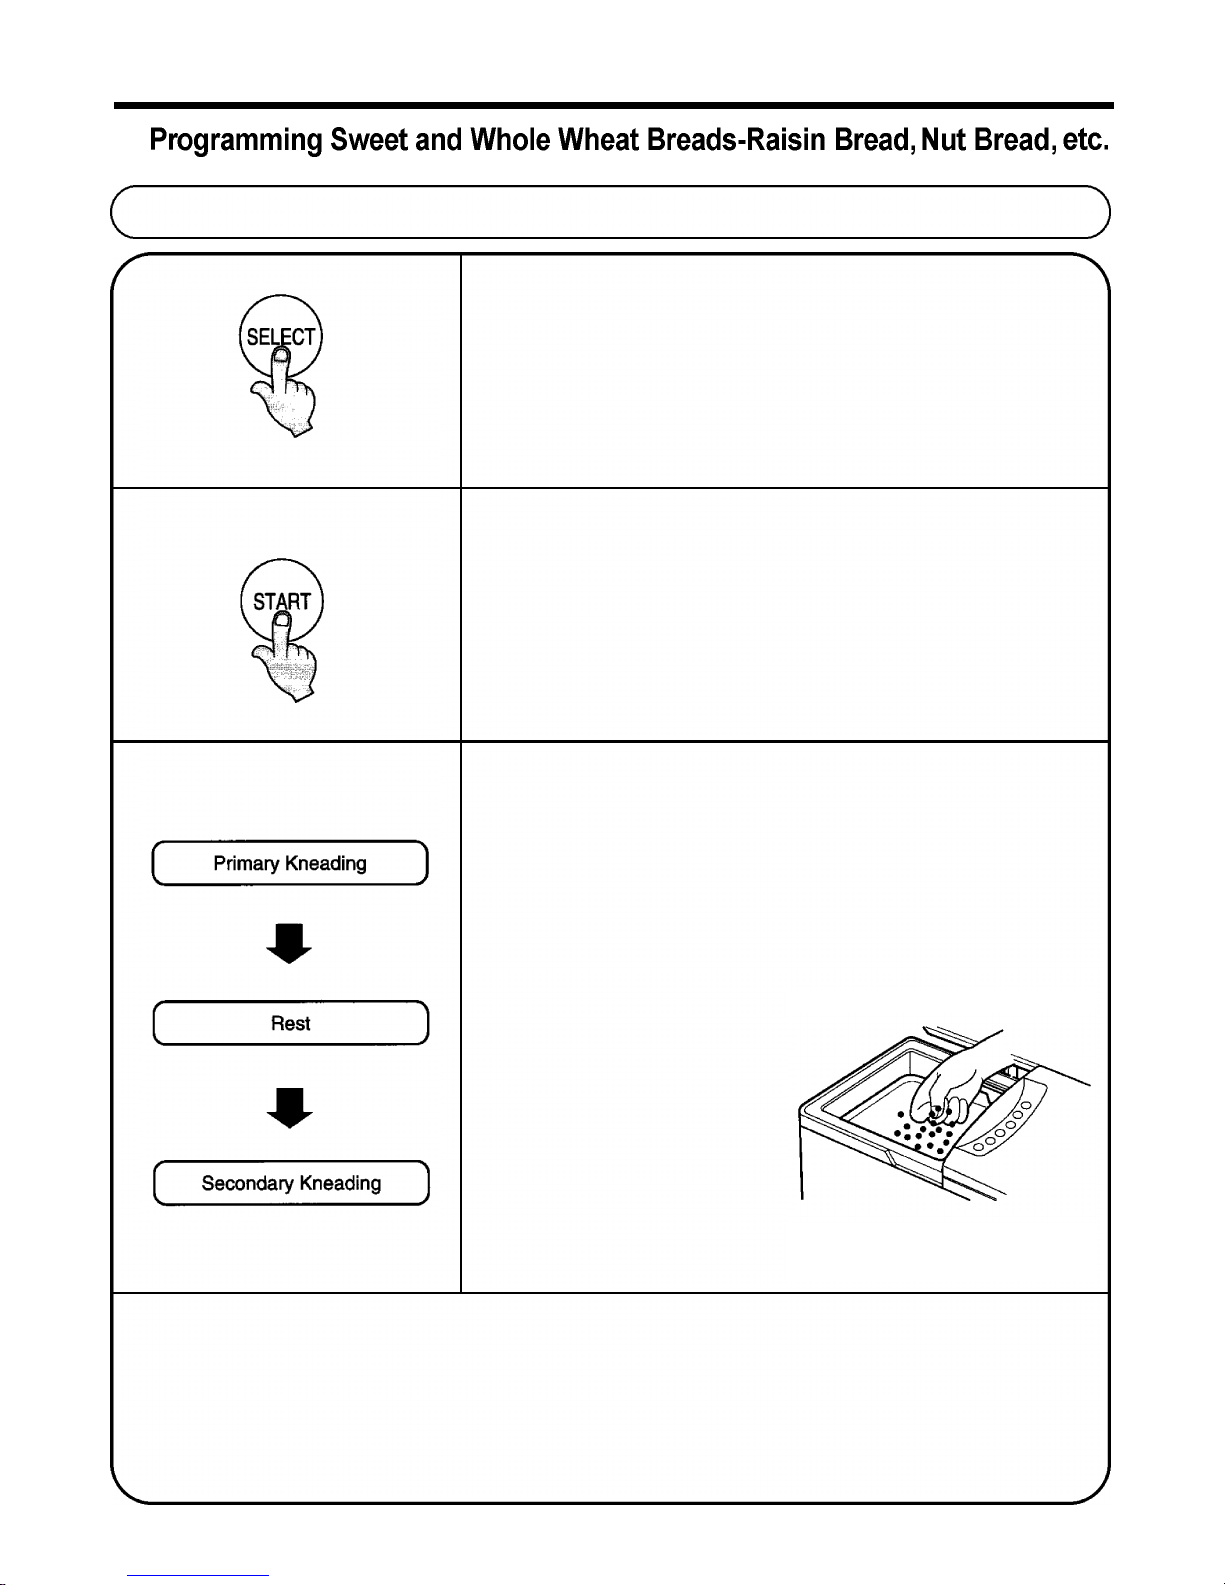
R
NOTE: SEE COOKBOOK GUIDE FOR RECIPES.
1. Press program to select Sweet or Whole Wheat Program.
2. Press the START pad. Notice that the timer displays 3:40
(4:00 for Whole Wheat) indicating how long it will take to
complete the bread making program.
3. For the sweet program after about 19 minutes from the start
(and 5 minutes before the secondary kneading is finished),
4 beeps indicate the time to add any additional ingredients
raisins, nuts, cheese, etc.The indicator panel will show 3:21.
For the whole wheat program, after about 1 hour and 30
minutes from the start (and 5 minutes before the secondary
kneading is finished), 4 beeps indicate the time to add any
additional ingredients raisins, nuts, etc.The indicator panel
will show 2:30.
Open the lid and add ingredients quickly and evenly
over the dough. Opening the
lid at this time will not stop
the kneading, so be careful.
Close the lid. Now the unit
will continue through the
remaining stages
automatically.
NOTE:
• Make sure you select the Sweet or Whole Wheat Program. If overlooked, the beeper will not
sound to indicate when to add the additional ingredients.
• If you add the additional ingredients before the machine beeps 4 times, the ingredients will be
chopped into smaller pieces.
• After adding the extras, quickly close the lid to prevent heat loss.
• It is better to select light baking control for a soft and delicious crust.
- 20 -
Page 21
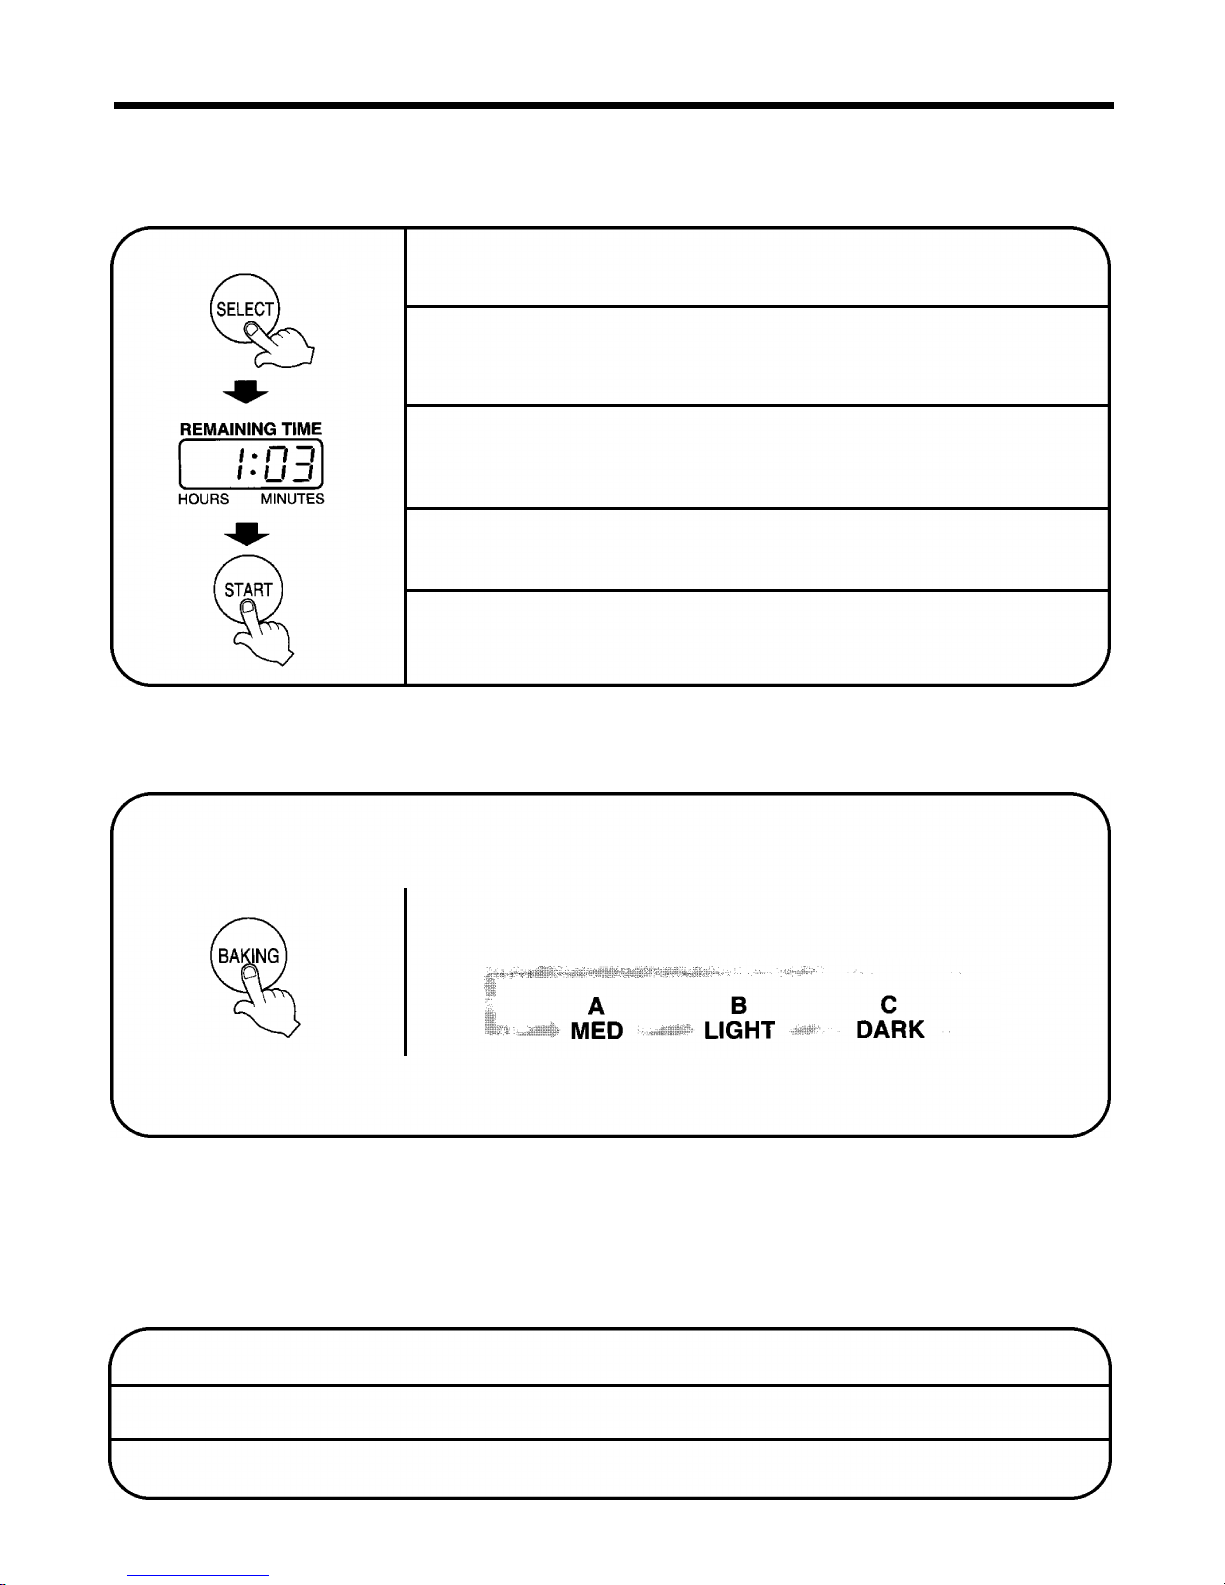
R Programming Dough
The Delay Timer cannot be used for the dough program.
1. First choose a recipe from the Recipe Section.
2. Press the PROGRAM SELECT pad until #6 is displayed.
3. Press the START pad.The remaining time displays 1:03 and the
breadmaker will start to knead.
4. After 1 hour and 3 minutes the beeper will sound indicating the
time to remove the dough.
5. Fo l l ow your recipe directions to complete whatever you have
c h o s e n to make.
R Baking Control
The Baking Control function is used for any loaf of bread baked in the Automatic Breadmaker.
The Baking Control function is used to select the color of the crust. It can be baked medium, light
or dark, you choose!
1. Press more than one time, the baking control function will be
advanced as follows:
NOTE: It is not necessary to press the Baking Control pad when medium is desired. It is automati-
cally set on medium with each bake program.
R CrustTreatments (use only with dough program)
Always allow optimum rising of shaped dough.Then, use a pastry brush to gently apply the glaze. Bake
as directed in the recipe. For a shiny, golden crust, use Egg Glaze or Egg Yolk Glaze. For a shiny,
chewy crust, use Egg White Glaze, because egg yolk is not used, crust will not be as golden in color.
Egg Glaze Mix 1 slightly beaten egg with 1 tablespoon water or milk.
Egg Yolk Glaze Mix 1 slightly beaten egg yolk with 1 tablespoon water or milk.
Egg White Glaze Mix 1 slightly beaten egg white with 1 tablespoon water.
- 21 -
Page 22

R CUTTING
Because loaves baked in a breadmaker are shaped differently from tradition bread loaves, below are
several ways to cut them:
• Use an electric knife for best results when cutting hot bread loaves. Otherwise, a sharp serrated or
sawtooth bread knife works well.
• For square slices-place the loaf on its side and slice across the loaf. We find this is the easiest way
to cut loaves.
• For rectangular slices-place the loaf upright and cut from the top down. Slices may be cut in half,
lengthwise or crosswise.
• For wedges-place the loaf upright and cut through the center from the top down. Place each half cut
side down and cut lengthwise into four, six or eight wedges.
R STORING
If you have leftover bread, store it as follows:
• Store bread tightly covered at room temperature up to three days. If weather is hot and humid, store
in the freezer.
• Store bread tightly covered in the freezer up to one month. Slicing the loaves before freezing makes
it easy to use one slice at a time.
• Do not store bread in the refrigerator because it tends to dry out and become stale more quickly
than commercially made bread.
• Leftover bread can be cut into
stuffing recipes. Keep a tightly closed container in the freezer to add to as needed.
1
⁄
2
-or 1-inch cubes for use in your favorite bread pudding, crouton and
R FREEZING OF BAKED YEAST PRODUCTS:
When freezing a baked yeast product, it is important to have it completely cooled before wrapping to
prevent moisture from making the product soggy.
Do not frost before freezing. Freeze cooled unwrapped product one hour to harden. Remove from
freezer; wrap in plastic wrap or aluminum foil. Place in plastic bag and seal. Freeze for up to six to eight
weeks.To thaw, partially open wrappings to allow moisture to escape.
R FREEZING UNBAKED YEAST PRODUCTS:
Freezing dough for later shaping and baking is done after the dough is finished kneading and before
the first rise. Divide dough into desired amounts and flatten into disks, one-inch thick. Place on cookie
sheet and put in freezer one hour to harden. Remove from freezer; wrap with plastic wrap or aluminum
fo i l . Place in plastic bag and seal. Dough can be kept in freezer up to four we e k s.To thaw, place
c ove r e d dough in refri g e rator ove rnight or for seve ral hours. Place uncovered dough on counter fo r
f i f t e e n to twenty minutes to bring dough to room temperature. Punch down dough. Dough is now ready
for shaping and second rising.
Dough can also be frozen after being formed into a desired shape and before proofing. Place shaped
dough on cookie sheet; put in freezer one hour to harden. Remove from freezer; wrap with plastic wrap
or aluminum foil. Place in plastic bag and seal. Dough can be kept in freezer up to four weeks.Thaw
the covered frozen dough slowly in your refrigerator overnight or for several hours.
Bring dough to room temperature partially unwrapped to allow moisture to escape. Let dough rise to
double before baking. Bake according to recipe instructions.
If an unbaked product needs to be frozen longer, add one half again as much yeast as called for in
recipe. Dough may be frozen up to six months.
- 22 -
Page 23

COOKBOOK GUIDE
INDEX
BREADS
BASIC WHITE BREAD . . . . . . . . . . . . . . . . . . . . . . . . . . . . . . . . . . . . . . . . . . . . . . . . . . . . . . 25
FRENCH BREAD . . . . . . . . . . . . . . . . . . . . . . . . . . . . . . . . . . . . . . . . . . . . . . . . . . . . . . . . . . 25
BUTTERMILK BREAD . . . . . . . . . . . . . . . . . . . . . . . . . . . . . . . . . . . . . . . . . . . . . . . . . . . . . . . 26
FRENCH VARIATION BREAD . . . . . . . . . . . . . . . . . . . . . . . . . . . . . . . . . . . . . . . . . . . . . . . . . 26
POTATO BREAD . . . . . . . . . . . . . . . . . . . . . . . . . . . . . . . . . . . . . . . . . . . . . . . . . . . . . . . . . . . 27
EGG BREAD . . . . . . . . . . . . . . . . . . . . . . . . . . . . . . . . . . . . . . . . . . . . . . . . . . . . . . . . . . . . . . 27
CORN BREAD . . . . . . . . . . . . . . . . . . . . . . . . . . . . . . . . . . . . . . . . . . . . . . . . . . . . . . . . . . . . . 28
DILL BREAD . . . . . . . . . . . . . . . . . . . . . . . . . . . . . . . . . . . . . . . . . . . . . . . . . . . . . . . . . . . . . . 28
BEER BREAD . . . . . . . . . . . . . . . . . . . . . . . . . . . . . . . . . . . . . . . . . . . . . . . . . . . . . . . . . . . . . 29
BLOODY MARY BREAD . . . . . . . . . . . . . . . . . . . . . . . . . . . . . . . . . . . . . . . . . . . . . . . . . . . . . 29
HONEY GRANOLA BREAD . . . . . . . . . . . . . . . . . . . . . . . . . . . . . . . . . . . . . . . . . . . . . . . . . . . 30
BANANA BREAD . . . . . . . . . . . . . . . . . . . . . . . . . . . . . . . . . . . . . . . . . . . . . . . . . . . . . . . . . . . 30
SPICED PUMPKIN BREAD . . . . . . . . . . . . . . . . . . . . . . . . . . . . . . . . . . . . . . . . . . . . . . . . . . . 31
CHEESE ONION BREAD . . . . . . . . . . . . . . . . . . . . . . . . . . . . . . . . . . . . . . . . . . . . . . . . . . . . 31
TRAIL MIX BREAD . . . . . . . . . . . . . . . . . . . . . . . . . . . . . . . . . . . . . . . . . . . . . . . . . . . . . . . . . 32
MAPLE BREAD . . . . . . . . . . . . . . . . . . . . . . . . . . . . . . . . . . . . . . . . . . . . . . . . . . . . . . . . . . . . 32
HOLIDAY BREAD . . . . . . . . . . . . . . . . . . . . . . . . . . . . . . . . . . . . . . . . . . . . . . . . . . . . . . . . . . 33
CINNAMON RAISIN BREAD . . . . . . . . . . . . . . . . . . . . . . . . . . . . . . . . . . . . . . . . . . . . . . . . . . 33
DRIED FRUIT BREAD . . . . . . . . . . . . . . . . . . . . . . . . . . . . . . . . . . . . . . . . . . . . . . . . . . . . . . . 34
WHITE WHEAT BREAD . . . . . . . . . . . . . . . . . . . . . . . . . . . . . . . . . . . . . . . . . . . . . . . . . . . . . . 34
WHOLE GRAIN BREAD . . . . . . . . . . . . . . . . . . . . . . . . . . . . . . . . . . . . . . . . . . . . . . . . . . . . . 35
CARAWAY RYE BREAD . . . . . . . . . . . . . . . . . . . . . . . . . . . . . . . . . . . . . . . . . . . . . . . . . . . . . 35
ONION RYE BREAD . . . . . . . . . . . . . . . . . . . . . . . . . . . . . . . . . . . . . . . . . . . . . . . . . . . . . . . . 36
PUMPERNICKEL BREAD . . . . . . . . . . . . . . . . . . . . . . . . . . . . . . . . . . . . . . . . . . . . . . . . . . . . 36
ITALIAN HERB BREAD . . . . . . . . . . . . . . . . . . . . . . . . . . . . . . . . . . . . . . . . . . . . . . . . . . . . . . 37
SWEET WALNUT BREAD . . . . . . . . . . . . . . . . . . . . . . . . . . . . . . . . . . . . . . . . . . . . . . . . . . . . 37
MOM’S HEARTY NUT BREAD . . . . . . . . . . . . . . . . . . . . . . . . . . . . . . . . . . . . . . . . . . . . . . . . 38
CRUNCHY CRACKED WHEAT BREAD . . . . . . . . . . . . . . . . . . . . . . . . . . . . . . . . . . . . . . . . . . 38
JALAPENO BREAD . . . . . . . . . . . . . . . . . . . . . . . . . . . . . . . . . . . . . . . . . . . . . . . . . . . . . . . . . 39
WHOLE WHEAT BREAD . . . . . . . . . . . . . . . . . . . . . . . . . . . . . . . . . . . . . . . . . . . . . . . . . . . . . 39
WHOLE WHEAT BREAD WITH GLUTEN . . . . . . . . . . . . . . . . . . . . . . . . . . . . . . . . . . . . . . . . . 40
HONEY WHOLE WHEAT BREAD . . . . . . . . . . . . . . . . . . . . . . . . . . . . . . . . . . . . . . . . . . . . . . 40
WHOLE WHEAT CINNAMON RAISIN WALNUT BREAD . . . . . . . . . . . . . . . . . . . . . . . . . . . . . 41
FARM STYLE WHEAT BREAD . . . . . . . . . . . . . . . . . . . . . . . . . . . . . . . . . . . . . . . . . . . . . . . . 41
MILK BREAD . . . . . . . . . . . . . . . . . . . . . . . . . . . . . . . . . . . . . . . . . . . . . . . . . . . . . . . . . . . . . . 42
SUNFLOWER SAND SESAME SEED BREAD . . . . . . . . . . . . . . . . . . . . . . . . . . . . . . . . . . . . . 42
DOUGHS
DINNER ROLLS . . . . . . . . . . . . . . . . . . . . . . . . . . . . . . . . . . . . . . . . . . . . . . . . . . . . . . . . . . . 43
WHEAT DINNER ROLLS . . . . . . . . . . . . . . . . . . . . . . . . . . . . . . . . . . . . . . . . . . . . . . . . . . . . . 44
BUTTERMILK ROLLS . . . . . . . . . . . . . . . . . . . . . . . . . . . . . . . . . . . . . . . . . . . . . . . . . . . . . . . 45
FRENCH BAGUETTES . . . . . . . . . . . . . . . . . . . . . . . . . . . . . . . . . . . . . . . . . . . . . . . . . . . . . . 46
FRENCH TWISTS . . . . . . . . . . . . . . . . . . . . . . . . . . . . . . . . . . . . . . . . . . . . . . . . . . . . . . . . . . 47
FRENCH BREAD . . . . . . . . . . . . . . . . . . . . . . . . . . . . . . . . . . . . . . . . . . . . . . . . . . . . . . . . . . 48
BAGELS . . . . . . . . . . . . . . . . . . . . . . . . . . . . . . . . . . . . . . . . . . . . . . . . . . . . . . . . . . . . . . . . . 49
BANANA WHEAT BAGELS . . . . . . . . . . . . . . . . . . . . . . . . . . . . . . . . . . . . . . . . . . . . . . . . . . . 50
LEBANESE PITA POCKETS . . . . . . . . . . . . . . . . . . . . . . . . . . . . . . . . . . . . . . . . . . . . . . . . . . 51
SOFT PRETZELS . . . . . . . . . . . . . . . . . . . . . . . . . . . . . . . . . . . . . . . . . . . . . . . . . . . . . . . . . . 52
PIZZA . . . . . . . . . . . . . . . . . . . . . . . . . . . . . . . . . . . . . . . . . . . . . . . . . . . . . . . . . . . . . . . . . . . 53
WHOLE WHEAT PIZZA . . . . . . . . . . . . . . . . . . . . . . . . . . . . . . . . . . . . . . . . . . . . . . . . . . . . . . 54
CHEEZY GARLIC ROLLS . . . . . . . . . . . . . . . . . . . . . . . . . . . . . . . . . . . . . . . . . . . . . . . . . . . . 55
FOCCACIA BREAD . . . . . . . . . . . . . . . . . . . . . . . . . . . . . . . . . . . . . . . . . . . . . . . . . . . . . . . . . 56
CHALLAH BRAID . . . . . . . . . . . . . . . . . . . . . . . . . . . . . . . . . . . . . . . . . . . . . . . . . . . . . . . . . . 57
CINNAMON ROLLS . . . . . . . . . . . . . . . . . . . . . . . . . . . . . . . . . . . . . . . . . . . . . . . . . . . . . . . . . 58
STICKY BREAKFAST ROLLS . . . . . . . . . . . . . . . . . . . . . . . . . . . . . . . . . . . . . . . . . . . . . . . . . 59
ALMOND-CHERRY COFFEE CAKE . . . . . . . . . . . . . . . . . . . . . . . . . . . . . . . . . . . . . . . . . . . . 60
- 23 -
Page 24

• The altitude chart is not a recipe but a guide to use to change key ingredients in a recipe if it doesn’t
work as printed.
• All recipes were developed at sea leve l - a p p r ox i m a t e l y. Adjustments may be necessary if your altitude
is 2000 feet or higher.
• Try the recipe as printed first unless you have experimented on other recipes and have an idea of
what to change.
• REMEMBER only change one ingredient in the recipe at a time.Then use this guide to change
other recipes.
The following chart is for a 1 pound loaf of bread using 2 cups bread flour in an automatic bread
machine.
Sea 2000 4000 6000 7500 8500
Level Feet Feet Feet Feet Feet
Yeast as is -
1
⁄
4
t -
1
⁄
2
t -
3
⁄
4
t - 1 t - 1
1
⁄
4
t
Sugar as is as is - 1 t - 1 t - 2 t - 2 t
Salt as is as is as is as is +
Gluten as is as is as is + 1
Liquid as is + 2 T +
1
⁄
4
c +
1
⁄
2
t + 1
3
⁄
8
c +
1
⁄
8
t +
1
⁄
2
t + 2 t
1
⁄
2
c +
1
⁄
8
t
1
⁄
2
c
The following chart is for a 1
1
⁄
2
pound loaf of bread using 3 cups bread flour in an automatic bread
machine.
Sea 2000 4000 6000 7500 8500
Level Feet Feet Feet Feet Feet
Yeast as is -
1
⁄
4
t -
1
⁄
2
t -
3
⁄
4
t - 1 t - 1
1
⁄
4
t
Sugar as is as is - 1 t - 1 t - 2 t - 1 t
Salt as is as is as is as is +
1
⁄
4
t +
Gluten as is as is as is + 2 t + 2 t + 2
Liquid as is + 2 T +
1
⁄
4
c +
3
⁄
8
c +
1
⁄
2
c +
1
⁄
4
t
1
⁄
4
t
5
⁄
8
c
Additional information about each of the ingredients listed above:
1. Atmospheric pressure is less at high elevations which makes the dough rise faster. In Utah, the
dough can rise 2
1
⁄
2
to 3 times its volume in the first rising before it is ready to punch down. Recipes
need less yeast as the altitude increases to slow the rising so that the dough has time to develop a
good flavor and texture.The higher the altitude the greater the internal pressure on baked goods;
therefore, the faster they rise.
2. Sugar weakens the cell structure of the dough so it must be reduced to have adequate rising.
3. Salt is increased to avoid overproofing.
4. The addition of gluten helps to protect the cell structure of the dough from over stretching so that it
doesn’t have a coarse texture, and the product will not fall.The automatic bread machine tends to
over knead at higher altitudes making it necessary to add gluten to the recipe.
5. Liquids eva p o rate faster at higher altitudes.If the bread is not rising enough, it is a moisture probl e m
and not the yeast.
R More information:
Flour is very dry at high altitudes; thus, it absorbs more liquid. In many cases, less flour is necessary to
achieve the proper dough consistency.
Use yeast before expiration date. Use regular active dry yeast or quick or rapid rise yeast, not com-
pressed yeast. If using bulk yeast, keep refrigerated or frozen. If using jarred yeast and it has been
open more than 2 months, check its freshness with the following test.
To test for 1 package (2
water (110°-115°F). Add 1 teaspoon granulated sugar and 1 package (2
4 minutes, it will have absorbed enough liquid to activate and will start rising to the surface. If at the
end of 10 minutes, the yeast has multiplied to the 1 cup mark, it is very active.The yeast mixture may
be used immediately in your Toastmaster Bread Maker in any recipe calling for 2
(Remember to adjust your recipe for the
yeast.)
1
⁄
4
teaspoons) use a liquid measuring cup and fill the
1
⁄
2
1
⁄
1
⁄
2
cup of water used in the test and do not add additional
cup level with warm
4
teaspoons) of yeast. In 3 or
1
⁄
4
teaspoons of yeast.
- 24 -
Page 25

YYYBREADS YYY
BASIC WHITE BREAD
BASIC WHITE BREAD (D)
1
⁄
2
Pounds
Water (80°F/27°C)
1 Pound 1
3
⁄
4
cup + 1 tbsp. 1 cup
Oil 1 tbsp 2 tbsp
Lemon Juice 1 tsp 1 tsp
Salt 1 tsp 1
Sugar 1
1
⁄
2
tbsp 2 tbsp
Dry Milk 1 tbsp 1
Bread Flour 2
Active DryYeast 1
1
⁄
4
cups 3 cups
1
⁄
4
tsp 2 tsp
1
1
⁄
2
⁄
2
tsp
tbsp
(D) If using Timer to delay bread, reduce the water by 1 tbsp for both size loaves. Use cool water
(70°F/20°C)
NOTE: If using Bread Rapid Program, use the above ingredients, but increase the yeast to 2 tsp for the
1 pound loaf and 2
1
⁄
2
tsp for the 1
1
⁄
2
pound loaf.
Method
1. Remove the bread pan from the breadmaker. Attach the kneading blade on the shaft of the bread
pan. Place the ingredients into the bread pan, in the order listed.
2. Place the bread pan into the breadmaker; close the lid.
3. Select Basic Bread Program or set Timer to delay and select light baking control. Press START.
4. When the beeper sounds 8 times, press STOP. Remove the bread pan using oven mitts. Remove
the bread and cool on a wire rack, cover with a clean teatowel.
5. When bread is completely cool, store in a well-sealed plastic bag.
FRENCH BREAD
Follow instructions on page 25 for Basic White Bread.
Set the breadmaker on the French program for best results.
FRENCH BREAD (D)
1 Pound 1
Water (80°F/27°C)
3
⁄
4
cup + 2 tbsp. 1 cup + 2 tbsp
Oil 1 tbsp 1
Lemon Juice 1 tsp 1 tsp
Salt 1 tsp 1tsp
Sugar 1tbsp 2 tbsp
Bread Flour 2
Active DryYeast 1
1
⁄
4
cups 3
1
⁄
4
tsp 2 tsp
(D) If using Timer to delay bread, reduce the water by 1 tbsp for both size loaves.Use cool water
(70°F/20°C)
NOTE: If using the Rapid Program, use the above ingredients, but increase the yeast to 1
1 pound loaf and 2
1
⁄
2
tsp for the 1
1
⁄
2
pound loaf.
1
⁄
2
Pounds
1
⁄
2
tbsp
1
⁄
2
cups
3
⁄
4
tsp for the
- 25 -
Page 26

BUTTERMILK BREAD
Follow instructions on page 25 for Basic White Bread.
Set the breadmaker on the Basic Bread program for best results.
BUTTERMILK BREAD
1
Cultured Buttermilk (room temperature) 1 cup + 2 tbsp
Oil 3 tbsp
Lemon Juice 1 tsp
Salt 1
Sugar 3 tbsp
Baking Soda
Bread Flour 3
Active Dry Yeast 1
1
⁄
1
⁄
2
Pounds
1
⁄
2
tsp
4
tsp
1
⁄
4
cups
1
⁄
2
tsp
NOTE: If using the Rapid Program, use the above ingredients, but increase the yeast to 2
FRENCH VARIATION BREAD
Follow instructions on page 25 for Basic White Bread.
Set the breadmaker on the French program for best results.
FRENCH VARIATION BREAD
1 Pound 1
Water (80°F/27°C)
3
⁄
4
cup + 2 tbsp 1 cup + 2 tbsp
Lemon Juice 1 tsp 1 tsp
Salt 1 tsp 1 tsp
Sugar 1 tbsp 1
Bread Flour 2
Active DryYeast 1
1
⁄
4
cups 3
1
⁄
4
tsp 2 tsp
1
⁄
2
Pounds
1
⁄
2
tbsp
1
⁄
2
cups
1
⁄
2
tsp.
(D) If using Timer to delay bread, use the same amounts of all ingredients. Use cool water (70°F/20°C)
NOTE: If using the Rapid Program, use the above ingredients, but increase the yeast to 2 tsp for 1 the
pound loaf and 2
3
⁄
4
tsp for the 1
1
⁄
2
pound loaf.
- 26 -
Page 27

POTATO BREAD
Follow instructions on page 25 for Basic White Bread.
Set the breadmaker on the Rapid program for best results.
POTATO BREAD
1 Pound 1
Egg(s) (room temperature) 1 2
+ enough Water (80°F/27°C) to equal
3
⁄
4
cup 1 cup + 3 tbsp
Oil 2 tbsp 2 tbsp + 2 tsp
Lemon Juice 1 tsp 1 tsp
Salt 1 tsp 1
Sugar 4 tsp 2 tbsp
Dry Milk 2 tbsp 3 tbsp
White Pepper
Potato Buds
1
⁄
8
tsp
1
⁄
4
cup
1
⁄
1
⁄
Green onion, chopped (tops only) 1 tbsp 1
Bread Flour 2 cups + 2 tbsp 3
Active DryYeast 1
1
⁄
2
tsp 2
DO NOT use this recipe on the DelayTimer Program.
1
⁄
2
Pounds
1
⁄
2
tsp
4
tsp
3
cup
1
⁄
2
tbsp
1
⁄
4
cups
1
⁄
4
tsp
EGG BREAD
Follow instructions on page 25 for Basic White Bread.
Set the breadmaker on the Rapid program for best results.
EGG BREAD
1 Pound 1
Egg(s) (room temperature) 1 2
+ enough Water (80°F/27°C) to equal
Lemon Juice 1 tsp 1 tsp
Oil 1 tbsp 1
Salt 1 tsp 1
Sugar 4 tsp 2 tbsp
Dry Milk 2 tbsp 3 tbsp
Bread Flour 2 cups + 2 tbsp 3 cups
Active Dry Yeast 1
DO NOT use this recipe on the DelayTimer Program.
3
⁄
4
cup + 1 tbsp 1 cup + 1 tbsp
1
⁄
2
tsp 2
1
⁄
2
Pounds
1
⁄
2
tbsp
1
⁄
2
tsp
1
⁄
4
tsp
- 27 -
Page 28

CORN BREAD
Follow instructions on page 25 for Basic White Bread.
Set the breadmaker on the Rapid program for best results.
CORN BREAD
1 Pound 1
Egg(s) (room temperature) 1 1
+ enough Water (80°F/27°C) to equal
3
⁄
4
cup + 1 tbsp 1 cup + 2 tbsp
Oil 2 tbsp 4 tbsp
Lemon Juice 1 tsp 1 tsp
Honey 2 tbsp 3 tbsp
Salt 1 tsp 1
Dry Milk 1 tbsp 2 tbsp
Bread Flour 2 cups 3 cups
Corn Meal
Active DryYeast 1
1
⁄
4
cup
1
⁄
2
tsp 2
DO NOT use this recipe on the Delay Timer Program.
DILL BREAD
1
⁄
2
1
⁄
2
1
⁄
3
cup
1
⁄
4
Pounds
tsp
tsp
Follow instructions on page 25 for Basic White Bread.
Set the breadmaker on the Rapid program for best results.
DILL BREAD
1 Pound 1
Egg(s) (room temperature) 1 2
+ enough plain Yogurt at room
temperature to equal
Oil 1 tbsp 1
Lemon Juice 1 tsp 1 tsp
Salt 1 tsp 2
Sugar 4 tsp 2 tbsp
Bread Flour 2 cups 3 cups
Dill Weed 1
Dried Minced Onion 2 tsp 1 tbsp
Active Dry Yeast 1
DO NOT use this recipe on the Delay Timer Program.
3
⁄
4
cup + 3 tbsp 1 cup + 3 tbsp
1
⁄
2
tsp 1 tbsp
1
⁄
2
tsp 2
1
⁄
2
Pounds
1
⁄
2
tbsp
1
⁄
4
tsp
1
⁄
4
tsp
- 28 -
Page 29

BEER BREAD
Follow instructions on page 25 for Basic White Bread.
Set the breadmaker on the Basic Bread program for best results.
BEER BREAD
1
⁄
2
1
⁄
3
cup
Pounds
Water (80°F/27°C)
Beer (room temperature and flat)
1 Pound 1
1
⁄
4
cup
2
⁄
3
cup 1 cup
Oil 4 tsp 2 tbsp
Lemon Juice 1 tsp 1 tsp
Salt 1 tsp 1
1
⁄
4
tsp
Sugar 2 tbsp 3 tbsp
Bread Flour 2 cups 3 cups
Active DryYeast 1
1
⁄
2
tsp 2
1
⁄
4
tsp
BLOODY MARY BREAD
Follow instructions on page 25 for Basic White Bread.
Set the breadmaker on the Rapid program for best results.
BLOODY MARY BREAD
1 Pound 1
Water (80°F/27°C)
Oil 1 tbsp 1
Lemon Juice 1 tsp 1 tsp
Bloody Mary mix (room temperature)
Honey 1 tbsp 1
Salt
Bread Flour 2 cups 3 cups
Fresh Parsley, chopped 1 tbsp 2 tbsp
Green Onion, chopped (tops only) 2 tbsp 2 tbsp
Active DryYeast 1
1
⁄
4
cup
1
⁄
2
cup
1
⁄
2
tsp
1
⁄
2
tsp 2
1
⁄
2
Pounds
1
⁄
3
cup + 2 tbsp
1
⁄
2
tbsp
3
⁄
4
cup
1
⁄
2
tbsp
3
⁄
4
tsp
1
⁄
4
tsp
- 29 -
Page 30

HONEY GRANOLA BREAD
Follow instructions on page 25 for Basic White Bread.
Set the breadmaker on the Basic Bread program for best results.
HONEY GRANOLA BREAD
1
⁄
2
Pounds
Water (80°F/27°C)
1 Pound 1
3
⁄
4
cup + 2 tbsp 1 cup + 2 tbsp
Oil 2 tbsp 4 tbsp
Lemon Juice 1 tsp 1 tsp
Honey 2 tbsp 2
Salt
1
⁄
2
tsp 1 tsp
1
⁄
2
tbsp
Dry Milk 2 tbsp 2 tbsp
Bread Flour 2
Granola Cereal
Active DryYeast 1
1
⁄
2
cups 3 cups
2
⁄
3
cup
1
⁄
2
tsp 1
3
⁄
4
cup
3
⁄
4
tsp
(D) If using Timer to delay bread, use the same amounts of all ingredients. Use cool water (70°F/20°C).
NOTE: If using Rapid Program, use the above ingredients, but increase the yeast to 2 tsp for 1 pound
loaf and 3
1
⁄
2
tsp for the 1
1
⁄
2
pound loaf.
BANANA BREAD
Follow instructions on page 25 for Basic White Bread.
Set the breadmaker on the Basic Bread program for best results.
BANANA BREAD
1 Pound 1
Egg(s) (room temperature) 1 2
+ enough Water (80°F/27°C) to equal
Oil 1 tbsp 2 tbsp
Lemon Juice 1 tsp 1 tsp
Mashed Bananas
Salt 1 tsp 1
Sugar 3 tbsp
Dry Milk
Bread Flour 2 cups 3 cups
Ginger
Instant Coffee Granules 1
Active Dry yeast 1
DO NOT use this recipe on the Delay Timer Program.
1
⁄
2
cup
1
⁄
3
cup
1
⁄
4
cup
1
⁄
4
tsp
1
⁄
2
tsp 2 tsp
1
⁄
2
tsp 2
1
⁄
2
3
⁄
4
cup
1
⁄
2
cup
1
⁄
2
1
⁄
4
cup
1
⁄
4
cup
1
⁄
2
tsp
1
⁄
4
Pounds
tsp
tsp
- 30 -
Page 31

SPICED PUMPKIN BREAD
Follow instructions on page 25 for Basic White Bread.
Set the breadmaker on the Rapid program for best results.
SPICED PUMPKIN BREAD
1 Pound 1
Egg(s) (room temperature) 1 2
+ enough Water (80°F/27°C) to equal
1
⁄
4
cup
Oil 2 tbsp 3 tbsp
Lemon Juice 1 tsp 1 tsp
Pumpkin
2
⁄
3
cup 1 cup
Salt 1 tsp 1
Brown Sugar 2 tbsp 3 tbsp
Cloves
Nutmeg
Ginger
Cinnamon 1
1
⁄
4
tsp
1
⁄
2
tsp
1
⁄
2
tsp
1
⁄
2
tsp 2
Bread Flour 2 cups 3
Active Dry Yeast 1
1
⁄
2
tsp 2
DO NOT use this recipe on the Delay Timer Program.
1
⁄
2
1
⁄
2
cup
1
⁄
2
1
⁄
2
tsp
3
⁄
4
tsp
3
⁄
4
tsp
1
⁄
4
1
⁄
3
1
⁄
4
Pounds
tsp
tsp
cups
tsp
CHEESE ONION BREAD
Follow instructions on page 25 for Basic White Bread.
Set the breadmaker on the Rapid program for best results.
CHEESE ONION BREAD
1 Pound 1
Water (80°F/27°C)
Lemon Juice 1 tsp 1 tsp
Salt
Sugar 2 tbsp 3 tbsp
Bread Flour 2
Active Dry yeast 1 tsp 1
Shredded Cheese
Dried Onion 1 tbsp 1
DO NOT use this recipe on the DelayTimer Program.
3
⁄
4
cup
1
⁄
2
tsp 1 tsp
1
⁄
4
cups 3 cups
1
⁄
2
cup
1
⁄
2
Pounds
3
⁄
4
cup + 3 tbsp
1
⁄
4
tsp
3
⁄
4
cup
1
⁄
2
tbsp
- 31 -
Page 32

TRAIL MIX BREAD
Follow instructions on page 33 for Cinnamon Raisin Bread.
Set the breadmaker on the Sweet program for best results.
TRAIL MIX BREAD (D)
1 Pound 1
Water (80°F/27°C)
Oil 1
2
⁄
3
cup 1 cup + 1 tbsp
1
⁄
2
tbsp 3 tbsp
Lemon Juice 1 tsp 1 tsp
Honey 2 tbsp 3 tbsp
Salt 1 tsp 1
Bread Flour 2 cups 3
Raisin & Nut Trail Mix
Active Dry Yeast 1
1
⁄
2
cup
1
⁄
2
tsp 2 tsp
(D) If using Timer to delay bread, use the same amount of all ingredients.
MAPLE BREAD
1
⁄
2
1
⁄
2
1
⁄
4
2
⁄
3
cup
Pounds
tsp
cups
Follow instructions on page 25 for Basic White Bread.
Set the breadmaker on the Basic Bread program for best results.
MAPLE BREAD (D)
1
1
⁄
2
Pounds
Water (80°F/27°C) 1 cup
Oil 4 tbsp
Lemon Juice 1 tsp
Maple Syrup
Maple Flavoring
Salt 2 tsp
Bread Flour 3 cups
Oatmeal, Quick or Regular 1 cup
Walnuts
Active Dry Yeast 2 tsp
(D) If using Timer to delay bread, reduce the water by 1 tbsp. Use cool water (70°F/20°C).
1
⁄
4
cup
1
⁄
2
tsp
3
⁄
4
cup
- 32 -
Page 33

HOLIDAY BREAD
Follow instructions on page 33 for Cinnamon Raisin Bread.
Set the breadmaker on the Sweet program for best results.
HOLIDAY BREAD
1 Pound 1
Water (80°F/27°C)
Milk (room temperature)
1
⁄
3
cup
1
⁄
3
cup
Oil 4 tsp 2 tbsp
Lemon Juice 1 tsp 1 tsp
Salt 1
1
⁄
2
tsp 2 tsp
Sugar 3 tbsp
Bread Flour 2 cups 3 cups
Active DryYeast 1
Candied Fruit
Walnuts
1
⁄
2
tsp 2
1
⁄
3
cup
1
⁄
3
cup
DO NOT use this recipe on the DelayTimer Program.
CINNAMON RAISIN BREAD
CINNAMON RAISIN BREAD (D)
1 Pound 1
Water (80°F/27°C)
Oil 1 tbsp 1
Lemon Juice 1 tsp 1 tsp
Salt 1 tsp 1
Light Brown Sugar 1
Dry milk 1 tbsp 1
Bread Flour 2
Active DryYeast 1
3
⁄
4
cup 1 cup
1
⁄
2
tbsp 2
1
⁄
4
cups 3 cups
3
⁄
4
tsp 2
1
⁄
2
1
⁄
2
cup
1
⁄
2
cup
1
⁄
4
cup
1
⁄
4
1
⁄
3
cup
1
⁄
2
cup
1
⁄
2
1
⁄
2
1
⁄
2
1
⁄
2
1
⁄
2
1
⁄
4
Pounds
tsp
Pounds
tbsp
tsp
tbsp
tbsp
tsp
Cinnamon 1 tsp 2 tsp
Raisins
Walnuts
NOTE: If using Rapid Program, use the above ingredients, but increase the yeast to 2
loaf and 2
3
⁄
4
tsp for 1
1
⁄
2
pound loaf. Add all the ingredients at the beginning of the cycle.
(D) If using timer to delay bread, use the same amounts of all ingredients.Add all the ingredients when
you set the timer. Use cool water (70°F/20°C).
Method
1. Remove bread pan from the breadmaker. Attach the kneading blade on the shaft of the bread pan.
Place all ingredients, in the order listed, except the raisins, nuts and cinnamon, into the bread pan.
2. Place the bread pan into the breadmaker, close the lid.
3. Select Sweet Bread Program. Select the light baking control
4. When the beeper sounds 4 times, open the lid and sprinkle the raisins, nuts and cinnamon quickly
and evenly over the dough. Close the lid to continue the program.
1
⁄
3
cup
1
⁄
3
cup
- 33 -
1
⁄
2
cup
1
⁄
2
cup
1
⁄
4
tsp for 1 pound
Page 34

DRIED FRUIT BREAD
Follow instructions on page 25 for Basic White Bread.
Set the breadmaker on the Sweet Bread program for best results.
DRIED FRUIT BREAD (D)
1
⁄
2
Pounds
Water (80°F/27°C)
Oil 2
1 Pound 1
3
⁄
4
cup 1 cup + 1 tbsp
1
⁄
2
tbsp 3 tbsp
Lemon Juice 1 tsp 1 tsp
Salt 1 tsp 1
Brown Sugar 1
1
⁄
2
tbsp 2
Dry Milk 1 tbsp 1
Bread Flour 2
Active DryYeast 1
Dried Fruit
Nutmeg
1
⁄
4
cups 3 cups
1
⁄
4
tsp 2
1
⁄
2
cup
1
⁄
2
tsp 1 tsp
1
⁄
2
tsp
1
⁄
2
tbsp
1
⁄
2
tbsp
1
⁄
2
tsp
3
⁄
4
cup
NOTE: If using the Rapid Program, use the above ingredients, but increase the yeast to 2
1 pound and 1 tbsp for the 1
1
⁄
2
pound loaf. Add all ingredients at the beginning of the cycle.
(D) If using the time to delay bread, use the same amount of all ingredients.
1
⁄
2
tsp for the
WHITE WHEAT BREAD
Follow instructions on page 25 for Basic White Bread.
Set the breadmaker on the Sweet Bread program for best results.
WHITE WHEAT BREAD (D)
1 Pound 1
Water (80°F/27°C)
3
⁄
4
cup 1 cup + 2 tbsp
Oil 1 tbsp 1
Lemon Juice 1 tsp 1 tsp
Salt 1 tsp 1
Sugar 2 tbsp 3 tbsp
Dry Milk 1 tbsp 1
Bread Flour 1
Whole Wheat Flour
3
⁄
4
cups 2
1
⁄
4
cup
Active DryYeast 1 tsp 1
(D) If using the Delay Timer Program reduce the water by 1 tbsp for the 1
the water for the 1 pound loaf.
NOTE: If using the Rapid Program, use the above ingredients, but increase the yeast to 1
1 pound loaf and 2
1
⁄
2
tsp for the 1
1
⁄
2
pound loaf.
1
⁄
2
Pounds
1
⁄
2
tbsp
1
⁄
2
tsp
1
⁄
2
tbsp
2
⁄
3
cups
1
⁄
3
cup
1
⁄
2
tsp
1
⁄
2
pound loaf. Do not reduce
1
⁄
2
tsp for the
- 34 -
Page 35

WHOLE GRAIN BREAD
Follow instructions on page 25 for Basic White Bread.
Set the breadmaker on Basic Bread for best results.
WHOLE GRAIN BREAD
1
1
⁄
3
Water (80°F/27°C)
Cultured Buttermilk (room temperature)
1 Pound 1
1
⁄
4
cup
2
⁄
3
cup 1 cup
Oil 2 tsp 1 tbsp
Lemon Juice 1 tsp 1 tsp
Salt 1
Dark Molasses 3 tbsp
Baking Soda
Oat Bran 3 tbsp
Corn Meal 3 tbsp
\Medium Rye Flour 3 tbsp
Buckwheat Flour 3 tbsp
Whole Wheat Flour
Bread Flour 1
Active DryYeast 1
1
⁄
2
tsp 2 tsp
3
⁄
4
tsp 1 tsp
1
⁄
3
cup
1
⁄
3
cups 2 cups
1
⁄
2
tsp 2
1
⁄
4
1
⁄
4
1
⁄
4
1
⁄
4
1
⁄
4
1
⁄
2
1
DO NOT use this recipe on the Delay Timer Program.
CARAWAY RYE BREAD (Whole Grain Rye)
⁄
2
Pounds
cup
cup
cup
cup
cup
cup
cup
⁄
4
tsp
Follow instructions on page 25 for Basic White Bread.
Set the breadmaker on the Sweet Bread program for best results.
CARAWAY RYE BREAD (Whole Grain Rye)
1 Pound 1
Egg (room temperature) + enough 1 1
Water (80°F/27°C) to equal
Oil 1 tbsp 1
Lemon Juice 1 tsp 1 tsp
Molasses 2 tbsp 3 tbsp
Dry Milk 1 tbsp 2 tbsp
Salt 1 tsp 1
Bread Flour 1 cup 1
Whole Wheat Flour
Caraway Seeds 1 tbsp 2 tbsp
Rye Flour
Active DryYeast 1
DO NOT use this recipe on the Delay Timer Program.
3
⁄
4
cup + 2 tbsp 1 cup + 2 tbsp
1
⁄
2
cup
1
⁄
2
cup
1
⁄
2
tsp 2 tsp
1
⁄
2
1
⁄
2
1
⁄
2
1
⁄
2
3
⁄
4
cup
2
⁄
3
cup
Pounds
tbsp
tsp
cups
- 35 -
Page 36

ONION RYE BREAD (Whole Grain Rye)
Follow instructions on page 25 for Basic White Bread.
Set the breadmaker on the Sweet Bread program for best results.
ONION RYE BREAD (Whole Grain Rye)
1 Pound 1
1
⁄
2
Pounds
Egg (room temperature) + enough 1 1
Water (80°F/27°C) to equal
Oil 1 tbsp 1
3
⁄
4
cup + 2 tbsp 1 cup + 2 tbsp
1
⁄
2
tbsp
Lemon Juice 1 tsp 1 tsp
Molasses 2 tbsp 3 tbsp
Dry Milk 1 tbsp 2 tbsp
Salt 1 tsp 1
Bread Flour 1 cup 1
Whole Wheat Flour
1
⁄
2
cup
1
⁄
2
tsp
1
⁄
2
cups
3
⁄
4
cup
Caraway Seeds 1 tbsp 2 tbsp
Dehydrated Onions 2 tbsp 3 tbsp
Rye Flour
Active DryYeast 1
1
⁄
2
cup
1
⁄
2
tsp 2 tsp
2
⁄
3
cup
DO NOT use this recipe on the DelayTimer Program.
PUMPERNICKEL BREAD (Whole Grain Rye)
Follow instructions on page 25 for Basic White Bread.
Set the breadmaker on the Sweet Bread program for best results.
PUMPERNICKEL BREAD (Whole Grain Rye)
1 Pound 1
Egg (room temperature) + enough 1 1
Water (80°F/27°C) to equal
Oil 1 tbsp 1
Lemon Juice 1 tsp 1 tsp
Molasses 2 tbsp 3 tbsp
Dry Milk 1 tbsp 2 tbsp
Salt 1 tsp 1
Bread Flour 1 cup 1
Whole Wheat Flour
Caraway Seeds 1 tbsp 2 tbsp
Instant Coffee Granules 1 tsp 2 tsp
Rye Flour
Cocoa Powder 2 tbsp 3 tbsp
Active Dry Yeast 1
DO NOT use this recipe on the DelayTimer Program.
3
⁄
4
cup + 2 tbsp 1 cup + 2 tbsp
1
⁄
2
cup
1
⁄
2
cup
1
⁄
2
tsp 2
1
⁄
2
1
⁄
2
1
⁄
2
1
⁄
2
3
⁄
4
cup
2
⁄
3
cup
1
⁄
4
Pounds
tbsp
tsp
cups
tsp
- 36 -
Page 37

ITALIAN HERB BREAD (D)
Follow instructions on page 39 for Whole Wheat Bread.
Set the breadmaker on the French program for best results.
ITALIAN HERB BREAD (D)
1
⁄
2
Pounds
Water (80°F/27°C)
1 Pound 1
3
⁄
4
cup + 2 tbsp 1 cup + 2 tbsp
Oil 4 tsp 2 tbsp
Lemon Juice 1 tsp 1 tsp
Salt 1 tsp 1
1
⁄
2
tsp
Sugar 1 tbsp 3 tbsp
Dry Milk 1 tbsp 1 tbsp
Bread Flour 2
Italian Mix 2
Active DryYeast 1
(D) If using the Delay Timer Program reduce the water by 1 tsp for the 1 pound loaf and by 1 tbsp for
the 1
1
⁄
2
pound loaf.
1
⁄
4
cups 3
1
⁄
4
tsp 1 tbsp
1
⁄
4
tsp 1
1
⁄
1
⁄
4
cups
2
tsp
NOTE: If using the Rapid program, use the above ingredients, but increase the yeast to 2 tsp for the 1
pound loaf and 1 tbsp for the 1
1
⁄
2
pound loaf.
SWEET WALNUT
Follow instructions on page 33 for Cinnamon Raisin Bread.
Set the breadmaker on the Sweet Bread Program for best results.
SWEET WALNUT (D)
1 Pound 1
Water (80°F/27°C)
3
⁄
4
cup 1 cup
Oil 1 tbsp 1
Lemon Juice 1 tsp 1 tsp
Salt 1 tsp 1
Sugar 1
1
⁄
2
tbsp 2 tbsp + 1 tsp
Dry Milk 1 tbsp 1
Bread Flour 2 cups 3 cups
Active DryYeast 1
Chopped Walnuts
1
⁄
2
tsp 1
1
⁄
3
cup
(D) If using the DelayTimer Program reduce the water by 1 tsp for the 1 pound loaf and by 1 tbsp for
1
the 1
⁄
2
pound loaf. Add all ingredients at the beginning of the cycle.
NOTE: If using the Rapid program, use the above ingredients, but increase the yeast to 2
1 pound loaf and 2
3
⁄
4
tsp for the 1
1
⁄
2
pound loaf. Add all ingredients at the beginning of the cycle.
1
⁄
2
1
⁄
2
1
⁄
2
1
⁄
2
3
⁄
4
1
⁄
2
cup
Pounds
tbsp
tsp
tbsp
tsp
1
⁄
4
tsp for the
- 37 -
Page 38

MOM’S HEARTY NUT BREAD
Follow instructions on page 25 for Basic White Bread. Set the breadmaker on the Bread Rapid Program
for the 1 pound loaf for best results.
Set the breadmaker on the Whole Wheat Program for the 1
MOM’S HEARTY NUT BREAD
1
⁄
2
pound loaf for best results.
1 Pound 1
Water (80°F/27°C) 1 cup 1
Oil 2 tsp 1 tbsp
Lemon Juice 1 tsp 1 tsp
Salt 1 tsp 1
Molasses 3 tbsp
Oatmeal, Quick or Regular
Whole Wheat Flour
Bread Flour 1
Walnuts
Active DryYeast 1
1
⁄
3
cup
2
⁄
3
cup 1 cup
1
⁄
3
cups 2 cups
2
⁄
3
cup
3
⁄
4
tsp 2
CRUNCHY CRACKED WHEAT BREAD
1
⁄
2
1
⁄
4
1
⁄
2
1
⁄
4
cup
1
⁄
2
cup
3
⁄
4
cup
1
⁄
4
Pounds
cups
tsp
tsp
Follow instructions on page 25 for Basic White Bread.
Set the breadmaker on the Bread Rapid Program for best results.
CRUNCHY CRACKED WHEAT BREAD
1 Pound
Water* 1 cup
Cracked Wheat*
Oil 4 tsp
Lemon Juice 1 tsp
Salt 1
Sugar 4 tsp
Bread Flour 2 cups
Active DryYeast 1
• Pour boiling water over cracked wheat; let stand until temperature cools down to 80°.
1
⁄
2
cup
1
⁄
2
tsp
1
⁄
2
tsp
- 38 -
Page 39

JALAPENO BREAD
Follow instructions on page 25 for Basic White Bread.
Set the breadmaker on the Basic Bread program for best results.
JALAPENO BREAD
1
⁄
2
3
⁄
4
cup
3
⁄
4
cup
Pounds
Water (80°F/27°C)
Whole Kernel Corn, well drained
1 Pound 1
1
⁄
2
cup
1
⁄
2
cup
Jalapeno, well drained 2 tbsp 3 tbsp
Oil 1
1
⁄
2
tbsp 2
1
⁄
2
tbsp
Lemon Juice 1 tsp 1 tsp
Sugar 1 tbsp 2 tbsp
Salt
1
⁄
2
tsp 1 tsp
Bread Flour 2 cups 3 cups
Corn Meal
1
⁄
3
cup
1
⁄
2
cup
Fresh Cilantro 2 tsp 1 tbsp
Active DryYeast 1
NOTE: If using the Rapid program, use the above ingredients, but increase the yeast to 2tsp for the 1
pound loaf and 1 tbsp for the 1
1
⁄
2
pound loaf.
1
⁄
2
tsp 2 tsp
DO NOT use this recipe on the DelayTimer Program.
WHOLE WHEAT BREAD
This whole wheat bread will be short and dense.
For a lighter texture loaf, use the Whole Wheat Bread With Gluten recipe on page 40.
WHOLE WHEAT BREAD
1
1
⁄
2
Pounds
Cultured Buttermilk (room temperature)
Oil 3 tbsp
Molasses 3 tbsp
Salt 1 tsp
Baking Soda
Whole Wheat Flour 3 cups
Active DryYeast 1 tbsp
Method
1. Remove the bread pan from the breadmaker. Attach the kneading blade on the shaft of the bread
pan. Place the ingredients into the bread pan, in the order listed, making sure the yeast is on top of
the flour.
2. Place the bread pan into the breadmaker; close the lid.
3. Select Whole Wheat Program and select light baking control. Press START.
4. When the beeper sounds 8 times, press STOP. Remove the bread pan using oven mitts. Remove
the bread and cool on a wire rack, covered with a clean teatowel.
5. When bread is completely cool, store in a well-sealed plastic bag.
3
⁄
4
cup + 2 tbsp
1
⁄
2
tsp
- 39 -
Page 40

WHOLE WHEAT BREAD WITH GLUTEN
Follow instructions on page 39 for Whole Wheat Bread.
Set the breadmaker on the Whole Wheat program for best results.
WHOLE WHEAT BREAD WITH GLUTEN (D)
1 Pound 1
Water (80°F/27°) 1cup 1
Oil 1
1
⁄
2
tbsp 7 tsp
1
⁄
2
Pounds
1
⁄
4
cups
Lemon Juice 1 tsp 1 tsp
Molasses 2 tbsp 2
Salt 1 tsp 1
Dry Milk 1
Whole Wheat Flour 2
Gluten 1
Active DryYeast 1
1
⁄
2
tbsp 2 tbsp
1
⁄
2
cups 3
1
⁄
2
tbsp 2
1
⁄
2
tsp 2
1
⁄
1
⁄
3
⁄
1
⁄
1
⁄
2
tbsp
2
tsp
4
cups
2
tbsp
4
tsp
(D) If using timer to delay bread, reduce the water by 1 tbsp for both size loaves. Use cool water
(70°F/20°C).
HONEY WHOLE WHEAT BREAD
Follow instructions on page 39 for Whole Wheat Bread.
Set the breadmaker on the Whole Wheat program for best results.
HONEY WHOLE WHEAT BREAD
1 Pound 1
Milk (room temperature)
Egg(s) (room temperature) 1 2
+ enough Water (80°F/27°C) to equal
Oil 2 tsp 1 tbsp
Lemon Juice 1 tsp 1 tsp
Honey 2 tbsp 3 tbsp
Salt 1
Whole Wheat Flour
Bread Flour 1
Active DryYeast 1
DO NOT use this recipe on the DelayTimer Program.
1
⁄
3
cup 6 tbsp
1
⁄
2
cup +1
1
⁄
2
2
⁄
3
cup 1 cup
1
⁄
3
1
⁄
2
1
⁄
2
tbsp
tsp 2 tsp
cups 2 cups
tsp 2
1
⁄
2
Pounds
3
⁄
4
cup + 2 tbsp
1
⁄
4
tsp
- 40 -
Page 41

WHOLE WHEAT CINNAMON RAISIN WALNUT BREAD
Follow instructions on page 33 for Cinnamon Raisin Bread.
Set the breadmaker on the Sweet Bread Program for best results.
WHOLE WHEAT CINNAMON RAISIN WALNUT BREAD
1 Pound 1
1
⁄
2
Pounds
Egg White(s) (room temperature) 1 2
+ enough Water (80°F/27°C) to equal
Oil 1
3
⁄
4
cup 1 cup + 2 tbsp
1
⁄
2
tbsp 2 tbsp
Lemon Juice 1 tsp 1 tsp
Honey 2 tbsp 3 tbsp
Salt 1 tsp 1
1
⁄
2
tsp
Whole Wheat Flour 2 cups 3 cups + 3 tbsp
Active DryYeast 2 tsp 1 tbsp
Cinnamon
Raisins
Walnuts
3
⁄
4
tsp 1 tsp
1
⁄
3
cup
1
⁄
4
cup
1
⁄
2
cup
1
⁄
3
cup
DO NOT use this recipe on the Delay Timer Program.
Method
1. Remove bread pan from the breadmaker. Attach the kneading blade on the shaft of the bread pan.
Place all ingredients, in the order listed, except the raisins, walnuts and cinnamon, into the bread
pan.
2. Place the bread pan into the breadmaker, close the lid.
3. Select Whole Wheat Bread Program. Select the light baking control.
4. When the beeper sounds 4 times, open the lid and sprinkle the raisins, nuts and cinnamon quickly
and evenly over the dough. Close the lid to continue the program.
FARM STYLE WHOLE WHEAT BREAD
Follow instructions on page 39 for Whole Wheat Bread.
Set the breadmaker on the Whole Wheat program for best results.
FARM STYLE WHOLE WHEAT BREAD
Water (80°F/27°)
Milk
Oil 1
Cottage Cheese 3 tbsp
Lemon Juice 1 tsp 1 tsp
Salt 1 tsp 2 tsp
Honey 4 tsp 2 tbsp
Whole Wheat Flour
Bread Flour 1
Active DryYeast 1
DO NOT use this recipe on the Delay Timer Program.
1 Pound 1
1
⁄
4
cup
1
⁄
2
cup
1
⁄
2
tbsp 2 tbsp
2
⁄
3
cup 1 cup
1
⁄
3
cups 2 cups
1
⁄
2
tsp 2
- 41 -
1
⁄
2
1
⁄
3
cup
3
⁄
4
cup
1
⁄
4
cup
1
⁄
4
Pounds
tsp
Page 42

MILK BREAD
Follow instructions on page 25 for Basic White Bread.
Set the breadmaker on the Rapid Program for best results.
MILK BREAD
Milk (room temperature) 1 cup
Oil 2 tbsp
Lemon Juice 1 tsp
Salt 1
Sugar 1
Bread Flour 3 cups
Active Dry Yeast 1
DO NOT use this recipe on the DelayTimer Program.
1
1
⁄
2
1
⁄
2
1
⁄
2
3
⁄
4
Pounds
tsp
tsp
tsp
SUNFLOWER AND SESAME SEED BREAD
Follow instructions on page 39 for Whole Wheat Bread.
Set the breadmaker on the French program for best results.
SUNFLOWER AND SESAME SEED BREAD
1
1
⁄
Egg (room temperature) 1
+ enough Water (80°F/27°C) to equal 1 cup
Oil 2 tbsp
Lemon Juice 1 tsp
Salt 1 tsp
Molasses 1 tbsp
Sugar 2 tsp
Sesame Seeds 2 tbsp
Cumin Seeds
Sunflower Seeds 1
Bread Flour 2
Whole Wheat Flour
Yeast 1
1
⁄
4
1
⁄
1
⁄
1
⁄
2
1
⁄
2
Pounds
tsp
2
tbsp
2
cups
cup
2
tsp
DO NOT use this recipe on the Delay Timer Program.
- 42 -
Page 43

YYYDOUGHS YYY
DINNER ROLLS
DINNER ROLLS
Dough 12 Rolls 18 Rolls
Egg (room temperature) 1 1
+ enough Water to equal
3
⁄
4
cup 1 cup + 1 tbsp
Lemon Juice 1 tsp 1 tsp
Oil 2 tbsp 3 tbsp
Salt
1
⁄
2
tsp 1 tsp
Sugar 2 tbsp 3 tbsp
Bread Flour 2 cups 3
Active DryYeast 1 tsp 1
1
⁄
1
⁄
4
cups
2
tsp
Method
1. Remove the bread pan from the breadmaker.Attach the kneading blade on the shaft of the bread
pan. Place the ingredients into the bread pan, in the order listed.
2. Place the bread pan into the breadmaker; close the lid.
3. Select Dough Program. (Timer cannot be used with the Dough Program.) Press Start.
4. When the beeper sounds 8 times, press STOP. Remove the dough from the bread pan.
5. Place on a lightly floured surface.Depending on which size recipe used, divide dough into 12 or 18
pieces. Shape into balls.
6. Place dough balls on greased baking sheet about
1
⁄
2
-inch apart. Let stand, covered, in warm, draft-
free place, 30 minutes or until doubled in size.
7. Bake in preheated 350°F oven 20 to 30 minutes, or until golden brown.
- 43 -
Page 44

WHEAT DINNER ROLLS
WHEAT DINNER ROLLS
Dough 12 Rolls
Water (80°F/27°C)
Lemon Juice 1 tsp
Oil 1 tbsp
Salt
Light Brown Sugar 2 tbsp
Dry Milk 1 tbsp
Bread Flour 1
Whole Wheat Flour 1 cup
Active Dry Yeast 1
Method
1. Remove the bread pan from the breadmaker. Attach the kneading blade on the shaft of the bread
pan. Place the ingredients into the bread pan, in the order listed.
2. Place the bread pan into the breadmaker; close the lid.
3. Select Dough Program. (Timer cannot be used with the Dough Program.) Press Start.
4. When the beeper sounds 8 times, press STOP. Remove the dough from the bread pan.
5. Punch down. Place on a lightly floured surface. Divide dough into 12 equal pieces; shape into balls.
6. Place into 2 greased 9-inch cake pans for “pull apart” rolls or space 2-inches apart on greased baking sheet for regular rolls. Let stand, covered, 30 to 40 minutes, or until doubled in size.
7. Bake in preheated 350°F oven 25 to 30 minutes, or until golden brown.
3
⁄
4
cup
1
⁄
2
tsp
1
⁄
4
cups
1
⁄
2
tsp
- 44 -
Page 45

BUTTERMILK ROLLS
BUTTERMILK ROLLS
Dough 18 Rolls 24 Rolls
Cultured Buttermilk (room temperature) 1 cup 1
Lemon Juice 1 tsp 1 tsp
Oil 3 tbsp
Honey 1
1
⁄
2
tbsp 2 tbsp
Salt 1 tsp 1
Bread Flour
Whole Wheat Flour 1
Wheat Germ
Baking Soda
Active DryYeast 1
3
⁄
4
cup 1
1
⁄
3
cups 2 cups
1
⁄
3
cup
1
⁄
4
tsp
3
⁄
4
tsp 2 tsp
Brush with:
Melted Butter 2 tbsp 3 tbsp
Method
1. Remove the bread pan from the breadmaker.Attach the kneading blade on the shaft of the bread
pan. Place the ingredients into the bread pan, in the order listed.
2. Place the bread pan into the breadmaker; close the lid.
3. Select Dough Program. (Timer cannot be used with the Dough Program.) Press Start.
4. When the beeper sounds 8 times, press STOP. Remove the dough from the bread pan.
5. Punch dough down. Place on a lightly floured surface, divide into 18 or 24 equal pieces. Shape
pieces into balls and place
1
⁄
2
-inch apart on greased baking sheets. Cover and let rise in warm,
draft-free place, 30 minutes, or until doubled in size. Brush with melted butter.
6. Bake in preheated 350°F oven 15 to 20 minutes, or until golden brown.
1
⁄
2
cups
1
⁄
4
cup
1
⁄
2
tsp
1
⁄
4
cups
1
⁄
2
cup
1
⁄
4
tsp
- 45 -
Page 46

FRENCH BAGUETTES
FRENCH BAGUETTES
Dough 2 Loaves
Water (80°F/27°C) 1 cup
Lemon Juice 1 tsp
Salt 1 tsp
Sugar 1 tbsp
Bread Flour 2
Active DryYeast 1
Glaze:
Egg Yolk 1
Water 1 tbsp
Method
1. Remove the bread pan from the breadmaker.Attach the kneading blade on the shaft of the bread
pan. Place the ingredients into the bread pan, in the order listed.
2. Place the bread pan into the breadmaker; close the lid.
3. Select Dough Program. (Timer cannot be used with the Dough Program.) Press Start.
4. When the beeper sounds 8 times, press STOP. Remove the dough from the bread pan.
5. Punch down. Place on a lightly floured surface.Roll dough into a 12 x 16-inch rectangle, rolling to
remove air bubbles. Divide dough into 2, 12 x 8-inch pieces. Roll up tightly, jelly-roll style, starting at
the 12-inch side. Shape into 12 inch long loaves.
6. Place 3 inches apart on greased baking sheet. With a sharp knife, make 3 to 4 diagonal slashes
across each loaf top. Cover and let rise in warm, draft-free place, 30 to 40 minutes, or until doubled
in size. Brush Glaze over tops of loaves.
7. Bake in preheated 375°F oven for 20 to 30 minutes or until golden brown.
1
1
⁄
2
⁄
2
cups
tsp
- 46 -
Page 47

FRENCH TWISTS
FRENCH TWISTS
Dough 18 Twists
Water (80°F/27°C)
Lemon Juice 1 tsp
Salt 1 tsp
Sugar 1 tbsp
Bread Flour 2 cups
Active Dry Yeast 1
3
⁄
4
cup
1
⁄
2
tsp
Brush With:
Melted Butter
1
⁄
3
cup
Glaze:
Egg White 1
Water 1 tbsp
Method
1. Remove the bread pan from the breadmaker.Attach the kneading blade on the shaft of the bread
pan. Place the ingredients into the bread pan, in the order listed.
2. Place the bread pan into the breadmaker; close the lid.
3. Select Dough Program. (Timer cannot be used with the Dough Program.) Press Start.
4. When the beeper sounds 8 times, press STOP. Remove the dough from the bread pan.
5. Punch down and divide into 18 equal pieces. On a lightly floured surface, roll dough into 14 inch
ropes. Fold each rope in half and twist, starting at fold.
6. Place on greased baking sheets and brush French twists generously with melted butter. Let rise in
warm, draft-free place until doubled in size. Brush the twists with Glaze.
7. Bake in preheated 400°F oven for 12 to 15 minutes or until golden brown.
- 47 -
Page 48

FRENCH BREAD
FRENCH BREAD
(Baguettes, Italian Bread, French Rolls)
Dough
Water (80°F/27°C) 1
Lemon Juice 1 tsp
Sugar 1 tbsp
Salt 1 tsp
Bread Flour 3
Active DryYeast 1 tbsp
Glaze:
Water 2 tbsp
Salt
Method
1. Remove the bread pan from the breadmaker.Attach the kneading blade on the shaft of the bread
pan. Place the ingredients into the bread pan.
2. Place the bread pan into the breadmaker; close the lid.
3. Select Dough Program. (Timer cannot be used with the Dough Program.) Press START.
4. When the beeper sounds 8 times, press STOP.
5. Punch the dough down. On a lightly floured surface, using a rolling pin, roll the dough into a large
rectangle. Starting with the longest side, roll the dough up tightly, pressing the seams to seal, and
tapering each end slightly.
6. Place the loaf on a greased baking sheet. Cover loosely with plastic wrap. Let rise for 40 minutes.
Preheat the oven to 400°F.
7. With a small sharp knife, cut three to four diagonal slashes across the top of the loaf. In a small
bowl, combine the glaze ingredients. Brush the loaf generously with the glaze. Bake at 400°F for 20
to 25 minutes, or until deep golden brown.
8. Cool on wire rack.
1
⁄
4
cups
1
⁄
2
cups
1
⁄
2
tsp
Makes 1 long French stick.
Variations
Baguettes: Follow above, but divide the dough into two equal pieces (stage 5) and roll into 2 rectan-
gles. Continue as above. Bake at 400°F for 20 to 25 m inutes.
Makes 2 baguettes.
Italian Loaf: At stage 5, shape the dough into one large round ball. Continue as above.
Bake at 400°F for 20 to 25 minutes.
Makes 1 loaf.
Rolls: Follow instructions for baguettes. After rolling up, cut each loaf into 6 equal pieces. Pinch the
ends of each roll and taper slightly.Bake at 400°F for 15 to 20 minutes.
Makes 12 rolls.
TIP: If desired, sprinkle glazed loaves before baking with one of the following:
Sesame seeds
Poppy seeds
Caraway seeds
Cracked wheat
Rye flakes
- 48 -
Page 49

BAGELS
BAGELS
Dough 6 Bagels
Water (80°F/27°C) 1 cup
Lemon Juice 1 tsp
Sugar 1
Salt 1 tsp
Bread Flour 3 cups
Active DryYeast 2
Glaze:
Egg, Beaten 1
Toppings:
Sesame Seeds, Poppy Seeds, Cracked Wheat,
Wheat Flakes or Dried Onion Flakes
(optional)
Method
1. Remove the bread pan from the breadmaker. Attach the kneading blade on the shaft of the bread
pan. Place the ingredients into the bread pan, in the order listed.
2. Place the bread pan into the breadmaker; close the lid.
3. Select Dough Program. (Timer cannot be used with the Dough Program.) Press START.
4. When the beeper sounds 8 times, press STOP. Remove the dough from the bread pan.
5. Divide the dough into 6 equal pieces. Form each piece of dough into a ball. Make a hole in the center of each ball with thumbs and stretch until smooth and hole is about one to two inches.
6. Place Bagels on a greased baking sheet. Cover and let rise for 10 minutes.
7. Preheat oven to 425°F. In a 3-quart saucepan, comb ine 2 quarts water and 2 tablespoons sugar;
heat to boiling. Place a few bagels at a time in boiling water.Simmer 3 minutes, turning once.
Remove with slotted spoon. Place Bagels back on greased baking sheet.
8. Brush with beaten egg and sprinkle with choice of toppings, if desired. Bake at 400°F for 20 to 25
minutes, until deep golden brown.
9. Cool on wire rack.
1
1
⁄
2
⁄
4
tbsp
tsp
- 49 -
Page 50

BANANA WHEAT BAGELS
BANANA WHEAT BAGELS
Dough 12 Bagels
Egg (room temperature) + 1
enough Water (80°F/27°C) to equal 1 cup
Oil 2 tbsp
Lemon Juice 1 tsp
Salt 1
Honey 1 tbsp
Mashed Banana
Whole Wheat Flour 2
Bread Flour 1 cup
Active Dry Yeast 2
Glaze:
Egg White, Beaten
Toppings:
Poppy Seeds, Sesame Seeds (optional)
1
⁄
2
1
⁄
1
⁄
1
⁄
2
tsp
cup
2
cups
4
tsp
Method
1. Remove the bread pan from the breadmaker.Attach the kneading blade on the shaft of the bread
pan. Place the ingredients into the bread pan, in the order listed.
2. Place the bread pan into the breadmaker; close the lid.
3. Select Dough Program. (Timer cannot be used with the Dough Program.) Press START.
4. When the beeper sounds 8 times, press STOP. Remove the dough from the bread pan. Divide
dough into 4 parts.Divide each fourth into 3 pieces. Shape each piece into a smooth ball. Punch a
hole in the center with a finger and gently pull dough to make a one to two-inch hole. Place bagels
on a greased baking sheet. Cover and let rise for 10 minutes.
5. In a 3-quart saucepan, combine 2 quarts water and 2 tablespoons sugar; heat to boiling. Place a
few bagels at a time in boiling water. Simmer 3 minutes, turning once. Remove with slotted spoon.
Place on greased cookie sheet. Brush tops with 1 egg white slightly beaten; sprinkle with poppy or
sesame seeds. Bake in a preheated 400°F oven for 20 to 25 minutes or until deep golden brown.
6. Cool on wire rack.
- 50 -
Page 51

LEBANESE PITA POCKETS
LEBANESE PITA POCKETS
Dough 10 Pita Pockets
Water (80°F/27°C) 1 cup + 3 tbsp
Oil 1 tbsp
Lemon Juice 1 tsp
Salt 1
Sugar
Whole Wheat Flour 3 cups
Active Dry Yeast 2
Method
1. Remove the bread pan from the breadmaker. Attach the kneading blade on the shaft of the bread
pan. Place the ingredients into the bread pan, in the order listed.
2. Place the bread pan into the breadmaker; close the lid.
3. Select Dough Program. (Timer cannot be used with the Dough Program.) Press START.
4. When the beeper sounds 8 times, press STOP. Remove the dough from the bread pan. Place onto
a slightly floured surface. Divide into 2 parts. Divide each half into 5 pieces. Shape each piece into
a smooth ball; roll each ball to a 5-inch circle. Cover; let rise 30 minutes.
5. Place 5 circles on a large cooling rack. Place cooling rack on oven rack. Bake at 500°F for 5 minutes until puffed and tops just begin to brown.
6. Remove from oven and from hot rack; cool. Cut circles in half; fill. Repeat items 5 and 6 with
remaining circles.
1
⁄
2
tsp
3
⁄
4
tsp
1
⁄
4
tsp
Tip: The rolling and baking instructions should be carefully followed to be sure the bread bakes with
the “pocket.”
- 51 -
Page 52

SOFT PRETZELS
SOFT PRETZELS
Dough 16 Pretzels
Water (80°F/27°C) 1
Oil 1 tbsp
Lemon Juice 1 tsp
Sugar 2 tbsp
Salt 1 tsp
EggYolk 1
White Pepper
Bread Flour 3
Active DryYeast 1 tbsp
Glaze
Egg White 1
Water 1 tbsp
Kosher Salt or Sesame Seeds
Method
1. Remove bread pan from the breadmaker. Attach the kneading blade on the shaft of the bread pan.
Place the dough ingredients into the bread pan.
2. Place the bread pan into the breadmaker; close the lid.
3. Select Dough Program. (Timer cannot be used with the Dough Program.) Press START.
4. When the beeper sounds 8 times, press STOP. Preheat the oven to 375°F.
5. Punch the dough down. On a lightly floured surface, cut the dough into 16 equal pieces. Roll each
piece of dough into a rope about 16-inches long. Shape each rope into a pretzel. (Cross the ends
of the rope to make a loop; twist the crossed ends once and fold across the loop.)
6. Place the pretzels on a greased baking sheet 1
water. Sprinkle with salt or sesame seeds. Bake at 375°F for 15 to 20 minutes or until golden
brown.
1
⁄
4
cups
1
⁄
8
tsp
1
⁄
2
cups
1
⁄
2
inches apart. Brush with combined egg white and
- 52 -
Page 53

PIZZA
PIZZA
Dough 1Twelve Inch Pizza
Water (80°F/27°C)
Lemon Juice 1 tsp
Oil, preferably Olive Oil 1 tbsp + 1 tsp
Sugar 1
Salt
Bread Flour 2 cups
Active DryYeast 2 tsp
Pizza Sauce
Grated Mozzarella Cheese
Sliced Pepperoni
Chopped Peppers
Sliced Mushrooms
Sliced Olives
Chopped Onions
Bacon Pieces
3
⁄
4
cup
1
⁄
2
tsp
3
⁄
4
tsp
Method
1. Remove bread pan from the breadmaker. Attach the kneading blade on the shaft of the bread pan.
Place the dough ingredients into the bread pan in the order listed.
2. Place the bread pan into the breadmaker; close the lid.
3. Select Dough Program. (Timer cannot be used with the Dough Program.) Press START.
4. When the beeper sounds 8 times, press STOP. Remove the dough from the bread pan. Preheat the
oven to 425°F.
5. Press pizza dough into a 12-inch pizza pan or a 13-inch x 9-inch greased pan, raising edges of
dough.
6. Spread pizza sauce over the dough. Sprinkle with cheese and other toppings as desired.
7. Bake the pizza at 425°F for 20 to 25 minutes or until crust is golden brown around edges.
Makes 1 Pizza
Variations
Medium Pizzas: Shape the dough into two 8 inch circles, raising the edges of the dough. Place on
greased baking sheet. Spread with sauce, cheese and other desired toppings. Bake at 425°F for 20 to
25 minutes. Makes 2 pizzas.
Small Individual Pizzas: Shape the dough into four 5 inch circles, raising the edge of the dough.
Follow directions above. Bake at 425°F for 15 to 20 minutes. Makes 4 pizzas.
- 53 -
Page 54

WHOLE WHEAT PIZZA
WHOLE WHEAT PIZZA
Dough 1 Twelve Inch Pizza
Water (80°F/27°C) 1 cup
Oil 2 tbsp
Lemon Juice 1 tsp
Salt 1 tsp
Whole Wheat Flour 1 cup
Bread Flour 1
Active DryYeast 2
Method
1. Remove bread pan from the breadmaker. Attach the kneading blade on the shaft of the bread pan.
Place the dough ingredients into the bread pan in the order listed.
2. Place the bread pan into the breadmaker; close the lid.
3. Select Dough Program. (Timer cannot be used with the Dough Program.) Press START.
4. When the beeper sounds 8 times, press STOP. Remove the dough from the bread pan. Divide
dough in half and press each half onto a 12” round pizza pan. (Sprinkle pans with 1 tablespoon
each of cornmeal if desired.) Generously prick dough with a fork.
5. Place the pizza pans into a preheated 400°F oven for 10-12 minutes or just until edges of crust
begin to turn a light golden brown. Remove from oven and add desired toppings. (See below for
suggestions). Return pizza to oven and bake 15-20 minutes.
1
⁄
1
⁄
2
cups
4
tsp
Suggested Toppings:
12 oz. thinly sliced Provolone cheese
2 cloves garlic, minced
1 cup thick pizza or spaghetti sauce
1 lb. bulk Italian sausage, browned and well drained
2 teaspoons dried Italian herb seasoning, crushed
2 cans (2
2
⁄
3
cup coarsely chopped green pepper
1 package (3
1
⁄
4
oz. each) sliced mushrooms, drained
1
⁄
2
oz.) sliced pepperoni
10 oz. Mozzarella cheese, shredded (about 2
1
⁄
2
cups)
- 54 -
Page 55

CHEEZY GARLIC ROLLS
CHEEZY GARLIC ROLLS
Dough 18 Rolls
Egg (room temperature) 1
+ enough Water to equal 1 cup
Lemon Juice 1 tsp
Oil 2 tbsp
Sugar
Salt 1 tsp
Bread Flour 3
Active DryYeast 1
1
⁄
3
cup
1
⁄
2
cups
1
⁄
2
tsp
Topping:
Parmesan Cheese
Garlic, finely minced 1
1
⁄
2
cup
1
⁄
2
tbsp
Butter, melted 3 tbsp
Method
1. Remove bread pan from the breadmaker. Attach the kneading blade on the shaft of the bread pan.
Place the dough ingredients into the bread pan in the order listed.
2. Place the bread pan into the breadmaker; close the lid.
3. Select Dough Program. (Timer cannot be used with the Dough Program.) Press START.
4. When the beeper sounds 8 times, press STOP. Remove the dough from the bread pan. Punch
down and divide into 18 equal pieces.
5. Combine cheese and garlic. Dip dough pieces in melted butter and then dip in cheese-garlic mixture. Arrange in well-greased 13 x 9-inch baking dish. Cover and let rise in warm, draft-free place,
45 minutes or until doubled in size.
6. Bake in preheated 325°F oven 35 to 40 minutes, or until golden brown.
- 55 -
Page 56

FOCCACIA BREAD
FOCCACIA BREAD
Dough 1 Loaf
Water (80°F/27°C) 1 cup
Lemon Juice 1 tsp
Olive Oil 1 tbsp
Salt 1 tsp
Sugar 1 tbsp
Bread Flour 3 cups
Yeast 2
1
⁄
4
tsp
Topping:
Fresh rosemary, finely chopped
Fresh chives, finely chopped
1
⁄
4
cup
1
⁄
4
cup
Garlic, finely minced 2 tbsp
Olive Oil 2 tbsp
Method
1. Remove bread pan from the breadmaker. Attach the kneading blade on the shaft of the bread pan.
Place the dough ingredients into the bread pan in the order listed.
2. Place the bread pan into the breadmaker; close the lid.
3. Select Dough Program. (Timer cannot be used with the Dough Program.) Press START.
4. When the beeper sounds 8 times, press STOP. Remove the dough from the bread pan.
5. Punch down, roll into a ball and flatten into a 10 inch circle.Place on a baking sheet. Cover dough
liberally with olive oil. Sprinkle fresh herbs and garlic over the dough.
6. Bake in preheated 425°F oven for 20 to 35 minutes or until golden brown. Serve with pasta or cut
into diamonds and serve as an appetizer.
- 56 -
Page 57

CHALLAH BRAID
CHALLAH BRAID
Dough Regular Large
Egg (room temperature) 1 1
+ enough Water (80°F/27°C) to equal
3
⁄
4
cup 1 cup + 1 tbsp
Lemon Juice 1 tsp 1 tsp
Oil 2 tbsp 3 tbsp
Sugar 1
Salt 1 tsp 1
Bread Flour 2 cups 3
Active Dry Yeast 1 tsp 1
1
⁄
2
tbsp 2 tbsp
1
⁄
1
⁄
1
⁄
2
tsp
4
cups
2
tsp
Glaze:
Egg Yolk, beaten 1 1
Water 1 tbsp 1 tbsp
Topping:
Poppy Seeds 1 tsp 1 tbsp
Method
1. Remove bread pan from the breadmaker. Attach the kneading blade on the shaft of the bread pan.
Place the dough ingredients into the bread pan in the order listed.
2. Place the bread pan into the breadmaker; close the lid.
3. Select Dough Program. (Timer cannot be used with the Dough Program.) Press START.
4. When the beeper sounds 8 times, press STOP. Remove the dough from the bread pan. Place on a
lightly floured surface.
5. Divide dough into thirds, making 3, (10 inch-regular), (13 inch-large) ropes with tapered ends.
Pinch ropes together at one end, braid together, pinching together at other end and secure braid.
6. Transfer braided dough to greased baking sheet; let rise until doubled in size, about 45 minutes.
7. Combine glaze ingredients and brush onto braid. Sprinkle with poppy seeds. Bake in preheated
375°F oven for 25 minutes or until golden brown.
- 57 -
Page 58

CINNAMON ROLLS
CINNAMON ROLLS
Dough 16 Rolls
Egg (room temperature) 1
+ enough Water (80°F/27°C) to equal 1cup
Lemon Juice 1 tsp
Oil 3 tbsp
Salt 1 tsp
Sugar
Bread Flour 3
Active Dry Yeast 1
1
⁄
3
cup
1
⁄
2
cups
1
⁄
2
tsp
Filling:
Butter, softened
Sugar
1
⁄
3
cup
1
⁄
4
cup
Cinnamon 2 tbsp
Walnuts, finely chopped
Raisins (optional)
1
⁄
4
cup
1
⁄
4
cup
Glaze:
Powdered Sugar
1
⁄
2
cup
Water or Milk 3 tbsp
Vanilla
1
⁄
2
tsp
Method
1. Remove bread pan from the breadmaker. Attach the kneading blade on the shaft of the bread pan.
Place the dough ingredients into the bread pan in the order listed.
2. Place the bread pan into the breadmaker; close the lid.
3. Select Dough Program. (Timer cannot be used with the Dough Program.) Press START.
4. When the beeper sounds 8 times, press STOP. Remove the dough from the bread pan.
5. Punch down; roll into a 12 x 16-inch rectangle. Spread with
1
⁄
3
cup butter. Combine remaining filling
ingredients and sprinkle over butter. Roll up tightly, jelly-roll style, starting at the 12-inch side. Cut
into one inch pieces.
6. Place in 2 greased 9-inch square pans about
1
⁄
2
-inch apart. Let stand in warm, draft-free place for
one hour, or until doubled in size.
7. Bake in preheated 350°F oven for 25 to 30 minutes or until golden brown.
8. Mix together Glaze ingredients until smooth and drizzle over top of warm rolls.
- 58 -
Page 59

STICKY BREAKFAST ROLLS
STICKY BREAKFAST ROLLS
Dough 12 Rolls
Egg (room temperature) 1
+ enough Water (80°F/27°C) to equal 1
1
⁄
4
cups
Lemon Juice 1 tsp
Oil 3
1
⁄
2
tsp
Salt 1 tsp
Sugar
Bread Flour 3
Active Dry Yeast 1
1
⁄
3
cup
1
⁄
2
cups
1
⁄
2
tsp
Filling:
Butter, softened
Sugar
1
⁄
2
cup
1
⁄
3
cup
Cinnamon 1 tbsp
Walnuts or Pecans, chopped
1
⁄
2
cup
Topping:
Butter, melted
Light Brown Sugar
3
⁄
4
cup
3
⁄
4
cup
Method
1. Remove bread pan from the breadmaker. Attach the kneading blade on the shaft of the bread pan.
Place the dough ingredients into the bread pan in the order listed.
2. Place the bread pan into the breadmaker; close the lid.
3. Select Dough Program. (Timer cannot be used with the Dough Program.) Press START.
4. When the beeper sounds 8 times, press STOP. Remove the dough from the bread pan.
5. On a lightly floured surface roll into 12 x 16-inch rectangle. Spread with the
1
⁄
2
cup butter. Mix
together cinnamon, sugar and nuts; sprinkle generously over buttered dough. Roll up tightly, jellyroll style, starting at the 12-inch side. Cut roll into 12, 1-inch slices.
6. Combine Topping mixture and spread into a 13 x 9 inch baking dish. Carefully place roll slices on
top of mixture. Let rise in warm, draft-free place, 30 minutes or until doubled in size.
7. Bake in preheated 350°F oven 35 to 40 minutes or until golden brown. Let cool 1 minute. Invert
onto heatproof serving platter or tray.Serve warm.
- 59 -
Page 60

ALMOND-CHERRY COFFEE CAKE
ALMOND-CHERRY COFFEE CAKE
Dough
Water (80°F/27°C) 1cup
Lemon Juice 1 tsp
Oil 1 tbsp
Dry Milk 1 tbsp
Salt
Sugar 1
Bread Flour 3
Active DryYeast 1
Filling:
Cream Cheese (8 oz.), at room temperature 1 package
Sugar 2 tbsp
Chopped Maraschino Cherries
Milk 1 tbsp
Almond Extract
3
⁄
4
tsp
1
⁄
2
tbsp
1
⁄
4
cups
1
⁄
2
tsp
1
⁄
2
cup
1
⁄
2
tsp
Glaze:
Powdered Sugar
1
⁄
2
cup
Sour Cream 1 tbsp
Milk 1~2 tbsp
Sliced Almonds, to decorate 2 tbsp
Cherries, quartered, to decorate 2 tbsp
Method
1. Remove bread pan from the breadmaker.Attach the kneading blade on the shaft of the bread pan.
Place the dough ingredients into the bread pan in the order listed.
2. Place the bread pan into the breadmaker; close the lid.
3. Select Dough Program. (Timer cannot be used with the Dough Program.) Press START.
4. Meanwhile in a small bowl, combine the filling ingredients; blend well.
5. When the beeper sounds 8 times, press STOP. Remove the dough from the bread pan.
6. Punch dough down. On a floured surface, roll the dough into a 15 x 10-inch rectangle. Spread the
cream cheese mixture evenly over the dough to within
1
⁄
2
-inch of the edges. Starting with the
longest side, roll the dough up tightly, pressing the edges to seal.
7. Place the roll, seam-side down on a greased baking sheet. Join the ends to form a ring; pinch to
seal.With scissors or a small sharp knife, cut from the outside edge of the ring to within 1 inch of
the inside of the ring, making cuts 1
1
⁄
2
inches apart. Turn each section on its side so filling shows.
8. Cover loosely with plastic wrap. Let rise for 40 minutes or until almost doubled in size. Preheat the
oven to 375°F.
9. Uncover the dough. Bake at 375°F for 20 to 25 minu tes or until deep golden brown. Cool slightly;
remove from pan.
10. In a small bowl, combine the first three glaze ingredients, adding only enough milk for drizzling
consistency. Drizzle over the warm coffee cake. Decorate with almonds and cherries. Serve warm.
Makes 10 to 12 servings.
- 60 -
Page 61

BEFORE REQUESTING SERVICE
R Problems and Solutions
The consistence of the dough can be checked while it is mixing after the first 5 minutes. Dough should
appear pliable and elastic. If too dry, add water one teaspoon at a time. If dough is too moist, add flour,
one tablespoon at a time.
PROBLEMS SOLUTIONS
Dough does not rise enough. • Liquids are too hot (above 105°F/30~40°C)
• Inactive yeast; or not enough yeast
• Ingredients are too cold
• Too much salt
Bread flops over sides of pan. • Too much dough
• Bread has over risen (reduce amount of yeast slightly)
• Too much sugar
Crust pale in color. • Not enough sugar
Bread does not keep well. • Bread lasts up to 3 days if stored at room temperature
Free form loaves spread out or lose • Dough too soft. Too much liquid
shape instead of rise.
Bread falls during bake cycle. • Bread over risen (reduce amount of yeast and/or liquid
slightly)
Bread has coarse texture; crumbly • Bread has over risen (reduce amount of yeast and/or
liquid slightly)
Bread has unusual aroma. • Stale ingredients used
• Too much yeast
Sticky bread which slices unevenly. • Always use a serrated bread knife
• Allow bread to cool longer before slicing
R Service information
Please refer to warranty statement to determine if in warranty service applies.
This appliance should be serviced by properly trained appliance repair technicians. Consult your local
phone directory yellow pages under “Appliances – Household – Small – Service and Repair” for your
nearest Toastmaster authorized service center or call 1-800-947-3744.
If an authorized service center is not available locally, your appliance may be returned postage prepaid
to our National Service Center at the address shown on the back of this book.
Products must be adequately protected to avoid shipping damage for repair or replacement at our
option.We suggest you surround your appliance with three inches of protective padding. Please include
a note explaining the problem you have experienced — it helps us to properly service your product and
speed its return to you. Product must be returned postage prepaid and we recommend insuring your
package.
- 61 -
Page 62
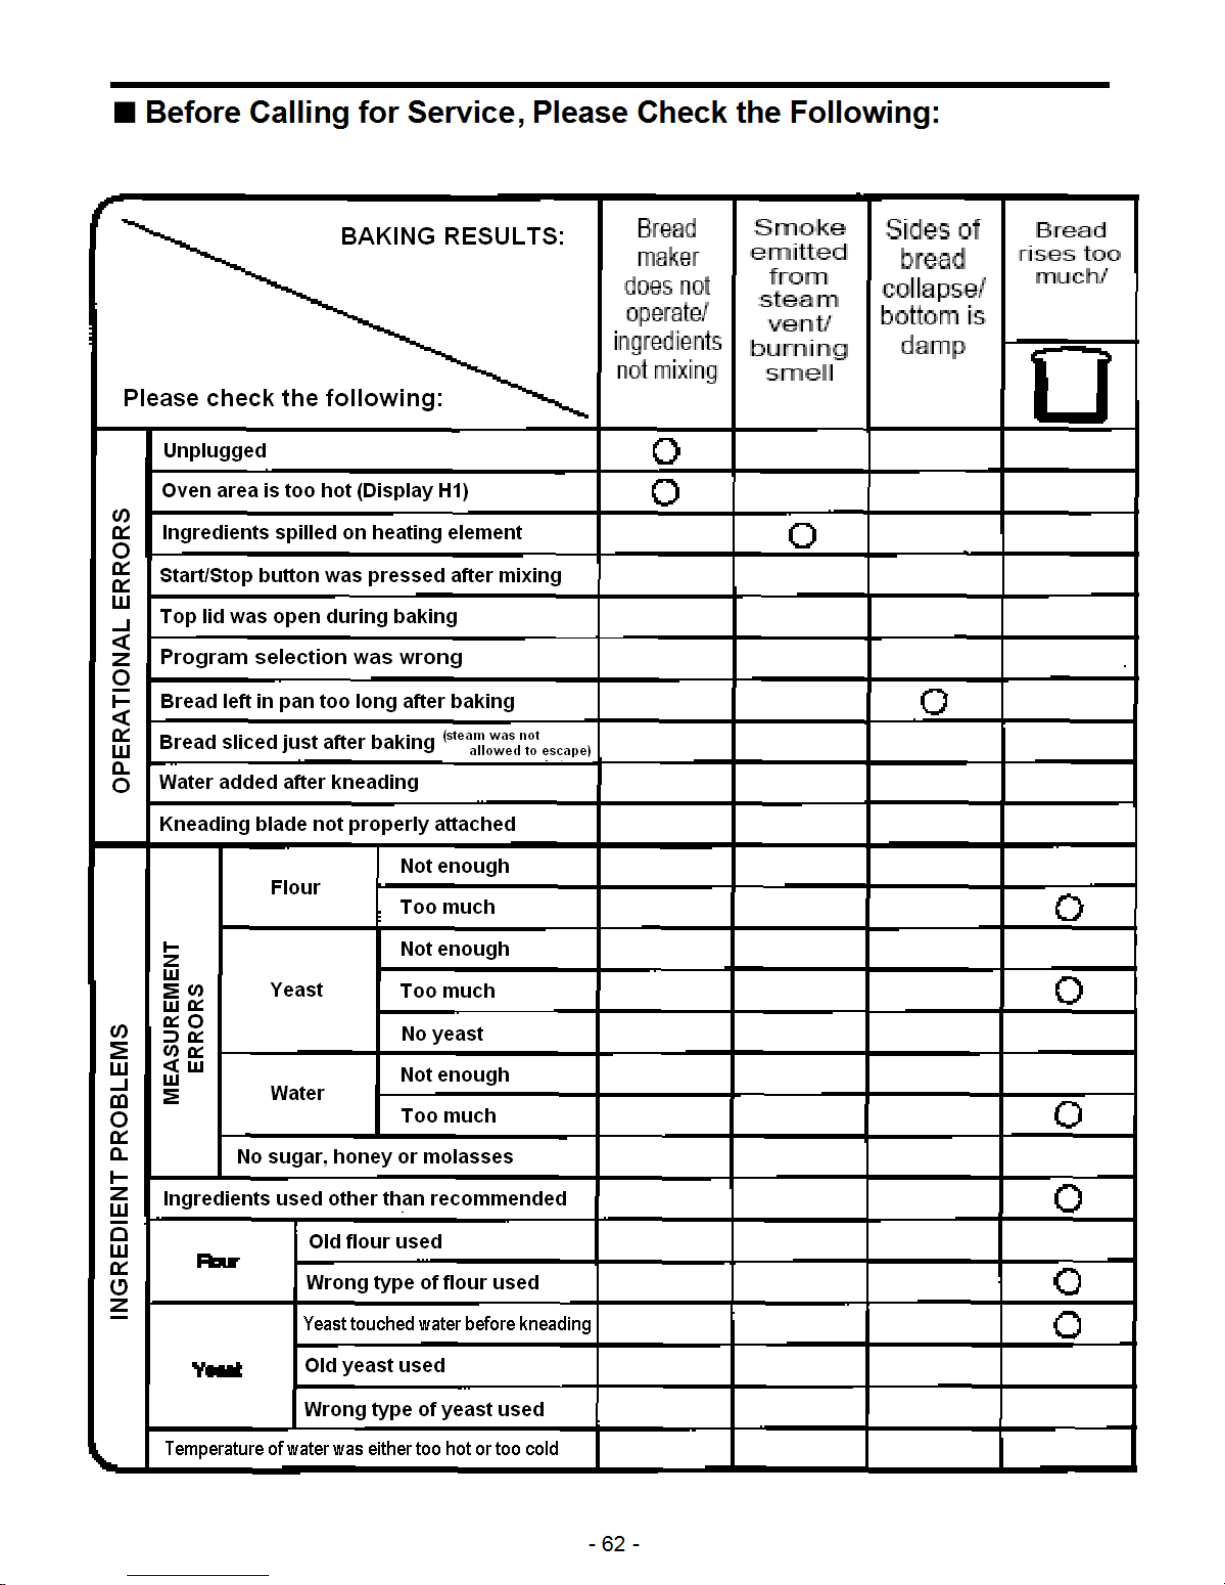
R Before Calling for Service, Please Check the Following:
- 62 -
Page 63

- 63 -
Page 64

R Questions and Answers for the Breadmaker
Questions Answers
Why does the height and The height and shape of bread may differ depending on the
1
shape of bread differ in ingredients, room temperature and length of the timer cycle.
each use? Also accurate measurement of ingredients is essential to
make delicious bread.
The bread has an unusual Stale ingredients may have been used or too much yeast
2
odor, why? may have been used. Always use fresh ingredients.
Accurate measurements are essential to make delicious
bread.
The kneading blade This can happen as the kneading blade is detachable. Use
3
comes out with the a non-metal utensil to remove it.
bread. Caution: The kneading blade will be hot.
The bread has a floured Sometimes flour in the corner of the bread pan may not
4
corner. have been completely kneaded into the dough. Scrape it off
with a knife.
Timer cannot be used for The breadmaker cannot shape individual rolls, doughnuts,
5
DOUGH program.Why? etc.
Can ingredients be If there is too little in the bread pan, the kneading blade
6
halved or doubled? cannot knead well enough. If there is too much, bread
swells out of the bread pan.
Can fresh milk be used Yes. Be sure to deduct the same measurement of water to
7
in place of dry milk? equal any liquid substitution. Fresh milk is not recommended
when using the timer, because it may spoil while sitting in the
bread pan.
- 64 -
Page 65

R Display Signals
When the START pad is pressed:
Display Reason How to reset
The oven area is too hot When the oven area has
(above 40°C/105°F).This cooled, press STOP pad and
may occur during continuous start again.
use.
During operation
During operation the
remaining time displays as follows:
There has been an interrup-
tion in the power supply
(unplugging of the power
cord, or malfunctioning of a
household fuse or breaker).
SPECIFICATIONS
Power supply
Power
Consumption
Dimension (WxDxH)
Heater
Kneading Motor
13
Remove the dough and start
again using all new ingredients.
A.C 120 V 60 Hz
550W
100W
3
1
⁄
4
”x10
⁄
4
”x13” (35.0x26.0x33.0cm)
Weight
Timer
Cord
Thermal Fuse
Main Heater Protector
Kneading Motor Protector
APPROX 18 lbs (Approx. 8.0kg)
13 hours digital timer
APPROX 3’ 11” (1.2M)
378°F / 192°C
248F / 120C
- 65 -
Page 66

MEMO
Page 67

MEMO
Page 68

ONEYEAR LIMITED WARRANTY
Toastmaster Inc. warrants this product, to original purchaser, for one year from purchase date to be
free of defects in material and workmanship.
This warranty is the only written or express warranty given byToastmaster Inc.This warranty gives
you specific legal rights.You may have other rights which vary from state to state. ANY OTHER
RIGHT WHICH YOU MAY HAVE, INCLUDING ANY IMPLIED WARRANTY OF MERCHANTABILITY
OR FITNESS FOR A PARTICULAR PURPOSE IS LIMITED IN DURATION TO THE DURATION OF
THIS WARRANTY.
Defective product may be brought or sent (freight prepaid) to an authorized service center listed in
the phone book, or to Service Department, Toastmaster Inc., 708 South Missouri St., Macon, MO,
63552 for free repair or replacement at our option.
Your remedy does not include: cost of inconvenience, damage due to product failure, transportation
damages, misuse, abuse accident or the like, or commercial use. IN NO EVENT SHALL TOASTMASTER INC. BE LIABLE FOR INCIDENTAL OR CONSEQUENTIAL DAMAGES.
Some states do not allow limitations on how long an implied warranty lasts, or allow the exclusion or
limitation of incidental or consequential damages, so the above limitations or exclusions may not
apply to you.
For information, write Consumer Claims Manager, at the Macon address. Send name, address,
zip, telephone area code and daytime number, model, serial number, and purchase date.
KEEP DATED SALES RECEIPT FOR WARRANTY SERVICE.
Keep this booklet. Record the following for reference:
Date purchased
Model number
- 68 -
 Loading...