

Page 1

W253 810-095002-EU
TMTM
USER’S MANUAL
Page 2

English page 1
Français page 49
Español página 99
Português página 153
Italiano página 197
Deutsch Seite 253
Nederlands pagina 305
Page 3

E
TABLE OF CONTENTS
INTRODUCTION . . . . . . . . . . . . . . . . . . . . . . . . . . . . . . . . . . . . . . . . 5
TIMEX
®
EXPEDITION®WS4™. . . . . . . . . . . . . . . . . . . . . . . . . . . . . . 7
WATCH FEATURES. . . . . . . . . . . . . . . . . . . . . . . . . . . . . . . . . . . . . . 8
Time . . . . . . . . . . . . . . . . . . . . . . . . . . . . . . . . . . . . . . . . . . . . . . 8
Altimeter . . . . . . . . . . . . . . . . . . . . . . . . . . . . . . . . . . . . . . . . . . . 8
Barometer. . . . . . . . . . . . . . . . . . . . . . . . . . . . . . . . . . . . . . . . . . 9
Compass. . . . . . . . . . . . . . . . . . . . . . . . . . . . . . . . . . . . . . . . . . . 9
Chronograph . . . . . . . . . . . . . . . . . . . . . . . . . . . . . . . . . . . . . . . . 9
Timer . . . . . . . . . . . . . . . . . . . . . . . . . . . . . . . . . . . . . . . . . . . . 10
Alarm . . . . . . . . . . . . . . . . . . . . . . . . . . . . . . . . . . . . . . . . . . . . 10
QUICK START. . . . . . . . . . . . . . . . . . . . . . . . . . . . . . . . . . . . . . . . . . . 11
Setting the Time and Date. . . . . . . . . . . . . . . . . . . . . . . . . . . . . 11
Calibrating the Compass . . . . . . . . . . . . . . . . . . . . . . . . . . . . . . 11
Calibrating Altitude or Barometer and Setting the Weather . . . . 12
1
Page 4

INSTRUCTIONS . . . . . . . . . . . . . . . . . . . . . . . . . . . . . . . . . . . . . . . . . 14
TIME MODE . . . . . . . . . . . . . . . . . . . . . . . . . . . . . . . . . . . . . . . . . . 14
Setting the Time and Measurements . . . . . . . . . . . . . . . . . . . . . 14
Changing the Display . . . . . . . . . . . . . . . . . . . . . . . . . . . . . . . . 15
ALTIMETER MODE . . . . . . . . . . . . . . . . . . . . . . . . . . . . . . . . . . . . . 15
Operating the Altimeter . . . . . . . . . . . . . . . . . . . . . . . . . . . . . . . 15
Setting the Target Altitude or Altitude Alarm . . . . . . . . . . . . . . . 17
BAROMETER MODE . . . . . . . . . . . . . . . . . . . . . . . . . . . . . . . . . . . . 20
Operating the Barometer . . . . . . . . . . . . . . . . . . . . . . . . . . . . . . 20
TEMPERATURE AND FORECAST. . . . . . . . . . . . . . . . . . . . . . . . . . . 22
COMPASS MODE . . . . . . . . . . . . . . . . . . . . . . . . . . . . . . . . . . . . . . 24
Calibrating the Compass . . . . . . . . . . . . . . . . . . . . . . . . . . . . . . 24
Using the Compass . . . . . . . . . . . . . . . . . . . . . . . . . . . . . . . . . . 28
CHRONO MODE . . . . . . . . . . . . . . . . . . . . . . . . . . . . . . . . . . . . . . . 28
Laps and Splits . . . . . . . . . . . . . . . . . . . . . . . . . . . . . . . . . . . . . 30
REVIEW MODE. . . . . . . . . . . . . . . . . . . . . . . . . . . . . . . . . . . . . . . . 31
Reviewing Activity Data . . . . . . . . . . . . . . . . . . . . . . . . . . . . . . . 31
E
TIMER MODE. . . . . . . . . . . . . . . . . . . . . . . . . . . . . . . . . . . . . . . . . 33
Setting the Timer . . . . . . . . . . . . . . . . . . . . . . . . . . . . . . . . . . . 34
Operating the Timer . . . . . . . . . . . . . . . . . . . . . . . . . . . . . . . . . 34
ALARM MODE . . . . . . . . . . . . . . . . . . . . . . . . . . . . . . . . . . . . . . . . 36
Setting an Alarm . . . . . . . . . . . . . . . . . . . . . . . . . . . . . . . . . . . . 36
Operating the Alarm . . . . . . . . . . . . . . . . . . . . . . . . . . . . . . . . . 36
CALIBRATION MODE . . . . . . . . . . . . . . . . . . . . . . . . . . . . . . . . . . . 38
Setting and Calibrating Your Reference Points . . . . . . . . . . . . . . 40
INDIGLO
®
NIGHT-LIGHT . . . . . . . . . . . . . . . . . . . . . . . . . . . . . . . . . 41
GLOSSARY. . . . . . . . . . . . . . . . . . . . . . . . . . . . . . . . . . . . . . . . . . . 42
TIMEX INTERNATIONAL WARRANTY. . . . . . . . . . . . . . . . . . . . . . . . 45
3
2
Page 5

INTRODUCTION
Some of the best places on the planet are the hardest to get to. Your new
Timex
®
Expedition®WS4™watch will help you get there.
Equipped with essential outdoor features, the WS4
™
watch takes a fresh
approach to wrist-top adventure instruments. The large, wide-screen dashboard displays key information at a glance, without flipping through modes.
The WS4
™
watch utilizes advanced sensors that have precision accuracy,
and coupled with the intuitive user-interface, you can rely on it to give you
all the right answers in even the most extreme conditions. The first few
pages of the manual will get you started in minutes, and the rest provides
an in-depth understanding of our most advanced outdoor instrument yet.
So whether you’re taking to the trails, hitting the slopes or racing up
twenty-three flights of stairs to see just how sensitive the altimeter is, get
ready to venture out of bounds.
E
5
4
Page 6

TIMEX®EXPEDITION®WS4
™
“Remember,your WS4 is no substitute for sound judgment.
Sound judgment comes from experience, and the only way to
gain experience is to put in the time. Enjoy your new instrument,
yet keep in mind it is like a pet dog that needs exercise. Take it
outdoors and put it and yourself through the paces.”
-Conrad Anker
World-Renowned Mountaineer
Timex
®
Expedition®Brand Ambassador
7
6
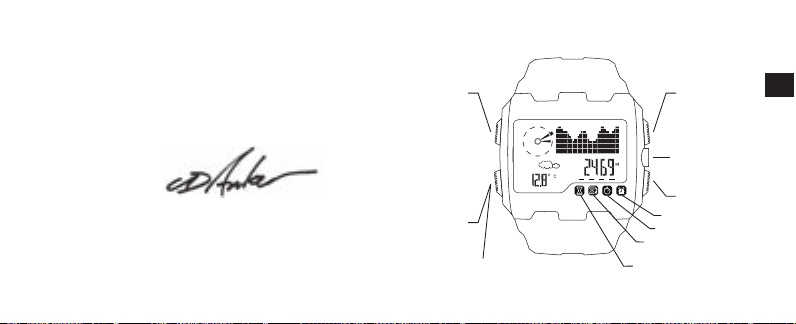
E
START/SPLIT
(+)
INDIGLO
®
BUTTON
SET
(DONE)
MODE
(NEXT)
STOP/RESET
(-)
TIME OF DAY>ALTIMETER>BAROMETER>
COMPASS>CHRONO>REVIEW>TIMER>ALARM>CALIBRATION
ALARM INDICATOR
CHRONOGRAPH INDICATOR
REPEAT COUNTDOWN
TIMER INDICATOR
COUNTDOWN TIMER INDICATOR
Page 7

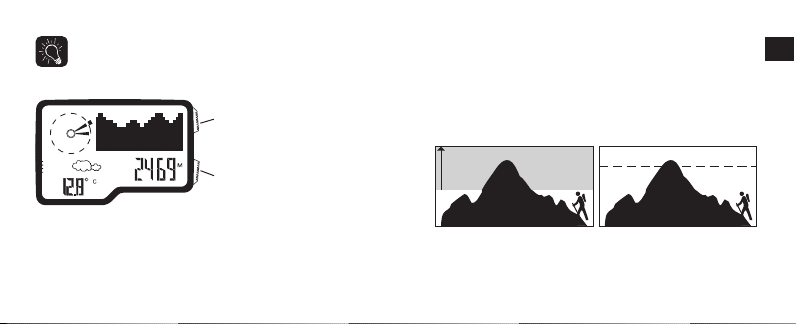
• Five user-set, customizable altitude reference points.
Barometer
• Tracks high, low and current pressure as well as sea level pressure.
• Displays sea level pressure changes in a graph.
• Displays a weather forecast graphic.
• Shows the temperature in either Celsius or Fahrenheit.
Compass
• Includes the heading in both number format and a digital compass needle.
• Can be calibrated to a declination angle for maximum accuracy.
Chronograph
• Stopwatch feature that will time up to 100 hours and 99 laps.
• Option to display lap or split time in larger digits.
• During chronograph use, the WS4
™
watch records key activity statistics
that can be seen in Review Mode.
WATCH FEATURES
Time
• Hours, minutes, and seconds displayed in 12- or 24-hour format.
• Date displayed in MM-DD or DD.MM formats.
• Second time zone, with independent hours, minutes, date, and format
settings.
• Hourly chime (optional).
• Button beep (optional).
• Both a digital and an analog clock.
Altimeter
• Shows measurements in either feet or meters.
• Tracks current, peak and accumulated altitude.
• Displays ascent and descent in a graph.
• Tracks time in and above target altitude (in Review Mode).
• Altitude alarm.
9
8
E
Page 8

QUICK START
The next three pages will give you the basics you need to get your watch
up and running in under 5 minutes. Continue reading for full instructions.
Setting the Time and Date
1. Press MODE until time of day appears.
2. Press and hold SET to start.
3. Press START/SPLIT (+) or STOP/RESET (-) to increase or decrease setting values for time zone, time, date, sounds,and measurement units.
4. Press MODE (NEXT) to advance to the next setting option.
5. Press SET (DONE) to finish.
Calibrating the Compass
Prior to calibrating, remove the watch from your wrist, hold it in your hand,
and choose a declination angle from the table on pages 25 and 26.
1. Press MODE until COMPASS appears.
2. Press and hold SET to start.
Timer
Countdown timer works up to 100 hours, with the option to repeat countdown up to 99 times.
Alarm
• Choose from daily, weekday, weekend,or weekly alarms.
• One-time backup alert if alarm is ignored.
11
10
ENGLISH QUICK START
Page 9

point settings and choose either MANUAL ALTI or BARO.
4. Press MODE (NEXT) to begin the setting process.
5. Press START/SPLIT (+) or STOP/RESET (-) to increase or decrease
setting values.
6. Press MODE (NEXT) to advance to the next setting option.
7. Press SET (DONE) to finish.
8. To calibrate the altimeter or barometer to the preselected data, hold
STOP/RESET until the watch beeps.
Once you have set the altitude or barometer, then you will need to synchronize the weather icon to current weather conditions.
1. In CAL mode, press SET to begin calibration.
2. Press START/SPLIT (+) or STOP/RESET (-) to scroll to WEATHER.
3. Press MODE (NEXT) to begin the setting process.
4. Press START/SPLIT (+) or STOP/RESET (-) to scroll among weather
options.
5. Press SET (DONE) to finish.
3. Keeping the watch level and facing up, rotate it twice (taking at least 15
seconds per revolution) and then press MODE.
4. Press START/SPLIT (+) or STOP/RESET (-) to increase or decrease setting values to match your chosen declination angle.
5. Press MODE to advance to the next setting option.
6. Press SET to finish.
If you see CAL OK at the end of the calibration process you have successfully calibrated the compass. If you see CAL FAIL, repeat the calibration
process.
Calibrating Altitude or Barometer and Setting the Weather
You should calibrate either the Altimeter (MAN-ALTI) or the Barometer
(BARO), and the Weather Icon (WEATHER) prior to first use. You should calibrate the watch to the most accurate information you have.
1. Press MODE until CAL appears.
2. Press and hold SET to begin the calibration.
3. Press START/SPLIT (+) or STOP/RESET (-) to scroll among the reference
13
12
ENGLISH QUICK START
Page 10

Changing the Display
• Times Zones: Look at the other time zone by pressing START/SPLIT or
switch time zones by holding START/SPLIT.
• When in Time of Day Mode, press STOP/RESET to choose among the
following display options: Date, Altitude,or Barometric Pressure.
ALTIMETER MODE
Your watch allows you to track current, peak, and accumulated altitude as
well as time spent at or above a target altitude. This mode also includes an
alarm if you want to be alerted when you go above an altitude of your
choosing. You should calibrate the altimeter before first use (see page 38).
Operating the Altimeter
Once in Altimeter Mode, the WS4
™
watch automatically scrolls through:
• PEAK: The highest reached altitude.
• ACC (accumulated): The total altitude change, taking both ascent and
descent into account.
• CURR (current): The current altitude.
6. To calibrate the weather to the preselected data, hold STOP/RESET until
the watch beeps.
INSTRUCTIONS
TIME MODE
Your watch shows the time for two time zones. In this mode, you can also
choose measurement units (i.e., feet or meters; Fahrenheit or Celsius) and
pick from three different display options.
Setting the Time and Measurements
1. Press MODE until time of day is displayed.
2. Press and hold SET to start.
3. Press START/SPLIT (+) or STOP/RESET (-) to increase or decrease setting values for time zone, time, date, sounds,and measurements.
4. Press MODE (NEXT) to advance to the next setting option.
5. Press SET (DONE) to finish.
14
E
15
Page 11
Setting the Target Altitude or Altitude Alarm
Altimeter settings include:
•
Target Altitude:
If the chrono is running, the watch will track the time
spent at or above this altitude in Review Mode.
•
Altitude Alarm:
Alerts you via an onscreen pop-up and an audible alarm
that you have reached a pre-selected altitude.
“When the alarm beeps you know you’ve reached your set
altitude. This quick reminder will allow you to assess your
Note: If during a hike you climb 400 meters and descend 100
meters, then your accumulated altitude is 300 meters.
When the watch reaches the current altitude display you can also:
Press START/SPLIT: view
numeric current altitude or
graphic display of altitude over
the last 36 hours.
Press STOP/RESET: Reset
accumulated altimeter statistics
to zero to clear the memory.
17
16
E
Target Altitude
Altitude Alarm
Page 12
altimeter reading by +/- 100 meters even if you have stayed in
the same location. If possible, re-calibrate to a known altitude
when drastic pressure changes occur.
You only need to calibrate barometer OR altimeter, since they
rely on the same pressure. See Calibration Mode on page 38 for
more information.
“Before I curl into my sleeping bag I note the current altitude and
barometric pressure. In the few hours I sleep if I see a change in
altitude or barometric pressure I can get an idea of the coming
weather patterns. As it is an inverse relationship between altitude
and barometric pressure, if I wake at the same or lower elevation
I can be confident the atmospheric pressure has remained constant. If I rise to a higher altitude I need to be aware as there is a
chance a low pressure is moving in.”
-Conrad Anker
World-Renowned Mountaineer
condition and decide if you are on track for a successful ascent.”
-Conrad Anker
World-Renowned Mountaineer
To set the Target Altitude or Altimeter Alarm:
1. Press MODE until ALTI is shown.
2. Press and hold SET to start.
3. Press START/SPLIT (+) or STOP/RESET (-) to increase or decrease setting
values.
4. Press MODE (NEXT) to advance to the next setting option.
5. Press SET (DONE) to finish.
NOTE: The altimeter will display in either FT (feet) or M (meters)
depending on which display unit you chose in Time Mode. See
page 14 for information on setting units of measurement.
ATTENTION: Your altimeter is sensitive to weather changes!
Sudden changes in barometric pressure can change your
19
18
E
Page 13
When the watch reaches the current barometric display you can also:
Press START/SPLIT: Displays
numeric current barometer
reading or graphic display of the
sea level pressure over the last
36 hours.
Press STOP/RESET: Reset
accumulated barometer
statistics to zero to clear the
memory.
NOTE: The barometer will display in either MB (millibars) or In
Hg (inches of mercury) depending on which display unit you
chose in Time Mode. See page 14 for information on setting
units of measurement.
You only need to calibrate the barometer OR altimeter, since
they rely on the same pressure. See Calibration Mode on page
38 for more information.
21
E
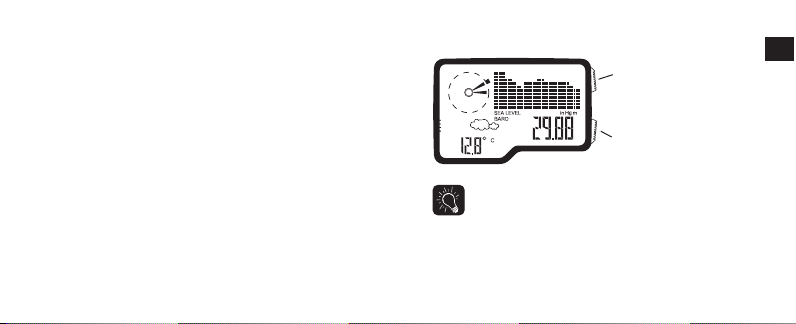
BAROMETER MODE
Your watch includes information about current and sea level pressure,high
or low barometric information, and changes in sea level pressure over the
most recent 36 hours. These features are useful for understanding changes
in weather.
Operating the Barometer
Once in BARO Mode, the watch automatically scrolls through:
• Highest reached barometric pressure.
• Lowest barometric pressure.
• Current barometric pressure and the corrected sea level pressure.
20
Page 14
23
E
NOTE: For more accurate temperature readings, try wearing the
watch outside your jacket or clipping it to your belt or pack
(ideally in an area not constantly exposed to the sun). You can
also remove the watch from your wrist and put in shade for 15
to 30 minutes.
For information on calibrating your weather icon see Calibration Mode on
page 38.
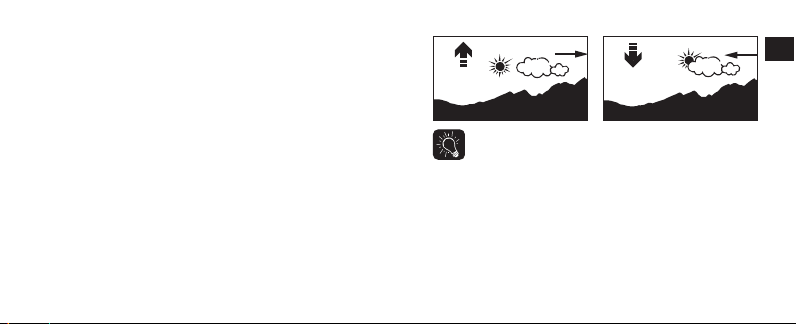
TEMPERATURE AND FORECAST
In TIME, ALTI, BARO, CHRONO, and TIMER Modes, your WS4™watch
includes information about temperature and forecast.
The watch can predict the weather for the upcoming 4 – 6 hour period
based on the air pressure trends for the previous twelve hours. Generally,if
the air pressure is rising, the weather situation is considered to be improving and is indicated by the sun icon. If the air pressure trend is falling, then
the weather situation is worsening and is indicated by showing the clouds
and/or precipitation icons.
When worn on your wrist, the temperature reading is affected by body heat
and may differ from the actual temperature by 10 degrees or more. Long
periods of exposure to direct sunlight may also affect accuracy.The watch
can also measure the temperature in water, but make sure you don’t press
any watch buttons under water or this will compromise the watch’s waterresistance.
22
P
P
Page 15

Prior to calibrating the compass, remove the watch from your wrist, hold it
in your hand and choose a declination angle from the table below.
CITY DEC. ANGLE CITY DEC. ANGLE
Amsterdam 0° W Chicago 3° W
Anchorage 19° E Dallas 3° E
Auckland 18° E Denver 9° E
Beijing 3° W Dubai 1° E
Berne 0° E Hong Kong 2° W
Bogota 5° W Jerusalem 3° E
Bozeman 13° E London 1° W
Buenos Aires 8° W Los Angeles 12° E
Calgary 15° E Madrid 1° W
Capetown 23° W Mexico City 5° W
Moscow 10° W Riyadh 2° E
Mt. Everest 0° W Rome 1° E
25
E
COMPASS MODE
The WS4™watch includes an accurate digital compass that takes a reading every second when engaged and shows the compass reading as a
number and a cardinal heading along with a virtual compass needle. You
must calibrate the compass prior to first use and it’s also a good idea to
calibrate it periodically to maintain more accurate readings. For more
information, see Calibration Mode on page 38.
Calibrating the Compass
When using the compass, it’s important to keep your wrist at a level,horizontal position to help make compass readings more accurate.
For the most accurate readings, avoid calibrating the compass near large
metallic objects (such as electronics, cars, filing cabinets,
and anything else metal) since magnetic force in these
objects may interfere with the magnetic field and give you
inaccurate compass readings. Note that the Indiglo
®
night-
light feature does not work while calibrating the compass.
24
continued on next page
Page 16

Once you know your declination angle:
1. Press MODE until COMPASS is shown.
2. Hold SET to start.
3. Keeping the watch level and facing up, rotate it twice (taking at least
15 seconds per revolution) and then press MODE.
4. Press START/SPLIT or STOP/RESET to increase or decrease setting
values to match your chosen declination angle.
5. Press MODE to advance to the next setting option.
6. Press SET to finish.
If you see CAL OK at the end of the calibration process you have successfully calibrated the compass. If you see CAL FAIL, repeat the calibration process.
ATTENTION: Calibration may fail if you rotate the watch too
quickly or take longer than one minute to complete.
Calibration may also fail if you are near objects that are
magnetic.
CITY DEC. ANGLE CITY DEC. ANGLE
Mumbai 0° W Seattle 17° E
Munich 1° E Seoul 7° W
New York 12° W Sydney 12° E
Orlando 5° W Tokyo 6° W
Oslo 1° E Toronto 10° W
Paris 0° W Vancouver 17° E
Reykjavik 15° W Warsaw 4° E
Rio De Janeiro 22° W Washington DC 10° W
For cities that do not appear on the table above, you can find your declination angle using the declination angle calculator at the URL listed below.
Note that you will need to know the latitude and longitude of your location
before you can calculate the declination angle at this website. Latitude
and longitude information can be found on the internet.
http://www.ngdc.noaa.gov/geomagmodels/struts/calcDeclination
27
E
26
Page 17
29
E
Most watch buttons have multiple functions in Chrono Mode. Use the table
along with your watch to explore the options.
Using the Compass
After you have calibrated your compass, you will see the current compass
heading, cardinal points, and the digital compass needle when you enter
Compass Mode. After 30 seconds the compass reading times out and disappears from the watch display to preserve battery life. Press START/SPLIT
to display the current heading for another 30 seconds.
TIP: Your watch would be a great tool for orienteering. You can
use your compass to navigate way points and if you participate
in an orienteering race, you can time yourself using the chronograph (see next section).
CHRONO MODE
Your watch includes a chronograph, which is a stopwatch function. The
chrono can track up to 100 hours and 99 laps. The data you collect while
running the chronograph can then be used to check your progress in
Review Mode. (See page 31 for more information about Review Mode).
28
BUTTON FUNCTIONS
MODE
• Enter or exit the mode.
• Quickly display a lap or split after pressing
START/SPLIT when chrono is running.
STOP/RESET
• Stop the chrono.
• Switch between altimeter or barometer
display information (if chrono is at 00:00:00).
START/SPLIT
• Start the chrono.
• Take a lap or split.
SET
• Switch the lap and split display positions.
Page 18
31
E
When the chrono is running, a bar is shown in chrono and time
of day modes above the stopwatch icon.
ATTENTION: To save the life of your watch battery, when the
chrono reaches 100 hours the watch will stop timing and the
START/SPLIT button will not function.
REVIEW MODE
The Activity Review Mode on the watch captures lows, highs and adventure
averages. Activity statistics are recorded while the chronograph is running
and are then visible in Review Mode.
Reviewing Activity Data
1. Press MODE until REVIEW is shown.
2. Press START/SPLIT to scroll through the data.
3. Press and hold STOP/RESET to clear the most recent review information
after you have finished reviewing it.
NOTE: Your chronograph can be a good tool for mountain
biking, skiing, or trail running.You can take splits at specified
trail points along the way, periodically check your altimeter to
see how high you’ve climbed or descended, and even check the
barometer to make sure bad weather is not approaching. Once
you’ve finished, you can check out information about your
activity in Review Mode.
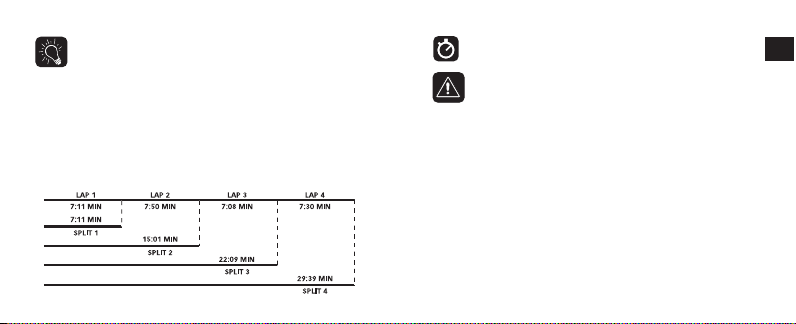
Laps and Splits
When referring to lap times, this is the time for an individual segment of an
activity. Split time is the entire time up to the current segment.
30
Page 19

33
E
TIP: You can use Review Mode to relive your hike on the way
home. Scroll through activity stats to let your friends know how
high you climbed, how much time you spent above your target
altitude, and even the temperature changes over the course
of your hike. Even more, you can show them this information
through a series of graphs that show altitude, barometric
pressure, and temperature changes over time.
NOTE: Press and hold START/SPLIT to quickly scroll through all
data.
ATTENTION: You will see the message NO DATA STORED if the
Chrono has never been run.
TIMER MODE
Your WS4™watch includes a standard countdown timer that you can use for
both outdoor and indoor activities. It can count down from a fixed time of up
to 100 hours and can repeat a countdown up to 99 times.
The following data is tracked in Review Mode:
• Maximum Altitude
• Minimum Altitude
• Total Ascent
• Total Descent
• Time Spent At or Above Target Altitude
• Altitude Graph
• Highest Barometric Pressure
• Lowest Barometric Pressure
• Average Barometric Pressure
• Sea Level Pressure Graph
• Highest Temperature
• Lowest Temperature
• Average Temperature
• Temperature Graph
32
Page 20

35
E
TIP: The timer might be useful when you want to be alerted at
the halfway point of an activity. For example, you go out knowing you only have about two hours to spend on a hike. You set
the timer for 60 minutes and when it beeps you know it’s time
to turn around and start heading back to the trail head. Timer
information is not connected to Review Mode.
NOTE: While setting the timer, quickly scroll through the setting
values by holding down START/SPLIT (+) or STOP/RESET (-).
When the timer is running, a bar is shown in timer and time of
day modes above the timer icon.
If the timer is set to repeat, the bar is shown above the timer
with arrow icon.
Setting the Timer
1. Press MODE until TIMER is shown.
2. Press and hold SET to start.
3. Press START/SPLIT (+) or STOP/RESET (-) to increase or decrease setting values for hours, minutes, seconds, and end action.
4. Press MODE (NEXT) to advance to the next setting option.
5. Press SET (DONE) to finish.
Operating the Timer
1. Press START/SPLIT to start the timer or restart it after a pause.
2. Press STOP/RESET to stop the countdown.
3. Hold STOP/RESET to reset the timer to the start value.
4. Hold STOP/RESET again to clear the timer to 0.
When the countdown reaches zero the watch will beep. You can press any
button to silence the beep. If you set the timer to repeat at the end of the
countdown, the repeat will continue until you press STOP/RESET.The display will show R and a number to indicate the timer is repeating and how
many times it has repeated.
34
Page 21
37
E
START/SPLIT when you enter ALARM MODE. The alarm will sound for 20
seconds when it reaches a scheduled alarm. Push any button to turn the
alarm off. A one-time backup alarm will sound after 5 minutes if you don’t
turn the alarm off the first time it rings.
“The alarm clock is perhaps the simplest function on the WS4
™
watch. Yet in it’s simplicity it plays a very important part in the
overall expedition. There is a comfort in hearing the 2 AM alarm
wake me from my sleep. These predawn hours are the finest of
the day. Crisp firm snow under foot, a few stars fading to dawn
and the rhythm of your partners cadence are the intangible part
of the expedition experience.”
-Conrad Anker
World-Renowned Mountaineer
ALARM MODE
The WS4™watch includes an alarm that you can set to ring once, or at the
same time every day, or only on weekends,weekdays, or even just one day
a week.
Setting an Alarm
1. Press MODE until ALARM is shown.
2. Press and hold SET to start.
3. Press START/SPLIT (+) or STOP/RESET (-) to increase or decrease setting values for hours, minutes, AM/PM and alarm type.
4. Press MODE (NEXT) to advance to the next setting option.
5. Press SET (DONE) to finish.
NOTE: When you set the alarm, you automatically turn it on.
Operating the Alarm
To turn an alarm on or off without initiating the setting process, press
36
Page 22
39
E
If you don’t know your altitude, you can find out the current sea
level pressure (published online or in a newspaper) and calibrate the sensor to barometric pressure.
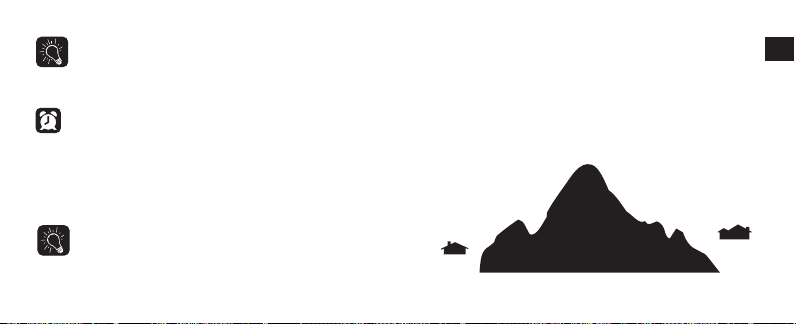
The watch also has five Altitude Reference Points (REFERENCE HOME,
REFERENCE BASE 1, REFERENCE BASE 2, REFERENCE BASE 3, and REFERENCE MAN-ALT) which allow you to set the altitude of a known location
ahead of time, and then re-calibrate your watch at that point with one push
of a button.
NOTE: While setting an alarm, quickly scroll through the setting
values by holding down START/SPLIT (+) or STOP/RESET (-).
— The AM/PM value will (+) only appear if you have set the
watch to display the 12-hour format.
When the alarm is armed, a bar is shown in alarm and time of
day modes above the alarm icon.
CALIBRATION MODE
The WS4™watch has the ability to take extremely accurate measurements.
You should calibrate either the Altimeter (MANUAL ALTI) or the Barometer
(BARO), and the Weather Icon (WEATHER) prior to first use. And, as with any
precision instrument, you should calibrate frequently to maintain accuracy.
NOTE: For the best accuracy, choose the calibration method
based on the most accurate reference source available. For
example, if you are standing at a trail head and know the correct altitude, then the most accurate calibration will be altitude.
38
HOME
(HOME 1 ALTI)
(ie. 800 M)
TRAIL HEAD
(BASE 1 ALTI)
(1200 M)
PEAK
(BASE 2 ALTI)
(2000 M)
LODGE
(BASE 3 ALTI)
(1000 M)
EXAMPLE: FAVORITE HIKE
Page 23
41
E
Note: Use Manual-Altitude (MAN-ALT) for one-time, manual re-
calibrations. Use Home Altitude and Base Altitude 1,2,3 to store
altitude reference points that will be used multiple times.
Note: If you have already entered a reference point, you can
quickly select that reference point and hold STOP/RESET to
quickly calibrate.
INDIGLO®NIGHT-LIGHT
In any mode, when you press the INDIGLO®button, the watch face will light
up for easier viewing. You can also activate Night-Mode
®
if you press and
hold the INDIGLO
®
button until you hear a beep. The Night-Mode® feature is
a very useful feature in low light conditions because it allows you to press
any button to light the watch for 2 to 3 seconds. Once activated, the NightMode
®
feature stays active for 7 to 8 hours. If you want to deactivate Night-
Mode
®
before 7 to 8 hours have elapsed, press and hold the INDIGLO
®
button until you hear a beep.
ATTENTION: Sudden changes in barometric pressure can
impact your altimeter reading. If possible, re-calibrate to a
known altitude when drastic pressure changes occur.
Setting and Calibrating Your Reference Points
1. Press MODE until CAL is shown.
2. Hold SET to begin the calibration.
3. Press START/SPLIT (+) to scroll among the reference points (HOME ALTI,
BASE 1 ALTI, BASE 2 ALTI, BASE 3 ALTI, MANUAL ALTI, BARO, and
WEATHER).
4. Press MODE (NEXT) to begin the setting process.
5. Press START/SPLIT (+) or STOP/RESET (-) to increase or decrease setting values.
6. Press MODE (NEXT) to advance to the next setting option.
7. Press SET (DONE) to finish.
8. Once you are on location, press and hold STOP/RESET to select and calibrate to that reference point in CAL mode. When the watch beeps, the
calibration is complete.
40
Page 24

43
E
Chronograph:
The chronograph records timed segments for the duration of
your activity.
Declination:
To account for the difference between true north and magnetic north, a compass uses a declination angle setting. Westerly declinations
are subtracted from the computed compass heading while easterly declinations are added. See the table on pages 25 and 26 for a list of declinations
for major world cities.
Digital:
As it relates to watches, digital tells time with the use of numbers.
In Hg:
In Hg stands for Inches of mercury, which is a unit for measuring air
pressure. One inch of mercury is equivalent to 33.86 millibars.
Lap:
Lap time records the time or duration of individual segments of your
activity.
Magnetic North:
The direction of the earth’s magnetic pole and the direction
towards which a compass needle points, which differs from true north (see
below). The difference between true north and magnetic north is used to
calculate the declination angle used by the watch’s compass.
GLOSSARY
This glossary provides definitions for some of the features and functions of
the watch described throughout this manual.
Altimeter:
An instrument used to determine the altitude of an object with
respect to a fixed level. Typically altitude is measured with respect to sea
level.
Analog:
As it relates to a watch, analog tells time with the use of hands.
Barometer:
A barometer measures atmospheric pressure and can help
predict changes in weather.
Barometric Pressure:
Air pressure as it relates to weather forecasts. Higher
pressure usually indicates warmer and clearer weather while lower
pressure typically indicates cloudy weather and a greater chance of precipitation.
Calibration:
A technique to improve the accuracy of the compass, altimeter,
barometer, and weather forecast, primarily by compensating for local
conditions.
42
Page 25

45
E
TIMEX INTERNATIONAL WARRANTY
(U.S. – LIMITED WARRANTY)
Your TIMEX®watch is warranted against manufacturing defects by Timex
Group USA, Inc. for a period of ONE YEAR from the original purchase date.
Timex and its worldwide affiliates will honor this International Warranty.
Please note that Timex may, at its option, repair your watch by installing
new or thoroughly reconditioned and inspected components or replace it
with an identical or similar model. IMPORTANT — PLEASE NOTE THAT
THIS WARRANTY DOES NOT COVER DEFECTS OR DAMAGES TO YOUR
WATCH:
1) after the warranty period expires;
2) if the watch was not originally purchased from an authorized Timex
retailer;
3) from repair services not performed by Timex;
4) from accidents, tampering or abuse; and
5) lens or crystal, strap or band, watch case, attachments or battery.
Timex may charge you for replacing any of these parts.
MB:
MB stands for millibars, which is a metric unit for measuring air pres-
sure. One millibar is equal to .0295 inches of mercury.
Sea Level Pressure:
Air pressure for a specific location adjusted for difference in the altitude of a location. Typically, local pressure will be lower than
sea level pressure because air pressure decreases with altitude.
Split:
Split time records the total elapsed time since the beginning of your
current activity.
Taking a lap or split:
When you take a lap or split, the chronograph records
the time for the current segment and automatically begins timing a new
one.
True North:
The geographic north pole where all longitude lines meet. Maps
are laid out with true north at the top. The difference between true north and
magnetic north is used to calculate the declination angle used by the
watch’s compass.
44
Page 26

47
E
BAND OR ANY OTHER ARTICLE OF PERSONAL VALUE IN YOUR SHIPMENT.
For the U.S., please call 1-800-328-2677 for additional warranty informa-
tion. For Canada, call 1-800-263-0981.For Brazil, call 0800-168787. For
Mexico, call 01-800-01-060-00. For Central America, the Caribbean,
Bermuda and the Bahamas, call (501) 370-5775 (U.S.). For Asia, call 8522815-0091. For the U.K., call 44 020 8687 9620. For Portugal, call 351
212 946 017. For France, call 33 3 81 63 42 00. For Germany/ Austria,
call +43 662 88921 30. For the Middle East and Africa, call 971-4-
310850. For other areas, please contact your local Timex retailer or Timex
distributor for warranty information. In Canada, the U.S. and in certain
other locations, participating Timex retailers can provide you with a
postage-paid, pre-addressed Watch Repair Mailer for your convenience in
obtaining factory service.
©2008 Timex Group USA, Inc. TIMEX E Logo, EXPEDITION and NIGHTMODE are registered trademarks of Timex Group USA, Inc. INDIGLO is a
registered trademark of Indiglo Corporation in the U.S. and other countries. WS4 is a trademark of Timex Group B.V.
THIS WARRANTY AND THE REMEDIES CONTAINED HEREIN ARE EXCLUSIVE
AND IN LIEU OF ALL OTHER WARRANTIES,EXPRESS OR IMPLIED, INCLUDING ANY IMPLIED WARRANTY OF MERCHANTABILITY OR FITNESS FOR
PARTICULAR PURPOSE.TIMEX IS NOT LIABLE FOR ANY SPECIAL, INCIDENTAL OR CONSEQUENTIAL DAMAGES. Some countries and states do not
allow limitations on implied warranties and do not allow exclusions or
limitations on damages, so these limitations may not apply to you. This
warranty gives you specific legal rights and you may also have other
rights which vary from country to country and state to state.
To obtain warranty service, please return your watch to Timex, one of its
affiliates or the Timex retailer where the watch was purchased, together
with a completed original Watch Repair Coupon or, in the U.S. and Canada
only, the completed original Watch Repair Coupon or a written statement
identifying your name, address, telephone number, and date and place of
purchase. Please include the following with your watch to cover postage
and handling (this is not a repair charge): a US $8.00 check or money
order in the U.S.; a CAN $7.00 cheque or money order in Canada; and a
UK £2.50 cheque or money order in the U.K. In other countries, Timex will
charge you for postage and handling. NEVER INCLUDE A SPECIAL WATCH-
46
Page 27

TABLE DES MATIÈRES
INTRODUCTION . . . . . . . . . . . . . . . . . . . . . . . . . . . . . . . . . . . . . . . 53
LA MONTRE TIMEX
®
EXPEDITION®WS4™. . . . . . . . . . . . . . . . . . . 55
FONCTIONS DE LA MONTRE . . . . . . . . . . . . . . . . . . . . . . . . . . . . . 56
Heure . . . . . . . . . . . . . . . . . . . . . . . . . . . . . . . . . . . . . . . . . . . . 56
Altimètre . . . . . . . . . . . . . . . . . . . . . . . . . . . . . . . . . . . . . . . . . . 56
Baromètre. . . . . . . . . . . . . . . . . . . . . . . . . . . . . . . . . . . . . . . . . 57
Boussole . . . . . . . . . . . . . . . . . . . . . . . . . . . . . . . . . . . . . . . . . . 57
Chronographe . . . . . . . . . . . . . . . . . . . . . . . . . . . . . . . . . . . . . . 58
Minuterie. . . . . . . . . . . . . . . . . . . . . . . . . . . . . . . . . . . . . . . . . . 58
Alarme . . . . . . . . . . . . . . . . . . . . . . . . . . . . . . . . . . . . . . . . . . . 58
DÉMARRAGE RAPIDE . . . . . . . . . . . . . . . . . . . . . . . . . . . . . . . . . . . . . 59
Réglage de l’heure et de la date . . . . . . . . . . . . . . . . . . . . . . . . 59
Étalonner la boussole . . . . . . . . . . . . . . . . . . . . . . . . . . . . . . . . 59
Étalonnage de l’altitude ou du baromètre
et réglage de la météo . . . . . . . . . . . . . . . . . . . . . . . . . . . . . 60
F
48
49
Page 28

MODE D’EMPLOI . . . . . . . . . . . . . . . . . . . . . . . . . . . . . . . . . . . . . . . . 62
MODE HEURE . . . . . . . . . . . . . . . . . . . . . . . . . . . . . . . . . . . . . . . . 62
Régler l’heure et les unités de mesure . . . . . . . . . . . . . . . . . . . 62
Changement de l’affichage . . . . . . . . . . . . . . . . . . . . . . . . . . . . 63
MODE ALTIMÈTRE . . . . . . . . . . . . . . . . . . . . . . . . . . . . . . . . . . . . . 63
Fonctionnement de l’altimètre . . . . . . . . . . . . . . . . . . . . . . . . . . 63
Réglage de l’altitude cible ou de l’alarme d’altitude . . . . . . . . . 65
MODE BAROMÈTRE . . . . . . . . . . . . . . . . . . . . . . . . . . . . . . . . . . . . 68
Fonctionnement du baromètre . . . . . . . . . . . . . . . . . . . . . . . . . 68
TEMPÉRATURE ET PRÉVISIONS MÉTÉOROLOGIQUES . . . . . . . . . . . 70
MODE BOUSSOLE . . . . . . . . . . . . . . . . . . . . . . . . . . . . . . . . . . . . . 72
Étalonner la boussole . . . . . . . . . . . . . . . . . . . . . . . . . . . . . . . . 72
Fonctionnement de la boussole . . . . . . . . . . . . . . . . . . . . . . . . . 76
MODE CHRONO . . . . . . . . . . . . . . . . . . . . . . . . . . . . . . . . . . . . . . . 76
Temps au tour et temps intermédiaires . . . . . . . . . . . . . . . . . . . 78
MODE RÉCAPITULATIF. . . . . . . . . . . . . . . . . . . . . . . . . . . . . . . . . . 79
Récapitulatif des données de l’activité . . . . . . . . . . . . . . . . . . . 79
MODE MINUTERIE . . . . . . . . . . . . . . . . . . . . . . . . . . . . . . . . . . . . . 81
Réglage de la minuterie . . . . . . . . . . . . . . . . . . . . . . . . . . . . . . 82
Fonctionnement de la minuterie . . . . . . . . . . . . . . . . . . . . . . . . 82
MODE ALARME . . . . . . . . . . . . . . . . . . . . . . . . . . . . . . . . . . . . . . . 84
Régler une alarme. . . . . . . . . . . . . . . . . . . . . . . . . . . . . . . . . . . 84
Fonctionnement de l’alarme . . . . . . . . . . . . . . . . . . . . . . . . . . . 85
MODE ÉTALONNAGE . . . . . . . . . . . . . . . . . . . . . . . . . . . . . . . . . . . 86
Réglage et étalonnage de vos points de référence . . . . . . . . . . 88
VEILLEUSE INDIGLO
®
. . . . . . . . . . . . . . . . . . . . . . . . . . . . . . . . . . . 89
GLOSSAIRE . . . . . . . . . . . . . . . . . . . . . . . . . . . . . . . . . . . . . . . . . . 90
GARANTIE INTERNATIONALE TIMEX . . . . . . . . . . . . . . . . . . . . . . . . 93
F
50
51
Page 29

INTRODUCTION
Certains des plus beaux endroits de la planète sont les plus difficiles
à atteindre. Votre nouvelle montre Timex
®
Expedition®WS4™vous aidera à
y parvenir.
Équipée des fonctions indispensables pour les activités de plein air, la montre
WS4
™
est une approche nouvelle des instruments pour l’aventure à porter au
poignet. Le large et grand écran affiche les informations essentielles, visibles
d’un seul coup d’œil, sans avoir besoin de parcourir tous les modes.
La montre WS4
™
utilise des capteurs de pointe qui sont d’une grande
précision doublée d’une interface intuitive avec l’utilisateur. Vous pouvez
compter sur elle pour vous donner toutes les bonnes solutions même
dans des conditions extrêmes. Les premières pages de ce manuel vous
permettront de commencer en quelques minutes. Les suivantes donnent
des informations plus complètes pour une compréhension approfondie de
notre instrument de plein air le plus performant actuellement.
Alors, que vous empruntiez des sentiers, attaquiez des pentes ou grimpiez
en courant vingt-trois étages simplement pour voir si votre altimètre est
vraiment sensible, préparez-vous à une aventure hors des limites.
53
F
52
Page 30
LA MONTRE TIMEX®EXPEDITION®WS4
™
« N’oubliez pas que votre WS4 ne se substitue pas au à votre
capacité de discernement qui s’acquiert avec l’expérience, et la
seule façon d’avoir de l’expérience est d’y consacrer du temps.
Profitez de votre nouvel instrument, gardez toujours à l’esprit
qu’il est comme un chien qui a besoin d’exercices. Emmenez-le
dehors et mettez-le, tout comme vous, à l’épreuve. »
-Conrad Anker
Alpiniste américain réputé
mondialement, ambassadeur
de la marque Timex
®
Expedition
®
55
54
START/SPLIT
(DÉMARRER/TEMPS
INTERMÉDIAIRE)
(+)
BOUTON INDIGLO
®
SET
(RÉGLER)
(DONE)
(VALIDÉ)
MODE
(NEXT)
(SUIVANT)
STOP/RESET
(STOP/REMISE À ZÉRO)
(-)
HEURE DU JOUR>ALTIMÈTRE>BAROMÈTRE
BOUSSOLE>CHRONOGRAPHE>RÉCAPITUALTIF>MINUTERIE>
ALARME>ÉTALONNAGE
INDICATEUR D’ALARME
INDICATEUR DU CHRONOGRAPHE
INDICATEUR DE LA RÉPÉTITION
DU COMPTE À REBOURS DE LA
MINUTERIE
INDICATEUR DU COMPTE À
REBOURS DE LA MINUTERIE
F
Page 31

• Cinq points de référence de l’altitude personnalisables, réglables par
l’utilisateur.
Baromètre
• Mesure les pressions haute, basse et courante tout comme la pression
au niveau de la mer.
• Affiche dans un graphique les changements de la pression au niveau de
la mer.
• Affiche un graphique des prévisions météorologiques.
• Affiche la température en degrés Celsius ou en degrés Fahrenheit.
Boussole
• Comprend l’affichage du cap au format en nombres et avec une aiguille
de boussole numérique.
• Peut être étalonnée à un angle de déclinaison pour une précision
maximale.
FONCTIONS DE LA MONTRE
Heure
• Les heures, les minutes et les secondes s’affichent aux formats 12 ou 24
heures.
• La date s’affiche aux formats MM-JJ ou JJ-MM.
• Deuxième fuseau horaire avec heures, minutes, date et réglages du
format indépendants.
• Carillon horaire (facultatif).
• Bip de bouton (facultatif).
• Deux affichages possibles : numérique ou analogique.
Altimètre
• Affiche les mesures aussi bien en pieds qu’en mètres.
• Mesures l’altitude actuelle, maximale et accumulée.
• Affiche l’ascension et la descente dans un graphique.
• Mesure le temps à l’altitude cible ou au-dessus (en mode Récapitulatif).
• Alarme d’altitude.
57
56
F
Page 32

DÉMARRAGE RAPIDE
Les trois prochaines pages vous donneront les bases dont vous avez besoin
pour préparer votre montre en moins de 5 minutes. Poursuivez votre lecture
pour des instructions complètes.
Réglage de l’heure et de la date
1. Appuyer sur MODE jusqu’à afficher l’heure du jour.
2. Appuyer et tenir SET enfoncé pour commencer.
3. Appuyer sur START/SPLIT (+) ou STOP/RESET (-) pour augmenter ou
diminuer les valeurs de réglage du fuseau horaire, de l’heure, de la
date, des sons et des unités de mesure.
4. Appuyer sur MODE (NEXT) pour se déplacer vers le réglage de l’option
suivante.
5. Appuyer sur SET (DONE) pour terminer.
Étalonner la boussole
Avant d’étalonner la boussole, enlevez la montre, tenez-la dans votre main
et choisissez un angle de déclinaison à partir du tableau pages 73 et 74.
1. Appuyer sur MODE jusqu’ à afficher COMPASS.
2. Appuyer et tenir SET enfoncé pour commencer.
Chronographe
• La fonction chronographe permet de chronométrer jusqu’à 100 heures et
99 tours.
• Possibilité d’afficher en gros chiffres le temps au tour ou le temps
intermédiaire.
• Durant l’utilisation du chronographe, la montre WS4
™
enregistre les
statistiques importantes de l’activité qui peuvent être consultables en
mode Récapitulatif.
Minuterie
Le compte à rebours de la minuterie fonctionne jusqu’à 100 heures avec la
possibilité de répéter le compte à rebours jusqu’à 99 fois.
Alarme
• Choix entre alarmes quotidienne, jours de semaine (lundi au vendredi),
fin de semaine (samedi, dimanche) ou hebdomadaire.
• Alerte de rappel unique si l’alarme est ignorée.
59
58
FRANÇAIS DÉMARRAGE RAPIDE
Page 33

4. Appuyer sur MODE (NEXT) pour commencer le processus de réglage.
5. Appuyer sur START/SPLIT ou STOP/RESET (-) pour augmenter ou diminuer les valeurs.
6. Appuyer sur MODE (NEXT) pour se déplacer vers le réglage de l’option
suivante.
7. Appuyer sur SET (DONE) pour terminer.
8. Pour étalonner l’altimètre ou le baromètre aux données présélectionnées, tenir STOP/RESET enfoncé jusqu’à ce que la montre bipe.
Une fois que vous avez réglé l’altitude ou le baromètre, alors vous aurez
besoin de synchroniser l’icône de la météo aux conditions météorologiques
courantes.
1. Dans le mode CAL, appuyer sur SET pour commencer l’étalonnage.
2. Appuyer sur START/SPLIT (+) ou STOP/RESET (-) pour faire défiler
jusqu’à WEATHER.
3. Appuyer sur MODE (NEXT) pour commencer le processus de réglage.
4. Appuyer sur START/SPLIT (+) ou STOP/RESET (-) pour faire défiler les
options de la météo.
5. Appuyer sur SET (DONE) pour terminer.
3. Poser la montre à plat avec le cadran tourné vers le haut, lui faire faire
deux tours complets (en comptant au moins 15 secondes par tour
complet) et ensuite appuyer sur MODE.
4. Appuyer sur START/SPLIT (+) ou STOP/RESET (-) pour augmenter ou
diminuer les valeurs qui correspondent à votre angle de déclinaison choisi.
5. Appuyer sur MODE pour se déplacer vers le réglage de l’option suivante.
6. Appuyer sur SET pour terminer.
Si CAL OK s’affiche à la fin du processus d’étalonnage, vous avez réussi
l’étalonnage de votre boussole. Si CAL FAIL s’affiche, répétez le processus
d’étalonnage.
Étalonnage de l’altitude ou du baromètre et réglage de la météo
Vous devrez étalonner l’altimètre (MAN-ALTI) ou le baromètre (BARO) et
l’icône de la météo (WEATHER) avant la première utilisation. Vous devrez
étalonner la montre avec l’information la plus précise dont vous disposez.
1. Appuyer sur MODE jusqu’à afficher CAL.
2. Appuyer et tenir SET enfoncé pour commencer l’étalonnage.
3. Appuyer sur START/SPLIT (+) ou STOP/RESET (-) pour faire défiler les
points de référence de vos réglages et choisir soit MANUAL ALTI soit BARO.
61
60
FRANÇAIS DÉMARRAGE RAPIDE
Page 34

Changement de l’affichage
• Fuseaux horaires : Consultez l’autre fuseau horaire en appuyant sur
START/SPLIT ou passez d’un fuseau à un autre en tenant START/SPLIT
enfoncé.
• En mode Heure du jour, appuyez sur STOP/RESET pour choisir entre les
options d’affichage suivantes : Date, altitude ou pression barométrique.
MODE ALTIMÈTRE
Votre montre vous permet de mesurer les altitudes courante, maximale et
accumulée ainsi que le temps passé à l’altitude cible ou au-dessus. Ce
mode comprend aussi une alarme si vous souhaitez être alerté quand vous
dépassez une altitude de votre choix. Vous devrez étalonner votre altimètre
avant la première utilisation (voir page 60).
Fonctionnement de l’altimètre
Une fois en mode Altimètre, la montre WS4
™
fait défiler automatiquement
les informations suivantes :
• POINT CULMINANT : L’altitude atteinte la plus haute.
• ACC (accumulée) : Le changement total d’altitude, en tenant compte
aussi bien de l’ascension que de la descente.
• CURR (courante) : L’altitude courante.
6. Pour étalonner la météo aux données présélectionnées, tenir
STOP/RESET enfoncé jusqu’à ce que la montre bipe.
MODE D’EMPLOI
MODE HEURE
Votre montre affiche l’heure pour deux fuseaux horaires. Dans ce mode,
vous pouvez également choisir des unités de mesure (exemple : pieds ou
mètres, degrés Fahrenheit ou Celsius) et vous avez le choix entre trois
différentes options d’affichage.
Régler l’heure et les unités de mesure
1. Appuyer sur MODE jusqu’à ce que l’heure du jour s’affiche.
2. Appuyer et tenir SET enfoncé pour commencer.
3. Appuyer sur START/SPLIT (+) ou STOP/RESET (-) pour augmenter ou
diminuer les valeurs du fuseau horaire, de l’heure, de la date, des sons
et des unités de mesure.
4. Appuyer sur MODE (NEXT) pour se déplacer vers le réglage de l’option
suivante.
5. Appuyer sur SET (DONE) pour terminer.
62
63
F
Page 35

Réglage de l’altitude cible ou de l’alarme d’altitude
Le réglage de l’altimètre comprend :
•
Altitude cible :
Si le chronographe fonctionne, la montre mesurera
le temps passé à cette altitude ou au-dessus en mode Récapitulatif.
•
Alarme d’altitude :
Elle vous alerte par une alarme qui apparaît
sur l’écran et qui émet un son que vous avez atteint une altitude
présélectionnée.
« Lorsque l’alarme bipe, vous savez que vous avez atteint
votre altitude réglée. Ce rapide rappel vous permettra
d’évaluer votre condition physique et de décider si vous
REMARQUE : Si pendant une randonnée, vous grimpez 400
mètres et descendez 100 mètres, alors votre altitude
accumulée sera de 300 mètres.
Lorsque la montre atteint l’affichage de l’altitude courante, vous pouvez
également :
Appuyer sur START/SPLIT :
pour voir l’altitude courante
numérique ou afficher le
graphique de l’altitude dans les
dernières 36 heures.
Appuyer sur STOP/RESET :
pour remettre les statistiques
accumulées de l’altimètre à zéro
et effacer la mémoire.
65
64
Altitude cible Alarme d’altitude
F
Page 36

altimètre de +/- 100 mètres même si vous êtes resté au même
endroit. Si possible, étalonnez à nouveau sur une altitude
connue quand un changement radical a eu lieu.
Vous avez seulement besoin d’étalonner le baromètre OU
l’altimètre, puisqu’ils dépendent de la même pression. Voir
le mode Étalonnage en page 86 pour plus d’informations.
« Avant de me pelotonner dans mon sac de couchage, je note
l’altitude courante et la pression barométrique. Si pendant les
quelques heures où je dors, je constate un changement dans
l’altitude ou dans la pression barométrique, je peux avoir une idée
sur les évolutions des conditions météo. Comme il y a une relation
inversée entre l’altitude et la pression barométrique, si à mon réveil
la montre indique la même altitude ou une altitude plus basse, je
peux penser que la pression atmosphérique est restée constante.
Si lorsque je me lève l’altitude indiquée est supérieure, je dois faire
attention car une zone de basse pression est en train de s’installer. »
-Conrad Anker
Alpiniste américain réputé mondialement
êtes sur la voie d’une ascension réussie. »
-Conrad Anker
Alpiniste américain réputé mondialement
Pour régler l’altitude cible ou l’altitude d’alarme :
1. Appuyer sur MODE jusqu’à afficher ALTI.
2. Appuyer et tenir SET enfoncé pour commencer.
3. Appuyer sur START/SPLIT (+) ou STOP/SET (-) pour augmenter ou diminuer les valeurs.
4. Appuyer sur MODE (NEXT) pour se déplacer vers le réglage de l’option
suivante.
5. Appuyer sur SET (DONE) pour terminer.
REMARQUE : L’altimètre s’affichera soit en FT (pieds) soit en M
(mètres) selon l’unité d’affichage que vous avez choisie en
mode Heure. Voir page 62 pour les informations concernant le
réglage des unités de mesure.
ATTENTION : Votre altimètre est sensible au changement de la
météo ! Les brusques changements de la pression
barométrique peuvent changer les informations de votre
67
66
F
Page 37

Lorsque la montre atteint l’affichage barométrique courant, vous pouvez
également :
Appuyer sur START/SPLIT : pour
afficher l’information
barométrique courante numérique
ou afficher le graphique de la
pression au niveau de la mer
dans les dernières 36 heures.
Appuyer sur STOP/RESET :
Remettre les statistiques
accumulées du baromètre à
zéro et effacer la mémoire.
REMARQUE : Le baromètre s’affichera soit en MB (millibars)
soit en In Hg (pouces de mercure) selon l’unité d’affichage que
vous avez choisie en mode Heure. Voir page 62 pour les
informations concernant le réglage des unités de mesure.
Vous avez seulement besoin d’étalonner le baromètre OU
l’altimètre, puisqu’ils dépendent de la même pression. Voir
le mode Étalonnage en page 86 pour plus d’informations.
69
MODE BAROMÈTRE
Votre montre comprend des informations sur la pression courante et celle
au niveau de la mer, les informations barométriques haute et basse et les
changements survenus dans la pression au niveau de la mer dans
les dernières 36 heures. Ces fonctions sont utiles pour comprendre les
changements météorologiques.
Fonctionnement du baromètre
Une fois en mode BARO, la montre fait défiler automatiquement les
informations suivantes :
• Pression barométrique la plus haute atteinte.
• Pression barométrique la plus basse.
• Pression barométrique courante et pression au niveau de la mer corrigée.
68
F
Page 38

71
REMARQUE : Pour des informations plus précises sur la
température, essayez de porter la montre sur votre veste ou
attachée à votre ceinture (l’idéal serait un endroit qui ne soit
pas exposé en permanence au soleil). Vous pouvez aussi
l’enlever de votre poignet et la mettre à l’ombre pendant
15 ou 30 minutes.
Pour plus d’informations sur l’étalonnage de l’icône de la météo voir le
mode Étalonnage à la page 86.
TEMPÉRATURE ET PRÉVISIONS MÉTÉOROLOGIQUES
En modes HEURE, ALTI, BARO, CHRONO et MINUTERIE,votre montre WS4
™
donne des informations sur la température et les prévisions
météorologiques.
La montre peut prévoir la météo pour la période à venir de 4 à 6 heures sur
la base de l’évolution de la pression atmosphérique au cours des douze
dernières heures. En général, si la pression atmosphérique augmente, on
estime que les conditions météo s’améliorent, ce qui est représenté par
l’icône du soleil. Si la pression atmosphérique chute, alors les conditions
météo empirent, ce qui est représenté par les icônes des nuages et/ou des
précipitations.
Lorsque la montre est portée à votre poignet, les informations du
thermomètre sont influencées par la chaleur corporelle et peuvent différer
de la température ambiante réelle de 10 degrés ou plus. Les longues
périodes d’exposition directe au soleil peuvent aussi avoir une incidence sur
la précision. La montre peut également mesurer la température dans l’eau,
prenez garde de n’appuyer sur aucun bouton de la montre, car cela
pourrait compromettre l’étanchéité de celle-ci.
70
F
P
P
Page 39

Avant d’étalonner la boussole, enlevez la montre de votre poignet, tenez-la
dans votre main et choisissez un angle de déclinaison à partir du tableau
ci-dessous.
VILLE ANGLE DE DÉC. VILLE ANGLE DE DÉC.
Amsterdam 0° O Chicago 3° O
Anchorage 19° E Dallas 3° E
Auckland 18° E Denver 9° E
Beijing 3° O Dubayy 1° E
Berne 0° E Hong Kong 2° O
Bogota 5° O Jérusalem 3° E
Bozeman 13° E Londres 1° O
Buenos Aires 8° O Los Angeles 12° E
Calgary 15° E Madrid 1° O
Capetown 23° O Mexico 5° O
Moscou 10° O Riyad 2° E
Mt. Everest 0° O Rome 1° E
73
MODE BOUSSOLE
La montre WS4™possède une boussole numérique précise qui prend des
informations toutes les secondes quand elle est en marche et indique les
données de la boussole avec un nombre et un point cardinal en même
temps qu’une aiguille de boussole virtuelle. Vous devez étalonner la boussole avant de l’utiliser la première fois et c’est aussi une bonne idée de
l’étalonner régulièrement pour avoir toujours des informations précises.
Pour plus d’informations, voir la rubrique mode Étalonnage à la page 86.
Étalonner la boussole
Quand vous utilisez la boussole, il est important de garder votre poignet
en position horizontale pour permettre à la boussole de fournir des
informations plus précises.
Pour avoir des informations précises, évitez d’étalonner la
boussole près de grands objets métalliques (tels que des
produits électroniques, des voitures, des armoires classeurs
et toute autre chose en métal, étant donné que la force
magnétique de ces objets peut interférer avec le champ
magnétique et vous donner des informations inexactes. Notez que l’option
veilleuse Indiglo
®
ne marche pas pendant l’étalonnage de la boussole.
72
continue à la page suivante
F
Page 40

Une fois que vous connaissez l’angle de déclinaison :
1. Appuyer sur MODE jusqu’à afficher COMPASS.
2. Tenir SET enfoncé pour démarrer.
3. Poser la montre à plat avec le cadran tourné vers le haut, lui faire
faire deux tours complets (en comptant au moins 15 secondes par
tour complet) et ensuite appuyer sur MODE.
4. Appuyer sur START/SPLIT ou STOP/RESET pour augmenter ou diminuer les valeurs qui correspondent à votre angle de déclinaison choisi.
5. Appuyer sur MODE pour se déplacer vers le réglage de l’option
suivante.
6. Appuyer sur SET pour terminer.
Si CAL OK s’affiche à la fin du processus d’étalonnage, vous avez
réussi l’étalonnage de votre boussole. Si CAL FAIL s’affiche, répéter le
processus d’étalonnage.
ATTENTION : L'étalonnage peut échouer si vous tournez la
montre trop rapidement ou si vous mettez plus d'une
minute pour effectuer l'opération. L'étalonnage peut aussi
échouer s'il y a près de vous des objets magnétiques.
VILLE ANGLE DE DÉC. VILLE ANGLE DE DÉC.
Mumbai
(Bombay) 0° O Seattle 17° E
Munich 1° E Séoul 7° O
New York 12° O Sydney 12° E
Orlando 5° O Tokyo 6° O
Oslo 1° E Toronto 10° O
Paris 0° O Vancouver 17° E
Reykjavik 15° O Varsovie 4° E
Rio de Janeiro 22° O Washington DC 10° O
Pour les villes qui ne sont pas dans le tableau ci-dessus, vous pouvez
trouver l’angle de déclinaison en utilisant le calculateur d’angles à l’adresse
URL indiquées ci-dessous (site en anglais). Notez que vous aurez besoin de
connaître la latitude et la longitude de l’endroit où vous vous trouvez avant
de calculer l’angle de déclinaison sur ce site. Les informations sur la
latitude et la longitude peuvent être trouvées sur Internet.
http://www.ngdc.noaa.gov/geomagmodels/struts/calcDeclination
75
74
F
Page 41

77
La plupart des boutons de la montre ont plusieurs fonctions en mode
Chrono. Utilisez le tableau en même temps que votre montre pour explorer
ces fonctions.
Fonctionnement de la boussole
Après avoir étalonné votre boussole, le cap courant de la boussole, les
points cardinaux et l’aiguille numérique de la boussole s’afficheront quand
vous êtes en mode Boussole. Après 30 secondes, les informations de la
boussole se mettent en pause et disparaissent de l’affichage pour prolonger
la durée de vie de la batterie. Appuyez sur START/SPLIT pour afficher le cap
actuel pendant 30 autres secondes.
CONSEIL PRATIQUE : Votre montre sera un formidable outil
pour l’orientation. Vous pouvez utiliser votre boussole pour
passer d’un point de répère à un autre et si vous participez à
une course d’orientation vous pouvez vous chronométrer en
utilisant le chronographe (voir section suivante).
MODE CHRONO
Votre montre comprend un chronographe qui a une fonction de
chronomètre. Le chrono peut enregistrer jusqu’à 100 heures et 99 tours.
Les données que vous recueillez pendant que le chronographe fonctionne
peuvent être utilisées pour consulter vos progrès en mode Récapitulatif.
(Voir page 79 pour plus d’informations sur le mode Récapitulatif).
76
BOUTON FONCTIONS
MODE
• Entrer ou quitter le mode.
• Affichage rapide du tour ou du temps
intermédiaire après avoir appuyé sur START/
SPLIT quand le chronographe fonctionne.
STOP/RESET
• Arrêter le chronographe.
• Passer de l’altimètre au baromètre (si le
chronographe est à 00:00:00).
START/SPLIT
• Démarrer le chronographe.
• Marquer un temps au tour ou un temps
intermédiaire.
SET
• Échanger les positions d’affichage du temps
au tour et du temps intermédiaire.
F
Page 42

79
Quand le chrono fonctionne, une barre s’affiche en modes
chrono et heure du jour au-dessus de l’icône de chronographe.
ATTENTION : Pour prolonger la durée de vie de la batterie de
votre montre, lorsque le chronographe atteint 100 heures, la
montre s’arrêtera de chronométrer et le bouton START/SPLIT ne
fonctionnera plus.
MODE RÉCAPITULATIF
Le mode Récapitulatif de l’activité de la montre recueille les moyennes
basse, haute et d’aventure. Les statistiques de l’activité sont enregistrées
pendant que le chronographe fonctionne et sont ensuite consultables en
mode Récapitulatif.
Récapitulatif des données de l’activité
1. Appuyer sur MODE jusqu’à afficher REVIEW.
2. Appuyer sur START/SPLIT pour faire défiler les données.
3. Appuyer et tenir STOP/RESET enfoncé pour effacer le récapitulatif de
l’information la plus récente après avoir terminé de le consulter.
REMARQUE : Votre chronographe peut être un excellent outil pour
le vélo tout terrain, le ski ou la randonnée. Vous pouvez prendre
des temps intermédiaires à des points précis de votre sentier tout
le long de la randonnée, consulter régulièrement votre altimètre
pour voir à combien vous êtes monté ou descendu et même
vérifier le baromètre pour être certain que le mauvais temps
n’approche pas. Une fois que vous avez terminé, vous pouvez
consulter les informations de votre activité en mode Récapitulatif.
Temps au tour et temps intermédiaires
Lorsque l’on parle de temps au tour, il s’agit du temps pour un segment
particulier de votre activité. Le temps intermédiaire au tour est le temps
total du segment courant.
78
F
Page 43

81
CONSEIL PRATIQUE : Vous pouvez utiliser le mode Récapitulatif
pour revivre votre randonnée sur le chemin du retour. Faites
défiler les statistiques de votre activité pour montrer à vos amis
à quelle hauteur vous êtes monté, combien de temps vous avez
passé au-dessus de votre altitude cible et même les changements de température tout le long de votre randonnée. Encore
mieux, vous pouvez leur montrer ces informations à partir d’une
série de graphiques qui indiquent les changements d’altitude, de
pression barométrique et de température qui se sont produits.
REMARQUE : Appuyer et tenir START/SPLIT enfoncé pour faire
défiler rapidement les données.
ATTENTION : Vous verrez le message NO DATA STORED (PAS DE
DONNÉES ENREGISTRÉES) si le chronographe n’a jamais été activé.
MODE MINUTERIE
Votre montre WS4™possède un compte à rebours standard que vous
pouvez utiliser aussi bien pour les activités de plein air que pour celles
d’intérieur. Il peut compter à rebours d’un temps déterminé jusqu’à 100
heures et répéter un compte à rebours jusqu’à 99 fois.
Les données suivantes sont stockées en mode Récapitulatif :
• Altitude maximale
• Altitude minimale
• Ascension totale
• Descente totale
• Temps passé à l’altitude cible ou au-dessus
• Graphique de l’altitude
• Pression barométrique la plus haute
• Pression barométrique la plus basse
• Pression barométrique moyenne
• Graphique de la pression au niveau de la mer
• Température la plus haute
• Température la plus basse
• Température moyenne
• Graphique de la température
80
F
Page 44

83
votre minuterie pour se répéter à la fin du compte à rebours, elle se répétera
jusqu’à ce que vous appuyiez sur STOP/RESET.R et un nombre s’afficheront
pour indiquer que la minuterie se répète et combien de fois elle se répète.
CONSEIL PRATIQUE : La minuterie peut être utile lorsque vous
voulez être prévenu au milieu d’une activité. Par exemple, vous
sortez en sachant que vous n’avez que deux heures pour faire
votre randonnée. Vous réglez la minuterie pour 60 minutes et
lorsqu’elle bipe, vous savez qu’il est temps de faire demi-tour et
de retourner vers le point de départ de votre marche. L’information
de la minuterie n’est pas connectée au mode Récapitulatif.
REMARQUE : Lorsque vous réglez la minuterie, faites défiler
rapidement les valeurs en tenant START/SPLIT (+) ou
STOP/RESET (-) enfoncé .
Quand la minuterie fonctionne, une barre s’affiche en modes
minuterie et heure du jour au-dessus de l’icône de la minuterie.
Si la minuterie est réglée pour se répéter, une barre s’affiche
au-dessus de l’icône de la minuterie avec une flèche.
Réglage de la minuterie
1. Appuyer sur MODE jusqu’à afficher TIMER.
2. Appuyer et tenir SET enfoncé pour commencer.
3. Appuyer sur START/SPLIT (+) ou STOP/RESET (-) pour augmenter
ou diminuer les valeurs des heures, des minutes et des secondes et de
l’action finale.
4. Appuyer sur MODE (NEXT) pour se déplacer vers le réglage de la
fonction suivante.
5. Appuyer sur SET (DONE) pour terminer.
Fonctionnement de la minuterie
1. Appuyer sur START/SPLIT pour démarrer la minuterie ou la redémarrer
après une pause.
2. Appuyer sur STOP/RESET pour arrêter le compte à rebours.
3. Tenir STOP/RESET enfoncé pour remettre la minuterie à la valeur de
départ.
4. Tenir STOP/RESET enfoncé encore une fois pour effacer la minuterie et
la remettre à 0.
Quand le compte à rebours atteint zéro la montre émettra un bip. Vous pouvez appuyer sur n’importe quel bouton pour arrêter le bip. Si vous avez réglé
82
F
Page 45

85
Fonctionnement de l’alarme
Pour allumer ou éteindre une alarme sans démarrer le processus de
réglage, appuyer sur START/SPLIT lorsque vous entrez dans le MODE
ALARME. L’alarme sonnera 20 secondes quand elle atteindra le temps
programmé. Appuyer sur n’importe quel bouton pour éteindre l’alarme.
L’alarme unique de rappel sonnera après 5 minutes si vous ne l’éteignez
pas la première fois quelle sonne.
« L’alarme est peut être la fonction la plus élémentaire sur la
montre WS4
™
. Tout en étant simple, elle joue un rôle très important
sur l’ensemble de l’expédition. Il est réconfortant d’entendre
l’alarme me réveiller à 2 heures du matin. Ces heures avant le
lever du jour sont les meilleures de la journée. Le crissement de
la neige dure sous le pied, quelques étoiles s’effaçant avec l’aube
et le rythme de la cadence de vos partenaires sont les éphémères
moments de l’expérience d’une expédition.»
-Conrad Anker
Alpiniste américain réputé mondialement
MODE ALARME
La montre WS4™a une alarme que vous pouvez régler pour sonner une fois,
au même moment tous les jours, seulement les fins de semaine ou même
un seul jour de la semaine.
Régler une alarme
1. Appuyer sur MODE jusqu’à afficher ALARM.
2. Appuyer et tenir SET enfoncé pour commencer.
3. Appuyer sur START/SPLIT (+) ou STOP/RESET (-) pour augmenter ou
diminuer les valeurs des heures, des minutes, AM/PM (matin/soir) et le
type de l’alarme.
4. Appuyer sur MODE (NEXT) pour se déplacer vers le réglage de la
fonction suivante.
5. Appuyer sur SET (DONE) pour terminer.
REMARQUE : Lorsque vous réglez votre alarme, vous l’allumez
automatiquement.
84
F
Page 46

87
l’étalonnage le plus précis sera l’altitude. Si vous ne connaissez
pas votre altitude, vous pouvez trouver la pression courante
au niveau de la mer (publiée en ligne ou dans le journal) et
étalonner le capteur à la pression barométrique.
La montre a cinq points de référence de l’altitude (RÉFÉRENCE HOME
(MAISON), RÉFÉRENCE BASE 1, RÉFÉRENCE BASE 2,RÉFÉRENCE BASE 3 et
RÉFÉRENCE MAN-ALT) ce qui vous permet de régler l’altitude d’un endroit
connu à l’avance et d’étalonner à nouveau votre montre à ce point avec une
seule pression sur un bouton.
REMARQUE : Lorsque vous réglez l’alarme, faites défiler rapidement les valeurs en tenant START/SPLIT (+) ou STOP/RESET
(-) enfoncé.
— La valeur AM/PM (matin/après-midi) s’affichera seulement si
vous avez réglé la montre au format 12 heures.
Quand l’alarme est programmée, une barre s’affiche en modes
alarme et heure du jour au-dessus de l’icône de l’alarme.
MODE ÉTALONNAGE
La montre WS4™a la possibilité de prendre des mesures extrêmement
précises. Vous devrez étalonner soit l’altimètre (MANUAL-ALTI), soit le
baromètre (BARO) et l’icône de la météo (WEATHER) avant la première
utilisation. Et, tout comme pour tout instrument de précision, vous devrez
l’étalonner régulièrement pour maintenir sa précision.
REMARQUE : Pour une meilleure précision, choisissez la
méthode d’étalonnage basée sur la source de référence
disponible la plus précise. Par exemple, si vous êtes au départ
d’un sentier et que vous connaissez la bonne altitude, alors
86
MAISON
(HOME 1 ALTI)
(exemple :
800 m)
DÉPART DU SENTIER
(BASE 1 ALTI)
(1200 m)
POINT CULMINANT
(BASE 2 ALTI)
(2000 m)
GÎTE
(BASE 3 ALTI)
(1000 m)
EXEMPLE : RANDONNÉE FAVORITE
F
Page 47

89
Remarque : Utilisez l’altitude manuelle (MAN-ALT) pour un
nouvel étalonnage manuel unique. Utilisez l’altitude de la
maison et des bases 1, 2, 3 pour stocker des points de
référence d’altitude qui seront utilisés plusieurs fois.
Remarque : Si vous avez déjà saisi un point de référence, vous
pouvez rapidement sélectionner ce point de référence et tenir
STOP/RESET enfoncé pour étalonner rapidement.
VEILLEUSE INDIGLO
®
En n’importe quel mode, lorsque vous appuyez sur le bouton INDIGLO®,
l’écran de la montre s’allumera pour une lecture plus facile. Vous pouvez
aussi activer la fonction Night-Mode
®
en appuyant et tenant le bouton
INDIGLO
®
enfoncé jusqu’à ce que vous entendiez un bip. Night-Mode®est
une fonction très utile dans des conditions de faible lumière, car elle vous
permet d’appuyer sur n’importe quel bouton de la montre pour l’éclairer
pendant 2 ou 3 secondes. Une fois activée, la fonction Night-Mode
®
reste
active pendant 7 ou 8 heures. Si vous souhaitez la désactiver avant que les
7 ou 8 heures ne soient écoulées, appuyer et tenir le bouton INDIGLO
®
enfoncé jusqu’à ce que vous entendiez un bip.
ATTENTION : Les brusques changements de la pression
barométrique peuvent avoir une influence sur les informations
de votre altimètre. Si possible, étalonnez à nouveau sur une
altitude connue quand un changement radical a eu lieu.
Réglage et étalonnage de vos points de référence
1. Appuyer sur MODE jusqu’à afficher CAL.
2. Tenir SET enfoncé pour commencer l’étalonnage.
3. Appuyer sur START/SPLIT (+) pour faire défiler les points de références
(HOME ALTI, BASE 1 ALTI, BASE 2 ALTI, BASE 3 ALTI, MANUAL ALTI, BARO
et WEATHER).
4. Appuyer sur MODE (NEXT) pour commencer le processus de réglage.
5. Appuyer sur START/SPLIT (+) ou STOP/RESET (-) pour augmenter ou
diminuer les valeurs.
6. Appuyer sur MODE (NEXT) pour se déplacer vers le réglage de la
fonction suivante.
7. Appuyer sur SET (DONE) pour terminer.
8. Une fois que vous êtes à cet endroit, appuyez et tenez STOP/RESET
enfoncé pour sélectionner et étalonner à ce point de référence en mode
CAL. Lorsque la montre émet un bip, l’étalonnage est terminé.
88
F
Page 48

91
Chronographe :
Le chronographe enregistre des segments de temps
pendant la durée de votre activité.
Déclinaison :
Pour prendre en compte la différence entre le vrai nord et le
nord magnétique, une boussole utilise un réglage d’angle de déclinaison.
Les déclinaisons de l’ouest sont soustraites du cap calculé de la boussole
alors que celles de l’est sont ajoutées. Voir le tableau pages 73 et 74 pour
avoir la liste des déclinaisons des principales villes du monde.
Numérique :
Lorsqu’il s’agit d’une montre, numérique signifie que l’heure
est indiquée en chiffres.
ln Hg :
ln Hg correspond à un pouce de mercure qui est l’unité de mesure pour
la pression atmosphérique. Un pouce de mercure est égal à 33.86 millibars.
Tour :
Le temps au tour enregistre le temps ou la durée de chaque segment
de votre activité.
Nord magnétique :
La direction du pôle magnétique de la terre et la direction
indiquée par l’aiguille de la boussole sont différents du vrai nord (voir
ci-dessous). La différence entre le vrai nord et le nord magnétique sert à
calculer l’angle de déclinaison utilisé par la boussole de la montre.
GLOSSAIRE
Ce glossaire donne les définitions de certaines caractéristiques et fonctions
de la montre décrites tout le long de ce manuel.
Altimètre :
Un instrument utilisé pour déterminer l’altitude d’un objet par
rapport à un niveau fixé. Généralement, l’altitude est mesurée par rapport
au niveau de la mer.
Analogique :
Lorsqu’il s’agit d’une montre, analogique signifie que l’heure
est indiquée par des aiguilles.
Baromètre :
Un baromètre mesure la pression atmosphérique et peut aider
à prévoir les changements de la météo.
Pression barométrique :
La pression atmosphérique est liée aux prévisions
météorologiques. Une haute pression indique normalement un temps chaud
et clair alors qu’une basse pression indique généralement un temps
nuageux et un grand risque de précipitations.
Étalonnage :
Une technique pour améliorer la précision de la boussole, de
l’altimètre, du baromètre et des prévisions météorologiques essentiellement en compensant pour les conditions locales.
90
F
Page 49

93
GARANTIE INTERNATIONALE TIMEX
(GARANTIE LIMITÉE AUX ÉTATS-UNIS)
Votre montre TIMEX
®
est garantie contre les défauts de fabrication par
Timex Group USA, Inc. pour une période d’UN AN, à compter de la date
d’achat. Timex ainsi que ses filiales du monde entier honoreront cette
Garantie Internationale.
Timex se réserve le droit de réparer votre montre en y installant des
composants neufs ou révisés, ou bien de la remplacer par un modèle
identique ou similaire.
IMPORTANT — CETTE GARANTIE NE COUVRE PAS LES DÉFAUTS OU
L’ENDOMMAGEMENT DE VOTRE MONTRE :
1) après l’expiration de la période de garantie ;
2) si la montre n’a pas été achetée chez un revendeur Timex agréé ;
3) si la réparation n’a pas été faite par Timex ;
4) s’il s’agit d’un accident, d’une falsification ou d’un abus ;
5) s’il s’agit du verre ou cristal, du bracelet, du boîtier, des
accessoires ou de la pile. Le remplacement de ces pièces peut
vous être facturé par Timex.
MB :
MB signifie millibars qui est une unité métrique utilisée pour mesurer la
pression atmosphérique. Un millibar est égal à 0,0295 pouces de mercure.
Pression au niveau de la mer :
La pression atmosphérique à un endroit
particulier ajusté à la différence d’altitude d’un endroit. Généralement, la
pression locale sera plus basse que la pression au niveau de la mer, car la
pression atmosphérique décroît avec l’altitude.
Intermédiaire :
Le temps intermédiaire est la durée totale écoulée depuis le
début de l’activité en cours.
Marquer un temps au tour ou un temps intermédiaire :
Quand vous prenez
un temps au tour ou un temps intermédiaire, le chronographe enregistre le
temps pour le segment courant et commence à chronométrer automatiquement un nouveau tour.
Le vrai nord :
Le pôle nord géographique se trouve là où toutes les
longitudes se retrouvent. Les cartes indiquent le vrai nord en haut.
La différence entre le vrai nord et le nord magnétique sert à calculer
l’angle de déclinaison utilisé par la boussole de la montre.
92
F
Page 50

95
(É.-U.), de 7,00 $CAN pour le Canada et de 2.50 £UK pour le RoyaumeUni. Pour les autres pays, Timex vous demandera de couvrir les frais de
poste et de manutention. N’INCLUEZ JAMAIS DANS VOTRE ENVOI UN
BRACELET SPÉCIAL OU TOUT AUTRE ARTICLE AYANT UNE VALEUR
PERSONNELLE.
Aux É.-U. veuillez composer le 1-800-328-2677 pour plus de renseignements sur la garantie. Au Canada, composer le 1-800-263-0981.
Au Brésil, composer le 0800-168787. Au Mexique,composer le 01-80001-060-00. En Amérique centrale, les Caraïbes, les Bermudes et les
Bahamas, composer le (501) 370-5775 (É.-U.). En Asie,composer le 8522815-0091. Au R.U., composer le 44 020 8687 9620.Au Portugal, composer le 351 212 946 017. En France, composer le 33 3 81 63 42 00.En
Allemagne/Autriche, composer le +43 662 88921 30. Au Moyen-Orient et
en Afrique, composer le 971-4-310850. Dans les autres régions,veuillez
contacter votre détaillant ou distributeur Timex pour des renseignements
sur la garantie. Au Canada, aux É.-U. et dans certains autres endroits, les
détaillants Timex participants peuvent vous faire parvenir un emballage
pré-adressé et pré-affranchi pour vous faciliter l’envoi de la montre à
l’atelier de réparation.
CETTE GARANTIE AINSI QUE LES RECOURS PRÉVUS DANS LES
PRÉSENTES SONT EXCLUSIFS ET REMPLACENT TOUTE AUTRE GARANTIE
EXPRESSE OU IMPLICITE, Y COMPRIS TOUTE GARANTIE IMPLICITE DE
QUALITÉ MARCHANDE ET D’ADAPTATION À UN USAGE PARTICULIER.
TIMEX N’EST RESPONSABLE D’AUCUN DOMMAGE PARTICULIER, ACCESSOIRE OU INDIRECT.Certains pays ou États n’autorisent pas les limitations
de garanties implicites et n’autorisent pas les exclusions ou limitations
pour des dommages, auquel cas lesdites limitations pourraient ne pas
vous concerner.Cette garantie vous confère des droits légaux précis. Il se
peut que vous bénéficiez d’autres droits, lesquels varient d’un pays à un
autre ou d’un États à un autre.
Pour obtenir le service de garantie, veuillez retourner votre montre à
Timex, à une de ses filiales ou au détaillant Timex où la montre a été
achetée. Inclure un coupon de réparation original dûment rempli ou, aux
É-U. et au Canada seulement, le coupon original dûment complété ou une
déclaration écrite comprenant votre nom, adresse, numéro de téléphone
ainsi que la date et le lieu d’achat. Veuillez inclure la somme suivante avec
votre montre pour couvrir les frais de port et de manutention (ce ne sont
pas des frais de réparation) : un chèque ou mandat-poste de 8,00 $US
94
F
Page 51

97
©2008 Timex Group USA, Inc.TIMEX E Logo, EXPEDITION et NIGHT-MODE
sont des marques déposées de Timex Group USA, Inc. INDIGLO est une
marque déposée de Indiglo Corporation aux É. U. et dans d’autres pays.
WS4 est une marque déposée de Timex Group B.V.
96
F
Page 52

ÍNDICE
INTRODUCCIÓN . . . . . . . . . . . . . . . . . . . . . . . . . . . . . . . . . . . . . . 103
FUNCIONES DEL RELOJ TIMEX
®
EXPEDITION® WS4™ . . . . . . . . 105
FUNCIONES DEL RELOJ . . . . . . . . . . . . . . . . . . . . . . . . . . . . . . . . 106
Hora . . . . . . . . . . . . . . . . . . . . . . . . . . . . . . . . . . . . . . . . . . . . 106
Altímetro . . . . . . . . . . . . . . . . . . . . . . . . . . . . . . . . . . . . . . . . . 106
Barómetro. . . . . . . . . . . . . . . . . . . . . . . . . . . . . . . . . . . . . . . . 107
Brújula . . . . . . . . . . . . . . . . . . . . . . . . . . . . . . . . . . . . . . . . . . 107
Cronógrafo . . . . . . . . . . . . . . . . . . . . . . . . . . . . . . . . . . . . . . . 108
Temporizador . . . . . . . . . . . . . . . . . . . . . . . . . . . . . . . . . . . . . 108
Alarma . . . . . . . . . . . . . . . . . . . . . . . . . . . . . . . . . . . . . . . . . . 108
INICIO RÁPIDO . . . . . . . . . . . . . . . . . . . . . . . . . . . . . . . . . . . . . . . . . 109
Para programar hora y fecha. . . . . . . . . . . . . . . . . . . . . . . . . . 109
Calibración de la brújula . . . . . . . . . . . . . . . . . . . . . . . . . . . . . 109
Calibración de la altitud o el barómetro y ajustes del clima. . . 110
S
99
98
Page 53

INSTRUCCIONES . . . . . . . . . . . . . . . . . . . . . . . . . . . . . . . . . . . . . . . 112
MODO HORARIO . . . . . . . . . . . . . . . . . . . . . . . . . . . . . . . . . . . . . 112
Programación de la hora y medidas . . . . . . . . . . . . . . . . . . . . 112
Cambio de pantalla . . . . . . . . . . . . . . . . . . . . . . . . . . . . . . . . . 112
MODO ALTÍMETRO. . . . . . . . . . . . . . . . . . . . . . . . . . . . . . . . . . . . 113
Uso del Altímetro. . . . . . . . . . . . . . . . . . . . . . . . . . . . . . . . . . . 113
Programación de la altitud prevista o la alerta de altitud. . . . . 115
MODO BARÓMETRO . . . . . . . . . . . . . . . . . . . . . . . . . . . . . . . . . . 118
Uso del barómetro. . . . . . . . . . . . . . . . . . . . . . . . . . . . . . . . . . 118
TEMPERATURA Y PRONÓSTICO DEL CLIMA . . . . . . . . . . . . . . . . . 120
BRÚJULA. . . . . . . . . . . . . . . . . . . . . . . . . . . . . . . . . . . . . . . . . . . 122
Calibración de la brújula . . . . . . . . . . . . . . . . . . . . . . . . . . . . . 122
Uso de la brújula . . . . . . . . . . . . . . . . . . . . . . . . . . . . . . . . . . . 126
MODO CRONÓGRAFO . . . . . . . . . . . . . . . . . . . . . . . . . . . . . . . . . 126
Tiempos de vuelta e intervalos. . . . . . . . . . . . . . . . . . . . . . . . . 128
MODO REVISIÓN . . . . . . . . . . . . . . . . . . . . . . . . . . . . . . . . . . . . . 129
Revisión de datos de la actividad . . . . . . . . . . . . . . . . . . . . . . 129
MODO TEMPORIZADOR . . . . . . . . . . . . . . . . . . . . . . . . . . . . . . . . 131
Programación del temporizador . . . . . . . . . . . . . . . . . . . . . . . 132
Uso del temporizador . . . . . . . . . . . . . . . . . . . . . . . . . . . . . . . 132
MODO ALARMA . . . . . . . . . . . . . . . . . . . . . . . . . . . . . . . . . . . . . . 134
Programación de la alarma . . . . . . . . . . . . . . . . . . . . . . . . . . . 134
Uso de la alarma . . . . . . . . . . . . . . . . . . . . . . . . . . . . . . . . . . . 135
MODO CALIBRACIÓN . . . . . . . . . . . . . . . . . . . . . . . . . . . . . . . . . . 136
Programación y calibración de los puntos de referencia . . . . . 138
LUZ NOCTURNA INDIGLO
®
. . . . . . . . . . . . . . . . . . . . . . . . . . . . . . 139
GLOSARIO . . . . . . . . . . . . . . . . . . . . . . . . . . . . . . . . . . . . . . . . . . 140
GARANTÍA INTERNACIONAL DE TIMEX . . . . . . . . . . . . . . . . . . . . . 143
SSS
101
100
Page 54

INTRODUCCIÓN
Algunos de los mejores lugares de la tierra son de difícil acceso. Con la
ayuda del nuevo reloj Expedition
®
WS4™de Timex®podrá llegar allá.
Equipado con funciones esenciales para actividades al aire libre, el reloj
WS4
™
tiene características de los instrumentos de pulso más sofisticados
para la vida de aventuras. El tablero grande de pantalla ancha presenta los
datos básicos en un vistazo, sin tener que sortear por los modos.
El reloj WS4
™
utiliza medidores avanzados de gran exactitud, y cuando está
acoplado con las interfases intuitivas del usuario, es muy confiable para
proveer todas las respuestas correctas aún en las condiciones más adversas. Usted estará listo para iniciarlo en cuestión de minutos tras las
primeras páginas de este manual y con las siguientes, obtendrá una comprensión a fondo de nuestro instrumento de aventuras más avanzado.
Por lo tanto, si se va de caminata por terreno irregular, o subiendo ventitrés
pisos sólo para probar lo responsivo del altímetro, prepárese para aventurarse en lo inexplorado.
103
S
102
Page 55

FUNCIONES DEL RELOJ TIMEX®EXPEDITION®WS4
™
“Tenga en cuenta, el WS4 no es un sustituto del buen juicio.
El buen juicio viene con la experiencia, y la única manera de
lograrla es con la práctica. Disfrute de este nuevo instrumento,
pero tenga presente que es como un perrito de compañía que
necesita ejercitarse. Llévelo afuera y junto con usted, comiencen
paso a paso”.
-Conrad Anker
Montañista de fama mundial
Embajador de la marca
Timex
®
Expedition
®
105
104
START/SPLIT
(+)
BOTÓN INDIGLO
®
SET
(programar)
(DONE)
(terminar)
MODE
(NEXT)
(siguiente)
STOP/RESET
(-)
HORA>ALTÍMETRO>BARÓMETRO>BRÚJULA
>CRONO>REVISIÓN>TEMPORIZADOR>ALARMA>CALIBRACIÓN
ALARMA
CRONÓGRAFO
TEMPORIZADOR REPETITIVO
TEMPORIZADOR
S
Page 56

• Alerta de altitud
• Cinco puntos de referencia de altitud, programables por el usuario.
Barómetro
• Registra la presión actual, alta y baja como también la presión a nivel
del mar.
• Presenta gráficamente los cambios de la presión a nivel del mar.
• Presenta gráficamente un pronóstico del clima.
• Presenta la temperatura tanto en Celsius como en Fahrenheit.
Brújula
• Incluye el rumbo tanto en formato numérico como en el de aguja de
brújula digital.
• Puede ser calibrada a determinado ángulo de declinación para máxima
exactitud.
FUNCIONES DEL RELOJ
Hora
• Horas, minutos y segundos en formato de pantalla de 12 ó 24 horas
• Fecha con formato MM-DD (mes-día) ó DD.MM (día-mes)
• Segunda zona horaria con disposición independiente de horas, minutos
y fecha.
• Timbre a cada hora (opcional)
• Sonido al pulsar (opcional)
• Reloj análogo y digital.
Altímetro
• Presenta las medidas tanto en piés como en metros.
• Lleva registro de altitud actual, máxima y acumulada.
• Presenta el ascenso y descenso gráficamente.
• Registra el tiempo a, o sobrepasando la altitud prevista (en modo
Revisión).
107
106
S
Page 57

INICIO RÁPIDO
Las tres páginas siguientes le darán lo básico para iniciar su reloj y ponerlo en marcha en menos de 5 minutos. Continúe la lectura para tener las
instrucciones completas.
Para programar hora y fecha
1. Pulse MODE hasta que aparezca la hora del día.
2. Pulse y sostenga SET para comenzar.
3. Pulse START/SPLIT (+) o STOP/RESET (-) para aumentar o disminuir los
valores establecidos de zona horaria, la hora, fecha, sonidos y unidades
de medida.
4. Pulse MODE (NEXT) para pasar a la siguiente opción de programación.
5. Pulse SET (DONE) para terminar.
Calibración de la brújula
Antes de calibrar, quítese el reloj de la muñeca, sosténgalo en la mano y
elija un ángulo declinación de la tabla en las páginas 123 y 124.
1. Pulse MODE hasta que COMPASS aparezca.
2. Pulse y sostenga SET para comenzar.
Cronógrafo
• Función de cronómetro que contará hasta 100 horas y 99 vueltas.
• Pantalla de tiempo de vuelta o intervalo en dígitos grandes.
• En función de cronógrafo, el reloj WS4
™
registra estadísticas importantes
de actividad que se pueden ver en el modo Revisión.
Temporizador
Contador de cuenta regresiva hasta por 100 horas, con la opción de repetir
el conteo hasta 99 veces.
Alarma
• Elija entre alarma diaria, de días hábiles, de fin de semana o semanal.
• Alerta de respaldo de única vez, si la alarma se ignora.
109
108
ESPAÑOL INICIO RÁPIDO
Page 58

4. Pulse MODE (NEXT) para empezar a programar.
5. Pulse START/SPLIT (+) o STOP/RESET (-) para aumentar o disminuir los
valores establecidos.
6. Pulse MODE (NEXT) para pasar a la siguiente opción de programación.
7. Pulse SET (DONE) para terminar.
8. Para calibrar el altímetro o el barómetro con los datos preseleccionados,
sostenga STOP/RESET hasta que el reloj emita un sonido.
Una vez haya programado la altitud o el barómetro, necesitará sincronizar
el símbolo del clima con las condiciones climáticas del momento.
1. En el modo CAL (calibración), pulse SET para empezar a calibrar.
2. Pulse START/SPLIT (+) o STOP/RESET (-) para pasar a WEATHER (clima).
3. Pulse MODE (NEXT) para empezar a programar.
4. Pulse START/SPLIT (+) o STOP/RESET (-) para explorar las opciones
de clima.
5. Pulse SET (DONE) para terminar.
6. Para calibrar el clima con los datos preseleccionados, sostenga
STOP/RESET hasta que el reloj emita un sonido.
3. Con el reloj nivelado y hacia arriba, gírelo dos veces (tomando al menos
15 segundos por cada vuelta) y luego pulse MODE.
4. Pulse START/SPLIT (+) o STOP/RESET (-) para aumentar o disminuir los
valores establecidos que correspondan al ángulo de declinación elegido.
5. Pulse MODE para pasar a la siguiente opción de programación.
6. Pulse SET para terminar.
Si observa CAL OK al terminar el proceso de calibración, la brújula ha sido calibrada correctamente. Si observa CAL FAIL, repita el proceso de calibración.
Calibración de la altitud o el barómetro y ajustes del clima
Se debe calibrar ya sea el altímetro (MAN-ALTI) o el barómetro (BARO),y el
símbolo del clima (WEATHER) antes del uso por primera vez. El reloj debe
ser calibrado con los datos más exactos disponibles.
1. Pulse MODE hasta que CAL aparezca.
2. Pulse y sostenga SET para iniciar la calibración.
3. Pulse START/SPLIT (+) o STOP/RESET (-) para desplazarse entre los
puntos de referencia establecidos y elegir ya sea MANUAL ALTI
(altímetro manual) o BARO.
111
110
ESPAÑOL INICIO RÁPIDO
Page 59

• Estando en el modo hora del día, pulse STOP/RESET para escoger entre
las siguientes opciones de pantalla: Fecha, altitud o presión barométrica.
MODO ALTÍMETRO
El reloj le permite registrar la altitud actual, la máxima y acumulada como
también el tiempo transcurrido a, o sobrepasando una altitud prevista. Este
modo incluye igualmente una alerta si usted quiere que se le avise cuando
va sobrepasando una altitud elegida. El altímetro debe ser calibrado antes
del primer uso (ver página 136).
Uso del Altímetro
Una vez en el modo Altímetro, el reloj WS4
™
pasa automáticamente por:
• CUMBRE: La máxima altitud alcanzada.
• ACC (accumulada): El cambio de altitud total, incluyendo tanto el ascenso como el descenso.
• CURR (actual): La altitud del momento.
INSTRUCCIONES
MODO HORARIO
El reloj presenta la hora en dos zonas horarias. En esta función, puede elegir las unidades de medida (p.e. piés o metros, fahrenheit o centígrados) y
escoger entre tres opciones de pantalla.
Programación de la hora y medidas
1. Pulse MODE hasta que hora del día aparezca en pantalla.
2. Pulse y sostenga SET para comenzar.
3. Pulse START/SPLIT (+) o STOP/RESET (-) para aumentar o disminuir los
valores establecidos para zona horaria, la hora, fecha, sonidos y
unidades de medida.
4. Pulse MODE (NEXT) para pasar a la siguiente opción de programación.
5. Pulse SET (DONE) para terminar.
Cambio de pantalla
• Zonas horarias: Observe la otra zona horaria pulsando START/SPLIT o
cambie de zona horaria sosteniendo START/SPLIT.
112
113
S
Page 60

Programación de la altitud prevista o la alerta de altitud
La programación del altímetro incluye:
•
Altitud prevista:
Si el cronógrafo está en marcha, el reloj registrará el
tiempo transcurrido a, o sobrepasando esta altitud en el modo Revisión.
•
Alerta de altitud:
Le avisa con una alerta visual en la pantalla y auditiva
cuando usted ha llegado a la altitud preseleccionada.
“Cuando la alerta suena usted se entera que ha llegado a la altitud
establecida. Este recordatorio rápido le permite evaluar su estado
Nota: Si durante una caminata usted sube 400 metros y
desciende 100 metros, su altitud acumulada será entonces de
300 metros.
Cuando el reloj llega a la altitud del momento en la pantalla,
usted tambien puede:
Pulsar START/SPLIT: vea la representación numérica de altitud
o gráfica en pantalla de la altitud
durante las 128 horas previas.
Pulsar STOP/RESET:
vuelva a cero las estadísticas
acumuladas de altitud para
limpiar la memoria.
115
114
Altitud prevista
Alerta de altitud
S
Page 61

lectura del altímetro por más o menos de 100 metros, inclusive si
ha permanecido en el mismo lugar.Si se puede, vuelva a calibrar a
una altitud conocida cuando ocurran cambios drásticos de presión.
Sólo necesita calibrar el barómetro O el altímetro, pues los dos
dependen de la misma presión. Ver el modo Calibración en la
página 136 para más información.
“Antes de enroscarme dentro de mi saco de dormir miro la altitud
del momento y la presión barométrica. Si veo un cambio en la
altitud o presión barométrica durante las pocas horas de sueño,
puedo tener una idea de las próximas condiciones climáticas.
Como existe una relación inversa entre la altitud y la presión
barométrica, si despierto a la misma elevación o más baja puedo
estar seguro de que la presión atmosférica ha permanecido
estable. Si me levanto a un altitud mayor debo estar alerta pues
hay probabilidad de que una baja presión se aproxima”.
-Conrad Anker
Montañista de fama mundial
físico y decidir si está en condiciones para un ascenso favorable”.
-Conrad Anker
Montañista de fama mundial
Para programar la altitud prevista y la alerta de altitud:
1. Pulse MODE hasta llegar a ALTI.
2. Pulse y sostenga SET para comenzar.
3. Pulse START/SPLIT (+) o STOP/RESET (-) para aumentar o disminuir los
valores establecidos.
4. Pulse MODE (NEXT) para pasar a la siguiente opción de programación.
5. Pulse SET (DONE) para terminar.
NOTA: El altímetro será presentado ya sea en FT (piés) o M
(metros) dependiendo de la unidad que escogió para la pantalla
en el modo horario. Ver la página 112 para información sobre
programación de las unidades de medida.
ATENCIÓN: ¡El altímetro responde a los cambios climáticos! Los
cambios repentinos en la presión barométrica pueden cambiar la
117
116
S
Page 62

Cuando el reloj llega a la pantalla barométrica del momento, usted tambien
puede:
Pulsar START/SPLIT: Vea la
representación numérica del
barómetro o gráfica en pantalla
de la presión a nivel del mar
durante las 36 horas previas.
Pulsar STOP/RESET:
Vuelva a cero las estadísticas
acumuladas del barómetro para
limpiar la memoria.
NOTA: El barómetro será presentado ya sea en MB (milibares) ó
In Hg (pulgadas de mercurio) dependiendo de la unidad que
escogió para la pantalla en el modo horario. Ver la página 112
para información sobre programación de las unidades de medida.
Sólo se necesita calibrar el barómetro O el altímetro, pues los
dos dependen de la misma presión. Ver el modo Calibración en
la página 136 para más información.
119
MODO BARÓMETRO
El reloj incluye datos sobre la presión del momento y a nivel del mar,de presión barométrica alta o baja y de cambios de la presión a nivel del mar
durante las últimas 36 horas. Estas características sirven para entender los
cambios climáticos.
Uso del barómetro
Una vez en el modo BARO, el reloj pasa automáticamente por:
• La presión barométrica más alta.
• La presión barométrica más baja.
• La presión barométrica del momento y la presión a nivel del mar
correcta.
118
S
Page 63

121
NOTA: Para una lectura exacta de temperatura,trate de llevar el
reloj por fuera de la chaqueta o enganchado al cinturón o a la
mochila (mejor, en una zona que no esté permanentemente
expuesta al sol). También puede quitarse el reloj de la muñeca y
ponerlo a la sombra durante 15 ó 30 minutos.
Para informarse sobre cómo calibrar el símbolo del clima ver el modo
Calibración en la página 136.
TEMPERATURA Y PRONÓSTICO DEL CLIMA
En los modos TIME, ALTI, BARO, CHRONO, y TIMER, el reloj WS4™incluye
datos de temperatura y pronóstico del clima.
El reloj puede pronosticar el clima para las 4 ó 6 horas siguientes, basándose en la presión atmosférica durante las doce horas previas. Por lo general, si la presión atmosférica está aumentando, se considera que el tiempo está mejorando, y eso se indica mediante el símbolo del sol. Si la presión atmosférica estuviera disminuyendo, se considerará que el tiempo está
desmejorando y eso se indica mediante el símbolo de nubes y/o lluvia.
Cuando se usa el reloj en la muñeca, el calor del cuerpo altera la lectura de
temperatura y podría haber una diferencia de 10 grados o más con la temperatura real. Largos períodos de exposición a la luz directa del sol también
pueden alterar la exactitud. El reloj igualmente mide la temperatura en el
agua, pero hay que asegurarse de no pulsar ningún botón del reloj bajo el
agua porque esto afectará la resistencia del mismo al agua.
120
S
P
P
Page 64

Antes de calibrar, quítese el reloj de la muñeca,sosténgalo en la mano y
elija un ángulo de declinación de la tabla siguiente.
CIUDAD ÁNGULO de D. CIUDAD ÁNGULO de D.
Amsterdam 0° W Chicago 3° W
Anchorage 19° E Dallas 3° E
Auckland 18° E Denver 9° E
Beijin 3° W Dubai 1° E
Berna 0° E Hong Kong 2° W
Bogotá 5° W Jerusalén 3° E
Bozeman 13° E Londres 1° W
Buenos Aires 8° W Los Ángeles 12° E
Calgary 15° E Madrid 1° W
Ciudad del Cabo 23° W México D.F. 5° W
Moscú 10° W Riyadh 2° E
Monte Everest 0° W Roma 1° E
123
BRÚJULA
El reloj WS4™incluye una brújula digital exacta que cuando está activada
toma lecturas a cada segundo y las presenta como un número y un
rumbo cardinal, e igualmente una aguja de brújula virtual. Se debe calibrar la brújula antes de usarse la primera vez e igualmente es buena idea
calibrarla a menudo para mantener lecturas más exactas. Para más información, ver el modo Calibración en la página 136.
Calibración de la brújula
Al usar la brújula es importante mantener la muñeca en posición horizontal, nivelada, para que la lectura de la brújula tenga más precisión.
Para obtener lecturas más exactas, evite calibrar la brújula en la cercanía
de objetos metálicos grandes (como electrónicos, carros,
archivadores y cualquier cosa de metal) puesto que las
fuerzas magnéticas en dichos objetos pueden interferir con
el campo magnético y proporcionar lecturas de la brújula
inexactas. Observe que la luz nocturna Indiglo
®
no funciona
mientras se hace la calibración de la brújula.
122
continúa en la página siguiente
S
Page 65

Cuando ya conozca el ángulo de declinación:
1. Pulse MODE hasta llegar a COMPASS.
2. Sostenga SET pare comenzar.
3. Con el reloj nivelado y hacia arriba, gírelo dos veces (tomando al
menos 15 segundos por cada vuelta) y luego pulse MODE.
4. Pulse START/SPLIT ó STOP/RESET para aumentar o disminuir los
valores establecidos que correspondan al ángulo de declinación
elegido.
5. Pulse MODE para pasar a la siguiente opción de programación.
6. Pulse SET para terminar.
Si observa CAL OK al terminar el proceso de calibración, la brújula ha
sido calibrada correctamente. Si observa CAL FAIL,repita el proceso de
calibración.
ATENCIÓN: La calibración puede fallar si usted gira el reloj
demasiado rápido o se demora más de un minuto para
completarla. La calibración también puede fallar si usted
se encuentra en la cercanía de objetos magnéticos.
CIUDAD ÁNGULO de D. CIUDAD ÁNGULO de D.
Mumbai 0° W Seattle 17° E
Munich 1° E Seúl 7° W
Nueva York 12° W Sydney 12° E
Orlando 5° W Tokio 6° W
Oslo 1° E Toronto 10° W
París 0° W Vancouver 17° E
Reykjavik 15° W Varsovia 4° E
Rio de Janeiro 22° W Washington DC 10° W
Se puede encontrar el ángulo de declinación, de ciudades que no aparecen en la tabla anterior, usando el calculador de ángulo de declinación
en la dirección URL puesta a continuación. Observe que necesitará
saber la latitud y longitud de la localidad antes de que pueda calcular el
ángulo de declinación en este sitio Web. Los datos de latitud y longitud
se pueden hallar en la Internet.
http://www.ngdc.noaa.gov/geomagmodels/struts/calcDeclination
125
124
S
Page 66

127
La mayoría de los botones del reloj tienen funciones múltiples en el modo
Cronógrafo. Utilice la tabla junto con el reloj para explorar las opciones.
Uso de la brújula
Después de calibrar la brújula, verá el rumbo de la brújula del momento, los
puntos cardinales y la aguja de brújula digital cuando entra al modo Brújula.
Después de 30 segundos la lectura de la brújula termina y desaparece de
la pantalla del reloj para alargar la duración de la pila. Pulse START/SPLIT
para presentar el rumbo del momento durante otros 30 segundos.
SUGERENCIA: El reloj sería de gran ayuda para orientarse.
Se puede usar la brújula para moverse entre puntos de ruta y,
durante una carrera de orientación, el reloj sirve para
cronometraje (ver la sección siguiente).
MODO CRONÓGRAFO
El reloj incluye un cronógrafo, que funciona como un cronómetro. El cronógrafo puede registrar hasta 100 horas y 99 vueltas. Los datos que recopile
mientras el cronógrafo está funcionando pueden servir para monitorear su
progreso en el modo Revisión. (Ver la página 129 para más información
sobre el modo Revisión).
126
BOTÓN FUNCIONES
MODE
• Entrar o salir del modo.
• Mostrar una vuelta o intervalo después
de pulsar START/SPLIT con el cronógrafo
funcionando.
STOP/RESET
• Parar el cronógrafo.
• Pasar a los datos del altímetro o barómetro
(si el cronógrafo está en 00:00:00).
START/SPLIT
• Iniciar cronógrafo
• Registrar un tiempo de vuelta o un intervalo
SET
• Cambiar las posiciones en pantalla del tiempo
de vuelta e intervalo.
S
Page 67

129
Cuando el cronógrafo está funcionando, se muestra una barra
en los modos cronógrafo y hora del día encima del símbolo de
cronómetro.
ATENCIÓN: Para alargar la duración de la pila, cuando el cronógrafo alcanza las 100 horas el reloj dejará de cronometrar y el
botón START/SPLIT no funcionará.
MODO REVISIÓN
El modo Revisión de actividad en el reloj registra los promedios bajos, altos y
el de la aventura. Las estadísticas de la actividad quedan gravadas cuando el
cronógrafo está funcionando y luego se pueden ver en el modo Revisión.
Revisión de datos de la actividad
1. Pulse MODE hasta llegar a REVIEW.
2. Pulse START/SPLIT para desplazarse por los datos.
3. Pulse y sostenga STOP/RESET para borrar los datos más recientes
revisados después que los haya visto.
NOTA: El reloj puede ser de gran ayuda para ciclomontañismo,
esquiar, o campo traviesa. Se puede tomar intervalos a
determinados puntos del camino en el recorrido, verificar el
grado de escalada o descenso con el altímetro e incluso monitorear el barómetro para asegurarse de que no hay mal clima
aproximándose. Cuando haya terminado, puede revisar los
datos de su actividad en el modo Revisión.
Tiempos de vuelta e intervalos.
Cuando se habla de tiempos de vuelta, se indica el tiempo que corresponde
a un segmento determinado de una actividad. Tiempo de intervalo o parcial
es el tiempo que ha transcurrido hasta el segmento del momento.
128
S
Page 68

131
SUGERENCIA: Puede usar el modo Revisión para revivir su cami-
nata en el regreso a casa. Recorra las estadísticas de actividad y
muestre a los amigos las cumbres a las que subió, el tiempo que
pasó por encima de la altitud prevista, e inclusive los cambios
de temperatura a lo largo de su caminata. Todavía más, puede
mostrarles estos datos mediante una serie de gráficos que
presentan los cambios de altitud, presión barométrica y
temperatura ocurridos.
NOTA: Pulse y sostenga START/SPLIT para recorrer rápidamente
los datos.
ATENCIÓN: Observará el mensaje NO DATA STORED (no hay
datos guardados) si el cronógrafo no fue activado.
MODO TEMPORIZADOR
El reloj WS4™incluye un temporizador de cuenta regresiva que se puede
usar tanto para actividades dentro de casa como al aire libre. Puede hacer
cuenta regresiva desde un momento determinado hasta 100 horas y puede
repetir un conteo regresivo hasta 99 veces.
Los siguientes datos son registrados en el modo Revisión:
• Altitud máxina
• Altitud mínima
• Ascenso total
• Descenso total
• Tiempo transcurrido a, o sobrepasando la altiud prevista.
• Gráfico de altitud
• Presión barométrica más alta
• Presión barométrica más baja.
• Promedio de presión barométrica
• Gráfico de la presión a nivel del mar
• Temperatura más alta
• Temperatura más baja
• Promedio de temperatura
• Gráfico de temperatura
130
S
Page 69

133
SUGERENCIA: El temporizador puede servir para cuando usted
quiera ser alertado en el punto a mitad de camino de una
actividad. Por ejemplo, usted sale sabiendo que sólo dispone de
dos horas para realizar una caminata. Programa el temporizador a 60 minutos y cuando suena la alarma, se da cuenta
que ya es tiempo de dar media vuelta y empezar el retorno al
punto de partida. La información del temporizador no está
conectada al modo Revisión.
NOTA: Al programar el temporizador, recorra rápidamente los
valores establecidos sosteniendo START/SPLIT (+) o
STOP/RESET (-).
Cuando el temporizador está funcionando, se muestra una barra
en los modos temporizador y hora del día sobre el símbolo del
reloj de arena.
Si el temporizador está programado a repetir, la barra se
presenta encima del símbolo de temporizador con la flecha.
Programación del temporizador
1. Pulse MODE hasta llegar a TIMER.
2. Pulse y sostenga SET para comenzar.
3. Pulse START/SPLIT (+) o STOP/RESET (-) para aumentar o disminuir los
valores establecidos para las horas, minutos, segundos y final del evento.
4. Pulse MODE (NEXT) para pasar a la siguiente opción de programación.
5. Pulse SET (DONE) para terminar.
Uso del temporizador
1. Pulse START/SPLIT para iniciar el temporizador o reiniciarlo después de
una pausa.
2. Pulse STOP/RESET para detener la cuenta regresiva.
3. Sostenga STOP/RESET para regresar el temporizador al valor de inicio.
4. Sostenga STOP/RESET de nuevo para poner el temporizador en cero.
El reloj sonará cuando el conteo regresivo llegue a cero. Pulse cualquier
botón para silenciar la alarma. Si programó el temporizador para repetir al
final del conteo regresivo, la repetición continuará hasta que pulse
STOP/RESET. Aparecerá R en la pantalla y un número para indicar que el
temporizador está repitiendo y el número de veces que ha repetido.
132
S
Page 70

135
Uso de la alarma
Para activar o desactivar la alarma sin entrar en el proceso de programación, pulse START/SPLIT mientras esté en el modo ALARMA. La alarma
sonará durante 20 segundos cuando llega a la alarma programada. Pulse
cualquier botón para silenciarla. Una alarma de respaldo sonará por única
vez después de 5 minutos si no es desactivada después de que suene la
primera vez.
“La alarma es quizás la función más elemental del reloj WS4™ .
Y a pesar de su simplicidad, juega un papel muy importante
durante toda una expedición. Conforta oir la alarma de 2 AM que
me despierta. Estas horas antes del alba son las mejores del día.
La nieve que se siente firme al pisarla, unas cuantas estrellas en
la alborada y el ritmo de la cadencia de los compañeros, son
parte intangible de la experiencia de una expedición”.
-Conrad Anker
Montañista de fama mundial
MODO ALARMA
El reloj WS4™lleva una alarma que usted puede programar para que suene
una vez, o a la misma hora cada día, o sólo en fines de semana, o sólo un
día a la semana.
Programación de la alarma
1. Pulse MODE hasta llegar a ALARM.
2. Pulse y sostenga SET para comenzar.
3. Pulse START/SPLIT (+) o STOP/RESET (-) para aumentar o disminuir
los valores establecidos para las horas, minutos, de mañana o tarde
(AM/PM) y el tipo de alarma.
4. Pulse MODE (NEXT) para pasar a la siguiente opción de programación.
5. Pulse SET (DONE) para terminar.
NOTA: Cuando se programa la alarma, ésta queda automáticamente activada.
134
S
Page 71

137
la altitud. Sin embargo, si desconoce la altitud, averigüe cuál es
la presión atmosférica a nivel del mar (publicada en la Internet o
en el periódico) y calibre el medidor con la presión barométrica.
El reloj tiene igualmente cinco puntos de referencia de altitud (REFERENCE
HOME, REFERENCE BASE 1, REFERENCE BASE 2, REFERENCE BASE 3, y
REFERENCE MAN-ALT) que le permiten establecer la altitud de un punto
conocido con anticipación, y luego volver a calibrar el reloj en dicho punto
pulsando un botón.
NOTA: Al programar la alarma, recorra rápidamente los valores
establecidos sosteniendo START/SPLIT (+) o STOP/RESET (-).
— El dato AM/PM sólo aparecerá (+) si el reloj ha sido programado con pantalla en formato de 12 horas.
Cuando la alarma está activada, se muestra una barra en los
modos alarma y hora del día encima del símbolo de alarma.
MODO CALIBRACIÓN
El reloj WS4™puede tomar medidas de gran exactitud. Se debe calibrar ya
sea el altímetro (MAN-ALTI) o el barómetro (BARO), y el símbolo del clima
(WEATHER) antes del uso por primera vez.Y,como con cualquier instrumento de precisión, se debe calibrar frecuentemente para mantener la exactitud.
NOTA: Para obtener la máxima exactitud, elija el método de
calibración basándose en la fuente de referencia más exacta
disponible. Por ejemplo, si usted se halla en un punto de partida y
sabe la altitud correcta, la calibración más exacta será por tanto
136
INICIO
(INICIO 1 ALTI)
(p.e. 800 M)
PUNTO DE
PARTIDA
(BASE 1 ALTI)
(1200 M)
CUMBRE
(BASE 2 ALTI)
(2000 M)
REFUGIO
(BASE 3 ALTI)
(1000 M)
EJEMPLO: CAMINATA FAVORITA
S
Page 72

139
Nota: Use altitud manual (MAN-ALT) para volver a calibrar manualmente por una sóla vez. Use la altitud de inicio y la altitud
de base 1, 2, 3 para guardar los puntos de referencia de altitud
que serán utilizados en otras ocasiones.
Nota: Si ya ha ingresado un punto de referencia, puede seleccionar rápidamente dicho punto y sostener STOP/RESET para
calibrar rápidamente.
LUZ NOCTURNA INDIGLO
®
En cualquier modo, cuando se pulsa el botón INDIGLO®, la esfera del reloj
se iluminará para hacerlo más visible. También se puede activar NightMode
®
pulsando y sosteniendo el botón INDIGLO®hasta que se escuche un
pitido. La función Night-Mode
®
es muy útil en condiciones de poca iluminación porque permite presionar cualquier botón para iluminar el reloj de 2
a 3 segundos. Después de activada, la función Night-Mode
®
permanece
activa de 7 a 8 horas. Si desea desactivar Night-Mode
®
antes que transcu-
rra el plazo de las 7 u 8 horas pulse y sostenga el botón INDIGLO
®
hasta que
se escuche un pitido.
ATENCIÓN: Los cambios repentinos en la presión barométrica
pueden alterar la lectura del altímetro. Si se puede, vuelva a
calibrar a una altitud conocida cuando ocurran cambios
drásticos de presión.
Programación y calibración de los puntos de referencia
1. Pulse MODE hasta llegar a CAL.
2. Pulse y sostenga SET para iniciar la calibración.
3. Pulse START/SPLIT (+) para desplazarse entre los puntos de referencia
(HOME ALTI,BASE 1 ALTI, BASE 2 ALTI,BASE 3 ALTI,MANUAL ALTI, BARO,
y WEATHER).
4. Pulse MODE (siguiente) para empezar a programar.
5. Pulse START/SPLIT (+) o STOP/RESET (-) para aumentar o disminuir los
valores establecidos.
6. Pulse MODE (siguiente) para pasar a la siguiente opción de programación.
7. Pulse SET (DONE) para terminar.
8. Cuando ya esté en el lugar, pulse y sostenga STOP/RESET para seleccionar y calibrar con ese punto de referencia en modo CAL. El reloj
suena cuando la calibración está completa.
138
S
Page 73

141
Cronógrafo:
El cronógrafo registra las fracciones de tiempo durante su
actividad.
Declinación:
La brújula usa un ángulo de declinación establecido para marcar la diferencia entre el norte verdadero y el norte magnético. Para
el Oeste, las declinaciones se restan del rumbo calculado por la brújula
mientras que para el Este, se suman. Ver la tabla sobre las páginas 123 y
124 para la lista de declinaciones de las principales capitales del mundo.
Digital:
Referido a un reloj, el digital indica la hora usando múmeros.
In Hg:
In Hg quiere decir pulgadas de mercurio, la unidad para medir la pre-
sión atmosférica. Una pulgada de mercurio equivale a 33,86 milibares.
Vuelta:
El tiempo de vuelta registra el tiempo o duración de segmentos indi-
viduales de la actividad.
Norte magnético:
La dirección del polo magnético de la tierra y dirección a
la cual apunta la aguja de la brújula, que es diferente del norte verdadero (ver
a continuación). La diferencia entre el norte verdadero y el norte magnético
se usa para calcular el ángulo de declinación usado por la brújula del reloj.
GLOSARIO
Este glosario provee las definiciones de algunas de las características y funciones del reloj descritas a lo largo de este manual.
Altímetro:
Un instrumento usado para determinar la altitud de un objeto con
respecto a un nivel fijo. Generalmente la altitud se mide con respecto al
nivel del mar.
Análogo:
Referido a un reloj, el análogo indica la hora usando las manecillas.
Barómetro:
Un barómetro mide la presión atmosférica y puede ayudar a
predecir los cambios climáticos.
Presión barométrica:
Presión atmosférica referida a los pronósticos del
clima. La presión más alta indica un clima más caliente y despejado,
mientras que la presión más baja indica generalmente tiempo nublado y
gran probabilidad de lluvia.
Calibración:
Técnica para afinar la precisión de la brújula, el altímetro, el
barómetro y el pronóstico del clima, partiendo de la compensación de las
condiciones locales.
140
S
Page 74

143
GARANTÍA INTERNACIONAL DE TIMEX
(GARANTÍA LIMITADA PARA EE.UU.)
Timex Group USA, Inc garantiza su reloj TIMEX
®
contra defectos de fabricación
durante un periodo de UN AÑO a partir de la fecha de compra original. Timex
y sus sucursales en todo el mundo respaldan esta garantía internacional.
Cabe aclarar que Timex tiene la libertad de optar por reparar el reloj con
componentes nuevos o reacondicionados e inspeccionados, o reemplazarlo
por un modelo idéntico o similar. IMPORTANTE — OBSERVE POR FAVOR
QUE ESTA GARANTÍA NO CUBRE DEFECTOS O DAÑOS A SU RELOJ:
1) después de vencido el plazo de la garantía;
2) si el reloj inicialmente no se compró a un distribuidor de TIMEX
autorizado;
3) si las reparaciones efectuadas no las hizo Timex;
4) si son consecuencia de accidentes, manipulación no autorizada o
abuso; y
5) en el cristal, la correa o pulsera, la caja, los accesorios o la pila. Timex
podrá cobrarle por el reemplazo de cualquiera de estas piezas.
MB:
MB quiere decir milibares, que es la unidad métrica de la presión
atmosférica. Un milibar equivale a 0,0295 de pulgada de mercurio.
Presión a nivel del mar:
La presión atmosférica de un sitio determinado
establecida por la diferencia con la altitud de un lugar.Generalmente, la presión atmosférica del sitio será más baja que la presión a nivel del mar
porque la presión de la atmósfera disminuye con la altitud.
Intervalo:
El tiempo de intervalo registra el total del tiempo transcurrido
desde el comienzo de su actividad actual.
Tomar un tiempo de vuelta o un intervalo:
Cuando usted toma la medida de
una vuelta o un intervalo, el cronógrafo registra el tiempo del segmento
actual y automáticamente empieza a cronometrar el siguiente.
Norte verdadero:
El polo norte geográfico donde coinciden todas las líneas
de longitud. Los mapas son trazados con el polo norte en la parte superior.
La diferencia entre el norte verdadero y el norte magnético sirve para calcular el ángulo de declinación usado por la brújula del reloj.
142
S
Page 75

o giro por valor de US $8.00 (dólares estadounidenses); en Canadá, un
cheque certificado o giro por valor de CAN $7.00 (dólares canadienses);
en el Reino Unido, un cheque certificado o giro por valor de UK £ 2.50
(libras). En otros países, Timex se encargará de cobrarle el importe por
gastos de envío. NO INCLUIR CON EL ENVÍO UNA PULSERA ESPECIAL NI
NINGÚN OTRO ARTÍCULO DE VALOR PERSONAL.
En EE.UU., por favor llame al 1-800-328-2677 para obtener información
adicional sobre la garantía. En Canadá, llamar al número 1-800-263-
0981. En Brasil, al 0800-168787. En México, al 01-800-01-060-00. En
América Central, Países del Caribe, Bermuda y Bahamas, al (501) 3705775 (EE.UU.). En Asia, al 852-2815-0091. En el Reino Unido, al 44 020
8687 9620. En Portugal, al 351 212 946 017. En Francia, al 33 3 81 63
42 00. En Alemania/Austria, al +43.662 88921 30. En Medio Oriente y
África, al 971-4-310850. En otras áreas, consulte al vendedor local de
Timex o al distribuidor de Timex sobre la garantía. En Canadá, EE.UU. y
algunos otros lugares, algunos distribuidores de Timex podrían proporcionarle un sobre con la dirección y el franqueo prepago para que envíe
el reloj a reparación.
ESTA GARANTÍA Y LAS COBERTURAS QUE CONTIENE SON EXCLUSIVAS Y
SUSTITUYEN A CUALQUIER OTRA GARANTÍA, EXPRESA O IMPLÍCITA,
INCLUYENDO CUALQUIER GARANTÍA IMPLÍCITA DE COMERCIABILIDAD O
ADECUACIÓN PARA UN FIN PARTICULAR. TIMEX NO ASUME NINGUNA
RESPONSABILIDAD POR DAÑOS DIRECTOS, INDIRECTOS O DERIVADOS.
En ciertos países y estados no se permiten limitaciones de las garantías
implícitas ni exclusiones o limitaciones de daños, por lo cual puede que
estas limitaciones no sean de aplicación en su caso particular. Esta
garantía le concede derechos legales específicos; usted también podría
estar amparado por otros derechos, que varían según el país y el estado
donde viva.
Para solicitar los servicios incluidos en la garantía, devuelva el reloj a
Timex a una de sus sucursales o al comercio minorista adonde se compró el reloj junto con el cupón de reparación del reloj original o, en EE.UU
y Canadá únicamente, el cupón de reparación del reloj original o una nota
en la que figure su nombre, domicilio, número de teléfono y fecha y lugar
de compra. Para cubrir el costo de envío, adjunte el siguiente importe
(este importe no es para el pago de la reparación): En EE.UU., un cheque
144 145
S
Page 76

©2008 Timex Group USA, Inc.El logotipo de TIMEX, EXPEDITION y NIGHTMODE son marcas comerciales registradas de Timex Group USA, inc.
INDIGLO es una marca comercial registrada de Indiglo Corporation en los
Estados Unidos y otros países. WS4 es una marca comercial de Timex
Group, B.V.
146
147
S
Page 77

ÍNDICE
INTRODUÇÃO. . . . . . . . . . . . . . . . . . . . . . . . . . . . . . . . . . . . . . . . 153
TIMEX
®
EXPEDITION®WS4™. . . . . . . . . . . . . . . . . . . . . . . . . . . . 155
FUNÇÕES DO RELÓGIO . . . . . . . . . . . . . . . . . . . . . . . . . . . . . . . . 156
Hora . . . . . . . . . . . . . . . . . . . . . . . . . . . . . . . . . . . . . . . . . . . . 156
Altímetro . . . . . . . . . . . . . . . . . . . . . . . . . . . . . . . . . . . . . . . . . 156
Barômetro. . . . . . . . . . . . . . . . . . . . . . . . . . . . . . . . . . . . . . . . 157
Bússola . . . . . . . . . . . . . . . . . . . . . . . . . . . . . . . . . . . . . . . . . . 157
Cronógrafo . . . . . . . . . . . . . . . . . . . . . . . . . . . . . . . . . . . . . . . 157
Temporizador . . . . . . . . . . . . . . . . . . . . . . . . . . . . . . . . . . . . . 158
Alarme . . . . . . . . . . . . . . . . . . . . . . . . . . . . . . . . . . . . . . . . . . 158
INÍCIO RÁPIDO . . . . . . . . . . . . . . . . . . . . . . . . . . . . . . . . . . . . . . . . . 159
Configuração da hora e da data . . . . . . . . . . . . . . . . . . . . . . . 159
Calibração da bússola . . . . . . . . . . . . . . . . . . . . . . . . . . . . . . . 159
Calibração da altitude ou do barômetro e configuração
da condição climática . . . . . . . . . . . . . . . . . . . . . . . . . . . . . 160
P
149
148
Page 78

INSTRUÇÕES . . . . . . . . . . . . . . . . . . . . . . . . . . . . . . . . . . . . . . . . . . 162
MODO HORA . . . . . . . . . . . . . . . . . . . . . . . . . . . . . . . . . . . . . . . . 162
Configuração da hora e das medidas . . . . . . . . . . . . . . . . . . . 162
Troca do mostrador. . . . . . . . . . . . . . . . . . . . . . . . . . . . . . . . . 163
MODO ALTÍMETRO. . . . . . . . . . . . . . . . . . . . . . . . . . . . . . . . . . . . 163
Operação do altímetro. . . . . . . . . . . . . . . . . . . . . . . . . . . . . . . 163
Configuração da altitude alvo ou do alarme de altitude . . . . . . 165
MODO BARÔMETRO . . . . . . . . . . . . . . . . . . . . . . . . . . . . . . . . . . 168
Operação do barômetro. . . . . . . . . . . . . . . . . . . . . . . . . . . . . . 168
TEMPERATURA E PREVISÃO DO TEMPO. . . . . . . . . . . . . . . . . . . . 170
MODO BÚSSOLA . . . . . . . . . . . . . . . . . . . . . . . . . . . . . . . . . . . . . 172
Calibração da bússola . . . . . . . . . . . . . . . . . . . . . . . . . . . . . . . 172
Uso da bússola . . . . . . . . . . . . . . . . . . . . . . . . . . . . . . . . . . . . 176
MODO CRONÓGRAFO . . . . . . . . . . . . . . . . . . . . . . . . . . . . . . . . . 176
Voltas e tempos fracionados . . . . . . . . . . . . . . . . . . . . . . . . . . 178
MODO REVER . . . . . . . . . . . . . . . . . . . . . . . . . . . . . . . . . . . . . . . 179
Revisão dos dados da atividade . . . . . . . . . . . . . . . . . . . . . . . 179
MODO TEMPORIZADOR (TIMER). . . . . . . . . . . . . . . . . . . . . . . . . . 181
Configuração do temporizador . . . . . . . . . . . . . . . . . . . . . . . . 182
Operação do temporizador . . . . . . . . . . . . . . . . . . . . . . . . . . . 182
MODO ALARME (ALARM) . . . . . . . . . . . . . . . . . . . . . . . . . . . . . . . 184
Configuração do alarme . . . . . . . . . . . . . . . . . . . . . . . . . . . . . 184
Operação do alarme . . . . . . . . . . . . . . . . . . . . . . . . . . . . . . . . 185
MODO CALIBRAÇÃO . . . . . . . . . . . . . . . . . . . . . . . . . . . . . . . . . . 186
Configuração e calibração dos pontos de referência . . . . . . . . 188
LUZ NOTURNA INDIGLO
®
. . . . . . . . . . . . . . . . . . . . . . . . . . . . . . . 189
GLOSSÁRIO . . . . . . . . . . . . . . . . . . . . . . . . . . . . . . . . . . . . . . . . . 190
GARANTIA INTERNACIONAL TIMEX. . . . . . . . . . . . . . . . . . . . . . . . 193
P
151
150
Page 79

INTRODUÇÃO
Alguns dos melhores lugares do planeta são os de mais difícil acesso.
O novo relógio Timex
®
Expedition®WS4™o ajudará a chegar lá.
Equipado com recursos essenciais para atividades ao ar livre, o relógio
WS4
™
segue uma abordagem original em instrumentos de pulso para
esportes de aventura. O painel com amplo visor mostra em relance
informações chave sem ter de passar pelos modos.
Com sensores avançados de alta precisão e uma interface de usuário
intuitiva, o WS4
™
é o relógio em que você pode confiar para obter todas as
respostas corretas, mesmo nas condições mais extremas. Em poucos
minutos você saberá como o relógio funciona ao ler as primeiras páginas
do manual. O restante, oferece uma compreensão mais aprofundada do
nosso mais avançado instrumento de atividades ao ar livre.
Seja pegando trilhas, subindo ladeiras ou correndo vinte-e-três lanços de
escada só para conferir a sensibilidade do altímetro, prepare-se para se
aventurar ultrapassando limites.
153
P
152
Page 80

TIMEX®EXPEDITION®WS4
™
“Lembre-se de que o WS4 não substitui o bom senso. O bom senso
surge da experiência, e a única forma de obter experiência é
dedicar tempo. Desfrute este novo instrumento; porém, não
esqueça que é como um cão de estimação que precisa de exercício.
Tire-o ao ar livre para experimentá-lo e ponha-se à prova.”
-Conrad Anker
Alpinista de renome mundial
Embaixador da marca
Timex
®
Expedition
®
155
154
START/SPLIT
(iniciar/tempo fracionado)
(+)
INDIGLO
®
BOTÃO
SET
(configurar)
(DONE)
(concluído)
MODE
(modo)
(NEXT)
(seguinte)
STOP/RESET
(parar/reinicializar)
(-)
HORA DO DIA>ALTÍMETRO>BARÔMETRO>BÚSSOLA>
CRONÓGRAFO>REVER>TEMPORIZADOR>ALARME>CALIBRAÇÃO
INDICADOR DE ALARME
INDICADOR DE CRONÓGRAFO
REPETIR INDICADOR DE
CONTAGEM REGRESSIVA
INDICADOR DE CONTAGEM REGRESSIVA
P
Page 81

• Cinco pontos de referência de altitude personalizáveis e estabelecidos
pelo usuário.
Barômetro
• Acompanha a pressão alta, baixa e atual, bem como a pressão ao nível
do mar.
• Mostra as mudanças da pressão ao nível do mar em gráficos.
• Mostra um gráfico da previsão climática.
• Mostra a temperatura em graus Celsius ou Fahrenheit.
Bússola
• Inclui a direção expressa por meio de números e pela agulha de bússola
digital.
• Pode ser calibrada para um ângulo de declinação para maior precisão.
Cronógrafo
• Função de cronógrafo com capacidade de cronometrar até 100 horas
e 99 voltas.
• Opção para mostrar a volta ou o tempo fracionado com dígitos maiores.
FUNÇÕES DO RELÓGIO
Hora
• Horas, minutos e segundos mostrados no formato de 12 ou 24 horas.
• Data mostrada no formato MM-DD ou DD.MM.
• Segundo fuso horário com horas, minutos e data independentes
e configuração dos formatos.
• Sinal horário (opcional).
• Botão do bipe (opcional).
• Um relógio digital e um analógico.
Altímetro
• Mostra as medidas em pés ou metros.
• Acompanha a altitude atual, máxima e acumulada.
• Mostra subidas e descidas em gráficos.
• Acompanha o tempo decorrido na altitude alvo e acima desta altitude
(no Modo Rever).
• Alarme de altitude.
157
156
P
Page 82

INÍCIO RÁPIDO
As três páginas seguintes oferecem as instruções básicas para que você
faça funcionar o relógio em menos de cinco minutos. Continue lendo para
obter as instruções completas.
Configuração da hora e da data
1. Pressione MODE até que apareça a hora do dia.
2. Pressione e mantenha pressionada a tecla SET para iniciar.
3. Pressione START/SPLIT (+) ou STOP/RESET (-) para aumentar ou
diminuir os valores de configuração para fuso horário, hora, data, sons
e unidades de medida.
4. Pressione MODE (NEXT) para avançar para a opção de configuração
seguinte.
5. Pressione SET (DONE) para finalizar.
Calibração da bússola
Antes de calibrar, tire o relógio do pulso,segure-o na mão e escolha um dos
valores de ângulo de declinação mostrados na tabela das páginas 173 e 174.
1. Pressione MODE até aparecer COMPASS.
• Durante o uso do cronógrafo, o relógio WS4
™
registra os dados estatísticos
das principais atividades que podem ser vistos no Modo Rever.
Temporizador
O temporizador de contagem regressiva funciona por até 100 horas, com a
opção de repetir até 99 vezes a contagem regressiva.
Alarme
• Escolha a partir de alarmes diários, de dias de semana, de fins de
semana ou semanais.
• Alerta de backup que toca só uma vez caso o alarme seja ignorado.
159
158
PORTUGUÊS – INÍCIO RÁPIDO
Page 83

3. Pressione START/SPLIT (+) ou STOP/RESET (-) para explorar as configurações dos pontos de referência e escolher MANUAL ALTI ou BARO.
4. Pressione MODE (NEXT) para iniciar o processo de configuração.
5. Pressione START/SPLIT (+) ou STOP/RESET (-) para aumentar ou
diminuir os valores de configuração.
6. Pressione MODE (NEXT) para avançar para a opção de configuração
seguinte.
7. Pressione SET (DONE) para finalizar.
8. Para calibrar o altímetro ou o barômetro para os dados pré-selecionados, mantenha pressionado STOP/RESET até o relógio emitir um bipe.
Após haver configurado a altitude ou o barômetro, você precisará sincronizar o ícone da condição climática para as condições climáticas atuais.
1. No modo CAL, pressione SET para iniciar a calibração.
2. Pressione START/SPLIT (+) ou STOP/RESET (-) para chegar até WEATHER
(condição climática).
3. Pressione MODE (NEXT) para iniciar o processo de configuração.
4. Pressione START/SPLIT (+) ou STOP/RESET (-) para explorar as opções
de condição climática.
2. Pressione e mantenha pressionada a tecla SET para iniciar.
3. Mantendo o relógio nivelado e voltado para cima, gire-o duas vezes
(levando pelo menos 15 segundos por revolução) e pressione MODE.
4. Pressione START/SPLIT (+) ou STOP/RESET (-) para aumentar ou
diminuir os valores de configuração para coincidirem com os valores
dos ângulos de declinação escolhidos.
5. Pressione MODE para avançar para a opção de configuração seguinte.
6. Pressione SET para finalizar.
Se aparecer CAL OK no final de um processo de calibração, a bússola foi calibrada com sucesso. Se aparecer CAL FAIL,repita o processo de calibração.
Calibração da altitude ou do barômetro e configuração da condição
climática
Você deve calibrar o altímetro (MAN-ALTI) ou o barômetro (BARO) e o ícone
da condição climática (WEATHER) antes de usá-lo por primeira vez. O relógio deve ser calibrado em função das informações mais precisas que se
tiver na ocasião.
1. Pressione MODE até aparecer CAL.
2. Pressione e mantenha pressionada a tecla SET para iniciar a calibração.
161
160
PORTUGUÊS – INÍCIO RÁPIDO
Page 84

Troca do mostrador
• Fusos horários: Veja o outro fuso horário pressionando START/SPLIT ou
troque fusos horários mantendo pressionado START/SPLIT.
• No modo Hora do Dia, pressione STOP/RESET para escolher entre as
seguintes opções de mostrador: Data, altitude ou pressão barométrica.
MODO ALTÍMETRO
O relógio possibilita acompanhar a altitude atual, máxima e acumulada,
bem como o tempo decorrido na altitude alvo ou acima desta altitude. Este
modo também inclui um alarme se você quiser ser alertado quando ultrapassar a altitude selecionada. Você deve calibrar o altímetro antes de usálo por primeira vez (consultar página 186).
Operação do altímetro
Uma vez no modo Altímetro, o relógio WS4
™
explora automaticamente:
• PEAK (máxima): a máxima altitude atingida.
• ACC (acumulada): a mudança total na altitude, levando em consideração
subidas e descidas.
• CURR (atual): a altitude atual.
5. Pressione SET (DONE) para finalizar.
6. Para calibrar a condição climática para os dados pré-selecionados,
mantenha pressionado STOP/RESET até o relógio emitir um bipe.
INSTRUÇÕES
MODO HORA
O relógio mostra a hora para dois fusos horários. Neste modo você também
pode escolher as unidades de medida (p.ex.: pés ou metros; Fahrenheit ou
Celsius) e selecionar uma das três opções de mostrador.
Configuração da hora e das medidas
1. Pressione MODE até aparecer a hora do dia.
2. Pressione e mantenha pressionada a tecla SET para iniciar.
3. Pressione START/SPLIT (+) ou STOP/RESET (-) para aumentar ou
diminuir os valores de configuração para fuso horário, hora, data, sons
e medidas.
4. Pressione MODE (NEXT) para avançar para a opção de configuração
seguinte.
5. Pressione SET (DONE) para finalizar.
162
163
P
Page 85

Configuração da altitude alvo ou do alarme de altitude
As configurações do altímetro incluem:
•
Altitude alvo:
Se o cronógrafo estiver ativado, o relógio acompanhará o
tempo decorrido nessa altitude ou acima dessa altitude no modo Rever.
•
Alarme de altitude:
Alerta-o por meio de uma tela instantânea e um
alarme audível de haver alcançado a altitude pré-selecionada.
“Quando o alarme toca, você sabe que você alcançou a
altitude configurada. Esse rápido lembrete lhe permitirá
avaliar a sua condição e decidir se você está no caminho
Observação: se durante uma caminhada você subir 400 metros
e descer 100 metros, você acumulou 300 metros de altitude.
Quando o relógio alcançar o mostrador da altitude atual você também
poderá:
Pressionar START/SPLIT: aparece
a altitude numérica atual ou o
mostrador com gráfico da
altitude das últimas 36 horas.
Pressionar STOP/RESET:
reinicializa os dados estatísticos
acumulados do altímetro para
zero para limpar a memória.
165
164
Altitude alvo Alarme de altitude
P
Page 86

do altímetro em +/- 100 metros, mesmo tendo permanecido no
mesmo local. Se possível, volte a calibrá-lo para uma altitude
conhecida quando ocorrerem mudanças drásticas de pressão.
Você só precisa calibrar o barômetro OU o altímetro, pois ambos
dependem da mesma pressão. Consulte a seção “Modo de
Calibração” na página 186 para obter informações adicionais.
“Antes de me enrolar no meu saco de dormir, anoto a altitude
e a pressão barométrica atuais. Se nas poucas horas que durmo
percebo uma mudança na altitude ou na pressão barométrica,
tenho uma idéia dos próximos padrões climáticos. Por haver uma
relação inversa entre altitude e pressão barométrica, se ao acordar a elevação for a mesma ou mais baixa, posso ter certeza de
que a pressão atmosférica permaneceu constante. Se eu acordar
a uma maior altitude, precisarei prestar atenção, pois há chances
da aproximação de um centro de baixa pressão.”
-Conrad Anker
Alpinista de renome mundial
certo para se sair bem na subida.”
-Conrad Anker
Alpinista de renome mundial
Para configurar a altitude alvo ou o alarme do altímetro:
1. Pressione MODE até aparecer ALTI.
2. Pressione e mantenha pressionada a tecla SET para iniciar.
3. Pressione START/SPLIT (+) ou STOP/RESET (-) para aumentar ou diminuir
os valores de configuração.
4. Pressione MODE (NEXT) para avançar para a opção de configuração
seguinte.
5. Pressione SET (DONE) para finalizar.
OBSERVAÇÃO: o altímetro mostrará os valores em FT (pés) ou
M (metros), dependendo da unidade de mostrador selecionada
no modo Hora. Consulte a página 162 para obter informações
de configuração das unidades de medida.
ATENÇÃO: O altímetro é sensível a mudanças climáticas!
Mudanças súbitas na pressão barométrica pode alterar a leitura
167
166
P
Page 87

Quando o relógio alcançar o mostrador da pressão barométrica atual você
também poderá:
pressionar START/SPLIT: mostra a
leitura numérica atual do
barômetro ou o mostrador do
gráfico da pressão ao nível do
mar das últimas 36 horas.
Pressionar STOP/RESET: reinicializa os dados estatísticos acumulados do barômetro para zero
para limpar a memória.
OBSERVAÇÃO: o barômetro mostrará os valores em MB (milibares)
ou In Hg (polegadas de mercúrio) dependendo da unidade de
mostrador selecionada no modo Hora. Consulte a página 162 para
obter informações de configuração das unidades de medida.
Você só precisa calibrar o barômetro OU o altímetro, pois
ambos dependem da mesma pressão. Consulte a seção “Modo
Calibração” na página 186 para obter informações adicionais.
169
MODO BARÔMETRO
Com o relógio incluem-se informações sobre a pressão atual e ao nível do
mar, informações de pressão barométrica alta ou baixa e mudanças na
pressão ao nível do mar durante as últimas 36 horas. Esses recursos são
úteis para entender as mudanças climáticas.
Operação do barômetro
Uma vez no modo BARO, o relógio explora automaticamente:
• A máxima pressão barométrica atingida.
• A pressão barométrica mínima.
• A pressão barométrica atual e a pressão ao nível do mar corrigida.
168
P
Page 88

171
OBSERVAÇÃO: para obter leituras de temperatura mais
precisas, tente usar o relógio por fora do casaco ou prenda-o
no cinto ou na mochila (idealmente em uma parte que não
fique constantemente exposta ao sol). Você também pode tirar
o relógio do pulso e colocá-lo à sombra por 15 a 30 minutos.
Para obter informações de calibração do ícone da condição climática,
consulte a seção “Modo Calibração” na página 186.
TEMPERATURA E PREVISÃO DO TEMPO
Nos modos TIME, ALTI, BARO, CHRONO e TIMER, o relógio WS4™inclui
informações sobre temperatura e previsão do tempo.
O relógio pode prever a condição climática das próximas 4 – 6 horas com
base nas tendências da pressão atmosférica das doze horas anteriores.
Em geral, se a pressão atmosférica sobe, considera-se que a condição
climática está melhorando e é indicada por um ícone de sol. Se a pressão
atmosférica tende a baixar, a condição climática piora e é indicada com
ícones de nuvens e/ou precipitação.
Se usar o relógio no pulso, a leitura da temperatura será afetada pelo calor
do corpo e poderá diferir da temperatura real em 10 graus ou mais. Longos
períodos de exposição direta aos raios solares também podem afetar a
precisão. O relógio também pode medir a temperatura na água, mas certifique-se de não pressionar nenhum botão do relógio debaixo d’água; do
contrário poderia comprometer a resistência do relógio à água.
170
P
P
P
Page 89

Antes de calibrar a bússola, tire o relógio do pulso, segure-o na mão e
escolha um dos valores de ângulo de declinação da tabela abaixo.
CITY DEC. ANGLE CITY DEC. ANGLE
(cidade) (ângulo de declinação) (cidade) (ângulo de declinação)
Amsterdã 0° O Chicago 3° O
Anchorage 19° L Dallas 3° L
Auckland 18° L Denver 9° L
Beijing 3° O Dubai 1° L
Berne 0° L Hong Kong 2° O
Bogotá 5° O Jerusalém 3° L
Bozeman 13° L Londres 1° O
Buenos Aires 8° O Los Angeles 12° L
Calgary 15° L Madri 1° O
Cidade do Cabo 23° O Cidade do México 5° O
Moscou 10° O Riad 2° L
Monte Everest 0° O Roma 1° L
173
MODO BÚSSOLA
O relógio WS4™ inclui uma bússola digital precisa que, quando utilizada,
faz a leitura a cada segundo e mostra a leitura da bússola como um número
e uma direção cardeal, juntamente com uma agulha de bússola virtual.
Você deve calibrar a bússola antes de usá-la por primeira vez. Além disso,
recomenda-se calibrá-la periodicamente para manter uma maior precisão
das leituras. Consulte a seção “Modo Calibração” na página 186 para obter
informações adicionais.
Calibração da bússola
Quando utilizar a bússola, é importante manter o pulso em uma posição
nivelada e horizontal para que as leituras sejam mais precisas.
Para as leituras mais precisas, evite calibrar a bússola perto de objetos
metálicos grandes (como objetos eletrônicos, carros,
arquivos metálicos e tudo mais que for metálico), pois sua
força magnética pode interferir com o campo magnético,
resultando em leituras imprecisas. Observe que a função
luz noturna Indiglo
®
não funciona durante a calibração
da bússola.
172
continua na página seguinte
P
Page 90

Uma vez conhecido o ângulo de declinação:
1. Pressione MODE até aparecer COMPASS.
2. Mantenha pressionada a tecla SET para iniciar.
3. Mantendo o relógio nivelado e voltado para cima, gire-o duas vezes
(levando pelo menos 15 segundos por revolução) e pressione MODE.
4. Pressione START/SPLIT ou STOP/RESET para aumentar ou diminuir
os valores de configuração para coincidirem com os valores de
ângulo de declinação escolhidos.
5. Pressione MODE para avançar para a opção de configuração
seguinte.
6. Pressione SET para finalizar.
Se aparecer CAL OK no final de um processo de calibração, a bússola
foi calibrada com sucesso. Se aparecer CAL FAIL,repita o processo de
calibração.
ATENÇÃO: A calibração poderá falhar se você girar o relógio muito rapidamente ou se tomar mais de um minuto
para completar.A calibração também poderá falhar se você
estiver perto de objetos magnéticos.
CITY DEC. ANGLE CITY DEC. ANGLE
(cidade) (ângulo de declinação) (cidade) (ângulo de declinação)
Mumbai 0° O Seattle 17° L
Munique 1° L Seul 7° O
Nova Iorque 12° O Sidney 12° L
Orlando 5° O Tóquio 6° O
Oslo 1° L Toronto 10° O
Paris 0° O Vancouver 17° L
Reykjavík 15° O Varsóvia 4° L
Rio de Janeiro 22° O Washington DC 10° O
Para as cidades que não aparecem na tabela acima, o ângulo de declinação
pode ser obtido utilizando o calculador de ângulo de declinação no URL
indicado a seguir. Observe que é necessário saber de antemão a latitude e
a longitude do local antes de poder calcular o ângulo de declinação nesse
site da Web.As informações de latitude e longitude podem ser encontradas
na Internet.
http://www.ngdc.noaa.gov/geomagmodels/struts/calcDeclination
175
174
P
Page 91

177
A maioria dos botões do relógio tem várias funções no modo Cronógrafo.
Utilize a tabela juntamente com o relógio para explorar as opções.
Uso da bússola
Depois de calibrada, a bússola mostrará a direção e os pontos cardeais atuais e a agulha da bússola digital quando entrar no modo Bússola. Depois de
30 segundos, a leitura da bússola é interrompida e desaparece do
mostrador do relógio para preservar a carga da pilha. Pressione
START/SPLIT para mostrar a direção atual por outros 30 segundos.
DICA: o relógio seria um excelente instrumento para orientação.
Você pode utilizar a bússola para navegar por pontos do
caminho e, se chegar a participar de uma corrida de orientação,
você poderá cronometrar o seu tempo utilizando o cronógrafo
(consultar a seção seguinte).
MODO CRONÓGRAFO
O relógio inclui um cronógrafo, o qual é tem a função de cronometar.
O cronógrafo pode acompanhar até 100 horas e 99 voltas. Os dados
coletados quando o cronógrafo está em funcionamento poderão ser utilizados
para verificar o seu progresso no modo Rever. (Consulte a página 179 para
obter mais informações sobre o modo Rever).
176
BUTTON (botão) FUNCTIONS (funções)
MODE (modo)
• Entrar no modo ou sair do modo.
• Mostra rapidamente uma volta ou um tempo
fracionado depois de pressionar START/SPLIT
quando o cronógrafo estiver em funcionamento.
STOP/RESET
(parar/reinicializar)
• Parar o cronógrafo.
• Alterne entre as informações do mostrador do
altímetro e do barômetro (se for o cronógrafo
será 00:00:00)
START/SPLIT (iniciar/
tempo fracionado)
• Iniciar o cronógrafo.
• Use uma volta ou um tempo fracionado.
SET (configurar)
• Alterne entre as posições do mostrador da
volta e do tempo fracionado.
P
Page 92

179
Quando o cronógrafo está em funcionamento, aparece uma
barra nos modos cronógrafo e hora do dia acima do ícone
de cronógrafo.
ATENÇÃO: Para economizar a carga da pilha do relógio, quando
o cronógrafo alcançar as 100 horas, o relógio parará a
cronometragem e o botão START/SPLIT não funcionará.
MODO REVER
O modo Rever Atividade no relógio captura os valores baixos, altos e as
médias do esporte de aventura. Os valores estatísticos da atividade são
registrados enquanto o cronógrafo está em funcionamento e são visíveis no
modo Rever.
Revisão dos dados da atividade
1. Pressione MODE até aparecer REVIEW.
2. Pressione START/SPLIT para explorar os dados.
3. Pressione e mantenha pressionada a tecla STOP/RESET para cancelar
as informações revistas mais recentes após concluir a revisão.
OBSERVAÇÃO: o cronógrafo pode ser um bom instrumento
para andar de bicicleta de montanha, esqui ou corrida em
trilhas. Você pode conferir o tempo fracionado em determinados
pontos da trilha ao longo do caminho, verificar periodicamente
o altímetro para ver quanto você subiu ou desceu e mesmo
para conferir o barômetro para ter certeza de que não vai
haver más condições climáticas. Logo que terminar, você pode
verificar as informações sobre a sua atividade no modo Rever.
Voltas e tempos fracionados
O tempo de uma volta se refere ao tempo de um segmento individual de uma
atividade. O tempo fracionado é todo o tempo do segmento atual.
178
P
Page 93

181
DICA: Você pode utilizar o modo Rever para voltar a ver a sua
caminhada quando estiver voltando para casa. Explore os valores de atividade para informar seus amigos quanto você subiu,
quanto tempo você passou acima da altitude alvo e mesmo as
mudanças de temperatura durante o curso da sua caminhada.
Mais ainda, você pode mostrar-lhes essas informações por meio
de uma série de gráficos que mostram altitude, pressão
barométrica e mudanças de temperatura ao longo do tempo.
OBSERVAÇÃO: pressione e mantenha pressionado START/SPLIT
para explorar rapidamente todos os dados.
ATENÇÃO: Você verá a mensagem NO DATA STORED (não há dados
armazenados) se o cronógrafo nunca foi posto para funcionar.
MODO TEMPORIZADOR (TIMER)
O relógio WS4™inclui um temporizador de contagem regressiva padrão que
pode ser utilizado para atividades ao ar livre e atividades em ambientes
internos. Pode fazer a contagem regressiva de uma hora fixa de até 100
horas e repetir até 99 vezes essa contagem.
Os seguintes dados são acompanhados no modo Rever:
• Altitude máxima
• Altitude mínima
• Subida total (Total Ascent)
• Descida total (Total Descent)
• Tempo decorrido na altitude alvo ou acima dessa altitude
• Gráfico da altitude
• Pressão barométrica máxima
• Pressão barométrica mínima
• Pressão barométrica média
• Gráfico da pressão ao nível do mar
• Temperatura máxima
• Temperatura mínima
• Temperatura média
• Gráfico da temperatura
180
P
Page 94

183
repetição continuará até o STOP/RESET ser pressionado. O mostrador
mostrará R e um número para indicar que o temporizador está repetindo e
quantas vezes repetiu.
DICA: o temporizador poderá ser útil quando você quer ser
alertado na metade de uma atividade. Por exemplo, você sai
para uma caminhada sabendo que tem cerca de duas horas
para concluí-la. Você configura o temporizador para 60 minutos
e, quando soa o bipe, você sabe que é hora de voltar em
direção ao início da trilha. As informações do temporizador não
estão conectadas ao modo Rever.
OBSERVAÇÃO: enquanto estiver configurando o temporizador,
explore rapidamente os valores de configuração ao manter
pressionado START/SPLIT (+) ou STOP/RESET (-).
Quando o temporizador está em funcionamento, aparece uma
barra nos modos temporizador e hora do dia acima do ícone
de temporizador.
Se o temporizador estiver configurado para repetir, a barra
aparece acima do temporizador com um ícone de seta.
Configuração do temporizador
1. Pressione MODE até aparecer TIMER.
2. Pressione e mantenha pressionada a tecla SET para iniciar.
3. Pressione START/SPLIT (+) ou STOP/RESET (-) para aumentar ou diminuir
os valores de configuração para horas, minutos, segundos e ação final.
4. Pressione MODE (NEXT) para avançar para a opção de configuração
seguinte.
5. Pressione SET (DONE) para finalizar.
Operação do temporizador
1. Pressione START/SPLIT para iniciar o temporizador ou reiniciá-lo após
uma pausa.
2. Pressione STOP/RESET para parar a contagem regressiva.
3. Mantenha pressionado STOP/RESET para reinicializar o temporizador
para o valor inicial.
4. Mantenha pressionado STOP/RESET de novo para limpar os valores do
temporizador para 0 (zero).
Quando a contagem regressiva atingir o número zero, o relógio emitirá um
bipe. Você pode pressionar qualquer botão para silenciar o bipe. Se você
configurou o temporizador para repetir no final da contagem regressiva, a
182
P
Page 95

185
Operação do alarme
Para ativar (ON) ou desativar (OFF) o alarme sem iniciar o processo de
configuração, pressione START/SPLIT enquanto estiver no ALARM MODE
(modo Alarme). O alarme tocará por 20 segundos quando atingir um alarme
programado. Pressione qualquer botão para desativar o alarme. Um alarme
de backup que só toca uma vez voltará a alertá-lo depois de 5 minutos
decorridos se você não o desativar na primeira vez que tocar.
“O despertador talvez seja a função mais simples do relógio
WS4
™
. Porém, na sua simplicidade, joga um papel muito
importante em toda a expedição. Sinto-me bem ao ouvir o
alarme me acordando às duas horas da manhã. Essas horas da
madrugada são as melhores do dia. A neve firme e revigorante
sob os pés, algumas estrelas se esvaindo com o amanhecer
e o ritmo dos seus companheiros são a parte intangível da
experiência de uma expedição.”
-Conrad Anker
Alpinista de renome mundial
MODO ALARME (ALARM)
O relógio WS4™inclui um alarme que você pode configurar para tocar uma
vez, à mesma hora todos os dias, somente nos fins de semana, dia de
semana ou mesmo apenas uma vez na semana.
Configuração do alarme
1. Pressione MODE até aparecer ALARM.
2. Pressione e mantenha pressionada a tecla SET para iniciar.
3. Pressione START/SPLIT (+) ou STOP/RESET (-) para aumentar ou
diminuir os valores de configuração para horas, minutos, AM/PM e tipo
de alarme.
4. Pressione MODE (NEXT) para avançar para a opção de configuração
seguinte.
5. Pressione SET (DONE) para finalizar.
OBSERVAÇÃO: ao configurar o alarme, você o ativa
automaticamente.
184
P
Page 96

187
será a altitude. Se você não sabe a altitude, você pode
descobrir a pressão ao nível do mar (publicado on-line ou nos
jornais) e calibrar o sensor em relação à pressão barométrica.
O relógio também tem cinco pontos de referência de altitude (REFERENCE
HOME, REFERENCE BASE 1, REFERENCE BASE 2, REFERENCE BASE 3
e REFERENCE MAN-ALT) os quais possibilitam configurar de antemão a
altitude de um local conhecido e, depois, voltar a calibrar o relógio nesse
ponto com só pressionar um botão.
OBSERVAÇÃO: enquanto estiver configurando um alarme,
explore rapidamente os valores de configuração ao manter
pressionado START/SPLIT (+) ou STOP/RESET (-).
— O valor AM/PM aparecerá (+) somente se você configurou o
relógio para mostrar o formato de 12 horas.
Quando o alarme está preparado, aparece uma barra nos
modos alarme e hora do dia acima do ícone de alarme.
MODO CALIBRAÇÃO
O relógio WS4™tem a capacidade de tomar medidas extremamente
precisas. Você deve calibrar o altímetro (MANUAL ALTI) ou o barômetro
(BARO) e o ícone da condição climática (WEATHER) antes de usá-lo por
primeira vez. E, como ocorre com qualquer instrumento de precisão, você
pode calibrá-lo freqüentemente para manter a precisão.
OBSERVAÇÃO: para obter a melhor precisão, escolha o método
de calibração com base na fonte de referência mais precisa
possível. Por exemplo, se você está parado no início de uma
trilha e sabe a altitude correta, então a calibração mais precisa
186
HOME (início)
(HOME 1 ALTI)
(ie. 800 M)
TRAIL HEAD
(início da trilha)
(BASE 1 ALTI)
(1200 M)
PEAK (máxima):
(BASE 2 ALTI)
(2000 M)
LODGE (alojamento)
(BASE 3 ALTI)
(1000 M)
EXEMPLO: CAMINHADA FAVORITA
P
Page 97

189
Observação: utilize a altitude manual (MAN-ALT) para recalibrações manuais feitas só uma vez. Utilize Altitude de Origem
(Home Altitude) e Altitude Base (Base Altitude) 1,2,3 para salvar os
pontos de referência da altitude que serão utilizados várias vezes.
Observação: após digitado, o ponto de referência poderá ser
rapidamente selecionado e calibrado ao manter pressionado
STOP/RESET.
LUZ NOTURNA INDIGLO
®
Em qualquer modo, quando você pressiona o botão INDIGLO®, a face do
relógio se iluminará para facilitar a visualização. Você também poderá
ativar o recurso noturno Night-Mode
®
ao pressionar e manter pressionado
o botão INDIGLO
®
até se ouvir um bipe. O recurso Night-Mode® é muito útil
em condições de pouca luz porque possibilita que o relógio se ilumine por
2 a 3 segundos ao pressionar qualquer botão. Após ativado, o recurso
Night-Mode
®
permanece ativo por 7 a 8 horas. Se você quiser desativar o
recurso noturno Night-Mode
®
antes de haver decorrido as 7 ou 8 horas,
pressione e mantenha pressionado o botão INDIGLO
®
até se ouvir um bipe.
ATENÇÃO: Mudanças súbitas da pressão barométrica podem
impactar a leitura do altímetro. Se possível, volte a calibrá-lo
para uma altitude conhecida quando ocorrerem mudanças
drásticas de pressão.
Configuração e calibração dos pontos de referência
1. Pressione MODE até aparecer CAL.
2. Pressione e mantenha pressionada a tecla SET para iniciar a calibração.
3. Pressione START/SPLIT (+) para explorar os pontos de referência (HOME
ALTI, BASE 1 ALTI, BASE 2 ALTI, BASE 3 ALTI, MANUAL ALTI, BARO e
WEATHER).
4. Pressione MODE (NEXT) para iniciar o processo de configuração.
5. Pressione START/SPLIT (+) ou STOP/RESET (-) para aumentar ou
diminuir os valores de configuração.
6. Pressione MODE (NEXT) para avançar para a opção de configuração
seguinte.
7. Pressione SET (DONE) para finalizar.
8. Ao chegar ao local, pressione e mantenha pressionado STOP/RESET
para selecionar e calibrar em relação a esse ponto de referência no
modo CAL. Quando o relógio emite um bipe, completa-se a calibração.
188
P
Page 98

191
Cronógrafo:
registra os segmentos cronometrados durante toda a atividade.
Declinação:
para considerar a diferença entre o norte verdadeiro e o norte
magnético, a bússola faz uso da configuração dos ângulos de declinação.
As declinações para o oeste são subtraídas da direção computadorizada da
bússola, enquanto as declinações para o leste, são somadas. Consulte
a tabela nas páginas 173 e 174 para obter uma lista dos valores de
declinação das principais cidades do mundo.
Digital:
quando relacionado com relógios, digital informa a hora com o uso
de números.
In Hg:
significa polegadas de mercúrio, unidade de medida da pressão
atmosférica. Uma polegada (25,40 mm) de mercúrio é equivalente a 33,86
milibares.
Volta:
o tempo da volta (Lap time) registra o tempo ou a duração de cada
segmento da sua atividade.
Norte magnético:
direção do pólo magnético da Terra e direção para a qual
a agulha da bússola aponta, o qual difere do norte verdadeiro (consulte a
seguir). A diferença entre o norte verdadeiro e o norte magnético é utilizada para calcular o ângulo de declinação utilizado pela bússola do relógio.
GLOSSÁRIO
Este glossário oferece definições para alguns dos recursos e algumas das
funções do relógio descritos neste manual.
Altímetro:
instrumento utilizado para determinar a altitude de um objeto em
relação a um nível fixo. Tipicamente,a altitude é medida em relação ao nível
do mar.
Analógico:
quando relacionado com relógios, analógico informa a hora com
o uso dos ponteiros.
Barômetro:
mede a pressão atmosférica e auxilia na previsão de mudanças
climáticas.
Pressão barométrica:
pressão atmosférica quando relacionada com a previsão
climática. Geralmente, uma maior pressão indica condições climáticas mais
quentes e com céu mais claro, enquanto que uma pressão mais baixa, tipicamente indica uma condição nublada e maior probabilidade de precipitação.
Calibração:
técnica para melhorar a precisão da bússola, do altímetro, do
barômetro e da previsão climática, principalmente pela compensação para
as condições locais.
190
P
Page 99

193
GARANTIA INTERNACIONAL TIMEX
(GARANTIA LIMITADA PARA OS EUA)
A Timex Group USA, Inc. garante o relógio TIMEX
®
contra defeitos de
fabricação por um período de UM ANO a partir da data original da
compra. A Timex e suas filiais em todo o mundo reconhecerão esta
Garantia Internacional.
Observe que a Timex poderá, por sua própria opção, consertar o relógio
colocando componentes novos ou totalmente recondicionados e inspecionados ou substituí-lo por um modelo idêntico ou similar.
IMPORTANTE— OBSERVE QUE ESTA GARANTIA NÃO COBRE DEFEITOS
OU DANOS OCASIONADOS AO SEU RELÓGIO:
1) após vencer o período de garantia;
2) se o relógio não foi comprado originalmente de um revendedor
Timex autorizado;
3) se for por consertos não executados pela Timex;
4) se for devido a acidentes, adulteração ou abuso e
5) se o defeito for no cristal, na pulseira, na caixa do relógio,
nos acessórios ou na pilha. A Timex poderá cobrar o custo de
substituição de qualquer uma dessas peças.
MB:
significa milibar, unidade métrica para medir a pressão atmosférica.
Um milibar é igual a 0,0295 polegadas de mercúrio (0,7500 mm Hg a 0 °C).
Pressão ao nível do mar:
pressão atmosférica para um local específico ajustada para a diferença na altitude de um local. Tipicamente, a pressão no
local será mais baixa que a pressão ao nível do mar porque a pressão
atmosférica diminuiu com a altitude.
Tempo fracionado:
registra o tempo total transcorrido desde o começo da
sua atividade atual.
Usar uma volta ou um tempo fracionado:
ao usar uma volta ou um tempo
fracionado, o cronógrafo registra o tempo do segmento atual e automaticamente começa a cronometrar outro seguinte.
Norte verdadeiro:
pólo norte geográfico onde convergem todas as linhas de
longitude. Os mapas são arranjados com o norte verdadeiro na parte superior. A diferença entre o norte verdadeiro e o norte magnético é utilizada
para calcular o ângulo de declinação utilizado pela bússola do relógio.
192
P
Page 100

195
outros países, você deverá pagar as despesas de manuseio e remessa.
NUNCA INCLUA NENHUMA PULSEIRA ESPECIAL OU OUTRO ARTIGO DE
VALOR PESSOAL NA SUA REMESSA.
Nos EUA, ligue para 1-800-328-2677 para obter informações adicionais
sobre a garantia. No Canadá, ligue para o 1-800-263-0981.No Brasil, ligue
para o 0800-168787. No México, ligue para o 01-800-01-060-00. Na
América Central, no Caribe, nas Bermudas e nas Bahamas, ligue para o
(501) 370-5775 (EUA). Na Ásia, ligue para o 852-2815-0091. No Reino
Unido, ligue para o 44 020 8687 9620. Em Portugal,ligue para o 351 212
946 017. Na França, ligue para o 33 3 81 63 42 00.Na Alemanha/Áustria,
ligue para o +43 662 88921 30. No Oriente Médio e na África, ligue para
o 971-4-310850. Para outras áreas, entre em contato com o representante
autorizado ou distribuidor Timex para obter informações sobre garantia.
Para facilitar a obtenção do serviço de fábrica, os revendedores participantes autorizados Timex no Canadá, nos EUA e em outros lugares podem
fornecer um envelope pré-endereçado e pré-pago do local de consertos.
©2008 Timex Group USA, Inc. O logotipo TIMEX E, EXPEDITION e NIGHTMODE são marcas comerciais registradas da Timex Group USA, Inc.INDIGLO
é uma marca comercial registrada da Indiglo Corporation nos Estados Unidos
e em outros países. WS4 é uma marca registrada da Timex Group B.V.
ESTA GARANTIA E OS RECURSOS AQUI CONTIDOS SÃO EXCLUSIVOS E
SUBSTITUEM TODAS AS OUTRAS GARANTIAS,EXPRESSAS OU IMPLÍCITAS,
INCLUSIVE QUALQUER GARANTIA IMPLÍCITA DE COMERCIABILIDADE OU
ADEQUAÇÃO A UM FIM PARTICULAR. A TIMEX NÃO ASSUME NENHUMA
RESPONSABILIDADE QUANTO A DANOS ESPECIAIS, INCIDENTAIS OU DE
CONSEQÜÊNCIA. Alguns países e estados não permitem limitações sobre
garantias implícitas nem permitem exclusões ou limitações de danos, por
isso, essas limitações poderão não se aplicar ao seu caso. Esta garantia
lhe confere direitos legais específicos, bem como outros direitos os quais
variam de um país para outro e de um estado para outro.
Para obter o serviço de garantia, devolva o relógio à Timex,a uma das filiais
ou ao revendedor autorizado Timex onde o relógio foi comprado, juntamente
com o Cupom de Conserto do Relógio original devidamente preenchido ou,
somente nos EUA e no Canadá, o Cupom de Conserto do Relógio original
devidamente preenchido ou uma declaração porescrito identificando o seu
nome, endereço, número de telefone e data e local da compra. Inclua com
o relógioo seguinte pagamento para cobrir as despesas de manuseio
e remessa (não se refere a custos de consertos): nos EUA, um cheque ou
vale-postal no valor de US$8; no Canadá, um cheque ou vale-postal no valor
de CAN$7; no Reino Unido, um cheque ou vale-postal no valor de £2,50. Nos
194
P
 Loading...