

Page 1
Model T488
Caller ID/Call Waiting
Telephone Clock Radio with
Nature Sounds and Dual Alarm
SNOOZE / NIGHT LIGHT
O
N
O
M1
M2
M
1
2
4
5
7
8
0
3
3
6
9
RADIO
S
LE
EP
FM 88 92 96 100 104 108 MHz
AM 54 60
70 80 100 120 140
SOUNDS
7•5•2
SELEC
T
106
DELETE
170
x
10
DOWN
kHz
FF
R
E
SE
T
FM
AM
UP
TUNING
SET
RAD
IO
/SO
U
ND
S
X
A
E
M
M
U
L
O
V
IN
M
DIAL
Page 2

Table of Contents
Consumer Guide to Product Safety.......................................................................................................................3-4
FCC Telephone Information .....................................................................................................................................5-7
Importance of the Ringer Equivalence Number
Prohibited Uses
Rights of the Telephone Company
Registration
Problems or Malfunctions
Initial Preparation
Consumer Information ..............................................................................................................................................8-9
Installation and Maintenance .....................................................................................................................................10
Installation and Setup
“Sure Alarm” Battery Backup Installation
Best Possible Battery Performance
Maintenance
Controls and Indicators ...............................................................................................................................................11
LCD Display with Indicators .......................................................................................................................................12
Programming Your Settings ....................................................................................................................................13
Operating the Telephone .......................................................................................................................................14-15
Telephone Installation
Making an Outgoing Call
Receiving an Incoming Call
Telephone Features
Speed Dial Programming and Dialing
Voicemail Indicator ..................................................................................................................................................15
Operating Caller ID ...............................................................................................................................................16-17
Using the Caller ID List
Caller ID with Call Waiting
Operating the Radio and Nature Sounds..................................................................................................................18
Listening to the Radio
Sleeping to the Radio and Nature Sounds
Antenna Information and Adjustment
Operating the Dual Alarms...................................................................................................................................19-20
Setting Alarm-1 for AM/FM Radio
Setting Alarm-2 for Bell or Bird Sounds
Checking Your Alarm Time Settings
Turning Off the Alarms
Adjusting the Display Brightness ...........................................................................................................................20
Troubleshooting ....................................................................................................................................................21-22
Warranty ................................................................................................................................................................23
Page 3
CAUTION
RISK OF ELECTRIC SHOCK
DO NOT OPEN
CAUTION:
OR BACK OF UNIT. NO USER-SERVICEABLE PARTS INSIDE. REFER SERVICING
TO QUALIFIED SERVICE PERSONNEL.
WARNING:
THIS APPLIANCE TO RAIN OR MOISTURE.
TO REDUCE THE RISK OF ELECTRIC SHOCK, DO NOT REMOVE COVER
TO REDUCE THE RISK OF FIRE OR ELECTRIC SHOCK, DO NOT EXPOSE
The exclamation point within an equilateral triangle is intended to alert the user
of the presence of important operating and maintenance (servicing) instructions
in the literature accompanying the appliance.
A Consumer Guide to Product Safety
IMPORTANT SAFETY INSTRUCTIONS
When used in the directed manner, this unit has been designed and manufactured to ensure your personal safety.
However, improper use can result in potential electrical shock or fire hazards. Please read all safety and operating
instructions carefully before installation and use, and keep these instructions handy for future reference. Take
special note of all warnings listed in these instructions and on the unit.
1. Read and understand all instructions.
2. Follow all warnings and instructions marked on the product.
3. To prevent damage or injury, do not set up or use the product near water or damp areas, such as near a bathtub, washbowl, kitchen
sink, laundry tub, in a wet basement, or near a swimming pool.
4. Never push objects of any kind into this product through cabinet slots as they may touch dangerous voltage points or shortout parts
that could result in a risk of fire or electric shock. Never spill liquid of any kind on the product.
5. To reduce the risk of electric shock, do not disassemble this product yourself, but take it to a qualified serviceman when service or
repair work is required. Opening or removing covers may expose you to dangerous voltage or other risks. Incorrect reassembly can
cause electric shock when the appliance is subsequently used. Read the warranty for further information.
6. Unplug the product from the wall outlet before cleaning. Clean the casing with a soft cloth moistened only with mild soap and water.
Stronger cleaning agents are not recommended, as they may damage the surface of the case.
3
Page 4

A Consumer Guide to Product Safety (continued)
IMPORTANT SAFETY INSTRUCTIONS
7. Unplug the product from the wall outlet and refer servicing to qualified service personnel under the following conditions:
A. If liquid has been spilled into the product.
B. If the product has been exposed to rain or water.
C. If the product does not operate normally by following the operating instructions, adjust only those controls that are covered by
the operating instructions because improper adjustment of other controls may result in damage and will often require extensive
work by a qualified technician to restore the product to normal operation.
8. Avoid using a non-cordless telephone during an electrical storm. There may be a remote risk of electric shock from lightning.
9. Do not use a telephone to report a gas leak in the vicinity of the leak.
10. Never install telephone wiring during a lightning storm.
11. Never install telephone jacks in wet locations unless the jack is specifically designed for wet locations.
12. Never touch uninsulated telephone wires or terminals unless the telephone line has been disconnected at the network interface.
13. Use caution when installing or modifying telephone lines.
14. Do not place the product on an unstable cart, stand or table. The product may fall, causing serious damage to the product.
15. Use only the power cord and batteries indicated in this manual. Do not dispose of batteries in a fire. The may explode. Check with
local codes for possible special disposal instructions.
SAVE THESE INSTRUCTIONS
Importantes Mesures De Sécurité
Certaines mesures de sécurité doivent être prises pendant l’utilisation de matérial téléphonique afin de réduire les risques d’incendie,
de choc électrique et de blessures. En voici quelquesunes:
1. Ne pas utiliser l’appareil pr`es de l’eau, p.ex., pr`es d’une baignoire, d’un lavabo, d’un évier de cuisine, d’un bac à laver, dans un
soussol humide ou pr`es d’une piscine.
2. Éviter d’utiliser le téléphone (sauf s’il s’agit d’un appareil sans fil) pendant un orage électrique, Ceci peut présenter un risque de choc
électrique causé par la foudre.
3. Ne pas utiliser l’appareil téléphonique pour signaler une fuite de gaz s’il est situé près de la fuite.
4. Utiliser seulement le cordon d’alimentation et le type de piles indiqués dans ce manuel. Ne pas jeter les piles dans le feu: elles peuvent
exploser. Se conformer aux règlements pertinents quant `a l’élimination des piles.
CONSERVER CES INSTRUCTIONS
4
Page 5

FCC Telephone Information
Note: The information that follows is extremely important. It should be read and understood before connecting the telephone
to the telephone line.
The handset complies with Part 68 of the Federal Communication Commission (FCC) rules for connection to telephone
lines. The telephone may replace some or all of your regular instruments.
Importance of the Ringer Equivalence Number
The Ringer Equivalence Number (REN) represents the electrical load that will be applied to your telephone line once the
device is connected. The REN is useful to determine the quantity of devices you may connect to your telephone line and
still have all the devices ring when your number is called. In most, but not all areas, the sum of the REN’s of all devices
should not exceed five (5.0). The setting of the Ringer Switch, if applicable, on your telephone has no effect on the REN.
Prohibited Uses
Your telephone may not be connected to a coin operated service provided by the telephone company. Connection to party
lines is subject to state tariffs. (Contact your state public utility commission for information.)
Rights of the Telephone Company
If your telephone causes harm to the telephone network, the telephone company may discontinue your service temporarily.
If possible, they will notify you in advance. If advance notice is not practical, you will be notified as soon as possible. You
will be given the opportunity to correct the situation and you will be informed of your rights to file a complaint to the FCC.
The telephone company may make changes to its technical operations and procedures; if such changes effect the compatibility
or use of this device, the telephone company is required to give adequate notice of the change.
5
Page 6

FCC Telephone Information
Registration
This Timex telephone set is registered with the FCC based upon compliance with part 68 of its rules. Connection of this
telephone to the nationwide telephone communications network must be through a standard network interface (compatible
modular jack which is Part 68 Compliant) jack which you can order from your telephone company if not already installed.
The USOC number of the registration jack for the equipment is RJ11C.
Note: FCC registration does not constitute an expressed or implied guarantee on performance. Only the limited warranty
set forth in this booklet covers the performance of this telephone set.
Problems or Malfunctions
If a problem occurs, you should disconnect the telephone from the telephone line until it can be determined whether your
set or the telephone line itself is the source of the trouble, The telephone can only be reconnected after the problem or
malfunction has been corrected.
Initial Preparation
1. Remove the unit and packing materials from the carton. You should save all packing materials if the unit ever needs to
be returned for service. If you do not wish to save the packing materials, please dispose of them properly.
2. Place the unit on a stable, level surface, away from direct sunlight and close to a modular wall jack. Also, keep the unit
away from sources of excess dust, dirt, heat, water, moisture, vibration, or strong magnetic fields.
6
Page 7

FCC Telephone Information
This device complies with Part 15 of the FCC Rules. Operation is subject to the condition that this device does not cause
harmful interference.
In addition, for a Class B digital device or peripheral, the instructions furnished to the user shall include the following or
similar statement, placed in a prominent location in the text of the manual:
Warning: Changes or modifications to this unit not expressly approved by the party responsible for compliance
could void the user’s authority to operate the equipment.
NOTE: This equipment has been tested and found to comply with the limits for a Class B digital device, pursuant
to Part 15 of the FCC Rules. These limits are designed to provide reasonable protection against harmful
interference in a residential installation. This equipment generates, uses, and can radiate radio frequency
energy and, if not installed and used in accordance with the instructions, may cause harmful interference to
radio communications. However, there is no guarantee that interference will not occur in a particular installation.
If this equipment does cause harmful interference to radio or television reception, which can be determined
by turning the equipment off and on, the user is encouraged to try to correct the interference by one or more
of the following measures:
1. Reorient or relocate the receiving antenna.
2. Increase the separation between the equipment and receiver.
3. Connect the equipment into an outlet on a circuit different from that to which the receiver is connected.
4. Consult the dealer or an experienced radio TV technician for help.
“This Class B digital apparatus conforms with Canadian ICES-003.”
“Cet appareil num
érique de la classe B est conforme `a la norme NMB-003 du Canada.”
7
Page 8

Consumer Information
This equipment complies with Part 68 of the FCC rules and the requirements adopted by the ACTA. On the bottom of
this equipment is a label that contains, among other information, a product identifier in the format US:AAAEQ##TXXXX.
If requested, this number must be provided to the telephone company.
Applicable certification jacks Universal Service Order Codes (USOC) for the equipment is provided (i.e., RJ11C) in the
packaging with each piece of approved terminal equipment.
A plug and jack used to connect this equipment to the premises wiring and telephone network must comply with the
applicable FCC Part 68 rules and requirements adopted by the ACTA. A compliant telephone cord and modular plug is
provided with this product. It is designed to be connected to a compatible modular jack that is also compliant. See installation
instructions for details.
The REN is used to determine the number of devices that may be connected to a telephone line. Excessive RENs on a
telephone line may result in the devices not ringing in response to an incoming call. In most but not all areas, the sum of
RENs should not exceed five (5.0). To be certain of the number of devices that may be connected to a line, as determined
by the total RENs, contact the local telephone company. For products approved after July 23, 2001, the REN for this product
is part of the product identifier that has the format US:AAAEQ##TXXXX. The digits represented by ## are the REN without
a decimal point (e.g., 03 is a REN of 0.3). For earlier products, the REN is separately shown on the label.
If this equipment T488 causes harm to the telephone network, the telephone company will notify you in advance that
temporary discontinuance of service may be required. If advance notice isn't practical, the telephone company will notify
the customer as soon as possible. Also, you will be advised of your right to file a complaint with the FCC if you believe it
is necessary.
8
Page 9

Consumer Information
The telephone company may make changes in its facilities, equipment, operations or procedures that could affect the
operation of the equipment. If this happens the telephone company will provide advance notice in order for you to make
necessary modifications to maintain uninterrupted service.
Please follow instructions for repairing if any (e.g. battery replacement section); otherwise do not alternate or repair any parts
of device except specified.
Connection to part line service is subject to state tariffs. Contact the state public utility commission, public service commission
or corporation commission for information.
This equipment is hearing-aid compatible.
NOTICE: If your home has specially wired alarm equipment connected to the telephone line, ensure that the installation
of this T488 does not disable your alarm equipment. If you have questions about what will disable alarm equipment, consult
your telephone company or a qualified installer.
NOTICE: According to telephone company reports, AC electrical surges, typically resulting from lightning strikes, are very
destructive to telephone equipment connected to AC power sources. To minimize damage from these types of surges, a
surge arrestor is recommended.
Should you experience trouble with this equipment, please contact Consumer Repair Department SDI Technologies
Inc. Timex Audio Products Division, 1401 Pullman Drive, Suite A, El Paso, Texas 79936-7726. Phone#
1-800-888-4491 for repair or warranty information. If the equipment is causing harm to the telephone network, the
telephone company may request that you disconnect the equipment until the problem is resolved.
9
Page 10

Installation and Maintenance
Installation and Setup
1. Remove unit and packing materials from the carton. You should save packing materials in case unit needs to be returned
for service. If you do not wish to save the packing materials, please dispose of them properly.
2. Place the unit on a stable, level surface, close to an AC outlet, out of direct sunlight, and away from sources of dust,
dirt, heat, water, moisture, vibration, and strong magnetic fields.
3. After activating the batteries and reading the Maintenance notes, plug the AC cord into an outlet.
“Sure Alarm” Battery Backup Installation
It is strongly recommended that 4 "AAA" batteries be installed in order to activate this product’s “Sure Alarm” Battery Backup
feature as well as some of the phone features. In the event that a power failure or other interruption occurs, the Battery
Backup will maintain clock and alarm settings for the life of the battery, ensuring that the alarm (buzzer only) will sound at
the set time. During any interruptions the time and alarm settings will be saved and restored when power is again active.
The telephone will also continue operation during power failures.
1. Use a Phillips screwdriver to unscrew the battery compartment door.
2. Install 4 "AAA" batteries (alkaline is recommended for longer life), matching the +
and – polarities with the diagram inside the battery compartment.
3. Close the battery compartment door and tighten the screw with the Phillips screwdriver.
The display’s Battery Low Indicator will flash when no batteries are installed, or when
the batteries are weak or installed incorrectly.
For the Best Possible Performance
• We recommend using alkaline batteries.
• Non-rechargeable batteries are not to be recharged.
• Exhausted batteries are to be removed from the unit.
• The supply terminals are not to be short-circuited.
• Only batteries of the same or equivalent type as recommended are to be used.
• Different types of batteries or new and used batteries are not to be mixed.
• Rechargeable batteries are to be removed before being charged (if removable).
Maintenance
1. Place the unit on a level surface away from direct sunlight or sources of excessive heat.
2. Protect your furniture when placing the unit on natural wood or wood with a lacquered finish. A cloth or other protective
material should be placed between the unit and the furniture.
3. Clean the casing with a soft cloth moistened only with mild soap and water. Stronger cleaning agents, such as thinner
or similar materials, are not recommended as they may damage the surface of the case.
4. If the unit is not to be used for a prolonged period, remove the batteries to prevent possible corrosion. Should
the compartment become corroded or dirty, clean the compartment thoroughly and replace the batteries.
Battery Compartment
10
Page 11

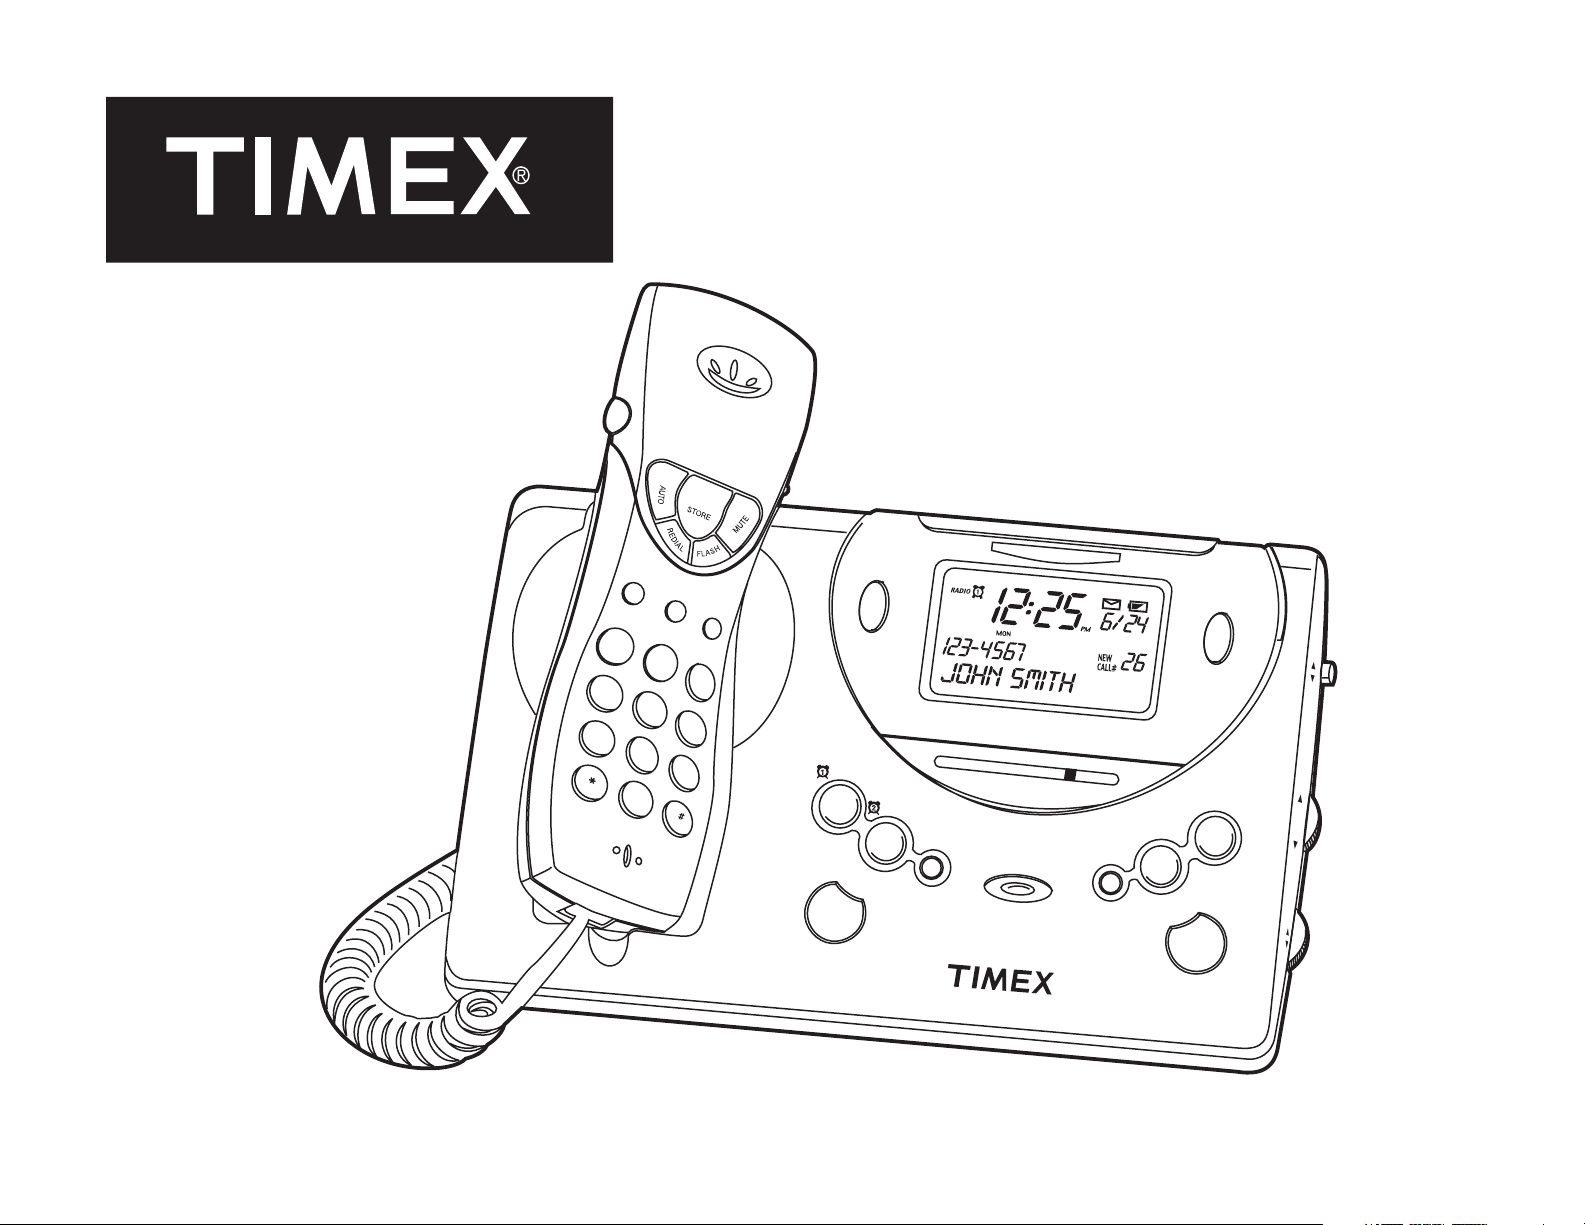
Controls and Indicators
Auto Button
Volume Boost Button
Redial Button
Memory Set Buttons
Flash Button
Ringer Switch
Store Button
4
7
Mute Button
Snooze/Night-Light Button
Tone/Pulse Switch
On/Sleep Button
Sleep Volume Button
STORE
O
SET
SLEEP
RAD
N
FM
AM
IO
SO
U
N
M
1
M2
1
8
0
M3
2
3
5
6
9
S
N
O
O
Z
E
/
N
IG
88 92 96 100 104 108
54 70 100 140 170
D
7•5•2
R
A
D
IO
/S
O
U
N
D
S
H
T
-
L
I
G
H
T
O
FF
FM
R
ESET
M
H
z
x10KHz
U
P
D
O
W
D
E
N
L
E
T
E
DIAL
BAND
AM
G
N
I
N
U
T
IN
M
E
M
VOLU
AX
M
New Call Indicator
Off/Reset Button
Band Switch
Reset Button (bottom)
Tuning Control
Volume Control
Control Key
Handset Controls
Cabinet Controls
Alarm-1 Button
Set Button
Alarm-2 Button
7•5•2 Button
Radio/Sounds Button
11
Dial Button
Down Button
Delete Button
Up Button
Page 12

LCD Display with Indicators
Alarm-1 (Radio) Indicator
Alarm-2 (Sounds) Indicator
Date/7-5-2 Indicator
Sleep Sounds Indicator
PM Indicator
Clock
RADIO
SOUND
((SLEEP
1
2
12:25
SUN MON TUES WED THU FRI SAT
PM
1-888-555-3312
VALERIE BUCK
Voicemail Indicator
9/07
CALL WAITING
NEW
CALL#
06
Battery Low Indicator
Calendar
Call Waiting Indicator
Caller ID Information
(Bottom of Display)
12
Page 13

Programming Your Settings
Before using the Telephone Clock Radio, you will need to program some important information into the unit.
Note: At any time during programming you may return to the standard display by pressing the Dial Button.
Selecting a Language
1. The first step in programming your settings is selecting a language. Press and hold the Set Button until
the display shows the words “Set Language.”
2. Press the Up or Down Buttons to view and choose from the language options: English, French, and
Spanish. Press the Set Button to enter the language. The unit will beep and advance to the next option.
Selecting a Display Contrast
1. After selecting your language, you will be able to select your display contrast. Press the Up or Down
Buttons to select from the eight contrast levels. The display will show the selected contrast level.
2. Press the Set Button to program the contrast level. The unit will beep and advance to the next option.
Programming the Time, Calendar, and Day
1. After programming the contrast, the display will show “Set Time/Date” and feature a flashing clock setting.
Press the Up or Down Buttons to set the clock. Holding a button for a few seconds will cause the
setting to advance or reverse rapidly. Be sure to set the proper AM/PM time, as shown by the PM Indicator.
2. When you have set the clock time, press the Set Button to continue to the calendar setting. Follow the
above instructions to select and program the current month/day setting.
3. Press the Up or Down Buttons to choose the current day, then press the Set Button.
Programming the Home and Local Area Codes
Before programming your area codes, you must first determine whether you are in a seven-digit or ten-digit local
calling area. (In some areas, callers must dial an area code, though not a “1” before it, for all local calls.) “Sevendigit” local callers should follow the directions in Step 1 below. “Ten-digit” local callers should go to Step 2 below.
1. After programming the time, calendar, and day settings, the display will show the words “Home Area Code.”
If you live in an area where you do not need to dial the area code for local calls, use the Up or Down
Buttons and the Set Button to program your home phone number’s area code into the system. You
will then leave the Local Area Code screens blank (three dashes) to complete the programming process.
2. If you need to dial an area code for all calls, including local calls, leave the Home Area Code screen blank
and use the Local Area Code screens to program area codes for numbers which you can dial without using
the “1” prefix. You may program up to five local area codes into the Local Area Codes section.
13
Page 14

Operating the Telephone
Telephone Installation
Note: Basic telephone features can be used without Caller ID, call waiting, or voicemail subscriptions from your
telephone company.
1. Connect one end of the coiled cord to the handset and the other to the jack on the left side of the unit.
2. Plug one end of the straight cord into the jack on the back of the unit and the other into your wall jack.
3. Take the AC power cord and plug the one-pronged end into the circular jack on the back of the unit and the
two-pronged end into your wall power outlet.
4. Set the Tone/Pulse Switch to Tone for touchtone dialing or Pulse for use on rotary lines to match your
telephone line.
CAUTION: After connecting the telephone cord to the telephone line, do not, under any circumstances,
disconnect the plug from the handset without first disconnecting the cord from the telephone line.
Making an Outgoing Call
1. Lift the handset to make a phone call. If the phone has been installed and connected properly, the keypad
LED will light up and you will hear a dial tone.
2. Dial the telephone number.
3. To increase the volume level of the call, press the Volume Boost Button, located on the left side of the
handset. Press the button again to resume normal volume level.
4. After the phone call has been completed, return the handset to the base, making sure that the handset has
been properly replaced and that the hook switch is pressed properly.
Receiving an Incoming Call
1. When the phone rings, lift the handset and listen for the incoming call. You may set the Ringer Switch
to the Hi, Lo, or Mute setting to select a ring volume.
2. To increase the volume level of the call, press the Volume Boost Button, located on the left side of the
handset. Press the button again to resume normal volume level.
3. After the phone call has been completed, return the handset to the base, making sure that the handset has
been properly replaced, and that the hook switch is pressed properly.
NOTE: This unit features an automatic mute function. Lifting the handset from the cradle will mute the radio
or nature sounds. The sounds will automatically resume playing when the handset is returned to the cradle.
14
Page 15

Operating the Telephone
Telephone Features
Flash Function: Press the Flash Button to quickly hang up the phone and receive a dial tone. This button
can also be pressed to access the Call Waiting Service. (Call Waiting is a special service; contact your telephone
company for more information.)
Redial Function: Press the Redial Button to again dial the last number called.
Mute Function: Press and hold the Mute Button during a phone conversation to mute your voice.
Volume Boost: Press the Volume Boost Button to increase the receiver volume. Press again to
resume normal volume level.
Speed Dial Programming and Dialing
Note: This phone has a 13-number storage memory for automatic dialing, with three one-touch and ten
two-touch speed dial numbers.
1. To program a phone number for speed dialing, press the Store Button and then dial a number, up to
21 digits. When you have finished entering the number, press the Store Button again.
2. After you have stored the number, press one of the Memory Set Buttons, M1, M2, or M3, to program
the number as a one-touch speed dial, or press a keypad number from 0-9 to program the number as a two-
touch speed dial. Keep a record of your numbers and their speed dial codes. You may continue programming
up to 13 phone numbers.
3. To dial one of your one-touch speed dial numbers, simply lift the handset and press M1, M2, or M3. To dial
one of your two-touch speed dial numbers, lift the handset, press the Auto Button, and then press
a keypad number from 0-9 to dial the stored number.
4. If you wish to replace one of your speed dial numbers with a new one, simply program the new phone number
in the old number’s storage slot.
Voicemail Indicator
If you have a voicemail service through your telephone company, the display’s Voicemail Indicator will appear
when you have a new voicemail message to be retrieved.
15
Page 16

Operating Caller ID
In order to use the Caller ID feature, you must contact your telephone company to receive information about
subscribing to it. The name of this service may vary according to your telephone company.
RADIO
1
10:14
MON
PM
5/25
TOTAL 11 NEW 04
Caller ID displays the caller’s phone number (and the caller’s name, if available), and keeps a record of the date
and time received for incoming calls. This allows you to identify the caller before you answer the phone, or to
see a list of phone calls you missed while you were out. For the feature to work correctly, it is important that
you accurately program your home and local area codes, as instructed in the Programming Your Settings section.
The above shows the display for a Caller ID-enabled phone with both old and new records stored in memory.
The phone stores data for the last 80 calls received, including unidentifiable calls. The system will store numbers
until they are erased, or until the maximum 80 stored calls have been reached, at which time older calls will be
erased from the memory.
Note: In some cases, including but not limited to the below, the caller’s name and/or number will not appear
on your display. The date and time the call was received will be shown, but the record will appear as “Unknown.”
Private/Blocked: In most areas, callers can choose to have their ID information blocked.
Out-of-Area: Calls made from foreign countries or domestic areas which do not have available Caller ID
information transmission will not appear in your Caller ID records.
Office Extensions: When a phone call is made from an office building that uses extensions or multiple phone
lines, the number that appears in your records may not be the same as the number you would need to dial to
contact the caller.
16
Page 17

Operating Caller ID
12:07
1-800-888-4491
PM
5/24
NEW
CALL#
03
SDI TECHNOLOGIES
Using the Caller ID List
1. In the example shown on the previous page, the system has 11 Caller ID records stored in memory, including
four new records. When new Caller ID records are available, the New Call Indicator will flash. When all
of the new records have been viewed or erased, the indicator will stop flashing.
2. Press the Up or Down Buttons to scroll through the list. The above shows the display for one of the
records, featuring the caller’s name and number, along with the time and date the call was received.
3. From this screen, you can return the missed call. While the number is displayed, lift the handset and press
the Dial Button. You will be connected to the listed number.
4. To erase the record, press the Delete Button. The main display will update the total number of records.
Caller ID with Call Waiting
This telephone is compatible with the “Caller ID with Call Waiting” service from your telephone company. It is
important that you specify “Caller ID with Call Waiting” when ordering, as this may be different from having the
two features separately.
When a new call comes in while you are talking, the new caller’s information will appear on your display for 15
seconds. To switch to the new caller, click the Flash Button. Click the button again to switch back to the
first caller. If you do not immediately talk to the new caller, the caller information will still be saved in the Caller
ID record.
17
Page 18

Operating the Radio and Nature Sounds
Listening to the Radio
1. Press the On/Sleep Button once to turn on the radio. The display will read “Radio On” and the radio
dial will light. If the On/Sleep Button is pressed more than once, the unit will enter the sleep mode,
with the radio operating on a programmable timer. See below for more information about this feature.
2. Slide the Band Switch to the AM or FM position to select a radio band.
3. Rotate the Tuning Thumbwheel to select a radio station.
4. Adjust the volume using the Volume Thumbwheel.
5. Press the Off/Reset Button to off turn the radio.
Sleeping to the Radio or Nature Sounds
This unit features a programmable radio sleep timer that will shut the radio or relaxing nature sounds off after a
set amount of time.
1. Press the On/Sleep Button twice to enter the sleep mode. This sets the sleep timer to the 90-minute
setting. The sleep timer setting remains active for approximately ten seconds before returning to the standard
display. The Sleep Indicator will be visible in the display.
2. Continue pressing the On/Sleep Button to select a 90-, 60-, 30-, or 15-minute sleep timer.
3. If you wish to fall asleep to the radio, press the Radio/Sounds Button until the display reads “Radio
On,” and then use the instructions in the Listening to the Radio section to select a radio station and volume.
4. If you wish to fall asleep to one of the nature sounds, press the Radio/Sounds Button to select from
the three nature sounds, and then rotate the Volume Thumbwheel to adjust the listening volume.
5. To adjust the sleep sounds volume without affecting the alarm volume, press the Sleep Volume Button
until you reach the desired volume. The Sleep Indicator will show the sleep volume level.
6. Press the Off/Alarm Reset Button to turn off the sleep sounds before the time has elapsed.
Note: To see the number of minutes remaining on the sleep timer, press the On/Sleep Button once. The
display will show the remaining sleep time for approximately ten seconds before returning to the normal mode.
Antenna Information and Adjustment
FM – Extend the FM wire antenna to its full length and vary the direction to its strongest signal.
AM – The AM bar antenna is located inside the cabinet. Rotate the unit to find the strongest AM signal.
18
Page 19

Operating the Dual Alarms
This clock radio features a dual alarm system, with two separate alarms that can be operated independently.
The alarms can be set to wake two people at different times, or to have a main alarm and a backup. One alarm
features your choice of radio stations as an alarm wake sound, while the second features bell and bird sounds.
Setting Alarm-1 for AM/FM Radio
1. Press and hold the Alarm-1 Button until the Alarm-1 settings appear on the flashing display. You will
have ten seconds to begin setting the alarm before the display reverts to the standard setting.
2. Press the Up or Down Buttons to set the alarm time. Holding a button for a few seconds will cause
the setting to advance or reverse rapidly. Set the proper AM/PM time, as shown by the PM Indicator.
3. After setting the wake time and sound, you will need to select your 7-5-2 setting. The 7-5-2 setting lets you
set the alarm for a full week, weekdays only, or the weekend. Before setting the alarm, be sure that you have
set the correct day and date, as shown in the Programming Your Settings section of
display is still flashing, press the
7-5-2 Button
until the desired alarm days are shown on the display.
this manual. While the
4. Use the
Alarm-1 wake sound settings. For more information, see the Listening to the Radio section of this manual.
5. After you have programmed the settings, press the Alarm-1 Button or wait ten seconds to return to
the standard display. The Alarm-1 Indicator will appear on the display, showing that the alarm is set. If
the Indicator does not appear, press the Alarm-1 Button once.
Band Switch, Tuning Thumbwheel, and the Volume Thumbwheel
to select your
Setting Alarm-2 for Bell or Bird Sounds
1. Press and hold the Alarm-2 Button until the Alarm-2 settings and “Set Alarm 2” appear on the display.
2. Press the Up or Down Buttons to set the alarm time. Holding a button for a few seconds will cause
the setting to advance or reverse rapidly. Set the proper AM/PM time, as shown by the PM Indicator.
3.
Press the Radio/Sounds Button to select one of the wake sounds: Cathedral Bells, Chimes, or Birds
4. See Note #3 in the previous section for instructions on setting the 7-5-2 alarm setting for Alarm-2.
5. After you have programmed the Alarm-2 settings, press the Alarm-2 Button or wait ten seconds to
return to the clock display. The Alarm-2 Indicator will appear on the display, showing that the alarm is
set. If the Indicator does not appear, press the Alarm-2 Button once.
19
.
Page 20

Operating the Dual Alarms (Continued)
Checking Your Alarm Time Settings
To check any of your alarm settings after you’ve set the alarm, press one of the Alarm Buttons so that its
settings appear on the display. The display will return to the standard clock display after a few seconds.
After you have checked the settings, be sure that the Alarm Indicator still appears on the display in order so
that the alarm will sound at the set time.
Turning Off the Alarms
1. After the alarm sounds, press the Alarm Off/Reset Button to turn off the alarm while still maintaining
the programmed 7-5-2 alarm settings. To turn off an alarm and cancel its 7-5-2 settings, press its Alarm
Button so that its Alarm Indicator no longer appears on the display.
Note: The bird and bell sounds are “Gentle Wake” alarms, featuring a gently rising alarm volume.
2. If it is not turned off, the alarm will sound for an hour before stopping. As long as an Alarm Indicator
appears on the display, the alarm will sound at the set time, according to the 7-5-2 settings.
3. To activate the snooze feature, press the Snooze/Night-Light Button when the alarm sounds. The
alarm will shut off for approximately nine minutes before sounding again. The feature can be repeated several
times during the one-hour snooze cycle.
Adjusting the Display Brightness
This alarm clock radio features an adjustable display backlight, with dim, medium, and bright settings. To select
a backlight setting, press the Night-Light/Snooze Bar until the desired brightness is reached.
20
Page 21

Troubleshooting: Clock/Radio
PROBLEM
The alarm does not sound
The alarm sounds at an incorrect time
Poor FM reception on certain stations
Poor AM reception on certain stations
Cannot set the alarm times
Unit is on but there is low or no volume at all
Unit shuts off unexpectedly
POSSIBLE CAUSE
• The alarm was not set correctly for AM/PM
• Alarm icons are not on the display
• Date or 7-5-2 settings programmed incorrectly
• The wrong alarm was activated
•Weak or distant station
•Weak or distant station
•The display must be flashing in order to set
the clock/alarm times
• Main volume has been turned all the way down
• Unit was in the Sleep Mode instead of Power
On Mode
• The unit was turned On by the alarm and the
alarm time ended
REMEDY
• Check the alarm time setting
•Press one of the Alarm Buttons so that its
Indicator appears on the display
• Check and reprogram settings
• Make sure the alarm you wish to wake to
is the only icon that appears on the display
• Adjust the direction of the FM wire antenna
• Rotate the unit to gain better reception
• Hold the Time Set Button or one of the
Alarm Set Buttons until the display flashes
• Raise the volume with the volume dial
•Press the Radio On Button once to turn
the unit back on
The radio will not play, or shuts off unexpectedly
The Battery Low icon is on
• Radio automatically mutes when phone is lifted
from the cradle.
• Radio set to sleep sounds timer
• Batteries have been installed incorrectly into
battery compartment or not at all
• Batteries are weak or exhausted
21
• Make sure that phone has been placed in
the cradle correctly
•Press On/Sleep Button once to turn radio
back on
• Install 1 “9-Volt” battery following the
instructions in this manual
• Install 1 “9-Volt” battery following the
instructions in this manual
Page 22

Troubleshooting: Telephone/Caller ID
PROBLEM
No dial tone can be heard
Phone dials but does not connect
Phone does not ring
Caller’s name/number does not appear in the
Caller ID display
Caller’s name/number does not appear on the
display during call waiting
POSSIBLE CAUSE
• Phone has not been installed correctly
• Incorrect touchtone/pulse setting
• Ringer setting set to mute.
• Not subscribed to Caller ID service
• Caller may have blocked ID info or may
be calling from an area or a company that
cannot transmit Caller ID info
•Area code settings programmed
incorrectly.
• Not subscribed to Caller ID service
REMEDY
• Make sure that the phone has been
correctly connected to a working outlet
•Try other dial setting; check correct setting
• Move Ringer Switch from Mute to Hi or Lo
volume setting
• Contact your telephone company for more
information about ordering Caller ID
• No remedy
•Press Set Buttons and reprogram home
and local area codes. See Programming
section for 7/10-digit local calling info
• Contact your telephone company for more
information about ordering Caller ID with
call waiting
You cannot store or dial a one-touch or twotouch memory phone number
While operating Caller ID, Call Waiting, or
other features the display or general
operation “locks up” and will not function
• Number stored incorrectly
• This is extremely rare, and can be
caused by a brief power surge or other
unusual operating action.
• Return to instructions and follow closely,
making sure that the area codes are correct
and that the number is less than 21 digits.
•Press the Reset Button on the bottom
of the cabinet; this may erase all saved
Caller ID information and programmed
settings. DO NOT press this button
unless all other options have failed.
If you have any questions, call SDI Technologies Inc. Timex Audio Products Division Customer Service, 1-800-888-4491.
22
Page 23

Limited 90-Day Warranty Information
Timex Audio Products, a division of SDI Technologies Inc. (hereafter referred to as SDI Technologies), warrants this product
to be free from defects in workmanship and materials, under normal use and conditions, for a period of 90 days from the date
of original purchase.
Should this product fail to function in a satisfactory manner, it is best to first return it to the store where it was originally purchased.
Should this fail to resolve the matter and service still be required by reason of any defect or malfunction during the warranty period,
SDI Technologies will repair or, at its discretion, replace this product without charge (except for a $10.00 charge for handling,
packing, return UPS/postage, and insurance). This decision is subject to verification of the defect or malfunction upon delivery
of this product to the Factory Service Center listed below. The product must include proof of purchase, including date of
purchase. The fee for service after the warranty period or without proof of purchase is $30.00.
Before returning this product for service, please first replace the batteries (if applicable) with fresh ones, as exhausted or
defective batteries are the most common cause of problems encountered.
If service is still required:
1. Remove the batteries (if applicable) and pack the unit in a well padded, heavy corrugated box.
2. Enclose a photocopy of your sales receipt, credit card statement, or other proof of the date of purchase, if within the warranty
period.
3. Enclose a check or money order payable to the order of SDI Technologies, for the sum of $10.00 ($30.00 after warranty period).
4. Send the unit prepaid and insured, to the Factory Service Center listed below.
Consumer Repair Department
SDI Technologies Inc.
Timex Audio Products Division
1401 Pullman Drive, Suite A
El Paso, TX 79936-7726
NOTE: This warranty is valid only if the product is used for the purpose for which it was designed. It does not cover (i) products
which have been damaged by negligence, misuse or accident, or which have been modified or repaired by unauthorized
persons; (ii) cracked or broken cabinets, or units damaged by excessive heat; (iii) damage to CD’s or tape cassettes (if
applicable); (iv) the cost of shipping this product to the Factory Service Center and its return to the owner.
This warranty is valid only in the United States of America and does not extend to owners of the product subsequent to the
original purchaser. Any applicable implied warranties are also limited to 90 days, and SDI Technologies will not be liable for
consequential damages. (Some states do not allow limitations on implied warranties or exclusion of consequential damages,
so these restrictions may not apply to you.) This warranty gives you specific legal rights, and you may also have other rights
which vary from state to state.
For questions or comments regarding this or other products, please call our toll-free number 1-800-888-4491.
TIMEX is a registered trademark of Timex Corporation in the U.S. and other countries.
T488IB-070102-08 Printed in China
Page 24

SNOOZE /
O
N
M
1
NIGHT LIGHT
O
FF
M2
1
M3
2
4
3
SLEEP
R
ESET
FM
AM
5
7
6
8
9
RADIO
FM 88 92 96 100 104 108 MHz106
AM 54 60
70 80 100 120 140
170
x
10
kHz
0
SOUNDS
7•5•2
SELECT
DOW
DELETE
RADIO/S OUNDS
SET
UP
N
TUNING
E
MAX
M
U
L
O
V
MIN
DIAL
 Loading...