

Page 1

Europe, Middle East
ENGLISH
FRANÇAIS
DEUTSCH
NEDERLANDS
ITALIANO
ESPAÑOL
PORTUGUÊS
РУССКИЙ
ΕΛΛΗΝΙΚΑ
TÜRKÇE
POLSKI
ﺔﻴﺑﺮﻌﻟا
North America/
Norteamérica
ENGLISH
FRANÇAIS
ESPAÑOL
Latin America/
América Latina
ENGLISH
ESPAÑOL
PORTUGUÊS
Page 2
1/8
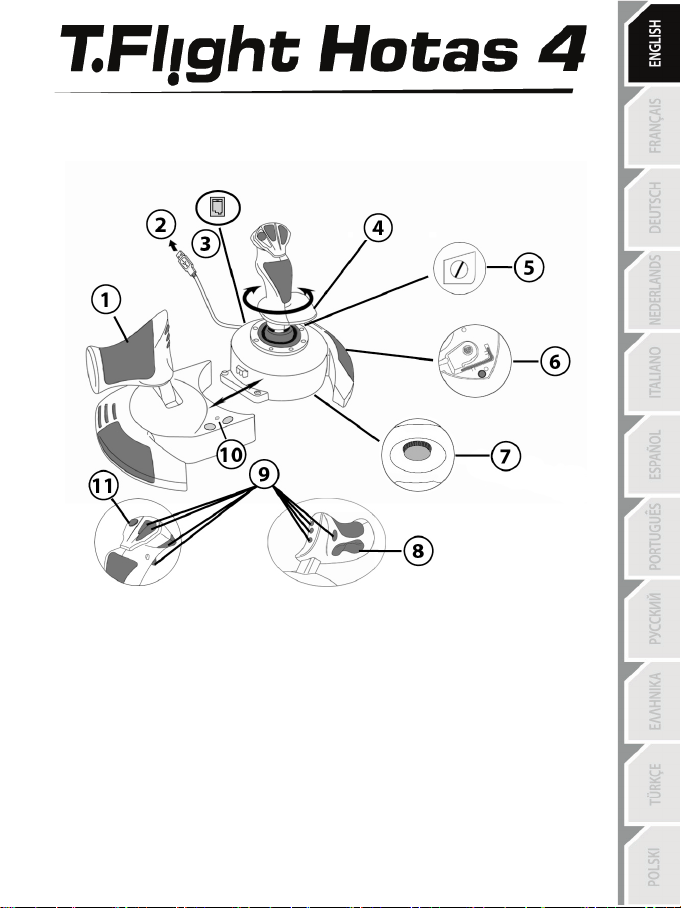
1. Throttle
Allen key to install or separate the
throttle
7. Handle resistance adjustment dial
TECHNICAL FEATURES
PlayStation®4
User Manual
2. USB connector
3. Rudder connector: RJ12 Thrustmaster
Rudder (sold separately) connector
4. Rudder function via twisting handle
5. Rudder locking screw on handle
6.
8. Rudder via rocking button
9. Action buttons
10. PS button with LED
11. Multidirectional "Point Of View" hat-
switch
Page 3

2/8
GETTING TO KNOW YOUR HOTAS JOYSTICK
THROTTLE
Your joystick features a large throttle which you can use to easily control the acceleration of
your aircraft.
The throttle is detachable and may be positioned in 2 different ways, either:
Detached and separated from the joystick
(to re-create authentic piloting conditions)
Attached to the joystick
(for greater stability and to take up less space).
By default, the throttle comes detached from the joystick.
To attach the throttle to the joystick:
1. Turn both items upside down (the throttle and the joystick).
2. Take the Allen key (6) attached underneath the base of the joystick.
3. Position the throttle to the left of the joystick.
Insert the connecting tab on the left of the joystick's base into the opening on the right
hand side of the throttle.
4. Using the key, tighten the two Allen screws underneath the base
(located on the left-hand side of the joystick's base).
5. Wind up the throttle cable and thread it through the cable guide slot.
6. Put the Allen key back in its place so as not to lose it.
Carry out this procedure in reverse to detach the throttle from the joystick.
ADJUSTABLE HANDLE RESISTANCE
Depending on your style of gaming, you may wish to have an ultra-sensitive joystick, which
responds to the slightest touch, or you may prefer to have a firmer joystick, which offers
some resistance when you move it.
Your joystick's handle resistance is adjustable, in order to adapt to all players. To adjust it,
use the handle resistance adjustment dial (7) located underneath your joystick's base.
Page 4

3/8
RUDDER FUNCTION
Your joystick features a rudder function, which in a plane corresponds to the pedals used by
the pilot to turn the steering, allowing the plane to pivot around its vertical axis (therefore
making the plane turn left or right). This rudder function is accessible on your joystick by
rotating the handle to the left or right.
This rudder function is accessible in two ways:
- on your joystick by rotating the handle (4) to the left or right.
- or via the rocking button (8) on the throttle.
If you are only using the rocking button (or if you are not using the rudder function), you can
disable the handle's rotation thanks to the locking screw (5) located on the base of the
joystick. Use a flat head screwdriver to change the screw’s position and thus lock/unlock the
rudder function.
MULTIDIRECTIONAL "POINT OF VIEW" HAT-SWITCH
Your joystick features a “Point Of View” hat-switch (11) which, as its name indicates, allows
you (in games which permit) to instantly view everything that’s going on around your plane.
To do so, simply go to your game’s configuration menu and program the different views (rear
view, left view, right view, and also external views) onto the directions of the “Point Of View”
hat-switch.
Of course, you can also use the “Point Of View” hat-switch for other functions instead (firing,
etc.).
Page 5

4/8
PLAYSTATION®4
INSTALLATION ON PLAYSTATION®4
1. Connect the USB connector (2) to one of your system’s USB ports.
2. Switch on your system.
3. The joystick’s led turns RED.
4. Press the joystick’s PS button (10) and sign in to your Sony Entertainment Network
account, in order to be able to use the joystick.
5. Launch a game that supports the Flight Stick mode.
You are now ready to play!
LIST OF COMPATIBLE PLAYSTATION®4 GAMES
On PlayStation®4, the T.Flight Hotas 4:
- Is only compatible with the games that support the Flight Stick mode.
- Is recognised in games as a real joystick and not a gamepad, for better responsiveness
and enhanced precision, and possibility to access the joystick’s options in these games.
A list of PlayStation®4 games compatible with the joystick is available at
http://ts.thrustmaster.com. Go to PlayStation® / Joystick / T.Flight Hotas 4, then select
Games Settings.
This list will be added to regularly, with the arrival of new PS4™ games compatible with
T.Flight Hotas 4.
Page 6

5/8
UPDATING YOUR JOYSTICK’S FIRMWARE
The firmware included in your joystick’s base can be updated to a more recent version
featuring product enhancements.
To display the firmware version that your Joystick is currently using and update it if required:
on PC, visit http://ts.thrustmaster.com. In the Updates and Downloads section, click
PlayStation / Joystick / T.Flight Hotas 4, then select Driver/Firmware and follow the
instructions describing the download and installation procedure.
TROUBLESHOOTING AND WARNINGS
• My joystick doesn’t function correctly or appears to be improperly calibrated:
- Switch off your system, disconnect your joystick, reconnect your joystick and then relaunch your game.
- When connecting your joystick: Leave the handle, rudder and throttle centered and do not
move them (to avoid any calibration problems).
- Exit the game, unplug your joystick, plug it again, then press the PS button (10) on the
joystick. Sign in to your Sony Entertainment Network account, in order to be able to use the
joystick.
• My joystick is too sensitive or not sensitive enough:
- Your joystick self-calibrates on its own after you have made a few movements on the
different axes.
- In your game’s “Options / Controller / Gamepad or Joystick” menu: Adjust the sensitivity or
dead zones for your controller (if this option is available).
- Adjust the handle resistance using the dial (7) located under your joystick’s base.
• The rudder function is too sensitive:
- Disable the handle's rotation using the locking screw (5) located on the base of the joystick
and use the rocking button for the rudder function.
HELP FILES AND FAQS (NOT INCLUDED IN THIS MANUAL)
Please visit http://ts.thrustmaster.com, and in the Updates and Downloads section, click
PlayStation / Joystick / T.Flight Hotas 4, then select Manual/Help file.
Page 7

6/8
Consumer warranty information
Worldwide, Guillemot Corporation S.A., whose registered office is located at Place du Granier, B.P.
97143, 35571 Chantepie, France (hereinafter “Guillemot”) warrants to the consumer that this
Thrustmaster product shall be free from defects in materials and workmanship, for a warranty period
which corresponds to the time limit to bring an action for conformity with respect to this product. In the
countries of the European Union, this corresponds to a period of two (2) years from delivery of the
Thrustmaster product. In other countries, the warranty period corresponds to the time limit to bring an
action for conformity with respect to the Thrustmaster product according to applicable laws of the country
in which the consumer was domiciled on the date of purchase of the Thrustmaster product (if no such
action exists in the corresponding country, then the warranty period shall be one (1) year from the original
date of purchase of the Thrustmaster product).
Notwithstanding the above, rechargeable batteries are covered by a warranty period of six (6) months
from the date of original purchase.
Should the product appear to be defective during the warranty period, immediately contact Technical
Support, who will indicate the procedure to follow. If the defect is confirmed, the product must be returned
to its place of purchase (or any other location indicated by Technical Support).
Within the context of this warranty, the consumer’s defective product shall, at Technical Support’s option,
be either replaced or returned to working order. If, during the warranty period, the Thrustmaster product is
subject to such reconditioning, any period of at least seven (7) days during which the product is out of use
shall be added to the remaining warranty period (this period runs from the date of the consumer’s request
for intervention or from the date on which the product in question is made available for reconditioning, if
the date on which the product is made available for reconditioning is subsequent to the date of the
request for intervention). If permitted under applicable law, the full liability of Guillemot and its subsidiaries
(including for consequential damages) is limited to the return to working order or the replacement of the
Thrustmaster product. If permitted under applicable law, Guillemot disclaims all warranties of
merchantability or fitness for a particular purpose.
This warranty shall not apply: (1) if the product has been modified, opened, altered, or has suffered
damage as a result of inappropriate or abusive use, negligence, an accident, normal wear, or any other
cause unrelated to a material or manufacturing defect (including, but not limited to, combining the
Thrustmaster product with any unsuitable element, including in particular power supplies, rechargeable
batteries, chargers, or any other elements not supplied by Guillemot for this product); (2) in the event of
failure to comply with the instructions provided by Technical Support; (3) to software, said software being
subject to a specific warranty; (4) to consumables (elements to be replaced over the product’s lifespan:
disposable batteries, audio headset or headphone ear pads, for example); (5) to accessories (cables,
cases, pouches, bags, wrist-straps, for example); (6) if the product was sold at public auction.
This warranty is nontransferable.
The consumer’s legal rights with respect to laws applicable to the sale of consumer goods in his or her
country are not affected by this warranty.
Page 8

7/8
TECHNICAL SUPPORT
http://ts.thrustmaster.com
Additional warranty provisions
During the warranty period, Guillemot shall not provide, in principle, any spare parts, as Technical Support
is the only party authorised to open and/or recondition any Thrustmaster product (with the exception of
any reconditioning procedures which Technical Support may request that the consumer carry out, by way
of written instructions – for example, due to the simplicity and the lack of confidentiality of the
reconditioning process – and by providing the consumer with the required spare part(s), where
applicable).
Given its innovation cycles and in order to protect its know-how and trade secrets, Guillemot shall not
provide, in principle, any reconditioning notification or spare parts for any Thrustmaster product whose
warranty period has expired.
Liability
If permitted under applicable law, Guillemot Corporation S.A. (hereinafter “Guillemot”) and its subsidiaries
disclaim all liability for any damages caused by one or more of the following: (1) the product has been
modified, opened or altered; (2) failure to comply with assembly instructions; (3) inappropriate or abusive
use, negligence, an accident (an impact, for example); (4) normal wear. If permitted under applicable law,
Guillemot and its subsidiaries disclaim all liability for any damages unrelated to a material or
manufacturing defect with respect to the product (including, but not limited to, any damages caused
directly or indirectly by any software, or by combining the Thrustmaster product with any unsuitable
element, including in particular power supplies, rechargeable batteries, chargers, or any other elements
not supplied by Guillemot for this product).
Page 9

8/8
COPYRIGHT
*
*
© 2016 Guillemot Corporation S.A. All rights reserved. Thrustmaster® is a registered trademark of
Guillemot Corporation S.A.
Licensed for sale in Europe, Africa, Middle East, Russia, India and Oceania. For use exclusively with
PlayStation®4.
“
”, “PlayStation”, “ ” and “ ” are registered trademarks of Sony Computer
Entertainment Inc. “
” is a trademark of the same company. All rights reserved.
All other trademarks and brand names are hereby acknowledged and are property of their respective
owners. Illustrations not binding. Contents, designs and specifications are subject to change without notice
and may vary from one country to another. Made in China.
Manufactured and distributed by Guillemot Corporation S.A.
ENVIRONMENTAL PROTECTION RECOMMENDATION
In the European Union: At the end of its working life, this product should not be
disposed of with standard household waste, but rather dropped off at a collection
point for the disposal of Waste Electrical and Electronic Equipment (WEEE) for
recycling.
This is confirmed by the symbol found on the product, user manual or packaging.
Depending on their characteristics, the materials may be recycled. Through recycling
and other forms of processing Waste Electrical and Electronic Equipment, you can
make a significant contribution towards helping to protect the environment.
Please contact your local authorities for information on the collection point nearest you.
For all other countries: Please adhere to local recycling laws for electrical and electronic equipment.
Retain this information. Colours and decorations may vary.
Plastic fasteners and adhesives should be removed from the product before it is used.
www.thrustmaster.com
*Applicable to EU and Turkey only
Page 10

1/8
1 Manette des gaz
manette des gaz du manche
7 Molette de réglage de la
PlayStation®4
Manuel de l'utilisateur
CARACTÉRISTIQUES TECHNIQUES
2 Connecteur USB
3 Connecteur de palonnier RJ12
Thrustmaster Rudder (vendu
séparément)
4 Palonnier par rotation du manche
5 Vis de blocage du palonnier sur le
manche
6 Clé Allen pour installer ou séparer la
résistance
8 Palonnier par bouton bascule
9 Boutons d’action
10 Bouton PS avec Led
11 Croix multidirectionnelle Point de
vue
Page 11

2/8
À LA DÉCOUVERTE DE VOTRE JOYSTICK HOTAS
MANETTE DES GAZ
Votre joystick dispose d’une imposante manette des gaz grâce à laquelle vous pourrez
aisément contrôler l’accélération de votre appareil.
La manette des gaz est amovible et peut-être positionnée de 2 manières différentes :
- Soit détachée et séparée du manche
(pour récréer les véritables conditions de pilotage)
- Soit fixée au manche
(pour un gain de stabilité et de place).
La manette des gaz est livrée par défaut détachée du manche.
Pour fixer la manette des gaz au manche :
1. Retournez les 2 éléments (manette des gaz et manche)
2. Prenez la clé Allen (6) fixée sous la base du manche.
3. Positionnez la manette des gaz à gauche du manche.
Insérez le crochet qui est situé sur la gauche du manche dans la fente qui est situé à droite
de la manette des gaz.
4. A l’aide de la clé, vissez les deux vis Allen sous la base
(situées à l’extrémité gauche de la base du manche).
5. Enroulez et fixez le câble de la manette des gaz dans le passe-fil prévu à cet effet.
6. Remettez la clé Allen dans son emplacement pour ne pas l’égarer. Effectuez l’opération
inverse pour détacher la manette des gaz du manche.
RESISTANCE DU MANCHE AJUSTABLE
Selon votre façon de jouer, vous voudrez un joystick ultra-sensible, qui réponde à la moindre
impulsion, ou au contraire un joystick plus dur, qui présente une certaine résistance lorsque
vous le manipulez.
La résistance du manche de votre Joystick est ajustable pour s’adapter à tous les joueurs.
Utilisez pour cela la molette de réglage de la résistance (7) située sous la base de
votre joystick.
Page 12
3/8
FONCTION PALONNIER
Votre joystick dispose d’une fonction palonnier, qui correspond dans un avion aux pédales
actionnées par le pilote pour faire braquer la gouverne de direction, permettant de faire
pivoter l’avion autour de son axe vertical (entraînant ainsi un virage de l’avion vers la gauche
ou la droite).
Cette fonction palonnier est accessible de deux façons :
- sur votre Joystick par rotation du manche (4) vers la gauche ou la droite
- ou via le bouton bascule (8) sur la manette des gaz.
Si vous utilisez uniquement le bouton bascule (ou que vous n’utilisez
palonnier), vous pouvez alors désactiver la rotation du manche grâce à la vis de blocage (5)
située à la base du manche. Utilisez un tournevis à tête plate pour modifier sa position et
ainsi verrouiller/déverrouiller la rotation du manche.
pas la
fonction
CROIX MULTIDIRECTIONNELLE POINT DE VUE
Votre joystick est doté d’une croix Point de Vue (11) qui, comme son nom l’indique, vous
permettra (dans les jeux le permettant) de surveiller instantanément tout ce qui se
passe autour de votre avion. Il vous suffit pour cela, depuis le menu de configuration de
votre jeu, de programmer les différentes vues (vue arrière, vue sur la gauche, vue sur la
droite, mais
Vous pouvez bien entendu réserver la Croix Point de vue à d’autres utilisations (tir, etc.).
aussi vues externes) sur les directions de la croix Point de vue.
Page 13

4/8
PLAYSTATION®4
INSTALLATION SUR PLAYSTATION®4
1. Branchez le connecteur USB (2) sur un port USB de la console.
2. Allumez votre console.
3. La led du joystick s’allume en ROUGE.
4. Appuyez sur le bouton PS (10) du joystick, puis connectez-vous à votre compte Sony
Entertainment Network pour que votre Joystick soit fonctionnel.
5. Lancez un jeu compatible (supportant le mode Flight Stick)
Vous êtes maintenant prêt à jouer !
LISTE DES JEUX PLAYSTATION®4 COMPATIBLES
Sur PlayStation®4, le T.Flight Hotas 4 :
- n’est compatible qu’avec les jeux supportant le mode Flight Stick.
- est reconnu dans les jeux comme un véritable Joystick (et non comme une manette). Ceci
pour une réactivité et une précision maximale ainsi que pour l’accès aux options joystick
disponibles dans ces jeux.
Liste des jeux PlayStation®4 compatibles avec le Joystick disponible sur
http://ts.thrustmaster.com dans la rubrique PlayStation / Joystick / T.Flight Hotas 4, puis
Paramétrage des Jeux.
Cette liste s’étoffera régulièrement avec l’arrivée des nouveaux jeux PS4™ compatibles
avec le T.Flight Hotas 4.
Page 14

5/8
METTRE A JOUR LE FIRMWARE DU JOYSTICK
Le firmware inclus dans la base du Joystick peut être mis à jour (ce qui signifie qu’il peut être
mis à jour par des versions plus récentes comportant des améliorations produits).
Pour afficher la version de firmware de votre Joystick et le mettre à jour si nécessaire : sur
PC, allez sur http://ts.thrustmaster.com, dans la section Mise à jour et téléchargement,
cliquez sur PlayStation / Joystick / T.Flight Hotas 4 puis Pilote/Firmware et suivez les
instructions et la procédure de téléchargement et d’installation.
DEPANNAGE ET AVERTISSEMENT
•
Mon joystick ne fonctionne pas correctement ou semble mal calibré :
- Eteignez votre console, déconnectez votre joystick, rebranchez et relancez votre jeu.
- Lorsque vous branchez votre joystick : laissez le manche, le palonnier et la manette des
gaz centrés et évitez de les déplacer (pour éviter tout problème de calibration).
- Quittez votre jeu, débranchez votre joystick, rebranchez le tout, appuyez sur le bouton PS
(10) du joystick, puis connectez-vous à votre compte Sony Entertainment Network pour que
votre Joystick soit fonctionnel.
•
Mon joystick est trop ou pas assez sensible :
- Votre joystick s’auto-calibre de manière autonome après quelques mouvements effectués
sur les différents axes.
- Dans le menu Options / Contrôleur / Manettes ou Joystick de votre jeu, ajustez la
sensibilité et les zones mortes de votre contrôleur (si l’option est disponible).
- Ajustez la résistance du manche à l’aide de la molette (7) située sous la base de
votre joystick.
•
La fonction palonnier est trop sensible
- Désactivez la rotation du manche grâce à la vis de blocage (5) située à la base du manche
et utilisez le bouton bascule pour la fonction palonnier.
AIDES & FAQ DIVERSES (non notifiées dans ce manuel)
Allez sur http://ts.thrustmaster.com. Dans la section Mise à jour et téléchargement,
cliquez sur PlayStation / Joystick / T.Flight Hotas 4 puis Manuel / Fichier Aide.
Page 15

6/8
INFORMATIONS RELATIVES A LA GARANTIE AUX CONSOMMATEURS
Dans le monde entier, Guillemot Corporation S.A., ayant son siège social Place du Granier, B.P. 97143, 35571 Chantepie,
France (ci-après « Guillemot ») garantit au consommateur que le présent produit Thrustmaster est exempt de défaut
matériel et de vice de fabrication, et ce, pour une période de garantie qui correspond au délai pour intenter une action en
conformité de ce produit. Dans les pays de l’Union Européenne, ce délai est de deux (2) ans à compter de la délivrance du
produit Thrustmaster. Dans les autres pays, la durée de la période de garantie correspond au délai pour intenter une action
en conformité du produit Thrustmaster selon la législation en vigueur dans le pays où le consommateur avait son domicile
lors de l’achat du produit Thrustmaster (si une telle action en conformité n’existe pas dans ce pays alors la période de
garantie est de un (1) an à compter de la date d’achat d’origine du produit Thrustmaster).
Nonobstant ce qui précède, les batteries sont garanties six (6) mois à compter de la date d’achat d’origine.
Si, au cours de la période de garantie, le produit semble défectueux, contactez immédiatement le Support Technique qui
vous indiquera la procédure à suivre. Si le défaut est confirmé, le produit devra être retourné à son lieu d’achat (ou tout
autre lieu indiqué par le Support Technique).
Dans le cadre de la garantie, le consommateur bénéficiera, au choix du Support Technique, d'un remplacement ou d'une
remise en état de marche du produit défectueux. Si, pendant la période de garantie, le produit Thrustmaster fait l'objet d'une
telle remise en état, toute période d'immobilisation d'au moins sept jours vient s'ajouter à la durée de la garantie qui restait à
courir (cette période court à compter de la demande d'intervention du consommateur ou de la mise à disposition pour
remise en état du produit en cause, si cette mise à disposition est postérieure à la demande d'intervention). Lorsque la loi
applicable l’autorise, toute responsabilité de Guillemot et ses filiales (y compris pour les dommages indirects) se limite à la
remise en état de marche ou au remplacement du produit Thrustmaster. Lorsque la loi applicable l’autorise, Guillemot
exclut toutes garanties de qualité marchande ou d’adaptation à un usage particulier.
Cette garantie ne s’appliquera pas : (1) si le produit a été modifié, ouvert, altéré, ou a subi des dommages résultant d’une
utilisation inappropriée ou abusive, d’une négligence, d’un accident, de l’usure normale, ou de toute autre cause non liée à
un défaut matériel ou à un vice de fabrication (y compris, mais non limitativement, une combinaison du produit
Thrustmaster avec tout élément inadapté, notamment alimentations électriques, batteries, chargeurs, ou tous autres
éléments non-fournis par Guillemot pour ce produit) ; (2) en cas de non respect des instructions du Support Technique ; (3)
aux logiciels, lesdits logiciels faisant l’objet d’une garantie spécifique ; (4) aux consommables (éléments à remplacer
pendant la durée de vie du produit : piles, coussinets de casque audio, par exemple) ; (5) aux accessoires (câbles, étuis,
housses, sacs, dragonnes, par exemple) ; (6) si le produit a été vendu aux enchères publiques.
Cette garantie n’est pas transférable.
Les droits légaux du consommateur au titre de la législation applicable dans son pays à la vente de biens de consommation
ne sont pas affectés par la présente garantie.
Par exemple, en France, indépendamment de la présente garantie, le vendeur reste tenu de la garantie légale de conformité
mentionnée aux articles L. 211-4 à L. 211-13 du code de la consommation et de celle relative aux défauts (vices cachés) de la
chose vendue, dans les conditions prévues aux articles 1641 à 1648 et 2232 du code civil. La loi applicable (c'est-à-dire la loi
française) impose de reproduire les extraits de la loi française suivants:
Article L. 211-4 du code de la consommation:
Le vendeur est tenu de livrer un bien conforme au contrat et répond des défauts de conformité existant lors de la
délivrance.
Il répond également des défauts de conformité résultant de l'emballage, des instructions de montage ou de l'installation
lorsque celle-ci a été mise à sa charge par le contrat ou a été réalisée sous sa responsabilité.
Article L. 211-5 du code de la consommation:
Pour être conforme au contrat, le bien doit :
1° Etre propre à l'usage habituellement attendu d'un bien semblable et, le cas échéant :
- correspondre à la description donnée par le vendeur et posséder les qualités que celui-ci a présentées à l'acheteur sous
forme d'échantillon ou de modèle ;
- présenter les qualités qu'un acheteur peut légitimement attendre eu égard aux déclarations publiques faites par le
vendeur, par le producteur ou par son représentant, notamment dans la publicité ou l'étiquetage ;
2° Ou présenter les caractéristiques définies d'un commun accord par les parties ou être propre à tout usage spécial
recherché par l'acheteur, porté à la connaissance du vendeur et que ce dernier a accepté.
Page 16

7/8
SUPPORT TECHNIQUE
Article L. 211-12 du code de la consommation:
L'action résultant du défaut de conformité se prescrit par deux ans à compter de la délivrance du bien.
Article L. 1641 du code civil:
Le vendeur est tenu de la garantie à raison des défauts cachés de la chose vendue qui la rendent impropre à l'usage
auquel on la destine, ou qui diminuent tellement cet usage que l'acheteur ne l'aurait pas acquise, ou n'en aurait donné
qu'un moindre prix, s'il les avait connus.
Article L. 1648 alinéa 1er du code civil:
L'action résultant des vices rédhibitoires doit être intentée par l'acquéreur dans un délai de deux ans à compter de la
découverte du vice.
Stipulations additionnelles à la garantie
Pendant la période de garantie, Guillemot ne fournira, en principe, pas de pièce détachée car le Support Technique est seul
habilité tant à ouvrir qu'à remettre en état tout produit Thrustmaster (à l'exception des remises en état que le Support
Technique demanderait, par instructions écrites, au consommateur d'effectuer -par exemple en raison de la simplicité et de
l'absence de confidentialité du processus de remise en état-, en lui fournissant, le cas échéant, la ou les pièces détachées
nécessaires).
Compte tenu de ses cycles d'innovation et pour préserver ses savoir-faire et secrets, Guillemot ne fournira, en principe, ni
notice de remise en état, ni pièce détachée pour tout produit Thrustmaster dont la période de garantie est expirée.
Responsabilité
Lorsque la loi applicable l’autorise, Guillemot Corporation S.A. (ci-après « Guillemot ») et ses filiales excluent toute
responsabilité pour tous dommages causés par un ou plusieurs des faits suivants: (1) le produit a été modifié, ouvert,
altéré, (2) l’irrespect des instructions de montage, (3) l’utilisation inappropriée ou abusive, la négligence, l’accident (un choc,
par exemple), (4) l’usure normale du produit. Lorsque la loi applicable l’autorise, Guillemot et ses filiales excluent toute
responsabilité pour tout dommage dont la cause n’est pas liée à un défaut matériel ou à un vice de fabrication du produit (y
compris, mais non limitativement, tout dommage causé directement ou indirectement par tout logiciel, ou par une
combinaison du produit Thrustmaster avec tout élément inadapté, notamment alimentations électriques, batteries,
chargeurs, ou tous autres éléments non-fournis par Guillemot pour ce produit).
http://ts.thrustmaster.com
Page 17

8/8
COPYRIGHT
*
*
© 2016 Guillemot Corporation S.A. Tous droits réservés. Thrustmaster® est une marque déposée de
Guillemot Corporation S.A.
Licence accordée pour la vente en Europe, Afrique, Moyen-Orient, Inde, Russie et Océanie. A utiliser
exclusivement avec PlayStation
“
”, “PlayStation”, “ ” et “ ” sont des marques déposées de Sony Computer
Entertainment Inc. “
®4.
” est une marque de la même société. Tous droits réservés.
Toutes les autres marques sont la propriété de leurs propriétaires respectifs. Illustrations non
contractuelles. Le contenu, la conception et les spécifications sont susceptibles de changer sans préavis
et de varier selon les pays. Fabriqué en Chine.
Produit et distribué par Guillemot Corporation S.A.
RECOMMANDATION RELATIVE A LA PROTECTION DE L’ENVIRONNEMENT
Dans l’Union Européenne : En fin de vie, ce produit ne doit pas être éliminé avec les
déchets ménagers normaux mais déposé à un point de collecte des déchets
d'équipements électriques et électroniques en vue de son recyclage.
Ceci est confirmé par le symbole figurant sur le produit, le manuel utilisateur ou
l’emballage.
En fonction de leurs caractéristiques, les matériaux peuvent être recyclés. Par le
recyclage et par les autres formes de valorisation des déchets d'équipements
électriques et électroniques, vous contribuez de manière significative à la protection
de l’environnement. Veuillez consulter les autorités locales qui vous indiqueront le point de collecte
concerné.
Dans les autres pays : Veuillez vous reporter aux législations locales relatives au recyclage des
équipements électriques et électroniques.
Informations à conserver. Les couleurs et décorations peuvent varier.
Il est recommandé de retirer les attaches en plastique et les adhésifs avant d’utiliser le produit.
www.thrustmaster.com
*Applicable à l’UE et la Turquie uniquement
Page 18

1/8
1. Gashebel (Drosselklappe)
resp. Abschrauben des Gashebels
7. Einstellscheibe für Widerstand Handgriff
TECHNISCHE MERKMALE
PlayStation®4
Benutzerhandbuch
2. USB-Stecker
3. Ruderanschluss: RJ12 Thrustmaster
Ruderanschluss (separate erhältlich)
4. Ruderfunktion via Handgriffdrehung
5. Ruder-Blockerschraube am Handgriff
6. Inbusschlüssel zum Anschrauben,
8. Ruder via Kipphebel
9. Action-Buttons
10. PS Button mit LED
11. Multidirektionaler "Point Of View"-
Kopfschalter
Page 19

2/8
LERNEN SIE IHREN HOTAS JOYSTICK KENNEN
GASHEBEL (DROSSELKLAPPE)
Ihr Joystick hat einen großen Gashebel, mit dem Sie wirklich einfach die Beschleunigung
Ihres Flugzeugs steuern können.
Der Gashebel kann abmontiert werden und somit in zwei unterschiedlichen Varianten
genutzt werden:
Vom Joystick getrennt
(Um authentische Flugbedingungen zu simulieren).
Mit dem Joystick verbunden
(Zur Verbesserung der Stabilität und um Platz zu sparen).
Standardmäßig wird der Gashebel vom Joystick getrennt ausgeliefert.
Um den Gashebel am Joystick zu montieren:
1. Drehen Sie die Unterseiten beider Teile nach oben (Gashebel und Joystick).
2. Nehmen Sie den Inbusschlüssel (6), der unten an der Basis des Joysticks befestigt ist.
3. Positionieren Sie den Gashebel auf der linken Seite des Joysticks.
Stecken Sie die Zunge an der linken Seite der Joystick-Basis in die Öffnung an der
echten Seite des Gashebels.
4. Mit dem Inbusschlüssel ziehen Sie die beiden Inbusschrauben unterhalb der Basis fest.
(Diese befinden sich links auf der Basis des Joysticks).
5. Wickeln Sie das Kabel des Gashebels ab und fädeln dies durch die Kabelführung.
6. Befestigen Sie den Inbusschlüssel wieder an seinem vorgesehenen Platz, so dass Sie
ihn nicht verlieren können.
Führen Sie diese Prozedur in umgekehrter Reihenfolge aus, um den Gashebel wieder vom
Joystick zu trennen.
EINSTELLEN DES HANDGRIFFWIDERSTANDES
Je nach Ihrem persönlichen Spielstil könnten Sie einen hochsensitiven Joystick bevorzugen,
der auf die kleinste Bewegung reagiert. Umgekehrt wünschen Sie sich vielleicht einen
festeren Joystick, der Ihnen beim Benutzen einen gewissen Widerstand entgegensetzt. Kein
Problem, denn der Widerstand Ihres Joysticks ist je nach Ihrem Gusto verstellbar. Um den
Widerstand Ihres Joysticks zu verstellen, nutzen Sie einfach die Einstellscheibe für
Widerstand Handgriff (7), die sich unterhalb an der Joystick-Basis befindet.
Page 20

3/8
RUDERFUNKTION
Ihr Joystick beinhaltet eine Ruderfunktion. Diese entspricht den Pedalen, die Piloten zur
Steuerung benutzen, Pedalen eines Flugzeugs entsprechen und dazu verwendet werden,
das Flugzeug um die vertikale Achse zu drehen. Dadurch bewegt sich das Flugzeug nach
rechts oder links. Diese Ruderfunktion ist durch die Drehung Ihres Handgriffs nach rechts
oder links verfügbar.
Die Ruderfunktion kann auf zweierlei Arten ausgeführt werden:
- durch Drehung des Handgriffs (4) nach links resp. rechts,
- oder via des Kipphebels (8) am Gashebel.
Falls Sie nur den Kipphebel nutzen (oder die Ruderfunktion überhaupt nicht nutzen), können
Sie die Drehung des Handgriffs dank der Ruder Blockierschraube (5) an der Joystick-Basis
blockieren. Zur Änderung der Schraubenposition benutzen Sie bitte einen FlachkopfSchraubendreher, um die Ruderfunktion zu blockieren/freizugeben.
MULTIDIREKTIONALER "POINT OF VIEW"-KOPFSCHALTER
Ihr Joystick verfügt über einen “Point Of View”-Kopfschalter (11), der Ihnen – wie der Name
schon sagt – eine Rundumsicht (bei Spielen, die diese Funktion unterstützen) um das
Flugzeug ermöglicht. Um dies zu ermöglichen, gehen Sie bitte in das Einstellungsmenü Ihres
Spiels und programmieren die verschiedenen Ansichten (rückwärtig, links, rechts aber auch
externe Ansichten) auf dem “Point Of View”-Kopfschalter.
Sie können stattdessen den “Point Of View”-Kopfschalter aber auch für andere Funktionen
nutzen (Feuern, etc.).
Page 21

4/8
PLAYSTATION®4
INSTALLATION AUF DER PLAYSTATION®4
1. Stecken Sie den USB-Stecker (2) in einen USB-Port Ihres Systems.
2. Schalten Sie Ihr System ein.
3. Die LED des Joysticks leuchtet ROT.
4. Drücken Sie den PS Button (10) an Ihrem Joystick und loggen sich in Ihren Sony
Entertainment Network Account ein, um Ihren Joystick nutzen zu können.
5. Starten Sie ein Spiel, das den Flight-Stick-Modus unterstützt.
Sie sind nun spielbereit!
LISTE DER KOMPATIBLEN PLAYSTATION®4-SPIELE
Auf der PlayStation®4 mit dem T.Flight Hotas 4:
- Nur kompatibel mit Spielen, die den Flight-Stick-Modus unterstützen.
- Wird im Spiel als echter Joystick erkannt und nicht als Gamepad.
Für besseres Ansprechverhalten und verbesserte Präzision sowie Zugriff auf die JoystickEinstellungen im Einstellungsmenü dieser Spiele.
Eine Liste der kompatiblen Spiele auf der PlayStation®4 mit diesem Joystick finden Sie auf
http://ts.thrustmaster.com. Gehen Sie auf PlayStation® / Joystick / T.Flight Hotas 4 und
wählen dann Games Settings.
Die Liste wird regelmäßig bei Veröffentlichungen von neuen PS4™ Spielen, die mit dem
T.Flight Hotas 4 kompatibel sind, aktualisiert.
Page 22
5/8
FIRMWARE-AKTUALISIERUNG IHRES JOYSTICKS
Die in Ihrem Joystick implementierte Firmware kann mit einer neueren Version der Firmware
aktualisiert werden, um in den Genuss von Produktverbesserungen zu kommen.
Um die derzeitige Firmwareversion Ihre Joysticks anzuzeigen und ggfs. zu aktualisieren,
gehen Sie auf dem PC auf http://ts.thrustmaster.com. In der Sektion Updates and
Downloads klicken Sie auf PlayStation / Joystick / T.Flight Hotas 4, wählen dann
Driver/Firmware und folgen den Instruktionen, die die Download- und Installations-Prozedur
beschreiben.
FEHLERBEHEBUNG UND WARNHINWEISE
• Mein Joystick funktioniert nicht richtig oder ist falsch kalibriert:
- Schalten Sie Ihr System aus. Trennen Sie den Joystick vom System und schließen ihn
danach erneut an. Starten Sie Ihr Spiel erneut.
- Beim Anschluss Ihres Joysticks: Stellen Sie Handgriff, Ruder und Gashebel mittig und
bewegen diese danach nicht mehr (um Kalibrierungsprobleme zu vermeiden).
- Beenden Sie das Spiel, trennen Ihren Joystick vom System und stecken ihn danach wieder
ein. Drücken Sie dann den PS Button (10) am Joystick. Loggen Sie sich in Ihren Sony
Entertainment Network Account, um den Joystick benutzen zu können.
• Mein Joystick ist zu empfindlich oder nicht empfindlich genug:
- Ihr Joystick kalibriert sich automatisch von allein, nachdem Sie einige Bewegungen auf
verschiedenen Achsen ausgeführt haben.
- Im Einstellungsmenü “Options / Controller / Gamepad oder Joystick” Ihres Spiels: Stellen
Sie die Empfindlichkeit oder die Totzonen für Ihren Controller ein (falls diese Option
verfügbar ist).
- Justieren Sie den Widerstand des Handgriffes mittels der Einstellscheibe (7), die sich
unterhalb Ihrer Joystick-Basis befindet.
• Die Ruderfunktion ist zu empfindlich:
- Deaktivieren Sie die Handgriffdrehung mittels der Blockierschraube (5) an der JoystickBasis und nutzen stattdessen den Kipphebel für die Ruderfunktion.
HILFEDATEIEN UND HÄUFIG GESTELLTE FRAGEN (NICHT IN
DIESEM HANDBUCH ENTHALTEN)
Besuchen Sie bitte http://ts.thrustmaster.com und klicken in der Sektion Updates and
Downloads auf PlayStation / Joystick / T.Flight Hotas 4. Wählen Sie dann
Manual/Help file.
Page 23

6/8
Kunden-Garantie-Information
Guillemot Corporation S.A. mit Hauptfirmensitz in Place du Granier, B.P. 97143, 35571 Chantepie, France
(fortfolgend “Guillemot”) garantiert Kunden weltweit, daß dieses Thrustmaster Produkt frei von Mängeln in
Material und Verarbeitung für eine Gewährleistungsfrist ist, die mit der Frist für eine Mängelrüge bezüglich
des Produktes übereinstimmt. In den Ländern der Europäischen Union entspricht diese einem Zeitraum
von zwei (2) Jahren ab Kaufdatum des Thrustmaster Produktes. In anderen Ländern entspricht die
Gewährleistungsfrist der zeitlichen Begrenzung für eine Mängelrüge bezüglich des Thrustmaster
Produktes in Übereinstimmung mit anwendbarem Recht des Landes, in dem der Kunde zum Zeitpunkt
des Erwerbs eines Thrustmaster Produktes wohnhaft ist. Sollte eine entsprechende Regelung in dem
entsprechenden Land nicht existieren, umfasst die Gewährleistungspflicht einen Zeitraum von einem (1)
Jahr ab dem originären Kaufdatum des Thrustmaster Produktes.
Ungeachtet dessen werden wiederaufladbare Batterien (fortfolgend “Akkus”) durch eine
Gewährleistungsfrist von sechs (6) Monaten ab dem Kaufdatum abgedeckt.
Sollten bei dem Produkt innerhalb der Gewährleistungsfrist Defekte auftreten, kontaktieren Sie
unverzüglich den technischen Kundendienst, der die weitere Vorgehensweise anzeigt. Wurde der Defekt
bestätigt, muß das Produkt an die Verkaufsstelle (oder an eine andere Stelle, je nach Maßgabe des
technischen Kundendienstes) retourniert werden.
Im Rahmen dieser Garantie sollte das defekte Produkt des Kunden, je nach Entscheidung des
technischen Kundendienstes, entweder ausgetauscht oder repariert werden. Sollte während der
Garantiezeit das Thrustmaster Produkt einer derartigen Instandsetzung unterliegen und das Produkt
während eines Zeitraums von mindestens sieben (7) Tagen nicht benutzbar sein, wird diese Zeit der
restlichen Garantiezeit hinzugefügt. Diese Frist läuft ab dem Zeitpunkt, an dem der Wunsch des
Verbrauchers bezüglich einer Intervention vorliegt oder ab dem Tag, an dem das fragliche Produkt zur
Instandsetzung zur Verfügung steht, falls das Datum, an dem das Produkt zur Instandsetzung zur
Verfügung steht, dem Datum des Antrags auf Intervention nachfolgt. Wenn nach geltendem Recht
zulässig, beschränkt sich die volle Haftung von Guillemot und ihrer Tochtergesellschaften auf die
Reparatur oder den Austausch des Thrustmaster Produktes (inklusive Folgeschäden). Wenn nach
geltendem Recht zulässig, lehnt Guillemot alle Gewährleistungen der Marktgängigkeit oder Eignung für
einen bestimmten Zweck ab.
Der Gewährleistungsanspruch verfällt: (1) Falls das Produkt modifiziert, geöffnet, verändert oder ein
Schaden durch unsachgemäßen oder missbräuchlichen Gebrauch hervorgerufen wurde, sowie durch
Fahrlässigkeit, einen Unfall, Verschleiß oder irgendeinem anderen Grund – aber nicht durch Materialoder Herstellungsfehler (einschließlich, aber nicht beschränkt auf, die Kombination der Thrustmaster
Produkte mit ungeeigneten Elementen, insbesondere Netzteile, Akkus, Ladegeräte, oder andere
Elemente, die von Guillemot für dieses Produkt nicht mitgeliefert wurden); (2) Im Falle der Nichteinhaltung
der durch den Technischen Support erteilten Anweisungen; (3) Durch Software. Die besagte Software ist
Gegenstand einer speziellen Garantie; (4) Bei Verbrauchsmaterialien (Elemente, die während der
Produktlebensdauer ausgetauscht werden, wie z. B. Einwegbatterien, Ohrpolster für ein Audioheadset
oder für Kopfhörer); (5) Bei Accessoires (z. B. Kabel, Etuis, Taschen, Beutel, Handgelenk-Riemen); (6)
Falls das Produkt in einer öffentlichen Versteigerung verkauft wurde.
Diese Garantie ist nicht übertragbar.
Die Rechte des Kunden in Übereinstimmung mit anwendbarem Recht bezüglich des Verkaufs auf
Konsumgüter im Land der/der Kunden/Kundin wird durch diese Garantie nicht beeinträchtigt.
Page 24

7/8
TECHNISCHER SUPPORT
Zusätzliche Gewährleistungsbestimmungen
Während der Garantiezeit bietet Guillemot grundsätzlich keine Ersatzteile an, da der technische
Kundendienst der einzige autorisierte Partner zum Öffnen und/oder Instandsetzen jedweden
Thrustmaster-Produkts ist (mit Ausnahme von irgendwelchen Instandsetzungsprozeduren, die der Kunde
nach Maßgabe des technischen Kundendienstes und durch schriftliche Instruktionen sowie der
Zurverfügungstellung des/der eventuell erforderlichen Ersatzteil(s)(e) selbst in der Lage ist durchzuführen
– zum Beispiel aufgrund der Einfachheit und einer nicht erforderlichen Geheimhaltung des
Instandsetzungsverfahrens).
Aufgrund seiner Innovationszyklen und um sein Know-how und seine Geschäftsgeheimnisse zu schützen,
bietet Guillemot grundsätzlich keine Instandsetzungs-Benachrichtigung oder Ersatzteile für alle
Thrustmaster Produkte an, deren Garantiezeit abgelaufen ist.
In den Vereinigten Staaten von Amerika und in Kanada ist diese Gewährleistung auf den internen
Mechanismus und das externe Gehäuse beschränkt. Auf keinen Fall haftet Guillemot oder ihre
Tochtergesellschaften gegenüber Dritten für etwaige Folgeschäden oder mittelbare Schäden, die aus der
Nichteinhaltung der ausdrücklichen oder stillschweigenden Gewährleistung resultieren. Einige
Staaten/Provinzen erlauben keine Begrenzung der impliziten Garantie oder einen Ausschluss oder die
Beschränkung der Haftung für Folgeschäden oder mittelbare Schäden, so dass die oben genannten
Einschränkungen oder Ausschlüsse möglicherweise nicht auf Sie zutreffen.
Diese Garantie gibt Ihnen bestimmte Rechte, und Sie haben möglicherweise auch andere Rechte, die von
Staat zu Staat oder Provinz zu Provinz unterschiedlich sein können.
Haftung
Wenn nach dem anwendbaren Recht zulässig, lehnen Guillemot Corporation S.A. (fortfolgend
"Guillemot") und ihre Tochtergesellschaften jegliche Haftung für Schäden, die auf eine oder mehrere der
folgenden Ursachen zurückzuführen sind, ab: (1) das Produkt wurde modifiziert, geöffnet oder geändert;
(2) Nichtbefolgung der Montageanleitung; (3) unangebrachte Nutzung, Fahrlässigkeit, Unfall (z. B. ein
Aufprall); (4) normalem Verschleiß. Wenn nach anwendbarem Recht zulässig, lehnen Guillemot und seine
Niederlassungen jegliche Haftung für Schäden, die nicht auf einen Material- oder Herstellungsfehler in
Bezug auf das Produkt beruhen (einschließlich, aber nicht beschränkt auf, etwaige Schäden, die direkt
oder indirekt durch Software oder durch die Kombination der Thrustmaster Produkte mit ungeeigneten
Elementen, insbesondere Netzteile, Akkus, Ladegeräte, oder andere Elemente, die von Guillemot für
dieses Produkt nicht geliefert wurden), ab.
http://ts.thrustmaster.com
Page 25
8/8
COPYRIGHT
*
*
© 2016 Guillemot Corporation S.A. Alle Rechte vorbehalten. Thrustmaster® ist eine eingetragene Marke von
Guillemot Corporation S.A.
Für den Verkauf in Europa, Afrika, dem Nahen Osten, Russland, Indien und Ozeanien lizenziert. Zur
exklusiven Nutzung mit PlayStation
“
„, “PlayStation„, “ „ und “ „ sind eingetragene Marken von Sony Computer
Entertainment Inc. “
®4.
„ ist eine Marke derselben Firma. Alle Rechte vorbehalten.
Alle anderen Marken sind im Besitz Ihrer jeweiligen Eigentümer. Illustrationen nicht verbindlich. Inhalte,
Designs und Spezifikationen können ohne vorherige Ankündigung geändert werden und können von Land
zu Land unterschiedlich sein. Hergestellt in China.
Hergestellt und vertrieben von Guillemot Corporation S.A.
Hinweise zum Umweltschutz
In der Europäischen Union: Dieses Produkt darf nach Ende seiner Lebensdauer nicht
über den Hausmüll entsorgt werden, sondern muss an einem Sammelpunkt für das
Recycling von elektrischen und elektronischen Geräten abgegeben werden.
Das Symbol auf dem Produkt, der Gebrauchsanleitung oder der Verpackung weist darauf
hin.
Die Werkstoffe sind gemäß ihrer Kennzeichnung wiederverwertbar. Mit der
Wiederverwertung, der stofflichen Verwertung oder anderen Formen von Altgeräten
leisten Sie einen wichtigen Beitrag zum Schutz unserer Umwelt. Bitte erfragen Sie bei der
Gemeindeverwaltung die zuständige Entsorgungsstelle.
Für alle anderen Länder: Bitte beachten Sie die lokalen Entsorgungsrichtlinien/-Gesetze
bezüglich elektrischen und elektronischen Equipments.
Wichtige Informationen. Die Farben und Verzierungen können abweichen.
Plastikhalterungen und Aufkleber bitte vor der Nutzung des Produktes entfernen.
www.thrustmaster.com
* Nur in der E U und der Türkei anwendbar
Page 26

1/8
1. Throttle
connector: RJ12 Thrustmaster
Rudder (wordt apart verkocht)
Inbussleutel voor losmaken of
vastzetten van throttle
7. Wieltje voor aanpassen stickweerstand
TECHNISCHE KENMERKEN
PlayStation®4
Handleiding
2. USB-connector
3. Roer-
connector
4. Roerfunctie via schommelstick
5. Roerfixatieschroef op stick
6.
8. Roerbediening via rocking-knop
9. Actieknoppen
10. PS-knop met LED
Multidirectionele "Point-of-View" hat-switch
11.
Page 27

2/8
DE DIVERSE FUNCTIES VAN DE HOTAS-JOYSTICK
THROTTLE
De joystick beschikt over een grote throttle die uitermate geschikt is voor het bedienen van
de stuwkracht van een vliegtuig.
De throttle is afneembaar en kan op twee verschillende manieren worden gebruikt:
Losgemaakt en apart van de joystick
(voor een authentieke pilootbeleving)
Bevestigd aan de joystick
(voor meer stabiliteit en minder ruimtebeslag).
Standaard wordt de throttle los van de joystick geleverd.
De throttle aan de joystick bevestigen
1. Zet beide items op hun kop (de throttle en de joystick).
2. Maak de inbussleutel (6) los die onderop de voet van de joystick is vastgeklemd.
3. Plaats de throttle links van de joystick.
Steek de aansluitlip aan de linkerkant van de joystickvoet in de opening op de rechterkant
van de throttle.
4. Draai de twee inbusbouten onderop de voet vast met de inbussleutel
(de bouten bevinden zich aan de linkerkant van de joystickvoet).
5. Rol de throttle-kabel op en leid deze door de kabeldoorgang.
6. Klem de inbussleutel terug op zijn plaats om hem niet kwijt te raken.
Voer deze procedure in omgekeerde volgorde uit om de throttle los te maken van de
joystick.
:
STICK MET INSTELBARE WEERSTAND
Bij de ene game wilt u graag een supergevoelige joystick die reageert op de minste of
geringste aanraking en bij een andere game wilt u een stick met meer weerstand die pas in
actie komt als u er flink tegen duwt.
De weerstand van deze stick is gelukkig instelbaar zodat u er elk type game mee kunt
spelen. U kunt de weerstand instellen met behulp van het wieltje voor het aanpassen van de
stickweerstand (7). Dit wieltje bevindt zich onderop de voet van de joystick.
Page 28

3/8
ROERFUNCTIE
De joystick beschikt over een roerfunctie die correspondeert met de pedalen in een vliegtuig
waarmee de piloot het stuur bedient om het vliegtuig om de verticale as te kantelen (om een
bocht naar links of rechts te maken). Deze roerfunctie is beschikbaar op de joystick door de
stick naar links of rechts te draaien.
Deze roerbediening is op twee manieren beschikbaar:
- op de joystick door de stick (4) naar links of rechts te draaien.
- of via de rocking-knop (8) op de throttle.
Als u alleen de rocking-knop gebruikt (of als u de roerfunctie niet nodig hebt), kunt u de
draaiing van de stick vergrendelen met de fixatieschroef (5) in de voet van de joystick.
Gebruik een gewone schroevendraaier om de roerfunctie vast of los te zetten.
MULTIDIRECTIONELE POINT-OF-VIEW HAT-SWITCH
De joystick beschikt over een Point-of-View hat-switch (11) waarmee u in één keer een
overzicht krijgt van alles wat er rondom uw vliegtuig gebeurt (indien de game deze
mogelijkheid biedt). Als u deze functie wilt gebruiken, hoeft u alleen maar in het
instellingenmenu van uw game de verschillende weergaven (links, rechts, naar voren, naar
achteren) op de richtingen van de Point-of-View hat-switch te programmeren.
De Point-of-View hat-switch kan natuurlijk ook voor andere functies worden gebruikt zoals
schieten.
Page 29

4/8
PLAYSTATION®4
INSTALLATIE OP DE PLAYSTATION®4
1. Sluit de USB-connector (2) aan op een van de USB-poorten van de computer.
2. Zet uw systeem aan.
3. De LED van de joystick gaar ROOD branden.
4. Druk op de joystick op de PS-knop (10) en login op uw Sony Entertainment Network
account om de joystick te kunnen gebruiken.
5. Start een game die de Flight Stick modus ondersteunt.
Nu kan er gespeeld worden!
LIJST VAN COMPATIBELE PLAYSTATION®4-GAMES
Op PlayStation®4, de T.Flight Hotas 4:
- is alleen compatibel met de games die de Flight Stick modus ondersteunen.
- wordt in games herkend als een echte joystick in plaats van een gamepad. Dit zorgt voor
een veel betere respons en nauwkeurigheid, en maakt het mogelijk de joystick-opties in de
game te gebruiken
Een lijst van PlayStation®4-games die compatibel zijn met deze joystick is te vinden op
http://ts.thrustmaster.com. Ga naar PlayStation / Joystick / T.Flight Hotas 4 en selecteer
Games Settings.
Deze lijst wordt regelmatig aangevuld zodra er nieuwe PS4™-games uitkomen die
compatibel zijn met de T.Flight Hotas 4.
Page 30
5/8
DE FIRMWARE VAN HET JOYSTICK BIJWERKEN
De firmware in de voet van de joystick kan worden bijgewerkt naar een nieuwere verbeterde
versie wanneer een dergelijke versie beschikbaar komt.
Om de huidige versie van de firmware van de joystick te bekijken en deze indien nodig bij te
werken, gaat u op een pc naar http://ts.thrustmaster.com. Klik in de sectie Updates and
downloads op PlayStation / Joystick / T.Flight Hotas 4, selecteer Driver/Firmware en
volg de instructies voor het downloaden en installeren.
PROBLEMEN OPLOSSEN EN WAARSCHUWINGEN
• Mijn joystick werkt niet goed of lijkt niet goed gekalibreerd te zijn
- Zet uw systeem uit, koppel uw joystick los, sluit de joystick opnieuw aan en start de game
opnieuw op.
- Bij het aansluiten van de joystick: laat de stick, het roer en de throttle tijdens het aansluiten
van de joystick in het midden staan en raak deze niet aan (dit ter voorkoming van problemen
met de kalibratie).
- Sluit de game af, ontkoppel de joystick, sluit hem opnieuw aan en druk op de PS-knop (10)
op de joystick. Login op uw Sony Entertainment Network account om de joystick te kunnen
gebruiken.
• Mijn joystick reageert te gevoelig of reageert niet gevoelig genoeg:
- De joystick wordt automatisch gekalibreerd wanneer u deze een paar maal in de richting
van de verschillende assen hebt bewogen.
- Ga in de game naar het menu met opties voor de controller, gamepad en joystick. Pas de
gevoeligheid of dode zones van de controller aan (indien deze optie beschikbaar is).
- Pas de weerstand van de stick aan met het wieltje (7) onderop de voet van de joystick.
• De roerbediening is te gevoelig:
- Schakel de draaiing van de stick uit met behulp van de fixatieschroef (5) op de voet van de
joystick en gebruik de rocking-knop voor de bediening van het roer.
HELPBESTANDEN EN FAQS (NIET OPGENOMEN IN DEZE
HANDLEIDING)
Ga op http://ts.thrustmaster.com naar de sectie Updates and Downloads, klik op
PlayStation / Joystick / T.Flight Hotas 4 en selecteer Manual/Help file.
Page 31

6/8
Informatie met betrekking tot kopersgarantie
Wereldwijd garandeert Guillemot Corporation S.A., het statutair adres gevestigd aan de Place du Granier,
B.P. 97143, 35571 Chantepie, Frankrijk, (hierna te noemen “Guillemot”) aan de de koper dat dit Thrustmasterproduct vrij zal zijn van materiaal- en fabricagefouten gedurende een garantieperiode gelijk aan de tijd
maximaal vereist om een restitutie/vervanging voor dit product te claimen. In landen van de Europese Unie
komt dit overeen met een periode van twee (2) jaar vanaf het moment van levering van het Thrustmasterproduct. In andere landen komt de garantieperiode overeen met de tijd maximaal vereist om een
restitutie/vervanging voor dit Thrustmaster-product te claimen zoals wettelijk is vastgelegd in het land waarin
de koper woonachtig was op de datum van aankoop van het Thrustmaster-product. Indien een dergelijk
claimrecht niet wettelijk is vastgelegd in het betreffende land, geldt een garantieperiode van één (1) jaar vanaf
datum aankoop van het Thrustmaster-product.
Ongeacht het hierboven gestelde, geldt voor oplaadbare batterijen een garantieperiode van zes (6) maanden
vanaf datum aankoop.
Indien u in de garantieperiode een defect meent te constateren aan dit product, neem dan onmiddellijk contact
op met Technical Support die u zal informeren over de te volgen procedure. Als het defect wordt bevestigd,
dient het product te worden geretourneerd naar de plaats van aankoop (of een andere locatie die wordt
opgegeven door Technical Support).
Binnen het gestelde van deze garantie wordt het defecte product van de koper gerepareerd of vervangen,
zulks ter beoordeling van Technical Support. Indien het Thrustmaster- product tijdens de garantieperiode is
onderworpen aan een dergelijk herstel, wordt elke periode van ten minste zeven (7) dagen waarin het product
niet in gebruik is, opgeteld bij de resterende garantieperiode (deze periode loopt vanaf de datum van verzoek
van de consument voor interventie of vanaf de datum waarop het product in kwestie beschikbaar is gesteld
voor herstel als de datum waarop het product ter beschikking wordt gesteld voor herstel later is dan de datum
van het verzoek om interventie). Indien toegestaan door van toepassing zijnde wetgeving, beperkt de
volledige aansprakelijkheid van Guillemot en haar dochterondernemingen (inclusief de aansprakelijkheid voor
vervolgschade) zich tot het repareren of vervangen van het Thrustmaster-product. Indien toegestaan door van
toepassing zijnde wetgeving, wijst Guillemot elke garantie af met betrekking tot verhandelbaarheid of
geschiktheid voor enig doel.
Deze garantie is niet van kracht: (1) indien het product aangepast, geopend of gewijzigd is, of beschadigd is
ten gevolge van oneigenlijk of onvoorzichtig gebruik, verwaarlozing, een ongeluk, normale slijtage, of enige
andere oorzaak die niet gerelateerd is aan een materiaal- of fabricagefout (inclusief maar niet beperkt tot het
combineren van het Thrustmaster-product met enig ongeschikt element waaronder in het bijzonder
voedingsadapters, oplaadbare batterijen, opladers of enig ander element niet geleverd door Guillemot voor dit
product); (2) indien u zich niet houdt aan de instructies zoals verstrekt door Technical Support; (3) op software
die onder een specifieke garantie valt; (4) op verbruiksartikelen (elementen die tijdens de levensduur van het
product worden vervangen zoals bijvoorbeeld batterijen of pads van een headset of koptelefoon); (5) op
accessoires (zoals bijvoorbeeld kabels, behuizingen, hoesjes, etui's, draagtassen of polsbandjes); (6) indien
het product werd verkocht op een openbare veiling.
Deze garantie is niet overdraagbaar.
De wettelijke rechten van de koper die in zijn/haar land van toepassing zijn op de verkoop van
consumentproducten worden op generlei wijze door deze garantie beperkt.
Page 32

7/8
Aanvullende garantiebepalingen
Gedurende de garantieperiode zal Guillemot in principe nooit reserveonderdelen leveren omdat Technical
Support de enige partij is die bevoegd is een Thrustmaster-product te openen en/of te herstellen (met
uitzondering van een herstelprocedure die de klant door Technical Support gevraagd wordt uit te voeren met
behulp van schriftelijke instructies – omdat deze procedure bijvoorbeeld eenvoudig is en het herstelproces
niet vertrouwelijk is – en door het verstrekken aan de consument van de benodigde onderdelen, indien van
toepassing).
Gezien de innovatiecycli en om haar knowhow en handelsgeheimen te beschermen, zal Guillemot in
principe nooit een herstelbeschrijving of reserveonderdelen verstrekken voor een Thrustmaster-product
waarvan de garantieperiode is verstreken.
In de Verenigde Staten en Canada is deze garantie beperkt tot het interne mechanisme en de externe
behuizing van dit product. In geen geval kan Guillemot of een van de bij Guillemot aangesloten
ondernemingen aansprakelijk worden gesteld voor enige derde partij voor vervolgschade of incidentele
schade als gevolg van inbreuk op expliciete of impliciete garantiebepalingen. In sommige rechtsgebieden
zijn beperkingen ten aanzien van de duur van impliciete garanties en uitsluiting of beperking van
aansprakelijkheid voor incidentele schade of vervolgschade niet toegestaan. Het is dus mogelijk dat
bovenstaande beperkingen of uitsluitingen voor u niet van toepassing is. Deze garantie verleent u specifieke
wettelijke rechten. Anderzijds is het mogelijk dat u rechten hebt die niet in deze garantiebepalingen worden
genoemd. Voorwaarden en condities variëren van land tot land.
Aansprakelijkheid
Indien toegestaan door van toepassing zijnde wetgeving, wijzen Guillemot Corporation S.A. (hierna te
noemen “Guillemot”) en haar dochterondernemingen alle aansprakelijkheid af voor enige schade
veroorzaakt door één van de volgende oorzaken: (1) indien het product aangepast, geopend of gewijzigd is;
(2) de montage-instructies niet zijn opgevolgd; (3) oneigenlijk of onvoorzichtig gebruik, verwaarlozing, een
ongeluk (bijvoorbeeld stoten); (4) normale slijtage. Indien toegestaan onder van toepassing zijnde
wetgeving, wijzen Guillemot en haar dochterondernemingen alle aansprakelijkheid af voor enige schade aan
dit product niet gerelateerd aan een materiaal- of fabricagefout (inclusief maar niet beperkt tot enige schade
direct of indirect veroorzaakt door enige software, of door het combineren van het Thrustmaster-product met
enig ongeschikt element waaronder in het bijzonder voedingsadapters, oplaadbare batterijen, opladers of
enig ander element niet geleverd door Guillemot voor dit product).
TECHNISCHE ONDERSTEUNING
http://ts.thrustmaster.com
Page 33

8/8
COPYRIGHT
*
*
© 2016 Guillemot Corporation S.A. Alle rechten voorbehouden. Thrustmaster® is een geregistreerd
handelsmerk van Guillemot Corporation S.A.
Gelicentieerd voor verkoop in Europa, Afrika, Midden-Oosten, Rusland, India en Oceanië. Voor exclusief
gebruik met PlayStation
“
”, “PlayStation”, “ ” en “ ” zijn geregistreerde handelsmerken van Sony Computer
Entertainment Inc. “
®4.
” is een handelsmerk van hetzelfde bedrijf. Alle rechten voorbehouden.
Alle andere handelsmerken zijn het eigendom van hun respectieve eigenaren. Afbeeldingen zijn niet
bindend. Inhoud, ontwerp en specificaties kunnen zonder kennisgeving vooraf worden gewijzigd en kunnen
per land verschillen. Geproduceerd in China.
Geproduceerd en gedistribueerd door Guillemot Corporation S.A.
AANBEVELINGEN VOOR DE BESCHERMING VAN HET MILIEU
In de Europese Unie: Gooi dit product na het einde van de levensduur niet weg met het
normale afval, maar breng het naar het door uw gemeente aangewezen inzamelpunt
voor elektrische en/of computerapparatuur.
Ter herinnering is hiertoe op het product, de gebruikshandleiding of de verpakking een
symbool aangebracht.
De meeste materialen kunnen worden gerecycled. Door recycling en andere methoden
voor verantwoorde verwerking van afgedankte elektrische en elektronische apparaten
kunt u een belangrijke bijdrage leveren aan de bescherming van het milieu.
Neem contact op met uw gemeente voor informatie over een inzamelpunt bij u in de buurt.
In alle andere landen: houd u aan de plaatselijk milieuwetgeving voor elektrische en elektronische apparaten.
Bewaar deze informatie. De kleuren en decoraties kunnen variëren.
Plastic bevestigingen en hechtmaterialen moeten van het product worden verwijderd voordat het wordt
gebruikt.
www.thrustmaster.com
*Alleen van toepassing in de EU en Turkije
Page 34

1/8
1. Manetta
Funzione timone tramite rotazione
Vita di bloccaggio del timone
la manetta
7. Disco per la regolazione della resistenza
CARATTERISTICHE TECNICHE
PlayStation®4
Manuale d’uso
2. Connettore USB
3. Connettore timone: connettore RJ12
per Timone Thrustmaster (venduto
separatamente)
4.
impugnatura
5.
sull’impugnatura
6. Chiave Allen per installare o separare
dell’impugnatura
8. Timone tramite pulsante oscillante
9. Pulsanti azione
10. Pulsante PS con LED
11. Hat-switch "Point Of View"
multidirezionale
Page 35

2/8
INTRODUZIONE AL TUO JOYSTICK HOTAS
MANETTA
Il tuo joystick è dotato di un’ampia manetta che potrai utilizzare per controllare facilmente
l’accelerazione del tuo aeroplano.
La manetta è rimuovibile e può essere collocata in 2 diverse posizioni:
Staccata e separata dal joystick
(per ricreare le autentiche condizioni di pilotaggio), oppure
Attaccata al joystick
(per una maggiore stabilità e per occupare minor spazio possibile).
Per default, la manetta si presenta separata dal joystick.
Per attaccare la manetta al joystick:
1. Ribalta entrambi gli elementi (la manetta e il joystick).
2. Prendi la chiave Allen (6) attaccata sotto la base del joystick.
3. Posiziona la manetta alla sinistra del joystick.
Inserisci la placca di aggancio presente nella parte sinistra della base del joystick
nell’apposita apertura nella parte destra della manetta.
4. Utilizzando la chiave, stringi le due viti Allen presenti sotto la base
(si trovano sulla parte sinistra della base del joystick).
5. Riavvolgi il cavo della manetta e fallo passare attraverso il relativo slot di alloggiamento.
6. Rimetti a posto la chiave Allen, in modo tale da non perderla.
Per staccare la manetta dal joystick, ripeti questa procedura al contrario.
IMPUGNATURA A RESISTENZA REGOLABILE
In base al tuo stile di gioco, potresti desiderare un joystick sensibilissimo, in grado di
rispondere anche al più lieve tocco, oppure potresti preferire un joystick più rigido, in grado
di offrire una maggiore resistenza ai movimenti da te effettuati.
L’impugnatura del tuo joystick è dotata di resistenza regolabile, per potersi adattare a tutti i
giocatori. Per regolarla, utilizza l’apposito disco di regolazione (7) presente sotto la base del
tuo joystick.
Page 36

3/8
FUNZIONE TIMONE
Il tuo joystick è dotato di una funzione timone, che in un aereo corrisponde ai pedali utilizzati
dal pilota per girare l’ipotetico sterzo, facendo oscillare l’aereo lungo il proprio asse verticale
(ossia facendolo girare verso destra o sinistra). Questa funzione timone è accessibile dal tuo
joystick ruotando l’impugnatura verso destra o verso sinistra.
È possibile accedere alla funzione timone in due diversi modi:
- sul tuo joystick, ruotando l’impugnatura (4) verso destra o sinistra;
- oppure utilizzando il pulsante oscillante (8) sulla manetta.
Qualora dovessi utilizzare unicamente il pulsante oscillante (o se non stai utilizzando la
funzione timone), puoi disattivare la rotazione dell’impugnatura tramite la vite di bloccaggio
(5) presente sulla base del joystick. Per cambiare la posizione della vite,
bloccando/sbloccando così la funzione timone, puoi utilizzare un cacciavite piatto.
HAT-SWITCH "POINT OF VIEW" MULTIDIREZIONALE
Il tuo joystick dispone di un hat-switch “Point Of View” (11) che, come il nome stesso sta a
indicare, ti permette (nei giochi che lo consentono) di vedere istantaneamente qualunque
cosa attorno al tuo aeroplano. Per far questo, non devi far altro che accedere al menu di
configurazione del tuo gioco e programmare le varie visuali (posteriore, verso sinistra, verso
destra, oltre alle visuali esterne), associandole alle varie direzioni dell’hat-switch “Point Of
View”.
Naturalmente, in alternativa, puoi utilizzare l’hat-switch “Point Of View” anche per altre
funzioni (fuoco, ecc.).
Page 37

4/8
PLAYSTATION®4
INSTALLAZIONE SU PLAYSTATION®4
1. Collega il connettore USB (2) ad una delle porte USB del tuo sistema.
2. Accendi il tuo sistema.
3. Il LED del joystick si illuminerà di rosso.
4. Per poter utilizzare il joystick, premi il pulsante PS del joystick (10) e accedi al tuo account
su Sony Entertainment Network.
5. Avvia un gioco che supporti la modalità Flight Stick.
Ora sei pronto per giocare!
ELENCO DEI GIOCHI PLAYSTATION®4 COMPATIBILI
Su PlayStation®4, il T.Flight Hotas 4:
- È compatibile soltanto con i giochi che supportano la modalità Flight Stick.
- Nei giochi, viene riconosciuto come un vero e proprio joystick e non come gamepad, per
una migliore risposta e una maggiore precisione, oltre alla possibilità di accedere alle opzioni
per il joystick di questi giochi.
Un elenco di giochi PlayStation®4 compatibili con il joystick è disponibile sul sito
http://ts.thrustmaster.com. Vai su PlayStation® / Joystick / T.Flight Hotas 4, quindi seleziona
Games Settings.
Questo elenco viene costantemente aggiornato, a seconda dell’uscita di nuovi giochi per
PS4™ compatibili con il T.Flight Hotas 4.
Page 38

5/8
AGGIORNARE IL FIRMWARE DEL TUO JOYSTICK
Il firmware presente nella base del tuo joystick può essere aggiornato ad una versione più
recente, per apportare dei miglioramenti al prodotto.
Per visualizzare la versione del firmware attualmente utilizzata dal tuo joystick e, se
necessario, per aggiornarla: su PC, visita il sito http://ts.thrustmaster.com. Nella sezione
Updates and Downloads, clicca su PlayStation / Joystick / T.Flight Hotas 4, dopodiché
scegli Driver/Firmware e segui le istruzioni per la procedura di download e installazione.
RACCOMANDAZIONI E RISOLUZIONE DEI PROBLEMI
• Il mio joystick non funziona correttamente o non sembra essere ben calibrato:
- Spegni il tuo sistema, scollega il tuo joystick, ricollega il tuo joystick e riavvia il tuo gioco.
- Quando colleghi il tuo joystick: lascia centrati l’impugnatura, il timone e la manetta, senza
muoverli (al fine di evitare problemi di calibrazione).
- Esci dal gioco, scollega il tuo joystick, ricollegalo, dopodiché premi il pulsante PS (10) sul
joystick. Per poter utilizzare il tuo joystick, accedi al tuo account su Sony Entertainment
Network.
• Il mio joystick è troppo sensibile o non abbastanza sensibile:
- Il tuo joystick si auto-calibra dopo aver compiuto alcuni movimenti lungo i vari assi.
- Tramite il menu “Options / Controller / Gamepad o Joystick” del tuo gioco: regola la
sensibilità o le zone morte del tuo controller (qualora questa opzione fosse disponibile).
- Regola la resistenza dell’impugnatura tramite il disco (7) presente sotto la base del tuo
joystick.
• La funzione timone è troppo sensibile:
- Disattiva la rotazione dell’impugnatura tramite la vite di bloccaggio (5) presente sulla base
del joystick e attiva la funzione timone utilizzando il pulsante oscillante.
FILE DI AIUTO E FAQ (NON INCLUSI NEL PRESENTE MANUALE)
Visita il sito http://ts.thrustmaster.com e, nella sezione Updates and Downloads, clicca
su PlayStation / Joystick / T.Flight Hotas 4, quindi seleziona Manual/Help file.
Page 39

6/8
Informazioni sulla garanzia al consumatore
A livello mondiale, Guillemot Corporation S.A., avente sede legale in Place du Granier, B.P. 97143, 35571
Chantepie, Francia (d’ora in avanti “Guillemot”) garantisce al consumatore che il presente prodotto
Thrustmaster sarà privo di difetti relativi ai materiali e alla fabbricazione, per un periodo di garanzia
corrispondente al limite temporale stabilito per la presentazione di un reclamo riguardante la conformità
del prodotto in questione. Nei paesi della Comunità Europea, tale periodo equivale a due (2) anni a partire
dalla consegna del prodotto Thrustmaster. In altri paesi, la durata della garanzia corrisponde al limite
temporale stabilito per la presentazione di un reclamo riguardante la conformità del prodotto Thrustmaster
in base alle leggi applicabili nel paese in cui il consumatore risiedeva alla data di acquisto del prodotto
Thrustmaster (qualora nel paese in questione non esistesse alcuna norma a riguardo, il periodo di
garanzia corrisponderà a un (1) anno a partire dalla data originale di acquisto del prodotto Thrustmaster).
Diversamente da quanto affermato in precedenza, le batterie ricaricabili sono coperte da una garanzia di
sei (6) mesi dalla data di acquisto originale.
Qualora, durante il periodo di garanzia, il prodotto dovesse apparire difettoso, contatti immediatamente
l’Assistenza Tecnica, che le indicherà la procedura da seguire. Qualora il difetto dovesse essere
confermato, il prodotto dovrà essere riportato al luogo di acquisto (o qualsiasi altro luogo indicato
dall’Assistenza Tecnica).
Nel contesto della presente garanzia, il prodotto difettoso di proprietà del consumatore potrà essere
sostituito o reso nuovamente funzionante, a discrezione dell’Assistenza Tecnica. Se, durante il periodo
coperto dalla garanzia, il prodotto Thrustmaster fosse oggetto di tale rimessa in operatività, alla rimanente
durata della garanzia dovrà essere aggiunto un periodo di almeno sette (7) giorni, durante il quale il
prodotto risulta non utilizzabile (tale periodo intercorre dalla data della richiesta di intervento da parte del
consumatore o dalla data in cui il prodotto in questione è reso disponibile per la rimessa in operatività,
questo nel caso in cui tale data sia successiva alla data di richiesta di intervento). Qualora le leggi
applicabili in materia lo consentano, la totale responsabilità di Guillemot e delle sue controllate (compresi i
danni conseguenti) si limita alla rimessa in operatività o alla sostituzione del prodotto Thrustmaster.
Qualora le leggi applicabili in materia lo consentano, Guillemot declina ogni garanzia sulla commerciabilità
o la conformità a finalità particolari.
La presente garanzia non potrà essere applicata: (1) se il prodotto è stato modificato, aperto, alterato o ha
subito danni derivanti da un uso inappropriato o non autorizzato, da negligenza, da un incidente, dalla
semplice usura, o da qualsiasi altra causa non riconducibile a difetti nei materiali o nell'assemblaggio
(compresi, ma non i soli, prodotti Thrustmaster combinati con elementi inadatti, tra cui, in particolare,
batterie ricaricabili, caricatori o qualsiasi altro elemento non fornito da Guillemot per questo prodotto); (2)
in caso di mancato rispetto delle istruzioni fornite dall'Assistenza Tecnica; (3) in caso di software, ovvero
software soggetto a una specifica garanzia; (4) ai materiali di consumo (elementi che richiedono la loro
sostituzione al termine della loro durata di esercizio come, ad esempio, batterie di tipo convenzionale o
cuscinetti protettivi per auricolari o cuffie); (5) agli accessori (ad esempio, cavi, custodie, borsette, borse,
cinturini); (6) se il prodotto è stato venduto ad un'asta pubblica.
La presente garanzia non è trasferibile.
I diritti legali del consumatore, stabiliti dalle leggi vigenti in materia di vendita di beni di consumo nel
relativo paese, non vengono intaccati dalla presente garanzia.
Page 40

7/8
ASSISTENZA TECNICA
Disposizioni addizionali sulla garanzia
Per tutta la durata della garanzia, in linea di principio, Guillemot non fornirà alcuna parte di ricambio, in
quanto la sola Assistenza Tecnica è la parte autorizzata ad aprire e/o rimettere in funzionamento tutti i
prodotti Thrustmaster (fatta eccezione per eventuali procedure di rimessa in operatività che l’Assistenza
Tecnica potrebbe richiedere al consumatore, attraverso istruzioni scritte – viste, ad esempio, la semplicità
e la mancanza di riservatezza della procedura di rimessa in operatività – e fornendo al consumatore le
necessarie parti di ricambio, se ve ne fosse l’esigenza).
Considerando i propri cicli di innovazione e per proteggere il proprio know-how e i propri segreti
commerciali, in linea di principio, Guillemot non fornirà alcuna notifica o parte di ricambio finalizzata alla
rimessa in attività di un qualunque prodotto Thrustmaster il cui periodo di garanzia risultasse scaduto.
Negli Stati Uniti d'America e in Canada, la presente garanzia è limitata al meccanismo interno del prodotto
e alla struttura esterna. In nessun caso Guillemot o le sue controllate potranno essere ritenute
responsabili, da una qualunque parte terza, per qualsiasi danno accidentale o consequenziale derivante
dalla violazione di una qualunque garanzia, espressa o implicita. Alcuni Stati/Province non ammettono
limitazioni alla durata di una garanzia implicita, oppure all'esclusione o alla limitazione della responsabilità
per danni accidentali o consequenziali, per cui le suddette limitazioni o esclusioni potrebbero non
riguardarti. La presente garanzia ti fornisce specifici diritti legali, inoltre potresti avere anche altri diritti,
variabili da Stato a Stato o da Provincia a Provincia.
Responsabilità
Qualora le leggi applicabili in materia lo consentano, Guillemot Corporation S.A. (d'ora in avanti
“Guillemot”) e le sue controllate declinano ogni responsabilità per qualsiasi danno derivante da almeno
una delle seguenti condizioni: (1) il prodotto è stato modificato, aperto o alterato; (2) mancato rispetto
delle istruzioni di installazione; (3) uso inappropriato o non permesso, negligenza, incidente (come, ad
esempio, un impatto); (4) semplice usura. Qualora le leggi applicabili in materia lo consentano, Guillemot
e le sue controllate declinano ogni responsabilità per qualsiasi danno non riconducibile a difetti nei
materiali o nella fabbricazione del prodotto (compresi, ma non i soli, potenziali danni causati direttamente
o indirettamente da un qualunque software, oppure dall’uso del prodotto Thrustmaster in combinazione
con elementi inadatti, tra cui, in particolare, batterie ricaricabili, caricatori o qualsiasi altro elemento non
fornito da Guillemot per questo prodotto).
http://ts.thrustmaster.com
Page 41

8/8
COPYRIGHT
*
*
© 2016 Guillemot Corporation S.A. Tutti i diritti riservati. Thrustmaster® è un marchio registrato da Guillemot
Corporation S.A.
Con licenza di vendita in Europa, Africa, Medio Oriente, Russia, India e Oceania. Utilizzabile esclusivamente
con PlayStation
“
Inc. “
®3 e PlayStation®4.
”, “PlayStation”, “ ” e “ ” sono marchi registrati da Sony Computer Entertainment
” è un marchio appartenente alla medesima compagnia. Tutti i diritti riservati.
Tutti gli altri marchi appartengono ai legittimi proprietari. Illustrazioni puramente indicative. I contenuti, i
design e le caratteristiche possono essere oggetto di modifiche senza preavviso e possono variare da una
nazione all’altra. Fabbricato in Cina.
Prodotto e distribuito da Guillemot Corporation S.A.
RACCOMANDAZIONI SULLA TUTELA DELL’AMBIENTE
Nell’Unione Europea: Al termine della sua vita operativa, questo prodotto non
dovrebbe essere gettato assieme ai comuni rifiuti, ma dovrebbe essere portato ad un
apposito punto di raccolta destinato al riciclaggio del Materiale Elettrico ed Elettronico.
Ciò è confermato dal simbolo riportato sul prodotto, nel manuale d’uso o sulla
confezione.
A seconda delle proprie caratteristiche, i materiali potrebbero essere riciclati. Tramite il
riciclaggio ed altre forme di trattamento del Materiale Elettrico ed Elettronico, è
possibile fornire un importante contributo per la salvaguardia dell’ambiente.
Per conoscere i punti di raccolta più vicini a te, contatta le autorità locali competenti.
In tutti gli altri Paesi: per favore, rispetta le leggi locali sul riciclo dei materiali elettrici ed elettronici.
Informazioni da conservare. I colori e le decorazioni possono variare.
I ganci di plastica e gli adesivi dovrebbero essere rimossi dal prodotto prima che quest’ultimo venga
utilizzato.
www.thrustmaster.com
*Valido solo in UE e Turchia
Page 42

1/8
1. Mando de potencia
Thrustmaster Rudder (vendido por
mando de potencia
7. Rueda ajuste de resistencia de palanca
CARACTERÍSTICAS TÉCNICAS
PlayStation®4
Manual del usuario
2. Conector USB
3. Conector de timón: conector de RJ12
separado)
4.
Función de timón con palanca giratoria
5. Tornillo bloqueo de timón en palanca
6. Llave Allen para instalar o separar el
8. Timón mediante botón de sacudida
9. Botones de acción
10. Botón PS con LED
11. Hat-switch multidireccional "Punto de
vista"
Page 43

2/8
LAS PARTES DE TU JOYSTICK HOTAS
MANDO DE POTENCIA
Tu joystick incorpora un gran mando de potencia que
la aceleración de tu avión.
El mando de potencia es desmontable y se puede colocar de 2 formas diferentes:
- Desmontado y separado
(para recrear condiciones de
del joystick
pilotaje auténticas)
- Unido al joystick
(para mayor estabilidad y para que ocupe
De forma predeterminada, el mando de potencia viene separado del joystick.
Para unir el mando de potencia al joystick:
menos espacio).
puedes utilizar
para controlar fácilmente
1. Dale la vuelta a ambos elementos (el mando de
2. Toma la llave Allen (6) colocada debajo de la base del joystick.
3. Coloca el mando de potencia a la izquierda del joystick.
Inserta la pestaña de conexión de la parte izquierda de la base del joystick en la abertura de la
parte derecha del mando de potencia.
4. Utilizando la llave, aprieta los dos tornillos Allen de debajo de la base
(situados en el lado izquierdo de la base
5. Enrolla el cable del mando de potencia y pásalo por la ranura
6. Vuelve a poner la llave Allen en su sitio para no perderla.
del joystick).
potencia
y el joystick).
de la
guía del cable.
Realiza este procedimiento a la inversa para desmontar el mando de potencia del joystick.
PALANCA CON RESISTENCIA AJUSTABLE
Dependiendo de tu estilo de juego, puede que quieras tener un joystick ultra-sensible, que
responda al más ligero toque, o puede
ofrezca algo de resistencia cuando lo muevas.
La resistencia de la palanca del joystick se puede
jugadores. Para ajustarla, utiliza la rueda de ajuste de la resistencia (7) situada debajo de la
base del joystick.
que prefieras
tener un joystick más firme, que
ajustar, pera adaptarlo a todos los
Page 44

3/8
FUNCIÓN DE TIMÓN
Tu joystick incorpora una función de timón, que en un avión
piloto utiliza para girar la dirección, permitiendo que el avión pivote sobre su eje vertical (por
lo tanto haciendo que el avión gire a la izquierda o a la derecha). Esta función de timón es
accesible
en el
joystick rotando la palanca a la izquierda o a la derecha.
corresponde a
los pedales que el
A esta función de timón se accede de dos maneras:
- en el joystick rotando la palanca (4) a la izquierda o a la derecha.
- o mediante el botón de sacudida (8) en el mando de potencia.
Si sólo estás utilizando el botón de sacudida (o si no vas a utilizar la función de
timón), puedes deshabilitar la rotación de la palanca con el tornillo de bloqueo (5)
situado en la base del joystick. Utiliza un destornillador de cabeza plana para cambiar
la posición del tornillo
y de
este modo bloquear/desbloquear la función de timón.
HAT-SWITCH MULTIDIRECCIONAL "PUNTO DE VISTA"
Tu joystick incorpora un hat-switch “Punto de vista” (11) que, como su nombre indica, te
permite (en
alrededor de tu avión. Para ello, dirígete al menú de configuración del juego y programa las
diferentes vistas (vista trasera, vista izquierda, vista derecha y también las vistas externas) en
las direcciones del hat-switch “Punto de vista”.
Por supuesto, también puedes utilizar el hat-switch “Punto de
diferentes (disparar, etc.).
juegos que incorporen esa función) ver instantáneamente lo que está pasando
vista” para
otras funciones
Page 45

4/8
PLAYSTATION®4
INSTALACIÓN EN PLAYSTATION®4
1. Enchufa el conector USB (2) en uno de los puertos USB del sistema.
2. Enciende el sistema.
3. El LED del joystick se ilumina en ROJO.
4. Pulsa el botón PS (10) del joystick e inicia sesión en tu cuenta de Sony Entertainment
Network para poder usar el joystick.
5. Ejecuta un juego compatible con el modo Flight Stick.
¡Ya estás preparado para jugar!
LISTA DE JUEGOS DE PLAYSTATION®4 COMPATIBLES
En PlayStation®4, el T.Flight Hotas 4:
- Solo es compatible con los juegos que admiten el modo Flight Stick.
- En los juegos se reconoce como un joystick auténtico y no como un gamepad, para lograr
una mayor receptividad y una precisión mejorada, y la posibilidad de acceder a las opciones
del joystick en esos juegos.
En http://ts.thrustmaster.com hay una lista de juegos de PlayStation®4 compatibles con el
joystick. Dirígete a PlayStation® / Joystick / T.Flight Hotas 4, y luego selecciona Games
Settings (Ajustes de los juegos).
Esta lista se actualizará con regularidad, con la llegada de nuevos juegos de PS4™
compatibles con T.Flight Hotas 4.
Page 46

5/8
ACTUALIZACIÓN DEL FIRMWARE DEL JOYSTICK
El firmware incluido en la base del joystick se puede actualizar a una versión más reciente
que incluya mejoras del producto.
Para mostrar la versión de firmware que está usando actualmente tu joystick y actualizarla si
es necesario: en PC, visita http://ts.thrustmaster.com. En la sección Updates and
Downloads (Actualizaciones y descargas), haz clic en PlayStation / Joystick /
T.Flight Hotas 4 y luego selecciona Driver/Firmware (Controlador/Firmware) y sigue las
instrucciones que describen el procedimiento de instalación y descarga.
RESOLUCIÓN DE PROBLEMAS Y ADVERTENCIAS
• El joystick no funciona correctamente o parece que la calibración es incorrecta:
- Apaga el sistema, desconecta el joystick, vuelve a conectarlo y luego inicia de nuevo el
juego.
- Al conectar el joystick: deja la palanca, el timón y el mando de potencia centrados y no los
muevas (para evitar problemas de calibración).
- Sal del juego, desconecta el joystick, vuelve a conectarlo y luego pulsa el botón PS (10) en
el joystick. Inicia sesión en tu cuenta de Sony Entertainment Network para poder usar el
joystick.
• Mi joystick es demasiado sensible o no es lo bastante sensible:
- El joystick se autocalibra por sí solo después de que hagas algunos movimientos en los
distintos ejes.
- En el menú "Opciones / Mando / Gamepad o Joystick" del juego: ajusta la sensibilidad o
las zonas muertas del mando (si esta opción está disponible).
- Ajusta la resistencia de la palanca usando la rueda (7) situado bajo la base del joystick.
• La función de timón es demasiado sensible:
- Desactiva la rotación de la palanca usando el tornillo de bloqueo (5) situado en la base del
joystick y usa el botón basculante para la función de timón.
ARCHIVOS DE AYUDA Y FAQ (NO INCLUIDOS EN ESTE MANUAL)
Visita http://ts.thrustmaster.com y en la sección Updates and Downloads (Actualizaciones
y descargas), haz clic en PlayStation / Joystick / T.Flight Hotas 4, y luego selecciona
Manual/Help file (Manual/Archivo de ayuda).
Page 47

6/8
INFORMACIÓN DE GARANTÍA AL CONSUMIDOR
En todo el mundo, Guillemot Corporation S.A., cuyo domicilio legal se encuentra en Place du Granier,
B.P. 97143, 35571 Chantepie, Francia (en lo sucesivo “Guillemot”) garantiza al consumidor que este
producto de Thrustmaster estará libre de defectos de materiales y mano de obra, durante un período de
garantía que corresponde al límite de tiempo para interponer una acción legal referida a la conformidad
en relación con este producto. En los países de la Unión Europea, esto corresponde a un período de dos
(2) años a partir de la entrega del producto de Thrustmaster. En otros países, el período de garantía
corresponde al límite de tiempo para interponer una acción legal referida a la conformidad en relación con
este producto de Thrustmaster según las leyes aplicables del país en el que el consumidor estuviese
domiciliado en la fecha de compra del producto de Thrustmaster (si no existiese una acción similar en el
país correspondiente, entonces el período de garantía será de un (1) año a partir de la fecha de compra
original del producto de Thrustmaster).
A pesar de lo anterior, las baterías recargables están cubiertas por un período de garantía de seis (6)
meses a partir de la fecha de compra original.
Si el producto resultase defectuoso durante el período de garantía, hay que ponerse en contacto
inmediatamente con el Soporte Técnico, que indicará el procedimiento a seguir. Si se confirma el defecto,
el producto debe devolverse a su lugar de compra (o a cualquier otra ubicación indicada por el Soporte
Técnico).
Dentro del contexto de esta garantía, el producto defectuoso del consumidor será sustituido o restaurado
su funcionamiento correcto. Si, durante el período de garantía, el producto de Thrustmaster fuese
sometido a dicho reacondicionamiento, cualquier período de cómo mínimo siete (7) días durante el que el
producto no se pueda usar se añadirá al período de garantía restante (este período va desde la fecha de
petición de intervención del consumidor o desde la fecha en la que el producto se entrega para el
reacondicionamiento, si la fecha en la que el producto se entrega para el reacondicionamiento fuese
posterior a la fecha de la petición de intervención). Si la ley aplicable lo permite, toda la responsabilidad
de Guillemot y sus filiales (incluso por daños resultantes) se limita a la restauración del funcionamiento
correcto o la sustitución del producto de Thrustmaster. Si la ley aplicable lo permite, Guillemot renuncia a
todas las garantías de comerciabilidad o adecuación para un propósito determinado.
Esta garantía no se aplicará: (1) si el producto ha sido modificado, abierto, alterado o ha sufrido daños
como resultado de un uso inapropiado o abuso, negligencia, accidente, desgaste normal, o cualquier otra
causa no relacionada con un defecto de materiales o fabricación (incluyendo, pero no de forma exclusiva,
la combinación del producto de Thrustmaster con cualquier elemento no adecuado, incluyendo en
particular fuentes de alimentación, baterías recargables, cargadores o cualquier otro elemento no
suministrado por Guillemot para este producto); (2) en caso de incumplimiento de las instrucciones
proporcionadas por el Soporte Técnico; (3) a software, es decir software sujeto a una garantía específica;
(2) en caso de incumplimiento de las instrucciones proporcionadas por el Soporte Técnico; (3) a software,
es decir software sujeto a una garantía específica; (4) a consumibles (elementos que se tienen que
reemplazar a lo largo de la vida del producto: por ejemplo, baterías desechables o almohadillas para
auriculares de audio); (5) a accesorios (por ejemplo, cables, cajas, bolsas, bolsos o muñequeras); (6) si el
producto se ha vendido en una subasta pública. (6) si el producto se ha vendido en una subasta pública.
Esta garantía no es transferible.
Los derechos legales del consumidor en relación con las leyes aplicables a la venta de productos de
consumo de su país no se ven afectados por esta garantía.
Page 48

7/8
SOPORTE TÉCNICO
Provisiones de garantía adicionales
Durante el período de garantía, Guillemot no proporcionará, en principio, ninguna pieza de repuesto, ya
que el Soporte Técnico es el único autorizado para abrir y/o reacondicionar los productos de
Thrustmaster (con la excepción de los procedimientos de reacondicionamiento que el Soporte técnico
puede solicitar que lleve a cabo el consumidor, mediante instrucciones por escrito – por ejemplo, debido a
la simplicidad y la falta de confidencialidad del proceso de reacondicionamiento – y suministrando al
consumidor las piezas de repuesto necesarias, si hiciese falta).
Debido a sus ciclos de innovación y para proteger su know-how y secretos comerciales, Guillemot no
proporcionará, en principio, ninguna pieza de repuesto ni instrucciones de reacondicionamiento para los
productos de Thrustmaster cuyo período de garantía haya vencido.
En los Estados Unidos de América y en Canadá, esta garantía está limitada al mecanismo interno del
producto y al alojamiento externo. En ningún caso, Guillemot ni sus filiales serán responsables ante
terceros por daños resultantes o fortuitos resultado del incumplimiento de cualquier garantía expresa o
implícita. En algunos estados o provincias no se permite la limitación de la duración de una garantía
implícita ni la exclusión o limitación de responsabilidad por daños resultantes o fortuitos, por lo que las
limitaciones o exclusiones anteriores pueden no ser aplicables. Esta garantía ofrece derechos legales
específicos al consumidor, que también puede tener otros derechos que pueden variar de un estado a
otro o de una provincia a otra.
Responsabilidad
Si la ley aplicable lo permite, Guillemot Corporation S.A. (en lo sucesivo “Guillemot”) y sus filiales
renuncian a toda responsabilidad por los daños causados por uno o más de los siguientes motivos: (1) el
producto ha sido modificado, abierto o alterado; (2) incumplimiento de las instrucciones de montaje; (3)
uso inapropiado o abuso, negligencia, accidente (un impacto, por ejemplo); (4) desgaste normal. Si la ley
aplicable lo permite, Guillemot y sus filiales renuncian a toda responsabilidad por los daños no
relacionados con defectos de materiales o fabricación en relación con el producto (incluyendo, pero no de
forma exclusiva, los daños causados de forma directa o indirecta por cualquier software, o por combinar
el producto de Thrustmaster con cualquier elemento no adecuado, incluyendo en particular fuentes de
alimentación, baterías recargables, cargadores o cualquier otro elemento no suministrado por Guillemot
para este producto).
http://ts.thrustmaster.com
Page 49

8/8
COPYRIGHT
*
*
© 2016 Guillemot Corporation S.A. Todos los derechos reservados. Thrustmaster® es una marca
comercial registrada de Guillemot Corporation S.A.
Licenciado para la venta en Europa, África, Oriente Medio, Rusia, India y Oceanía. Para usar
exclusivamente con PlayStation
“
”, “PlayStation”, “ ” y “ ” son marcas comerciales registradas de Sony Computer
Entertainment Inc. “
®4.
” es una marca comercial de la misma compañía. Todos los derechos
reservados.
Todas las demás marcas comerciales son propiedad de sus respectivos dueños. Ilustraciones no
vinculantes. Los contenidos, diseños y especificaciones están sujetos a cambios sin previo aviso y pueden
variar de un país a otro. Fabricado en China.
Fabricado y distribuido por Guillemot Corporation S.A.
RECOMENDACIÓN DE PROTECCIÓN AMBIENTAL
En la Unión Europea: Al terminar su vida útil, este producto no debe tirarse en un
contenedor de basuras estándar, sino que debe dejarse en un punto de recogida de
desechos eléctricos y equipamiento electrónico para ser reciclado.
Esto viene confirmado por el símbolo que se encuentra en el producto, manual del
usuario o embalaje.
Dependiendo de sus características, los materiales pueden reciclarse. Mediante el
reciclaje y otras formas de procesamiento de los desechos eléctricos y el
equipamiento electrónico puedes contribuir de forma significativa a ayudar a proteger
el medio ambiente.
Contacta con las autoridades locales para más información sobre el punto de recogida más cercano.
Para los demás países: cumpla las leyes locales sobre reciclaje de equipos eléctricos y electrónicos.
Esta información debe conservarse. Los colores y motivos decorativos pueden variar.
Los adhesivos y los cierres de plástico se deben quitar del producto antes de utilizarlo.
www.thrustmaster.com
*Aplicable únicamente a la UE y Turquía
Page 50

1/8
1. Manete de potência
Função de leme de direção via
Chave sextavada para instalar ou
separar a manete de potência
7. Mostrador de ajuste da resistência do
CARACTERÍSTICAS TÉCNICAS
PlayStation®4
Manual do Utilizador
2. Conector USB
3. Conector do leme de direção: conector
RJ12 Thrustmaster Rudder (vendido à
parte)
4.
manípulo giratório
5. Parafuso de travamento do leme de
direção no manípulo
6.
manípulo
8. Leme de direção via botão oscilante
9. Botões de ações
10. Botão PS com LED
11. Hat switch multidirecional de “ponto de
vista”
Page 51

2/8
FAMILIARIZAÇÃO COM O SEU JOYSTICK HOTAS
MANETE DE POTÊNCIA
O seu joystick possui uma manete de potência grande que pode utilizar para controlar
facilmente a aceleração do seu avião.
A manete de potência é destacável e pode ser posicionada de 2 formas diferentes:
Destacada e separada do joystick
(para recriar condições de pilotagem autênticas).
Fixada ao joystick
(para maior estabilidade e ocupar menos espaço).
Por predefinição, a manete de potência é fornecida destacada do joystick.
Para fixar a manete de potência ao joystick:
1. Vire ambos os itens ao contrário (a manete de potência e o joystick).
2. Retire a chave sextavada (6) presa por baixo da base do joystick.
3. Posicione a manete de potência do lado esquerdo do joystick.
Insira a patilha de ligação situada no lado esquerdo da base do joystick na abertura
existente no lado direito da manete de potência.
4. Com a chave, aperte os dois parafusos sextavados por baixo da base
(situados no lado esquerdo da base do joystick).
5. Estique o cabo da manete de potência e passe-o através da ranhura de guiamento do
cabo.
6. Volte a colocar a chave sextavada na base do joystick para não a perder.
Execute este procedimento no sentido inverso para destacar a manete de potência do
joystick.
RESISTÊNCIA AJUSTÁVEL DO MANÍPULO
Consoante o seu estilo de jogo, poderá preferir um joystick ultrassensível, que responda ao
mínimo toque, ou um joystick mais firme, que ofereça alguma resistência quando o move.
A resistência do manípulo do joystick é ajustável, para se adaptar a todos os jogadores.
Para ajustá-la, utilize o mostrador de ajuste da resistência do manípulo (7) situado por baixo
da base do joystick.
Page 52

3/8
LEME DE DIREÇÃO
O joystick dispõe de uma função de leme de direção, que numa aeronave corresponde aos
pedais utilizados pelo piloto para mover o leme de direção, permitindo assim à aeronave
rodar no seu eixo vertical (e, por conseguinte, virar à esquerda ou à direita). Esta função
está acessível no joystick fazendo rodar o manípulo para a esquerda ou direita.
Esta função de leme de direção está acessível de duas formas:
- No joystick rodando o manípulo (4) para a esquerda ou direita, ou
- Através do botão oscilante (8) na manete de potência.
Se utilizar apenas o botão oscilante (ou não estiver a utilizar a função de leme de direção),
pode desativar a rotação do manípulo graças ao parafuso de travamento (5) situado na
base do joystick. Utilize uma chave de fendas de cabeça chata para mudar a posição do
parafuso e, dessa forma, bloquear/desbloquear a função de leme de direção.
HAT SWITCH MULTIDIRECIONAL DE “PONTO DE VISTA”
O joystick possui um botão de “ponto de vista” (11), que, como o nome indica, lhe permite
(nos jogos que o suportam) ver imediatamente tudo o que se passa à volta da aeronave.
Para tal, basta aceder ao menu de configuração do jogo e programar as diferentes vistas
(retaguarda, esquerda, direita e também as vistas externas) nas direções do botão de “ponto
de vista”.
Evidentemente, em vez disso também pode utilizar o botão de “ponto de vista” para realizar
outras funções (disparar, etc.).
Page 53

4/8
PLAYSTATION®4
INSTALAÇÃO NA PLAYSTATION®4
1. Ligue o conector USB (2) a uma das portas USB do sistema.
2. Ligue o sistema.
3. O LED do joystick fica VERMELHO.
4. Prima o botão PS (10) do joystick e inicie sessão na sua conta Sony Entertainment
Network, para poder utilizar o joystick.
5. Inicie um jogo que suporte o modo Manípulo de voo.
Está pronto para começar a jogar!
LISTA DE JOGOS COMPATÍVEIS COM A PLAYSTATION®4
Na PlayStation®4, o T.Flight Hotas 4:
- Apenas é compatível com os jogos que suportam o modo Manípulo de voo.
- É reconhecido nos jogos como um joystick verdadeiro e não como um gamepad, para uma
melhor capacidade de resposta e uma precisão otimizada, sendo possível aceder às opções
do joystick nestes jogos.
Uma lista de jogos para a PlayStation®4 compatíveis com o joystick está disponível em
http://ts.thrustmaster.com. Aceda a PlayStation® / Joystick / T.Flight Hotas 4 e em seguida
selecione Games Settings.
Esta lista será atualizada regularmente com a chegada de jogos para a PS4™ compatíveis
com o T.Flight Hotas 4.
Page 54

5/8
ATUALIZAÇÃO DO FIRMWARE DO JOYSTICK
O firmware incluído na base do joystick pode ser atualizado para uma versão mais recente
que inclua melhoramentos do produto.
Para visualizar a versão do firmware que o joystick utiliza atualmente e atualizá-la, se
necessário: no PC, aceda a http://ts.thrustmaster.com. Na secção Updates and
Downloads, clique em PlayStation / Joystick / T.Flight Hotas 4, em seguida selecione
Driver/Firmware e siga as instruções que descrevem o procedimento de transferência e
instalação.
RESOLUÇÃO DE PROBLEMAS E AVISOS
• O meu joystick não funciona corretamente ou parece estar mal calibrado:
- Desligue o sistema, desligue o joystick, volte a ligar o joystick e em seguida reinicie o jogo.
- Ao ligar o joystick: deixe o manípulo, o leme de direção e a manete centrados e não os
mova (para evitar quaisquer problemas de calibração).
- Saia do jogo, desligue o joystick, volte a ligá-lo e em seguida prima o botão PS (10) no
joystick. Inicie sessão na sua conta Sony Entertainment Network, para poder utilizar o
joystick.
• O meu joystick é demasiado sensível ou não é suficientemente sensível:
- O seu joystick calibra-se automaticamente sozinho assim que executar alguns movimentos
nos diferentes eixos.
- No menu “Options / Controller / Gamepad or Joystick” do jogo: ajuste a sensibilidade ou as
zonas mortas do controlador (se esta opção estiver disponível).
- Ajuste a resistência do manípulo utilizando o mostrador (7) situado por baixo da base do
joystick.
• A função de leme de direção é demasiado sensível:
- Desative a rotação do manípulo através do parafuso de travamento (5) situado na base do
joystick e utilize o botão oscilante para a função de leme de direção.
FICHEIROS DE AJUDA E FAQ (NÃO INCLUÍDOS NESTE MANUAL)
Aceda a http://ts.thrustmaster.com e, na secção Updates and Downloads, clique em
PlayStation / Joystick / T.Flight Hotas 4 e em seguida selecione Manual/Help file.
Page 55

6/8
INFORMAÇÕES SOBRE A GARANTIA PARA O CONSUMIDOR
A Guillemot Corporation S.A., com sede social sita em Place du Granier, B.P. 97143, 35571 Chantepie,
França (a seguir designada como “Guillemot”) garante a nível mundial ao consumidor que este produto
Thrustmaster está livre de defeitos em termos de materiais e fabrico durante um período de garantia que
corresponde ao limite de tempo para intentar uma ação de conformidade relativamente a este produto.
Nos países da União Europeia, isto corresponde a um período de dois (2) anos desde a entrega do
produto Thrustmaster. Noutros países, o período de garantia corresponde ao limite de tempo para
intentar uma ação de conformidade relativamente ao produto Thrustmaster de acordo com a legislação
em vigor do país no qual o consumidor residia à data de compra do produto Thrustmaster (se a dita ação
não existir no país correspondente, então o período de garantia será de um (1) ano a partir da data de
compra original do produto Thrustmaster.
Não obstante o supracitado, as baterias recarregáveis estão cobertas por um período de garantia de seis
(6) meses a partir da data de compra original.
No caso de o produto apresentar algum defeito durante o período da garantia, contacte imediatamente o
Suporte Técnico, que lhe indicará o procedimento a tomar. Se esse defeito se confirmar, o produto terá
de ser devolvido ao respetivo local de compra (ou qualquer outro local indicado pelo Suporte Técnico).
No âmbito da presente garantia, e por opção do Suporte Técnico, o produto defeituoso do consumidor
será substituído ou reparado. Se, durante o período da garantia, o produto Thrustmaster for submetido à
dita reparação, qualquer período mínimo de (7) dias durante o qual o produto estiver fora de serviço será
adicionado ao período da garantia restante (este período decorre desde a data do pedido intervenção
pelo consumidor ou desde a data em que o produto em questão é disponibilizado para reparação, se a
data em que o produto é disponibilizado para reparação for posterior à data do pedido de intervenção).
Se for permitido pela legislação em vigor, a responsabilidade total da Guillemot e das respetivas filiais
(incluindo para danos indiretos) está limitada à reparação ou à substituição do produto Thrustmaster. Se
for permitido pela legislação em vigor, a Guillemot rejeita todas as garantias de comercialização ou
adequação a um fim específico.
A presente garantia não se aplicará: (1) se o produto tiver sido modificado, aberto, alterado ou danificado
em resultado de utilização inadequada ou abusiva, negligência, acidente, desgaste normal ou qualquer
outra casa relacionada com um defeito de material ou fabrico (incluindo, sem limitação, combinar o
produto Thrustmaster com qualquer elemento inadequado, incluindo, em particular, fontes de
alimentação, baterias recarregáveis, carregadores ou quaisquer outros elementos não fornecidos pela
Guillemot para este produto); (2) na eventualidade de incumprimento das instruções fornecidas pelo
Suporte Técnico; (3) a software, estando o mesmo sujeito a uma garantia específica; (4) a consumíveis
(elementos para substituir ao longo da vida útil do produto, como baterias descartáveis e auriculares de
auscultadores, por exemplo); (5) a acessórios (cabos, estojos, bolsas, sacos e correias de pulso, por
exemplo); (6) se o produto foi vendido num leilão público.
A presente garantia não é transmissível.
Os direitos legais do consumidor no que concerne à legislação aplicável à venda de bens de consumo no
seu país não são afetados pela presente garantia.
Page 56

7/8
SUPORTE TÉCNICO
Disposições de garantia adicionais
Durante o período da garantia, a Guillemot não fornecerá, em princípio, quaisquer peças de substituição,
uma vez que o Suporte Técnico é a única parte autorizada a abrir e/ou reparar qualquer produto
Thrustmaster (à exceção de quaisquer procedimentos de reparação que o Suporte Técnico possa pedir
ao consumidor para realizar, através de instruções por escrito – por exemplo, devido à simplicidade e à
falta de confidencialidade do processo de reparação – e fornecendo ao consumidor a(s) peça(s) de
substituição necessária(s), quando aplicável).
Tendo em conta os seus ciclos de inovação, e a fim de proteger o seu “know-how” e segredos
comerciais, a Guillemot não fornecerá, em princípio, qualquer notificação de reparação ou peças de
substituição para produtos Thrustmaster cujo período da garantia tenha expirado.
Nos Estados Unidos da América e no Canadá, a presente garantia está limitada ao mecanismo interno e
à caixa do produto. Em nenhuma circunstância serão a Guillemot ou as respetivas filiais consideradas
responsáveis perante terceiros por quaisquer danos indiretos ou acidentais resultantes da violação de
quaisquer garantias expressas ou implícitas. Alguns estados/províncias não permitem a limitação da
duração de uma garantia implícita ou a exclusão ou limitação de responsabilidade por danos indiretos ou
acidentais, pelo que as limitações ou exclusões supracitadas podem não se aplicar a si. A presente
garantia concede-lhe direitos legais específicos, podendo ter também outros direitos, que variam
consoante o estado ou a província.
Responsabilidade
Se for permitido pela legislação em vigor, a Guillemot Corporation S.A. (a seguir designada como
“Guillemot”) e as respetivas filiais rejeitam qualquer responsabilidade por quaisquer danos resultantes de
uma ou mais das seguintes causas: (1) o produto foi modificado, aberto ou alterado; (2) incumprimento
das instruções de montagem; (3) utilização imprópria ou abusiva, negligência ou acidente (um impacto,
por exemplo); (4) desgaste normal. Se for permitido ao abrigo da legislação aplicável, a Guillemot e as
respetivas filiais rejeitam qualquer responsabilidade por danos relacionados com um defeito de material
ou fabrico relativamente ao produto (incluindo, mas sem limitação, quaisquer danos causados direta ou
indiretamente por qualquer software ou por combinar o produto Thrustmaster com qualquer elemento
inadequado, incluindo, em particular, fontes de alimentação, baterias recarregáveis, carregadores ou
quaisquer outros elementos não fornecidos pela Guillemot para este produto).
http://ts.thrustmaster.com
Page 57

8/8
DIREITOS DE AUTOR
*
*
© 2016 Guillemot Corporation S.A. Todos os direitos reservados. Thrustmaster® é uma marca registada da
Guillemot Corporation S.A.
Licenciado para venda na Europa, África, Médio Oriente, Rússia, Índia e Oceânia. Para utilização exclusiva
com a PlayStation
“
”, “PlayStation”, “ ” e “ ” são marcas registadas da Sony Computer Entertainment
Inc. “
®4.
” é uma marca comercial da mesma empresa. Todos os direitos reservados.
Todas as outras marcas comerciais pertencem aos respetivos proprietários. As ilustrações não são
vinculativas. Os conteúdos, os desenhos e as especificações estão sujeitos a alteração sem aviso prévio e
podem variar consoante o país. Fabricado na China.
Fabricado e distribuído pela Guillemot Corporation S.A.
RECOMENDAÇÕES DE PROTEÇÃO AMBIENTAL
Na União Europeia: quando este produto chegar ao fim da sua vida útil, não o elimine
juntamente com os resíduos domésticos normais; em vez disso, deixe-o num ponto de
recolha de resíduos de equipamento elétrico e eletrónico (REEE) para posterior
reciclagem.
O símbolo presente no produto, no manual de utilizador ou na caixa confirma-o.
Os materiais podem ser reciclados, consoante as suas características. Através da
reciclagem e de outras formas de processamento de resíduos de equipamento elétrico e
Contacte as autoridades locais para saber onde fica o ponto de recolha mais perto da sua área de
residência.
Relativamente a todos os outros países: respeite a legislação local relativa à reciclagem de equipamento
elétrico e eletrónico.
Informações a reter. As cores e as decorações podem variar.
Os fechos e os adesivos devem ser removidos do produto antes da utilização.
www.thrustmaster.com
*Aplicável apenas à União Europeia e Turquia
eletrónico, pode dar um importante contributo no sentido de ajudar a proteger o ambiente.
Page 58

1/8
1. Рычаг управления
на рукоятке
6. Шестигранный ключ для
точки обзора
Инструкция по эксплуатации
ТЕХНИЧЕСКИЕ ХАРАКТЕРИСТИКИ
PlayStation®4
2. Разъем USB
3. Разъем для руля направления: для
подключения руля направления
Thrustmaster RJ12 (приобретается
отдельно)
4. Управление полетом вращающейся
рукояткой
5. Винт блокировки руля направления
установки/отсоединения рычага
управления
7. Регулятор сопротивления рукоятки
8. Управление полетом шарнирной
кнопкой
9. Функциональные кнопки
10. Кнопка PS с индикатором
11. Многопозиционный переключатель
Page 59

2/8
ЗНАКОМСТВО С ДЖОЙСТИКОМ HOTAS
РЫЧАГ УПРАВЛЕНИЯ
В комплект джойстика входит большой рычаг управления, с помощью которого удобно
управлять ускорением самолета.
Рычаг управления является съемным и предполагает два варианта установки:
отдельно от джойстика
(для создания реалистичных условий пилотирования);
с креплением к джойстику
(для большей устойчивости и экономии места).
По умолчанию рычаг управления поставляется отсоединенным от джойстика.
Чтобы прикрепить рычаг управления к джойстику:
1. Переверните рычаг и джойстик вверх дном.
2. Возьмите шестигранный ключ (6), закрепленный на базе джойстика.
3. Разместите рычаг управления слева от джойстика.
Вставьте выступ на левой стороне базы джойстика в паз с правой стороны рычага
управления.
4. С помощью ключа затяните два винта на нижней стороне базы
(с левой стороны базы джойстика).
5. Смотайте кабель рычага управления и проведите его через направляющий слот.
6. Верните шестигранный ключ на место, чтобы не потерять его.
Для отсоединения рычага управления от джойстика выполните эти действия в
обратном порядке.
РЕГУЛИРУЕМОЕ СОПРОТИВЛЕНИЕ РУКОЯТКИ
В зависимости от стиля игры, может потребоваться повышенная чувствительность
джойстика и реакция на малейшее касание или большая жесткость его работы с
некоторым сопротивлением при сдвигании.
Сопротивление рукоятки джойстика можно настраивать в соответствии с
предпочтениями геймера. Для настройки служит регулятор сопротивления рукоятки
(7), расположенный на нижней стороне базы джойстика.
Page 60

3/8
ФУНКЦИЯ УПРАВЛЕНИЯ ПОЛЕТОМ
Джойстик оснащен функцией управления полетом, которой в самолете соответствуют
педали, с помощью которой пилот осуществляет рулевое управление с вращением
самолета вокруг вертикальной оси (для поворота самолета влево или вправо). Для
использования функции управления полетом джойстика следует повернуть рукоятку
влево или вправо.
Воспользоваться функцией можно двумя способами:
- повернуть рукоятку на джойстике (4) влево или вправо;
- воспользоваться шарнирной кнопкой (8) на рычаге управления.
Если используется только шарнирная кнопка (или если функция управления полетом
не используется), поворотную функцию рукоятки можно отключить с помощью винта
блокировки (5), расположенного на базе джойстика. С помощью отвертки с плоским
шлицем измените положение винта, заблокировав или разблокировав таким образом
функцию управления полетом.
МНОГОПОЗИЦИОННЫЙ ПЕРЕКЛЮЧАТЕЛЬ ТОЧКИ ОБЗОРА
Джойстик оснащен переключателем точки обзора (11), которая, как следует из
названия, позволяет (если это поддерживается игрой) моментально обозревать все
происходящее вокруг самолета. Для этого просто перейдите в меню конфигурации
игры и запрограммируйте различные точки обзора (вид сзади, вид слева, вид справа, а
также виды снаружи) для позиций переключателя точки обзора.
Разумеется, переключатель точки обзора может также служить для других функций
(стрельба и пр.).
Page 61

4/8
PLAYSTATION®4
УСТАНОВКА НА PLAYSTATION®4
1. Подключите USB-кабель (2) к одному из USB-портов системы.
2. Включите систему.
3. Индикатор джойстика загорается КРАСНЫМ.
4. Нажмите кнопку PS на джойстике (10) и войдите в свою учетную запись Sony
Entertainment Network, чтобы можно было использовать джойстик.
5. Запустите игру, поддерживающую режим Flight Stick.
Теперь все готово для игры!
СПИСОК СОВМЕСТИМЫХ ИГР ДЛЯ PLAYSTATION®4
Использование джойстика T.Flight Hotas 4 на PlayStation®4:
- совместимость только с играми, поддерживающими режим Flight Stick;
- распознается в играх как настоящий джойстик, а не игровой пульт — для
оптимальной реактивности и повышенной точности, а также для обеспечения доступа
к параметрам джойстика в соответствующих играх.
Список игр для PlayStation®4, совместимых с данным джойстиком, можно найти на
сайте:http://ts.thrustmaster.com. Откройте раздел PlayStation® / Joystick / T.Flight Hotas 4
и выберите Games Settings (Настройки в играх).
Этот список будет постоянно обновляться по мере выхода новых игр для PS4
совместимых с джойстиком T.Flight Hotas 4.
™,
Page 62

5/8
ОБНОВЛЕНИЕ ПРОШИВКИ ДЖОЙСТИКА
Прошивку в базе джойстика можно обновить до более поздней версии, содержащей
усовершенствования.
Для просмотра установленной в данный момент версии прошивки и ее обновления
при необходимости откройте сайт http://ts.thrustmaster.com. В разделе Updates and
Downloads выберите PlayStation / Joystick / T.Flight Hotas 4, затем откройте
Driver/Firmware и выполните указания по загрузке и установке прошивки.
УСТРАНЕНИЕ НЕИСПРАВНОСТЕЙ И ПРЕДУПРЕЖДЕНИЯ
• Джойстик не работает должным образом или кажется неверно
откалиброванным
Выключите систему, отключите джойстик, подключите его снова и перезагрузите игру.
При подключении джойстика: оставьте рукоятку, руль направления и рычаг
управления в центральном положении и не сдвигайте их (во избежание проблем
калибровки).
Выйдите из игры, отключите джойстик, подключите его снова и нажмите кнопку PS (10)
на джойстике. Войдите в свою учетную запись Sony Entertainment Network, чтобы
можно было использовать джойстик.
• Слишком высокая или недостаточная чувствительность джойстика
- Джойстик самостоятельно выполняет автокалибровку, после того как пользователь
совершает несколько движений на различных осях.
- В игре, в разделе «Параметры / Контроллер»: настройте чувствительность или
мертвые зоны для контроллера (если эта опция доступна).
- Настройте сопротивление рукоятки с помощью регулятора (7) на нижней стороне
базы джойстика.
• Слишком высокая чувствительность функции управления полетом
- Выключите вращение рукоятки с помощью винта блокировки (5) на нижней части
базы джойстика и используйте для функции управления полетом шарнирную кнопку.
СПРАВКА И ОТВЕТЫ НА ЧАСТЫЕ ВОПРОСЫ (НЕ
ПРИВЕДЕННЫЕ В НАСТОЯЩЕМ РУКОВОДСТВЕ)
На сайте http://ts.thrustmaster.com, в разделе Updates and Downloads, выберите
PlayStation / Joystick / T.Flight Hotas 4, затем откройте Manual/Help file.
Page 63

6/8
Сведения о потребительской гарантии
Корпорация Guillemot Corporation S.A., зарегистрированная по адресу Place du Granier, B.P. 97143, 35571
Chantepie, Франция, (далее — «Guillemot») гарантирует своим клиентам во всем мире, что в данном
изделии Thrustmaster не будет выявлено никаких дефектов материалов и производства в течение
гарантийного периода, который равен сроку предъявления претензии по соответствию для данного
изделия. В странах Европейского Союза этот срок соответствует двум (2) годам с момента поставки
изделия Thrustmaster. В других странах гарантийный период равен сроку предъявления претензии по
соответствию для изделия Thrustmaster, определяемому соответствующим законодательством страны, в
которой проживал потребитель на момент приобретения изделия Thrustmaster (если подобные претензии
не действуют в соответствующей стране, гарантийный период равняется одному (1) году с
первоначальной даты приобретения изделия Thrustmaster).
Невзирая на вышеизложенное, гарантия на аккумуляторы равняется шести (6) месяцам с первоначальной
даты приобретения.
В случае обнаружения дефектов изделия во время гарантийного периода незамедлительно обратитесь в
службу технической поддержки, сотрудники которой определят дальнейшую процедуру. Если дефект
будет подтвержден, изделие следует вернуть по месту приобретения (или в любое другое место,
указанное службой технической поддержки).
В рамках действия гарантии дефектное изделие будет, по усмотрению службы технической поддержки,
заменено или возвращено в рабочее состояние. Если в течение гарантийного срока изделие Thrustmaster
будет подвержено такому восстановлению, к оставшемуся гарантийному сроку прибавляется период
времени, но не менее семи (7) дней, во время которого изделие находилось вне употребления (началом
этого периода считается дата запроса покупателя о вмешательстве или дата предоставления дефектного
изделия для восстановления, если изделие было предоставлено для восстановления позднее, чем был
сделан запрос о вмешательстве). В мере, разрешенной применимым законодательством, полная
ответственность компании Guillemot и ее дочерних компаний (в том числе косвенный ущерб)
ограничивается восстановлением рабочего состояния или заменой изделия Thrustmaster. В мере,
разрешенной применимым законодательством, компания Guillemot отказывается от любых гарантий
коммерческой пригодности или пригодности для определенной цели.
Настоящая гарантия не распространяется: (1) на ситуации, когда изделие было видоизменено, открыто,
модифицировано или получило повреждения в результате недопустимого или неправильного
использования, небрежности или несчастного случая, естественного износа или любой другой причины, не
связанной с дефектом материалов или производства (включая, помимо прочего, использование изделия
Thrustmaster совместно с любыми неподходящими элементами, в частности — с блоками питания,
аккумуляторами, зарядными устройствами и любыми другими элементами, не входящими в комплектацию
Guillemot для данного изделия); (2) на ситуации, когда указания службы технической поддержки не были
выполнены; (3) на ПО, так как на такое ПО распространяется отдельная гарантия; (4) на расходные
материалы (элементы, предназначенные для замены в течение срока службы изделия: например,
батарейки и ушные подушки для гарнитур или наушников); (5) на аксессуары (например, кабели, чехлы,
сумки, футляры, наручные ремешки); (6) на случаи продажи изделия с открытого аукциона.
Данная гарантия не подлежит передаче.
Настоящая гарантия не ущемляет прав потребителя, предоставляемых ему применимыми законами в
отношении продажи потребительских товаров в соответствующей стране.
Page 64

7/8
Дополнительные условия гарантии
В течение гарантийного срока компания Guillemot, в общем и целом, не предоставляет никаких запасных
частей, так как вскрытие и/или модификацию любых изделий Thrustmaster вправе осуществлять только
служба технической поддержки (за исключением каких-либо процедур по модификации, которые служба
технической поддержки может предложить выполнить клиенту путем письменных инструкций и
предоставления, при необходимости, требуемых запасных частей: например, в связи с отсутствием
статуса сложности или конфиденциальности у такой восстановительной процедуры).
С учетом периода освоения новых изделий и в целях защиты своих ноу-хау и коммерческих тайн
компания Guillemot, в общем и целом, не предоставляет каких-либо уведомлений о восстановлении или
запасных частей для любых изделий Thrustmaster с истекшим гарантийным сроком.
В США и Канаде настоящая гарантия ограничивается внутренним механизмом и оболочкой устройства.
Корпорация Guillemot и ее дочерние предприятия ни при каких условиях не несут ответственности перед
третьими лицами за косвенные или случайные убытки, связанные с нарушением каких-либо явных или
подразумеваемых гарантий. В некоторых штатах/провинциях не допускается ограничение срока действия
подразумеваемой гарантии или ограничение ответственности за косвенные/случайные убытки, поэтому в
вашем случае вышеуказанные ограничения или исключения могут быть неприменимы. Настоящая
гарантия предоставляет Вам определенные юридические права. У Вас могут также быть другие права,
определенные законодательством штата или провинции.
Ответственность
В мере, разрешенной применимым законодательством, компания Guillemot Corporation S.A. (далее —
«Guillemot») и ее дочерние предприятия отказываются от любой ответственности за любой ущерб,
вызванный одним или несколькими из следующих факторов: (1) видоизменение, вскрытие или
модификация изделия; (2) несоблюдение инструкций по сборке; (3) недопустимое или неправильное
использование, небрежность, несчастный случай (например, физическое воздействие); (4) естественный
износ. В мере, разрешенной применимым законодательством, компания Guillemot и ее дочерние
предприятия отказываются от любой ответственности за любой ущерб, не связанный с дефектами
материалов или изготовления, в отношении данного изделия (включая, помимо прочего, любой ущерб,
вызванный прямо или опосредованно любым программным обеспечением или использованием изделия
Thrustmaster с любыми неподходящими элементами, в частности — блоками питания, аккумуляторами,
зарядными устройствами и любыми другими элементами, не входящими в комплектацию Guillemot для
данного изделия).
ТЕХНИЧЕСКОЙ ПОДДЕРЖКИ
http://ts.thrustmaster.com
Page 65

8/8
АВТОРСКИЕ ПРАВА
© Корпорация 2016 Guillemot Corporation S.A. Все права защищены. Thrustmaster® является
зарегистрированным товарным знаком корпорации Guillemot Corporation S.A.
Лицензия для продажи в Европе, Африке, на Ближнем Востоке, в России, Индии и Океании. Для
исключительного использования с PlayStation
, PlayStation, и являются зарегистрированными товарными знаками компании
Sony Computer Entertainment Inc.
компании. Все права защищены.
Все остальные товарные знаки являются собственностью соответствующих владельцев.
Иллюстрации могут не соответствовать внешнему виду/функциям конкретного изделия. Содержание,
конструкция и технические характеристики изделия могут быть изменены без предварительного
уведомления и зависят от страны приобретения. Сделано в Китае.
Произведено и распространяется компанией Guillemot Corporation S.A.
При пользовании изделием учитывайте следующее: цвета и дизайн могут различаться.
Пластиковые стяжки и клейкую ленту следует снять перед использованием изделия.
www.thrustmaster.com
®4.
" является зарегистрированным товарным знаком этой же
Page 66

1/8
1. Γκάζι
αφαίρεση του γκαζιού
7. Διακόπτης ρύθμισης αντίστασης της
PlayStation®4
Εγχειρίδιο χρήσης
ΤΕΧΝΙΚΑ ΧΑΡΑΚΤΗΡΙΣΤΙΚΑ
2. Υποδοχή USB
3. Υποδοχή πεντάλ: Υποδοχή πηδαλίου
RJ12 της Thrustmaster (πωλείται
χωριστά)
4.
5. Βίδα ασφάλισης πηδαλίου στη λαβή
6. Κλειδί άλεν για τοποθέτηση ή
Λειτουργία πηδαλίου μέσω
περιστροφικής λαβής
λαβής
Πηδάλιο μέσω κουμπιού κραδασμών
8.
9. Κουμπιά δράσης
10. Κουμπί PS με λυχνία LED
11. Διακόπτης τύπου hat «Point of View» πολλών
κατευθύνσεων
Page 67

2/8
ΣΥΝΤΟΜΗ ΠΑΡΟΥΣΙΑΣΗ ΤΟΥ JOYSTICK HOTAS
ΓΚΑΖΙ
Το joystick διαθέτει πλατύ γκάζι που μπορείτε να το χρησιμοποιήσετε για να χειριστείτε
εύκολα την ταχύτητα του αεροσκάφους σας.
Το γκάζι είναι αποσπώμενο και μπορεί να τοποθετηθεί με 2 διαφορετικούς τρόπους:
Αποσπώμενο και διαχωρισμένο από το joystick
(για να αναδημιουργήσετε τις αυθεντικές συνθήκες πλοήγησης)
Προσαρτημένο στο joystick
(για μεγαλύτερη σταθερότητα και κατάληψη μικρότερου χώρου).
Από προεπιλογή, το γκάζι είναι αποσπώμενο από το joystick.
Για να προσαρτήσετε το γκάζι στο joystick:
1. Γυρίστε ανάποδα και τα δύο στοιχεία (το γκάζι και το joystick).
2. Πάρτε το κλειδί άλεν (6) που είναι τοποθετημένο κάτω από τη βάση του joystick.
3. Τοποθετήστε το γκάζι στην αριστερή μεριά του joystick.
Εισαγάγετε την προεξοχή σύνδεσης που βρίσκεται στην αριστερή μεριά της βάσης του
joystick μέσα στο άνοιγμα που βρίσκεται στη δεξιά μεριά του γκαζιού.
4. Με το κλειδί, σφίξτε τις δύο βίδες άλεν κάτω από τη βάση
(βρίσκονται στην αριστερή μεριά της βάσης του joystick).
5. Ξετυλίξτε το καλώδιο του γκαζιού και περάστε το μέσα από τον οδηγό υποδοχή του
καλωδίου.
6. Τοποθετήστε το κλειδί άλεν στη θέση του για να μην το χάσετε.
Διεξαγάγετε αυτήν τη διαδικασία αντίστροφα για να αποκολλήσετε το γκάζι από το joystick.
ΡΥΘΜΙΖΟΜΕΝΗ ΑΝΤΙΣΤΑΣΗ ΛΑΒΗΣ
Ανάλογα με το στυλ που παίζετε, μπορεί να επιθυμείτε ένα εξαιρετικά ευαίσθητο joystick, το
οποίο να ανταποκρίνεται και στο πιο ελαφρύ άγγιγμα ή μπορεί να προτιμάτε ένα πιο
σκληρό joystick, που να σας παρέχει αντίσταση όταν το κινείτε.
Η αντίσταση της λαβής του joystick είναι ρυθμιζόμενη για να μπορεί να προσαρμοστεί σε
κάθε επιθυμία των παικτών. Για να το ρυθμίσετε, χρησιμοποιήστε τη χειροκίνητη ρύθμιση
αντίστασης της χειρολαβής (7) που βρίσκεται κάτω από τη βάση του joystick.
Page 68

3/8
ΛΕΙΤΟΥΡΓΙΑ ΠΗΔΑΛΙΟΥ
Το joystick διαθέτει λειτουργία πηδαλίου που σε αεροπλάνο αντιστοιχεί με τα πεντάλ που
χρησιμοποιεί ο πιλότος για να αλλάξει την κατεύθυνση, επιτρέποντας στο αεροπλάνο να
περιστραφεί γύρω από τον κάθετο άξονά του (επομένως, κάνοντας το να στρίψει προς
αριστερά ή δεξιά). Αυτή η λειτουργία πηδαλίου είναι προσβάσιμη από το joystick
περιστρέφοντας τη λαβή προς αριστερά ή δεξιά.
Μπορείτε να χρησιμοποιήσετε αυτήν τη λειτουργία του πηδαλίου με δύο τρόπους:
- από το joystick περιστρέφοντας τη λαβή (4) προς αριστερά ή δεξιά.
- ή μέσω του κουμπιού κραδασμών (8) στο γκάζι.
Αν χρησιμοποιείτε μόνο το κουμπί κραδασμών (ή αν δεν χρησιμοποιείτε τη λειτουργία του
πηδαλίου), μπορείτε να απενεργοποιήσετε την περιστροφή της λαβής χάρη στη βίδα
ασφάλισης (5) που βρίσκεται στη βάση του joystick. Χρησιμοποιήστε ένα ίσιο κατσαβίδι
για να αλλάξετε τη θέση της βίδας και, επομένως, να ασφαλίσετε/απασφαλίσετε τη
λειτουργία του πηδαλίου.
ΔΙΑΚΟΠΤΗΣ ΤΥΠΟΥ HAT «POINT OF VIEW» ΠΟΛΛΩΝ
ΚΑΤΕΥΘΥΝΣΕΩΝ
Το joystick διαθέτει διακόπτη τύπου hat «Point of View» (11) που, όπως λέει και το όνομά
του, σας επιτρέπει (σε παιχνίδια όπου διαθέτουν τη δυνατότητα) να βλέπετε άμεσα όλα όσα
συμβαίνουν γύρω από το αεροσκάφος σας. Για να χρησιμοποιήσετε αυτήν τη δυνατότητα,
απλώς μεταβείτε στο μενού διαμόρφωσης του παιχνιδιού και προγραμματίστε τις
διαφορετικές προβολές (πίσω προβολή, προβολή προς αριστερά, προβολή προς δεξιά και
επίσης εξωτερικές προβολές) στις κατευθύνσεις του διακόπτη τύπου hat «Point of View».
Φυσικά, αν το επιθυμείτε, μπορείτε επίσης να χρησιμοποιήσετε τον διακόπτη τύπου hat
«Point of View» για άλλες χρήσεις (πυροβολισμός, κ.λπ.).
Page 69

4/8
PLAYSTATION®4
ΕΓΚΑΤΑΣΤΑΣΗ ΣΕ PLAYSTATION®4
1. Συνδέστε την υποδοχή USB (2) σε μία από τις θύρες USB του συστήματός σας.
2. Ενεργοποιήστε το σύστημά σας.
3. Η λυχνία LED του joystick ανάβει με ΚΟΚΚΙΝΟ χρώμα.
4. Πατήστε το κουμπί PS του joystick (10) και συνδεθείτε στο δικό σας λογαριασμό στο
Sony Entertainment Network για να μπορέσετε να χρησιμοποιήσετε το joystick.
5. Ξεκινήστε ένα παιχνίδι που υποστηρίζει τη λειτουργία Flight Stick.
Τώρα είστε έτοιμοι για παιχνίδι!
ΛΙΣΤΑ ΣΥΜΒΑΤΩΝ ΠΑΙΧΝΙΔΙΩΝ ΜΕ ΤΟ PLAYSTATION®4
Στο PlayStation®4, το T.Flight Hotas 4:
- Είναι συμβατό μόνο με τα παιχνίδια που υποστηρίζουν τη λειτουργία Flight Stick.
- Αναγνωρίζεται στα παιχνίδια ως πραγματικό joystick και όχι ως χειριστήριο παιχνιδιού,
για καλύτερη απόκριση και βελτιωμένη ακρίβεια, καθώς και πιθανότητα πρόσβασης στις
επιλογές του joystick σε αυτά τα παιχνίδια.
Θα βρείτε διαθέσιμη μια λίστα με τα παιχνίδια για το PlayStation®4 που είναι συμβατά με
το joystick στον ιστότοπο http://ts.thrustmaster.com. Μεταβείτε στη διαδρομή PlayStation® /
Joystick / T.Flight Hotas 4, και επιλέξτε Games Settings.
Αυτή η λίστα θα ανανεώνεται τακτικά, με την κυκλοφορία κάθε νέου παιχνιδιού για το
PS4™ που είναι συμβατό με το T.Flight Hotas 4.
Page 70

5/8
ΕΝΗΜΕΡΩΣΗ ΤΟΥ ΥΛΙΚΟΛΟΓΙΣΜΙΚΟΥ ΤΟΥ JOYSTICK ΣΑΣ
Είναι δυνατή η ενημέρωση του υλικολογισμικού που περιλαμβάνεται στη βάση του joystick
σας σε μια πιο πρόσφατη έκδοση με τις βελτιώσεις του προϊόντος.
Για να εμφανίσετε την έκδοση του υλικολογισμικού που διαθέτει προς το παρόν το joystick
σας και να την ενημερώσετε αν απαιτείται: σε υπολογιστή, συνδεθείτε στον ιστότοπο
http://ts.thrustmaster.com. Στην ενότητα Updates and Downloads (Ενημερώσεις και
Λήψεις), κάντε κλικ στις επιλογές PlayStation
επιλέξτε Driver/Firmware και ακολουθήστε τις οδηγίες που περιγράφουν τη διαδικασία
λήψης και εγκατάστασης.
ΑΝΤΙΜΕΤΩΠΙΣΗ ΠΡΟΒΛΗΜΑΤΩΝ ΚΑΙ ΠΡΟΕΙΔΟΠΟΙΗΣΕΙΣ
• Το joystick δεν λειτουργεί σωστά ή φαίνεται να έχει βαθμονομηθεί λανθασμένα:
- Απενεργοποιήστε το σύστημά σας, αποσυνδέστε το joystick, επανασυνδέστε το και στη
συνέχεια, ξεκινήστε ξανά το παιχνίδι σας.
- Κατά τη σύνδεση του joystick: Αφήστε τη λαβή, το πηδάλιο και το γκάζι στην κεντρική
θέση και μην τα μετακινήσετε (για να αποφύγετε πιθανά προβλήματα βαθμονόμησης).
- Βγείτε από το παιχνίδι, αποσυνδέστε το joystick, συνδέστε το ξανά, και μετά πατήστε το
κουμπί PS (10) επάνω στο joystick. Συνδεθείτε στον λογαριασμό σας στο Sony
Entertainment Network για να μπορέσετε να χρησιμοποιήσετε το joystick.
• Το joystick είναι εξαιρετικά ευαίσθητο ή δεν είναι αρκετά ευαίσθητο:
- Το joystick πραγματοποιεί αυτόματη βαθμονόμηση από μόνο του αφού έχετε κάνει μερικές
κινήσεις στους διάφορους άξονες.
- Στο μενού του παιχνιδιού «Επιλογές/Ελεγκτής/Χειριστήριο για παιχνίδια ή Joystick»: Ρυθμίστε
την ευαισθησία ή τις νεκρές ζώνες του ελεγκτή σας (αν αυτή η επιλογή είναι διαθέσιμη).
- Ρυθμίστε τη χειροκίνητη ρύθμιση αντίστασης της λαβής (7) που βρίσκεται κάτω από τη
βάση του joystick.
• Η λειτουργία του πηδαλίου είναι ιδιαίτερα ευαίσθητη:
- Απενεργοποιήστε την περιστροφή της λαβής χρησιμοποιώντας τη βίδα ασφάλισης (5) που
βρίσκεται στη βάση του joystick και χρησιμοποιήστε το κουμπί κραδασμών για τη
λειτουργία του πηδαλίου.
ΑΡΧΕΙΑ ΒΟΗΘΕΙΑΣ ΚΑΙ ΣΥΧΝΕΣ ΕΡΩΤΗΣΕΙΣ (ΔΕΝ
ΠΕΡΙΛΑΜΒΑΝΟΝΤΑΙ ΣΕ ΑΥΤΟ ΤΟ ΕΓΧΕΙΡΙΔΙΟ)
Επισκεφθείτε τον ιστότοπο http://ts.thrustmaster.com, και στην ενότητα Updates and
Downloads (Ενημερώσεις και Λήψεις), κάντε κλικ στις επιλογές PlayStation / Joystick /
T.Flight Hotas 4, έπειτα επιλέξτε το αρχείο Manual/Help file.
/ Joystick / T.Flight Hotas 4, έπειτα
Page 71

6/8
Πληροφορίες εγγύησης καταναλωτή
Παγκοσμίως, η Guillemot Corporation S.A. της οποίας η εγγεγραμμένη έδρα είναι η οδός Place du
Granier, B.P. 97143, 35571 Chantepie, France (Γαλλία) (εφεξής “Guillemot”) εγγυάται στον καταναλωτή
ότι το προϊόν της Thrustmaster δεν παρουσιάζει ελάττωμα στο υλικό ούτε κατασκευαστικές ατέλειες για
το χρονικό διάστημα της εγγύησης, το οποίο αντιστοιχεί στο χρονικό όριο για άσκηση αγωγής για
συμμόρφωση αναφορικά με αυτό το προϊόν. Στις χώρες της Ε.Ε., αυτό αντιστοιχεί σε διάστημα δύο (2)
ετών από την παράδοση του προϊόντος της Thrustmaster. Σε άλλες χώρες, η περίοδος εγγύησης
αντιστοιχεί στο χρονικό όριο για άσκηση αγωγής για συμμόρφωση αναφορικά το προϊόν της
Thrustmaster σύμφωνα με την ισχύουσα νομοθεσία της χώρας στην οποία ο καταναλωτής διέμενε κατά
την ημερομηνία αγοράς του προϊόντος της Thrustmaster (σε περίπτωση που δεν υπάρχει τέτοια ενέργεια
στην αντίστοιχη χώρα, τότε η εγγύηση θα ισχύει για ένα (1) έτος από την αρχική ημερομηνία αγοράς του
προϊόντος της Thrustmaster).
Κατά παρέκκλιση των παραπάνω, οι επαναφορτιζόμενες μπαταρίες καλύπτονται από περίοδο εγγύησης
έξι (6) μηνών από ημερομηνία της αρχικής αγοράς.
Σε περίπτωση που το προϊόν σας φαίνεται να είναι ελαττωματικό κατά την περίοδο της εγγύησης,
επικοινωνήστε αμέσως με την Τεχνική υποστήριξη, η οποία θα υποδείξει την διαδικασία που θα
ακολουθήσετε. Αν το ελάττωμα επιβεβαιωθεί, το προϊόν πρέπει να επιστραφεί στο σημείο αγοράς του (ή
σε οποιοδήποτε άλλο σημείο υποδεικνύει η Τεχνική υποστήριξη).
Στα πλαίσια της εγγύησης, το ελαττωματικό προϊόν του καταναλωτή, με επιλογή της Τεχνικής
υποστήριξης, είτε θα αντικατασταθεί είτε θα επιστραφεί και θα είναι σε κατάσταση λειτουργίας. Αν κατά
τη διάρκεια της περιόδου εγγύησης το προϊόν της Thrustmaster υπόκειται σε τέτοιου είδους μετασκευή,
οποιαδήποτε περίοδος τουλάχιστον επτά (7) ημερών κατά την οποία το προϊόν έχει τεθεί εκτός χρήσης
θα προστεθεί στην εναπομένουσα περίοδο εγγύησης (αυτή η περίοδος ισχύει από την ημερομηνία του
αιτήματος του καταναλωτή για παρέμβαση ή από την ημερομηνία κατά την οποία το εν λόγω προϊόν
διατίθεται για μετασκευή, αν η ημερομηνία κατά την οποία το προϊόν διατίθεται για μετασκευή είναι
επακόλουθη της ημερομηνίας του αιτήματος για παρέμβαση). Αν επιτρέπεται από την ισχύουσα
νομοθεσία, η πλήρης ευθύνη της Guillemot και των θυγατρικών της (περιλαμβάνονται οι επακόλουθες
ζημιές) περιορίζεται στην επιστροφή σε κατάσταση λειτουργίας ή την αντικατάσταση του προϊόντος της
Thrustmaster. Αν επιτρέπεται από την ισχύουσα νομοθεσία, η Guillemot αποποιείται κάθε εγγύηση
εμπορευσιμότητας ή καταλληλότητας για τον συγκεκριμένο σκοπό.
Η παρούσα εγγύηση δεν ισχύει: (1) αν το προϊόν έχει τροποποιηθεί, ανοιχτεί, μεταποιηθεί ή υποστεί
βλάβη ως αποτέλεσμα ακατάλληλης ή κακής χρήσης, αμέλειας, ατυχήματος, φυσιολογικής φθοράς ή
οποιασδήποτε άλλης αιτίας που δεν σχετίζεται με ελάττωμα στο υλικό ή κατασκευαστικό ελάττωμα
(συμπεριλαμβανομένων, ενδεικτικά, συνδυάζοντας το προϊόν της Thrustmaster με οποιοδήποτε
ακατάλληλο στοιχείο, συμπεριλαμβανομένων συγκεκριμένων παροχών ρεύματος, επαναφορτιζόμενων
μπαταριών, φορτιστών ή άλλων στοιχείων που δεν παρέχονται από τη Guillemot για αυτό το προϊόν), (2)
σε περίπτωση μη συμμόρφωσης με τις οδηγίες που παρέχονται από την Τεχνική υποστήριξη, (3) για
λογισμικό, το εν λόγω λογισμικό υπόκειται σε συγκεκριμένη εγγύηση, (4) για αναλώσιμα (στοιχεία που
πρόκειται να αντικατασταθούν από τη διάρκεια ζωής του προϊόντος: για παράδειγμα, μπαταρίες μίας
χρήσης, καλύμματα αυτιών για σετ ακουστικών ή ακουστικά), (5) για αξεσουάρ (για παράδειγμα,
καλώδια, περιβλήματα, θήκες, τσάντες, λουράκια καρπού), (6) αν το προϊόν πωληθεί σε δημοπρασία.
Η παρούσα εγγύηση δεν μεταβιβάζεται.
Τα νομικά δικαιώματα του καταναλωτή σε σχέση με την ισχύουσα νομοθεσία όσον αφορά την πώληση
των καταναλωτικών ειδών στη χώρα του/της που δεν επηρεάζονται από την παρούσα εγγύηση.
Page 72

7/8
ΤΕΧΝΙΚΗ ΥΠΟΣΤΗΡΙΞΗ
http://ts.thrustmaster.com
Επιπλέον διατάξεις εγγύησης
Κατά την περίοδο εγγύησης, η Guillemot δεν θα διαθέσει, κατά βάση, κανένα ανταλλακτικό, καθώς Η
Τεχνική υποστήριξη είναι ο μόνος συμβαλλόμενος εξουσιοδοτημένος να ανοίξει και/ή να μετασκευάσει
οποιοδήποτε προϊόν της Thrustmaster (με εξαίρεση κάθε διαδικασία μετασκευής, την οποία η Τεχνική
υποστήριξη μπορεί να ζητήσει να διεξάγει ο καταναλωτής, υπό τη μορφή γραπτών οδηγιών – για
παράδειγμα, λόγω της απλούστευσης και της έλλειψης εμπιστευτικότητας της διαδικασίας μετασκευής –
και παρέχοντας στον καταναλωτή το απαιτούμενο(α) ανταλλακτικό(ά), όπου είναι εφικτό).
Δεδομένου των κύκλων καινοτομιών και με σκοπό την προστασία της τεχνογνωσίας και των εμπορικών
μυστικών, η Guillemot δεν θα παρέχει, κατά βάση, καμία ειδοποίηση περί μετασκευής ή ανταλλακτικών
για κανένα προϊόν της Thrustmaster του οποίου η περίοδος εγγύησης έχει λήξει.
Στις Η.Π.Α. και τον Καναδά, η παρούσα εγγύηση περιορίζεται στον εσωτερικό μηχανισμό και το
εξωτερικό περίβλημα του προϊόντος. Σε καμία περίπτωση η Guillemot ή η θυγατρικές της δεν φέρουν
ευθύνη σε οποιονδήποτε τρίτο για κάθε επακόλουθη ή τυχαία ζημιά που προκύπτει από το παράπτωμα
οποιασδήποτε ρητής ή σιωπηρής εγγύησης. Μερικές Πολιτείες/Επαρχίες δεν επιτρέπουν περιορισμό στο
πόσον καιρό διαρκεί μια σιωπηρή εγγύηση ή η εξαίρεση ή περιορισμένη ευθύνη για επακόλουθες ή
τυχαίες ζημιές, ώστε οι παραπάνω περιορισμοί ή εξαιρέσεις ενδέχεται να μην ισχύουν για εσάς. Η
παρούσα εγγύηση σας παρέχει συγκεκριμένα νομικά δικαιώματα, και επίσης ενδέχεται να έχετε κι άλλα
δικαιώματα που ποικίλουν από Πολιτεία σε Πολιτεία ή από Επαρχία σε Επαρχία.
Ευθύνη
Αν επιτρέπεται από την ισχύουσα νομοθεσία, η Guillemot Corporation S.A. (εφεξής “Guillemot”) και οι
θυγατρικές της αποποιούνται κάθε ευθύνης για οποιαδήποτε ζημιά προκαλείται από ένα ή περισσότερα
από τα ακόλουθα: (1) το προϊόν έχει τροποποιηθεί, ανοιχτεί ή μεταποιηθεί, (2) αποτυχία ως προς τη
συμμόρφωση με τις οδηγίες συναρμολόγησης, (3) ακατάλληλη ή κακή χρήση, αμέλεια, ατύχημα (για
παράδειγμα, πρόσκρουση), (4) φυσιολογική φθορά. Αν επιτρέπεται από την ισχύουσα νομοθεσία, η
Guillemot και οι θυγατρικές της αποποιούνται κάθε ευθύνης για οποιαδήποτε ζημιά δεν σχετίζεται με
λάθος στο υλικό ή την κατασκευή αναφορά με το προϊόν (συμπεριλαμβάνεται, ενδεικτικά, οποιαδήποτε
ζημιά προκαλείται άμεσα ή έμμεσα από οποιοδήποτε λογισμικό ή από συνδυασμό του προϊόντος της
Thrustmaster με κάθε ακατάλληλο στοιχείο, συμπεριλαμβανομένων συγκεκριμένων παροχών ρεύματος,
επαναφορτιζόμενων μπαταριών, φορτιστών ή άλλων στοιχείων που δεν παρέχονται από την Guillemot
για αυτό το προϊόν).
Page 73

8/8
ΠΝΕΥΜΑΤΙΚΑ ΔΙΚΑΙΩΜΑΤΑ
*
*
© 2016 Guillemot Corporation S.A. Με την επιφύλαξη παντός δικαιώματος. Η ονομασία Thrustmaster®
είναι εμπορικό σήμα κατατεθέν της Guillemot Corporation S.A.
Με άδεια πώλησης σε Ευρώπη, Αφρική, Μέση Ανατολή, Ρωσία, Ινδία και Ωκεανία. Για χρήση μόνο με
PlayStation
®4.
Τα λογότυπα «
Computer Entertainment Inc. Το λογότυπο «
», «PlayStation», « » και « » είναι εμπορικά σήματα της Sony
» είναι εμπορικό σήμα κατατεθέν της ίδιας
εταιρείας. Με την επιφύλαξη παντός δικαιώματος.
Όλα τα υπόλοιπα εμπορικά σήματα αποτελούν ιδιοκτησία των αντίστοιχων κατόχων τους. Οι εικόνες δεν
είναι δεσμευτικές. Τα περιεχόμενα, τα σχέδια και οι προδιαγραφές υπόκεινται σε αλλαγές χωρίς
προειδοποίηση και μπορεί να διαφέρουν από χώρα σε χώρα. Κατασκευάζεται στην Κίνα.
Κατασκευάζεται και διανέμεται από τη Guillemot Corporation S.A.
ΣΥΣΤΑΣΗ ΠΡΟΣΤΑΣΙΑΣ ΠΕΡΙΒΑΛΛΟΝΤΟΣ
Στην Ευρωπαϊκή Ένωση: Στο τέλος της ωφέλιμης διάρκειας ζωής, το παρόν
προϊόν δεν πρέπει να απορρίπτεται με τα τυπικά οικιακά απορρίμματα, αλλά να
απορρίπτεται σε σημείο συλλογής απόρριψης ηλεκτρικού και ηλεκτρονικού
εξοπλισμού για ανακύκλωση.
Το παρόν επιβεβαιώνεται με το σύμβολο που υπάρχει στο προϊόν, στο εγχειρίδιο
χρήσης ή στη συσκευασία.
Ανάλογα με τα χαρακτηριστικά τους, τα υλικά μπορούν να ανακυκλωθούν. Μέσω
της ανακύκλωσης και άλλων μορφών επεξεργασίας απόρριψης ηλεκτρικού και
ηλεκτρονικού εξοπλισμού, μπορείτε να συμβάλετε σημαντικά στην προστασία του
περιβάλλοντος. Επικοινωνήστε με τις τοπικές αρχές για το πλησιέστερο σε εσάς σημείο συλλογής.
Για όλες τις υπόλοιπες χώρες: Να τηρείτε τους τοπικούς νόμους περί ανακύκλωσης του ηλεκτρικού και
ηλεκτρονικού εξοπλισμού.
Κρατήστε αυτές τις πληροφορίες. Τα χρώματα και τα διακοσμητικά ενδέχεται να ποικίλουν.
Τα πλαστικά εξαρτήματα σύνδεσης και τα αυτοκόλλητα υλικά πρέπει να αφαιρούνται από το προϊόν
πριν τη χρήση του.
www.thrustmaster.com
*Ισχύει μόνο σε ΕΕ και Τουρκία
Page 74

1/8
1. Gaz kolu
allen anahtarı
7. Kol direnci ayarlama düğmesi
TEKNİK ÖZELLİKLER
PlayStation®4
Kullanma Kılavuzu
2. USB konektörü
3. Dümen konektörü. RJ12 Thrustmaster
Dümen (ayrı olarak satılır) konektörü
4. Döner kolla dümen fonksiyonu
5. Kolda dümen kilitleme vidası
6. Gaz kolunu takmak veya sökmek için
8. Mafsallı düğmeyle dümen
9. Eylem düğmeleri
10. LED’li PS düğmesi
11. Çok yönlü “Görüş Açısı” başlık düğmesi
Page 75

2/8
HOTAS JOYSTİCK’İ TANIYALIM
GAZ KOLU
Joystick’iniz uçağınızın hızını kolayca kontrol etmeniz için kullanabileceğiniz büyük bir gaz
kolu içerir.
Gaz kolu ayrılabilir ve 2 farklı şekilde konumlandırılabilir:
Sökülü ve joystick’den ayrı
(otantik pilotaj şartları oluşturmak için)
Joystick’e takılı
(daha üstün stabilite ve daha az yer kaplaması için).
Normal olarak gaz kolu joystick’den sökülü olarak gelir.
Gaz kolunu joystick’e takmak için:
1. Her iki öğeyi (gaz kolu ve joystick) baş aşağı çevirin.
2. Joystick tabanının alt kısmına takılı Allen anahtarını (6) alın.
3. Gaz kolunu joystcik’in soluna yerleştirin.
Joystick tabanının solundaki bağlantı tırnağını gaz kolunun sağ tarafındaki deliğe sokun.
4. Anahtarı kullanarak tabanın altındaki iki Allen vidasını sıkın
(joystick tabanının sol tarafında bulunur).
5. Gaz kolu kablosunu sararak kablo kılavuzu yuvasından geçirin.
6. Allen anahtarını kaybetmemek için yerine geri koyun.
Gaz kolunu joystick’den ayırmak için bu prosedürü ters sırayla uygulayın.
AYARLANABİLİR KOL DİRENCİ
Oyun oynama stilinize bağlı olarak en ufak dokunuşa bile tepki veren çok hassas bir joystick
isteyebileceğiniz gibi hareket ettirdiğinizde bir miktar direnç gösteren daha sıkı bir joystick’i
de tercih edebilirsiniz.
Joystick'inizin kol direnci, tüm oyunculara uyum sağlamak için ayarlanabilir. Ayarlamak için
joystick tabanının alt kısmında bulunan kol direnci ayarlama düğmesini (7) kullanın.
Page 76

3/8
DÜMEN FONKSİYONU
Joystick’iniz uçakta uçağın dikey ekseni etrafında dönmesini sağlayan (uçağı sağa veya sola
döndüren) dümeni döndürmek için pilot tarafından kullanılan pedallara karşılık gelen bir
dümen fonksiyonu içerir. Bu dümen fonksiyonu joystick’inizde kolu sağa veya sola
döndürerek kullanılabilir.
Bu dümen fonksiyonuna iki şekilde erişilebilir:
- joystick’inizde kolu (4) sağa veya sola döndürerek.
- veya gaz kolu üzerindeki mafsallı düğme (8) ile.
Sadece mafsallı düğmeyi kullanacaksanız (veya dümen fonksiyonunu kullanmıyorsanız)
joystick tabanında bulunan kilitleme vidası (5) sayesinde kolun dönüşünü devre dışı
bırakabilirsiniz. Vidanın pozisyonunu değiştirerek dümen fonksiyonunu kilitlemek/kilidini
açmak için düz tornavida kullanın.
ÇOK YÖNLÜ “GÖRÜŞ AÇISI” BAŞLIK DÜĞMESİ
Joystick’iniz adından da anlaşılacağı üzere (izin veren oyunlarda) uçağınızın çevresinde olan
her şeyi anında görmenizi sağlayan bir "Görüş Açısı" başlık düğmesi (11) içerir. Bunun için
oyunun ayarlar menüsüne giderek farklı görünümleri (arkadan görünüm, soldan görünüm,
sağdan görünüm ve dıştan görünümler) “Görüş Açısı” başlık düğmesinin yönlerine
programlayın.
İsterseniz “Bakış Açısı” başlık düğmesini başka amaçlarla da (ateşleme, vb.) kullanabilirsiniz.
Page 77

4/8
PLAYSTATION®4
PLAYSTATION®4'TE KURULUM
1. USB konektörünü (2) sisteminizin USB bağlantı noktalarından birine bağlayın.
2. Sisteminizi açın.
3. Joystick’in led'i kırmızıya döner.
4. Joystick'i kullanabilmek için joystick'in PS düğmesine (10) basın ve Sony Entertainment
Network hesabınıza giriş yapın.
5. Uçuş Kolu modunu destekleyen bir oyun başlatın.
Artık oynamaya hazırsınız!
UYUMLU PLAYSTATION®4 OYUNLARI LİSTESİ
PlayStation®4'te T.Flight Hotas 4:
- Sadece Uçuş Kolu modunu destekleyen oyunlarla uyumludur.
- Daha iyi tepki ve gelişmiş hassasiyet ile oyunlarda joystick'in seçeneklerine erişmek için bu
oyunlarda oyun pedi olarak değil gerçek bir joystick olarak algılanır.
Joystick ile uyumlu PlayStation®4 oyunlarının listesi için bkz.: http://ts.thrustmaster.com.
PlayStation® / Joystick / T.Flight Hotas 4'e gidin ardından Games Settings'i seçin.
Bu liste, T.Flight Hotas 4 ile uyumlu PS4™ oyunları çıktıkça düzenli olarak güncellenecektir.
Page 78

5/8
JOYSTICK'İNİZİN DONANIM YAZILIMINI GÜNCELLEME
Joystick'inizin tabanında bulunan donanım yazılımı ürün geliştirmeleri içeren daha yeni
sürümlere güncellenebilir.
Joystick'inizin halihazırda kullandığı donanım yazılımı sürümünü görmek ve gerektiğinde
güncellemek için: PC'de http://ts.thrustmaster.com adresine gidin. Updates and
Downloads kısmında PlayStation / Joystick / T.Flight Hotas 4 seçeneklerine tıklayın,
ardından Driver/Firmware seçeneğini seçerek indirme ve kurulum işlemini anlatan
talimatları izleyin.
SORUN GİDERME VE UYARILAR
• Joystick’im düzgün çalışmıyor ya da uygun kalibre edilmemiş gözüküyor:
- Sisteminizi kapatın, joystick’inizi ayırın, joystick’inizi yeniden bağlayın ve oyununuzu tekrar
başlatın.
- Joystick’inizi bağlarken: Kolu, dümeni ve gaz kolunu ortada bırakın ve her türlü kalibrasyon
sorununa engel olmak için bunları hareket ettirmeyin.
- Oyundan çıkın, joystick'i çıkarın, tekrar takın, ardından joystick üzerindeki PS düğmesine
(10) basın. Joystick'i kullanabilmek için Sony Entertainment Network hesabınıza giriş yapın.
• Joystick’im çok hassas veya yeterince hassas değil:
- Joystick’iniz farklı eksenlerde birkaç hareket yaptığınızda kendini otomatik olarak kalibre
eder.
- Oyununuzun “Seçenekler / Kumanda / Gamepad veya Joystick” menüsünden: Kumanda
biriminiz için hassasiyeti veya ölü bölgeleri (bu seçenekler mevcutsa) ayarlayın.
- Joystick tabanının alt kısmında bulunan düğmeyi (7) kullanarak kol direncini ayarlayın.
• Dümen fonksiyonu çok hassas:
- Joystick tabanında bulunan kilitleme vidasını (5) kullanarak kol dönüşünü devre dışı bırakın
ve dümen fonksiyonu için mafsallı düğmeyi kullanın.
YARDIM DOSYALARI VE SIK SORULAN SORULAR (BU KILAVUZDA
GEÇMEZ)
Lütfen http://ts.thrustmaster.com adresine giderek Updates and Downloads kısmında
PlayStation / Joystick / T.Flight Hotas 4 seçeneklerine tıklayın ve ardından
Manual/Help file'ı seçin.
Page 79

6/8
TÜKETİCİ GARANTİ BİLGİSİ
İşbu Thrustmaster ürünü, malzeme ve işçilik hatalarına karşı, müşterinin kusurlu ürünün ücretinin iade
edilmesi veya değiştirilmesi talebinde bulunabileceği süreye karşılık gelen garanti süresince dünya
çapında tescil edilmiş merkezi Place du Granier, B.P. 97143, 35571 Chantepie, Fransa’da bulunan
Guillemot Corporation S.A. (bundan sonra “Guillemot” olarak ifade edilecektir) garantisi altındadır. Avrupa
Birliği ülkelerinde bu süre, Thrustmaster ürününün tesliminden itibaren iki (2) seneye karşılık gelir. Diğer
ülkelerde garanti süresi, Thrustmaster ürünü ile ilgili olarak, Thrustmaster ürününün satın alındığı tarihte
müşterinin ikamet ettiği ülkede geçerli yasalara uygun şekilde, müşterinin kusurlu ürünün ücretinin iade
edilmesi veya değiştirilmesi talebinde bulunabileceği süreye karşılık gelir (İlgili ülkede bu tür bir düzenleme
mevcut değilse garanti süresi Thrustmaster ürününün satın alındığı asıl tarihten itibaren bir (1) yıl
olacaktır).
Yukarıdakilere bağlı kalmaksızın, yeniden doldurulabilir piller ilk satın alındıkları tarihten itibaren altı (6) ay
boyunca garanti kapsamındadır.
Garanti süresi içinde üründe hata veya kusur tespit edilmesi durumunda derhal izlenecek yöntem ile ilgili
size bilgi verecek olan Teknik Destek servisimize başvurun. Hata veya kusur onaylanırsa ürünün satın
alındığı yere (ya da Teknik Destek servisi tarafından belirtilen yere) iade edilmesi gerekmektedir.
İşbu garanti kapsamında müşterinin kusurlu ürünü, Teknik Destek servisinin insiyatifine bağlı olarak,
değiştirilecek veya çalışır hale getirilecektir. Garanti süresince Thrustmaster ürününün onarım işlemine
tabi tutulması durumunda, ürünün kullanım dışı olduğu en az yedi (7) günlük tüm süreler kalan garanti
süresine eklenecektir (bu süre, ürünün onarılması için hazır bulundurulduğu tarih müdahale edilmesi için
talepte bulunduğu tarihi takip ediyor ise müşterinin müdahale edilmesi için talepte bulunduğu tarihten veya
bahse konu ürünün onarılması için hazır bulundurulduğu tarihten başlar). Yürürlükte olan yasaların izin
verdiği durumlarda, Guillemot ve bağlılarının tüm sorumluluğu (dolaylı hasarlar da dahil olmak üzere)
Thrustmaster ürününün çalışır hale getirilmesi veya değiştirilmesi ile sınırlıdır. Yürürlükte olan yasaların
izin vermesi halinde Guillemot, ticarete elverişlilik veya belirli bir amaca uygunluk ile ilgili tüm garantileri
reddeder.
İşbu garanti aşağıdaki durumlar için geçerli değildir: (1) Ürün modifiye edilmişse, açılmışsa, üzerinde
değişiklik yapılmışsa, uygunsuz veya kötü kullanım, ihmal, kaza, normal aşınma ya da malzeme veya
üretim hatası ile ilgili olmayan nedenlerden dolayı hasar görmüşse (ancak bununla sınırlı kalmamak üzere,
Thrustmaster ürününü herhangi uygun bir elemanla birleştirmek, buna dahil olarak özellikle güç
kaynakları, yeniden doldurulabilir piller, şarj cihazları veya bu ürün için Guillemot tarafından tedarik
edilmemiş tüm diğer elemanlar); (2) Teknik Destek servisi tarafından sağlanan talimatlara uyulmamışsa;
(3) yazılım için, işbu garanti geçerli değildir, söz konusu yazılım için sağlanan özel garanti hükümlerine
tabidir; (4) sarf malzemeleri için (ürünün kullanım süresi içinde değiştirilecek elemanlar: örneğin; tek
kullanımlık piller, kulaklık yastıkları); (5) aksesuarlar için (örneğin; kablolar, kılıflar, cepler, çantalar,
bileklikler); (6) ürün açık artırma ile satılmışsa.
Bu garanti devrolunamaz.
Tüketim mallarının tüketicinin ülkesinde satışına ilişkin tüketicinin yasal hakları işbu garantiden
etkilenmemektedir.
Ek garanti hükümleri
Garanti süresince, tüm Thrustmaster ürünlerini açmaya ve/veya onarmaya yetkili tek taraf Teknik Destek
Servisi olduğundan prensip olarak Guillemot tarafından hiçbir yedek parça sağlanmayacaktır
(Uygulanabilir olması durumunda yazılı talimatlarla ve müşteriye gerekli yedek parça(lar) sağlanarak
Teknik Destek Servisinin müşteri tarafından yapılmasını isteyebileceği tüm onarım prosedürleri hariç –
örneğin onarım işleminin basit olmasından ve gizlilik içermemesinden dolayı).
İnovasyon döngülerini dikkate almak ve bilgi birikimi ile ticari sırlarını korumak için Guillemot, prensip
olarak garanti süresi dolmuş hiç bir Thrustmaster ürünü için onarım bilgisi veya yedek parça
sağlamayacaktır.
Page 80

7/8
TEKNIK DESTEK
http://ts.thrustmaster.com
Amerika Birleşik Devletleri ve Kanada'da bu garanti, ürünün dahili mekanizması ve harici gövdesi ile
sınırlıdır. Guillemot veya bağlıları hiçbir durum altında, her türlü açık ve zımni garantinin ihlal edilmesinden
kaynaklanan tüm dolaylı veya arızi hasarlardan dolayı hiçbir üçüncü tarafa karşı sorumlu tutulamaz. Bazı
Eyalet/İllerde zımni garantinin ne kadar süre ile geçerli olduğunun sınırlanmasına veya dolaylı veya arızi
hasarlara karşı sorumluluk muafiyeti veya sınırlanmasına izin vermez; bu nedenle yukarıda geçen
sınırlamalar veya muafiyetler sizin için geçerli olmayabilir. İşbu garanti size yasal haklar sağlamakta olup
Eyalete veya İle göre farklılık gösteren başka haklara da sahip olabilirsiniz.
Sorumluluk
Yürürlükte olan yasaların izin vermesi halinde, Guillemot Corporation S.A. (bundan sonra “Guillemot”
olarak ifade edilecektir) ve bağlıları aşağıdakilerin biri veya daha fazlasından kaynaklanan her türlü hasara
karşı tüm sorumluluğu reddeder: (1) Ürün modifiye edilmişse, açılmışsa, üzerinde değişiklik yapılmışsa;
(2) montaj talimatlarına uyulmamışsa; (3) uygunsuz veya kötü kullanım, ihmal, kaza (örneğin bir darbe);
(4) normal aşınma. Yürürlükte olan yasaların izin vermesi halinde, Guillemot ve bağlıları ürünle ilgili
malzeme veya üretim hatası ile ilgili olmayan her türlü hasara karşı tüm sorumluluğu reddeder (ancak
bununla sınırlı kalmamak üzere, herhangi bir yazılımdan veya Thrustmaster ürününün herhangi bir uygun
olmayan elemanla birleştirilmesinden doğrudan veya dolaylı olarak kaynaklanan tüm hasarlar, buna dahil
olarak özellikle güç kaynakları, yeniden doldurulabilir piller, şarj cihazları veya bu ürün için Guillemot
tarafından tedarik edilmemiş tüm diğer elemanlar).
Page 81

8/8
TELİF HAKKI
*
*
© 2016 Guillemot Corporation S.A. Tüm hakları saklıdır. Thrustmaster® Guillemot Corporation S.A.’nın
tescilli ticari markasıdır.
Avrupa, Afrika, Orta Doğu, Rusya, Hindistan ve Okyanusya’da satılmak üzere lisanslıdır. Yalnızca
PlayStation
®4 ile kullanmak için.
“
”, “PlayStation”, “ ” ve “ ” Sony Computer Entertainment Inc.’in tescilli ticari
markalarıdır. “
” aynı firmanın ticari markasıdır. Tüm hakları saklıdır.
Diğer tüm ticari markalar ilgili sahiplerine aittir. Fotoğraflar bağlayıcı değildir. İçindekiler, tasarım ve teknik
özellikler önceden haber vermeksiniz değiştirilebilir ve ülkeden ülkeye farklılık gösterebilir. Çin'de
üretilmiştir.
Guillemot Corporation S.A. tarafından üretilmekte ve dağıtılmaktadır.
ÇEVRE KORUMA ÖNERİLERİ
Avrupa Birliği’nde: Cihazın kullanım ömrü sona erdiğinde, standart ev atıkları ile
atılmamalı, geri dönüşüm için Atık Elektrikli ve Elektronik Cihazların toplandığı bir yere
bırakılmalıdır.
Bu, ürünün, kullanım kılavuzunun veya paketin üzerinde bulunan sembol ile
onaylanmıştır.
Özelliklerine bağlı olarak malzemeler geri dönüştürülebilir. Atık Elektrik ve Elektronik
Cihazların geri dönüşümü veya diğer işleme yöntemleri sayesinde çevrenin
korunmasına yönelik önemli bir katkıda bulunabilirsiniz. Size en yakın toplama merkezleri hakkında bilgi
almak için lütfen yerel yetkililerle iletişime geçin.
Diğer ülkeler için: Lütfen elektrikli ve elektronik cihazların geri dönüşümü için yerel yasalara uyunuz
AEEE Yönetmeliğine Uygundur.
Bu belgeyi saklayın. Renkler ve süslemeler değişiklik gösterebilir.
Plastik tutturucular ve bantlar, kullanmadan önce üründen çıkarılmalıdır.
www.thrustmaster.com
*Sadece AB ve Türkiye için geçerlidir
Page 82

1/8
1. Przepustnica
odłączania przepustnicy
7. Pokrętło regulacji oporu uchwytu
ELEMENTY
PlayStation®4
Instrukcja obsługi
2. Złącze USB
3. Złącze steru kierunku: RJ12 do steru
Thrustmaster (do nabycia osobno)
4. Funkcja steru kierunku obsługiwana
przez skręcanie uchwytu
5. Śruba blokująca ster kierunku (na
uchwycie)
6. Klucz imbusowy do mocowania i
8. Obsługa steru kierunku przy użyciu
przycisku wahadłowego
9. Przyciski czynności
10. Przycisk PS z diodą
11. Wielokierunkowy przełącznik widoku (hat
switch)
Page 83

2/8
INFORMACJE NA TEMAT JOYSTICKA HOTAS
PRZEPUSTNICA
Joystick jest wyposażony w dużą dźwignię przepustnicy, która umożliwia łatwe sterowanie
przyspieszeniem samolotu.
Przepustnica jest odłączana, dzięki czemu można jej używać w dwóch różnych
ustawieniach:
Odłączoną od joysticka
(podobnie jak przy pilotowaniu prawdziwego samolotu)
Zamocowaną do joysticka
(większa stabilność i mniejsza ilość zajmowanego miejsca)
Fabrycznie przepustnica nie jest zamocowana do joysticka.
Aby zamocować przepustnicę do joysticka:
1. Obróć oba elementy (przepustnicę i joystick) dołem do góry.
2. Wyjmij klucz imbusowy (6) znajdujący się pod podstawą joysticka.
3. Umieść przepustnicę po lewej stronie joysticka.
Włóż wypustkę łączącą umieszczoną z lewej strony podstawy joysticka w otwór
znajdujący się po prawej stronie przepustnicy.
4. Kluczem przykręć dwie śruby imbusowe pod podstawą joysticka
(znajdujące się po jej prawej stronie).
5. Zwiń kabel przepustnicy i poprowadź go przez gniazdo prowadzące.
6. Włóż klucz imbusowy z powrotem na miejsce, aby się nie zgubił.
Chcąc odłączyć przepustnicę od joysticka, wykonaj procedurę w odwrotnej kolejności.
REGULOWANY OPÓR UCHWYTU
W zależności od swojego stylu gry możesz preferować joystick bardzo czuły, reagujący
nawet na najdelikatniejszy dotyk, lub bardziej
pewien opór.
Aby joystick odpowiadał preferencjom różnych graczy, opór jego uchwytu można regulować.
W tym celu należy użyć pokrętła regulacji oporu uchwytu (7) znajdującego się pod podstawą
joysticka.
„twardy”, czyli stawiający podczas ruchu
Page 84

3/8
FUNKCJA STERU KIERUNKU
Joystick jest wyposażony w funkcję steru kierunku. Odpowiada ona pedałom znajdującym
się w samolocie, za pomocą których pilot porusza sterem kierunku, umożliwiając samolotowi
obracanie się wokół osi pionowej (i powodując skręcanie samolotu w lewo lub w prawo). Aby
w joysticku użyć funkcji steru kierunku, należy obrócić uchwyt w lewo lub w prawo.
Funkcji steru kierunku można użyć na dwa sposoby:
— obracając uchwyt joysticka (4) w lewo lub w prawo,
— za pomocą przycisku wahadłowego (8) na dźwigni przepustnicy.
Jeśli korzystasz wyłącznie z przycisku wahadłowego (lub nie używasz funkcji steru
kierunku), możesz zablokować obrót uchwytu za pomocą śruby blokującej (5) znajdującej się
na podstawie joysticka. Śrubokrętem z płaską końcówką zmień położenie śruby, blokując lub
odblokowując funkcję steru kierunku.
WIELOKIERUNKOWY PRZEŁĄCZNIK WIDOKU
Joystick jest wyposażony w przełącznik widoku (11), tzw. grzybek lub hat switch. Jak
sugeruje nazwa, umożliwia on szybkie wzrokowe sprawdzenie, co dzieje się wokół samolotu.
Aby uzyskać tę możliwość, należy wejść do menu konfiguracji gry i przypisać poszczególne
widoki (tylny, lewy, prawy, a także widoki zewnętrzne) odpowiednim kierunkom przełącznika
widoku.
Oczywiście przełącznika widoku można także używać do innych celów (np. do strzelania).
Page 85

4/8
PLAYSTATION®4
INSTALACJA W SYSTEMIE PLAYSTATION®4
1. Podłącz złącze USB (2) do jednego z portów USB systemu.
2. Włącz system.
3. Dioda joysticka zacznie świecić na CZERWONO.
4. Naciśnij przycisk PS joysticka (10) i zaloguj się na swoje konto Sony Entertainment
Network, aby umożliwić korzystanie z joysticka.
5. Uruchom grę obsługującą tryb Flight Stick.
Teraz możesz zacząć grać!
LISTA ZGODNYCH GIER NA PLAYSTATION®4
W systemie PlayStation®4 joystick T.Flight Hotas 4:
— Jest zgodny tylko z grami obsługującymi tryb Flight Stick.
— Jest rozpoznawany w grach jako prawdziwy joystick, a nie kontroler (gamepad). Zapewnia
to lepszą czułość i precyzję oraz możliwość dostępu do opcji joysticka w tych grach.
Listę gier na PlayStation®4 zgodnych z joystickiem można znaleźć na stronie
http://ts.thrustmaster.com. Wybierz PlayStation® / Joystick / T.Flight Hotas 4, a następnie
Games Settings.
Lista jest regularnie uzupełniana wraz z wprowadzaniem nowych gier na PS4™
joystickiem.
zgodnych z
Page 86

5/8
AKTUALIZACJA OPROGRAMOWANIA SPRZĘTOWEGO
JOYSTICKA
Oprogramowanie zawarte w podstawie joysticka można zaktualizować do nowszej wersji,
zawierającej rozszerzenia różnych funkcji.
Aby wyświetlić i w razie potrzeby zaktualizować wersję oprogramowania sprzętowego, z
której obecnie korzysta joystick, na komputerze wejdź na stronę
http://ts.thrustmaster.com. W sekcji Updates and Downloads kliknij PlayStation
Joystick / T.Flight Hotas 4, następnie wybierz Driver/Firmware, a następnie postępuj
zgodnie z instrukcją pobierania i instalacji.
ROZWIĄZYWANIE PROBLEMÓW I OSTRZEŻENIA
• Joystick nie działa prawidłowo lub wydaje się niewłaściwie skalibrowany:
— Wyłącz system, odłącz joystick, podłącz go ponownie, a następnie uruchom ponownie
grę.
— Podczas podłączania joysticka: pozostaw uchwyt, ster kierunku i przepustnicę w
położeniu środkowym oraz nie poruszaj nimi (aby uniknąć problemów z kalibracją).
— Wyjdź z gry, odłącz joystick, podłącz go ponownie, a następnie naciśnij przycisk PS (10)
na joysticku. Zaloguj się na swoje konto Sony Entertainment Network, aby umożliwić
korzystanie z joysticka.
• Joystick jest zbyt czuły lub niewystarczająco czuły:
— Joystick kalibruje się automatycznie, gdy wykonasz nim kilka ruchów wzdłuż
poszczególnych osi.
— W menu opcji/kontrolera/gamepada dostępnym w grze ustaw odpowiednią czułość lub
martwe strefy joysticka (jeśli tego rodzaju opcje są dostępne).
— Wyreguluj opór uchwytu za pomocą pokrętła (7) znajdującego się pod podstawą
joysticka.
• Funkcja kierunku jest zbyt czuła:
— Zablokuj obrót uchwytu za pomocą śruby blokującej (5) znajdującej się na podstawie
joysticka i obsługuj funkcję steru kierunku przyciskiem wahadłowym.
PLIKI POMOCY I CZĘSTO ZADAWANE PYTANIA
(NIEZAMIESZCZONE W NINIEJSZEJ INSTRUKCJI)
Wejdź na stronę http://ts.thrustmaster.com. W sekcji Updates and Downloads kliknij
PlayStation / Joystick / T.Flight Hotas 4, a następnie wybierz Manual/Help file.
/
Page 87

6/8
INFORMACJE DOTYCZĄCE GWARANCJI DLA KLIENTA
Firma Guillemot Corporation S.A. z siedzibą pod adresem Place du Granier, B.P. 97143, 35571
Chantepie, Francja („Guillemot”) udziela klientowi obowiązującej na całym świecie gwarancji, że niniejszy
produkt Thrustmaster będzie wolny od wad materiałowych i produkcyjnych przez okres gwarancji równy
limitowi czasu, w którym klient może występować z roszczeniami z tytułu wad niniejszego produktu. W
krajach Unii Europejskiej jest to okres dwóch (2) lat od dostarczenia produktu Thrustmaster. W innych
krajach okres gwarancji jest równy limitowi czasu, w którym klient może występować z roszczeniami z
tytułu wad produktu Thrustmaster zgodnie z przepisami obowiązującymi w kraju, w którym klient mieszkał
w dniu zakupu produktu Thrustmaster. (Jeśli przepisy danego kraju nie przewidują występowania z takimi
roszczeniami, okres gwarancji będzie wynosić jeden (1) rok od pierwotnej daty zakupu produktu
Thrustmaster).
Niezależnie od powyższego akumulatory są objęte sześciomiesięcznym (6-miesięcznym) okresem
gwarancji liczonym od daty pierwotnego zakupu.
Jeśli w okresie gwarancji wystąpią objawy mogące świadczyć o wadzie produktu, należy niezwłocznie
skontaktować się z działem pomocy technicznej, który wskaże dalszy sposób postępowania. W razie
potwierdzenia wady produkt należy zwrócić w punkcie zakupu (lub innym miejscu wskazanym przez dział
pomocy technicznej).
W ramach niniejszej gwarancji wadliwy produkt zostanie wymieniony lub przywrócony do stanu
sprawności użytkowej, zgodnie z decyzją działu pomocy technicznej. Jeśli w okresie gwarancji produkt
Thrustmaster zostanie poddany czynnościom mającym na celu przywrócenie go do stanu użytkowego,
dowolny okres co najmniej siedmiu (7) dni, podczas których produkt nie jest użytkowany, zostanie dodany
do pozostałego okresu gwarancji (okres ten liczy się od dnia, w którym klient poprosi o interwencję, lub od
dnia, w którym dany produkt zostanie udostępniony celem przywrócenia do stanu użytkowego, jeśli data
udostępnienia celem przywrócenia do stanu użytkowego następuje po dacie prośby o interwencję). Jeśli
zezwala na to obowiązujące prawo, całkowita odpowiedzialność firmy Guillemot i jej podmiotów zależnych
(łącznie z odpowiedzialnością za szkody wtórne) ogranicza się do przywrócenia do stanu użytkowego lub
wymiany produktu Thrustmaster. Jeśli zezwala na to obowiązujące prawo, firma Guillemot wyłącza
wszelkie gwarancje pokupności i przydatności do określonego celu.
Niniejsza gwarancja nie obowiązuje: (1) w przypadku, gdy produkt został zmodyfikowany, otwarty,
zmieniony albo uszkodzony na skutek nieodpowiedniego lub nadmiernego użytkowania, niedbałości,
wypadku, normalnego zużycia lub z innego powodu niezwiązanego z wadą materiałową ani produkcyjną
(w tym między innymi z powodu połączenia produktu Thrustmaster z nieodpowiednim elementem, w tym
w szczególności z zasilaczem, akumulatorem, ładowarką lub jakimkolwiek innym elementem
niedostarczonym przez firmę Guillemot dla tego produktu); (2) w razie nieprzestrzegania instrukcji
podanych przez dział pomocy technicznej; (3) w odniesieniu do oprogramowania, jako że
oprogramowanie to jest objęte odrębną szczegółową gwarancją; (4) materiałów eksploatacyjnych
(elementów wymienianych w czasie eksploatacji produktu, na przykład baterii jednorazowych,
muszli/nakładek na uszy do zestawów słuchawkowych lub słuchawek); (5) akcesoriów (na przykład kabli,
pokrowców, etui, torebek, pasków na rękę); (6) w przypadku sprzedania produktu na aukcji publicznej.
Niniejsza gwarancja nie podlega przeniesieniu.
Niniejsza gwarancja nie wpływa na prawa klienta wynikające z przepisów dotyczących sprzedaży dóbr
konsumenckich w kraju klienta.
Page 88

7/8
http://ts.thrustmaster.com
Dodatkowe postanowienia gwarancyjne
W okresie gwarancji firma Guillemot zasadniczo nie udostępnia jakichkolwiek części zamiennych,
ponieważ jedynym podmiotem upoważnionym do otwarcia jakiegokolwiek produktu Thrustmaster i/lub
przywrócenia go do stanu użytkowego jest dział pomocy technicznej (oprócz ewentualnych procedur
przywracania produktu do stanu użytkowego, o wykonanie których dział pomocy technicznej może
poprosić klienta przez przekazanie pisemnych instrukcji
przywracania do stanu użytkowego
części zamiennych).
Ze względu na realizowane cykle innowacji oraz konieczność zapewnienia ochrony swojej specjalistycznej
wiedzy i tajemnic handlowych firma Guillemot zasadniczo nie udostępnia powiadomień dotyczących
przywracania do stanu użytkowego ani części zamiennych w przypadku produktów Thrustmaster, których
okres gwarancji upłynął.
W USA i Kanadzie niniejsza gwarancja ogranicza się do wewnętrznych mechanizmów i zewnętrznej
obudowy produktu. W żadnym wypadku firma Guillemot ani jej podmioty stowarzyszone nie będą
odpowiadać wobec osób trzecich za szkody wtórne ani przypadkowe wynikające z naruszenia
jakichkolwiek gwarancji wyraźnych lub domniemanych. Niektóre stany/prowincje nie zezwalają na
ograniczenie czasu trwania gwarancji domniemanych bądź wyłączenie lub ograniczenie
odpowiedzialności za szkody wtórne lub przypadkowe, więc powyższe ograniczenia lub wyłączenia mogą
Ciebie nie dotyczyć. Niniejsza gwarancja przyznaje Ci określone prawa, a ponadto mogą przysługiwać Ci
inne prawa zależnie od stanu lub prowincji.
Odpowiedzialność
Jeśli zezwala na to obowiązujące prawo, firma Guillemot Corporation S.A. („Guillemot”) i jej podmioty
zależne nie ponoszą żadnej odpowiedzialności za szkody spowodowane przez co najmniej jeden z
następujących czynników: (1) modyfikację lub otwarcie produktu bądź wprowadzenie w nim zmian; (2)
nieprzestrzeganie instrukcji montażu; (3) nieodpowiednie lub nadmierne użytkowanie, niedbałość,
wypadek (na przykład uderzenie); (4) normalne zużycie. Jeśli zezwala na to obowiązujące prawo, firma
Guillemot i jej podmioty zależne nie ponoszą żadnej odpowiedzialności za szkody niezwiązane z wadą
materiałową lub produkcyjną produktu (w tym między innymi za szkody spowodowane bezpośrednio lub
pośrednio przez jakiekolwiek oprogramowanie lub na skutek połączenia produktu Thrustmaster z
nieodpowiednim elementem, w tym w szczególności z zasilaczem, akumulatorem, ładowarką lub
jakimkolwiek innym elementem niedostarczonym przez firmę Guillemot dla tego produktu).
— oraz, w razie potrzeby, przez udostępnienie klientowi wymaganych
— np. ze względu na prostotę i jawność procesu
WSPARCIE TECHNICZNE
Page 89

8/8
PRAWA AUTORSKIE
*
*
© 2016 Guillemot Corporation S.A. Wszelkie prawa zastrzeżone. Thrustmaster® jest zastrzeżonym znakiem
towarowym firmy Guillemot Corporation S.A.
Produkt licencjonowany do sprzedaży na terenie Europy, Afryki, Bliskiego Wschodu, Rosji, Indii i Oceanii.
Do użytku wyłącznie z systemami PlayStation®4.
„
”, „PlayStation”, „ ” i „ ” są zastrzeżonymi znakami towarowymi firmy Sony Computer
Entertainment Inc. „
” jest znakiem towarowym tej samej firmy. Wszelkie prawa zastrzeżone.
Wszystkie inne znaki towarowe stanowią własność odpowiednich podmiotów. Ilustracje nie są wiążące
prawnie. Treść, wzory i dane techniczne mogą ulec zmianie bez powiadomienia i mogą różnić się w
zależności od kraju. Wyprodukowano w Chinach.
Urządzenie wyprodukowane i dystrybuowane przez firmę Guillemot Corporation S.A.
ZALECENIE DOTYCZĄCE OCHRONY ŚRODOWISKA
Na terenie Unii Europejskiej: gdy okres przydatności produktu do eksploatacji dobiegnie
końca, produktu nie należy pozbywać się wraz ze zwykłymi odpadami z gospodarstwa
domowego, ale oddać do recyklingu w punkcie zbiórki zużytego sprzętu elektrycznego i
elektronicznego. Potwierdza to symbol znajdujący się na produkcie, w instrukcji obsługi
lub na opakowaniu.
Zależnie od swoich właściwości materiały zawarte w produkcie mogą nadawać się do
recyklingu. Dzięki recyklingowi i innym formom utylizacji zużytych urządzeń
elektrycznych i elektronicznych klient może w znacznym stopniu przyczynić się do
ochrony środowiska. Aby uzyskać informacje o najbliższych punktach zbiórki odpadów, należy skontaktować
z miejscowymi władzami.
We wszystkich innych krajach: należy przestrzegać miejscowych przepisów dotyczących recyklingu sprzętu
elektrycznego i elektronicznego.
Niniejsze informacje należy zachować. Kolorystyka i elementy ozdobne mogą różnić się od
przedstawionych.
Przed korzystaniem z produktu należy zdjąć z niego plastikowe elementy mocujące oraz naklejki.
www.thrustmaster.com
*Dotyczy wyłącznie UE i Turcji
Page 90

8\1
1. ﻖﻧﺎﺧ
6. ﺡﺎﺘﻔﻣ ﻦﻟﺃ ﺖﻴﺒﺜﺘﻟ ﻖﻧﺎﺨﻟﺍ ﻭﺃ ﻪﻠﺼﻓ
7. ﺹﺮﻗ ﻂﺒﺿ ﺔﻣﻭﺎﻘﻣ ﺾﺒﻘﻤﻟﺍ
PlayStation®4
ﻡﺪﺨﺘﺴﻤﻟﺍ ﻞﻴﻟﺩ
ﺔﻴﻨﻘﺘﻟﺍ ﺕﺍﺰﻴﻤﻟﺍ
8. ﻪﻴﺟﻮﺘﻟﺍ ﺮﺒﻋ ﺭﺰﻟﺍ ﺯﺍﺰﻬﻟﺍ
9. ﺭﺍﺭﺯﺃ ﺕﺍءﺍﺮﺟﻹﺍ
10. ﺭﺯ PS ﺩﻭﺰﻤﻟﺍ ﺮﺷﺆﻤﺑ LED
11. ﺡﺎﺘﻔﻣ ﺩﺪﻌﺘﻣ ﺕﺎﻫﺎﺠﺗﻻﺍ "ﻲﻋﺎﺑﺭ ﻩﺎﺠﺗﻻﺍ"
Thrustmaster )ﻉﺎﺒﻳ ًﻼﺼ ﻔﻨ ﻣ(
2. ﻞﺻﻮﻣ USB
3. ﻞﺻﻮﻣ ﻪﻴﺟﻮﺘﻟﺍ: ﻞﺻﻮﻣ ﻪﻴﺟﻮﺘﻟﺍ RJ12
4. ﺓﺰﻴﻣ ﻪﻴﺟﻮﺘﻟﺍ ﻦﻋ ﻖﻳﺮﻁ ﻒﻟ ﺾﺒﻘﻤﻟﺍ
5. ﻲﻏﺮﺑ ﻖﻠﻏ ﻪﻴﺟﻮﺘﻟﺍ ﻰﻠﻋ ﺾﺒﻘﻤﻟﺍ
Page 91

8\2
ﺐﻌﻠﻟﺍ ﻉﺍﺭﺫ ﻰﻠﻋ ﻑﺮﻌﺘﻟﺍHOTAS
ﻦﻣ ﻦﻤﻳﻷﺍ ﺐﻧﺎﺠﻟﺍ ﻰﻠﻋ ﺓﺩﻮﺟﻮﻤﻟﺍ ﺔﺤﺘﻔﻟﺍ ﻲﻓ ﺐﻌﻠﻟﺍ ﻉﺍﺭﺫ ﺓﺪﻋﺎﻗ ﺭﺎﺴﻳ ﻰﻠﻋ ﺩﻮﺟﻮﻤﻟﺍ ﻞﻴﺻﻮﺘﻟﺍ ﻥﺎﺴﻟ ﻞﺧﺩﺃ
.ﻚﺗﺮﺋﺎﻁ ﻲﻓ ﻉﺭﺎﺴﺘﻟﺍ ﻲﻓ ﺔﻟﻮﻬﺴﺑ ﻢﻜﺤﺘﻠﻟ ﻪﻣﺍﺪﺨﺘﺳﺍ ﻚﻨﻜﻤﻳ ﺮﻴﺒﻛ ﻖﻧﺎﺧ ﺐﻌﻠﻟﺍ ﻉﺍﺭﺫ ﺮﻓﻮﺗ
:ﺎﻣﺇ ،ﻦﻴﺘﻘﻳﺮﻄﺑ ﻪﻌﺿﻭﻭ ﻖﻧﺎﺨﻟﺍ ﻞﺼﻓ ﻦﻜﻤﻳ
.(ﻞﻗﺃ ﺔﺣﺎﺴﻣ ﻞﻐﺸﻟﻭ ﺮﺜﻛﺃ ﺭﺍﺮﻘﺘﺳﻻ)
.ﺐﻌﻠﻟﺍ ﻉﺍﺭﺫ ﻦﻋ ًﻼﺼﻔﻨﻣ ﻖﻧﺎﺨﻟﺍ ﻲﺗﺄﻳ ،ﻲﺿﺍﺮﺘﻓﺍ ﻊﺿﻮﻛ
ﻗ ﻦﻣ ﺮﺴﻳﻷﺍ ﺐﻧﺎﺠﻟﺍ ﻰﻠﻋ ﻦﻳﺩﻮﺟﻮﻣ).(ﺐﻌﻠﻟﺍ ﻉﺍﺭﺫ ﺓﺪﻋﺎ
.ﺐﻌﻠﻟﺍ ﻉﺍﺭﺫ ﻦﻣ ﻖﻧﺎﺨﻟﺍ ﻞﺼﻔﻟ ﺎًﺳﻮﻜﻌﻣ ءﺍﺮﺟﻹﺍ ﺍﺬﻬﺑ ﻢﻗ
ﻞﻘﺘﺴﻣﻭ ﻝﻮﺼﻔﻣﺐﻌﻠﻟﺍ ﻉﺍﺭﺫ ﻦﻋ
ﺐﻌﻠﻟﺍ ﻉﺍﺭﺬﺑ ﻞﺼﺘﻣ ﻭﺃ
:ﺐﻌﻠﻟﺍ ﻉﺍﺭﺬﺑ ﻖﻧﺎﺨﻟﺍ ﻞﻴﺻﻮﺘﻟ
ﺳﺃﺭ ﻦﻳﺮﺼﻨﻌﻟﺍ ﺐﻠﻗﺍ
ً
ﻂﺒﻀﻠﻟ ﺔﻠﺑﺎﻘﻟﺍ ﺾﺒﻘﻤﻟﺍ ﺔﻣﻭﺎﻘﻣ
.ﻪﻜﻳﺮﺤﺗ ﺪﻨﻋ ﺔﻣﻭﺎﻘﻤﻟﺍ ﺾﻌﺑ ﻪﻨﻋ ﺭﺪﺼﻳ ﺎًﺗﺎﺒﺛ ﺮﺜﻛﺃ ﺐﻌﻟ ﻉﺍﺭﺫ ﻚﻳﺪﻟ ﻥﻮﻜﻳ ﻥﺃ ﻞﻀﻔﺗ
ﻉﺍﺭﺫ ﻰﻠﻋ ﻝﻮﺼﺤﻟﺍ ﻲﻓ ﺐﻏﺮﺗ ﺪﻗ ،ﺐﻌﻠﻟﺍ ﻲﻓ ﻚﺘﻘﻳﺮﻄﻟ ﺎًﻘﻓﻭ ﺪﻗ ﻭﺃ ﺔﺴﻤﻟ ﻒﺧﺃ ﻰﻟﺇ ﺐﻴﺠﺘﺴﻳ ﺔﻴﺳﺎﺴﺤﻟﺍ ﻖﺋﺎﻓ ﺐﻌﻟ
.ﺐﻌﻠﻟﺍ ﻉﺍﺭﺫ ﺓﺪﻋﺎﻗ ﻞﻔﺳﺃ ﺩﻮﺟﻮﻤﻟﺍ
.ﻖﻧﺎﺨﻟﺍ
ﻖﻧﺎﺨﻟﺍ
ﻹ)ءﺎﺸﻧﺇ ﺓﺩﺎﻋ (ﺔﻴﻘﻴﻘﺣ ﻥﺍﺮﻴﻁ ﻉﺎﺿﻭﺃ
1.
.(ﺐﻌﻠﻟﺍ ﻉﺍﺭﺫﻭ ﻖﻧﺎﺨﻟﺍ) ﺐﻘﻋ ﻰﻠﻋ ﺎ
2. ) ﻦﻟﺃ ﺡﺎﺘﻔﻣ ﺬﺧ6ﺍ (.ﺐﻌﻠﻟﺍ ﻉﺍﺭﺫ ﺓﺪﻋﺎﻗ ﻞﻔﺳﺃ ﻞﺼﺘﻤﻟ
3. .ﺐﻌﻠﻟﺍ ﻉﺍﺭﺫ ﺭﺎﺴﻳ ﻰﻟﺇ ﻖﻧﺎﺨﻟﺍ ﻊﺿ
4. ﺓﺪﻋﺎﻘﻟﺍ ﻞﻔﺳﺃ ﻦﻳﺩﻮﺟﻮﻤﻟﺍ ﻦﻟﺃ ﻲﻏﺮﺑ ﻂﺑﺭ ﻢﻜﺣﺃ ،ﺡﺎﺘﻔﻤﻟﺍ ﻡﺍﺪﺨﺘﺳﺎﺑ
5. .ﺔﻴﻬﻴﺟﻮﺘﻟﺍ ﻞﺑﺎﻜﻟﺍ ﺔﺤﺘﻓ ﻝﻼﺧ ﻦﻣ ﻪﻄﺑﺭﺍﻭ ﻖﻧﺎﺨﻟﺍ ﻞﺑﺎﻛ ﻞﺻﻭ
6. .ﻪﻌﻴﻀﺗ ﻻ ﻰﺘﺣ ﻯﺮﺧﺃ ﺓﺮﻣ ﻪﻧﺎﻜﻣ ﻲﻓ ﻦﻟﺃ ﺡﺎﺘﻔﻣ ﻊﺿ
ﺔﻣﻭﺎﻘﻣ ﺾﺒﻘﻣ ﻉﺍﺭﺫ ﺐﻌﻠﻟﺍ ﺔﻠﺑﺎﻗ ﻂﺒﻀﻠﻟ ﺐﺳﺎﻨﺘﻟ ﻊﻴﻤﺟ ﻦﻴﺒﻋﻼﻟﺍ. ) ﺾﺒﻘﻤﻟﺍ ﺔﻣﻭﺎﻘﻣ ﻂﺒﺿ ﺹﺮﻗ ﻡﺪﺨﺘﺳﺍ ،ﺎﻬﻄﺒﻀﻟ7 (
Page 92

8\3
:ﻦﻴﺘﻘﻳﺮﻄﺑ ﻩﺬﻫ ﻪﻴﺟﻮﺘﻟﺍ ﺔﻔﻴﻅﻭ ﻰﻟﺇ ﻝﻮﺻﻮﻟﺍ ﻦﻜﻤﻳ
ﻖﻠﻏ ﻲﻟﺎﺘﻟﺎﺑﻭ ﻲﻏﺮﺒﻟﺍ ﻊﺿﻭ ﺮﻴﻴﻐﺘﻟ ﺱﺃﺮﻟﺍ ﺢﻄﺴﻣ ﻚﻔﻣ ﻡﺪﺨﺘﺳﺍ
ﺽﺮﻌﻟﺍ ﻕﺮﻁ ﺔﺠﻣﺮﺑﻭ ﻚﺑ ﺔﺻﺎﺨﻟﺍ ﺔﺒﻌﻠﻟﺍ ﻦﻳﻮﻜﺗ ﺔﻤﺋﺎﻗ ﻰﻟﺇ ﻝﺎﻘﺘﻧﻻﺍ ﻻﺇ ﻚﻴﻠﻋ ﺎﻣ ،ﺍﺬﻬﺑ ﻡﺎﻴﻘﻠﻟ
ﺕﺎﻫﺎﺠﺗﺍ ﻰﻠﻋ (ﺎًﻀﻳﺃ ﺔﻴﺟﺭﺎﺧ ﺽﺮﻋ ﻕﺮﻁﻭ ﻦﻤﻳﺃ ﺽﺮﻋﻭ ﺮﺴﻳﺃ ﺽﺮﻋﻭ ﻲﻔﻠﺧ ﺽﺮﻋ) ﺔﻔﻠﺘﺨﻤﻟﺍ" ﺭﺰﻟﺍ"ﺕﺎﻫﺎﺠﺗﻻﺍ ﻲﻋﺎﺑﺭ.
"ﻩﺎﺠﺗﻻﺍ ﻲﻋﺎﺑﺭ" ﺕﺎﻫﺎﺠﺗﻻﺍ ﺩﺪﻌﺘﻣ ﺡﺎﺘﻔﻣ
، ﺎﻤﻛ ﺮﻴﺸﻳ ،ﻪﻤﺳﺍ ﺢﻤﺴﻳ ﻚﻟ )ﻲﻓ ﺏﺎﻌﻟﻷﺍ ﻲﺘﻟﺍ ﺢﻤﺴﺗ ﻪﺑ (ﺽﺮﻌﺑ
ﺍ ﺔﻔﻴﻅﻭﻪﻴﺟﻮﺘﻟ
ﺰﻴﻤﺘﺗ ﻉﺍﺭﺫ ﺐﻌﻠﻟﺍ ﺔﺻﺎﺨﻟﺍ ﻚﺑ ﺔﻔﻴﻅﻮﺑ ﻪﻴﺟﻮﺘﻟﺍ ﻲﺘﻟﺍﻭ ﺐﻴﺠﺘﺴﺗ ﻲﻓ ﺓﺮﺋﺎﻄﻟﺍ ﻰﻟﺇ ﺕﺎﺳﺍﻭﺪﻟﺍ ﻲﺘﻟﺍ ﺎﻬﻣﺪﺨﺘﺴﻳ ﺭﺎﻴﻄﻟﺍ
ﻒﻠﻟ ﺔﻠﺠﻋ ،ﻪﻴﺟﻮﺘﻟﺍ ﺎﻤﻣ ﺢﻤﺴﻳ ﺓﺮﺋﺎﻄﻠﻟ ﻥﺍﺭﻭﺪﻟﺎﺑ ﻝﻮﺣ ﺎﻫﺭﻮﺤﻣ ﻲﺳﺃﺮﻟﺍ )ﺎﻤﻣ ﻞﻌﺠﻳ ﺓﺮﺋﺎﻄﻟﺍ ﻒﻄﻌﻨﺗ ﻰﻟﺇ ﺭﺎﺴﻴﻟﺍ
ﻰﻟﺇ ﻝﻮﺻﻮﻟﺍ ﻦﻜﻤﻳﺔﻔﻴﻅﻭ ﺍ ﻉﺍﺭﺫ ﻲﻓ ﻪﻴﺟﻮﺘﻟﺍﻴﻟﺍ ﻰﻟﺇ ﺾﺒﻘﻤﻟﺍ ﺮﻳﻭﺪﺗ ﻖﻳﺮﻁ ﻦﻋ ﻚﺑ ﺹﺎﺨﻟﺍ ﺐﻌﻠﻟﺭﺎﺴ ﻴﻟﺍ ﻭﺃﻦﻴﻤ.
.ﻪﻴﺟﻮﺘﻟﺍ ﺔﻔﻴﻅﻭ ﻖﻠﻏ ءﺎﻐﻟﺇ/
)11(
ﺭﺰﻟﺍ ﻡﺍﺪﺨﺘﺳﺍ ﺎًﻀﻳﺃ ﻚﻨﻜﻤﻳ ،ﻊﺒﻄﻟﺎﺑ"ﻩﺎﺠﺗﻻﺍ ﻲﻋﺎﺑﺭ" .(ﻚﻟﺫ ﺮﻴﻏﻭ ﻕﻼﻁﻹﺎﻛ) ﻚﻟﺫ ﻦﻣ ًﻻﺪﺑ ﻯﺮﺧﺃ ﻒﺋﺎﻅﻭ ﻲﻓ
ﻭﺃ ﻦﻴﻤﻴﻟﺍ.(
-) ﺾﺒﻘﻤﻟﺍ ﺮﻳﻭﺪﺗ ﻖﻳﺮﻁ ﻦﻋ ﺐﻌﻠﻟﺍ ﻉﺍﺭﺫ ﻦﻣ4 (ﻦﻴﻤﻴﻟﺍ ﻭﺃ ﺭﺎﺴﻴﻟﺍ ﻰﻟﺇ.
-) ﺯﺍﺰﻬﻟﺍ ﺭﺰﻟﺍ ﻖﻳﺮﻁ ﻦﻋ ﻭﺃ8 (ﻖﻧﺎﺨﻟﺍ ﻰﻠﻋ ﺩﻮﺟﻮﻤﻟﺍ.
ﺍﺫﺇ ﺖﻨﻛ ﻡﺪﺨﺘﺴﺗ ﺭﺰﻟﺍ ﺯﺍﺰﻬﻟﺍ ﻂﻘﻓ )ﻭﺃ ﺍﺫﺇ ﻟﻢ ﻦﻜﺗ ﻡﺪﺨﺘﺴﺗ ﺔﻔﻴﻅﻭ ﻪﻴﺟﻮﺘﻟﺍ(، ﻓﻚﻨﻜﻤﻴ ﻞﻴﻄﻌﺗ ﺮﻳﻭﺪﺗ ﺾﺒﻘﻤﻟﺍ ﻞﻀﻔﺑ
ﻲﻏﺮﺑ ﻞﻔﻘﻟﺍ )5 (ﺩﻮﺟﻮﻤﻟﺍ ﻰﻠﻋ ﺓﺪﻋﺎﻗ ﻉﺍﺭﺫ ﺐﻌﻠﻟﺍ.
ﺮﻓﻮﺗ ﻉﺍﺭﺫ ﺐﻌﻠﻟﺍ ﺭﺯ "ﻲﻋﺎﺑﺭ ﻻﺍﻩﺎﺠﺗ"
ﻞﻛ ءﻲﺷ ﻝﻮﺣ ﻚﺗﺮﺋﺎﻁ ﺍًﺭﻮﻓ.
Page 93

8\4
PLAYSTATION®4
)2(
ﺪﺣﺄﺑ ﺬﻓﺎﻨﻣ USB ﻰﻠﻋ ﺯﺎﻬﺠﻟﺍ ﺹﺎﺨﻟﺍ ﻚﺑ.
!ﺐﻌﻠﻟ ﺪﻌﺘﺴﻣ ﻥﻵﺍ ﺖﻧﺃ
.ﺏﺎﻌﻟﻷﺍ ﻩﺬﻫ ﻲﻓ ﺐﻌﻠﻟﺍ ﻉﺍﺭﺫ ﺕﺍﺭﺎﻴﺧ ﻰﻟﺇ
ﺏﺎﻌﻟﺃ ﻝﻮﺻﻭ ﻊﻣ ،ﻡﺎﻈﺘﻧﺎﺑ ﺔﻤﺋﺎﻘﻟﺍ ﻩﺬﻫ ﻰﻟﺇ ﺏﺎﻌﻟﻷﺍ ﺔﻓﺎﺿﺇ ﻢﺘﻳPS4™ ﻊﻣ ﺔﻘﻓﺍﻮﺘﻣ ﺓﺪﻳﺪﺟT.Flight Hotas
ﺐﻴﻛﺮﺘﻟﺍﻲﻓ
1 .ﻢﻗ ﻞﻴﺻﻮﺘﺑ ﻞﺻﻮﻣ USB
2 .ﻢﻗ ﻞﻴﻐﺸﺘﺑ ﺯﺎﻬﺠﻟﺍ.
3.
ﻣ ﻝﻮﺤﺘﻳ ﺮﺷﺆled .ﺮﻤﺣﻷﺍ ﻥﻮﻠﻟﺍ ﻰﻟﺇ ﺐﻌﻠﻟﺍ ﻉﺍﺭﺫ ﻲﻓ
4.
ﻂﻐﺿﺍ ﻋﻠﻰ ﺭﺯ PS ﻲﻓ ﻉﺍﺭﺫ ﺐﻌﻠﻟﺍ )10 (ﻞﺠﺳﻭ ﻝﻮﺧﺪﻟﺍ ﻰﻟﺇ ﻚﺑﺎﺴﺣ ﻲﻓ ﺔﻜﺒﺷ Sony Entertainment
Network، ﻦﻜﻤﺘﺘﻟ ﻦﻣ ﻡﺍﺪﺨﺘﺳﺍ ﻉﺍﺭﺫ ﺐﻌﻠﻟﺍ.
5 ..ﻥﺍﺮﻴﻄﻟﺍ ﺎﺼﻋ ﻊﺿﻭ ﻢﻋﺪﺗ ﺔﺒﻌﻟ ﻞﻐﺷ
ﺑ ﺔﻤﺋﺎﻗ ﺏﺎﻌﻟﺄPLAYSTATION®4 ﻮﺘﻤﻟﺍﺔﻘﻓﺍ
ﻲﻓPlayStation®4 ، ﺺﺋﺎﺼﺧT.Flight Hotas 4 ﻲﻟﺎﺘﻟﺎﻛ:
-.ﻥﺍﺮﻴﻄﻟﺍ ﺎﺼﻋ ﻊﺿﻭ ﻢﻋﺪﺗ ﻲﺘﻟﺍ ﺏﺎﻌﻟﻷﺍ ﻊﻣ ﻂﻘﻓ ﻖﻓﺍﻮﺘﺗ
- ﻝﻮﺻﻮﻟﺍ ﺔﻴﻧﺎﻜﻣﺇ ،ﺓﺯﺰﻌﻣ ﺔﻗﺩﻭ ﻞﻀﻓﺃ ﺔﺑﺎﺠﺘﺳﻻ ،ﺏﺎﻌﻟﺃ ﺡﻮﻟ ﺖﺴﻴﻟﻭ ﺔﻴﻘﻴﻘﺣ ﺐﻌﻟ ﻉﺍﺭﺬﻛ ﺏﺎﻌﻟﻷﺍ ﻲﻓ ﻑﺮﻌﺗ
ﺮﻓﻮﺘﺗ ﺔﻤﺋﺎﻗ ﺏﺎﻌﻟﺄﺑ PlayStation®4 ﺔﻘﻓﺍﻮﺘﻤﻟﺍ ﻊﻣ ﻉﺍﺭﺫ ﺐﻌﻠﻟﺍ ﻰﻠﻋ http://ts.thrustmaster.com.
ﻰﻟﺇ ﻞﻘﺘﻧﺍPlayStation® / Joystick / T.Flight Hotas 4 ﺩﺪﺣ ﻢﺛ ،Games Settings.
4.
PLAYSTATION®4
Page 94

8\5
ﻕﻮﻓ ﺮﻘﻧﺍ ،
.ﺞﺘﻨﻤﻠﻟ ﺕﺍﺰﻳﺰﻌﺗ ﺮﻓﻮﻳ ﺙﺪﺣﺃ ﺭﺍﺪﺻﺇ ﻰﻟﺇ ﺐﻌﻠﻟﺍ ﻉﺍﺭﺫ ﺓﺪﻋﺎﻗ ﻲﻓ ﻦﻤﻀﻤﻟﺍ ﺖﺑﺎﺜﻟﺍ ﺞﻣﺎﻧﺮﺒﻟﺍ ﺚﻳﺪﺤﺗ ﻦﻜﻤﻳ
Updates and Downloads
Manual/Help file
.
.ﺖﻴﺒﺜﺘﻟﺍﻭ ﻞﻳﺰﻨﺘﻟﺍ ءﺍﺮﺟﺇ ﺢﺿﻮﺗ ﻲﺘﻟﺍ ﺕﺎﻤﻴﻠﻌﺘﻟﺍ
ﺕﺍﺮﻳﺬﺤﺘﻟﺍﻭ ﺎﻬﺣﻼﺻﺇﻭ ﺕﻼﻜﺸﻤﻟﺍ ﻑﺎﺸﺘﻛﺍ
ﺌﺳﻷﺍﻭ ﺕﺎﻤﻴﻠﻌﺘﻟﺍ ﺕﺎﻔﻠﻣ(ﻞﻴﻟﺪﻟﺍ ﺍﺬﻫ ﻲﻓ ﺔﻨﻤﻀﻣ ﺮﻴﻏ) ﺔﻟﻭﺍﺪﺘﻤﻟﺍ ﺔﻠ
http://ts.thrustmaster.com
،ﻲﻓ ﻢﺴﻗ
PlayStation® / Joystick / T.Flight Hotas 4
ﺩﺪﺣ ﻢﺛ ،
ﻧﺮﺒﻟﺍ ﺚﻳﺪﺤﺗﻚﺑ ﺔﺻﺎﺨﻟﺍ ﺐﻌﻠﻟﺍ ﻉﺍﺭﺬﻟ ﺖﺑﺎﺜﻟﺍ ﺞﻣﺎ
ﺮﺗﻮﻴﺒﻤﻜﻟﺍ ﺸﻟﺍ،ﻲﺼﺨ ﺭﺯ http://ts.thrustmaster.com. ﻢﺴﻗ ﻲﻓUpdates and Downloads ﺮﻘﻧﺍ ،
ﺓﺮﻳﺎﻌﻤﻟﺍ.(
ﺓﺭﺎﻳﺯ ﻰﺟﺮﻳ
ﺽﺮﻌﻟ ﺭﺍﺪﺻﺇ ﺞﻣﺎﻧﺮﺒﻟﺍ ﺖﺑﺎﺜﻟﺍ ﻱﺬﻟﺍ ﻪﻣﺪﺨﺘﺴﺗ ﻉﺍﺭﺫ ﺐﻌﻠﻟﺍ ﺔﺻﺎﺨﻟﺍ ﻚﺑ ﺎًﻴﻟﺎﺣ ﻪﺜﻳﺪﺤﺗﻭ ﻥﺇ ﻥﺎﻛ ﺎًﻣﺯﻻ: ﻲﻓ
ﻕﻮﻓPlayStation® / Joystick / T.Flight Hotas 4 ﺩﺪﺣ ﻢﺛ ، ﺞﻣﺎﻧﺮﺑDriver/Firmware ﻊﺒﺗﺍﻭ
• ﻻ ﻞﻤﻌﺗ ﻉﺍﺭﺫ ﺐﻌﻠﻟﺍ ﻞﻜﺸﺑ ﺢﻴﺤﺻ ﻭﺃ ﻭﺪﺒﻳ ﻪﻧﺃ ﺗﺖﻤ ﺎﻬﺗﺮﻳﺎﻌﻣ ﻞﻜﺸﺑ ﺮﻴﻏ ﺢﻴﺤﺻ:
- ﻒﻗﻭﺃ ﻞﻴﻐﺸﺗ ،ﺯﺎﻬﺠﻟﺍ ﻢﺛﻞﺼﻓﺍ ﻉﺍﺭﺫ ،ﺐﻌﻠﻟﺍ ﻚﻟﺫ ﺪﻌﺑﺪﻋﺃ ﻞﻴﺻﻮﺗ ﻉﺍﺭﺫ ﺐﻌﻠﻟﺍ ﺪﻋﺃﻭ ﻞﻴﻐﺸﺗ ﺔﺒﻌﻠﻟﺍ.
- ﺪﻨﻋ ﻞﻴﺻﻮﺗ ﻉﺍﺭﺫ ﺐﻌﻠﻟﺍ: ﻙﺮﺗﺍ ﺾﺒﻘﻤﻟﺍ ﻪﻴﺟﻮﺘﻟﺍﻭ ﻖﻧﺎﺨﻟﺍﻭ ﻲﻓ ﻒﺼﺘﻨﻤﻟﺍ ﻻﻭ ﺎﻬﻛﺮﺤﺗ )ﺐﻨﺠﺘﻟ ﻱﺃ ﻞﻛﺎﺸﻣ ﻲﻓ
- ﺝﺮﺧﺍ ﻦﻣ ،ﺔﺒﻌﻠﻟﺍ ﻞﺼﻓﺍ ﻉﺍﺭﺫ ،ﺐﻌﻠﻟﺍ ﻪﻠﺻﻭ ﺓﺮﻣ ،ﻯﺮﺧﺃ ﻢﺛ ﻂﻐﺿﺍ ﻰﻠﻋ ﺭﺯ PS )10 (ﺩﻮﺟﻮﻤﻟﺍ ﻰﻠﻋ ﻉﺍﺭﺫ
ﺐﻌﻠﻟﺍ. ﻲﻓ ﻚﺑﺎﺴﺣ ﻰﻟﺇ ﻝﻮﺧﺪﻟﺍ ﻞﺠﺳSony Entertainment Network.ﺐﻌﻠﻟﺍ ﻉﺍﺭﺫ ﻡﺍﺪﺨﺘﺳﺍ ﻦﻣ ﻦﻜﻤﺘﺘﻟ ،
• ﻉﺍﺭﺫ ﺐﻌﻠﻟﺍ ﺔﺳﺎﺴﺣ ﺔﻳﺎﻐﻠﻟ ﻭﺃ ﺖﺴﻴﻟ ﺔﺳﺎﺴﺣ ﺎﻤﺑ ﻪﻴﻓ ﺔﻳﺎﻔﻜﻟﺍ:
ﻡﻮﻘﺗ ﻉﺍﺭﺫ ﺐﻌﻠﻟﺍ ﺓﺮﻳﺎﻌﻤﻟﺎﺑ ﺔﻴﺗﺍﺬﻟﺍ ﺪﻌﺑ ﻥﺃ ﻡﻮﻘﺗ ﻊﻀﺒﺑ ﺮﺣﺕﺎﻛ ﻰﻠﻋ ﺭﻭﺎﺤﻣ ﺔﻔﻠﺘﺨﻣ.
ﻲﻓ ﺔﻤﺋﺎﻗ "Options/Controller/Gamepad or Joystick) "ﺕﺍﺭﺎﻴﺨﻟﺍ/ﺓﺪﺣﻭ ﻢﻜﺤﺘﻟﺍ/ﺔﺣﻮﻟ ﺔﺒﻌﻠﻟﺍ ﻭﺃ ﻉﺍﺭﺫ
ﺐﻌﻠﻟﺍ (ﺔﺻﺎﺨﻟﺍ ﺔﺒﻌﻠﻟﺎﺑ: ﻢﻗ ﻂﺒﻀﺑ ﺔﻴﺳﺎﺴﺤﻟﺍ ﻭﺃ ﻖﻁﺎﻨﻤﻟﺍ ﺔﺘﻴﻤﻟﺍ ﺓﺪﺣﻮﻟ ﻢﻜﺤﺘﻟﺍ ﺔﺻﺎﺨﻟﺍ ﻚﺑ )ﺍﺫﺇ ﻥﺎﻛ ﺍﺬﻫ ﺭﺎﻴﺨﻟﺍ
ﺍًﺮﻓﻮﺘﻣ.(
ﻂﺒﺿﺍ ﺔﻣﻭﺎﻘﻣ ﺾﺒﻘﻤﻟﺍ ﻡﺍﺪﺨﺘﺳﺎﺑ ﻘﻟﺍﺹﺮ )7 (ﺩﻮﺟﻮﻤﻟﺍ ﻞﻔﺳﺃ ﺓﺪﻋﺎﻗ ﻉﺍﺭﺫ ﺐﻌﻠﻟﺍ.
• ﺔﻔﻴﻅﻭ ﻪﻴﺟﻮﺘﻟﺍ ﺔﺳﺎﺴﺣ ﺔﻳﺎﻐﻠﻟ:
ﻞﻄﻋ ﺮﻳﻭﺪﺗ ﺾﺒﻘﻤﻟﺍ ﻡﺍﺪﺨﺘﺳﺎﺑ ﻲﻏﺮﺑ ﻖﻠﻐﻟﺍ )5 (ﺩﻮﺟﻮﻤﻟﺍ ﻰﻠﻋ ﺓﺪﻋﺎﻗ ﻉﺍﺭﺫ ﺐﻌﻠﻟﺍ ﻡﺪﺨﺘﺳﺍﻭ ﺭﺰﻟﺍ ﺯﺍﺰﻬﻟﺍ
ﺔﻔﻴﻅﻮﻟ ﻪﻴﺟﻮﺘﻟﺍ.
Page 95

8\6
ﺪﻗ ﻲﺘﻟﺍ (ﺞﻣﺍﺮﺒﻟﺍﻭ ﻞﻴﻐﺸﺘﻟﺍ ﺞﻣﺍﺮﺑ ﺕﺍﺭﺍﺪﺻﺇ ﺙﺪﺣﺃ ،ﺔﻌﺋﺎﺸﻟﺍ ﺔﻠﺌﺳﻷﺍ) ﺔﻋﻮﻨﺘﻤﻟﺍ ﺓﺪﻋﺎﺴﻤﻟﺍ ﺕﺍﻭﺩﻷﺍ ﻰﻟﺇ ﻝﻮﺻﻮﻟﺍ ﻦﻣ ﻦﻜﻤﺘﺘﺳ
ﻰﻟﺇ ﻝﺎﻘﺘﻧﻻﺍ ﻰﺟﺮﻴﻓ ،ﻚﺑ ﺹﺎﺨﻟﺍ ﺞﺘﻨﻤﻟﺍ ﻊﻣ ﺔﻠﻜﺸﻣ ﺖﻬﺟﺍﻭ ﺍﺫﺇaster.comhttp://ts.thrustm .ﺔﻐﻠﻟﺍ ﺪﻳﺪﺤﺗﻭ ﻙﺎﻨﻫ ﻦﻤﻓ
.ﻚﺘﻠﻜﺸﻣ ﻞﺣ ﻲﻓ ﻙﺪﻋﺎﺴﺗ ﺕﺎﺠﺘﻨﻤﻟ ﻲﻨﻔﻟﺍ ﻢﻋﺪﻟﺍ ﺔﻣﺪﺨﺑ ﻝﺎﺼﺗﻻﺍ ﻚﻨﻜﻤﻴﻓ ،ﺔﻠﻜﺸﻤﻟﺍ ﺕﺮﻤﺘﺳﺍ ﺍﺫﺇThrustmaster ﻢﻋﺪﻟﺍ")
:ﻲﻧﻭﺮﺘﻜﻟﻹﺍ ﺪﻳﺮﺒﻟﺍ ﻖﻳﺮﻁ ﻦﻋ
ﺮﺒﻋ ﺎﻨﺑ ﺹﺎﺨﻟﺍ ﻲﻨﻔﻟﺍ ﻢﻋﺪﻟﺍ ﻰﻟﺇ ﻝﻮﺻﻮﻠﻟﻲﻧﻭﺮﺘﻜﻟﻹﺍ ﺪﻳﺮﺒﻟﺍ ﺐﻳﻭ ﻊﻗﻮﻣ ﻰﻠﻋ ﺖﻧﺮﺘﻧﻹﺍ ﺮﺒﻋ ﻞﻴﺠﺴﺘﻟﺎﺑ ﻻﻭﺃ ﻡﻮﻘﺗ ﻥﺃ ﺐﺠﻳ ،
http://ts.thrustmaster.com/. .ﻦﻜﻤﻣ ﺖﻗﻭ ﻉﺮﺳﺃ ﻲﻓ ﻚﺘﻠﻜﺸﻣ ﻞﺣ ﻲﻓ ﻦﻴﻴﻨﻔﻟﺍ ﺎﻬﻣﺪﻘﺘﺳ ﻲﺘﻟﺍ ﺕﺎﻣﻮﻠﻌﻤﻟﺍ ﺪﻋﺎﺴﺘﺳ ﺚﻴﺣ
ﻝﻮﻘﺤﻟﺍ ﻲﻓ ﻡﺪﺨﺘﺴﻤﻟﺍ ﺕﺎﻣﻮﻠﻌﻣ ﻝﺎﺧﺩﺇ ﻰﺟﺮﻴﻓ ،ﻞﻌﻔﻟﺎﺑUsername )ﻡﺪﺨﺘﺴﻤﻟﺍ ﻢﺳﺍﻭ (Password )ﺭﻭﺮﻤﻟﺍ ﺔﻤﻠﻛ ﺮﻘﻨﻟﺍ ﻢﺛ (
ﻲﻨﻔﻟﺍ ﻢﻋﺪﻟﺍ
:("ﻲﻨﻔﻟﺍ
ﻕﻮﻓ ﺮﻘﻧﺍProduct Registration )ﺞﺘﻨﻤﻟﺍ ﻞﻴﺠﺴﺗ.ﺔﺷﺎﺸﻟﺍ ﻰﻠﻋ ﺔﺿﻭﺮﻌﻤﻟﺍ ﺕﺎﻤﻴﻠﻌﺘﻟﺍ ﻊﺒﺗﺍﻭ ( ﺞﺘﻨﻤﻟﺍ ﻞﻴﺠﺴﺘﺑ ﺖﻤﻗ ﺍﺫﺇ
ﻕﻮﻓLogin )ﻝﻮﺧﺪﻟﺍ ﻞﻴﺠﺴﺗ.(
ﻚﻠﻬﺘﺴﻤﻟﺍ ﻥﺎﻤﺿ ﺕﺎﻣﻮﻠﻌﻣ
Place du Granier, B.P. 97143, 35571 Chantepie, France ﺞﺘﻨﻣ ﻥﻮﻜﻳ ﻥﺃ ﻚﻠﻬﺘﺴﻤﻠﻟ ،Thrustmaster ﺍﺬﻫ
ﻊﻣ ﻖﻓﺍﻮﺘﺗ ﻲﺘﻟﺍ ﻥﺎﻤﻀﻟﺍ ﺓﺮﺘﻓ ﺓﺪﻣ ﻝﺍﻮﻁ ،ﻊﻴﻨﺼﺘﻟﺍ ﺏﻮﻴﻋﻭ ﺩﺍﻮﻤﻟﺍ ﺏﻮﻴﻋ ﻦﻣ ﺎًﻴﻟﺎﺧ ﺔﺒﻟﺎﻄﻤﻟﺍ ﺎﻬﻟﻼﺧ ﻦﻜﻤﻳ ﻲﺘﻟﺍ ﺓﺩﺪﺤﻤﻟﺍ ﺓﺮﺘﻔﻟﺍ
.ﻪﻟﺍﺪﺒﺘﺳﺍ ﻭﺃ ﺞﺘﻨﻤﻟﺍ ﺍﺬﻫ ﺔﻤﻴﻗ ﺩﺍﺩﺮﺘﺳﻻ ﺔﻘﺑﺎﻄﻤﻟﺎﺑ ) ﺓﺪﻤﻟ ﺍﺬﻫ ﻱﺮﺴﻳ ،ﻲﺑﻭﺭﻭﻷﺍ ﺩﺎﺤﺗﻻﺍ ﻝﻭﺩ ﻲﻓ2 ﻡﻼﺘﺳﺍ ﺦﻳﺭﺎﺗ ﻦﻣ ﻦﻴﻣﺎﻋ (
ﺞﺘﻨﻤﻟﺍ ءﺍﺮﺷ ﺦﻳﺭﺎﺗ ﺪﻨﻋ ﻚﻠﻬﺘﺴﻤﻟﺍ ﺎﻬﺑ ﻦﻄﻘﻳ ﻥﺎﻛ ﻲﺘﻟﺍ ﺔﻟﻭﺪﻟﺍ ﻲﻓ ﺎﻬﺑ ﻝﻮﻤﻌﻤﻟﺍ ﻦﻴﻧﺍﻮﻘﻠﻟ ﺎًﻘﻓﻭThrustmaster ﻡﺪﻋ ﺔﻟﺎﺣ ﻲﻓ)
) ﻡﺎﻋ ﻥﺎﻤﻀﻟﺍ ﺓﺮﺘﻓ ﻥﻮﻜﺘﺳ ،ﺔّﻴﻨﻌﻤﻟﺍ ﺔﻟﻭﺪﻟﺍ ﻲﻓ ﺔﺒﻟﺎﻄﻤﻟﺍ1 ﺞﺘﻨﻤﻠﻟ ﻲﻠﺻﻷﺍ ءﺍﺮﺸﻟﺍ ﺦﻳﺭﺎﺗ ﻦﻣ ﺪﺣﺍﻭ (Thrustmaster.(
ﺍ ﻞﻤﺸﻳ ،ﻡﺪﻘﺗ ﺎﻤﺑ ﻝﻼﺧﻹﺍ ﻡﺪﻋ ﻊﻣ) ﺔﺘﺳ ﺓﺪﻤﻟ ﻦﺤﺸﻟﺍ ﺓﺩﺎﻋﻹ ﺔﻠﺑﺎﻘﻟﺍ ﺕﺎﻳﺭﺎﻄﺒﻟﺍ ﻥﺎﻤﻀﻟ6 .ﻲﻠﺻﻷﺍ ﻊﻴﺒﻟﺍ ﺦﻳﺭﺎﺗ ﻦﻣ ﺮﻬﺷﺃ (
ﻥﺃ ﺐﺠﻳ ﻲﺘﻟﺍ ﺕﺍءﺍﺮﺟﻹﺍ ﻰﻟﺇ ﻙﺪﺷﺮﻴﺳ ﻱﺬﻟﺍ ﻲﻨﻔﻟﺍ ﻢﻋﺪﻟﺎﺑ ﺭﻮﻔﻟﺍ ﻰﻠﻋ ﻞﺼﺗﺎﻓ ،ﻥﺎﻤﻀﻟﺍ ﺓﺮﺘﻓ ﻝﻼﺧ ﺎًﺒﻴﻌﻣ ﺞﺘﻨﻤﻟﺍ ﻥﺃ ﺮﻬﻅ ﺍﺫﺇﻭ
ﺐﺠﻳ ،ﻥﺎﻤﻀﻟﺍ ﺍﺬﻫ ﻕﺎﻴﺳ ﻲﻓﻭﻝﺍﺪﺒﺘﺳﺍ ﻭﺃ ﻚﻠﻬﺘﺴﻤﻟﺎﺑ ﺹﺎﺨﻟﺍ ﺐﻴﻌﻤﻟﺍ ﺞﺘﻨﻤﻟﺍﻪﺣﻼﺻﺇ.ﻲﻨﻔﻟﺍ ﻢﻋﺪﻟﺍ ﺭﺎﻴﺘﺧﺍ ﺐﺴﺣ ﻚﻟﺫﻭ ، ﺍﺫﺇ
.(ﻞﺧﺪﺘﻟﺍ ﺐﻠﻁ ﺦﻳﺭﺎﺘﻟ ﺎًﻘﺣﻻ ﺡﻼﺻﻺﻟ ﺞﺘﻨﻤﻟﺍ ﻢﻳﺪﻘﺗ ﺦﻳﺭﺎﺗ ﻥﺎﻛ ﺍﺫﺇ ،ﺡﻼﺻﻺﻟ ﺭﻮﻛﺬﻤﻟﺍ ﺞﺘﻨﻤﻟﺍ ﻢﻳﺪﻘﺗ ﺔﻠﻣﺎﻜﻟﺍ ﺔﻴﻟﻭﺆﺴﻤﻟﺍ ﺮﺼﺘﻘﺗ
.ﻱﺭﺎﺴﻟﺍ ﻥﻮﻧﺎﻘﻟﺍ ﺐﺟﻮﻤﺑ ﺍًﺰﺋﺎﺟ ﺍﺬﻫ ﻥﻮﻜﻳ ﺔﻛﺮﺷ ﻲﻠﺨﺗGuillemot ﺔﻣءﻼﻤﻟﺍ ﻭﺃ ﺓﺭﺎﺠﺘﻟﺎﺑ ﺔﺻﺎﺧ ﺕﺎﻧﺎﻤﺿ ﻱﺃ ﻦﻋ ﺎﻬﺘﻴﻟﻭﺆﺴﻣ
.ﻱﺭﺎﺴﻟﺍ ﻥﻮﻧﺎﻘﻟﺍ ﺐﺟﻮﻤﺑ ﺍًﺰﺋﺎﺟ ﺍﺬﻫ ﻥﻮﻜﻳ ﺎﻣﺪﻨﻋ ﻚﻟﺫﻭ ،ﻦّﻴﻌﻣ ﺽﺮﻐﻟ
ﺎﻤﺑ) ﻊﻴﻨﺼﺘﻟﺍ ﻭﺃ ﺩﺍﻮﻤﻟﺍ ﻲﻓ ﺐﻴﻋ ﺩﻮﺟﻮﺑ ﻂﺒﺗﺮﻳ ﻻ ﺮﺧﺁ ﺐﺒﺳ ﻱﺃ ﻭﺃ ،ﻱﺩﺎﻌﻟﺍ ﻝﺎﻤﻌﺘﺳﻻﺍ ﺔﺠﻴﺘﻧ ﻙﻼﻫﻹﺍ ﻭﺃ ﺙﺩﺎﺣ ﻭﺃ ﻝﺎﻤﻫﻹﺍ ﻭﺃ
ﺼﺤﻟﺍ ﻻ ﻝﺎﺜﻤﻟﺍ ﻞﻴﺒﺳ ﻰﻠﻋ ،ﻚﻟﺫ ﻲﻓ ﺞﺘﻨﻣ ﻊﻴﻤﺠﺗ ،ﺮThrustmaster ﻪﺟﻭ ﻰﻠﻋ ﻚﻟﺫ ﻲﻓ ﺎﻤﺑ ،ﺐﺳﺎﻨﻣ ﺮﻴﻏ ﺮﺼﻨﻋ ﻱﺃ ﺔﻄﺳﺍﻮﺑ
ﻦﻣ ﺎﻫﺪﻳﺭﻮﺗ ﻢﺘﻳ ﻻ ﻯﺮﺧﺃ ﺮﺻﺎﻨﻋ ﻱﺃ ﻭﺃ ﻦﺣﺍﻮﺸﻟﺍ ﻭﺃ ﻦﺤﺸﻟﺍ ﺓﺩﺎﻋﻹ ﺔﻠﺑﺎﻘﻟﺍ ﺕﺎﻳﺭﺎﻄﺒﻟﺍ ﻭﺃ ﺔﻗﺎﻄﻟﺎﺑ ﺩﺍﺪﻣﻹﺍ ﺕﺍﺪﺣﻭ ﺹﻮﺼﺨﻟﺍ
) ؛ﺩﺪﺤﻣ ﻥﺎﻤﻀﻟ ﺞﻣﺍﺮﺒﻟﺍ ﻩﺬﻫ ﻊﻀﺨﺗ4 :ﺞﺘﻨﻤﻟﺍ ﺮﻤﻋ ﺓﺮﺘﻓ ﻝﻼﺧ ﺎﻬﻛﻼﻬﺘﺳﺍ ﻢﺘﻳ ﻲﺘﻟﺍ ﺮﺻﺎﻨﻌﻟﺍ) ﺔﻴﻛﻼﻬﺘﺳﻻﺍ ﺮﺻﺎﻨﻌﻟﺍ ﻰﻠﻋ (
) ؛(ﺱﺃﺮﻟﺍ ﺔﻋﺎﻤﺴﺑ ﺔﺻﺎﺨﻟﺍ ﻥﺫﻷﺍ ﺕﺍﺩﺎﺳﻭ ﻭﺃ ﺱﺃﺮﻟﺍ ﺕﺎﻋﺎﻤﺳ ﻭﺃ ﻡﺍﺪﺨﺘﺳﻻﺍ ﺓﺩﺎﻋﻹ ﺔﻠﺑﺎﻘﻟﺍ ﺮﻴﻏ ﺕﺎﻳﺭﺎﻄﺒﻟﺎﻛ5 ﺕﺎﻘﺤﻠﻤﻟﺍ (
.ﻞﻳﻮﺤﺘﻠﻟ ﻞﺑﺎﻗ ﺮﻴﻏ ﻥﺎﻤﻀﻟﺍ ﺍﺬﻫ
.ﺎﻫﺪﻠﺑ/ﻩﺪﻠﺑ ﻲﻓ ﺔﻴﻛﻼﻬﺘﺳﻻﺍ ﻊﻠﺴﻟﺍ ﻊﻴﺑ ﻰﻠﻋ ﺔﻘّﺒﻄﻤﻟﺍ ﻦﻴﻧﺍﻮﻘﻟﺍ ﻰﻀﺘﻘﻤﺑ ﻚﻠﻬﺘﺴﻤﻠﻟ ﺔﻴﻧﻮﻧﺎﻘﻟﺍ ﻕﻮﻘﺤﻟﺍ ﻰﻠﻋ ﻥﺎﻤﻀﻟﺍ ﺍﺬﻫ ﺮﺛﺆﻳ ﻻ
ﺔﻛﺮﺷ ﻦﻤﻀﺗGuillemot Corporation S.A" ﻢﺳﺎﺑ ﺪﻌﺑ ﺎﻤﻴﻓ ﺎﻬﻴﻟﺇ ﺭﺎﺸﻤﻟﺍ) ﺔﻴﻤﻟﺎﻌﻟﺍ ،Guillemot ﻲﻓ ﻲﺴﻴﺋﺮﻟﺍ ﺎﻫﺮﻘﻣﻭ ("
ﺞﺘﻨﻤﻟﺍThrustmaster . ﺞﺘﻨﻤﻟﺍ ﺔﻘﺑﺎﻄﻤﺑ ﺔﺒﻟﺎﻄﻤﻠﻟ ﺓﺩﺪﺤﻤﻟﺍ ﺓﺮﺘﻔﻟﺍ ﻊﻣ ﻥﺎﻤﻀﻟﺍ ﺓﺮﺘﻓ ﻖﻓﺍﻮﺘﺗ ،ﻯﺮﺧﺃ ﻝﻭﺩ ﻲﻓﻭThrustmaster
.ﺎﻬﻌﺒﺘﺗ ﺷ ﻥﺎﻜﻣ ﻰﻟﺇ ﺞﺘﻨﻤﻟﺍ ﺓﺩﺎﻋﺇ ﺐﺠﻴﻓ ،ﺐﻴﻌﻟﺍ ﺩﻮﺟﻭ ﻦﻣ ﺪﻛﺄﺘﻟﺍ ﻢﺗ ﺍﺫﺇﻭ.(ﻲﻨﻔﻟﺍ ﻢﻋﺪﻟﺍ ﻪﻴﻟﺇ ﺮﻴﺸﻳ ﺮﺧﺁ ﻊﻗﻮﻣ ﻱﺃ ﻭﺃ) ﻪﺋﺍﺮ
ﺞﺘﻨﻣ ﻊﻀﺧThrustmaster ﺔﻣﺪﺨﻟﺍ ﺝﺭﺎﺧ ﺎﻬﻟﻼﺧ ﺞﺘﻨﻤﻟﺍ ﻥﻮﻜﻳ ﺓﺮﺘﻓ ﻱﺃ ﻥﺈﻓ ،ﺡﻼﺻﺇ ﺔﻴﻠﻤﻋ ﻱﻷ ،ﻥﺎﻤﻀﻟﺍ ﺓﺮﺘﻓ ﻝﻼﺧ ﻲﻓ ،
) ﺔﻌﺒﺳ ﻰﻧﺩﺃ ﺪﺤﺑﻭ7 ﺦﻳﺭﺎﺗ ﻦﻣ ﻭﺃ ﻞﺧﺪﺘﻠﻟ ﻞﻴﻤﻌﻟﺍ ﺐﻠﻁ ﺦﻳﺭﺎﺗ ﻦﻣ ﺓﺮﺘﻔﻟﺍ ﻩﺬﻫ ﺃﺪﺒﺗ) ﺔﻴﻘﺒﺘﻤﻟﺍ ﻥﺎﻤﻀﻟﺍ ﺓﺮﺘﻓ ﻰﻟﺇ ﻑﺎﻀﺗ ﻑﻮﺳ ﻡﺎﻳﺃ (
ﺔﻛﺮﺸﻟGuillemot ﺑ) ﺎﻬﻋﻭﺮﻓﻭ ﻰﻠﻋ (ﺔﻴﻌﺒﺘﻟﺍ ﺭﺍﺮﺿﻷﺍ ﻚﻟﺫ ﻲﻓ ﺎﻤﺡﻼﺻﺇ ﺞﺘﻨﻤﻟﺍThrustmaster ﺎﻣﺪﻨﻋ ﻚﻟﺫﻭ ،ﻪﻟﺍﺪﺒﺘﺳﺍ ﻭﺃ
ﻱﺮﺴﻳ ﻻ :ﻥﺎﻤﻀﻟﺍ ﺍﺬﻫ )1 ﻢﺋﻼﻤﻟﺍ ﺮﻴﻏ ﻭﺃ ﺊﻴﺴﻟﺍ ﻡﺍﺪﺨﺘﺳﻼﻟ ًﺔﺠﻴﺘﻧ ﻒﻠﺘﻠﻟ ﺽّﺮﻌﺗ ﺍﺫﺇ ﻭﺃ ﻩﺮﻴﻴﻐﺗ ﻭﺃ ﻪﺤﺘﻓ ﻭﺃ ﺞﺘﻨﻤﻟﺍ ﻞﻳﺪﻌﺗ ﻢﺗ ﺍﺫﺇ (
ﻝﻼﺧGuillemot ) ؛(ﺞﺘﻨﻤﻟﺍ ﺍﺬﻬﻟ2ﻦﻣ ﺔﻣﺪﻘﻤﻟﺍ ﺕﺎﻤﻴﻠﻌﺘﻟﺎﺑ ﻡﺍﺰﺘﻟﻻﺍ ﻡﺪﻋ ﺔﻟﺎﺣ ﻲﻓ ( ) ؛ﻲﻨﻔﻟﺍ ﻢﻋﺪﻟﺍ ﻞَﺒِﻗ3 ﺚﻴﺣ ،ﺞﻣﺍﺮﺒﻟﺍ ﻰﻠﻋ (
)) ؛(ﻢﺼﻌﻤﻟﺍ ﺔﻄﺑﺭﺃﻭ ﺐﺋﺎﻘﺤﻟﺍﻭ ﺕﺎﻈﻓﺎﺤﻟﺍﻭ ﺐﻠﻌﻟﺍﻭ ﺕﻼﺑﺎﻜﻟﺎﻛ6.ﻲﻨﻠﻋ ﺩﺍﺰﻣ ﻲﻓ ﺞﺘﻨﻤﻟﺍ ﻊﻴﺑ ﻢﺗ ﺍﺫﺇ (
Page 96

8\7
ﻯﺮﺧﻷﺍ ﻥﺎﻤﻀﻟﺍ ﻁﻭﺮﺷ
ﻦﻣ ﺞﺘﻨﻣ ﻱﺃ ﺡﻼﺻﺇ ﻭﺃ/ﻭ ﺢﺘﻔﺑThrustmaster ،ﻞﻴﻤﻌﻟﺍ ﺔﻄﺳﺍﻮﺑ ﺎﻫﺅﺍﺮﺟﺇ ﻲﻨﻔﻟﺍ ﻢﻋﺪﻟﺍ ﺐﻠﻄﻳ ﺡﻼﺻﺇ ﺕﺍءﺍﺮﺟﺇ ﻱﺃ ءﺎﻨﺜﺘﺳﺎﺑ)
ﺔﺑﻮﺘﻜﻣ ﺕﺎﻤﻴﻠﻌﺗ ﻖﻳﺮﻁ ﻦﻋ– ًﺮﻈﻧ ،ﻝﺎﺜﻤﻟﺍ ﻞﻴﺒﺳ ﻰﻠﻋ ﺎﻬﺘﻳﺮﺳ ﻡﺪﻋﻭ ﺡﻼﺻﻹﺍ ﺔﻠﻤﻋ ﺔﻁﺎﺴﺒﻟ ﺍ– (ﻊﻄﻗ) ﺔﻌﻄﻘﺑ ﻞﻴﻤﻌﻟﺍ ﺪﻳﻭﺰﺗﻭ
.ﻚﻟﺫ ﻦﻜﻣﺃ ﺎﻤﺜﻴﺣ ،ﺔﺑﻮﻠﻄﻤﻟﺍ ﺭﺎﻴﻐﻟﺍ
ﺮﻓﻮﺗ ﻦﻟ ،ﺔﻳﺭﺎﺠﺘﻟﺍ ﺭﺍﺮﺳﻷﺍﻭ ﺔﻴﻨﻔﻟﺍ ﺔﻓﺮﻌﻤﻟﺍ ﺭﺍﺮﺳﺃ ﺔﻳﺎﻤﺤﻟﻭ ﺔﻴﻋﺍﺪﺑﻹﺍ ﺕﻻﺎﺠﻤﻟﺍ ﻰﻀﺘﻘﻤﻟGuille mot ﻱﺃ ،ﺃﺪﺒﻤﻟﺍ ﺚﻴﺣ ﻦﻣ ،
.ﻪﻟ ﻲﺟﺭﺎﺨﻟﺍ ءﺎﻄﻐﻟﺍﻭ ﺞﺘﻨﻤﻠﻟ ﺔﻴﻠﺧﺍﺪﻟﺍ ﺔﻴﻟﻵﺍ ﻰﻠﻋ ﻥﺎﻤﻀﻟﺍ ﺍﺬﻫ ﺮﺼﺘﻘﻳ ،ﺍﺪﻨﻛﻭ ﺔﻴﻜﻳﺮﻣﻷﺍ ﺓﺪﺤﺘﻤﻟﺍ ﺕﺎﻳﻻﻮﻟﺍ ﻲﻓ ﺔﻛﺮﺷ ﻞﻤﺤﺘﺗ ﻻ
.ﻩﻼﻋﺃ ﺓﺩﺭﺍﻮﻟﺍ ﺕﺍءﺎﻨﺜﺘﺳﻻﺍ ﻭﺃ ﺩﻭﺪﺤﻟﺍ ﻚﻴﻠﻋ ﻱﺮﺴﺗ ﻻ ﺪﻘﻓ ﻚﻟﺬﻟﻭ ،ﺔﻴﺿﺮﻌﻟﺍ ﻭﺃ ﺔﻴﻌﺒﺘﻟﺍ ﺭﺍﺮﺿﻷﺍ ﻦﻋ ﺔﻴﻟﻭﺆﺴﻤﻟﺍ ﺪﻳﺪﺤﺗ ﻚﺤﻨﻤﻳ
ﺞﺘﻨﻣ ﻱﻷ ﺭﺎﻴﻏ ﻊﻄﻗ ﻭﺃ ﺡﻼﺻﻺﻟ ﺕﺍﺭﺎﻌﺷﺇThrustmaster .ﻪﺑ ﺔﺻﺎﺨﻟﺍ ﻥﺎﻤﻀﻟﺍ ﺓﺮﺘﻓ ﺖﻬﺘﻧﺍ
ًﻀﻳﺃ ﻊﺘﻤﺘﺗ ﺪﻗﻭ ،ﺔﻨﻴﻌﻣ ﺔﻴﻧﻮﻧﺎﻗ ﺎًﻗﻮﻘﺣ ﻥﺎﻤﻀﻟﺍ ﺍﺬﻫ.ﻯﺮﺧﻷ ﺔﻌﻁﺎﻘﻣ ﻦﻣ ﻭﺃ ﻯﺮﺧﻷ ﺔﻳﻻﻭ ﻦﻣ ﻒﻠﺘﺨﺗ ﻯﺮﺧﺃ ﻕﻮﻘﺤﺑ ﺎ
ﻝﻼﺧ ﺮﻓﻮﺗ ﻦﻟ ،ﻥﺎﻤﻀﻟﺍ ﺓﺮﺘﻓGuillemot ، ﻝﻮﺨﻤﻟﺍ ﺪﻴﺣﻮﻟﺍ ﻑﺮﻄﻟﺍ ﻮﻫ ﻲﻨﻔﻟﺍ ﻢﻋﺪﻟﺍ ﻥﺃ ﺚﻴﺣ ،ﺭﺎﻴﻏ ﻊﻄﻗ ﻱﺃ ،ﺃﺪﺒﻤﻟﺍ ﺚﻴﺣ ﻦﻣ
Guillemot ﻦﻋ ﺔﺠﺗﺎﻧ ﺔﻴﺿﺮﻋ ﻭﺃ ﺔﻴﻌﺒﺗ ﺭﺍﺮﺿﺃ ﻱﺃ ﻦﻋ ﻯﺮﺧﺃ ﺔﻬﺟ ﻱﺃ ﺔﻴﻟﻭﺆﺴﻣ ﻝﺍﻮﺣﻷﺍ ﻦﻣ ﻝﺎﺣ ﻱﺄﺑ ﺔﻌﺑﺎﺘﻟﺍ ﺎﻬﺗﺎﻛﺮﺷ ﻭﺃ
ﻤﻀﻠﻟ ﻕﺮﺧ.ﺔﻴﻨﻤﻀﻟﺍ ﻭﺃ ﺔﺤﻳﺮﺼﻟﺍ ﺕﺎﻧﺎ ﻭﺃ ءﺎﻨﺜﺘﺳﻻﺍ ﻭﺃ ﻲﻨﻤﻀﻟﺍ ﻥﺎﻤﻀﻟﺍ ﺓﺪﻣ ﺪﻳﺪﺤﺘﺑ ﺕﺎﻌﻁﺎﻘﻤﻟﺍ/ﺕﺎﻳﻻﻮﻟﺍ ﺾﻌﺑ ﺢﻤﺴﺗ ﻻ
Page 97

8\8
© 2016 Guillemot Corporation S.A. ﺔﻅﻮﻔﺤﻣ ﻕﻮﻘﺤﻟﺍ ﻊﻴﻤﺟ Thrustmaster®. ﺔﻠﺠﺴﻣ ﺔﻳﺭﺎﺠﺗ ﺔﻣﻼﻋ ﻲﻫ
*
*
®4
ﺔﻴﻧﻭﺮﺘﻜﻟﻹﺍﻭ ﺔﻴﺑﺮﻬﻜﻟﺍ ﺕﺍﺪﻌﻤﻟﺍ ﺕﺎﻳﺎﻔﻧ ﻦﻣ ﺺﻠﺨﺘﻟﺎﺑ ﺔﺻﺎﺧ ﻊﻴﻤﺠﺗ ﺔﻄﻘﻧ ﻲﻓ ﻊﺿﻮﻳ ﻦﻜﻟ ،ﺔﻳﺩﺎﻌﻟﺍ
.ﻑﻼﻐﻟﺍ ﻭﺃ ﻡﺪﺨﺘﺴﻤﻟﺍ ﻞﻴﻟﺩ ﻭﺃ ﺞﺘﻨﻤﻟﺍ ﻰﻠﻋ ﺩﻮﺟﻮﻤﻟﺍ ﺰﻣﺮﻟﺍ ﻚﻟﺫ ﺪﻛﺆﻳﻭ
ﺔﻳﺎﻤﺣ ﻰﻠﻋ ﺓﺪﻋﺎﺴﻤﻟﺍ ﻲﻓ ﺔﻴﻟﺎﻌﻔﺑ ﺔﻛﺭﺎﺸﻤﻟﺍ ﻚﻨﻜﻤﻳ ،ﺔﻴﻧﻭﺮﺘﻜﻟﻹﺍﻭ ﺔﻴﺑﺮﻬﻜﻟﺍ ﺕﺍﺪﻌﻤﻟﺍ ﺕﺎﻳﺎﻔﻧ ﺔﺠﻟﺎﻌﻤﻟ
.ﻚﻴﻟﺇ ﺏﺮﻗﻷﺍ ﻊﻴﻤﺠﺘﻟﺍ ﺔﻄﻘﻧ ﻝﻮﺣ ﺕﺎﻣﻮﻠﻌﻣ ﻰﻠﻋ ﻝﻮﺼﺤﻠﻟ ﻚﻳﺪﻟ ﺔﻴﻠﺤﻤﻟﺍ ﺕﺎﻄﻠﺴﻟﺎﺑ ﻝﺎﺼﺗﻻﺍ ﻰﺟﺮﻳ
ﺎﻴﻗﻭﺃﻭ ﺪﻨﻬﻟﺍﻭ ﺎﻴﺳﻭﺭﻭ ﻂﺳﻭﻷﺍ ﻕﺮﺸﻟﺍﻭ ﺎﻴﻘﻳﺮﻓﺇﻭ ﺎﺑﻭﺭﻭﺃ ﻲﻓ ﻊﻴﺒﻠﻟ ﺺﺧﺮﻣﺎﻴﺳﻮﻧ ﻊﻣ ﺎًﻳﺮﺼﺣ ﻡﺍﺪﺨﺘﺳﻼﻟ.PlayStation
“
.ﺮﺧﺁ ﻰﻟﺇ ﺪﻠﺑ ﻦﻣ ﻒﻠﺘﺨﺗ ﺪﻗﻭ ﺭﺎﻌﺷﺇ ﻥﻭﺩ ﺮﻴﻴﻐﺘﻠﻟ ﺕﺎﻔﺻﺍﻮﻤﻟﺍﻭ .ﻦﻴﺼﻟﺍ ﻲﻓ ﻊﻨﺻ
.ﺎﻬﺼﺋﺎﺼﺧ ﺐﺴﺣ ﻰﻠﻋ ،ﺩﺍﻮﻤﻟﺍ ﺮﻳﻭﺪﺗ ﺓﺩﺎﻋﺇ ﻦﻜﻤﻳ ﺮﻳﻭﺪﺘﻟﺍ ﺓﺩﺎﻋﺇ ﻝﻼﺧ ﻦﻣ ﻯﺮﺧﻷﺍ ﻝﺎﻜﺷﻷﺍﻭ
.ﻪﻣﺍﺪﺨﺘﺳﺍ ﻞﺒﻗ ﺞﺘﻨﻤﻟﺍ ﻦﻣ ﺔﻘﺻﻼﻟﺍﻭ ﺔﺘﺒﺜﻤﻟﺍ ﺩﺍﻮﻤﻟﺍ ﺔﻟﺍﺯﺇ ﺐﺠﻳ
” Computer Entertainment Inc. .ﺔﻅﻮﻔﺤﻣ ﻕﻮﻘﺤﻟﺍ ﻊﻴﻤﺟ .ﺎﻬﺴﻔﻧ ﺔﻛﺮﺸﻠﻟ ﺔﻳﺭﺎﺠﺗ ﺔﻣﻼﻋ ﻲﻫ ﺔﻓﺎﻛ
.ﻦﻴﻴﻨﻌﻤﻟﺍ ﺎﻬﺑﺎﺤﺻﻷ ﺔﻛﻮﻠﻤﻣ ﻯﺮﺧﻷﺍ ﺔﻳﺭﺎﺠﺘﻟﺍ ﺕﺎﻣﻼﻌﻟﺍ ﺍ.ﺔﻣﺰﻠﻣ ﺮﻴﻏ ﺔﻴﺤﻴﺿﻮﺘﻟﺍ ﻡﻮﺳﺮﻟ ﺕﺎﻤﻴﻤﺼﺘﻟﺍﻭ ﺕﺎﻳﻮﺘﺤﻤﻟﺍ ﻊﻀﺨﺗﻭ
:ﻲﺑﻭﺭﻭﻷﺍ ﺩﺎﺤﺗﻻﺍ ﻲﻓ ﺐﺠﻳ ،ﺞﺘﻨﻤﻟﺍ ﺔﻴﺣﻼﺻ ءﺎﻬﺘﻧﺍ ﺪﻨﻋ ﺔﻴﻟﺰﻨﻤﻟﺍ ﺕﺎﻳﺎﻔﻨﻟﺍ ﻊﻣ ﻪﻨﻣ ﺺﻠﺨﺘﻟﺍ ﻡﺪﻋ
:ﻯﺮﺧﻷﺍ ﻥﺍﺪﻠﺒﻟﺍ ﺔﻓﺎﻜﻟ ﺔﺒﺴﻨﻟﺎﺑ ﺎﻋﺇ ﻦﻴﻧﺍﻮﻘﺑ ﻡﺍﺰﺘﻟﻻﺍ ﻰﺟﺮﻳ ﺕﺍﺪﻌﻤﻟﺎﺑ ﺔﺻﺎﺨﻟﺍ ﺔﻴﻠﺤﻤﻟﺍ ﺮﻳﻭﺪﺘﻟﺍ ﺓﺩ
.ﺔﻴﻧﻭﺮﺘﻜﻟﻹﺍﻭ ﺔﻴﺑﺮﻬﻜﻟﺍ
ﺔﻄﺳﺍﻮﺑ ﻊﻳﺯﻮﺘﻟﺍﻭ ﻊﻴﻨﺼﺘﻟﺍ ﻢﺗ.Guillemot Corporation S.A.
ﺔﻴﺌﻴﺒﻟﺍ ﺔﻳﺎﻤﺤﻟﺍ ﺕﺎﻴﺻﻮﺗ
)WEEE.(
.ﺔﺌﻴﺒﻟﺍ
.ﺕﺎﻣﻮﻠﻌﻤﻟﺍ ﻩﺬﻬﺑ ﻆﻔﺘﺣﺍ .ﻑﺭﺎﺧﺰﻟﺍﻭ ﻥﺍﻮﻟﻷﺍ ﻒﻠﺘﺨﺗ ﺪﻗ
www.thrustmaster.com
ﻲﺑﻭﺭﻭﻷﺍ ﺩﺎﺤﺗﻻﺍ ﻰﻠﻋ ﻖﺒﻄﻨﻳ* ﻂﻘﻓ ﺎﻴﻛﺮﺗﻭ
ﺮﺸﻨﻟﺍ ﻕﻮﻘﺣ
ﺔﻛﺮﺸﻟ.Guillemot Corporation S.A.
“
” ﻭ “PlayStation” ﻭ“ ” ﻭ “ ” ﺔﻛﺮﺸﻟ ﺔﻠﺠﺴﻣ ﺔﻳﺭﺎﺠﺗ ﺕﺎﻣﻼﻋ ﻲﻫ So ny
Page 98

1/8
1. Throttle
Allen key to install or separate the
throttle
7. Handle resistance adjustment dial
TECHNICAL FEATURES
PlayStation®4
User Manual
2. USB connector
3. Rudder connector: RJ12 Thrustmaster
Rudder (sold separately) connector
4. Rudder function via twisting handle
5. Rudder locking screw on handle
6.
8. Rudder via rocking button
9. Action buttons
10. PS button with LED
11. Multidirectional "Point Of View" hat-
switch
Page 99

2/8
GETTING TO KNOW YOUR HOTAS JOYSTICK
THROTTLE
Your joystick features a large throttle which you can use to easily control the acceleration of
your aircraft.
The throttle is detachable and may be positioned in 2 different ways, either:
Detached and separated from the joystick
(to re-create authentic piloting conditions)
Attached to the joystick
(for greater stability and to take up less space).
By default, the throttle comes detached from the joystick.
To attach the throttle to the joystick:
1. Turn both items upside down (the throttle and the joystick).
2. Take the Allen key (6) attached underneath the base of the joystick.
3. Position the throttle to the left of the joystick.
Insert the connecting tab on the left of the joystick's base into the opening on the right
hand side of the throttle.
4. Using the key, tighten the two Allen screws underneath the base
(located on the left-hand side of the joystick's base).
5. Wind up the throttle cable and thread it through the cable guide slot.
6. Put the Allen key back in its place so as not to lose it.
Carry out this procedure in reverse to detach the throttle from the joystick.
ADJUSTABLE HANDLE RESISTANCE
Depending on your style of gaming, you may wish to have an ultra-sensitive joystick, which
responds to the slightest touch, or you may prefer to have a firmer joystick, which offers
some resistance when you move it.
Your joystick's handle resistance is adjustable, in order to adapt to all players. To adjust it,
use the handle resistance adjustment dial (7) located underneath your joystick's base.
Page 100

3/8
RUDDER FUNCTION
Your joystick features a rudder function, which in a plane corresponds to the pedals used by
the pilot to turn the steering, allowing the plane to pivot around its vertical axis (therefore
making the plane turn left or right). This rudder function is accessible on your joystick by
rotating the handle to the left or right.
This rudder function is accessible in two ways:
- on your joystick by rotating the handle (4) to the left or right.
- or via the rocking button (8) on the throttle.
If you are only using the rocking button (or if you are not using the rudder function), you can
disable the handle's rotation thanks to the locking screw (5) located on the base of the
joystick. Use a flat head screwdriver to change the screw’s position and thus lock/unlock the
rudder function.
MULTIDIRECTIONAL "POINT OF VIEW" HAT-SWITCH
Your joystick features a “Point Of View” hat-switch (11) which, as its name indicates, allows
you (in games which permit) to instantly view everything that’s going on around your plane.
To do so, simply go to your game’s configuration menu and program the different views (rear
view, left view, right view, and also external views) onto the directions of the “Point Of View”
hat-switch.
Of course, you can also use the “Point Of View” hat-switch for other functions instead (firing,
etc.).
 Loading...