

Page 1
Installation and user manual for the integrated washing machine
Manuel d’Installation et d’Utilisation du lave-linge intégrable
Hinweise zur Installation und Benutzung der einbaufähigen
Waschmaschine
Page 2

washing machine
contents
WARNINGS
SPECIFICATIONS
INSTALLATION AND ASSEMBLY
USING THE APPLIANCE.
PRACTICAL TIPS
MAINTENANCE
AND CLEANING
SAFETY
AND TROUBLESHOOTING
ENVIRONMENTAL
WARNINGS
lave-linge
AVERTISSEMENTS
index
4
5
6
10
20
22
25
26
SPÉCIFICATIONS
INSTALLATION ET MONTAGE
UTILISATION DE L’APPAREIL
ET CONSEILS PRATIQUES
MAINTENANCE
ET ENTRETIEN DE L’APPAREIL
SÉCURITÉ
ET RÉSOLUTION DE PROBLÈMES
AVERTISSEMENTS SUR
L’ENVIRONNEMENT
27
28
32
42
44
47
Page 3

waschmaschine
inhalt
ALLGEMEINE HINWEISE
BESCHREIBUNG
INSTALLATION UND MONTAGE
BEDIENUNG DES GERÄTS
UND PRAKTISCHE HINWEISE
PFLEGE UND REINIGUNG
DES GERÄTS
SICHERHEIT UND
PROBLEMLÖSUNGEN
HINWEISE ZUM
UMWELTSCHUTZ
48
49
50
54
64
66
69
Page 4

warnings
To avoid the risk of fire, electric shocks, injury or damage when using your washing
machine, please take the following precautions:
This washing machine comes with a
manual that includes operating, maintenance
and installation instructions. Please read all
the instructions before using the washing
machine.
Do not wash items that have previously
been cleaned, washed, soaked or treated
with petrol, solvents for dry cleaning, other
inflammable substances or explosives, as
they produce fumes that could catch fire or
explode.
Do not add petrol, solvents for dry cleaning
or other inflammable or explosive substances
to the wash water as they produce fumes
that could catch fire or explode.
Do not repair or replace any part of the
washing machine or try to carry out any type
of servicing unless it is recommended in the
maintenance instructions in the manual.
Do not climb onto the machine or stand
on the open hatch door.
Do not use an extension lead or adaptor
to connect your washing machine to the
mains supply.
The machine should only be used for the
purpose it is designed for.
Follow the washing instructions
recommended by the manufacturer of the
garment to be washed.
Do not turn your washing machine on until
you are sure that:
• It has been installed in accordance with
the installation instructions.
• All the water, drainage, mains electricity
and earth connections meet the local
regulations and/or other applicable
regulations.
4
Page 5
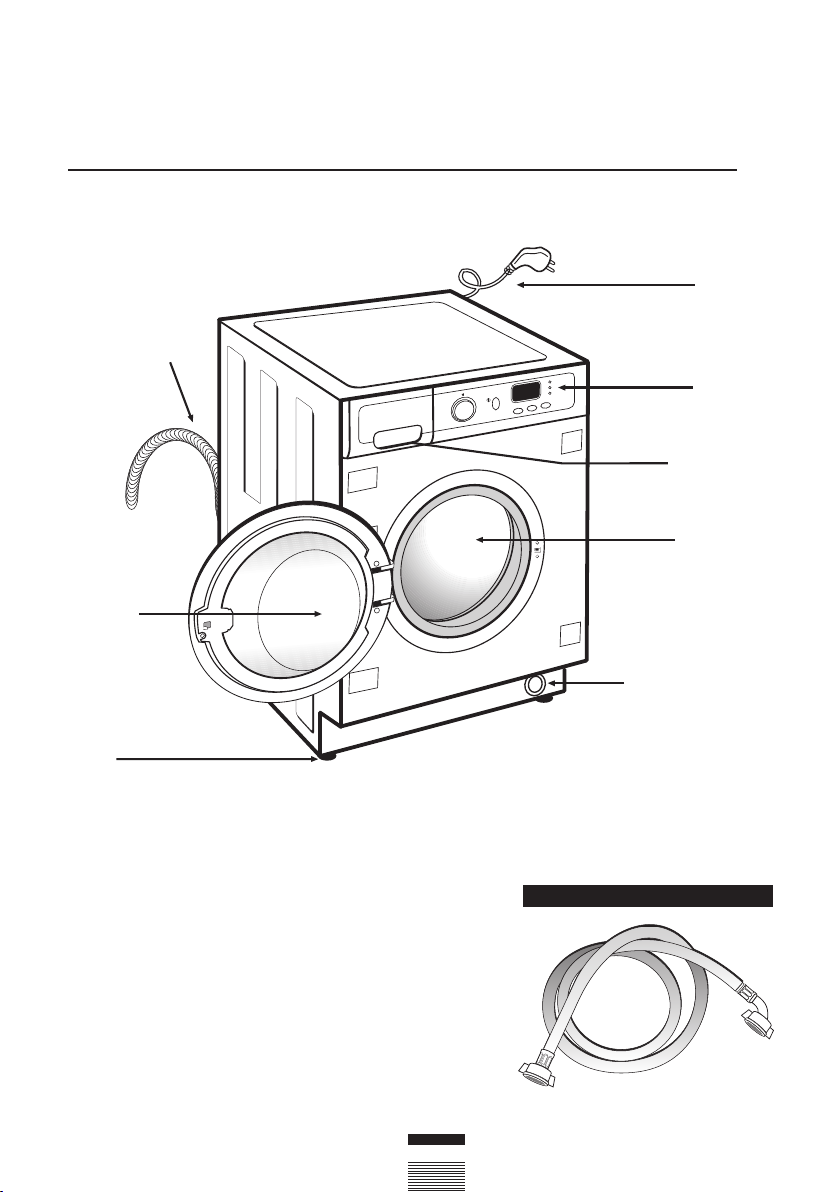
washing machine
Drain hose
Hatch
Adjustable
feet
specifications
Power
cord
Control
panel
Detergent
dispenser
Stainless
steel drum
Accessible filter
ACCESSORIES
Water inlet hose.
5
Page 6
washing machine
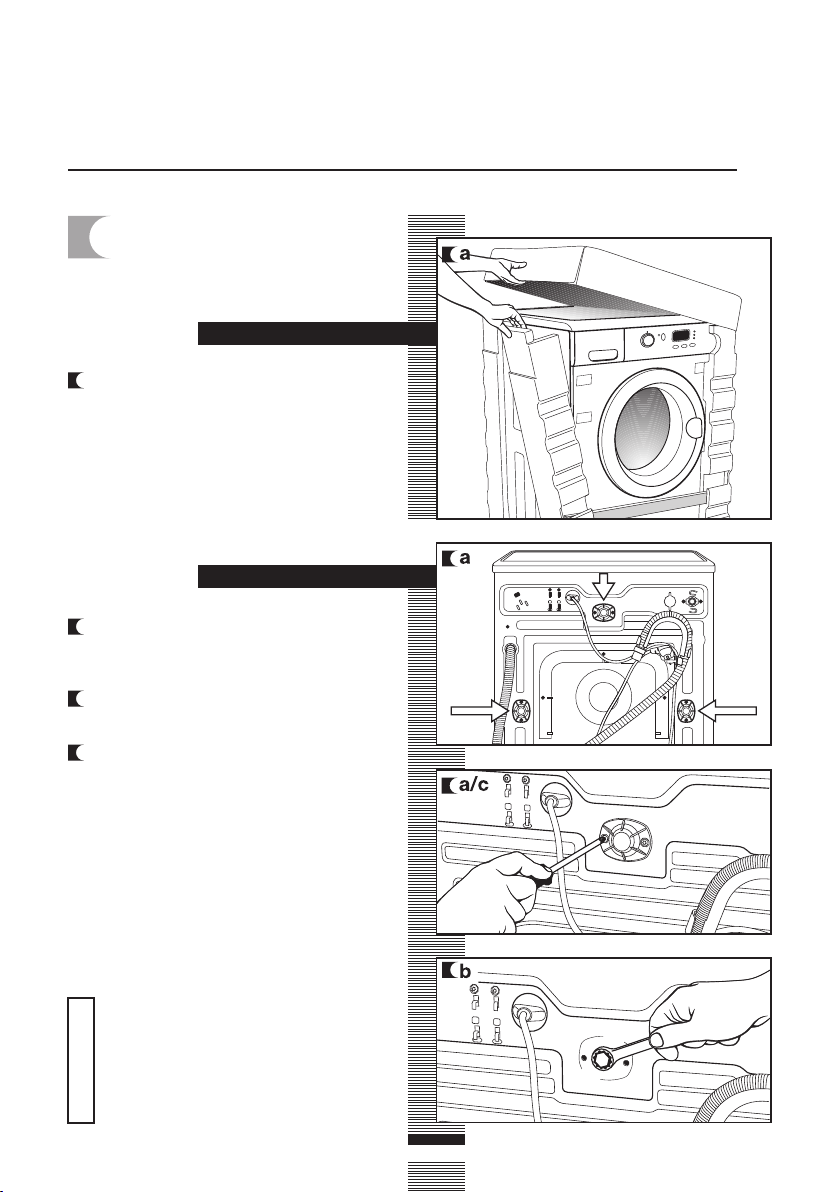
UNPACKING AND
1
UNBLOCKING THE
WASHING MACHINE
a Remove the base, corner protectors and
top cover.
a Remove the screws holding the plastic
covers to the back of the washing
machine.
b Loosen and remove the 3 blocking
screws.
installation and assembly
UNPACKING
UNBLOCKING
c Cover the holes with the plastic covers
you have just removed.
Do not throw the blocking screws
away. You may need to move the
washing machine at a later date.
Important
6
Page 7

CONNECTION TO THE MAINS WATER SUPPLY AND
2
DRAINAGE
CONNECTION TO THE
MAINS WATER SUPPLY
The water supply hose is inside the drum:
a Connect the bent end of the hose to the
threaded inlet of the electrovalve located
at the rear of the washing machine.
b Connect the other end of the hose to
the water intake. Then securely tighten
the connection nut.
It is important that the drain hose
bend is correctly fastened to the
outlet, to prevent any risk of it
becoming detached and causing
flooding.
If your washing machine has a hot
water intake, connect the hose with
the red threaded end to the hot water
tap, and to the electrovalve with the
red filter.
The washing machine must be
connected to the mains water supply,
Important
using the new supply hoses supplied
with the appliance. Do not use water
supply hoses that have been used
before.
For your washing machine to work
properly, the mains water pressure
must be between 0.05 and 1MPa (0.05
and 10 Kgr/cm
2
).
installation and assembly
DRAINAGE
CONNECTION
a It is recommended that you have a fixed
drainage outlet 50 to 70 cm from the
floor.
Avoid the drain hose being too tight,
kinked or restricted.
7
Page 8
LEVELLING THE WASHING MACHINE AND CONNECTING
3
IT TO THE MAINS ELECTRICITY SUPPLY
installation and assembly
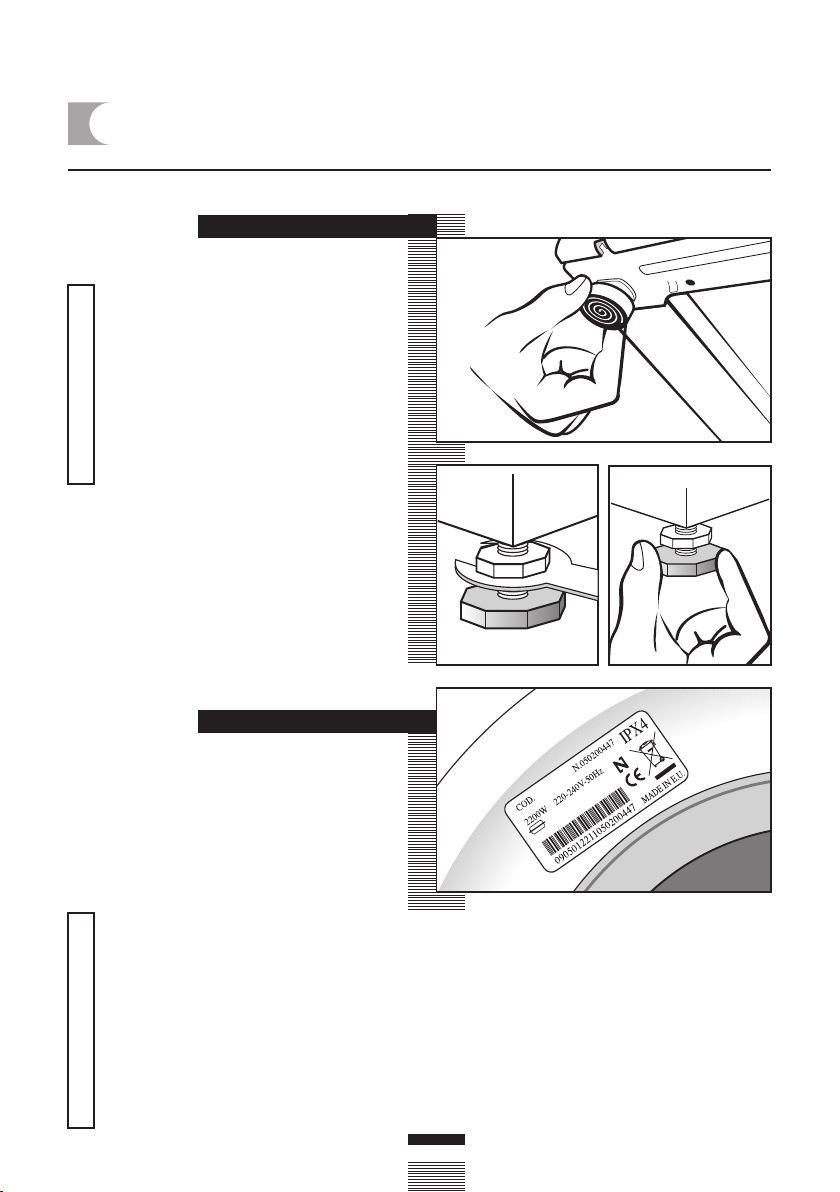
LEVELLING
Use the adjustable feet to level the
washing machine. This will reduce
the noise level and prevent it from
moving during use.
Do not bring the feet too far out, you
will achieve better stability.
Important
You need to use a spanner for the
models that have a nut.
ELECTRICAL CONNECTION
Consult the specifications plate located on the
hatch door of the washing machine before
making the electrical connections. Ensure that
the voltage reaching the plug is the same as
that on the plate.
Do not remove the specifications plate.
The information on it is important.
It is very important to correctly earth the
washing machine. The electrical
installation, plug, socket, fuses or
automatic switch and counter must be
correctly dimensioned for the maximum
power indicated on the specifications
plate.
Important
Do not plug the washing machine plug
into the socket with wet or damp hands.
To remove the power cord, pull on the
body of the plug.
If the power cord is damaged, it must be
replaced by a cord or special unit provided
by either the manufacturer or your aftersales service.
With built-in washing machines, the plug
must be accessible after installation.
8
Page 9
PRE-CLEANING
4
PRE-CLEANING
When your washing machine has been
correctly installed, we recommend that you
pre-clean the machine.
This is to check that the installation, the
connections and the drainage are all correct,
and to thoroughly clean the inside of the
washing machine before any wash
programmes are run (see the operating
instructions on the following pages).
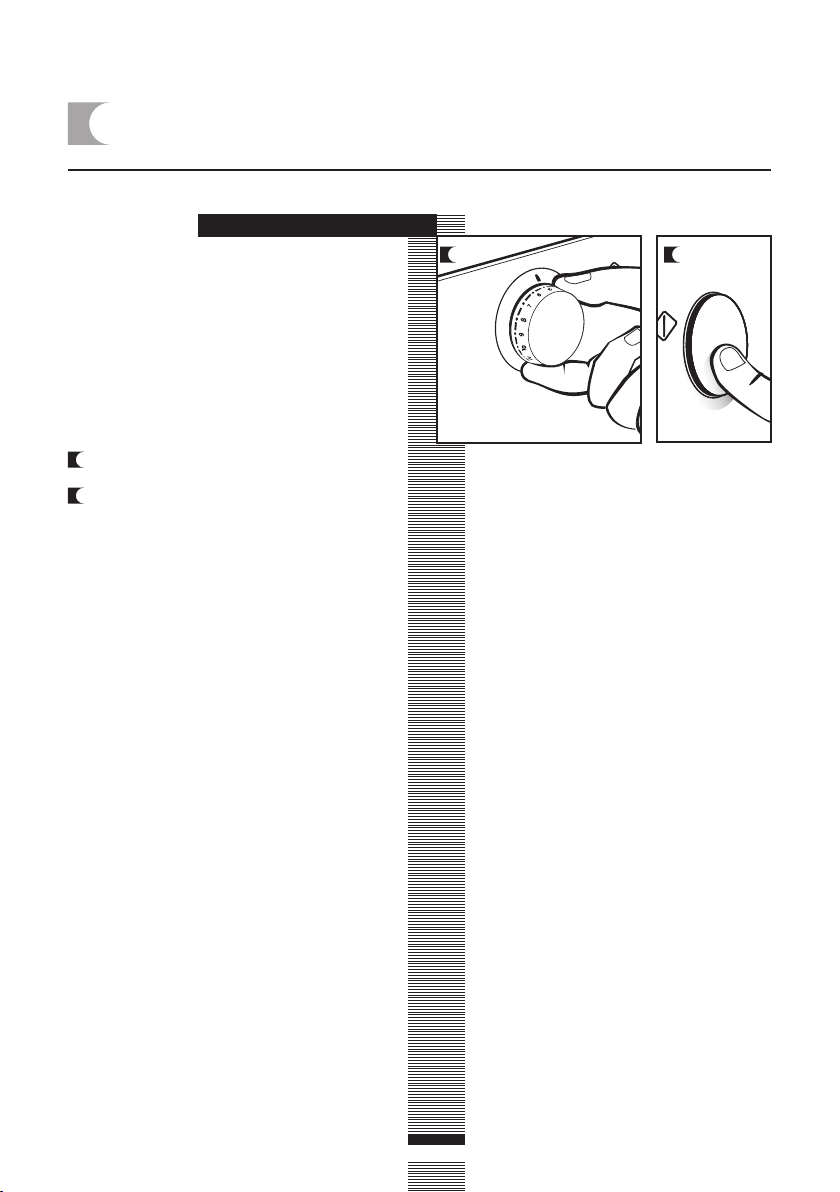
a Select the normal programme at 60ºC.
b Press the Start/Stop button.
ba
9
Page 10
washing machine
PREPARING
1
GARMENTS FOR
using the appliance and practical tips
WASHING
PREPARATION
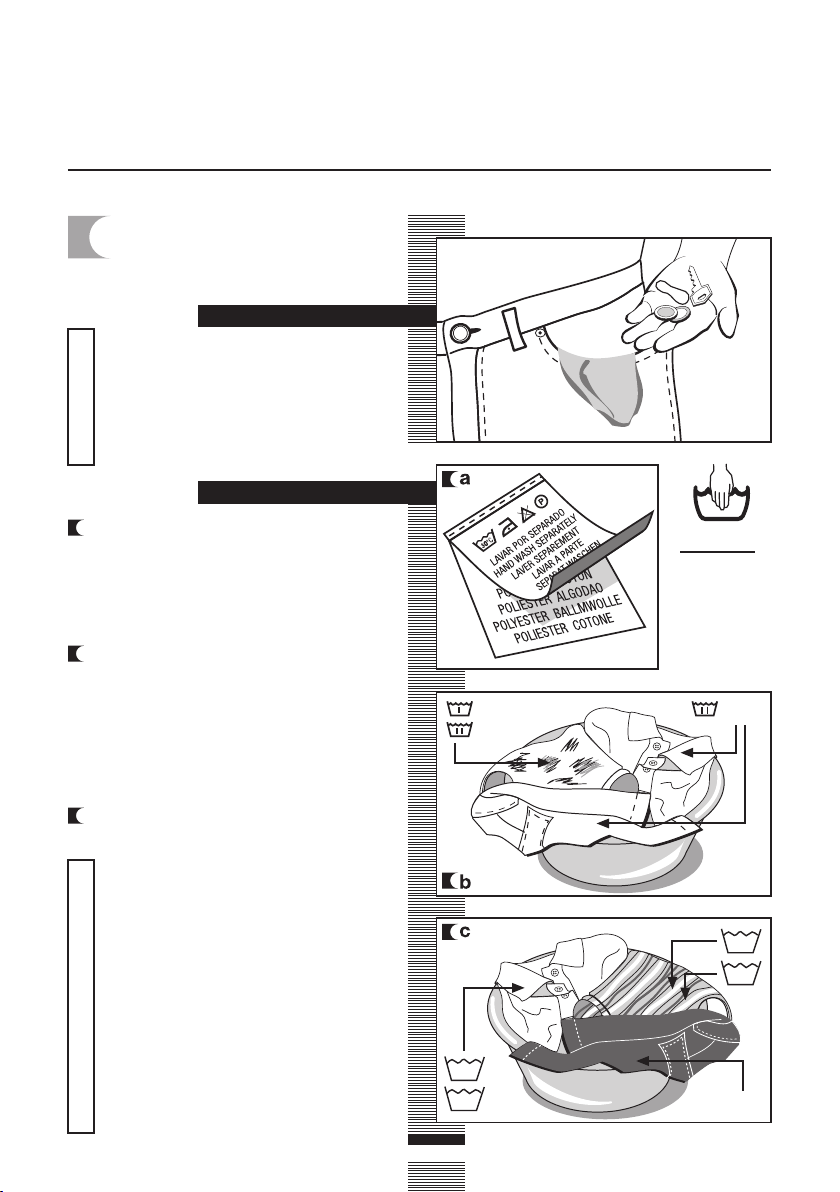
Before placing the clothes in the
drum, make sure all the pockets are
empty.
Any small objects may block the drain
pump.
Important
SORTING THE CLOTHES
a Sort the clothes according to fabric
and how they are made:
We recommend using the delicate
programmes for sensitive fabrics. There
is a special wool programme for
woollens.
b Sort clothes according to how soiled
they are.
• Wash lightly soiled garments using a
short programme.
• Use a programme without prewash
for medium-soiled garments.
• Wash heavily soiled garments using a
long programme with prewash.
Prewash
Wash
Important
Make sure
beforehand
that your
woollens can
be machinewashed.
Wash
a Sort your clothes according to colour.
Wash whites and coloured separately.
We recommend loading the washing
machine to its full capacity. This
means savings on water and energy.
Whenever possible, we recommend
that you wash garments of different
sizes within the same wash
programme. This improves the
washing action and also aids the
correct distribution of the garments
in the drum when spin-drying, and
Important
the washing machine will therefore
be quieter.
It is a good idea to put small garments
in a wash bag.
10
60
90
30
40
Cold
Page 11
2
USING DETERGENT AND ADDITIVES
using the appliance and practical tips
DETERGENT AND
ADDITIVES
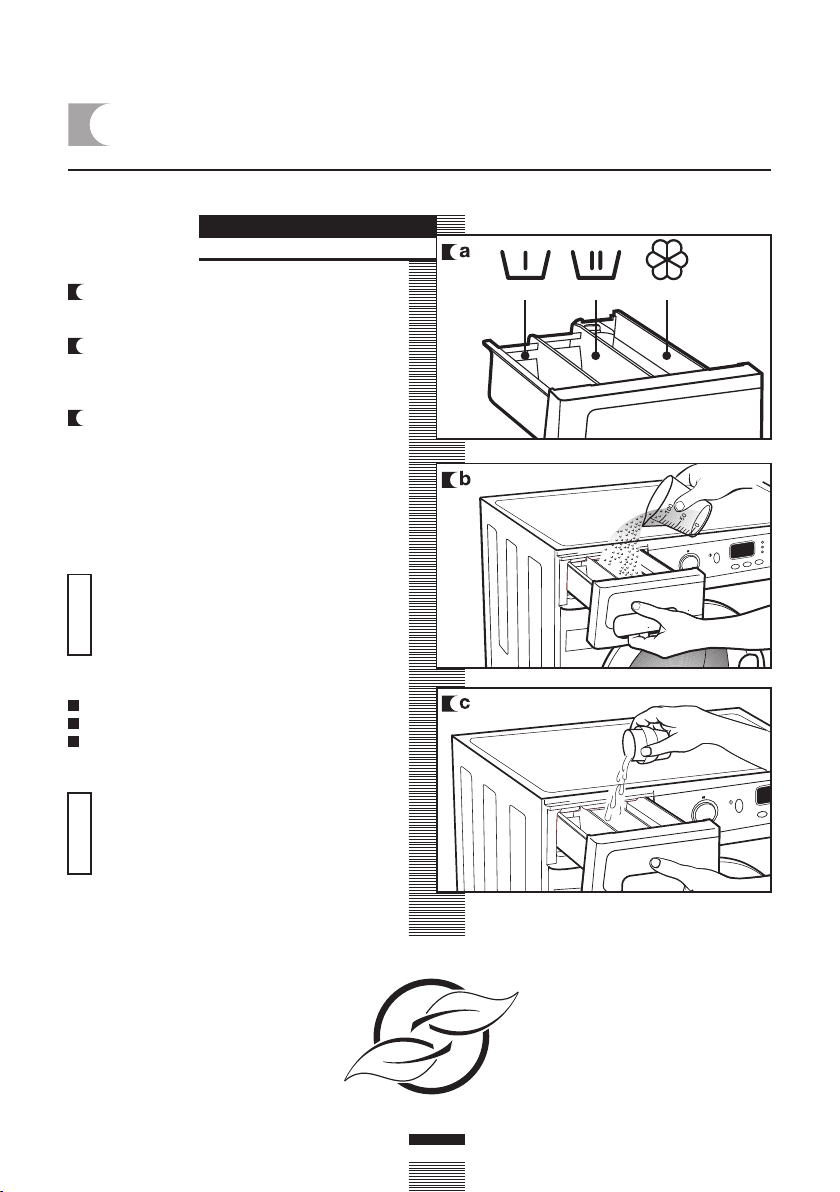
a Your washing machine’s detergent
dispenser has three compartments.
b Put the detergent or additive into the
detergent dispenser before starting the
wash programme.
c Liquid detergents may also be used in
this washing machine. An optional
detergent dispenser is to be used for
this, which can be obtained from the
Technical Service Network.
Place this optional dispenser inside the
wash compartment.
The level of liquid must never be
higher than the MAX mark printed on
the dispenser wall.
Important
Remember that the amount of detergent to
be used will always depend on:
The amount of clothes to be washed.
How heavily the clothes are soiled.
The hardness of the water (Information on
water hardness in your area can be obtained
from the competent local authorities).
We recommend the use of a
decalcifying product if the water
hardness is high in your area.
Important
PREWASH
WASH
FABRIC SOFTENER
eco-note
Remember that concentrated detergents
exist which are more environment- and
nature-friendly.
The use of more detergent than
necessary will not improve your
washing results, and apart from costing
you money it will have a negative effect
on the preservation of the
environment.
We therefore recommend you follow
the detergent manufacturer’s
instructions.
11
Page 12
3
SELECTING THE WASH PROGRAMME
using the appliance and practical tips
start/
stop
button
screen
detergent dispenser
detergent dispenser
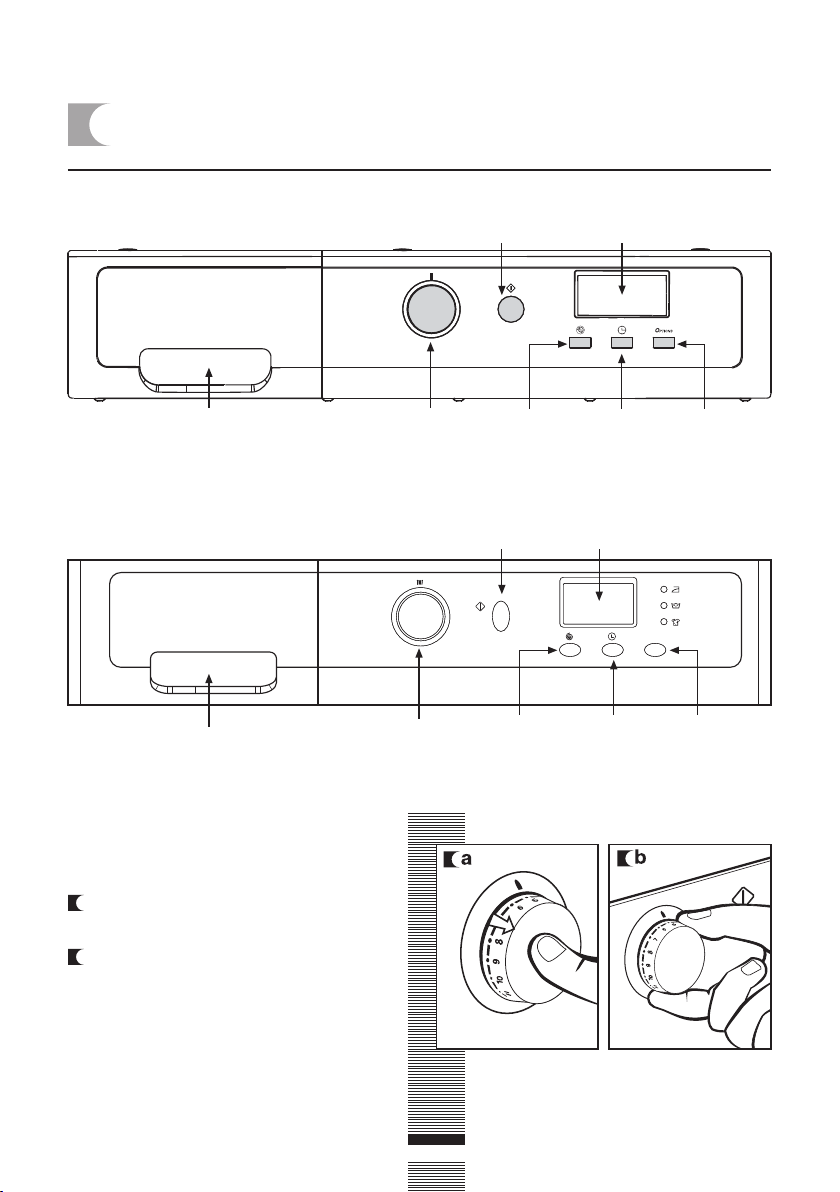
The procedure for selecting the wash
programme is as follows:
a Activate the programme selector by
pressing it to release it.
b Select the wash programme by turning
the programme selector dial (see
programme table).
The display on the control panel will light
up.
programme
selector
programme
selector
spin and
anti-crease
button
start/
stop
button
spin and
anti-crease
button
time
delay
button
screen
time
delay
button
additional
function
button
additional
function
button
12
Page 13
using the appliance and practical tips
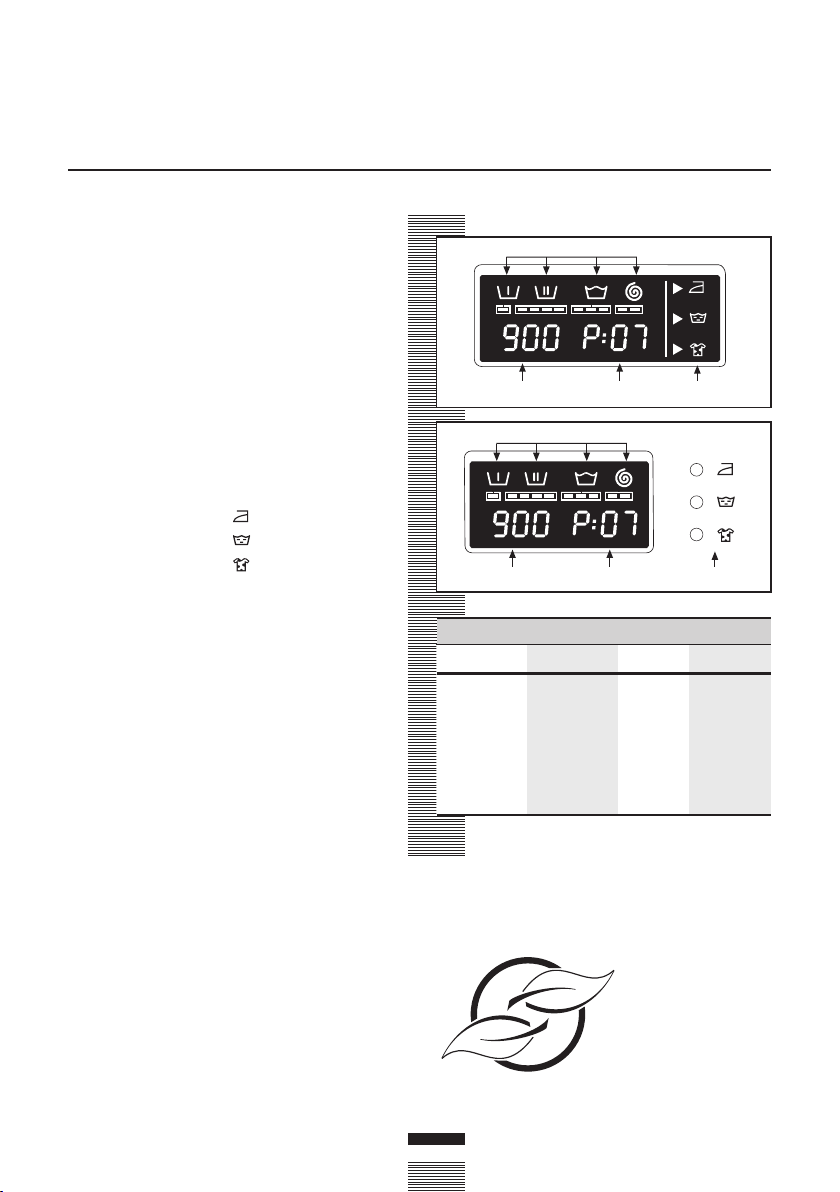
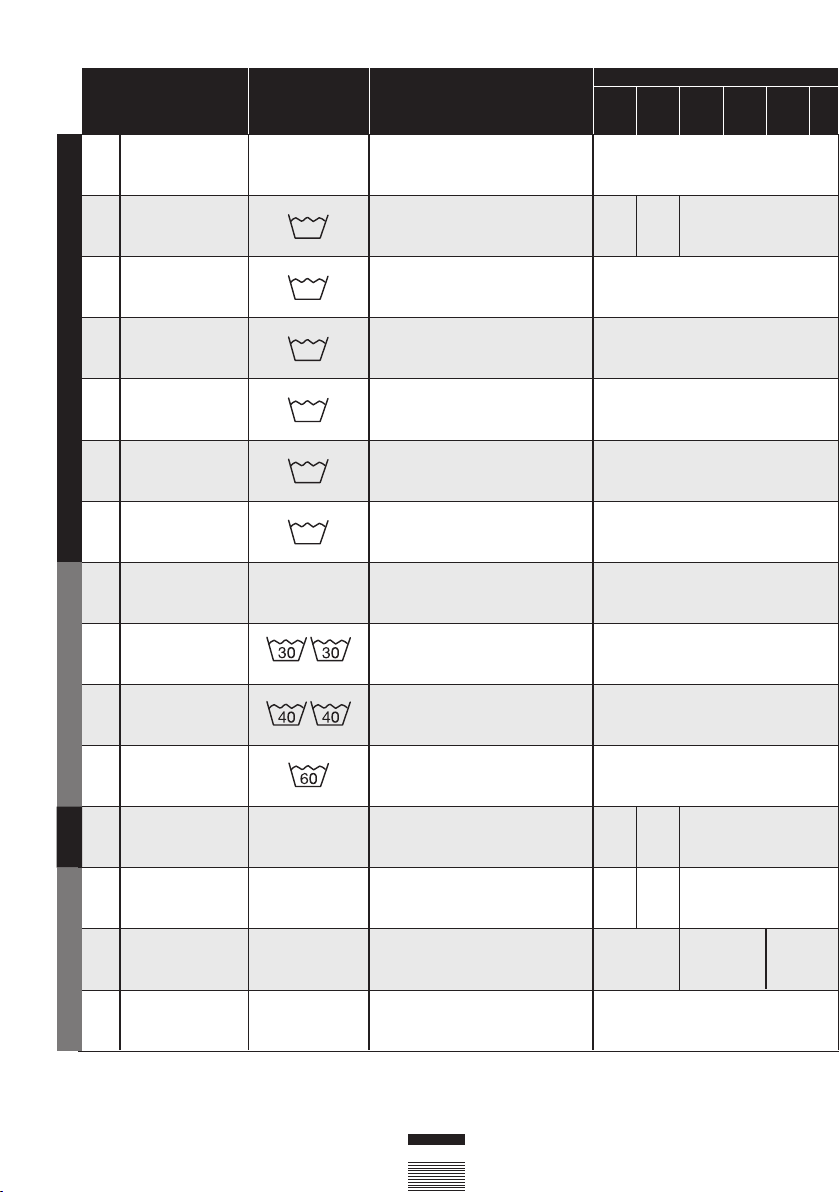
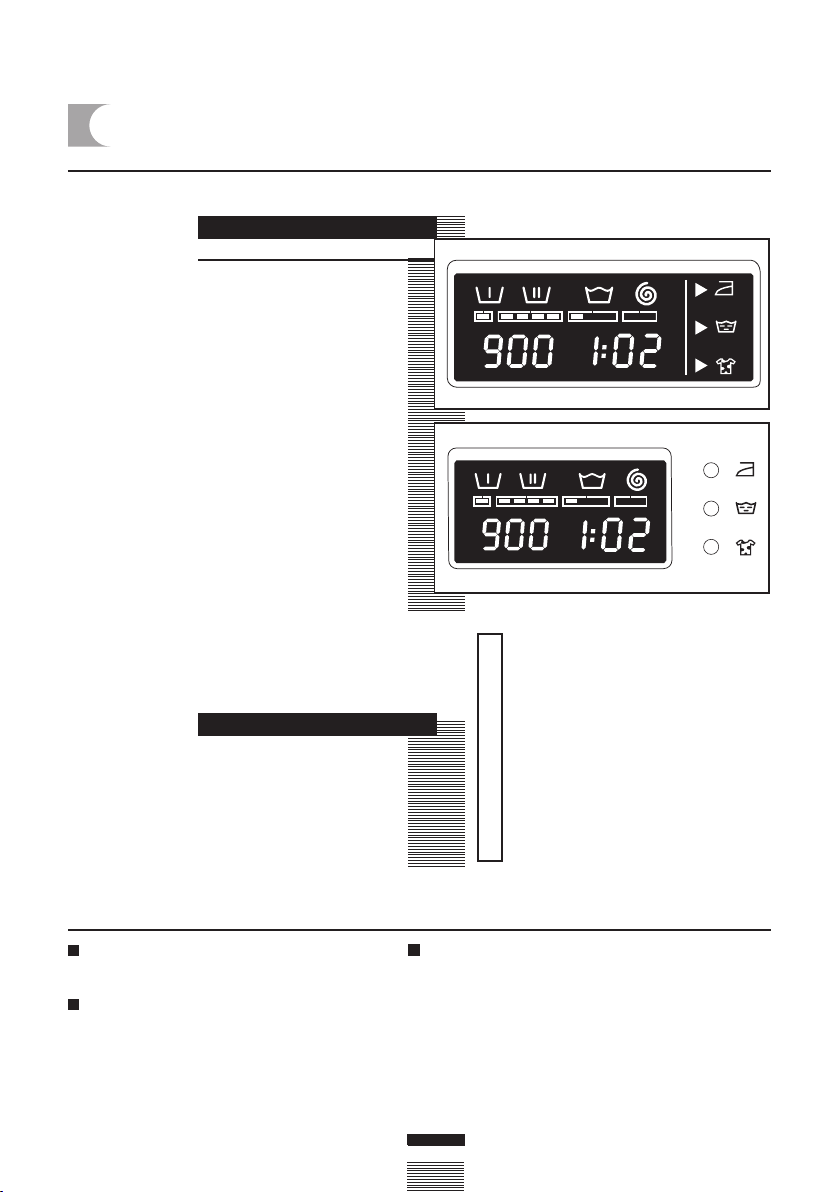
When you select the programme, the following
information will be displayed:
1 Wash programme phases:
Prewash
Wash
Rinse
Spin-drying and draining
2 Spin speed
3 Programme nº (for a few seconds)
and then programme duration.
4 Additional functions
Easy iron
Extra rinse
Intensive wash
There are four types of programme:
Normal programmes
Delicate programmes
Wool programmes
Auxiliary programmes
1
2 3 4
1
23 4
PROGRAMMMES
Normal AuxiliaryWool
Normal cold
2
Quick 30ºC
3
Normal 30ºC
4
Normal 40ºC
5
Normal 60ºC
6
Normal 90ºC
7
Prewash 60ºC
Delicate
8
Delicate cold
9
Delicate 30ºC
10
Delicate 40ºC
11
Delicate 60ºC
12
Wool 35ºC1
Rinses
13
Spin-drying
14
Draining
15
eco-note
We recommend you choose a wash
programme without prewash whenever
possible. This will save you money and
help protect the environment.
13
Page 14
Programme
1
Normal cold
2
Quick 30ºC
3
Normal 30ºC
4
Normal 40ºC
5 (*)
Normal 60ºC
Normal programmesDelicate programmes
6
Normal 90ºC
7
Prewash 60ºC
8
Delicate cold
9
Delicate 30ºC
10
Delicate 40ºC
11
Delicate 60ºC
12
Wool 35ºC
Wool prog
13
Rinses
14
Spin-drying
Auxiliary Prog.
15
Draining
Recommended
temperature
Cold
30
30
40
60
90
60
Cold
—– –
—– –
—
WOOL 35
_
_
_
Fabric type
Cotton/Linen
delicate colours
very light soil
Cotton/Linen
whites/colours
very light soil
Cotton/Linen
delicate colours
light soil
Cotton/Linen
fast colours
light soil
Cotton/Linen
fast colour
medium soil
Cotton/Linen
whites
heavy soil
Cotton/Linen
whites/fast colours
heavy soil
Synthetic/mix cotton
delicate colours
very light soil
Synthetic/mix cotton
delicate colours
light soil
Synthetic/mix cotton
delicate colours
medium soil
Synthetic/mix cotton
whites/fast colours
medium soil
Wool/woll mix
whites/colours
light soil
Cotton/cotton mix
Synthetic/Delicate
Wool/wool mix
Cotton/cotton mix
Synthetic/Delicate
Wool/wool mix
Cotton/cotton mix
Synthetic/Delicate
Wool/wool mix
Possible option buttons
Extra
rinse
Intensive
wash
Easy-iron
Spin speed
YES
YES
NO
YES
YES
YES
YES
YES
YES
YES
YES
YES
YES
YES
NO
YES
NO
NO NO
YES
YES
YES
NO
selection
No spin
Anti-crease
(*)
Programme for wash and energy consumption assessment in
accordance with standard EN60456, press intensive wash button.
14
Page 15
Max load
of clothes
(Kg)
6/7
1,5
Wash
product
compartment
Programme
description
Normal wash, rinses,
automatic additive absorption if
desired and long final spin
SHORT wash, rinses,
automatic additive absorption if
desired and long final spin
kWh/litres min.
6 Kg
0,10/49
0,20/30
50
30
kWh/litres min.
7 Kg
0,10/54
0,20/30
50
30
6/7
6/7
6/7
6/7
6/7
3
3
3
3
1
6/7
0,35/49
Normal wash, rinses,
automatic additive absorption
if desired and
long final spin
0,60/49
1,02/49
1,90/53
Prewash, normal wash, rinses,
automatic additive absorption if
desired and long final spin
1,40/57
0,10/49
Delicate wash, rinses,
automatic additive absorption
if desired and
gentle final spin
0,30/49
0,55/49
0,90/49
WOOL, wash, rinses,
automatic additive absorption if
desired and gentle final spin
_
Rinses, automatic additive
absorption if desired and
long final spin
0,40/52
0,05/30
52
57
70
110
100
50
50
55
70
40
23
0,45/54
0,65/54
1,19/54
2,15/60
1,45/65
0,10/55
0,30/55
0,60/55
0,95/55
0,50/60
0,05/30
52
57
70
110
100
50
50
55
70
40
23
6/7
6/7
NOTE: the KWh and litre consumptions and programme durations may vary depending
on the type and amount of clothes, mains water pressure, etc.
_
Long final spin
Draining
15
0,05/0
0,00/0
10
0,05/0
2
0,00/0
10
2
Page 16
SPIN SPEED SELECTION
4
using the appliance and practical tips
SPIN-DRYING
The wash options must always be selected
after choosing the wash programme. Any
programme change during selection cancels
the previously selected options.
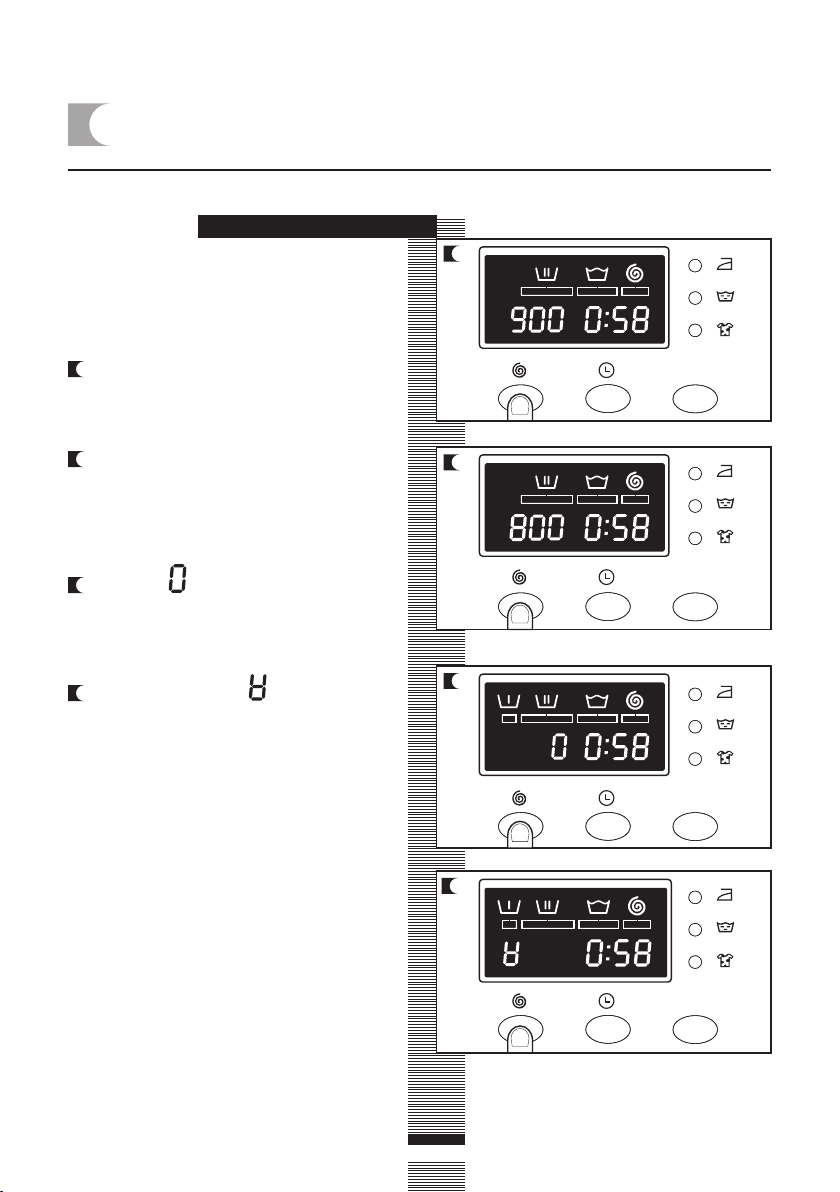
a Spin speed selection and anti-crease
button
The selected programme has its own
particular spin speed.
a
b You can change it by repeatedly pressing
the spin button. The spin speed will
gradually be reduced at 100 r.p.m.
intervals to 400 r.p.m. for display models.
On non-display models the LED will
light up.
c No spin
Press the spin button again to get to the
no spin option. A programme without a
final spin. It is used to prevent creasing
when washing special fabrics.
d Anti-crease option
The wash programme stops on the last
rinse, with the clothes left in water. When
the function is deactivated, the washing
machine continues the programme,
draining and spin-drying.
It is used, for example, when you are
not at home and want to delay the spindrying until you get home, to prevent
the clothes creasing after spin-drying
and being left in the drum to be removed.
b
c
d
16
Page 17

using the appliance and practical tips
TIME DELAY
Time delay selection button
A delay of up to 24 hours can be selected.
The delay must be selected after choosing the
wash programme.
To select the hours of delay, press the clock
button. Each time the button is pressed the
start of washing is delayed by 1 more hour.
Cancelling the delay
To cancel the delay you have to press the
clock button successively. The delay will be
cancelled when 24 hours have been reached
and the button is pressed once more. If the
programme is changed the delay is also
cancelled.
ADDITIONAL FUNCTIONS
Additional function selection button
depending on programmes.
a There are 3 options: easy iron, extra rinse
and intensive wash.
Press the button and the desired option
will be displayed.
b By pressing the button several times you
can choose between several
combinations of one, two and up to three
additional functions at the same time
depending on the programme selected.
Button: Easy-iron ( )
This option prevents garments from
creasing by means of carrying out a
special programme with special turns to
fluff out the garments after spin-drying
and make them easier to iron.
Button: Extra rinse ( )
Increases the level of the final rinse
obtained in the clothes; suitable for large
loads and garments belonging to people
with sensitive skin. Increases water
consumption!
Button: Intensive wash ( )
This option, specially recommended for
heavily soiled, stained clothes, achieves
better results by extending the normal
wash cycle.
If during the additional function selection, the
programme is changed or the Start/Stop
button is pressed, all the functions selected
until then are cancelled.
Important
17
Page 18
STARTING UP AND
6
BLOCK FUNCTION SELECTION
using the appliance and practical tips
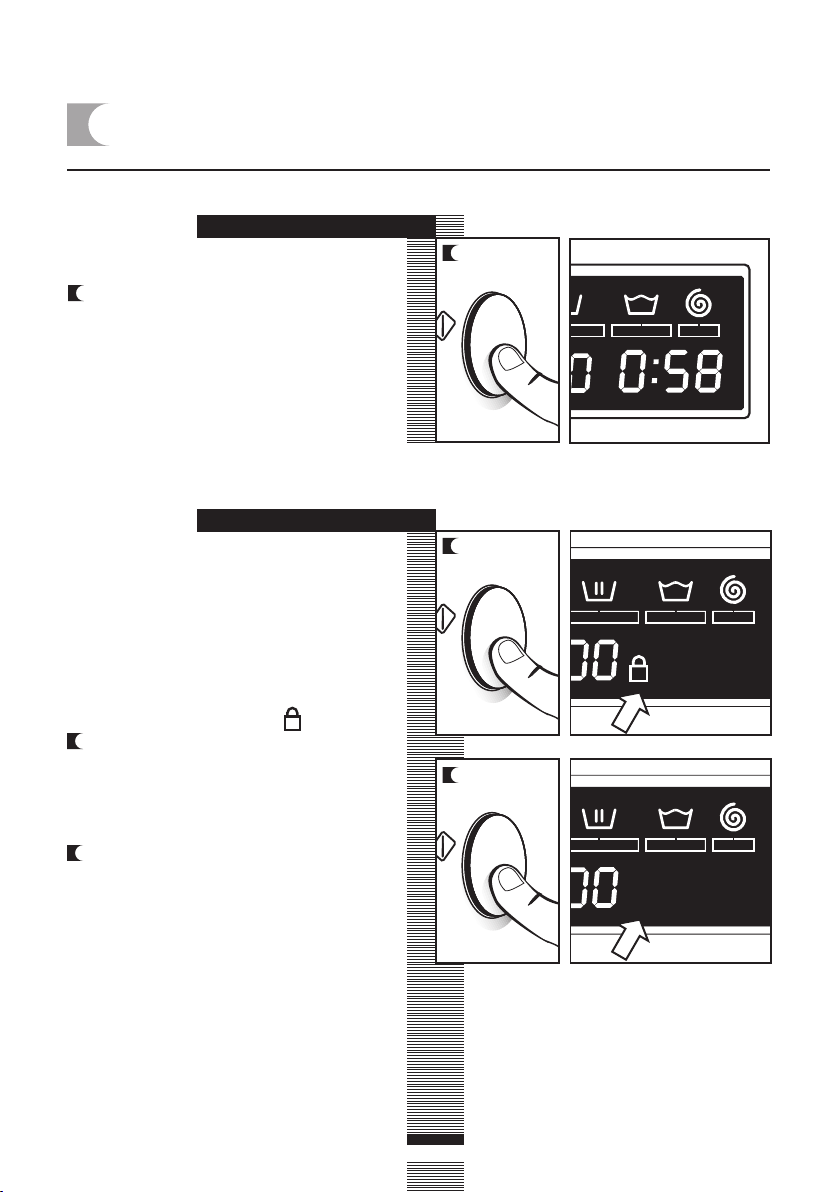
STARTING UP
Start/Stop button
a To start up the washing machine you
have to press the Start/Stop button.
The minutes remaining until the end of
washing and drying will appear on the
display at all times.
BLOCK FUNCTION
Block function selection
The lock function ensures that the programme
will not be affected if any buttons are pressed.
It is used when children could press the
buttons, etc.
The block function should be activated after
the wash programme has been selected
together with all its options.
a
a
Activating the block function
a The block function is activated by
pressing the Start/Stop button and
holding it down for at least 3 seconds.
The display will show if it is activated.
Deactivating the block function
b The block function is cancelled when
the wash programme comes to an end.
If you want to deactivate the block
function before the end of the
programme, you have to hold the start
button down again for at least 3 seconds.
After 3 seconds, the block function
indicator will disappear from the display,
and it will go into pause status.
The Start/Stop button does not cancel
the block function.
b
18
Page 19
WASH PROGRAMME PHASES
5
AND POWER CUTS
using the appliance and practical tips
PROGRAMME
PHASES
When the programme is running, the
programme phase and the time remaining for
it to end will appear on the display..
The active phases will appear successively at
the top of the display as the programme
progresses. The time remaining until the end
of the programme will also appear on the
display. It updates at regular intervals, but not
minute by minute.
Any option button can be selected provided
the wash phase in which it takes effect has
not been passed and when the programme
accepts the option.
Pressing the delay button during washing will
have no effect on the washer.
Pressing the Start/Stop button during the wash
activates the PAUSE function.
POWER CUTS
If there is a power cut, when the electricity
comes back on the washing machine will
continue to run from where it left off (it has
several hours of memory). The same will
happen if the ON/OFF button is pressed.
If the programme is changed on
the selector dial during the washing
and drying process, the washer will
go onto PAUSE status and the
programme will be cancelled.
If you need to add or remove a
garment, press the Start/Stop
button and make sure that the water
level is not above the door overflow
Important
level and that the temperature
inside is not high. Press the
Start/Stop button again to restart
the wash from the same cycle
phase it had stopped at.
warnings
Level the washing machine by adjusting the
feet to reduce the noise caused by spin-drying.
Try and wash clothes of different sizes in
the same wash programme to favour the
distribution of the clothes inside the drum
during spin-drying.
All the models have a safety system for spin-drying
that prevents spin-drying from being carried out if the
distribution of the clothes inside the drum is too
concentrated. This prevents the appliance from vibrating
too much.
If you find that the clothes are not properly wrung out,
try spin-drying them again after having distributed the
clothes more evenly in the drum.
19
Page 20

washing machine
After each wash, leave the door open
for a while to allow the air to circulate
freely inside the machine.
From time to time, depending on the
hardness of your water, it is
recommendable to run a full wash cycle
using a decalcifying product. This will
extend the life of your washing
machine.
The washing machine should be
disconnected from the mains
electricity supply before any
cleaning or maintenance is carried
out.
CLEANING THE DETERGENT DISPENSER
1
maintenance and cleaning
MAINTENANCE
Clean the detergent dispenser whenever
there is any washing product residue left
inside.
a Pull outwards on the detergent
dispenser to remove it completely.
b Use warm water and a brush to
clean the compartments.
c Also clean the additive
compartment siphons, having
removed them first. Once they
have been cleaned, put them back
making sure that they fit right in to
the back.
Put the dispenser back into the
washing machine.
A dirty or incorrectly fitted siphon will
prevent the additives from being taken
in and leave water inside the
compartment at the end of the wash.
Important Important
20
aa
bb
c
Page 21
CLEANING THE ACCESSIBLE FILTER
2
AND THE OUTSIDE
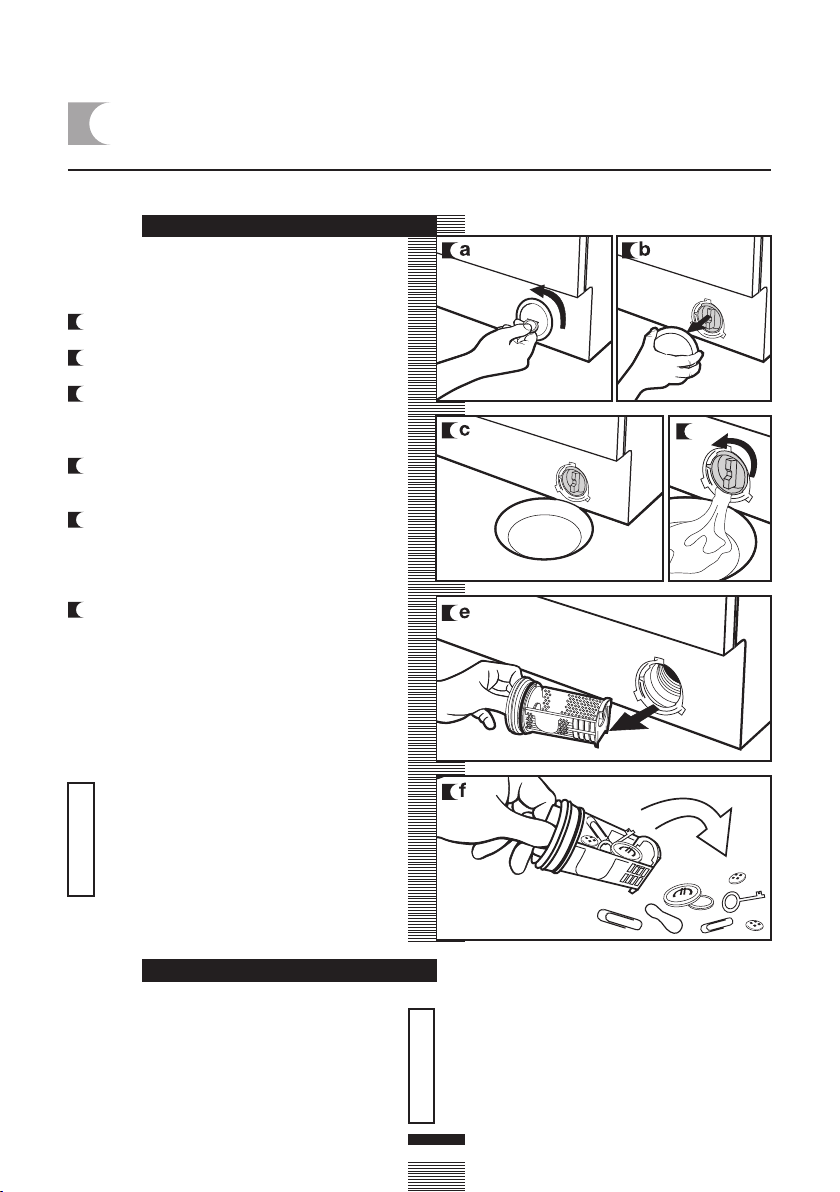
CLEANING THE FILTER
Clean the accessible filter if the drain pump
is blocked by any foreign objects.
a Use a coin to turn the filter cap.
b Pull out the filter cap.
c Place a container under the drain pump
filter to collect any water that comes out
of it.
d Half- or quarter-turn the filter to the left.
Water will start to come out.
e When all the water has drained out of
the washing machine, turn the filter
several times until it can be completely
removed by gently pulling on it.
f Remove the objects or fluff caught in the
filter or the drain pump.
Put the filter and the filter cap back in
place.
maintenance and cleaning
To avoid burns, do not carry out this
operation when the wash water is at
a temperature of over 30ºC.
Important
CLEANING THE OUTSIDE
The outside of the washing machine should
be cleaned with warm soapy water or a gentle
cleaning agent. Do not use abrasive cleaning
products or solvents.
It should then be thoroughly dried with a soft
cloth.
When there have been spillages of detergent
or additives from the dispenser onto the
washing machine cabinet, clean them up
right away as they are corrosive.
Important
21
Page 22

washing machine
safety and troubleshooting
If you detect any problems with
your washing machine, you will
probably be able to rectify them
yourself by consulting the following
instructions.
If this is not the case, unplug the
appliance and contact the
TECHNICAL ASSISTANCE
SERVICE.
Do not open up the
washing machine. It does
not contain any fuses or
similar components that
can be replaced by the
Important
user.
PROBLEMS
Why won’t the washing
machine start?
Indicaor
FO1
FO2
CO3
FO4
FO5
.
.
.
.
.
F10
This may be due to the following:
Check the door is properly shut.
The washing machine is not plugged into the mains or
there is no voltage in the mains supply.
The Start/Stop button has not been pressed.
If the washing machine door is not properly shut, F04
will appear on the display.
Problems
No water coming in
Does not drain or spin-dry
Does not spin-dry
Does not start
Call the Technical Assistance Service
Why is the washing machine
vibrating or making too
much noise?
This may be due to the following:
The blocking and transport screws have not been
removed.
The washing machine has not been correctly levelled.
On spin-drying, the motor makes a kind of whistling
noise. This is due to the mechanical action of the motor
itself and is perfectly normal.
22
Page 23

safety and troubleshooting
Why doesn’t the washing
machine take in water?
Why doesn’t the washing
machine drain or spin-dry?
Why doesn’t the washing
machine spin-dry?
If no water is entering, F01 will appear on the display.
Indicator F01, no water coming in, this may be due to
a cut in the water supply, a tap turned off or a blocked
water inlet filter.
The possible solutions are as follows: wait for the water
supply to be reconnected, turn on the tap, or remove
the water inlet hose and clean the filter.
If this failure is detected, F02 will appear on the display.
The reasons for the F02 indicator may be the following:
washing machine drain pump blocked, building drainage
pipes blocked, or incorrect pump electrical connection.
Solution: if the pump is blocked, gain access to it as
described in section 2, maintaining and cleaning the
appliance.
If this failure is detected, C03 will appear on the display.
This may be due to an uneven distribution of clothes
in the drum and may cause an excessive level of
vibrations.
Why can’t I see any water in
the drum during the wash?
The solution is to select a spin-drying programme.
This is due to the fact that the washing machine is provided
with a system which is able to adapt to the load and type
of fabrics, adjusting the levels of water and energy used,
in order to preserve the environment.
So, although the water level you can see through the hatch
may look low, there is no cause for concern as washing
and rinsing efficiency will still be optimum.
23
Page 24

safety and troubleshooting
Why is there still some water
in the dispenser?
Why can’t I open the hatch
immediately after the wash
has finished?
Other indications
This may be because the dispenser needs cleaning. This
simple operation is described in Maintaining and cleaning
the appliance.
1- Cleaning the detergent dispenser.
Washing machines today are provided with safety systems
for users. One of them is that the washing machine cannot
be opened until it is certain that the drum is quite still. This
is why the hatch cannot be opened for 2 minutes.
The washing machine can detect other indications. When
this happens a number of other indicators appear on the
display: F05, F06..., F10. If this happens, call the Official
Technical Service.
24
Page 25

environmental warnings
eco-note
INFORMATION FOR THE CORRECT DISPOSAL OF WASTE ELECTRICAL AND
ELECTRONIC APPLIANCES
When your appliance is of no further use, it should
not be disposed of together with general domestic
waste.
It can be taken, free of charge, to a specific waste
collection centre, run by your local authority, or
dealers who provide this service.
Disposing of waste domestic appliances separately
means avoiding possible negative consequences
for the environment and health, derived from
incorrect disposal. This will enable the materials
in them to be treated and recycled, obtaining
important savings in energy and resources.
To highlight the obligation of collaborating with
selective waste collection, the product is marked
with a symbol to warn against using traditional
containers for disposing of the appliance.
For further information, contact
your local authority or the shop
where you purchased the product.
25
Page 26

avertissements
Pour éviter tout risque d’incendie, d’électrocution, de lésion personnelle ou autre
dommage lors de l’utilisation du lave-linge, veillez à respecter les précautions suivantes:
Ce lave-linge est livré avec un Manuel
contenant les instructions de fonctionnement,
de maintenance et d’installation. Prière de
lire attentivement ces instructions avant
d’utiliser le lave-linge.
Ne pas laver des textiles préalablement
nettoyés, lavés, trempés ou traités avec de
l’essence, des solvants pour nettoyage à
sec, ou d’autres substances inflammables
ou explosives, car elles dégagent des vapeurs
qui risquent de s’enflammer ou d’exploser.
Ne pas verser d’essence, ni de solvants
pour nettoyage à sec, ni d’autres substances
inflammables ou explosives dans l’eau de
lavage, car elles dégagent des vapeurs qui
risquent de s’enflammer ou d’exploser.
Ne pas réparer ni remplacer des pièces
du lave-linge et ne procéder à aucune
opération de maintenance sur l’appareil, à
moins qu’elle soit expressément autorisée
par les instructions de maintenance du
Manuel.
Ne pas monter sur l’appareil et ne pas
s’appuyer sur la porte ouverte.
Ne pas utiliser de rallonge ni d’adaptateur
pour brancher le lave-linge au secteur.
Ce lave-linge doit être utilisé uniquement
aux fins pour lesquelles il a été conçu.
Suivre les instruction de lavage
recommandées par le fabricant sur le textile
à laver.
Avant de mettre en route le lave-linge,
vérifier que :
• Il est installé conformément aux
instructions d’installation.
• Tous les raccordements d’eau,
d’évacuation, électrique et prise de terre
sont conformes aux normes locales et/ou
autres normes en vigueur.
26
Page 27

lave-linge
Tuyau de
vidange
Hublot
spécifications
de commandes
produits lessiviels
lavage en acier
Filtre accessible
Cordon
d’alimentation
Bandeau
Boîte/bac à
Tambour de
inoxydable
Pieds
réglables
ACCESSOIRES
Tuyau d’alimentation en eau.
27
Page 28

lave-linge
DÉSEMBALLAGE ET
1
DÉBRIDAGE DU
LAVE-LINGE
a Retirer la base, les cornières et le capot
de protection supérieur.
a Dévissez les vis qui maintiennent les 3
traverses en plastique situées à l’arrière
du lave-linge.
b Dévissez les 3 brides métalliques
d’immobilisation de l’appareil et retirezles.
installation et montage
DÉSEMBALLAGE
DÉBRIDAGE
c Recouvrez les orifices avec les traverses
en plastique préalablement retirées.
Conservez les brides métalliques
d’immobilisation, elles vous seront
utiles si vous devez transporter
postérieurement votre appareil.
Important
28
Page 29

RACCORDEMENT À LA CANALISATION D’EAU ET
2
D’ÉVACUATION
RACCORDEMENT À LA
CANALISATION D’EAU
Vous trouverez, à l’intérieur du tambour,
le tube d’alimentation d’eau :
a Raccordez l’extrémité coudée du tube
à l’entrée cannelée de l’électrovanne,
située à l’arrière de l’appareil.
b Raccordez l’autre extrémité du tube à
la canalisation d’eau. Veillez, ensuite, à
bien serrer l’écrou de serrage.
Veillez à raccorder correctement le
coude du tuyau à la canalisation
d’eau, afin d’éviter tout risque
d’inondation.
Si votre lave-linge permet le
raccordement à une entrée d’eau
chaude, branchez le tube cannelé
rouge au robinet d’eau chaude et à
l’électrovanne au filtre de couleur
rouge.
Le lave-linge doit être raccordé à la
canalisation d’eau à l’aide des tuyaux
Important
d’alimentation neufs fournis avec
l’appareil. Ne pas utiliser les tuyaux
d’alimentation anciens.
Pour un fonctionnement correct du
lave-linge, la pression de l’eau devra
se situer entre 0,05 et 1MPa (0,5 à 10
2
Kg/cm
).
installation et montage
RACCORDEMENT À LA
CANALISATION D’ÉVACUATION
a Il est recommandé de disposer d’un
tuyau de vidange fixe à une distance du
sol de 50 à 70 cm.
Veillez à ce que le tuyau de vidange ne
soit ni coincé, ni plié, ni pincé.
29
Page 30

MISE À NIVEAU DU LAVE-LINGE ET RACCORDEMENT
3
ÉLECTRIQUE
installation et montage
MISE À NIVEAU
Mettez à niveau l’appareil à l’aide des
pieds réglables, afin de réduire les
bruits et d’éviter le déplacement du
lave-linge pendant le lavage.
Evitez d’extraire excessivement les
pieds, pour une plus grande stabilité
de l’appareil.
Important
Sur les modèles munis d’écrous, les
serrer à l’aide d’une clé.
RACCORDEMENT ÉLECTRIQUE
Consultez la plaque signalétique, située sur le
hublot du lave-linge, avant de procéder au
raccordement électrique. Vérifiez que la tension
du secteur correspond bien à celle mentionnée
sur la plaque signalétique.
Ne jamais retirer la plaque signalétique,
elle contient des informations précieuses.
Veillez à bien brancher votre lave-linge à
une prise reliée à la terre.
L’installation électrique, la fiche, la prise
de secteur, les fusibles ou le disjoncteur
automatique et le compteur doivent être
capables de résister à la puissance
maximale mentionnée sur la plaque
Important
signalétique. Ne jamais brancher la fiche
du lave-linge au secteur avec les mains
mouillées ou humides.
Pour débrancher l’appareil de la prise de
courant, tirer de la fiche, jamais du cordon.
Si le cordon d’alimentation est
endommagé, il doit être aussitôt remplacé
par un cordon ou ensemble spécial fourni
par le fabricant ou par son service aprèsvente.
Sur les lave-linge encastrés, la fiche de
raccordement au secteur devra être
accessible après l’installation.
30
Page 31

ENTRETIEN PRÉALABLE
4
ENTRETIEN PRÉALABLE
Maintenant que votre lave-linge est correctement
installé, nous vous conseillons de procéder à un
nettoyage préalable de l’appareil.
Vous pourrez ainsi vérifier l’installation, les
raccords et la vidange, tout en procédant à
un lavage complet de l’intérieur de l’appareil,
avant de procéder au premier lavage de linge
(voir instructions ci-après).
b Sélectionner le programme normal à
60ºC.
c Appuyer sur la touche Marche/Arrêt.
ba
31
Page 32

lave-linge
utilisation de l’appareil et conseils pratiques
PRÉPARATION DU
1
LINGE AVANT LE
LAVAGE
PRÉPARATION
Avant d’introduire le linge dans le
tambour, veillez à bien vider les
poches.
Les petits objets risquent de boucher
la pompe de vidange.
ImportantImportant
CLASIFICACIÓN ROPA
a Triez le linge par type de textile.
Nous vous conseillons d’utiliser les
programmes délicats pour les textiles
fragiles. Utilisez pour les lainages les
programmes spécialement conçus pour
laver la laine.
b Triez les textiles selon le degré de
salissure.
• Utilisez de préférence un programme
court à l’eau froide pour laver le linge
peu sale.
• Utilisez un programme sans prélavage
pour laver le linge pas trop sale.
• Réservez les programmes longs avec
prélavage pour laver le linge très sale.
Prélavage
Lavage
Important
Vérifiez au
préalable que
vos lainages
peuvent être
lavés en
machine.
Lavage
c Triez les textiles selon leur couleur.
Lavez séparément le linge blanc et le
linge de couleur.
Il est recommandé de charger votre
lave-linge au maximum, afin
d’économiser de l’eau et de l’énergie.
Nous vous conseillons de laver
ensemble, dans la mesure du
possible, des pièces de linge de
différentes dimensions, afin
d’optimiser le lavage et de favoriser
la répartition du linge à l’intérieur du
tambour lors de l’essorage, réduisant
ainsi les bruits de la machine.
Lavez les petites pièces fragiles dans
un filet à linge.
32
60
90
30
40
Froid
Page 33

UTILISATION DU PRODUIT LESSIVIEL ET DES ADDITIFS
2
utilisation de l’appareil et conseils pratiques
PRODUIT LESSIVIEL
ET ADDITIFS
a Le bac à produits de votre lave-linge est
divisée en 3 compartiments.
b Avant de procéder au lavage, versez le
produit lessiviel et les additifs dans les
bacs à produits correspondants.
c Vous pouvez également utiliser, dans ce
lave-linge, des détergents liquides. Pour
ce faire, utilisez le compartiment
optionnel, que vous pouvez acquérir
en vous adressant au Réseau
d’Assistance Technique.
Installez ce compartiment optionnel à la
place du compartiment de lavage.
Les compartiments sont marqués
d’une ligne MAX, qui indique le niveau
maximum de produit à ne pas
ImportantImportant
dépasser.
N’oubliez pas que la dose de produit lessiviel
dépendra de :
La quantité de linge à laver.
Du degré de salissure du linge.
De la dureté de l’eau (pour connaître la
dureté de votre eau, adressez-vous aux
autorités locales compétentes).
Nous vous recommandons d’utiliser
un produit anticalcaire si votre eau
est particulièrement dure.
PRÉLAVAGE
LAVAGE
ASSOUPLISSANT
note écologique
N’oubliez pas qu’il existe des produits
lessiviels concentrés, qui préservent
davantage la nature et l’environnement.
Une plus grande quantité de produit
lessiviel n’améliorera pas les résultats
de lavage. Par contre, outre le coût
économique que cela implique, vous
ne contribuerez pas à la protection
de l’environnement.
Nous vous recommandons vivement
de respecter les instructions du
fabricant de produit lessiviel.
33
Page 34

SÉLECTION DU PROGRAMME DE LAVAGE
3
utilisation de l’appareil et conseils pratiques
touche
marche/
arrêt
écran
bac/boîte à produits
bac/boîte à produits
Pour sélectionner le programme de lavage,
procéder comme suit :
b Enfoncer la commande du sélecteur de
programmes.
c Sélectionner le programme de lavage
en faisant tourner la commande du
sélecteur de programmes (voir tableau
des programmes).
L’écran s’allumera sur le bandeau de
commandes
commande
sélecteur de
programmes
commande
sélecteur de
programmes
touche
essorage
+ arrêt
cuve pleine
touche
marche/
arrêt
touche
essorage
+ arrêt
cuve pleine
touche
départ
différé
écran
touche
départ
différé
touche
fonctions
complémentaires
touche
fonctions
complémentaires
34
Page 35

utilisation de l’appareil et conseils pratiques
L’écran affichera l’information suivante :
1 Cycles du programme de lavage
Prélavage
Lavage
Rinçage
Essorage et vidange
2 Nombre de tours
3 Numéro du programme (durant
quelques secondes) et
ensuite sa durée.
4 Fonctions complémentaires
Repassage facile
Rinçage extra
Lavage intensif
Votre lave-linge dispose de 4 types de
programmes :
Programmes normaux
Programmes délicats
Programmes laine
Programmes complémentaires
23 4
Normaux
Normal froid
2
Celeris 30ºC
3
Normal 30ºC
4
Normal 40ºC
5
Normal 60ºC
6
Normal 90ºC
7
Prèlavage 60ºC
1
2 3 4
1
PROGRAMMES
12
Laine
Laine 35ºC1
Délicats
8
Dèlicat froid
9
Dèlicat 30ºC
10
Dèlicat 40ºC
11
Dèlicat 60ºC
Complémentaires
Rinçages
13
Essorage
14
Vidange
15
note écologique
Nous vous recommandons de choisir le
programme le mieux adapté à votre linge,
afin d’éviter le prélavage, dans la mesure
du possible. Vous économiserez de l’argent
et vous contribuerez à la protection de
l’environnement.
35
Page 36

Programme
1
Normal froid
2
Celeris 30ºC
3
Normal 30ºC
4
Normal 40ºC
5 (*)
Normal 60ºC
Programmes normauxProgrammes délicats
6
Normal 90ºC
7
Prélavage 60ºC
8
Délicat froid
9
Délicat 30ºC
10
Délicat 40ºC
11
Délicat 60ºC
12
Laine 35ºC
Prog. laine
13
Rinçages
14
Essorage
15
Vidange
Programmes compl.
Température
conseillée
Froid
30
30
40
60
90
60
Froid
—– –
—– –
—
LAINE 35
_
_
_
Type de textile
Coton/Lin
couleurs délicates
linge très peu sale
Coton/Lin
blanc/couleur
linge très peu sale
Coton/Lin
couleurs délicates
linge peu sale
Coton/Lin
couleurs résistantes
linge peu sale
Coton/Lin
couleurs résistantes
salissure normale
Coton/Lin
blanc
linge très sale
Coton/Lin
blanc/couleurs résistantes
linge très sale
Synthétique/mélange
coton couleurs délicates
linge très peu sale
Synthétique/mélange
coton couleurs délicates
linge peu sale
Synthétique/mélange
coton couleurs délicates
salissure normale
Synthétique/mélange coton
blanc/couleur résistantes
salissure normale
Laine/mélange laine
blanc/couleur
linge peu sale
Coton/mélange coton
Synthétique/Délicat
Laine/mélange laine
Coton/mélange coton
Synthétique/Délicat
Laine/mélange laine
Coton/mélange coton
Synthétique/Délicat
Laine/mélange laine
Touches options possibles
Rinçage
extra
Lavage
intensif
Repassage
facile
Essorage
OUI
SI
NON OUI
OUI
OUI
OUI
OUI
OUI
OUI
OUI
OUI
OUI
OUI
NON
OUI
NON
NON NON
OUI
OUI
OUI
NON
Antifroissage
Elimination
de l’essorage
(*)
Pour programmes de lavage et consommation conformes à la
Norme EN60456, appuyer sur la touche de lavage intensif.
36
Page 37

Charge
de linge
max. (Kg)
6/7
1,5
Bacs à
produits
Description
du programme
Lavage normal, rinçages,
absorption automatique d’additifs
le cas échéant et essorage final long
Lavage COURT, rinçages,
absorption automatique d’additifs
le cas échéant et essorage final long
kWh/litres min.
6 Kg
0,10/49
0,20/30
50
30
kWh/litres min.
7 Kg
0,10/54
0,20/30
50
30
6/7
6/7
6/7
6/7
6/7
3
3
3
3
1
6/7
0,35/49
Lavage normal, rinçages,
absorption automatique
d’additifs le cas échéant
et essorage final long
0,60/49
1,02/49
1,90/53
Prélavage, lavage normal, rinçages,
absorption automatique d’additifs
le cas échéant et essorage final long
1,40/57
0,10/49
Lavage délicat, rinçages,
absorption automatique
d’additifs le cas échéan et
essorage final réduit
0,30/49
0,55/49
0,90/49
Lavage LAINE, rinçages,
absorption automátique d’additifs
le cas échéant et essorage final réduit
_
Rinçages, absorption automatique
d’additifs le cas échéant
et essorage final long
0,40/52
0,05/30
52
57
70
110
100
50
50
55
70
40
23
0,45/54
0,65/54
1,19/54
2,15/60
1,45/65
0,10/55
0,30/55
0,60/55
0,95/55
0,50/60
0,05/30
52
57
70
110
100
50
50
55
70
40
23
6/7
6/7
REMARQUE: Les consommations en KW/h et litres, de même que la durée des
programmes, peuvent varier en fonction du type et du volume de linge, de la pression
de l’eau, etc.
_
Essorage final long
Vidange
37
0,05/0
0,00/0
10
0,05/0
2
0,00/0
10
2
Page 38

4
FONCTION ESSORAGE
utilisation de l’appareil et conseils pratiques
ESSORAGE
Sélectionner toujours les fonctions de lavage
après avoir sélectionné le programme de
lavage. Toute modification du programme
durant la sélection annulera les options
préalablement sélectionnées.
a Touche fonction essorage et
antifroissage (arrêt cuve pleine)
Le programme sélectionné a été
préalablement associé à un certain
nombre de tours d’essorage par minute.
b Pour le modifier, appuyer successivement
sur la touche essorage et le nombre de
tours diminuera de 100 à chaque fois
jusqu’à atteindre les 400 sur les modèles
avec écran, ou le témoin lumineux
s’allumera sur les modèles sans écran.
c Élimination de l’essorage
Appuyer sur la touche essorage pour
sélectionner la fonction élimination de
l’essorage. Le lave-linge effectue un
programme sans essorage final. À utiliser
pour éviter de froisser les textiles
spécialement délicats.
a
b
c
d Fonction: arrêt cuve pleine/
antifroissage
L’appareil s’arrête après le dernier
rinçage, l’eau demeurant à l’intérieur de
la cuve. Si l’on désactive cette fonction,
la machine complète le programme et
procède à la vidange et à l’essorage. À
utiliser si vous souhaitez retarder
l’essorage, en cas d’absence du foyer,
pour éviter que le linge ne se froisse
après l’essorage, en attendant que vous
le retiriez du tambour.
d
38
Page 39

utilisation de l’appareil et conseils pratiques
DÉPART DIFFÉRÉ
Touche fonction départ différé
Possibilité de sélectionner un départ différé
jusqu’à 24 heures. Sélectionner toujours le
départ différé après avoir sélectionné le
programme de lavage. Pour sélectionner les
heures de retard, appuyer sur la touche
horloge. Chaque fois que la touche est
enfoncée, le départ est retardé d’1 heure.
Annulation du départ différé
Pour annuler le départ différé, appuyer
successivement sur la touche horloge, jusqu’à
atteindre les 24 heures. Enfoncer alors une
nouvelle fois la touche, pour valider l’annulation.
Tout changement de programme annule
également la fonction départ différé.
FONCTIONS COMPLÉMENTAIRES
Touche fonctions complémentaires selon
programmes.
a 3 Fonctions possibles : repassage facile,
super rinçage et lavage intensif.
Appuyer sur la touche pour visualiser
l’option souhaitée.
b En enfonçant la touche plusieurs fois,
vous pourrez combiner jusqu’à trois
fonctions complémentaires à la fois,
selon le programme sélectionné.
Touche : Repassage facile ( )
Cette fonction évite que le linge ne se
froisse, grâce au programme spécial qui
fait tourner le tambour en douceur pour
défouler le linge après l’essorage et
faciliter ainsi le repassage.
Touche : Rinçage extra ( )
Rinçage final réalisé avec une plus grande
quantité d’eau. Convient aux grandes
charges de linge et aux personnes à la
peau sensible. Mais il augmente la
consommation d’eau !
Touche : Lavage intensif ( )
Convient au linge très sale. Meilleurs
résultats de lavage grâce à l’allongement
du cycle normal.
Si l’on modifie le programme durant la
sélection de fonctions complémentaires ou
si l’on enfonce la Marche/Arrêt, toutes les
fonctions préalablement sélectionnées seront
annulées.
Important
39
Page 40

MISE EN ROUTE ET
6
FONCTION VERROUILLAGE
utilisation de l’appareil et conseils pratiques
MISE EN ROUTE
Touche Marche/Arrêt
a Pour mettre en route le lave-linge,
appuyer sur la touche Marche/Arrêt.
L’écran affichera en tout moment les
minutes qui restent pour la fin du
programme de lavage et séchage.
VERROUILLAGE
Fonction verrouillage
La fonction verrouillage sert à éviter toute
manipulation intempestive des touches risquant
de modifier le programme et les fonctions de
lavage et séchage sélectionnées. Tout spécialement
conçues comme sécurité-enfants, etc…
Activer le verrouillage après avoir sélectionné
le programme de lavage et toutes les fonctions
souhaitées.
a
a
Activer le verrouillage
a Pour activer le verrouillage, maintenir
enfoncée la touche Marche/Arrêt
pendant au moins 3 secondes.
L’écran indiquera que cette fonction est
activée.
Désactiver le verrouillage
b Le verrouillage est automatiquement
éliminé dès que le programme de lavage
est achevé.
Si vous souhaitez désactiver le
verrouillage avant la fin du programme,
maintenez enfoncée à nouveau pendant
au moins 3 secondes la touche de
Marche. L’indicateur de verrouillage
disparaîtra de l’écran, qui restera en état
de pause.
Le fait d’enfoncer la touche Marche/Arrêt
n’élimine pas le verrouillage.
b
40
Page 41

DÉROULEMENT DU PROGRAMME DE
5
LAVAGE ET PANNE DE COURANT
utilisation de l’appareil et conseils pratiques
DÉROULEMENT
DU PROGRAMME
Le programme une fois lancé, l’écran affichera
le cycle de lavage en cours, ainsi que le temps
qui reste pour la fin du programme.
Les cycles actifs de lavage en cours seront
affichés successivement sur le haut de l’écran,
de même que le temps qui reste pour la fin
du lavage, à intervalles périodiques mais pas
par minutes.
Les fonctions complémentaires peuvent être
sélectionnées à tout moment, à condition que
le cycle de lavage correspondant ne soit pas
achevé et que le programme admette cette
fonction.
Le fait d’enfoncer la touche de départ différé
durant le lavage n’aura aucun effet sur le lavelinge.
L’activation de la touche Marche/Arrêt durant
le lavage provoquera l’arrêt du lave-linge qui
se situera en état de PAUSE.
PANNE DE
COURANT
Après une panne de courant, la machine
relance et poursuit automatiquement le cycle
en cours (qui est mémorisé pendant quelques
heures). Il en est de même lorsque l’on appuie
sur la touche OFF/ON.
Si durant le lavage et séchage, le
programme est modifié à l’aide du
sélecteur de programmes, le lave-linge
se situera automatiquement en état de
PAUSE et le programme en cours sera
annulé.
Si vous devez ajouter ou enlever une
pièce, appuyez sur la touche
Marche/Arrêt et vérifiez que l’eau ne
risque pas de déborder en ouvrant la
Important
porte et que la température de l’eau ne
soit pas trop élevée. Pour relancer et
poursuivre le cycle de lavage en cours,
appuyez à nouveau sur la touche
Marche/Arrêt.
avertissements
Pour réduire les bruits lors de l’essorage,
procédez à la mise à niveau du lave-linge, à
l’aide des pieds réglables.
Lavez ensemble, dans la mesure du
possible, des pièces de différentes dimensions
sur un même programme, afin de permettre
une meilleure répartition du linge à l’intérieur
du tambour et, donc, un essorage plus
performant.
Tous les modèles sont dotés d’un système de
sécurité essorage, qui annule l’essorage si le linge est
excessivement tassé dans le tambour, afin d’éviter un
excès de vibrations.
Si vous constatez que le linge ne sort pas suffisamment
égoutté, procédez à un nouvel essorage, après avoir
réparti uniformément le linge dans le tambour.
41
Page 42

lave-linge
Après chaque lavage, laissez le hublot
ouvert un moment, afin que l’air puisse
circuler librement à l’intérieur de l’appareil.
Nous vous conseillons d’effectuer, de
temps en temps, en fonction de la dureté
de l’eau, un cycle de lavage complet
avec un produit détartrant. Vous
prolongerez ainsi la vie de votre lavelinge.
Avant de procéder à une quelconque
opération d’entretien ou de
maintenance, débranchez le lavelinge du secteur.
Important
NETTOYAGE DE LA BOÎTE À PRODUITS
1
maintenance et entretien
MAINTENANCE
Nettoyez la boîte à produits
régulièrement, pour éliminer tout reste
de produit lessiviel.
a Retirez complètement la boîte à
produits en tirant vers l’extérieur.
b Nettoyez les compartiments de la
boîte à produits. Utilisez de l’eau
tiède et une brosse.
c Nettoyez également les siphons
du compartiment à additifs, après
les avoir retirés et remettez-les
correctement en place.
Remettez la boîte à produits dans
son logement.
Un siphon mal remis en place ou sale
empêche la prise d’additifs et la
vidange totale de la cuvette à la fin
du lavage.
Important
42
aa
bb
c
Page 43

NETTOYAGE DU FILTRE ACCESSIBLE ET NETTOYAGE
2
EXTÉRIEUR DE L’APPAREIL
NETTOYAGE DU FILTRE
Nettoyez le filtre accessible si la pompe de
vidange est bloquée par des objets
indésirables.
a Faire tourner la trappe du filtre à l’aide
d’une pièce de monnaie.
b Retirez la trappe du filtre.
c Pour recueillir l’eau qui va s’écouler
lorsque vous retirerez le filtre, déposez
un récipient en dessous.
d Faites tourner le filtre un quart ou un
demi-tour à gauche. L’eau commencera
à sortir.
e Une fois achevée l’évacuation de l’eau
du lave-linge, faire tourner le filtre
plusieurs tours, jusqu’à son extraction
totale, en tirant légèrement.
f Débarrassez le filtre des objets et
peluches qu’il contient.
Remettre en place le filtre et la trappe
du filtre.
maintenance et entretien
Pour éviter tout risque de brûlure, ne
pas effectuer cette opération si la
température de l’eau dépasse les
30ºC.
Important
NETTOYAGE EXTÉRIEUR
Pour nettoyer l’extérieur du lave-linge, utilisez
de l’eau tiède savonneuse, ou un produit non
agressif. Ne jamais utiliser de produits abrasifs
ni solvants.
Séchez à fond, à l’aide d’un chiffon.
Éliminez aussitôt tout reste de produit lessiviel
ou d’additifs sur l’extérieur du lave-linge,
pour éviter la corrosion de l’appareil.
Important
43
Page 44

lave-linge
sécurité et résolution de problèmes
Si vous observez une anomalie
quelconque, consultez les
indications suivantes.
Si elles ne vous aident pas à
résoudre le problème, débranchez
l’appareil et adressez-vous au
SERVICE D’ASSISTANCE
TECHNIQUE.
Nous vous prions de ne
jamais ouvrir l’appareil. Il
n’y a, à l’intérieur, aucun
fusible ou composant
quelconque pouvant être
Important
remplacé par le client.
INCIDENCES
Le lave-linge ne démarre
pas?
Indicateur
FO1
FO2
CO3
FO4
FO5
.
.
.
.
.
F10
Causes possibles :
Vérifiez que la porte est bien fermée.
Le lave-linge n’est pas branché au secteur ou il n’y pas
de courant.
La touche Marche/Arrêt n’est pas enfoncée.
Si la porte du lave-linge est mal fermée, l’écran affichera
F04.
Incidences
Il n’y a pas d’arrivée d’eau
Le lave-linge ne vidange pas et n’essore pas
Il n’essore pas
Il ne se met pas en route
S’adresser au Service d’Assistance Technique
Le lave-linge vibre ou est
excessivement bruyant?
Causes possibles :
Les cales d’immobilisation du tambour et de transport
de l’appareil n’ont pas été retirées.
Le lave-linge n’est pas bien nivelé ou n’est pas stable.
Durant l’essorage le moteur émet un “sifflement” qui
est normal, par l’action mécanique du moteur.
44
Page 45

sécurité et résolution de problèmes
Le lave-linge ne se remplit
pas d’eau?
Le lave-linge ne vidange pas
et n’essore pas?
Le lave-linge n’essore pas?
S’il n’y a pas d’arrivé d’eau, l’écran affichera l’indication
F01.
Si l’écran affiche l’indication F01 : Vérifier s’il n’y a pas
de panne d’alimentation en eau, si le robinet de l’eau
est ouvert et si le filtre de l’entrée d’eau au lave-linge
n’est pas bouché.
Remède : Attendre le retour de l’eau, ouvrir le robinet
d’arrivée de l’eau, retirer le tuyau d’arrivée de l’eau et
nettoyer le filtre.
Si le lave-linge ne vidange et n’essore pas, l’écran
affichera l’indication F02.
Si l’écran affiche l’indication F02 : Vérifier que la pompe
ne soit pas bouchée, que le conduit d’évacuation de
l’immeuble ne soit pas bouché ou que la pompe soit
mal raccordée.
Remède: Si la pompe est bouchée, suivre les instructions
de l’alinéa 2 de Maintenance et Entretien de l’appareil.
Si le lave-linge n’essore pas, l’écran affichera l’indication
C03.
Cause : Le linge es mal réparti dans le tambour et cela
risque de provoquer un niveau excessif de vibrations.
Je ne vois pas d’eau dans
le tambour durant le lavage.
Remède : Répartir correctement le linge et lancer un
programme d’essorage.
Le lave-linge est doté d’un système capable de s’adapter
à la charge et à la nature des textiles et il calcule
automatiquement la quantité d’eau et d’énergie nécessaires,
afin de contribuer à la protection de l’environnement. Par
conséquent, ne vous inquiétez pas si la quantité d’eau
que vous observez à travers le hublot vous semble
insuffisante: le lavage et le rinçage seront tout aussi
performants.
45
Page 46

sécurité et résolution de problèmes
Pourquoi reste-t-il de l’eau
dans la boîte à produits?
Pourquoi je ne peux pas
ouvrir le hublot
immédiatement après la fin
du lavage?
Autres indications
Vérifiez que la boîte à produits soit propre. Pour la nettoyer,
suivre les indications de Maintenance et Entretien de
l’appareil.
1- Nettoyage de la boîte à produits.
Les lave-linge actuels sont dotés de systèmes de sécurité
pour l’usager. Il est notamment impossible d’ouvrir le lavelinge si le tambour n’est pas totalement arrêté. De là qu’il
faille attendre environ 2 minutes avant de pouvoir ouvrir le
hublot.
Le lave-linge peut également détecter d’autres anomalies.
L’écran affichera dans ce cas les indications F05, F06...,
F10. Appeler les Service Technique Agréé.
46
Page 47

avertissements concernant l’environnement
note écologique
INFORMATION POUR LA CORRECTE GESTION DES DÉCHETS D’APPAREILS
ÉLECTRIQUES ET ÉLECTRONIQUES
A la fin de la vie utile de l’appareil, ce dernier ne
doit pas être éliminé mélangé aux ordures
ménagères brutes.
Il peut être porté, sans coût additionnel, aux centres
spécifiques de collecte, agréés par les
administrations locales, ou aux prestataires qui
facilitent ce service.
L’élimination séparée d’un déchet d’électroménager
permet d’éviter d’éventuelles conséquences
négatives pour l’environnement et la santé, dérivées
d’une élimination inadéquate, tout en facilitant le
traitement et le recyclage des matériaux qu’il
contient, avec la considérable économie d’énergie
et de ressources que cela implique.
Afin de souligner l’obligation de collaborer à la
collecte sélective, le marquage apposé sur le
produit vise à rappeler la non-utilisation des
conteneurs traditionnels pour son élimination.
Pour davantage d’information,
contacter les autorités locales ou
votre revendeur.
47
Page 48

allgemeine hinweise
Um Brandgefahr und dem Risiko elektrischer Schläge, Verletzungen und anderer
Schäden während der Benutzung des Geräts vorzubeugen, beachten Sie bitte folgende
Hinweise.
Diese Waschmaschine wird mit einer
Anleitung geliefert, die Hinweise zu Betrieb,
Wartung und Installation umfasst. Bitte lesen
Sie diese Anleitung, bevor Sie die
Waschmaschine benutzen.
Waschen Sie in dem Gerät keine Objekte,
die zuvor mit Benzin, Lösemittel für
Trockenreinigung oder anderen entzündlichen
oder explosiven Substanzen gewaschen
oder behandelt wurden, da dabei
entzündliche oder explosive Dämpfe
entstehen können.
Geben Sie kein Benzin, Lösemittel für
Trockenreinigung oder sonstige brennbare
oder explosive Substanzen in das
Waschwasser, da sonst entzündliche oder
explosive Dämpfe entstehen können.
Versuchen Sie nicht, Teile des Geräts zu
reparieren oder auszutauschen oder sonstige
Instandhaltungsmaßnahmen auszuführen,
die nicht in den Wartungshinweisen der
Anleitung aufgeführt sind.
Setzen oder stellen Sie sich nicht auf die
Waschmaschine und stützen Sie sich nicht
auf die geöffnete Tür.
Beim Anschluss der Waschmaschine darf
kein Verlängerungskabel oder
Mehrfachstecker benutzt werden.
Die Maschine darf nur für die
vorgesehenen Zwecke benutzt werden.
Befolgen Sie stets die Waschanweisungen
der Hersteller der zu waschenden
Kleidungsstücke.
Schalten Sie die Waschmaschine erst ein,
wenn sichergestellt ist, dass:
• Die Installation gemäß der
Installationshinweise ausgeführt wurde.
• T lle Anschlüsse für den Zu- und Ablauf
des Wassers, sowie der Elektro- und
Erdungsanschluss gemäß der örtlichen
und/oder sonstigen anzuwendenden
Normen ausgeführt wurden.
48
Page 49

waschmaschine
Abflussschlauch
Einfüllöffnung
beschreibung
Netzkabel
Bedienfeld
Waschmittel-
schale
Waschtrommel
aus Edelstahl
Außenfilter
Regulierbare
Füße
ZUBEHÖR
Zulaufschlauch.
49
Page 50

waschmaschine
AUSPACKENUND
1
ENTFERNEN DER
TRANSPORSICHERUNGEN
a Entfernen Sie den unteren
Verpackungsteil, den Kantenschutz.
a Lösen Sie die Schrauben, mit denen die
drei Kunststoffplättchen auf der
Rückseite der Waschmaschine befestigt
sind.
b Lösen Sie die 3 Sicherungsschrauben
und nehmen Sie sie heraus.
installation und montage
AUSPACKEN
ENTFERNEN DER
SICHERUNGEN
c Decken Sie die Löcher mit den zuvor
abgenommenen Kunststoffplattchen ab.
Bewahren Sie die
Sicherungsschrauben für einen
möglichen erneuten Transport auf.
Wichtig
50
Page 51

ANSCHLUSS AN DIE
2
WASSERVERSORGUNG
ANSCHLUSS AN DIE
WASSERVERSORGUNG
Den Wasserzulaufschlauch finden Sie in
der Trommel.
a Schließen Sie das gekröpfte Ende an
das Gewinde des Elektroventils auf der
Rückseite der Waschmaschine.
b Schließen Sie dann das andere
Schlauchende an den Wasseranschluss.
Ziehen Sie abschließend die
Verbindungsmutter gut fest.
Es ist wichtig, dass der
Anschlussstutzen des
Abwasserschlauchs fest sitzt, damit er
nicht herunterfallen und folglich das
Wasser auslaufen kann. Wenn in Ihrer
Waschmaschine der Zufluss von
Warmwasser vorgesehen ist, schließen
Sie den Schlauch mit dem roten
Gewinde an den Warmwasserhahn. An
dem Elektroventil montieren Sie ihn mit
dem roten Filter. Die Waschmaschine
darf nur mit den neuen Schläuchen, die
Wichtig
mit dem Gerät geliefert werden, an die
Wasserversorgung geschlossen
werden. Zuvor benutzte Schläuche
dürfen dazu nicht verwendet werden.
Um den korrekten Betrieb der Maschine
sicherzustellen, muss der Druck der
Versorgungsleitung zwischen 0,05 und
1MPa (0,5 und 10 kg/cm
2
) liegen.
installation und montage
ANSCHLUSS AN
DAS ABWASSERNETZ
a Es wird die Verwendung eines festen
Abwasseranschlusses mit einer Höhe
von 50 bis 70 cm über dem Boden
empfohlen.
Achten Sie darauf, dass das
Abwasserrohr nicht zu eng ist und dass
es keine Knicke oder Quetschstellen
aufweist.
51
Page 52

NIVELLIEREN DER WASCHMASCHINE UND
3
ELEKTROANSCHLUSS
installation und montage
NIVELLIEREN
Nivellieren Sie die Waschmaschine
mit Hilfe der regulierbaren Füße so,
dass sie einwandfrei auf dem Boden
aufsteht. Dadurch verringern Sie das
Geräuschniveau und vermeiden
Bewegungen der Maschine während
des Waschvorgangs. Vermeiden Sie
es dabei, die Füße zu weit
Wichtig
herauszuziehen, um eine höhere
Stabilität zu gewährleisten.
Bei Modellen mit Mutter muss diese
mit einem Schlüssel angezogen
werden.
ELEKTROANSCHLUSS
Bevor Sie den Elektroanschluss vornehmen,
beachten Sie bitte die Angaben des
Typenschilds an der Ladetür der
Waschmaschine. Vergewissern Sie sich, dass
die Netzspannung mit den Daten des
Typenschilds übereinstimmt.
Das Typenschild darf nicht entfernt werden.
Es enthält wichtige Daten.
Die Waschmaschine muss an eine
ordnungsgemäß geerdete Steckdose
geschlossen werden.
Die Elektroinstallation, Stecker,
Stromanschluss, Sicherungen oder
Automatikschalter und Zähler müssen für
die auf dem Typenschild angegebene
Wichtig
Maximalleistung ausgelegt sein. Stecken
Sie den Stecker der Waschmaschine nicht
mit feuchten oder nassen Händen in die
Steckdose.
Beim Herausziehen des Kabels aus der
Steckdose, fassen Sie es bitte am Stecker
an. Sollte das Netzkabel beschädigt sein,
muss es durch ein neues Kabel oder einen
Spezialsatz ersetzt werden, die vom
Hersteller oder vom Kundendienst geliefert
werden müssen.
Bei eingebauten Waschmaschinen muss
der Netzanschluss nach der Installation
zugänglich sein.
52
Page 53

REINIGEN DER WASCHMASCHINE
4
VOR DER INBETRIEBNAHME
REINIGEN DER
WASCHMASCHINE
Nach dem erfolgreichen Anschluss der
Waschmaschine, empfehlen wir, diese vor der
erstmaligen Benutzung zu reinigen.
Dabei wird nicht nur das Innere der
Waschmaschine vor dem ersten Waschen
vollständig gereinigt, sondern gleichzeitig
werden auch die Installation und die
Wasseranschlüsse geprüft. (vgl.
Benutzungshinweise auf den folgenden Seiten).
a Wählen Sie das normale
Waschprogramm bei 60 ºC
b Betätigen Sie die Start-/Stop-Taste.
ba
53
Page 54

waschmaschine
bedienen des geräts und praktische hinweise
VORBEREITEN DER
1
WÄSCHE VOR DEM
WASCHEN
VORBEREITEN
Bevor Sie die Wäsche in die Trommel
legen, vergewissern Sie sich, dass
alle Taschen geleert sind.
Kleinere Gegenstände können die
Wichtig
Abwasser-Motorpumpe verstopfen.
SORTIEREN DER WÄSCHE
a Sortieren Sie die Wäsche nach Geweben
oder Herstellung.
Für empfindliche Gewebe empfehlen wir
die Benutzung von Feinwaschgängen. Für
Wollgewebe steht ein spezielles
Wollprogramm zur Verfügung.
b Sortieren Sie Ihre Wäsche nach
Verschmutzungsgrad.
• Leicht verschmutzte Wäschestücke können
in einem Kurzprogramm gewaschen werden.
• Normal verschmutzte Wäsche kann ohne
Vorwaschgang gewaschen werden.
• Stark verschmutzte Wäsche kann in einem
langen Programm mit Vorwaschgang
gewaschen werden.
Vorwäsche
Hauptwäsche
Wichtig
Vergewissern Sie
sich vor dem
Waschen, ob Ihre
Kleidungsstücke
in der Maschine
gewaschen
werden können.
Hauptwäsche
c Sortieren Sie die Wäsche nach Farben.
Waschen Sie farbige und weiße Wäsche
getrennt.
Wir empfehlen, die Waschmaschine bis
zum maximalen Fassungsvermögen zu
füllen.
Damit sparen Sie Wasser und Energie
Es sollten immer Wäschestücke
unterschiedlicher Größe zusammen
gewaschen werden. Dadurch wird die
Reinigungswirkung erhöht und beim
Schleudern die Verteilung der 60
Wäsche in der Trommel verbessert, so
Wichtig
dass die Maschine geräuscharmer 90
läuft.
Kleinere Wäscheteile sollten zum
Waschen in einen Waschsack 1 getan
werden.
54
60
90
30
40
Kalt
Page 55

WASCHMITTEL UND WASCHZUSÄTZE
2
bedienen des geräts und praktische hinweise
WASCHMITTEL
UND ZUSÄTZE
a Die Waschmittelschale Ihrer
Waschmaschine verfügt über drei
Kammern.
b Geben Sie das Waschmittel oder die
Zusätze vor Beginn des Waschprogramms
in die Waschmittelschale.
c In dieser Waschmaschine können Sie auch
Flüssigwaschmittel benutzen. Verwenden
Sie dafür die optionale
Waschmittelschale, die beim
Technischen Kundendienst erhältlich ist.
Diese optionale Schale muss in die
Hauptwasch-Kammer eingesetzt.
Die Flüssigkeit darf dabei niemals die
Markierung MAX an der Seitenwand
der Flüssigkeitsschale übersteigen.
Wichtig
Denken Sie daran, dass die Waschmittelmenge
abhängig ist von:
Der Menge der zu waschenden Wäsche.
Dem Verschmutzungsgrad der Wäsche.
Der Wasserhärte (Information zum Härtegrad
des Wassers erhalten Sie von den zuständigen
örtlichen Einrichtungen).
VORWÄSCHE
HAUPTWÄSCHE
WEICHSPÜLEN
Bei hohem Härtegrad empfehlen wir
die Verwendung eines
Kalkschutzmittels.
Wichtig
umweltschutz
Beachten Sie bitte, dass es konzentrierte
Waschmittel gibt, die für Natur undUmwelt
schonender sind.
Die Verwendung von höheren
Waschmitteldosen führt zu keiner
Verbesserung des Waschergebnisses und
ist nicht nur finanziell aufwendiger,
sondern hat auch negative
Auswirkungen auf unsere Umwelt.
Wir empfehlen Ihnen daher, den
Hinweisen des Waschmittelherstellers
zu folgen.
55
Page 56

EINSTELLEN DES WASCHPROGRAMMS
3
bedienen des geräts und praktische hinweise
Start/StopTaste
Display
Waschmittelschale
Waschmittelschale
Bei der Anwahl des Waschprogramms
gehen Sie bitte folgendermaßen vor:
a Betätigen Sie den Programmknopf, so
dass er herausspringt.
b Wählen Sie das Waschprogramm durch
Drehen des Schalters (vgl.
Programmtabelle). Das Display der
Bedienleiste schaltet nun ein.
Programm
-schalter
Programm
-schalter
Taste
Schleudern
und Flot
Start/StopTaste
Taste
Schleudern
und Flot
StartzeitVorwahl
Display
StartzeitVorwahl
Taste
Zusatzfunktionen
Taste
Zusatzfunktionen
56
Page 57

bedienen des geräts und praktische hinweise
Bei der Auswahl des Programms wird
folgende Information angezeigt:
1 Phasen des Waschprogramms
Vorwäsche
Hauptwäsche
Spülgänge
Schleudern und Abpumpen
2 Drehzahl
3 Programm-Nr. (einige Sekunden).
Danach erscheint die Dauer des
Programms.
4 Zusatzfunktionen
Bügelleicht
Extraspülen
Intensivwäsche
Es stehen vier Programmarten zur Verfügung:
Normalwaschprogramme
Feinwaschprogramme
Wollwaschprogramme
Zusatzprogramme
1
2 3 4
1
23 4
PROGRAMME
Normal ZusatzWolle
1
Normal kalt
2
Kurz 30ºC
3
Normal 30ºC
4
Normal 40ºC
5
Normal 60ºC
6
Normal 90ºC
7
Vorwäsche 60ºC
Fein
Fein kalt
8
Fein 30ºC
9
Fein 40ºC
10
Fein 60ºC
11
Wolle 35ºC12Spülgänge
13
Schleudern
14
Abpumpen
15
umweltschutz
Wir empfehlen, das geeignete Programm
auszuwählen und so weit wie möglich auf
die Vorwäsche zu verzichten. Dies hilft
Ihnen zu sparen und die Umwelt zu
schützen.
57
Page 58

Programm
1
Normal kalt
2
Kurz 30ºC
3
Normal 30ºC
4
Normal 40ºC
5 (*)
Normal 60ºC
NormalwaschprogrammeFeinwaschprogramme
6
Normal 90ºC
7
Vorwäsche 60ºC
8
Feinwäsche kalt
9
Feinwäsche 30ºC
10
Feinwäsche 40ºC
11
Feinwäsche 60ºC
12
Wolle 35ºC
Wollwasch.
13
Spülgänge
14
Schleudern
15
Abpumpen
Zusatzprogramme
Empfohlene
Temperatu
Kalt
30
30
40
60
90
60
Kalt
—– –
—– –
—
WOLLE 35
_
_
_
Gewebeart
Extra-
Baumwolle/Leinen
Empfindl Buntwäsche
Sehr leicht verschmutzte Wäsche
Baumwolle/Leinen
Weiß/bunt
Sehr leicht verschmutzte Wäsche
Baumwolle/Leinen
Empfindl Buntwäsche
Leicht verschmutzte Wäsche
Baumwolle/Leinen
Unempf Buntwäsche
Leicht verschmutzte Wäsche
Baumwolle/Leinen
Unempf Buntwäsche
Normale verschmutzung
Baumwolle/Leinen
Weiß
Stark verschmutzt
Baumwolle/Leinen
Weiß/Unempf Buntwäsche
Stark verschmutzt
Synthetik/Baumwoll-Mischgew.
Empfindl Buntwäsche
Sehr leicht verschmutzte Wäsche
Synthetik/Baumwoll-Mischgew.
Empfindl Buntwäsche
Leicht verschmutzte Wäsche
Synthetik/Baumwoll-Mischgew.
Empfindl Buntwäsche
Normale verschmutzung
Synthetik/Baumwoll-Mischgew.
Weiß/Unempf Buntwäsche
Normale verschmutzung
Wolle/Wollmischgewebe
Weiß/bunt
Leicht verschmutzte Wäsche
Baumwolle/Baumwollmischgew.
Synthetik/Empf. Gewebe
Wolle/Wollmischgewebe
Baumwolle/Baumwollmischgew.
Synthetik/Empf. Gewebe
Wolle/Wollmischgewebe
Baumwolle/Baumwollmischgew.
Synthetik/Empf. Gewebe
Wolle/Wollmischgewebe
JA NEIN JA
JA NEIN
JA NEIN
Mögliche Optionen
spülen
Intensiv-
wäsche
Büge-
lleicht
JA
JA
JA
JA
JA
JA
JA
JA
JA
JA
JANEIN NEIN
NEIN
Anwahl
Schleudern
JA
JA
Schleudern
annullieren
Knitterschutz
(*)
Programm für die Bewertung der Reinigungswirkung und des
Energeiverbrauchs gem. der Norm EN60456, bei Betätigen der Taste.
58
Page 59

Max.
Beladung
(kg)
6
1,5
Waschmittel-
kammern
Beschreibung des
Programms
Normalwäsche, Klarspülgänge, automatisches Einsaugen von Zusätzen, falls
gewünscht und langes Endschleudern.
KURZ-Wäsche, Klarspülgänge, automatisches Einsaugen von Zusätzen, falls
gewünscht und langes Endschleudern.
TURBO TIME PLUS
Gesamtverbrauch
kWh/litros
0,15/46
0,20/30
Dauer ca.
(Minuten)
60
30
6
6
Normalwäsche, Klarspülgänge,
automatisches Einsaugen von
Zusätzen, falls gewünscht und langes
Endschleudern.
6
6
Vorwäsche, Normalwäsche, Klarspülgänge,
6
automatisches Einsaugen von Zusätzen,
falls gewünscht und langes Endschleudern.
3
3
3
Feinwäsche, Klarspülgänge,
automatisches Einsaugen von
Zusätzen, falls gewünscht und sanftes
Endschleudern.
3
1
6
_
WOLL-Waschgang, Klarspülgänge,
automatisches Einsaugen von Zusätzen,
falls gewünscht und sanftes Endschleudern.
Klarspülgänge, automatisches
Einsaugen von Zusätzen, falls
gewünscht und langes Endschleudern.
0,40/49
0,65/49
1,02/49
1,90/55
1,45/60
0,15/55
0,30/55
0,60/55
0,95/50
0,50/60
0,05/25
82
91
80
120
105
55
55
60
70
40
23
6
6
ANMERKUNG: Der Verbrauch von kWh und Litern, sowie die Programmdauer können
in Abhängigkeit von Art und Menge der Wäsche.
_
Langes Endschleudern.
Abpumpen.
59
0,05/0
0,00/0
10
2
Page 60

ANWAHL DER ZUSATZFUNKTIONEN
4
bedienen des geräts und praktische hinweise
SCHLEUDERN
Die Waschoptionen müssen stets nach der
Wahl des Waschprogramms eingestellt
werden. Wird das Programm während der
Anwahl der Optionen geändert, werden die
zuvor eingestellten optionellen Funktionen
annulliert.
a Anwahltaste für Schleudern
undKnitterschutz (Flot)
Den gewählten Programm entspricht
eine gewisse Drehzahl beim Schleudern.
b Diese kann durch wiederholtes Betätigen
der Schleudertaste geändert werden.
Die Drehzahl kann dabei in 100er
Schritten bis auf 400 Umdrehungen
gesenkt werden.
c Ohne Schleidern
Durch erneutes Betätigen der
Schleudertaste gelangt man zu der
Option Schleudern annullieren. Ein
Programm ohne Endschleudern wird
benutzt, um der Bildung von Falten in
cspeziellen Geweben vorzubeugen.
a
b
c
d Option Flot/Knitterschutz
Die Maschine stoppt im letzten Spülgang
und die Wäsche bleibt so im Wasser
liegen. Wird diese Funktion
ausgeschaltet, setzt die Maschine das
Progamm fort, das Wasser wird
abgepumpt und die Wäsche
geschleudert. Diese Funktion wird
benutzt, wenn man z.B. z.B. außer Haus
ist und nach dem Schleudern die
Wäsche nicht sofort aus der Maschine
nehmen kann. So verhindert man, die
Faltenbildung, die auftreten würde, wenn
die Wäsche nach dem Schleudern in
der Trommel liegen bleiben würde.
d
60
Page 61

bedienen des geräts und praktische hinweise
STARTZEITVORWAHL
Taste zum Einstellen der Startzeit
Es ist eine Startzeitvorwahl von bis zu 24 Stunden
möglich. Die Startzeit muss nach der Wahl des
Waschprogramms eingegeben werden.
Betätigen Sie die Taste der Uhr, um die Startzeit
einzustellen. Bei jedem Drücken der Taste wird
die Startzeit um eine weitere Stunde verzögert.
Annullieren der Startzeitvorwahl
Um die eingegebene Startzeit zu annullieren, muss
die Uhr-Taste wiederholt gedrückt werden. Die
Annullierung erfolgt, wenn auf der Anzeige 24
Std. erscheinen und man die Taste erneut betätigt.
Ändert man das Programm, wird die Zeitvorwahl
ebenfalls gelöscht.
ZUSATZFUNKTIONEN
Taste zurAnwahlvon Zusatzfunktionen, in
Abhängigkeit von dem jeweiligen
Waschprogramm.
a Es stehen 3 Optionen zur Verfügung:
bügelleicht, Extra-Spülgang und
Intensivwäsche. Durch Betätigen der Taste
wird die gewünschte Option angezeigt.
b Durch mehrmaliges Betätigen der Taste
können verschieden Kombinationen aus
einer, zwei oder drei Zusatzfunktionen in
Abhängigkeit von dem jeweils angewählten
Waschprogramm gewählt werden.
Taste: Bügelleicht ( )
Mit Hilfe eines Spezialprogramms mit
speziellen Drehungen, die die Wasche nach
dem Drehen lockert, wird mit dieser
Funktion die Faltenbildung vermieden und
ein leichteres Bügeln ermöglicht.
Taste: Extra-Spülgang ( )
Mit dieser Funktion wird die
Gesamtspülwirkung erhöht. Diese Funktion
ist vorteilhaft bei großen Mengen Wäsche
sowie bei Kleidungsstücken von Personen
mit empfindlicher Haut. Beachten Sie bitte,
dass dadurch der Wasserverbrauch erhöht
wird.
Taste: Intensivwäsche (
Diese Option ist für besonders
verschmutzte und mit Flecken behaftete
Wäsche empfehlenswert. Durch
Verlängerung des normalen Waschzyklus
werden bessere Ergebnisse erreicht.
)
Wenn während der Einstellung der
Zusatsfunktionen das Programm geändert
oder die Taste ON/OFF betätigt wird, werden
alle bis dahin angewählten Funktionen
Wichtig
annulliert.
61
Page 62

INBETRIEBNAHME UND TASTENSPERRE
5
bedienen des geräts und praktische hinweise
STARTEN
Taste:Start/ Stop
a Um die Waschmaschine zu starten,
betätigen Sie bitte die Start/Stop-Taste.
Auf dem Display können Sie jederzeit
die bis zum Ende des Waschvorgangs
verbleibende Zeit in Minuten ablesen.
TASTENSPERRE
Einstellen der Tastensperre
Durch die Tastensperre gehen Sie sicher, dass
Manipulationen an den einzelnen Tasten das
Programm und die gewählten Zusatzfunktionen
nicht beeinträchtigen. Sie dient als
Kindersicherung, etc.
Die Tastensperre darf erst nach Auswahl des
Waschprogramms und der entsprechenden
Zusatzfunktionen programmiert werden.
a
a
Auslösen der Sperre
a Die Tastensperre wird ausgelöst, indem
bman die Taste Start/Stop mindestens
3 Sekunden betätigt hält. Auf dem
Display können Sie erkennen, ob die
Tastensperre aktiviert ist.
Aufheben der Tastensperre
b Die Sperre wird aufgehoben, sobald das
Waschprogramm beendet ist.
Soll die Sperre aufgehoben werden,
bevor das Waschprogramm abgelaufen
ist, muss die Start/Stop- Taste erneut
mindestens 3 Sekunden gedrückt
gehalten werden. Nach Ablauf dieser 3
Sekunden erlischt die Anzeige auf dem
Display und es erfolgt ein Wechsel auf
den Pausen- Status.
Die Ausposition „0“ annulliert die
Tastensperre nicht.
b
62
Page 63

ABLAUF DES WASCHPROGRAMMS UND STROMAUSFALL
6
bedienen des geräts und praktische hinweise
PROGRAMMABLAUF
Wenn das Programm läuft, können Sie auf
dem Display ablesen, in welcher Phase es
sich befindet. Auch die verbleibende Restzeit
bis zum Programmende wird angezeigt.
Die aktiven Phasen erscheinen während des
Programmablaufs nacheinander im oberen Teil
des Displays. Auch die verbleibende Restzeit
bis zum Programmende wird angezeigt. Sie
wird in regelmäßigen Abständen, jedoch nicht
Minute für Minute aktualisiert.
Die Zusatzfunktionen können jederzeit
angewählt werden, vorausgesetzt die
Programmphase, in denen sie aktiv werden,
ist noch nicht abgelaufen und dass gewählte
Programm lässt diese Option zu.
Das Betätigen der Zeitvorwahl-Taste während
des Programmablaufs hat keine Wirkung.
Durch Betätigen der Taste Start/Stop während
des Waschprogramms geht die Maschine in
den PAUSEN-Status.
UNTERBRECHUNG DER
STROMVERSORGUNG
Sollte es zu einem Stromausfall kommen, setzt
die Waschmaschine nach Wiederherstellung
der Versorgung den Programmablauf an der
Stelle fort, an der er unterbrochen wurde (sie
verfügt über einen Speicher für einige Stunden).
Das Gleiche gilt für den Fall, dass die ON/OFFTaste betätigt wird.
hinweise
Zur Geräuschreduzierung während des
Maschinenbetriebes nivellieren Sie bitte die
Waschmaschine mit Hilfe der regulierbaren
Füße.
Versuchen Sie stets Wäschestücke
unterschiedlicher Größe in einem Programm
zu waschen. Dies verbessert die Verteilung
der Wäsche in der Trommel während
desSchleuderns.
Wird das Programm während des
Waschens und Trocknens mit dem
Wahlschalter geändert, geht die
Waschmaschine auf PAUSEN-Status
und das Programm wird annulliert.
Wenn Sie ein Wäschestück
herausnehmen oder einlegen möchten,
betätigen Sie die Taste Start/Stop und
vergewissern Sie sich, dass die
Wassermenge in der Maschine unter
Wichtig
der Höhe der Ladetür liegt und die
Innentemperatur nicht zu hoch ist.
Durch erneutes Betätigen von
Start/Stop setzt die Maschine das
Programm an der Stelle fort, an der
sie es unterbrochen hat.
Alle Modelle verfügen über ein Sicherheitssystem
beim Schleudern. Es verhindert, dass geschleudert
wird, wenn die Wäsche in der Trommel extrem ungleich
verteilt sein sollte. Dadurch wird vermieden, dass das
Gerät zu starke Vibrationen erzeugt.
Sollten Sie feststellen, dass die Wäsche nicht
einwandfrei geschleudert ist, verteilen Sie sie
gleichmäßig in der Trommel und lassen Sie sie erneut
schleudern.
63
Page 64

waschmaschine
PFLEGE
Nach jedem Waschen lassen Sie bitte
die Ladetür eine Zeit lang offen stehen,
damit Luft im Innern der Maschine
zirkulieren kann.
Je nach Härtegrad des Wassers ist es
ratsam, von Zeit zu Zeit einen kompletten
Reinigungszyklus mit einem
Entkalkungsmittel vorzunehmen.
Dadurch erhöhen Sie die Lebensdauer
Ihrer Waschmaschine.
Bevor Reinigungs- oder
Pflegemaßnahmen vorgenommen
werden, ist es empfehlenswert, den
Netzanschluss der Maschine zu
unterbrechen.
REINIGEN DER WASCHMITTELSCHALE
1
Reinigen Sie die Waschmittelschale, sobald
sich dort Reste von Reinigungsprodukten
absetzen.
pflege und reinigung
a
a Ziehen Sie die Waschmittelschale
an dem Griff vollständig heraus.
b Reinigen Sie die Kammern der
Schale mit lauwarmem Wasser und
einer Bürste.
c Reinigen Sie auch die Siphons der
Kammern für Waschzusätze. Ziehen
Sie diese dazu heraus. Nach dem
Reinigen setzen Sie sie wieder ein
und vergewissern Sie sich, dass sie
bis auf den Boden eingerastet sind.
Setzen Sie die Schale wieder in die
Waschmaschine.
Ein Siphon, der nicht korrekt sitzt oder
verschmutzt ist, behindert die
Aufnahme von Zusätzen und hat zur
Folge, dass nach dem Waschen
Wichtig Wichtig
Wasser in der Schale stehen bleibt.
64
b
c
Page 65

REINIGEN DES AUSSENFILTERS UND DES
2
MASCHINENGEHÄUSES
REINIGEN DES FILTERS
Sollten Fremdkörper die Absaugpumpe
blockieren, reinigen Sie den Außenfilter.
a Drehen Sie den Deckel des Filters mit
Hilfe einer Münze.
b Nehmen Sie den Filterdeckel ab.
c Stellen Sie einen Teller oder einen
anderen Behälter unter die Öffnung, um
das Wasser aufzufangen, das beim
Entfernen des Filters herausläuft.
d Drehen Sie den Filter eine Viertel- oder
halbe Umdrehung nach links. Es beginnt
Wasser herauszulaufen
e Wenn das gesamte Wasser
herausgelaufen ist, drehen Sie den Filter
um mehrere Umdrehungen, bis Sie ihn
ganz herausnehmen können.
f Entfernen Sie Objekte und Flusen, die
sich im Filter oder in der Absaugpumpe
festgesetzt haben.
Setzen Sie den Filter und dessen
Abdeckung wieder ein.
pflege und reinigung
Um Verbrennungen zu vermeiden,
führen Sie diese Tätigkeit nicht aus,
wenn das Wasser wärmer als 30ºC
ist.
Wichtig
REINIGEN DES
MASCHINENGEHÄUSES
Reinigen Sie das Gehäuse mit lauwarmem
Seifenwasser oder einem milden
Reinigungsmittel. Benutzen Sie keine Scheueroder Lösemittel.
Trocknen Sie es dann mit einem weichen
Tuch gut ab.
Sollten aus der Waschmittelschale
Waschmittel oder Zusätze auf das Gehäuse
auslaufen, reinigen Sie sie sofort, sie sind
korrosiv.
Wichtig
65
Page 66

waschmaschine
sicherheit und problemlösungen
Bestimmte Probleme, die beim
Betrieb der Maschine auftreten
können, lassen sich durch das
Befolgen der unten aufgeführten
Anweisungen möglicherweise
selbst beheben.
Besteht das Problem weiter,
benachrichtigen sie bitte Ihren
KUNDENDIENST.
Öffnen Sie auf keinen Fall
selbst das Gerät! Im
Inneren des Geräts
befinden sich keine
Sicherungen oder analoge
Komponenten, die vom
Wichtig
Benutzer selbst
ausgewechselt werden
dürfen.
MÖGLICHE STÖRUNGEN
Warum startet die Maschine
nicht?
Anzeige
FO1
FO2
CO3
FO4
FO5
.
.
.
.
.
F10
Mögliche Gründe sind:
Prüfen Sie, ob die Tür richtig geschlossen ist.
Die Waschmaschine ist nicht an das Stromnetz
angeschlossen, oder es liegt kein Strom an den Leitungen.
Die Start/Pause Taste wurde nicht gedrückt.
Wenn die Tür der Waschmaschine nicht richtig
geschlossen ist, erscheint auf dem Display F04.
Mögliche Störungen
Es läuft kein Wasser in die Maschine ein
Wasser läuft nicht ab, Maschine
schleudert nicht
Die Maschine schleudert nicht
Die Maschine geht nicht in Betrieb
Bitte wenden Sie sich an den
Technischen Kundendienst
Warum vibriert die Maschine
oder macht übermäßigen
Lärm?
Mögliche Gründe sind:
Die Transportsicherungsschrauben wurden nicht entfernt.
Die Maschine ist schlecht nivelliert oder steht nicht fest
auf dem Boden.
Der Motor macht beim Schleudern ein pfeifendes
Geräusch. Dabei handelt es sich um eine normale
mechanische Aktion des Motors.
66
Page 67

sicherheit und problemlösungen
Warum läuft kein Wasser in
die Maschine?
Warum pumpt die Maschine
nicht ab und schleudert
nicht?
Warum schleudert die
Maschine nicht?
Wenn kein Wasser in die Maschine läuft, erscheint die
auf dem Display die Fehleranzeige F01.
Die Anzeige F01 –kein Wasserzulauf – kann durch eine
Unterbrechung der Wasserversorgung, den nicht
geöffneten Hahn am Wasserzulauf oder eine Verstopfung
des Zulauffilters ausgelöst werden.
Die entsprechenden Lösungen sind: Warten, bis die
Wasserversorgung wieder hergestellt ist; den Hahn
öffnen; den Eingangsschlauch lösen und seinen Filter
reinigen.
Wenn das Wasser nicht abläuft und die Maschine nicht
schleudert, erscheint auf dem Display die Meldung F02.
Die Anzeige F02 kann durch eine Verstopfung der
Motorpumpe der Maschine, durch Verstopfungen in
den Abwasserleitungen des Gebäudes oder durch
einen fehlerhaften elektrischen Anschluss der Pumpe
ausgelöst werden.
Vorgehen: Sollte die Motorpumpe verstopft sein, folgen
Sie bitte den Hinweisen in Abschnitt 2, Pflege und
Reinigung.
Wenn die Maschine nicht schleudert, erscheint auf dem
Display C03.
Warum ist während des
Waschvorgangs kein Wasser
in der Trommel zu sehen?
Grund dafür ist die ungleiche Verteilung der Wäsche in
der Trommel. Dadurch werden Vibrationen erzeugt.
Wählen Sie ein Schleuderprogramm.
Die Maschine verfügt über ein System, das das benötigte
Wasservolumen und die Energie der Wäschemenge und
deren Gewebeart entsprechend reguliert, um so einen
Betirag zum Umweltschutz zu leisten. Das heißt, selbst
wenn die durch die Glastür sichtbare Wassermenge gering
erscheinen mag, wird die Reinigungs- und Spülwirkung
trotzdem auf optimalem Niveau gehalten.
67
Page 68

sicherheit und problemlösungen
Warum bleibt Wasser in der
Waschmittelschale stehen?
Warum kann ich die Tür nicht
sofort nach Programmende
öffnen?
Sonstiges
Möglicherweise muss die Schale gereinigt werden.
Vergleichen Sie dazu die Beschreibung im Abschnitt Pflege
und Reinigung des Geräts.
1- Reinigen der Waschmittelschalte.
Moderne Waschmaschinen sind mit einem
Sicherheitssystem ausgestattet. Dazu gehört auch, dass
die Maschine erst geöffnet werden kann, wenn sichergestellt
ist, dass die Trommel zum Stehen gekommen ist. Deshalb
kann die Tür erst nach ca. 2
Minuten geöffnet werden.
Die Maschine kann noch weitere Vorfälle erkennen. In
diesen Fällen erscheinen auf dem Display die Anzeigen
F05, F06..., F10. Bei Auftreten dieser Probleme wenden
Sie sich bitte an den Technischen Kundendienst.
68
Page 69

waschmaschine
ökologische hinweise
INFORMATION ZUR VORSCHRIFTGEMÄSSEN ENTSORGUNG VON ELEKTRISCHEN
UND ELEKTRONISCHEN GERÄTEN
hinweise zum umweltschutz
Ist das Gerät nicht mehr funktionsfähig, darf dieses
nicht gemeinsam mit dem üblichen Hausmüll
entsorgt werden.
Das Gerät kann kostenfrei bei speziell dafür
vorgesehenen Annahmestellen abgegeben werden.
Die Adressen dieser Stellen erhalten Sie von ihrer
örtlichen Verwaltung. Auch bestimmte Hersteller
bieten diesen Service an.
Durch die getrennte Entsorgung eines Elektrogeräts
vermeiden sie mögliche negative Auswirkungen
auf die Umwelt und die Gesundheit, die durch eine
unsachgemässe Entsorgung entstehen können.
Durch Verwertung und Recycling der Bestandteile
des Geräts können Energie und Rohstoffe
eingespart werden.
Ein auf dem Gerät angebrachtes Symbol weist
darauf hin, dass dieses Gerät getrennt entsorgt
werden muss und nicht in übliche Hausmüllbehälter
gegeben werden darf.
Wenden Sie sich für alle weiteren
Informationen bitte an die örtliche
Verwaltung oder an den
Händler,bei dem Sie dieses Gerät
gekauft haben.
69
Page 70

Page 71

Page 72

10/10 WF2N00011 / 0049555-00
 Loading...