

Page 1

THS221
Digital HD
Satellite
Receiver
User Manual
Bedienungsanleitung
Manuel d’utilisation
Manuale d’uso
Manual de usuario
Manual do Utilizador
Användarmanual
Uputstvo za upotrebu
Evolution. Emotion. Passion.
www.thomsonstb.net
Page 2
Page 3

Page 4
THOMSON is a trademark of TECHNICOLOR S.A. used under license to STRONG Europe
Represented by STRONG Ges.m.b.H. • Franz-Josefs-Kai 1 • 1010 Vienna • Austria
Email: support_at@thomsonstb.net
Page 5

THS221 is delivered with USB multimedia support. After downloading the PVR
software from the website www.thomsonstb.net the receiver can be upgraded
to support the recording function via USB. This user manual describes the full
functionality including the recording function and may not be applicable if the
PVR software has not yet been installed.
LICENSES
ANY USE OF THIS PRODUCT IN ANY MANNER OTHER THAN PERSONAL USE THAT COMPLIES
WITH THE MPEG-2 STANDARD FOR ENCODING VIDEO INFORMATION FOR PACKAGED MEDIA
IS EXPRESSLY PROHIBITED WITHOUT A LICENSE UNDER APPLICABLE PATENTS IN THE MPEG-2
PATENT PORTFOLIO, WHICH LICENSE IS AVAILABLE FROM MPEG LA, LLC, 6312 S. Fiddlers Green
Circle, Suite 400E, Greenwood Village, Colorado 80111 U.S.A.
THIS PRODUCT IS LICENSED UNDER THE AVC PATENT PORTFOLIO LICENSE FOR THE PERSONAL
AND NONCOMMERCIAL USE OF A CONSUMER TO (i) ENCODE VIDEO IN COMPLIANCE WITH
THE AVC STANDARD (“AVC VIDEO”) AND/OR (ii) DECODE AVC VIDEO THAT WAS ENCODED
BY A CONSUMER ENGAGED IN A PERSONAL AND NON-COMMERCIAL ACTIVITY AND/OR WAS
OBTAINED FROM A VIDEO PROVIDER LICENSED TO PROVIDE AVC VIDEO. NO LICENSE IS GRANTED
OR SHALL BE IMPLIED FOR ANY OTHER USE. ADDITIONAL INFORMATION MAY BE OBTAINED FROM
MPEG LA, L.L.C. SEE HTTP://WWW.MPEGLA.COM
This product contains one or more programs protected under international and U.S. copyright
laws as unpublished works. They are confidential and proprietary to Dolby Laboratories. Their
reproduction or disclosure, in whole or in part, or the production of derivative works therefrom
without the express permission of Dolby Laboratories is prohibited. Copyright 2003-2009 by Dolby
Laboratories. All rights reserved.
English
P1
Page 6

TABLE OF CONTENT
1.0 INTRODUCTION 3
1.1 Safety Instructions 3
1.2 Storage 3
1.3 Equipment Set-up 4
1.4 Accessories 4
1.5 Usage of external USB devices* 4
2.0 YOUR RECEIVER 5
2.1 Default PIN: 0000 5
2.2 Front panel 5
2.3 Rear panel 5
2.4 Remote Control 5
2.5 Installing the batteries 7
2.6 Using the remote control 7
3.0 CONNECTIONS 7
3.1 Basic connection using an HDMI cable 7
3.2 Basic connection using a Scart cable 7
3.3 Connecting multiple fixed LNBs using a
DiSEqC 1.0/1.1 switch 8
3.4 Connecting to Ethernet 8
4.0 FIRST TIME INSTALLATION 8
4.1 Installation 9
*This user manual describes the full functionality including the recording function and may not be applicable if the PVR software has not yet been
installed.
THOMSON declares that this item complies with the basic requirements and other relevant regulations of directives CE 2004/108/EC and
73/23/EC, RoHS 2002/95/EC
Subject to alterations. In consequence of continuous research and development technical specifications, design and appearance of products may
change. HDMI, the HDMI logo and High-Definition Multimedia Interface are trademarks or registered trademarks of HDMI Licensing LLC in the
United States and other countries. Manufactured under license from Dolby Laboratories. Dolby and the double-D symbol are registered trademarks
of Dolby Laboratories. All other product names are trademarks or registered trademarks of their respective owners.
07 May 2015 12:56
© THOMSON 2015. All rights reserved.
P2
5.0 QUICK GUIDE FOR USING YOUR RECEIVER
9
6.0 OPERATION 10
6.1 Changing channels 10
6.2 Info banner 11
6.3 Selection of audio language 11
6.4 Teletext 11
6.5 Subtitles 11
6.6 EPG (Electronic Programme Guide) 11
6.7 Favourite channels 12
6.8 Instant Recording* 12
6.9 Timeshift* 12
7.0 MAIN MENU 12
7.1 Installation 12
7.2 Channel 16
7.3 Multimedia 23
8.0 TROUBLESHOOTING 26
9.0 SPECIFICATIONS 28
Page 7

1.0 INTRODUCTION
1.1 Safety Instructions
DO NOT INSTALL YOUR RECEIVER:
• In a closed or poorly ventilated cabinet; directly on top of or under any other equipment; on a
surface which might obstruct the ventilation slots.
DO NOT EXPOSE THE RECEIVER OR ITS ACCESSORIES:
• To direct sunlight or any other equipment that generates heat; to rain or intense moisture; to
intense vibration and to any shock which may cause permanent damage to your receiver or to any
magnetic objects, such as loudspeakers, transformers, etc.
• Do not use a damaged power cord. It may cause a fire or an electric shock. Do not touch a power
cord with wet hands. It may cause an electric shock.
• When the receiver is not used for a long period of time, you should unplug the power cord from
the wall socket.
• Do not use alcohol or ammonia based liquids to clean the receiver. If you wish, you may clean
your receiver with a soft lint-free cloth slightly made damp with a mild soap solution, and only
after disconnecting from the mains voltage supply. Make sure no foreign objects fall through the
ventilation slots because this could cause fire or an electric shock.
• Do not place any objects on top of the receiver because this might prevent proper cooling of the
components inside.
Safety Precautions
• Never try to open the receiver. It is dangerous to touch the inside of the receiver due to high
voltages and possible electrical hazards. Opening the receiver will void the warranty of the
product. Refer all maintenance or servicing to suitably qualified personnel.
• When you are connecting cables, be sure that the receiver is disconnected from the mains supply
voltage. Wait a few seconds after switching off the receiver before you move the receiver or
disconnect any equipment.
• It is a necessity that you only use an approved extension and compatible wiring that is suitable
for the electrical power consumption of the installed equipment. Please ensure that the electrical
power supply corresponds with the voltage on the electrical identification plate at the back of the
receiver.
If the receiver does not operate normally even after strictly following the instructions in this user
manual, it is recommended to consult your dealer.
1.2 Storage
Your receiver and its accessories are stored and delivered in a packaging designed to protect
against electric shocks and moisture. When unpacking it, make sure that all the parts are included
and keep the packaging away from children. When transporting the receiver from one place to
another or if you are returning it under warranty conditions, make sure to repack the receiver in its
original packaging with its accessories. Failing to comply with such packaging procedures could
damage the product and void your warranty.
INTRODUCTION
English
P3
Page 8

1.3 Equipment Set-up
We recommend you consult a professional installer to set up your equipment. Otherwise, please
follow the instructions below:
• Refer to the user manual of your TV and your antenna.
• Make sure that the SCART/HDMI cable and outdoor components are in a good condition and the
SCART/HDMI connections are well shielded and from good quality.
This manual provides complete instructions for installing and using this receiver. The following
symbols will serve as follows.
WARNING: Indicates warning information.
NOTE: Indicates any other additional important or helpful information.
MENU Represents a button on the remote control or the receiver. (Bold characters)
Move to Represents a menu item within a window. (Italic characters)
1.4 Accessories
• 1x Installation Instruction
• 1x remote control
• 2x batteries (AAA type)
NOTE: The batteries should not be recharged, disassembled, electrically short-
circuited or be mixed or used with other types of batteries. If rechargeable
accumulators instead of batteries are going to be used, we recommend
using (e.g. NiMH) types with low self-discharge to ensure long time operation
of remote control.
1.5 Usage of external USB devices*
• It is recommended to use USB 2.0 storage devices. If your device is not compatible to USB 2.0
specifications, multimedia, recording and Timeshift functions of the receiver might not work
properly.
• If you are going to use external USB HDD (Hard Disk Drive) please consider that the power
specifications may exceed the supported output of your receiver (5 V/500 mA). If so, please
connect your USB HDD to an according external power adapter.
• THOMSON cannot guarantee compatibility with all types of USB storage devices.
• It is advised not to store important information on USB storage devices used with the receiver.
Always make backups of data on your USB storage device before using it with this receiver.
THOMSON will not take responsibility for any loss of information or circumstances caused by loss
of information.
• THOMSON cannot guarantee the playback of all files although extensions are listed, as it depends
on file size, codec, bit rate and resolution.
• Please ensure that either the USB device is already formatted to FAT/FAT32, or format the USB
device via your receiver, refer to chapter 7.3 Multimedia for details.
*This user manual describes the full functionality including the recording function and may not be applicable if the PVR software has not yet been
installed.
P4
INTRODUCTION
Page 9

2.0 YOUR RECEIVER
2.1 Default PIN: 0000
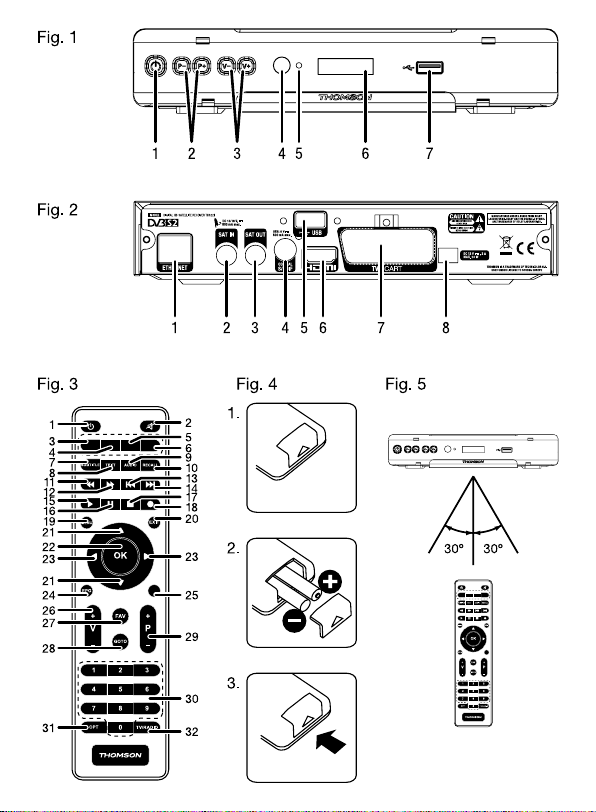
2.2 Front panel
1. Power button: Switch the receiver to Standby or On.
2. P-/P+: To change channels without using the remote control
3. V-/V+ Decrease/Increase audio volume. V-/V+ and P+/P- double as navigation
4. Remote control sensor:
Receives the signal from the remote control
5. Standby indicator:
Shows power state of the receiver
6. LED display: Shows channel number in operation and time in Standby
7. USB: For connection of USB pen drive for software upgrade storage devices
2.3 Rear panel
1. Ethernet To connect to a network switch, router or modem
2. SAT IN To connect to the LNB of your satellite dish for reception of satellite
3. SAT OUT To loop through the satellite signal to a second receiver
4. S/PDIF coaxial To connect to a digital or home cinema audio amplifier
5. USB For connection of USB pen drive for software upgrade storage devices or
6. HDMI To connect to the HDMI input of your TV using a good quality HDMI cable.
7. TV SCART To connect to TV using a SCART cable
8. DC power To connect to the original included main power adapter (input 100 ~ 240 V
2.4 Remote Control
1. q Turns the receiver ON/Standby
2. ! Turns the sound on or off
3. RED Flexible functions in OSD menu and Teletext
4. GREEN Flexible functions in OSD menu and Teletext.
5. YELLOW Flexible functions in OSD menu and Teletext.
6. BLUE In viewing mode: displays the schedule menu for easy setup timers; Flexible
7. SUBTITLE Selects the subtitle language
buttons when in menu.
Green LED - receiver is turned on
Red LED - receiver is in standby mode
broadcast signal
HDD for Multimedia.
50~60 Hz/output 12 V DC
functions in OSD menu and Teletext.
YOUR RECEIVER
Fig. 1
Fig. 2
Fig. 3
English
P5
Page 10

8. TEXT Opens Teletext if available
9. AUDIO Opens the audio selection
10. RECALL Switches between the last viewed channels
11. 5 Searches backwards during playback. Each pressing increases the speed (x2
12. 6 Searches forwards during playback. Each pressing increases the speed (x2 –
13. 7 Jumps to the previous file during playback
14. 8 Jumps to the next file during playback
15. 1 Starts/resumes the playback
16. 2 Freezes the playback of multimedia files.
17. 3 Stops playback of multimedia files.
18. 4 Starts recording the current programme
19. MENU Opens the main menu in viewing mode or to goes one step back in the
20. EXIT Cancels the current process/exits from main menu to viewing mode
21. pq Switches to the next/previous channel in viewing mode, switches to the
22. OK Viewing mode: Displays the channel list. Menu: activation of the highlighted
23. tu Decreases/increases the volume level in viewing mode/navigates through
24. EPG Displays the EPG (Electronic Programme Guide) in viewing mode
25.
Press once to display channel number/name and current/coming
26. V+/V- Increases/decreases the volume level in TV mode
27. FAV To access your favourite channels. Toggles between available favourite
28. GOTO In playback mode: opens the time banner for selection the moment where
29. P+/P- Jumps 10 places up or down in channel list.
30. 0~9 Channel number and numeric value input
31. OPT No function
32. TV/RADIO Toggles between TV and radio mode
– x32)
x32)
menu
next/previous page in channel list or moving the highlight up/down in the
menu.
item
the menus/changing values of settings in a menu
information. Press twice to display detailed event information. Press three
times for transponder/signal strength information. Press again to get back to
viewing mode.
groups
to jump.
P6
YOUR RECEIVER
Page 11

2.5 Installing the batteries
Remove the battery cover from the remote control and put 2x AAA size batteries inside the
compartment.
The diagram inside the battery compartment shows the correct way to install the batteries.
1. Open the cover
2. Install batteries
3. Close the cover
NOTE: The batteries should not be recharged, disassembled, electrically short-
circuited, be mixed or used with other types of batteries.
Fig. 4
2.6 Using the remote control
To use the remote control, point it towards the front of the digital receiver. The remote control
has a range of up to 7 metres from the receiver, if properly aligned towards the IR eye on the front
panel.
The remote control will not operate if its path is blocked.
NOTE: Sunlight or very bright light might decrease the sensitivity of the remote control.
Fig. 5
3.0 CONNECTIONS
For basic setup with 1 dish + 1 LNB: Connect the satellite cable to the SAT IN connector on your
receiver. For advanced dish setup, refer to section 3.3
3.1 Basic connection using an HDMI cable
1. Connect the LNB of your satellite antenna to the SAT IN connector of your receiver using a
good quality coax cable and suitable ‘F-connector’ plugs.
2. Connect one end of a good quality HDMI cable to the HDMI output on your receiver and the
other end to the HDMI input of your TV.
3. Plug the power adapter to a suitable wall outlet.
3.2 Basic connection using a Scart cable
1. Connect the LNB of your satellite antenna to the SAT IN connector of your receiver using a
good quality coax cable and suitable ‘F-connector’ plugs.
2. Connect one end of a good quality Scart cable to the TV SCART connector on your receiver
and the other end to the SCART input of your TV.
3. Plug the power adapter to a suitable wall outlet.
Fig. 6
Fig. 7
English
CONNECTIONS
P7
Page 12

3.3 Connecting multiple fixed LNBs using a DiSEqC
1.0/1.1 switch
1. Connect the LNBs of your fixed antenna to the inputs of a DiSEqC 1.0/1.1 switch
2. Connect the output or “to receiver” connector of the DiSEqC 1.0/1.1 switch to the SAT IN
connector on your receiver.
3. Refer to section 3.1 or 3.2 for TV and mains connections.
4. Refer to section 7.1.1 for Satellite Settings
Fig. 8
3.4 Connecting to Ethernet
Connect a CAT5E cable (or higher quality) to the RJ45 connector of the unit and the other end
to an existing switch, router or modem. The default setting is Auto (DHCP) for automatically
obtaining IPs and DNS. Select Manual in Menu - Network - Network Settings to enter own settings if
required. When setting up manually, you need to provide a unique IP address, Netmask, Gateway
and DNS for your receiver. Refer to the manual of your router or modem to setup properly. The
Ping test can be selected to check your connecting, once setup correctly.
Fig.8
4.0 FIRST TIME INSTALLATION
After all connections have been made properly, switch on your TV and make sure the receiver is
connected to the main power. If you are using the receiver for the rst time or restored to factory
default, the Installation menu will appear on your TV screen. Press the tu buttons to select the
OSD Language of your preference.
Country Select your country.
Pre-installed List Some countries come with a pre-installed channel list.
Video Output Select the output you prefer to use.
TV Format Select between 16:9FIT. 16:9LB and 4:3LB or 4:3PS
Start Search If the pre-installed list is selected, the receiver will jump to the first channel
NOTE: If Germany is selected as country, a German pre-set channels list from ASTRA
You can continue with the Installation menu to scan and install further channels as described
below or go to viewing mode by pressing the EXIT button to start enjoying the pre-installed
channels immediately.
If not available for your country, the item is not selectable.
in the list. If no pre-installed list available, the Satellite Setting page will
appear.
19.2E will be installed. The pre-installed list will work with a single Universal
LNB (LO 9750/10600). If another type of LNB is used, you need to setup the
LNB in the Installation menu, Satellite Setting.
P8
FIRST TIME INSTALLATION
Page 13

4.1 Installation
4.1.1 Satellite Setting
Press pq to highlight the satellite your dish is aimed at. When using a multi feed antenna with
more than 1 LNB, select the satellites your antenna is adjusted for by pressing the OK button and
set the appropriate DiSEqC input for the LNBs. Astra 19.2E and Hotbird 13E are pre-selected on
DiSEqC 1 and 2. The scan process will then search on all selected satellites.
NOTE: If you have a non-standard setup, then please refer to section 7.1.2 of this
manual: Configure the antenna settings for the selected satellite.
4.1.2 Signal Adjust
The signal quality bar on the bottom of the screen allows you to ne tune the alignment of your
antenna for optimum reception. Adjust your antenna for maximum possible signal quality. When
the signal cannot be improved anymore, x the dish on this position and press the GREEN Scan
button to continue.
4.1.3 Automatic SAT scan
Press pq tu to highlight the options of choice and press GREEN Scan to start the channel
search. It is recommended to use the default settings.
NOTE: For details, please refer to section 7.1.4 of this manual: Automatic SAT scan.
4.1.4 Channel Search
Your receiver will now perform an automatic channel search. When the process has been
completed, all found channels will be stored and the receiver will switch to the rst found channel.
You are now ready to enjoy your new receiver.
NOTE: If no channels were found during the automatic channel scan, the receiver
will return to the Installation menu. Please select your language again and
refer to chapter 7.1 for further instructions.
5.0 QUICK GUIDE FOR USING YOUR RECEIVER
We at THOMSON understand that you can’t wait to enjoy your new HD receiver. The following quick
guide will make you familiar with the basic operation of this device. We do, however, advice you to read
the full user manual to get the best performance from your THOMSON HD receiver.
To turn your receiver ON or to Standby, press the q button on the remote control.
Choose channels with the pq buttons. Alternatively, you can also enter the channel number with the
0~9 buttons on the remote control or press OK in viewing mode to display the channel list.
The volume can be adjusted with the tu buttons.
QUICK GUIDE FOR USING YOUR RECEIVER
English
P9
Page 14

6.0 OPERATION
In viewing mode, several features are available to make watching TV a true pleasure. This
paragraph describes these features. Please also read chapter 7 to get familiar with the menu of
your new receiver.
6.1 Changing channels
There are dierent ways to change channels with your new receiver.
• Via direct access
• Via the channel list
• Via the pq buttons
• Via the RECALL button
6.1.1 Direct access
To gain direct access to a certain channel, simply enter its number with the 0~9 buttons on the
remote control. Channel numbers can be up to four digits long. Entering a number with less than
four digits is possible. Just wait a few seconds (or press OK) and your receiver will switch to the
selected channel.
6.1.2 Channel list
Press OK in viewing mode to display the channel list. Press pq to highlight your channel of
choice and press OK once to select the highlighted channel. The channel list is equipped with
a Search function to make it easier to nd channels. In the channel list, press GREEN and an
alphabet popup will be displayed. Press pq to select the rst letter (or letters) of your channel of
choice. Press EXIT to leave the popup. All channels beginning with the chosen letter(s) will now be
displayed. Now select the channel in the ltered list.
The following buttons are available in the channel list and in viewing mode:
GREEN: Opens an alphabet banner to quickly find a channel
TV/RADIO: Toggles between TV and radio channels
BLUE: While in channel list, jump to top line, to scroll through satellites list. In
FAV: To switch to one of the available favourite lists.
6.1.3 Using the pq buttons
p will switch to a higher channel.
q will switch a lower channel.
6.1.4 Using the RECALL button
Press the RECALL button for switching between the last viewed channels.
viewing mode:
P10
OPERATION
Page 15

6.2 Info banner
At any time during viewing mode you can press the i button to get information about the
current channel as well as the current and following programme*. Press i twice to view detailed
info of current and following programmes. Press tu to see information about current and next
programme. Press three times to view technical details about the current channel. Press i again or
EXIT to close the information.
You can change the on-screen duration of the info banner in the System menu. Please refer to
section 7.2.5.2 for more details.
*Programme information is displayed when available. Availability depends on broadcast.
6.3 Selection of audio language
Some channels support a choice of dierent audio formats and/or languages. To select another
audio stream, press AUDIO in viewing mode. A list with available audio streams will now be
displayed. Press pq to select a stream and conrm with OK. With the tu buttons you can
choose between mono left, mono right or stereo audio.
6.4 Teletext
Your receiver includes a fully featured Teletext. To access Teletext, press the TEXT button in viewing
mode and press the 0~9 or pq buttons to select the number of the page you wish to see.
Subpages (if loaded and available) can be selected with the tu buttons. The coloured buttons of
the remote control allow you to jump to selected pages directly, as indicated on the bottom of the
Teletext screen. Press TEXT again or EXIT to go back to viewing mode.
6.5 Subtitles
Some programmes support a choice of dierent DVB subtitle languages. Press the SUBTITLE
button in viewing mode to display a list of available subtitle languages. Press pq to select a
subtitle language and conrm with OK.
6.6 EPG (Electronic Programme Guide)
The Electronic Programme Guide is a very useful function that allows you to watch programme
schedules and information on screen. Press the EPG button to activate this guide (you can also
enter EPG via the menu too). Press pq tu to select a channel and u to move the highlight to
the programme list. In the programme list, press pq to select or scroll through programmes and
tu to display programme information for the next/previous days. Press OK to display detailed
information about the selected programme. If there is more than one page of information, press
tu to scroll. Press MENU to go 1 step back, EXIT to leave the EPG.
NOTE: Availability of EPG data depends on broadcast.
English
Booking a programme from the EPG
Select a programme as described above. Press YELLOW (Book) when you have selected a
programme. This will lead you to the Timer (Schedule) menu. All details are already lled in for
OPERATION
P11
Page 16

you. Save the timer with OK. To display the list of booked events just press the BLUE button while
being in viewing mode.
Press RED or GREEN or P+/P- to jump 10 places in the list. A total of 32 events can be booked.
6.7 Favourite channels
Press the FAV button to access your favourite channels and to toggle between available favourite
groups. Please refer to section 7.2.1 for details on how to create favourite lists.
6.8 Instant Recording*
Your new receiver allows you to make an instant recording of the programme you are watching.
Simply press 4 and conrm with OK to start the recording. Default recording time is set to 2:00
hours. If you like to change the duration time of a recording, press 4 and select the duration with
tu. During the recording a recording sign will be shown in the channel list. To stop the recording,
press 3 and press OK again to stop the recording.
*This user manual describes the full functionality including the recording function and may not be applicable if the PVR software has not yet been
installed.
**Please connect a USB storage device with sufficient free space before you start a recording.
6.9 Timeshift*
Timeshift allows pausing live broadcasts and resume playback later. Press 2 in viewing mode
to activate Timeshift, according the set Timeshift mode in the menu. A time banner and pause
symbol will appear on screen. Live TV is now frozen. Press 2 to resume timeshifted playback. Press
5 6 for fast rewind/fast forward. Press 3 to return to live TV.
*This user manual describes the full functionality including the recording function and may not be applicable if the PVR software has not yet been
installed.
7.0 MAIN MENU
The Main Menu consists of the following items: Installation, Channel, Multimedia, System, Others
and Network.
7.1 Installation
This menu consists of the following items: Satellite Setting, Automatic SAT Scan, Manual Scan,
Information. Press the MENU button and tu pq to navigate through the menu.
7.1.1 Satellite Setting
Press the pq buttons to highlight the satellite your dish is aimed at. Its antenna settings will
be shown at the right side. You can enter the right side with the tu buttons and return to the
satellite list with EXIT. From the Satellite Setting menu, you can start a scan by pressing the GREEN
button after you have made the appropriate settings or edit transponders by pressing the RED
button.
P12
MAIN MENU
Page 17

7.1.2 Configure the antenna settings for the selected satellite
Satellite The name of the selected satellite is shown here.
LNB The setting is Universal LNB (09750/10600) – the most used on the market.
Transponder Select a transponder, known to carry a signal.
DiSEqC 1.0 Select the switch type in use. 4to1(DiSEqC 1.0) or 16to1. (DiSEqC 1.1)
Uncommitted If uncommitted DiSEqC switches are used, select them here. (Advanced
22K Tone Auto: this setting will follow automatically.
Polarity 13/18 V, this setting will follow automatically.
Motor If using a motor, press tu to choose DiSEqC1.2/GOTOX. Then press OK to
DiSEqC1.2 Move the motor to the right position for locking the signal like explained
GOTO X Select GOTO X with the tu buttons. Press GREEN to setup your location
Location: Press tu to select one of the pre-set locations. Choose a location nearest
Longitude Direction: Choose East or West.
Longitude Angle: Press the 0~9 buttons to enter the coordinate.
Latitude Direction: Choose North or South.
Latitude Angle: Press the 0~9 buttons to enter the coordinate. When all settings have
SatCR Select On, if you use a SatCR LNB, otherwise leave to Off. When On is
Position: Select the LNB A or LNB B.
IF Channel: Select the IF channel number according to the specifications of your
Center Frequency: Select the Center Frequency according to the specifications of your SatCR
Select the store button to nalize your settings or press MENU or EXIT to leave without storing.
Select Tone Burst if a Legacy 2to1 switch is used.
user setup)
show the menu for setting the position for your location.
below.
Move Continue: press tu for moving West/East. It will keep moving as
long as the button is kept pressed. By pressing once it will move in 1° step.
Move Step(1): press tu for moving West/East in 0.3° step.
Store Position: to store the current motor position for selected satellite.
Goto Reference: to go to the reference 0° position.
coordinates. A pop-up window will appear, in which the following settings
can be made:
to you. If you know the coordinates of your place of residence, you can
choose Manual and make the following extra adjustments:
been made, press EXIT to save the data and leave the window. Now
press OK to enter the GOTO X menu. Move Auto will move the dish to the
selected satellite automatically. For Move Continue, Move Step (1) and Goto
Reference please see explanation above.
selected press YELLOW (Setup SatCR) to enter the Sat setup page.
SatCR LNB. Note: Any SatCR LNB in the chain needs a different IF channel
number.
LNB. Note: Any SatCR LNB in the chain needs a different Center Frequency.
7.1.3 Satellite and Transponder edit options
When in Satellite Setting use the RED TP Edit button to edit Satellites and Transponders.
MAIN MENU
English
P13
Page 18

Use tu to switch between Left and Right window. (Satellite List and Transponder List.)
Add: While in the satellite name list: Press YELLOW to add a new satellite. In
Delete While in the satellite name list: Press BLUE to delete a satellite from the list.
Edit: While in the satellite name list: Press RED Edit to enter the Sat Edit window.
After entering all data, press OK and conrm with OK or press EXIT to leave without saving.
Use GREEN to enter to the Automatic scan window.
NOTE: Deleted satellites and transponders from the pre-installed lists can only be
the popup window, enter a satellite name with the key table (press u),
selecting a character by using the navigation buttons. Press OK to enter
the chosen character. When you have entered the name, navigate to the
on screen and press OK on the remote control to confirm the new
name. Select the satellites position E for East and W for West. Longitude:
Use the numeric keys to enter the longitude of the satellite. Save the
settings with OK or cancel with EXIT.
While in the Transponder list: Press YELLOW to add a new Transponder. In
the popup window enter the frequency, symbol rate and polarity of the
new transponder.
Press GREEN to delete the selected satellite, select YELLOW to delete all
satellites. Confirm deleting with OK or EXIT to cancel.
While in the Transponder list: Press BLUE to delete a transponder from the
list. Press GREEN to delete the selected transponder, select YELLOW to
delete all transponders. Confirm deleting with OK or EXIT to cancel.
Select the satellites position E for East and W for West. Longitude: Use the
numeric keys to enter the longitude of the satellite. Enter a satellite name
with the key table (press u), selecting a character by using the navigation
buttons. Press OK to enter the chosen character. When you have entered
the name, navigate to the on screen and press OK on the remote
control to confirm the new name. Save the settings with OK or cancel by
EXIT.
While in the Transponder list: Press RED Edit to enter the TP Edit window.
Frequency: Use the numeric keys to enter a known frequency of the
satellite transponder. Symbol Rate: Use the 0~9 buttons to enter the
symbol rate of the satellite transponder.
Polarity: Press tu to select the polarization of the satellite transponder. V
(Vertical) or H (Horizontal).
retrieved by performing a factory reset.
7.1.4 Automatic SAT scan
Select the options if you want to do automatic scan.
Satellite: Select the satellite you wish to scan, as previously set up in the Satellite
Transponder: Select a transponder which is known to carry a signal to check if reception
Setting menu.
of the satellite is possible.
P14
MAIN MENU
Page 19

NIT: Network Information Table. If selected On, the receiver will use the NIT
Programme: Select Free Only to search for Free to Air channels. Select All to include
Scan Mode: Default TP: All stored transponders in the memory will be scanned.
One TP: The transponder selected under Transponder will only be scanned.
Scan Select: Select All Sat to search all satellites you have selected in the Satellite Setting
After conguring, press GREEN to start scanning with the selected settings.
Your receiver will now perform an automatic channel search with the scanning progress shown
on screen. During the channel search you can quit the scan process with EXIT or MENU. When the
progress has been completed, all found channels will be stored and the receiver will switch to the
rst found channel.
provided by the satellite provider to search for channels. If selected Off, the
receiver will search with its pre-installed transponder list.
scrambled channels as well. Note: Scrambled channels cannot be watched
with this receiver.
Blind: Slow scan in 2 MHz steps. The receiver will first scan the whole
frequency band to find the transponders it can lock on. After gathering
all transponders, it scans the transponders one by one to get all available
programmes.
menu. Select Single Sat to search only the satellite selected under Satellite.
7.1.5 Manual scan - Scanning by transponder
Select the options if you want to do a manual scan. (Advanced users.)
Satellite: Select the satellite you wish to scan from, as previously set up in the
Frequency: Enter a known frequency of a satellite transponder with the 0~9 buttons
Symbol Rate: Enter the symbol rate of the previously set satellite transponder with the
Polarity: Set the polarization of the previously set satellite transponder, V (Vertical)
NIT: Select On if you want to do a scan starting from the previously set satellite
Programme: Select Free Only to search for Free to Air channels. Select All to include
After conguring, press GREEN to start scanning with the selected settings.
Your receiver will now perform a channel search with the scanning progress shown on screen.
During the channel search you can quit the scan process by pressing EXIT or MENU. When the
progress has been completed, all found channels will be stored and the receiver will switch to
channel number 1. The new found channels are added to the end of the list.
Satellite Finder: You can use the menus Satellite Setting, Automatic Sat Scan or Manual
Satellite Setting menu.
on the remote.
0~9 buttons on the remote.
or H (Horizontal).
transponder according to the Network Information Table, as offered by the
Satellite Provider. Select Off, to scan just the one transponder.
scrambled channels as well. Note: Scrambled channels cannot be watched
with this receiver.
Scan to find a satellite and peak the dish for maximum reception. Select
the satellite you wish to find or peak, select the settings according to your
dish-setup and then select a transponder which is known to carry a signal.
MAIN MENU
English
P15
Page 20

Use the signal and quality bar to find/peak the satellite. Signal strength
and quality above ~70% would be considered usable.
7.1.6 Information
Find technical information about this receiver as model, hard and software versions. This
information might be asked for if you contact us.
7.2 Channel
Press MENU and select Channel by pressing the tu buttons. Use the pq buttons to select the
TV Channel Editor submenu. Press OK to edit programme settings. Press EXIT to exit the menu.
7.2.1 TV Channel Editor
To edit your programme preferences (rename, move, sort, skip, lock, delete, or favourite), please go
to the TV Channel Editor. Press pq to highlight a channel, BLUE to select a satellite (if more than
one available).
Set favourite programme
Your receiver allows you to store channels in up to 8 favourite lists. Due to the large number of
channels available on satellite nowadays, this can be a very useful function.
1. Select the preferred programme, then press the FAV button.
A Favourite Type window will pop up on screen. The following 8 groups are available: Music,
Sport, Shopping, News, Movie, Talk shows and two personal lists.
All types of Favourite List are represented with an icon.
Please select one (or more) of them. Below the preview window you can see to which
favourite list the programme belongs.
2. Repeat the previous step to select more favourite programmes.
3. To confirm and exit the menu, press EXIT. You will be prompted to confirm the changes.
Disable favourite TV or radio programme
Repeat step 1 described above and deselect with OK in the Favourite Type window.
View favourite programme
1. In normal viewing mode (no menu mode) press the FAV button repeatedly to display the lists
of favourite programmes. (Or press tu to switch between available favourite lists.)
2. Select your favourite programme by pq and press OK to switch to it.
3. Now in viewing mode you can select channels from the chosen favourite group only by
pressing pq. If you want to change to the main channel list, toggle the FAV button in
viewing mode until FAV Off is displayed.
Delete a TV or radio programme
1. Select the programme you want to delete and press the YELLOW button.
A popup window will appear to decide to delete the selected channels or to delete all
channels.
P16
MAIN MENU
Page 21

(Re-scan required.) A cross-sign will appear behind the selected channel. Press OK to delete
the programmes. You will be prompted to conrm the changes.
2. Repeat the previous step to delete more programmes.
Skip TV or radio programme
1. Select the programme you want to skip and press the EDIT button. Then press the BLUE
button.
2. The programme will be marked to skip. The receiver will skip this programme while zapping
between programmes in normal viewing mode (in channel list mode the skipped channels
remain selectable).
3. Repeat the previous step to skip more programmes.
4. To confirm and exit the menu, press EXIT.
Disable a skipped TV or radio programme
Press the BLUE button on the programme marked with the skip symbol.
Move a TV or radio programme
1. Select the programme you want to move, and then press the EDIT button. Then press the
GREEN button.
2. A move symbol will appear. Press OK.
3. Press pq to select the new position of the programme.
4. Press OK to confirm the new position.
5. Repeat the above steps to move more channels.
Locking programmes
You can lock selected programmes for restricted view.
1. Select the programme you want to lock, and then press the GREEN button. The programme
is now marked as locked.
2. Repeat the previous step to select more programmes
3. To confirm and exit the menu, press EXIT.
4. In viewing mode: When coming to a locked channel: Press exit at the warning popup and
enter your Password.
NOTE: Programmes will only be locked when channel lock is set to On in the System
menuParental Control.
English
NOTE: We recommend changing of the default password (0000) to one of your
Disable a locked TV or radio programme
Press the GREEN button on the programme marked with the lock symbol.
Rename a TV or radio programme
1. Select the programme you want to rename and press the EDIT button. Then press the RED
(Name) button. An alphabet popup appears.
preference. Please refer to chapter 7.2.5.6 System for more details.
MAIN MENU
P17
Page 22

2. In the alphabet popup select a character by using the navigation buttons. Press OK to enter
the character. When you have entered the new name, navigate to the sign on screen and
press OK on the remote control to confirm the new name.
3. To store the changes and exit the menu, press OK.
7.2.2 Sort
Here you can sort your channels in the following order:
1. Select the programme you want to rename and press the EDIT button. Then press the
YELLOW button.
2. A popup will appear with the following possibilities:
A-Z/Z-A Sort the channels in alphabetical order (A-Z or Z-A)
TP Sort the channels in frequency order as found on Satellite.(Low-High)
FTA/Scrambled Sort the channels from Free to Air to Scrambled
HD/SD Sort the channels from HD to SD order.
Satellite Sort the channels by satellite.
NOTE: The 1st time the option is selected, the first possibility is executed, if you select
the same option again, the 2nd possibility is executed. (Example: 1st time
A-Z/Z-A will yield A-Z order. 2nd time will yield Z-A)
7.2.3 Radio Channel Editor
Press MENU and select Channel using the tu buttons. Use the pq buttons to select the Radio
Channel Editor submenu. Press OK to edit programme settings. Press EXIT to exit the menu. Refer
to 7.2.1 TV Channel Editor for explanations of the menu items.
7.2.4 EPG (Electronic Programme Guide)
Please refer to section 6.6 above.
7.2.5 System
Press MENU and select System.
Select an option and press OK to enter a menu item.
Use tu to adjust the settings.
This menu consists of the following items: Language, OSD Style, Clock setting, TV setup, Adv Timer,
Parental Control, Update&Backup and Factory Setting.
7.2.5.1 Language
Press MENU and select System, then Language.
Select an option and press tu to adjust the setting.
Press EXIT to exit the menu.
OSD Language: Select the preferred language for the On Screen Display.
Audio Language: Select the preferred audio language for watching TV channels. If the
P18
MAIN MENU
language is not available, the default programme language will be used.
Page 23

Subtitle Language: Select the preferred subtitle language.
7.2.5.2 OSD Style
OSD Transparency: Select the amount of Transparency you prefer in 8 steps.
Banner Display Time: Set the time-out for the info banner. Possible settings are: Always, 1~30
seconds in several steps.
7.2.5.3 Clock setting
Press MENU and select Clock setting. The menu provides options to adjust the time and date
settings.
Press pq to select an option and tu to adjust the setting. Press EXIT to exit the menu.
GMT Usage: Select On for automatic time and date updates from live signal or Off for
Time Zone: Select the Offset from GMT standard time.
Set Date: Enter the date using tu and the numeric buttons when GMT Usage is set
Set Time: Enter the time using tu and the numeric buttons when GMT Usage is set
Sleep Time: Enter the duration the unit should continue running before switching itself
Summer Time: Select On or Off depending on the year’s period.
entering them manually.
to Off.
to Off.
off. Select 15 min up to 120 min or Off.
7.2.5.4 TV setup
Press MENU and select TV Setting. The menu provides options to adjust the interaction between
TV (monitor) and this receiver. Press pq to select an option and tu to adjust the setting. Press
EXIT to exit the menu.
TV Format
You can set the display format to available settings:
For 4:3 TVs:
4:3LB: 4:3 LetterBox: The full 16:9 picture will be displayed on your 4:3 TV set with
4:3PS: 4:3 Pan&Scan: The centre of the 16:9 picture will be displayed full-screen
16:9LB Combination of Letter-box and Pan&Scan. For 16:9 TVs:
16:9FIT: Select when using a 16:9 TV set. Whole picture will be shown.
TV mode
Only PAL possible.
Video output
This setting is relevant when the receiver is connected to the TV set via Scart. Select Scart RGB for
the best picture quality or Scart CVBS if your TV doesn’t support RGB. If connected by HDMI, leave
it on HDMI.
black bars above and below the picture.
on your 4:3 TV
MAIN MENU
English
P19
Page 24

TV Resolution
If the video does not appear correctly, change the setting. These settings match the most
common settings for HDMI.
576i: For analogue TVs (on Scart connection).
576p: For digital SD TVs (some digital TVs do not support this mode).
720p_50Hz: For digital HD TVs (on HDMI connection).
1080i_50Hz: For digital HD TVs (on HDMI connection).
1080p_50Hz: For digital HD TVs (on HDMI connection).
Auto: The best possible resolution available will be auto negotiated by between
Digital Audio Output: Select digital audio output mode. Settings affect S/PDIF output.
Auto Switch Off
Auto Standby is a new, power saving feature that helps you reduce power consumption. It will
switch o the receiver when no command is given for the dened period of time. It is set per
default to 3 hours. With the tu buttons you can select between dierent time intervals or O for
disabling the feature.
NOTE: If there are timers running, the auto standby function will be disabled for the
TV Brightness Some adjustment can be made to the brightness of the picture.
TV Contrast Some adjustment can be made to the contrast of the picture.
TV Saturation Some adjustment can be made to the colour saturation of the picture.
These features are useful for analogue TVs, in practice, best left on default 50.
TV and receiver (‘handshake’) when using a modern digital HD TV when
connected with an HDMI cable.
LPCM – audio from any format will be converted to digital stereo PCM
format.
RAW – audio from receiver will be sent in original digital format to be used
in combination with Home Theatre Sets or Digital Amplifier with Multi
Audio capability.
booked time.
7.2.5.5 Adv Timer (Schedule)
In this menu you can setup the schedule for automatic switching to the dened channels at a
particular date/time. The timer menu can be entered directly from viewing mode by pressing the
BLUE button.
Add: Press OK to add a new booking. In the appearing dialog select channel
Del: Press the RED button to delete a booking from the list. Press OK to confirm
Page Use YELLOW and/or BLUE to jump quickly through your list of bookings.
type and number, the starting date and time, end time, repeat cycle mode
(once, daily, weekday, weekend day or weekly). Tip: For selecting the
channel number you can use the 0~9 buttons.
When you have entered all parameters, press OK to store your booking.
To edit an existing booking select that booking and press the OK button.
deleting or EXIT to cancel.
P20
MAIN MENU
Page 25

NOTE: You can set timers for programmes directly from the EPG. Please refer to
section 7.2.4 for more details.
7.2.5.6 Parental Control
In this menu you can setup your preferences for Parental Control. (Default Password: 0000)
Menu Lock Use this option to prevent entering the menu and changing settings. The
Channel Lock When set to On, channels marked as Locked in the Channel Editor are
Censorship Lock Some Satellite Providers sent an age restriction in their signals. When
Change Password Press OK, enter the old password, then enter the new password, and
menu items can only be altered after entering the password.
indeed only viewable after entering the password.
an age is selected here, and an age restriction signal higher or equal is
received as the set age, the programme will only be viewable when the
correct password is entered. The options are 4 to 18, no block, total block.
confirm the new password. Memorize it well.
7.2.5.7 Update & Backup
Select System then Update & Backup from the main menu and press OK to select.
Image upgrade
NOTE: The front panel USB port is especially adapted for Software update.
The upgrade can be performed with an USB device, preferably an USB pen drive.
The USB device must have been formatted in FAT32.
Download the required update le for your receiver model from the support page on our website
www.thomsonstb.net or contact your local dealer.
Unzip the le on your computer, if necessary, and then copy it to root folder of your USB storage device.
Connect the USB storage device to the front USB port of the receiver. Press MENU and select
System then Update & Backup and Image Upgrade. Select the correct USB device (USB0 or USB1).
Press OK to enter the software le list. Select the le containing the software image with
pqtu and press OK to initiate the software update. An attention banner will now be displayed.
Press OK to start the update (or EXIT to cancel it). Follow the instructions displayed on screen. The
update process will take some time. After the update process has been completed the receiver will
reboot and the receiver will start with the last shown channel.
You also can reload your previous backed up channel a favourite database, see Image backup.
WARNING: NEVER power off the receiver or remove the USB device during the software
update process. Doing so might cause irreparable damage to your receiver
and will void your warranty.
English
Image Backup
NOTE: The front panel USB port is especially adapted for Image backup.
P21
MAIN MENU
Page 26

This menu allows you to save the channel data base with favourites, the application or backup all
(select it in the top line) of your receiver to a USB device. This very convenient feature enables you
to save your personal settings like Channel and Favourite-lists on an USB storage device and load
them back to the receiver later. This feature is especially helpful after unintentional changes or
factory reset. In such cases just skip the Installation by pressing EXIT in Installation and select the
database management menu in System, Update&backup.
7.2.5.8 Factory setting
Reset your receiver to the default factory settings. Sometimes useful if the unit suddenly behaves
in an unexpected manner, e.g. after a power failure.
Select System then factory setting in the main menu and press OK to select. Enter your PIN code
or the DEFAULT PIN: 0000 and press OK to conrm. This option will delete all your channels and
settings. The receiver will reboot and start with the initial Installation menu.
WARNING: A factory reset will permanently delete all your personal settings, timers and
Others
Here you will nd some simple convenient items to use.
Calendar Find out quickly what day is a certain date.
Calculator Have quick access to a digital calculator.
Game Select from three games, follow the instructions on screen.
Network
The unit is equipped with a network connection, which can provide weather forecasts and RSS
news reports via an Internet portal. Connect a CAT5E cable (or higher quality) to the Ethernet RJ45
connector of the unit, and the other end to an existing switch/router/modem which is connected
to the internet. The default setting is Auto (DHCP) for automatically obtaining IPs and DNS. Select
Manual in Network Settings to enter own settings if required. Refer to the manual of your router or
modem to setup properly. The Ping test can be selected to check your connecting, once done.
Weather You can setup several cities to monitor 5-day weather forecast on regular
RSS Feed Enter your own preferred RSS feeds with the YELLOW button or use the
stored channels. Please consider this before you perform a factory reset.
basis. Up to 4 cities can be monitored around the globe. Select pre-defined
cities or enter your own preference with the RED search button and use the
key-pad to enter. Select the symbol to save. Press YELLOW to save all cities.
Delete a city with BLUE, then press YELLOW to save. After setting up for the
first time, exit from the Weather app and enter again to see the forecasts. Use
tu to scroll through the cities. To edit cities again, press YELLOW.
default settings with the RED button. Start editing by using the tu
buttons and the appearing key-pad. Be sure to save with the symbol.
Press OK to connect to a selected feed. Use the pqtu buttons to scroll
through the content.
P22
MAIN MENU
Page 27

NOTE: Applications available in our product(s) may change from time to time
and are not guaranteed to work at all times. They are subject to technical,
commercial and/or license related changes.
7.3 Multimedia
NOTE: The back panel USB port is especially adapted for Multimedia.
Press MENU and select Multimedia.
The menu provides the Multimedia feature for playback of Movie, Music and Photo. The dierent le
formats listed below are supported. In this menu you can make video and photo congurations. The
unit supports USB devices with FAT32 format. Make sure your USB device is formatted correctly.
NOTE: THOMSON cannot guarantee compatibility (operation and/or bus power)
7.3.1 Multimedia*
If there is no USB device plugged in, a warning message ‘Device is not available’ will be displayed.
When a USB device is detected you can select between Movie, Music and Photo in this menu.
Select one of them, press OK to enter the file browser and select the file you want to play.
Movie: Video files in various formats are supported (MPG, MPEG, TS, VOB, MP4,
Music: Supported file formats are MP3 and WMA**
Photo: Supported file formats are JPG and BMP**
My Recorder: Manage your made recordings.
Recorder Settings: Manage your settings for Timeshift and recordings.
Also available in the menu: Remove Device.
*This user manual describes the full functionality including the recording function and may not be applicable if the PVR software has not yet been
installed.
**THOMSON cannot guarantee the playback of files although extensions are listed, as it depends on codec used, data bit rate and resolution (all
MPEG codec formats are supported).
7.3.1.1 Movie
In the Movie menu you have to navigate to a movie le.
Select the le and press OK to start playback in preview mode.
Select ‘Upper Folder’ to go back to the parent folder.
During playback you can use the playback control buttons, such as 1, 2, 3, 5 6, 7 8. You
can check the le details by pressing the i button in full screen mode. To close the banner, press
again. Press the GOTO button and enter the time moment you want to jump to with the 0~9
i
with all USB mass storage devices and assumes no responsibility for any loss
of data that may occur when connected to this unit.
• With large amounts of data, it may take longer for the system to read the
contents of a USB device.
• Some USB devices may not be properly recognized. Even when they are in a
supported format, some files may not play or display depending on the content.
• It is possible to use already by PC formatted NTFS HDDs.
AVI,...)**
MAIN MENU
English
P23
Page 28

buttons, then press OK to conrm. With the 5 6 buttons you can rewind or forward playback in
x2, x4, x8, x16 and x32 speed. When it has fast rewound to the beginning, playback of the current
le will be resumed. When it has fast forwarded to the end, playback of the next le starts. With
the 7 8 buttons you can jump to the previous/next video le. Press GREEN to select the correct
character set for subtitle les.
Movie Subtitle
This subtitle function is only relevant in the Movie menu for movies which contain subtitle les
in.srt format.
During playback, press SUBTITLE to select a language and conrm with OK. During playback of
Movie les you can press SUBTITLE twice to change the subtitle settings described below:
Subtitle Size: Choose subtitle size between Small, Normal and Big.
Subtitle BG: Choose subtitle background between White, Transparent, Grey and Yellow-
Subtitle Font Colour: Choose subtitle font colour between Red, Blue, Green, White and Black.
Green.
7.3.1.2 Music
These options available with the RED button:
Random: On: Music will be played in a random order.
Repeat: All: Repeat at the end of the list.
Info option: Show Lyrics or Music info
Display: Show Equalizer or Cover
Options available with the GREEN button: Folder view or Thumbnail view, During slide show:
Switch between Equalizer and Cover.
Options available with the YELLOW button: Switch between Lyrics or Music info
7.3.1.3 Photo
These options available with the RED button:
Random: On: Pictures will be shown in a random order.
Repeat: All: Repeat at the end of the list.
Interval Time: You can adjust the slide show interval from Slow to Fast..
Effect: On: Implement a random slide show effect.
Options available with the GREEN button: Folder view or Thumbnail view, During slide show:
Select music to accompany your slide show.
Options available with the YELLOW button: Big or Small thumbnails.
7.3.1.4 My Recorder*
In the My Recorder menu you can access and manage your recorded events and programmes.
With pq you can highlight the recording on the left side of the screen. With tu you can scroll
pagewise for recordings. Playback of the highlighted recording will start after a few seconds
in preview mode on the right side of the screen. To start a playback in full screen, press OK. If
multiple USB devices are connected, press p to highlight the “USB/USB1/1” menu point and
select the USB device with tu. Then press OK. The available recordings from the selected USB
P24
MAIN MENU
Page 29

device will be displayed. The following functions can be chosen with the colour buttons: Rename,
Device, Select, Del.
Rename RED EDIT: Select or highlight the recording that you want to rename with pqtu,
In the ABC window you can use pqtu to move the cursor. Press OK to add a character or
process the selected function. After renaming your recording, select the “Floppy Disk” symbol and
press OK.
USB Device GREEN DEVICE:
You can check the capacity and format the connected USB devices from this
Select YELLOW Select:
For selecting multiple recordings for editing, highlight the recording with
Delete BLUE Del: For deleting recording(s), highlight a recording with pq and select it with
In playback mode the following functions and buttons can be used: 1, OK, 3, 6, 5, 7, 8,
SUBTITLE, TEXT, AUDIO,
1: Starts/resumes playback
OK, 2: Pauses/resumes playback
3: Stops playback and returns to the recording manager.
5 6: Rewind or forward playback in x2, x4, x8, x16 and x32 speed.
7 8: Jump to the previous/next video file.
SUBTITLE: Displays the subtitle selection window. If the recording includes subtitles you
TEXT: If the recording includes Teletext, it displays the recorded Teletext content.
AUDIO: If the recording includes multiple audio tracks, you can select the audio
: Displays information about the recording, the playback time and the
GOTO: To continue playback from the set time, press the RED GOTO button. With
STEP: Press the GREEN Step button to playback step by step.
then press the RED Edit button. The ABC window appears on the screen.
menu point. Press the GREEN Device button. The USB device menu displays.
With pqtu you can select the options Slot, Partition or Format. Below the
selected device/partition, this information is displayed: Free space, Used space,
Total space. For formatting a device, select the partition, highlight Format
with pq and press OK. A confirmation window pops up to continue and
proceed formatting. Select an action with tu and press OK. Please note
that after formatting all currently stored data will be lost from the device.
pq and then select the recording with the YELLOW Select button. A check
mark symbol appears next to the name of the recording. Repeat the steps to
select your recordings for further processing.
the YELLOW Select button, then press the BLUE Del button. A confirmation
message pops up for confirmation that the selected file(s) shall be deleted.
Select the delete or cancel option with tu and press OK.
, GOTO, 0~9, STEP, ZOOM+/ZOOM-, !, EXIT.
can select the subtitle language here.
channel/language in the audio selection window by pressing tu.
additional function buttons. Press
window.
the 0~9 buttons you can add the playback time 00:00:00 from where you
want to continue the current playback and press OK.
again to remove the information
English
MAIN MENU
P25
Page 30

ZOOM+: Press the YELLOW ZOOM+ button during playback to zoom in the video,
ZOOM-: Press the BLUE ZOOM- during playback to zoom out in the video, press again
!: Mutes audio.
EXIT: Exits from the recording manager, returns to the last viewed channel.
*This user manual describes the full functionality including the recording function and may not be applicable if the PVR software has not yet been
installed.
press again to zoom deeper, with pq tu you can move the picture to the
part which you like to display.
to zoom out.
7.3.1.5 Recorder Settings*
In the Recorder Settings menu you can setup the recording and Timeshift modes.
Timeshift mode: PAUSE, AUTO, OFF. Set the Timeshift mode with tu.
PAUSE: In the PAUSE mode, Timeshift can be activated in channel view mode
AUTO: In the AUTO mode, Timeshift starts immediately in channel view
OFF: The Timeshift function is disabled.
One button recording: OFF, ON. With tu you can switch the one button recording mode ON/OFF.
ON: If you press 4 in the one button recording mode the recording starts in
OFF: After pressing 4 the recording length time window appears on
Default Recording Period:
You can setup the default recording time period by pressing tu.
*This user manual describes the full functionality including the recording function and may not be applicable if the PVR software has not yet been
installed.
by pressing 2.
mode. If you switch channels the previously timeshifted programme will
be deleted and the receiver starts timeshifting the currently watched
programme. During timeshifted content you can use 5 6, 1 to view the
earlier parts of the programme or to return to the current point.
the set recording length time.
screen. With tu (15 min steps) and pq (1 hour steps) you can setup the
recording length time and then press 4 again. During the recording you can
change the recording length time by pressing 4.
8.0 TROUBLESHOOTING
There may be various reasons for abnormal operation of the receiver. Please check the receiver
according to the procedures shown below. If the receiver does not work properly after checking it,
please contact your local Service line or a THOMSON dealer. Alternatively you can send a support
mail via our website: www.thomsonstb.net. NEVER open or disassemble your receiver. This may
cause a dangerous situation and will void the warranty.
Problem Possible cause What to do
The display on the front
panel does not light up.
The mains cable is not
connected
The mains fuse is blown
Check that the mains cable is
plugged into the power socket
Check the mains fuse
P26
TROUBLESHOOTING
Page 31

Problem Possible cause What to do
No sound or picture,
but the front panel
shows red light
No sound or picture,
but the receiver menu
can be seen on the TV
screen.
(Press MENU on the
remote control.)
No signal or weak signal,
intermittent reception.
The receiver is in standby
mode
The channel is o-air
The satellite dish is not
pointing at the (correct)
satellite.
Channels are deleted in the
edit menu
Cables might have loosened.
Moisture might have entered
into cables or connectors.
Heavy rain at present.
Heavy storm at present.
Press the On/Standby button
Try other channel(s).
Check the signal level in the
Antenna Setup menu. Adjust
the dish.
Scan for channels (again)
Check the cable connections, LNB
and other equipment connected
between the LNB and the receiver,
or peak the dish.
Wait for the rain/storm to subside
English
Bad picture/blocking
error during heavy rain.
The receiver switches o
after 3 hours of inactivity
of remote control
commands
The receiver is suddenly
behaving unexpectedly
or erratically, for example
after a mains power
failure, power glitch,
lightning strike near you
or after a (interrupted)
software update.
The satellite dish is not
pointing at the (correct)
satellite(s)
Satellite dish is too small
Trees or buildings in path.
The signal is too strong, the
dish is oversized.
Heavy rain will attenuate
satellite signals, below a
certain level blocking will
occur.
The power saving Auto
Standby function is activated
Mains power problems could
cause a glitch in the software
in rare cases.
Adjust the dish. Ask a local satellite
specialist for advice.
Change to a larger dish
Change position of the dish
Connect a signal attenuator to
the LNB input. Ask a local satellite
specialist for advice.
Make sure your dish installation is
up to standards to minimize rain
eects. When in doubt, ask a local
satellite specialist for advice.
Switch the Auto Standby function
o, if you don’t like it.
Load the factory setting from the
System menu.
If not recoverable, ask a local
satellite specialist for advice or
contact the local Service Hotline or
send email to our support via
www.thomsonstb.net.
TROUBLESHOOTING
P27
Page 32

Problem Possible cause What to do
No picture or sound, but
the display and green
LED are on.
The remote control is not
working
No audio, only video Audio is muted on the
Scrambled service
message
The external USB HDD
does not start.
Password forgotten Contact the local Service Hotline
HDMI or Scart is not selected
on your TV or audio amplier
TV is not switched on
The battery is exhausted
The remote control is
incorrectly aimed
receiver, audio is muted on
the TV. The audio amplier is
muted. The Scart cable is not
inserted correctly.
The channel is scrambled. Select an alternative channel.
The power consumption is
too high.
Switch to the correct TV input
Switch the audio amplier to the
correct input
Switch the TV on
Change the batteries
Aim the remote control at the
receiver, or check that nothing
blocks the path to the front panel
Check if audio is muted.
Insert the Scart cable properly
Connect an extra power supply
adapter to your USB HDD device.
or send an email to our support via
www.thomsonstb.net.
9.0 SPECIFICATIONS
Video
Aspect ratio: 4:3 and 16:9, Pan & Scan, Pillarbox Letterbox, Auto
Video resolution: PAL 50Hz: 576i, 720p, 1080i, 1080p
Audio
Audio mode: Mono L/R, Stereo, Dolby® Digital, Dolby® Digital Plus*
*Dolby and the double-D symbol are registered trademarks of Dolby Laboratories
Tuner
LNB power: 13/18 V DC (± 5 %), max. 0.5 A, overload protected
DiSEqC versions: 1.0, 1.1, 1.2, GOTO X, Tone burst, SatCR
Multimedia
Video playback: Supported in various formats (MPG, MPEG, TS, VOB, MP4,
Audio playback: MP3, WMA*
Picture view: JPG, BMP*
*THOMSON cannot guarantee the playback of files although extensions are listed here, as it depends on codec used, data bit rate and resolution.
P28
SPECIFICATIONS
AVI…)*
Page 33

Connectors
Ethernet RJ45
SAT IN F-type female
SAT OUT F-type female
HDMI Type A
USB 2.0 Type A
TV SCART RGB, CVBS, Audio L/R output with volume control
S/PDIF Dolby Digital Out (Coaxial)
Power socket for external power supply
General Data
Supply voltage: 100 – 240 V AC 50/60 Hz
Output voltage: DC 12 V, 2 A
Power consumption: max. 24 W, typ. 10 W
Power consumption in standby: max. 0.5 W
Operating temperature: 0 ~ +40 °C
Storage temperature: -10 ~ +50 °C
Operating humidity range: 10 ~ 85 % RH, Non-condensing
Size (W x D x H) in mm: 220 x 170 x 45
Weight: 0.53 kg
English
SPECIFICATIONS
P29
Page 34

P30
SPECIFICATIONS
 Loading...