


 Loading...
TD5130 |
Setup & User Guide |
Copyright © 2012 Technicolor. All rights reserved. |
DMS-CTC-20120508-0000 v1.0. |

SETUP & USER GUIDE
Table of Contents
1 |
PRODUCT OVERVIEW ....................................................................................... |
4 |
||
|
1.1 |
Features................................................................................................... |
4 |
|
|
1.2 |
Hardware Overview..................................................................................... |
5 |
|
|
1.2.1 |
Front Panel ............................................................................................ |
5 |
|
|
1.2.2 |
Rear Panel............................................................................................. |
6 |
|
2 |
INSTALLATION ................................................................................................ |
7 |
||
|
2.1 |
Connect the Power ..................................................................................... |
7 |
|
|
2.2 |
Connect Wired Devices................................................................................ |
7 |
|
|
2.3 |
Connect Wireless Devices ............................................................................ |
8 |
|
|
2.3.1 |
WLAN................................................................................................... |
8 |
|
|
2.3.2 Wi-Fi Protected Setup (WPS) ....................................................................... |
8 |
||
|
2.4 |
Connect the Broadband (DSL) ....................................................................... |
8 |
|
|
2.4.1 |
Use a Splitter .......................................................................................... |
8 |
|
|
2.5 |
Check the Installation.................................................................................. |
9 |
|
3 |
CONFIGURE THE COMPUTER ............................................................................ |
10 |
||
|
3.1 |
Windows XP............................................................................................. |
10 |
|
|
3.2 |
Windows Vista.......................................................................................... |
10 |
|
|
3.3 |
Windows 7............................................................................................... |
11 |
|
4 ACCESS THE WIRELESS GATEWAY .................................................................... |
12 |
|||
|
4.1 |
Login...................................................................................................... |
12 |
|
|
4.2 |
The Interface ............................................................................................ |
13 |
|
|
4.3 |
Using the Menu......................................................................................... |
14 |
|
|
4.4 |
Configuration Wizard ................................................................................. |
14 |
|
5 |
TECHNICOLOR GATEWAY................................................................................. |
20 |
||
|
5.1 |
System Information.................................................................................... |
20 |
|
|
5.2 |
System Configuration................................................................................. |
21 |
|
|
5.2.1 |
DSL Service Configuration ........................................................................ |
21 |
|
|
5.2.2 Date and Time Configuration...................................................................... |
21 |
||
|
5.2.3 |
Web Browsing Interception........................................................................ |
22 |
|
|
5.3 |
Event Logs .............................................................................................. |
22 |
|
6 |
BROADBAND CONNECTION .............................................................................. |
23 |
||
|
6.1 |
DSL Connection........................................................................................ |
23 |
|
|
6.2 |
Internet Services ....................................................................................... |
24 |
|
7 |
TOOLBOX...................................................................................................... |
25 |
||
|
7.1 |
Remote Assistance.................................................................................... |
25 |
|
|
7.1.1 |
Enable Remote Assistance........................................................................ |
25 |
|
|
7.1.2 |
Disable Remote Assistance ....................................................................... |
26 |
|
Copyright © 2012 Technicolor. All rights reserved. |
2 |
|
DMS-CTC-20120508-0000 v1.0. |
||
|

SETUP & USER GUIDE
7.2 |
Game & Application Sharing ........................................................................ |
26 |
|
7.2.1 Assign a Game or Application .................................................................... |
27 |
||
7.2.2 Modify Assigned Game or Application ........................................................... |
28 |
||
7.2.3 Create a New Game or Application .............................................................. |
28 |
||
7.2.4 Modify a Game or Application..................................................................... |
29 |
||
7.3 |
Parental Control........................................................................................ |
30 |
|
7.4 |
Firewall ................................................................................................... |
31 |
|
7.4.1 Change Firewall Security Level................................................................... |
31 |
||
7.4.2 Create a New Security Level...................................................................... |
31 |
||
7.4.3 |
Set Filter Rules...................................................................................... |
32 |
|
7.5 |
Intrusion Detection .................................................................................... |
33 |
|
7.6 |
Dynamic DNS ........................................................................................... |
33 |
|
7.7 |
User Management...................................................................................... |
34 |
|
7.7.1 |
Add New User....................................................................................... |
34 |
|
7.7.2 |
Reset Password..................................................................................... |
34 |
|
7.7.3 |
Manage Users....................................................................................... |
34 |
|
7.8 |
DMZ ....................................................................................................... |
35 |
|
8 HOME NETWORK ............................................................................................ |
36 |
||
8.1 |
Devices................................................................................................... |
36 |
|
8.1.1 View or Modify Device Information ............................................................... |
36 |
||
8.1.2 Assign Game or Application to Device........................................................... |
37 |
||
8.1.3 Remove a Shared Game or Application ......................................................... |
37 |
||
8.1.4 Assign a Public IP Address to Device ........................................................... |
37 |
||
8.2 |
Interfaces ................................................................................................ |
38 |
|
8.2.1 |
Local Network Interface............................................................................ |
38 |
|
8.2.2 |
Wireless Access Point ............................................................................. |
39 |
|
APPENDIX A WIRELESS CONSIDERATIONS.............................................................. |
43 |
||
APPENDIX B REGULATORY & SAFETY INFORMATION ................................................ |
44 |
||
APPENDIX C SPECIFICATIONS .............................................................................. |
46 |
||
Copyright © 2012 Technicolor. All rights reserved. |
3 |
|
DMS-CTC-20120508-0000 v1.0. |
||
|

SETUP & USER GUIDE
1 Product Overview
Thank you for choosing Technicolor Wireless n ADSL2+ Gateway. This Wireless Gateway combines the functionality of an ADSL / ADSL2 / ADSL2+ modem and Internet gateway in one. The various security features, such as WPS, WPA2, SPI, and NAT, protect your data and privacy online. The web-based utility allows you to configure your Wireless Gateway easily.
1.1Features
▪Compliant with ADSL G.dmt (G.992.1), G.lite (G.992.2) standards
▪Compliant with ADSL2 G.dmt.bis (G.992.3) and ADSL2 + G.992.4 standards
▪Up to Up to 24Mbps downstream, 1.2Mbps upstream with ADSL2+ service
▪IEEE 802.11b/g/n infrastructure operating modes
▪Supports IPv4 and IPv6 protocols
▪Supports web-based configuration
▪Supports Command Line Interface (CLI) via Telnet
▪Supports NAT, SPI
▪Supports VLAN and QoS
▪Supports firewall protection
▪Supports up to 8 permanent virtual circuits (PVC)
▪Supports Wi-Fi Multimedia (WMM)
▪Supports Wi-Fi Protected Setup (WPS) for easy connection
▪Supports wireless data encryption with 64/128-bit WEP standard
▪Supports enhance security for WPA-TKIP, WPA2-AES, WPA, and WPA2
Copyright © 2012 Technicolor. All rights reserved. |
4 |
|
DMS-CTC-20120508-0000 v1.0. |
||
|
SETUP & USER GUIDE
1.2Hardware Overview
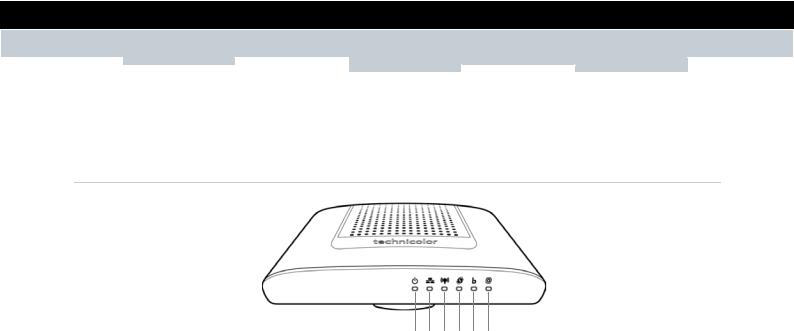
1.2.1Front Panel
|
|
1 |
2 |
3 |
4 |
5 |
6 |
|
||
|
|
|
|
|
|
|
|
|
|
|
No. |
LED |
|
|
Description |
|
|
|
|
|
|
|
|
|
|
|
|
|||||
1 |
Power LED |
|
|
Lights up when the device is powered on. |
||||||
|
|
|
|
▪ Solid GREEN – Indicates normal operation. |
||||||
|
|
|
▪ Flashing GREEN – Firmware upgrade in progress. |
|||||||
|
|
|
▪ Solid RED – Indicates malfunction. |
|
|
|||||
|
|
|
▪ Off – The device is powered off. |
|
|
|
||||
|
|
|
|
|
|
|||||
2 |
Ethernet LED |
|
|
▪ Solid GREEN – A wired connection is established. |
|
|||||
|
|
|
|
▪ Flashing GREEN – Data transmission is in progress. |
|
|||||
|
|
|
|
|
||||||
|
|
|
|
▪ Off – No wired connection detected. |
|
|||||
|
|
|
|
|
|
|||||
3 |
WLAN LED |
|
Lights up to indicate wireless connection. |
|||||||
|
|
|
▪ Solid GREEN – Wireless connection is established. |
|||||||
|
|
|
▪ Flashing GREEN – Data transmission is in progress. |
|||||||
|
|
|
▪ Off – Wireless connection is disabled. |
|||||||
|
|
|
|
|
||||||
4 |
WPS LED |
|
|
Lights up to indicate the Wi-Fi Protected Setup (WPS) connection status. |
|
|||||
|
|
|
|
▪ Solid GREEN – WPS is enabled. |
|
|
|
|
||
|
|
|
|
|
|
|
|
|||
|
|
|
|
▪ Flashing RED – Failure. |
|
|
|
|
|
|
|
|
|
|
▪ Off – WPS is disabled. |
|
|
|
|
|
|
|
|
|
|
|
|
|||||
5 |
Broadband (DSL) |
|
|
Lights up to indicate DSL connection status. |
||||||
|
LED |
|
|
▪ Flashing GREEN (slow) – DSL line detection in progress. |
||||||
|
|
|
|
|||||||
|
|
|
▪ Flashing GREEN (fast) – Attempts to synchronize with DSL line. |
|||||||
|
|
|
▪ Solid GREEN – DSL connection is established. |
|||||||
|
|
|
▪ Off – Modem power is off. |
|
|
|
|
|
||
|
|
|
|
|
|
|
|
|
|
|
Copyright © 2012 Technicolor. All rights reserved. |
5 |
|
DMS-CTC-20120508-0000 v1.0. |
||
|
SETUP & USER GUIDE
No. |
LED |
|
Description |
|
|
|
|
|
|
6 |
Internet LED |
|
Lights up to indicate Internet connection status. |
|
|
|
|
▪ Solid GREEN – Internet is connected but no activity. |
|
|
|
|
|
|
|
|
|
▪ Flashing GREEN – Data transmission is in progress. |
|
|
|
|
▪ Solid RED – Internet connection failed. |
|
|
|
|
▪ Off – No internet connection. |
|
|
|
|
|
|
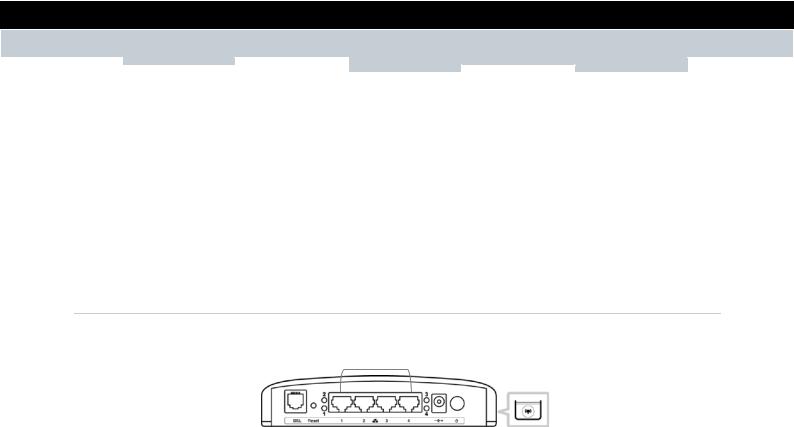
1.2.2Rear Panel
1 |
2 3 |
4 |
5 6 |
7 |
8 |
||||||||||
|
|
|
|
|
|
|
|
|
|
|
|
|
|
|
|
|
|
|
|
|
|
|
|
|
|
|
|
|
|
|
|
|
|
|
|
|
|
|
|
|
|
|
|
|
|
|
|
|
|
|
|
|
|
|
|
|
|
|
|
|
|
|
|
|
|
|
|
|
|
|
|
|
|
|
|
|
|
|
|
No. |
|
Ports / Buttons |
Description |
|
|
|
|
|
|
1 |
|
DSL port |
Connects to the DSL line using the RJ-11 cable. |
|
|
|
|
|
|
2 |
|
Reset button |
Press and hold this button for at least 10 seconds to restore your |
|
|
|
|
|
device to its original factory default setting. |
|
|
|
|
|
3 |
|
LAN LED 1, 2 |
The LAN LED (1, 2) lights up when a device is connected to the |
|
|
|
|
|
Ethernet port (1, 2). |
|
|
|
|
|
4 |
|
Ethernet port |
|
Connects a computer and other Ethernet network devices to the |
|
|
1, 2, 3, 4 |
|
Wireless Gateway using RJ-45 cables. |
|
|
|
|
|
|
|
|
|
|
5 |
|
LAN LED 3, 4 |
The LAN LED (3, 4) lights up when a device is connected to the |
|
|
|
|
|
Ethernet port (3, 4). |
|
|
|
|
|
6 |
|
DC In jack |
Connects to the power adapter. |
|
|
|
|
|
|
7 |
|
Power button |
Press to turn your device on or off. |
|
|
|
|
|
|
8 |
|
WPS button |
Press 1 to 8 seconds to enable or disable WLAN. |
|
|
|
|
|
Press for more than 8 seconds to enable WPS. |
|
|
|
|
|
Copyright © 2012 Technicolor. All rights reserved. |
6 |
|
DMS-CTC-20120508-0000 v1.0. |
||
|
SETUP & USER GUIDE
2 Installation
Make sure that all devices are powered off before starting installation.
|
|
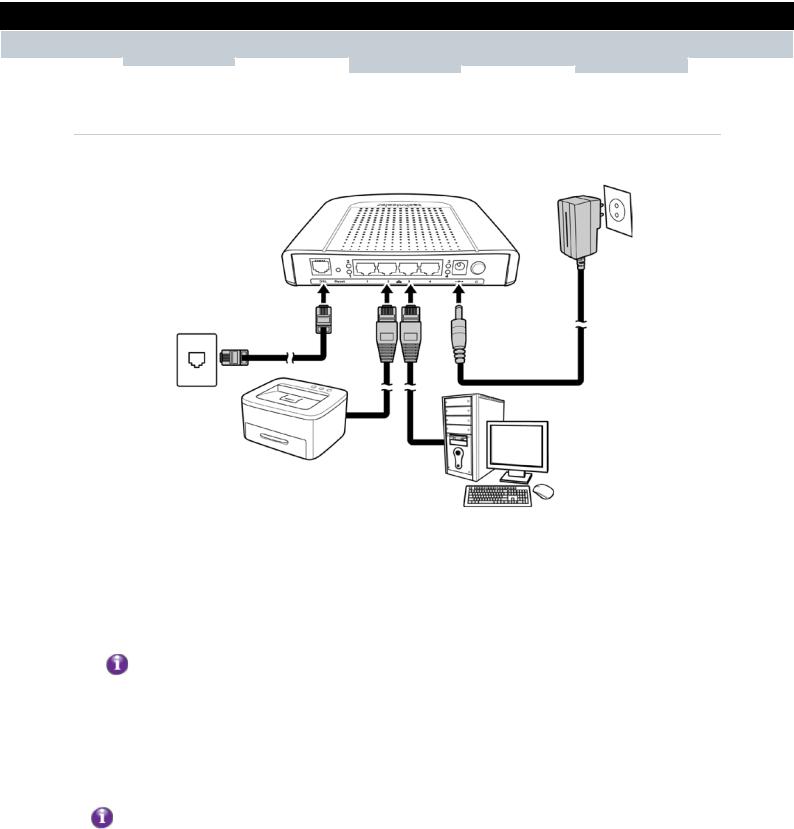
Installation Diagram |
2.1 |
Connect the Power |
|
1 |
Connect the power adapter to the DC In jack of your Wireless Gateway. |
|
2 |
Plug the power adapter to a wall outlet or a power strip. |
|
|
|
▪ Use only the supplied power adapter. Using other power adapters may cause damage to the |
|
|
device. |
|
|
▪ Connect all devices to your Wireless Gateway before connecting the power adapter to a wall |
|
|
outlet. |
2.2 |
Connect Wired Devices |
|
When setting up the Wireless Gateway for the first time, connect the host computer via Ethernet connection.
1Connect one end of the RJ-45 cable to one of the Ethernet (1, 2, 3, 4) ports of your Wireless Gateway.
2Connect the other end of the RJ-45 cable to the Ethernet port of the computer.
3Repeat the above steps to connect other computers to the Wireless Gateway via Ethernet connection.
4To connect more than four computers, use a hub or switch. Connect one end of an RJ-45 cable to the hub or switch and the other end to the computer.
Copyright © 2012 Technicolor. All rights reserved. |
7 |
|
DMS-CTC-20120508-0000 v1.0. |
||
|
SETUP & USER GUIDE
2.3Connect Wireless Devices
Before connecting wireless devices to the Wireless Gateway, configure the wireless security settings of your Wireless Gateway (see “To Set up Security Settings on page 41”). Take note of the SSID and the password you have set, you need the SSID and the password to connect devices to your Wireless Gateway.
2.3.1WLAN
From the wireless device end, search for the Wireless Gateway network name (SSID), and enter the passphrase to connect.
The SSID and passphrase are the ones you have set in the Wireless Security Settings (see “To Set up Security Settings on page 41”).
2.3.2Wi-Fi Protected Setup (WPS)
Press and hold the WPS button of the Wireless Gateway for at least 8 seconds and press the WPS button on the WPS-enabled device to start pairing.
2.4Connect the Broadband (DSL)
1Connect one end of the RJ-11 cable to the DSL port of your Wireless Gateway.
2Connect the other end of the RJ-11 cable to a wall jack with DSL service.
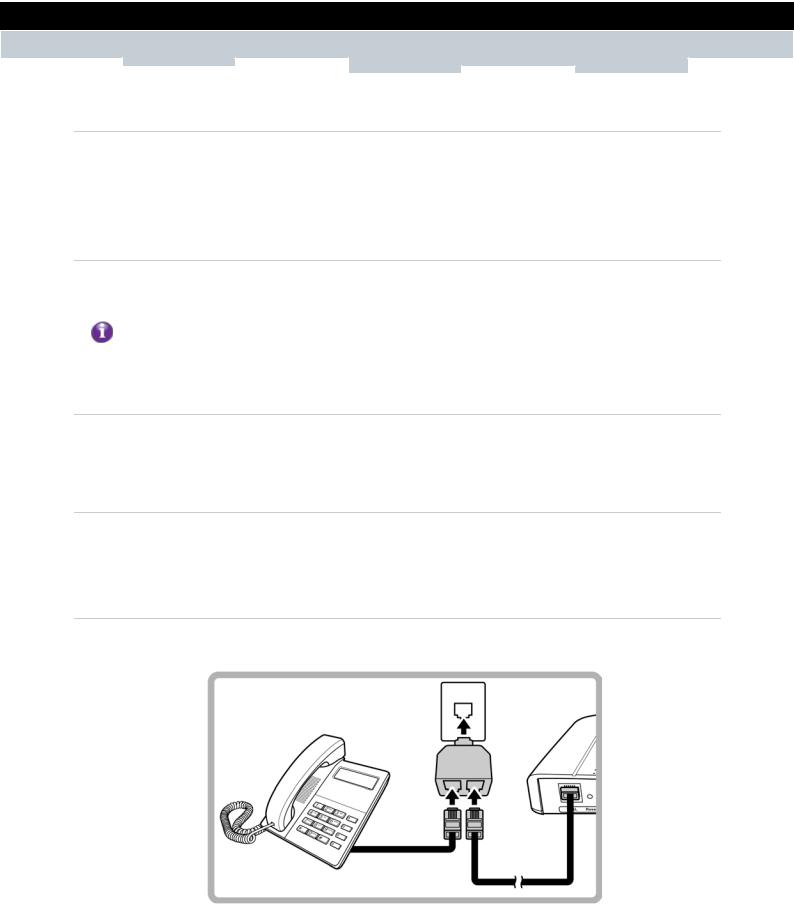
2.4.1Use a Splitter
You need a splitter when connecting the Wireless Gateway to the wall jack that also connects to a telephone.
1Plug the splitter to the wall jack with DSL service.
2Connect one end of the RJ-11 cable to the DSL port of your Wireless Gateway.
3Connect the other end of the RJ-11 cable to the MODEM port of the splitter.
4Connect the telephone to the LINE port of the splitter using another RJ-11 cable.
Copyright © 2012 Technicolor. All rights reserved. |
8 |
|
DMS-CTC-20120508-0000 v1.0. |
||
|

SETUP & USER GUIDE
2.5Check the Installation
To ensure that all devices are properly connected, check the LED indicators on the front of your Wireless Gateway. For basic installation, the following LEDs must be lit:
▪Power LED
▪Ethernet LED
▪DSL LED
The lighted LED indicators vary depending on the type of connection that you make. See “Front Panel” on page 5 for more information about the LED indicators.
Copyright © 2012 Technicolor. All rights reserved. |
9 |
|
DMS-CTC-20120508-0000 v1.0. |
||
|
SETUP & USER GUIDE
3 Configure the Computer
This chapter will guide you on how to configure your computer according to the operating system you are using.
▪Windows XP, see below.
▪Windows Vista, see page 10.
▪Windows 7, see page 11.
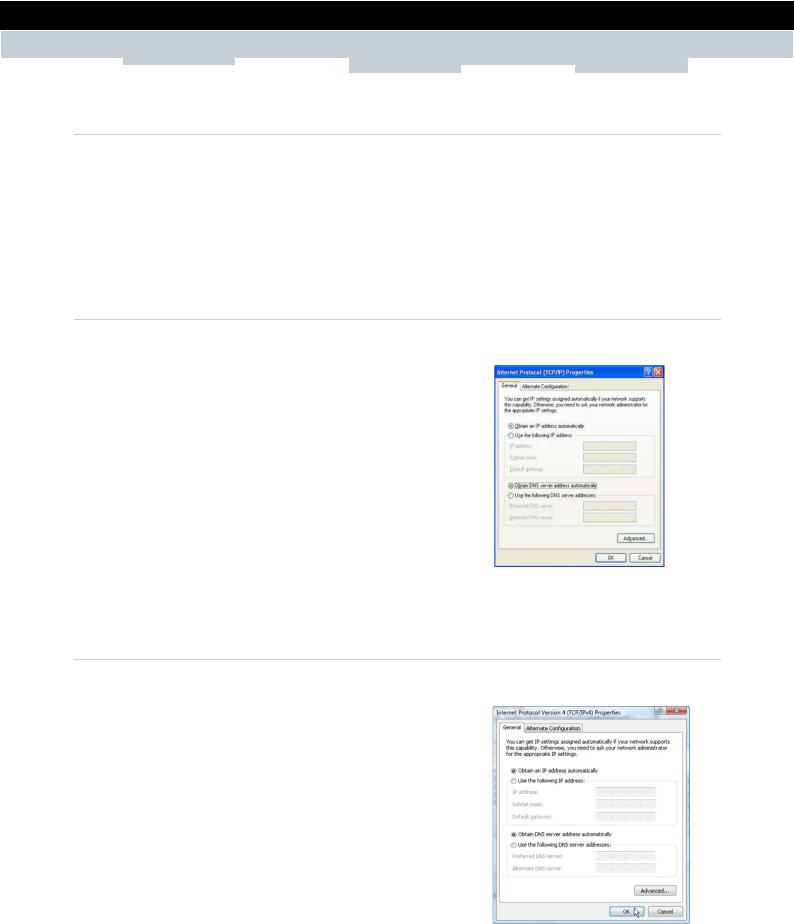
3.1Windows XP
If you are using Windows XP, follow the instructions below to configure your computer.
1Click Start > Control Panel > Network Connections.
2Right-click Local Area Connection, then click Properties.
3On the network components list, make sure that Internet Protocol (TCP/IP) is checked. If not, check it to enable the
Properties button.
4Select Internet Protocol (TCP/IP), and then click Properties.
5On the General tab, select Obtain an IP Address automatically and Obtain DNS server address automatically.
6Click OK.
General Page
3.2Windows Vista
If you are using Windows Vista, follow the instructions below to configure your computer.
1Click Start > Control Panel > Network and Internet Connections > Network Connections.
2Right-click Local Area Connection, then click Properties.
3On the General tab, make sure that Internet Protocol (TCP/IP) is checked. If not, check it to enable the
Properties button.
4Select Internet Protocol (TCP/IP), and then click Properties.
5Select Obtain an IP Address automatically and Obtain DNS server address automatically.
6Click OK.
General Page
Copyright © 2012 Technicolor. All rights reserved. |
10 |
|
DMS-CTC-20120508-0000 v1.0. |
||
|
SETUP & USER GUIDE
3.3Windows 7
If you are using Windows 7, follow the instructions below to configure your computer.
1Click Start > Control Panel > Network & Sharing Center.
2Click Local Area Connection.
3Click Properties.
4On the network components list, make sure that Internet Protocol (TCP/IP) is checked. If not, check it to enable the
Properties button.
5Select Internet Protocol (TCP/IP), and then click Properties.
6On the General tab, select Obtain an IP Address automatically and Obtain DNS server address
automatically. |
General Page |
7 Click OK. |
|
Copyright © 2012 Technicolor. All rights reserved. |
11 |
|
DMS-CTC-20120508-0000 v1.0. |
||
|
SETUP & USER GUIDE
4 Access the Wireless Gateway
Use the Web Configurations utility to configure your Wireless Gateway.
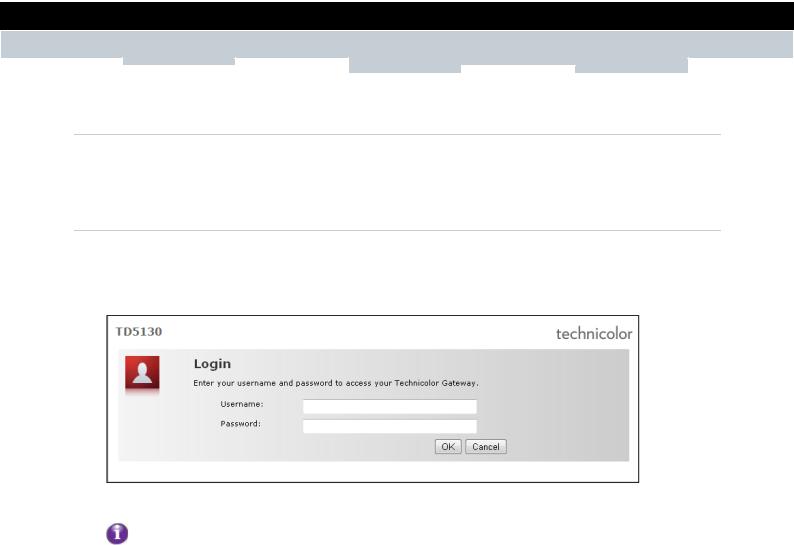
4.1Login
For more advanced configuration, access the Technicolor web configuration utility.
1Launch the web browser.
2On the address bar, type http://192.168.1.1, and then press Enter.
3 Type the Username and Password, default values are “admin”.
If the Web Configurations utility has been left idle for some minutes, the system may prompt you to login again; enter the User name and Password.
The default user name and password is “admin”. It is advised to change the password.
4 Click OK.
Copyright © 2012 Technicolor. All rights reserved. |
12 |
|
DMS-CTC-20120508-0000 v1.0. |
||
|

SETUP & USER GUIDE
4.2The Interface
Once logged in, the Home screen appears. The Home screen provides quick access to the most common functions of your Wireless Gateway. Click an option to access the function.
To quickly change passwords or switch users, click the user name on the top-left corner of the screen (in the above example, “admin”). To change the menu language, click es for Spanish or en for English.
In some screens, shortcut items are available on the bottom of the screen. Click a shortcut to access the page. See example below.
Copyright © 2012 Technicolor. All rights reserved. |
13 |
|
DMS-CTC-20120508-0000 v1.0. |
||
|
SETUP & USER GUIDE
4.3Using the Menu
For more advanced users, use the main menu, located on the left panel of the screen, to configure your Wireless Gateway.
Click a menu item, then a submenu to display the page. The following menu items are available:
▪Home — Displays the Home screen.
▪Technicolor Gateway — Allows you to configure your Wireless Gateway, such as system date and time, and to view event logs.
▪Broadband Connection — Allows you to view the DSL connection status of your Wireless Gateway and configure a dial-up connection and establish or terminate the Internet connection.
▪Toolbox — Allows you to configure more advanced functions, such as remote assistance, firewall, filter, parental control services, and others.
▪Home Network — Allows you to view the devices connected to the network of your Wireless Gateway.
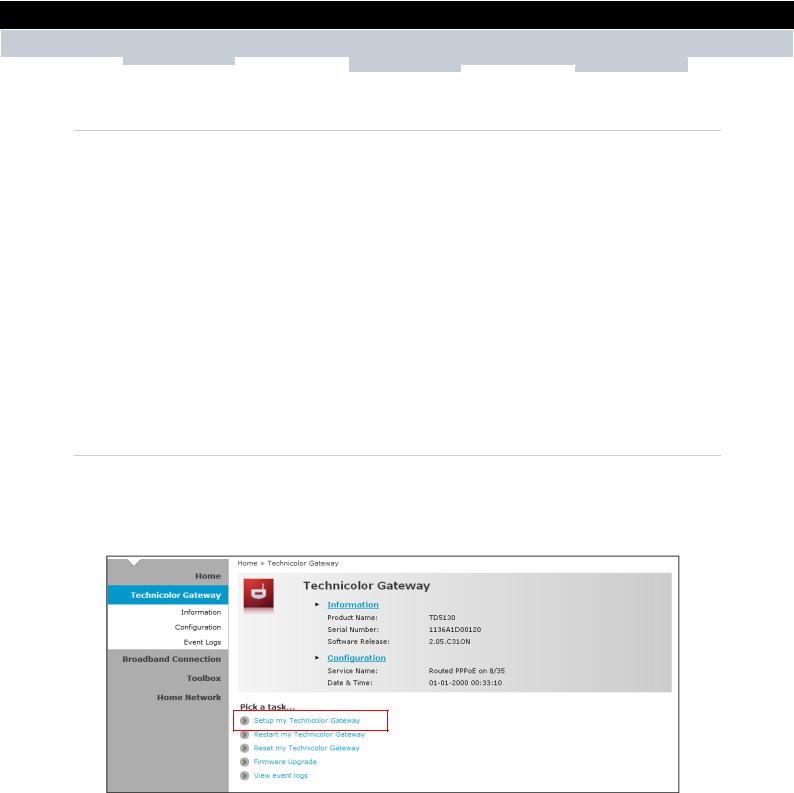
4.4Configuration Wizard
For first time users, you may want to use the wizard to set up your Wireless Gateway. Perform the following:
1On the main menu, click Technicolor Gateway.
2Click the Setup my Technicolor Gateway shortcut at the bottom of the screen.
Copyright © 2012 Technicolor. All rights reserved. |
14 |
|
DMS-CTC-20120508-0000 v1.0. |
||
|
Loading...