

Page 1
Functions
- Normal Time with PM Indicator
- 12/24 hour selectable
- Dual Alarm, Snooze, Sleep Timer Green LED Backlight display
- Month and Date Display
- Thermometer (32oF - 122-F)
- AM/FM Radio Receiver
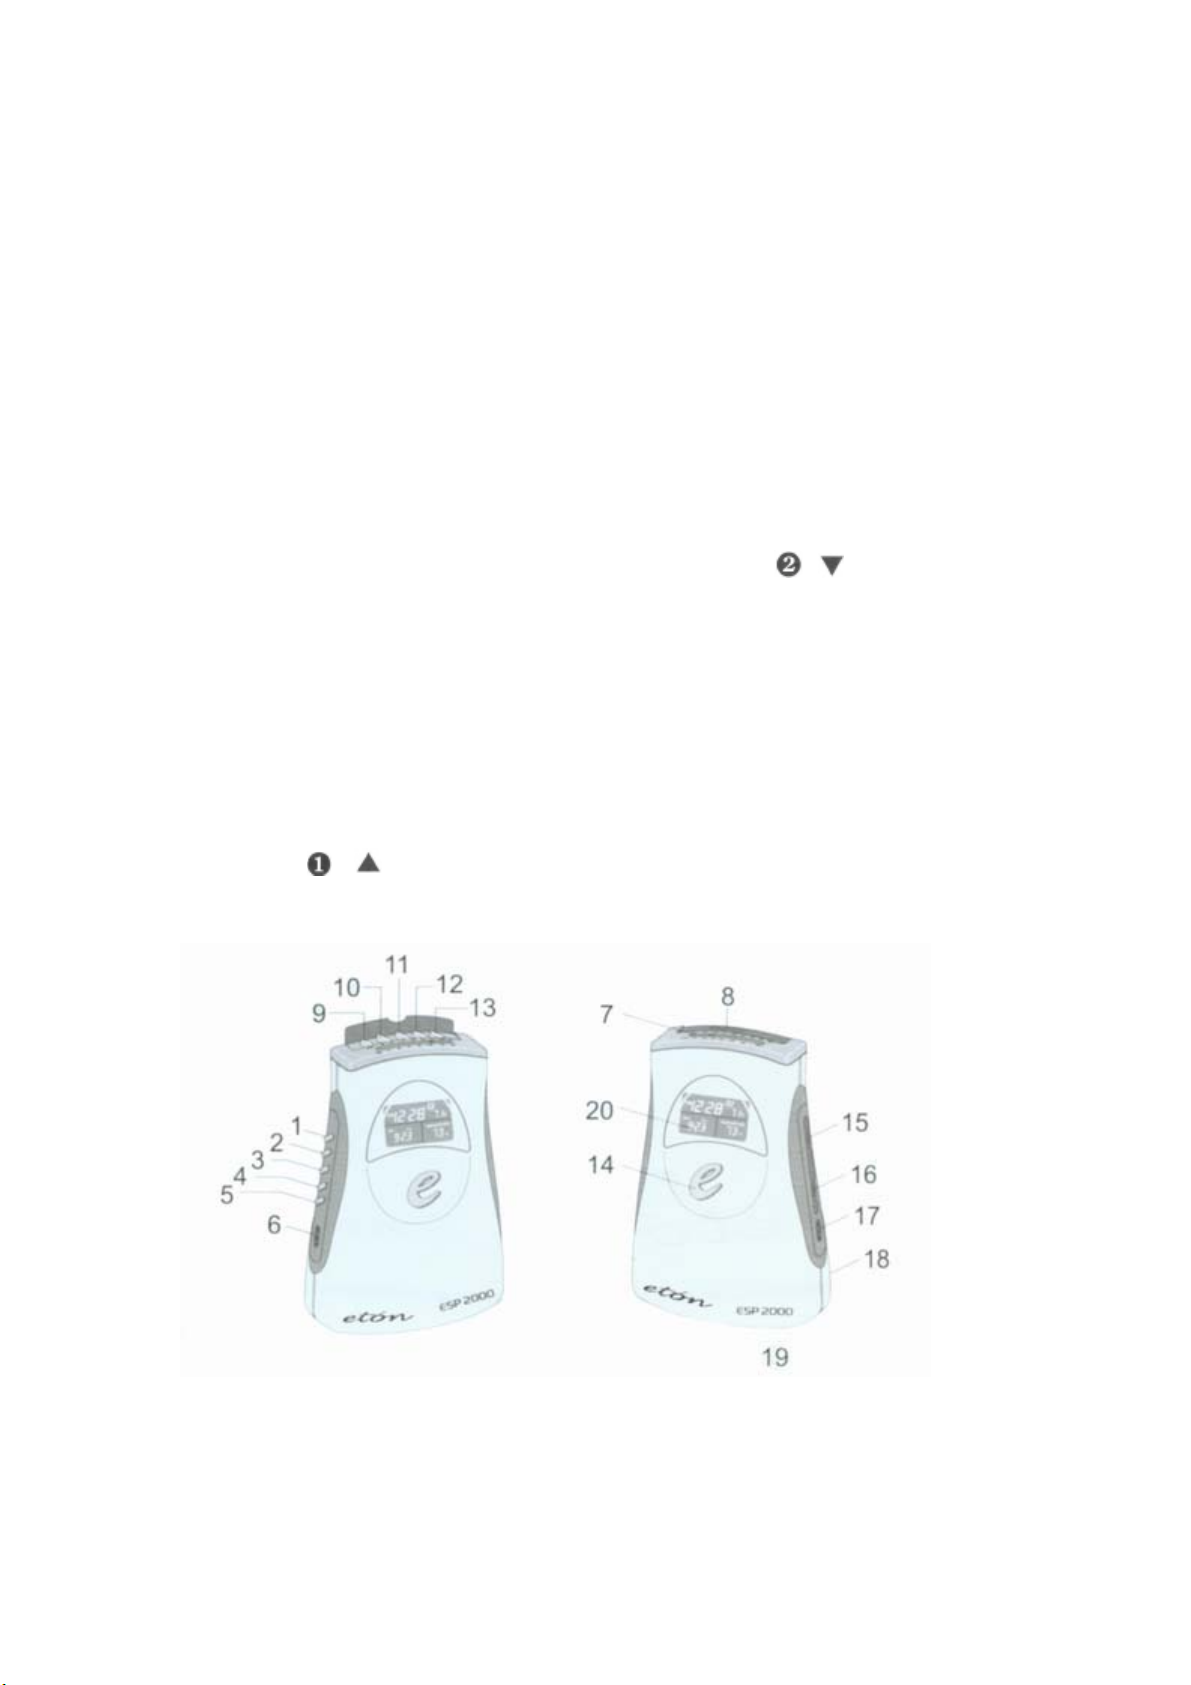
Control Location
1. OCEAN button 11. 1-5/1-7/SLEEP button
2. RAIN button
3. STREAM button 13. SET button
4. HEART BEAT button 14. ON/OFF button
5. WOODLANDS button 15. Volume knob
6. Radio/Sound/Beep function slide switch 16. Tuning knob
12. ALARM / button
7. DIAL scale 17. FM/AM slide switch
8. SNOOZE button 18. DC jack
9. MODE button 19. Battery compartment
10. ALARM / button
20. LCD display
Replacing Battery
When the low battery symbol shows on the LCD display (20), open the Battery door (19)
at the bottom, replace the exhausted batteries with three new alkaline "AA" batteries.
Page 2

Note: If theAC/DC adapter is connected to the DC jack, the batteries are used to maintain
clock function only. The batteries can operate the unit with full functions for only a few
hours. The unit should be operated with the included adapter.
Setting Normal Time
When power is on, the clock starts to enter the radio controlled clock mode. The LCD
display (20) initially shows:
- L: 0-5 receiving signal strength, 5 indicates signal level OK, 0-4 signal weak.
- 00-59: a count of seconds
- OFF: Alarm off mode
- The receiving tower symbol starts to blink. It indicates that the unit has entered the time
signal-receiving mode.
- If this unit is within the signal area: after receiving all signals successfully, the clock
shows the correct time and starts to work. The blinking receiving tower symbol becomes
steady. The time signal is transmitted four times a day to auto-adjust the clock.
-If this unit is out of the signal area: Press MODE button (9) once, the clock changes to
normal clock mode. To set the correct time, hold SET button (13) for two seconds to enter
set mode.
Year/Month/Date SETTING
- The LCD display (20) showing the year digits flashes, press UP (10) or DOWN (12)
button to set the year.
- Press MODE button (9) once to flash the month digits, then press UP (10) or DOWN (12)
button to set the month.
- Press MODE button (9) once again to flash the date digits, then press UP (1 0) or
DOWN (12) button to set the date.
- Press MODE button (9) once again to finish the setting or press SET button (13) once to
continue time setting.
Time Setting
- After entering set mode, press SET button (1 3) once to flash the hour digits, then press
UP (1 0) or DOWN (1 2) button to set the hour.
- Press MODE button (9) once to flash the minute digits, then press UP (10) or DOWN
(12) button to set the minute.
- Press MODE button (9) once again to finish the time setting or press SET button (1 3) to
continue alarm time setting.
Setting Alarm Time
(Remark: please make sure the 'e' ONIOFF switch is in 'OFF' position to set alarm time or
operate the alarm function)
To set alarm time:
Hold SET button(13) for two seconds to enter set mode, press SET button (1 3) twice to
show the symbol and flash the alarm hour digits, then press UP
(10) or DOWN (12) button to set alarm l hour.
Page 3

- Press MODE button (9) once to flash the alarm minute digits, then press UP (10) or
DOWN (12) button to set alarm l minutes.
- Press MODE button (9) once again to finish alarm l setting (all digits steady) or press
SET button (13) to continue alarm2 time setting.
To set alarm2 time:
-Hold SET button (1 3) for two seconds to enter set mode, press SET button (13) three
times to show the symbol and flash the alarm hour digits, then press UP (10) or DOWN
(12) button to set alarm2 hour.
-Press MODE button (9) once to flash the alarm minute digits, then press UP (10) or
DOWN (12) button to set alarm2 minute.
-Press MODE button (9) once again to finish alarm2 setting (all digits steady) or press
SET button (13) to continue zone setting.
Setting Alarm ON/OFF
To turn alarm l ON:
Press ALARM button (10) until the display shows both the alarm time and symbol.
Press MODE button (9) until it returns to normal month and date display.
To turn alarm l OFF:
Press ALARM button (1 0) until the display shows both OFF and symbol. Press
MODE button (9) until it returns to normal month and date display.
To turn alarm2 ON:
Press ALARM button (12) until the display shows both the alarm time and symbol.
Press MODE button (9) until it returns to normal month and date display.
To turn alarm2 OFF:
Press ALARM button (12) until the display shows both OFF and symbol. Press
MODE button (9) until it returns to normal month and date display.
Wake to Radio:
If the function slide switch (6) is set to RADIO position, the radio will come on
automatically when the preset alarm time is reached.
Wake to soothing sound:
If the function slide switch (6) is set to SOUND, the soothing sound will come on
automatically when the preset alarm time is reached.
Wake to Alarm:
If the function slide switch (6) is set to BEEP position, the alarm will come on for two
minutes automatically when the preset alarm time is reached.
Snooze:
Press SNOOZE button (8) once within two minutes (or two minutes later, the alarm will
Page 4

stop automatically) to stop radio or alarm temporarily and give you extra eight minutes of
sleep. Within this period, the symbol 'SNOOZE, shows on the LCD display (20). After
eight minutes, radio or alarm will come on again. It will repeat if you press the SNOOZE
button (8) again within two minutes.
To stop the radio or alarm:
To stop it, press any control button once except for SNOOZE button, or just wait for two
minutes (the alarm will stop automatically).
Selecting 5 Day Alarm / 7 Day Alarm
Press 1-5 / 1-7 button (11) to select 1-5 or 1-7 alarm.
12/24 Hour Format
Hold down the SNOOZE button (8) for five seconds to change from a 12 hour format to a
24 hour format.
Setting Time Zone For USA
Hold SET button (13) for two seconds to enter set mode. Press SET button (13) four times
to enter zone setting mode. When the LCD display (13) shows the map flashing, press UP
(10) or DOWN button (12) to select your US time zone.
1) Daylight Savings Set-Up: Press MODE button (9) once, then press (10) or (12)
button to set summer time on/off.
2) Hour Offset Set-Up: Press MODE button (9) again, then press (10) or (12) button
to set a -1 2 to + 1 2 hour offset when traveling to a different time zone. To return to
normal clock display mode, press MODE button (9) or SET (13) once.
Setting Sleep Timer
Set the function switch to RADIO or SOUND and switch the e' ON/OFF switch to 'OFF'
position, then hold the (1-5/1-7)/ SLEEP button (3) for three seconds, the SLEEP symbol
will show on the LCD display (20) and the sleep timer digits start from 60 minutes. It will
turn on at the same time. Then use the buttons (10) or (12) to set the desired sleep
time. The range is from one to 99 minutes. Press MODE
button (9) once to finish timer setting. The digits start to count down. When the sleep
timer counts down to 00, it will turn off the radio or sound automatically. Or press the
SNOOZE button (8) once to stop the sleep timer.
Radio Operation
Slide the function switch to RADIO and slide the AM/FM selector to desired band, press
the ON/OFF button to switch it on and off. The ON/OFF button will light up when the
radio is on.
Soothing sound operation
Slide the function switch to SOUND and press the ON/ OFF button to switch it on and off.
Page 5

Select the sound by pressing the corresponding key. The ON/OFF button and the
corresponding key will light up.
Important Note
This clock is designed as a consumer use item, NOT as scientific equipment. The success
of time reception is not guaranteed; it is subject to environmental conditions and the
distance from the signal source.
This clock is designed for indoor use only. Please avoid high humidity, high temperature,
vibration and shock.
Specifications
POWER:
Main Supply : AC 12OV/DC 6V Adapter 5OOmA (included)
Battery Backup of Clock and Alarm DC 4.5V (3 x "AA") (included)
RADIO:
AM 530 - 1710 kHz
FM :88 - 108 MHz (Mono)
RADIO CONTROLLED CLOCK:
WWVB: 60 kHz
FCC Statement
It is possible, yet highly unlikely, that even your properly operating radio may cause
interference to other radios or televisions. If the interference goes away after you turn off
your radio, it is the cause. Here are some tips to help eliminate the interference:
• Rotate or relocate the radio.
• Increase the distance from the equipment being interfered with.
• Contact the manufacturer of your equipment for assistance.
If you cannot eliminate the interference to devises in other households, the FCC requires
that you stop using your radio until the interference can be eliminated.
 Loading...