


DTI series
652 / 1004
User manual

General Information
1. Precautions
Never open your set yourself. It could be dangerous and you risk electric shock or damaging the set.
Any noticed damage will invalidate the warranty conditions of your equipment.
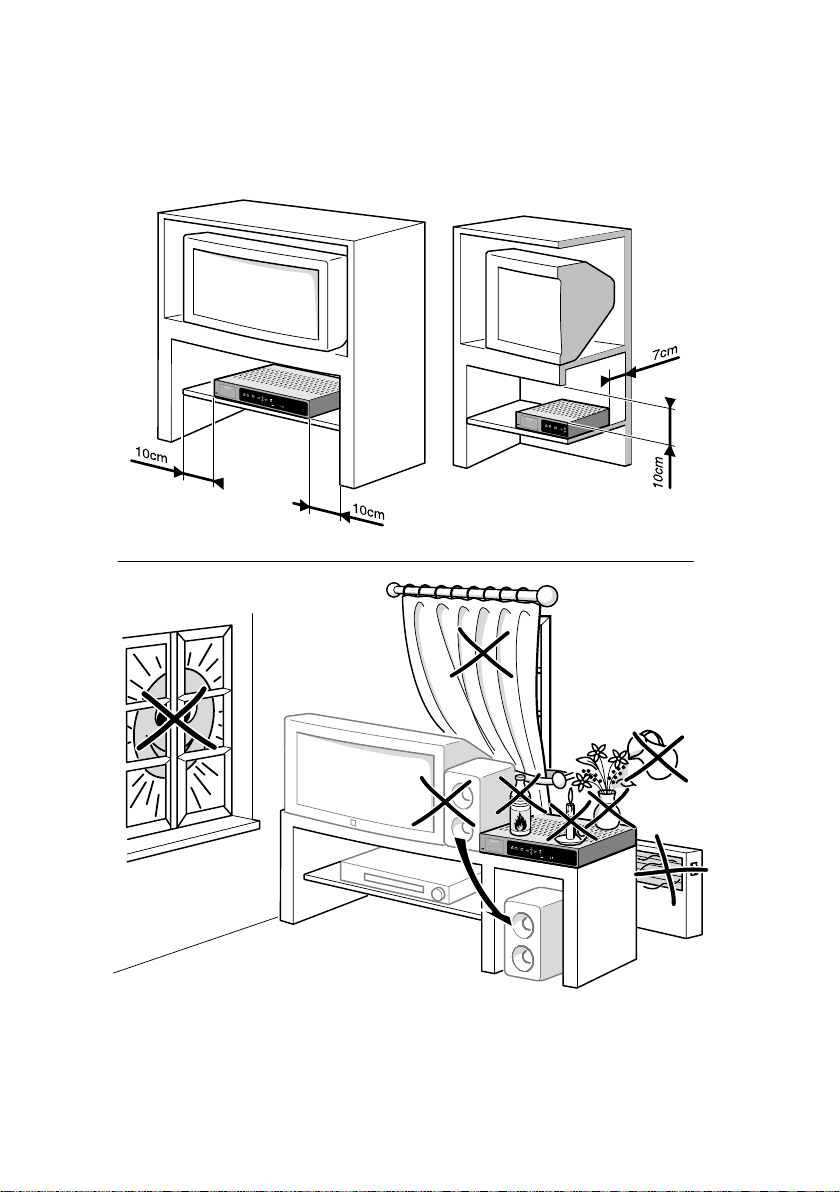
Installation: Ensure that the voltage from the mains in your room complies with that indicated on the
back of your set (identification label, screen marking, etc.). Do not connect an AC or DC power supply
other than that from the mains. Ensure that the electric plug is fully inserted into the wall socket. Leave
the mains socket accessible so that you can unplug the set quickly. Place the set horizontally, away from
any source of heat (sunlight, radiator, fireplace, etc.) or from equipment which produces high magnetic
or electrical fields (motors, non-insulated loud speakers, etc.). If you install your set in a cabinet, ensure
that it has enough ventilation. Leave 7 to 10 cm around the set, as shown in the enclosed drawing. The
openings on top and underneath the set are for ventilation purposes. They must not be obstructed.
Use: The set is designed for use in a dry place. If, under exceptional circumstances, you happen to use
it outdoors, (e.g. on a balcony or in a tent), make absolutely certain that it is protected from humidity
(dew, rain, splashes) and from heat. If the set has spent some time in a cold atmosphere, (after transport
during winter), wait until the condensation has evaporated from the metal parts before connecting it. The
set is intended to operate at an ambient temperature of less than 40° Celsius and a maximum humidity
level of 95%. It must not, under any circumstances, be used for industrial purposes, as it was designed
for domestic use only.
In case of a thunder storm – It is recommended that you unplug the set from the mains
and from the socket connected to the outside aerial. As a general rule, it is preferable to unplug
the set from the mains if you are away for a prolonged period. If you smell any suspicious odours or see
smoke coming rom the set, unplug the set immediately and have it checked by an approved technician.
Maintenance – Use a dry, clean, soft cloth with no cleaning, solvent or abrasive products,
etc. The openings on top of and underneath the set are for ventilation purposes and must not be
obstructed. Clean the ventilation grilles regularly. If an object or liquid gets into the set, unplug the set
immediately and have it checked by an approved technician.
Environment friendly - Only ecologically high-grade materials are used. The packing consist of almost
100% recycled paper, its plastic parts have been reduced to a minimum. To facilitate service and optimum
recycling, this receiver has been designed in a specially disassembly-friendly and recycling friendly way.
The batteries supplied are free of mercury and cadmium. Do not dispose of used batteries, also those
free of heavy metals, together with domestic waste. If you are not using the receiver for a lengthy period
(including overnight), please switch it over to standby. This saves energy.
EN
This symbol on your set guarantees that your product complies with the European directive
89/336/CEE, 73/23/CEE, 93/68/CEE on safety, electromagnetic compatibility and marking aspects.
This symbol indicates “Dangerous voltage” in the set. It represents the risk of electric shock or
bodily injury.
The receiver can be upgraded by means of free updates downloaded over the air whose
purpose is to improve product behaviour. You should know that the proposed update
is irreversible so you are given the option of refusing it. IT IS POSSIBLE THAT THE
FUNCTIONS CONTAINED IN THE SOFTWARE DO NOT CORRESPOND TO YOUR
REQUIREMENTS OR FAIL TO GIVE THE RESULTS YOU ANTICIPATED. INSTALLING
THIS SOFTWARE COULD MODIFY THE WAY YOUR PRODUCT WORKS.
1
General Information
2. Quick start: about connections and installation
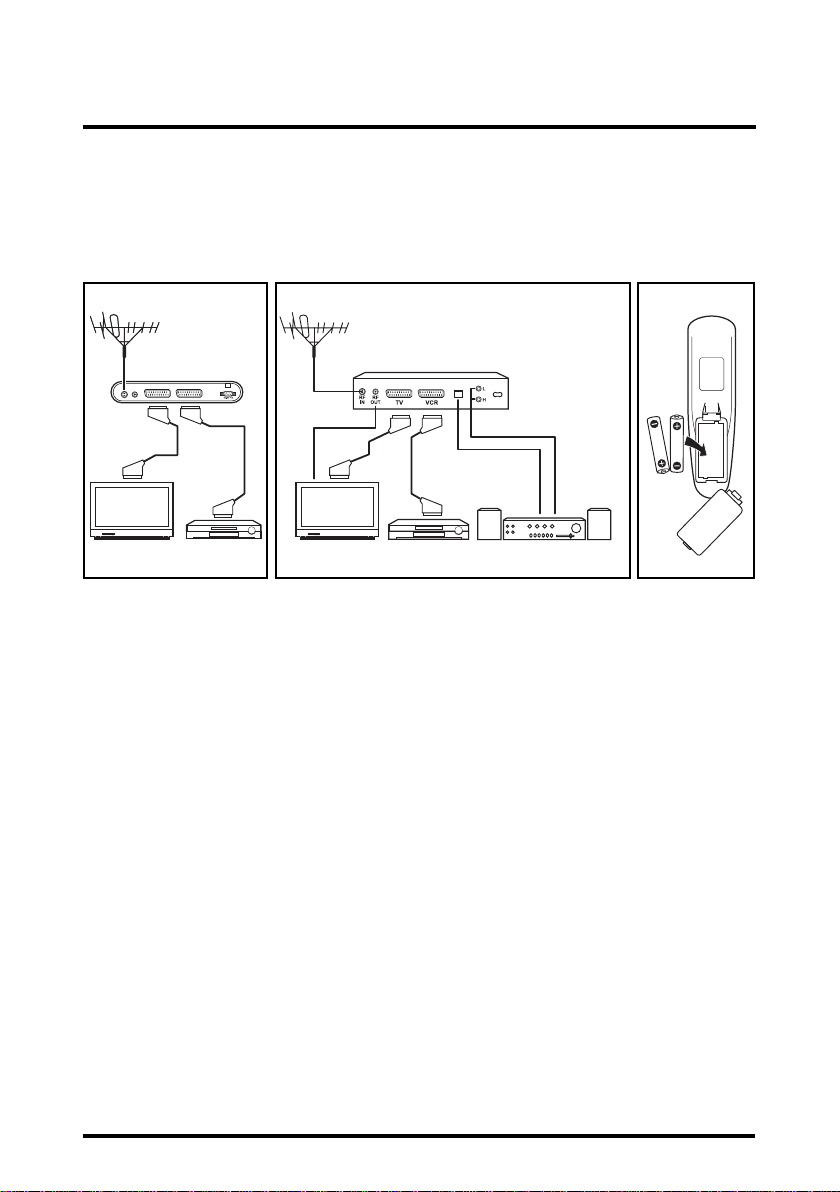
2.1 Connections
Please follow figures 1 to 3 for a standard installation.
Note: Before plug in the receiver, you should connect at least the aerial antenna cable and the TV scart. Others connections
are optional.
RF IN RF OUT
Figure 1: DTI 652 Figure 2: DTI 1004 Figure 3: inserting
batteries
Warning
If you are not sure how to connect your receiver, do not take the risk of doing it yourself. Ask your
dealer to do it for you. He is specially trained by our technicians and can get the best performance out
of your receiver.
Important: about DTI1004 connections
If you use an indoor antenna requiring a specific powering by RF cord, please switch the value to ON
in the installation menu (see Menu/Installation/Terminal/Antenna) and then launch the channels
installation (see Menu/Installation/Channels).
If you use the RF modulator connection, please switch the value to ON in the installation menu (see
Menu/Installation/Terminal/Connection) and then switch your TV on the channel 62.
Note that if the UHF Channel numbers of the receiver and the TV set are not set the same, no picture will be
displayed.
Disclaimer
Note that the availability of digital services in your particular location is dependent on the transmitter(s)
available to your receiving aerial and the configuration of your existing reception equipment. Please
check with your dealer or installer.
2

General Information
2.2 Installation
Standard settings
The first start is done automatically in one click : Once the decoder is ON, just choose your menu
language, confirm by OK and let the decoder automatically start the installation of channels.
Personal settings
Pour régler vos préférences personnelles pour votre adaptateur (par exemple format TV, langue, réglages
To install your receiver with your personal preferences (like TV format, language, time settings), please
follow Menu/Installation/Terminal.
To display and browse through the menu, press the MENU button and follow the guidelines in chapter 3.
Important: Be careful when using Factory Reset, because it will erase all the data and parameters
you may have set earlier on your receiver (PIN code factory setting is ‘0000’). Once you have made a
Factory Reset you will have to re-scan your channels and re-install your preferences.
3. Navigation clues
3.0 Navigation through the men u
1. Press the MENU button to open the menu entry page.
2. Use the p/q and t/u buttons to highlight your choice in a list.
3. Press OK to open the sub-menu or confirm the selection.
4. Press BACK to return to the previous screen or EXIT to return to the viewing mode.
3.1 Overview
Always read the help bar displayed at the bottom of your screen.
- In the menu, EPG, banner and channel list, instructions on availability of further functionalities and on
active remote control buttons are given on screen.
- The TV Banner automatically displays when you tunes to another channel. To change the display duration
of the TV Banner go in MENU/Installation/Terminal/Menu settings/Banner Duration.
- To display the Information Banner, press the i button.
- To display the extended Information Banner (with synopsis of the currently viewed program), press
the i button twice.
- To display the current TV list, press the OK button then EXIT to exit the list.
- For EPG (Electronic Program Guide) direct access, press the GUIDE button.
- For switching between the TV or the Radio services list, press the TV/RADIO button.
- If your channel has teletext features, then for teletext direct access, press the TXT button.
- For DVB Subtitling see Menu/Installation/Terminal/Language or press SUB button.
- For a direct access to a favourite list (if Favourite Lists have already been created), press the colour
buttons.
- To display all lists (Favourite lists and the All Channels list), press the WHITE/LIST button. Select
the desired list with the p/q buttons and press OK to switch to the selected channel list.
EN
To benefit from our policy of continuous improvement, note that this set-top box is upgradeable through
download “over the air”.
Therefore we highly recommend you to try regularly to update your set using the manual activation in
the menu (see Menu/Installation/Terminal/Upgrade).
3

General Information
3.2 Remote Control and behaviour
- When the adapter is running, the LED is green; in standby mode the LED is red.
B
Turns the receiver on/off.
Mutes/unmutes audio.
BACK
Active only in video mode, allows
toggling between the 2 last channels.
In the menu allows returning to the
last screen.
MENU
Opens/closes the main menu.
p/q
In the viewing mode, tunes to the
next/previous channel
Moves up/down through menus.
OK
Selects or confirms a choice
Opens the current channel list
(favourite list and All Channels list).
GUIDE
Opens the Electronic Program Guide.
WHITE/LIST
Opens all lists (favourite list and All
Channels list).
SUB
Switches on/off subtitles (if available).
Colour buttons / FAV A —> D
Context dependant function buttons in
menu.
Gives a direct access to each favourite
list in video.
Numerical buttons (0-9)
Controls numerical operations (i.e.
enter a channel number or a PIN code).
Switches between TV and
TV/RADIO
radio programs.
EXIT
Exits the menu.
t VOL- / u VOL+
In the viewing mode, increases/
decreases audio volume
Moves left/right through menus.
In the viewing mode, tunes to the
Opens the teletext / Opens the teletext
transparency mode / Closes the teletext
Opens the extended information banner
next/previous channel.
Scrolls a list page up/down.
(if the channel displays teletext).
Opens the information banner.
P+/P-
TXT
i
4

General Information
4. Chart of menus
Channels
Overview of all installed TV &
radio services.
EN
Favourite lists
Timers
Installation
Terminal
Channels
Parental lock
PIN code
Edit lists of TV services.
Edit timers.
Language
Connection
Menu settings
Time
Upgrade
Factory Reset
Antenna
Install all TV & radio.
Lock or unlock channels based on maturity information.
Change PIN Code.
Set up language
choices.
Set up receiver output
formats.
Set up banner style.
Edit time.
Download available software
release, if on air.
Erase all settings, including PIN code (0000).
Set the internal antenna to on/off (off).
DTI 1004 only.
Menu language
Audio Preference
TV format: 4/3, 16/9,…
TV scart output
CVBS standard
RGB level
banner duration
menu transparency
Erase Channels
Information
Show terminal & software reference
http://www.thomson-europe.com.
Note : value set by default is
shown under brackets (e.g.).
5

General Information
4.1 Channels
This sub-menu gives an access to the All channels list.
1. Press the MENU button.
2. Using p/q buttons, select Channels then press OK.
The ‘All channels’ list displays on the left while you can view in a resized video picture on the right the current
program of the highlighted channel. This sub-menu allows you to reorganize the All channels list and set a
channel protection on some channels.
Note: For a direct access the ‘All channels’ list without reorganizing channels, press the WHITE/LIST button, select All
channels and press OK.
Delete Channels from the channel list (to remove unwished channels):
1. Use the p/q, buttons to select the channel to remove from the list.
2. Press the (Red) button. A red garbage bin displays on the right of the channel name.
3. Press OK button to delete all channels selected with the red garbage bin, or press EXIT to cancel
this operation.
Move Channels from the channel list (to modify the P+/P- order):
1. Use the p/q buttons to select the channel to reorder in the list.
2. Press the (Green) button to display a green twin-arrow icon on the right of the channel name.
3. Use the p/q buttons to move the selected channel to its new position in the list.
4. Press the (Green) button to insert it.
Lock/unlock Channels from the channel list (to set/delete a PIN code to view some
channels):
1. Use the p/q buttons to select the channel to lock.
2. Press the (Yellow) button to display a yellow lock icon on the right of each channel to lock.
3. Press the OK button.
4. Enter the decoder PIN Code to lock all channels selected with a yellow lock icon.
Note 1: The procedure to unlock a channel is similar.
Note 2: Prior to any PIN Code change, the PIN Code factory setting is ‘0000’.
3. Press the EXIT button to view the highlighted channel on full screen.
4.2 Favourite lists
1. Press the MENU button.
2. Use the p/q buttons to highlight Favourite List then press OK. The All channels list displays.
3. Use the colour buttons to assign/unassign channels of the All channels list to one or several Favourite
List(s).
You can set up to 4 Favourite lists, each defined by a colour (List A uses RED color, B uses GREEN, C uses
YELLOW and D uses BLUE).
Note: For a direct access to all lists (favourite A to D and All channels) press the WHITE/LIST button.
4. Press the OK button to save the favourite list(s). A pop-up message displays.
5. Press the EXIT button to return to the viewing mode.
Note: In the viewing mode, each favourite list can be directly accessed by using the colour buttons on the remote control.
6

General Information
4.3 Timers
The timer can automatically switch on or off your receiver at any time, start a record by setting the
stream on your VCR SCART with or without having your TV on and foresee a zapping to an expected
channel. You can set up to 8 different timers. To use timers, please apply the following steps:
1. Press the MENU button.
2. Using the p/q buttons on your remote, select Timers and press OK.
3. Using the p/q buttons on your remote, select Manual setting and press OK.
4. Fill the following fields:
- Timer number: You can select up to 8 different events.
- Status: Set to Enable to use the timer function, or Disable to stop the timer functions of the
selected timer number.
- Repetition: You can set the cycle of the action designated in the timer mode (Once, Daily,
Weekly).
- Purpose: select in the list (Power off/ Power on/ Power on-off/ Zap to Channel/ VCR Record)
the action you want the timer to do.
• Power off: This is the sleep timer setting with Date and Time.
• Power on: This is the wake up timer setting with Date and Time.
• Power on-off: This is a combination of the two previous Timers.
• Zap to Channel: Set the Date and Start Time first and setup a channel to zap to. When the time
comes, the system will automatically jump to the selected channel.
• VCR Record: this timer setting is used when you want to record a TV program with a VCR set.
- Set Date, Start Time, Stop Time and select a channel you want to record with VCR in Channel
setting. When it is the Start Time during a program, the system will automatically switch to the
service via TV SCART for VCR recording. When the Stop Time comes, the unit will resume to
former status. If the unit stays in STANDBY status, when it is the Start Time, the unit will wake up
and shift to the service transmitted to VCR via TV SCART to be recorded, and resume to normal
status on the Stop Time.
- (Such function allows the unit to transmit various TV programs to VCR for recording)
- Date and Time: Set the date and time at which this timer will occur using the numerical
- Channel: Set the TV channel to be used by the timer.
5. Press the OK button to save the timer and EXIT to return to the viewing mode.
Note: To display the global list of enabled timers select List of Timer from the Timer sub-menu main page.
buttons.
EN
7

General Information
4.4 Parental Lock
The Parental Control function allows you to control access to TV programs with a rating of Maturity
Level.
1. Press the MENU button.
2. Using the p/q buttons on your remote, select Installation and press OK.
3. Using the p/q buttons on your remote, select Parental lock and press OK.
4. Enter the PIN code.
Note: Prior to any change, the PIN code factory setting is ‘0000’. You can modify the PIN Code in the menu MENU /
Installation / PIN code set up.
5. Enable the activation of the Parental Lock.
6. Define the Maturity rating (from 4 to 18 years old).
To view programs protected by a parental control, you have to enter a correct pin code.
5. Guide
Press GUIDE on the remote control to enter the Electronic Program Guide.
1. Select the EPG date with t or u, button, and scroll through the detailed information with p or q
button.
2. Press EXIT to return to the viewing mode or OK to set a timer based on this EPG information. Regarding
the timer setting operation, please refer to item "4.3. Timer/Manual Setting".
Note 1: When you view a program, pressing i button allows you to display information of the currently viewed channel (present/
next program). You may also have the possibility to change options in this Information Banner (Subtitle/Audio languages and
Audio channels). The availability of subtitle and audio languages is depending of the current broadcasted program. Use the p/q
buttons to highlight the option you want to modify, then use the t or u buttons to make a selection (i.e. for audio channel, you
may choose between ’Stereo, Left or Right Audio’).
Note 2: A second click on the i button will enable you to view the extended Information Banner. Press EXIT to exit this
banner.
8

General Information
6. Main features
DTI 652 and DTI 1004
• Reception of digital TV and radio DVB services.
• MPEG2 - DVB-T ETSI 300 744 compliant
• VHF - UHF bandwidth reception.
• 2 Scart connectors: connection of the decoder to TV (CVBS/RGB) and VCR (CVBS).
• Multi lingual user friendly on screen menus (English, French, German, Swedish, Finnish, Spanish, Italian, Greek,
Czech, Arabic)
through 256 colors On Screen Display (OSD).
• Easy to use Remote Control Unit.
• EPG (Electronic Program Guide) with now & next and 7 days events ready.
• Information Banner (including synopsis of the current program)
• Channel organizer (including resized video window).
• Embedded Teletext subtitles and Teletext magazine decoder.
• DVB Subtitling - ETSI 300 473 compliant.
• 2 preferred audio and 2 preferred subtitles languages selection.
• Up to 4 Favourite lists.
• Parental Lock by PIN code (0000 default value).
• Software upgrade over the air.
• Timers available to trigger programs (recording in the VCR for instance).
• Fast and easy first install.
• Operating consumption power < 10W.
• Main supply 230V, 50/60 Hz.
DTI 1004
• Very low power consumption standby mode (<0.3W).
• 2 Audio RCA connectors (Left & Right): connection to home audio system.
• SPDIF coaxial connector: connection of the decoder with a Home Cinema amplifier.
• UHF modulator (Ch21-69), Pal BG, DK, I, SECAM.
• Indoor active antenna powering by RF cord (5V, 30mA) and activated by software.
Disclaimer: Reception of digital channels may depend on the type and condition of existing aerial equipment
and installation.
THOMSON reserves the right to modify the specifications and pictures mentioned in this document at any time and without
prior notice. Therefore information contained in this user manual is not contractual. For a full and updated description, see
http://www.thomson-broadband.com.
EN
This symbol means that your inoperative electronic appliance must be collected separately and not
mixed with the household waste.The European Union has a implemented a specific collection and
recycling system for which manufacturers’ are responsible.
This appliance has been designed and manufactured with high quality materials and components
that can be recycled and reused. Electrical and electronic appliances are liable to contain parts that
are necessary in order for the system to work properly but which can become a health and
environmental hazard if they are not handled or disposed of in the proper way. Consequently, please
do not throw out your inoperative appliance with the household waste.
If you are the owner of the appliance, you must deposit it at the appropriate local collection point
or leave it with the vendor when buying a new appliance.
- If you are a professional user, please follow your supplier’s instructions.
- If the appliance is rented to you or left in your care, please contact your service provider.
Help us protect the environment in which we live!
9

Annexes
7. T rouble shooting
If the receiver does not work properly after checking the trouble shooting section, please contact the
dealer.
Warning: never open your set yourself.
Symptoms Cause Solution
The green/red lights on front
panel do not light up.
No picture and sound. TV is set to wrong channel.
No picture and sound.
No picture and sound.
No picture and sound.
The receiver displays the
message “no signal”
during bad weather conditions
heavy rain or snow).
The receiver displays the
message “no signal”.
The receiver displays the
message “no signal”.
The receiver displays the
message “no signal”.
For the DTI 1004 - First installation
failure.
The remote control is not
working.
The power cord is not
plugged in.
Problem in cable connections
between receiver and TV.
Receiver “hang-up”. Switch off receiver; disconnect the main power
The receiver or TV is in
“mute”’ mode.
This is normal, the bad
weather is interfering with
the signal.
Wrong reception. Check your connections.
Wrong parameters set in the
menu.
Wrong alignment of the antenna. Ask your dealer to check the outdoor
Antenna.
The batteries of the remote control
are not inserted or exhausted.
Check that the power cord is plugged
into the wall outlet.
Check if the TV is switched on and set
your TV to the correct EXT / AV or
UHF channel.
Check if the scart and/or RF cable is connected
correctly to the TV and to the back of the
receiver. Replace the scart cable
cord of the receiver from the 230V mains.After
30 seconds reconnect to the main power and
check if it is working properly.
Press the MUTE key on the remote
control of your receiver and/or TV.
Once the weather is better the
picture will appear. If not check your
antenna or call your dealer.
Check settings in antenna and channel
set up menu.
antenna unit and antenna cable.
If you use an indoor antenna requiring a
specific powering by RF cord, please switch
the value to On in the installation menu
(see MENU/Installation/Terminal/Antenna)
and restart the installation by MENU/
Installation/Channels.
Check the batteries.
The remote control is not
working.
For the DTI 652 - The menu is in a
language I don’t understand.
10
Receiver is in very low power
standby.
The menu language has been changed
without you knowing it.
Press the Standby button on the receiver.
To change the menu language, follow the steps
described below:
1. Press the
2. Press 3 times the
3. Press 3 times
4. Use the
MENU button.
q button.
OK.
t / u buttons to select your
preferred menu language. The menu language
has now been changed.

DTI series
652 / 1004
THOMSON Sales Europe
46, quai A. Le Gallo
92648 Boulogne Cedex
FRANCE
322 019 464 RCS NANTERRE
http://www.thomson-europe.com
http://www.thomson-broadband.com
Model and serial number
36119220 © Copyright THOMSON 2006
Dealer's address
 Loading...