

Page 1
User manual
3569723D DTI1000 UM8.qxp 02/03/2005 12:23 Page 1
Page 2
CCoonntteennttss
AAcccceessssoorriieess
2 Accessories
3 Safety Information
4 Connections
5 Remote Control Handset
6 Tuning the Receiver
7 Advanced Setup
8 Program Information
9 Lists and interactive services
10 Timer Programming and Recording
11 Parental Controls
12 Upgrading your Receiver
13 Other Information
14 Trouble Shooting and Information
15 Your Guarantee
2
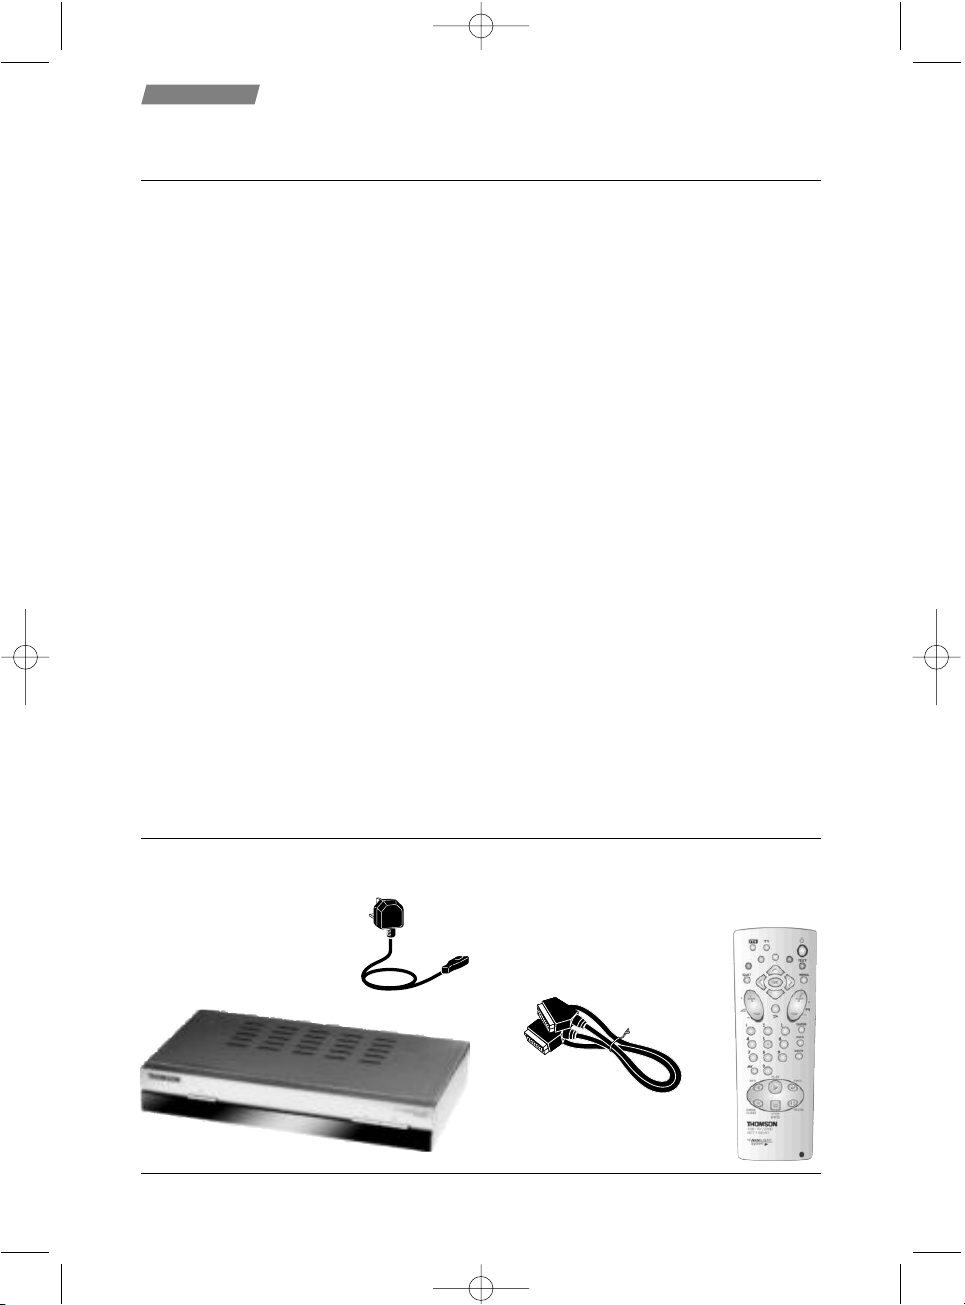
Set-up
Operation Manual
2 x AA batteries
Guarantee Card
DTI1000
Power Cord
Remote Control
Scart Lead
3569723D DTI1000 UM8.qxp 02/03/2005 12:24 Page 2
Page 3
3
Congratulations on your choice of this state-of-the-art Digital Free to View Receiver.
We hope you will enjoy all the new features this technology brings to your home for
many years. Your dealer should have checked your postcode for reception, but the
availability of Digital Signals does depend on the transmitter(s) available to your
receiving aerial. If you have any doubt about this availability, please contact your
dealer, or check the following internet websites:-
wwwwww..ffrreeeevviieeww..ccoo..uukk
or
wwwwww..ddttgg..oorrgg..uukk//ccoonnssuummeerr
If you experience reception problems contact our aerial helpline on
00880000 55442288226655
SSaaffeettyy iinnffoorrmmaattiioonn
IInnttrroodduuccttiioonn
In order that you may enjoy this product for a long time it is important that you observe the
following points when installing and operating your receiver
● This receiver is intended for the reception of TV picture and sound signals. Any other
application is expressly prohibited.
● Avoid the long-term display of static images, e.g. menus or audio only channels. Use the
Radio (Blank Screen) feature (see Advanced Setup)
● Do not expose the receiver to any moisture. The receiver is intended for use in dry rooms.
If you wish to operate it in the open air, make absolutely sure that it is protected against
moisture (rain, splashes, etc.).
● Do not place any object filled with water (vases or similar) on the receiver.
● Place the receiver on a flat and hard surface. Do not place any objects (e.g. newspapers) on
the receiver.
● If placed in an enclosed unit, the all-round distance between the receiver and the sides of
the unit must be at least 10cm.
● Do not place the receiver in the immediate vicinity of a heat source or in direct sunlight as
this would prevent appropriate cooling.
● During a thunderstorm it is recommended that you disconnect the receiver from the mains
and aerial to prevent damage from lightning strikes.
● Never open the receiver as this will invalidate your guarantee.
● Do not dispose of used batteries in normal waste. Please dispose of them at appropriate
collection points.
● If you are not using the receiver for a long time (including overnight), please switch it off
at the mains. This saves energy. Note that any software upgrades can take place at night at
your request.
● This product has been constructed with the environment in mind. There is a minimum of
plastic parts and the packaging is largely made from recycled paper. It is also disassemblyfriendly allowing for easy recycling at the end of its life.
● CLEANING - Dust will collect on the unit and can be removed with dry clean cloth.
DDoo nnoott
spray any substance on the unit.
Set-up
3569723D DTI1000 UM8.qxp 02/03/2005 12:24 Page 3
Page 4
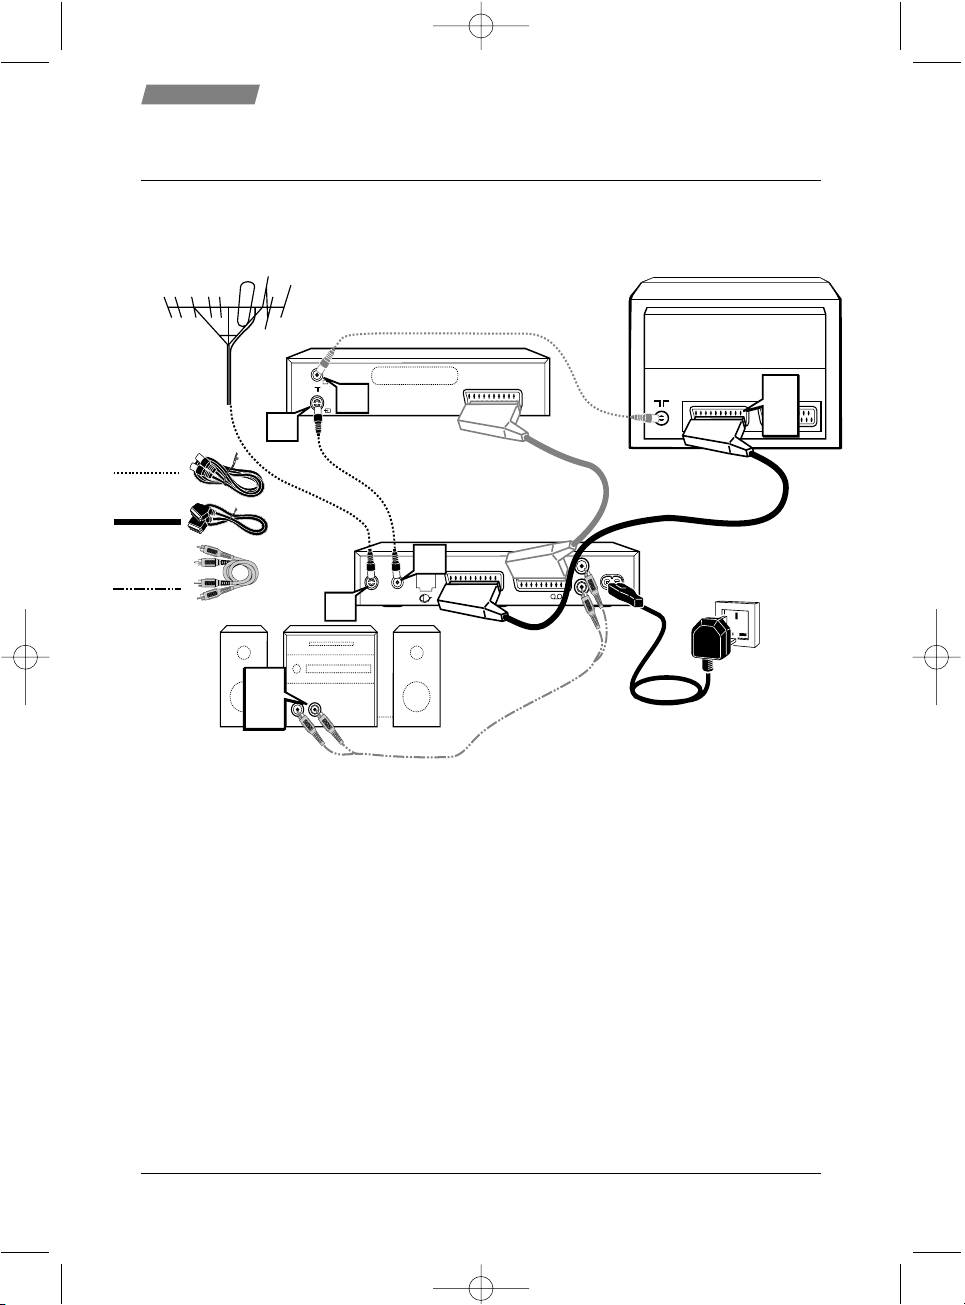
How to connect the aerial, scart and co-axial cables
Caution : Always disconnect the receiver from the mains supply before you connect it
to any other equipment.
Unplug the aerial lead from your VCR (or TV) and connect it to the »RF IN« socket on the
rear of the receiver.
If connecting to a VCR, connect the aerial fly-lead that came with your VCR between
»
LLOOOOPP TTHHRROOUUGGHH OOUUTT
« on the receiver and aerial IN on the VCR.
Connect the scart lead from the »
TTVV SSCCAARRTT
« socket on the receiver to the AV1/EXT1/AUX1
scart IN on your TV.
Plug the power connector into the »
MMAAIINNSS IINNPPUUTT
« socket on the receiver.
If you wish to connect the audio outputs to your Hi-Fi or AV amplifier, you will need to
purchace the necessary phono cables ad connect them as shown above.
Note: If you wish to continue watching analogue TV on your television, you must
purchase an aerial fly-lead and connect it between the aerial IN on the TV and the
aerial OUT on the VCR (or the »
LLOOOOPP TTHHRROOUUGGHH OOUUTT
« on the receiver)
It is strongly recommended that the product be connected via scart leads to your TV
and VCR.
TV
Aerial
TV
VCR
RECEIVER
AV AMPLIFIER
AUX IN
LR
RF IN
RF LOOP
THROUGH
TV
MAINS
INPUT
VCR
L
R
v
w
x
u
Aerial Leads
Scart Leads
Note : For best results
connect the STB to the TV
using the scart lead supplied.
AV1
EXT1
AUX1
OUT
IN
IN
OUT
Not supplied - purchase separately if required
Not supplied
AUX
VIDEO
EXT
Phono Leads
(not supplied)
CCoonnnneeccttiioonnss
4
Set-up
3569723D DTI1000 UM8.qxp 02/03/2005 12:24 Page 4
Page 5
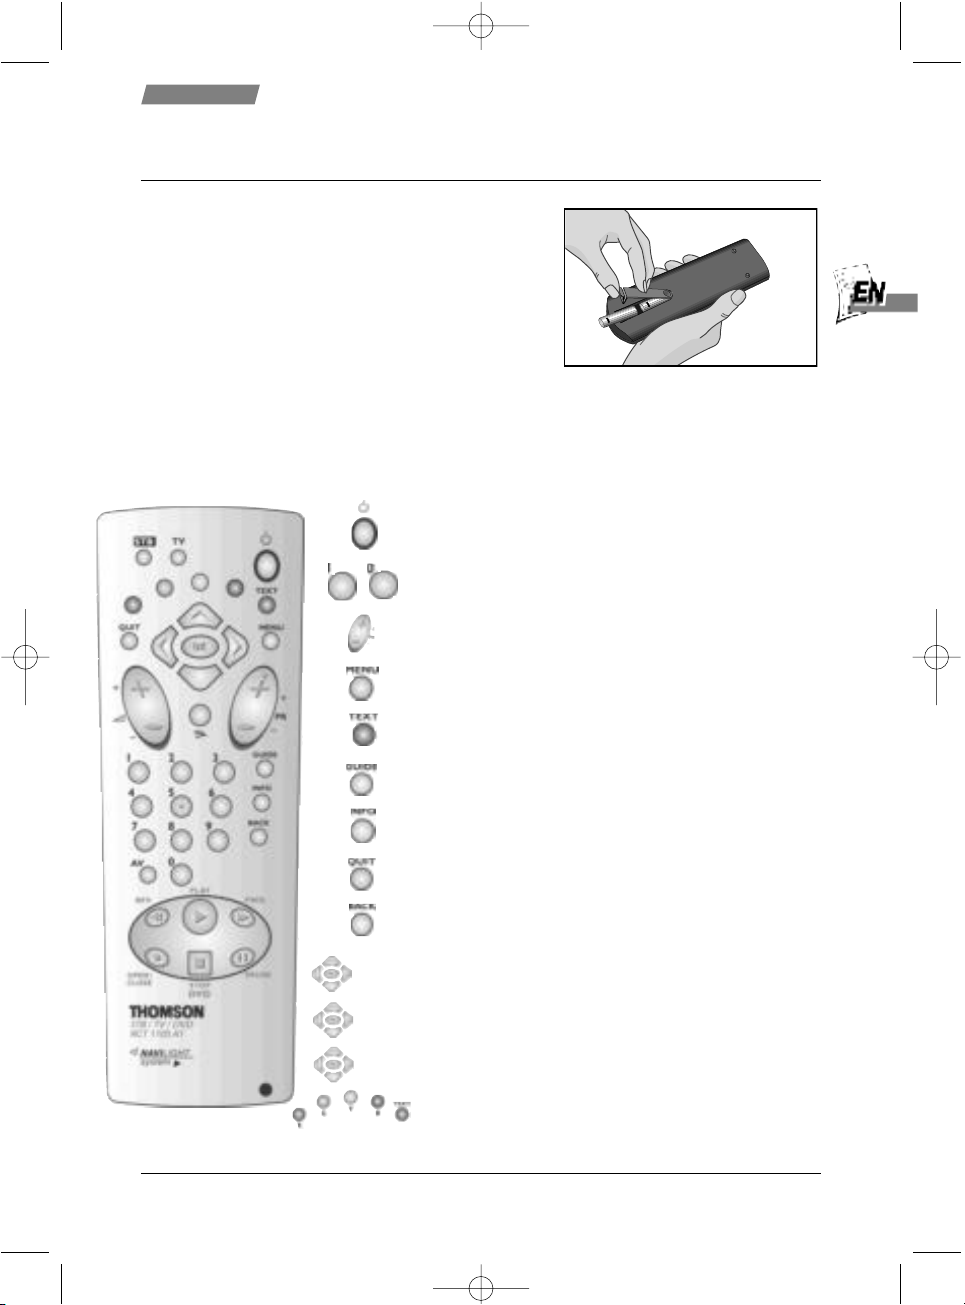
Insert the batteries into the handset making
note of the polarity shown in the picture
opposite. Point the remote control at the
receiver and press the STB button.
If you have a Thomson TV, you can operate
some of the features of your TV by pointing the
handset at the TV and pressing the TV button. The handset will then work the TV
until you press the STB button again.
The remote control
Switches the receiver in/out of stand-by mode.
Numeric keys for various inputs.
Switches to the next channel, position step by step.
[MENU] Access main menu.
[TEXT] Enter / Exit teletext.
[GUIDE] Access TV-Guide.
[INFO] Calls up the Information Banner.
[QUIT] Quit the menu system.
[BACK] Select previous menu.
Select various functions in the menus.
Select various functions in the menus.
[OK] Confirms selections made from the menus.
[COLOUR] Coloured keys for Teletext information.
RReemmoottee CCoonnttrrooll
Set-up
▼//▲
▼
▲
OOKK
//
5
B
aanndd tthhee pprrooggrraamm aanndd bbuuttttoonnss ccaann aallssoo bbee ffoouunndd oonn tthhee rreecceeiivveerr ffrroonntt ppaanneell..
NNoottee::
Other keys not mentioned above have no function on this model.
3569723D DTI1000 UM8.qxp 02/03/2005 12:24 Page 5
Page 6

6
Start up
Once the mains has been connected to the receiver, it will
take up to 15 seconds to start up. If this is the first time
installation, a menu will automatically appear.
Press [OK] when prompted.
If this is not the first time, follow the steps below :-
Auto tune
Once the receiver has been connected to the aerial and
television, the receiver can now be tuned in.
1. Press B on the handset to turn the receiver on.
2. Press [MENU].
3. Select SETUP with // and press [OK].
4. Select AUTO TUNE with // and press [OK].
5. Press [OK] to select REPLACE EXISTING SERVICES.
Now wait while the receiver searches for all the available
services, this may take a few minutes.
The receiver will place the services in numerical order.
6. Press [OK] or [QUIT] to exit the menu. Alternatively
see later in the guide how to sort your Service List.
As new services become available, upgrade the SERVICE
LIST by selecting the ADD NEW SERVICES option or, when
major changes occur, use REPLACE EXISTING SERVICES
option.
Manual tune
This allows an advanced user to manually tune services.
1. Select MANUAL TUNE from the SETUP menu and
press [OK].
2. Now enter the channel number to be tuned.
This menu also shows the aerial signal strength. The Level
bar shows GREEN for good, YELLOW for poor, or RED for
bad signals. The higher the Quality number, the better the
signal is.
By changing AUTO MODE to NO, it is possible to change
other reception parameters.
TTuunniinngg tthhee rreecceeiivveerr
Set-up
3569723D DTI1000 UM8.qxp 02/03/2005 12:24 Page 6
Page 7

TV Setup
You can choose how pictures are displayed on your TV.
1. Press [MENU], select the SETUP menu and press [OK].
2. Now select TV SETUP and press [OK].
3. Now choose your type of TV. Use // and choose 16:9
for a widescreen TV or 4:3 for a conventional one.
4. Now choose how widescreen images appear. If your TV
is 4:3 use // and choose from Letterbox, Centre
Cutout (centre action only) or Full Frame (stretched).
5. To avoid screen burn on radio channels choose
RRaaddiioo
((BBllaannkk SSccrreeeenn))
to display a blank screen. Options are
OOffff,, IImmmmeeddiiaattee
or
DDeellaayyeedd
(screen blanks after a delay)
6. Now choose the Video Output mode. Use // to
choose from RGB (best quality pictures for TVs that
support it) or PAL (suitable for all other TV sets).
7. Use // to turn the
RR
FF MMoodduullaattoorr
On or Off.
8. The
MMoodduullaattoorr CChhaannnneell
is set by the factory to CH22. If
you wish to change the channel you tune your TV to (in
order to avoid interference), use // to adjust it.
9. To exit menu press [QUIT].
Languages
You can choose your desired languages for Sound, Subtitles
and Interactive (data) Services (depends on broadcast).
1. Press [MENU], select the SETUP menu and press [OK].
2. Select LANGUAGES and press [OK].
3. Select Subtitles, Data Services or Audio using //.
4. Use // to choose the desired language or Off to
suppress Subtitles.
5. To exit menu press [QUIT].
PIN number
You can choose a PIN (Personal Identification Number) for
use with parental controls. The receiver was originally
programmed with 1234. Change this number as follows :-
1. Press [MENU], select SETUP menu and press [OK].
2. Select PARENTAL CONTROL and press [OK].
3. Now enter the current PIN ****.
4. Select CHANGE PIN and press [OK].
5. Use 0..9 to enter a new PIN.
6. Use 0..9 to confirm new PIN. When confirmed, this
number is now stored. KEEP THIS NUMBER SAFE!
7. To exit menu press [QUIT].
AAddvvaanncceedd sseettuupp
Set-up
7
3569723D DTI1000 UM8.qxp 02/03/2005 12:24 Page 7
Page 8

8
7 Day TV guide
The TV guide shows details of programs whilst allowing you to watch a smaller picture of the
selected service.
To access the guide press [GUIDE].
Move up and down the channel listings using // keys,
you can move a page at a time by using Pr+/Pr- keys.
Find out what’s on later using / keys.
To see a preview of the chosen program press [GREEN].
Press [YELLOW] or [BLUE] to move backwards or forwards a day
at a time.
Press [OK] to view the selected channel.
You can set a reminder for a program you wish to view later. Select the program you wish to
view and press [GREEN]. The Item you chose then turns green. A prompt will appear on screen
when the program is about to start, press [OK] to select the program or [QUIT] to cancel.
To record the chosen program press [RED]. The item will then be entered into a timer. See page
10 for details on timer programming.
Information banner
To view information about the program you are currently viewing, press the [INFO] button.
One press shows a small amount of information a second
press shows more details about the current program.
The icons represent the following information :TXT - Interactive service available
U - The certificate issued for the current program
SUB - Subtitles available
While the information banner is on display, you can view
details for the next program. Do this by pressing .
You can also view details for other channels. Search
through the listings using the // keys.
Press the [INFO] button again to remove the banner.
PPrrooggrraamm iinnffoorrmmaattiioonn
Use
3569723D DTI1000 UM8.qxp 02/03/2005 12:24 Page 8
Page 9

Use
Service List
This list contains all the services that were tuned in during an Auto tune or Manual tune. You
can delete services that you do not want or you can add them to your Favourite List for easier
selection.
1. Press [MENU], select SERVICE LIST and press [OK].
2. Select a service using // keys.
3. To delete the selected service, press [RED]. (Once
deleted, you must repeat manual/auto tune to view)
4. To add a service to the Favourite List, select the service
and then press [BLUE] until “YES” is shown.
5. To remove a service from the Favourite List press
[BLUE] until “NO” is shown.
6. Press [OK] to view the selected service.
Favourite List
All Free-to-View services are automatically set to favourites after a Manual or Auto tune. This
list determines the order in which services are selected when using the Pr+/Pr- keys. So for the
example below, when watching
five
five, pressing Pr+ would select
BBC Radio 2
BBC Radio 2.
To reorder the list,
1. Press [MENU], select FAVOURITE LIST and press [OK].
2. Select the service you wish to move with // and
press [BLUE]. (The service will be highlighted in red)
3. Now move the service using // to your desired
location and press [BLUE] to store it in position.
4. Repeat this process until the list is how you wish it.
5. To exit menu, press [QUIT].
The favourite channels are now set to suit your personal requirements. To view channels that
are not selected as favourites, use TV Guide, Service List or enter the channel number directly
via the remote control, 0..9.
Teletext and interactive services
If your chosen channel has Teletext (MHEG) features use [TEXT] to access them. To return to
normal viewing press [TEXT] again. Some services offer interactive features, details of these and
how to use them will appear on screen as they occur.
LLiissttss aanndd iinntteerraaccttiivvee
sseerrvviicceess
9
3569723D DTI1000 UM8.qxp 02/03/2005 12:24 Page 9
Page 10

10
TTiimmeerr pprrooggrraammmmiinngg aanndd
rreeccoorrddiinngg
To record an analogue channel ensure that the aerial connections to your VCR are as shown in
the connection diagram and use the VCR as normal.
To record a digital channel, connect the receiver directly to your VCR via the VCR scart socket
on the rear of the receiver (see connection diagram). Please consult your VCR user manual for
details on recording via AV or AUX inputs. For RF recordings select tuned channel on the VCR.
The TIMER PROGRAMMING function enables the receiver to :-
● Automatically switch to your pre-selected channels at pre-selected times.
● Start Auto Record on the VCR (where the VCR supports scart automatic
recording function, see your VCR manual for details on this.)
NOTE: The system may not accept a start time less than 5 minutes ahead of the current clock
time displayed in the menu.
1. Press [MENU], select TIMER PROGRAMMING and
press [OK].
2. Using // select a free event, or select an event you
wish to alter and press [OK].
3. Using select the program you wish to record or
use 0..9 to enter the number directly, e.g. 003.
4. Press to select the date and enter the date directly
using 0..9 or use // to choose.
5. Press to select the time and enter the start time
directly using 0..9 or use // to choose.
6. Press to select the duration and enter the length of
the program using 0..9 or use // to choose.
7. Press to select repeat. Press to choose from
WEEKLY, DAILY, MON-FRI, MON-SAT or NO.
8. Press to select subtitles. Press to choose YES or NO.
9. When the details are correct, press [OK] to store
them.
10. To exit menu, press [QUIT].
If a mistake has been made during DETAIL ENTRY, an error message will be displayed at the
bottom of the screen. For instance, in the event of 2 programmes being entered with similar
start times, then an EVENT CLASH error message will be displayed. If any errors are found
during this stage, the system will not allow any further progress.
When the Timer Event has been activated, both RED and GREEN LEDs will be lit for the duration
of the event. A suitably equipped VCR will record automatically during this time. Please note
that unless your VCR supports automatic scart recording YOU MUST ALSO SET THE VCR TIMER.
In order to delete an entry you no longer need, position the cursor over the entry to be removed
in the TIMER PROGRAMMING menu and press [RED].
Cancel an event at any time by pressing [QUIT]. Press [QUIT
] again to confirm.
Use
▼
▲
//
3569723D DTI1000 UM8.qxp 02/03/2005 12:24 Page 10
Page 11

11
You can use PARENTAL CONTROL to create viewing restrictions on your receiver. First create
your own Personal Identification Number (PIN) as shown in the Advanced Setup section of this
guide. You can now create censorship levels or Lock out channels completely.
Press [MENU], select PARENTAL CONTROL and press [OK].
Now enter your PIN. The menu will appear.
Censorship
If the censorship level does not match the censorship rating
of the program, access will be denied, the user is prompted
for the PIN before access is granted.
Press to set the censorship level to OFF, 6, 12, 15, 18 or
BLOCK (for total block).
Lock services
From the PARENTAL CONTROL menu, select LOCK/UNLOCK
SERVICES and press [OK].
To Lock/Unlock services scroll through the list of services
with // and Lock/Unlock the highlighted service with
[OK].
To exit menu press [QUIT].
To view a locked channel the PIN must be entered. Once
entered, all locked channels will be unlocked until the
receiver is next in standby.
Should any censored or locked channel be selected using
the TIMER PROGRAMMING function, you must enter the
PIN before the event is stored.
Should any channel be censored or locked after the TIMER
PROGRAMMING function has been set, you will be
prompted for the PIN before access is granted. Entering an
incorrect PIN will only allow the status of the channel to be
displayed upon a blank screen.
PPaarreennttaall ccoonnttrroollss
Use
3569723D DTI1000 UM8.qxp 02/03/2005 12:24 Page 11
Page 12

From time to time new services are launched which may require your receiver to be upgraded
with new software before you can use them. Sometimes new features may be introduced to
enhance your receiver.
Notification
This menu is automatically displayed when a new “Over-AirDownload” is detected after switch on. You now have three
options.
● To start the download immediately, press [OK].
● Select DOWNLOAD LATER to set a timer event to receive
the new software during the night.
● Refuse the download at this time by pressing [QUIT].
(However, the download may be re-detected and
indicated the next time you switch on.) It is highly
recommended that you keep your receiver up to date.
Check for download
You can manually check to see if new software is available for download. If there is one
available, you will see the download menu as above.
To check:-
1. Press [MENU], select SETUP and press [OK].
2. Select CHECK FOR DOWNLOAD and press [OK].
3. If no download is available, press [QUIT] to exit.
4. Press [OK] to start. Alternatively, schedule the download for later.
The download can take up to 30 minutes or be slow to start, so please be patient. After the
download, details about the new software will be displayed for you. There may also be a
telephone number to call in case of any difficulty.
If the download fails, try again later.
During part of the download, DO NOT switch off the receiver, this warning is displayed on
screen.
12
UUppggrraaddiinngg yyoouurr RReecceeiivveerr
Use
3569723D DTI1000 UM8.qxp 02/03/2005 12:24 Page 12
Page 13

Technical information details
The technical information screen displays the hardware and
software information of the receiver. This information may
be required by the service agent or service call operator.
1. Press [MENU], select SETUP and press [OK].
2. Select TECHNICAL INFORMATION and press [OK].
Hotel Mode
When power to the receiver is disconnected, the unit will always return to standby when next
reconnected. If you wish the unit to return to the last viewed channel, follow the instructions
below :-
1. Press [MENU], select SETUP and press [OK].
2. Select TECHNICAL INFORMATION and press [OK].
3. Key in the number 4177 - Note that the numbers will not be displayed on the screen.
When successful, the words “Hotel Mode” will be displayed at the bottom of the menu. The unit
will now power on to the last viewed channel. This can be useful for hotel redistribution systems
for power loss recovery. Key in 6399 to return the unit to normal operation.
Electricity Consumption
The Receiver will always switch to standby when you press the B key, but will still use energy
running other functions of the receiver. To minimise this energy drain, if you press and
hold the B key, the Receiver will switch off all functions. In this mode the Receiver only uses
a tiny amount of energy, but it will take a little longer to switch on. In this mode you must use
the B button on the front of the unit to switch it back on. This returns the unit to normal
standby and you can now use the remote control as normal.
NNoottee
: This low power standby mode will also interrupt the aerial signal, making
aannaalloogguuee
TV
viewing or recording impossible.
Optional extras
In addition to a VCR being used along side the receiver, a remote IR extender (mouse) may be
installed. This gives you the advantage of placing the receiver out of view, leaving only the
mouse on display.
When used in conjunction with a romote control, the mouse allows the full use of the receiver.
Alternatively press
++//--
on the mouse to scroll through the channels.
OOtthheerr iinnffoorrmmaattiioonn
Use
13
3569723D DTI1000 UM8.qxp 02/03/2005 12:24 Page 13
Page 14

Trouble Shooting
Not every picture or sound problem is caused by a defect in your Digital Terrestrial Receiver.
Leads having been accidentally pulled out or worn out batteries in the remote control can also
cause impairment. If your unit does something unexpected while you are using it, please unplug
it, wait a few seconds then plug it in again. If this fails to solve the problem or the following
measures do not bring about satisfactory results, please consult an authorised dealer.
Technical Information
This product fulfils the European directives 89/336/EEC, 73/23/EEC and 93/68/EEC. This device
conforms to the safety regulation DIN EN 60065 (VDE 0860) and therefore the international
safety regulation IEC 60065.
You may not open the Digital Terrestrial Receiver. The manufacturer accepts no liability for
damage resulting from improper handling
MMaaiinnss vvoollttaaggee:: PPoowweerr ccoonnssuummppttiioonn::
230V~, 50/60Hz Operating approx. 10W. Low power standby <1W
AAmmbbiieenntt tteemmppeerraattuurree:: AAuuddiioo FFoorrmmaatt::
+10°C to 35°C Analogue : Stereo Sound
DDiimmeennssiioonnss aanndd wweeiigghhtt
Dimensions : W x H x D - 252 x 43 x 153mm Weight : Approx. 0.7Kg
VViiddeeoo:
: AAuuddiioo::
Signal to noise : 73dB Signal-to-noise: 95dB
Video jitter : 1ns Interchannel isolation : 90dB
THD : 0.03%
TTrroouubbllee sshhoooottiinngg aanndd
tteecchhnniiccaall iinnffoorrmmaattiioonn
Use
FFAAUULLTT CCAAUUSSEE//RREEMMEEDDYY
Receiver does not Press STB button on handset.
respond to the Unit is in low power standby. Press Standby button on unit.
remote control Point the remote control directly at the receiver.
Remove all obstacles which may impair the path of the
remote control signal.
Check or replace the remote control batteries.
No Picture Check all connections at the rear of the unit
Disrupted Picture Check RF IN connection. Ensure cables to TV are inserted correctly
Select AV channel on TV set
Replace aerial outlet plate with shielded type
No Sound Check all connections at rear of unit
No Power Check mains plug is inserted correctly and receiver is switched on
14
3569723D DTI1000 UM8.qxp 02/03/2005 12:24 Page 14
Page 15

3569723D DTI1000 UM8.qxp 02/03/2005 12:24 Page 15
Safety information
Mains connection
This receiver is suitable for use on A.C. mains supply, 220-240 V - 50 Hz only.
It must not be connected to D.C. mains.
Note: The mains lead of the receiver is fitted with a moulded plug. If the mains sockets are not compatible or if for any reason
the plug is removed please follow the directions below.
The moulded plug cannot be rewired and if removed must be disposed of safely. Remove the fuse to make it safer.
Do NO
T under any circumstances plug the severed plug into any mains socket as this could result in an electric shock.
Important!
If the plug is removed, rewire new plug as follows: The wires in the mains plug are coloured in
E
accordance with the following code:
BLUE - NEUTRAL
BROWN - LIVE
As the colours of the wires in the mains lead of this apparatus may not correspond with the
N
3A
L
coloured markings identifying the terminals in your plug, proceed as follows:
BLUE wire to the terminal coded N (Neutral) or coloured black.
BROWN wire to the terminal coded L (Live) or coloured red.
Do NO
T make any connection to the terminal in the plug which is marked by the letter E
or by the safety symbol l or coloured green and yellow.
A fused plug must be fitted with a 3A fuse approved by ASTA or BSI to BS 1362 and fuse
covers must always be securely replaced.
If the fuse blows, check the mains cable for damage or call a qualified technician. Do not
BLUE BROWN
3A
3A
try to bridge the fuse or increase its rating!
The OFF buttonBon the remote control and the receiver* does not completely disconnect the unit from the
mains supply, but switches operating power on and off. *Note: Not all receivers have control buttons.
!
Your guarantee
Dear Customer,
Thank you for purchasing this THOMSON product and for your confidence in our company. This product meets applicable safety requirements and has
undergone stringent testing during manufacture.
However, should there occur a defect, the product or its defective part(s) (excluding accessories and consumables) will be repaired free of charge
(labor and parts) or, at THOMSON discretion, exchanged for a similar item, provided that it has been returned within 12 (twelve) months from
the date of original purchase (date of receipt), is defective in materials and/or workmanship and has been bought in any of the following
countries: F, I, E, P, GB, IRL, D, CH, A, B, L, NL (Territory) or in a Duty-free shop in the named countries.
This guarantee will be granted only upon presentation of the original invoice or cash receipt, indicating the date of purchase and dealer’s name. The
benefits of this guarantee may be refused if the invoice, cash receipt or guarantee card has been altered in any way, deleted or made illegible after the
original purchase.
This guarantee does not apply to any of the following:
1. Damage caused by accidents including, but not limited to, lightning, fire, water;
2. Transport costs between the home and place of service and other costs and risks of transport relating directly or indirectly to this guarantee;
3. Damage to the product resulting from neglect, misuse, including but not limited to, failure to use, repair and/or install the product for its
normal domestic purposes and/or in accordance with the operating instructions on its proper installation and use;
4. Modifications, adaptations and alterations of the product to operate in a country other than that for which it was originally designed and
manufactured, or any damage resulting from such modifications;
These statements do not affect your statutory rights as a consumer under applicable national legislation in force, nor your consumer’s rights against
the dealer from whom you bought the product.
If you need service, whether or not under guarantee, please approach the dealer who sold you the product.
In your own interest we advise you to read the instruction booklet for your THOMSON product carefully before contacting your dealer or service
center.
If you need service while in a country (within the named Territory) other than the one where you bought your product, please contact the nearest
THOMSON InfoCenter.
Should you have any questions which your dealer is unable to answer, please contact:
THOMSON
Technicolor Building
Bath Road
West Drayton
Middlesex
UB7 0DB
tel.+44 (0) 1788 541 970
http://www.thomson-broadband.com
Page 16

THOMSON
Technicolor Building - Bath Road
West Drayton - Middlesex UB7 0DB
UK
http://www.thomson-broadband.com
MMooddeell
DDeeaalleerr''ss aaddddrreessss
3569723D © Copyright THOMSON 2005
DDTTII 11000000
3569723D DTI1000 UM8.qxp 02/03/2005 12:24 Page 16
 Loading...