

Page 1
220 - 240 V
50 - 60 Hz
United Kingdom
Ireland
Europe
1
2
3
4
Guide d’Installation Rapide • Quick Start Guide • Quick-Installations-Anleitung • Guida d’Installazione Rapida • Guía de instalación rápida • Snabbguide för installation
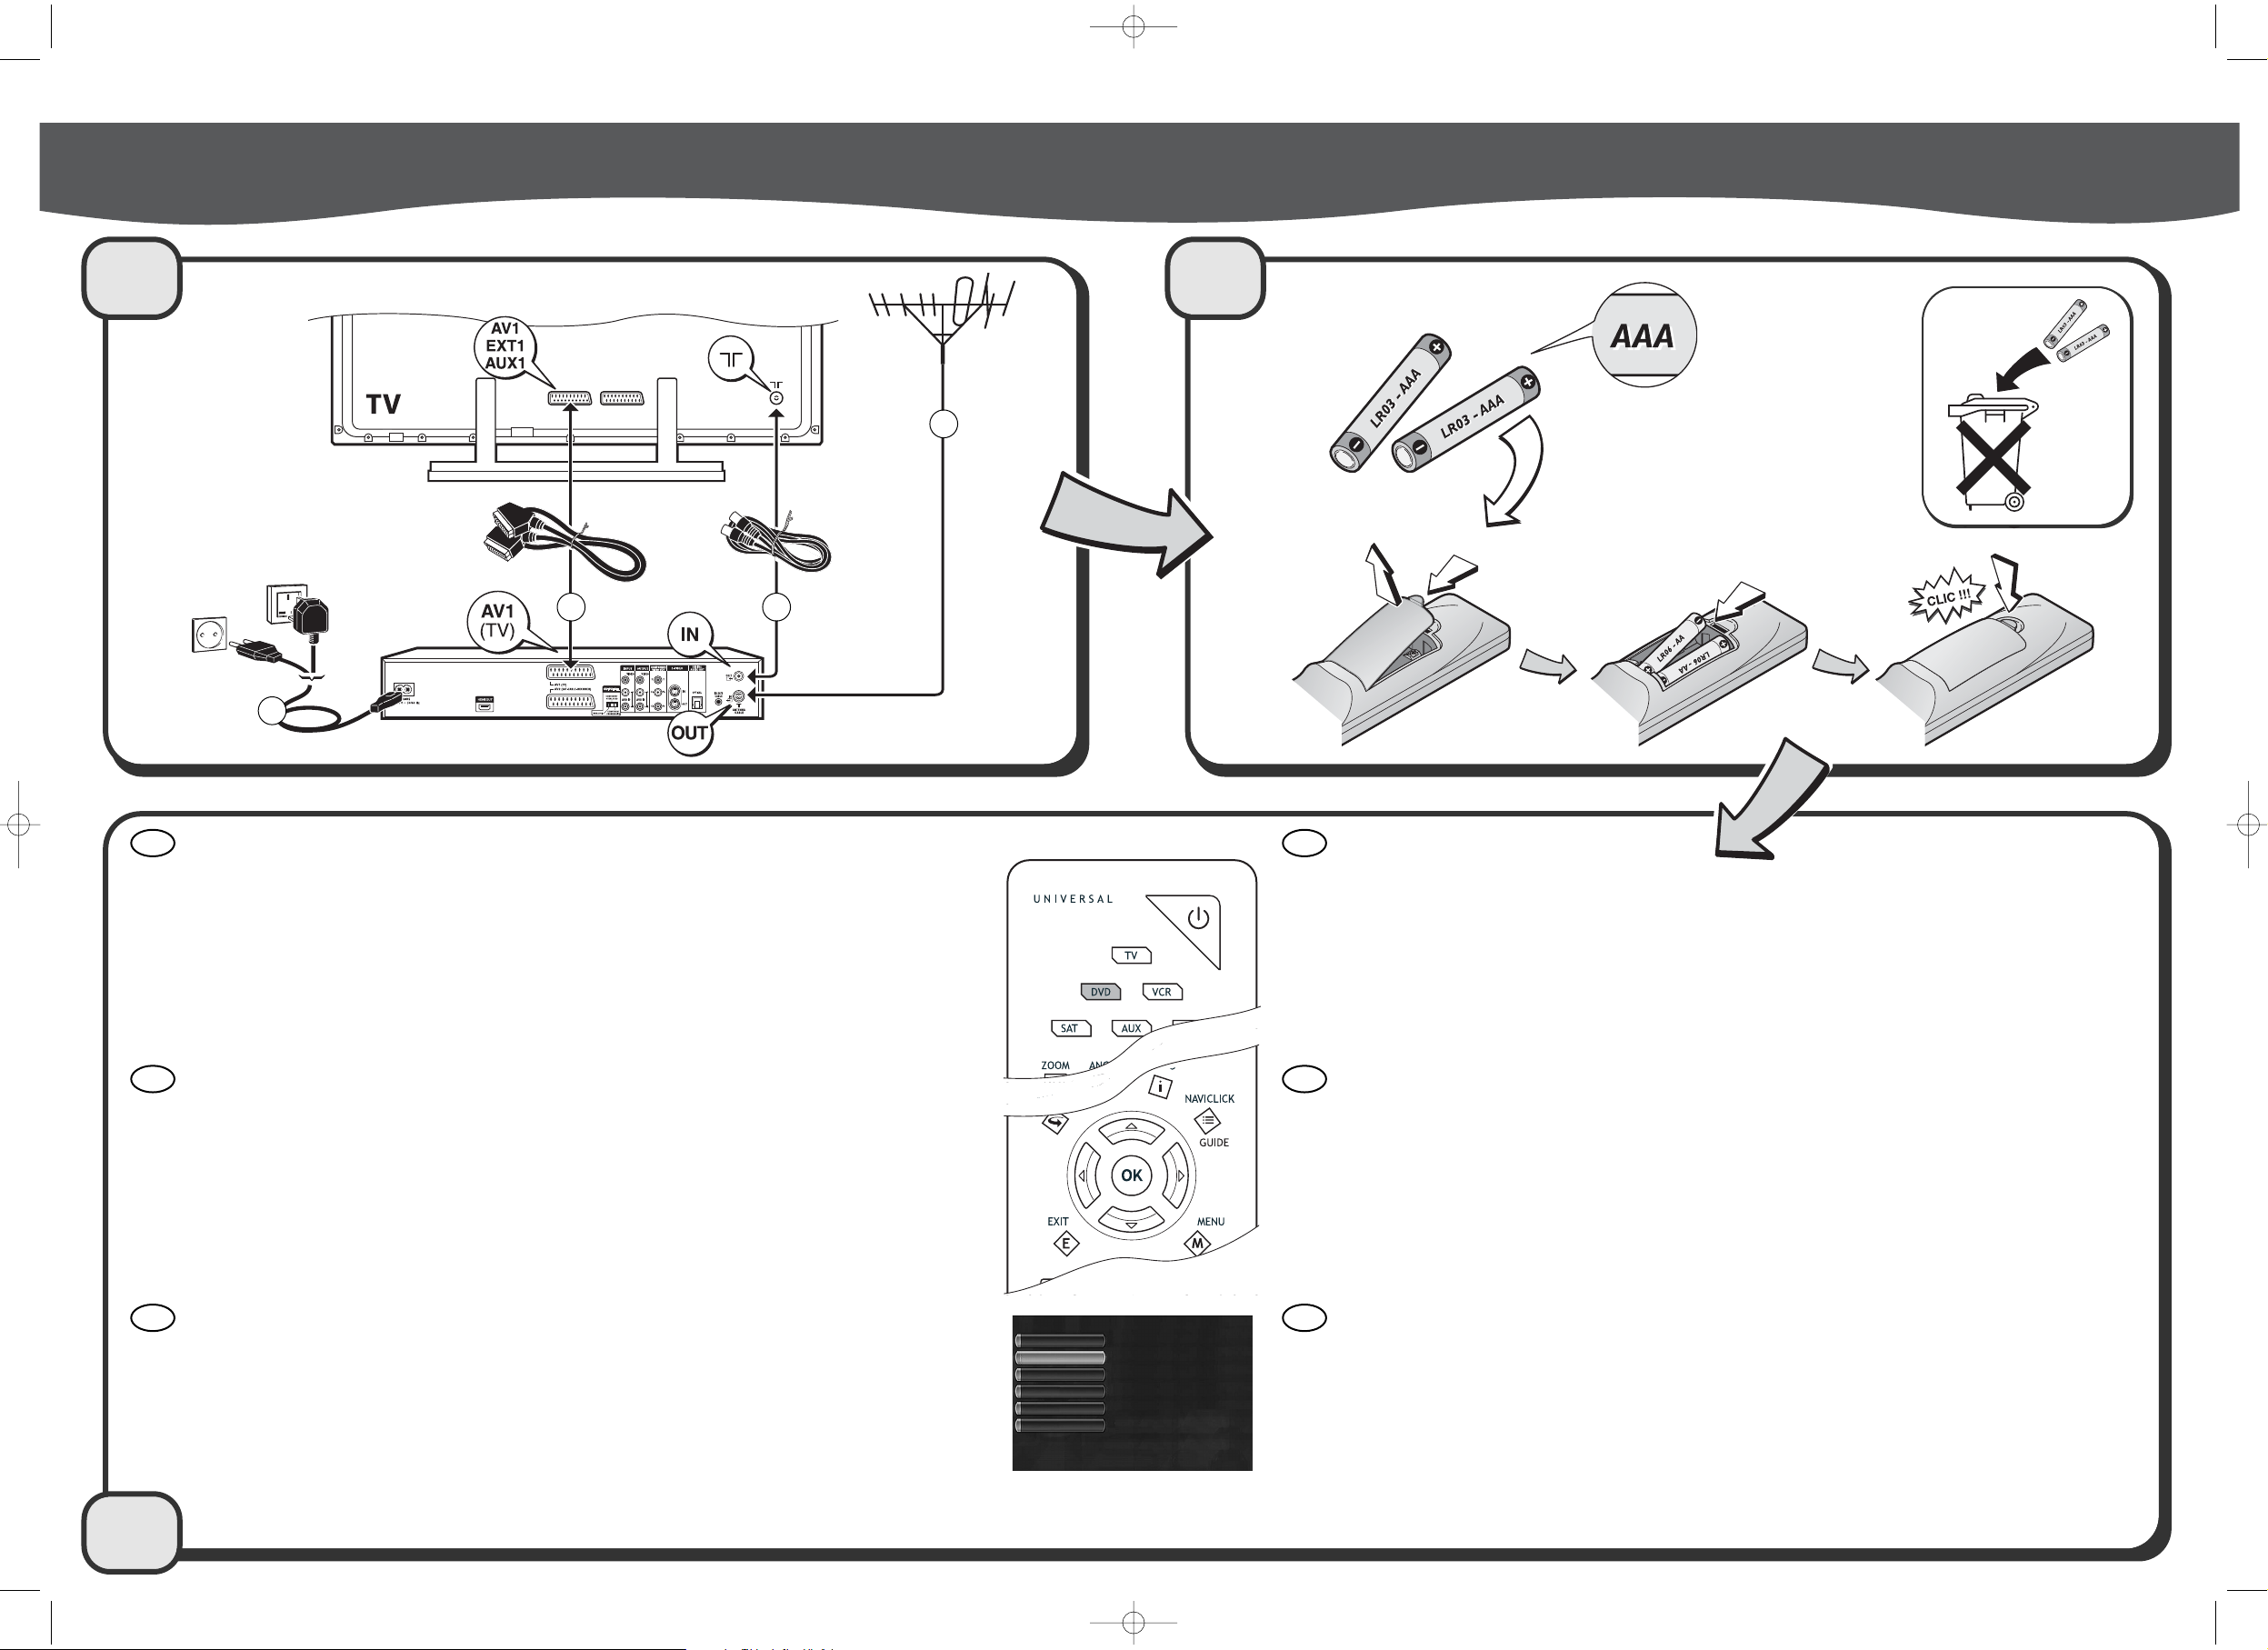
Raccordements de base - Basic Set up - Basisanschlüsse - Raccordi di base - Conexiones básicas - Basanslutning
A
FR
EN
DE
1 2
3
Installation automatique des chaînes
1. Allumez votre téléviseur.
2. Appuyez une fois sur la touche DVD de la télécommande.
3. Appuyez une fois sur la touche STANDBY/ON de l’enregistreur. Attendez quelques secondes que le menu des langues
apparaisse.Après un instant, si le menu n’est pas affiché, sélectionnez sur le téléviseur la prise AV à laquelle vous avez
raccordé votre enregistreur.
4. Choisissez une langue avec les touches , , OK.
Le choix d’une langue détermine la langue des menus de l’enregistreur mais aussi la langue des dialogues et des sous-titres des disques
DVD si la langue choisie est également proposée par les disques lus.
5. Sélectionnez votre pays de résidence puis la méthode d’installation avec les touches , , OK.
6. Dans l’écran “Antenne et Prises AV”, ne changez aucun des réglages proposés et sélectionnez Valider avec , OK.
L’installation des chaînes commence.Attendez la fin de la recherche des chaînes et continuez l’installation en suivant les indications, sur
l’écran, pour les différentes étapes.
Automatic channel set-up
1. Switch on your TV set.
2. Press and release the DVD button on the remote control.
3. Press and release the STANDBY/ON button on the recorder.Wait a few seconds until the language menu appears. If no
menu is displayed after a moment or two, select the AV socket on the TV set that you have connected your recorder to.
4. Use the , and, OK buttons to choose a language.
This language choice dictates what language is used on the recorder's menus as well as the language for dialogues and subtitles on DVD
discs if they contain that language.
5. Select your country of residence then the set-up method with the , and OK buttons.
6. When you get to the “Antenna and AV sockets”, screen, do not change any of the adjustments shown; just confirm
with the
and OK buttons.
Channel set-up begins. Wait until the search for channels ends then continue the set-up operation by following the instructions on the screen
for the remaining steps.
Automatische Installation der Sender
1. Schalten Sie Ihr Fernsehgerät ein.
2. Drücken Sie auf die DVD Taste der Fernbedienung.
3. Drücken Sie einmal auf die Taste STANDBY/ON des Recorders.Warten Sie einige Sekunden bis Anzeige des
Sprachmenüs.Wenn nach einiger Zeit dieses Menü nicht angezeigt werden sollte, am Fernsehgerät die AV-Buchse
auswählen, an der Ihr Recorder angeschlossen ist.
4. Wählen Sie eine Sprache aus:Tasten , , OK.
Die Auswahl einer Sprache bestimmt dann die Sprache in den Menüs des Recorders, aber auch gleichzeitig die Dialog- und
Untertitelsprache für die DVD-Discs, falls diese eine Sprachfunktion besitzen.
5. Wählen Sie das Land aus, in dem Sie wohnen und dann die Installationsmethode:Tasten , , OK..
6. Auf dem Bildschirm “Antenne und AV-Buchsen”, verändern Sie keine der ab Werk eingestellten Werte und wählen Sie
Fertig mit
, OK.
Die Senderinstallation beginnt. Warten Sie bis zum Ende der Sendersuche und fahren Sie die weitere Installation unter Befolgung der
Bildschirmanzeigen fort.
IT
ES
SV
Installazione automatica dei canali
1. Accendere il televisore.
2. Premere una volta il tasto DVD del telecomando.
3. Premere una volta il tasto STANDBY/ON del registratore.Aspettare qualche secondo affinchè compaia il menu delle
lingue. Dopo qualche istante, se il menu non compare, selezionare sul televisore la presa AV alla quale avete collegato il
vostro registratore.
4. Scegliere una lingua con i tasti , , OK.
La scelta di una lingua determina la lingua dei menu del registratore ma anche la lingua dei dialoghi e dei sottotitoli dei dischi DVD qualora
la lingua prescelta rientri fra quelle proposte sui dischi letti.
5. Selezionare il vostro paese di residenza e quindi il metodo d'installazione con i tasti , , OK..
6. Nello schermo “Antenna e Prese AV”, non cambiare nessuna delle regolazioni proposte e selezionare Conferma
con il tasto
, OK.
L’installazione dei canali comincia.Attendere la fine della ricerca dei canali e continuare l’installazione seguendo le indicazioni, sullo schermo,
per le varie fasi.
Instalación automática de las cadenas
1. Encienda su televisor.
2. Pulse una vez el botón DVD del mando a distancia.
3. Pulse una vez el botón STANDBY/ON del grabador. Espere unos segundos a que aparezca el menú de idiomas. Si des-
pués de un instante no aparece el menú, seleccione en el televisor la toma AV a la que ha conectado el grabador.
4. Elija un idioma con los botones , , OK.
La selección de un idioma determina además del idioma de los menús del grabador, el de los diálogos y subtítulos de los discos DVD si el
idioma seleccionado también está en los discos que se reproduzcan.
5. Seleccione el país de residencia y, a continuación, el método de instalación con los botones , , OK..
6. En la pantalla “Antena y Tomas AV”, no modifique ninguno de los ajustes propuestos y seleccione Validar con , OK.
Se inicia la instalación de las cadenas. Espere a que finalice la búsqueda de cadenas y continúe la instalación siguiendo las instrucciones
que irán apareciendo en pantalla, para las distintas etapas.
Automatisk installation av kanaler
1. Sätt på din TV.
2. Tryck en gång på fjärrkontrollens DVD -knapp.
3. Tryck en gång på inspelarens STANDBY/ON-knapp.Vänta några sekunder tills språkmenyn kommer fram. Om menyn
inte kommit fram efter en stund ska du på TV:n välja det AV-uttag som du anslutit din inspelare till.
4. Välj språk med knapparna , , OK.
Språkvalet avgör språket i inspelarens menyer men också i dialoger och texter till DVD-skivor om det valda språket också finns skivorna som
spelas.
5. Välj land och därefter installationsmetod med knapparna , , OK..
6. På skärmen “Antenn och AV-uttag”, ska du inte ändra de föreslagna inställningarna utan bara välja Klar med , OK.
Installationen av kanaler börjar.Vänta tills sökningen av kanaler är klar och fortsätt sedan installationen genom att följa vad som anges på
skärmen för de olika stegen.
English Select a display language
Sélectionner une langue d’affichage
Wählen Sie eine Anzeigesprache
Selezionare una lingua da visualizzare
Seleccione un idioma para la pantalla
Välj spräk för visning
Deutsch
Italiano
Español
Svenska
Français
36023160
QSG.qxp 21/11/05 11:00 Page 1
Page 2
Guide d’Installation Rapide • Quick Start Guide • Quick-Installations-Anleitung • Guida d’Installazione Rapida • Guía de instalación rápida • Snabbguide för installation
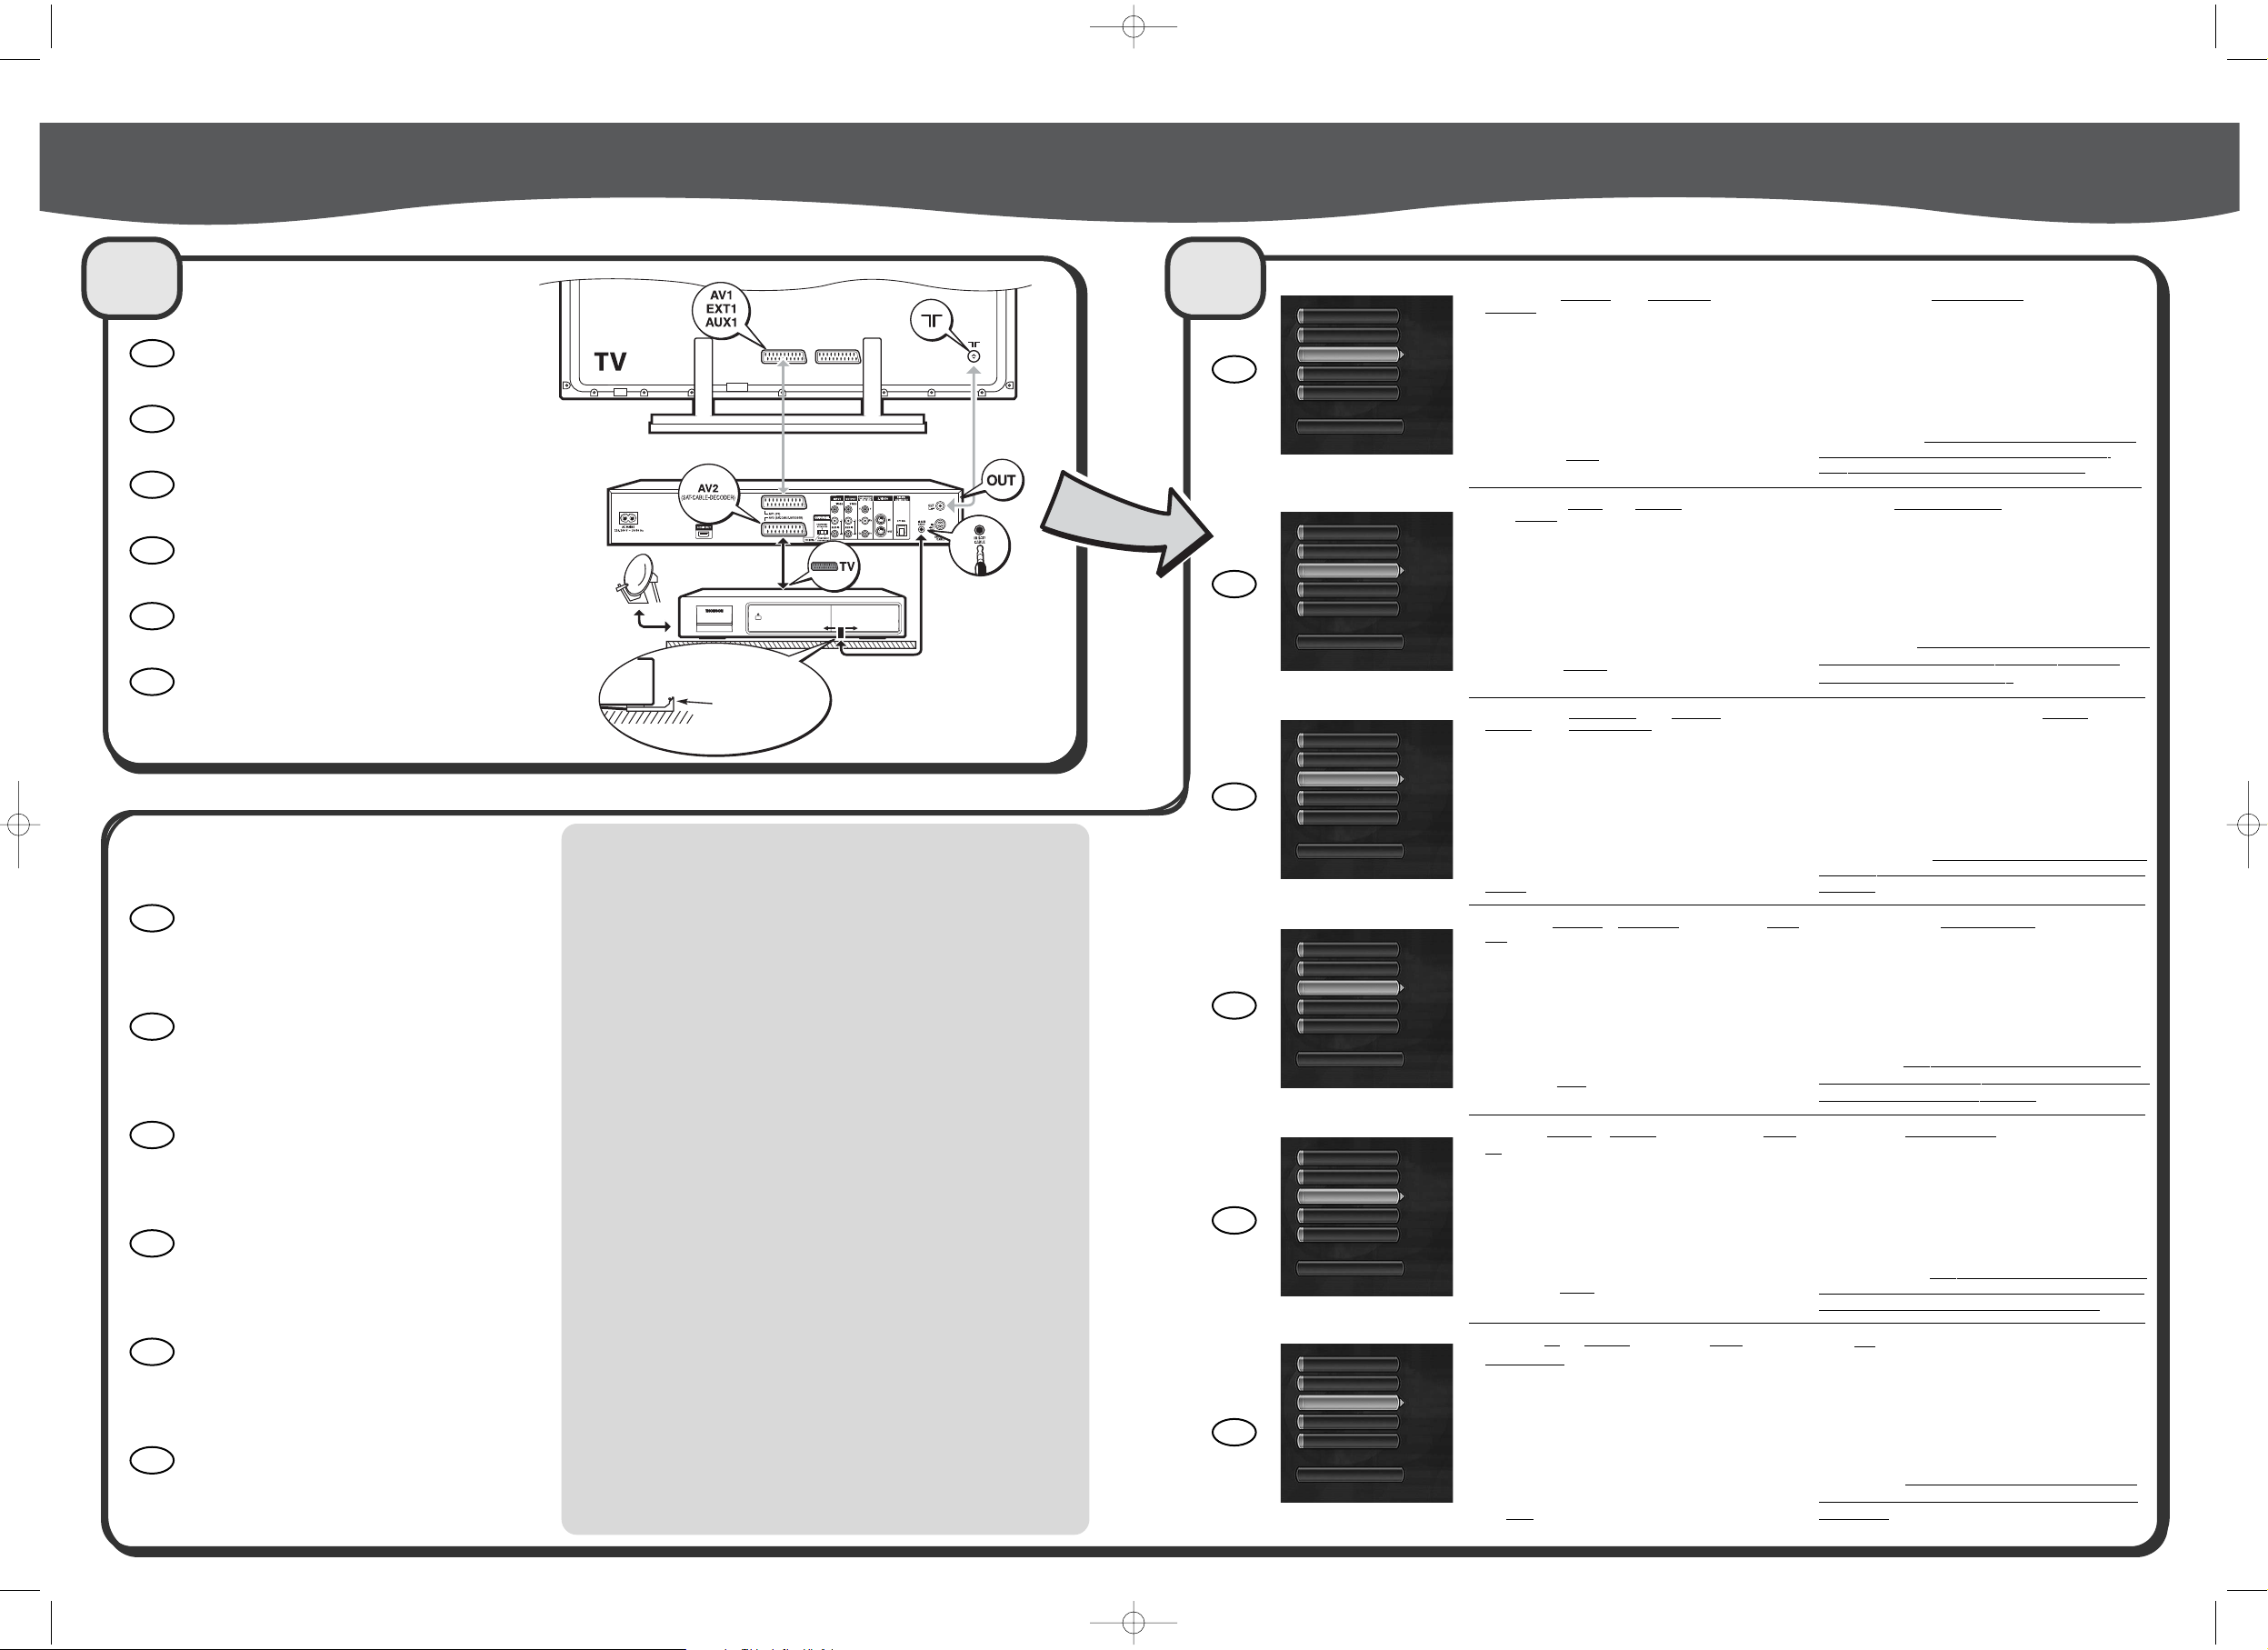
Installation satellite - Satellite installation - Satelliteninstallation - Installazione satellite - Instalación del satélite - Installation av satellit
B
1. Allumez votre téléviseur, votre enregistreur puis votre
récepteur
satellite ou câble.
2. Placez le récepteur sur la chaîne 002.Avec la télécommande
de votre enregistreur procédez aux réglages suivants :
3. Si le Menu Principal (Regarder la TV), (Naviclick), (Disques,)
(...) n’est pas affiché, appuyez sur la touche MENU de la
télécommande.
4. Sélectionnez la ligne Réglages avec les touches , , OK.
5. Sélectionnez la ligne Installation avec les touches , ,
OK.
6. La ligne Installation guidée est déjà sélectionnée, appuyez
sur OK.
7. Choisissez une langue pour les écrans suivants avec les
touches , , OK.
8. Sélectionnez votre pa
ys de résidence puis la méthode d’ins-
tallation avec les touches , , OK.
9. Dans l’écran « Antenne et Prises AV » changez l’affectation
de AV2-SAT-CABL pour un Récepteur satellite, ou un
Récepteur du câble puis sélectionnez Valider avec ,
OK.
L’installation des chaînes commence. Attendez la fin de la
recherche des chaînes et continuez l’installation en suivant les
indications, sur l’écran,pour les différentes étapes.
Etapes suivantes. A par
tir d’ici suivez les indications et les ins-
tructions qui appar
aîtront à l’écran dans différentes fenêtres.
Reportez-vous aux précisions ci-après en cas de besoin.
La liste des codes vous est proposée à titre indicatif. Les
codes indiqués sont en a ceux qui sont reconnus par les
récepteurs des marques citées. Ils peuvent cependant ne
pas correspondre à l’appareil que vous possédez pour les
modèles les plus anciens ou les plus récents. Dans ce cas
prenez conseil auprès de votre revendeur.
Liste des codes récepteurs satellites et câbles
List of satellite or cable receiver codes
Codeliste Satelliten- und Kabelempfänger
Lista dei codici ricevitori via satellite o via cavo
Lista de los códigos de receptores de satélite y cable
Lista över satellit- och kabelmottagarkoder
Codes récepteurs câbles - Cable receiver codes - Codes Kabelempfänger
Codici ricevitori via cavo - Códigos de receptores de cable - Koder för kabelmottagare
AKAÏ. . . . . . . . . . . . . . . . . . . . . . . . . . . . . . . . . . . . . 13
ALBA . . . . . . . . . . . . . . . . . . . . . . . . . . . . . . . . . 01, 13
ALDES . . . . . . . . . . . . . . . . . . . . . . . . . . . . . . . . . . . 02
ALLSAT . . . . . . . . . . . . . . . . . . . . . . . . . . . . . . . . . . 04
AMSTRAD . . . . . . . . . . . . . . . . . . . . . . . . . . . . . . . . 03
ARMSTRONG . . . . . . . . . . . . . . . . . . . . . . . . . . . . . 06
BEST. . . . . . . . . . . . . . . . . . . . . . . . . . . . . . . . . . . . . 07
B.TELECOM. . . . . . . . . . . . . . . . . . . . . . . . . . . . 13, 08
BUSH . . . . . . . . . . . . . . . . . . . . . . . . . . . . . . 19, 01, 09
CANAL SATELLITE . . . . . . . . . . . . . . . . . 20 (49, 50)
CAMBRIDGE. . . . . . . . . . . . . . . . . . . . . . . . . . . 11, 13
CHANNEL MASTER . . . . . . . . . . . . . . . . . . . . . . . . 11
CHAPARRAL. . . . . . . . . . . . . . . . . . . . . . . . . . . . . . 18
CITIVISION . . . . . . . . . . . . . . . . . . . . . . . . . . . . . . . 10
CITYCOM . . . . . . . . . . . . . . . . . . . . . . . . . . . . . . . . 26
COLUMBUS . . . . . . . . . . . . . . . . . . . . . . . . . . . . . . 35
CONNEXIONS. . . . . . . . . . . . . . . . . . . . . . . . . . . . 14
DISKEXPRESS . . . . . . . . . . . . . . . . . . . . . . . . . . . . . 07
DNT. . . . . . . . . . . . . . . . . . . . . . . . . . . . . . . . . . . . . 15
DRAKE. . . . . . . . . . . . . . . . . . . . . . . . . . . . . . . . . . . 16
EXATOR . . . . . . . . . . . . . . . . . . . . . . . . . . . . . . . . . 37
FERGUSON . . . . . . . . . . . . . . . . . . . . . . . . . . . . . 12
FINLUX . . . . . . . . . . . . . . . . . . . . . . . . . . . . . . . . . . 34
FUBA . . . . . . . . . . . . . . . . . . . . . . . . . . . . . . . . . 35, 37
GOODMANS . . . . . . . . . . . . . . . . . . . . . . . . . . . . . 19
GRUNDIG . . . . . . . . . . . . . . . . . . . . . . . . . . . . . 19-21
HIRSCHMANN . . . . . . . . . . . . . . . . . . . . . . . . . . . . 22
HITACHI . . . . . . . . . . . . . . . . . . . . . . . . . . . . . . . . . 19
JOHANSSON . . . . . . . . . . . . . . . . . . . . . . . . . . . . . 25
JVC. . . . . . . . . . . . . . . . . . . . . . . . . . . . . . . . . . . 19, 08
KATHREIN. . . . . . . . . . . . . . . . . . . . . . . . . . . . . . . . 26
MANHATTAN . . . . . . . . . . . . . . . . . . . . . . . . . . . . . 25
MASPRO . . . . . . . . . . . . . . . . . . . . . . . . . . . . . . . . . 27
MATSUI . . . . . . . . . . . . . . . . . . . . . . . . . . . . . . . . . . 21
MIMTECH . . . . . . . . . . . . . . . . . . . . . . . . . . . . . . . . 28
MINERVA . . . . . . . . . . . . . . . . . . . . . . . . . . . . . . . . . 21
MITSUBISHI . . . . . . . . . . . . . . . . . . . . . . . . . . . . . . . 19
MORGAN . . . . . . . . . . . . . . . . . . . . . . . . . . . . . . . . 06
NAGAI . . . . . . . . . . . . . . . . . . . . . . . . . . . . . . . . . . . 29
NEC . . . . . . . . . . . . . . . . . . . . . . . . . . . . . . . . . . . . . 30
NETWORK . . . . . . . . . . . . . . . . . . . . . . . . . . . . . . . 31
NIKKO . . . . . . . . . . . . . . . . . . . . . . . . . . . . . . . . . . . 32
NOKIA. . . . . . . . . . . . . . . . . . . . . . . . . . . . . . . . . . . 23
NORDMENDE . . . . . . . . . . . . . . . . . . . . . . . . 19, 33
OXFORD. . . . . . . . . . . . . . . . . . . . . . . . . . . . . . . . . 08
ORBITECH . . . . . . . . . . . . . . . . . . . . . . . . . . . . . . . 47
PACE . . . . . . . . . . . . . . . . . . . . . . . . . . . . . . . . . . . . 19
PALADIUM . . . . . . . . . . . . . . . . . . . . . . . . . . . . . . . 21
PALCOM . . . . . . . . . . . . . . . . . . . . . . . . . . . . . . . . . 35
PALSAT. . . . . . . . . . . . . . . . . . . . . . . . . . . . . . . . . . . 29
PANASONIC. . . . . . . . . . . . . . . . . . . . . . . . . . . 19, 36
PHILIPS . . . . . . . . . . . . . . . . . . . . . . . . . . . . . . . . . . 20
PROSAT . . . . . . . . . . . . . . . . . . . . . . . . . . . . . . . . . . 19
QUADRAL. . . . . . . . . . . . . . . . . . . . . . . . . . . . . . . . 38
REDIFFUSION . . . . . . . . . . . . . . . . . . . . . . . . . . . . . 39
RFT . . . . . . . . . . . . . . . . . . . . . . . . . . . . . . . 20, 21, 26
SABA. . . . . . . . . . . . . . . . . . . . . . . . . . 02, 05, 40, 49
SABRE . . . . . . . . . . . . . . . . . . . . . . . . . . . . . . . . . . . 58
SAKURA . . . . . . . . . . . . . . . . . . . . . . . . . . . . . . . . . 41
SALORA. . . . . . . . . . . . . . . . . . . . . . . . . . . . . . . . . . 23
SAMSUNG/JUPITER . . . . . . . . . . . . . . . . . . . . . . . . 42
SEEMANS. . . . . . . . . . . . . . . . . . . . . . . . . . . . . . . . . 43
SENTRA. . . . . . . . . . . . . . . . . . . . . . . . . . . . . . . . . . 44
SONY. . . . . . . . . . . . . . . . . . . . . . . . . . . . . . . . . . . . 46
SUNSTAR. . . . . . . . . . . . . . . . . . . . . . . . . . . . . . . . . 06
TATUNG . . . . . . . . . . . . . . . . . . . . . . . . . . . . . . . . . 32
TECHNISAT. . . . . . . . . . . . . . . . . . . . . . . . . . . . . . . 48
TELECIS . . . . . . . . . . . . . . . . . . . . . . . . . . . . . . . . . . 19
TELEDIREKT . . . . . . . . . . . . . . . . . . . . . . . . . . . . . . 43
TELEFUNKEN. . . . . . . . . . . . . . . . . . . . . . . . 19, 49
TELEPIU . . . . . . . . . . . . . . . . . . . . . . . . . . . . . . . . . . 59
TELEVES. . . . . . . . . . . . . . . . . . . . . . . . . . . . . . . . . . 56
THOMSON. . . . . . . . . . . . . . . . . . . . . . . . . . . 49, 50
THORN . . . . . . . . . . . . . . . . . . . . . . . . . . . . . . . . . . 58
TOSHIBA. . . . . . . . . . . . . . . . . . . . . . . . . . . . . . 19, 51
TPS . . . . . . . . . . . . . . . . . . . . . . . . . . . . . . . 67 (49, 50)
UNIDEN . . . . . . . . . . . . . . . . . . . . . . . . . . . . . . . . . 52
UNIVERSUM . . . . . . . . . . . . . . . . . . . . . . . . . . . . . . 21
WINERSAT . . . . . . . . . . . . . . . . . . . . . . . . . . . . . . . 25
WISI . . . . . . . . . . . . . . . . . . . . . . . . . . . . . . . . . . . . . 53
WOSLEY (TANDY) . . . . . . . . . . . . . . . . . . . . . . . . . 54
CABLESTAR . . . . . . . . . . . . . . . . . . . . . . . . . . . . . . 60
CABLETIME. . . . . . . . . . . . . . . . . . . . . . . . . . . . . . . 60
GI. . . . . . . . . . . . . . . . . . . . . . . . . . . . . . . . . . . . . . . 61
IMPULSE . . . . . . . . . . . . . . . . . . . . . . . . . . . . . . . . . 61
JERROLD. . . . . . . . . . . . . . . . . . . . . . . . . . . . . . . . . 61
MACOM . . . . . . . . . . . . . . . . . . . . . . . . . . . . . . . . . 62
NOOS . . . . . . . . . . . . . . . . . . . . . . . . . 20-67 (49, 50)
OAK. . . . . . . . . . . . . . . . . . . . . . . . . . . . . . . . . . . . . 63
SCIENTIFIC ATLANTA. . . . . . . . . . . . . . . . . . . . . . 64
VISIOPASS . . . . . . . . . . . . . . . . . . . . . . . . . . . . . 20-67
VIDEOTRON . . . . . . . . . . . . . . . . . . . . . . . . . . . . . 66
VIDEOWAY. . . . . . . . . . . . . . . . . . . . . . . . . . . . . . . 66
The list of codes is given as a guide.The codes given are
generally those which are recognised by the receivers of
the brands quoted. However, they may not correspond to
your device if it is an older or more recent model.In such
a case, contact your retailer.
Die Liste der Codes hat rein informativen Charakter und
ist nicht vollständig. Die angegebenen Codes sind im
Allgemeinen jene Codes, die von den Empfängern der
aufgeführten Marken erkannt werden. Bei älteren oder
ganz neuen Modellen können sie jedoch möglicherweise
nicht dem Gerät entsprechen, das Sie besitzen. Wenden Sie
sich in diesem Fall an Ihren Fachhändler.
La lista dei codici è proposta a titolo indicativo.I codici
indicati sono in generale quelli che sono riconosciuti dai
ricevitori delle marche citate.Tuttavia, possono non
corrispondere all’apparecchio di cui si dispone per i
modelli più vecchi o più recenti. In questo caso, chiedere
consiglio al rivenditore.
La lista de códigos se propone a título indicativo. Los
códigos indicados suelen ser reconocidos por los
receptores de las marcas mencionadas. Sin embargo, puede
que no correspondan al aparato que usted posee si se
trata de modelos más antiguos o más modernos. En ese
caso, consulte a su distribuidor.
Listan över koderna anges endast upplysningsvis. Koderna
som anges är i allmänhet de som mottagarna av de nämnda
märkena känner igen. Det är dock möjligt att de inte
motsvarar apparaten ni har för äldre eller senare modeller.
Rådfråga i så fall er återförsäljare.
La cellule du contôleur IR (transmetteur infrarouge) doit
être postionnée en face de la cellule réceptrice du
récepteur satellite.
The IR (infrared) controller cell must face the receiver cell
of the satellite receiver.
Die Zelle des IR-Senders (Infrarotsender) muss genau
gegenüber der Empfängerzelle des Satellitenempfängers
platziert werden.
La cellula del controllore IR (trasmettitore a infrarossi)
deve essere posizionata di fronte alla cellula ricevitrice del
ricevitore satellitare.
La célula del controlador de IR (transmisor de infrarrojos)
debe colocarse delante de la célula receptora del receptor
de satélite.
IR-kontrollerns cell (infraröd sändare) skall vara placerad
mitt emot satellitmottagarens mottagarcell.
1. Switch on your TV set, your recorder, then your satellite or
cable r
eceiver.
2. Place the receiver on channel 002. Carry out the following
adjustments using your recorder's remote control handset:
3. If the main menu (Watch TV), (Naviclick), (Discs,) (etc.) does
not come up on the screen, press the MENU button on the
remote control.
4. Select the Setup menu line using the , , and OK
buttons.
5. Select the Installation menu line using the , and OK
buttons.
6. The Interactive setup line is already preselected; press
OK.
7. Choose which language
to use for the remaining screens
with the , and OK buttons.
8. Select your countr
y of residence then the installation
method using the , and OK buttons.
9. On the “Antenna and AV sockets” screen, set AV2-SAT-
CABL to either satellite or cable receiver then press ,
and OK to confirm.
Channel set-up begins.Wait until the search for channels ends
then continue the set-up operation by following the instructions on
the screen for the remaining steps.
Following steps. No
w follow all of the indications and instructions
that appear on the screen in the various windows. Refer to the
extended instructions below if necessary.
1. Schalten Sie Ihr Fernsehgerät, Ihren Recorder und dann Ihren
Satelliten
- oder Kabelempfänger ein.
2. Schalten Sie den Empfänger auf den Sender 002. Dann mit
der Fernbedienung folgende Einstellungen vornehmen:
3. Wenn das Hauptmenü (Fernsehen), (Naviclick), (Discs,) (...)
nicht angezeigt wird, auf die Taste MENU der Fernbedienung
drücken.
4. Wählen Sie die Zeile Einstellungen mittels der Tasten ,
und dann OK.
5. Wählen Sie die Zeile Installation mittels der Tasten ,
und dann OK.
6. Die Zeile Interaktives Setup wurde bereits ausgewählt,
dann auf Taste OK drücken.
7. Wählen Sie für die folgenden Bildschirmanzeigen eine
Sprache
:Tasten , , OK.
8. Wählen Sie für die Installationsmethode das Land
aus, in dem
Sie wohnen:Tasten , , OK.
9. Ändern Sie auf der Bildschirmanzeige “ Antenne und AVBuchsen” die Zuteilung von AV2-SAT-CABL bei einem
Satellitenempfänger oder einem Kabelempfänger und wählen
Sie
Fertig mit und dann OK.
Die Senderinstallation beginnt.Warten Sie bis zum Ende der
Sendersuche und fahren Sie die weitere Installation unter
Befolgung der Bildschirmanzeigen fort.
Folgende Schritte: g
emäß den Anweisungen auf dem Bildschirm
in den verschiedenen Fenstern. Falls erforderlich, siehe nachstehende
Präzisionen.
1. Accendere il televisore, il registratore DVD e quindi il ricevitore satellitare o via cavo.
2. Mettere il ricevitore sul canale 002. Con il telecomando del
registratore procedere alle seguenti regolazioni:
3. Se il Menu Principale (Guardare la TV),(Naviclick), (Dischi,)
(...) non è visualizzato, premere il tasto MENU del teleco-
mando.
4. Selezionare la riga Impostazioni con i tasti , , OK.
5. Selezionare la riga Installazione con i tasti , , OK.
6. La riga Installazione interattiva è già selezionata, premere
OK.
7. Scegliere una lingua
per gli schermi successivi con i tasti ,
, OK.
8. Selezionare il vostro paese di r
esidenza e quindi il metodo
d'installazione con i tasti , , OK.
9. Nello schermo “Antenna e prese AV” cambiare l'assegna-
zione di AV2-SAT-CABL per un Ricevitore satellite, o un
Ricevitore cavo, quindi selezionare Conferma con , OK.
L'installazione dei canali comincia. Attendere la fine della ricerca
dei canali e continuare l'installazione seguendo le indicazioni, sullo
schermo, per le varie fasi.
Fasi seguenti. A par
tire da questo punto seguire le indicazioni e
le istruzioni che appaiono in diverse finestre dello schermo. Se necessario, riportarsi alle precisazioni che seguono.
1. Encienda el tele
visor, el grabador
y,a continuación, el recep-
tor de satélite o de cable.
2. Coloque el receptor en la cadena 002. Realice los siguientes
ajustes con el mando a distancia de su grabador de DVD
3. Si no aparece el menú principal (Ver TV), (Naviclick),
(Discos), (...), pulse el botón MENU del mando a distancia.
4. Seleccione la línea Ajustes con los botones , , OK.
5. Seleccione la línea Instalación con los botones , , OK.
6. La línea Instalación guiada ya está seleccionada. Pulse OK.
7. Seleccione un idioma
para las siguientes pantallas con los
botones , , OK.
8. Seleccione su país de r
esidencia y, a continuación, el método
de instalación con los botones , , OK.
9. En la pantalla “Antena y tomas AV”, cambie la asignación de
AV2-SAT-CABL para un Receptor de satélite,o un
Receptor de cable y,a continuación, validar con , OK.
Se inicia la instalación de las cadenas. Espere a que finalice la
búsqueda de cadenas y continúe la instalación siguiendo las instrucciones que irán apareciendo en pantalla, para las distintas
etapas.
Siguientes etapas. A par
tir de este punto, siga las indicaciones e
instrucciones que aparecerán en las distintas ventanas de la pantalla. Si es necesario, consulte las siguientes puntualizaciones.
1. Sätt på din TV, din inspelare och sedan din satellit- eller
kabelmottagar
e.
2. Ställ in mottagaren på kanal 002. Med fjärrkontrollen till din
inspelare fortsätter du till följande inställningar:
3. Om inte huvudmenyn (Titta på TV), (Naviclick), (Skiva,) (...)
visas ska du trycka på fjärrkontrollens MENU-knapp.
4. Välj raden Inställningar med knapparna , , OK.
5. Välj raden Installation med knapparna , , OK.
6. Raden Interaktiv install. är redan förvald, tryck på OK.
7. Välj språk
för följande skärmar med knapparna , , OK.
8. Välj land
och därefter installationsmetod med knapparna ,
, OK.
9. På skärmen “Antenn och AV-uttag ” ändrar du tilldelning för
AV2-SAT-CABL till Satellitmottagare eller Kabelmottagare
och väljer sedan Bekräfta Klar med , OK.
Installationen av kanaler börjar.Vänta tills sökningen av kanaler är
klar och fortsätt sedan installationen genom att följa vad som
anges på skärmen för de olika stegen..
Följande steg. F
rån denna punkt följer du de instruktioner som
kommer att visas i olika fönster på skärmen. Se vid behov följande
förtydliganden.
1 2
FR
EN
DE
IT
ES
SV
FR
EN
DE
IT
ES
SV
FR
EN
DE
IT
ES
SV
Antenne-Câble
AV1-TV
AV2-SAT-CABL
AV3-Façade
AV4
Valider
Antenna-Cable
AV1-TV
AV2-SAT-CABL
AV3-Front
AV4
Done
Antenne-Kable
AV1-TV
AV2-SAT-CABL
AV3-Front
AV4
Fertig
Antenna/Cavo
AV1-TV
AV2-SAT-CABL
AV3-Frontale
AV4
Conferma
Antena-Cable
AV1-TV
AV2-SAT-CABL
AV3-Frontal
AV4
Validar
Antenn-Kabel
AV1-TV
AV2-SAT-CABL
AV3-Fram
AV4
Klar
QSG.qxp 21/11/05 11:01 Page 2
Cellule du contrôleur IR
IR controller cell
Zelle des IR-Senders
Célula del controlador de IR
Cellula del contr
IR-kontrollerns cell
ollore IR
 Loading...