


Table of Contents
Connections and Setup
Some points to check before you connect your TV set ..2
Accessories provided ....................................................2
Front panel controls......................................................3
Front panel display ........................................................3
The remote control ......................................................4
Basic connections (DVD/VCR + TV) ............................6
Basic connections (DVD/VCR + TV + satellite or
cable receiver) ..............................................................6
Other connection options ............................................6
Tuning in a video channel on your TV..........................8
Tuning in TV channels ..................................................9
VCR mode
Basic playback operations
Description of the VCR main menu ..........................11
Playback........................................................................11
Stopping playback........................................................11
Accelerated play..........................................................12
Fast forward / Rewind ................................................12
Variable playback ........................................................12
Still image ....................................................................12
Frame Advance ............................................................12
Ejecting the tape..........................................................12
Recording
Recording options........................................................13
Instant recording ........................................................13
Instant timer recording ..............................................13
Ending a recording ......................................................13
Programming a recording ..........................................13
Advanced functions
Copying from DVD to VCR ........................................15
Language selection......................................................15
Auto tracking ..............................................................15
Setting the clock..........................................................15
Colour standards ........................................................15
Video doctor ................................................................16
Sound settings..............................................................16
On screen display ........................................................16
Format..........................................................................16
Decoder........................................................................17
OPR ..............................................................................17
NICAM ........................................................................17
Resetting the tape counter ........................................17
Child lock......................................................................17
Playing NTSC tapes ....................................................17
DVD mode
Basic playback operations
Compatible discs ........................................................18
Compatible formats....................................................18
Regional coding............................................................18
Operating the DVD player..........................................18
Using the menus..........................................................18
Playback........................................................................18
Accelerated play..........................................................19
Still image ....................................................................19
Frame advance ............................................................19
Variable slow motion ..................................................19
Changing chapter / track ............................................19
Zoom ............................................................................19
Scene replay ................................................................19
Adavnced functions
Play modes ..................................................................20
Program playback........................................................20
Info menu
Using the Info menu....................................................21
Title/Chapter / Track ..................................................22
Direct access ................................................................22
Audio ............................................................................22
Subtitles........................................................................23
Camera angle ..............................................................23
Sound............................................................................23
Audio CDs, mp3,WMA, Divx and JPEG
discs
Playing an audio,mp3 or WMA CD ..........................24
Displaying JPEG files....................................................25
Playing JPEG and mp3 or WMA files at the same time ..25
Playing DivX files....................................................................26
Player Menus
Using the player’s menus ............................................27
The Language menu....................................................27
The Display menu........................................................28
The Audio menu..........................................................29
The Lock menu............................................................30
The Others menu........................................................31
VCR and DVD modes
Additional Information
Tr oubleshooting ..........................................................32
Precautions ..................................................................33
Guarantee ....................................................................34
Technical data ..............................................................34
Discs and formats you can play..................................34
1
EN
EN
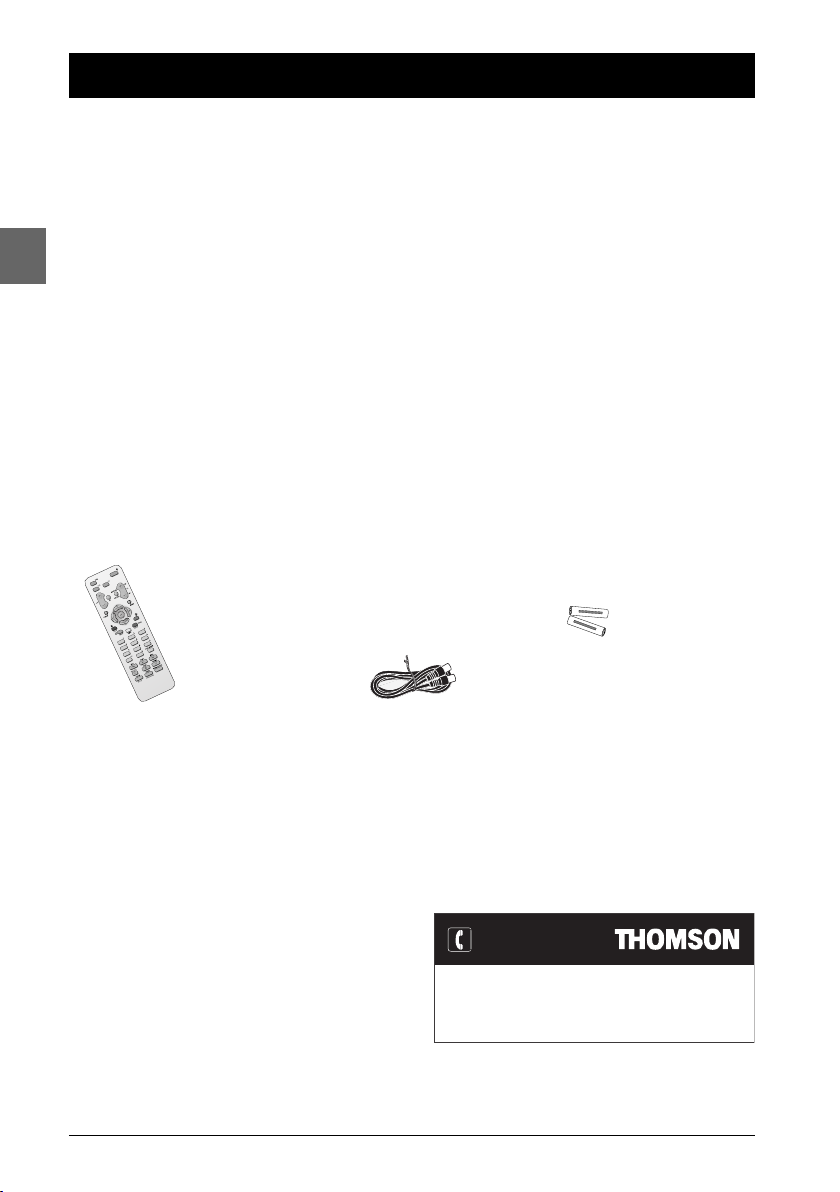
You can contact THOMSON by dialling: 0871 712 1312
(for United Kingdom, £0.10/mn inc VAT)
www.thomson-europe.com
HELPLINE
Connections and Setup
Some points to check before you connect your TV set
• Ensure that the mains supply in your house complies with that indicated on the identification
sticker located on the back of your appliance.
• Install your appliance horizontally, away from any source of heat (fireplace) or appliances
generating strong magnetic or electric fields.The components of this appliance are sensitive to
heat.The maximum ambient temperature should not exceed 35° Celsius.
• Leave sufficient space around the appliance to allow adequate ventilation: 10 cm on either side
and at the back, as well as 7 cm above it are ideal.
• The humidity of the room should not exceed 75%. If you have to use the appliance outdoors,
do not expose it to rain or splashing water.The appliance should not be exposed to dripping
or splashing and no objects filled with liquids, such as vases, should be placed on top of it.
•Moving it from a cold environment to a warm one is likely to cause condensation on some
components inside the appliance. Let the condensation disappear of its own accord before
turning the appliance on again.
• Before moving the player, make sure the disc tray is empty.
Other important information about using and cleaning your appliance is available at the end of the booklet.
Accessories provided
+
Remote control 2 non-rechargeable
-
-
+
batteries, type AAA
Coaxial cable
Notes
DVD copy protection
In accordance with the DVD standard, your DVD player is
equipped with a Copy Protection system, which can be
switched on and off by the DVD disc itself, in order to make
any recording of the relevant DVD disc onto a videotape of
very poor picture quality, or even impossible.“This product
incorporates copyright protection technology that is
protected by method claims of certain U.S. patents and
other intellectual property rights owned by Macrovision
Corporation and other rights owners. Use of this copyright
protection technology must be authorized by Macrovision
Corporation, and is intended for home use only unless
otherwise authorized by Macrovision Corporation. Reverse
engineering or disassembly is prohibited.”
In the interest of improving the quality of our products, we reserve the right to modify their features.The
information in this manual is, therefore, subject to change and does not represent any kind of contract.
Caution!
Invisible laser radiation when open. Avoid exposure to
beam. Class 1 laser product.This appliance must only be
opened by a qualified engineer to prevent accidents caused
by the laser beam.
2

Connections and Setup
Front panel controls (buttons appearing left to right below)
DTH6350E
DVD
Point the remote control here.
VCR
REC
TV
Remote sensor
EN
ON/STANDBY- To switch the appliance
on and off.
PREV/REV - To skip to the previous
DVD player's disc tray.
chapter or track; to start fast reverse search; to
rewind the tape.
PLAY - To start playing a disc or a cassette.
NEXT/FWD - To skip to the next
video recorder.
- PROGRAM + - To change channel in VCR
mode.
chapter or track; to start fast forward search;
to wind the tape.
STOP - To stop disc or cassette playback.
DVD/VCR - To change from DVD mode to
VCR mode and vice versa.
Front panel display
DVD
Indicates total playing time/elapsed time/current time.
DVD Appears when the appliance is in DVD mode.
Appears when a disc is loaded.
Appears when the appliance is in repeat mode.
Indicates that the child lock is On.
Indicates that a recording is programmed or a timer recording is in progress.
Appears when a tape is inserted in the video recorder.
VCR Appears when the appliance is in VCR mode.
REC Appears when a recording is in progress.
TV Appears in TV mode.
PA USE - To pause playback; frame advance.
OPEN/CLOSE - To open and close the
EJECT - To eject the cassette from the
REC - To start recording in VCR mode.
VCR
REC
TV
3

EN
Connections and Setup
The remote control
Navigating through menus
Use the direction buttons to navigate through the menus. Press the OK button
on the remote control to confirm any selection you make.
General functions
DVD To select the DVD player.
VCR To select the video recorder.
(mute) To mute and restore the sound of the television
LOCK (red) To lock the appliance. Press again
0-9 Number input.
PLAY To start playing a disc or a tape.
Functions in DVD mode
GO BACK To return to the previous menu.
CLEAR To remove a track from a program list.
MENU To access and hide the disc menu during play.
(red) To access the audio function in the
(green) To access the subtitle function in the
INFO (yellow) To access the
TITLE (blue) To switch between music and photo menus (see
(purple) To access the camera angle function in the
PLAY MODE To access the play mode function (see pages 20
REV To start fast reverse, reverse accelerated play or
FWD To start fast forward, forward accelerated play or
STOP To stop play, accelerated search or slow motion.
PAUSE To activate freeze frame, frame advance or slow
AGAIN To move backwards approximately 10 seconds
ZOOM To access the Zoom function (see page 19).
OPEN.CLOSE To open and close the disc tray.
4
To switch the appliance on and off.
To adjust the sound volume of the television set.
set.
LOCK
to
unlock the appliance.
To skip to the next or previous chapter or track.
To cancel the zoom function.
To display the player’s main menu (see page 27).
Info
menu
(see page 22).
Info
menu
(see page 23).
Info
menu (see page 21).
page 25).
menu (see page 23).
Info
and 24).
reverse slow motion (see page 19).
forward slow motion (see page 19).
motion (see page 19).
during disc playback (DVD) (see page 19).
Connections and Setup
Functions in VCR mode
PR+ / PR- To change channel.
CLEAR To set the counter to zero.
To access the VCR main menu.
To exit a menu.
0-9 To select a channel.
AV To select the devices connected to
the Audio/Video sockets (AV1, ...).
PLAY MODE To watch one TV channel whilst
recording another one.
REV To start fast reverse, reverse
accelerated play (see page 12).
FWD To start fast forward, forward
accelerated play (see page 12).
STOP To stop play, accelerated search,
slow motion or recording.
PAUSE To activate freeze frame, frame
advance (see page 12).
RECORD To start recording (see page 13).
SP/LP To double the recording time of a
tape with the LP function
(see page 13).
OPEN.CLOSE To eject the tape.
Functions in TV mode
This remote control can be used with some
recent TV set models from the following
brands:Thomson, Saba, Brandt, Ferguson,
Telefunken and Nordmende.
Note:The buttons described below operate as
specified, provided that the relevant function is
available on the television.
TV To select the television.
To adjust the sound volume.
(mute) To mute and restore the sound.
PR+ / PR- To change channel.
GO BACK To return to the channel watched
before last.
CLEAR To exit a menu.
MENU To access the television's main
menu.
To use the Zoom function (with a
16/9 television only).
INFO (yellow) To obtain information about the
channel.
GUIDE (blue) To display the programme guide.
Note:The coloured buttons can also be used to
access the Teletext topics indicated in colour (if
your television has the Teletext function available).
0-9 Select a channel. For 2-digit
channels, first press
0
.
EN
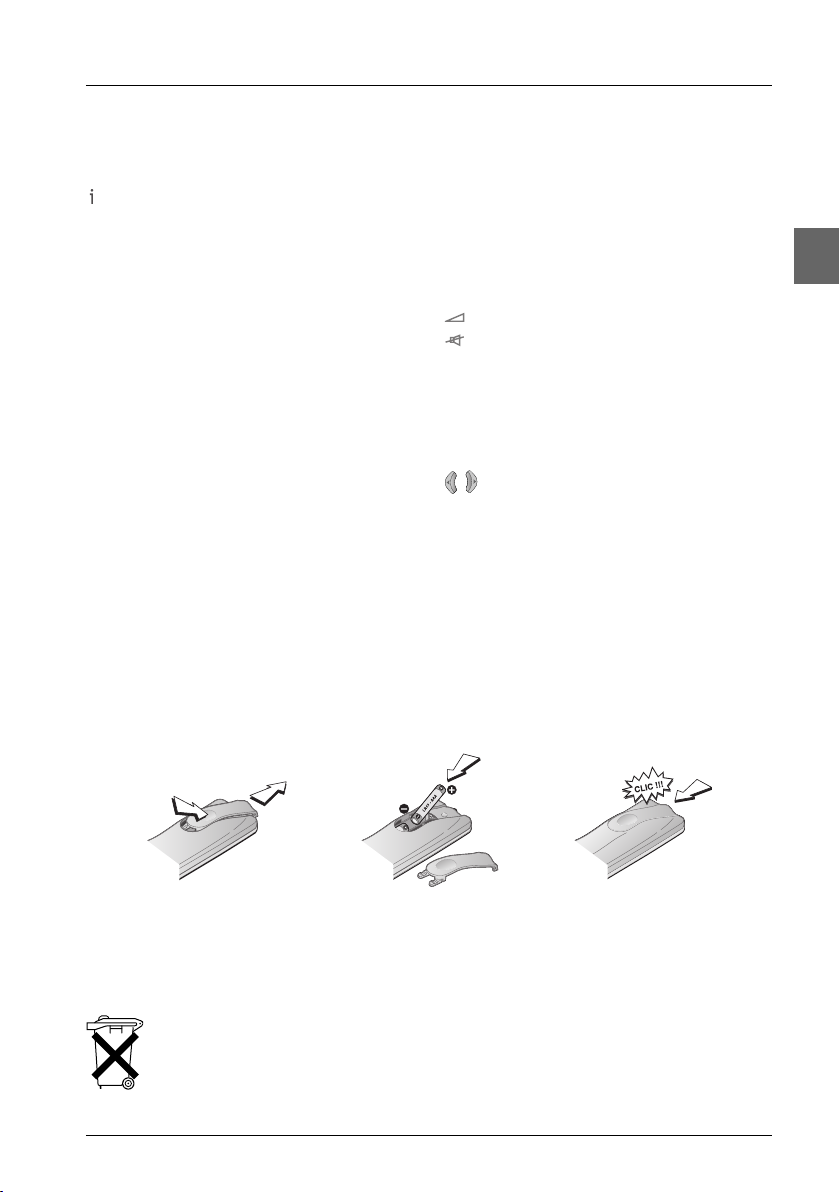
Inserting batteries in the remote control
1
• Do not mix different types of batteries or new and old batteries. Do not use rechargeable batteries.
• In order to avoid any risk of explosion, observe the polarities indicated inside the battery
compartment. Replace only with the type of batteries specified above. Do not dispose of them in a
fire or recharge them.
• If you are not using the remote control for a long period of time, remove the batteries.
• Please respect the environment and prevailing regulations.Before you dispose of
batteries or accumulators, ask your dealer whether they are subject to special
recycling and if they will accept them for disposal.
2
5
3
Connections and Setup
Television
set
EN
United Kingdom,
Ireland
Continental
Europe
1
4
DVD/VCR
Scart lead
not provided
3
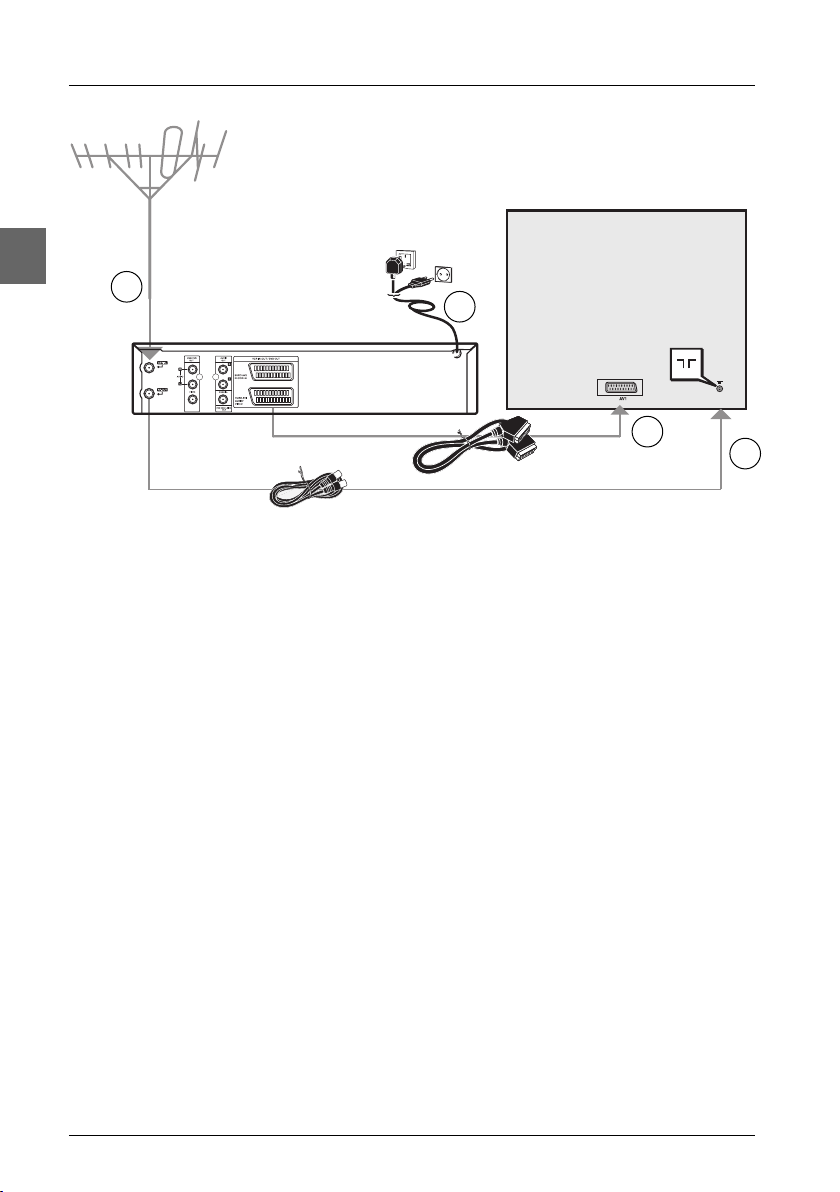
Basic connections (DVD/VCR + TV)
1. Disconnect the aerial cable from your television set and reconnect it to the AERIAL socket
of the DVD/VCR.
2. Using the coaxial cable supplied, connect the RF OUT socket of the DVD/VCR to the aerial
socket of the television set.
3. A Scart lead connection between the appliance and your television set makes it easier to use
and improves picture and sound quality. Connect the DVD/VCR’s Scart socket (EURO AV1
AUDIO/VIDEO) to the television set’s Scart socket (AV1, EXT1, AUX1, according to the
make) using the Scart lead (not provided).
4. Connect the DVD/VCR to the mains socket using the mains lead.
Basic connections (DVD/VCR + TV + satellite or cable receiver)
1. Connect the DVD/VCR to the television set as described above.
2. Connect the satellite or cable receiver scart socket to the DVD/VCR’s second Scart socket
(EURO AV2 DECODER) using a Scart lead (not provided).
3. Connect the DVD/VCR to the mains socket using the mains lead.
Note: If one of the devices is not working, check that all the cables have been inserted properly into the
sockets which they should be connected to.
2
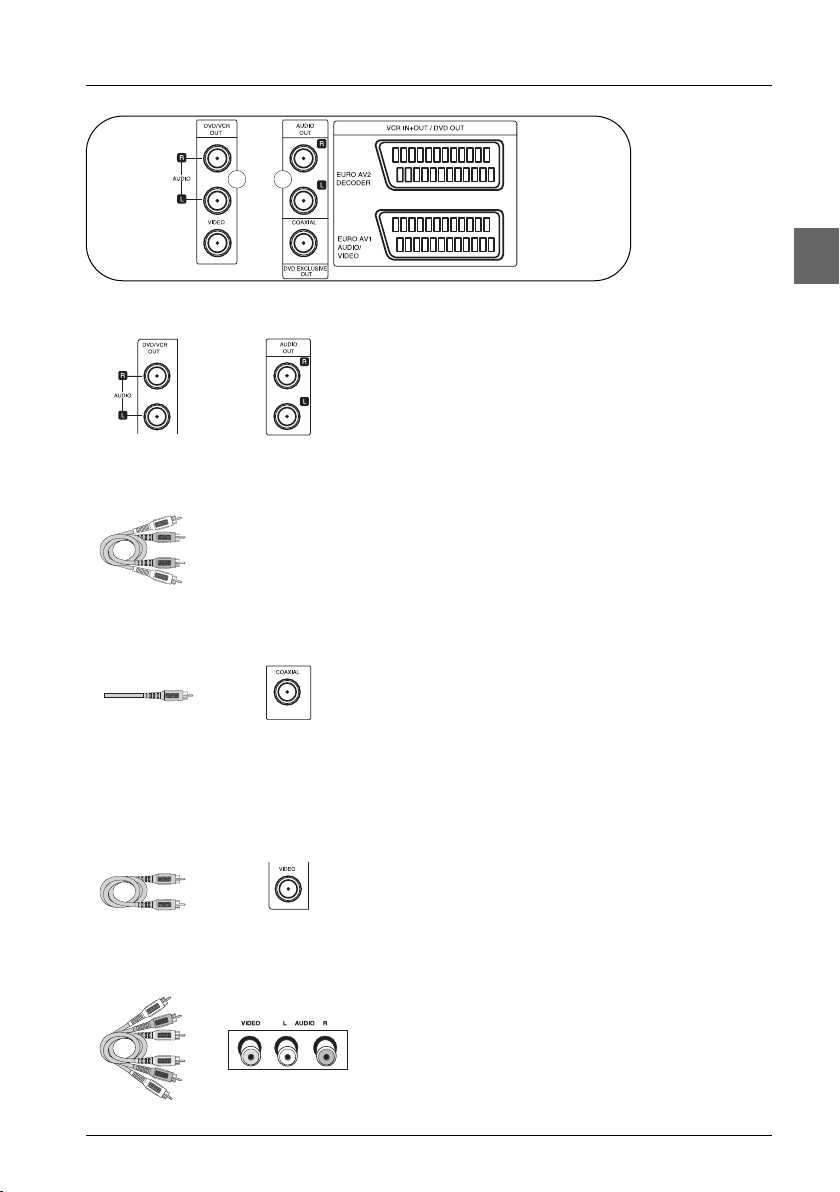
Other connection options
The basic connections (described above) are for standard-quality sound and high-quality picture
reproduction. There are other connection options available, which can produce pictures and sound
of better or poorer quality:
6
DVD/VCR AUDIO R
and L sockets
Coaxial cable
DVD EXCLUSIVE
AUDIO R and L
sockets
Audio cables (red
and white)
Coaxial digital
audio output
Connections and Setup
Back of
DVD /VCR
EN
Back panel audio sockets
DVD/VCR AUDIO OUT L (left) and R (right) sockets DVD EXCLUSIVE AUDIO OUT L (left) and R (right) sockets
These are analogue audio output sockets.The AUDIO L
socket and cable are white, while the AUDIO R socket
and cable are red. Connect the DVD/VCR AUDIO L and
R sockets to the television set’s AUDIO L and R sockets
using audio cables (not supplied).
Note: If your television set only has one audio socket connect it
to the DVD player’s left socket (white).
The DVD exclusive sockets are dedicated to the DVD
player and offer a higher level of sound quality than the
DVD/VCR ones.
Coaxial digital audio output (COAXIAL)
This socket offers a higher level of sound quality
compared to that provided using an analogue audio
connection. Use this socket to connect your DVD Player
to an amplifier equipped with two-channel digital stereo
(PCM) or to an Audio/Video receiver equipped with a
multi-channel decoder (Dolby Digital, MPEG 2 or DTS)
using a digital coaxial cable (not supplied).
Video cable
Audio/video cable
DVD/VCR VIDEO
OUT socket
VIDEO IN and
AUDIO IN L and R
sockets
Back panel video sockets
DVD/VCR VIDEO OUT socket
This socket (yellow) is also known as a composite video
socket. The video cable (not supplied) usually comes with
two audio cables (red and white). The picture quality
obtained using a video connection is poorer compared to
that obtained using a Scart connection.
Note: Remember to connect the audio cables because the
video cable carries only the picture signal, not the sound.
Front panel audio and video sockets
Connect your camcorder to the AUDIO L (left),AUDIO
R (right) and VIDEO sockets located at the front of the
DVD/VCR using an audio/video cable (not supplied).
7

EN
Connections and Setup
Tuning in a video channel on your TV
If your television is not fitted with a Scart socket, you were unable to connect it to the AV1 socket
of the DVD/VCR using a Scart cable as shown on page 6, step 3. In this case, you must make below
settings before you start the automatic channel set-up (page 9).
The output frequency of this appliance is set at UHF channel 36.
If channel 36 is already used by another TV channel, or if the picture is distorted, you can change
the transmitter channel of your VCR. Stages 7 to 13 will show you how to change the output
frequency of your DVD/VCR.
Make sure that you have correctly installed the appliance as described earlier in this book.
1. Turn on your TV.
2. Press to turn on the appliance and then
press the
control.
VCR button on the remote
3. Insert a pre-recorded video tape into the
VCR and press
control.
PLAY on the remote
4. Select a TV channel number on which you
wish to watch videos.
Don’t worry if you don’t have a video tape
to play at this stage! If you switch the
appliance on and continue stages 5 ~ 6,
instead of seeing video playback tune your
TV until you see a bright blue screen.
5. Tune this channel until the video picture is
sharp and the sound is clear.
6. Store this channel on your TV.
You will need to look at the TV instruction
book if you do not know how to do this.
Note: Only carry out stages 7 to 13 if you cannot
obtain clear video playback as described in stages
1 to 6.
7. Select a TV channel number on which you
wish to watch videos. Make sure that the
DVD/VCR is in standby by pressing on
the remote control.
8. Press PROGRAM - or PROGRAM + on
the front of the appliance for more than 4
seconds.
RF36 will appear on the front display.The
picture below will be displayed on the TV
screen.
RF CHANNEL 36
9. Press PROGRAM - or PROGRAM + to
select another video channel.You may
select any channel number between 22 and
68.
10. Select a TV channel number on which you
wish to watch videos.
11. Tune this channel so that a bright blue
screen appears.
12. Store this channel on your TV.
13. Press on the front of your appliance
when you have finished.
Make sure that you have correctly installed the
appliance and successfully tuned in a dedicated
video channel on your TV. If you do not tune in
a dedicated video channel on your TV you will
be unable to view and record video tapes!
8

Connections and Setup
Pr-12
ACMS
Tuning in TV channels
The first time you use the DVD/VCR,you will see the ACMS (Automatic Channel Memory
System) displayed on the screen.This system automatically tunes and stores TV channels. If you
want to return to ACMS after your initial set-up, access it via the menu (ACMS ).
Automatic channel search
1. Switch the television set on.
2. Press the button to turn the appliance
on and then press the
VCR button on the
remote control.
3. Select the AV channel on the television set.
The ACMS menu screen appears.
A
B D DK E F I
CH
NNLPSSFOTHERS
Pr-12
ACMS
OK
i
Use the and buttons on the remote
control to select a country code:
A:Austria, B: Belgium, CH:Switzerland,
D: Germany, DK: Denmark, E: Spain,
F: France, I: Italy,N: Norway,
NL: Netherlands, P:Portugal, S:Sweden,
SF: Finland, OTHERS.
4. Press OK to start the automatic tuning
process.
5. When the automatic channel search is
completed a screen showing all the
channels that have been found and the
positions they have been placed in is
displayed.
6. The automatic channel set-up assigns the
numbers to the channels in a predefined
order. These numbers may therefore not
match the actual channel numbers. Should
this be the case, change these numbers by
carrying out the instructions below (see
"Sorting the channels").
7. Press to store the settings.
EN
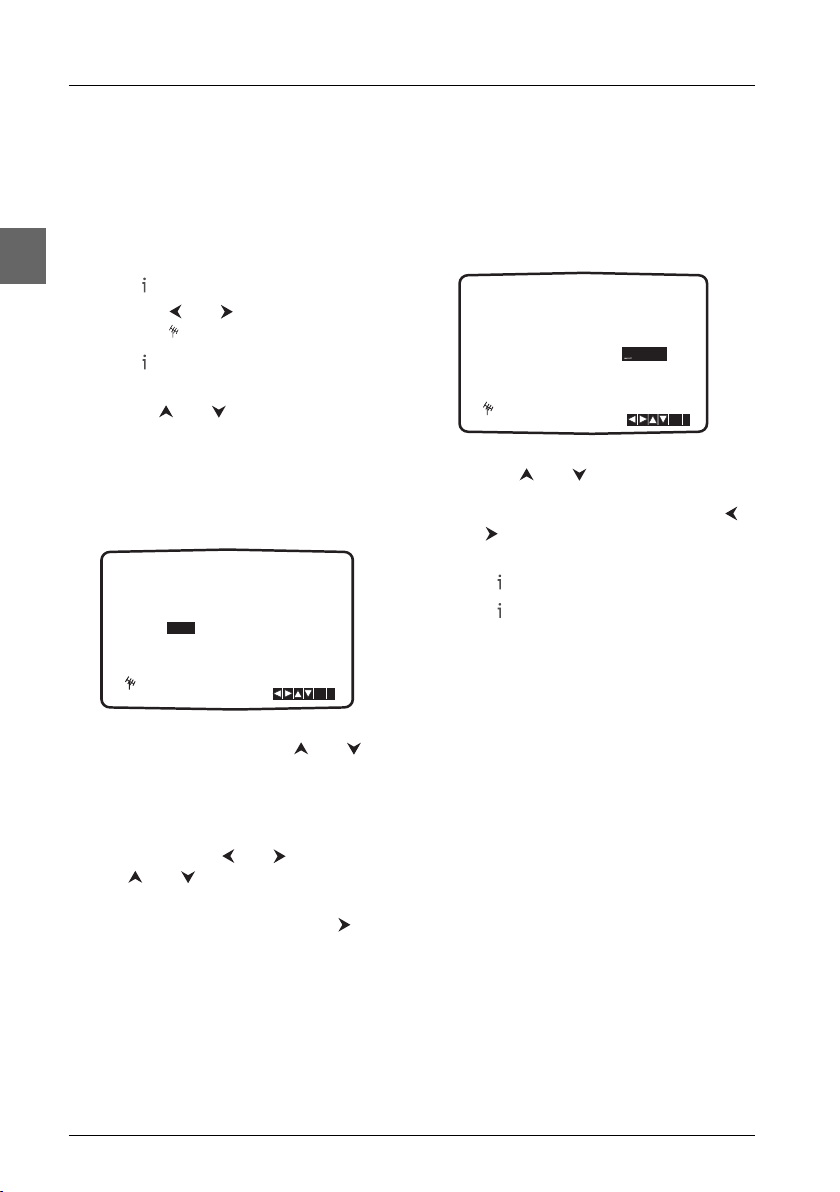
Sorting the channels
For easy channel identification, we suggest that you have a TV magazine at hand.
1. Press the VCR button. Press to access
the main menu. Use the and buttons
to select PR SET then press
P
SET
R
OK.
2. Press again.
3. To move a channel, use the and
buttons to select the programme number
that you wish to move.Then press .
Press and until you reach the
position you wish to store the channel in.
OK.The channel will move to the
Press
new position.
01 C02 00 PR-01
02 C03 00 PR-02
03 C04 00 PR-03
04 C05 00 PR-04
05 C06 00 PR-05
06 C07 00 PR-06
07 C08 00 PR-07
08 C09 00 PR-08
P
SET
R
MOVE :
,DELETE :
OK
i
4. To delete a channel, use the and
buttons to select the channel number you
wish to delete and press .After a short
while the selected channel will be deleted.
The remaining channels are resorted
automatically.
5. Press to leave the menu.To move or
delete other channels, repeat the above
process.
9
Connections and Setup
Manual installation
To complete the set-up of your video recorder when the automatic channel set-up has not stored
all the channels or when you wish to store a new channel.
EN
1. Turn on your television and your
DVD/VCR. Select the AV channel on your
television, press the
VCR button and then
press to access the main menu.
2. Press the and buttons to select
PR SET then press
P
SET
R
OK.
3. Press again and the television channel
table appears.
4. Use the and buttons to select the
programme number you want to tune, then
OK.
press
5. Press the AV key to select C (for channels
received via your roof aerial) or S (for
cable network channels).
PR CH STATION
09 - - - - - -
P
SET
R
C - -
CHANNEL/CABLE : AV
MFT
i
OK
6. Press OK, and then use the and
buttons to search for the channel of a
programme.
7. The station can be fine tuned to improve
picture quality. Select MFT (Manual Fine
Tuning) using the and buttons. Use
the and buttons to adjust the
picture.
8. Select STATION by pressing the
button. You can then name your station.
9. Press OK.A flashing bar appears beneath
the first letter.
PR CH MFT
C40
06 00
P
SET
R
STATION
i
OK
10. Use the and buttons to select
letters and numbers for the new channel
name up to a maximum of 5. Press the
and buttons to pass on to the previous
or next character. Press
OK.
11. Press to confirm.
12. Press again to remove the menu.
13. The new channel is now stored into your
video recorder.
If you wish to install manually other channels
you should repeat the above procedure.
To sort the new channel, see “Sorting the
channels” on page 9.
Note: If it is necessary for you to tune all the
channels manually you may find it easier if you
write the CH numbers down for each channel as
you find them.You can then select each channel
from the main menu and type the CH numbers
in directly. Each channel will then be in the correct
position so there is no need to sort them later.
10
Basic playback operations
SYS
12
SET
Pr-12
ACMS
REC
DECO-
DER
+
-
OSD
ON
OFF
OSD
f
AUD
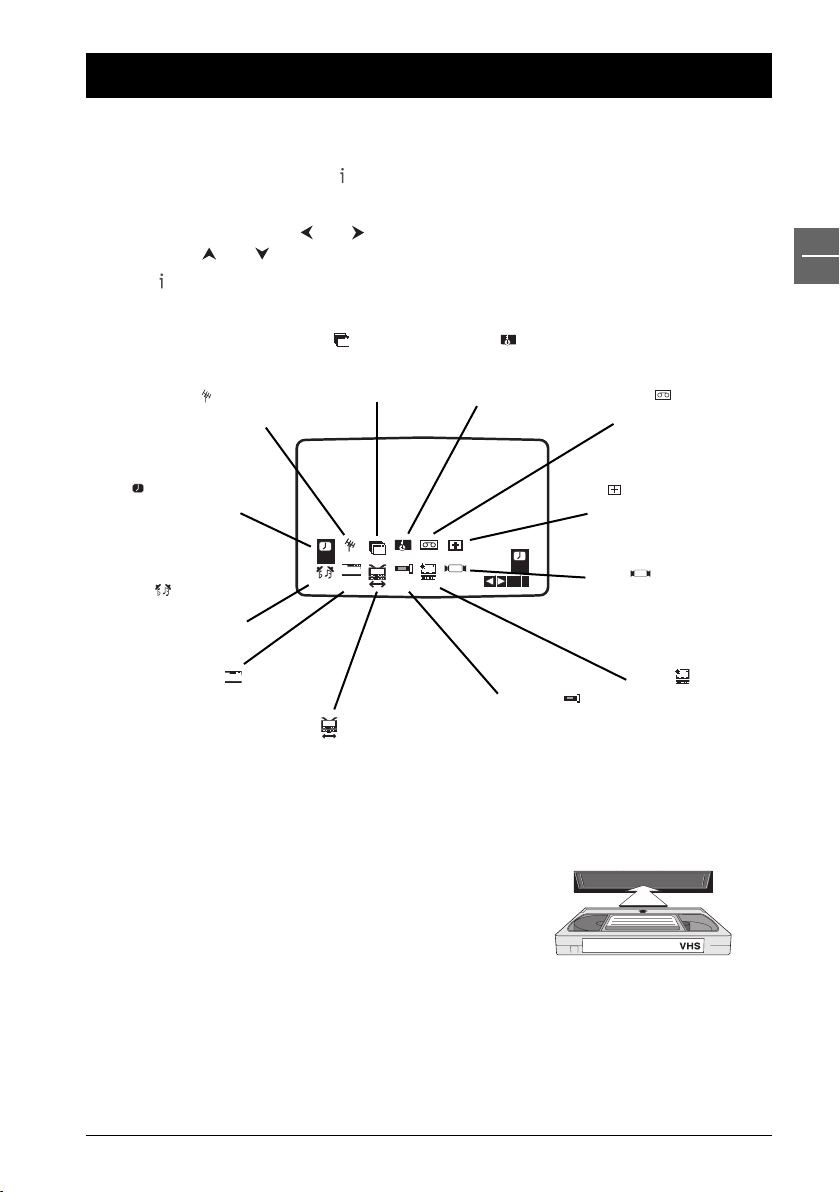
Description of the VCR main menu
1. Turn on your television and your DVD/VCR. Select the AV channel on your television, press
VCR button and then press to access the main menu.
the
2. The VCR main menu includes the options below.
3. Use the direction buttons and to select an option. Press OK to confirm your selection
and use the and buttons to select an option within the menu.
4. Press to leave the menu.
EN
VCR
ACMS
Automatic channel
installation (see page 9)
P
PR SET
SET
R
Manual installation
(see page 10)
REC
Timer recording
settings (see page 13)
REC
AUD
AUDIO
12
Pr-12
P
SET
R
f
OSD
OSD
ON
OFF
ACMS
SET
+
DECO-
DER
SYS
-
Audio output channel
selection (see page 16)
F. O S D ON/OFF
Activation or deactivation
of the on-screen displays
(see page 16)
↔↔
Aspect ratio selection
(see page 16)
Playback
Load a tape and press PLAY.
Note: Check that the window on one side of the tape is facing
upwards.The label should be facing you with the arrow next to
the window pointing twoards the appliance.
SET
Date and clock
setting (see page 15)
OK
REC
i
NIC
DECODER
Must be activated
when a decoder is
connected to your
VCR (see page 17)
SYS
Colour standard
selection (see page 15)
+
Status of various features
of the VCR (see page 16)
NIC
NIC
Activation or deactivation
of the NICAM function
(see page 17)
OPR
Improvement of the
playback picture
(see page 17)
Stopping playback
Press the STOP button on the remote control to stop
playback.
11
 Loading...