

Page 1
D100E
D100E512
It is important to read this instruction book prior to using your new product for the first time.
user
manual
Page 2
EN
Safety Information
The descriptions and characteristics given in this document are given as a general indication and not as a guarantee. In
order to provide the highest quality product possible, we reserve the right to make any improvement or modification
without prior notice. The English version serves as the final reference on all products and operational details should
any discrepancies arise in other languages.
RISK OF ELECTRIC SHOCK
DO NOT OPEN
RISQUE DE CHOC ELECTRIQUE
NE PAS OUVRIR
TO REDUCE THE RISK OF ELECTRIC SHOCK, DO NOT REMOVE THE COVER (OR BACK). NO USERSERVICEABLE PARTS ARE INSIDE. REFER SERVICING TO THE QUALIFIED SERVICE PERSONNEL.
This symbol indicates “dangerous
voltage” inside the product that
presents a risk of electric shock or
personal injury.
This symbol indicates important
instructions accompanying the
product.
IMPORTANT NOTE: To reduce the risk of fire or shock hazard, do not expose this
player to rain or moisture.
CAUTION
ATTENTION
In accordance with the rating plate of
the unit, this unit complies with current
standards concerning electrical safety
and electromagnetic compatibility.
Please respect the environment Before
throwing any batteries away, consult
your distributor who may be able to
take them back for specific recycling.
CAUTION
RISK OF ELECTRIC SHOCK
THE LIGHTNING
FLASH AND ARROWHEAD WITHIN THE
TRIANGLE IS A
WARNING SIGN
ALERTING YOU OF
"DANGEROUS
VOLTAGE" INSIDE
THE PRODUCT.
WARNING: TO PREVENT FIRE
SHOCK HAZARD,
TO RAIN OR MOISTURE.
DO NOT OPEN
CAUTION: TO REDUCE THE
RISK OF ELECTRIC SHOCK,
DO NOT REMOVE COVER
(OR BACK). NO USERSERVICEABLE PARTS INSIDE. REFER SERVICING
TO QUALIFIED SERVICE
PERSONNEL.
SEE MARKING ON BOTTOM / BACK OF PRODUCT
DO NOT EXPOSE THIS PR ODUCT
THE EXCLAMATION
POINT WITHIN THE
TRIANGLE IS A
WARNING SIGN
ALERTING YOU OF
IMPORTANT
INSTRUCTIONS
ACCOMPANYING
THE PRODUCT.
OR ELECTRICAL
Page 3

EN
End User License Agreement
IMPORTANT-READ CAREFULLY: This End User
License Agreement ("Agreement") is a
legal agreement between you and
Thomson Inc. ("Thomson") for the Thomson
application/driver software program and
associated documentation, if any
("Program").
ACKNOWLEDGMENT
BY INSTALLING THE SOFTWARE OR CLICKING ON
THE ACCEPTANCE BUTTON OF THE SOFTWARE,
COPYING OR OTHERWISE USING THE PROGRAM,
YOU ACKNOWLEDGE AND AGREE THAT YOU
HAVE READ THIS AGREEMENT, UNDERSTAND IT,
AND AGREE TO BE BOUND BY ITS TERMS AND
CONDITIONS. IF YOU DO NOT AGREE TO THE
TERMS OF THIS LICENSE AGREEMENT, CLICK ON
THE REJECTION BUTTON AND/OR DO NOT
INSTALL THE SOFTWARE AND/OR DO NOT USE
THE PROGRAM.
LICENSE
a) You are granted the license (i) to use the
Program on a single workstation and (ii) to make
one (1) copy of the Program into any machinereadable form for backup of the Program,
provided the copy contains all of the original
Program's proprietary notices.
b) You may transfer the Program and license,
only as part of the Thomson device, to another
party if the other party agrees to accept the
terms and conditions of this Agreement. If you
transfer the Program, you must at the same time
either transfer all copies to the same party or
destroy any copies not transferred.
LICENSE RESTRICTIONS
a) Except for the licenses expressly granted to
you in this Agreement, no other licenses are
implied.
b) You may not (i) modify, translate, reverse
engineer, decompile, disassemble (except to the
extent that this restriction is expressly prohibited
by law) or create derivative works based upon
the Program or (ii) copy the Program, except as
expressly permitted herein. You agree that you
shall only use the Program in a manner that
complies with all applicable laws in the
jurisdictions in which you use the Program,
including, but not limited to, applicable
restrictions concerning copyright and other
intellectual property rights.
c) The Program may contain pre-release code
that does not perform at the level of a final code
release. In this case, the Program may not
operate properly. Updated versions of the
Program can be downloaded from
www.thomson-lyra.com.
d) Thomson is not obligated to provide support
services for the Program.
e) The Program is provided with "RESTRICTED
RIGHTS". Use, duplication, or disclosure by the
U.S. Government is subject to restrictions as set
forth in subparagraph (c)(1)(ii) of DFARS
252.227-7013, or FAR 52.227-19, or in FAR
52.227-14 Alt. III, as applicable.
Page 4

EN
End User License Agreement
TERM AND TERMINATION
a) The license is effective on the date you accept
this Agreement, and remains in effect until
terminated by either party.
b) You may terminate this license without any
notice or delay, by destroying or permanently
erasing the Program and all copies thereof.
c) If you use, copy, modify, or transfer the
Program, or any copy, in whole or part, except as
expressly provided for in this license, your license
is automatically terminated.
d) When the license is terminated, you must
destroy or permanently erase the Program and
all copies thereof.
WARRANTY DISCLAIMER
THE PROGRAM IS PROVIDED "AS IS" WITHOUT
WARRANTY OF ANY KIND, EITHER EXPRESSED
OR IMPLIED, INCLUDING, BUT NOT LIMITED TO
THE IMPLIED WARRANTIES OF
MERCHANTABILITY, FITNESS FOR A PARTICULAR
PURPOSE, TITLE OR NON-INFRINGEMENT. THE
ENTIRE RISK AS TO THE QUALITY AND
PERFORMANCE OF THE PROGRAM IS WITH YOU.
SHOULD THE PROGRAM PROVE DEFECTIVE, YOU
(AND NOT THOMSON, ITS SUPPLIERS, ITS
AFFILIATES OR ITS DEALERS) ASSUME THE
ENTIRE COST FOR ALL NECESSARY REPAIR OR
CORRECTION.
This exclusion of warranty may not be allowed
under some applicable laws. As a result, the
above exclusion may not apply to you, and you
may have other rights depending on the law
that applies to you.
OWNERSHIP RIGHTS
All title and intellectual property rights in and to
the Program and any copies thereof are owned
by Thomson or its suppliers. All title and
intellectual property rights in and to the content
which may be accessed through use of the
Program is the property of the respective
content owner and may be protected by
applicable copyright or other intellectual
property laws and treaties. This license grants
you no rights to use such content.
LIMITATION OF LIABILITY
a) TO THE MAXIMUM EXTENT PERMITTED BY
APPLICABLE LAW, IN NO EVENT SHALL
THOMSON, ITS AFFILIATES, OR ITS DEALERS BE
LIABLE FOR ANY SPECIAL, INCIDENTAL, INDIRECT
OR CONSEQUENTIAL DAMAGES WHATSOEVER
(INCLUDING, WITHOUT LIMITATION, DAMAGES
FOR LOSS OF PROFITS, BUSINESS INTERRUPTION,
CORRUPTION OF FILES, LOSS OF BUSINESS
INFORMATION OR ANY OTHER PECUNIARY
LOSS) REGARDLESS OF CAUSE OR FORM OF
ACTION, INCLUDING CONTRACT, TORT OR
NEGLIGENCE, ARISING OUT OF THE USE OF OR
INABILITY TO USE THE PROGRAM, EVEN IF
THOMSON HAS BEEN ADVISED OF THE
POSSIBILITY OF SUCH DAMAGES. BECAUSE
SOME STATES AND JURISDICTIONS DO NOT
ALLOW THE EXCLUSION OR LIMITATION OF
LIABILITY OF CONSEQUENTIAL OR INCIDENTAL
DAMAGES, THE ABOVE LIMITATION MAY NOT
APPLY TO YOU.
b) YOU ASSUME RESPONSIBILITY FOR THE
SELECTION OF THE APPROPRIATE PROGRAM TO
ACHIEVE YOUR INTENDED RESULTS, AND FOR
THE INSTALLATION, USE, AND RESULTS
OBTAINED.
WINDOWS MEDIA
This version of the Personal Digital Player
("Player") contains software licensed from
Microsoft that enables you to play Windows
Media Audio (WMA) files ("WMA Software").
Page 5

EN
End User License Agreement
The WMA Software is licensed to you for use
with the RCA/THOMSON Portable Audio Device
digital music player under the following
conditions. By installing and using this version
of the Player, you are agreeing to these
conditions. IF YOU DO NOT AGREE TO THE
CONDITIONS OF THIS END USER LICENSE
AGREEMENT, DO NOT INSTALL OR USE THIS
VERSION OF THE Player.
The WMA Software is protected by copyright
and other intellectual property laws. This
protection also extends to documentation for
the WMA Software, whether in written or
electronic form.
GRANT OF LICENSE. The WMA Software is only
licensed to you as follows:
You may use this version of the Player containing
the WMA Software only with the Portable Audio
Device player.
You may not reverse engineer, decompile, or
disassemble the WMA Software, except and only
to the extent that such activity is expressly
permitted by applicable law in spite of this
limitation.
You may transfer your right to use this version of
the Player only as part of a sale or transfer of
your Portable Audio Device player, on the
condition that the recipient agrees to the
conditions in this End User License Agreement.
If the version of the Player that you are
transferring is an upgrade, you must also
transfer all prior versions of the Player that you
have which include the WMA Software.
MICROSOFT IS NOT PROVIDING ANY WARRANTY
OF ANY KIND TO YOU FOR THE WMA
SOFTWARE, AND MICROSOFT MAKES NO
REPRESENTATION CONCERNING THE
OPERABILITY OF THE WMA SOFTWARE.
The WMA Software is of U.S. origin. Any export
of this version of the Player must comply with all
applicable international and national laws,
including the U.S. Export Administration
Regulations, that apply to the WMA Software
incorporated in the Player.
THIRD PARTY SOFTWARE
ANY THIRD PARTY SOFTWARE THAT MAY BE
PROVIDED WITH THE PROGRAM IS INCLUDED
FOR USE AT YOUR OPTION. IF YOU CHOOSE TO
USE SUCH THIRD PARTY SOFTWARE, THEN SUCH
USE SHALL BE GOVERNED BY SUCH THIRD
PARTY'S LICENSE AGREEMENT, AN ELECTRONIC
COPY OF WHICH WILL BE INSTALLED IN THE
APPROPRIATE FOLDER ON YOUR COMPUTER
UPON INSTALLATION OF THE SOFTWARE.
THOMSON IS NOT RESPONSIBLE FOR ANY THIRD
PARTY'S SOFTWARE AND SHALL HAVE NO
LIABILITY FOR YOUR USE OF THIRD PARTY
SOFTWARE.
GOVERNING LAW
This Agreement is governed by the laws of
France, without regard to its conflict of laws.
GENERAL TERMS
This Agreement can only be modified by a
written agreement signed by you and Thomson,
and changes from the terms and conditions of
this Agreement made in any other manner will
be of no effect. If any portion of this Agreement
shall be held invalid, illegal, or unenforceable,
the validity, legality, and enforceability of the
remainder of the Agreement shall not in any
way be affected or impaired thereby. This
Agreement is the complete and exclusive
statement of the agreement between you and
Thomson, which supersedes all proposals or prior
agreements, oral or written, and all other
communications between you and Thomson,
relating to the subject matter of this Agreement.
Page 6

EN
1
Table of Contents
Safety Information
End User License Agreement
Table of Contents . . . . . . . . . . .1
Before You Begin . . . . . . . . . . .2
Power Supply . . . . . . . . . . . . . .5
General Controls . . . . . . . . . . .6
Loading Music . . . . . . . . . . . . .7
Inserting USB Device or Memory
Card to the Player . . . . . . . . . . . . . . .7
Transferring Files to the Player . . . .7
File Menu . . . . . . . . . . . . . . . .10
How Files are Organization . . . . .10
File Menu Navigation . . . . . . . . . . .10
Player Menu . . . . . . . . . . . . . .11
Player Menu Navigation . . . . . . . . .11
Audio Playback . . . . . . . . . . .12
Switching On and Off the Player . .12
Switching Source . . . . . . . . . . . . . . .12
Playing/ Pausing . . . . . . . . . . . . . . . .12
Skipping Files . . . . . . . . . . . . . . . . . .12
Scanning Files . . . . . . . . . . . . . . . . . .12
DSP . . . . . . . . . . . . . . . . . . . . . . . . . .12
Random Playback . . . . . . . . . . . . . .13
Repeat Playback . . . . . . . . . . . . . . .13
My Selections . . . . . . . . . . . . . . . . . .13
Radio . . . . . . . . . . . . . . . . . . .14
Radio Recording . . . . . . . . . . .15
Line-in Recording . . . . . . . . . .16
Clock & Alarm . . . . . . . . . . . .17
Setting the Player . . . . . . . . .18
Settings . . . . . . . . . . . . . . . . . . . . .18
System Info . . . . . . . . . . . . . . . . . .18
More Information . . . . . . . . .19
Page 7

EN
2
Before You Begin
Unpacking your unit
When you unpack your new player, be
sure you have removed all the accessories
and documentation. The items below
should have been packed in the box with
your player.
• Multimedia Sound Station
• Music Management CD
• USB extension cable
• Power adapter
•FMantenna
What’s so special about this
mp3 player?
This player is meant to play mp3 and
Windows Media
TM
audio files.
To do so, you need the use of a computer
with a USB port , USB extension cable
(optional) and a music management
software.
Computer system
requirements
• Pentium III 500MHz or higher
recommended
Macintosh iMac G3 or higher
• Windows ®98SE, Me, 2000 (SP3 or
higher), or XP
Mac OS X Version 10.2 or higher
• Internet Explorer 4.0 or higher
• Internet access
• 200MB free hard disk space for the
software
• 64MB RAM (128 MB recommended)
• CD-ROM drive capable of digital audio
extraction
• USB port (2.0 recommended)
• Sound card
Dear Thomson Customer,
Thank you for purchasing the Thomson Multimedia Sound Station. This product will
play open mp3 and Windows Media™ audio (WMA) content as well as content
purchased from some online music download services.
After purchasing and downloading music to your PC, you are now ready to move
content to your player. To transfer the music, you should use Windows Media Player
or the application recommended by the online music download service.
(Note: Services and applications must be Windows Media audio-compliant and
support Digital Rights Management.)
Page 8
EN
3
Before You Begin
Precautions for the Unit
• Do not use the unit immediately after
transportation from a cold place to a
warm place; condensation problem
may result.
• Avoid shock to the unit.
• Do not store the unit near fire, places
with high temperature or in direct
sunlight.
• Do not operate or store unit in places
with frequent static electricity or
electrical noise (e.g. speaker, TV set).
• Clean the unit with a soft cloth or a
damp chamois leather. Never use
solvents.
• The unit must only be opened by
qualified personnel.
Installation
• Keep product out of direct sunlight.
Exposure to direct sunlight or extreme
heat (such as inside a parked car) may
cause damage or malfunction.
• Do not expose to rain or moisture.
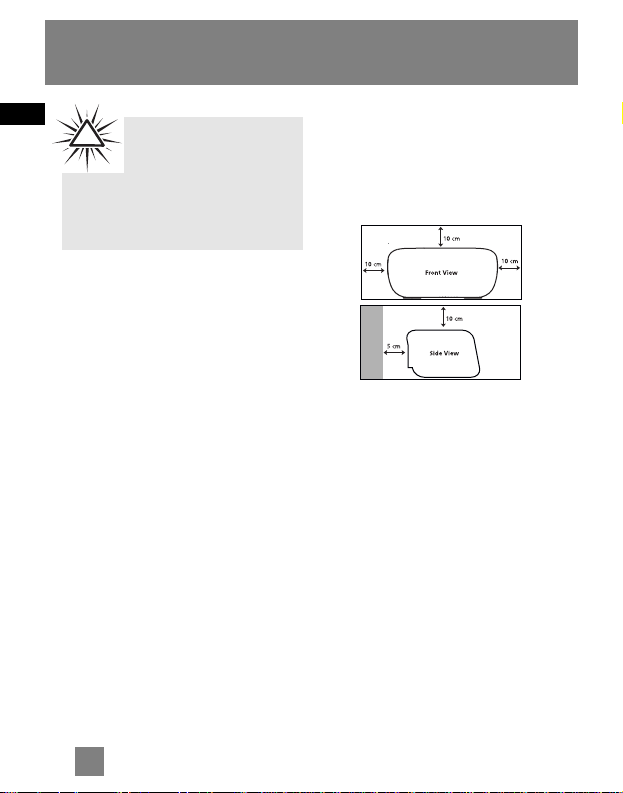
• The ventilation should not be impeded
by covering the ventilation opening
with items, such as newspaper, tablecloths, curtains, etc.
• Minimum distances around the
apparatus for sufficient ventilation.
Caution while Driving
Use of headphones while operating an
automobile or moving vehicle is not
recommended and is unlawful in some
states and areas. Be careful and attentive
on the road. Stop operation of the unit if
you find it disruptive or distracting while
driving.
Warning:
Use of this product is for your
personal use only. Unauthorized
recording or duplication of copyrighted
material may infringe upon the rights of third
parties and may be contrary to copyright laws.
!
Page 9
EN
4
Before You Begin
Headset Safety
Have a Blast- Just Not in
Your Eardrums
Make sure you turn down
the volume on the unit
before you put on
headphones. Increase the volume to the
desired level only after headphones are
in place.
• Do not play your headset at a high
volume. Hearing experts warn against
extended high-volume play.
• If you experience a ringing in your
ears, reduce volume or discontinue use.
• You should use extreme caution or
temporarily discontinue use in
potentially hazardous situations. Even
if your headset is an open-air type
designed to let you hear outside
sounds, don’t turn up the volume so
high that you are unable to hear what
is around you.
This symbol means that your
inoperative electronic appliance
must be collected separately and
not mixed with the household
waste. The European Union has
implemented a specific collection and
recycling system for which manufacturers
are responsible.
This appliance has been designed and
manufactured with high quality materials
and components that can be recycled and
reused.
Electrical and electronic appliances are
liable to contain parts that are necessary
in order for the system to work properly
but which can become a health and
environmental hazard if they are not
handled or disposed of in the proper way.
Consequently, please do not throw out
your inoperative appliance with the
household waste.
If you are the owner of the appliance,
you must deposit it at the appropriate
local collection point or leave it with the
vendor when buying a new appliance.
• If you are a professional user, please
follow your supplier’s instructions.
• If the appliance is rented to you or left
in your care, please contact your service
provider.
Help us protect the environment in which
we live!
Page 10

EN
5
Power Supply
AC Power
Plug the cord of the power adapter into
the AC power jack on the back of the
unit, and the power adapter into an AC
power supply outlet that accepts the
plug supplied with your unit.
Battery Power
You can insert 3 D-sized alkaline
batteries (not supplied) and you can take
your player just about anywhere.
• Open the battery compartment door
on the bottom of the unit by pressing
down on the tab and pulling out the
cover.
• Before inserting the batteries, observe
the polarities (that is, + and -) of the
battery, then relate the polarities to
the engraved diagram located on the
battery compartment door.
IMPORTANT: Be sure to remove
batteries when storing the set for more
than 30 days. Leaky batteries can badly
damage the system. Be sure to dispose
of leaky, weak or dead batteries properly
according to federal, state, and local
regulations.
Caution with Batteries
• The battery used in this device may
present a risk of fire, explosion, or
chemical burn if mistreated. Do not
separately recharge, disassemble,
incinerate, or expose to high
temperatures. Examples of high
temperatures that may damage your
product include leaving it in a locked
car in summer, or putting it on top of
heat generating electronic devices
(such as power amplifiers and
computer monitors ).
• Dispose of used batteries
promptly. Keep away from
children. Do not disassemble
and do not dispose of in fire.
Tips:
The plug icon shows on
the display to indicated that
AC power is connected. The battery
icon is shown instead to indicate
battery power is being used. An empty
battery icon means battery power is
running low.
Page 11

EN
6
General Controls
1. PLAY/PAUSE , POWER - starts and
pauses music playback; changes
between radio manual and preset
mode; press and hold to turn on/off
the player.
2. SOURCE - selects audio source.
3. MENU - accesses player’s menu.
4. REC - starts and stops recording; press
and hold during music playback to
select file as MySelections.
5. REWIND - Skips and searches
backward a file; goes back a menu
level in menu navigation; scans radio
frequency downward and selects
preset stations.
6. VOLUME - Increases or decreases
volume; moves upward or downward
in menu navigation.
7. F. F WD - skips and searches forward
a file; goes into a menu level in menu
navigation; scans radio frequency
upward and selects preset stations..
8. Connector cover. Lift up to open.
9. - USB connector (for connection
with external thumb drive).
10. - SD/MMC card slot
11. - Headphone jack.
12. - USB connector for computer
connection.
13. LINE IN - Line-in jack and
connection for FM antenna.
14. DC 5V - Power adapter jack
This player can play mp3/wma files from the internal flash memory (D100E512 only),
USB thumb drive and SD/MMC card. FM radio, line-in and radio recroding are also
available.
Page 12

EN
7
Loading Music
Inserting USB Device or
Memory Card to the Player
Lift up the connector cover and insert
your USB device or memory card into the
USB connector or card slot respectively.
Refer to the instruction manual of your
USB device or memory card for
transferring music onto them.
Transferring Files to the
Player (D100E512 only)
Your transferred files to the internal
memory of the player can be seen in the
Library mode.
1. Insert the Included CD-ROM into
CD-ROM Drive
Turn on your computer and place the
Music Management CD into your
computer that came with your player.
The setup should be started
automatically. Follow the on-screen
instruction for software installation.
If the setup screen does not appear,
double click My Computer, double click
your CD-ROM drive icon, and double
click Install to run the installer.
If you’re running Windows ME/2000/XP
no additional drivers are required. If
you’re running Windows 98SE, you must
install the USB drivers from the CD-ROM
in order for the Multimedia Sound
Station to connect to your computer
properly.
The installation program will detect
whether your system requires a USB
driver. The program will install the USB
driver first, restart the computer, and
then begin to install the necessary
software.
2. Launch the MusicMatch software
The MusicMatch software converts audio
files to the mp3 and WMA formats so
you can play them on your Multimedia
Sound Station.
1. Remove the Music Management CD
from your computer.
2. Start the MusicMatch Jukebox
software (double click on the
MusicMatch icon in your system
tray or on your desktop).
Page 13

EN
8
Loading Music
3. Connecting the Player to the
Computer
Connect the Multimedia Sound Station
to your computer with the USB
connection cable provided. The larger
end of the cable should be connected to
the computer while the smaller end to
the player. It might take several seconds
for the player to be detected, especially
in Windows 2000/XP.
Click Refresh in My Computer or Explorer
to make sure the device has been
detected. The player will appear as a
Removable Disk drive.
4. Transferring Files
via MusicMatch Jukebox
1. Drag and drop desired tracks from the
Music Library to the Playlist display
and save the playlist.
2. From the menu area, select “Files/
Send to Portable Device” or click
“Send to Portable” under the copy
item on the left side of the
MusicMatch Jukebox screen to display
the “Portable Device Manager”
screen.
3. Click on “Options” and select your
portable device under Select Device.
Click “OK”. Your device should be
listed under Portable Device.
4. Select the playlist item and drag it to
the active device listed under Portable
Device. Only those playlists saved in
step 1 are displayed on the playlist
window. The songs in the playlist will
now be automatically transferred to
your Multimedia Sound Station.
via W
indows Explorer (Drag and Drop)
From Windows Explorer, highlight all the
files/folders you want to transfer to your
Multimedia Sound Station and drag
them to the drive letter that is associated
with it.
Page 14

EN
9
Loading Music
5. Disconnecting Your Player from
the Computer
For Windows XP, from the System Tray,
double click the left mouse button on
the icon and select Safely Remove
Hardware. Select the drive
corresponding to your player and click
STOP.
The Stop a Hardware device screen
appears. Select the device to be stopped
again for confirmation and click OK.
You can also stop your player by left
clicking on the icon from the system
tray and selecting the drive
corresponding to your player.
Before disconnecting the USB
connection from the computer or the
Digital Audio Player, be sure the "Safe to
Remove Hardware" message is
displayed.
Attention
Do not disconnect the USB
connection during music
download. Doing so may corrupt system
files or the files being downloaded.
If you want to go back to USB mode
for file transfer at this stage, you
need to unplug and connect the player
to the PC again.
Note
Secure music download files
can be transferred to your
player through Windows Media Player
or the application recommended (e.g.
MusicMatch Jukebox) by the online
music download service. Please visit
the online music download service’s
website where you purchased your
content from for more details on
transferring secure music to your
player.
For more information on Windows
Media Player, visit
http://www.microsoft.com/windows/wi
ndowsmedia.Note
The description on this page is
based on Windows XP. If you
are running other operating systems,
there may be some differences. See
the Windows Help for details about
safely removing hardware.
Page 15

EN
10
File Menu
How Files are Organized?
The files transferred to the player, USB or
memory card will be sorted
automatically so that you can easily find
and play them. They are sorted as below:
• Now Playing (your currently selected
or playback file)
• Folders (contains all music files)
•Radio Recs (contains radio recording)
• Line-in Recs (contains line-in
recording)
• My Selections (contains a playlist of
your preferred music files)
The file menu is displayed when
playback is stopped or when MENU is
pressed during playback in USB, Memory
card or Library (D100E512 only) mode.
File Menu Navigation
•To navigate through the file menu,
press to go into a menu level.
•Press or to move along menu
items at the same level.
•Press to go back a menu level.
•If the selected item is a music or
recorded file, press or will start
playback.
Page 16

EN
11
Player Menu
The player menu lets you access more
features of the player. Depending on the
mode you are in (e.g. music playback,
radio recording etc.), the items available
in the player menu may vary. Follow the
steps below to access the player menu:
• If you are at the playback screen in
USB, Memory card or Library
(D100E512 only) mode, press MENU
twice to access the player menu.
• If you are at the file menu screen in
USB, Memory card or Library
(D100E512 only) mode, press MENU
once to access the player menu.
• If you are in Radio or Line-in mode,
press MENU once to access the player
menu.
•Press MENU to switch between file
menu and player menu in USB,
Memory card or Library (D100E512
only) mode.
Player Menu Navigation
•To navigate through the file menu,
press to go into a menu level.
•Press or to move along menu
items at the same level.
•Press to go back a menu level.
Player Menu
Tips:
Refer to “Setting the Player”
on page 18 for details of the
player menu.
Page 17

EN
12
Audio Playback
Switching On and Off
Player
•Press and hold to turn on the unit.
•To turn off the player completely, press
and hold .
Switching Source
Press SOURCE repeatedly to select
desired listening source.
Playing / Pausing
•Press to begin playback.
•Press once to pause playback, press
again to resume playback.
During playback, file duration, elapsed
playback time, file information show on
the display.
These icons show the mode you are
currently in:
- Library mode (D100E512 only)
- Memory card mode
- USB mode
- Radio mode
- Line-in mode
Skipping Files
•To skip to the next file, press and
release .
•To go to the previous file, press and
release within the beginning 4
seconds of the current file. Otherwise,
press and release twice.
Scanning Files
•To scan backward a file, press and
hold during playback.
•To scan forward a file, press and hold
during playback.
DSP
DSP feature consists a number of sound
effects.
1. Press MENU once or twice to access to
player’s setting menu (refer to page 11
for more details).
2. Press to highlight “DSP”.
3. Press repeatedly to select an effect
mode (Flat, Bass, Pop, Rock, Jazz and
Grap (Graphic mode)).
•Press to enter graphic mode to
customize the 5 band equalizer. Press
or to select a band and or to
adjust band level. When finished, press
and hold to exit graphic mode
setting.
Page 18

EN
Random Playback
1. Press MENU once or twice to access to
player menu (refer to page 11 for
more details).
2. Press to highlight “Shuffle”.
3. Press repeatedly to select the
shuffle mode on or off. The shuffle
icon lights on the display.
Repeat Playback
1. Press MENU once or twice to access to
player menu (refer to page 11 for
more details).
2. Press to highlight “Repeat”.
3. Press repeatedly to select a repeat
mode (Repeat One , Repeat All
and Repeat Off). The corresponding
icon lights on the display.
My Selections
My Selections is a playlist of your
preferred music files (recorded files are
not selectable).
1. Select your preferred files in one of
the following ways:
•Press REC once while you are listening
to a preferred music file with “Added
to MySel” shows on the display briefly.
•Press REC once while you are
browsing music files in the navigation
menu with “Added to MySel” shows
on the display briefly. (see “File Menu How Files are Organized and File
Menu Navigation” for details).
2. Highlight “My Selections” folder from
the navigation menu (see “File Menu How Files are Organized and File
Menu Navigation” for details) and
press to enter the folder.
3. Press to begin playback.
•To clear My Selections, while in Library
(D100E512only), USB or Memory card
mode, press MENU twice to access
player menu. Press to highlight
“Clear MySel”. Press to confirm
clearing.
Tips:
Shuffle on + Repeat one = a
file is selected randomly and
played repeatedly.
Shuffle on + Repeat All = Files are
played in random order repeatedly.
Audio Playback
13
Page 19

EN
14
Press SOURCE repeatedly to select radio.
Manual and Preset Modes
Press repeatedly to select between
the two modes while listening to the
radio.
Manual mode – tuning to stations
manually,
Preset mode – selecting stations saved
in preset memory.
Manual Tuning
•Press or once to tune down or up
frequency. or
•Press and hold or until you see
“Searching...” to start automatic
search for the next available station.
or
•Press or continuously to tune down
or up frequency at a faster rate until
you release the button.
Saving Preset Stations
1. Tune to a station to be saved as a
preset station (refer to manual
tuning).
2. Press MENU.
3. Press to highlight “Save to Preset”
and press .
4. Press or to select a preset number.
5. Press to save station as selected
preset number.
Selecting Preset Stations
1. Make sure you are in preset mode.
2. Press or to select a preset number.
Clearing Presets
1. In preset mode, select the preset.
station to be cleared, press MENU to
view the radio sub-menu.
2. Press to highlight "Clear Preset".
3. Press to confirm clearing.
Suppressing Stereo Signal
If FM stereo reception is weak, select
mono sound to reduce the noise.
1. While listening to the radio, press
MENU to view the radio sub-menu.
2. Press to highlight "Mode".
3. Press repeatedly to select between
stereo or mono sound.
Preset mode
Radio
Tips:
Plug in the included antenna
to the FM jack for FM
reception. There is usually better
reception by extending the antenna
fully .
Page 20

EN
Radio Recording
Radio programs can be recorded as mp3
files.
1. Tune to the station to be recorded.
2. Press REC to start recording. Press
to pause recording and again to
resume.
3. Press REC to stop recording.
• The recorded files will be named as
FM001.mp3, FM002.mp3 and so on.
Record Duration
1. While listening to the radio, press
MENU to view the radio sub-menu.
2. Press to highlight "RecDur" (record
duration).
3. Press repeatedly to select among
max, 1 hour, 30 min and 5 min.
Listening to Recording
1. In the file menu, press to highlight
"Radio Recs".
2. Press to view recorded files and then
press to highlight a desired one.
3. Press or to play the selected file.
Deleting Recording
1. In the file menu, press to select
"Radio Recs".
2. Press to view recorded files and then
press to highlight an unwanted one.
3. Press MENU and then to highlight
"Delete File".
4. Press to confirm deletion.
Record Destination
1. While listening to the radio, press
MENU to view the radio sub-menu.
2. Press to highlight "RecDest" (record
destination).
3. Press repeatedly to select among
USB, MemCard (memory card) or Builtin (internal memory, D100E512 only).
Record Quality
1. While listening to the radio, press
MENU to view the radio sub-menu.
2. Press to highlight "RecQual" (record
quality).
3. Press repeatedly to select between
high and standard.
15
Page 21

EN
Line-in Recording
Press SOURCE repeatedly to select line-in
recording.
Line-in Recording
Recording as mp3 files can be made
through a line-in cable connected to the
line-in jack.
1. Start playback of the line-in source.
2. Press REC to start recording. Press
to pause recording and again to
resume.
3. Press REC to stop recording.
• The recorded files will be named as
Line001.mp3, Line002.mp3 and so on.
Listening to Recording
1. In the file menu, press to highlight
"Line-in Recs".
2. Press to view recorded files and then
press to highlight a desired one.
3. Press or to play the selected file.
Deleting Recording
1. In the file menu, press to select
"Line-in Recs".
2. Press to view recording and then
press to highlight an unwanted one.
3. Press MENU and then to select
"Delete File".
4. Press to confirm deletion.
Record Duration,
Destination and Quality
Refer to the previous page “Selecting
Record Duration”, “Selecting Record
Destination” and “Selecting Record
Quality” for radio. Repeat the same steps
while you are in line-in mode.
Tips:
Adjust the volume level of
the source audio device in
order to achieve the optimum
recording quality. The source output
varies from model to model. You might
want to experiment with a few
recordings to determine the proper
volume output of the source to get
optimum recording quality from the
player. Recommend starting the
source at around the room volume
level.
16
Page 22

EN
Clock & Alarm
Setting Clock
1. Press MENU once or twice to access
to player menu (refer to page 11 for
more details).
2. Press to highlight “Settings” and
then press to enter its submenu.
3. Press to highlight “Time & Date”
and then press to enter its submenu.
4. Press to highlight “Time”, “Date” or
“Time Format” to perform respective
settings. To set time and date, press
or to shift time/date digit and
press or to change time/date
value. To change time format,
press repeatedly to switch between
12 or 24 hour format.
5. To exit from setting menus, press
one or more times.
Setting Alarm
1. Press MENU once or twice to access to
player menu (refer to page 11 for
more details).
2. Press to highlight “Alarm” and then
to enter its submenu.
3. The following items are available,
press or to highlight one of them
and perform the setting.
•Alarm on/ off - press repeatedly to
select alarm on or off.
• Source - press repeatedly to select
among buzzer, music and radio. The
latest music file or radio channel you
have played will be heard as alarm.
•Alarm Time - press to enter alarm
time setting, press or to shift time
digit and or to change time value.
• Occurrence - press to enter
occurrence setting, press or to
highlight day of the week and press
repeatedly to select on or off.
Alarm will only be activated when the
day of the week is selected as on.
Attention
You have to set the clock
everytime the power is cut.
Tips:
Press any key on the unit to
stop the alarm.
Alarm function will not be activated if
the unit is already turned on.
17
Page 23

EN
18
Setting the Player
Settings
1. Press MENU once or twice to access to
player menu (refer to page 11 for
more details).
2. Press to highlight “Settings”. and
then to enter the setting menu.
3. The following items are available,
press or to highlight one of them
and perform the setting.
• Contrast (adjusts the display
brightness, 7 levels available),
• Backlight (adjusts the duration
before backlight deactivation, 4
options available),
• Power Save (adjusts the duration
before automatic switch off, 5 options
available),
• Sleep (selects the time interval in
minutes before the players turns off
automatically, 4 options available). To
cancel this function while activated,
return to this menu and select “Off”.
• FreqStep (Frequency Step) (selects
between US and Europe frequency
mode),
• Language (selects one of the display
languages available)
• Time & Date (sets date and time,
refer to “Clock and Alarm”)
• Restore Defaults (restore all settings
to default values by pressing )
Unless otherwise indicated, select
available options within each item by
pressing repeatedly. To exit the
setting menu, press MENU.
System Info
1. Press MENU once or twice to access to
player’s setting menu (refer to page 11
for more details)
2. Press to highlight “System Info”.
3. Press to check memory usage and
firmware version.
Page 24

EN
More Information
Troubleshooting Tips
The player does not turn on when
the PLAY button is pressed?
• Batteries may be empty or incorrectly
installed.
• Check if AC power is properly
connected.
Skipping tracks or bad sound
quality?
• Repeat, random or program function
may be activated.
• There may be strong magnetic fields
(e.g. too close to TV) near the unit.
• Low Battery level.
Cannot perform playback?
• There may be no mp3/WMA tracks in
the internal memory, USB or memory
card.
USB display does not appear when
connected to computer?
• Check connection between your unit
and the computer. (Refer to the
software instruction manual)
• Check if the USB drivers are properly
installed if you are using Windows
98SE.
•You may have to re-associate the
drive letter that was assigned to the
device. Please check your help on
Windows for details on assigning a
different drive letter.
Cannot playback tracks on the
player.
• Make sure audio tracks are encoded
in the mp3 or Windows Media
formats at supported bitrates.
Bitrates supported by the player:
mp3 – 32 to 320 kbps
wma – 48 to 192 kbps
• WMA or audiobooks files may be DRM
protected and you don’t have the
proper rights (license) to play the files.
• DRM protected songs cannot be
played if stored on a memory card or
thumb drive. Please put them on the
internal memory of the player.
• Check the website and/or application
help system of the music download
service provider from where the
content was purchased for
license acquisition details. For more
information on how license
acquisition works, go to
www
.microsoft.com/windows/window
smedia/forpros/drm/default.mspx..
• Play the original or downloaded song
on your computer to ensure that
there was nothing wrong with the
encoding of the mp3 or WMA.
The player does not work after
reformat.
•In case you need to reformat the
player, it must be in FAT or FAT32
format. The player does not work in
NTFS format.
19
Page 25

EN
20
More Information
My computer does not boot-up if
the player is connected prior to
turning on the PC.
• In order to improve the performance
of your player and allow a faster
download experience, the storage in
your device has been formatted using
a larger sector size. The BIOS in some
older computers does not support this
larger sector size, which causes it not
to recognize the device when the PC is
booting-up. To correct this, simply
disable the "boot from USB" option in
your computer BIOS or wait until your
computer has completed its boot-up
sequence before connecting your
player.
Check for Updates
Visit http://www.thomson-lyra.com for the
latest news and firmware upgrades for
our Multimedia Sound Station. You must
update your system after new
downloads have been made in order for
the new applications to be executed.
Specifications
Weight: 0.82kg
Dimensions: 106mm (Height) x 292mm
(Width) x 175mm (Depth).
Note:
For better result, we
recommend a constant
encoded bit rate from 32 to 320kbps
for mp3 and 48kbps to 192kbps for
Windows Media Audio.
Nevertheless, your unit can play
tracks encoded in variable bit rate
(VBR).
Note:
This unit may temporarily
cease to function if subjected
to electrostatic disturbance. To
resume to normal operation, it may be
necessary to switch the power off and
on again or to remove or reinstall the
battery.
Page 26

THOMSON
46, quai Alphonse Le Gallo
92648 Boulogne
Cedex FRANCE
www.thomson.net
TOCOM (v2.0)
Page 27

Quick Start Guide
English
1. PLAY/PAUSE , POWER - starts and pauses
music playback; changes between radio
manual and preset mode; press and hold to
turn on/off the player.
2. SOURCE - selects audio source.
3. MENU - accesses player’s menu.
4. REC - starts and stops recording; press and
hold during music playback to select file as
MySelections.
5. REWIND - Skips and searches backward a
file; goes back a menu level in menu
navigation; scans radio frequency downward
and selects preset stations.
6. VOLUME - Increases or decreases
volume; moves upward or downward in
menu navigation.
7. F. FWD - skips and searches forward a file;
goes into a menu level in menu navigation;
scans radio frequency upward and selects preset
stations..
8. Connector cover. Lift up to open.
9. - USB connector (for connection with
external thumb drive).
10. - SD/MMC card slot
11. - Headphone jack.
12. - USB connector for computer connection.
13. LINE IN - Line-in jack and connection for
FM antenna.
14. DC 5V - Power adapter jack
 Loading...