

Page 1

FR GUIDE D'UTILISATION
EN USER GUIDE
DE BETRIEBSANLEITUNG
Four
Oven
Backofen
99644901_A_FR.qxp 20/12/2007 12:22 Page 1
Page 2

2
Chère Cliente, Cher Client,
Vous venez d'acquérir un four THOMSON et nous vous en remercions.
Nous avons mis dans cet appareil toute notre passion, notre savoir-faire pour qu'il
réponde au mieux à vos besoins. Innovant, performant, nous l'avons conçu pour qu'il
soit aussi toujours facile à utiliser.
Vous trouverez également dans la gamme des produits THOMSON, un vaste choix
de fours à micro-ondes, de tables de cuisson, de hottes aspirantes, de lavevaisselle, de lave-linge, de sèche-linge, de réfrigérateurs et congélateurs que vous
pourrez coordonner à votre four THOMSON.
Bien entendu, dans un souci permanent de satisfaire le mieux possible vos
exigences vis à vis de nos produits, notre service consommateurs est à votre
disposition et à votre écoute pour répondre à toutes vos questions ou suggestions
(coordonnées à la fin de ce livret).
THOMSON
Dans le souci d'une amélioration constante de nos produits, nous nous réservons le droit
d'apporter à leurs caractéristiques techniques, fonctionnelles ou esthétiques toutes
modifications liées à leur évolution.
Important :
Avant de mettre votre appareil en marche, veuillez lire attentivement ce guide
d'installation et d'utilisation afin de vous familiariser plus rapidement avec son
fonctionnement.
99644901_A_FR.qxp 20/12/2007 12:22 Page 2
Page 3

3
FR
SOMMAIRE
1 / DESCRIPTION DE VOTRE APPAREIL
••
Présentation de votre four
___________________________________ 4
••
Accessoires
_______________________________________________ 5
••
Présentation du programmateur ______________________________ 6
••
Présentation des touches de sélections________________________ 7
2 / UTILISATION DE VOTRE APPAREIL
••
Utilisation du programmateur
º
Comment régler l’heure _________________________________ 8
º
Cuisson immédiate _____________________________________ 9
••
Cuisson programmée
º
Départ immédiat _______________________________________ 10
º
Départ différé _________________________________________ 11
••
Utilisation de la fonction minuterie ____________________________ 12
••
Personnalisation de la température préconisée__________________ 13
••
Verrouillage des commandes ________________________________ 13
••
La fonction “Easy Cook.”
º
Départ immédiat _______________________________________ 14
º
Départ différé _________________________________________ 15
3 / GUIDE DES FONCTIONS EASY COOK. ___________________________ 16
4 / MODES DE CUISSON DU FOUR_________________________________ 18
5 / ENTRETIEN ET NETTOYAGE DE VOTRE FOUR ____________________ 20
6 / NOTES ______________________________________________________ 22
99644901_A_FR.qxp 20/12/2007 12:22 Page 3
Page 4

4
FR
1 / DESCRIPTION DE VOTRE APPAREIL
PRESENTATION DE VOTRE FOUR
••
A
B
Programmateur
Touches de commandes
Lampe
C
D
Gradins fil
D
C
B
A
99644901_A_FR.qxp 20/12/2007 12:22 Page 4
Page 5

5
FR
1 / DESCRIPTION DE VOTRE APPAREIL
•Accessoires
Votre appareil est équipé de deux grilles sécurité avec poignée, d’une grille avec poignées pour
plat 45 mm et d’une pour plat 20 mm.
99644901_A_FR.qxp 20/12/2007 12:22 Page 5
Page 6
6
FR
1 / DESCRIPTION DE VOTRE APPAREIL
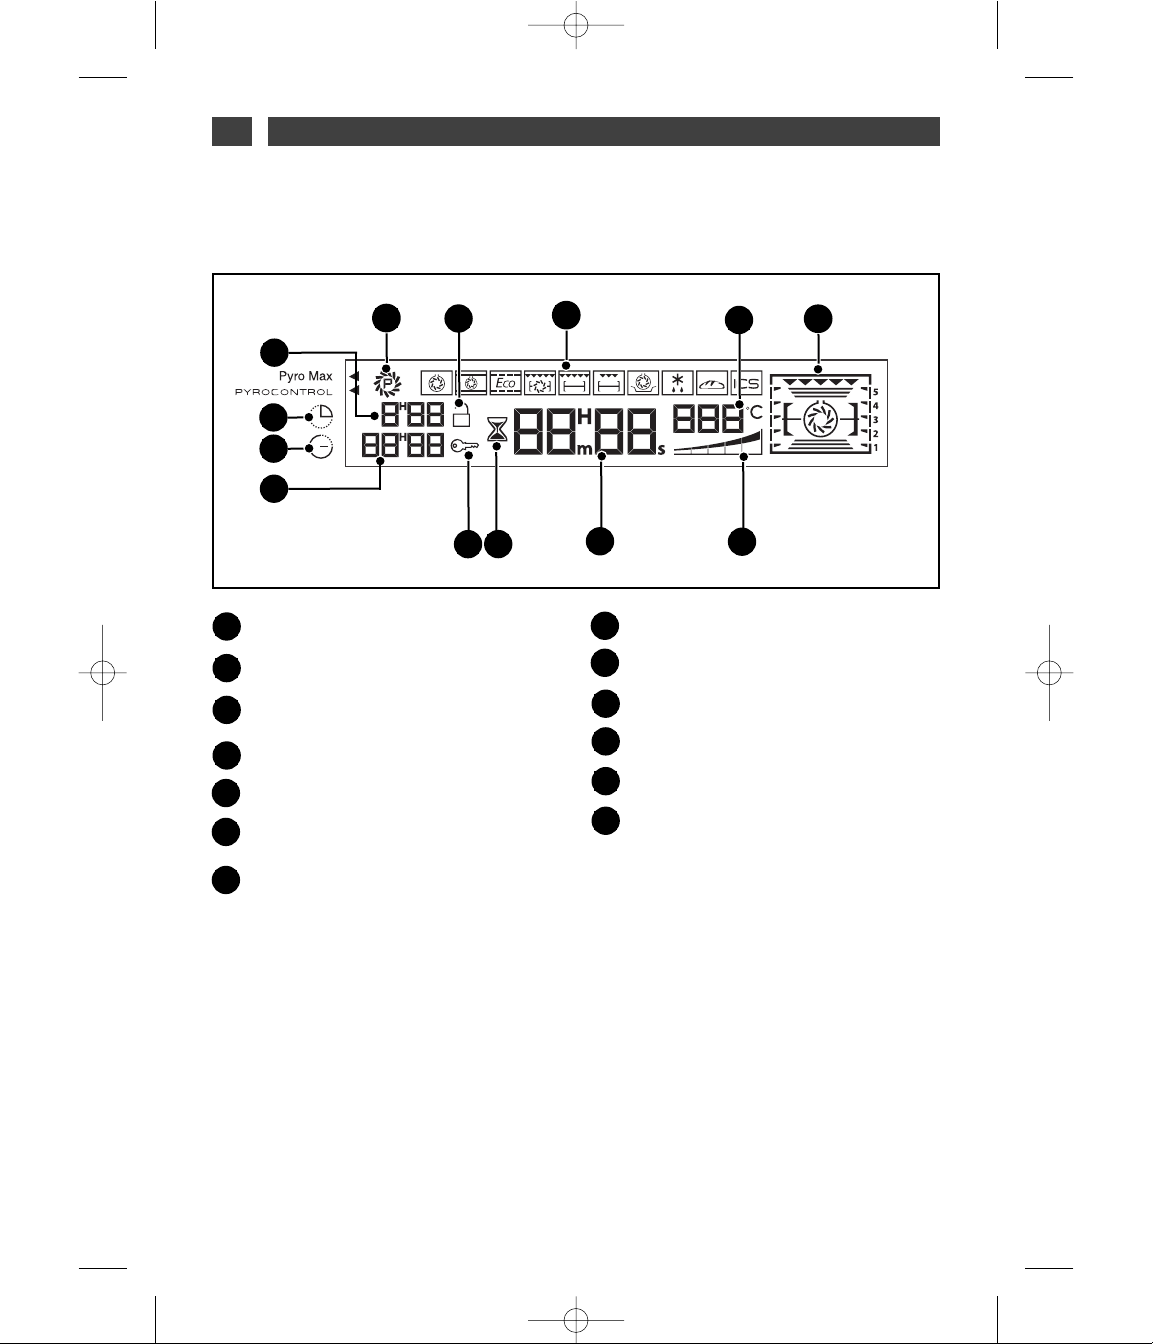
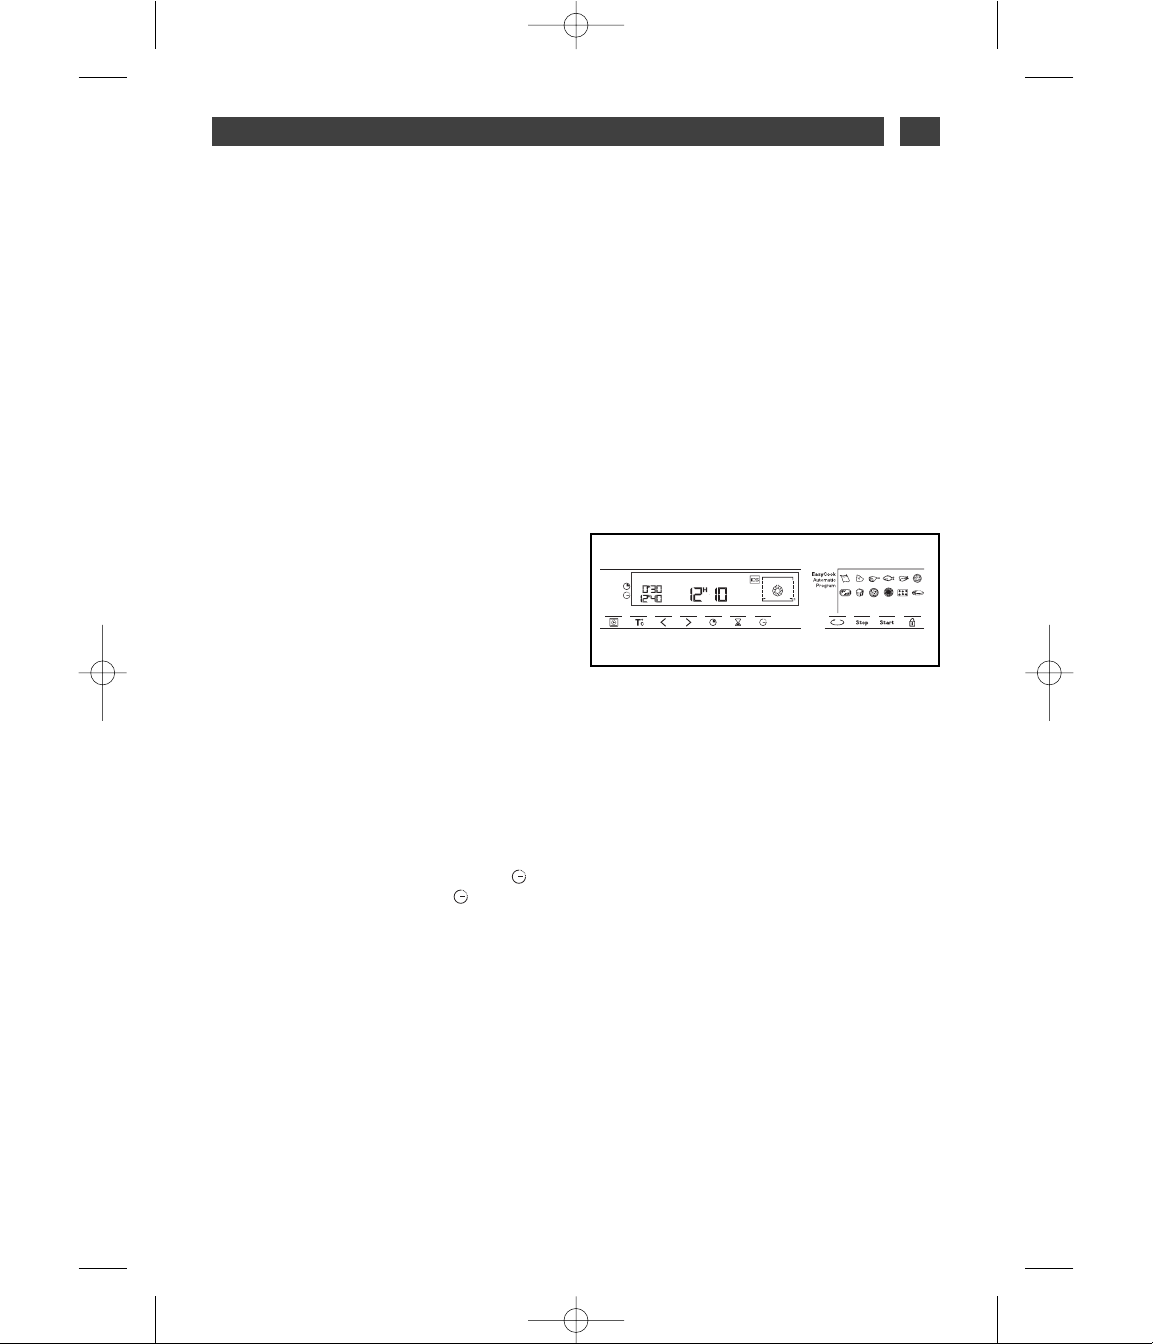
PRESENTATION DU PROGRAMMATEUR
••
A
K
A
B
Affichage des modes de cuisson
Affichage de la température du four
Indicateur de gradins et du mode de
cuisson choisis
Indicateur de montée en température
Affichage de l’horloge ou de la minuterie
Indicateur de minuterie
Indicateur de verrouillage clavier
(sécurité enfant)
C
D
E
Affichage fin de cuisson
Indicateur fin de cuisson
Indicateur durée de cuisson
Affichage durée de cuisson
Indicateur de nettoyage
Verrouillage pyrolyse
F
G
H
I
C
J
I
L
G
F
E
B
H
J
K
L
M
M
D
99644901_A_FR.qxp 20/12/2007 12:22 Page 6
Page 7
7
FR
1 / DESCRIPTION DE VOTRE APPAREIL
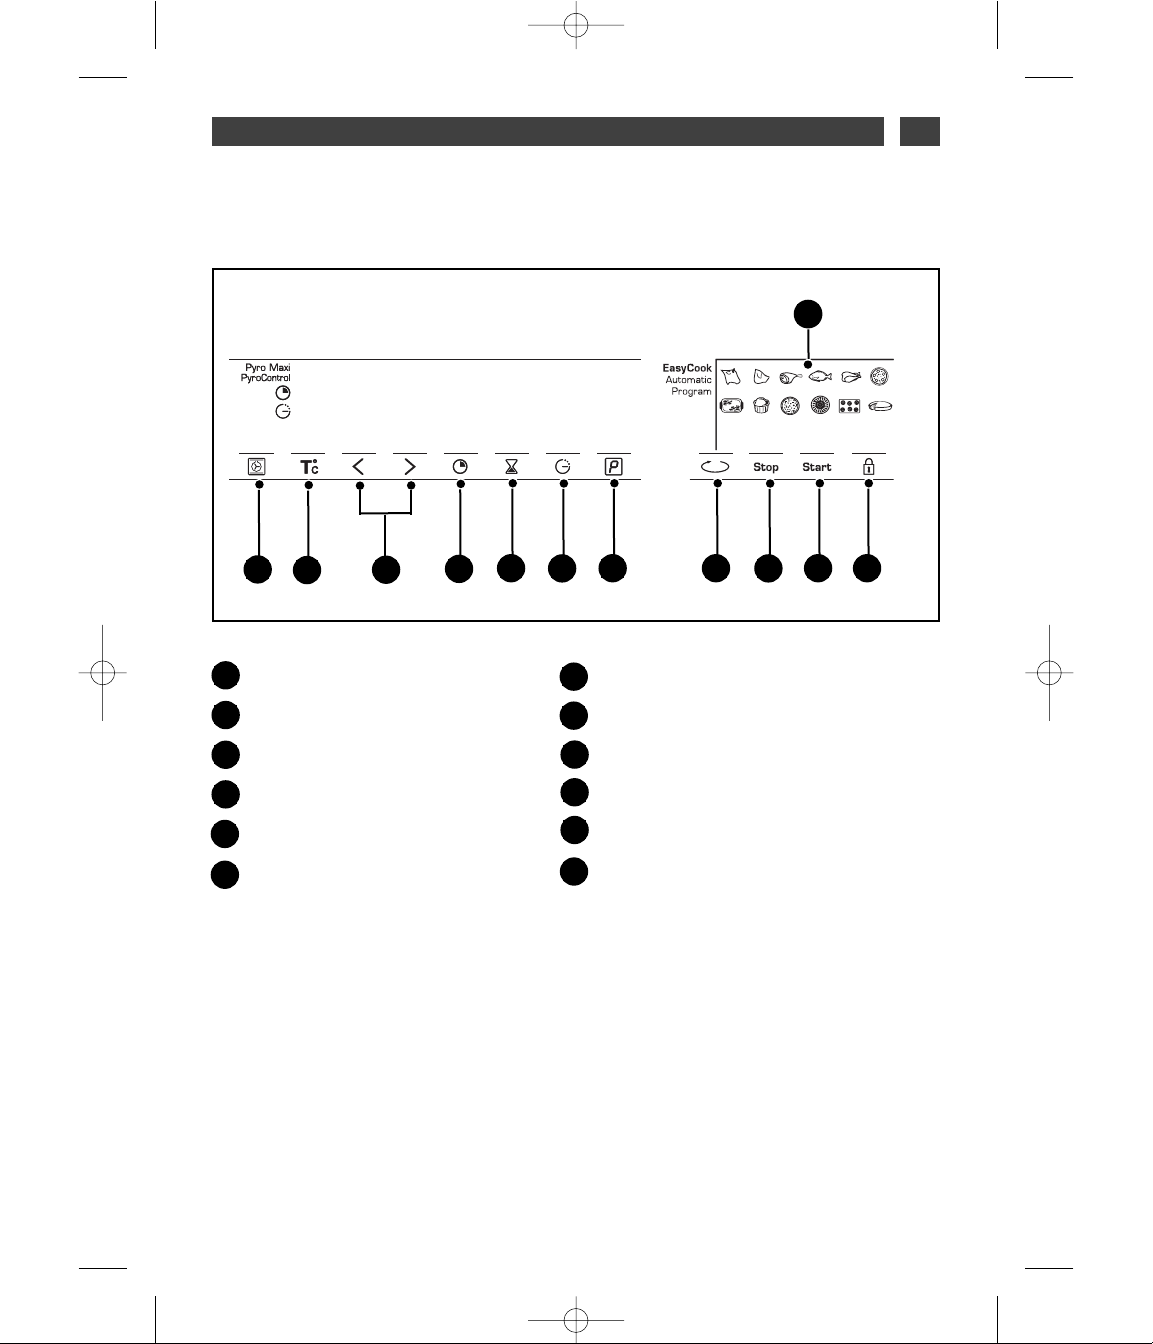
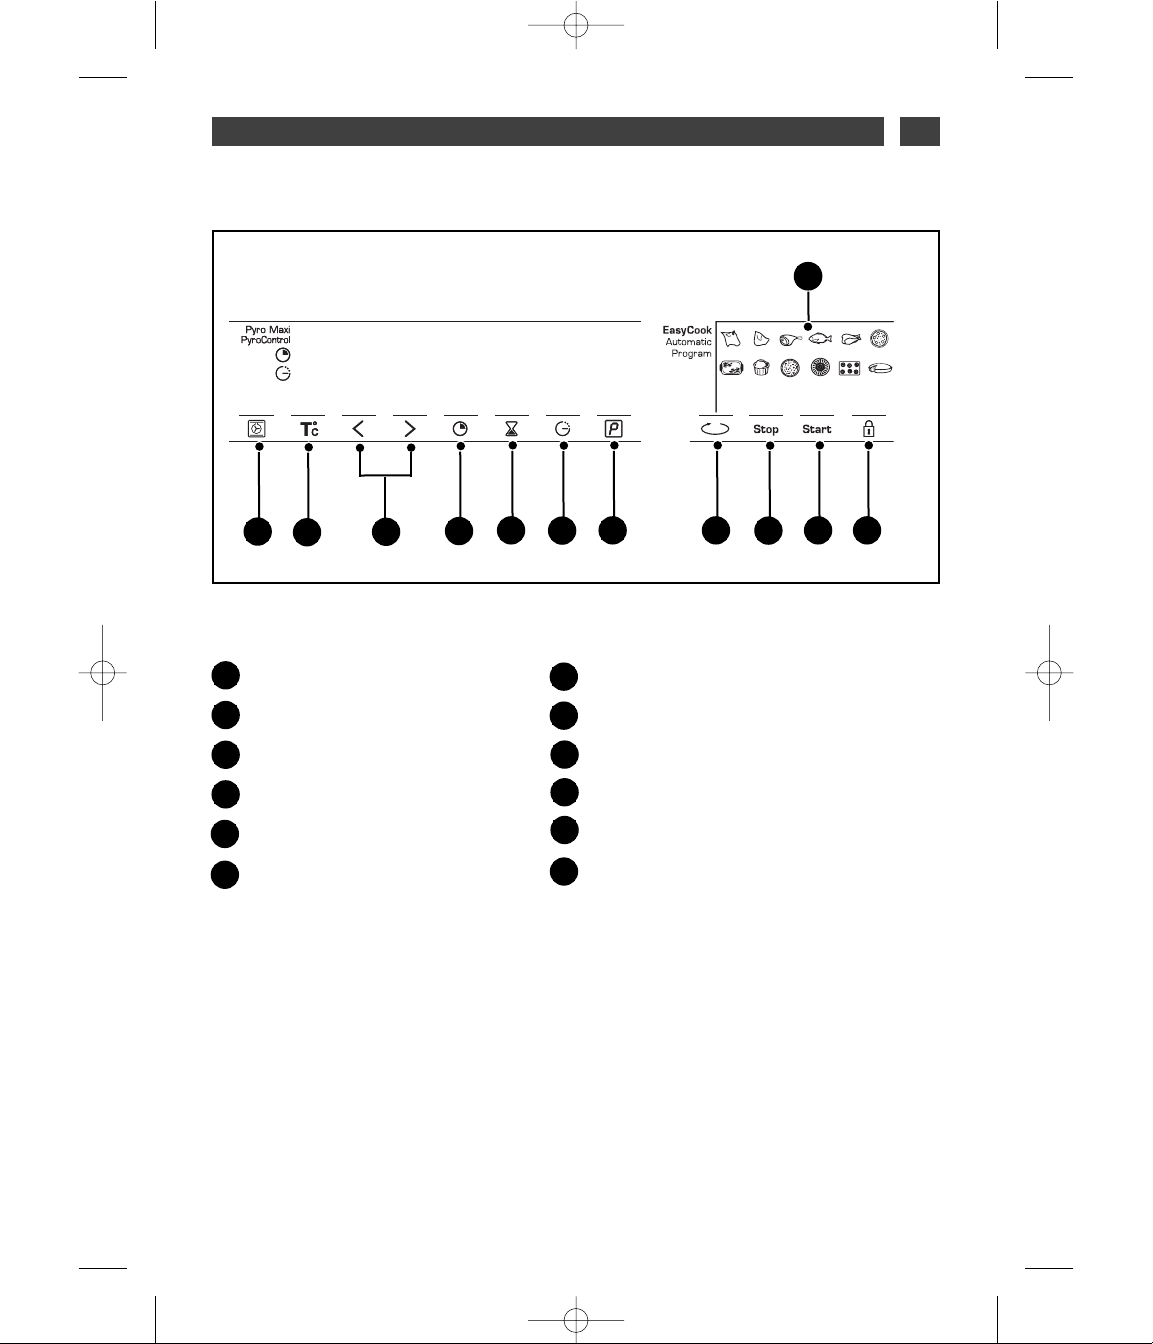
PRESENTATION DES TOUCHES DE SELECTIONS
••
A
B
C
D
E
F
G
H
I
J
K
A
B
D
E
F
G
C
H
I
J K
L
Sélection des modes de cuisson
Température de cuisson
Touches de réglages
Durée de cuisson
Minuterie
Fin de cuisson
Pyrolyse
Touche EASY COOK
Stop
Start
Verrouillage du clavier (sécurité enfants)
Indicateur de plats choisis avec EASY COOK
L
99644901_A_FR.qxp 20/12/2007 12:22 Page 7
Page 8
8
FR
2 / UTILISATION DE VOTRE APPAREIL
•
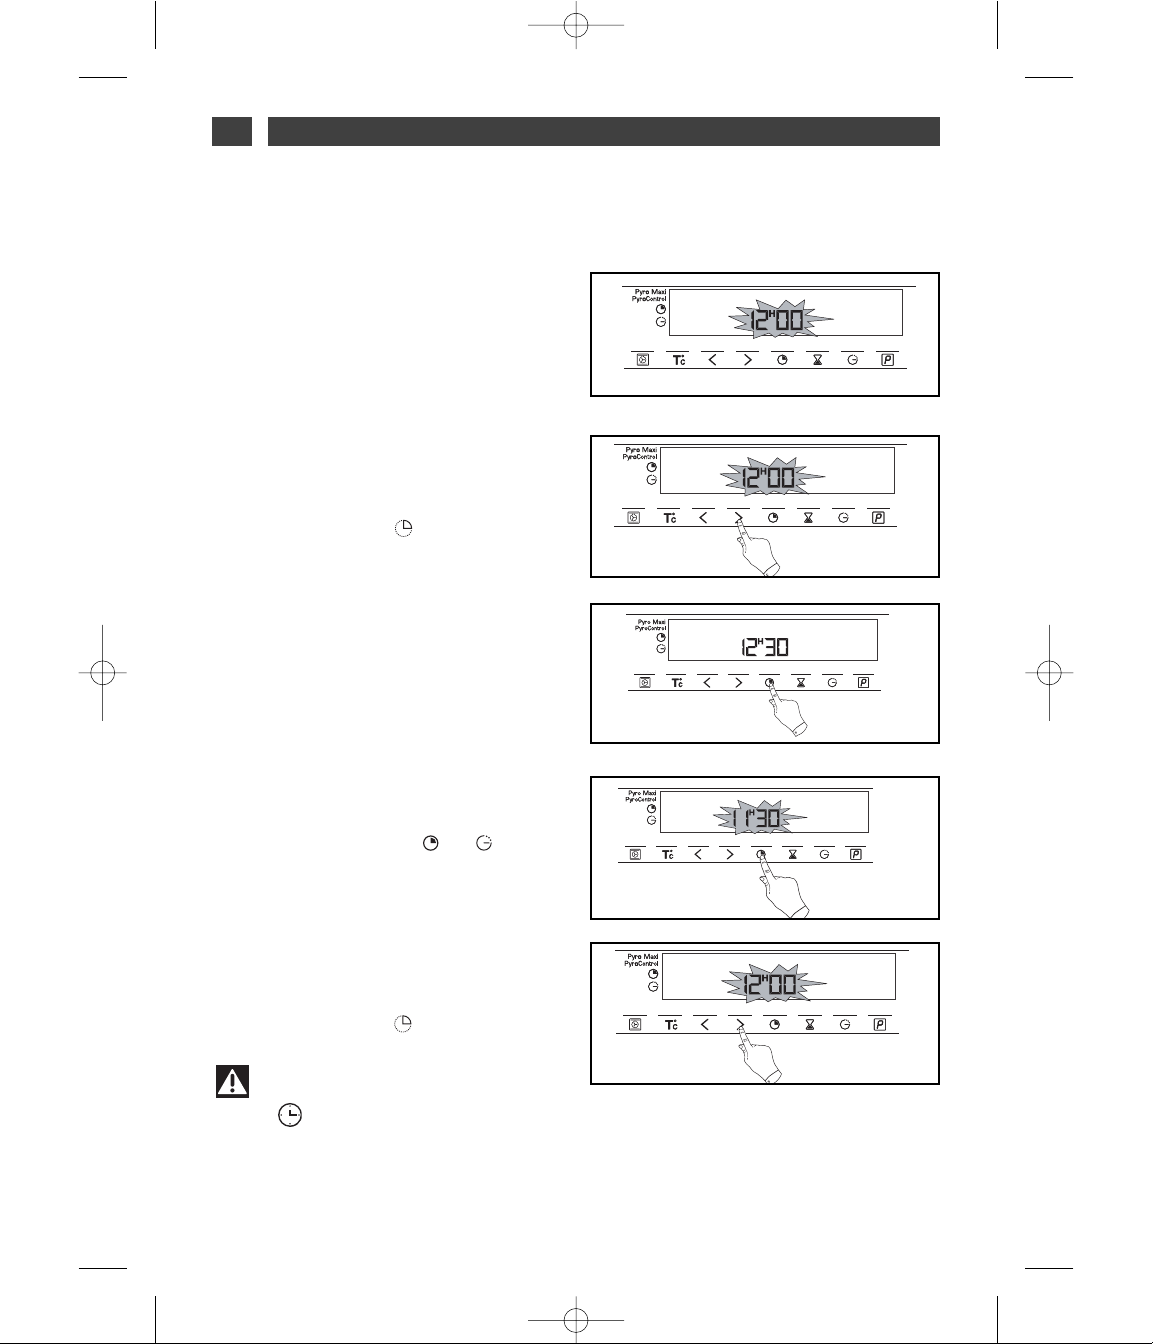
Comment régler l’heure
--
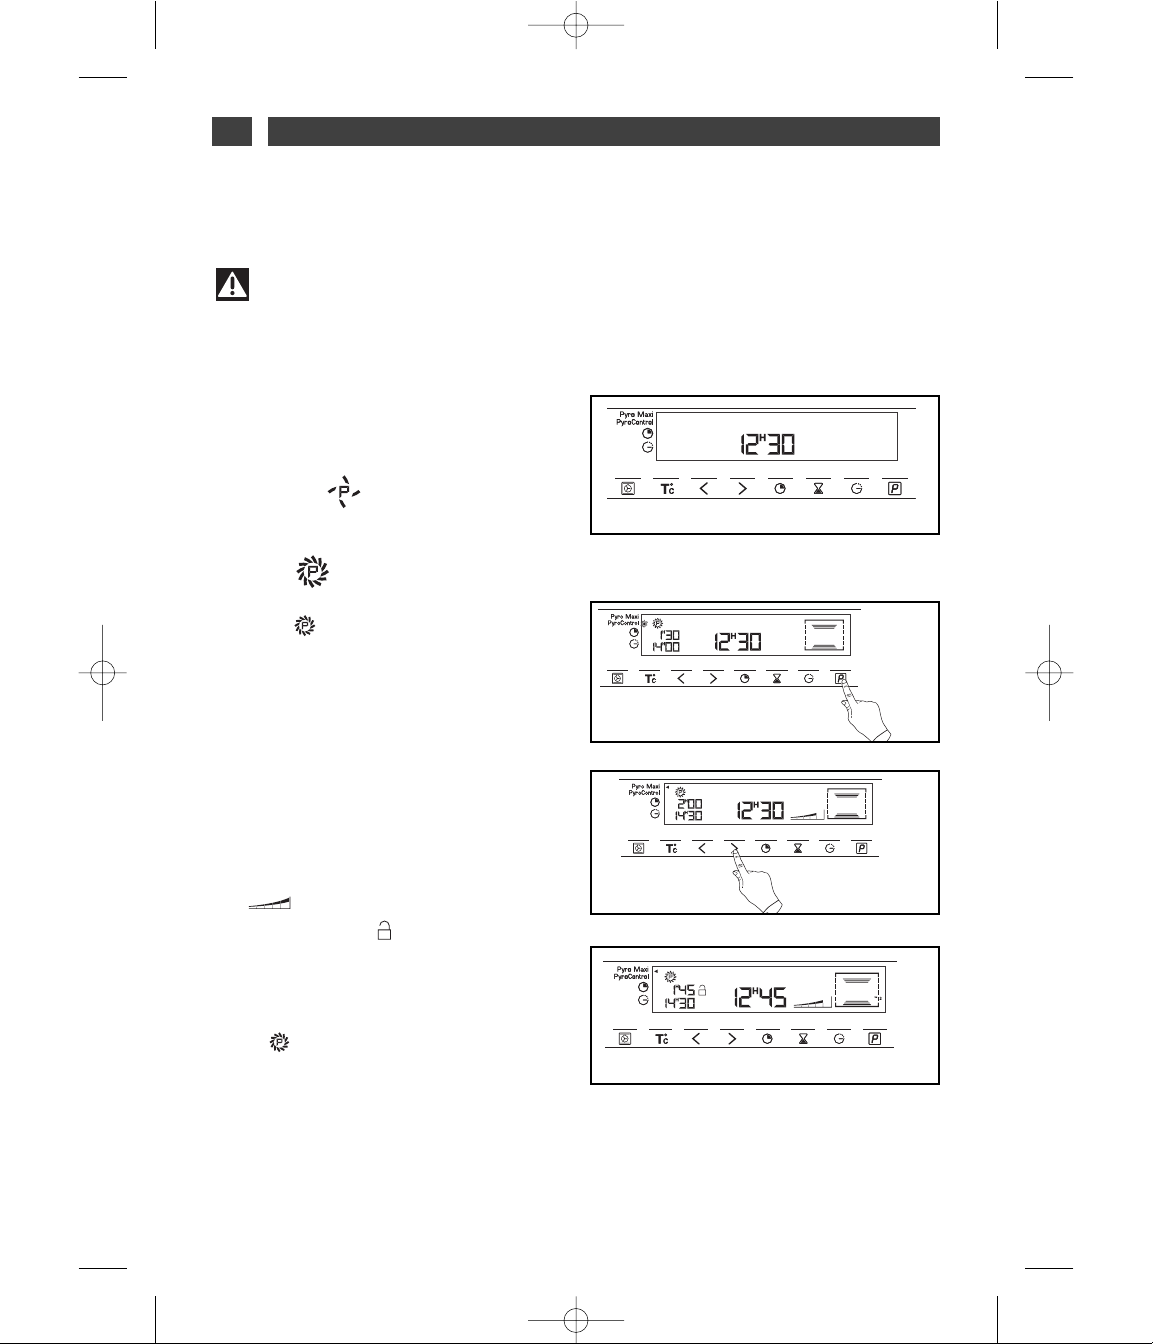
A la mise sous tension
L’afficheur clignote à 12H00 (fig.1).
Réglez l’heure en appuyant sur les touches
< et > (le maintien de la touche permet
d’obtenir un défilement rapide) (fig.2).
Exemple : 12H30
Appuyez sur la touche pour valider.
L’affichage ne clignote plus (fig.3).
fig.1
fig.2
fig.2
fig.3
fig.1
- Pour remettre à l’heure l’horloge
Appuyez sur les touches et pendant
quelques secondes jusqu’à faire clignoter
l’afficheur (fig.1), puis relâchez.
Des bips sonores indiquent que le réglage
est alors possible.
Ajustez le réglage de l’heure avec les
touches < et > (fig.2).
Appuyez sur la touche pour valider.
Attention
S’il n’y a pas de validation par la
touche“ ”, l’enregistrement est automatique au bout de quelques secondes.
99644901_A_FR.qxp 20/12/2007 12:22 Page 8
Page 9
9
FR
2 / UTILISATION DE VOTRE APPAREIL
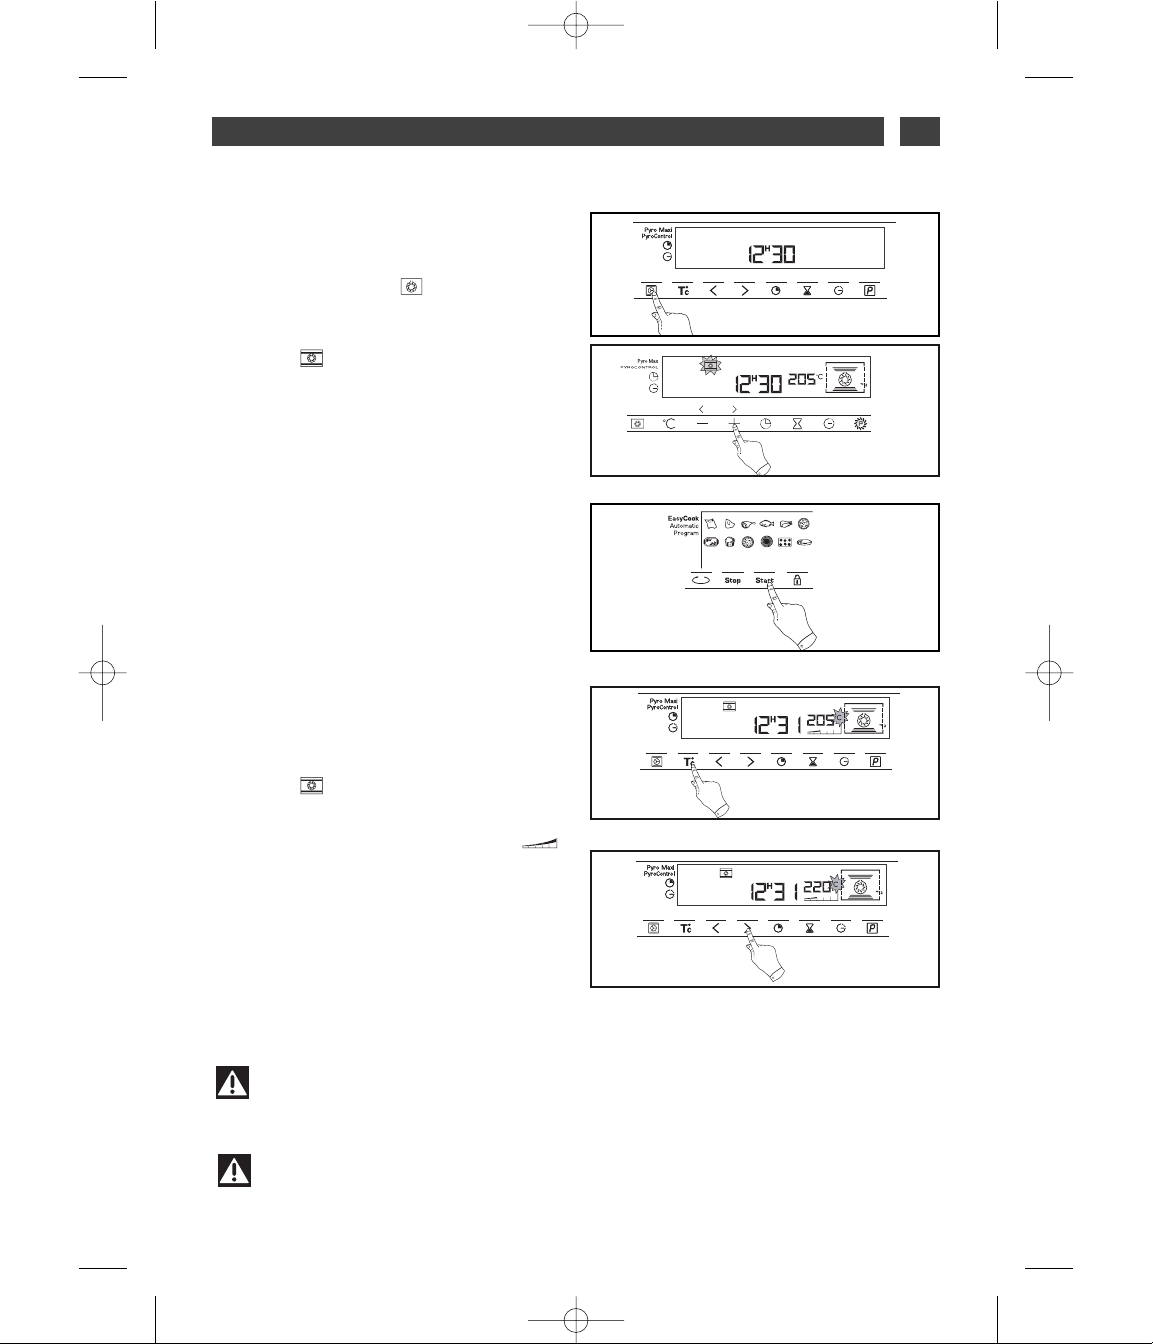
•Cuisson immédiate
— Le programmateur ne doit afficher que
l’heure. Celle-ci ne doit pas clignoter.
Appuyez sur la touche (fig.1) puis sélectionnez avec les touches < ou > la cuisson
choisie (fig.2).
Exemple : --> gradin 2 conseillé.
— Validez avec la touche
““
SSttaarrtt””
(fig.3).
L’indicateur de cuisson et la température préconisée se figent. L’indicateur de gradins et
les éléments en fonctionnement apparaissent.
Le four se met en marche.
Placez votre plat dans le four selon la préconnisation indiquée dans l’afficheur.
Votre four vous propose la température optimale pour ce type de cuisson.
Il vous est cependant possible d’ajuster la
température en appuyant sur la touche
““°°CC””
située sous l’afficheur (fig.4).
Le “°C” clignote dans l’afficheur et indique
que vous pouvez ajuster la température en
appuyant sur les touches < ou > (fig.5).
Exemple : --> ajustée à 220°C.
— Validez avec la touche
““
SSttaarrtt””
.
L’indicateur de montée en température
signale la progression de la température à
l’intérieur du four.
Une série de bips sonores retentit lorsque le
four atteint la température choisie.
Pour arrêter la cuisson, appuyez quelques secondes sur la touche
““
SSttoopp””
.
fig.2
Attention
Toutes les cuissons se font porte fermée.
Attention
Après un cycle de cuisson, la turbine de refroidissement continue de fonctionner
pendant un certain temps, afin de garantir une bonne fiabilité du four.
fig.1
fig.4
fig.5
fig.3
99644901_A_FR.qxp 20/12/2007 12:22 Page 9
Page 10
10
FR
2 / UTILISATION DE VOTRE APPAREIL
--
Cuisson avec départ immédiat et durée
programmée
- Choisissez le mode de cuisson souhaité et
ajustez la température (voir paragraphe : cuisson immédiate).
- Appuyez sur la touche jusqu’à faire clignoter l’indicateur de durée de cuisson .
L’affichage clignote à 0h00 pour indiquer que
le réglage est alors possible (fig.
1).
- Appuyez sur la touche <<ou >>pour régler le
temps souhaité.
Exemple : 30 min de cuisson (fig.
2).
L’enregistrement du temps de cuisson est automatique au bout de quelques secondes ou
validez avec la touche
““
SSttaarrtt””..
L’affichage de la durée ne clignote plus.
Le décompte de la durée se fait immédiatement après le réglage.
AApprrèèss cceess 33 aaccttiioonnss,, llee ffoouurr cchhaauuffffee ::
Une série de bips sonores retentit lorsque le
four atteint la température choisie.
En fin de cuisson (fin du temps programmé),
- le four s’arrête,
- l’indicateur de durée de cuisson et 0:00 clignotent (fig.
3),
- une série de bips sonores est émise durant
quelques minutes. L’arrêt définitif de ces bips
se fait en appuyant sur
““SSttoopp””
.
fig.2
CUISSON PROGRAMMEE
••
fig.1
fig.3
99644901_A_FR.qxp 20/12/2007 12:22 Page 10
Page 11
11
FR
2 / UTILISATION DE VOTRE APPAREIL
--
Cuisson avec départ différé et heure de
fin choisie
PPrrooccééddeezz ccoommmmee uunnee ccuuiissssoonn pprrooggrraammmmééee..
- Appuyez sur la touche jusqu’à faire clignoter l’indicateur de fin de cuisson .
L’affichage clignote pour indiquer que le réglage est alors possible (fig.
1).
- Appuyez sur la touche <<ou >>pour régler
l’heure de fin de cuisson souhaitée.
Exemple : fin de cuisson à 16h (fig.
2).
Validez avec la touche
““
SSttaarrtt””..
L’affichage de la fin de cuisson ne clignote
plus.
AApprrèèss cceess 33 aaccttiioonnss,, llee ddééppaarrtt ddee llaa cchhaauuffffee eesstt
ddiifffféérréé ppoouurr qquuee llaa ccuuiissssoonn ssooiitt ffiinniiee àà 1166hh..
En fin de cuisson (fin du temps programmé),
- le four s’arrête,
- l’indicateur de durée de cuisson et 0:00 clignotent (fig.
3),
- une série de bips sonores est émise durant
quelques minutes. L’arrêt définitif de ces bips
se fait en appuyant sur
““SSttoopp””
.
L’affichage repasse à l’heure du jour.
Dans le cas de cuissons programmées, la cavité est éclairée à partir du démarrage de la
cuisson et s’éteint en fin de cuisson.
fig.1
fig.2
fig.3
CUISSON PROGRAMMEE
••
99644901_A_FR.qxp 20/12/2007 12:22 Page 11
Page 12
12
FR
2 / UTILISATION DE VOTRE APPAREIL
-- LLee pprrooggrraammmmaatteeuurr ddee vvoottrree ffoouurr ppeeuutt êêttrree uuttii--
lliisséé ccoommmmee mmiinnuutteerriiee iinnddééppeennddaannttee ppeerrmmeett--
ttaanntt ddee ddééc
coommpptteerr uunn tteemmppss ssaannss ffoonnccttiioonnnnee--
mmeenntt dduu ffoouurr..
Dans ce cas, l’affichage de la minuterie est
prioritaire sur l’afficheur de l’heure du jour.
- Appuyez sur la touche (fig.1).
Le symbole minuterie et 0m00s clignotent
dans l’afficheur.
- Ajustez le temps choisi en appuyant sur les
touches <<ou
>>
(fig.2).
- Appuyez sur la touche pour valider ou attendre quelques secondes.
Attention
Il est possible de modifier ou d’annuler à n’importe quel moment la programmation de
la minuterie.
fig.1
fig.2
UTILISATION DE LA FONCTION MINUTERIE
••
L’afficheur s’arrête de clignoter au bout de quelques secondes et la minuterie se met en marche
et décompte le temps de secondes en secondes.
Une fois la durée écoulée, la minuterie émet une série de bips sonores pour vous avertir.
L’arrêt de ces bips se fait en appuyant sur
““SSttoopp””
.
L’affichage repasse à l’heure du jour.
99644901_A_FR.qxp 20/12/2007 12:22 Page 12
Page 13

13
FR
2 / UTILISATION DE VOTRE APPAREIL
PERSONNALISATION DE LA TEMPERATURE PRECONISEE
Sélectionnez la fonction de cuisson.
- Appuyez sur
SSttaarrtt
..
Si vous souhaitez personnaliser la température préconisée :
- Appuyez sur la touche
°°CC
jusqu’à faire clignoter la température.
- Appuyez sur la touche < ou > jusqu’à la température désirée.
- Appuyez sur
SSttaarrtt
pour valider.
••
VERROUILLAGE DES COMMANDES (SÉCURITE ENFANTS)
FOUR
A L’ARRET
Vous avez la possibilité d’interdire l’accès aux
commandes du four en procédant de la façon
suivante :
le four étant
àà ll’’aarrrrêêtt,,
appuyez sur la touche
pendant quelques secondes (fig.1),
une “clé” vient alors s’afficher dans l’écran
-> l’accès aux commandes de votre four est
bloqué (fig.2).
Pour le débloquer, appuyez pendant quelques
secondes sur la touche .
Les commandes de votre four sont à nouveau
accessibles.
••
Attention
Vous ne pouvez pas verrouiller le four si vous avez programmé une cuisson.
fig.1
fig.2
99644901_A_FR.qxp 20/12/2007 12:22 Page 13
Page 14
14
FR
2 / UTILISATION DE VOTRE APPAREIL
LA FONCTION “EASY COOK”
La fonction EASY COOK saura vous faciliter
entièrement la tâche puisque le four calculera
automatiquement tous les paramètres de cuisson en fonction du plat sélectionné (température, durée de cuisson, type de cuisson), grâce
à des capteurs électroniques placés dans le
four qui mesurent en permanence le degré
d’humidité et la variation de température.
FONCTIONNEMENT DE LA FONCTION EASY
COOK :
Ce mode de cuisson s'effectue en 2 phases :
1) une phase de recherche durant laquelle le
four commence à chauffer et va déterminer le
temps de cuisson idéal. Cette phase dure entre
5 et 40 minutes selon le plat.
- Appuyez sur la touche "EASY COOKS” (fig.1).
Le four propose un choix de 12 plats :
- Appuyez sur la touche < ou > pour sélectionner votre plat (fig.2).
Exemple : Soufflés
·· RRôôttii ddee bbœœuuff
·· RRôôttii ddee ppoorrcc
·· AAggnneeaauu
·· PPooiissssoonnss
·· PPoouulleett
·
PPiizzzzaa
·· LLéégguummeess ffaarrcciiss
·· SSoou
uffffllééss
·· TTaarrtteess ssaallééeess
·· TTaarrtteess ssuuccrrééeess
·· PPeettiittss bbiissccuuiittss
·· GGââtteeaauuxx
Une fois le plat sélectionné, enfournez votre
plat au niveau de gradin demandé.
- Validez en appuyant sur le bouton
SSttaarrtt
pour
démarrer la cuisson (fig.3).
••
fig.1
fig.2
fig.3
99644901_A_FR.qxp 20/12/2007 12:22 Page 14
Page 15
15
FR
2 / UTILISATION DE VOTRE APPAREIL
NN..BB..:: aauuccuunn pprréécchhaauuffffaaggee nn''eesstt nnéécceessssaaiirree
ppoouurr uuttiilliisseerr llaa ffoonnccttiioonn EEAASSYY CCOOOOKK.. LLaa ccuuiiss--
ssoonn ddooiitt IIMMPPE
ERRAATTIIVVEEMMEENNTT ddéébbuutteerr ffoouurr
ffrrooiidd.. IIll ccoonnvviieenntt dd’’aatttteennddrree llee rreeffrrooiiddiisssseemmeenntt
ccoommpplleett aavvaanntt dd’’eeffffeeccttuueerr u
unnee ddeeuuxxiièèmmee ccuuiiss--
ssoonn,, ssiinnoonn ddeess bbiippss ssoonnoorreess ssiiggnnaalleenntt qquuee llee
ffoouurr eesstt cchhaauudd..
IIMMPPOORRTTAANNTT :: nnee ppaass oouuv
vrriirr llaa ppoorrttee ppeennddaanntt
cceettttee pphhaassee aaffiinn ddee nnee ppaass ppeerrttuurrbbeerr llee ccaallccuull
eett ll''eennrreeggiissttrreemmeenntt ddeess ddoonnnnééeess.
.
CCeettttee pphhaassee ddee rreecchheerrcchhee eesstt ssyymmbboolliissééee ppaarr
lleess ffllèècchheess ttoouurrnnaanntteess..
2) une deuxième phase de cuisson : le four a
déterminé le temps nécessaire, l'affiche ainsi
que l'heure de fin de cuisson. La durée indiquée restante prend en compte la durée de
cuisson de la première phase. Il vous est possible dorénavant d'ouvrir la porte, par exemple
pour arroser le rôti.
- Le four s'éteint lorsque la durée de cuisson
est terminée.
FFOONNCCTTIIOONN DDEEPPAARRTT DDIIFFFFEERREE ::
Pour procéder à un départ différé,
- Appuyez sur la touche fin de cuisson jusqu’à faire clignoter l’indicateur et changez
l'heure de fin de cuisson.
REMARQUE : Si vous souhaitez enchaîner
une deuxième cuisson avec EASY COOK, attendre le refroidissement total du four. Cependant, une utilisation de la fonction “Manuelle”
est possible même à four chaud.
LA FONCTION “EASY COOK”
••
99644901_A_FR.qxp 20/12/2007 12:22 Page 15
Page 16
16
FR
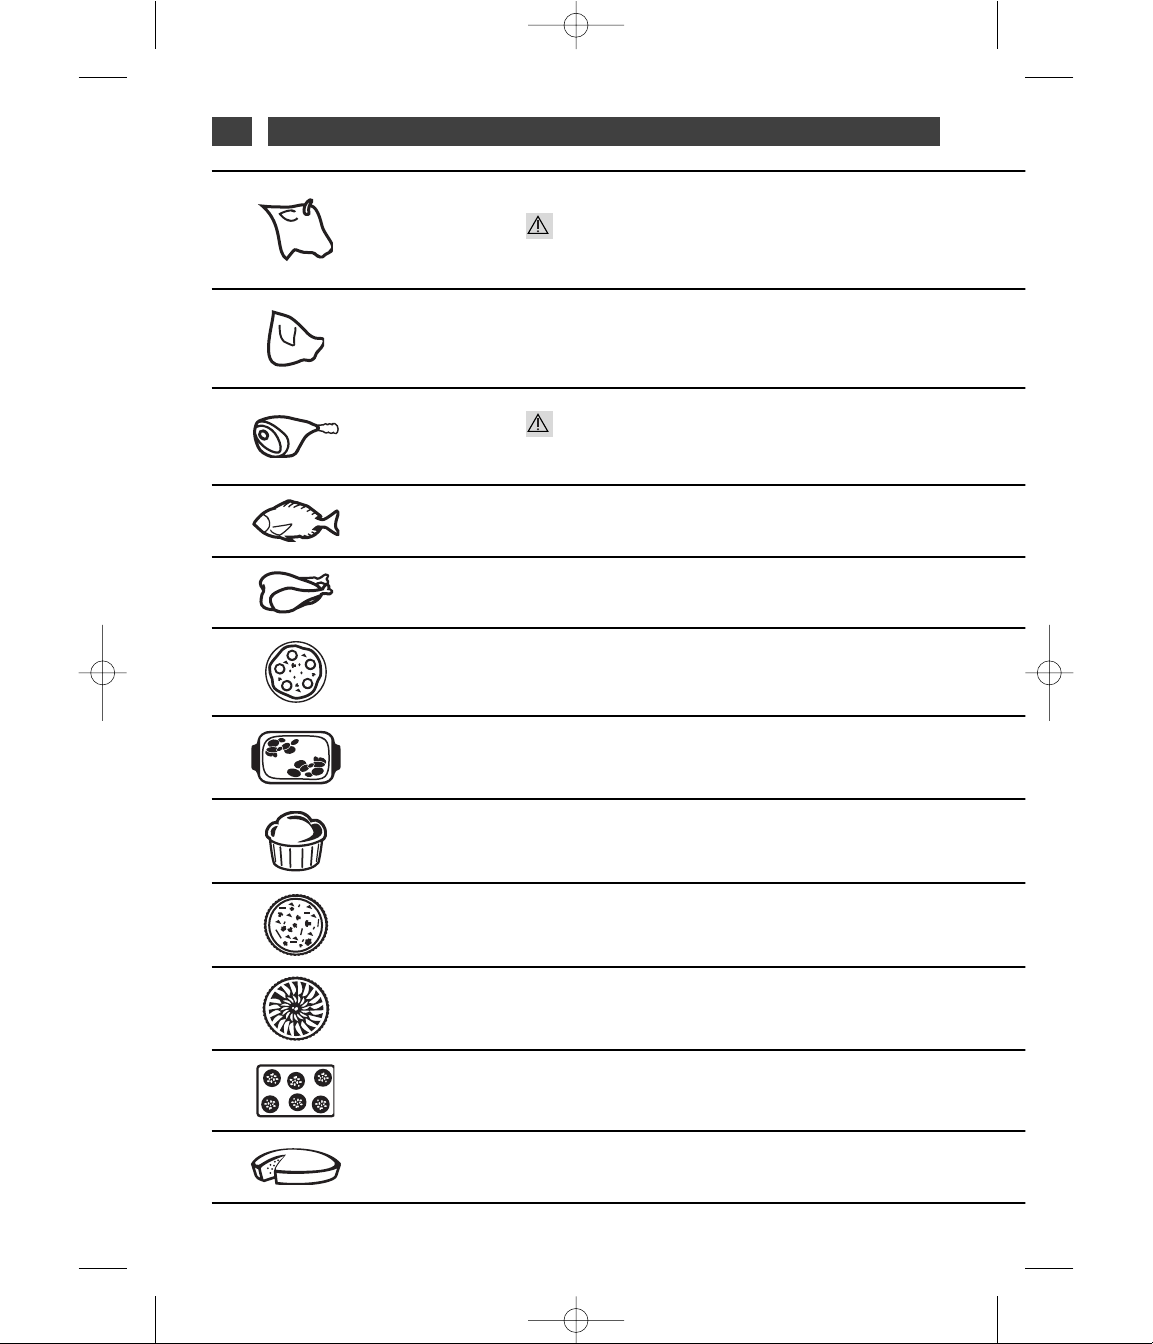
3 / GUIDE DES FONCTIONS EASY COOK
RR
ôôttii ddee
BB
œœuuff
• Rôtis de bœuf
(cuisson saignante)
• Posez le rôti sur la grille de l’ensemble grille +
lèchefrite.
VVoouuss ppoouuvveezz llee rreettoouurrnneerr lloorrssqquuee llee tteemmppss ddee ccuuiissssoonn
ddeevviieenntt ffiixxee..
RR
ôôttii ddee
PP
oorrcc
• Rôtis de porc
- échine
- filet
AA
ggnneeaauu
• Gigot de 1kg à 2,5kg
• Posez le gigot sur la grille de l’ensemble grille +
lèchefrite.
VVoouuss ppoouuvveezz llee rreettoouurrnneerr lloorrssqquuee llee tteemmppss ddee ccuuiissssoonn
ddeevviieenntt ffiixxee..
PP
ooiissssoonnss
• Poissons entiers
(dorade, colinot,truites, maquereaux...)
• Rôti de poisson
PP
oouulleett
• Poulets de 1 kg à 1,700 kg
• Canette, pintade...
PP
iizzzzaa
• Pizza traiteur fraîches
• Pizza pâtes prêtes à l’emploi
• Pizza pâtes “maison”
• Pizza surgelées
LL
éégguummeess
ffaarrcciiss
• Tomates, poivrons... farcis
• Lasagnes (frais ou surgelés)
• Hachis parmentier, brandade...
SS
oouufffflléé
• Utilisez un moule haut à bords droits diamètre 21cm
TT
aarrtteess
ssaallééeess
• Quiches fraîches
• Quiches surgelées
• Paniers surgelés
TT
aarrtteess
ssuuccrrééeess
• Tartes fraîches
• Tartes surgelées
PP
eettiittss
BB
iissccuuiittss
• Petits gâteaux individuels : cookies, financiers,
croissants,petits pains, pains aux raisins en boîte,
croque-monsieur.
GG
ââtteeaauuxx
• Gâteaux familiaux : cake (salés, sucrés),
quatre quarts
• Préparations toutes prêtes proposées en sachets.
99644901_A_FR.qxp 20/12/2007 12:23 Page 16
Page 17

17
FR
3 / GUIDE DES FONCTIONS EASY COOK
• Sortez le rôti du réfrigérateur, 1 heure minimum avant de débuter la cuisson :
• Vous allez obtenir un rôti saignant; si vous préférez une viande bien cuite, optez pour une fonction de cuisson
traditionnelle.
• Otez le maximum de barde : elle provoque des fumées.
• En fin de cuisson, respectez un temps de repos de 7 à 10 min viande emballée dans une feuille d’aluminium
avant de trancher.
• Sortez le rôti du réfrigérateur, 1 heure minimum avant de débuter la cuisson : plus la viande est froide, plus
elle le sera en fin de cuisson.
• Utilisez un plat en terre. Ajoutez 1 à 2 cuillerées à soupe d’eau.
• En fin de cuisson, respectez un temps de repos de 7 à 10 min viande emballée dans une feuille d’aluminium
avant de trancher. Salez en fin de cuisson.
• Sortez la viande du réfrigérateur 1 heure minimum avant la cuisson :
• Choisissez le gigot rond et dodu plutôt que long et efflanqué.
• Laissez reposer après la cuisson le gigot emballé d’une feuille de papier aluminium.
• Réservez cette fonction pour les poissons entiers, cuisinés avec aromates et vin blanc (les poissons grillés
ou cuits en papilotte nécessitent un préchauffage du four).
• Cuisson au plat : préférez les plats en terre pour éviter les projections.
• Piquez la peau des volailles pour éviter les éclaboussures.
• Posez-la sur la grille pour obtenir une pâte croustillante.
(Vous pouvez intercaler une feuille de papier cuisson entre la grille et la pizza pour protéger le four des
débordements de fromage.)
• Posez sur la plaque à patisserie pour obtenir une pâte mœlleuse.
• Adaptez correctement les dimentions de votre plat à la quantité à la quantité à cuire pour éviter les
débordements de jus.
• Beurrez le moule et ne touchez pas l’intérieur avec les doigts, sinon le soufflé ne montera pas.
• Utilisez un moule en aluminium non adhésif : la pâte sera croustillante dessous.
• Retirez la barquette des quiches surgelées avant de les poser sur la grille.
• Utilisez un moule en aluminium non adhésif :
• La pâte sera plus croustillante dessous.
• Petits gâteaux individuels sur la plaque pâtisserie.posée sur la grille.
La pâte à choux doit être cuite sur “GATEAUX”pour obtenir de bons résultats.
• Gâteaux préparés dans un moule à cake, rond, carré... et toujours posés sur la grille.
Possibilités de cuire 2 cakes moules côte à côte.
99644901_A_FR.qxp 20/12/2007 12:23 Page 17
Page 18

18
FR
4 / LES MODES DE CUISSON DU FOUR
*
Séquences(s) utilisée(s) pour l’annonce écrite sur l’étiquette énergétique conformément à la norme
européenne EN 50304 et selon la directive Européenne 2002/40/CE.
CCHHAALLEEUURR TTOOUURRNNAANNTTEE
(température préconisée
118800°°CC
mini 35°C maxi 235°C)
•
La cuisson s’effectue par l’élément chauffant situé au fond du four et par l’hélice de
brassage d’air.
•
Montée rapide en température : Certains plats peuvent être enfournés four froid.
•
Recommandé pour garder le mœlleux des viandes blanches, poissons, légumes.
Pour les cuissons multiples jusqu’à 3 niveaux.
CCHHAALLEEUURR CCOOMMBBIINNEEEE
(température préconisée
220055°°CC
mini 35°C maxi 275°C)
•
La cuisson s’effectue par les éléments inférieur et supérieur et par l’hélice de brassage
d’air.
•
Trois sources de chaleur associées : beaucoup de chaleur en bas, un peu de chaleur
tournante et un soupcon de gril pour dorer.
•
Recommandé pour les quiches, tourtes, tarte aux fruits juteux, posés dans un plat en
terre de préference.
EECCOO
(température préconisée
220000°°CC
mini 35°C maxi 275°C)
•
La cuisson s'effectue par les éléments inférieur et supérieur.
•
Cette position permet de faire un gain d’énergie tout en conservant les qualités de cuis-
son.
•
La position ECO est utilisée pour l’étiquetage énergétique.
•
Toutes les cuissons se font
ssaannss pprréécchhaauuffffaaggee..
GGRRIILL PPUULLSSEE
(température préconisée
220000°°CC
mini 180°C maxi 230°C)
•
La cuisson s'effectue, alternativement, par l’élément supérieur et par l’hélice de
brassage d’air.
•
Préchauffage inutile. Volailles et rôtis juteux et croustillants sur toutes les faces.
•
Glissez la léchefrite au gradin du bas.
•
Recommandé pour toutes les volailles ou rôtis au tourne broche, pour saisir et cuire à
cœur gigot, côtes de bœuf. Pour garder leur fondant aux pavés de poissons.
MMAAIINNTTIIEENN AAUU CCHHAAUUDD
(température préconisée
8800°°CC
mini 35°C maxi 100°C)
•
Cette position permet un maintien au chaud de vos aliments par un dosage de l’élé-
ment situé au fond du four associé au brassage d’air.
•
Recommandé pour faire lever les pâtes à pain, à brioche, kouglof... en ne dépassant
pas 40°C (chauffe-assiettes, décongélation).
*
*
99644901_A_FR.qxp 20/12/2007 12:23 Page 18
Page 19

19
FR
4 / LES MODES DE CUISSON DU FOUR
DDEECCOONNGGEELLAATTIIOONN
(température préconisée
3300°°CC
mini 30°C maxi 50°C)
•
La décongélation des plats se fait avec apport limité de chaleur et par brassage
d’air.
•
Idéal pour les aliments délicats (tartes aux fruits, à la crème,...).
•
La décongélation des viandes, petits pains, etc...se fait à 50°C (viandes posées sur la
grille avec un plat dessous pour récupérer le jus de décongélation qui n’est pas consommable).
PPAAIINN
(température préconisée
220055°°CC
mini 35°C maxi 275°C)
•
Séquence de cuisson préconisée pour la cuisson du pain.
•
Après un préchauffage, posez la boule de pain sur le plat pâtisserie - 2ème gradin.
•
N’oubliez pas de déposer un ramequin d’eau sur la sole pour obtenir une croûte croustillante et dorée.
99644901_A_FR.qxp 20/12/2007 12:23 Page 19
Page 20
20
FR
5 / ENTRETIEN ET NETTOYAGE DE VOTRE FOUR
--
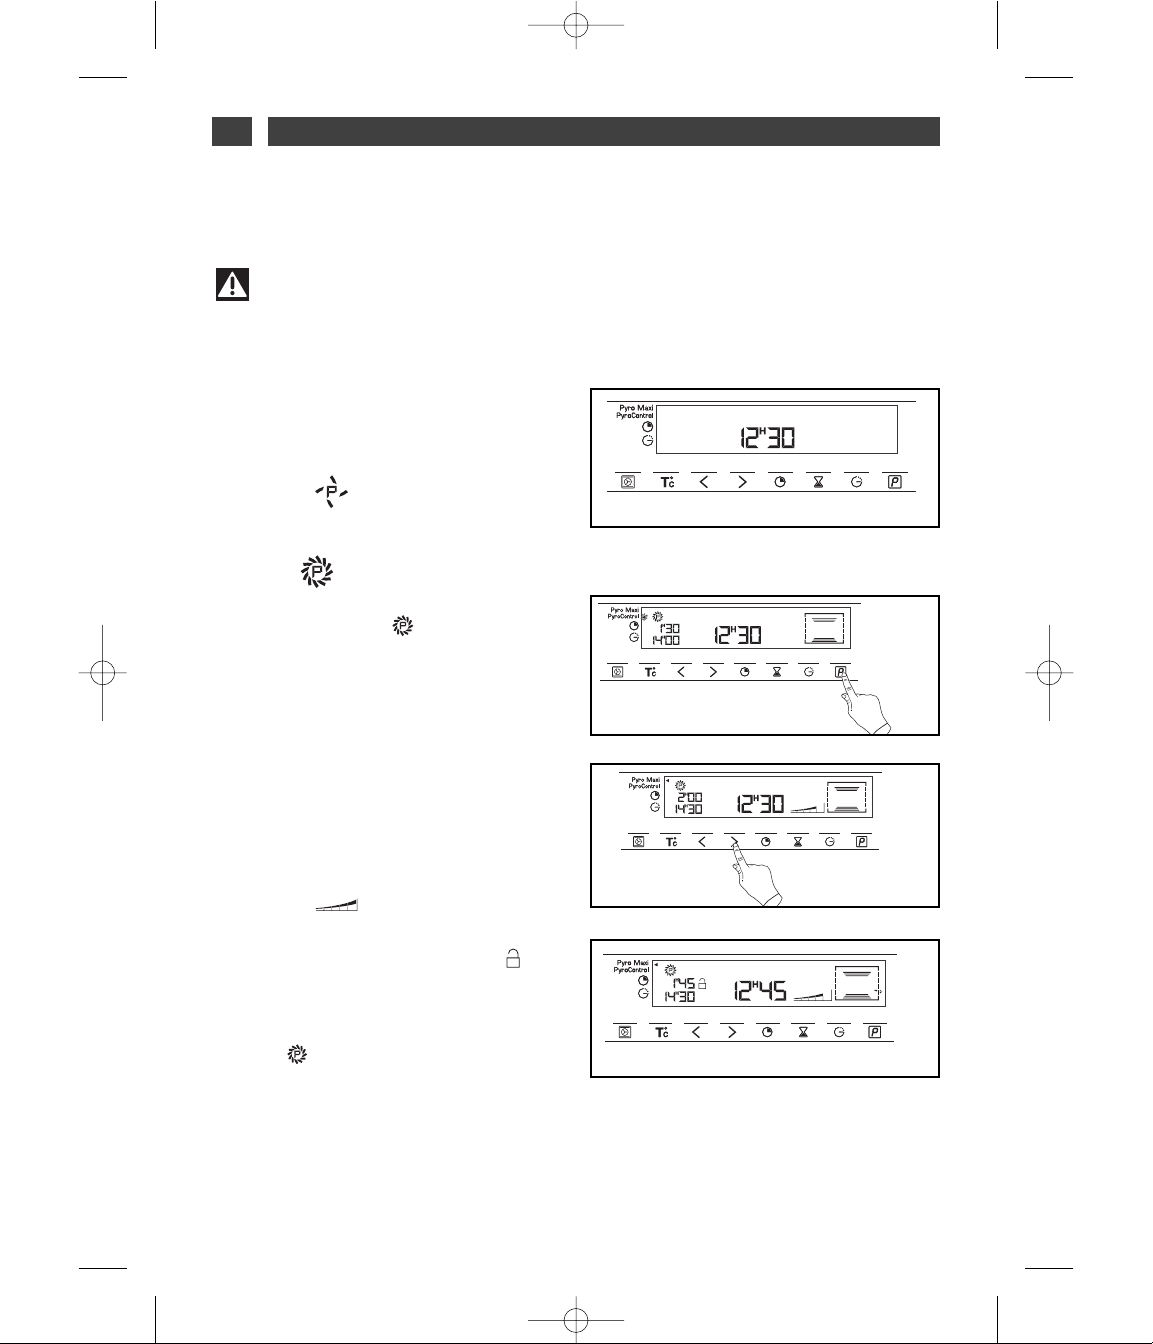
Vérifiez que le programmateur affiche l’heu-
re du jour et que celle-ci ne clignote pas (fig.1).
Vous avez la possibilité de choisir entre
2 durées de cycle pyrolyse :
Pyrocontrol : durée de pyrolyse comprise entre 1h30 et 2h15 en fonction du degré de
salissure.
Pyro Max : durée de pyrolyse de 2 h 00.
Appuyez sur la touche (fig.2).
La durée du cycle de pyrolyse par défaut affiche 1h30 (fig.1), mais vous avez la possibilité
de modifier cette durée.
Exemple : cycle de pyrolyse de 2h00.
Appuyez sur la touche < ou > pour obtenir la
durée souhaitée (fig.3).
Validez en appuyant sur la touche
SSttaarrtt
.
La pyrolyse démarre. Le décompte de la
durée se fait immédiatement après le réglage.
Le symbole montée en température
s’anime.
Au cours de la pyrolyse, le symbole s’affiche dans le programmateur vous indiquant
que la porte est verrouillée (fig.4).
En fin de pyrolyse, 0:00 clignote ainsi que le
symbole .
--
Lorsque le four est froid, utilisez un chiffon hu-
mide pour enlever la cendre blanche.
Le four est propre et à nouveau utilisable pour
effectuer une cuisson de votre choix.
FAIRE UNE PYROLYSE
•Pyrolyse immédiate
••
fig.1
fig.2
fig.4
Attention
Retirez la casserolerie du four ainsi que le support de plat sortant (voir dans le “guide
d’installation” chapitre accessoires) et enlevez les débordements importants qui auraient pu
se produire.
fig.3
99644901_A_FR.qxp 20/12/2007 12:23 Page 20
Page 21

21
FR
5 / ENTRETIEN ET NETTOYAGE DE VOTRE FOUR
fig.1
•Pyrolyse différée
--
Suivre les instructions décrites dans le
paragraphe “Pyrolyse immédiate”.
Après avoir validez le cycle de pyrolyse avec la
touche
SSttaarrtt ::
- Appuyez sur la touche .
Le symbole fin de cuisson clignote pour
indiquer que le réglage est alors possible
(fig.1).
- Appuyez sur la touche < ou > pour régler
l’heure de fin souhaitée (fig.2).
Exemple : fin de cuisson à 18 heures.
Validez en appuyant sur la touche
SSttaarrtt..
--
Après ces actions, le départ de la pyrolyse est
différé pour qu’elle se termine à 18 heures.
FAIRE UNE PYROLYSE
••
fig.2
99644901_A_FR.qxp 20/12/2007 12:23 Page 21
Page 22

22
6 / NOTES
FR
99644901 12/07
99644901_A_FR.qxp 20/12/2007 12:23 Page 22
Page 23

99644901_A_EN.qxp 20/12/2007 13:12 Page 1
Page 24

2
Dear Customer,
You have just acquired a THOMSON oven and we would like to thank you.
Our research teams have created this new generation of appliances for you. Their quality,
appearance, functions and technological advances make them exceptional products,
showcases of our unique know-how.
Your new THOMSON oven will blend harmoniously into your kitchen and perfectly combine
cooking performance and ease of use. We wanted to offer you a product of excellence.
In the line of THOMSON products, you will also find a wide range of microwave ovens,
steamers, hobs, ventilation hoods, dishwashers, washing machines, laundry dryers,
refrigerators and freezers, all of which can be built in and coordinated with your new
THOMSON oven.
Of course, in an ongoing effort to better satisfy your demands with regard to our products, our
after-sales service department is at your disposal and ready to listen in order to respond to all
of your questions and suggestions.
THOMSON
As part of our commitment to constantly improving our products, we reserve the right to make
changes to them based on advances to their technical, functional and/or aesthetic properties.
Important:
Before installing and using your appliance, please read this Installation and Usage
Guide carefully, as it will allow you to quickly familiarise yourself with its operation.
99644901_A_EN.qxp 20/12/2007 13:12 Page 2
Page 25

3
TABLE OF CONTENTS
EN
1 / DESCRIPTION OF YOUR APPLIANCE
••
Introduction to your oven
____________________________________ 4
••
Accessories
_______________________________________________ 5
••
Introduction to the programmer ______________________________ 6
••
Introduction to the selection buttons __________________________ 7
2 / USING YOUR APPLIANCE
••
Using the programmer
º
How to set the time_____________________________________ 8
º
Immediate cooking _____________________________________ 9
••
Programmed cooking
º
Immediate start ________________________________________ 10
º
Delayed start __________________________________________ 11
••
Using the timer function_____________________________________ 12
••
Personalising the recommended temperature___________________ 13
••
Locking the controls________________________________________ 13
••
“EASY COOK.” Function
º
Immediate start ________________________________________ 14
º
Delayed start __________________________________________ 15
3 / GUIDE TO EASY COOK FUNCTIONS _____________________________ 16
4 / OVEN COOKING MODES_______________________________________ 18
5 / CARING FOR AND CLEANING YOUR OVEN_______________________ 20
6 / NOTES ______________________________________________________ 22
99644901_A_EN.qxp 20/12/2007 13:12 Page 3
Page 26

4
1 / DESCRIPTION OF YOUR APPLIANCE
EN
INTRODUCTION TO YOUR OVEN
••
A
B
Programmer
Control buttons
Lamp
C
D
Wire shelf supports
D
C
B
A
99644901_A_EN.qxp 20/12/2007 13:13 Page 4
Page 27

5
1 / DESCRIPTION OF YOUR APPLIANCE
EN
•Accessories
Your appliance is equipped with 2 safety grids with handles and 2 baking trays, 20 and 45
millimetres high.
99644901_A_EN.qxp 20/12/2007 13:13 Page 5
Page 28

6
1 / DESCRIPTION OF YOUR APPLIANCE
EN
INTRODUCTION TO THE PROGRAMMER
••
A
K
A
B
Cooking modes display
Oven temperature display
Shelf support indicator and
selected cooking mode indicator.
Temperature rise indicator
Clock or timer display
Timer indicator
Control panel lock indicator (child
safety device).
C
D
E
Cooking end time display
Cooking end time indicator
Cooking time indicator
Cooking time display
Cleaning indicator
Pyrolysis lock
F
G
H
I
C
J
I
L
G
F
E
B
H
J
K
L
M
M
D
99644901_A_EN.qxp 20/12/2007 13:13 Page 6
Page 29
7
1 / DESCRIPTION OF YOUR APPLIANCE
EN
INTRODUCTION TO THE SELECTION BUTTONS
••
A
B
C
D
E
F
G
H
I
J
K
Selecting cooking modes
Cooking temperature
Adjustment buttons
Cooking time
Timer
End of cooking
Cleaning
EASY COOK button
Stop
Start
Control panel locking (child safety device)
Indicator of dishes selected with EASY COOK
L
A
B
D
E
F
G
C
H
I
J K
L
99644901_A_EN.qxp 20/12/2007 13:13 Page 7
Page 30

8
2 / USING YOUR APPLIANCE
EN
•
How to set the time
--
When plugged in
The displays flashes 12:00 (fig.1).
Set the time by pressing the < or > buttons
(holding your finger on the button allows you
to scroll through the numbers rapidly) (fig.2).
Example: 12:30
Press the button to confirm.
The display stops flashing (fig.3).
- To set the time on the clock
Press and hold the “ and button for a
few seconds until the display is flashing
(fig.1), then release.
Audible beeps indicate that it is now possible
to set the time.
Adjust the clock setting with the < and
>buttons (fig.2).
Press the button to confirm.
Warning
If there is no confirmation from the
“ ” button, the time is recorded
automatically after a few seconds.
••
fig.1
fig.2
fig.2
fig.3
fig.1
99644901_A_EN.qxp 20/12/2007 13:15 Page 8
Page 31

9
2 / USING YOUR APPLIANCE
EN
•Immediate cooking
— The programmer should display only the
time. It should not be flashing.
Press the button (fig.1) then select your
cooking programme using < or > (fig.2).
Example: —> shelf support 2 recommended.
— Confirm with the button
““
SSttaarrtt””
(fig.3).
The indicator for cooking programme and
recommended temperature freeze. The shelf
support indicator and the working elements
appear.
The oven begins heating.
Place your dish in the oven based on the
recommendation shown in the display.
Your oven recommends the optimal
temperature for the chosen cooking mode.
Hower, you can still adjust the temperture by
pressing the
““TT°°CC””
button under the display
(fig.4).
The “°C” flashes in the display to indicate that
you can adjust the termperature by pressing
the < or > buttons (fig.5).
Example: —> set to 220°C.
— Confirm with the
““
SSttaarrtt””
button.
The temperature rise indicator indicates
the temperature increase in the oven.
A series of beeps will sound when the oven
reaches the selected temperature.
To stop cooking, press and hold the
““
SSttoopp””
button for a few seconds.
Warning
All types of cooking are done with the door closed.
Warning
After a cooking cycle, the cooling fan continues to operate for a period of time in order
to guarantee optimal oven reliability.
fig.2
fig.1
fig.4
fig.5
fig.3
99644901_A_EN.qxp 20/12/2007 13:19 Page 9
Page 32

10
2 / USING YOUR APPLIANCE
EN
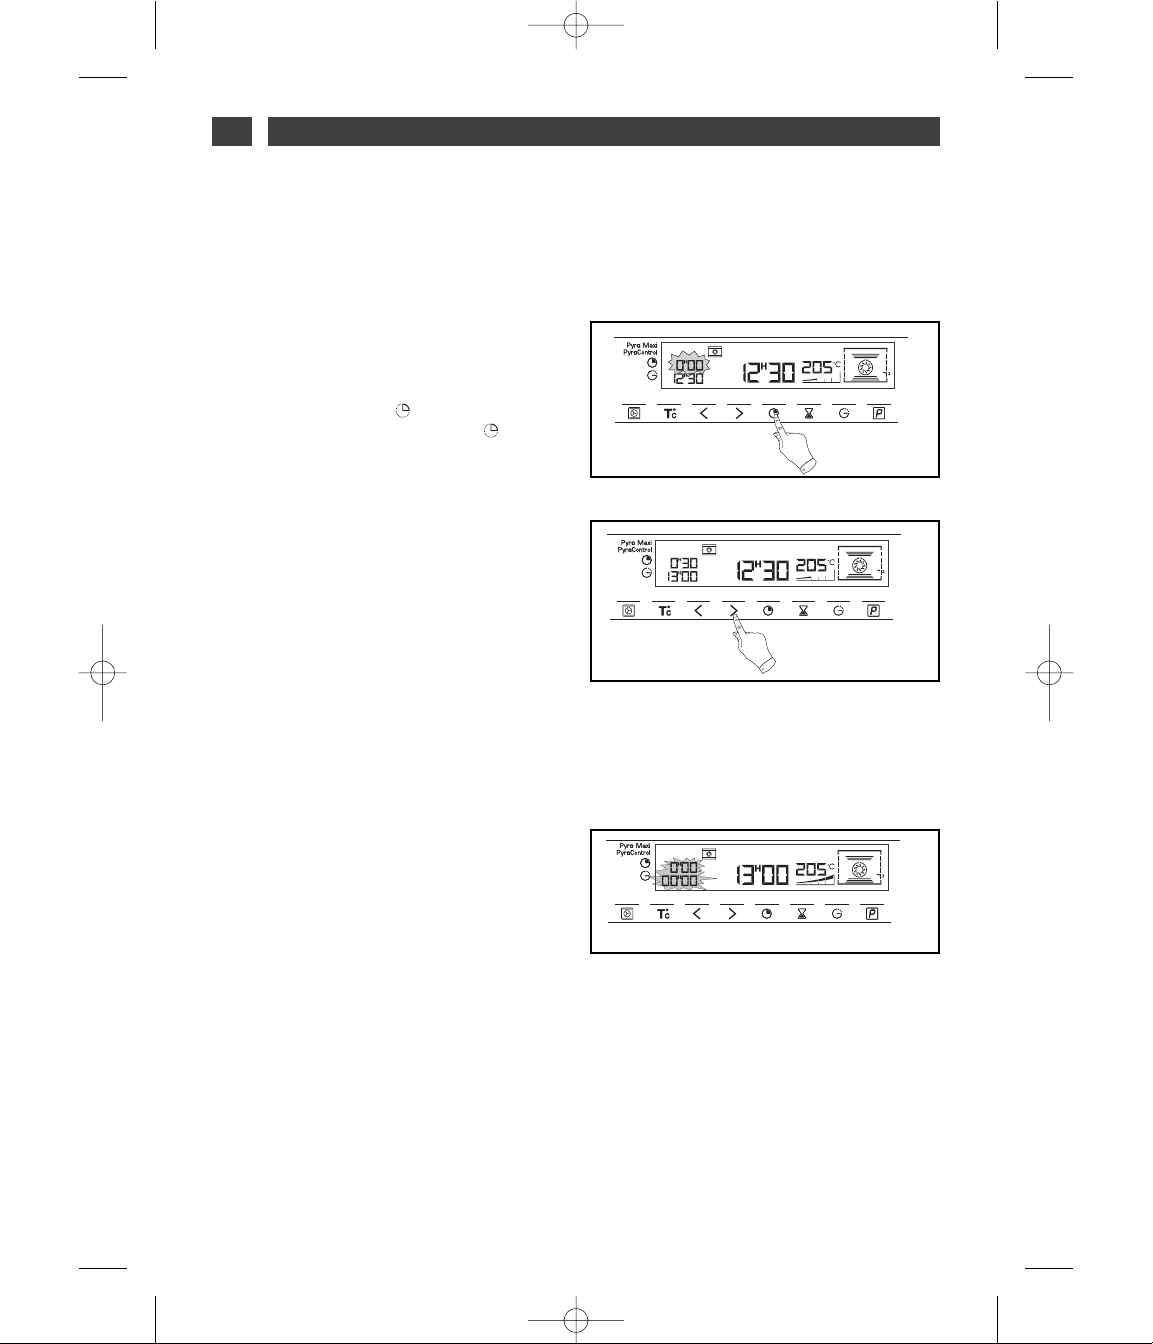
--
Cooking with immediate start and
programmed duration
- Select the desired cooking mode and adjust
the temperature (see paragraph: immediate
cooking).
- Press the button until the cooking time
indicator starts to flash .
The display flashes 0:00 to indicate that you
can now adjust the setting (fig.
1).
- Press the <<or >>buttons to set the desired
time.
Example: 30 mins cooking time (fig.
2).
The cooking time is recorded automatically
after several seconds or alternatively, confirm
by pressing the
““
SSttaarrtt””
button.
The cooking time display stops flashing.
The countdown of the cooking time begins
immediately after it has been set.
AAfftteerr tthheessee tthhrreeee sstteeppss,, tthhee oovveenn hheeaattss uupp::
A series of beeps will sound when the oven
reaches the selected temperature.
At the end of cooking (end of programmed
time),
- the oven turns off;
- the cooking time indicator and 00:00 both
flash (fig.
3),
- a series of beeps sounds for a few minutes.
The beeping can be stopped by pressing
““SSttoopp””
.
PROGRAMMED COOKING
••
fig.2
fig.1
fig.3
99644901_A_EN.qxp 20/12/2007 13:21 Page 10
Page 33

11
2 / USING YOUR APPLIANCE
EN
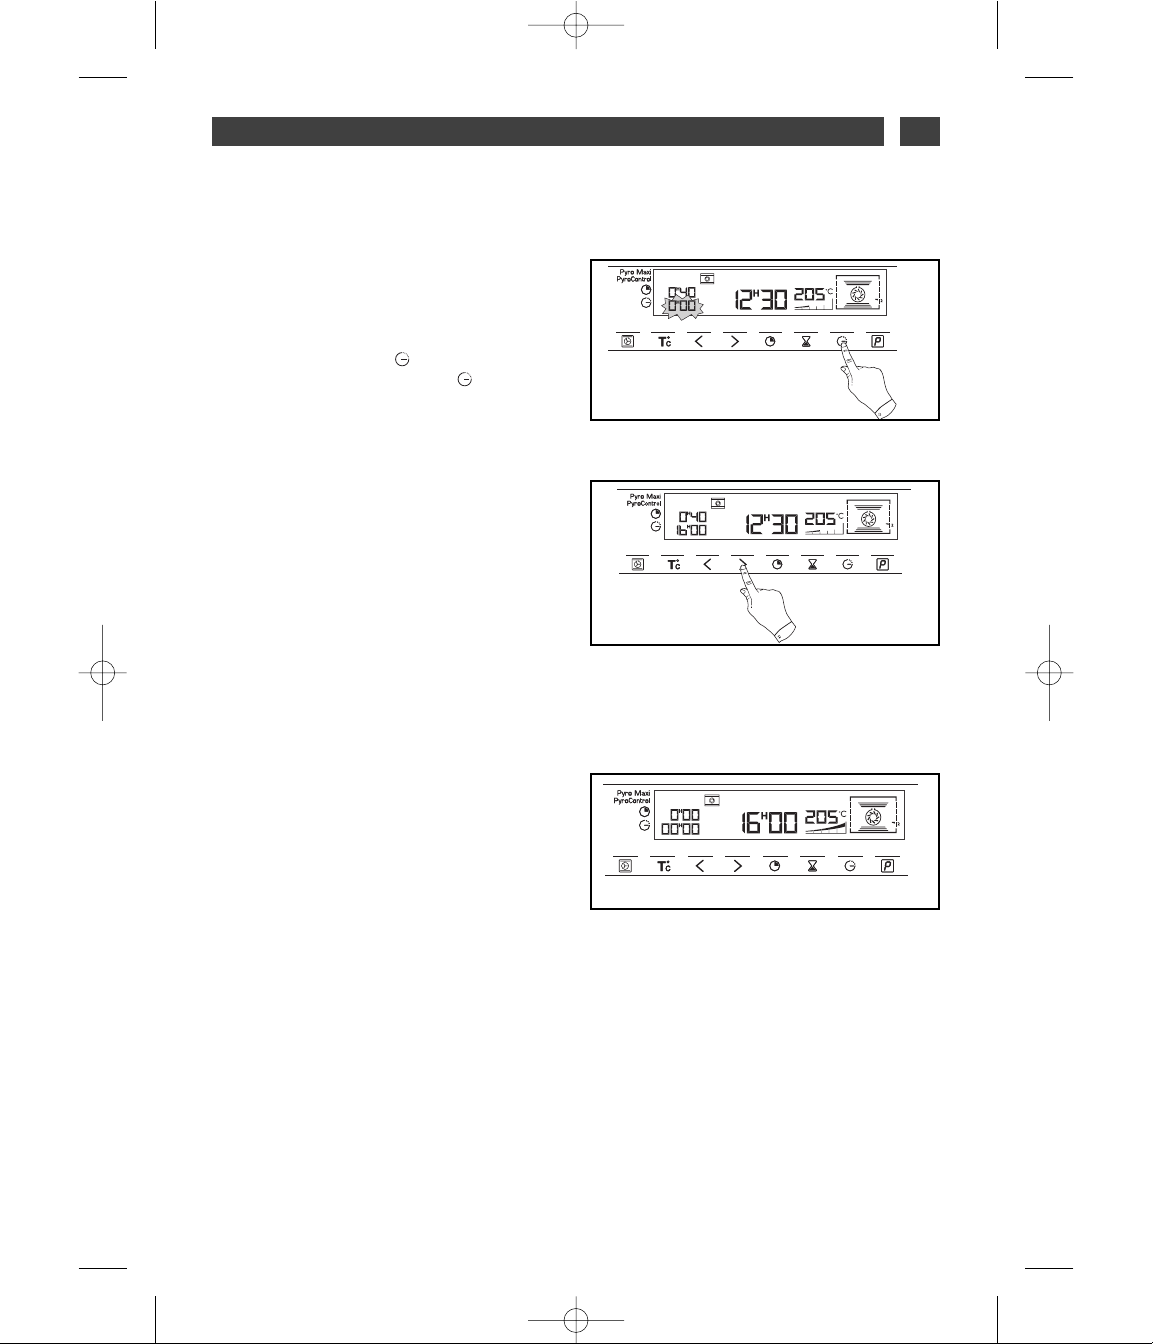
--
Cooking with delayed start and chosen
cooking end time
PPrroocceeeedd aass wwiitthh pprrooggrraammmmeedd ccooookkiinngg..
- Press the button until the cooking end
time indicator starts to flash .
The display flashes to indicate that you can
now adjust the setting (fig.
1).
- Press the <<or >>button to set the desired
cooking end time.
Example: end of cooking at 16:00 (fig.
2).
The cooking end time is recorded
automatically after a few seconds or
alternatively, valide by pressing the
““
SSttaarrtt””
button.
The cooking end time display stops flashing.
AAfftteerr tthheessee 33 sstteeppss,, tthhee oovveenn hheeaattiinngg iiss
ddeellaayyeedd ssoo tthhaatt ccooookkiinngg eennddss aatt 1166::0000..
At the end of cooking (end of programmed
time),
- the oven turns off,
- the cooking time indicator and 0:00 both flash
(fig.
3),
- a series of beeps sounds for a few minutes.
The beeping can be stopped by pressing
““SSttoopp””
.
The display returns to the time of day.
In the case of programmed cooking cycles, the
cavity lights up until cooking begins, and
remains lit until cooking is finished.
PROGRAMMED COOKING
••
fig.1
fig.2
fig.3
99644901_A_EN.qxp 20/12/2007 13:22 Page 11
Page 34

12
2 / USING YOUR APPLIANCE
EN
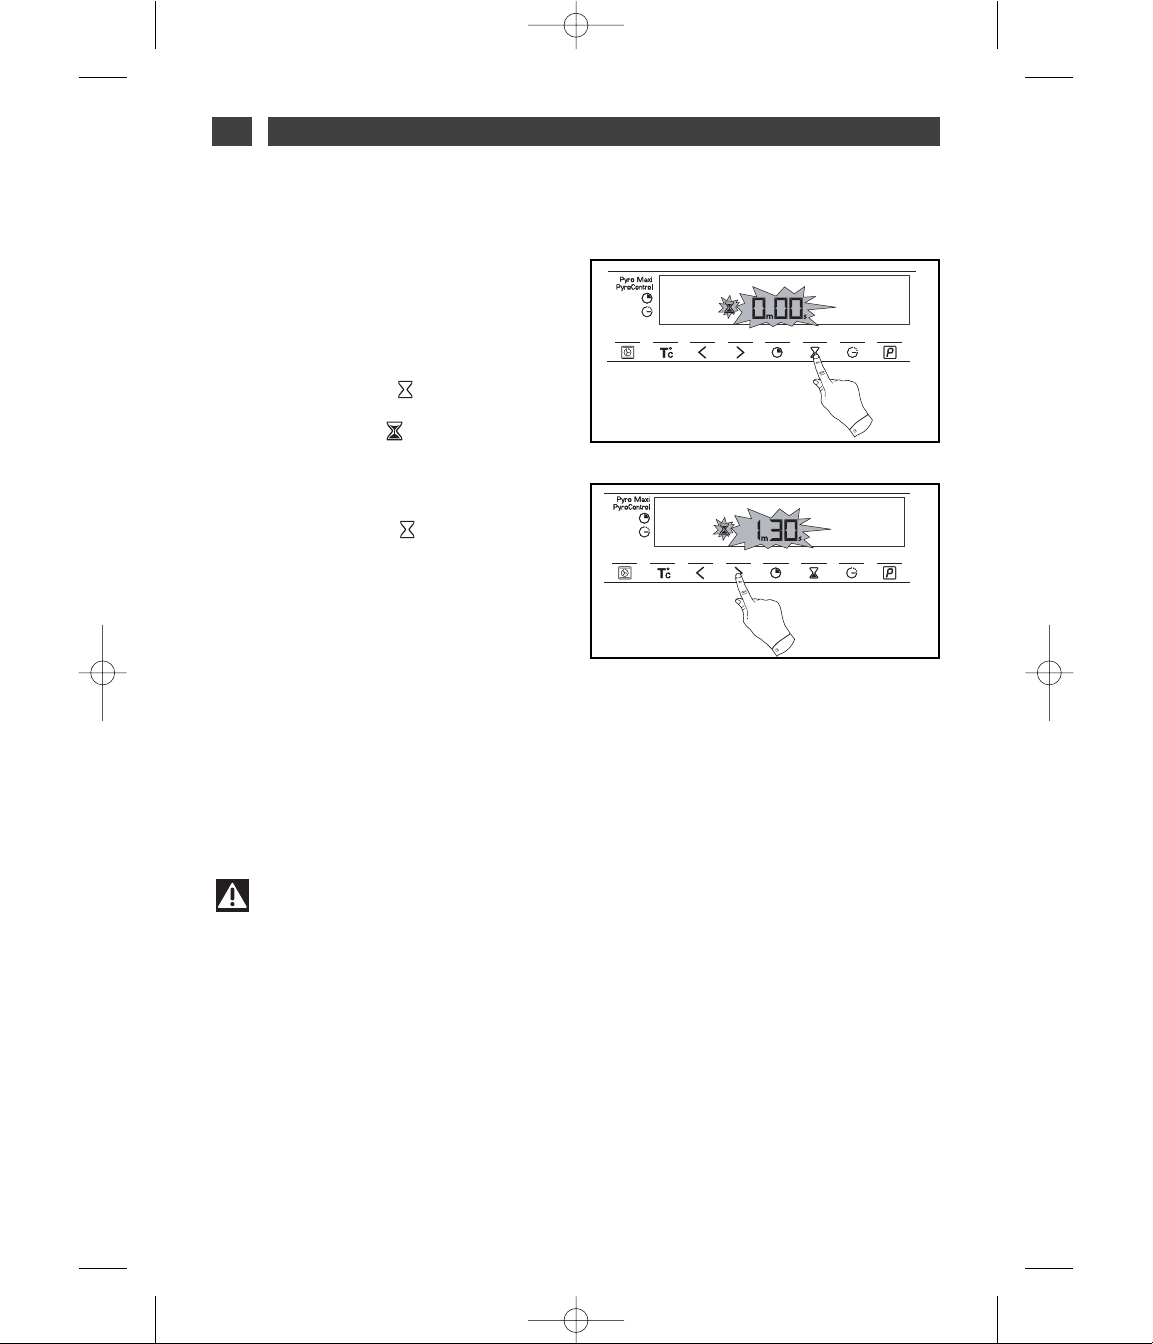
-- YYoouurr oovveenn’’ss pprrooggrraammmmeerr ccaann bbee uusseedd aass aann
iinnddeeppeennddeenntt ttiimmeerr tthhaatt aalllloowwss yyoouu ttoo ccoouunntt
ddoowwnn aa ttiimmee wwiit
thhoouutt ooppeerraattiinngg tthhee oovveenn..
In this case, the timer display has priority over
the clock display.
- Press the button (fig.1).
The time symbol and 0m00s flash in the
display.
- Adjust the chosen time by pressing the <<or
>>
buttons (fig.2).
- Press the “ ” button to confirm, or wait for
a few seconds.
Warning
It is possible to change or cancel the timer at any time.
USING THE TIMER FUNCTION
••
The display stops flashing after a few seconds and the timer starts working, counting down the
time in seconds.
Once the time has expired, the timer emits a series of beeps to notify you.
The beeping can be stopped by pressing
““SSttoopp””
.
The display returns to the time of day.
fig.1
fig.2
99644901_A_EN.qxp 20/12/2007 13:23 Page 12
Page 35

13
2 / USING YOUR APPLIANCE
EN
PERSONALISING THE RECOMMENDED TEMPERATURE
Select the cooking function.
- Press
SSttaarrtt
.
If you wish to customise the recommended temperature:
- Press the
°°CC
button until the temperature display begins flashing.
- Press the < or > button until the desired temperature appears.
- Press
SSttaarrtt
to confirm.
••
LOCKING THE CONTROLS (CHILD SAFETY)
OVEN
OFF
You have the option of preventing access to
the oven controls by taking the following
steps:
when the oven is
ooffff
press the button for
a few seconds (fig.1),
a “key” appears in the display -> access to your
controls is locked (fig.2).
To unlock access, press on the button
for a few seconds.
The oven controls are once again accessible.
••
Warning
You cannot lock the oven if you have programmed a cooking cycle.
fig.1
fig.2
99644901_A_EN.qxp 20/12/2007 13:23 Page 13
Page 36

14
2 / USING YOUR APPLIANCE
EN
“EASY COOK” FUNCTION
The EASYY COOK function will completely
simplify cooking for you because the oven will
automatically calculate all the cooking
parameters (temperature, cooking time,
cooking mode) based on the selected dish
thanks to its electronic sensors located in the
oven that constantly measure the moisture level
and temperature variations.
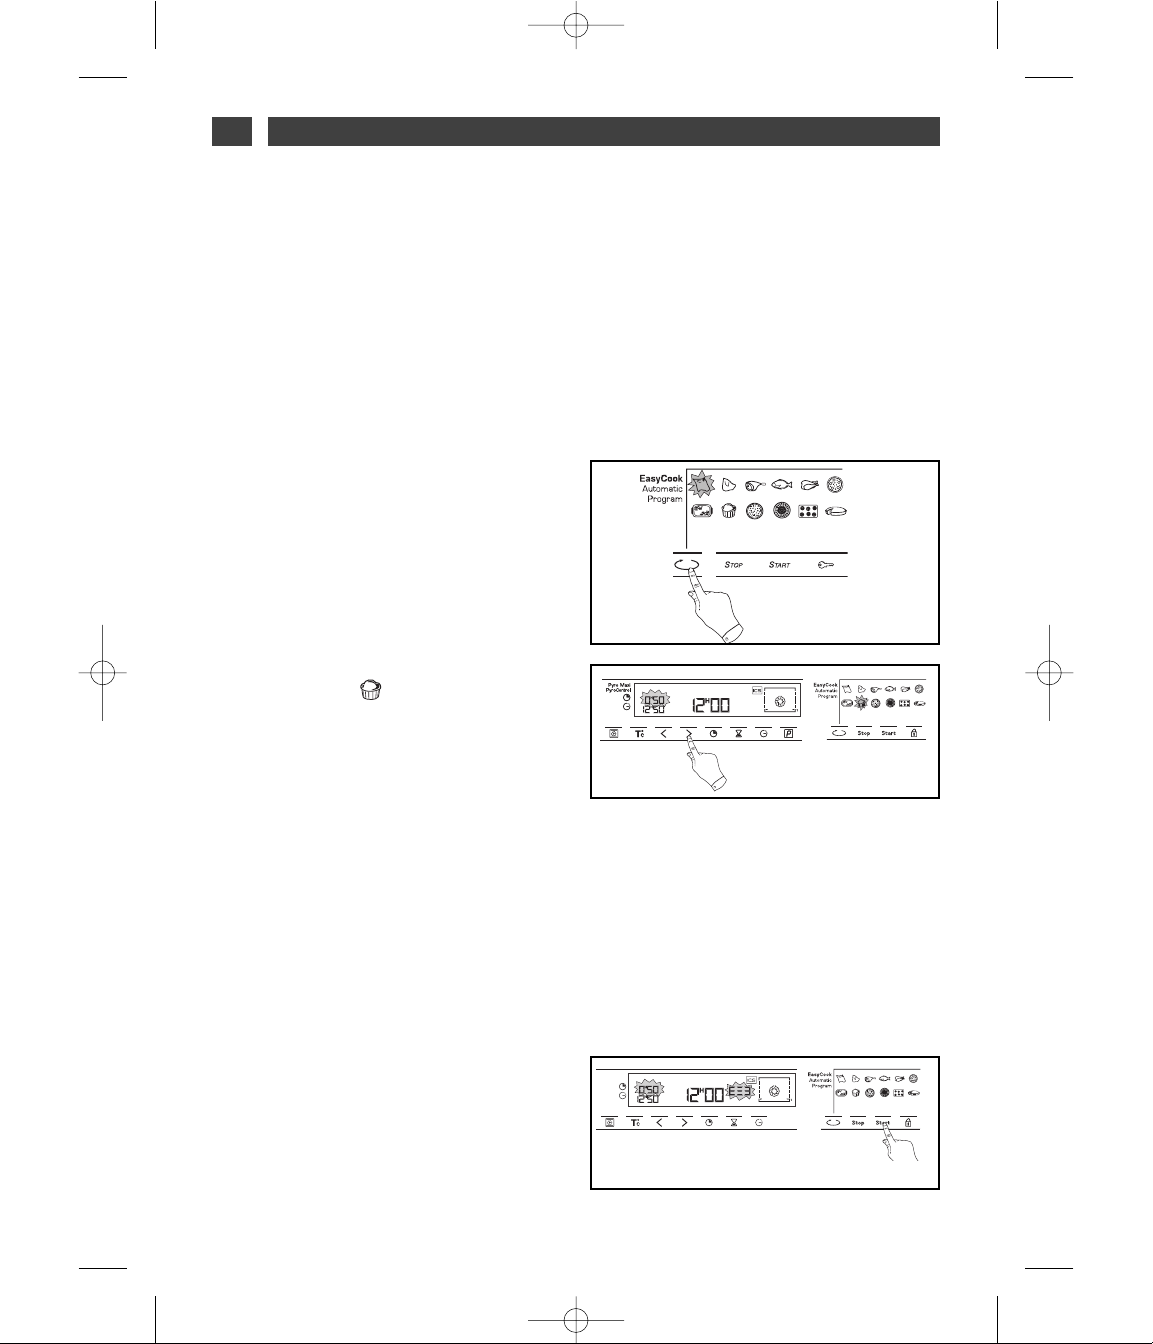
OPERATING THE EASY COOK FUNCTION:
This cooking mode takes place in two phases:
1) a data search phase during which the oven
begins heating and determines the ideal
cooking time. This phase lasts between 5 and
40 minutes depending on the dish.
- Press the “EASY COOK” button (fig.1).
The overn offers a choice of 12 dishes:
- Press the < or > button to select your dish
(fig.2).
Example: Soufflés
·· RRooaasstt bbeeeeff
·· PPoorrkk rrooaasstt
·· LLaammbb
·· FFiisshh
·· CChhiicckkeenn
·
PPiizzzzaa
·· SSttuuffffeedd vveeggeettaabblleess
·· SSoouuffffllééss
··
SSaavvoouurryy ttaarrttss
·· PPiieess
-- SSmmaallll bbiissccuuiittss
·· CCaakkeess
One you have selected your dish, slide it into
the oven at the shelf support requested.
- Confirm by pressing the
SSttaarrtt
button to start
cooking (fig.3).
••
fig.1
fig.2
fig.3
99644901_A_EN.qxp 20/12/2007 13:23 Page 14
Page 37

15
2 / USING YOUR APPLIANCE
EN
NN..BB..:: NNoo pprreehheeaattiinngg iiss rreeqquuiirreedd ttoo uussee tthhee IICCSS
ffuunnccttiioonn.. CCooookkiinngg AABBSSOOLLUUTTEELLYY mmuusstt bbeeggiinn
iinn aa ccooooll oovve
enn.. IItt iiss uusseeffuull ttoo wwaaiitt ffoorr yyoouurr oovveenn
ttoo ccooooll ddoowwnn ccoommpplleetteellyy bbeeffoorree ssttaarrttiinngg aa
sseeccoonndd ccooookkiinngg pprrooggr
raammmmee,, iiff nnoott,, iitt wwiillll ssttaarrtt
bbeeeeppiinngg ttoo iinnddiiccaattee tthhaatt tthhee oovveenn iiss hhoott..
IIMMPPOORRTTAANNTT:: DDoo nnoott ooppeenn tthhee ddooo
orr dduurriinngg
tthhiiss pphhaassee oorr yyoouu mmaayy ddiissttuurrbb tthhee rreeccoorrddiinngg ooff
ddaattaa..
TThhiiss ddaattaa sseeaarrcchh pphhaassee iiss ssyymmbboolliisseedd
bbyy
rroottaattiinngg aarrrroowwss..
2) a second cooking phase: The oven has
determined the time required and displays it,
along with the cooking end time. The
remaining cooking time indicated takes into
account the cooking time from the first phase.
You can now open the door (e.g. to baste a
roast).
- The oven turns itself off when the cooking
time has ended.
DDEELLAAYYEEDD SSTTAARRTT FFUUNNCCTTIIOONN::
To program a delayed start,
- Press the button until the indicator starts
flashing and change the hour for the
cooking end time.
PLEASE NOTE: If you want to programme a
subsequent EASY COOK cooking cycle, wait
until the oven has cooled completely. However,
you can use the “Manual” function even if the
oven is hot.
“EASY COOK” FUNCTION
••
99644901_A_EN.qxp 20/12/2007 13:23 Page 15
Page 38

16
3 / GUIDE TO EASY COOK FUNCTIONS
EN
RR
ooaasstt
BB
eeeeff
• Roast beef
(prepared rare)
• Place the roast on the grid using the grid + drip
tray assembly.
YYoouu ccaann ttuurrnn iitt oovveerr wwhheenn tthhee ccooookkiinngg ttiimmee bbeeccoommeess
ffiixxeedd..
RR
ooaasstt
PP
oorrkk
• Pork roasts
- Loin
- Tenderloi
LL
aammbb
• Leg of 1kg to 2,500kg
• Place the roast on the grid using the grid + drip
tray assembly.
YYoouu ccaann ttuurrnn iitt oovveerr wwhheenn tthhee ccooookkiinngg ttiimmee bbeeccoommeess
ffiixxeedd..
FF
iisshh
• Whole fish
(sea bream, pollock, trout, mackerel, etc.)
• Roasted fish
CC
hhiicckkeenn
• Chickens weighing 1 to 1.7 kg
• Duck, guinea fowl, etc.
PP
iizzzzaa
• Fresh store-bought pizza
• Ready-to-use pizza dough
• Home-made pizza dough
• Frozen pizza
VV
eeggeettaabblleess
ssttuuffffeedd
• Tomatoes, stuffed peppers & vegetables
• Lasagna (fresh or frozen)
• Shepherd’s pie, brandade, etc.
SS
oouufffflléé
• Use a tall mould with straight edges and a diameter
of 21cm.
TT
aarrttss
((ssaavvoouurryy))
• Fresh quiches
• Frozen quiches
• Frozen mini-pastry
TT
aarrttss
((sswweeeett))
• Fresh tarts
• Frozen tarts
SS
mmaallll
BB
iissccuuiittss
• Small individual pastries: cookies, croissants, buns,
fruit bread in a mould, croque-monsieur.
CC
aakkeess
• Home-style cakes: sweet or savoury loaves,
pound cake.
• Ready-to-mix batters in packets.
99644901_A_EN.qxp 20/12/2007 13:23 Page 16
Page 39

17
3 / GUIDE TO EASY COOK FUNCTIONS
EN
• Take the roast out of the refrigerator at least one hour before starting the cooking programme:
• If you prefer meat rare; if you prefer it well done, opt for a traditional cooking function.
• Trim away as much fat as possible: it causes smoke.
• At the end of cooking, allow the meat to sit for 7 to 10 minutes wrapped in a sheet of aluminium foil before
carving.
• Take the roast out of the refrigerator at least one hour before starting the cooking programme: the colder the
meat is, the closer it will be to the end of cooking.
• Use an earthenware dish. Add one to two tablespoons of water.
• At the end of cooking, allow the meat to sit for 7 to 10 minutes wrapped in a sheet of aluminium foil before
carving. Add salt when cooking is finished.
• Take the meat out of the refrigerator at least one hour before starting the cooking programme:
• Select a leg that is round and plump rather than long and lean.
• Wrap the meat in aluminium and let it sit after cooking.
• Use this function only for whole fish cooked with herbs and white wine.
(Grilled fish or papillote preparations require that the oven be preheated.)
• Cooking in a dish: Opt for earthenware dishes to avoid splattering.
• Pierce the skin of poultry to avoid splattering.
• Place it on the grid for a crispy crust (you can place a sheet of parchment paper between the grid and the
pizza to protect the oven from cheese drippings).
• Place the pizza on the baking tray for a soft crust.
• Properly adjust the dimensions of the dish to the quantity of food to be cooked to avoid juices spilling over.
• Butter the mould and do not touch the inside with your fingers or the soufflé will not rise.
• Use a non-stick aluminium mould: the crust will be crispy on the bottom.
• Remove the tray from frozen quiches before placing them on the grid.
• Use a non-stick aluminium mould:
• The crust will be crispy on the bottom.
• Small individual cakes made on a pastry tray and placed on the grid.
puff pastry must be cooked on “CAKES” to achieve good results.
• Cakes made in a cake mould, round, square... and always placed on the grid.
It is possible to place two cake moulds side by side.
99644901_A_EN.qxp 20/12/2007 13:23 Page 17
Page 40

18
4 / OVEN COOKING MODES
EN
*
Program(s) used to obtain the results indicated on the energy label in accordance with European
standard EN 50304 and European Directive 2002/40/CE.
CCIIRRCCUULLAATTIINNGG HHEEAATT
(recommended temperature
118800°°CC
min 35°C max 235°C)
•
Cooking controlled by the heating element located at the back of the oven and by the
fan.
•
Rapid temperature increase: Some dishes can be placed in the oven while it is still cold.
•
Recommended for keeping white meat, fish and vegetables moist.
For cooking multiple items on up to.3 levels.
CCOOMMBBIINNEEDD HHEEAATT
(recommended temperature
220055°°CC
min 35°C max 275°C)
•
Cooking controlled by the upper and lower heating elements and by the fans.
•
Three combined sources of heat: a lot of heat from the bottom, a little circulating heat
and a bit from the grill.
•
Recommended for quiches, pies, wet fruit tarts, placed preferable on an earthenware
dish.
EECCOO
(recommended temperature
220000°°CC
min 35°C max 275°C)
•
Cooking controlled by the upper and lower heating elements.
•
This position allows for energy savings while preserving the quality of the cooking.
•
The ECO position is used for energy label performance.
•
All types of cooking are done
wwiitthhoouutt pprreehheeaattiinngg..
FFAANN GGRRIILLLL
(recommended temperature
220000°°CC
min 180°C max 230°C)
•
Cooking controlled, alternately, by the upper element and by the fan.
•
Slide the drip tray onto the bottom shelf support.
KKEEEEPPIINNGG TTHHIINNGGSS WWAARRMM
(recommended temperature
8800°°CC
min 35°C max 100°C)
•
This position allows you to keep your dishes hot by occasional heating from the
bottom of the oven along with the fan.
•
Recommended for letting dough rise for bread, brioche, kugelhopf...without exceeding
40°C (plate warming, defrosting).
*
*
99644901_A_EN.qxp 20/12/2007 13:23 Page 18
Page 41

19
4 / OVEN COOKING MODES
EN
DDEEFFRROOSSTTIINNGG
(recommended temperature
3300°°CC
min 30°C max 50°C)
•
Dishes are defrosted by a limited amount of heat and the fan.
•
Ideal for delicate dishes (fruit tart, custard pie, etc).
•
Meat, buns, etc, are defrosted at 50°C (meat should be placed under the grill with a
dish underneath to catch drips from the defrosting which are not edible).
BBRREEAADD
(recommended temperature
220055°°CC
min 35°C max 275°C)
•
Cooking sequence recommended for baking bread.
•
After preheating, place the ball of dough on the pasty dish - 2nd shelf.
•
Do not forget to place a ramekin of water on the bottom to get a crispy, shiny crust.
99644901_A_EN.qxp 20/12/2007 13:23 Page 19
Page 42
20
5 / CARING FOR AND CLEANING YOUR OVEN
EN
--
Check that the programmer is displaying the
time of day and that it is not flashing (fig.1).
You can choose between 2 lengths of time for
the pyrolysis:
Pyrocontrol: duration of pyrolysis
between 1h30m and 2h12m depending on
how dirty it is.
Pyro Max: pyrolysis duration 2h00m.
Press the button (fig.2).
The pyrolysis duration by default displays
1h30 (fig.1), but you can make this longer or
shorter.
Example: pyrolysis cycle 2h00.
Press the < or > button to obtain the duration
you want (fig.3).
Confirm your selection by pressing
SSttaarrtt
.
The pyrolysis starts. The duration starts to
count down immediately after it has been set.
The temperature rise symbol lights up.
During pyrolysis, the symbol flashes in the
programmer indicating that the door is locked
(fig.4).
When pyrolysis finishes, 0:00 flashes as well
as the symbol.
--
When the oven is cool, use a damp cloth to
remove the white ashes.
The oven is clean and once again ready for the
cooking application of your choice.
PERFORM A PYROLYSIS
•Immediate pyrolysis
••
Warning
Take out the oven fittings out, as well as the sliding dish support (see the chapter on
accessories in the “installation guide”) and remove any large splashes that may have have
formed.
fig.1
fig.2
fig.4
fig.3
99644901_A_EN.qxp 20/12/2007 13:23 Page 20
Page 43

21
5 / CARING FOR AND CLEANING YOUR OVEN
EN
•Delayed pyrolysis
--
Follow the instructions described in the
section “Programming for immediate
pyrolysis”.
After confirming the pyrolysis cycle with the
SSttaarrtt
button:
- Press the button.
The end of cooking time flashes to indicate
that it is now possible to set it (fig.1).
- Press the < or > button to set the desired end
time (fig.2).
Example: end of cooking at 18:00.
Confirm your selection by pressing
SSttaarrtt
.
--
After these steps, the beginning of pyrolsys is
delayed so that it finishes at 18:00.
PERFORM A PYROLYSIS
••
fig.1
fig.2
99644901_A_EN.qxp 20/12/2007 13:23 Page 21
Page 44

22
6/ NOTES
EN
99644901 12/07
99644901_A_EN.qxp 20/12/2007 13:23 Page 22
Page 45

99644901_a_de.qxp 20/12/2007 14:03 Page 1
Page 46

2
Liebe Kundin, lieber Kunde,
Sie haben soeben einen THOMSON Backofen erworben, und wir danken Ihnen dafür.
Wir haben in dieses Gerät unsere ganze Leidenschaft und unser Know-how einfließen lassen,
damit es Ihre Bedürfnisse bestmöglich erfüllt. Es ist innovativ, leistungsfähig, und wir haben es so
konzipiert, daß auch seine Benutzung immer einfach bleibt.
In der THOMSON Produktpalette finden Sie auch eine breite Auswahl an Mikrowellenherden,
Kochfeldern, Dunstabzugshauben, Küchenherden, Geschirrspülern, Waschmaschinen,
Wäschetrocknern, Kühlschränken, Gefrierschränken und Tiefkühltruhen, die Sie mit Ihrem neuen
THOMSON Backofen abstimmen können.
THOMSON
Da wir unsere Produkte ständig verbessern möchten, behalten wir uns im Zuge der technischen
Weiterentwicklung das Recht vor, ihre technischen, funktionellen und ästhetischen Merkmale zu
verändern.
Wichtig:
Bitte lesen Sie die vorliegenden Hinweise zu Einbau und Gebrauch aufmerksam vor
der ersten Inbetriebnahme durch, damit Sie Ihr Gerät schnell beherrschen.
99644901_a_de.qxp 20/12/2007 14:03 Page 2
Page 47

3
INHALT
DE
1 / BESCHREIBUNG DES GERÄTS
••
Übersicht über den Ofen
____________________________________ 4
••
Zubehör
__________________________________________________ 5
••
Beschreibung des Programmierers ___________________________ 6
••
Wahltasten________________________________________________ 7
2 / BENUTZUNG DES GERÄTS
••
Nutzung des Programmierers
________________________________
º
Einstellung der Uhr _____________________________________ 8
º
Sofortiger Garvorgang __________________________________ 9
••
Programmierter Garvorgang
º
Sofortiger Start ________________________________________ 10
º
Späterer Start _________________________________________ 11
••
Nutzung der Funktion Kurzzeitwecker _________________________ 12
••
Veränderung der empfohlenen Temperatur _____________________ 13
••
Verriegelung der Bedienungselemente_________________________ 13
••
“EASY COOK”-Funktion
º
Sofortiger Start ________________________________________ 14
º
Späterer Start _________________________________________ 15
3 / EINFÜHRUNG IN DIE EASY COOK-FUNKTIONEN __________________ 16
4 / BACKTABELLE FÜR DEN BACKOFEN____________________________ 18
5 / PFLEGE UND REINIGUNG DES BACKOFENS _____________________ 20
6 / NOTIZEN_____________________________________________________ 22
99644901_a_de.qxp 20/12/2007 14:03 Page 3
Page 48

4
1 / BESCHREIBUNG DES GERÄTS
DE
ÜBERSICHT ÜBER DEN OFEN
••
A
B
Programmierer
Bedientasten
Lampe
C
D
Einschubleistenhalter
D
C
B
A
99644901_a_de.qxp 20/12/2007 14:03 Page 4
Page 49

5
1 / BESCHREIBUNG DES GERÄTS
DE
•Zubehör
Ihr Backofen wird mit 2 Multifunktions-Blechen (20 und 45 mm hoch) sowie 2 kippsicheren
Gitterrosten mit Sicherheitsbügel geliefert.
99644901_a_de.qxp 20/12/2007 14:03 Page 5
Page 50

6
1 / BESCHREIBUNG DES GERÄTS
DE
BESCHREIBUNG DES PROGRAMMIERERS
••
A
K
A
B
Anzeige der Gararten
Anzeige der Ofentemperatur
Anzeige der gewählten
Einschubleiste und Garart
Anzeige für den Temperaturanstieg
Anzeige der Uhr oder des Kurzzeitweckers
Anzeige des Kurzzeitweckers
Anzeiger für die Tastensperre
(Kindersicherung)
C
D
E
Anzeige für Ende des Garvorgangs
Anzeige des Endes der Garzeit
Anzeiger der Gardauer
Anzeige der Gardauer
Reinigungsanzeige
Verriegelung Pyrolyse
F
G
H
I
C
J
I
L
G
F
E
B
H
J
K
L
M
M
D
99644901_a_de.qxp 20/12/2007 14:03 Page 6
Page 51

7
1 / BESCHREIBUNG DES GERÄTS
DE
WAHLTASTEN
••
A
B
C
D
E
F
G
H
I
J
K
Auswahl der Gararten
Gartemperatur
Einstelltasten
Garzeit
Kurzzeitwecker
Ende der Garzeit
Reinigung
EASY COOK-Taste
Stopp
Start
Tastenverriegelung (Kindersicherung)
Anzeige der ausgewählten Gerichte mit EASY
COOK
L
A
B
D
E
F
G
C
H
I
J K
L
99644901_a_de.qxp 20/12/2007 14:03 Page 7
Page 52

8
2 / BENUTZUNG DES GERÄTS
DE
•
Einstellung der Uhr
--
Bei Anschluss an den Strom
Die Anzeiger blinkt auf 12.00 Uhr (Abb.1).
Die Uhrzeit durch Drücken der Tasten < und >
einstellen (bei Festhalten der Taste erfolgt ein
Schnelldurchlauf) (Abb.2).
Beispiel: 12.30 Uhr
Zur Bestätigung die Taste drücken.
Die Anzeige blinkt nicht mehr (Abb.3).
Abb.1
Abb.2
Abb.2
Abb.3
Abb.1
- Einstellung der korrekten Uhrzeit
Taste und einige Sekunden lang
gedrückt halten, bis die Anzeige blinkt
(Abb.1), dann loslassen.
Signaltöne geben an, dass eine Einstellung
vorgenommen werden kann.
Die Uhrzeit mit den Tasten < und > einstellen
(Abb.2).
Zur Bestätigung die Taste drücken.
NUTZUNG DES PROGRAMMIERERS
Achtung
Wenn keine Bestätigung über Taste
“ ” erfolgt, wird nach einigen Sekunden
automatisch gespeichert.
••
99644901_a_de.qxp 20/12/2007 14:03 Page 8
Page 53

9
2 / BENUTZUNG DES GERÄTS
DE
•Sofortiger Garvorgang
— Der Programmierer darf nur die Uhrzeit
anzeigen; diese darf nicht blinken.
Auf die Taste (Abb.1) drücken und
anschließend mit den Tasten < oder > die
Garart auswählen (Abb.2).
Beispiel: —> die kleine Ziffer am rechten
Rand des Bildschirms gibt die empfohlene
Einschubhöhe an, z. B. "2" (Abb. 2).
— Mit Taste
““
SSttaarrtt””
(Abb.3) bestätigen.
Die Anzeige für Garzeit und empfohlene
Temperatur leuchten permanent. Die Anzeige
für die Einschubleisten und die eingeschalteten
Elemente leuchtet auf.
Der Backofen geht an.
Das Gericht nach den Empfehlungen in der
Anzeige in den Backofen stellen.
Der Backofen schlägt die für die gewählte
Garart optimale Temperatur vor.
Jedoch kann die Temperatur über die Taste
““TT°°CC””
unter der Anzeige (Abb.4) angepasst
werden.
“°C” blinkt in der Anzeige und bedeutet, dass
die Temperatur über die Tasten < oder >
angepasst werden kann (Abb.5).
Beispiel: —> auf 220°C angepasst.
— Mit Taste
““
SSttaarrtt””
bestätigen.
Der Anzeiger für den Temperaturanstieg
zeigt die Temperaturentwicklung im Backofen
an.
Wenn die gewählte Temperatur erreicht wird,
ertönen Signaltöne.
Zum Abschalten des Garvorgangs die Taste
““
SSttoopp””
einige Sekunden lang drücken.
Abb.2
Achtung
Garvorgänge erfolgen immer bei geschlossener Ofentür.
Achtung
Nach einem Garzyklus funktioniert die Gebläseturbine noch einige Zeit, um
zuverlässigen Ofenbetrieb sicher zu stellen.
Abb.1
Abb.4
Abb.5
Abb.3
99644901_a_de.qxp 20/12/2007 14:04 Page 9
Page 54

10
2 / BENUTZUNG DES GERÄTS
DE
--
Unmittelbar anlaufender Garvorgang
über vorprogrammierte Zeit
- Garmodus wählen und Temperatur anpassen
(s. Absatz: sofortiger Garvorgang).
- Die Taste drücken, bis die Anzeige für die
Dauer der Garzeit blinkt .
Die Anzeige 0:00 blinkt und zeigt an, dass die
Garzeit jetzt eingestellt werden kann (Abb.
1).
- Über Taste <<oder >>die gewünschte Zeit
einstellen.
Beispiel: 30 Minuten Garzeit (Abb.
2).
Das Ende der Garzeit wird nach einigen
Sekunden automatisch abgespeichert, oder
kann über die Taste
““SSttaarrtt””
bestätigt werden.
Die Anzeige für die Dauer der Garzeit blinkt
nicht mehr.
Die eingestellte Zeit läuft sofort ab
Einstellung.
NNaacchh ddiieesseenn 33 SScchhrriitttteenn bbeeggiinnnntt ddeerr OOffeenn zzuu
hheeiizzeenn::
Wenn die gewählte Temperatur erreicht wird,
ertönen Signaltöne.
Am Ende der Garzeit (Ende der
programmierten Garzeit)
- schaltet sich der Backofen aus,
- blinken der Anzeiger für die Dauer der
Garzeit und 0:00 (Abb.
3),
- ertönt einige Minuten lang eine Reihe von
Signaltönen. Das akustische Signal kann
durch Druck auf
““SSttoopp””
abgestellt werden.
Abb.2
PROGRAMMIERTER
GARVORGANG
••
Abb.1
Abb.3
99644901_a_de.qxp 20/12/2007 14:04 Page 10
Page 55

11
2 / BENUTZUNG DES GERÄTS
DE
--
Zeitlich versetzt anlaufende Garzeit und
Wahl des Endzeitpunkts des
Garvorgangs
WWiiee bbeeii eeiinneemm pprrooggrraammmmiieerrtteenn GGaarrvvoorrggaanngg
vvoorrggeehheenn..
- Die Taste drücken, bis die Anzeige für das
Ende der Garzeit blinkt .
Die Anzeige blinkt und zeigt an, dass die
Einstellung vorgenommen werden kann
(Abb.
1).
- Den gewünschten Endzeitpunkt mit dem
Wahlschalter <<oder >>einstellen.
Beispiel: Ende der Garzeit um 16 Uhr (Abb.
2).
Das Ende der Garzeit wird nach einigen
Sekunden automatisch abgespeichert, oder
kann über die Taste
““SSttaarrtt””
bestätigt werden.
Die Anzeige für das Ende der Garzeit blinkt
nicht mehr.
NNaacchh ddiieesseenn 33 SScchhrriitttteenn wwiirrdd ddaass AAuuffhheeiizzeenn
zzeeiittlliicchh ssoo vveerrsseettzztt,, ddaassss ddeerr GGaarrvvoorrggaanngg uumm
1166..0000 UUhhrr
aabbggeesscchhlloosssseenn iisstt..
Am Ende der Garzeit (Ende der
programmierten Garzeit)
- schaltet sich der Backofen aus,
- blinken die Anzeige für die Dauer der Garzeit
und 0:00 (Abb.
3),
- ertönt einige Minuten lang eine Reihe von
Signaltönen. Das akustische Signal kann durch
Druck auf
““SSttoopp””
abgestellt werden.
Die Anzeige springt wieder auf die Uhrzeit um.
Bei programmierten Garvorgängen ist der
Ofenraum beleuchtet, wenn der Garvorgang
anläuft und erlischt nach Ende des
Garvorgangs.
Abb.1
Abb.2
Abb.3
PROGRAMMIERTER
GARVORGANG
••
99644901_a_de.qxp 20/12/2007 14:04 Page 11
Page 56

12
2 / BENUTZUNG DES GERÄTS
DE
-- DDeerr PPrrooggrraammmmiieerreerr ddeess OOffeennss kkaannnn aallss
uunnaabbhhäännggiiggeerr KKuurrzzzzeeiittwweecckkeerr eeiinnggeesseettzztt
wweerrddeenn,, oohhnnee ddaassss ddeerr O
Offeenn eeiinnggeesscchhaalltteett iisstt..
In diesem Fall hat die Anzeige des
Kurzzeitweckers Vorrang vor der Anzeige der
Tageszeit.
- Auf die Taste drücken (Abb.1).
Das Symbol des Kurzzeitweckers und
0m00s blinken in der Anzeige.
- Die Zeiteinstellung über die Tasten <<oder
>>
(Abb.2)einstellen.
- Über die Taste abspeichern, oder einige
Sekunden warten.
Achtung
Die Programmierung des Kurzzeitweckers kann jederzeit geändert oder aufgehoben
werden.
Abb.1
Abb.2
NUTZUNG DER FUNKTION KURZZEITWECKER
••
Der Anzeiger blinkt nach einigen Sekunden nicht mehr, der Kurzzeitwecker startet und zählt die
Zeit sekundenweise rückwärts.
Wenn die eingestellte Zeit abgelaufen ist, ertönt ein akustisches Signal.
Das akustische Signal kann durch Druck auf
““SSttoopp””
abgestellt werden.
Die Anzeige springt wieder auf die Uhrzeit um.
99644901_a_de.qxp 20/12/2007 14:04 Page 12
Page 57

13
2 / BENUTZUNG DES GERÄTS
DE
VERÄNDERUNG DER EMPFOHLENEN TEMPERATUR
Die Garfunktion wählen.
- Auf
SSttaarrtt
drücken.
Wenn die empfohlene Temperatur verändert werden soll:
- Die Taste
°°CC
drücken, bis die Temperatur blinkt.
- Die Taste < oder > bis zur gewünschten Temperatur drücken.
- Zur Bestätigung Taste
SSttaarrtt
drücken.
••
VERRIEGELUNG DER BEDIENUNGSELEMENTE (KINDERSICHERUNG)
BEI AUSGESCHALTETEM BACKOFEN
Der Zugriff zu den Bedienungselementen des
Backofens kann folgendermaßen gesperrt
werden:
Bei
aauussggeesstteelllltteemm
Backofen einige Sekunden
die Taste gedrückt halten (Abb.1),
ein “Schlüssel” wird auf dem Display
angezeigt -> die Bedienelemente des Ofens
sind verriegelt (Abb.2).
Für die Freigabe einige Sekunden lang die
Taste drücken.
Die Bedienelemente des Backofens sind
erneut zugänglich.
••
Achtung
Bei programmiertem Garvorgang kann der Backofen nicht gesperrt werden.
Abb.1
Abb.2
99644901_a_de.qxp 20/12/2007 14:04 Page 13
Page 58

14
2 / BENUTZUNG DES GERÄTS
DE
“EASY COOK.”-FUNKTION
Die Funktion EASY COO Kerleichtert die
Aufgabe erheblich, denn der Backofen
berechnet automatisch alle Garparameter je
nach ausgewähltem Gericht (Temperatur,
Gardauer, Garmodus) durch elektronische
Sonden im Backofen, die ständig den
Feuchtigkeitsgrad und die Temperaturveränderungen messen.
WIE FUNKTIONIERT DIE FUNKTION EASY
COOK?
Dieser Garmodus läuft in 2 Phasen ab:
1) Eine Suchphase, während der der Backofen
mit dem Aufheizen beginnt und die ideale
Gardauer bestimmt. Diese Phase dauert je
nach Gericht 5 bis 40 Minuten.
- Taste “EASY COOK” (Abb.1) drücken.
Der Backofen schlägt 12 Gerichte vor:
- Zur Auswahl des Gerichts auf Taste < oder >
drücken (Abb.2).
Beispiel: Soufflés
·· RRiinnddeerrbbrraatteenn
·· SScchhwweeiinneebbrraatteenn
·· LLaammmm
·· FFiisscchh
.. HHäähhnncchheenn
·
PPiizzzzaa
·· GGeeffüülllltteess GGeemmüüssee
·· SSo
ouuffffllééss
·· SSaallzziiggee TTaarrttee
·· SSüüßßee TTaarrttee
-- KKlleeiinnggeebbääcckk
·· KKuucchheenn
Nach Auswahl des Gerichtes die Zubereitung
auf der angezeigten Einschubleiste einführen.
- Über die Taste
SSttaarrtt
den Garvorgang einleiten
(Abb.3).
••
Abb.1
Abb.2
Abb.3
99644901_a_de.qxp 20/12/2007 14:04 Page 14
Page 59

15
2 / BENUTZUNG DES GERÄTS
DE
NN..BB..:: FFüürr ddiiee FFuunnkkttiioonn
EEAASSYY CCOOOOKK
iisstt
kkeeiinneerrlleeii VVoorrhheeiizzeenn ddeess BBaacckkooffeennss
eerrffoorrddeerrlliicchh.. DDeerr GGaarrvvoorrggaanngg mmuussss
UUNNBBEEDDIINNGGTT bbeeii kkaalltteemm BBaacckkooffeen
n bbeeggiinnnneenn..
VVoorr ddeemm nnääcchhsstteenn GGaarrvvoorrggaanngg mmuussss ddeerr
BBaacckkooffeenn vvoollllssttäännddiigg aabbkküühhlleenn,, aannssoonnsstteenn
mmaacchheenn aakkuus
sttiisscchhee SSiiggnnaallee ddaarraauuff
aauuffmmeerrkkssaamm,, ddaassss ddeerr BBaacckkooffeenn wwaarrmm iisstt..
WWIICCHHTTIIGG:: WWäähhrreenndd ddiieesseerr PPhhaassee ddiiee
BBaacck
kooffeennttüürr nniicchhtt ööffffnneenn,, ddaammiitt ddiiee
AAuuffzzeeiicchhnnuunngg ddeerr DDaatteenn nniicchhtt ggeessttöörrtt wwiirrdd..
DDiiee SSyymmbboollee ddiieesseerr SSuucchhp
phhaassee ssiinndd ddrreehheennddee
PPffeeiillee..
2) Eine zweite Garphase: Der Backofen hat die
notwendige Zeit bestimmt und zeigt sie sowie
den Zeitpunkt des Endes der Garzeit an. Die
angegebene verbleibende Zeit berücksichtigt
die Gardauer der ersten Phase. Jetzt kann die
Tür geöffnet werden, zum Beispiel, um den
Braten zu begießen.
- Der Ofen stellt sich am Ende der Garzeit aus.
FFUUNNKKTTIIOONN ZZEEIITTVVEERRSSEETTZZTTEESS GGAARREENN::
Für das zeitversetzte Garen,
- Taste Ende der Garzeit drücken, bis die
Anzeige blinkt und das Ende der Garzeit
ändern.
BEMERKUNG: Wenn ein zweiter Garvorgang
mit EASY COOK durchgeführt werden soll,
abwarten, bis der Backofen vollkommen
abgekühlt ist. Eine Benutzung der manuellen
Funktion ist jedoch auch bei heißem Ofen
möglich.
EASY COOK.”-FUNKTION
••
99644901_a_de.qxp 20/12/2007 14:04 Page 15
Page 60

16
3 / EINFÜHRUNG IN DIE ICS-FUNKTIONEN
DE
RR
iinnddeerrbbrraatteenn
• Rinderbraten
(halb durchgebraten)
• Den Braten auf das Gitter mit der Fettpfanne
darunter legen.
WWeennnn ddiiee GGaarrzzeeiitt ppeerrmmaanneenntt lleeuucchhtteett,, kkaannnn eerr
uummggeeddrreehhtt wweerrddeenn..
SS
cchhwweeiinnee--
bbrraattee
• Schweinebraten
- Schweinekamm
- Filet
LL
aammmm
• Keule 1 kg bis 2 1/2 kg
• Die Keule auf das Gitter mit der Fettpfanne
darunter legen.
WWeennnn ddiiee GGaarrzzeeiitt ppeerrmmaanneenntt lleeuucchhtteett,, kkaannnn ssiiee mmggeeddrreehhtt
wweerrddeenn..
FF
iisscchh
• Ganze Fische
(Goldbrasse, Seehecht, Forellen, Makrelen...)
• Fischbraten
HH
äähhnncchheenn
• Hähnchengewicht 1 kg bis 1.700 kg
• Entchen, Perlhuhn ...
PP
iizzzzaa
• Frische Pizza aus dem Feinkostgeschäft
• Pizza aus Fertigteig
• “Hausgemachter” Pizzateig
• Tiefkühl-Pizza
GG
eeffüülllltteess
GGeemmüüssee
• Gefüllte Tomaten, Paprikaschoten ...
• Lasagne (frisch oder tiefgekühlt)
• Hackfleisch mit Kartoffelbrei, Brandade …
SS
oouufffflléé
• Eine hohe Form mit geraden Kanten mit 21cm
Durchmesser wählen.
SS
aallzziiggee
TTaarrttee
• Frischer Speckkuchen
• Tiefgekühlter Speckkuchen
• Tiefgekühlte Körbe
SS
üüßßee
TTaarrttee
• Frische Tarte
• Tiefgekühlte Tarte
KK
lleeiinnggeebbääcckk
• Kleine Plätzchen: Cookies, Kleingebäck, Croissants,
Brötchen, Rosinenbrötchen aus der Dose, CroqueMonsieur.
KK
uucchheenn
• Kuchen für die Familie: Englischer Kuchen (salzig, süß),
Sandkuchen.
• Gebrauchsfertige Zubereitungen in der Tüte.
99644901_a_de.qxp 20/12/2007 14:04 Page 16
Page 61

17
3 / EINFÜHRUNG IN DIE ICS-FUNKTIONEN
DE
• Das Fleisch mindestens 1 Stunde vor der Zubereitung aus dem Kühlschrank nehmen:
• Der Braten wird nicht durchgebraten; wenn gut durchgebratenes Fleisch gewünscht wird, eine herkömmliche
Bratfunktion auswählen.
• Möglichst viel von der Speckschicht entfernen: sie führt zu Rauchentwicklung.
• Nach dem Garvorgang den Braten 7 bis 10 Minuten in Aluminiumfolie gewickelt ruhen lassen, bevor er
aufgeschnitten wird.
• Das Fleisch mindestens 1 Stunde vor der Zubereitung aus dem Kühlschrank nehmen: je kälter das Fleisch ist,
je kälter ist es am Ende der Garzeit.
• Einen Tontopf verwenden. 1 bis 2 EL Wasser hinzufügen.
• Nach dem Garvorgang den Braten 7 bis 10 Minuten in Aluminiumfolie gewickelt ruhen lassen, bevor er
aufgeschnitten wird. Am Ende der Garzeit salzen.
• Das Fleisch mindestens 1 Stunde vor der Zubereitung aus dem Kühlschrank nehmen:
• Eher eine runde und pralle Keule als eine lange und dünne wählen.
• Nach dem Garvorgang die in Aluminiumfolie eingewickelte Keule ruhen lassen.
• Diese Funktion nur für ganze Fische verwenden, die mit Gewürzen und Weißwein zubereitet werden.
(Bei gegrilltem oder in Folie gebackenem Fisch ist das Vorheizen des Backofens erforderlich.)
• Garen auf dem Teller: Besser Tonteller verwenden, damit Spritzer vermieden werden.
• Um Spritzer zu vermeiden, die Haut des Geflügels einstechen.
• Pizza auf das Gitter legen, um einen knusprigen Teig zu erhalten.
(Es kann ein Backpapier zwischen Gitter und Pizza eingeschoben werden, damit der Backofen vor tropfendem
Käse geschützt wird).
• Pizza auf das Backblech legen, um einen weichen Teig zu erhalten.
• Die Größe des Behälters entsprechend der zu garenden Menge auswählen, damit kein Saft überläuft.
• Die Form innen mit Butter bestreichen, die Innenseite nicht mit den Fingern berühren, denn sonst geht das
Soufflé nicht auf.
• Eine Form aus Aluminium mit Anti-Haft-Beschichtung benutzen: Der Teig wird unten knusprig.
• Die tiefgekühlten Speckkuchen aus der Schale nehmen, bevor sie auf das Gitter gelegt werden.
• Eine Form aus Aluminium mit Anti-Haft-Beschichtung benutzen:
• Der Teig wird unten knuspriger.
• Kleine Plätzchen auf dem Backblech auf dem Gitter.
Um ein gutes Ergebnis zu erzielen, muss Brandteig auf “KUCHEN” gebacken werden.
• In runder, eckiger ... Kuchenform zubereiteter Kuchen, immer auf dem Rost.
Es können 2 Kuchen in Formen nebeneinander gebacken werden.
99644901_a_de.qxp 20/12/2007 14:04 Page 17
Page 62

18
4 / BACKTABELLE FÜR DEN BACKOFEN
DE
*
Für die Angabe auf dem Energieetikett gemäß der europäischen Norm EN 50304 und der Europäischen
Richtlinie 2002/40/EG benutzte Sequenz(en).
UUMMLLUUFFTT--PPLLUUSS
(empfohlene Temperatur
118800°°CC
, mindestens 35°C, maximal 235°C)
•
Das Garen erfolgt durch das Heizelement an der Rückwand des Backofens und die
Luftschraube.
•
Schneller Temperaturanstieg: Gewisse Gerichte können in den kalten Backofen gestellt
werden.
•
Für safitges helles Fleisch, Fisch und Gemüse empfohlen.
Für Koch- und Backvorgänge auf bis zu 3 Ebenen.
UUMMLLUUFFTT--PPLLUUSS MMIITT ZZUUAASSÄÄTTZZLLIICCHHEERR OOBBEERR-- UUNNDD UUNNTTEERRHHIITTZZEE
(empfohlene Temperatur
220055°°CC
, mindestens 35°C, maximal 275°C)
•
Das Garen erfolgt durch Ober- und Unterhitze sowie Luftumwälzung.
•
Kombination dreier Wärmequellen: viel Unterhitze, ein wenig Umlufthitze und etwas
Grillwirkung zum Anbräunen.
•
Für Quiches, Blätterteigpasteten, saftige Obstkuchen vorzugsweise in Tongefäßen
empfohlen.
OOBBEERR-- UUNNDD UUNNTTEERRHHIITTZZEE ((EECCOO))
(empfohlene Temperatur
220000°°CC
, mindestens 35°C, maximal 275°C)
•
Das Backen erfolgt durch Unter- und Oberhitze.
•
Mit dieser Einstellung kann unter Beibehaltung gleicher Backergebnisse Energie
gespart werden.
•
Die Energiesparposition dient als Grundlage für die Angaben auf dem Energieetikett.
•
Alle Garvorgänge erfolgen
oohhnnee VVoorrwwäärrmmeenn..
UUMMLLUUFFTT--PPLLUUSS MMIITT OOBBEERRHHIITTZZEE
(empfohlene Temperatur
220000°°CC
, mindestens 180°C, maximal 230°C)
•
Das Garen erfolgt abwechselnd durch Oberhitze und Umluft.
•
Vorheizen nicht erforderlich. Geflügel und saftige, rundum knusprige Braten.
•
Der Spieß (nicht im Lieferumfang) dreht sich, so lange die Backofentür geschlossen ist.
•
Die Fettpfanne auf die untere Einschubleiste einschieben.
•
Für alle Geflügelsorten oder Spießbraten zum Anbraten und Garen von Lammkeule,
Rinderkoteletts empfohlen. Zur Erhaltung des zarten Charakters von Fischkoteletts.
WWAARRMM HHAALLTTEENN
(empfohlene Temperatur
8800°°CC
, mindestens 35°C, maximal 100°C)
•
In dieser Position können Zubereitungen durch dosierte Wärmeabgabe des
rückwärtigen Wärmeelements in Kombination mit Umluft warm gehalten werden.
•
Empfohlen, um das Aufgehen von Brot-, Hefe- und Kugelhopfteig zu begünstigen, ohne
40°C zu überschreiten (Telleraufwärm- oder Auftautemperatur).
*
*
99644901_a_de.qxp 20/12/2007 14:05 Page 18
Page 63

19
4 / BACKTABELLE FÜR DEN BACKOFEN
DE
AAUUFFTTAAUUEENN
(empfohlene Temperatur
3300°°CC
mindestens 30°C, maximal 50°C)
•
Zum Auftauen wird wenig Wärme zugeführt und die Luft umgewälzt.
•
Ideal für empfindliche Nahrungsmittel geeignet (Obstkuchen, Sahnezubereitungen ...)
•
Das Auftauen von Fleisch, Brötchen ... erfolgt bei 50 °C (Fleisch auf das Rost legen, ein
Gefäß zum Auffangen der Auftauflüssigkeit darunter stellen. Diese Flüssigkeit ist nicht für
den Verzehr geeignet).
BBRROOTT
(empfohlene Temperatur
220055°°CC
, mindestens 35°C, maximal 275°C)
•
Empfohlene Einstellung zum Backen von Brot.
•
Nach dem Vorheizen die Teigkugel auf das Kuchenblech legen - Einschubleiste 2.
•
Nicht vergessen, eine Form mit etwas Wasser unten in den Ofen zu stellen. Dadurch
entsteht eine knusprige, goldbraune Kruste.
99644901_a_de.qxp 20/12/2007 14:05 Page 19
Page 64

20
5 / PFLEGE UND REINIGUNG DES BACKOFENS
DE
--
Prüfen, dass der Programmierer die Tageszeit
anzeigt und diese nicht blinkt (Abb.1).
Es besteht die Auswahl zwischen 2 Pyrolysezyklen:
Pyrocontrol: Pyrolysezeit je nach
Verschmutzung zwischen 1 1/2 und 2 1/4
Stunden.
Pyro Max: Pyrolysedauer 2 Stunden.
Taste (Abb.2) drücken.
Es wird die Standardzeit für einen
Pyrolysezyklus - 1 1/2 Stunden angezeigt
(Abb.1), diese kann jedoch individuell
angepasst werden.
Beispiel: Pyrolysezyklus 2 Stunden.
Über Druck auf die Taste < oder > die
gewünschte Dauer einstellen (Abb.3).
Zur Bestätigung die Taste
SSttaarrtt
drücken.
Die Pyrolyse läuft an. Die eingestellte Zeit läuft
sofort ab Einstellung.
Das Symbol für den Temperaturanstieg
erscheint.
Im Verlauf der Pyrolyse blinkt das Symbol
in der Programmierleiste und zeigt an, dass die
Tür verriegelt ist (Abb.4).
Am Ende der Pyrolyse blinken 0:00 und das
Symbol .
--
Wenn der Backofen kalt ist, die weiße Asche
mit einem feuchten Tuch entfernen.
Der Backofen ist sauber und wieder für einen
beliebigen Garvorgang bereit.
PYROLYSE
•Sofortige Pyrolyse
••
Abb.1
Abb.2
Abb.4
Achtung
Zubehör und Träger des herausgezogenen Gerichts aus dem Backofen nehmen
(s. “Installation”, Kapitel Zubehör) und eventuelle übergelaufene Reste beseitigen.
Abb.3
99644901_a_de.qxp 20/12/2007 14:05 Page 20
Page 65

21
5 / PFLEGE UND REINIGUNG DES BACKOFENS
DE
Abb.1
•Spätere Pyrolyse
--
Die Anweisungen aus dem Absatz “Sofortige
Pyrolyse” befolgen.
Nach Bestätigung des Pyrolysezyklus über die
Tas te
SSttaarrtt::
- Taste drücken.
Das Symbol für das Ende der Garzeit blinkt und
gibt an, dass eine Einstellung vorgenommen
werden kann (Abb.1).
- Den gewünschten Endzeitpunkt mit der Taste
+ oder - einstellen (Abb.2).
Beispiel: Ende der Garzeit um 18 Uhr.
Zur Bestätigung die Taste
SSttaarrtt
drücken.
--
Anschließend wird der Beginn der Pyrolyse so
verschoben, dass sie um 18.00 Uhr
abgeschlossen ist.
PYROLYSE
••
Abb.2
99644901_a_de.qxp 20/12/2007 14:05 Page 21
Page 66

22
6 / NOTE
DE
99644901 12/07
99644901_a_de.qxp 20/12/2007 14:05 Page 22
 Loading...