

Page 1

FR GUIDE D'UTILISATION
DE BETRIEBSANLEITUNG
EN USER GUIDE
Four
Backofen
Oven
99644891_A_FR.qxp 19/12/2007 17:30 Page 1
Page 2

2
Chère Cliente, Cher Client,
Vous venez d'acquérir un four THOMSON et nous vous en remercions.
Nous avons mis dans cet appareil toute notre passion, notre savoir-faire pour qu'il
réponde au mieux à vos besoins. Innovant, performant, nous l'avons conçu pour qu'il
soit aussi toujours facile à utiliser.
Vous trouverez également dans la gamme des produits THOMSON, un vaste choix
de cuisinières, de fours à micro-ondes, de tables de cuisson, de hottes aspirantes,
de lave-vaisselle, de lave-linge, de sèche-linge, de réfrigérateurs et congélateurs
que vous pourrez coordonner à votre four THOMSON.
Bien entendu, dans un souci permanent de satisfaire le mieux possible vos
exigences vis à vis de nos produits, notre service consommateurs est à votre
disposition et à votre écoute pour répondre à toutes vos questions ou suggestions
(coordonnées à la fin de ce livret).
Et connectez-vous aussi sur notre site vous trouverez tous nos produits, ainsi que
des informations utiles et complémentaires.
THOMSON
Dans le souci d'une amélioration constante de nos produits, nous nous réservons le droit
d'apporter à leurs caractéristiques techniques, fonctionnelles ou esthétiques toutes
modifications liées à leur évolution.
Important :
Avant de mettre votre appareil en marche, veuillez lire attentivement ce guide
d'installation et d'utilisation afin de vous familiariser plus rapidement avec son
fonctionnement.
99644891_A_FR.qxp 19/12/2007 17:30 Page 2
Page 3

3
SOMMAIRE
FR
1 / DESCRIPTION DE VOTRE APPAREIL
••
Présentation de votre four
___________________________________ 4
••
Accessoires
_______________________________________________ 4
••
Présentation du programmateur
______________________________
5
2 / UTILISATION DE VOTRE APPAREIL
••
Utilisation du programmateur
º
Comment régler l’heure
_________________________________
6
º
Cuisson immédiate
_____________________________________
7
••
Cuisson programmée
º
Départ immédiat
_______________________________________
8
º
Départ différé
_________________________________________
9
••
Utilisation de la fonction minuterie
____________________________
10
3 / MODES DE CUISSON DU FOUR
_________________________________
11
4 / ENTRETIEN ET NETTOYAGE DE VOTRE FOUR
____________________
12
99644891_A_FR.qxp 19/12/2007 17:30 Page 3
Page 4

4
1 / DESCRIPTION DE VOTRE APPAREIL
FR
PRESENTATION DE VOTRE FOUR
••
A
B
Programmateur
Sélecteur de température
Sélecteur de fonctions
C
D
E
Lampe
Gradins fil
E
D
B
A
C
•Accessoires
Votre appareil est équipé de deux grilles sécurité avec poignée, d’une grille avec poignées pour
plat 45 mm et d’une pour plat 20 mm.
99644891_A_FR.qxp 19/12/2007 17:30 Page 4
Page 5
5
1 / DESCRIPTION DE VOTRE APPAREIL
FR
PRESENTATION DU PROGRAMMATEUR
••
A
D
A
B
Affichage de l’heure et des durées
Indicateur de durée de cuisson
Indicateur de fin de cuisson
Indicateur du minuterie
C
D
E
Indicateur de verrouillage
Indicateur de nettoyage
Affichage de la température
Touche de sélection (durées et heures)
Touches de réglage du temps
F
G
G
H
H
C
B
F
I
E
I
99644891_A_FR.qxp 19/12/2007 17:30 Page 5
Page 6
6
2 / UTILISATION DE VOTRE APPAREIL
FR
UTILISATION DU PROGRAMMATEUR
•
Comment régler l’heure
--
A la mise sous tension
L’afficheur clignote à 12:00 (fig.1).
Réglez l’heure en appuyant sur les touches +
et - (le maintien de la touche permet d’obtenir
un défilement rapide) (fig.2).
Exemple : 12H30
Appuyez sur la touche “ ” pour valider.
L’affichage ne clignote plus.
- Pour remettre à l’heure l’horloge
Le sélecteur de fonction doit obligatoirement
être sur la position 0 (fig.1).
Appuyez sur la touche “ ” pendant
quelques secondes jusqu’à faire clignoter
l’afficheur (fig.2), puis relâchez. Des bips
sonores indiquent que le réglage est alors
possible.
Ajustez le réglage de l’heure avec les
touches + et - (fig.3).
Appuyez sur la touche “ ” pour valider
(fig.4).
fig.1
fig.2
fig.2
fig.3
fig.4
fig.1
Attention
S’il n’y a pas de validation par la
touche “ ”, l’enregistrement est automatique au bout de quelques secondes.
••
99644891_A_FR.qxp 19/12/2007 17:30 Page 6
Page 7
7
2 / UTILISATION DE VOTRE APPAREIL
FR
•Cuisson immédiate
— Le programmateur ne doit afficher que
l’heure.
Celle-ci ne doit pas clignoter (fig.1).
Tournez le sélecteur de fonctions sur la position de votre choix.
Exemple : position (fig.2).
Votre four vous propose la température optimale pour ce type de cuisson.
Il vous est cependant possible d’ajuster la
température en actionnant la manette de sélection de température vers ++ou
--
(fig.3).
PPllaacceezz vvoottrree ppllaatt ddaannss llee ffoouurr
selon les recommandations fournies par le guide de cuisson.
Après ces actions, le four chauffe, et l’indicateur de température clignote.
Une série de bips sonores retentit lorsque le
four atteint la température choisie.
Celle-ci cesse de clignoter.
Pour arrêter la cuisson, ramenez le sélecteur
de fonctions sur 0.
fig.2
fig.4
Attention
Toutes les cuissons se font porte fermée.
Attention
Après un cycle de cuisson, la turbine de refroidissement continue de fonctionner
pendant un certain temps, afin de garantir une bonne fiabilité du four.
fig.1
fig.3
99644891_A_FR.qxp 19/12/2007 17:30 Page 7
Page 8
8
FR
2 / UTILISATION DE VOTRE APPAREIL
--
Cuisson avec départ immédiat et
durée programmée
- Choisissez le mode de cuisson souhaité et
ajustez la température (fig.
1).
- Appuyez sur la touche “ ” jusqu’à faire
clignoter l’indicateur de durée de cuisson
“”.
L’affichage clignote à 0h00 pour indiquer que
le réglage est alors possible (fig.
2).
- Appuyez sur la touche ++ou --pour régler le
temps souhaité.
Exemple : 30 min de cuisson (fig.
3).
L’enregistrement du temps de cuisson est automatique au bout de quelques secondes.
L’affichage de la durée ne clignote plus.
Le décompte de la durée se fait immédiatement après le réglage.
AApprrèèss cceess 33 aaccttiioonnss,, llee ffoouurr cchhaauuffffee ::
Une série de bips sonores retentit lorsque le
four atteint la température choisie.
En fin de cuisson (fin du temps programmé),
- le four s’arrête,
- l’indicateur de durée de cuisson et 0:00 clignotent (fig.
4),
- une série de bips sonores est émise durant
quelques minutes. L’arrêt définitif de ces bips
se fait en appuyant sur n’importe quelle
touche.
L’affichage repasse à l’heure du jour en ramenant le sélecteur de fonctions sur 0 (fig.
5).
fig.2
fig.3
CUISSON PROGRAMMEE
••
fig.1
fig.4
fig.5
99644891_A_FR.qxp 19/12/2007 17:30 Page 8
Page 9

9
FR
2 / UTILISATION DE VOTRE APPAREIL
--
Cuisson avec départ différé et heure de
fin choisie
PPrrooccééddeezz ccoommmmee uunnee ccuuiissssoonn pprrooggrraammmmééee..
- Après le réglage de la durée de cuisson, ap-
puyez sur la touche “ ” jusqu’à faire cli-
gnoter l’indicateur de fin de cuisson “ ”.
L’affichage clignote pour indiquer que le réglage est alors possible (fig.
1).
- Appuyez sur la touche ++ou --pour régler
l’heure de fin de cuisson souhaitée.
Exemple : fin de cuisson à 13h (fig.
2).
L’enregistrement de la fin de cuisson est automatique au bout de quelques secondes.
L’affichage de la fin de cuisson ne clignote
plus.
AApprrèèss cceess 33 aaccttiioonnss,, llee ddééppaarrtt ddee llaa cchhaauuffffee
eesstt ddiifffféérréé ppoouurr qquuee llaa ccuuiissssoonn ssooiitt ffiinniiee àà 1133hh..
En fin de cuisson (fin du temps programmé),
- le four s’arrête,
- l’indicateur de durée de cuisson et 0:00 clignotent (fig.
3),
- une série de bips sonores est émise durant
quelques minutes. L’arrêt définitif de ces bips
se fait en appuyant sur n’importe quelle
touche.
L’affichage repasse à l’heure du jour en ramenant le sélecteur de fonctions sur 0 (fig.
4).
La cavité est éclairée à partir du démarrage
de la cuisson et s’éteint en fin de cuisson.
fig.1
fig.2
fig.3
fig.4
CUISSON PROGRAMMEE
••
99644891_A_FR.qxp 19/12/2007 17:30 Page 9
Page 10
10
2 / UTILISATION DE VOTRE APPAREIL
FR
-- LLee pprrooggrraammmmaatteeuurr ddee vvoottrree ffoouurr ppeeuutt êêttrree
uuttiilliisséé ccoommmmee mmiinnuutteerriiee iinnddééppeennddaannttee ppeerr--
mmeettttaanntt ddee ddééccoom
mpptteerr uunn tteemmppss ssaannss ffoonncc--
ttiioonnnneemmeenntt dduu ffoouurr..
Dans ce cas, l’affichage de la minuterie est
prioritaire sur l’afficheur de l’heure du jour.
- Appuyez sur la touche “ ” (fig.1) jusqu’à
faire clignoter le symbole minuterie.
-> 0.00 et un petit sablier clignotent.
- Ajustez le temps choisi en appuyant sur les
touches ++ou
--
(fig.2).
- Appuyez sur la touche “ ” pour valider ou
attendre quelques secondes.
Attention
Il est possible de modifier ou d’annuler à n’importe quel moment la programmation de
la minuterie.
fig.1
fig.2
UTILISATION DE LA FONCTION
MINUTERIE
••
L’afficheur s’arrête de clignoter au bout de quelques secondes et la minuterie se met en marche
et décompte le temps de secondes en secondes.
Une fois la durée écoulée, la minuterie émet une série de bips sonores pour vous avertir.
L’arrêt de ces bips se fait en appuyant sur n’importe quelle touche.
99644891_A_FR.qxp 19/12/2007 17:30 Page 10
Page 11
11
3 / LES MODES DE CUISSON DU FOUR
FR
*
Séquences(s) utilisée(s) pour l’annonce écrite sur l’étiquette énergétique conformément à la norme
européenne EN 50304 et selon la directive Européenne 2002/40/CE.
*
CCHHAALLEEUURR TTOOUURRNNAANNTTEE
(température préconisée
118800°°CC
mini 35°C maxi 235°C)
•
La cuisson s'effectue par la résistance placée au fond du four et par l’hélice de
brassage d’air.
•
Préchauffage inutile.sauf pour des cuissons exigeant des temps très courts (sablés sur
plusieurs niveaux)
•
Recommandé pour garder le moelleux des viandes, pour les légumes, poissons et pour
les cuissons multiples jusqu’à 3 niveaux.
TTRRAADDIITTIIOONNNNEELL
(température préconisée
224400°°CC
mini 35°C maxi 275°C)
•
La cuisson s'effectue par les éléments inférieur et supérieur et par l’hélice de
brassage d’air.
•
Montée rapide en température : Certains plats peuvent être enfournés four froid.
•
Recommandé pour les
vviiaannddeess, ppooiissssoonnss, lléégguummeess
, posés dans un plat en terre de préfé-
rence.
GGRRIILL PPUULLSSEE
(température préconisée
220000°°CC
mini 180°C maxi 230°C)
•
La cuisson s'effectue , alternativement, par l’élément supérieur et par l’hélice de
brassage d’air.
•
Préchauffage inutile. Volailles et rôtis juteux et croustillants sur toutes les faces.
•
Recommandé pour toutes les
vvoollaaiilllleess
ou
rrôôttiiss
, pour saisir et cuire à coeur
ggiiggoott, ccôôtteess
ddee bbooeeuuff
. Pour garder leur fondant aux pavés de
ppooiissssoonnss
.
TTRRAADDIITTIIOONNNNEELL EECCOO
(température préconisée
220000°°CC
mini 35°C maxi 275°C)
•
La cuisson s'effectue par les éléments inférieur et supérieur sans brassage d’air.
•
Cette position permet de faire un gain d’énergie d’environ 25% en conservant les quali
tés de cuisson. La position ECO est utilisée pour l’étiquetage énergétique.
•
Vous réaliserez une économie d’énergie tout au long de la cuisson mais le temps peut
être plus long.
SSOOLLEE PPUULLSSEEEE
(température préconisée
220055°°CC
mini 35°C maxi 275°C)
•
La cuisson s'effectue par l’élément inférieur associé à un léger dosage du gril et à
l’hélice de brassage d’air.
•
Cuisson par le dessous avec léger dosage dessus. Placez la grille sur le gradin bas.
•
Recommandé pour les
ppllaattss hhuummiiddeess
(quiches, tartes aux fruits juteux...). La pâte sera
bien cuite dessous. Recommandé pour
lleess pprrééppaarraattiioonnss qquuii llèèvveenntt(ccaakkee,, bbrriioocchhee
,
kkoouuggllooff......
) et pour les
ssoouuffffllééss
qui ne seront pas bloqués par une croûte dessus.
les cuissons multiples jusqu’à 3 niveaux.
MMAAIINNTTIIEENN AAUU CCHHAAUUDD // PPAATTEE AA PPAAIINN
(température préconisée
8800°°CC
mini 35°C maxi 100°C)
•
Dosage de l’élément supérieur et inférieur associés au brassage d’air.
•
Recommandé pour
ffaaiirree lleevveerr lleess ppââtteess àà ppaaiinn,, àà bbrriioocchhee,, kkoouuggllooff
...en ne dépassant
pas 40° (chauffe-assiette, décongélation).
GGRRIILL FFOORRTT
(température préconisée
227755°°CC
mini 180°C maxi 275°C)
•
La cuisson s’effectue par l’élément supérieur sans brassage d’air.
• Effectuez un préchauffage de 5 min. Glissez la léchefrite sur le gradin du bas pour
rceuillir le graisses.
• Recommandé pour griller les
ccôôtteelleetttteess, ssaauucciisssseess, ttrraanncchheess ddee ppaaiinn, ggaammbbaass ppoossééeess
ssuurr llaa ggrriillllee
.
*
99644891_A_FR.qxp 19/12/2007 17:30 Page 11
Page 12
12
4 / ENTRETIEN ET NETTOYAGE DE VOTRE FOUR
FR
fig.2
fig.1
fig.3
Pour bénéficier de la quantité de chaleur déjà
emmagasinée dans le four, et économiser de
l’énergie :
Débutez une pyrolyse après une cuisson.
Retirez les accessoires du four et enlevez les
débordements importants qui auraient pu se
produire.
Vérifiez que le programmateur affiche l’heure
du jour et que celle-ci ne clignote pas. (fig.1).
Il suffit de positionner votre sélecteur de cuis-
son sur la position “Pyrolyse”ou sur la po-
sition “Pyrolyse ECO”(fig.1).
La durée d’indisponibilité du four est de 2h30
(2 heures de pyro + 30 minutes de refroidissement) en “Pyrolyse” ou 2h (1h30 de pyro + 30
minutes de refroidissement) en “Pyrolyse
ECO”(cette durée n’est pas modifiable).
Ce temps prend en compte la durée de refroidissement jusqu’au déverrouillage de la porte.
Attention
Le verrouillage de la porte est effectif quelques minutes après le départ du cycle.
La pyrolyse s’arrête automatiquement. Lorsque la température atteint environ 275°C, il est
alors possible d’ouvrir la porte.
DEMARRAGE DU NETTOYAGE
••
FIN DU NETTOYAGE
••
La pyrolyse s’arrête automatiquement, il est
alors possible d’ouvrir la porte.
En fin de cycle pyrolyse l’afficheur indique
0:00.
Ramenez le sélecteur de fonctions sur la
position 0. (fig.3).
Lorsque le four est froid, utilisez un chiffon
humide pour enlever la cendre blanche. Le
four est propre et à nouveau utilisable pour
effectuer une cuisson de votre choix.
99644891_A_FR.qxp 19/12/2007 17:30 Page 12
Page 13
13
4 / ENTRETIEN ET NETTOYAGE DE VOTRE FOUR
FR
fig.1
•Pyrolyse différée
--
Suivre les instructions décrites dans le para-
graphe “Pyrolyse immédiate” puis:
--
Tounez le sélecteur de fonctions sur la posi-
tion de pyrolyse désirée.
- Appuyez sur la touche .
Le symbole fin de cuisson clignote pour indiquer que le réglage est alors possible (fig.1).
- Appuyez sur la touche + ou - pour régler
l’heure de fin souhaitée (fig.2).
Exemple : fin de nettoyage à 18 heures.
--
Après ces actions, le départ de la pyrolyse est
différé pour qu’elle se termine à 18 heures.
Lorsque votre pyrolyse est terminée, remettez le
sélecteur de fonctions sur arrêt.
FAIRE UNE PYROLYSE
fig.2
••
99644891_A_FR.qxp 19/12/2007 17:30 Page 13
Page 14

14
99644891 12/07
99644891_A_FR.qxp 19/12/2007 17:30 Page 14
Page 15

99644891_a_de.qxp 20/12/2007 12:06 Page 1
Page 16

2
Liebe Kundin, lieber Kunde,
Sie haben soeben einen THOMSON Backofen erworben, und wir danken Ihnen dafür.
Wir haben in dieses Gerät unsere ganze Leidenschaft und unser Know-how einfließen
lassen, damit es Ihre Bedürfnisse bestmöglich erfüllt. Es ist innovativ, leistungsfähig,
und wir haben es so konzipiert, daß auch seine Benutzung immer einfach bleibt.
In der THOMSON Produktpalette finden Sie auch eine breite Auswahl an
Mikrowellenherden, Kochfeldern, Dunstabzugshauben, Küchenherden,
Geschirrspülern, Waschmaschinen, Wäschetrocknern, Kühlschränken,
Gefrierschränken und Tiefkühltruhen, die Sie mit Ihrem neuen THOMSON Backofen
abstimmen können.
THOMSON
Da wir unsere Produkte ständig verbessern möchten, behalten wir uns das Recht vor, ihre
technischen, funktionellen und ästhetischen Merkmale zu verändern, damit sie mit der
technischen Weiterentwicklung Schritt halten.
Wichtig: Bitte lesen Sie vor der Inbetriebnahme des Gerätes diese Einbauund Gebrauchsanleitung aufmerksam durch, damit Sie sich sehr rasch mit seinem
Betrieb vertraut machen können.
99644891_a_de.qxp 20/12/2007 12:06 Page 2
Page 17

3
DEINHALT
1 / BESCHREIBUNG DES GERÄTS
••
Übersicht über den Ofen
____________________________________
4
••
Zubehör
__________________________________________________
4
••
Beschreibung des Programmierers
___________________________
5
2 / BENUTZUNG DES GERÄTS
••
Nutzung des Programmierers
º
Einstellung der Uhr
_____________________________________
6
º
Sofortiger Garvorgang
__________________________________
7
••
Programmierter Garvorgang
º
Sofortiger Start
________________________________________
8
º
Späterer Start
_________________________________________
9
••
Nutzung der Funktion Kurzzeitwecker
_________________________
10
3 / ZUBEREITUNGSARTEN IM BACKOFEN
__________________________
11
4 / PFLEGE UND REINIGUNG DES OFENS
___________________________
12
99644891_a_de.qxp 20/12/2007 12:06 Page 3
Page 18

4
DE
1 / BESCHREIBUNG DES GERÄTS
ÜBERSICHT ÜBER DEN OFEN
••
A
B
Bildschirm
Temperaturwahlschalter
Funktionswahlschalter
C
D
E
Lampe
Einschubleistenhalter
•Zubehör
Ihr Backofen wird mit 2 Multifunktions-Blechen (20 und 45 mm hoch) sowie 1 kippsicheren
Gitterrost mit Sicherheitsbügel geliefert.
E
D
B
A
C
99644891_a_de.qxp 20/12/2007 12:06 Page 4
Page 19

DE1 / BESCHREIBUNG DES GERÄTS
BESCHREIBUNG DES PROGRAMMIERERS
••
A
D
A
B
Anzeige von Uhrzeit und Dauer
Anzeiger der Gardauer
Anzeige des Endes der Garzeit
Anzeige des Kurzzeitweckers
C
D
E
Verriegelungsanzeige
Reinigungsanzeige
Temperaturanzeige
Auswahltaste (Dauer und Zeit)
Zeiteinstelltasten
F
G
G
H
H
C
B
F
I
E
I
5
99644891_a_de.qxp 20/12/2007 12:06 Page 5
Page 20

6
DE
2 / BENUTZUNG DES GERÄTS
NUTZUNG DES PROGRAMMIERERS
•
Einstellung der Uhrzeit
--
Bei Anschluss an den Strom
In der Anzeige blinkt 12:00 (Abb.1).
Die Uhrzeit durch Drücken der Tasten + und einstellen (bei Festhalten der Taste erfolgt ein
Schnelldurchlauf) (Abb.2).
Beispiel: 12.30 Uhr
Zur Bestätigung die Taste “ ” drücken.
Die Anzeige blinkt nicht mehr.
- Einstellung der korrekten Uhrzeit
Der Funktionswahlschalter muss sich in
Position 0 (Abb.1) befinden.
Taste “ ” einige Sekunden lang gedrückt
halten, bis die Anzeige blinkt (Abb.2), dann
loslassen. Signaltöne geben an, dass eine
Einstellung vorgenommen werden kann.
Die Uhrzeit mit den Tasten + und - einstellen
(Abb.3).
Zur Bestätigung die Taste “ ” drücken
(Abb.4).
Abb.1
Abb.2
Abb.2
Abb.3
Abb.4
Abb.1
Achtung
Wenn keine Bestätigung über Taste
“ ” erfolgt, wird nach einigen Sekunden
automatisch gespeichert.
••
99644891_a_de.qxp 20/12/2007 12:06 Page 6
Page 21

DE2 / BENUTZUNG DES GERÄTS
•Sofortiger Garvorgang
— Der Programmierer darf nur die Uhrzeit
anzeigen;
Diese darf nicht blinken (Abb.1).
Den Funktionswahlschalter auf die gewünschte
Position drehen.
Beispiel: Position (Abb.2).
Der Backofen schlägt die für die gewählte
Garart optimale Temperatur vor.
Die Temperatur kann jedoch noch reguliert
werden. Dazu den Temperaturwahlschalter in
Richtung ++oder --(Abb.3) drehen.
DDiiee ZZuubbeerreeiittuunngg eennttsspprreecchheenndd ddeenn
Empfehlungen der Gartabelle in den Ofen
schieben.
Danach heizt der Ofen und die
Temperaturanzeige blinkt.
Wenn die gewählte Temperatur erreicht wird,
ertönen Signaltöne.
Die Anzeige hört auf zu blinken.
Zum Stoppen des Garvorgangs den
Funktionswahlschalter auf 0 stellen.
Abb.2
Abb.4
Achtung
Garvorgänge erfolgen immer bei geschlossener Ofentür.
Achtung
Nach einem Garzyklus funktioniert die Gebläseturbine noch einige Zeit, um
zuverlässigen Ofenbetrieb sicher zu stellen.
Abb.1
Abb.3
7
99644891_a_de.qxp 20/12/2007 12:07 Page 7
Page 22

8
DE
2 / BENUTZUNG DES GERÄTS
--
Unmittelbar anlaufender Garvorgang
über vorprogrammierte Zeit
- Garmodus wählen und Temperatur anpassen
(Abb.1).
- Die Taste “ ” drücken, bis die Anzeige für
die
Dauer der Garzeit blinkt.
Die Anzeige 0:00 Uhr blinkt und zeigt an, dass
die Garzeit jetzt eingestellt werden kann
(Abb.2).
- Über Taste ++oder --die gewünschte Zeit
einstellen.
Beispiel: 30 Minuten Garzeit (Abb.3).
Nach einigen Sekunden wird die Garzeit
automatisch abgespeichert.
Die Anzeige für die Dauer der Garzeit blinkt
nicht mehr.
Die eingestellte Zeit läuft sofort ab Einstellung.
NNaacchh ddiieesseenn 33 SScchhrriitttteenn bbeeggiinnnntt ddeerr OOffeenn zzuu
hheeiizzeenn::
Wenn die gewählte Temperatur erreicht wird,
ertönen Signaltöne.
Am Ende der Garzeit (Ende der
programmierten Garzeit)
- schaltet sich der Backofen aus,
- blinken der Anzeiger für die Dauer der
Garzeit und 0:00 (Abb.4),
- ertönt einige Minuten lang eine Reihe von
Signaltönen. Die Signaltöne können durch
Druck auf eine beliebige Taste abgestellt
werden.
Wird der Funktionswahlschalter auf 0 gestellt
(Abb.5), erscheint die Tageszeit wieder in der
Anzeige.
Abb.2
Abb.3
PROGRAMMIERTER
GARVORGANG
••
Abb.1
Abb.4
Abb.5
99644891_a_de.qxp 20/12/2007 12:07 Page 8
Page 23

DE2 / BENUTZUNG DES GERÄTS
--
Zeitlich versetzt anlaufende Garzeit und
Wahl des Endzeitpunkts des Garvorgangs
WWiiee bbeeii eeiinneemm pprrooggrraammmmiieerrtteenn GGaarrvvoorrggaanngg
vvoorrggeehheenn..
- Nach Einstellung der Garzeit Taste “ ”
drücken, bis der Anzeiger für das Ende der
Garzeit “ ” blinkt.
Die Anzeige blinkt und zeigt an, dass die
Einstellung vorgenommen werden kann
(Abb.1).
- Den gewünschten Endzeitpunkt mit der Taste
++
oder --einstellen.
Beispiel: Ende der Garzeit um 13 Uhr (Abb.2).
Das gewünschte Ende der Garzeit wird nach
einigen Sekunden automatisch abgespeichert.
Die Anzeige für das Ende der Garzeit blinkt
nicht mehr.
NNaacchh ddiieesseenn 33 SScchhrriitttteenn wwiirrdd ddaass AAuuf
fhheeiizzeenn
zzeeiittlliicchh ssoo vveerrsseettzztt,, ddaassss ddeerr GGaarrvvoorrggaanngg uumm
1133..0000 UUhhrr aabbggeesscchhlloosssseenn iisstt..
Am Ende der Garzeit (Ende der
programmierten Garzeit)
- schaltet sich der Backofen aus,
- blinken die Anzeige für die Dauer der Garzeit
und 0:00 (Abb.3),
- ertönt einige Minuten lang eine Reihe von
Signaltönen. Die Signaltöne können durch
Druck auf eine beliebige Taste abgestellt
werden.
Wird der Funktionswahlschalter auf 0 gestellt
(Abb.4), erscheint die Tageszeit wieder in der
Anzeige.
Die Beleuchtung des Ofenraums springt zu
Beginn des Garvorgangs an und geht nach
Abschluss des Garvorgangs wieder aus.
Abb.1
Abb.2
Abb.3
Abb.4
PROGRAMMIERTER
GARVORGANG
••
9
99644891_a_de.qxp 20/12/2007 12:07 Page 9
Page 24

10
DE
2 / BENUTZUNG DES GERÄTS
-- DDeerr PPrrooggrraammmmiieerreerr ddeess OOffeennss kkaannnn aallss
uunnaabbhhäännggiiggeerr KKuurrzzzzeeiittwweecckkeerr eeiinnggeesseettzztt
wweerrddeenn,, oohhnnee ddaassss ddeerr O
Offeenn eeiinnggeesscchhaalltteett iisstt..
In diesem Fall hat die Anzeige des
Kurzzeitweckers Vorrang vor der Anzeige der
Tageszeit.
- Taste “ ” (Abb.1) drücken, bis das Symbol
des Kurzzeitweckers ->sowie 0:00 blinken.
- Die Zeiteinstellung über die Tasten ++oder
--
(Abb.2) vornehmen.
- Über die Taste “ ” abspeichern, oder
einige Sekunden warten.
Achtung
Die Programmierung des Kurzzeitweckers kann jederzeit geändert oder aufgehoben
werden.
Abb.1
Abb.2
NUTZUNG DER FUNKTION
KURZZEITWECKER
••
Der Anzeiger blinkt nach einigen Sekunden nicht mehr, der Kurzzeitwecker startet und zählt die
Zeit sekundenweise rückwärts.
Wenn die eingestellte Zeit abgelaufen ist, ertönt ein akustisches Signal.
Dieses kann durch Druck auf eine beliebige Taste abgestellt werden.
99644891_a_de.qxp 20/12/2007 12:07 Page 10
Page 25

DE3 / ZUBEREITUNGSARTEN IM BACKOFEN
11
UMLUFT-PLUS
(empfohlene Temperatur 180 °C, mindestens 35 °C, maximal 275 °C)
•
Das Garen erfolgt durch das Heizelement an der Rückwand des Backofens
Lund die uftschraube.
•
Schneller Temperaturanstieg. Gewisse Gerichte können in den kalten Backofen gest
ellt werden.
•
Wird zur Erhaltung der Zartheit von weissem Fleisch, Fisch, Gemüse empfohlen
Für Koch- und Backvorgänge auf bis zu 3 Ebenen
KLASSISCHE UMLUFT
(empfohlene Temperatur 240°C mindestens 35°C, maximal 275°C)
•
Das Backen erfolgt durch Heizelemente unten und oben mit Umluft, aber ohne das
Heizelement an der Rückseite.
•
Erfordert ein Vorheizen, bevor das Gericht in den Backofen gestellt wird.
•
Für langsame und empfindliche Garvorgänge empfohlen: für saftiges Wild, Braten und
zum Schmoren in tönernen, geschlossenen Töpfen (Hähnchen in Weinsauce, Hasen
pfeffer).
OBERHITZE MIT UMLUFT
(empfohlene Temperatur 200°C mindestens180°C maximal 230°C)
•
Das Garen erfolgt abwechselnd durch das obere Heizelement und die Luf
tumwäl zung.
•
Hinweis: alle Garvorgänge ohne Vorheizen.
•
Für das Anbraten und Durchbraten von rotem und weissem Fleisch.
OBER- UND UNTERHITZE (ECO)
(empfohlene Temperatur 200°C mindestens 35°C, maximal 275°C)
•
Das Backen erfolgt durch Heizelemente unten und oben ohne Luftumwäl
zung
•
Mit dieser Position kann unter Beibehaltung gleicher Backergebnisse Energie
eingespart werden.
•
Die Position ECO wird für die Ermittlung der Energieeffizienzklasse benutzt.
Hinweis: alle Garvorgänge ohne Vorheizen.
UNTERHITZE MIT UMLUFT
(empfohlene Temperatur 205°C mindestens 35°C, maximal 275°C)
•
Das Garen erfolgt anhand des unteren Heizelements verbunden mit leichtem Grillen
bei Umluft.
•
Garen mit Unterhitze und leichter Oberhitze. Das Rost in die untere Einschubleiste ein-
schieben.
•
Empfohlen für feuchte Speisen (Speckkuchen, saftige Obsttorten...) Der Teig wird von
unten gut gebacken. Empfohlen für aufgehende Zubereitungen (Sandkuchen, Brioche,
Guglhupf ...) und Soufflees, die deren Aufgehen nicht durch eine Kruste behindert werden
darf.
WARM HALTEN
(empfohlene Temperatur 80°C, mindestens 35°C, maximal 100°C)
•
In dieser Position können Zubereitungen durch dosierte Wärmeabgabe des
rückwärtigen Wärmeelements in Kombination mit Umluft warm gehalten werden.
•
Empfohlen, um das Aufgehen von Brot-, Hefe- und Gugelhupfteig zu begünstigen,
ohne 40°C zu überschreiten (Telleraufwärm- oder Auftautemperatur).
STARKER GRILL
(empfohlene Temperatur 275°C mindestens 180°C, maximal 275°C)
•
Das Garen erfolgt anhand des oberen Heizelements ohne Umluft.
• 5 Minuten vorheizen. Die Fettpfanne in die untere Einschubleiste einführen, um ablaufendes Fett aufzufangen.
• Wird für das Grillen von Koteletts,Würstchen, Brotscheiben und Gambas auf dem Grillrost empfohlen.
*
*
* Benutzte Sequenz(en) für die Angabe auf dem Energieetikett gemäß der europäischen Norm
EN 50304 und der Europäischen Richtlinie 2002/40/EG.
99644891_a_de.qxp 20/12/2007 12:07 Page 11
Page 26

12
DE
4 / PFLEGE UND REINIGUNG DES OFENS
Abb.1
PYROLYSEVORGANG
••
Abb.2
Abb.3
Um die Restwärme im Backofen auszunutzen
und Energie zu sparen, führen Sie eine Pyrolyse
am besten direkt nach einem Garvorgang durch.
Alles Zubehör aus dem Backofen nehmen und
eventuell vorhandene stark übergelaufene Reste
entfernen.
Prüfen, dass der Programmierer die Tageszeit
anzeigt und diese nicht blinkt (Abb. 1).
Den Funktionswahlschalter auf die Position „
Pyrolyse
(Abb. 2) oder „Pyrolyse ECO“ stellen.
Zu Beginn der Pyrolyse wird das
Symbol sowie die Dauer des Pyrolysezyklus
in der Programmierleiste angezeigt.
Nach einigen Minuten erscheint außerdem das
Symbol in der Programmierleiste und zeigt
die Türverriegelung an.
·Wird eine „Pyrolyse durchgeführt, steht Ihr
Backofen während 2 ½ Stunden nicht zur
Verfügung (120 Minuten Pyrolyse plus 30
Minuten Abkühlung). Wird eine „
Pyrolyse ECO“ durchgeführt, steht Ihr
Backofen während 2 Stunden nicht zur
Verfügung (90 Minuten Pyrolyse plus 30 Minuten
Abkühlung).
Die Pyrolyse endet automatisch.
Die Türverriegelung wird bereits vor Ende des
Abkühlvorgangs aufgehoben, sobald die
Temperatur im Ofeninneren unter 275 °C abfällt.
Am Ende der Pyrolyse blinken 0:00 und das
Symbol (Abb. 1).
Um zur Anzeige der Uhrzeit zurück zu kehren,
den Funktionswahlschalter auf 0 stellen (Abb. 3).
Wenn der Backofen abgekühlt ist, die weiße
Asche mit einem feuchten Tuch entfernen. Der
Backofen ist sauber und wieder für einen
beliebigen Garvorgang bereit.
Anmerkungen:
Reinigungstemperatur und -dauer sind nicht
änderbar.
Während der Pyrolyse ist die Beleuchtung
abgeschaltet.
Wenn das Reinigungsergebnis zu schwach ist,
war der Verschmutzungsgrad des Backofens zu
hoch. Wiederholen Sie die Pyrolyse.
•Sofortige Pyrolyse
99644891_a_de.qxp 20/12/2007 12:07 Page 12
Page 27

DE4 / PFLEGE UND REINIGUNG DES OFENS
Abb.1
•Spätere Pyrolyse
--
Die Anweisungen zur Vorbereitung einer
Pyrolyse aus dem Absatz “Sofortige Pyrolyse”
befolgen, anschließend:
--
Den Funktionswahlschalter auf die Position
der gewünschten Pyrolyse stellen.
- Taste drücken.
Das Symbol für das Ende der Garzeit blinkt
und gibt an, dass eine Einstellung
vorgenommen werden kann (Abb.1).
- Den gewünschten Endzeitpunkt mit der Taste
+ oder - einstellen (Abb.2).
Beispiel: Ende der Pyrolyse um 18 Uhr.
--
Anschließend wird der Beginn der Pyrolyse
so verschoben, dass sie um 18.00 Uhr
abgeschlossen ist.
Am Ende der Pyrolyse den Funktionswahlschalter ausstellen.
PYROLYSEVORGANG
Abb.2
••
13
99644891_a_de.qxp 20/12/2007 12:07 Page 13
Page 28

14
99644891 12/07
99644891_a_de.qxp 20/12/2007 12:07 Page 14
Page 29

99644891_A_EN.qxp 20/12/2007 17:11 Page 1
Page 30

2
Dear Customer,
Our research teams have created this new generation of appliances for you. Their
quality, appearance, functions and technological advances make them exceptional
products, showcases of our unique know-how.
You will also find a wide range of cookers, hobs, ventilation hoods, dishwashers, and
refrigerators, all of which can be built in and coordinated with your new THOMSON
oven.
Of course, in an ongoing effort to better satisfy your demands with regard to our
products, our after-sales service department is at your disposal and ready to listen in
order to respond to all of your questions and suggestions (contact information at the
end of this booklet).
You can also log onto our site:where you will find our latest new ideas and useful
additional information.
THOMSON
SSeettttiinngg NNeeww VVaalluueess
As part of our commitment to constantly improving our products, we reserve the right to make
changes to them based on advances to their technical, functional and/or aesthetic properties.
Important:
Before installing and using your appliance, please read this Installation and Usage
Guide carefully, as it will allow you to quickly familiarise yourself with its operation.
99644891_A_EN.qxp 20/12/2007 17:11 Page 2
Page 31

3
TABLE OF CONTENTS
EN
1 / DESCRIPTION OF YOUR APPLIANCE
••
Introduction to your oven
____________________________________
4
••
Accessories
_______________________________________________
4
••
Introduction to the programmer
______________________________
5
2 / USING YOUR APPLIANCE
••
Using the programmer
º
How to set the time
_____________________________________
6
º
Immediate cooking
_____________________________________
7
••
Programmed cooking
º
Immediate start
________________________________________
8
º
Delayed start
__________________________________________
9
••
Using the timer function
_____________________________________
10
3 / OVEN COOKING MODES
_______________________________________
11
4 / CARING FOR AND CLEANING YOUR OVEN
_______________________
12
99644891_A_EN.qxp 20/12/2007 17:11 Page 3
Page 32

4
1 / DESCRIPTION OF YOUR APPLIANCE
EN
INTRODUCTION TO YOUR OVEN
••
A
B
Programmer
Temperature selector switch
Function selector switch
C
D
E
Light
Wire shelf supports
•Accessories
Your appliance is equipped with 2 safety grids with handles and 2 baking trays, 20 and 45
millimetres high.
E
D
B
A
C
99644891_A_EN.qxp 20/12/2007 17:11 Page 4
Page 33

5
1 / DESCRIPTION OF YOUR APPLIANCE
EN
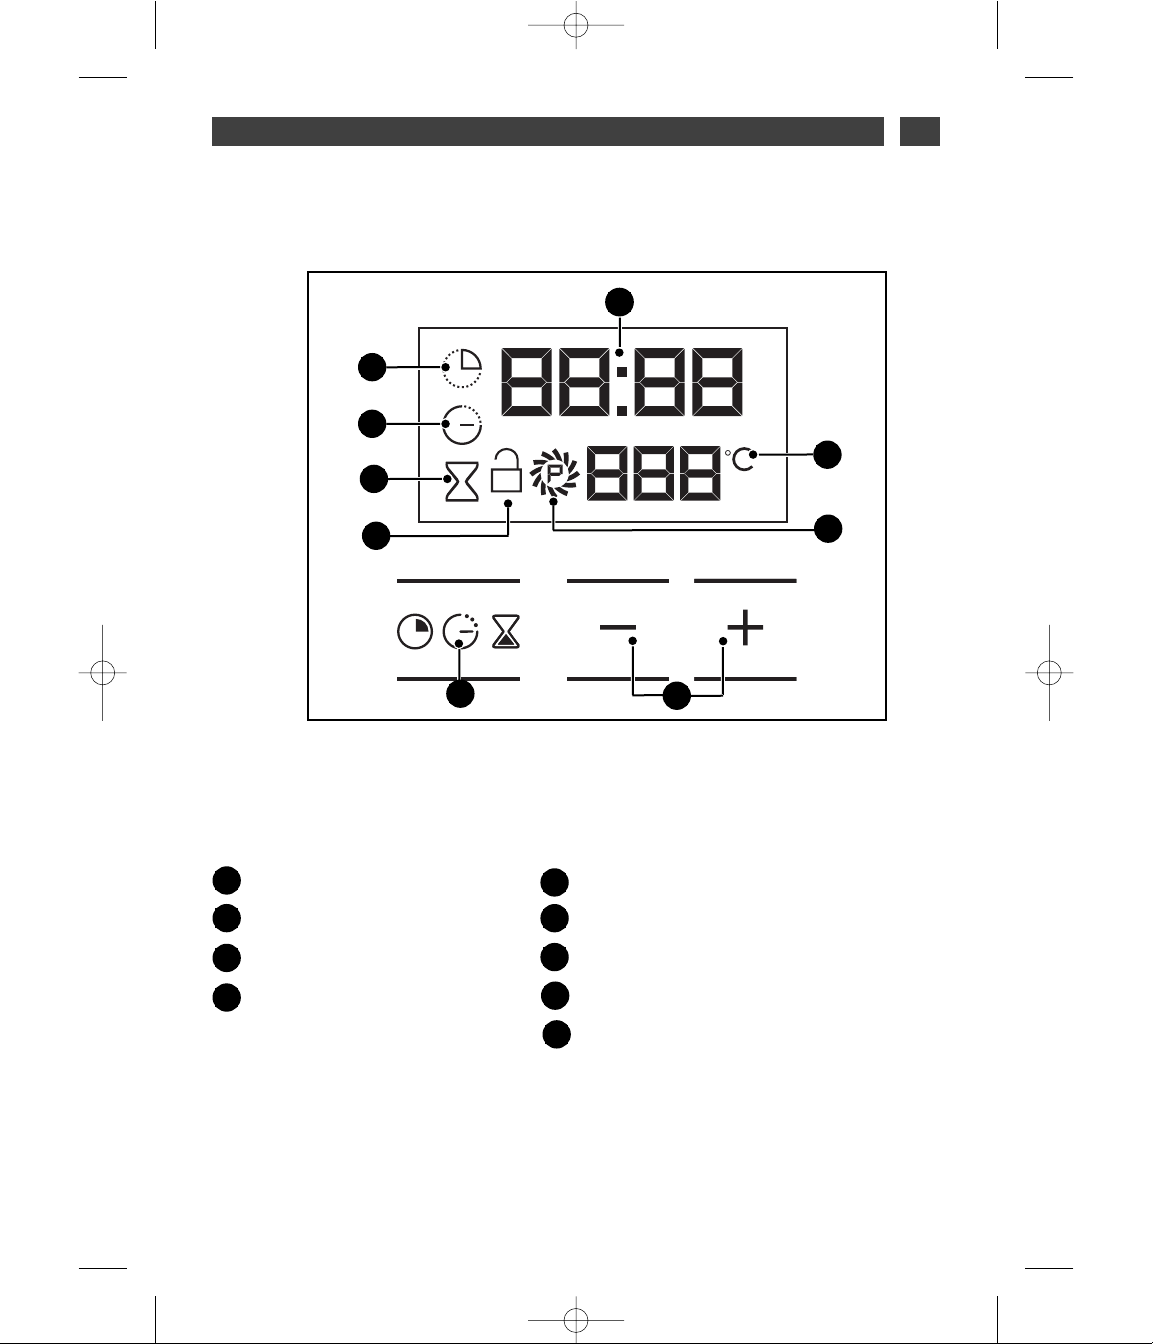
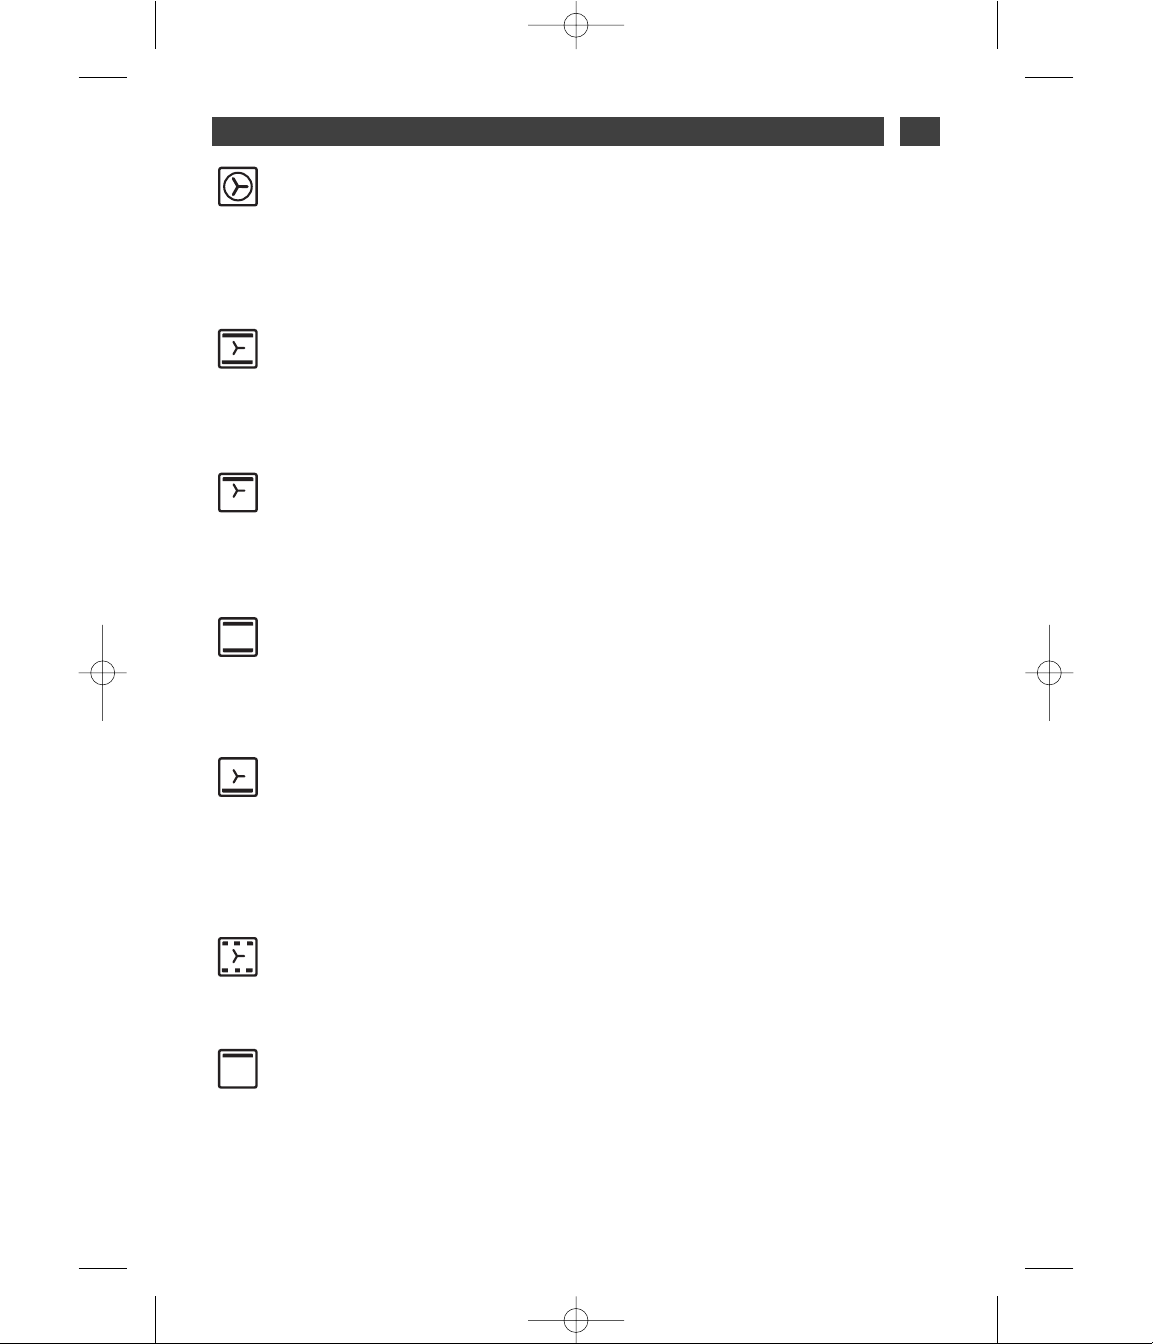
INTRODUCTION TO THE PROGRAMMER
••
A
B
Time and cooking time display
Cooking time indicator
Cooking end time indicator
Timer display
C
D
E
Lock indicator
Cleaning indicator
Temperature display
Selection button (cooking time and time)
Time setting buttons
F
G
H
I
A
D
G
H
C
B
F
I
E
99644891_A_EN.qxp 20/12/2007 17:11 Page 5
Page 34

6
2 / USING YOUR APPLIANCE
EN
USING THE PROGRAMMER
•
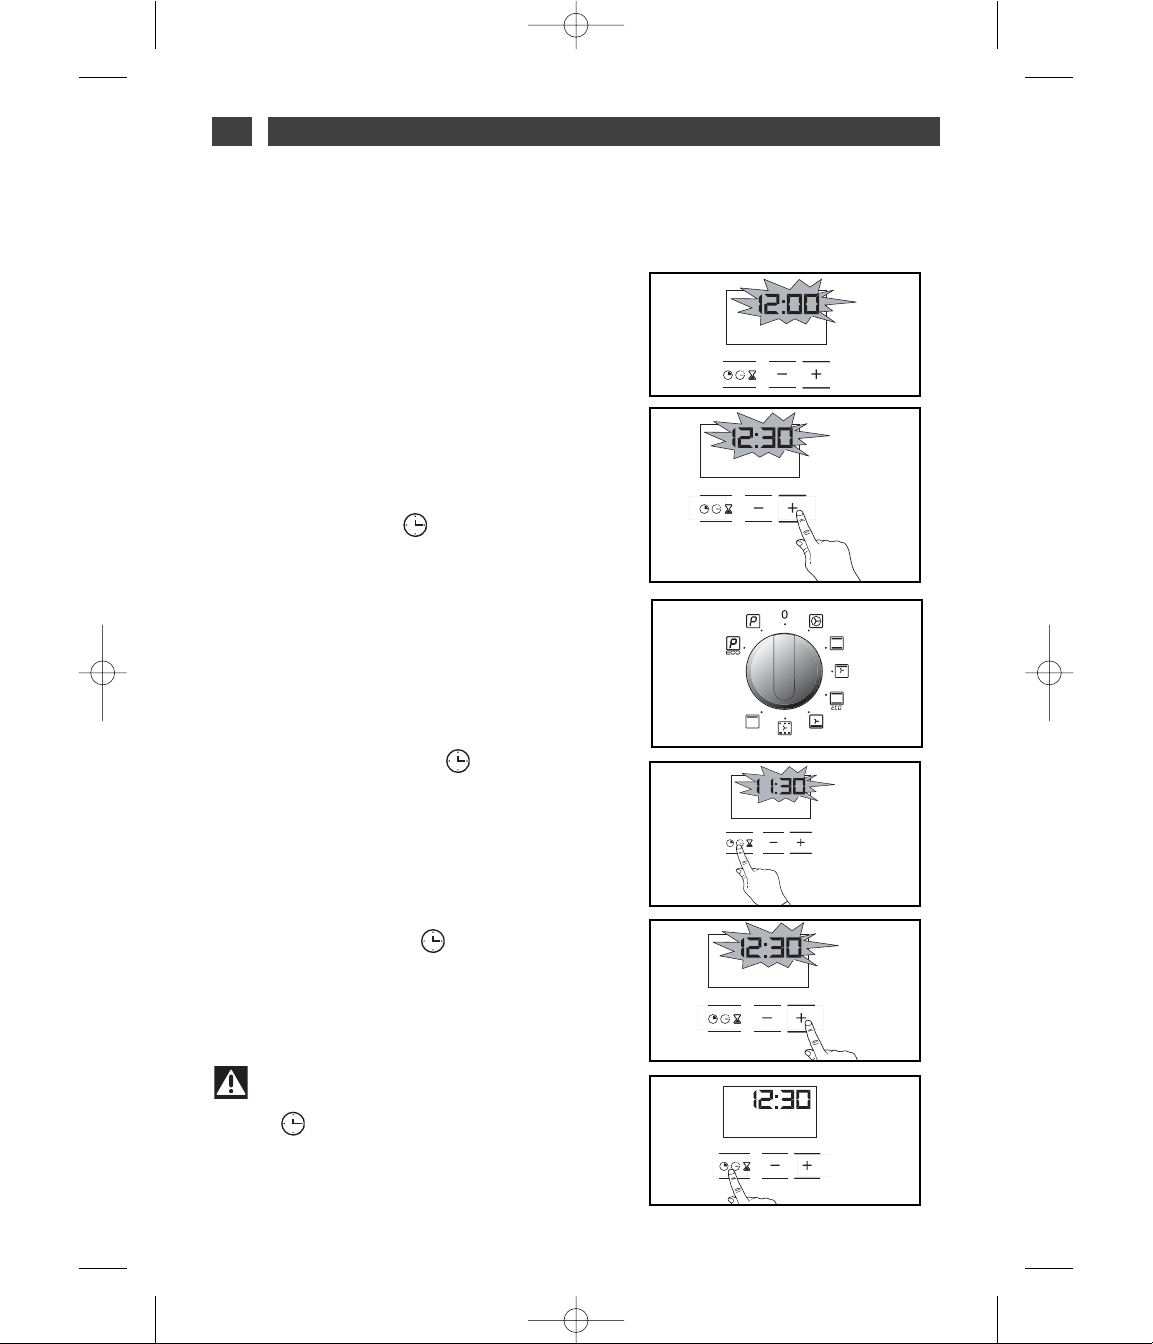
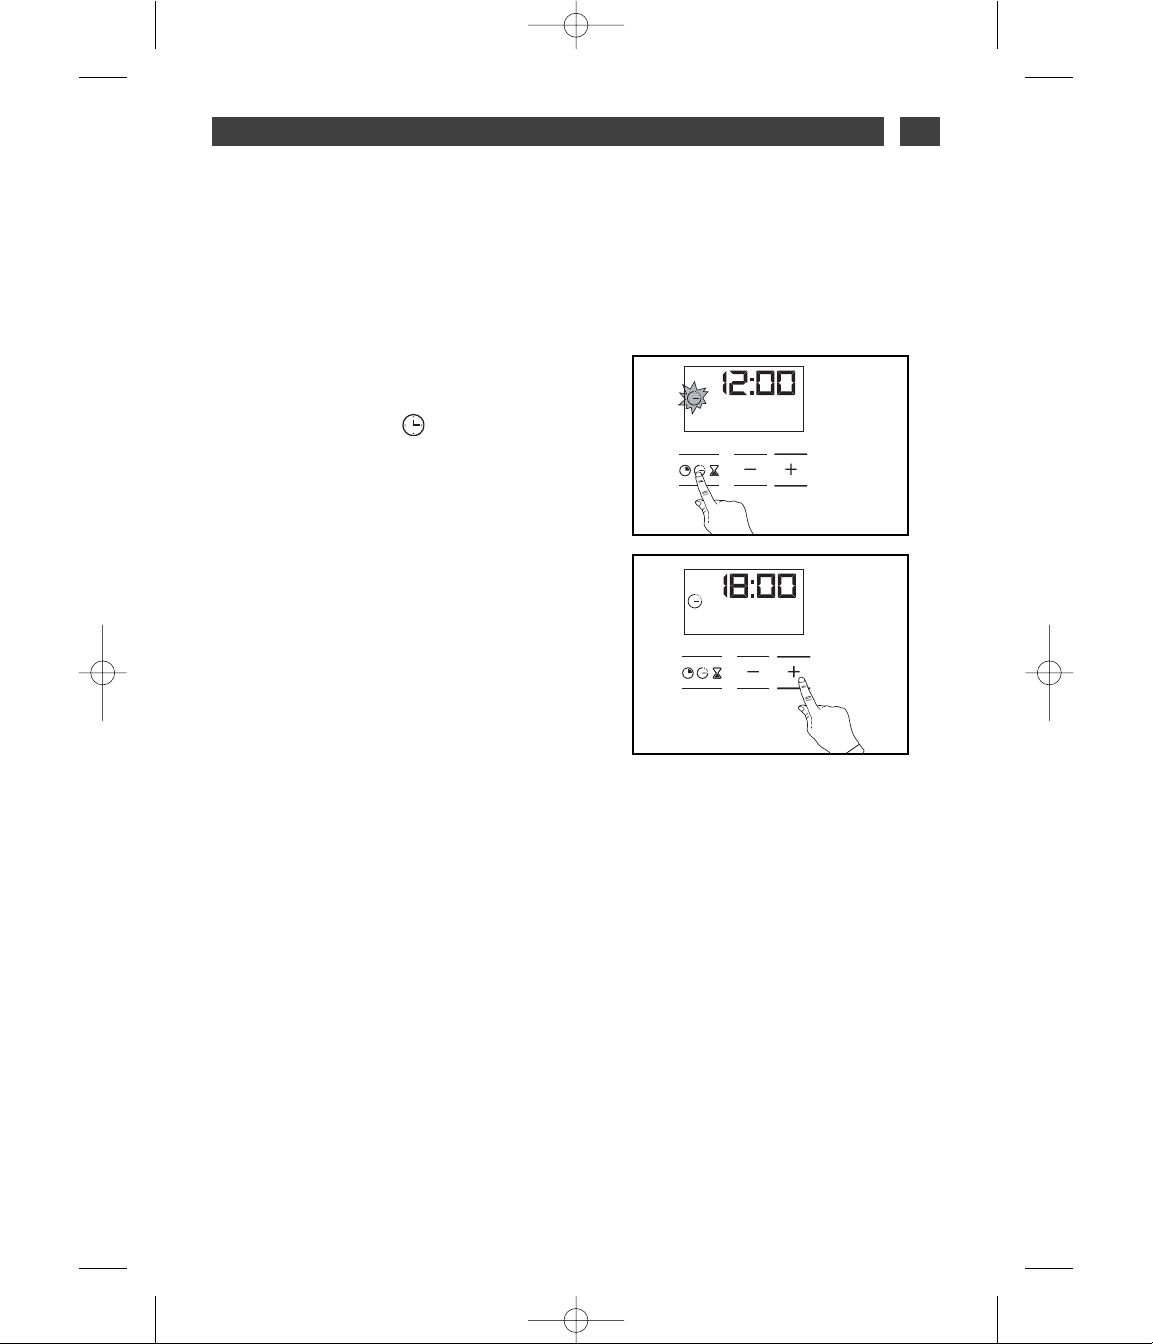
How to set the time
--
When plugged in
The display flashes 12:00 (fig.1).
Set the time by pressing the + or - buttons
(holding your finger on the button allows you
to scroll through the numbers rapidly) (fig.2).
Example: 12:30
Press the “ ” button to confirm.
The display stops flashing.
- To set the time on the clock
The function selector switch must be in the 0
position (fig.1).
Press and hold the “ ” button for a few
seconds until the display starts flashing (fig.2),
then release. Audible beeps indicate that it is
now possible to set the time.
Adjust the clock setting with the + and buttons (fig.3).
Press the “ ” button to confirm (fig.4).
Warning
If there is no confirmation from the
“ ” button, the time is recorded
automatically after a few seconds.
••
fig.1
fig.2
fig.2
fig.3
fig.4
fig.1
99644891_A_EN.qxp 20/12/2007 17:11 Page 6
Page 35

7
2 / USING YOUR APPLIANCE
EN
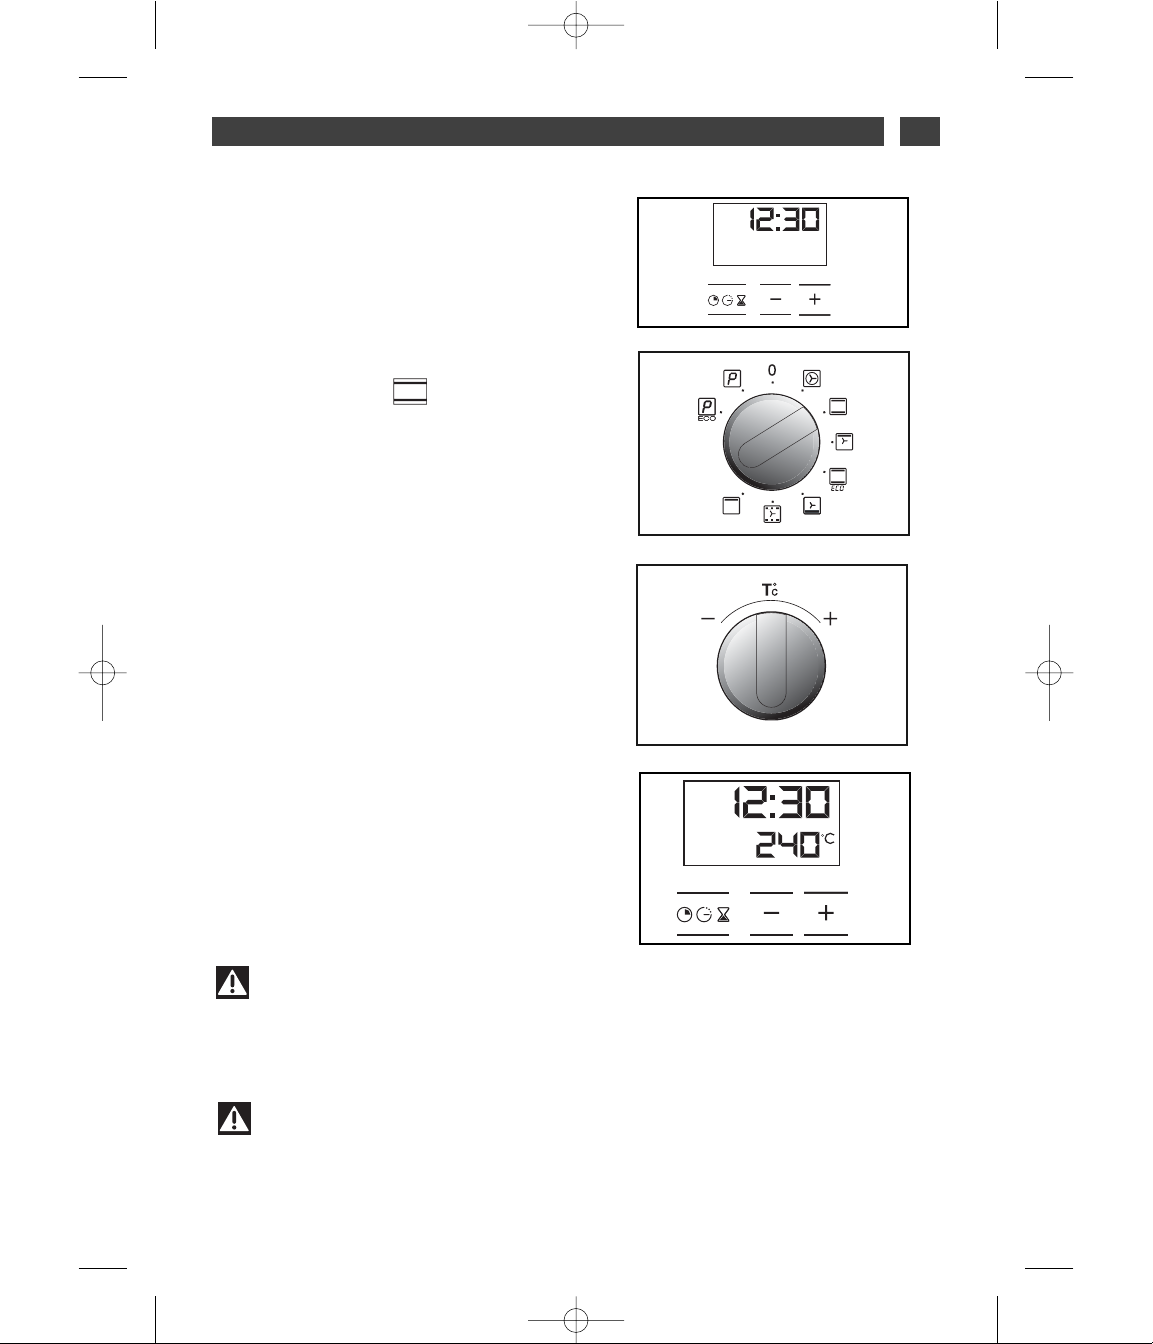
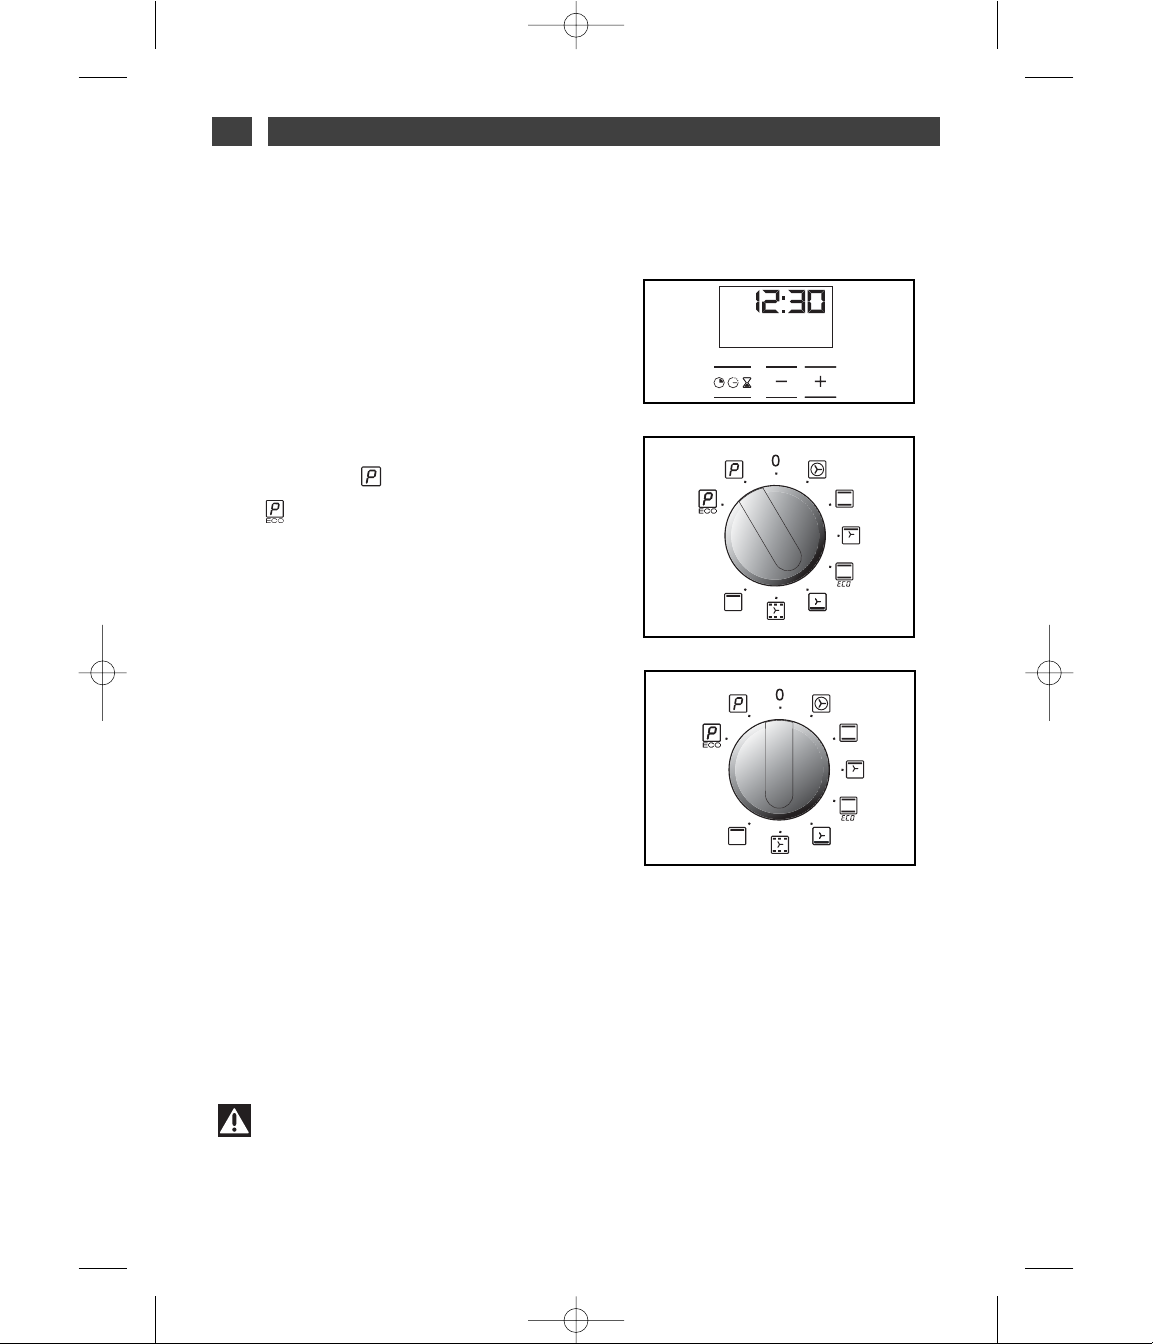
•Immediate cooking
— The programmer should display only the
time.
It should not be flashing (fig.1).
Turn the function selector to the position of
your choice.
Example: position (fig.2).
Your oven recommends the optimal
temperature for the chosen cooking mode.
It is, however, possible to adjust the
temperature by pushing the selection lever
towards ++or
--
(fig.3).
PPllaaccee yyoouurr ddiisshh iinn tthhee oovveenn
based on the
recommendations provided by the cook book.
After these steps, the oven heats up and the
temperature indicator flashes.
A series of beeps will sound when the oven
reaches the selected temperature.
The temperature stops flashing.
To stop this heating, return the function
selector to 0.
Warning
All types of cooking are done with the door closed.
Warning
After a cooking cycle, the cooling fan continues to operate for a period of time in order
to guarantee optimal oven reliability.
fig.2
fig.4
fig.1
fig.3
99644891_A_EN.qxp 20/12/2007 17:11 Page 7
Page 36

8
EN
2 / USING YOUR APPLIANCE
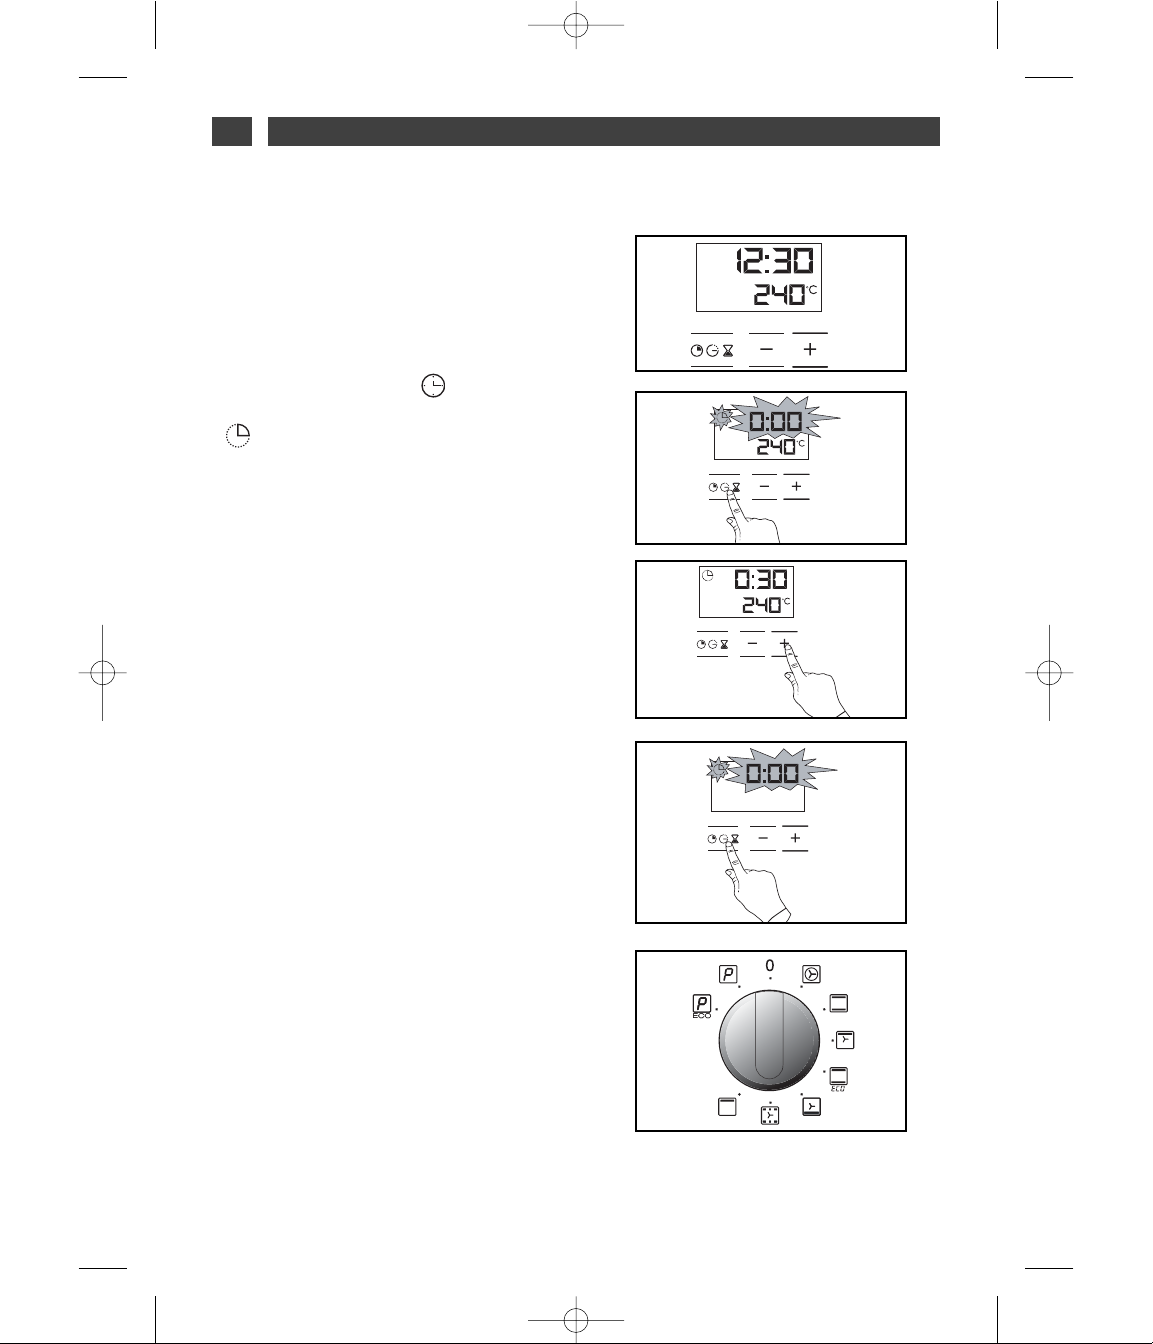
--
Cooking with immediate start and
programmed duration
- Select the desired cooking mode and adjust the
temperature (fig.1).
- Press the “ ” button until the cooking time
indicator starts to flash .
The display flashes 0:00 to indicate that you can
now adjust the setting (fig.2).
- Press the ++or --buttons to set the desired time.
Example: 30 mins cooking time (fig.3).
The cooking time is automatically recorded after a
few seconds.
The cooking time display stops flashing.
The countdown of the cooking time begins
immediately after it has been set.
AAfftteerr tthheessee tthhrreeee sstteeppss,, tthhee oovveenn hheeaattss uupp::
A series of beeps will sound when the oven
reaches the selected temperature.
At the end of cooking (end of programmed time),
- the oven turns off,
- the cooking time indicator and 00:00 both flash
(fig.4),
- a series of beeps sounds for a few minutes.
Press any button to stop the beeping.
The display shows the time once again when the
function selector switch is returned to 0 (fig.5).
PROGRAMMED COOKING
••
fig.2
fig.3
fig.1
fig.4
fig.5
99644891_A_EN.qxp 20/12/2007 17:11 Page 8
Page 37

9
EN
2 / USING YOUR APPLIANCE
--
Cooking with delayed start and chosen
cooking end time
PPrroocceeeedd aass wwiitthh pprrooggrraammmmeedd ccooookkiinngg..
- After setting the cooking time, press the “ ”
button until the end of cooking indicator flashes
“”.
The display flashes to indicate that you can
now adjust the setting (fig.1).
- Press the ++or --button to set the desired
cooking end time.
Example: end of cooking at 13:00 (fig.2).
The cooking end time is automatically
recorded after a few seconds.
The cooking end time display stops flashing.
AAfftteerr tthheessee 33 sstteeppss,, tthhee oovveenn hheeaattiinngg iiss
ddeellaayyeedd s
soo tthhaatt ccooookkiinngg eennddss aatt 1133::0000..
At the end of cooking (end of programmed
time),
- the oven turns off,
- the cooking time indicator and 0:00 both
flash (fig.3),
- a series of beeps sounds for a few minutes.
Press any button to stop the beeping.
The display shows the time once again when
the function selector switch is returned to 0
(fig.4).
The light inside the oven turns on when
cooking starts and goes out when cooking
stops.
PROGRAMMED COOKING
••
fig.1
fig.2
fig.3
fig.4
99644891_A_EN.qxp 20/12/2007 17:11 Page 9
Page 38

10
2 / USING YOUR APPLIANCE
EN
-- YYoouurr oovveenn’’ss pprrooggrraammmmeerr ccaann bbee uusseedd aass aann
iinnddeeppeennddeenntt ttiimmeerr tthhaatt aalllloowwss yyoouu ttoo ccoouunntt
ddoowwnn aa ttiimmee wwiit
thhoouutt ooppeerraattiinngg tthhee oovveenn..
In this case, the timer display has priority over
the clock display.
- Press the “ ” button (fig.1) until the timer
symbol begins flashing.
-> 0.00 and a small hourglass both flash.
- Adjust the chosen time by pressing the
buttons ++or
--
(fig.2).
- Press the button “ ” to confirm, or wait for
a few seconds.
Warning
It is possible to change or cancel the timer at any time.
USING THE TIMER FUNCTION
••
The display stops flashing after a few seconds and the timer starts working, counting down the
time in seconds.
Once the time has expired, the timer emits a series of beeps to notify you.
Press any button to stop the beeping.
fig.1
fig.2
*
*
99644891_A_EN.qxp 20/12/2007 17:11 Page 10
Page 39

11
3 / OVEN COOKING MODES
EN
*
Program(s) used to obtain the results indicated on the energy label in accordance with European
standard EN 50304 and European Directive 2002/40/CE.
CCIIRRCCUULLAARREE HHEEAATTIINNGG
(recommended temperature180
°°CC
min 35°C max 235°C)
•
Cooking is controlled by the heating element located at the back of the oven and the fan
•
Rapid temperature increase: Some dishes can be placed in the oven while it is still cold.
•
Recomended for
mmeeaatt, ffiisshh, vveeggeettaabblleess
, preferably placed in a terracotta dish.
TTRRAADDIITTIIOONNAALL
(recommended temperature
222255°°CC
min 35°C max 275°C)
•
Cooking controlled by the upper and lower heating elements.
•
Requires preheating before placing the dish in the oven.
•
Recommended for
ssllooww,, ggeennttllee ccooookkiinngg: rriicchh ggaammee
... For retaining the juices in
rreedd
mmeeaatt rrooaassttss
. For simmering in a covered stew pan dishes that were begun on the hob (
ccooqq
aauu vviinn,, sstteeww
).
GGRRIILLLL FFAANN AASSSSIISSTTEEDD
(recommended temperature
220000°°CC
min 180°C max 180°C)
•
Cooking controlled by the upper element and by the fan.
•
No need for preheating. Roasts and poultry that are crispy and juicy all the way around.
Ability to roast a large piece of meat placed on the special grid with the hollow dish
underneath to catch the cooking juices.
TTRRAADDIITTIIOONNAALL EECCOO
(recommended temperature
220000°°CC
min 35°C max 275°C)
•
Cooking is controlled by the upper element with some heat from the lower element.
•
This position provides energy saving while preserving the quality of the
cooked
ppoouullttrryy
.
•
Place the poultry in a terracotta dish, preferably on the grid in the first shelf support.
There is no need to preheat the oven. You can turn the poultry half-way through cooking if
you wish.
PPUULLSSEEDD OOVVEENN SSHHEELLFF
(recommended temperature
220055°°CC
min 35°C max 275°C)
•
Cooking is controlled by the lower element combined with reduced input from the grill
and use of the fan.
•
Cooking heat from the bottom with a small amount of heat from the top. Place the grid
on the lowest shelf support.
•
Recommended for
mmooiisstt ddiisshheess
(quiches, juicy fruit tarts, etc...). The crust will be tho-
roughly cooked on the bottom. Recommended for
ddiisshheess tthhaatt rriissee(ccaakkeess,, bbrriioocchhee
,
kkuuggeellhhooff......
) and for
ssoouuffffllééss
that will not be stuck by a crust formed on the top.
HHOOLLDD WWAARRMM FFUUNNCCTTIIOONN
(recommended temperature
220000°°CC
min 35°C max 275°C)
•
Heat regulated by the upper element with use of fan.
•
Stabilisation at low temperatures.
•
Recommended for
rriissiinngg ddoouugghh
for
bbrreeaaddss,, bbrriioocchhee,, aanndd ccaakkeess
... without exceeding 40°C
(warming plates, defrosting).
HHIIGGHH TTEEMMPPEERRAATTUURREE GGRRIILLLL
(recommended temperature
227755°°CC
min 180°C max 275°C)
•
Cooking controlled by the upper element.
• Preheat the oven for five minutes. Slide the drip tray onto the bottom shelf support.
• Recommended for
ggrriilllliinngg cchhooppss,, ssaauussaaggeess,, ttooaasstt oorr pprraawwnnss
placed on the grid.
*
*
99644891_A_EN.qxp 20/12/2007 17:11 Page 11
Page 40

12
4 / CARING FOR AND CLEANING YOUR OVEN
EN
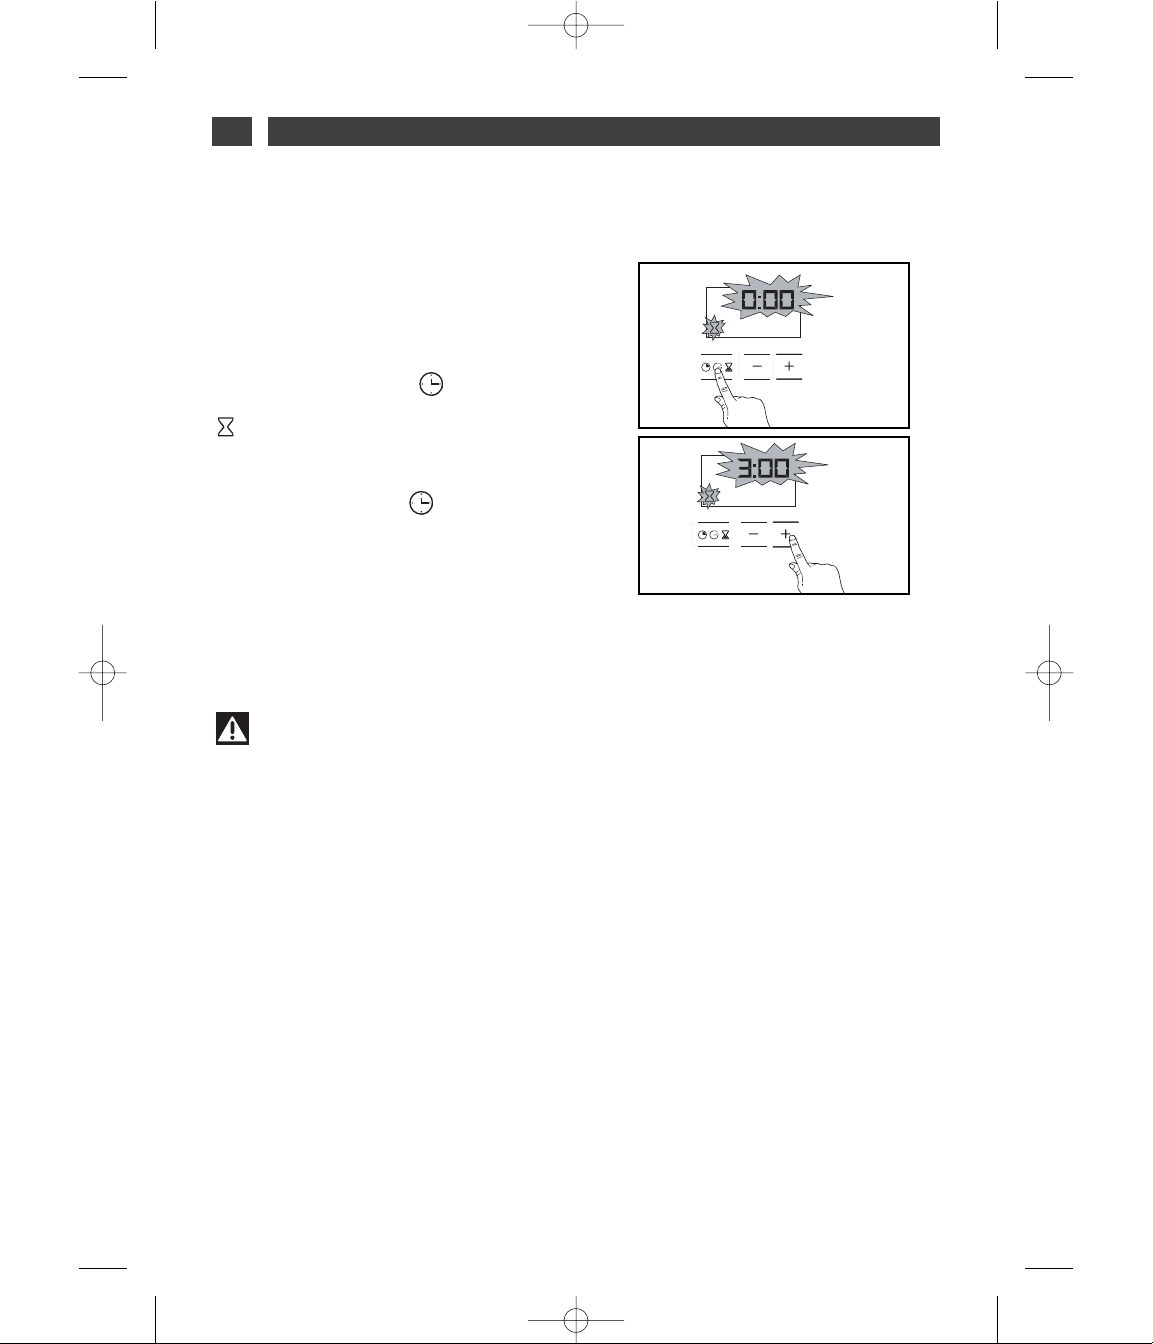
•Immediate pyrolysis
--
Remove the grids and trays from the oven
and clean any major spill residue.
--
Check that the programmer is displaying the
time of day and that it is not flashing (fig.1).
--
Turn the function selector to the desired
pyrolysis setting.
Example: 1 hr 45 mins (fig.2).
When pyrolysis starts, the symbol
displays in the programmer as well as the
duration of the pyrolysis cycle (fig.3).
The symbol displays in the programmer to
indicate that the door is locked.
When pyrolysis finishes, 0:00 starts flashing as
well as the symbol (fig.4).
To return to the time of day, set the function
selector to stop (fig.5).
--
When the oven is cool, use a damp cloth to
remove the white ashes.
The oven is clean and once again ready for the
cooking cycle of your choice.
Notes: The cleaning temperature cannot be
adjusted. During the pyrolysis cycle, the oven
lighting is off. If your oven is not clean after a
pyrolysis cycle, you waited too long before
launching a cleaning cycle. Repeat the cycle.
PERFORM A PYROLYSIS
••
fig.2
fig.1
fig.3
99644891_A_EN.qxp 20/12/2007 17:11 Page 12
Page 41

•Delayed pyrolysis
--
Follow the instructions described in the
section “Immediate pyrolysis”, then:
--
Turn the function selector to the desired
pyrolysis setting.
- Press the button.
The end of cooking symbol flashes to indicate
that it is now possible to set it (fig.1).
- Press the + or - button to set the desired end
time (fig.2).
Example: end of cooking at 18:00.
--
After tthese steps, the beginning of pyrolysis
is delayed so that it finishes at 18:00.
When the pyrolysis cycle is over, return the
function selector to stop.
PERFORM A PYROLYSIS
••
13
4 / CARING FOR AND CLEANING YOUR OVEN
EN
fig.1
fig.2
99644891_A_EN.qxp 20/12/2007 17:12 Page 13
Page 42

9999664444889911
12/07
14
99644891_A_EN.qxp 20/12/2007 17:12 Page 14
 Loading...