

Thetford C260, C262CWE, C263S, C263CS, C263CSL Installation Instructions Manual
CCCC260
260260
260 INSTALLATION INSTRUCTION
INSTALLATION INSTRUCTIONINSTALLATION INSTRUCTION
INSTALLATION INSTRUCTIONSSSS
AAAAvailable
vailablevailable
vailable in
in in
in EN
ENEN
EN /
/ /
/ FR
FRFR
FR /
/ /
/ NL
NLNL
NL /
/ /
/ DE
DEDE
DE /
/ /
/ IT
ITIT
IT /
/ /
/ ES
ESES
ES /
/ /
/ SSSSVVVV /
/ /
/ SSSSLLLL

2
CONTENTS
CONTENTS ..................................................................................................................................................... 2
GENERAL ....................................................................................................................................................... 3
1 INTRODUCTION ............................................................................................................................................ 3
2 STANDARDS / LEGISLATION ........................................................................................................................ 4
3 CUSTOMER SERVICE .................................................................................................................................... 4
C262CWE ...................................................................................................................................................... 5
4 INTERFACES ................................................................................................................................................. 5
5 UNPACKING INSTRUCTIONS ........................................................................................................................ 9
C263S ......................................................................................................................................................... 10
6 INTERFACES .............................................................................................................................................. 10
7 UNPACKING INSTRUCTIONS ..................................................................................................................... 15
C263CS ....................................................................................................................................................... 16
8 INTERFACES .............................................................................................................................................. 16
9 UNPACKING INSTRUCTIONS ..................................................................................................................... 21
C263CSL ..................................................................................................................................................... 22
10 INTERFACES .............................................................................................................................................. 22
OPTIONS ...................................................................................................................................................... 27
11 CERAMIC BOWL ........................................................................................................................................ 27
12 PLENUM .................................................................................................................................................... 28
13 PASSIVE OUTSIDE VENT ........................................................................................................................... 29
14 POWERED OUTSIDE VENT ........................................................................................................................ 30
15 WASTE PUMP-OUT SYSTEM ...................................................................................................................... 31
CONTACT ..................................................................................................................................................... 33
3
GENERAL
GENERAL
1
11
1 INTRODUCTION
INTRODUCTIONINTRODUCTION
INTRODUCTION
These installation instructions provide you with the necessary information to install the Thetford C260 Cassette
Toilet. Thetford also provides 2D-drawings and 3D-files for further reference.
1.1
1.11.1
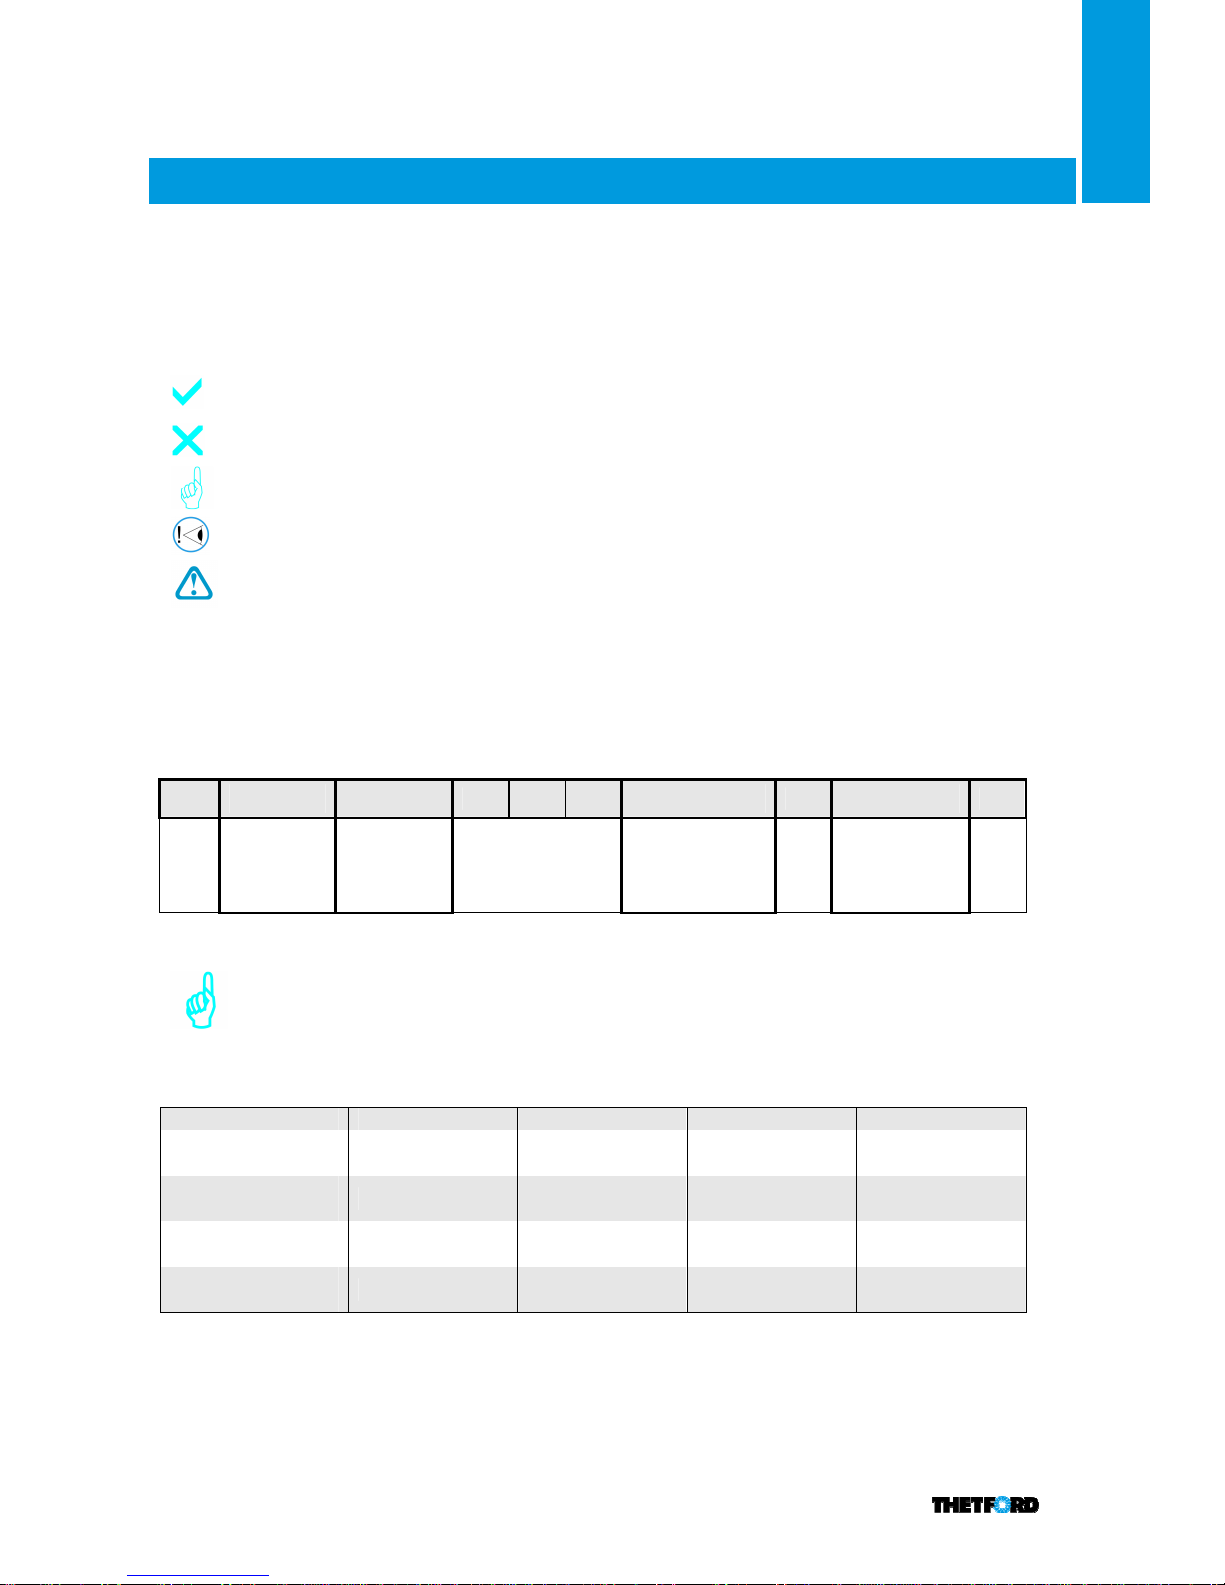
1.1 Symbols used
Symbols usedSymbols used
Symbols used
OK
Not OK
Tip
Special attention required
Caution (possible risk of injury or product damage)
1.2
1.21.2
1.2 Toilet designation
Toilet designationToilet designation
Toilet designation
Each toilet has a specific identification code, the
toilet designation.
The different positions stand for different
variations of the toilet. In these instructions, the designation will be used as reference.
Designation example
C263CS – N062X40L01
C26
3333 CS
CSCS
CS
– N 062
XXXX
40
LLLL
01
Type of
water
supply
Type of
console
Slide out
direction waste-
holding tank
Type of level
indication
1.3
1.31.3
1.3 Overview
Overview Overview
Overview CCCC26
2626
260000 versions
versionsversions
versions
The C260
has 4 main versions:
C263CWE
C263CWEC263CWE
C263CWE - x xxx x xx x xx
C263
C263C263
C263SSSS - x xxx x xx x xx
C263
C263C263
C263CS
CSCS
CS - x xxx x xx x xx
C263
C263C263
C263CSL
CSLCSL
CSL - x xxx x xx x xx (= C263 low console)
C262CWE
C262CWEC262CWE
C262CWE
C263S
C263SC263S
C263S
C263CS
C263CSC263CS
C263CS
C263CS
C263CSC263CS
C263CS
LLLL
Capacity waste
-
holding tank
17,5L 17,5L 17,5L 17,5L
Capacity flush
-
water
tank
8L N.A. N.A N.A
Level indication
waste-holding tank
1 level 1 level 1 level 1 level
Level indication
flush-water tank
N.A N.A N.A N.A
4
GENERAL
1.4
1.41.4
1.4 Available drawings and models
Available drawings and modelsAvailable drawings and models
Available drawings and models
Designation
Description
2D drawing
3D
file
C262CWE
– x 062 x 40 x xx /
C262CWE – x 030 x 40 x xx
C262CWE with standard bowl
LE900 LE
900
C263S
– x 062 x 40 x xx /
C263S – x 030 x 40 x xx
C263S with standard bowl
LE901 LE
901
C263CS
– x 062 x 40 x xx /
C263CS – x 030 x 40 x xx
C263CS with standard bowl
LE902 LE
902
C263CSL
– x 062 x 40
x xx /
C263CSL – x 030 x 40 x xx
C263CS low with standard bowl
LE903 LE
903
C262CWE
– x 062 x 50 x xx
C262CWE with ceramic bowl
LE904 LE
904
C263S –
x 062 x
5
0 x xx
C263S with ceramic bowl
LE905 LE
905
C263CS
– x 062 x 50 x xx
C263CS with ceramic bow
l LE
906 LE
906
C263CSL
– x 062 x 50 x xx
C263CS low with ceramic bowl
LE907 LE
907
C263S
– x 062 x 40 x 04 /
C263S – x 030 x 40 x 04
C263S with standard bowl and waste
pump-out system
LE908
LE908
C263S
– x 062 x 50 x 04
C263S with ceramic bowl and waste
pump-out system
LE909
LE909
Not applicable
Waste pump
-
out system
LE910
LE910
Not applicable
Powered outside vent
LE911
LE911
Not applicable
Waste
-
holding tank
LE912
LE912
Not applicable
Waste
-
holding tank with waste pump
-
out system
LE
913 LE
913
2
22
2 STAND
STANDSTAND
STANDARDS / LEGISLATION
ARDS / LEGISLATIONARDS / LEGISLATION
ARDS / LEGISLATION
BSI 2081
-
2 1998
Closets for use with chemicals
Directive 72/245/EEC, as last amended by Directive
2004/104/EC and 2005/83/EG.
CE
3
33
3 CUSTOMER SERVICE
CUSTOMER SERVICECUSTOMER SERVICE
CUSTOMER SERVICE
3.1
3.13.1
3.1 Installation audit form
Installation audit formInstallation audit form
Installation audit form
Thetford offers an additional service by auditing the installation of our products at the manufacturer. This means that
before
a C260 is installed in production series, our local service representative will carry out a specific audit based on
these Thetford installation instructions. The outcome of this audit will be shared and agreed to with the individual
manufacturer.
The audit is meant as a reference for the specific toilet model (C260) to ensure correct installation for the complete
production series.
In any case, the manufacturer can always contact the local service representative for any additional support related
to the installation of the C260 toilet.
3.2
3.23.2
3.2 Serviceability
ServiceabilityServiceability
Serviceability
The manufacturer is responsible for correct installation to ensure the right functionality and serviceability of the
C260. In terms of serviceability, this means that a dealer or an authorised Thetford service partner must be able to
de-install and re-install the C260 within 45 minutes, using standard tools and equipment.
This is to claim any warranty during the period of 3 years after purchase date. The serviceability of the toilet is also
included in the audit. In case of any queries on this subject, please contact your local service representative
before
installing our product.
5
C262CWE
C262CWE
4
44
4 INTERFACES
INTERFACESINTERFACES
INTERFACES
4.1
4.14.1
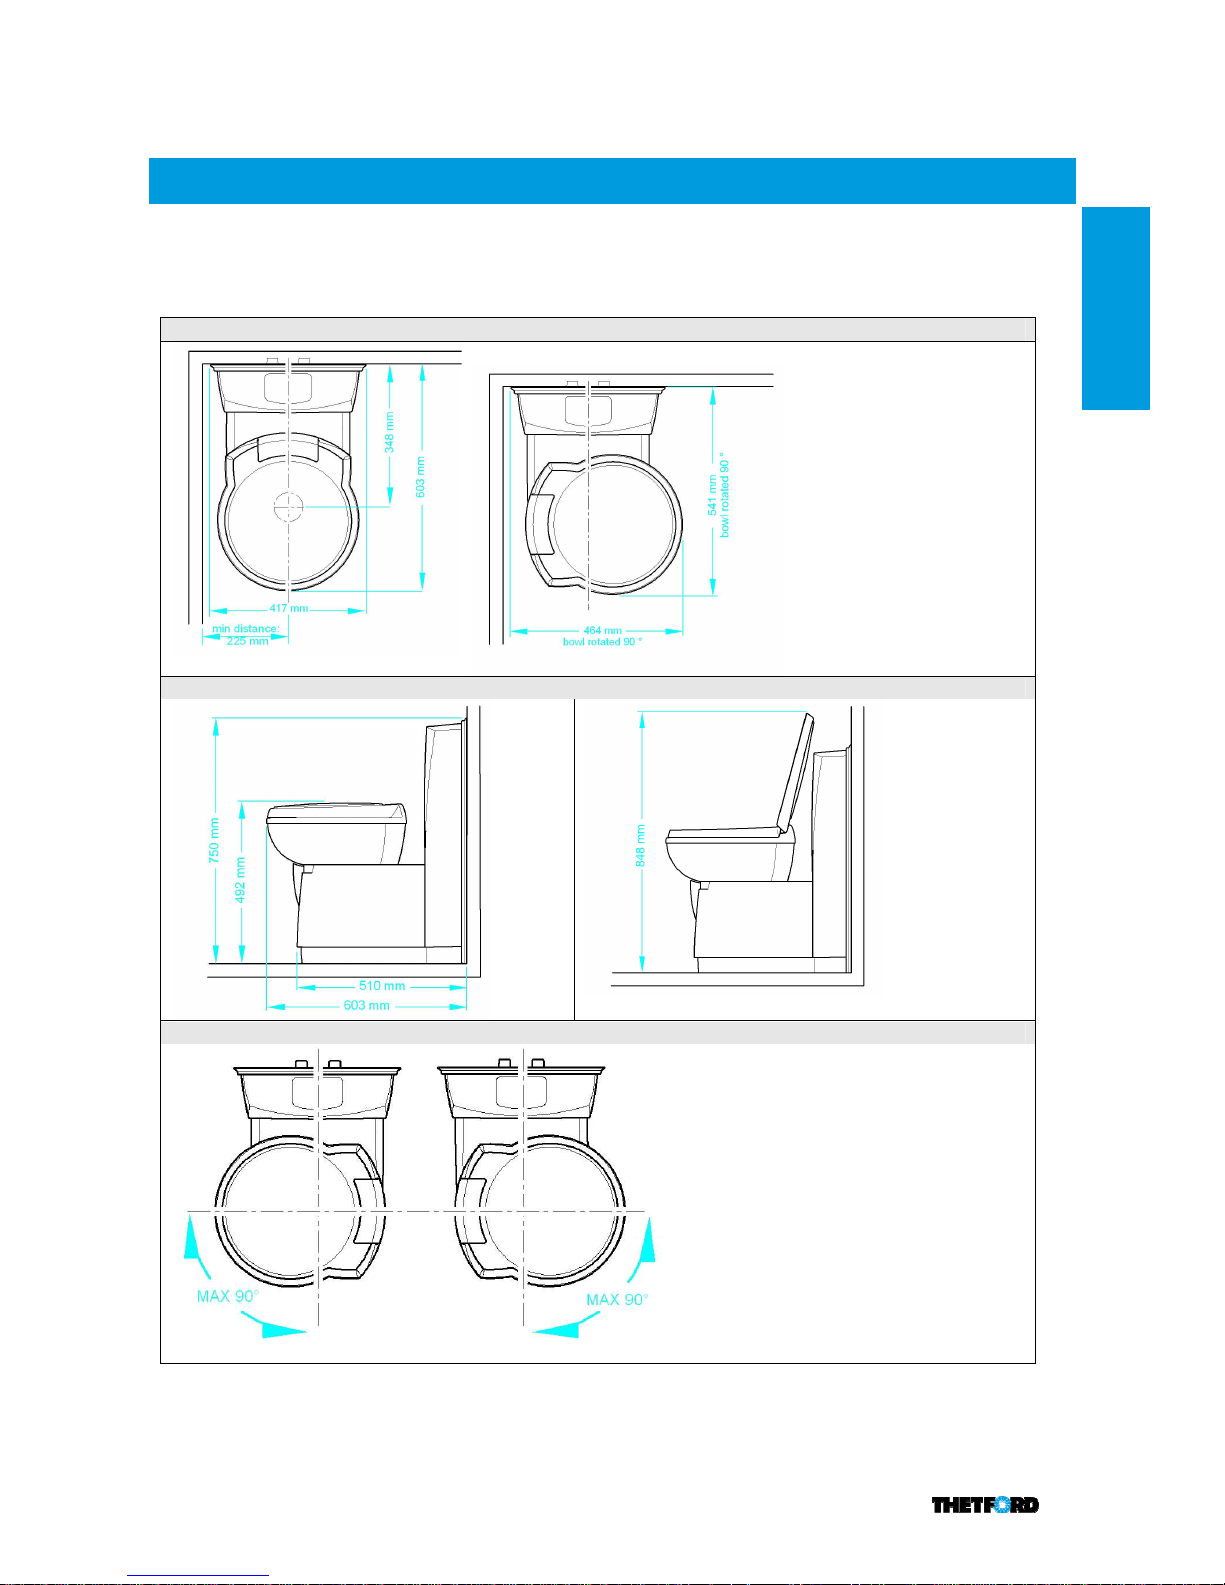
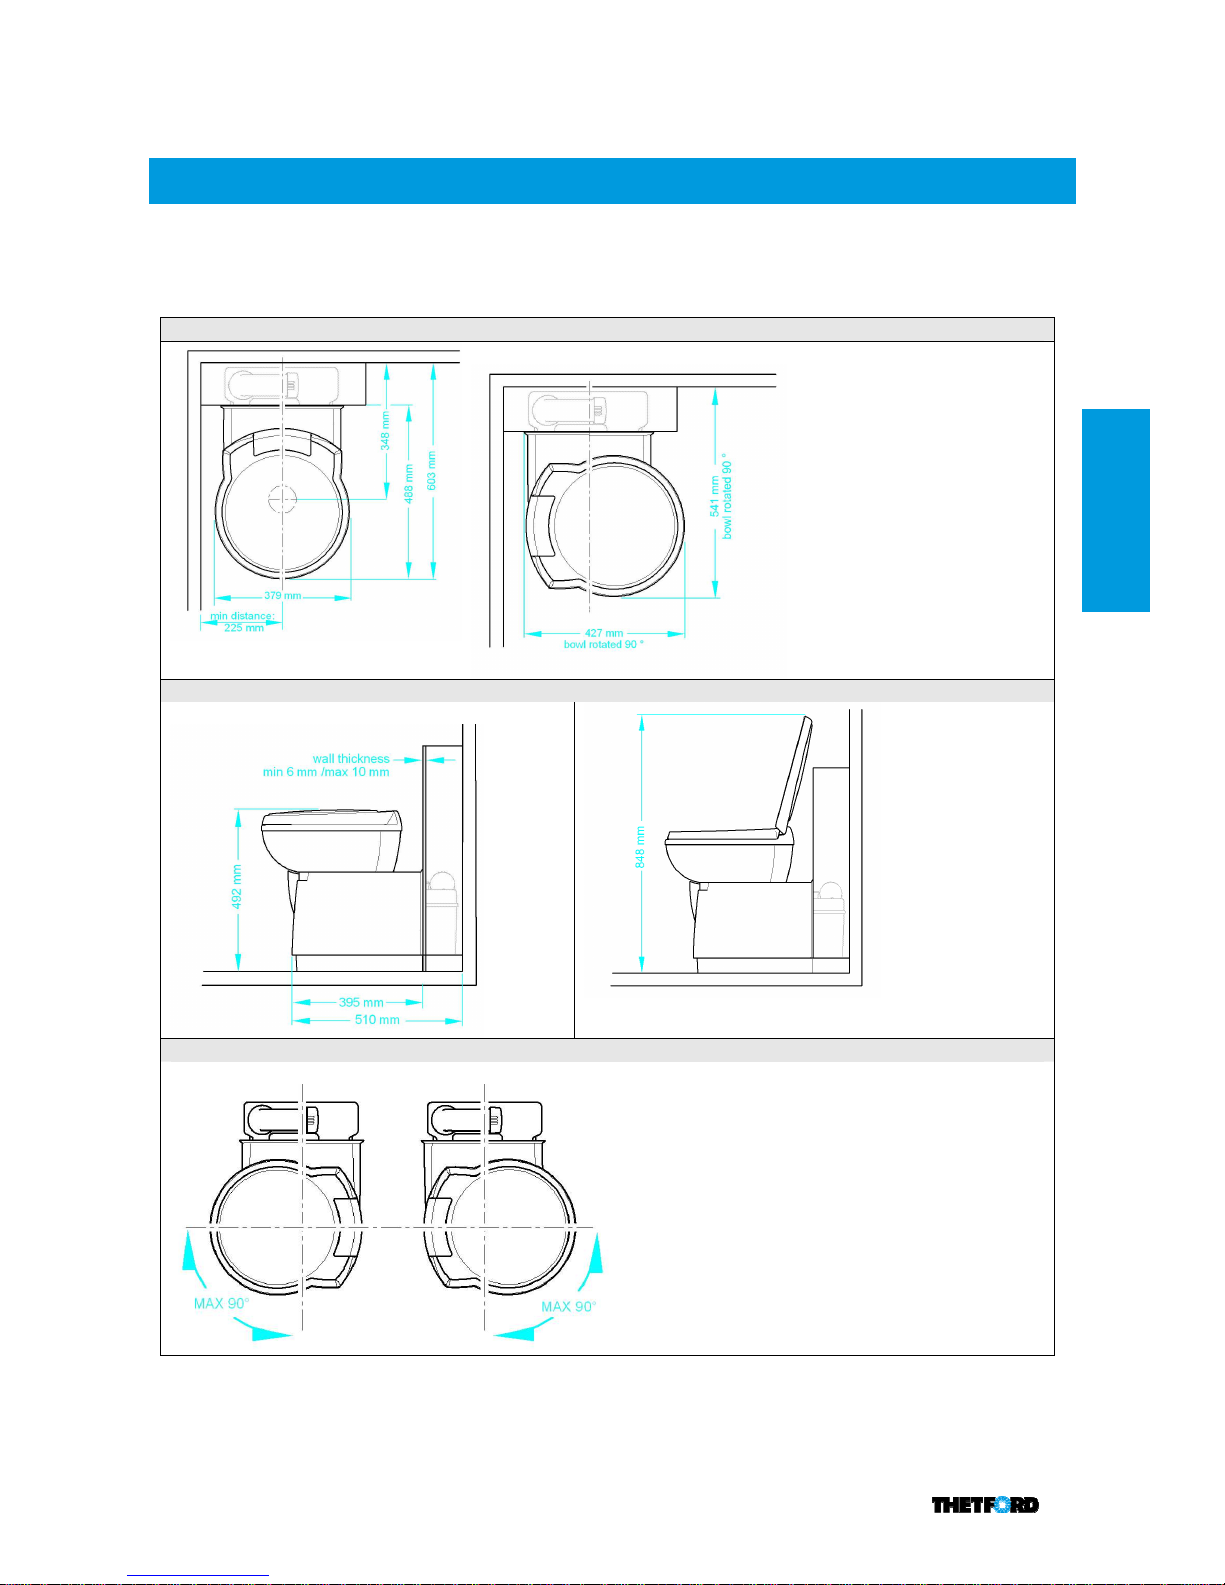
4.1 Bathroom requirements
Bathroom requirementsBathroom requirements
Bathroom requirements
Main dimensions bathro
om
Other dimensions
Rotation Bowl
6
C262CWE
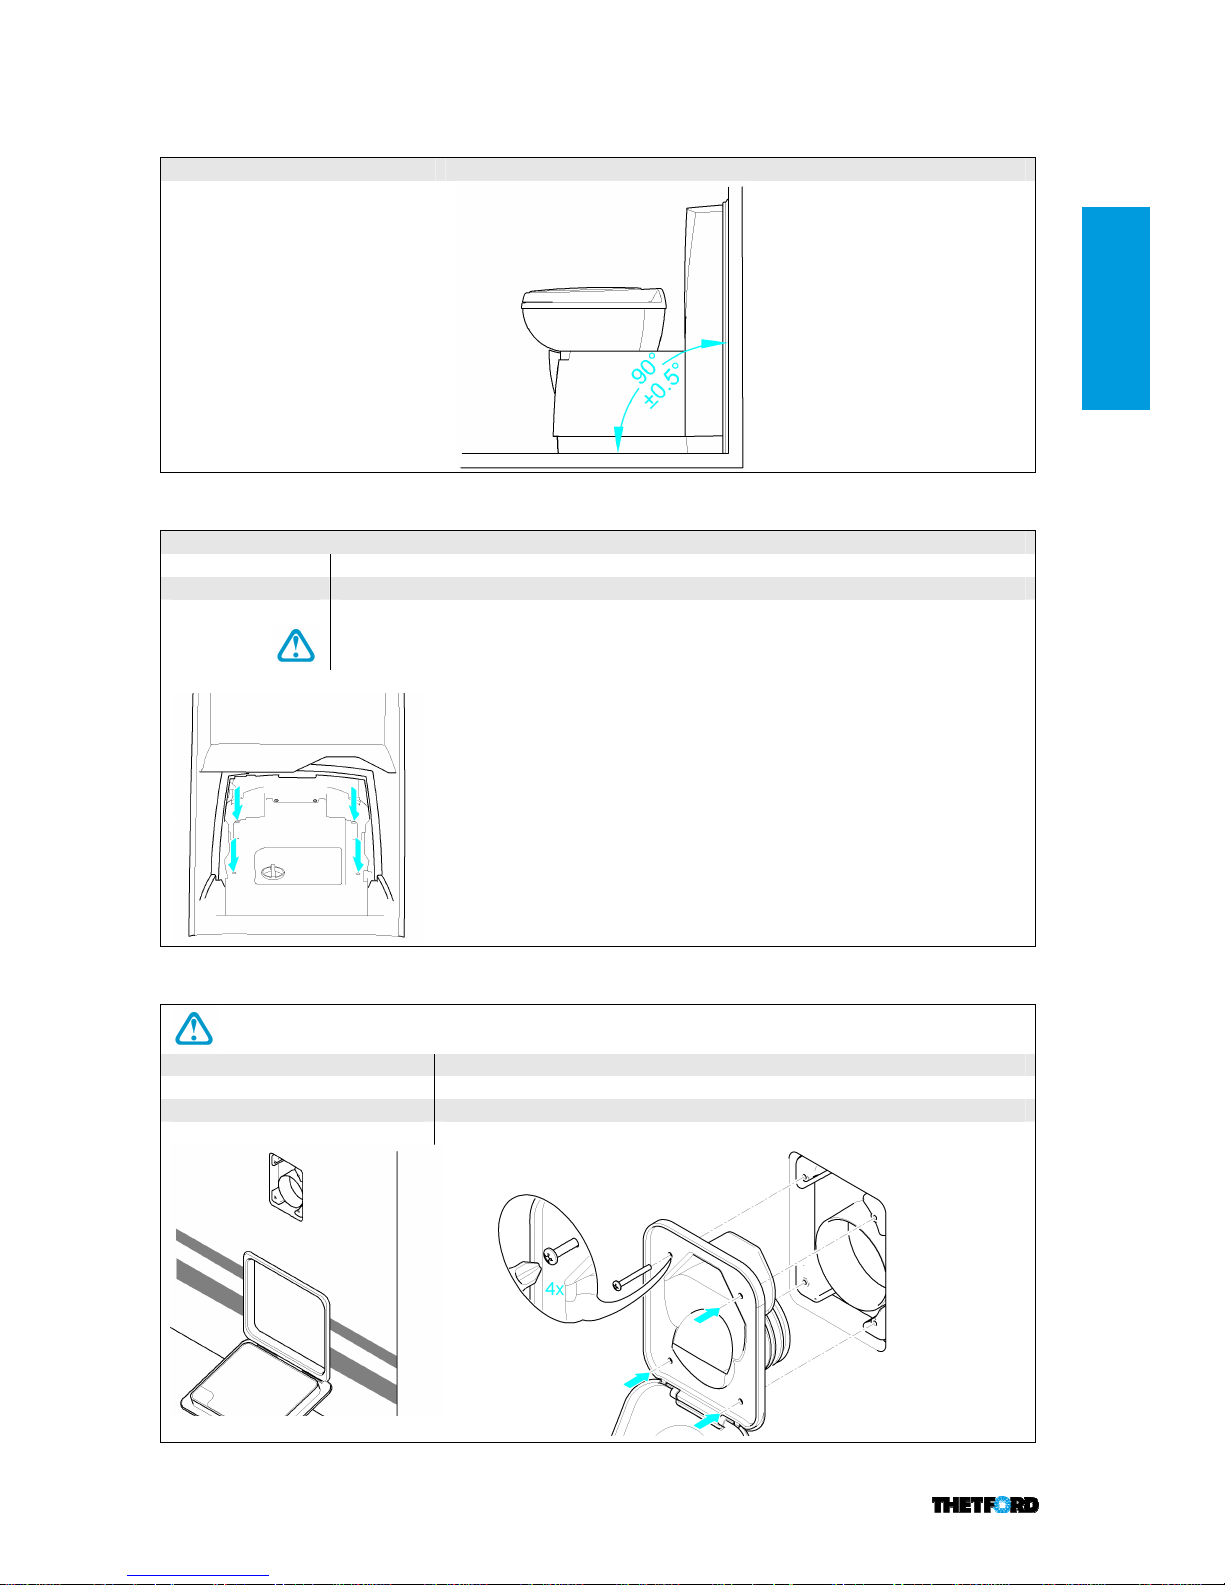
Floor
The C
260 must be
screwed
to
a flat and stable floor
Angle back wall
- floor
4.2
4.24.2
4.2 Floor connection
Floor connectionFloor connection
Floor connection
Mount the toilet to the floor with four screws.
Screw type
Screws are supplied by Thetford
S
crew positions
See
the
installation drawing
of the
applicable toilet (1.4)
Required torque
1.
2 ± 0.3
Nm for a Plywood floor
Torque may differ if the floor is made from a different material.
4.3
4.34.3
4.3 Water fill door
Water fill doorWater fill door
Water fill door
First c
onnect the toilet to the floor a
nd then
install
the waterfill door
. Install the waterfill door
with four screws. For further instructions see the installation instructions of the door.
Extra cut
-
out
outside
wall A cut-out need
s to be created in the
outside
wall for
the
waterfill door
.
Dimensions cut
-
out See the installation drawing of
the
applicable toilet (1.4)
Screw type
Screws are supplied by Thetford
Required torque
0.5 Nm
7
C262CWE
4.4
4.44.4
4.4 Service door
Service doorService door
Service door
Door 3
Door 3Door 3
Door 3
Flush door 3
Flush door 3Flush door 3
Flush door 3
Mounting position
See
the
installation drawing of
the
applicable toilet (1.4)
See the installation drawing of
the
applicable toilet (1.4)
Cut-out dimensions
See
the
installation drawing of
the
applicable toilet (1.4)
See
the
installation drawing of
the
applicable toilet (1.4)
Wall thickness
23 –
39 mm
23 –
39 mm
Ins
tallation
See
the
installation instruction of
the
door See
the
installation instruction of
the
door
4.5
4.54.5
4.5 Shower tray
Shower trayShower tray
Shower tray
Available space for shower tray
Interfaces
See
the
installation drawing of
the
applicable toilet (1.4)
4.6
4.64.6
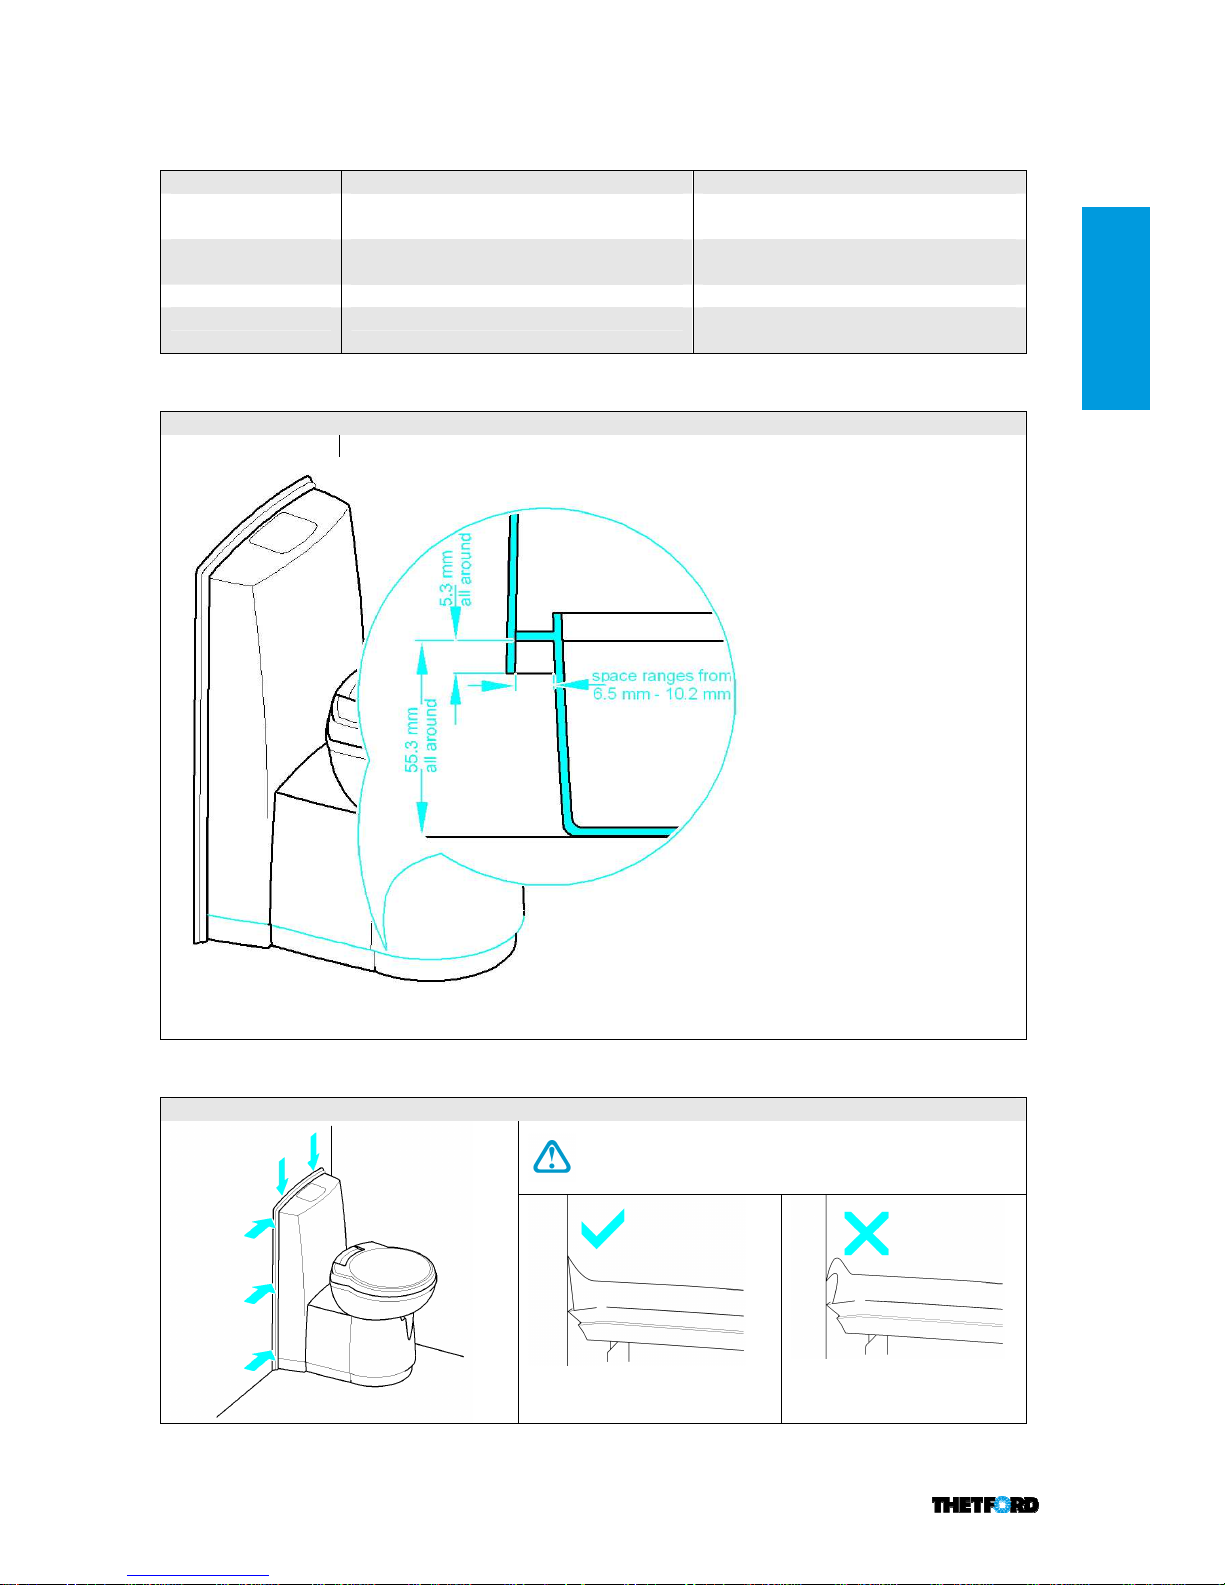
4.6 Cosmetic w
Cosmetic wCosmetic w
Cosmetic wall s
all sall s
all seal
ealeal
eal
The wall seal is
integrated with the toilet.
Pay close attention to the position of the wall seal!
8
C262CWE
4.7
4.74.7
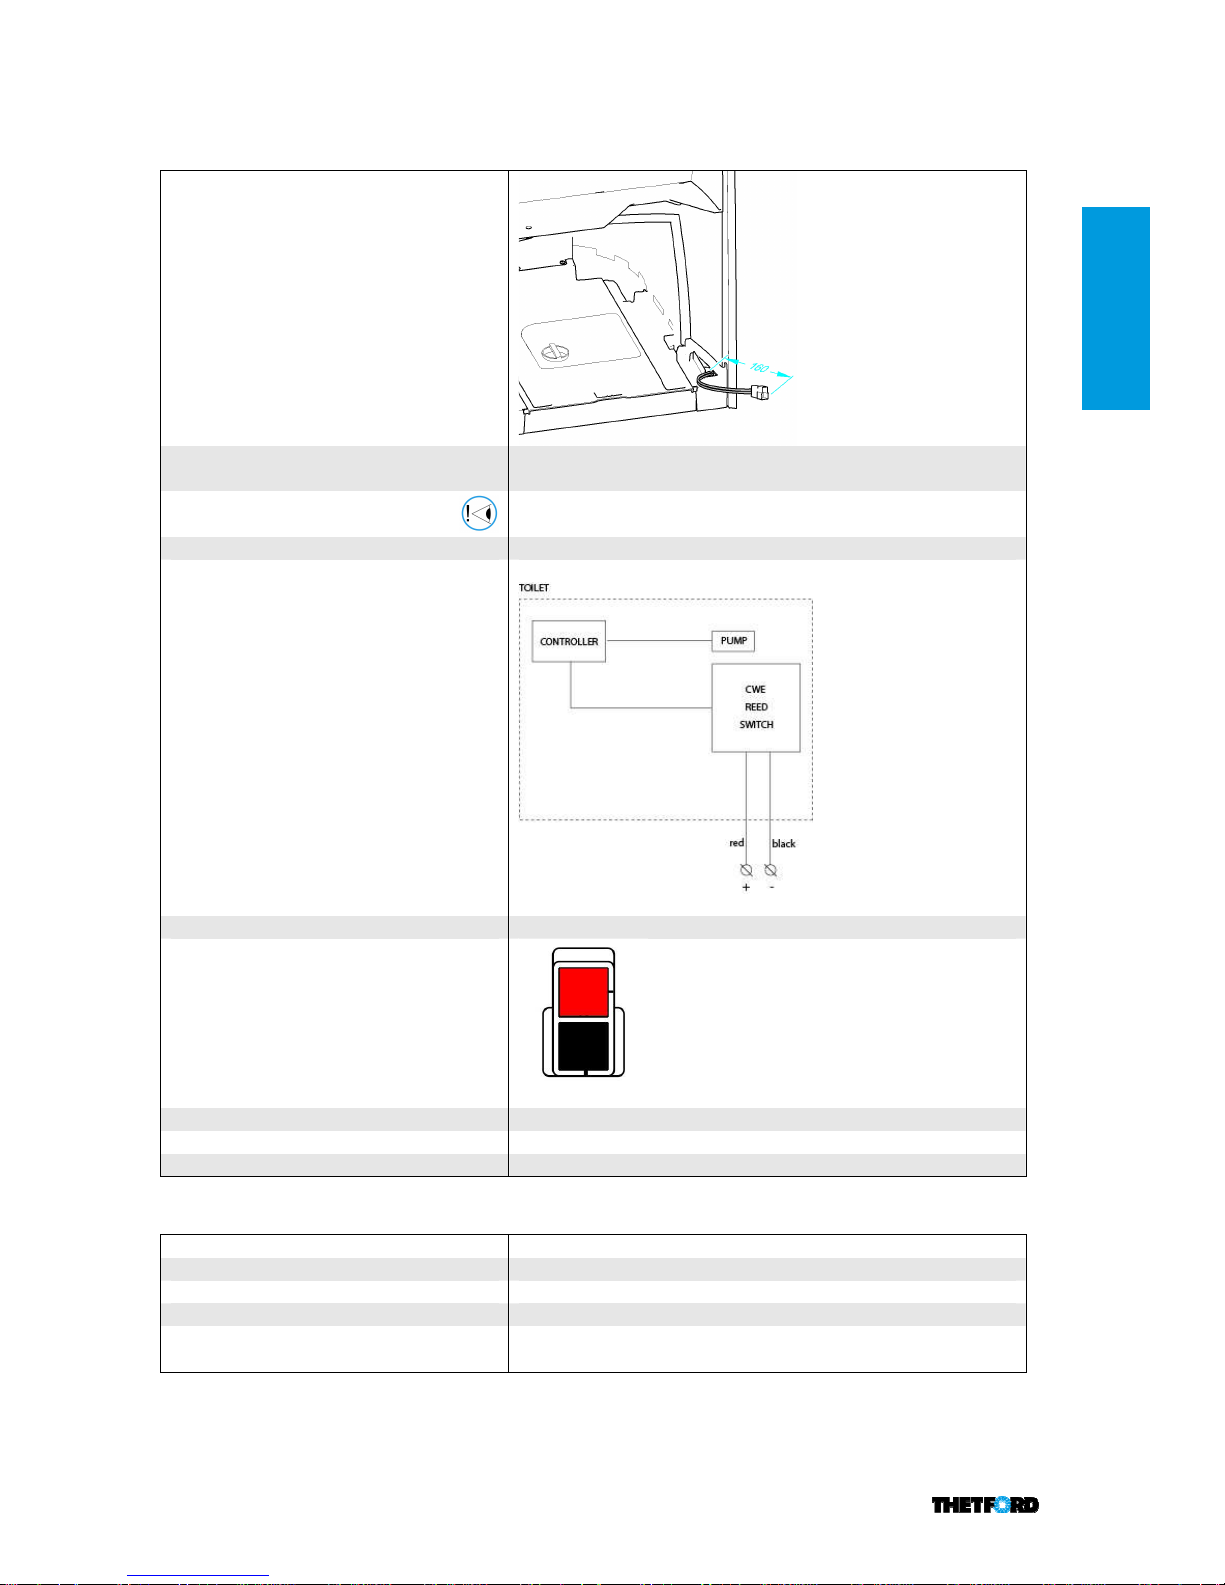
4.7 Power supply
Power supplyPower supply
Power supply
Position
Operating voltage
10 –
15 V (power supply must be able to deliver 3 ampere
s at
rated voltage)
T
he voltage must be between
11.4
and 13.8V to be able to
achieve full bowl coverage flush.
Wiring diagram
Connection
2 pole tab housing
Position wiring in tab housing
2 pole connector
on toilet
TYCO/AMP 180
908
2 pole
connector
OEM TYCO/AMP 180907
Thickness
0.
5 mm²
4.8
4.84.8
4.8 Packag
PackagPackag
Packaging
inging
ing
Type of packaging
Pallet packaging (see chapter 5 for unpacking)
Amount of toilets on a pallet
6 (2x3)
Maximum stack height
3 pallets high
Pallet size
1200 x 800 mm
Returnable packaging
The pallet must be returned to Thetford if a half truck load i
s
available.
red
black
9
C262CWE
5
55
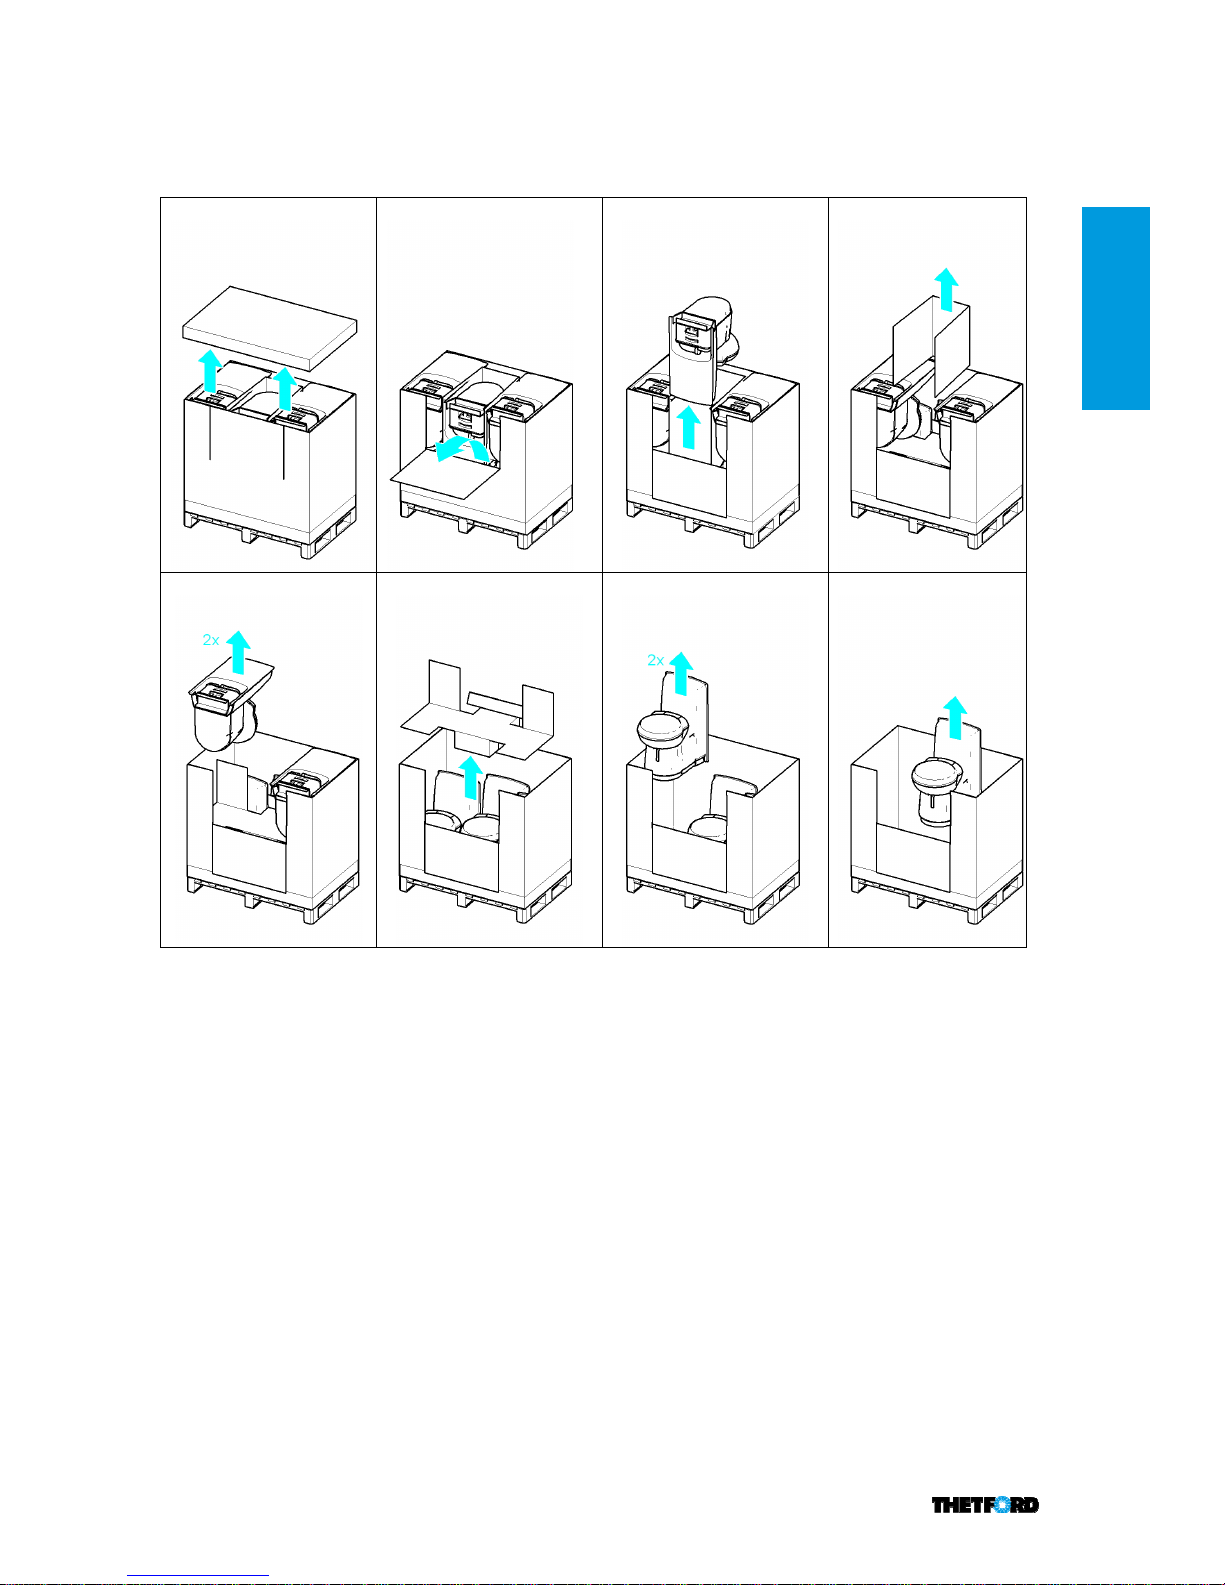
5 UNPACKING
UNPACKINGUNPACKING
UNPACKING INSTRUCTION
INSTRUCTIONINSTRUCTION
INSTRUCTIONSSSS
1111
2222
3333
4444
5555
6666
7777
8888
10
C263S
C263S
6
66
6 INTERFACES
INTERFACESINTERFACES
INTERFACES
6.1
6.16.1
6.1 Bathroom requirements
Bathroom requirements Bathroom requirements
Bathroom requirements
Main dimensions bathroom
Other dimensions
Rotation Bowl
 Loading...