

ThermoPro TP-67 Instruction Manual

Model No.: TP-67
V201808 EN FR31
Wireless Weather Station
Instruction Manual
English................. 2 Français............... 14
1 Introduction
Congratulations on your purchase of your tabletop weather station with weather
forecast, barometric pressure display, indoor temperature/humidity display and
outdoor temperature display.
2 Components
1. One base station unit (Receiver)
2. One outdoor remote sensor (Transmitter)
3. USB charging cable
* Remote sensor is designed to be rain-proof, it's preferable to place the
remote sensor in a dry location that avoids direct rainfall and sunlight for a
more accurate measurement.
3 Product Features and Specification
1. LCD display: Displays the current outdoor temperature, indoor humidity/
temperature, barometric pressure including its history and the weather
forecast.
2. Indoor Temperature range: -4 °F ~ 158°F (-20 °C ~ 70 °C), humidity range:
10% ~ 99%.
3. Outdoor Temperature range: 58°F ~ 158°F (-50 °C ~ 70 °C).
4. Temperature tolerance: +/- 2.0 °F (+/- 1.1 °C).
5. Humidity tolerance: ±2% from 30% to 80%; ±3% below 30% and above 80%.
6. Low battery indication for both base station and remote sensor.
7. Backlight LCD display.
8. Tabletop and wall mountable design; Base is detachable.
9. Rain proof design for remote sensor.
10. Power source: 2*AAA 1.5V batteries for base station and 18650 lithium
3.7V battery for remote sensor.
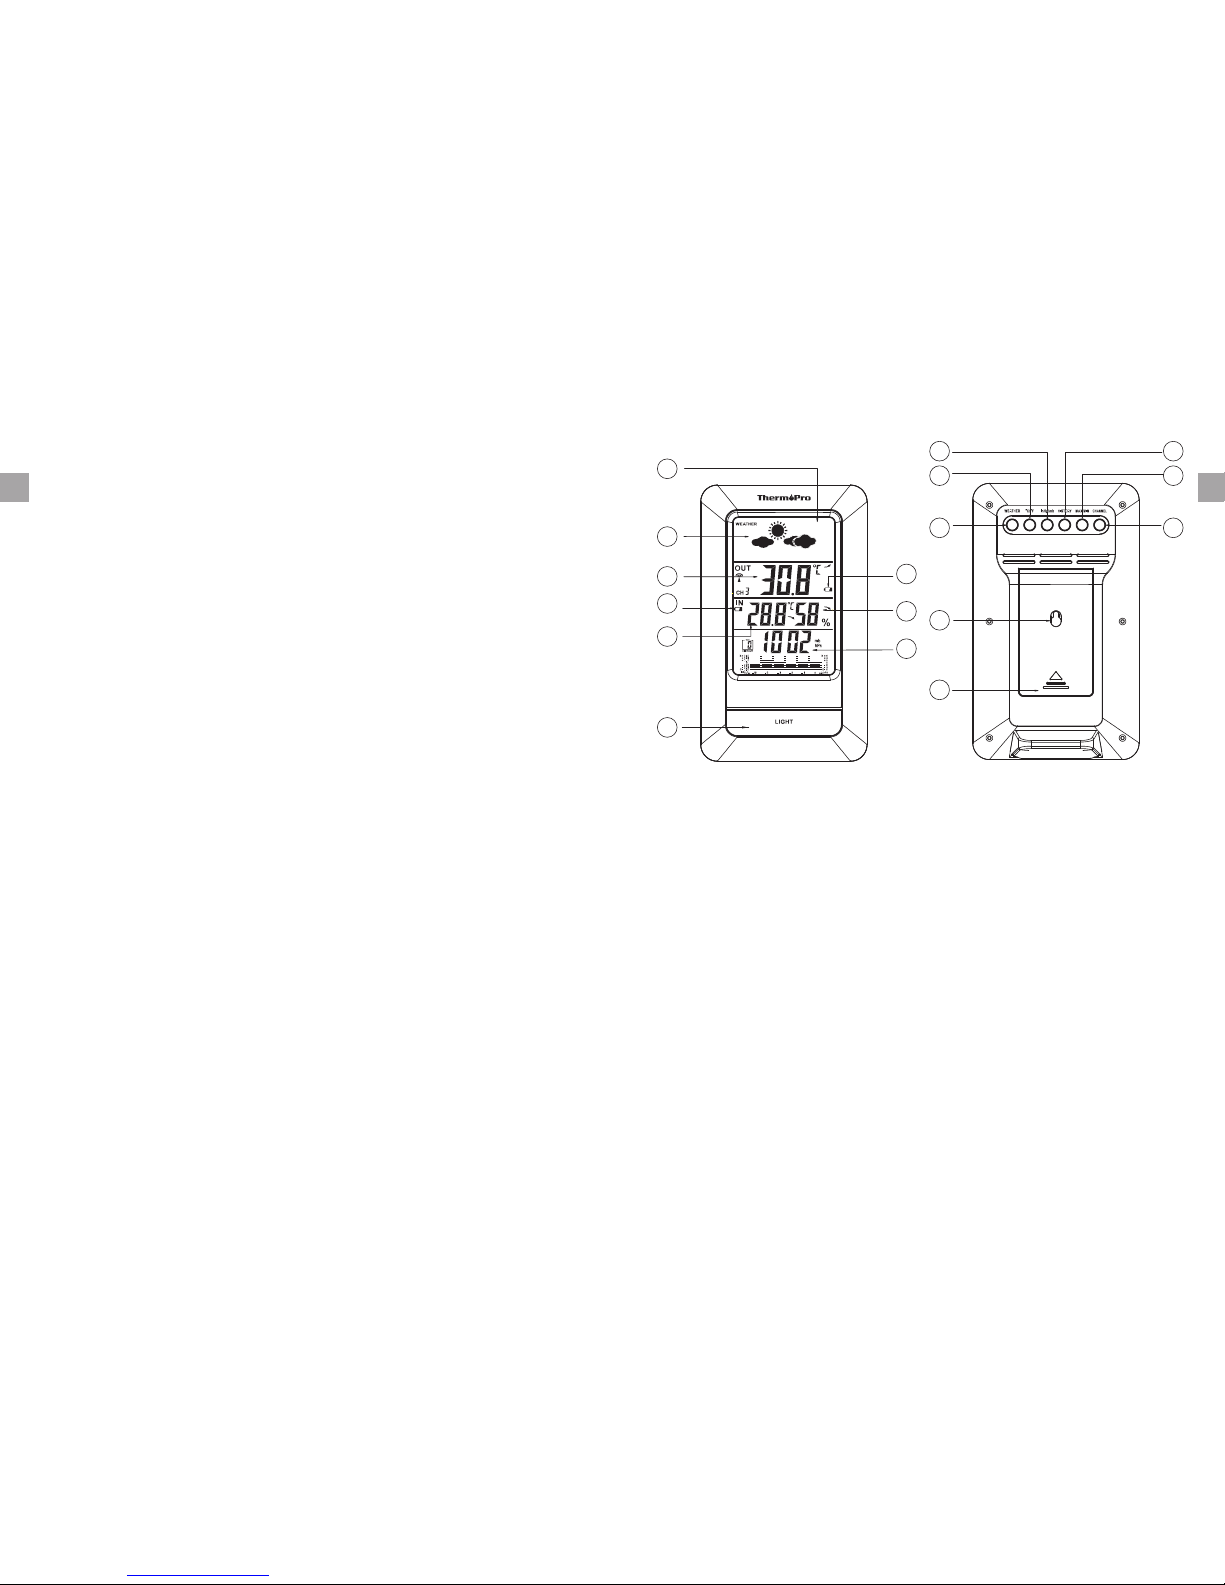
4 Base Station (Receiver)
5 Buttons
1. LIGHT: Press to turn on/off display backlight.
2. WEATHER: Press to select one of five weather conditions (sunny, partially
cloudy, cloudy, rainy, and snow) to best reflect the current weather condition.
3. °C/°F: Press to select temperature display unit between °C or °F.
4. inHg/mb: Press to select barometric pressure display unit between inHg or
mb (hPa).
-2- -3-
EN EN
01
02 Weather Forecast
03 Outdoor temperature
04 Base Station Low Battery Icon
05 Indoor Temperature
06 Backlight Button
07
08
09 Barometric Pressure
Large LCD display
Remote Low Battery Icon
Indoor humidity
02
01
03
04
05
6
07
08
09
10
11
12
13
14
15
16
17
10
° °
WEATHER
13
14
15 HISTORY
16
17
inHg/mb
11 C/ F
12
Wall hanging hole
Battery Compartment
MAX/MIN
CHANNEL
6 Temperature & HUMIDITY Trend
1. indicates the temperature & humidity is in an increasing trend.
2. indicates the temperature & humidity is in an no change trend.
3. indicates the temperature & humidity is in a decreasing trend.
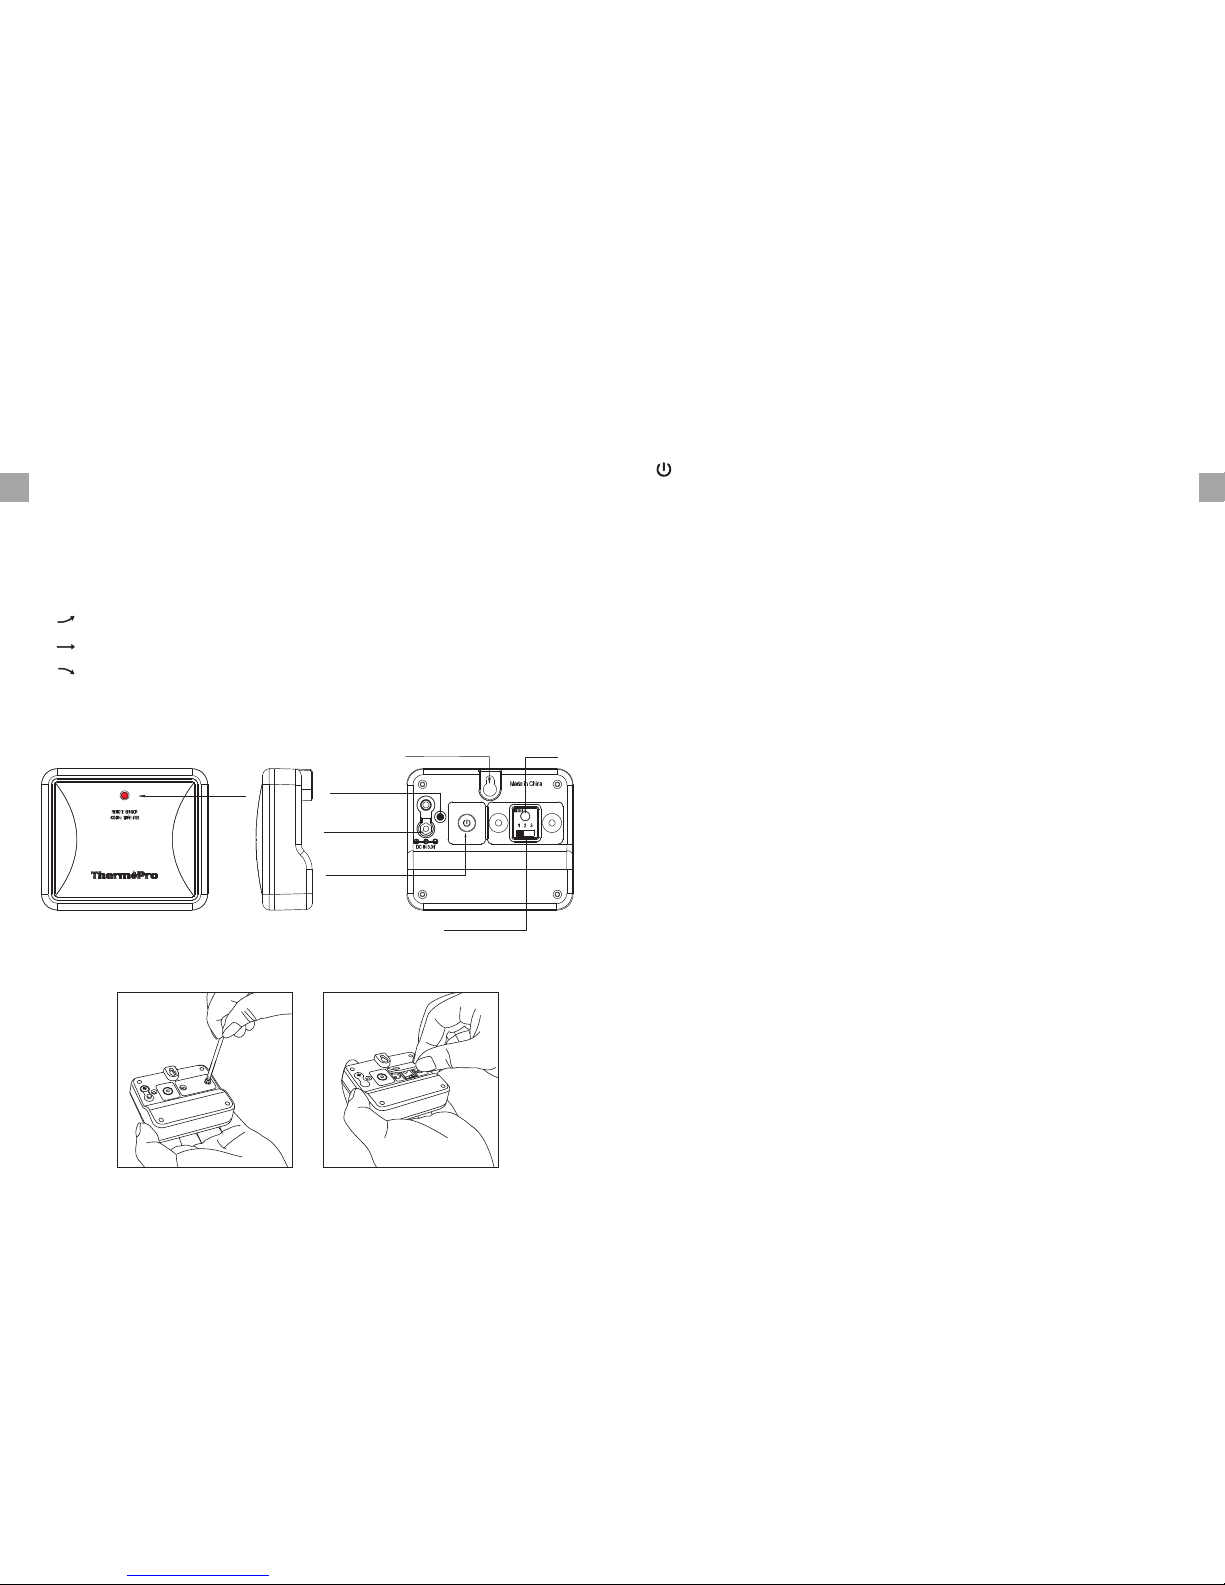
7 Outdoor Remote Sensor (Transmitter)
Note: To access CHANNEL SELECTOR and RESET buttons, you need to unscrew
the cover as per below Figure.
LED
Temperature
Sensor
Charging
Socket
ON/OFF
Reset
Channel
8 Charging Remote Sensor
1. Remote sensor: A built-in rechargeable lithium battery is installed in the
remote sensor. Although there could be some power in the rechargeable
battery before the unit leaves our manufacturing facility, we always
recommend to fully recharge the remote sensor before use by following the
steps below:
a. Note, the package does not INCLUDE a wall adapter. Simply use any cellphone
wall charger with USB socket to charge the battery. Connect the charging
cable (provided in the package contents) into your wall adapter and take the
other end of the plug and insert into the charging socket located on the back
of the remote sensor;
b. Plug the wall charger into a standard AC outlet
c. The red light on the remote sensor will light up
d. Charge the remote sensor for at least 4 hours until the light changes from
red to green which indicates charging is complete.
9 Low Battery Warning
If the battery power (base station or remote sensor) is low, there will be low
battery icon showing on the base station display.
If the low battery icon for base station is displayed, please replace the batteries
with new batteries.
If the low battery icon for remote sensor is displayed, please charge the remote
sensor as soon as possible.
Wall hanging ho le
-4- -5-
EN EN
7. CHANNEL: Press once to display the temperature readings from up to 3
outdoor remote sensors; Press and hold to enter the synchronization mode.
5. HISTORY: Press to display the record of barometric pressure for the past 12
hours.
6. MAX/MIN: Press once to display the maximum and minimum temperature
and humidity since last reset. Press and hold to clear the MAX/MIN records.
CHANNEL Selector (1,2,3): Slide to set Channel 1,2 or 3.
RESET: Press once to reset the remote sensor.
: Press and hold for 2 seconds to turn ON/OFF the unit.
(ON: Flash 1 time , OFF: Flash 3 times)

11 Synchronize Remote Sensors with The Base Station
1. Place the remote sensor near the base station.
2. Insert the batteries into the base station, the RF indicator (located on the
upper left of the outdoor temperature display section) will begin to flash for
3 minutes, indicating that the base station is in synchronization mode and
waiting for remote sensors to be registered.
3. Set the CHANNEL selector (on the back of the remote sensor unit) to position
1 or 2 or 3. The unit is pre-set to Channel 1 and you can always leave it
unchanged unless you have purchased more than 1 remote sensor.
4. Press and hold ON/OFF button on the back of the remote sensor for 2 seconds
to turn on the remote sensor. Then wait for a moment until the temperature of
the remote sensor is displayed on the base station which indicates the
synchronization is complete.
5. If the synchronization is not successful after 3 minutes since the batteries
were inserted into the base station and the RF indicator no longer flashes,
press and hold the CHANNEL button on the back of the base station for 3-4
seconds until the RF indicator begins to flash again, setting it back into
synchronization mode;
6. If you have additional remote sensors, repeat the above steps to synchronize
the additional remote sensors (up to 3 remote sensors can be registered with
one base station). Please note the additional sensors should be set to a
different channel.
7. If you have registered more than one sensor, press the CHANNEL button on
the base station to select the remote channel you want displayed permanently
12 Thermometer
1. Once the remote sensor and the base station are synchronized, the indoor
temperature/humidity and outdoor temperature will both be shown the base
station display.
2. Maximum & Minimum Recorded Temperature & Humidity
a. Press MAX/MIN/CLEAR button once to display the highest indoor
temperatures/humidity and outdoor temperatures recorded. MAX is
shown on the display.
b. Press MAX/MIN/CLEAR button again to display the lowest indoor
temperatures/humidity and outdoor temperatures recorded. MIN is shown
on the display.
c. To clear and reset the max/min records, press and hold MAX/MIN/Clear
for 3 seconds.
3. Temperature and Humidity Trend: there are 3 types of icon on the base
station display:
indicates the temperature and humidity are in an increasing trend.
indicates the temperature and humidity are in a no change trend.
indicates the temperature and humidity are in a decreasing trend.
13 Barometer
1. Press the HISTORY button on the back of the base station to show the actual
barometric pressure value in the past 1 to 12 hours.
2. Barometric Pressure Trend: on the bottom of the display, the graph shows
the barometric pressure change in the last 12 hours.
-6- -7-
EN EN
10 Display Unit Selection
1. Press °C/°F button on the back of the base station to change the temperature
display unit between °C or °F.
2. Press inHg/mb button on the back of the base station to change the
barometric pressure display unit between inHg or mb (hPa).
on the base station. If wanting to observe all channels, press the CHANNEL
button until you observe a circular arrow on the base station LCD display
under the channel number, the unit will auto-scroll, changing from channel to
channel every 5 seconds.

14 Weather Forecast
The initial current weather condition should be set before using the weather
forecast feature to allow for the weather station to accurately forecast the
weather for the upcoming 12-24 hours. Press the WEATHER button on the back
of the base station and the weather symbols on the top of the screen will
change. Choose one of five weather symbols (sunny, partially cloudy, cloudy,
rainy, snow) that best reflect the current weather condition.
15 Interpreting the weather forecast symbols
The weather station requires at least 24 hours to acclimatize to local weather
conditions. The weather station processes and analyzes the weather patterns
including temperature and barometric pressure change for the past 24 hours to
determine the forecast. Only then the predicted weather forecast will reflect
the actual weather for your immediate area. Until that time has elapsed, the
predicted weather forecast may not accurately reflect the actual weather in
your immediate area.
The weather station will display the symbols to indicate the predicted weather
forecast for the next 12 to 24 hours for an area within a radius of approximately
20-30 miles or 30-50 km.
Note:
a.The weather forecasting is approximately 70% accurate. The accuracy rate
might be lower in extreme weather conditions. The weather forecasting is
for reference and for domestic use only. Do NOT rely on the weather station's
weather forecast for any serious matters such as health, business and
financial decisions and/or agricultural planning and certainly not for life and
death situations.
16 Place the Base Station and Remote Sensor
1. The indoor base station (receiver) should always be placed in a well
ventilated indoor area and located away from vents, heating or cooling
elements, direct sunlight, windows, doors, or any other openings.
2. The remote sensor (transmitter) can be placed on a flat surface, indoor or
outdoor. Make sure the sensor is within the wireless distance from the base
station with minimal obstructions. Although the remote sensor is designed
to be rain-proof, it still must be always put in a dry place to avoid direct rainfall.
3. The base station and remote sensor can both be wall mounted.
17 Purchasing Additional Remote Sensors
The model number of the remote sensor for this unit is TX-3.
Additional sensors may be ordered directly from Amazon or ThermoPro by
contacting our customer service listed below.
18 Hints and Tips
If the receiver can't connect to the transmitter, try as following:
Repeat the synchronization process as described above.
Relocate the base station or the remote unit until connection is established
again.
Sunny
Partially Cloudy Cloudy
Painy
Snow
-8- -9-
EN EN
b.The weather forecast does not display the current weather. It forecasts the
weather for the next 12~24 hours.
Rising(up) Falling(down)
 Loading...