


TP-09
Réglementation FCC
1. Cet appar eil est en accord ave c la partie 15 d es Règl es FCC. L'op érati on est sujette
aux deux con ditions suivant es :
(1) Cet a ppare il ne pro voque p as d'in terférences da ngere uses,
(2) L'appareil doit accepter n'import e quelle interf érence reçue, dont une interfé rence
pouvant causer une opération non voulue.
2. En cas de changements ou de modific ations qui ne sont pas expressément app rouvés
pa r la parti e respo ns abl e, cell e- ci pe ut in vo quer la re sp on sab il ité d e l'uti li sateu r
opér ant sur l'équipement.
EN
Remote Food Thermometer
Model No. TP-09
Introduction
Congrat ulation s on y our purchas e of t he Profes si onal Remo te C ooking Th ermomet er,
a pr og ra mm ab le radio frequency fo od t he rmometer. You will now be a bl e to remotely
monit or the ti me and te mpera ture of f ood cooking on your grill , smoke r or oven .
GARANTIE LIMITÉE A 90 JOURS
Therm oPro ga ranti t ce prod uit de to ut défaut dans ses compos ants, m atéri aux et
fabrication pendant une période de 90 jours, à partir de la date d'achat.
Si une réparation ou un service sous garantie est nécessaire, veuillez contacter le service
client par téléphone ou courriel pour des instructions sur la manière d'emballer et d'envoyer
le colis à ThermoPro.
Cette g arant ie vous d onne dr oit à des d ispositions lé gales e t certa ins dro its
suppl ément aires s elon l' État où v ous êtes domicil ié.
SERVICE CLIENT
Télép hone: 1 -877- 515-7 797 (US & C A seulement)
Email : servi ce@bu yther mopro .com
Heure s d'Ouv ertur e : Lundi a u Vendre di de 9:00 à 17:00 heu re loca le.
-24 -
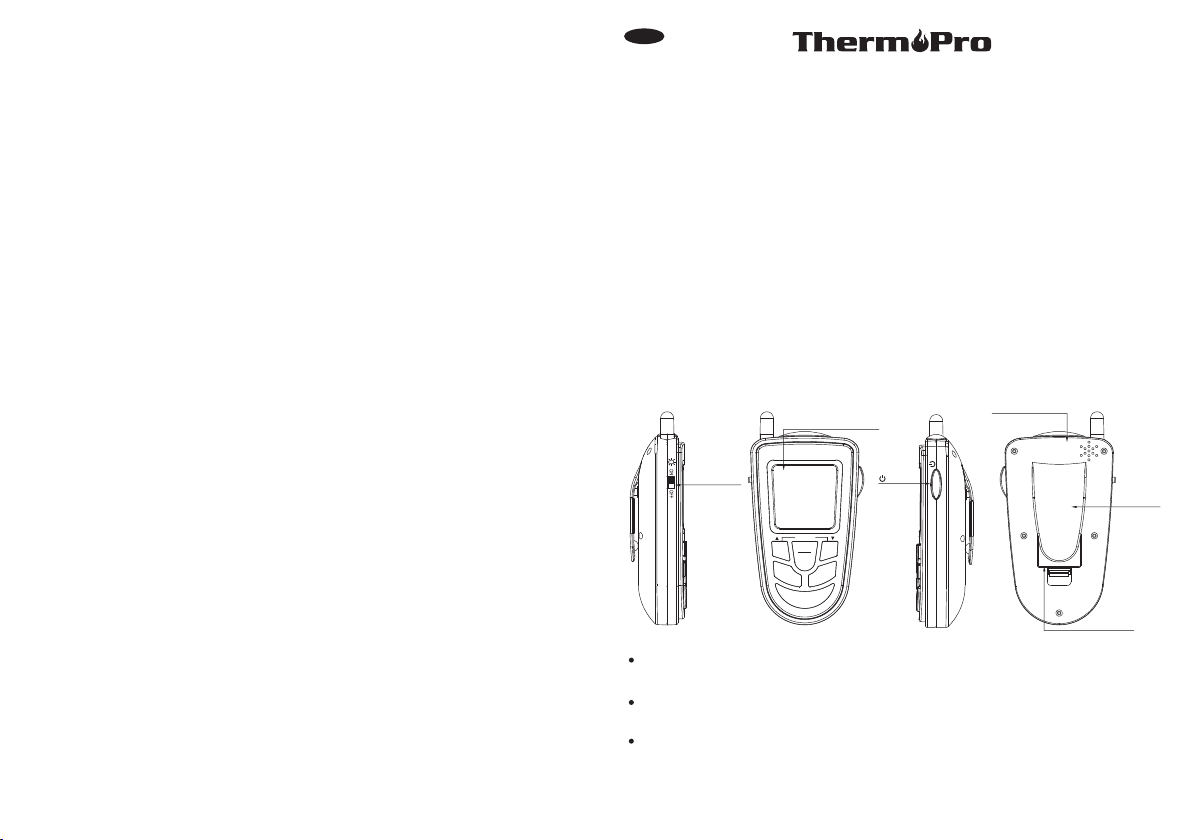
Components
1. 1 - rece iver un it.
2. 1 - tran smitt er unit .
3. 1 - deta chabl e stain less st eel pro be sensor.
4. 2 - 2* AAA bat terie s.
Receiver Features
Rec eiver L CD Scre en
Lig ht ON/O FF
CLEAR
START
HR
MIN
STOP
ME
AT
STE
TA
MODE
/ºC /ºF
LCD (Li qu id Crysta l Display ) – Di splay s al l icons, te mperatu re and time r. Se e LCD
diagr am f or detail ed inform ation.
Belt Cl ip – Batt ery com partm ent cli p allows you to be mobile. Cl ip the re ceive r unit
to belt .
Batte ry Comp artme nt – Hold s 2 AAA batte ries.
-1-
Sou nd Spea ker
ºC/ ºF
Bat tery Co mpart ment
Bel t Clip
Buttons
1. MO DE – Press to se lect therm ometer or ti mer mode. Pr ess and hold f or 2 seconds t o
ent er Synchronizat ion/Pair ing mode.
2. HR – In timer mode, press once to set hour. Press and hold for 2 se conds, the hours
will increa se b y 10 h ours per second . In t he rmomete r mo de , press once to inc re ase
th e tempe ra tu re va lu e. Press an d hold it for 2 se conds, th e tempe ra tu re valu e will
incre ase by 10 d egree s per sec ond.
3. F/ C/ – Press and hold for 2 seconds to turn the receiver ON or OFF. In thermometer
º º
mode, press once to select temperature readings in Celsius or Fahrenheit.
4. MIN – In ti me r mod e, pr es s onc e set m inute s. Pr es s and h old f or 2 se conds , the
minutes will increa se b y 10 m in ut es p er s econd. In thermom et er m ode, press once
to d ec re as e the temperature v al ue . Pr es s and hold fo r 2 seconds, the te mp er at ur e
value w ill dec rease b y 10 degr ees per s econd.
5. MEAT – In t hermome te r mode, pre ss t o select meat t yp e, PROG (pr og ram), GBE EF
(gr ou nd be ef) , GPO UL ( gro un d pou ltr y) , BEEF, VEA L, CH CKE ( chi ck en) , POR K,
POULT (poultry), LAMB & FISH. In Timer mode, press it to switch between hour/min ute
timer t o a minut e/sec ond tim er and ba ck.
6. START STOP– I n timer m ode, press to start or stop t he time r.
7. TA STE – In t her mo met er mo de , p re ss to se le ct th e m ea t t as te le vel , RAR E, ME D
RARE, MEDI UM, M ED WE LL and WE LL DO NE .
8. Ligh t ON/OF F: Swit ch to tur n on or off the ligh t.
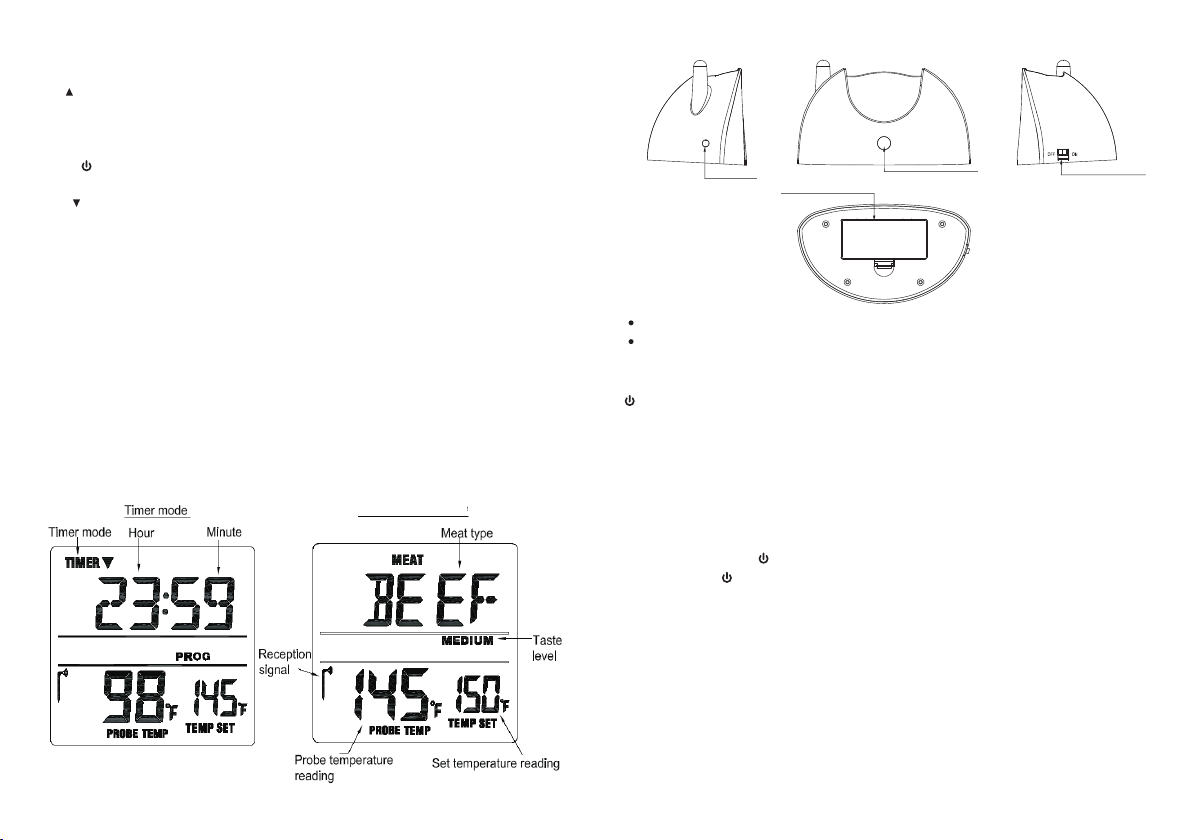
LCD
The rmome ter mod e
Transmitter Features
Sen sor Soc ket
Batte ry Comp artme nt – hold s 2 AAA batte ries.
Senso r Socke t: plug i n for sta inles s steel probe sensor
Bat tery Co mpart ment
TX in dicat or LED
Tran smitt er Powe r Butto n
Buttons
– Press a nd hold f or 2 seco nds to tu rn the tr ansmitter on or off.
Installing batteries
Open the batter y compart ment of the receiver an d insert two “AAA” batt eries with correct
pol ari ty. Open the battery compartment of the tra nsmitter and insert two “A AA” b att eri es
with co rrect p olari ty.
Turn On/Off Unit
Press a nd hold F / C/ but ton on th e recei ver for 2 ~3 seco nds to turn it ON or OFF.º º
Press a nd h old but to n on the tran smitt er f or 2~3 seco nds to turn i t ON or OFF. When
th e tr an sm itter is tu rn ed o n, the in di ca to r light will fl as h every 10 se co nd s. When it is
turne d off , the ind icator light will stop fl ashin g.
Synchronize/Pair Transmitter and Receiver
The t ransmitter an d rec eiver need to be synch ronized or paired be fore using. There are
two w ays to do so:
Optio n 1:
a. Inse rt the st ainle ss stee l probe i nto the plug in of the transm itter.
b. Open t he ba tt ery c ompar tm ent o f tra ns mitte r and i nsert t wo “A AA ” bat terie s. T he
transmitt er w il l au tomatically k ee p se nd ing the tempera tu re r eading to the receive r
for synchroni za ti on/pairin g.
-2-
-3-

c. Then open the batter y co mp ar tment of receiver and insert two “AAA ” ba tt er ies. The
re ce iv er will e nt er S ynchronization mo de which is i nd ic at ed by f la sh in g Reception
Signal icon on the display. Th e sy nc hronization mode will las t fo r 60 sec on ds .
d. Wai t f or a mo me nt un til t he te mp era tu re re ad ing s hows on th e rec ei ver d ispla y, it
me an s th e synchronization/Pairing i s co mp le te . Your pr of es si on al r em ot e cooking
th er mo me te r is ready for us e.
Note: The tr ansmitter and rec eiver are on ly required to be syn chronize d/pai red
once whene ver batteries of th e receiver o r transmitter are r eplaced.
If the ba tteri es are al ready i nstal led in the receiver and tra nsmit ter, you c an use Op tion
2 to sync hroni ze/pa ir them :
a. Inse rt the st ainle ss stee l probe i nto the plug in of the transm itter.
b. Turn on t he tran smitt er by pre ssing a nd holding button for 2~3 s econd s. Th e
trans mitte r will au tomat icall y keep sending the temper ature r eadin g to the re ceive r
for syn chron izati on/pa iring .
c. Turn on t he rece iver by p ressi ng and ho lding F/ C/ but ton for 2~3 seconds.º º
d. Press an d hold Mode button for 2~3 seconds to en ter the synchr oni zation mode wh ich
will last for 60 secon ds.
e. Wai t f or a mo me nt un til t he te mp era tu re re ading s how s on th e rec ei ver d ispla y, it
me an s th e synchronization/Pairing is co mp le te . Your professional r em ot e co ok in g
th er mo me te r is ready for us e.
Auto Off feature
The receiver will turn off automatically if it hasn't the temperature signal received from the
transmitter for more than 30 minutes, a beep will sound for one minute before it shuts
down. How ever, the Auto Off feature will be automatically disabled if the timer is running.
The transmitter w ill tur n off automa tical ly if the t emper ature m easured is always lower
tha n 50ºC (122ºF) in 120 minutes.
Measure meat temperature to USDA doneness temperature range:
1. Pr ess MODE to select thermo met er mode. The up per display will sho w a sma ll ME AT
and a meat type such as BEEF.
2. P re ss M EAT t o se le ct m ea t type. PROG (program), GBEEF ( gr ou nd b ee f) , GP OU L
(g ro un d poultry), B EE F, VEAL , CH CK E (chicken), PO RK , POULT (poultry) , LA MB
& FISH.
3. Pr ess TAS TE to se lec t t he le vel of d one nes s f or th e meat ty pe se lec ted . R ARE ,
MED RA RE, ME DIU M, MED WE LL an d W EL L DON E.
No te : Th e temperatu re d is played to t he right of t he actual m ea t tempera tu re P ROBE
TEMP will show the preset temperature TEMP SET according to USDA donenes s levels.
Ex am ple: Be ef wi ll be w el l done at 165 ºF.
4. Once the temperature of meat reaches the preset doneness level the receiver will beep.
-4-
Measure meat temperature set to your specific taste
1. Pr ess M ODE t o sel ect thermometer mode. The upper display will show a smal l
and a meat type such as BEEF.
2. P re ss HR or MI N to raise or l ow er the se t te mperature. As you press H R or Min th e
d isp lay cha nge s to PR OG ( pro gra m). Hol ding th e bu tto n wi ll rai se o r l owe r th e
tem pera tur e sett ing rap idl y. Pr ess ing ME AT wi ll ret urn yo u to t he p re set USD A
ra ng es.
3. Once the temperature of meat reaches the preset doneness level the receiver will beep.
MEAT
Procedure for typical use on an outdoor grill
The following typical example will go thr oug h the steps to have the Professiona l Remote
Co oki ng The rmo met er ale rt you to wh en a b eef s tea k is c ook ed to med ium (U SDA
donen ess lev el) and r emind y ou to rot ate hot dogs in 5 minu tes.
1. Turn on t he gril l.
2. Foll ow the sy nchro nizat ion/p airing procedu re.
3. Plac e steak a nd hot do gs on gri ll rack .
4. I ns ert pro be s ensor i nt o the c en te r of th ic ke st port io n of the st ea k. Avoid t ouching
bo ne or h ea vy fat ar ea s. Ass um e the m ea t temperatu re i s 45 ºF.
5. Po sitio n the probe sensor wire so they w ill not come i nto contac t with flame s and exit
the g rill surfa ce area with out being pi nched /crushed b y the grill cover.
6. Stand the transm it ter away from heat sour ce o f gr il l. D O NOT put trans mi tt er on the
cl os ed cover or u nd er t he cover. The tr an sm it te r is not wa te rp ro of . DO NOT use in
the rain.
7. Pres s MEAT so BEEF is displa yed.
8. Pres s TASTE so MEDIUM is dis playe d and 150 F w ill be sh own as th e TEMP SET.º
9. Pres s MODE to c hange t o timer m ode.
10. Press MIN 5 times to set fo r 5 minutes so that 0:05 is dis pla yed . Press START/STOP
to start th e countdown. Press MOD E to go back to thermometer mode.
11. You m ay ta ke th e rec eiv er up to 3 00 ft aw ay fr om th e o ut doo r gri ll. G o i nd oor s if
des ir ed.
12. Whe n 5 minut es are up t he rece iver wi ll beep for 60 secon ds.
13. When th e te mperature o f pr obe in the stea k re aches 150 F MEDIU M, t he receiv er
will beep .
14. Pre ss STOP to turn off t he aler t.
15 . Turn o ff g ri ll. Rem ov e the p ro be sensor f ro m steak . Always w ea r a hea t re sistant
glove to touch th e st ai nless steel pro be s en sor or wire during or j us t af te r cooking.
Do not touch with b ar e ha nd s.
16. Cle an the st ainle ss stee l probe a nd dry thoroughl y after e ach and e very us e.
17. Turn o ff th e trans mitter and receiver.
-5-
º

HELPFUL HINTS
If the receiver and/or the transmitter display LLL or HHH instead of the probe temperature,
wait fo r probe t o reach r oom tem perat ure. If LLL or H HH is sti ll displayed, it is likel y the
inter nal pro be wire h as shor ted out e ither through moistur e or heat d amage .
Using the Timer
Count d own
1. Press MODE to select timer mode. The upper display will show a small TIMER and 0:00.
2. Press HR and MIN button to set the timer. Press START/STOP button to start
“ ” will blink for every second.
3. To stop the countdown process, press START/STOP button. The “ ” becomes solid.
4. Pres s HR & MIN bu ttons t ogeth er to cle ar the setting back to 0:00 .
Not e: The minimu m set ting for the timer is 1 minute. When the timer co unt s down below
1 hour 1:00 t he displa y wi ll change t o 59 '59" to ind icate, 59 min utes 59 sec on ds. The s
eco nds will be sho wn co unting down then. When the countdown reaches 0'00 ” the time r
starts coun ti ng u p an d it w il l be ep for 60 seconds. Th e ti mer and “ ” wi ll b link. Press
th e S TART/S TO P but ton t o stop b eep in g. Whe n the c oun t u p rea ch es 23: 59 :59 ( 59
seconds are not displayed) the display will turn to 0:00, the unit beeps and “ ” will blin k
for 60 se conds .
Count u p
1. Press MODE to select timer mode. The upper display will show a small TIMER and 0:00.
2. Press START/STOP button to start count up. The “ ” will blink for every second.
3. To stop the c ount up proc ess, press S TART/STOP butto n. Th e “ ” becomes so lid.
4. Pres s CLEAR b utton t o clear t he sett ing back to 0:00.
countdown.
HELPFUL HINTS
Do not im merse t he prob e in wate r while c leaning.
Do not allow the probe or probe wire to com e int o contac t with flames. If cooking with
gri ll cover clos ed, only use medium or low heat.
If the probe becomes defective within 90 days warranty period please return
probe to address below along with return address and we will send you a new probe no
charge.
If t he te mp er ature d is played se ems to re ad to o hi gh or t he temp er at ure s ee ms to
increase too quickly check to make sure the probe tip is not poking through the food to
outside. Reposition the probe tip in the center of the thickest part of food. Avoid touching
bone or heavy fat areas.
defective
Cautions
Always wea r a heat resis tant glove to touch the stainle ss steel pro be sens or or wire
during or ju st after coo king. Do not t ouch with bare hand s.
-6-
Keep th e stain less st eel pro be sens or and wire away fro m child ren.
Not Int ended f or Use by P erson s ages 12 a nd Under.
Clean t he stai nless s teel pr obe and d ry thoroughly af ter eac h and eve ry use.
Do not im merse t he prob e or wire i n water. U se a damp, soapy clo th to Cle an.
Do not us e the rec eiver o r trans mitte r in the rain. The y are not w aterp roof.
Do not expose the plug of the stainless steel probe or the plug in hole of the
to water or any liquid. This will result in a bad connection and faulty readings.
Do not ex pose th e recei ver or tr ansmi tter to direct heat or surf ace.
Do not us e stain less st eel pro be in mic rowave oven.
transmitter
Cleaning
Alw ays wear a heat resist ant glove to touch the s tainless stee l pro be sensor or wire
dur ing or just after cook ing. Do not touch with b are hands.
Keep th e stain less st eel pro be sens or and wire away fro m child ren.
Wash the metal probe tip with hot soapy water and dry thoroughly. Do not immerse the
probe in water while cleaning.
Wip e the t ransmitter and receiver wi th da mp cl oth. Do not immerse either in water.
FCC Statement
1. This device complies with Part 15 of the FCC Rules. Operation is subject to the following
two conditions:
(1) This dev ice may n ot cause harmful interf erenc e.
(2) This device must accept an y interference received, including interference that may
caus e undesired operation.
2. Changes or modifications not expressly approved by the party responsible for compliance
could void the user's authority to operate the equipment.
LIMITED 90 DAYS WARRANTY
ThermoPro warrants this product to be free of defects in parts, materials and workmanship
for a period of 90 days, from date of purchase.
Should any repairs or servicing under this warranty be required, contact Customer Service
by phon e or e mail for in structi ons on how to p ac k and ship th e product t o Therm oPro.
This warran ty g ives you specif ic l egal rights and y ou m ay a ls o have other righ ts w hich
vary from sta te t o st ate.
CUSTOMER SERVICE
Telepho ne: 1-8 77-51 5-779 7 (US&C A only)
Email : servi ce@bu yther mopro .com
Hours : Wee kdays 9 :00 AM- 5:00 PM EST
-7-
 Loading...