

Thermopro TP-65 User Manual

bajo es ta garant ía, comun íquese co n el Servic io de atenc ió n
al clie nte por tel éfono o por c orreo ele ctrónic o para obte ne r
las ins truccio nes sobre c ómo embal ar y enviar e l product o a
The rm oPro.
Esta garantía le ot orga der ech os le gal es es pec ífi cos y usted
puede también tener otros dere chos que varí an en función del
estado donde se enc uentra.
Comprar sensores remotos adicionales
ES
El núme ro de model o del senso r remoto de e sta unida d es
TPR 65 .
Se pueden pedir sensores adicionales directamente de Amazon
o de ThermoPro contactando nuestro servicio al cliente utilizando
los detalles que se encuentran más abajo.
Servicio de atención al cliente
Teléfon o: 1-877- 515-779 7 (solo EE. UU. y Canad á)
Corre o electró nico: ser vice@bu ythermo pro.com
Horar io: De lune s a viernes d e 8:00 AM a 6:00 P M EST
-56-
WIRELESS INDOOR/OUTDOOR HUMIDITY
AND TEMPERATUR E MO NI TOR
Model No.: TP-65
EN
Instruction Manual Page 2
FR
Manue l D'utili sationa l Page 12
DE
Bedienungsanleitung Se ite 23
IT
Ist ru zioni per l ’uso Pagi na 35
ES
Manua l de instru cciones P ágina 46
-1-
V20 17101 3 EN FR DE IT ES

Introduction
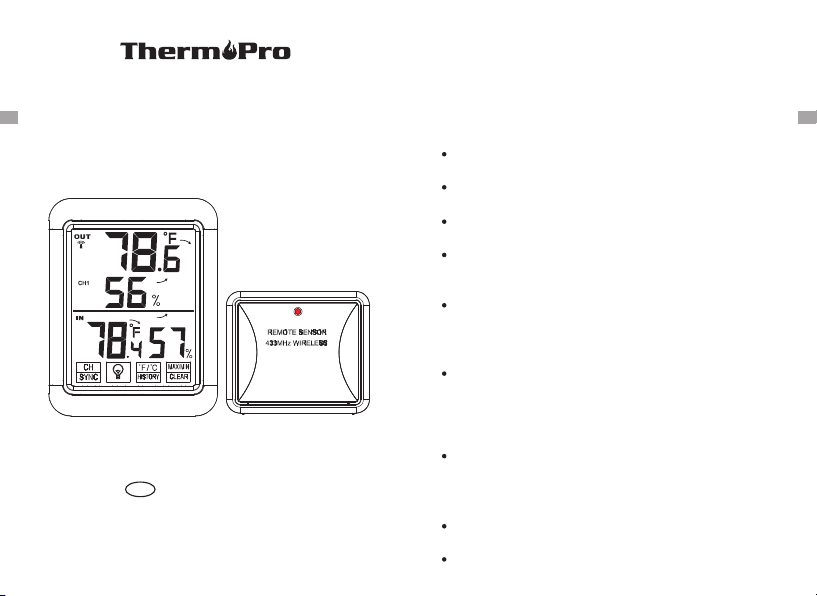
Congratulations on your purchase of the wireless indoor/outdoor
humidity and temperature monitor. You will now be able to know
the outdoor/indoor temperature and humidity while sitting inside.
EN EN
Hints and tips
If th e re ceiver do es not conn ect to the tr ansmitt er, try the
follo wing:
Pre ss a nd hold the C HANNEL/ SYNC butt on on the bas e
sta ti on and then p ress TX b utton on th e transmi tter.
Reloc ate the bas e station a nd/or the r emote uni t until
conne ction is fo und.
Signals from other electronic devices may cause interference.
Place the base station and receiver away from these devices.
The t ra nsmitte r may not fun ction pro perly in ex treme
tem pe ratures d ue to batte ry power. Re place the b atterie s
or th e un it will res ume prope r functio n in more mod erate
weath er.
If t he base s tatio n is at ta ched to a re fr igera to r or a me tal
obje ct by magnet, the transmi ssion may be sh orter. Remove
the b ase statio n fro m the refrig erato r or th e metal obje ct or
place the base station and remote sensor as close as possible.
If th e Hu midity is l ower than 1 0%, it will d isplay LL L.
Warnings
Do not su bject the u nit to exce ssive for ce, shock , dust,
tem pe rature or h umidity.
Do not im merse the u nit in wate r.
Do not re move any sc rews.
Do not di spose thi s unit in a fir e. IT MAY EXPLO DE.
-2-
Kee p unit away from sm all childr en. The un it or parts of t he
uni t might be a chokin g hazard.
Never a ttempt to r echarge t he batter ies using a ny other
metho ds.
Dispo se of the uni t legally a nd recycl e when poss ible.
Specifications
1. 433 Mh z transmi ssion fre quency
2. Transmission range up to 200 feet in open area. (range maybe
shorter based on interference present)
3. In do or Temper ature ran ge: -4 °F ~ 158 °F (-20 °C ~ 70 ° C)
4. Outdo or Tempe rature range: -58°F ~ 158°F (-50 °C ~ 70 ° C)
5. Hu mi dity rang e: 10% ~ 99%
6. Temp erature t oleranc e: +/- 2.0 °F ( +/- 1.1 °C)
7. Hu midity tol eranc e: ±2 % from 30 % to 80 %; ±3% below 3 0%
and a bov e 80%
8. Po we r: 2 X AAA 1.5V for b ase unit an d 2 X AAA 1.5V for
rem ot e sensor
Components
1. On e ba se statio n unit (Rec eiver)
2. On e re mote sens or (Transmit ter)
*Although the remote sensor is designed to be rain-proof, the
remote sensor must be always placed up wards so that rai n
won't get inside the sensor through the vent holes on the bottom
of the senor which functions to let the remote sensor detect the
environmental temperature and humidity more precisely and
qui ck ly.
-3-
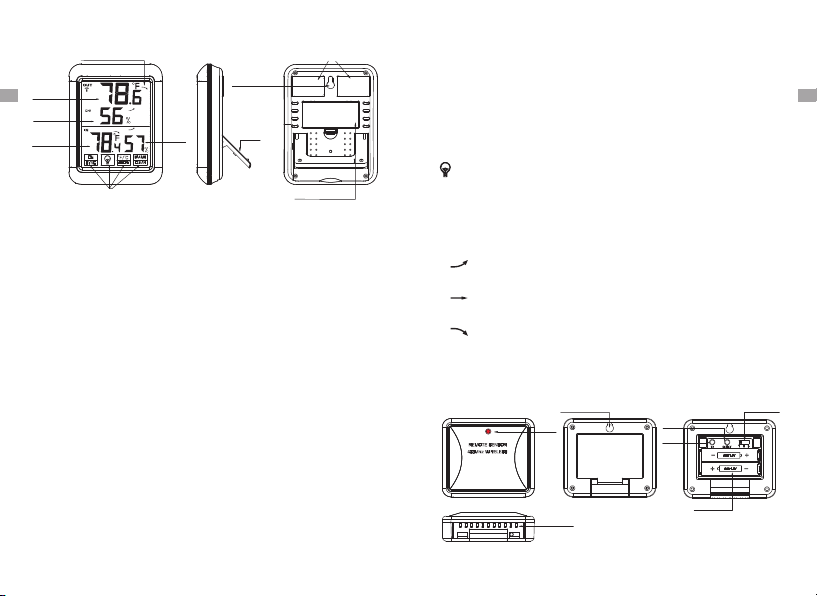
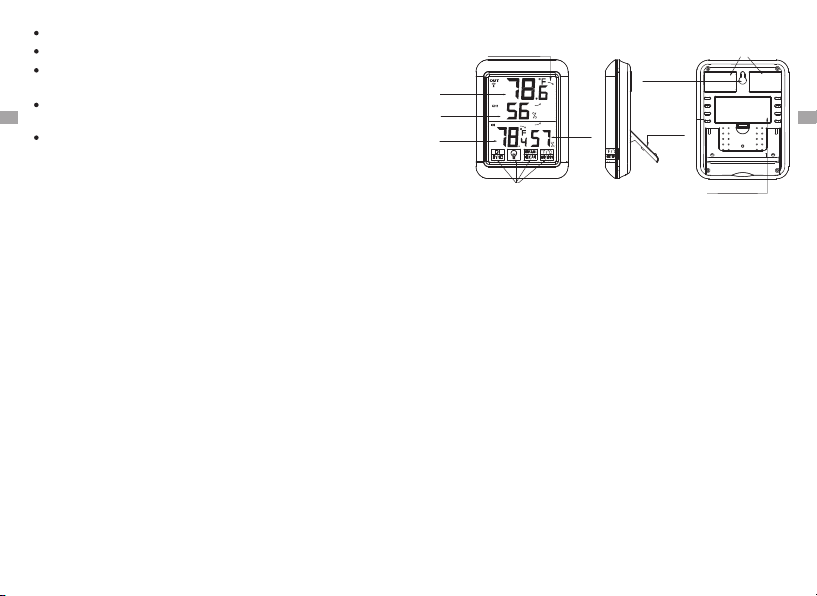
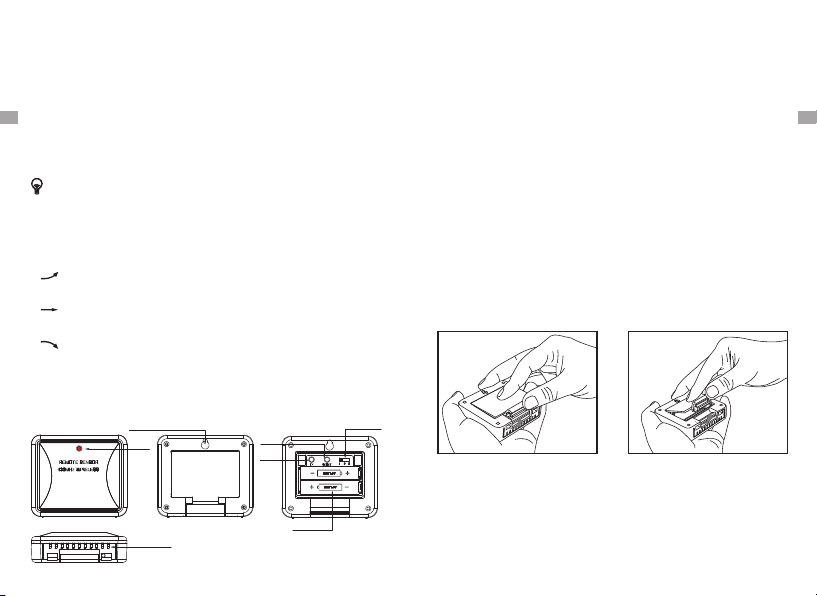
Indoor base station (receiver) features
Large L CD disp lay
Outdo or
tempe ratur e
EN EN
Outdo or
humid ity
Indoo r
tempe ratur e
Indoo r
humid ity
SIDE
Wall ha nging h ole
Stand
Magne t
minim um temper ature and h umidity ; Press and h old to clea r
the h is tory data .
° or ºF; F/°C/History: Press to select the temperature display in ºC
When the display show s the maximum or minimum temperature
and hum idity. Touch this b utton onc e to set the maxim um and
minimum data record time interval between ALL TIME or 24 hours.
Note: Both ALL TIME and 24 hours represent the tim e since you
last manually cleared the history data or installed a new battery.
: Touch on ce to t urn on/off backlig ht. If you do not press th e
Four Touc h Butto ns :
Batte ry comp artme nt
but ton for 15 second s, th e bac kligh t wil l be au tomat ica lly
tur ned off.
1. LCD display: Displays the current outdoor humidity/temperature
and indoor humidity/temperature
2. Battery Compartment: Holds 2 AAA batteries to power the unit
3. Tabl etop and wa ll-moun ted desig n
4. In do or Temper ature ran ge: -4 °F ~ 158 °F (-20 °C ~ 70 ° C).
5. Hu mi dity rang e: 10% ~ 99%.
6. Temp erature d isplay un it: °C and °F s electab le
7. Temp erature R esoluti on: 0.1 °C/ °F
8. Hu mi dity Reso lution: 1%
9. Low ba ttery ind ication
10. Fou r touch but tons
11. Ba cklight
Temp er at ur e & hu mi di ty t re nd
1. in dicat es the te mpera ture & hu midit y is in an incre asing
tre nd.
2. i nd ic at es t he t empe ra tu re & hum idit y is in a n o ch an ge
tr en d.
3. in di cates the t emperat ure & humid ity is in a dec reasing
tre nd .
Outdoor remote sensor (transmitter) features
TX LED
Wall ha nging h ole
RESET
TX
Chann el 1, 2, 3
Touc h bu tt on s
CHANNEL/SYNC: Press once to displa y the temperatu re and
humidit y read ings from up to 3 outdoor remote sensors; Press
and hold thi s butt on to enter th e sync hronizatio n mode.
MAX/M IN/CLEA R: Touch once t o display t he maximu m or
-4-
Vent hol es
-5-
2 AAA batte ry
1. Battery Compartment: Holds 2 X AAA batteries to power the unit.
2. Ra in -proof an d desig nwall- mounted
3. Outdo or Tempe rature range: -58°F ~ 158°F (-50 °C ~ 70 °C)
4. Hu mi dity rang e: 10% ~ 99%
EN EN
Buttons
CHANN EL Sele ctor (1,2 ,3): Slid e to set Chan nel 1,2 or 3.
RESET: Pr ess once to r eset the re mote sens or.
TX: P re ss to send te mperatu re/humi dity data t o the recei ver
manua lly.
Rep la ce the comp artment d oor;
Not e:
Do not mi x old and new b atterie s.
Do not mi x alkalin e, standa rd (carbo n zinc), or r echarge ab le
(nick el cadmiu m) batter ies.
For maximum performance in normal conditions we recomme nd
using good quality alkaline batteries.
If the battery power is low, there will be low batte ry icon sh owing
on the base station display.
Synchronize remote sensors with the base Station
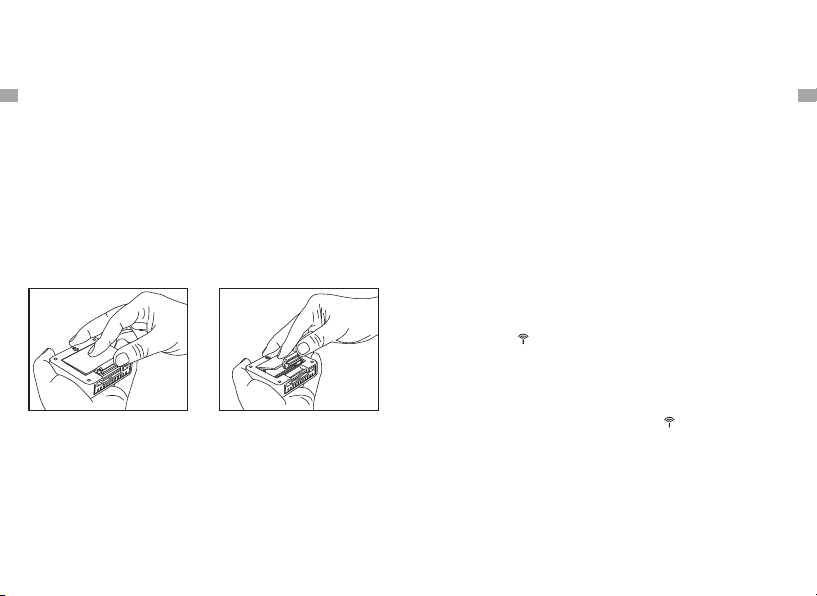
Battery installation and setup
1. Open the battery compartment of the rem ote sensor as below
Figure;
2. Sl id e the chann el select or switch i nside the b attery
com pa rtment to y our desir ed channe l. For the fi rst remot e
you m ay s elect any c hannel, f or additi onal remo tes selec t
any u nu sed chann el;
3. In se rt (2) AAA batt eries acc ording to t he polari ty markin gs .
Rep la ce the batt ery compa rtment co ver;
4. Open the batt ery compartmen t at the back of the base station
and insert (2) AAA batteries according to the polarity markings.
-6-
Pleas e note: eac h time the ba tteries ( either ba se statio n or
remote sensor) ar e replaced or base station/remote sensor lost
conne ction, ma ke sure to fo llow the be low synch ronizat io n
process to pair and re-connect the base station and remote senor:
1. Po si tion the re mote sens or near the b ase stati on;
2. Once the b atteries are inst al le d in t he base stati on, the RF
si gn al ic on ( located o n the u pp er le ft o f the b as e stati on
display) will flash for 3 minutes, indicating that the base station
is in s yn chroniz ation mod e: it is wait ing for rem ote senso rs
to be r eg istered .
3. If 3 minute s have pass ed after th e batteri es were ins talled in
the base station and the RF signal Icon is no longer flashing,
press and hold the CHANNEL/SYNC button of the base station
for 3 -4 s econds un til the RF si gnal icon i s fla sh ing again t o
set i t ba ck in synch ronizat ion mode;
4. In st all the bat teries in t he remote s ensor and w ait for a
mom en t or just pre ss either t he TX or RE SET but ton insid e
the remo te se nsor batte ry co mpart men t, the remot e sen sor
tem peratur e/hum idity w ill sho w on the ba se statio n displ ay
whi ch i ndicate s the synch ronizat ion is comp lete.
-7-

5. If you have ad ditional remote se nsors, repeat the above
steps to register the re mote sensors (u p to 3 remote sensors
can be re gistered with one base station );
6. If y ou h ave regis tered mor e than one se nsor, pres s the
CHA NN EL/SYNC b utton on th e base stat ion to sele ct the
remote channel yo u want displayed perma nently on the base
sta ti on. Press C HANNEL/ SYNC butt on until yo u observe a
cir cu lar arrow o n the base st ation LCD d isplay un der the
channel number. The unit will th en auto-scroll, changing from
cha nn el to chann el every 5 se conds.
NOT E: If you have addi tiona l rem ote sensor s, when you ar e
syn chronizi ng remo te se nsors with t he base stat ion, the uni t
wil l keep chang ing from cha nnel to chan nel i n the first th ree
min utes, afte r that you can sele ct any chann el you like or auto
-sc roll mode.
Place the base station and remote sensor
1. The indoor base statio n (rec eiver) should always be placed
in a well ve ntilate d indo or are a and located away from vents,
heating or co oling element s, dir ect sunlight, windows, doors,
or any other openin gs.
2. T he r emote s en sor ( tr an smitt er ) can b e pla ce d on a fl at
su rf ace i nd oo r or ou td oor. M ak e sur e th e sen so r is wi th in
th e tra ns mi ssion d is tance f ro m the b as e sta ti on an d wi th
mi ni mal o bs tr uctio ns .
3. The base station and remote sensor can both be wall mounted.
NOTE: Although the remote sensor is designed to be rain-proof,
the remote sen sor must be always placed upw ard s so that rain
won't get inside the sensor through the vent holes on the bott om
of the senor which func tions to let the remote sens or detect the
env ironm ent al temp era ture an d hum idity m ore p recis ely and
qui ckly.
-8-
Maximum & minimum recorded temperature &
humidity
1. Pr es s MAX/MIN /Clear bu tton once t o display t he highes t
ind oo r and outdo or temper atures/ humidit y recorde d si nce
las t re set. MAX is s hown on the d isplay.
2. Pr es s MAX/MIN /Clear bu tton agai n to displa y the lowes t
ind oo r and outdo or temper atures/ humidit y recorde d since
las t re set. MIN is s hown on the d isplay.
3. To clear and reset the ma x/mi n records, wh en either the MAX
or MI N re cord is sho wn on the LCD d isplay, press and h old
MAX /M IN/Clea r for 3 secon ds.
4. Wh en e ither the M AX or MIN rec ord is show n on the LCD
display, press ALL-TIME/24 button once to set the data record
time inte rva l bet wee n ALL TIME or 24 hou rs. Note: Both ALL
TIM E and 24 hour s represe nt the time s ince you la st time
man ua lly clear ed the hist ory data or b attery in stallat io n.
FCC statement of compliance
Thi s device com plies with P art 15 of the FCC rul es. Operat ion
is su bject to the foll owing t wo co nditi ons:
1) Th is device m ay not caus e harmful i nterfer ence.
2) This device must accept an y interference received, including
interference th at may ca use undesi red operation.
Warning: C hanges or m odifica tions to th is unit not e xpressl y
appro ved by the pa rty respo nsible fo r complia nce could v oi d
the u se r's autho rity to ope rate the eq uipment .
NOTE: This equipment has been tested and found to comply with
the limits for a Class B digital device, pursuant to Part 15 of the FCC
rules. These limits are designed to provide reasonable protection
aga in st harmfu l interfe rence in a re sidenti al instal lation. This
equipment generates, uses and can radiate radio frequency energy
-9-
ENEN

and, if not installed and used in accordance with the instructions,
may cause harmful interference to radio communications. However,
there is no guarantee that interference will not occur in a particular
installation. If this equipment does cause harmful interference to
EN EN
radio or television reception, which can be determined by turning
the equipment off and on, the user is encouraged to try to correct
the interference by one of more of the following measures:
- Reori ent or relo cate the re ceiving a ntenna.
Inc re ase the sep aration b etween th e equipme nt and the
-
rec ei ver.
-
Conne ct the equi pment int o an outlet o n a circuit d iffer en t
fro m th at to which t he receiv er is conne cted. Con sult the
dea le r or an exper ienced ra dio/TV te chnicia n for help.
Customer service
Telepho ne: 44-20 3- 769-1 321
Ema il : service @buythe rmopro. com
Hours : Weekd ays 8:00 AM- 6 :00 PM EST
Limited one-year warranty
ThermoPro warrants this product to be free of de fec ts in parts,
materials and workmanship for a period of one ye ar, from date
of purchase.
Should any repairs or se rvicing under this warran ty be required ,
contact Customer Service by phone or email for instructi ons on
how to pack and ship the product to Ther moPro.
Thi s war ran ty gives you specifi c leg al ri ghts and you ma y also
hav e oth er ri ghts which vary from state to state .
Purchasing additional remote sensors
The model number of the remote sensor for this un it is TPR65.
Addit ional sen sors may be o rdered di rectly fr om Amazon or
The rm oPro by con tacting o ur custom er servic e listed be lo w.
-10-
-11-
MONITEUR SANS FIL D'H UM ID ITÉ ET DE
TEMPÉRATUR E IN TÉ RI EU R/EXTÉRIEUR
FR
Modèle N°.: TP-65
FR
Manue l D'utili sationa l
-12-
Introduction
Fél icitatio ns pour avoi r acheté le monit eur sans fil d 'humidit é
et de temp ératu re in térie ur/ extér ieur. Vous êtes dés ormais en
mes ure de conna itre la tempéra ture et l'hu midité int érieure et
ext érieure to ut en r estan t con forta ble ment ch ez vo us.
Conseils et astuces
Si le récepteur ne se con nec te pas avec l'émette ur, veu ill ez
essayer les consei ls suivants :
Laissez appuyé sur le bouton CHANNEL/SYNC sut la station
intérieure, puis appuyez sur le bouton TX de l'émetteur.
Repos itionne z la statio n intérie ure ou l'un ité à dista nc e
jusqu 'à ce qu'un e connexi on soit tro uvée.
Les signaux d'autres appareils électroniques peuvent causer
des interférences. Éloignez la station intérieure et le capteur
de ces appareils.
Il est possible que l'émetteur ne fonctionne pas correctement
à des tem pératur es ext rêmes à caus e des piles. Remplacez
les pil es ou atten dez des con ditions p lus cléme ntes pour
que l'u nité repr enne son fo nctionn ement nor ma l.
Si la sta tion inté rieure es t placée su r un réfrig érateur o u
sur un ob jet métal lique à l'a ide d'un ai mant, il es t possibl e
que la tr ansmiss ion soit pl us courte . Retirez l a station d u
réfri gérateu r ou de l'obj et en métal o u placez- la aussi pr ès
que pos sible du ca pteur à dis tance.
Si le niveau d'humidité est inférieu r à 10 %, l'écran affic hera
LLL.
Avertissements
Ne faite s pas subi r des f orc es ex cessives, des coup s, de la
pou ssi ère, ou de s tem pérature s ou de l'hu mid ité extrêmes.
Ne plon gez pas l'a ppareil d ans l'eau .
-13-
FR
Ne reti rez aucun e vis.
Ne jetez pas l'appareil dans le feu, IL POURRAIT EXPLOSER.
Gar de z l'appar eil éloig né des enfa nts. L'ap pa reil ou s es
compo sants com portent d es risque s d'étouffemen t.
N'es sayez jamais de recharger les piles en utilisant d'autres
FR FR
méthodes.
Jetez l'appareil de mani ère légal e et recyclez-le si pos sib le.
Fonctionnalités de la station intérieure (Récepteur)
Tempéra ture
extér ieure
Humid ité
extér ieure
Tempéra ture
intér ieure
Grand é cran LCD
Humid ité
intér ieure
VUE LATÉ RALE
Trou de f ixati on
mural e
Suppo rt
Aima nt
Spécifications
1. Fr éq uence de tr ansmiss ion : 433 Mhz
2. Distan ce de transmis sio n maximale : 200 ft./ 60 m (la por tée
peut ê tre inférieure si des int erf érences sont prés entes)
3. Pla ge de te mpé rature in tér ieure : -20°C~70°C(-4 °F~158°F).
4. Plage de température extérieure : -50°C~70°C(-58°F~158°F).
5. Pl ag e d'humid ité : 10 % ~ 99 %.
6. Tolé rance de te mpératu re : +/- 1,1 °C ( +/- 2,0 °F)
7. Tolé rance d'h umidité : ± 2 % entre 30 % et 8 0 %, ±3 % en des so us de 30 % et au- dessus de 8 0 %
8. Alime ntation : 2 X AA A 1,5 V pour la st ation int érieure e t 2
X AAA 1,5 V p ou r le capteu r à distanc e
Composants
1. Un e st ation int érieure ( récepte ur)
2. Un c ap teur à dist ance (éme tteur)
*Si vous possédez des capteurs à distance supplémentaires,
lorsque vous synchronisez les capteurs à distance avec la
station intérieure, l'unité passera d'un canal à un autre pendant
les tro is premières minu tes, après quoi vous pourrez
sélectionner le canal de votre choix ou le mode de défilement
automatique.
-14- -15-
Quatr e bouto ns tact iles
Compa rtime nt des pi les
1. Éc ran LCD : Aff iche la t empér ature et l'h umidi té actu elles à
l'i ntéri eur et à l'ext érieu r
2. Compartiment des piles : Contient 2 piles AAA pour alimenter
l'unité
3. Su pp ort de tabl e ou mural
4. Pla ge de te mpérature intérieure : -20° C~7 0°C(-4°F~1 58° F).
5. Pl ag e d'humid ité : 10 % ~ 99 %.
6. Aff ichage de l a tempéra ture : °C et °F o ptionne ls
7. Ré so lution de l a tempéra ture : 0,1 °C /°F
8. Ré so lution de l 'humidi té : 1 %
9. In di cateur de b atterie f aible
10. Qua tre bouto ns tactil es
11. Ré troécla irage ble u
Boutons tactiles
CHANNEL/SYNC : Ap puyez un e fois pour affiche r les lectures
de température et d' humidité d e tr oi s ca pt eu rs e xt ér ie ur s au
maximum. Laissez appuyé sur ce b ou to n po ur e nt re r da ns l e
mode de sy nchronisation.
MAX/MIN/CLEAR : Appuyez une fois pour afficher la température
et l'humidité maximum ou minimum. Laissez appuyé pour effacer
l'historique des données.
°F/ °C /Histor y: Appuye z pour séle ctionne r l'aff ichage de l a
temp érature en ºC ou ºF. Lorsque l'écran affiche la température
et l 'h um id it é ma xi mu m ou minimum, appuyez u ne f oi s su r ce
bouto n pour défi nir l'int ervalle d 'enregi stremen t de s donné es
FR
maximum et m in im um e nt re AL L TIME (TOU T LE T EM PS ) ou
24 h eu re s. Remarq ue : ALL TI ME et 2 4 he ures représ en te nt
la péri ode depui s laquell e vous avez m anuelle me nt effa cé
l'his torique d es donnée s ou instal lé de nouve ll es pile s.
: Appuyez une fois pour allumer/éte ind re le r étr oéclairage.
Si vous n'appuye z sur aucu n bou ton p end ant 15 sec ondes,
le rétro-éc lai rage sera automatique men t dés activé.
Tendance de la température et de l'humidité
1. indique que la température et l'humidité ont une tendance
à la hausse.
2. indique que la température et l'humidité ont une tendance
constante.
3. indique que la température et l'humidité ont une tendance
à la baisse .
Fonctionnalités du capteur à distance extérieur
(Émetteur)
Trou de s uspen sion mu rale
DEL TX
Trous d 'éven t
RESET
TX
2 piles AA A
-16-
Chann el 1, 2, 3
1. Compartiment des piles : Contient 2 piles AAA pour alimenter
l'unité
2. Ré si stant à la pl uie et supp ort mural
3. Plage de température in téri eure : -50°C~70°C(-58°F~158° F)
4. Pl ag e d'humid ité : 10 % ~ 99 %
Boutons
Sél ect ionneur de cana l (1, 2, 3) : Faites gli sse r l'i nterrupt eur
pou r cho isir le ca nal 1, 2 ou 3.
RESET : A ppuyez un e fois pour r éinitia liser le ca pteur à
dista nce.
TX : Ap pu yez pour en voyer man uelleme nt les donn ées de
tempé rature et d 'humidi té au récep teur.
Installation des piles
1. Ou vr ez le compa rtiment d es piles du c apteur à di stance
com me i ndiqué su r l'image c i-desso us.
2. Pl acez l' interru pteur d u sélec tionn eur de ca nal sur le canal
de votre choix. Vous pouvez choisir n'importe quel canal pour
le premier capteur, mais vous devr ez choisi r l'un des can aux
res tants p our les c apteurs s uivan ts.
3. In sé rez (2) pil es AAA batter ies en resp ectant la p olarité .
Rep la cez le couv ercle du co mpartim ent.
-17-
FR
 Loading...