

ThermoPro TP-21 Instruction Manual
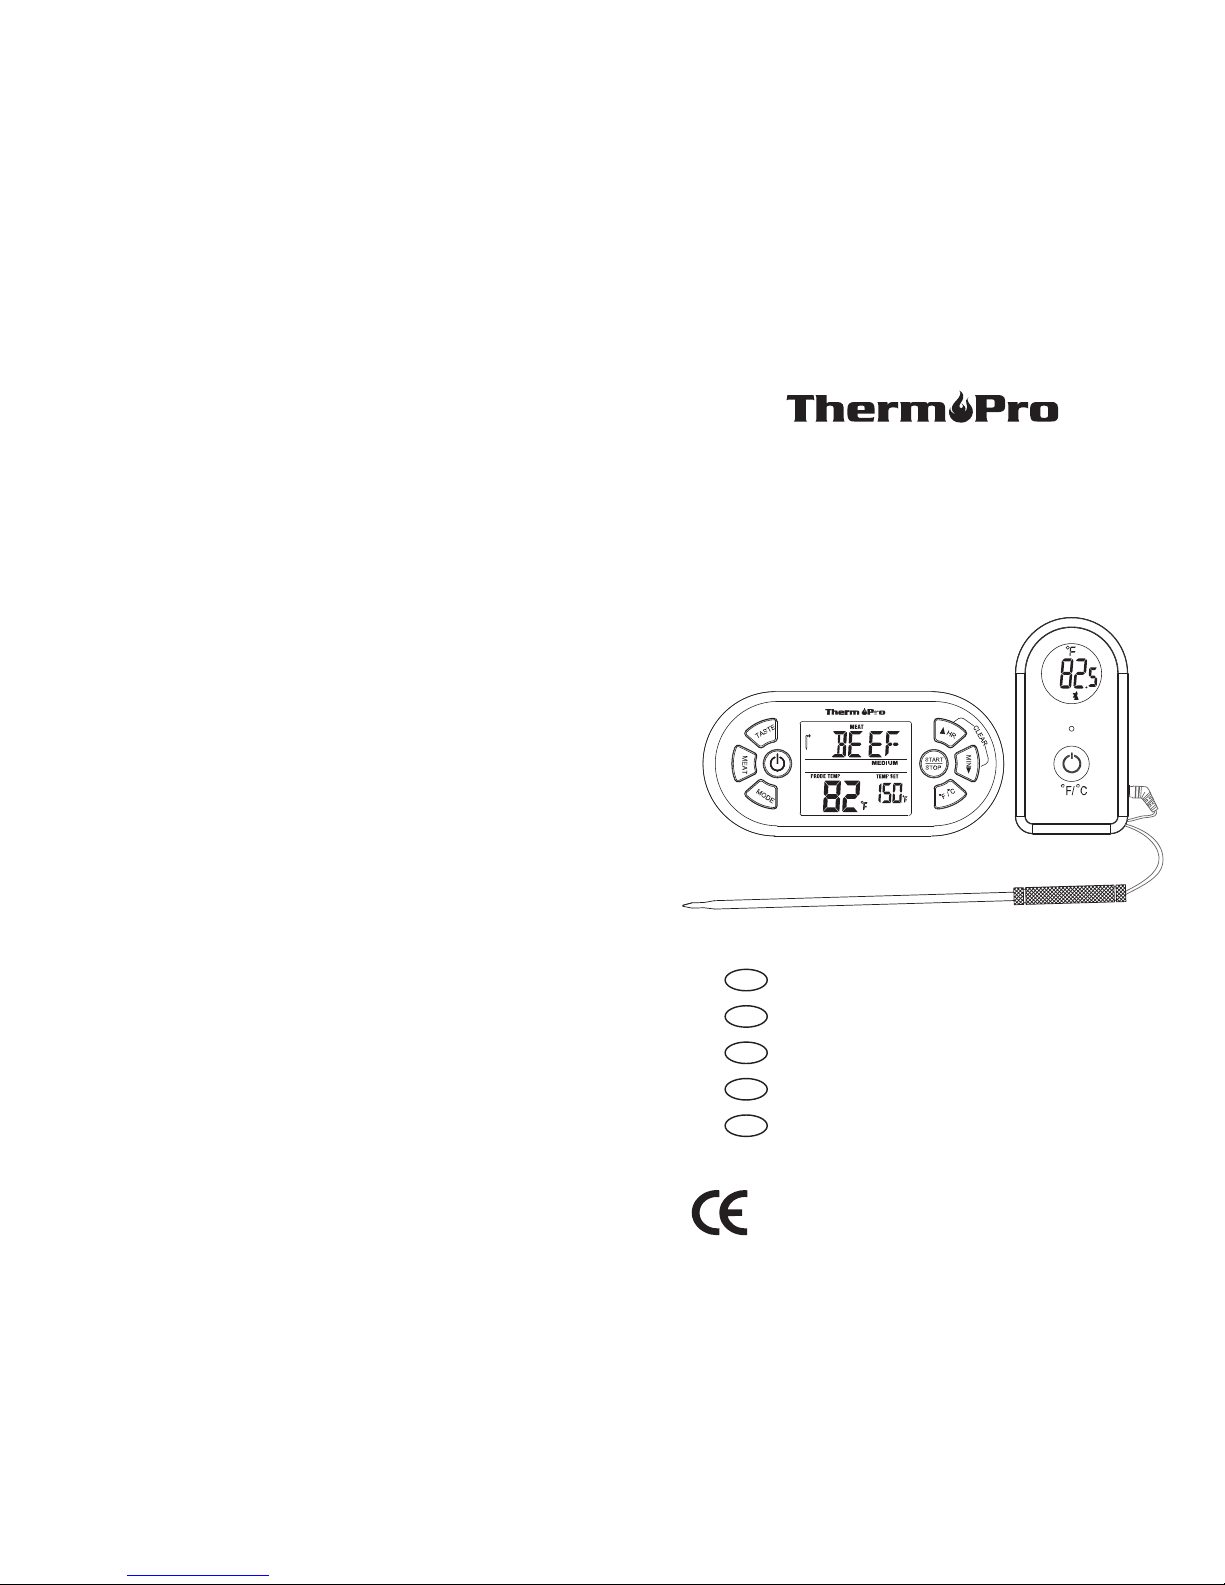
Remote Food Thermometer
Model No.: TP-21
Cook Like A Pro Every Time!
V20180423 EN DE FR IT ES
Instruction Manual Page 2
Manuel d'Utilisation Page 14
Bedienungsanleitung Seite 28
Istruzioni per l’uso Pagina 42
Manual de instrucciones Página 57
EN
DE
FR
IT
ES
Introduction
Congratulations on your purchase of the Professional
Remote Cooking Thermometer, a programmable radio
frequency food thermometer. You will now be able to
remotely monitor the time and temperature of food cooking
on your grill, smoker or oven.
Components
1. 1 - receiver unit.
2. 1 - transmitter unit.
3. 1 - detachable stainless steel probe sensor.
4. 2 - 2*AAA batteries.
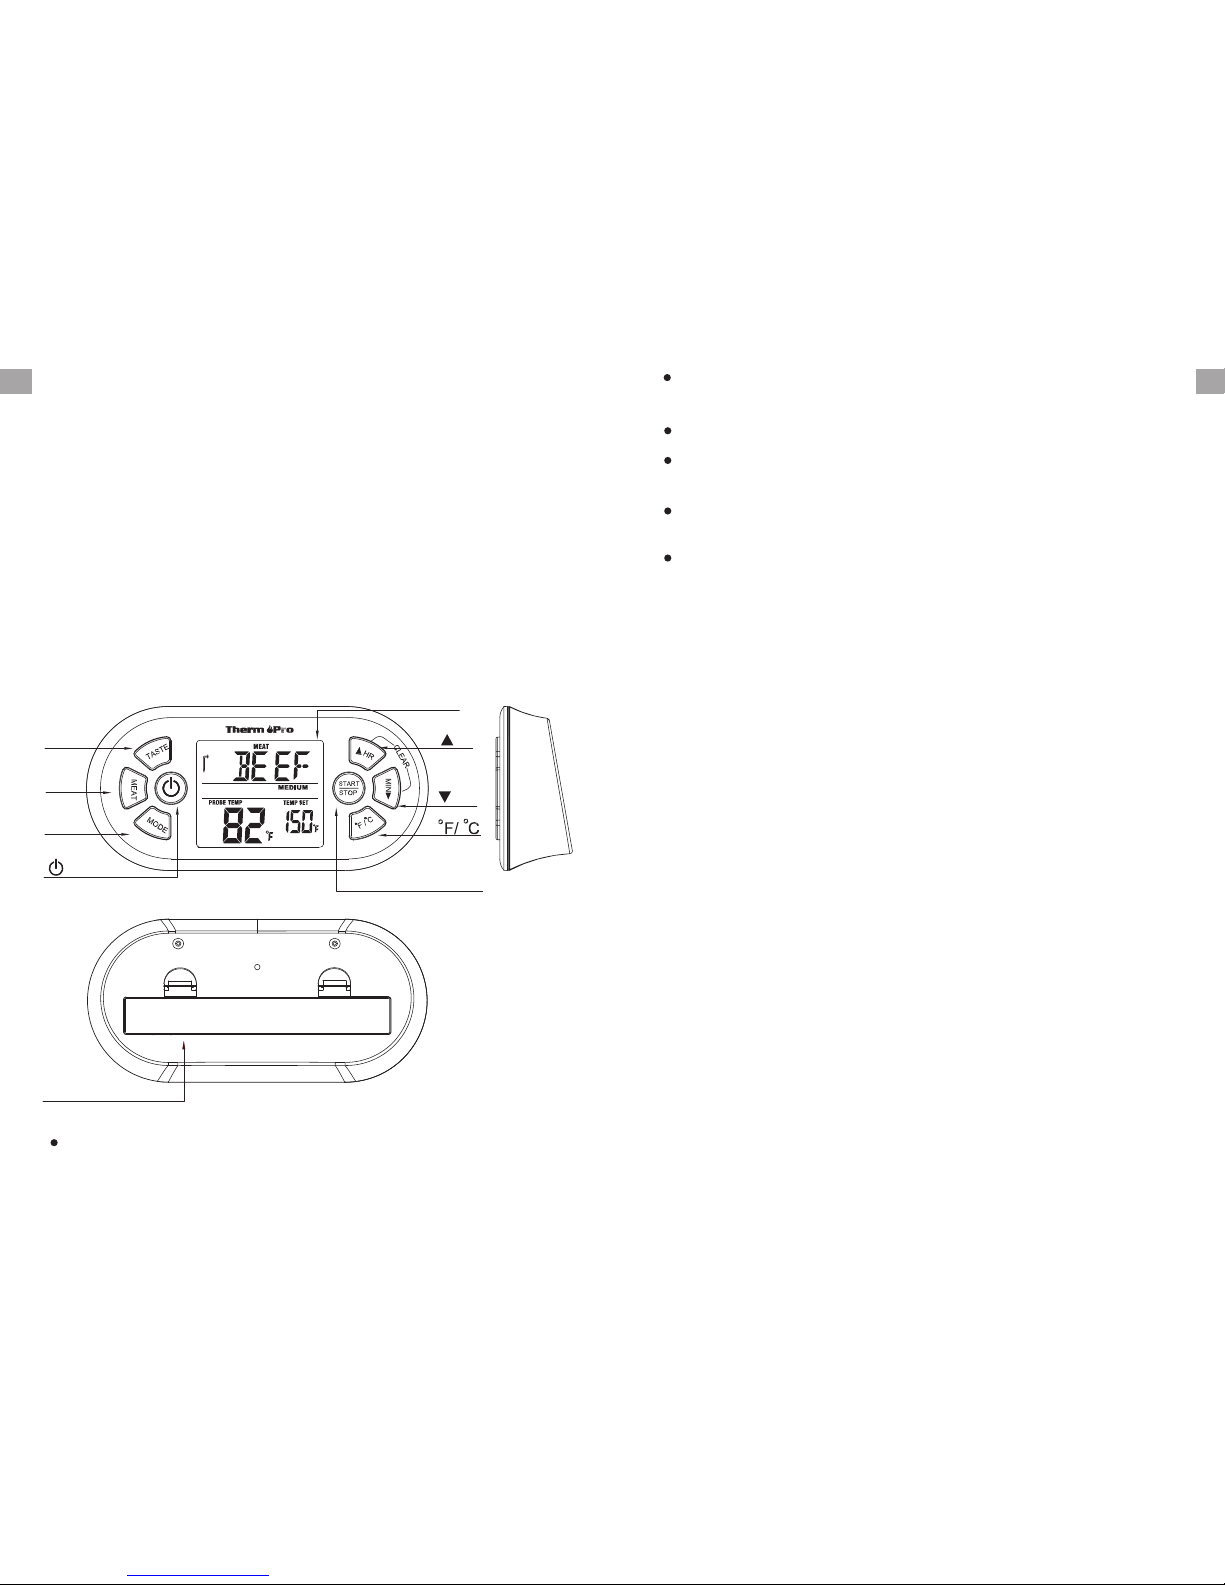
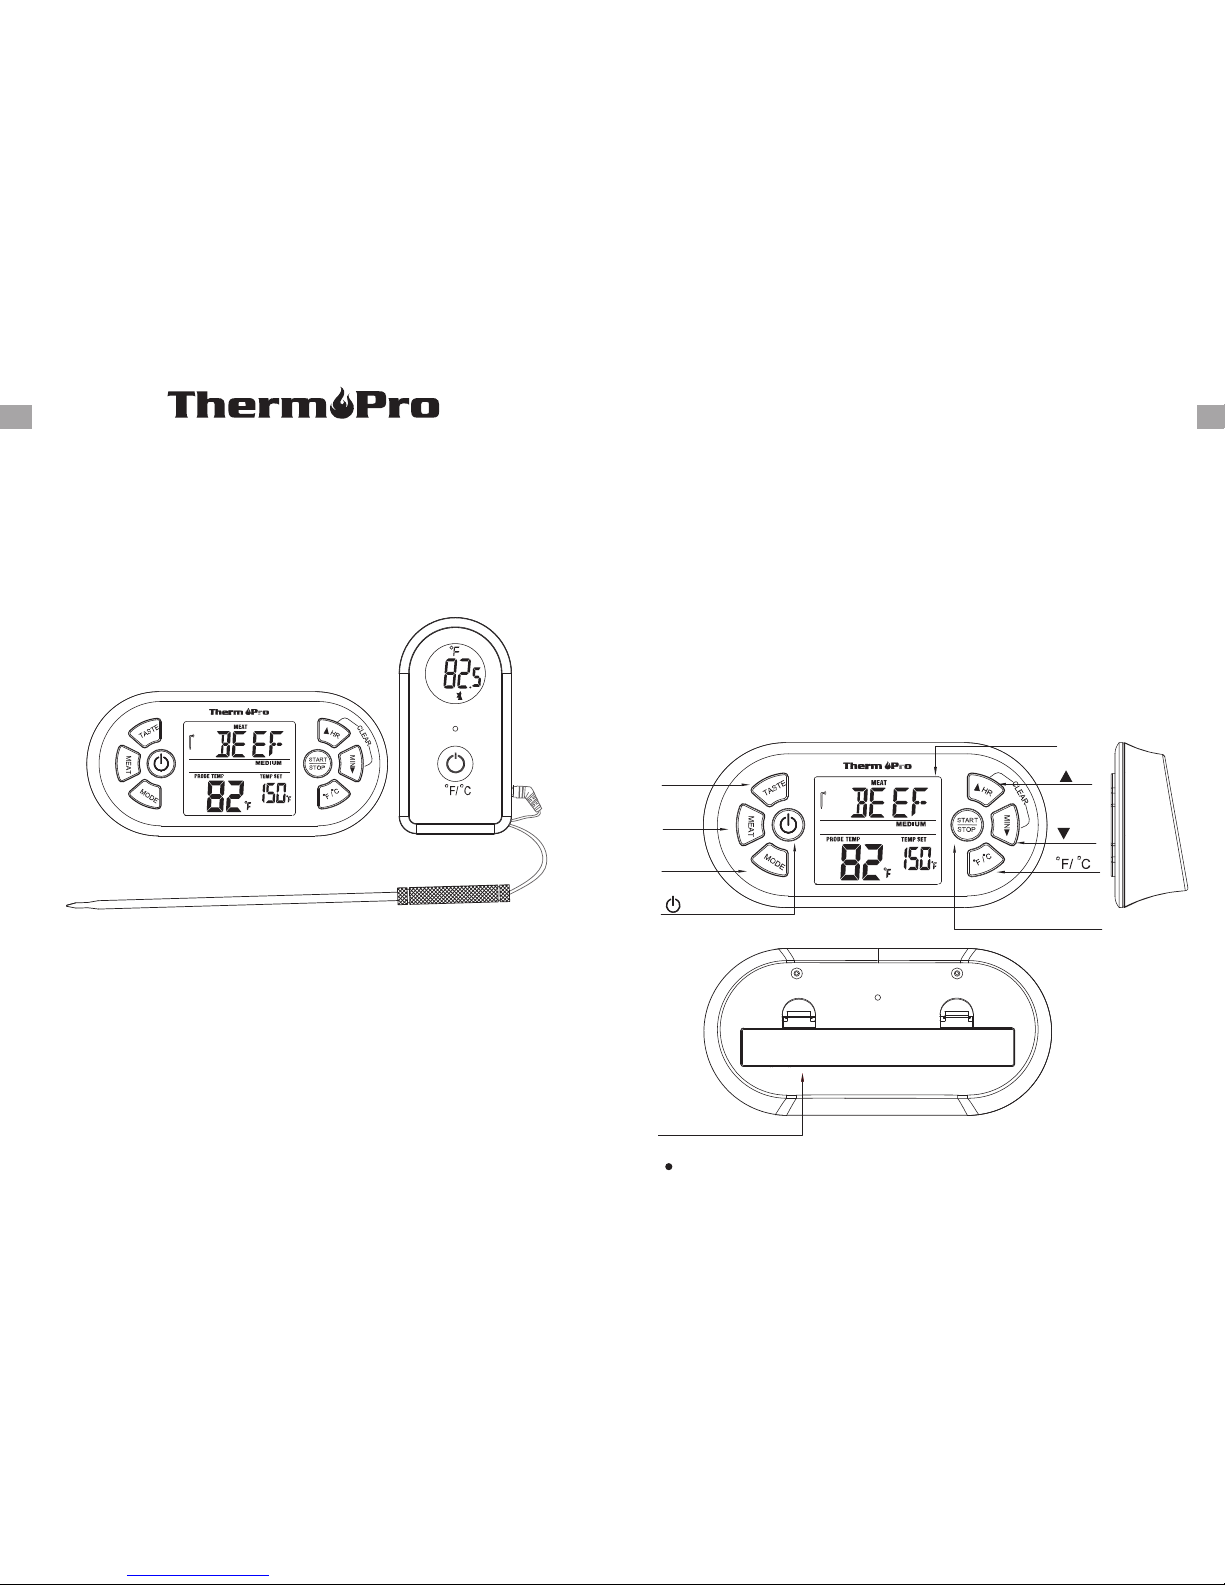
Receiver Features
-2-
LCD display
MODE
MEAT
TASTE
START STOP
HR
MIN
Battery Compartment
1. MODE – Press to select thermometer or timer mode.
Press and hold for 2 seconds to enter Synchronization/
Pairing mode.
2. ▲HR – In timer mode, press once to set hour. Press
and hold for 2 seconds, the hours will increase by 10
hours per second. In thermometer mode, press once to
increase the temperature value. Press and hold for 2
seconds, the temperature value will increase by 10
degrees per second.
4. ▼MIN – In timer mode, press once to set minutes. Press
and hold for 2 seconds, the minutes will increase by 10
minutes per second. In thermometer mode, press once
to decrease the temperature value. Press and hold for 2
seconds, the temperature value will decrease by 10
degrees per second.
LCD (Liquid Crystal Display) with backlight – Displays
all icons, temperature and timer. The backlight will flash
Blue once the temperature increases by 10 ºF from when
cooking starts, then it will change to Green when the
temperature is within 15 ºF of the set temperature and
then it will turn Red when it reaches the set temperature.
See LCD diagram for detailed information.
Programmable alert with preset temperatures for specific
meaty types and their doneness levels.
23-hour, 59-minute countdown timer and count up timer.
Temperature range of probe: 15.8˚F to 572˚F (-9˚C to
300˚C).
Temperature tolerance of internal food reading: +/-1.8˚F
(+/-1.0˚C).
Power source – 2 AAA batteries.
3. F/ C – Press once to select temperature readings in
Celsius or Fahrenheit.
º º
5. MEAT – In thermometer mode, press to select meat type,
PROG (program), GBEEF (ground beef), GPOUL (ground
poultry), BEEF, VEAL, CHCKE (chicken), PORK, POULT
(poultry), LAMB & FISH. In Timer mode, press to switch
between hour/ minute timer and minute/second timer.
Buttons
6. START/STOP– In timer mode, press to start or stop the
timer.
-3-
ENEN
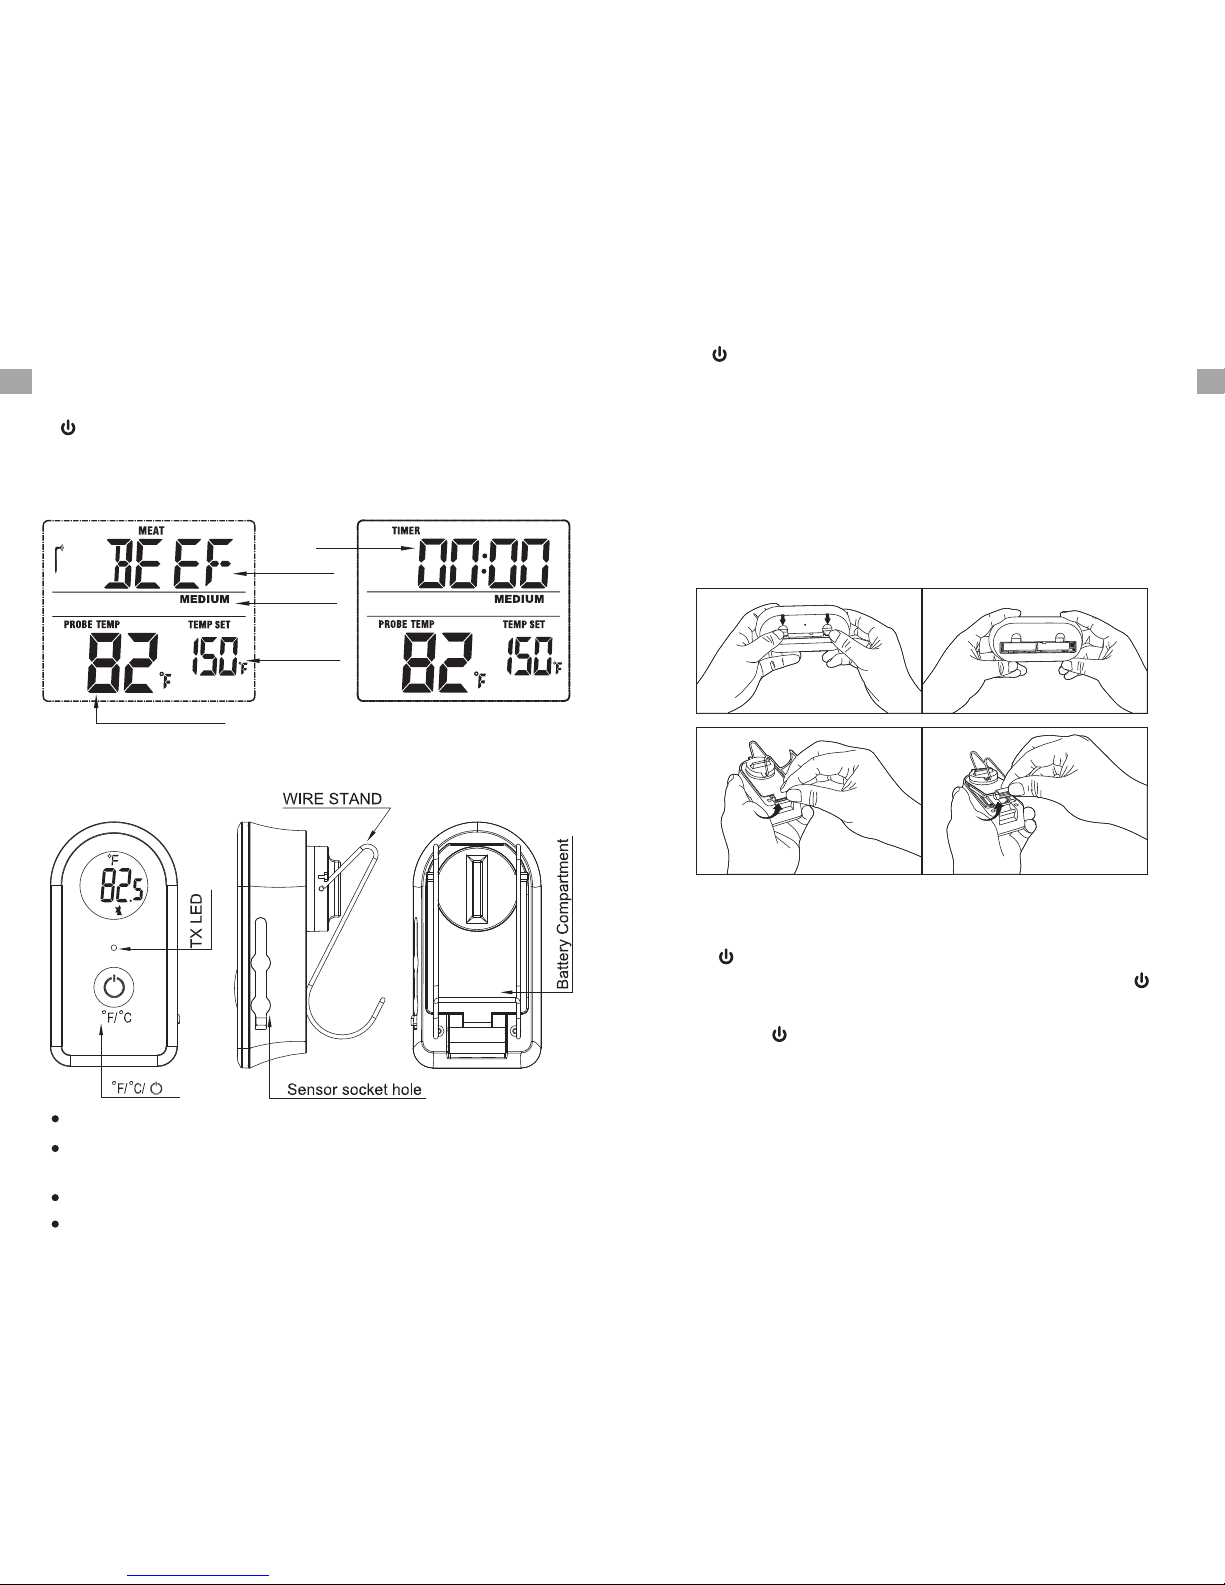
LCD Screen
Probe Temp Re ad ing
Probe Temp
Setting
Taste level
Meat type
Tim er
Thermom et er M od e Tim er M ode
LCD (Liquid Crystal Display)
Wire Stand – Allows you to stand the transmitter on
tabletop or it can be reversed and used as a hanger.
Power source – 2 AAA batteries.
Sensor Socket Hole: plug in for stainless steel probe
sensor
Transmitter Features
8. – Press once to turn ON/OFF the receiver.
ºF/ºC/ – Press once to turn on or off the transmitter.
Press and hold for 2 seconds to select the transmitter
temperature display in ºC or ºF.
Open the battery compartment of the receiver and insert
two “AAA” batteries with correct polarity. Open the battery
compartment of the transmitter and insert two “AAA”
batteries with correct polarity.
Turn On/Off Unit
Installing batteries
Press button on the receiver to turn on/off the receiver
or press and hold °F/°C button for 2 seconds to turn the
receiver.
Press ºF/ºC/ button on the transmitter to turn on/off the
transmitter.
Buttons
Synchronize/Pair Transmitter and Receiver
The transmitter and receiver were already paired at our
manufacturing facility. Usually you do NOT need to resynchronize or re-pair the units. You just plug in the probes,
7. TASTE – In thermometer mode, press to select the meat
taste level, RARE, MED RARE, MEDIUM, MED WELL
and WELL DONE. In Timer mode, press to switch
between hour/minute timer and minute/second timer.
insert batteries, turn on the receiver and the transmitter
and wait for a few seconds, you will see the temperatures
-4-
-5-
EN EN

shown on both receiver and transmitter and the units are
ready for use.
However, in some unusual cases, the transmitter and
receiver are no longer paired, then you may need to resynchronize them by following the below steps:
a. Insert the stainless steel probes into the corresponding
plugs in the transmitter.
b. Turn on the transmitter by pressing the /ºF/ºC button.
The transmitter will show the current temperatures on its
LCD display.
c. Turn on the receiver by pressing the button.
3. Press TASTE to select the level of doneness for the meat
type selected. RARE, MED RARE, MEDIUM, MED WELL
and WELL DONE.
Note: The temperature displayed to the right of the actual
meat temperature PROBE TEMP will show the preset
temperature TEMP SET according to USDA doneness
levels. Example: Beef will be Well Done at 165 ºF.
4. Once the temperature of meat reaches the preset
doneness level, the receiver will beep and the LCD
backlight will turn red.
2. Press MEAT to select meat type. PROG (program),
GBEEF (ground beef), GPOUL (ground poultry), BEEF,
VEAL, CHCKE (chicken), PORK, POULT (poultry), LAMB
& FISH.
1. Press MODE to select thermometer mode. The upper
display will show a small MEAT and a meat type such
as BEEF.
Measure meat temperature to USDA doneness
temperature range
d. Press and hold Mode button on receiver for 2~3 seconds
to enter the synchronization mode which will last for 60
seconds. The display shows “---” and it is flashing.
e. Wait for a moment until the temperature reading shows
on the receiver display, t means the synchronization/
Pairing is complete. Your professional remote cooking
thermometer is now ready for use.
i
Note: The synchronization between the transmitter and
the receiver won't be lost even if you replace the batteries.
Auto Off Feature
The receiver will turn off automatically if it has not received
the temperature signal from the transmitter for more than
30 minutes, a beep will sound for one minute before it shuts
down. However, the Auto Off feature will be automatically
disabled if the timer is running.
2. Press HR or MIN to raise or lower the set temperature.
As you press HR or Min the display changes to PROG
(program). Press and holding the button will raise or
lower the temperature setting rapidly. Pressing MEAT
will return you to the preset USDA ranges.
3. Once the temperature of meat reaches the preset
doneness level, the receiver will beep and the LCD
backlight will turn red.
Measure meat temperature set to your specific
taste
1. Press MODE to select thermometer mode. The upper
display will show a small MEAT and a meat type such
as BEEF.
Procedure for typical use on an outdoor grill
The following typical example will go through the steps to
have the Professional Remote Cooking Thermometer alert
you to when a beef steak is cooked to medium (USDA
doneness level) and remind you to rotate hot dogs in 5
minutes.
1. Turn on the grill.
2. Follow the synchronization/pairing procedure.
3. Place steak and hot dogs on grill rack.
4. Insert probe sensor into the center of thickest portion of
the steak. Avoid touching bone or heavy fat areas.
-6-
-7-
EN EN

5. Position the probe sensor wire so they will not come into
contact with flames and exit the grill surface area without
being pinched/crushed by the grill cover.
7. Press MEAT until BEEF is displayed.
8. Press TASTE MEDIUM is displayed and 150 F will
be shown as the TEMP SET.
until º
9. Press MODE to change to timer mode.
10. Press MIN 5 times to set for 5 minutes so that 0:05 is
displayed. Press START/STOP to start the countdown.
Press MODE to go back to thermometer mode.
11. You may take the receiver up to 300 ft away from the
outdoor grill. Go indoors if desired.
6. Stand the transmitter away from heat source of grill. DO
NOT put transmitter on the closed cover or under the
cover. The transmitter is not waterproof. DO NOT use in
the rain.
Using the Timer
Count down
1. Press MODE to select timer mode. The upper display
will show a small TIMER and 0:00.
2. Press HR and MIN button to set the timer. Press START/
STOP button to start countdown. “▼ will blink for every
second.
”
3. To stop the countdown process, press START/STOP
button. The “▼ becomes solid.”
4. Press HR & MIN buttons together to clear the setting
back to 0:00.
Note: The minimum setting for the timer is 1 minute. When
the timer counts down below 1 hour 1:00, the display will
change to 59'59” to indicate, 59 minutes 59 seconds. The
seconds will be shown counting down then. When the
countdown reaches 0'00” the timer starts counting up and
it will beep for 60 seconds. The timer and “▼▲” will blink.
Press the START/STOP button to stop the beeping. When
the count up reaches 23:59:59 (59 seconds are not
displayed) the display will turn to 0:00, the unit beeps and
“▼▲” will blink for 60 seconds.
13. When the temperature of probe in the steak reaches
55 ºF the LCD backlight will flash blue.
14. When the temperature of probe in the steak reaches
135 ºF the LCD backlight will flash green.
15. When the temperature of probe in the steak reaches
150 ºF MEDIUM the receiver will beep and the LCD
backlight will flash red.
16. Press STOP to turn off the alert.
17. Turn off grill. Remove the probe sensor from steak.
Always wear a heat resistant glove to touch the stainless
steel probe sensor or wire during or just after cooking.
Do not touch with bare hands.
18. Clean the stainless steel probe and dry thoroughly after
each and every use.
19. Turn off the transmitter and receiver.
Helpful Hints
If the receiver and/or the transmitter display LLL or HHH
instead of the probe temperature, wait for probe to reach
room temperature. If LLL or HHH is still displayed, it is
likely the internal probe wire has shorted out either through
moisture or heat damage.
12. When 5 minutes are up the receiver will beep for 60
seconds.
Assume the meat temperature is 45 F.º
Count up
1. Press MODE to select timer mode. The upper display
will show a small TIMER and 0:00.
2. Press START/STOP button to start count up. The “▲
will blink for every second.
”
3. To stop the count up process, press START/STOP button.
The “▲ becomes solid.”
4. Press CLEAR button to clear the setting back to 0:00.
-8-
-9-
EN EN

Helpful Hints
Do not immerse the probe in water while cleaning.
Do not allow the probe or probe wire to come into contact
with flames. If cooking with grill cover closed, only use
medium or low heat.
If the probe becomes defective within 90 days warranty
period, please return defective probe to address below
along with return address and we will send you a new
probe no charge.
If the temperature displayed seems to be reading too
high or the temperature seems to increase too quickly,
check to make sure the probe tip is not poking through
the food. Reposition the probe tip into the center of the
thickest part of food. Avoid touching bone or heavy fat
areas.
Caution:
Always wear a heat resistant glove to touch the stainless
steel probe sensor or wire during or just after cooking.
Do not touch with bare hands.
Keep the stainless steel probe sensor and wire away
from children.
Not Intended for Use by Persons aged 12 and Under
Clean the stainless steel probe and dry thoroughly after
each and every use.
Do not immerse the probe or wire in water. Clean using
a damp, soapy cloth.
Do not use the receiver or transmitter in the rain. They
are not waterproof.
Note: This equipment has been tested and found to comply
with the limits for a Class B digital device, pursuant to part
15 of the FCC Rules. These limits are designed to provide
reasonable protection against harmful interference in a
residential installation. This equipment generates, uses and
can radiate radio frequency energy and, if not installed and
used in accordance with the instructions, may cause harmful
interference to radio communications.
FCC Compliance
Information to user
Warning: Changes or modifications to this unit not expressly
approved by the party responsible for compliance could void
the users' authority to operate the equipment.
Do not expose the receiver or transmitter to direct heat
or surface.
Do not use stainless steel probe in microwave oven.
Cleaning
Always wear heat resistant glove to touch the stainless
steel probe sensor or wire during or just after cooking.
Do not touch with bare hands.
Keep the stainless steel probe sensor and wire away
from children.
Wash the metal probe tip with hot soapy water and dry
thoroughly. Do not immerse the probe in water while
cleaning.
Wipe the transmitter and receiver with damp cloth. Do
not immerse either in water.
Do not expose the plug of the stainless steel probe or
the plug in hole of the transmitter to water or any liquid.
This will result in a bad connection and faulty
readings.
However, there is no guarantee that interference will not
occur in a particular installation. If this equipment does
cause harmful interference to radio or television reception,
which can be determined by turning the equipment off and
on, the user is encouraged to try to correct the interference
by one or more of the following measures:
- Reorient or relocate the receiving antenna.
- Increase the separation between the equipment and
receiver.
- Connect the equipment into an outlet on a circuit different
from that to which the receiver is connected.
-10-
-11-
EN EN
- Consult the dealer or an experienced radio/TV technician
for help.
This device complies with part 15 of the FCC Rules.
Operation is subject to the following two conditions: (1) this
device may not cause harmful interference, and (2) this
device must accept any interference received, including
interference that may cause undesired operation.
Limited Two-years Warranty
ThermoPro warrants this product to be free of defects in
parts, materials and workmanship for a period of two years,
from date of purchase.
Should any repairs or servicing under this warranty be
required, contact Customer Service by phone or email for
instructions on how to pack and ship the product to
ThermoPro.
This warranty gives you specific legal rights and you may
also have other rights which vary from state to state.
Customer Service
Telephone: 44 203 769-1321- -
Email: service@buythermopro.com
Hours: Weekdays 1:00 PM - 11:00 PM CET
-12-
EN
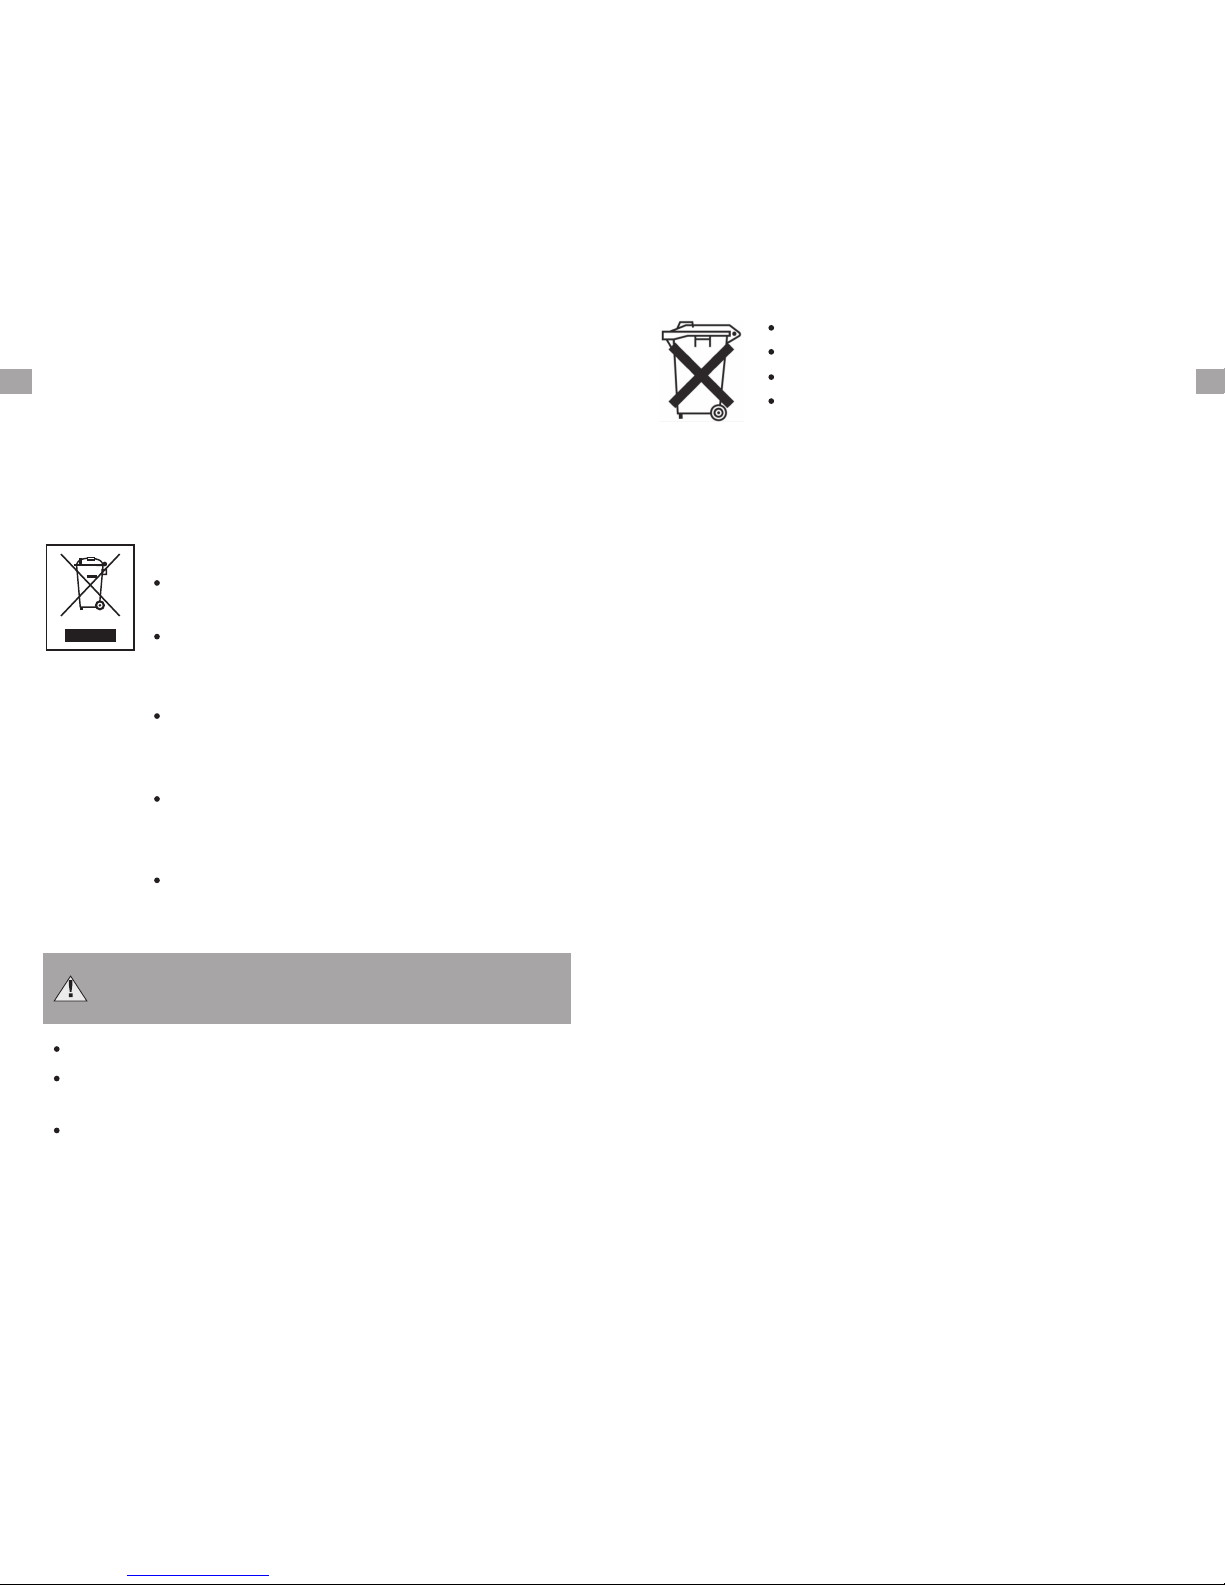
Disposal
Meaning of the “Dustbin” Symbol
Protect our environment: do not dispose
electrical equipment in the domestic waste.
of
Please return any electrical equipment
you will no longer use to the collection
points provided for their disposal.
that
This helps avoid the potential effects of
incorrect disposal on the environment and
human health.
This will contribute to the recycling and
other forms of reutilisation of electrical and
electronic equipment.
Information concerning where the
equipment can be disposed of can be
obtained from your local authority.
CAUTION: Batteries/rechargeable batteries must
not be disposed of with household waste!
The batteries must be removed from the appliance.
Take spent batteries to the appropriate collection
or to a dealer.
point
Your town or local authority can provide information
about public collection points.
This symbol can be found on batteries/rechargeable
batteries which contain hazardous.
Pb = contains lead
Cd = contains cadmium
Hg = contains mercury
Li = contains lithium
-13-
EN
Thermomètre alimentaire à distance
Modèle N°.: TP-21
Cuisinez comme un pro à coup sûr !
-14-
FR
Introduction
Félicitations pour votre achat du Thermomètre de cuisson
à distance professionnel, un thermomètre alimentaire
programmable à fréquence radio Vous pouvez désormais
contrôler à distance la température et la durée de des
aliments cuisant sur votre grill, dans votre fumoir ou votre
four.
Introduction
1. 1 - Récepteur.
2. 1 - Transmetteur.
3. 1 - Sonde détachable en acier inoxydable.
4. 2 - 2*piles AAA.
Fonctionnalités du récepteur
Compartiment des piles
LCD (Écran à cristaux liquides) avec rétroéclairage –
Affiche toutes les icônes, températures et durées. Le
rétroéclairage clignotera en bleu une fois que la température augmente de 10°F (environ 5°C) à partir du
affichage LCD
START STOP
HR
MIN
MODE
MEAT
TASTE
-15-
FR

Programmable avec des températures prédéfinies pour
des types spécifiques de viande et leur niveau de cuisson.
Compte à rebours et minuterie de 24 heures et 59
minutes.
Amplitude de température de la sonde : de 15,8˚F à
572˚F (de -9˚C à 300˚C).
Tolérance de la lecture des températures internes des
aliments : +/-1,8˚F (+/-1˚C).
Source d'alimentation – 2 piles AAA.
Boutons
1. MODE – Appuyez pour sélectionner le mode thermomètre
ou minuterie. Laissez appuyer pendant 2 secondes pour
entrer en mode de synchronisation/pairage.
2. ▲ HR – En mode minuterie, appuyez une fois pour con figurer les heures. Laissez appuyer pendant 2 secondes
pour que les heures augmentent de 10 par seconde. En
mode thermomètre, appuyez une fois pour augmenter la
température. Laissez appuyer pendant 2 secondes pour
que la température augmente de 10 degrés par seconde.
3. F/ C – Appuyez une fois pour modifier l'unité de
température entre Celsius et Fahrenheit.
º º
début de la cuisson et passera au vert lorsque la température arrive à 15°F (environ 7°C) de la température
définie et deviendra rouge une fois la température voulue
atteinte. Voir le diagramme LCD pour plus d'informations.
5. MEAT – En mode thermomètre, appuyez pour
sélectionner le type de viande, PROG (programme),
GBEEF (bœuf haché), GPOUL (volaille hachée), BEEF
(bœuf), VEAL (veau), CHCKE (poulet), PORK (porc),
POULT (volaille), LAMB (agneau) et FISH (poisson). En
4. ▼MIN – En mode minuterie, appuyez une fois pour con figurer les minutes. Laissez appuyer pendant 2 secondes
pour que les minutes augmentent de 10 par seconde. En
mode thermomètre, appuyez une fois pour diminuer la
température. Laissez appuyer pendant 2 secondes pour
que la température diminue de 10 degrés par seconde.
-16-
FR FR
6. START/STOP– En mode minuterie, appuyez pour
démarrer ou arrêter la minuterie.
7. TASTE – En mode thermomètre, appuyez pour
sélectionner le niveau de cuisson de la viande, RARE
(bleu), MED RARE (saignant), MEDIUM (à point), MED
WELL(cuit) et WELL DONE (bien cuit). En mode
minuterie, appuyez pour passer de la minuterie en
heure/minute à la minuterie en minute/seconde.
8. – Appuyez une fois pour allumer ou éteindre le
récepteur.
Caractéristiques du transmetteur
Entr e du Capteuré
Lumi re LEDé
Écran LCD
Probe Temp Reading
Pro be Te mp
Set ting
Taste l evel
Mea t type
Tim er
The rmome ter Mod e Tim er Mode
MEAT
Entr e du Capteuré
mode minuterie, appuyez pour passer de la minuterie
en heure/minute à la minuterie en minute/seconde.
Compartiment des piles
-17-

LCD (Écran à cristaux liquides).
Support – Vous permet de poser le transmetteur sur le
plan de travail ou il peut être déplié pour être pendu.
Source d'alimentation – 2 piles AAA.
Prise du capteur : prise pour la sonde en acier inoxydable.
Boutons
ºF/ºC/ – Appuyez une fois pour allumer ou éteindre le
transmetteur.
Mettre les piles
Ouvrez le compartiment des piles du récepteur et insérez
deux piles AAA en respectant la polarité. Ouvrez le
compartiment des piles du transmetteur et insérez deux
piles AAA en respectant la polarité.
Laissez appuyer pendant 2 seconde pour sélectionner
l'unité de température, en °C ou en °F.
Appuyez sur le bouton ºF/ºC/ du transmetteur pour
allumer/éteindre le transmetteur.
Appuyez sur le bouton de marche/arrêt du récepteur pour
allumer/éteindre le récepteur ou appuyer sur le bouton ºC/ºF
pendant 2 secondes pour allumer / éteindre le récepteur.
Allumer/Éteindre l'unité
-18-
-19-
FR FR
Synchroniser/Apparier le transmetteur et le
récepteur
Le transmetteur et le récepteur ont déjà été synchronisés
dans l'usine de fabrication. Vous n'avez normalement PAS
besoin de resynchroniser les unités. Il vous suffit de brancher les sondes, d'insérer les piles, d'allumer le récepteur
et le transmetteur et d'attendre quelques secondes. Les
températures seront alors affichées sur le récepteur et le
transmetteur et les unités seront donc prêtes à l'emploi.
Cependant, dans certains cas très rares, il est possible que
le transmetteur et le récepteur ne soient pas synchronisés
et vous devrez donc le faire en suivant les étapes ci-dessous:
a. Insérez les sondes en acier inoxydable dans les prises
correspondantes du transmetteur.
b. Allumez le transmetteur en appuyant sur le bouton
ºF/ºC/ . Le transmetteur affichera la température
actuelle sur son écran LCD.
c. Allumez le récepteur en appuyant sur le bouton .
d. Restez appuyer sur le bouton Mode du récepteur
pendant 2 ou 3 secondes pour entrer en mode de
synchronisation, qui durera pendant 60 secondes.
L'écran affichera “---” et commencera à clignoter.
e. Attendez un moment jusqu'à ce que la lecture de la
température soit affichée sur l'écran du receveur, ce qui
signifie que la synchronisation est terminée. Votre
thermomètre de cuisine à distance professionnel est
prêt à l'emploi.
Remarque : La synchronisation entre le transmetteur et le
récepteur ne sera pas perdue même si vous changez les
piles.
Fonction d'extinction automatique
Le récepteur s'éteindra automatiquement s'il ne reçoit pas
de signal de température du transmetteur pendant plus de
30 minutes – un bip se fera entendre pendant une minute
avant l'extinction. Cette fonction sera cependant désactivée
automatiquement si la minuterie est en route.

Mesurer la température de la viande selon la plage
de température de cuisson de l'USDA
1. Appuyez sur MODE pour sélectionner le mode ther momètre. La partie supérieure de l'écran affichera MEAT
en petit, ainsi que le type de viande, par ex. BEEF.
2. Appuyez sur MEAT pour sélectionner le type de viande.
PROG (programme), GBEEF (bœuf haché), GPOUL
(volaille hachée), BEEF (bœuf), VEAL (veau), CHCKE
(poulet), PORK (porc), POULT (volaille), LAMB (agneau)
et FISH (poisson).
3. Appuyez sur TASTE pour sélectionner le niveau de
cuisson pour le type de viande sélectionné. RARE (bleu),
MED RARE (saignant), MEDIUM (à point), MED WELL
(cuit) et WELL DONE (bien cuit).
Remarque : La température affichée à droite correspond
à la température réelle de la viande. PROBE TEMP
affichera la température prédéfinie TEMP SET selon les
niveaux de cuisson de l'USDA. Exemple: le bœuf sera
bien cuit à 165 °F (74°C).
4. Une fois que la température de la viande a atteint le
niveau de cuisson prédéfinie, le récepteur bipera et le
rétroéclairage de l'écran deviendra rouge.
Mesurer la température avec votre propre
configuration
1. Appuyez sur MODE pour sélectionner le mode ther momètre. La partie supérieure de l'écran affichera MEAT
en petit, ainsi que le type de viande, par ex. BEEF.
2. Appuyez sur HR ou MIN pour augmenter ou diminuer la
température définie. Lorsque vous appuyez sur HR ou
MIN, l'écran affichera PROG (program). Laisser appuyer
sur le bouton augmentera ou diminuera la température
plus rapidement. Appuyer sur MEAT vous permettra de
retourner aux températures prédéfinies par l'USDA.
3. Une fois que la température de la viande atteint la
température de votre choix, le récepteur bipera et la
rétroéclairage de l'écran deviendra rouge.
-20-
-21-
FR FR
Procédure pour une utilisation normale sur un
grill en extérieur
L'exemple suivant est typique et explique toutes les étapes
pour que le thermomètre de cuisson professionnel vous
avertisse lorsqu'un steak de bœuf est cuit à point (selon le
niveau de l'USDA) et vous rappelle de retourner les hot
dog dans cinq minutes.
1. Allumez le grill.
2. Suivez la procédure de synchronisation.
3. Placez les steaks et les hot dog sur le grill.
4. Insérez la sonde dans la partie la plus épaisse du steak.
Évitez de toucher les os ou les zones graisseuses.
5. Positionnez le fil de la sonde pour qu'il n'entre pas en
contact avec les flammes et qu'il sorte du grill sans qu'il
soit écrasé par le couvercle.
6. Éloignez le transmetteur de la source de chaleur. Ne
placez pas le transmetteur sur le couvercle fermé ou
sous le couvercle. Le transmetteur n'est pas étanche.
Ne pas l'utiliser sous la pluie.
7. Appuyez sur MEAT jusqu'à ce que BEEF soit affiché.
8. Appuyez sur TASTE jusqu'à ce que MEDIUM soit affiché
et 150 ºF sera affiché sur TEMP SET.
9. Appuyez sur MODE pour passer en mode minuterie.
10. Appuyez sur MIN 5 fois pour choisir 5 minutes - 0:05
devrait être affiché. Appuyez sur START/STOP pour
lancer le compte à rebours. Appuyez sur MODE
pour retourner au mode thermomètre.
11. Vous pouvez éloigner le récepteur jusqu'à 300 ft (90 m)
du grill. Vous pouvez rentrer si nécessaire.
12. Lorsque les 5 minutes sont écoulées, le récepteur bipera
pendant 60 secondes.
13. Lorsque la température de la sonde dans le steak atteint
55 ºF, le rétroéclairage de l'écran clignotera en bleu.
14. Lorsque la température de la sonde dans le steak atteint
135 ºF, le rétroéclairage de l'écran clignotera en vert.
15. Lorsque la température de la sonde dans le steak atteint
 Loading...