

Thermopro TP-20 User Manual
EN
V20 16072 9 EN FR
Cook Like A Pro Every Time!
Remote Food Thermometer with Dual Probe
Model No. TP-20
Introduction
Congratulations on your purchase of the Professional Remote Food Thermometer,
a programmable radio frequency food thermometer. You will now be able to remotely
monitor the temperature of cooking food and the temperature inside your grill, oven
or smoker from anywhere in your home.
Components
1. One receiver uni t.
2. One transmitte r unit.
3. Two d etach able stainless st eel pro bes with steel mesh c able.
4. Four AAA batteries .
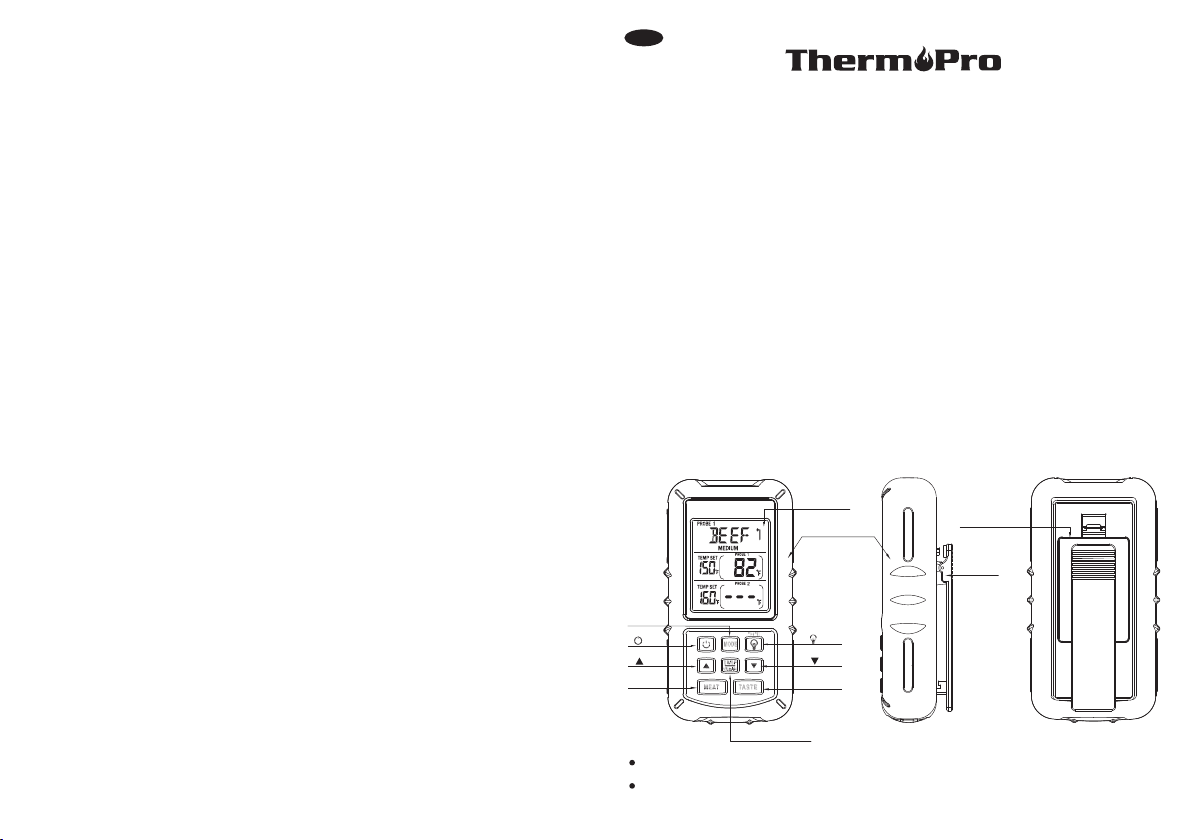
Receiver Features
MOD E
MEAT
LCD display
Soft rubber sleeve
°F/°C
TASTE
ST/ SP/CL EAR
Bat tery
Com partm ent
Bel t Clip
LCD (Liquid Cryst al Disp lay) – Displays all i cons, t emperature and ti me.
Dual probe temper ature d isplay.
-1-
Programmable al ert wit h preset temperat ures fo r specific foods.
99-hour, 59-minu te coun tdown timer and cou nt up tim er
Temperature range o f probe : 32˚F to 572˚F (0˚C to 3 00˚C) .
Temperature toler ance of i nternal food read ing: +/ -1.8˚F (+/-1.0˚ C).
Battery compart ment – Ho lds 2 AAA batteries.
Bel t clip/Stand – Belt clip allows you to be mobile. Clip the receiver unit to belt.
Swi ngs out and allow you to stand the receiver on tabletop as well.
Buttons
1. MO DE – Press t o sel ect Thermomete r Pro be 1, Thermometer Probe 2 or Timer
mod e. Pr ess and hold for 2 sec onds to en ter Synchronization/Pairi ng mo de.
2. – In thermometer mode (Probe 1 or 2), press once to increase the temperature
value. Press and hold for 2 seconds and t he temperatur e value will increase at
a fast er pace. In timer mode, press once to i nc re as e Ho ur, Minute or Second
setting. Press and hold for 2 seconds, the hours, minutes or seconds will increase
at a faster pace.
3. – In thermometer mode (Probe 1 or 2), press once to decrease the temperature
value. Pres s and hold for 2 se conds, the te mperatu re v alue will d ec rease at a
faster pa ce . In ti mer mod e, press on ce to d ec rease H ou r, M in ut e or Se cond
setting. Press and hold for 2 seconds, the hours, minutes or seconds will decrease
at faster pace.
4. ST/SP /CL EAR – When setting the timer, press to confirm the sett ing . Whe n the
timer setting is set, press once to start the timer. When the timer is running, press
once to pause the tim er. Pres s and hold for two seco nds to cl ear timer setting .
5. MEAT – In thermometer mode, pr ess to se lect the meat type : PROG (p rogram
– User Self-Define d), GBEEF (Ground Be ef), GPOUL (Ground Poultry), BE EF,
VEAL, CHC KE (Chicken), PO RK, POULT (Poultry), LAM B & FISH and OVEN.
In Timer mode, press to sele ct Hour, Minute mode or Minute' second” mod e.
6. TASTE – In thermometer mode, press to select the meat taste level: RARE, MED
RARE, MEDIUM, MEDIUM WELL and WELL DONE.
7. /ºF/ºC–Press once to turn on or off the backlight, Press and hold for 2 seconds
to select temperature readings in Celsius or Fahrenheit.
8. – Press once to turn O N/OFF t he receiver.
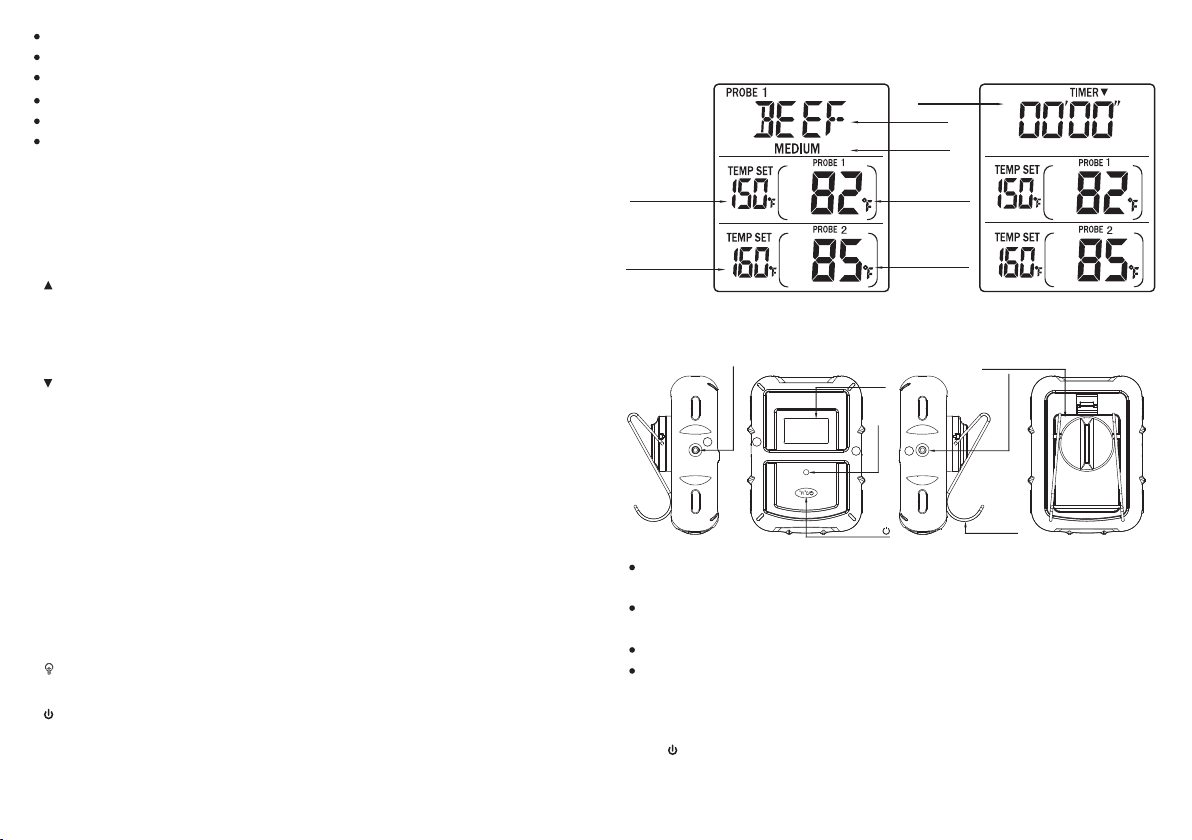
LCD Screen
The rmomete r mode Timer mod e
Timer
Mea t type
Taste level
Pro be 1 Temp
Set ting
Pro be 2 Temp
Set ting
Pro be 1 Temp
Rea ding
Pro be 2 Temp
Rea ding
Transmitter Features
LCD
Sens or sock et hole
2 2
1
ºF/ ºC/
1
TX LE D
LCD (Liquid Crystal Display) – displays temperatures of both probe 1 and probe
2. It will automatically switch between probe 1 and probe 2 displays.
Wire Stand – Allows you to stand the transmitter on tabletop or it can be reversed
and used as a hanger.
Battery Compart ment – ho lds 2 AAA batteries.
Sensor soc ket hole – Plug-i n for stainl ess steel probe 1 and probe 2.
Bat tery Co mpart ment
Sen sor soc ket hol e
WIR E STAND
Button
ºF/ºC / – Press once to turn on or off the transmitter. Press and hold for 2 seconds
to select the transmitter temperature display in ºC or ºF.
-3--2-

Installing batteries
Open the battery compartme nt of t he re ceiver and insert two “AAA” batte ries with
correct p olarity. Open the batte ry c ompartm ent of the tran smitter and i nsert two
“AAA” batteries with corre ct po larity.
Turn On/Off Unit
Press button on the r eceiv er to turn on/off the receiver;
Press ºF/ºC button on the trans mitte r to turn on/off the transmitte r./
To regain transmission sign al, move the receiver closer to the transmitter, the link
sho uld be automatically restored and the temperatures should appear on the
rec eiv er display.
Auto Off Feature
The receiver will turn off a utomatically if it hasn't received the temperature s ignal
from the transmitter for more than 30 minutes, a beep will sound for one minute
before it shuts down. However, the Auto Off feat ure will be aut omatically disabled
if th e timer is running.
Synchronize/Pair Transmitter and Receiver
Th e tr an sm it te r an d receiv er were already paired at o ur m an uf ac tu ri ng f ac il it y.
Usually you do NOT ne ed t o re -s ynchroniz e or re- pa ir the units. You just plug in
the prob es, inse rt batteries, turn on the receiver and the transmitter and wait for a
few seconds, you will see the temperatures shown on both receiver and transmitter
and the units are rea dy for us e.
However, in some unusual cases, the transmitter and receiver are no longer paired,
then you may need to re-synchronize them by following the below steps:
a. Insert the stainless steel probes into the corresponding plugs in the trans mitter.
b. Turn on the transmitter by pressing the ºF/ºC button. The transmitter will show
the current temperatures on its LCD display.
c. Turn on the receive r by pres sing the button.
d. Press and hold Mode button on receiver for 2~3 seconds to enter the synchronization
mode which will last for 60 seconds. The display shows “---” and it is flashing.
e. Wait for a moment until the temperature reading shows on the receiver disp lay,
it means the sy nchronization/Pairing is complete . Your professi onal remote
coo king thermometer is now ready for use.
Note: Th e syn chronization between the transmitter and the receiver won't be los t
even if you replac e the batteries.
/
Loss link alert
If the rece iver is taken out of range or there is abnor mal exter nal interferen ce or
after shutting off the transmitter, the receiver may not be able to receive the
transmission fr om the transmitte r. If this happens for o ver 4 minute s, the unit will
alert you the signal is lost. Pressing any button on Receiver will stop the Loss Link
beep.
Measure meat temperature to USDA doneness temperature
range
1. You can use two probes (Probe 1 and Probe 2) to measure and monitor temperatures
of two pieces of meat or two sections of the same large piece of meat at the same
time.
2. Pr ess MODE to select Thermometer Mode, Probe 1 or Prob e 2, represented by
a small icon (PROBE 1 or PROBE 2) on the uppe r displa y.
3. Press MEAT to select meat ty pe: PROG (Program - User self- defined), GBEEF
(Ground Beef), GPOUL (Ground Poultry), BEEF, VEAL, CHCKE (Chicken), PORK,
POULT (Poultry), LAM B & FIS H.
4. Pr ess TAS TE to select the level of doneness for the meat type selected: RARE,
MED RARE, MEDIUM, MEDIUM WELL an d WELL DONE .
Note: The temperature displayed t o the left of the actual meat t emperature will
show the preset temp erature TEMP SET acco rding to USDA donenes s levels.
Example: Beef will be Well Don e at 165 ºF.
5. Once the temperature of meat (Probe 1 or Probe 2) reaches the preset doneness
level, the rece iver will beep an d the LCD backlig ht will be turned on. Press any
button to stop th e beep.
Measure meat temperature set to your specific taste
1. Press MODE to sele ct Thermom eter Mode, Probe 1 or Probe 2.
2. Press or to raise or lower the set temperature. As you press or the display
changes to PROG (pr ogram). Press a nd h ol ding the button w il l raise or lower
th e tempera tu re setting ra pi dly. Press in g MEAT will re tu rn you to t he preset
USDA ranges.
-5--4-

3. Once the temperature of meat reach es the preset doneness level, the rec eiver
will beep and the LCD ba cklight will be turn ed on. Press any button to stop the
beep.
Measure oven/smoker/barbeque temperature
1. You can use one probe (Probe 1 or 2 ) to measure and moni tor the t emperature
inside the oven, sm oker or b arbeque. Clip the p robe yo u selected to grill r ack
of oven or barbecue c hambe r
2. Press MODE to select Thermo meter Mode, Probe 1 or Probe 2 as you selected.
3. Press MEAT repe atedly until the display s hows OVEN.
4. Th e displ ay will show the temp eratu re inside oven, smo ker or barbeque.
Procedure for typical use on an outdoor grill
The follo wing typi cal examp le will go th rough the s teps to hav e the Professional
Remote Coo king Thermometer alert you whe n you cook two piec es of beef steak
at the same time wi th on e pie ce of b eef s teak to be cook ed to m edium (USD A
do ne ne ss l ev el ) and the o th er p ie ce of beef st ea k to be cooked to m ed iu m well
(USDA doneness lev el).
1. Turn on the grill.
2. Place two pieces o f beef st eak on grill rack.
3. Insert p robe sensor 1 into t he center o f thickes t portion o f first piece of steak.
Avoid to uching bo ne or heavy f at areas. Insert p robe sens or 2 into the s econd
pi ece of st ea k. Assume yo u wo uld like to c ook first p ie ce of steak t o medium
and the sec ond piece t o medium well.
4. P os ition the pr obe se nsor w ire so t he y wi ll n ot com e into conta ct w it h fl am es
and exit the gril l surface area without bein g pinched/ crushed by the gr ill cover.
6. Stand the transmitter away from heat source of grill. DO NOT put transmitter on
the closed cover or under the cover. The transmitter is not waterproof. DO NOT
use in the rain.
7. Press Mode to select Thermometer Probe 1. Press MEAT so BEEF is displayed.
8. Press TAS TE s o MEDIUM is displ ay ed and 150 F will be shown as the TE MP
SET.
9. Press MODE to change Thermometer Probe 2. Press MEAT so BEEF is displayed.
10. Press TASTE so MEDIUM WE LL is disp layed and 16 0 F will b e shown as the
TEM P SET.
º
º
11. You may take the receiver up to 300 feet away from the outdoor grill. Go indoors
if desired.
12. When the temper ature o f first piece of stea k reaches 150 F MEDIUM , the
receiver will bee p and the L CD backlight will b e turne d on.
13. Press any button to turn off the alert.
14. Take the first piece o f steak out of grill.
15. When the temperature of second piece of steak reaches 160 F MEDIUM WELL,
the receiver will beep and the LCD backlight will be turned on.
16. Press any butto n to turn o ff th e alert.
17. Turn off grill. Rem ove the probe sensors from bot h steaks. Always wear a heat
resistan t glove to tou ch the stainless steel probe sensor or wire d uring or jus t
after cooking. Do not touch with bare hands.
18. Clean the stain less st eel probe and dry tho rough ly after each and eve ry use.
19. Turn off th e transmitter and r eceiver.
º
º
Using the Timer
Count down
1. Press the MODE button to select the TIMER mode. The timer 00:00 with a small
icon TIMER will be shown in the upper part of the display.
2. Press MEAT to s wi tch between Hou r: M inute timer to a minu te ' second” timer
and back.
3. Press or to adjust t imer se tting. Press and ho ld or to adjust setti ng at
a faster pace. Pres s ST/SP /CLEAR to confirm t he setting. The maximum
countdown timer s ettin g is 99 hours and 59 minu tes.
4. Press and hold ST/ SP/CL EAR to clear the sett ing bac k to 00:00
5. After setting, press ST/SP/CLEAR to start the timer. TIMER will blink indicating
the countdown timer is running.
6. To pause the countd own process, press the ST /SP/CLEAR button . The TIMER
becomes solid. Press th e ST/SP/CLEAR button to c ontinue the timer.
7. When countdown timer reaches 00:00, an alarm will sound and backlight will be
on for one minute.
Note: When the timer counts down below 1 hour 1:00, the display will automatically
change to 59'59” to i ndica te, 59 minutes 59 sec onds. The se conds will be shown
counting down th en. When the countdow n reache s 0'00” the timer starts counting
up and it will beep for 6 0 secon ds. Press any butto n to stop t he timer.
-7--6-
 Loading...