

EN
Digital Food Thermometer
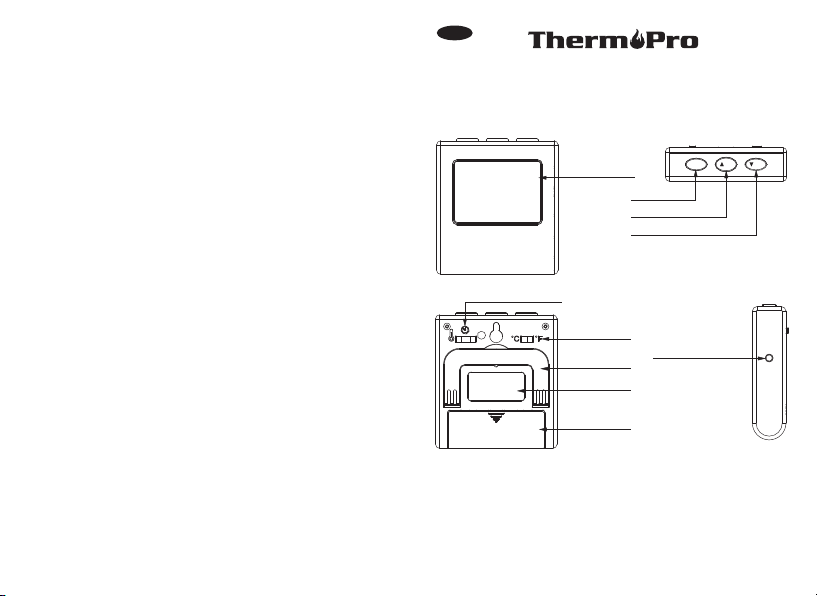
Key Definition
Mod e Selec tor
Model No. TP-16
LCD S creen
MEM S /S Butt on
Up Arrow/H R Button
Dow n Arr ow/ MIN B utton
MEM/S /S
/MIN
/HR
˚F or ˚ C Selec tor
Flip -out Coun ter Top Stand
Bat tery Co mpart ment
Tempe ratur e Probe S ocket
Mag net
Keys Definition
1. Temperature Probe Socket: Insert temperature probe into this
socket to measure meat temperature.
2. LCD Screen: Displays meat temperature and set temperature
while in cook mod e. Displays co unt dow n timer whe n in timer
-1-

mode.
3. MEM|S/S Button: Press the MEM button while in cook mode to
enable the option to adjust quic k temperat ure settings. Pr ess
again to save selection. Press the S/S button when in timer mode
to begin the count-down timer. Press the S/S button to pause or
restart the timer. When the countdown timer hits 0:00 press the
S/S button to silence the unit.
4. Up Arro w/HR Butt on: Pr ess the up arrow to se lect food types
while in qu ick temperature setting. Pre ss th e up arrow to set
your desired cooking temperature while in manual temperature
setti ng. Press the HR button to set hours while in timer mode.
To clear time, press the HR and MIN buttons at the same time.
5. Down Arrow/ MIN Button: Press the down arrow to select food
types while in quick temperature setting. Press the down arrow
to set yo ur desire d cooking temperature while in the manual
temperature setting. Press the MIN button to set minutes while
in timer mode. To clear time, press the HR and MIN buttons at
the same time.
6. F or ˚C Selector: Move the switch towards ˚F or ˚C, depending
˚
on how you would like your temperature displayed.
7. M od e Se le ct or : Mo ve t he pos it io n of the selector to select
co ok m od e, t im er m ode or p ower o ff t he d evic e.
8. Flip -o ut Coun te r Top Stand : All ows user to p la ce devi ce on
count er f or easy v ie wing.
9. Magnet: Allows user to stick device to a metal surface. For example,
a refrigerator.
10 . Bat te ry Co mp artme nt: R em ove b atter y cov er to i nsert 1
AAA batt er y.
Note: This unit is designed to remotely monitor cooking progress.
Do not remove the probe during cooking. The internal temperature
will be displayed on the remote unit outside of the oven.
-2-
FEATUR ES AND SPECIFICATI ON S
Pro gr ammable a lert with p reset tem peratur es for spec ific
foo ds .
23-ho ur, 59-min ute count down time r.
Sta in less stee l tempera ture prob e with stee l mesh cabl e.
Tempera ture range of probe* : 32˚F to 482˚F (0˚C to 250˚C) .
Temperat ure tolera nce of in terna l food readi ng**: + /-1.8 ˚F
(+/ -1.0˚ C).
Tempe rature re adings in ˚ F or ˚C.
Fli p- out cou nt er top st an d and magne t.
Use s on e AAA battery ( include d).
* The probe is not designed to perform as an oven thermometer.
If p ro be i s not inserted in to f ood, t he tem pera ture r eadi ng of
ove n heat above 2 00˚ F (93˚C ) wil l be accurat e to wi thin 1˚ F to
5˚F (0.5˚C to 2. 7˚C).
** The internal food reading temperature range is: 145˚F to 185˚F
(63˚ C to 85˚C).
BATT ERY INS TALLATION/SET UP
Sli de op en th e battery co mpartmen t doo r at th e back of the
unit.
Insert one (1) AAA battery according to the polarity markings.
Repla ce the batt ery compa rtment do or.
Remov e the print ed vinyl la bel from th e LCD scree n.
IMPORTAN T NO TE S/ WAR NI NG
Thi s pr oduct is no t for use in mi crowave o vens.
Keep ou t of reach of c hildren .
Do no t tou ch ho t probe or wire wit h bar e hands or just aft er
coo king. Alw ays wear a heat-r esi stant glov e.
Do not ex pose prob e di rectl y to f lame. Doi ng so will ca us e
-3-

wire to deterio rate.
When n ot i n use, slide th e mo de selector s wi tc h to t he off
positi on O to c on se rv e the battery.
Be sure to use a new, good quality alkaline battery and replace
it of ten . A weak ba tte ry will caus e the u nit to lose accur acy.
Always dispose of exha usted ba tte ries saf ely.
A food thermom eter can ass ist in the proper p reparati on of
food. How eve r, use of this electronic device doe s not guard
against unsafe food handling practices. Always follow proper
food preparation tech niqu es t o li mi t th e ri sk o f fo od b or ne
ill ness.
Th e sta inl es s ste el wi re pr ob e sho uld n ot be e xpo se d to
ov en t em per at ure s exc eed in g 482 ˚F (2 50˚C) .
Do not let probe or cable come into direct cont act wi th t he
oven el ements, as th is will resul t in faulty readi ng s an d/or
damage.
If the t em perature exceeds o r fa ll s be lo w th e me as ur ab le
ranges , th e LC D screen will d is pl ay t he following lett er s:
HHH for temperatures above range and L L L for temperatures
below ra ng e.
OPERATIN G IN ST RU CT IO NS
Using t he Cookin g Therm ometer
Clean the stainle ss tem pe rature probe with hot water and
soap and rin se cle an. Do not sub merge the probe and cable
in w ater. The p ro be / ca bl e co nn ec ti on i s not wa terp ro of .
Plug the te mpe rat ure probe into the socket on the right side
of the main unit.
Make sure th e pr ob e ca bl e is f ree of k no ts . Ma ke sur e th e
sen sor plu g on the en d of th e cord is p lugge d into th e base
unit. (Note: if the probe is not plugged in properly or is crimped,
-4-
the disp lay w ill s how L LL. )
Slide t he s witch on the ba ck o f the base unit t o di splay the
tempe ra ture in ˚F o r ˚C.
Slide t he mode sel ector swi tch to the co ok positi on “ ”.
You wi ll s ee two t em pe ra tures on t he L CD d is play. On the
left actual temperat ure re ad in g as m ea su re d by t he is the
tem pe ratur e probe a nd o n the rig ht is the s et temper ature .
The default reading is 212˚F
Set your desired c ooking t emperature by ch oo sing Q ui ck
Tempe rature Se tting o r Manua l Tempera ture Se tting . (see
Section Quick Temperature Setting and Manual Temperature
Setting)
Insert the tip of the temperature probe at least 5 cm/2” into the
thickest part of the meat, but not near bone or gristle.
Place food into the oven. Before closing the oven door, make
sure there is enou gh slack in the steel mesh cable to prevent
the probe from being pulled out of the food when the oven door
is closed . Th e base unit must be p ositioned outsi de o f th e
oven on a stable surface and must be firmly connected to the
tempera ture probe.
To preve nt damage to the base u nit , it should not be placed
on a hot surface.
Wh en th e int ern al te mp eratu re of y our f oo d rea ches th e
te mp er at ure you h av e se t, an a ud ib le aler t wi ll soun d. To
st op th e ale rt, e ither s lid e the m ode s el ect or sw it ch to O
or di sc onn ect t he te mpe ra tur e p ro be fr om th e bas e uni t
an d the a lar m wil l sto p wit hi n 30 sec on ds.
Before removing the food from the oven, disconnect the steel
mesh cable from the base unit. Do not touch hot probe or wire
wit h bar e han ds du rin g or ju st af ter c ook ing. Always wear a
heat-resistant glove.
-5-
Quick Temperature Setting
Your digital cooking thermometer is programmed with preset temperatures
for various cooking levels; poultry (185˚F), beef well (170˚F), veal/pork
(170˚F), beef medium (160˚F), ham (160˚F) and beef rare/fish (145˚F).
Fol low these steps:
Press the MEM button.
Press “ ” or “ ” to select your food type.
Press MEM to confirm and lock in the setting.
NOTE: You can make manua l adjustments to the preset temper atures
by pressing “ ” or “ ”. Press and hold the button for fast setting.
PR ESE T TEM PER AT URE COO KING CHA RT:
PRESET
TYPE
HEADING
FISH
BEEF RARE
HAM
BEEF
MEDIUM
VEAL
PORK
BEEF WELL
POULTRY
Beef (roasts, steaks & chops) - Rare
Beef (roasts, steaks & chops) – Medium
Pork (roasts, steaks, chops, sausages) –
Veal (steaks, roasts, tenderized or non-
Pork (roasts, steaks, chops, sausages) –
Beef (roasts, steaks & chops) – Well
FOOD
TYPE
Fish
Egg dishes
Ham (Raw) – Note: Precooked
Ham (140˚F)
Medium (Pink)
Ground Meats (beef, veal, pork)
tenderized cuts) – Well Done
Well Done
Poultry (chicken, turkey) – Whole
Duck & Goose
-6-
RECOMMENDED
INTERNAL
TEMPERATURE
145˚F/63˚C
160˚F/71˚C
160˚F/71˚C
170˚F/77˚C
170˚F/77˚C
185˚F/85˚C
Manual Temperature Setting
For manua l sett ing , pres s “ ” or “ ” to s et your de sired
coo king tem perat ure.
Refer to the ‘Preset Temperature Cooking Chart’ for recommended
internal temperatures.
COUNTDOWN TIMER
Your c ountd ow n timer can o pe rate as a tim er o nly or it can be
used wh il e the cooki ng t hermome te r is in opera ti on.
Sli de th e mode selector s wit ch on the back of the base unit
to t he time r po siti on .
Pre ss H R to set th e ho urs and MIN t o set the m in utes.
Press S/S (start/stop) to start the countdown timer. The colon
between hours and minutes will flash.
When the time r gets to 0:00, the alar m will sound. Press S/S
to sil enc e the al arm . This unit has a timing me mor y and wi ll
aut omati cally disp lay he or igina l tim er sett ing when S/S i s
t
pressed to silence the alarm.
To clear the time, press the HR and MIN button s at the same
time. You can pause th e timer while it is runni ng by pressin g
S/S . Pr ess S/S a ga in to res ta rt the ti me r.
If you are using the timer and therm omet er at the same time,
you m ay
slide the selector switch back to the cook positio n
during the ti ming se ssion to view the cooking temperatures.
The timer will continue the cou ntdown.
CLEANING AND CARE
Unit is not wa terproof. Do not exp ose plug of probe or plug in hole to any liquid, which will result in a bad connection and
faulty readings.
-7-

The probe an d ca bl e ar e no t dish wa sh er s af e. T he y mu st
be hand wa sh ed u si ng h ot wat er a nd s oap. M ak e su re to
rinse and dr y th e 0probe thoroughly before storing.
Do n ot subm er ge the ba se unit i n water o r expos e to any
cor rosiv e cle aning m ateri als. Wi pe with d amp clo th.
LIMITED 90 DAYS WARRANTY
The rmo Pro w arr ants this product to be free of def ects in pa rts,
mat eri als and wo rkmanship for a pe riod of 90 d ays, fro m dat e
of purch ase .
Should any rep airs or servicing under this warra nty be required,
contact
Customer Service by phone or email for instr ucti ons on
how to pack and ship the prod uct to ThermoPro.
DE
Digital Lebensmittel-Thermometer
Modell Nr. TP-16
Tast en D ef in it io n
LCD -Anze ige
MEM/S /S
ME| S/S-Tas te
Up Arr ow/HR Tast e
Dow n Arr ow/ MIN Tast e
/MIN
/HR
CUSTO ME R SE RVICE
Telepho ne: 1-877 -515-77 97(USA & Can ada only)
Ema il : service @buythe rmopro. com
Hours : Weekd ays 9:00 AM- 5 :00 PM EST
Thi s war ranty g ive s you specif ic legal rig hts a nd you may als o
hav e oth er righ ts whi ch va ry from stat e to st ate.
-8-
Mod us- Wahl schal ter
˚F or ˚ C- Wahls chalt er
Tempe ratur fühle r Ans chlus s-Buc hse
Sta ndfuß
Mag net
Bat terie fach
Bedientasten
1. Temperaturfühler Anschluss-Buchse: Stecken Temperaturfühler
in diese Buchse, um Fleisch Temperatur zu messen.
2. LC D- Anzei ge: Zeigt d ie Flei sc htemp eratur an u nd stel lete
-9-

Temperatur im Koch-Modus. Zeigt Countdown-Timer im Timer
Mod us .
3. M E| S/ S- Taste: Dr üc ke n Si e die „MEM” - Taste, währen d in
Koch- Modus, um die Option schnelle Temperatureinstellungen
zu aktivieren, drücken Sie erneut diese Taste, um Ihre Auswahl
zu spei chern. Dr üc ken Sie d ie “ S/S”- Tast e, wenn im Tim er Modus, um den Co untdown zu starten. Drücken Sie die “S/S”
-Taste, um den Timer anzuh al te n de r erneut starte n. W enn
o
der Coun tdown-Timer trifft 0:00 dr ück en Sie “S/S” (An/Aus) ,
um den Alarm abzustel len.
4. Up Arrow/HR Taste: Drück en Si e die “ Up Arrow” -Taste, um
L eb ens- mitt elt ypen in sch nel le Temp erat ure inst ellu ng
au szu wä hlen. Dr üc ken S ie di e „ Up Arr ow” Tas te, u m die
gewünschte Gartemperatur einzustellen, während im manuellen
Tem pe ratur einst ellun g. Dr ück en Si e die “ HR” - Tas te , um
Stunden im Timer Modus einzustellen. Um die Time -An zeige
au f 0:0 0 zur üc kzu se tzen dr ücken S ie di e “HR ” und “ MIN”
Tasten glei chz eitig.
5. Down Arrow/ MIN Taste: Drücken Sie die “Down Arrow” -Taste,
Le be num sm it te ltypen in s chnelle Temper at ur einstel lu ng
aus zuw ählen . Drü cken Sie die “Dow n Arro w” -Taste, um die
g ewü nsch te G ar-t empe ratu r ei nzu stel le n, währ end i m
man uellen Temperatur- einst ellung. Dr ücken Sie di e “MIN” Taste, um Minuten im Timer Modus einzustellen. Um die Timer Anze ige auf 0 :00 zur ückzu setze n drücken S ie die “H R” und
“M IN ” Tas te n gle ic hz eitig .
6. F or ˚C- Wahlschalter: Schieben Sie den Schalter in Richtung ˚
˚F oder ˚C, in jedem anderen Modus wird zwischen °F und °C
umgescha ltet.
7. Mo dus -Wa hl sch alt er: Ver sch ieb en Sie di e P osi tio n d es
Wahlsc halte r auf Koc h-Mod us, Time r-Mod us oder s chalt en
Sie da s Ger ät aus .
-10 -
8. Standfu ß: Ausklappbar, zum Aufstellen auf einer Tisch platte.
9. Magnet: Erm ögl icht dem Be nut zer das Gerät an eine
Metalloberflä che haften. Z.B. Kü hls chr ank .
10. Bat teriefa ch: für ein AA A-Batte rien
Hin weis: D as Th ermomete r dient d azu, den Gar grad aus der
Entfernung zu überprüfen. Den Temperaturfühler während des
Garvorgangs nicht herausz iehe n. Die Temper atur des Brat guts
wird auf dem Display des The rmo met ers außerhalb des Ofens
angezeigt.
Gerätdaten:
Prog rammier barer Alarm und vore instell bare Tempe raturen
fü r sp ez iel le Le be nsmit te l.
Timer bi s 23 S tunden 59 M inuten.
Tempera turfühl er aus Edel stahl und K abel.
Temperaturb ereich des Thermo meters* 0˚ C bis 250˚C(32°F
bis 482 °F).
Anzei ge toleranz de s Le be nsmitte rt emperat ur ** : +/-1.0˚ C
(+/-1 .8 ˚F).
Tempera turanze ige in C oder °F.°
Abneh mbare und m agnetis che Stati on.
Benöt igt eine AAA -Batter ie ( im Liefe rumfang e nthalte n).
* Die Sonde ist nicht dafür ausge leg t, al s Ofe nthermomete r zu
fungi eren. Wenn die Son denicht i n Lebensm itteln ei ngesetz t
ist, wi rd die Temp eratura nzeige de r Ofenhit ze über 93° C
( ) wi rd m it einer Ge na ui gkei t von bis ( 20 0° F 0. 5° C 2. 7° C 1° F
bi s 5° F) gemess en .
** Der interne Nahrungstemperaturmessbereich: bis 63°C 85°C
(145 bi s ).°F 185° F
-11 -

EINSETZEN DER BATT ER IE
Da s Ba tte rief ach a uf dem Rüc ksei te d es G erä ts d urc h
Sc hieb en ö ffn en.
Ein e (1 ) AAA-Ba tteri e ei nsetz en und da be i auf die r ichti ge
Pol ari tät achten.
Den Dek el des Batt eriefac hs wieder e insetze n.
Das bedruc kte vi nyl-Eti kett von der LCD-A nzeige abzieh en.
WICHTIGE HINWEISE / WARNUNG
Nicht e inem Mikr owellen herd verw enden.
Außer R eichwei te von Kind ern aufbe wahren.
Den heiß en Temperaturfüh ler oder das Ka bel während des
Gar - ode r direk t danac h nic ht mit bl oßen Hä nden vor gangs
be rü hren. I mm er hitz eb eständi ge Hand sc huhe tr ag en.
Den Temperaturfü hler nicht offenem Fe uer au ssetzen. Dies
kön nte Ka bel beschädig en.das
Ist das Thermometer nicht in Betrieb, den Modus-Wahlschalter
auf 0 ste llen, um die B att erie zu scho nen.Pos ition
Neue, qualitativ hochwertige alkalische Batterien verwenden
un d di ese hä ufig er w ech seln . Ei ne sch wach e Ba tte rie
ve rs c hle ch t e d ie P räzi si o n d es G erät es . Abge nu tzte
Ba tter ie i mme r in ge eign eten Be hält ern e nts orge n.
Der Temperaturfühler aus Edelstahl darf bei einer Temperatur
über (48 2°F) nicht verwendet we rde n.250 °C
Der Temperatur fühler und das Kabl e dürfen nicht in direkten
kontakt heizstäben gebracht werden, dies könnte die mit den
Temperatur-nahme verfälschen oder den Fühler beschädigen.
-12 -
GEBRAUCHSANLEITUNG
Vervwe ndung des G arthe rm ometers
Den Temperaturfühler aus Edelstahl mit warmen Seifenwasser
rei ni gen und a bs pülen . Fü hler un d Ka ble nic ht i ns Wa sser
tauchen .
Die Ver bi nd ung zw isch en Temperaturfü hl er u nd k abel i st
ni ch t wa sserfes t.
Das Thermometer in die Stec kdose an der rechten Seite der
Basisstation einstecken.
Überprüfen Sie, dass der Draht de s Temper atu rfü hle rs sich
nic ht ve rknot et ha t.
Den schalter auf der Rückse ite de s Geräts auf Position “°C”
oder “°F” stellen.
Den Mod us-Wahlsch alter auf P osition “ ” S te llen, w ie a uf
der Zei chung des Thermo meters da rg estel lt .
Die LCD-Anzeige zeigt zwe i Temperaturen an. Die vom Garth ermo mete r ta tsä chl ich g eme sse ne Te mp erat ur w irk
linksangezeigt, d ie ge wü ns ch te Te mp er at u r r ec ht s.
Sta nd ardmä ßig zeigt d as Th ermomet er 100° C( 212°F ) an.
Di e Gar te mpe ra tur e in stell en du rch Au swa hl de r Opt io n
Sc hn ell -r eguli er ung Temp er atur od er ma nu ell e
Tempe ra turre gul ie rung.
De n Füh ler mi nde s 2cm /2* ti ef in di e dick ste St ell e des
Fl eis chs tüc ks tec ken , ohn e alle rdi ngs Kn och en zu eins
be rüh ren .
Da s Ger ic ht in d en Of en St el len. Vor de m Sch li eßen de r
Of ent ür si che rs tel le n, da ss de r Sta hldra ht au sre ic hen d
Rau m hat, damit d er Fühler ko rrekt a m Pla tz blei bt, sobald
die O fe ntüre g es chlos se n wird. D ie Basiss tation mu ss auf
einem Stabilien Untergrun d, außer -ha lb de s Ofens, stehen
un d ko rrek t mit dem F üh ler verbu nd en sein.
-13 -

Nicht auf e ine he iße Oberfläch e st el le n, damit die Statio n
ni ch t wi rd .be sc häd ig t
Sob ald die vorgese hene Tempe rat ur erreich t ist, ertönt ein
Signal. Alarm abzustellen, den Modus-Wahlschalter Um den
auf Pos ition 0 ste llen oder d en Stecke r des Fühle r aus der
basisst at io n de s Ge räts heraus ziehen. Das Signa l stoppt
nach 30 S ekunden .
Vor d em Hera us nehm en des Ge rich ts aus de m Ofen da s
Kab el aus de r Basisst ation d es Gerä ts hera usziehe n. Den
he ißen Tem per atur füh ler o de r de n Dr ah t wä hre nd d es
Ga rvor gan gs o der di rekt da nach ni cht blo ßen Hän den
be rü hr en. Imm er h itzebes tä nd ige H an ds chuh e tra ge n.
SCHNELLREGULIERUNG DER TEMPERATU R
Da s Ga rthe rmom eter ist mi t voreing es te llte n Temp eraturen
pro-gra mmiert, je nach untersc hied licher Garstu fe: Ge flügel
85 °C, Ri nd-f lei sch , gu t d urc hge gar t(7 7°C ) Ka lb/ Sch wei n
(77° C),Rindfleisch, halb durch gegart (71 °C) sowi e Rindflei sch,
blu tig/F isch( 63 °C) Ge hen Sie w ie folg t vor:
Den Kno pf “MEM” dr ücken.
“ ” oder “ ” drücken, um die Art des Gargutes auszuwählen.
“M EM ” drü ck en um d ie Ei ns tellu ng zu b estät ig en un d zu
speichern.
HINWEIS: Sie können die voreingest ellten Temperatur manuell
veränd ern , Sie “ ” ode r “ ” drücken. Für d ie indem
Schnel lei nst ell ung den Kn opf gedr ück t hal ten .
-14 -
TEMPERATUR TABELLE:
Anzei ge -Begrif f
für die
Einst ellung
FISH
BEEF RARE
HAM
BEEF
MEDIUM
VEAL
PORK
BEEF WELL
POULTRY
Kal b- u nd S chw ei nef leisc h,
Rin dflei sch,g ut durc hgega rt
Typ
Leben smittel
Fis ch , Rin df lei sch,blu ti g
Roh er Schi nken,
Ger ichte a uf Eier basis
Rin dflei sh,ha lbgar,
Sch weine fleis ch,ha lbgar,
Hac kflei sh
gut d urchg egart
Gef lügel i m Ganze n
Empfo hlene
Innen tempera tu r
145˚F/63˚C
160˚F/71˚C
160˚F/71˚C
170˚F/77˚C
170˚F/77˚C
185˚F/85˚C
MANUELLE TEMPERATU RR EG UL IE RU NG
Im m
anue
l
l
e
Mo
d
us
” oder
“
“ ” z
R
ur
eg uli
Ga
r
t
em p
e
r
at ur d
rü cke
n.
er
Die Tabelle d er vor ei ngestellt en Temperaturen beach te n,
um d ie Inne nt em pe ra ture n zu erha lt en .empf oh le ne n
TIMER
Der Timer kann alle in oder mit Tempe raturfühler verwendet
werden.
-15 -
un g d
e
r

Den Modus-wahlschalter auf der Rückseite des Temperaturfühlers auf Position “ ” dargest ellt durch ei ne Uhr, stellen.
Au f “HR” dr ücken z ur Eins te llung d er Stun de n sowie a uf
“MI N” z ur Einst ellun g de r Minut en.
“S/S” (An/auf) drücken, um den Timer zu starten. Der Doppelpunkt
zwischen den Stunden und den Minuten blinkt.
So bal d der Tim er “0 :00 ” anz ei gt, e rtö nt ei n Sig na l “S/ S”
(A n/ Aus ) um de n Alar m abz ust el len. Da s zei gt dr üc ken ,
das Gerät a utom atisch die zuvo r eing estellte ze it an.
Um d ie Tim er a uf Null z ur ückzuse tz en , gleic hz ei tig “HR ”
un d “M IN” drü ck en .
Um den Tim er vorübe rgehe nd a nzuha lten, “ S/S” drüc ken.
Dan ac h dense lben Kn opf drü cken,um d ie Timer e rneut z u
sta rten.
Be i Ver wen dun g des Ti me rs mit de m Temp era tur füh ler
gege be nf a lls d en M od us-Wa hl schalt er währ en d de r
Mi nut ena nze ige a uf Pos iti on Ga run g zur ück ste lle n,u m
di e Ga rtemp er at ur zu ü be rprüfen . De r Time r beg in nt mit
de m Coun tdo wn.
WARTUNG UND REINIGUNG
Das Gerät is nicht wasserfest. Der Stecker des Temperaturfühlers
sowie die Steckdose dürfen mit keinerlei Flüssigkeit in Berührung
kommen, das so eine schleckte Verbindung zustande Kommen
könnte und falsch Ergebnisse angezeigt werden.
Temperaturfühler und Kabel nicht in die Geschirrspülmaschine
geben. Sie müssen mit einem feuchten Tuch reinigen.
90 TAG E BE SC HR ÄN KT E GA RA NT IE
ThermoPro garantiert fü r einen Zeitraum vo n 90 Tagen ab dem
Ka uf da tum, dass d ie ses Pro du kt frei v on Mäng el n in Teil en ,
Material und Verar beitung ist .
Sollten Reparaturen oder Wartungen im Rahmen dieser Garantie
erforderlich sein, kontaktieren Sie für Anleitungen zum Verpacken
und Versenden des Produkts an ThermoPro den Kundenservice
per Telefon oder E-Mail.
KUNDENSERVI CE
Telefon : 1-877-5 15-7797 ( nur in US&C A verfügba r)
E-M ai l: servic e@buyth ermopro .com
Öff nungsze iten: Wochenta gs 09:00 - 17 :00 Uhr EST
Diese Garantie gibt Ihnen bestimmte Rechte und eventuell haben
Sie zudem andere Rechte, die von Staat zu Staat variieren.
-16 -
-17 -

FR
Thermomètre numérique pour Aliments
Modèle No. TP-16
Aperçu de l'Appareil
Écr an LCD
Sél ecteu r du Mode
Sél ecteu r °F ou °C
App ui pour p oser
Aim ant
Com parti ment de l a Pile
MEM/S /S
Bou ton MEM S /S
Bou ton Flè che Hau t/Max
Bou ton Flè che Bas /Min
Sor tie de la Ti ge de Tempé ratur e
/MIN
/HR
Aperçu de l'Appareil
1. Temp erature P robe Sock et: Insér ez la tige de t empérat ure
dan s ce tte ouv er ture po ur m esurer la t empérat ure de la
via nd e.
2. Écran LCD: Affiche la température de la viande et la température
-18 -
cal cu lée en mode c uisine. Affiche l e minuteu r en mode
min ut eur.
3. Bo ut on MEM|S/ S: Appuyez s ur le bouto n MEM en mode
cuisine pour que l'option ajuste les paramètres de température
rap id e. Appuyez à n ouveau po ur sauveg arder la sé lection .
Appuy ez sur le bouton S/S en mode minute ur pour démarrer
le com pte à rebours. Appuyez sur le bouton S/S pou r arrêter
ou r ed ém ar re r le minuteur. Q ua nd l e mi nute ur a ttei nt 0 :00
app uy ez sur le b ou ton S/S pou r éteindr e la sonner ie.
4. Bouton Flèch e Haut /HR: Ap puyez sur la flèche haute pou r
sél ec tionner d es types d' aliment a vec les par amètres d e
tem pé ratur e ra pides. App uyez sur la f lèche hau te pour
programmer votre température de cuisson avec les paramètres
de te mp ératu re m anuels. Ap puyez sur l e bouton HR p our
par amétr er les he ures av ec le m ode min uteur. P our efface r
le temps programmé, appuyez en même temps sur les boutons
MIN e t HR .
5. Bo ut on Flèche B as/MIN: Ap puyez sur l a flèche ha ute pour
sél ec tionner d es types d' aliment a vec les par amètres d e
tem pé ratur e ra pides. App uyez sur la f lèche hau te pour
programmer votre température de cuisson avec les paramètres
de te mp ératu re m anuels. Ap puyez sur l e bouton MI N pour
paramétrer les minutes avec le mode minuteur. Pour eff acer
le temps programmé, appuyez en même temps sur les boutons
MIN e t HR .
6. Sé le cteur °F/ °C: Pou ss ez le bouto n vers °F ou °C , selon
vot re c hoix d' un ité.
7. Mode Sélecteur: Poussez le bouton du sélecteur pour ch oisir
le mode de cuisson, le mode minuteur ou éte indre l'appareil.
8. Appui p our poser : Pour pouv oir poser l 'appare il sur le pla n
de tr av ail pour un e utilisa tion faci lité.
-19 -

9. Aim ants: P our pou voir ac croch er l'ap parei l sur une s urfac e
en mé ta l. Par ex em ple, un r éf rigérat eur.
10. Compartiment de la pile : Enlevez le cache du compartiment
pour insérer une pile AAA.
Note: Ce t ap pa reil e st conçu pour c on tr ôl er l e proc essu s de
cuiss on. Ne pas en lever la ti ge pendan t la cuisso n. La
temp ér at ur e in tern e sera affichée s ur l 'u nité à l'extérieu r du
fou r.
FONCTIONNALITÉS ET SPÉCIFICITÉS
Alerte programmable avec des températures prédéfinies
pour des a liments spécifiques.
Minut eur de 23 heu res et 59 min utes.
Tige de temp érature e n acier ino xydable e t un câble en
acier t ressé.
Tempéra tures lim ites de la ti ge*: jusq u' à (
à 482°F ) .
Toléran ce à la tempé rature de l a mesure in terne des
alime nts** : ± 1,0 ° C (± 1,8° F) .
Mesur es de la temp érature e n ou .°C °F
Appui p our poser e t aimants .
Uti li se une pile AA A (incluse ).
*La tige n 'e st p as c on çu e co mm e un t he rm om èt re d e fo ur. Si
la t ig e n' est pas ins ér ée s ur dans les a li me nts, l a mesure de
la te mpéra ture de la chaleur d u four au -delà d e ( ) 93° C 200 °F
se ra e xa cte dans la l imit e de ju sq u' à ( 0, 5° C 2 .7 °C 1° F
jusqu ' 5°Fà ).
**Les t empérat ures limi tes de la mes ure inter ne des alim ents
est : 63° C jusqu'à 8 5°C (145° F jusqu'à 1 85°F).
0°C 25 0° C 32°F
-20 -
POSE DE LA PILE/INSTALLATI ON
Ouv re z le compar timent de l a pile au dos d e l'unité .
Ins ér ez une (1) pi le AAA en respe ctant les p olarité s.
Repla cez le couv ercle du co mpartim ent de la pil e.
Retir ez l'étiq uette en pl astique i mprimée d e l'écran L CD.
NOTES IMPORTAN TE S/ ATTENTION
Ce produit ne doit pas être uti lisé dans un four micro-ondes.
Gar de z-le hors d e la portée d es enfant s.
Ne pas to ucher la tige chaude ou le fil à mains nu es ou juste
apr ès la cui ss on. Por tez tou jours d es gant s résista nts à la
chale ur.
De n e pas e xpose r la ti ge di re cteme nt à la f lamme . Cel a
ca us erait u ne dé té riora ti on du f il.
Quand vous ne l'utilisez pas, poussez le bouton de sélection .
de mode vers off po ur conserver la pile.
Uti li sez une pil e alcalin e neuve et de b onne qual ité et
rempl acez-la s ouvent. U ne pile fai ble ferai t perdre à
l'a ppare il son exact itude . Jetez les pi les usa gées dans le s
poube lles prév ues à cet effet.
Un thermomètre aliment air e peu t vous aider à préparer les
repas. Cependant, l'utilisation de cet appareil électrique ne
pr évi ent p as l'h ygi ène d es mat ièr es pr emi ère s o u d e la
prép aration . Suiv ez tou jours des te chnique s de prépara tion
de plat s adéquat es pour lim iter les ri sques san itaires .
La ti ge e n acier ino xydable n e doit pas êt re exposé e à des
tem pé ratures d e four supé rieures à 2 50°C (482 °F).
Ne lai sse z ni la ti ge ni le câble entr er en contact direct avec
des él éments du four, ce qu i pourrai t provoqu er des erreurs
de mesu res et/ou d es dommag es.
-21 -

Si la tem pé ratur e e st su périe ur e a ux limit es mesurab les,
l'écr an LCD affichera l es lettre s suivant es : HHH pour u ne
tem pé rature su pé rieur e à la lim it e mesurab le, et L LL po ur
une tem pératur e inférie ure à la limi te mesura ble.
INSTRUCTIONS DE FONCTIONNEMENT
Pour ut iliser le t hermomè tre alime ntaire
Netto yez la tige de te mpératu re en acier i noxyd ab le a ve c
de l'eau chau de e t du s av on, puis rinc ez à l'e au c la ire. Ne
pas plo nger la tig e et le câble d ans l'eau . La connex ion de
la ti ge e t du câble n' est pas wat erproof .
Enfo ncez la tige de température dan s l'ouvert ure su r le côté
droit d e l'unité p rincipa le.
Véri fiez que la tige ne comporte pas de nœ uds. Vérifiez que
le capte ur au bout du câble est bien en cle nché dans l' uni té
principale. (Note : si la tige n 'est p as b ie n in st allée ou e st
tor du e, l'écra n affic hera LLL) .
Pouss ez le bouto n au dos de l'u nité pour a ffich er des
tem pé ratures e n °F ou °C.
Po us se z le bo ut on du s él ec teur de m od e vers la p os ition
cu is so n .
Vous ver rez deux te mpératu res sur l'é cran LCD. A gau che
est la température actuelle mesurée par la tige de température
et à dr oi te la tempé rature pr ogrammé e. La mesur e par
défau t est ( ).100°C 21 2° F
Chois is se z votre tem pé ra ture de cui sson en modif ia nt l es
par amètr es de tem pérat ure rap ides, o u les par amètr es de
te mpé rat ure man uel s. (Vo ir la sec tio n : pa ram ètr es de
température rapides et paramètres de température manuels).
Insérez le bout de la tig e de tem pérature à au moins 5cm/2''
-22 -
de profondeur dans la pa rtie l a pl us é pa is se d e la v ia nd e,
mais lo in des os et de s tendons .
Pl ac ez le p lat d an s le fo ur. Ava nt de r eferm er la p or te du
four, vé rifiez qu e le câble so it assez lâ che pour qu e la tige
ne t om be pas du p la t quand l a po rt e du four s er a fermée.
L'u nit é principa le do it êt re po sitionné e à l'e xtérieur du four
sur une s urface st able et doi t être ferm ement con nectée à
la ti ge d e tempéra ture.
Pour év iter les do mmages ca usés à l'un ité princ ipale, el le
ne doit p as être pla cée sur une s urface ch aude.
Quand la tem pérature interne des ali ments att eint cell e que
vous avez sélectionnée, une alerte sonore se met en marche.
Pour arrêter l'alerte, poussez le bouton du sélecteur de mode
ve rs 0 ou déc onn ec tez la ti ge de te mpé rat ur e de l 'un ité
princip ale et la sonn erie s'ar rêtera au bout de 30 secondes.
Avant de sortir le plat du four, déconnectez le câble en acier
tressé d e l' un it é pr inci pa le . Ne touchez ni l e fi l ni la tige à
mains nues pendant ou après avoir cuisiné. Portez toujour s
des gan ts résist ant à la chal eur.
Paramètres de Temp ér at ur e Ra pi de s
Vous th erm omètre alimentaire digi tal est pro gra mmé avec des
tem pératur es préd éfini es pour d es nive aux var iés de cu isine:
vo la il le (85° C) , bœ uf bien c ui t (77°C), v ea u/po rc (7 7° C) ,
bœ uf à p oint (7 1° C) , jambo n (7 1°C) et b œu f ro sé/poisso n
(145° C).
Suive z ces étape s:
Appuy ez sur le bou ton MEM.
Ap puye z su r “ ” ou “ ” p our sél ecti onn er v otr e ty pe
d'ali ment.
Appuyez sur MEM pour confirmer et verrouiller vo tre choix.
-23 -

No te : Vo us pou vez aj ust er man uel lem ent le s p ara mèt res
de s tem pé ratur es pr éd éfini es en a ppuya nt su r “ ” o u “ ”
App uyez et m ainte nez le bo uton po ur un paramé trage r apide .
TABL EA U DE S TE MP ÉR ATURES DE CUISSON
PRÉDÉFINIES
NOM DES
TYPES
PRÉDÉ FINIS
POI SSON
BŒU F ROSE
JAM BON
BŒU F A
POI NT
VE AU
POR C
BŒU F BIEN
CUI T
VOL AIL LES
TYPE
D'ALI MENT
Pois son
Bœu f (rôti s, stea ks et
bro chett es) - ros é
Pla t à base d' œufs
Jam bon (cr u) – Note : P réc uit
Jam bon (14 0°F)
Bœu f (rôti s, stea ks et bro chett es)
– A poi ntPorc ( rôtis , steak s,
bro chett es, sau cisse s) – A poin t
(ro sé)Vi andes h achée s (bœuf ,
vea u, porc )
Veau ( Steak s, rôti s, part ies
ten dres ou n on) – Bie n Cuit
Porc ( rôtis , steak s, broc hette s,
sau cisse s) – Bien C uit
Bœu f (Rôti s, stea ks et bro chett es)
– Bie n Cuit
Vola illes ( Poulet , Dinde ) – Entie r
Can ard et Oi e
-24 -
TEMPÉ RAT URE
INTER NE
RECOM MANDÉE
145˚F/63˚C
160˚F/71˚C
160˚F/71˚C
170˚F/77˚C
170˚F/77˚C
185˚F/85˚C
Paramètres de température manuels
Po ur un pa ra mét ra ge ma nue l, ap pu yez s ur “ ” ou “ ”
po ur pr ogr am mer l a t em pér at ure d e c ui sso n dés ir ée.
Se référer au tableau des températures de cuisson prédéfinies
pour les températures internes recommandées.
MINUTEUR
Votre minuteur pour fonctionner uniquement comme un minuteur
ou bi en il peu t être utilisé en mêm e temps q ue la mes ure de la
tem pé rature de c uisson.
Poussez l e bout on d e sé lection de mode au bas de l'uni té
princ ipale ver s la positi on minute ur
Ap puy ez su r H R pou r c ho isi r les he ur es et MI N pou r les
mi nut es.
Ap pu ye z su r S/S (St ar t/ St op) pour dé ma rr er le min ut eu r.
Les deux points entre les minutes et les heures vont clignoter.
Quan d le minuteur arrive à 0:00, l'alarme sonnera. Appu yez
su r S/ S pour ét ei ndre l'al ar me . L'uni té g ar de le t em ps e n
mémoi re et aff ichera au tomatiq uement le s paramèt res de
minut eur d'ori gine quan d S/S est enc lenché po ur éteind re
l'ala rme.
Pour effacer l e temps, ap puyez sur l es bouton s HR et MIN
en même t emps.
Vous pouvez mettre le minuteur en pause quand il fonctionne
en appu yant sur S/ S. Appuyez à n ouveau su r S/S pour
redém arrer le mi nuteur.
Si vo us u tilisez l e minuteu r et le therm omètre en m ême
tem ps , vous po uv ez pousse r le bouton d u sélecte ur vers
la position cuiss on pendant que le minuteur fonct ionne pour
voir le s tempéra tures de cu isson. Le m inuteur c ontinue ra
de fonc tionner.
-25 -

NETTOYAGE ET ENTRE TIEN
L'uni té n'est pa s waterpr oof. Ne pas p longer l' entrée de l a
tige dans l e li qu ide, ce qui pourr ai t pr ovoquer des e rreurs
d'affichag e et une mauv aise conn exion.
La tige et le câble ne peuvent pas être lavés au lave-vaisselle.
Ils do iv en t êt re l av és à la main en u ti li sa nt d u savo n et de
l' ea u ch aude . Il faut b ie n rince r et s éche r la tige a va nt de
la rang er.
Ne pas plonger l'unité dans l'eau ou l'exposer à des produits
ménage rs co rro sif s. Ne tto yez avec u n chi ffon humide.
GARANTIE LIMITÉE A 90 JO UR S
The rm oPro gara ntit ce pro duit de tou t défaut da ns ses
com posan ts, m atéri aux et fabri cation pen dant une pér iode de
90 jour s, à partir d e la date d'a chat. Si un e réparat ion ou un
servi ce sous gar antie est n écessai re, veuil lez conta cter le
servi ce client p ar téléph one ou cour riel pour d es instru ctions
sur la ma nière d'e mballer e t d'envoy er le colis à Thermo Pro.
SERVI CE C LI EN T
Tél ép hone : 1-87 7-515-7 797 (US & CA seu lement )
Ema il : s ervice@ buyther mopro.c om
Heures d'Ouver tur e : Lundi au Ven dredi de 9:00 à 17:00 heure
locale .
Cette g arantie vous donn e dr oi t à de s di sposition s lé ga le s et
certa ins droits supp lémentaires s el on l 'É tat où vous êtes
domic ilié.
-26 -
 Loading...