

Thermopro TP-11 User Manual
EN
Remote Food Thermometer
Model No. TP-11
Introduction
Congratulations on your purchase of the Professional Remote Cooking Thermometer,
a programmable radio frequency food thermometer. You will now be able to remotely
monitor the time and tempe ratur e of food cooking on yo ur gril l, smoker or oven.
Components
1. 1 - receiver unit.
2. 1 - transmitter unit.
3. 1 - detachable stainles s steel p robe sensor.
4. 2 - 2* AAA batteries.
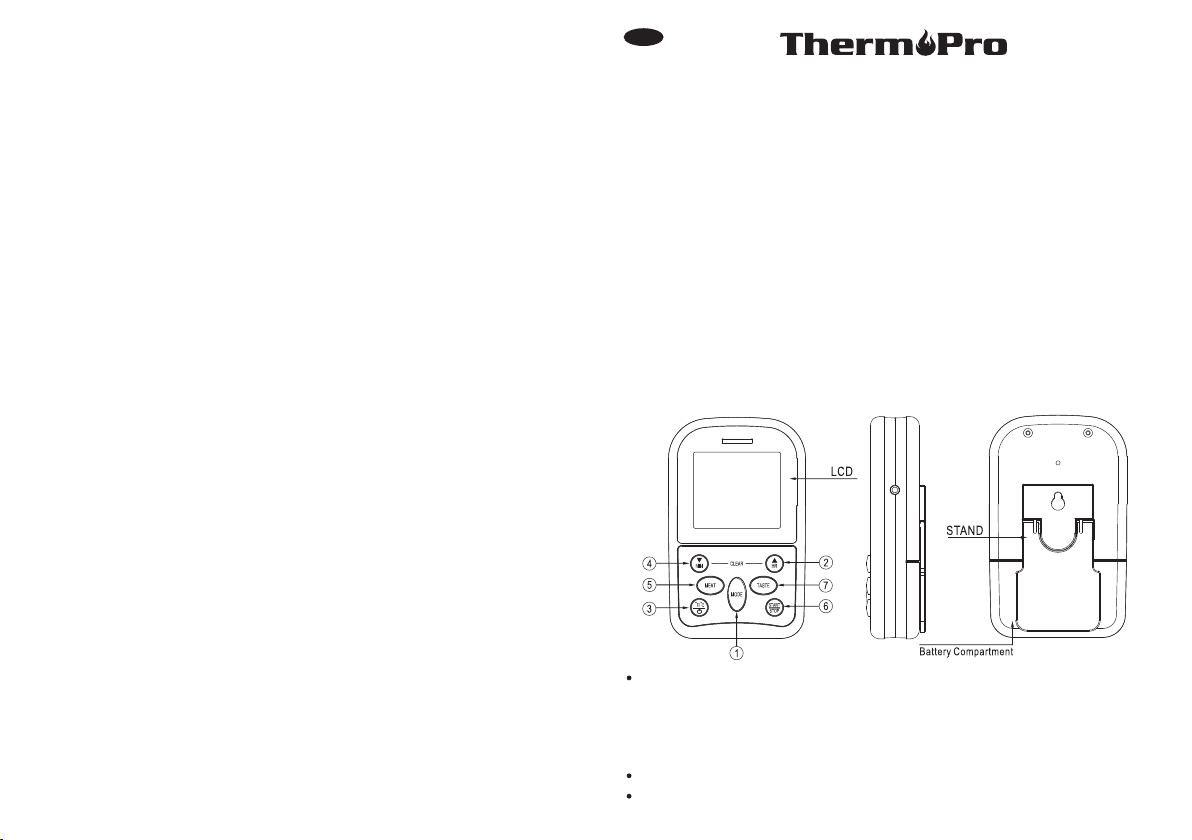
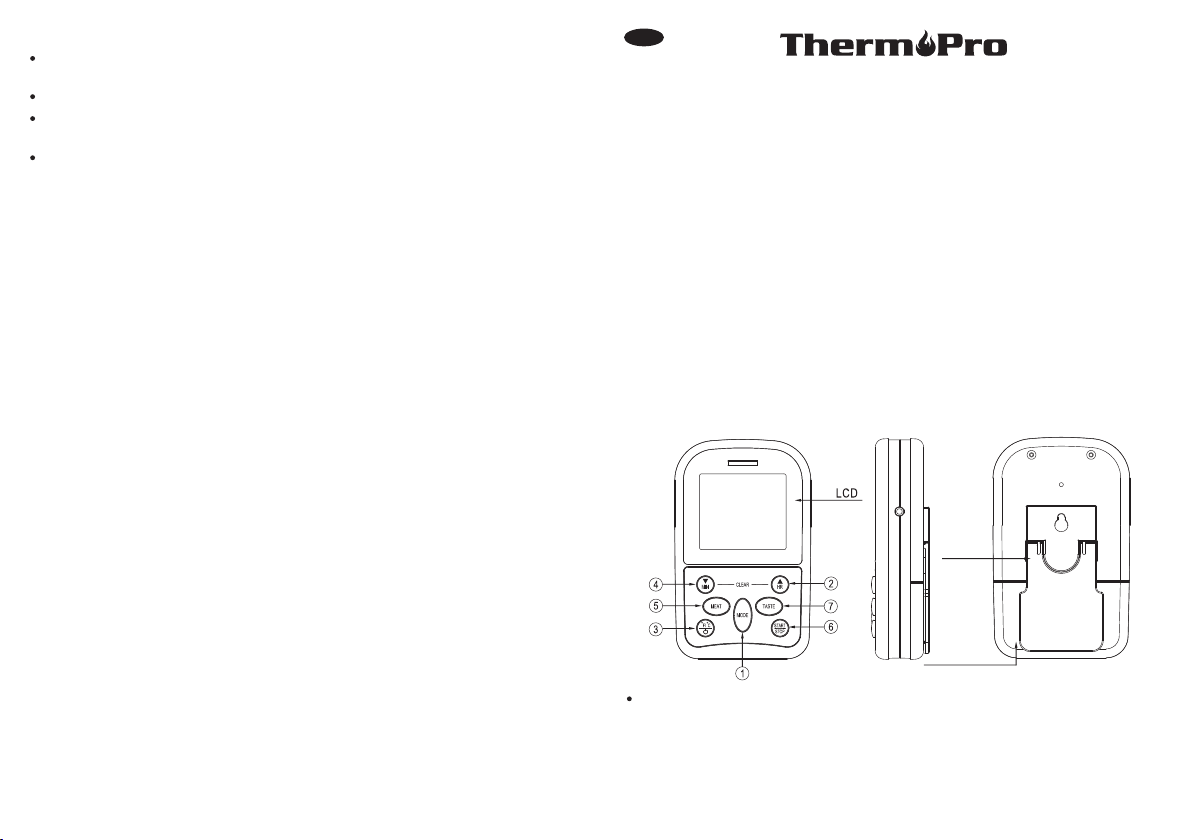
Receiver Features
LCD (Liquid Cryst al Disp lay) – Displays all i cons, temperatu re and ti mer. The
backlight will fl ash Blu e once the temperat ure increases by 10 º F from when
cooking starts, then it will change to Green when the temperature is within 15 ºF
of the set temperat ure and will turn Red when it re aches the set tempe rature.
See LCD diagram for d etailed information.
Battery compartment – Ho lds 2 AAA bat teries.
Stand – Swings out and allow y ou to sta nd the receiver on ta bleto p.
-1-
Buttons
1. MODE – Press to select thermometer or timer mode. Press and hold for 2 seconds
to enter Synchronization/Pairing mode.
2. HR – In t im er mo de, p ress on ce to set hour. Press and ho ld fo r 2 s econd s,
th e hour s will increase by 10 h ou rs per second. In thermometer mode, p re ss
on ce to increase th e temperature value . Pr es s and hold it for 2 seco nd s, t he
te mp erature value will increase by 10 degrees per second.
° °
3. F / – P re ss and h old fo r 2 s eco nds t o t urn t he rec eiver ON or O FF. / C In
the rmome ter mode , p ress onc e to sel ec t t emper atu re re adi ngs i n C el siu s
or Fahrenheit.
4. MIN – In timer mode, press once set minutes. Press and hold for 2 seconds, the
minutes will increase by 10 minutes per second. In thermometer mode, press once
to decrease the temperature value. Press and hold for 2 seconds, the temperature
value will decrease by 10 degrees per second.
5. MEAT – In thermome te r mode, p re ss to sel ec t meat ty pe , PROG (p ro gr am),
G B EEF (gro un d b ee f), G POU L (g ro und poul tr y), B EEF, VEAL , CHC KE
(c hi ck en ), P OR K, P OU LT (p ou lt ry), L AM B & FISH . In Timer m ode, p re ss i t to
switch be tw ee n hour/mi nu te timer to a minu te /s econd tim er and ba ck .
6. START STOP– I n timer mode, press to start o r stop the timer.
7. TA STE – I n therm om eter mo de , press t o sel ec t the m ea t taste level, R ARE,
MED RAR E, MEDIUM , MED W EL L an d WELL DONE .
Transmitter Features
Sen sor soc ket hol e
˚F/ ˚C/
Wire Stand
Bat tery Co mpart ment
Wir e S tand – A llo ws y ou t o s tan d th e tr ansm itte r o n t able top o r i t c a n b e
reversed and used as a hange r.
Battery Compartment – ho lds 2*A AA batteries.
Sensor Socket Hole: plug i n for sta inless steel prob e senso r.
Buttons
˚ /˚ / Press
F C – Press and hold fo r 2 seconds to turn the transmitter ON or OFF.
once to select temperature readings in Celsius or F ahrenhei t.
LCD
Installing batteries
Open the battery compartme nt of the receiver and insert two “AA A” ba tteries with
The rmome ter mod e
correct polar it y. Open the battery comp ar tment of the transmit te r an d in sert two
“AAA” batteri es w it h co rrect polarit y.
Turn On/Off Unit
Press and hold F/ C/ button on the receiver for 2~3 seconds to turn it ON or
OFF.
Pre ss and hold ˚F/˚C/ butto n on the transmitter for 2~3 seconds to turn it ON or
OFF.
˚ ˚
Synchronize/Pair Transmitter and Receiver
Th e t ra nsm itter and recei ver n eed t o b e syn chron ized or pa ire d bef or e u sing.
Th ere a re two w ays t o do so:
-2-
Option 1:
-3-

a. I nsert the stainless steel probe int o th e pl ug in of the trans mi tt er.
b. O pen the ba ttery compartme nt of tran sm itter and insert two “AAA” batterie s.
The t ran smi tte r w il l s how the cur ren t tem per atu re on it s L CD di spl ay an d
a uto m ati cal ly k eep sen din g th e t e mpe rat ure rea ding to the re c eiv er for
s ync hron iza tion /pai r ing .
c. Then open the batte ry compartmen t of re ceiver and inse rt two “AAA” batteri es.
The re ceiver w ill en te r Sy nc hr onization mode w hich i s in di ca te d by fla sh in g
Re ce pt ion Si gn al i co n on the display. The s yn ch ro ni za tion m od e wi ll l as t fo r
60 s ec on ds .
d. Wait for a moment until the temperature re adi ng shows on the receiver display,
it m ea ns t he synch ro ni za tion/Pairing is complete. Your p ro fe ss io nal re mote
co ok ing th er mometer is r eady f or u se .
Note: The transmitter and receiver are only required to be synchronized/paired
once whenever batteries of the receiver or transmitter are replaced.
If the batteries are alrea dy inst alled in the receiv er and tr ansmitter, you can use
Option 2 to synchronize/ pair th em:
a. Ins ert the st ainl ess ste el p r obe in to t he p lug in of the tr ansm itte r.
b. Tu rn o n t h e t ran s mit ter by pre ssin g an d h oldi ng ° F/° C/ b u tto n f o r 2 ~3
sec ond s. The transmitter will show the current temperature on its LCD display
an d au to matically keep sending the temper at ur e re ading to t he r ec eiver for
sy nchronization/p ai ri ng.
c. Turn on the re ceiver by pr essing and holding °F/°C/ b utton for 2~3 sec onds.
d. Press and hold Mode button for 2~3 seconds to enter the synchronization mode
which will last for 60 seconds.
e. Wait for a moment until the temperature reading shows on the receiver display,
it m ea ns t he s yn ch ro nization/Pairin g is compl et e. Your profession al rem ot e
co ok ing thermometer is ready for use.
Auto Off feature
The receiver wi ll turn off automatical ly if it hasn't received the temperature signal
fr om t he transmitter for more t ha n 30 minutes,a beep will so un d fo r one minute
before it shu ts do wn. Howe ver, the Auto Off feature will be automatically disabled
if the timer is running.
Th e tr an sm it te r wi ll turn off automatically if the te mp er ature me as ur ed i s lower
th an 1 22 °F o r 50°C for 120 mi nu te s.
-4-
Measure meat temperature to USDA doneness temperature
range
1. Press MODE to selec t thermometer mode. The u pper display will sh ow a small
MEAT and a meat type such as B EEF.
2. Pr es s M EAT to sele ct me at ty pe. PROG (p ro gra m) , G BEEF (grou nd be ef) ,
GPO UL ( gro und p oultr y), B EEF, V EAL, CHC KE (c hi cke n), P ORK , POU LT
(po ul try ), LA MB & FIS H.
3. Press TASTE to select the level of doneness for the meat type selected.
MED RARE, MEDIUM, MED WE LL and WELL DONE.
Note: The temperature displayed to the right of the actual meat temperature PROBE
TEMP will show the pres et te mperature TEMP SET according to USDA doneness
levels. Example: Beef wi ll be Well Don e at 165 F.˚
4. Once the tempera ture of meat reaches the pre set doneness leve l the receiver
will beep and the LCD b acklight will turn red.
RAR E,
Measure meat temperature set to your specific taste
1. Press MODE to se lect thermometer mode. The upper di splay will show a small
MEAT and a meat type such as BEEF.
2. Pr es s H R or MIN t o rai se or lo we r t he se t tem per at ure . As y ou press HR o r
Mi n th e display changes to PROG (program). Holding the button w il l ra is e or
lower the te mpera tu re se tting r apidl y. Pre ssing M EAT wi ll retu rn yo u to th e
pr eset U SDA ran ge s.
3. Once t he temperature of meat reaches the preset donen ess lev el the re ceive r
will be ep and th e LCD backlight will turn red.
Procedure for typical use on an outdoor grill
The following typical exa mple will g o through t he steps to h ave the Pro fession al
Remote Cooking Thermometer alert you to when a beef steak is cooked to medium
(USDA doneness level) and remind you to rotate hot dogs in 5 minutes.
1. Turn on the grill.
2. Follow the synchroniz ation /pairing procedure.
3. Place steak and hot dogs on g rill ra ck.
4. Insert probe sensor into the center of thickest portion of the steak. Avoid
bone or heavy fat areas. Assume the meat temperature is 45°F.
5. P os ition the pr obe se nsor w ire so t he y wi ll n ot c om e in to con ta ct w it h fl am es
and exit the grill surface area without being pinched/crushed by the grill cover.
6. S tand the transmitte r aw ay f ro m he at s ource of grill. DO NOT put tran sm itter
on t he closed cov er o r under the cover. The t ransmit te r is not waterpro of. DO
-5-
touching

use in the rain.NOT
7. Press MEAT so BEE F is disp layed.
8. Press TASTE so MEDIUM is displayed and 150 F will be shown as the TEMP SET.°
9. Press MODE to change to tim er mode .
10. Press MIN 5 times to set for 5 minutes so that 0:05 is displayed. Press START
/STOP to start the countdown. Press MO DE to go back to thermometer mo de.
11.You may tak e the recei ver up to 300 f t away from t he outdoor grill .Go indoors
if desired.
12. When 5 minutes are up the re ceive r will beep for 60 seconds.
13. When the tempe rature of p robe in the s teak reaches 55 F t he LCD back light
will flash blue.
14. When the tempe rature of probe in the steak reac hes 135 F the LCD backlight
wil l fla sh green .
15 . When th e t emp era tur e o f pro be in the st eak re ach es 15 0 F ME DI UM the
rec eiv er wil l b eep an d the LC D b ack lig ht wil l fla sh red .
16. Press STOP to t urn off the al ert.
17. Turn off grill. Remove the probe sensor from steak. Always wear a heat resistant
glo ve to t ouch the s tainl es s s te el pr obe s ensor or w ire d uring or ju st af ter
cooking. Do not touch with b are han ds.
18. Cle an the st ainle ss steel probe and dry thoroughly after e ach and e very us e.
19. Turn off th e transmitter and receiv er.
°
°
°
HELPFUL HINTS
If the recei ve r and /o r t he tran sm itt er disp la y L LL o r HHH i nstea d of th e pro be
te mpe rat ur e, wai t for pr ob e t o r ea ch roo m tem per at ure . I f LLL o r H HH is st il l
dis pla y ed, it is li kel y th e i nte rnal pr obe wir e h as sho rted ou t e i the r t hro ugh
moisture or heat damage.
Using the Timer
Count down
1. Press MOD E to select ti mer mode. The upper display will show a small TIMER
and 0:00.
2. Press HR and M IN b utton to set th e ti mer. Press START/STOP butto n to s tart
countdo wn . “ ” wi ll blink for ev ery second.
3. To stop the countdown process , press START /STOP button. The “ ” be com es
solid.
4. Press HR & MIN buttons toge ther to c lear the setting ba ck to 0:0 0.
Not e: Th e mi nim um set tin g f or the ti mer is 1 min ute. Wh en the ti mer co unt s
-6-
dow n b elo w 1 hou r 1 :00 the di spla y w ill cha nge to 59' 59” to ind icat e, 5 9
minutes 59 seco nds. The seco nd s will be shown count in g down then. When the
co untd own re ach es 0' 00” th e time r s tar ts cou nti ng up and it w ill be ep for 60
seconds. Th e time r an d “ ” will blink . Pr es s th e START/STOP button to stop
be ep in g. When the c ou nt up reaches 2 3: 59 :5 9 (59 seconds a re not displayed)
th e display w il l turn to 0 :0 0, the un it beeps an d “ ” will bl ink for 6 0 seconds.
Count up
1. Press MOD E to select timer mod e. Th e upper disp lay will show a small TIME R
and 0:00.
2. Press START/STOP button to start count up. The “ ” will blink for every second.
3. To st op the cou nt u p proc es s , pr es s STA RT/STOP b utton. The “ ” becomes
so lid.
4. Press CLEAR button to cle ar the se tting back to 0:00.
HELPFUL HINTS
Do not immerse the probe in wa ter whi le cleaning.
Do not allow the probe or probe wire to come into contact with flames. If cooking
with grill cover closed, only use medium or low heat.
If the pr ob e becomes d efectiv e wi thin 90 day wa rr an ty peri od please r et urn
defective probe to addres s be lo w al on g wi th r et urn address and we will send
yo u ne w probe no ch ar ge .
If the temperature display ed seems to read too high or the temperature se ems
to incr ease too qu ickly c heck to mak e sure the probe tip i s not poking throu gh
the food. Reposition the probe tip in the center of the thickest part of food. Avoid
touching bone or heavy fat a reas.
Cautions
Always wear a heat resist an t gl ove to touch the stainles s st ee l probe sensor
or wire during or just after cooking. Do not touc h with bare hands.
Keep the stainless steel p robe se nsor and wire away from chil dren.
Not Intended for Use by Pers ons age s 12 and Under.
Clean the stainless steel probe and dry thoroughly after each and every use.
Do not immerse the probe or wi re in wat er. Clean using a damp, soapy c loth.
Do not use the receiver or tra nsmit ter in the rain. They are not water proof .
Do n ot expose t he p lu g of the st ai nl ess steel p ro be or the plu g in hole of th e
tra nsm itt er to water or any liquid. This will result in a bad connection and fa ult y
rea din gs.
Do not expose the receiver o r trans mitter to direct he at or sur face.
Do not use stainless steel p robe in m icrowave oven.
-7-
Cleaning
Always wear a heat resist an t glove to touch the stainl es s st eel probe sensor
or wire during or just after c ookin g. Do not touch with ba re hand s.
Keep the stainless steel p robe se nsor and wire away from chil dren.
Wa sh th e m eta l pro be tip wi th ho t s oap y wat er and d ry tho rou ghl y. D o not
im me rse the p robe in w ater wh il e cleanin g.
Wi pe t he transmitter and receiver with da mp c lo th . Do not immerse ei th er i n
water.
FCC Statement
1. T hi s devic e co mplies wi th Part 1 5 of the FC C Rules . Operation i s subject t o
the follo wi ng two co nd itions:
(1) This dev ice may not cause harmful in terfe rence.
(2) Thi s de vice must acc ept any inter ference r ec eived, incl uding int erference
that may caus e undesired o peration.
2. Change s or modi fi ca tions n ot expr es sl y appro ve d by th e party r esponsibl e
for com pl iance c ou ld void t he user 's author it y to op er ate the e quipmen t.
DE
Funk-Kochthermometer
Model Nr. TP-11
Bedienungsanleitung
Herzlichen Glückwuns ch zum Er werb des Profi Funk -Koch thermometers, einem
programmierbaren Fun kther mometer für das Koc hen. Mi t dem Gerät werden Sie
in der Lage sein die Zeit und di e Temperatur d es Esse ns dass Sie auf ihren Grill,
im Smoker oder in ihrem Back ofen zu bereiten aus der Fe rne zu üb erwachen.
Einzelteile
1. 1 - Empfängereinheit
2. 1 - Sende-Einheit.
3. 1 - Abnehmbarer Messfühl er aus Ed elstahl.
4. 2 - 2* Batterien AAA Größe.
.
LIMITED 90 DAYS WARRANTY
Th ermoP ro wa rr ant s this produ ct to b e f re e o f defec ts in part s, ma te rials and
wo rkman ship fo r a p eri od of 9 0 day s, fr om da te of p urcha se.
Should any repairs or servicing under this warranty be required, contact Customer
Service by phone or e mail for instruct ions on how to p ack and ship the prod uct to
ThermoPro.
This warranty gives you sp ecifi c legal rights and yo u may als o have other rights
which vary from state to sta te.
CUSTOMER SERVICE
Telephone: 1-877-515-7 797 (US &CA only)
Email: service@buyth ermop ro.com
Hours: Wee kdays 9:00 AM- 6:00 PM EST
-8-
Empfänger Funktionen
Stä nder
Bat terie gehäu se
LCD (Flüssigkristall anzei ge) – Zeigt alle Icons, die Tempera tur und d en Timer
an. Die Displaybeleuch tung wi rd Blau aufleuchten wenn d ie Temperatu r nach
dem Beginn des Kochens um 5, 5ºC ges tiegen ist. Sie wird in eine g rüne Farbe
wechseln we nn d ie Tem peratur 8 ºC innerh alb der eingest el lten Temperat ur
liegt und sie wird nach rot wech seln wenn die eingestellte Temper atur erreicht
ist. Beachten Sie das LCD -Bild um genauere Infor mationen zu erhalt en.
-9-
 Loading...