

Thermopro TP-10 User Manual
EN
Digital Food Thermometer
Model No. TP-10
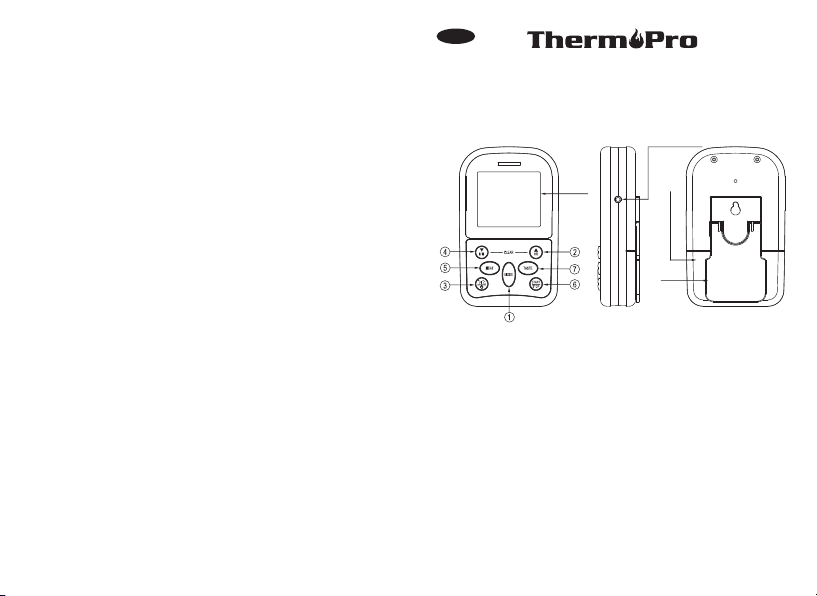
Key Definition
TP- 10
LCD (Liq uid C rys tal Display) – Displays a ll ic ons , tem perature
and timer. The b ac kl ig ht will flash Blue once t he tem perature
inc rease s 10ºF, wil l chang e to Gree n whe n the tem perat ure is
wi th in 15ºF o f the s et t emperat ur e and w il l turn Re d when it
re ac he s the s et te mp er ature . Se e LCD d ia gram fo r detai le d
inf ormatio n.
Sta nd – S wings out a nd allow yo u to stand th e receive r on
tab le top.
Senso r socket Pro be c able outl et hole.–
Batte ry compar tment Holds 2 AAA ba tteries .–
LCD
SIDE
Sens or sock et hole
Batt ery Com partm ent
STAND
Buttons
1. MODE – P ress to sel ec t thermom et er or timer m ode.
2. H R – In ti me r mode, p re ss to set h ou r. Press & hold f or 2
-1-

wi ll in cre as e 10 ho urs p er se co nd. I n sec on ds, t he ho ur s
the temperature value. thermometer mode, press to increase
increase Press & hold for 2 seconds, the temperature value will
10 deg rees per se con d.
3. F/ C/ – Pº º the unit. ress and hold it for 2 seconds to turn on/off
In th ermom eter mo de pres s to sele ct temp er ature r eadin gs
in Ce lsius o r Fah renhe it.
4. MI N – In t imer mo de, press t o set min ut es. Pre ss & hold for
will increase 10 minutes per second. 2 second s, the minut es
temp er at ur e In thermo me te r mo de, press t o de cr ease t he
value. Press & hold for 2 seconds, the temp erature value will
decr ease 10 degrees per second.
5. MEAT – In thermometer mode, press to select meat type, PROG
(groun d beef), GPOUL (gro und poul try ) , (progr am) , GBE EF
POULT (poultry) , LAMB BEEF, VEAL, CHCKE (chicken), PORK,
& FISH. In Timer mode swit ches between ho ur/ minute
tim er
to a minute/s econd timer and back .
6. START STOP– In timer mode, press to start or stop the timer.
7. TASTE – In t hermo meter m ode, se lect th e me at tast e level ,
RARE, MED MEDI UM, MED WELL and WELL DONE .RARE ,
Installing Batteries
Ope n th e battery c ompartm ent and ins ert two AAA bat teries
with co rrect pol arity.
Turn O n/ Of f Th e Un it
Pre ss a nd hold “ C/ ” fo r 2 se conds to tu rn on/off the unit .ºF/ º
Measure meat temperature to USDA doneness
temperature range
1. Press MODE to select thermometer mode. The upper display
-2-
will show a and a meat type such as BEEF.small MEAT
2. Press MEAT to select meat type. PR OG (progr am), GBEEF
(ground beef), (ground poultry) , BEEF, VEAL, CHCKE GPOUL
(chicken), PORK , POULT (poultry) , LAM B & FISH.
3. Pres s TASTE to s el ec t the level of do ne ness for the me at
selected. RARE, MEDIUM, MED WELL and type RARE, MED
DONE.WELL
Note : The tempera ture displ ayed to the right of the actual meat
tempe ra ture PROBE TE MP will s ho w th e preset temp er ature
TEMP SET according to USDA doneness levels.
will be Well Done at 165 ºF.
4. Once the temperature of mea t reaches the pr ese t don ene ss
level the unit will be ep and the LCD bac kli ght will turn re d.
Example: Beef
Measure meat temperature set to your specific taste
1. Press MODE to select thermom eter mode. The upper display
will show a small MEAT and a meat type such as BEEF.
2. P re ss H R or MIN to r ai se or lower t he s et temper at ur e. As
display changes to PROG (program). you press HR or Min the
temperat ure setting Holding the button will raise or lower the
rapidly. Pressing MEAT wi ll ret ur n yo u to t he pre se t US DA
ranges.
3. Once the temperature of mea t rea che s the preset don ene ss
level the unit will beep an d the LCD bac kli ght will turn red.
Using the Tim er
Cou nt d own
1. Press MODE to select timer mode. The upper display will show
a small TIMER and 0:00.
2. Press HR and MIN button to set the timer. Press START/STOP
button to start countdown. “ ” will blink for every second.
-3-

3. To stop the countd own process , press START/S TOP but ton.
The “ ” becomes solid.
4. Pr es s HR & MIN butt ons toget her to clea r the setti ng back
to 0: 00 .
Not e: Th e minim um sett ing for t he timer is 1 mi nute. W hen the
timer count s dow n bel ow 1 hour 1:00 the displa y will change to
59'59 ” di sp lay advis ing 59 minute s 59 s ec onds. The s ec onds
will be shown counting down then. When the countdown reaches
0'00” the timer starts counting up and it will beep for 60 seconds.
The timer and “ ” will blink. Press the START/STOP button to
stop beeping. When the count up reaches 23:59:59 (59 seconds
are not displayed) the display will turn to 0:00, the unit beeps and
“ ” will blink for 60 seconds.
Cou nt u p
1. Press MODE to select timer mode. The upper display will show
a small TIMER and 0:00.
2. Press START/STOP button to start count up. The “ ” will blink
for every second.
3. To stop the count up process , press START/STOP button. The
“ ” becomes solid.
4. Pr es s CLEAR but ton to clea r the setti ng back to 0: 00.
Procedure for typical use on an outdoor grill:
The fo llo win g typical exam ple will go through th e steps to ha ve
the Professional Cooking ,Thermometer alert you to when a beef
steak is co oke d to medium ( USDA donen ess level) and remi nd
you to rotate hot dogs in 5 minutes.
1. Pl ea se correc t load 2*AA A batterie s.
2. Pl ac e steak and h ot dogs on gr ill rack.
3. In sert probe s ensor into t he cent er of t hicke st portion o f the
ste ak. Avoid bone or hea vy fat areas . Assume the touchi ng
-4-
mea t temperat ure is 45 F.º
4. Position the probe sensor wire so they will not come into contact
exit the grill surface area without being pinched/with flames and
crushed by the grill cover.
5. Pr es s MEAT so BEEF is d is played.
6. Press TASTE so MEDIUM is displayed and 150 F will be shown
as the TEMP SET.
7. Pr es s MODE to c ha nge to time r mode.
8. Press MIN 5 times to set for 5 minutes so that 0:05 is displayed.
Press START/
STOP to start the countdown. Press MODE to go
back to thermometer mode.
9. Wh en 5 m inutes ar e up the unit w ill beep fo r 60 second s.
10. When the temperature of probe in the steak reaches 55 F the
LCD back light will flash blue.
11. When the temperature of probe in the steak reaches 135 F
the LCD back ligh t will flas h green.
12. Wh en the temperature of probe in the steak reac hes 150 F º
MEDIUM the unit beep and the LCD backlight will flash red.will
13. Pre ss STOP to turn off the ale rt.
14. R emove the p robe se nsor fr om stea k. Always we ar a heat
the stainles s steel pro be sensor or resistant glove to touch
with bare hands.wire during or just after cooking. Do not touch
15. Clean the stainless steel probe and dry thoroughly after each
and every use.
º
º
º
HELPFUL HIN TS
If the unit display LLL or HHH instead of the probe temperature,
wait for probe to reach room temperature. If LLL or HHH is still
displayed it is like ly the inte rna l probe wir e has short ed out
either through moisture or heat damage.
Do not im merse the p robe in wat er while cl eaning.
-5-

Do not allow the probe or probe wire to come into contact with
flames. If cooking with grill cover closed, only use medium or
low heat.
If the probe becomes defective within 90 days warranty period
ple as e retur n de fecti ve p robe to a ddress be low along w ith
retu rn address and we will send you a new probe no charge.
If th e tempe ra ture di splay ed seem s to read too high or th e
temperature seems to increase too quickly check to make sure
the probe tip is not poking through the food to outside. Reposition
the probe tip in the center of the thickest part of food. Avoi d
touching bone or heavy fat areas.
Cleaning
Always wear a heat resistant glove to touch the stainless steel
probe sensor or wire during or just after cooking. Do not touch
with bare hands.
Keep the stainle ss st eel probe sensor and wire away from
childr en.
Wash the metal probe tip with hot soapy water and dry thoroughly.
Do not immerse the probe in water while cleaning.
Wip e the transm itter and re ceiver wit h damp cloth . Do no t
imm erse eithe r in water.
Cautions:
Always wear a heat resistant glove to touch the stainless steel
probe sensor or wire during or just after cooking. Do not touch
with bare hands.
Keep the stainl es s st ee l pr ob e se nsor and wire away from
childre n.
Not Int ended for U se by Perso ns ages 12 an d Under.
Clean the stain less steel probe and dry thoroughly after each
and every use.
Do not immerse the probe or wire in water. use a damp, soapy
cloth to clean.
Do not use the receiver or transmitter in the rain. They are not
waterproof.
Do not expose the plug of the stainless steel probe or the plug
in hole of the transmitter to water or any liquid. This will result
in a bad connection and faulty readings .
Do not ex pose the un it to direc t heat or sur face.
Do not us e stainle ss steel pr obe in micr owave ove n.
LIMITED 90 DAYS WARRANTY
Thermo Pro warr ant s thi s produc t to be free of defe cts in par ts,
mat er ials an d workman ship fo r a period of 9 0 days, f rom date
of purchase.
Should any rep airs or servicing under this warranty be req uired,
contact Customer Service by phone or email for instructions on
how to pack and shi p the product to ThermoPro.
CUSTO ME R SE RVICE
Telepho ne: 1-877 -515-77 97 (US&CA on ly)
Ema il : service @buythe rmopro. com
Hours : Weekd ays 9:00 AM- 5 :00 PM EST
Thi s war ranty give s you specif ic le gal rights and yo u may a lso
hav e oth er rights wh ich vary from sta te to s tate.
-7--6-
 Loading...