

Thermopro TP-08 User Manual
EN
Remote Food Thermometer with Dual Probe
Model No. TP-08
Introduction
Co ng ra tu la ti on s on yo ur p ur ch ase of th e Pr of essional Re mo te F oo d Th ermometer, a
pr ogram mable radi o fre quenc y foo d the rm ome te r. You wil l now b e abl e to remot ely
monit or the temp erature o f co oking f oo d and the tem peratur e inside yo ur grill, o ven or
smoke r from an ywher e in your h ome.
Components
1. 1– Rec eiver u nit.
2. 1– Tran smitt er unit .
3. 1– Det achab le stai nless s teel FO OD probe.
4. 1– Det achab le stai nless s teel BA RBECUE probe wit h clip.
5. 2– 2*A AA batte ries.
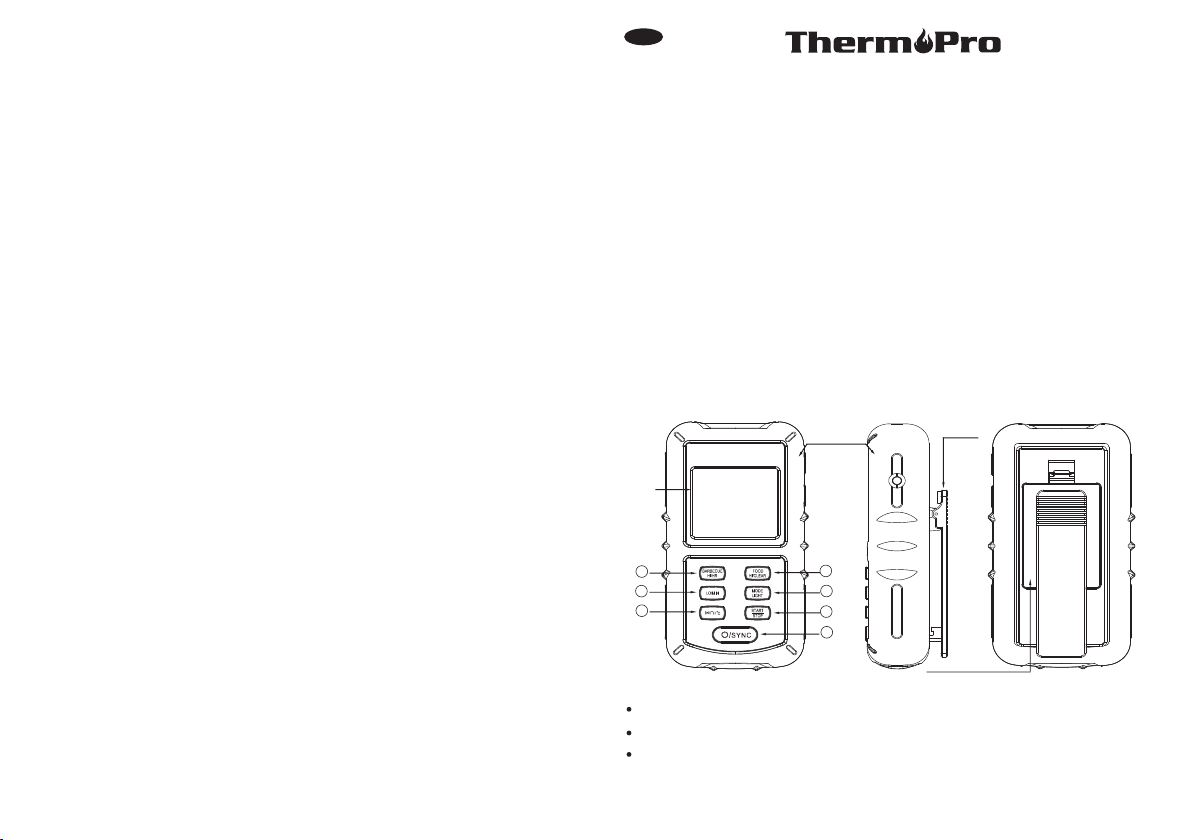
Receiver Features
LCD
Sof t rubbe r
sle eve
Bel t clip
1
2
7
LCD (Li quid Cr ystal D ispla y) – Disp lays all icons, te mpera ture an d time.
Batte ry comp artme nt – Hold s 2 AAA batte ries.
Belt clip/Stand – Belt clip allows you to be mobile. Clip the receiver unit to belt. Swings
out and allow you to stand the receiver on tabletop as well.
4
3
5
6
Bat tery Co mpart ment
-1-
Buttons
1. HI/HR – In THERMOMETER MODE, press once to display the maximum set BARBECUE
/oven/smoker temp er at ur e se tting. To increase temper at ur e, p re ss a nd h old bu tton
until the dig it s fl ash, then pre ss o nc e to i ncrease t o yo ur d es ired BARBEC UE /oven/
sm ok er t em pe ra tu re . To increase temperature faster, pr es s an d ho ld for 2 seconds
to increase by 10 ºF pe r sec ond . In TIMER MODE, when the TIMER stops, press once
to increase the Hour. Pres s and hold for 2 seconds to increase by 10 hours per second.
2. LO/MIN – In THERMOMETER MODE, press once to display the minimum set BARBECUE
/ov en/sm oker tempe rature set ting. To increase t emperatu re, press an d hold until t he
di gi ts f la sh , then press on ce t o increase to your de si re d BA RB EC UE/oven/smoker
temperatur e. To increase temperature faster, press and hold for 2 seconds to increase
by 10 ºF per se cond. In TIMER MODE, when the TIMER stops, press once to increase
the MIN UTE. Pr ess and h old for 2 s econd s to increase by 10 minutes p er seco nd.
3. MODE/LIGHT – Pre ss once to turn on the LCD back light which will last for 5 seconds.
Press a nd ho ld fo r 2 s econd s to se lec t TH ERM OM ETE R MODE or TIME R MOD E.
When wa nting t o save yo ur sele cted te mperature, press once t o save te mp sett ing.
4. HI/C LE AR – In TH ER MOM ET ER MO DE, p re ss on ce to disp lay t he cu rr ent F OOD
temperature setting. To increase temperature, press and hold until the digits flash, then
press o nce to in creas e to your d esire d FOOD temperature. To increas e tempe rature
faster, press and hold for 2 seconds to increase by 10 ºF per second. In TIMER MODE,
when th e timer s tops, p ress on ce clea r the timer setting back to 0 :00.
5. START/S TOP –In T IM ER MODE, press on ce t o st art or stop the timer c ou nt down or
count up.
6. /SYN C – Press onc e to t urn ON/ OFF the rec eiver. Pre ss and hold f or 2 s econd s
to
synch ronize/ pair with t ransmit ter.
7. /ºF/ºC- press once to activa te /d ea ctivate the tempera tu re a la rm . Pr ess and hold
it f or 2 s ec on ds t o se lect receiver tempe ra tu re d is play in ºC o r ºF.
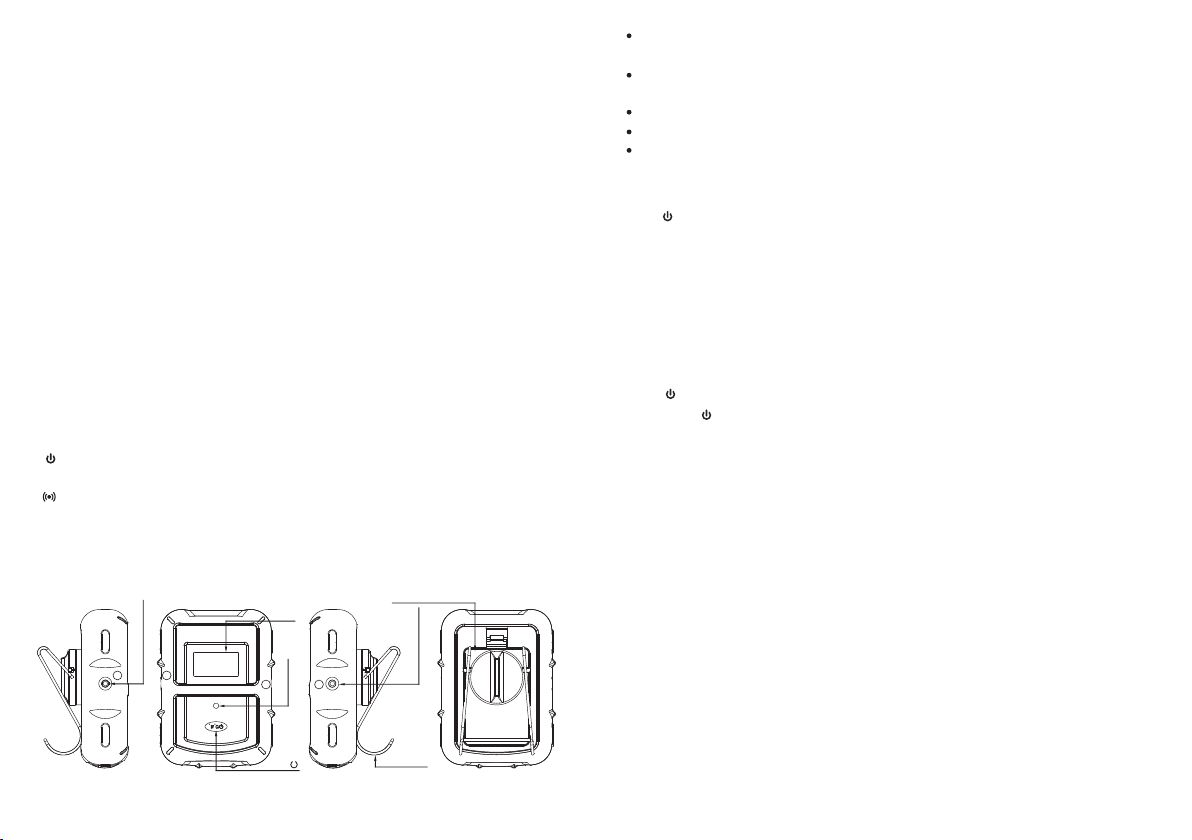
Transmitter Features
Bat tery Co mpart ment
Sen sor soc ket hol e
WIR E STAND
Sens or sock et hole
2 2
1
ºF/ ºC/
LCD
1
TX LE D
-2-
LCD ( Liquid Cry sta l Display) – disp lays tempe rature of both FOOD an d
BAR BECUE.
It wi ll automatica lly switch betw een FOOD and BARB ECUE displ ays.
WIR E STAND – Allow s you to stand the receiv er on tableto p or it can be
rev ers ed an d
use d as a hanger.
BATT ERY COMPARTMENT – Hol ds 2 AAA batt eries .
1 FOOD – Pl ug-in f or stai nless s teel FO OD probe.
2 BARBE CUE –Pl ug-in f or stai nless s teel BARBECUE pr obe.
Button
º
F/ºC/ – Press once to turn ON/OF F th e tr an sm it ter. Pr ess and hold for 2 s econds to
select the transmit te r te mp er ature display in ºC or ºF.
Installing batteries
Op en the ba tte ry com par tme nt of the re cei ver an d i nse rt two “A AA” ba tte rie s w ith
correct p ol arity. Ope n th e battery c om partmen t of t he t ransmit te r and insert tw o“ AAA”
ba tt er ie s with corr ec t po larity.
Turn On/Off Unit
Press /SYNC b utton o n the rec eiver t o turn on /off th e recei ver;
Press º F/ºC/ butto n on the tr ansmi tter to t urn on/off the t ransm itter.
Synchronize/Pair Transmitter and Receiver
The t ransmitter an d rec eiver need to be synch ron ized or paired befor e using. There are
two w ays to do so:
Optio n 1:
a. Inse rt the st ainle ss stee l probe s into the correspondin g plugs i n the tra nsmit ter.
Note: The FOOD probe is 6 inches long wi th pointed end while the BARBE CUE probe
is 3 inches lo ng with a grill rack clip.
b. Op en th e b at tery compartment of tr an sm it te r a nd in sert two “AAA” b at te ri es . The
tr an sm it te r will show the c ur re nt t emperature on i ts L CD d isplay and auto ma ti ca ll y
ke ep s en di ng the temperat ur e re ad in g to the rece iv er f or s ynchronization/pairing.
c. Then open th e ba tt er y co mpartment of rece iv er a nd i nsert two “AAA” batte ri es . The
rec eiver will ente r Synchroniza tion mode which w ill last for 120 secon ds. The di splay
shows “ ---” an d it is fla shing .
d. Wai t f or a m om en t u nt il th e t em pe ra tu re re ad in g s ho ws on th e r ec ei ve r d is pl ay, it
me an s th e sy nc hr on iz at io n/ Pa ir in g is complete. Your p ro fe ss io na l re mo te c oo ki ng
th er mo me te r is r ea dy for use.
Note: T he tran smitt er and re ceive r are only required to be syn chron ized/ paire d
once wh eneve r batte ries of t he rece iver or transmitter are r eplac ed.
-3-

If the ba tteri es are al ready i nstal led in the receive r and tra nsmit ter, you c an use Op tion
2 to sync hroni ze/pa ir them :
a. Inse rt the st ainle ss stee l probe s into the correspondin g plugs i n the tra nsmit ter.
b. Tur n on th e tra nsm it ter b y pre ssing ºF/º C/ but to n. Th e tra ns mit te r w il l sho w the
cu rr ent t em pe ra ture on i ts LCD di sp lay.
c. Turn on t he rece iver by p ressi ng /SYNC b utton .
d. Press and hold /S YNC button for 2~3 seco nd s to e nt er the synchron iz at ion mode
which will last f or 1 20 s ec on ds. The displ ay s ho ws “---” and it is flashi ng .
e. Wait for a moment until the temperature reading sh ow s o n t he re ce iv er di sp la y, i t
me an s th e synchronization/Pairing is co mp le te . Your pr of es si on al r em ot e cooking
th er mo me te r is ready for us e.
Loss link alert
If t he r eceiver is t aken out o f ra nge or t he re i s ab no rm al e xternal interference or after
shutting OFF the transmitter, the receiver may not be able to receive the transmission from
the transmitter. If this happens over 4 minutes, the unit wi ll alert you by be epi ng once for
every 4 seconds to tell you the signal is lost. Pressing any button on receiver will stop the
loss Link beep.
To regain tra nsmission sign al, move the receiver close to the transmitter, the link
be automatically restored and the temp eratures sh oul d appear on the receiver display.
sho uld
THERMOMETER MODE
In t he rm ometer m od e, t he L CD w il l show a FOOD icon in t he u pp er p ar t of the display
an d a BAR BE CU E ico n in the lo wer p ar t of th e display. You ca n fol lo w the p ro cesses
below t o gain yo ur desi red set tings .
Setti ng HI (Ma ximum ) FOOD Temperature
1. Pres s the HI/ C LEAR bu tton to d ispla y the current FOOD temper ature s ettin g, whic h
will only be displayed for 5 seconds. T he F OO D te mperature range is 32 ºF - 572 ºF
and the d efaul t setti ng is 176 º F.
2. Pres s and hol d the HI/ C LEAR bu tton un til the digits flash.
3. Pr ess the HI/ CLEAR b utton to set your d esired temper ature. It will in crease one with
eac h press. Press an d hold the HI/ CLEA R button to fast in crease.
4. Pres s the LIG HT/MO DE butt on to con firm the setting.
Note: P ress HI /CLEA R to read y our cur rent FOOD temperature .
To de str oy ha rmf ul ba cte ria l ike Sa lm one lla a nd E Col i t he US DA reco mme nd s the
fo llo win g min imu m int ern al te mpe ra tur es:
(Beef, Veal, Lamb Steaks & Roasts and Fish) to be 145 ºF (Egg Dishes, Pork and Ground
Bee f Veal & Lamb) to be 160 ºF (Turkey, Chicken & Duck Whole, Pie ces & Ground) to be
165 ºF.
-4-
Setti ng HI (Maximu m) BARBEC UE/Oven/Smoker Temperature
1. Press the HI/HR button to display the current maximum BARBECUE/oven/smoker
tempe rature sett ing, whic h will only be di splayed f or 5 seconds. The maxi mum
BARBECUE/oven/ smoker temperature range is 140 ºF – 572 ºF and the default
setti ng is 176 ºF.
Note: The unit will not allow you to set the BARBECUE temperature below the minimum
BARBECUE temperature.
2. Pres s and hol d the HI/ HR butt on unti l the digits flash.
3. Press the HI/H R bu tt on t o set your desired te mp erature. It will in cr ea se one degree
with each press . Pr es s an d hold the HI/CLEAR b ut ton to i ncrease fas te r.
4. Pres s the LIG HT/ MOD E butto n to conf irm the s etting.
Note: Press th e HI/HR button to read your set maximum BARBECUE temper atu re.
Setti ng LO (Mi nimum ) BARBE CUE/O ven/S moker Tempera ture
1. Press the LO/MIN button to display the minimum BARBECUE/oven/smoker temperature
setting, which will only be displayed for 5 seconds. The minimum BARBECUE temperature
range i s 32 ºF – 554 º F and the d efaul t setti ng is 50 ºF.
Note: The unit will not allow you to set the minimum BARBECUE temperature above
the maximum BARBECUE temperature.
2. Pres s and hol d the LO/ MIN but ton unt il the digits flash.
3. P re ss t he LO/MIN button to s et y ou r de si re d temperature. It will in cr ea se o ne with
ea ch p re ss . Press and hold th e LO /M IN b ut to n to fast increase.
4. Pres s the LIG HT/MO DE butt on to con firm th e setting.
Note: Press the LO/MIN button to read your set minimu m BARBECUE temperature.
Activating/Deactivating the temperature alarm
You can press t he /ºF/ºC b ut to n to a ct iv at e or deactivate the temperature alarm f or
BARBECUE and FOOD. The alarm icons will appe ar beneath the FOOD and BARBECUE
icons .
The rec eiver w ill bee p with th e alarm i con and probe temp eratu re flas hing if :
a) Th e actua l FOOD te mpera ture ha s exceeded your set maxim um FOOD t emper ature
(Beep t wice in e very se cond) ;
b) Th e actua l BARBE CUE/oven/smoker tem perat ure has e xceed ed your s et maximum
BARBE CUE/o ven/s moker t emper ature (Beep once in every s econd );
c) The actu al BA RBE CUE /ov en/ smo ker tempera tur e has fallen below your se t minimum
BARBE CUE/o ven/s moker t emper ature (Beep once in every s econd );
Note: The minimum BARBECUE temperature alarm will not be activ ated until
actual BARBECUE temperature goes above the set mini mum temperature .
Fo r ex am pl e: You s et t he m in im um B AR BE CU E temperature as 22 0 ºF a nd p re ss
the / to acti vate th e alarm . Th e uni t wi ll NO T be ep or f la sh ev en i f the act ual ºC /ºF
-5-
the

BAR BECUE t emp era ture is below 220 º F. It assu mes t hat your BAR BEC UE is n ot up
to temper ature. On ly whe n the ac tual B ARBECUE t empe rat ure go es ove r 220 ºF, then
fal ls bel ow 220 º F, can th e alar m be act ivated, t he uni t will b eep an d flas h.
Note: The unit will re tai n your Barb ecu e & Food alert temp erature sett ing s even a fte r the
uni t is tur ned off.
TIMER MODE
Count d own
1. P ress an d hold th e LIG HT /M ODE b ut to n to sw itch th e unit fr om THER MO ME TER
MO DE to T IM ER MODE . Th e tim er 0:00, wi th a sm all i co n TI MER w il l be sh ow n on
th e low er part o f the d is play.
2. Pres s the HI/ HR butt on to set t he hour a nd LO/MIN button to set the m inute .
3. Pr ess the START/STOP button to start countdow n. The ico n “ ” wil l bli nk.
4. Press the START/ STOP button to stop the countdow n. The “ ” wi ll be solid .
5. Pres s the HI/ CLEAR b utton t o clear t he setting back 0:00.
Note: The minimum setting for the timer is 1 minut e and the maximum setting is 24 hours .
It wil l be display ed as hou rs & minutes wh en the timer does not excee d 10 hours. Once
it exceeds10 hours , only the hour can be displayed. When the countdown reach es “0:00”
th e ti me r st ar ts c ou nt ing up a nd i t wi ll b ee p fo r 30 s ec on ds . Th e “0 :0 0” a nd “ ” will
blink . Pre ss th e STAR T /STOP but ton to st op th e bee p.
Count u p
1. Pr es s a nd ho ld th e LIG HT /MO DE bu tt on to sw it ch th e u ni t fro m THE RMOME TER
MO DE to T IM ER MODE . Th e timer 0 :0 0, wi th a smal l icon TI ME R will be shown on
th e low er p art o f th e dis pl ay.
2. Pres s the START/STOP button to start count up . The i con “ ” wil l blink.
3. Pres s the START/STOP button to stop the count u p. Th e “ ” will be s olid.
4. Pres s the HI/ CLEAR b utton t o clear t he setting back to 0:00.
Note: When the count up timer reaches 9:59, it will keep displaying as 9:59,
the unit beeps with the “ ” icon blinking for 30 seconds.
Note: Th e unit will ret ain your tim er settings even after the unit is turn ed off.
meanwhile,
Temperature Unit Display
Press a nd h old the /ºF/º C button fo r 2 se conds o n th e receive r to select t emperat ure
displ ay in ºF or ºC.
Press and hold the ºF/ºC/ button for 2 seconds on the transmitter to select temperature
display in ºF or ºC.
-6-
Using TIMER MODE & TEMPERATURE MODE simultaneously
The TI MER MODE and TEMPERATURE MO DE can be used simultaneo usly. This al lows
you to monitor the temperature for both FOOD and BABECUE in the TEMPERATURE MODE
when using the TIMER MODE to keep track of another cooking task. You can tell different
task by the alarm sound as well as the icons.
1. I n th e TH ER MOMETER MODE, w he n th e temperature is re ac he d, t he receiver w il l
alarm you by beeping once every second for the BARBECUE/oven/smoker temperature
and beeping twice every second for the FOOD temperature. The alarm icons and probe
tempe ratur e will bl ink alo ng with t he alarm sound.
2. In the TIMER MODE, when the timer is reached, the receiver will alarm you by
3 times in every second. Either the upward arrow (for count-up) or downward arrow (for
countdown) will blink.
beeping
Procedure for typical use in an outdoor BARBECUE
The following examples will go through the steps to have this professional remote cooking
thermom et er a larm you if a piece of meat ( Bo st on Butt) is cooke d to 1 60 º F an d if y our
barbecue temperature falls below 225 ºF or goes above 250 ºF, and remi nds you to check
the smo ker in 2 ho urs.
Set up BARBECUE
Follo w the syn chron izati on/pa iring procedur e to pair t he rece iver an d trans mitter.
Place m eat on th e BARBE CUE gri ll rack .
Insert FOOD p ro be s ensor into th e ce nt er of thickest po rt ion of the meat. Avo id
touchin g bo ne o r he avy fat areas .
Clip th e speci al BARB ECUE pr obe to gr ill rack of barbec ue cham ber.
Po si ti on t he probe se ns or w ir es so t he y wi ll not come i nt o contact with fl am es and
ex it t he barbecue w it ho ut b ei ng pinched/ c ru sh ed by the c ov er.
Stand/ hang the transmitter away from heat source of barbecue. DO NOT put transmitter
on closed cover or under the cover. The transmitter is water proof for use in rain.
In THERMOMETER MODE
Press H I/CLE AR to dis play th e maxim um FOOD temperature.
Press a nd hold H I/CLE AR unti l the max imum FOOD temperature f lashe s.
Press H I/CLEAR r epeat edly unti l 160 ºF appe ars (pres s and hold HI /CLEA R button
will in crease th e tempera ture 10 d egrees pe r second) .
Quick ly pres s LIGHT /MODE t o confi rm the 160 ºF setting.
Press H I/HR to d ispla y the max imum BA RBECUE tempera ture.
Press a nd hold H I/HR un til the m aximu m BARBECUE tempe ratur e flash es.
Press HI/HR repeatedly until 250ºF appears (press and hold HI/HR button will increase
the temperature 10 degrees per second)
-7-

Quick ly pres s LIGHT /MODE t o confi rm the 250ºF setting.
Press L O/MIN t o displ ay the mi nimum B ARBECUE temperature .
Press a nd hold L O/MIN u ntil th e minim um BARBECUE temp eratu re flas hes.
Press LO/MIN repeatedly until 225 ºF app ears (press and hold LO/MIN button will
increase the temperature 10 degrees per second).
Quick ly pres s LIGHT /MODE t o confi rm the 225 ºF setting.
Pre ss to activate the tempe rat ure alarm for the BA RBECUE and FOOD. /ºC /ºF
In TIMER MODE
Press HI/HR twice to s et f or 2 hou rs so that 2:00 will be displayed. Press START
STOP to start the countdown .
Press a nd hold L IGHT/ MODE to g o back to THERMO METER M ODE.
Clip the receiver to your belt or pocke t and move up to 300 ft aw ay from the barbecue.
Go indoors if desired. You are now remotely monitoring your food and barbecue. Th e
receiver will beep and flash if your meat temperature goes above 160 ºF or the barbecue
tem perature f alls below 225 ºF or exceed s 250 ºF.
Helpful Hints
If the receiver and / or the transmitter display LLL or HHH instead of the probe temperature,
wait for probe to reach room temperature. If LLL or HHH is still displayed or you get a false
temperature, squeeze the probe jacks harder into the tra nsmitter and twist them back
and forth so they make good contact. If the prob lem still persists it is likely the internal
probe wire has shorted out either through moisture or heat damage.
Do not im merse t he prob e in wate r while c leaning.
Do not al low the p robe or p robe wi re to com e into contact wit h flame s.
Within the war ran ty period, return defective probe to address below along with return
address and we will send you a replacement pro be at no charge.
If the temperature displayed seems to read too high or the temperature se ems to
increase too quickly, check to make sure the probe tip is not poking through th e food
to outside. Repositi on the probe tip in the center of the thickest part of food. Avoid
touching bone or he avy fat areas.
Cautions
1) Always we ar a heat resist ant glove to touch the stainless steel probe sensors or wires
during or just after cooking. Do not touch wit h bare hands.
2) Keep t he stai nless s teel pr obe sen sors and wires awa y from ch ildre n.
3) Clea n the sta inles s steel p robes a nd dry thoroughl y after e ach and e very us e.
4) Do not use the receiver in the rain. It is NOT rain proof. The transmitter is rain proof but
not water tight. Do not immerse in water.
-8-
5) Do not expose the plugs of the stainless steel probes or the plug in holes of the transmitter
to water or any liquid. This will result in a bad connecting and faulty readings.
6) Do not e xpose t he rece iver or t ransm itter to direct heat or sur face.
7) Do not u se stai nless s teel pr obes in m icrowave oven.
8) The Barbecue Th ermometer registers temperatures as low as 32 ºF (0 ºC) and as high
as 572 ºF (300 ºC). LLL will be displayed below 32 ºF and HHH will be displayed above
572 ºF. Do not use the st ainle ss probe sen sor abo ve 572 ºF. Doing s o will deter iorat e
the wire.
9) Not In tende d for Use b y Perso ns ages 1 2 and Under.
/
Cleaning
1) Always we ar a heat resist ant glove to touch the stainless st eel probe sensors or wires
during or just after cooking. Do not touch wit h bare hands.
2) Keep t he stai nless s teel pr obe sen sors and wires awa y from ch ildre n.
3) Wash the metal probe tips with hot soapy water and dry thoroughly. Do not immerse the
probe in water while cleaning.
4) Wipe the transmitter and receiver with damp cloth. Do not immerse either in water.
FCC Compliance
Information to user
Warning: Changes or modifications to this unit not expressly approved by the party
responsible for compliance could void the users' authority to operate the equipment.
Note: This equipment has been tested and found to comply with the limits for a Class
B digital device, pu rsuant to part 15 of the FC C Rules. Th ese limits are desig ned to
provide reasonable protection against harmful interference in a residential installation.
This equipmen t gene rates, uses and can radiate radio frequency energy and, if not
installed and used in accordance with the instructions, may cause harmful interference
to radio communications.
However, there is no guarantee that interferen ce will not occur in a particul ar installation.
If this equipment does cause harmful int erference to rad io or television reception, which
can be deter mined by tur ning th e equipmen t off a nd on, the use r is enco uraged to tr y to
corre ct the inte rferenc e by one or m or e of the fo llowing m easures :
-Reor ient or r eloca te the re ceivi ng antenna.
-Incre ase the s epara tion be tween t he equipment and r eceiv er.
-Connect the equipment into an outlet on a circuit different from that to which the receiver
is connected.
-Consu lt the de aler or a n exper ience d radio/TV techn ician f or help .
This device complies with part 15 of the FCC Rul es. Operation is su bje ct to the fol low ing
two condi tions: (1 ) th is device m ay n ot cause ha rm ful inter ference , an d (2) this de vi ce
-9-

must accept any interference received, inc luding interference tha t may cause undesir ed
operation.
LIMITED 90 DAYS WARRANTY
ThermoPro warrants this product to be free of defects in parts, materials and workmanship
for a period of 90 days, from date of purchase.
Should any repairs or servicing under this warranty be required, contact Customer Service
by phone or email for instructions on how to pack and ship the product to ThermoPro.
This warr anty give s you speci fi c legal rig hts and you m ay a lso have ot he r rights wh ich
vary from s tate to sta te.
CUSTOMER SERVICE
Telepho ne: 1-8 77-51 5-779 7 (US&C A only)
Email : servi ce@bu yther mopro .com
Hours : Wee kdays 9 :00 AM- 5:00 PM EST
Meat Temperatures & Doneness Chart Recommended by USDA
MEAT
Ground
Beef
Ground
Poultry
Beef
Veal
Chicken
Pork
Rare Med Rare Medium Med Well Well Done
160 F/71 Cº º
165 F/74 Cº º
125 F/52 Cº º 140 F/60 Cº º
125 F/52 Cº º
140 F/60 Cº º
150 F/66 Cº º
150 F/66 Cº º
165 F/74 Cº º
160 F/71 Cº º
160 F/71 Cº º
160 F/71 Cº º
165 F/74 Cº º
165 F/74 Cº º
165 F/74 Cº º
170 F/77 Cº º
-10 -
Poultry
Lamb
Fish
Program
140 F/60 Cº º
145 F/63 Cº º
145 F/63 Cº º
165 F/74 Cº º
160 F/71 Cº º
145 F/63 Cº º
-11 -
165 F/74 Cº º
170 F/77 Cº º
 Loading...