

Thermopro TP-07 User Manual
EN
Remote Food Thermometer
Model No. TP-07
Introduction
Congratulations on your purchase of the Professional Remote Cooking Thermometer,
a pro gram mab le rad io fre que ncy fo od the rmo met er. You wil l n ow be abl e t o
remot ely monitor the time and te mpera ture of food cooking on you r grill , smoker
or ov en.
Components
1. 1 - receiver unit.
2. 1 - transmitter un it.
3. 1 - detachable sta inles s steel probe senso r.
4. 2 - 2*AAA batteries .
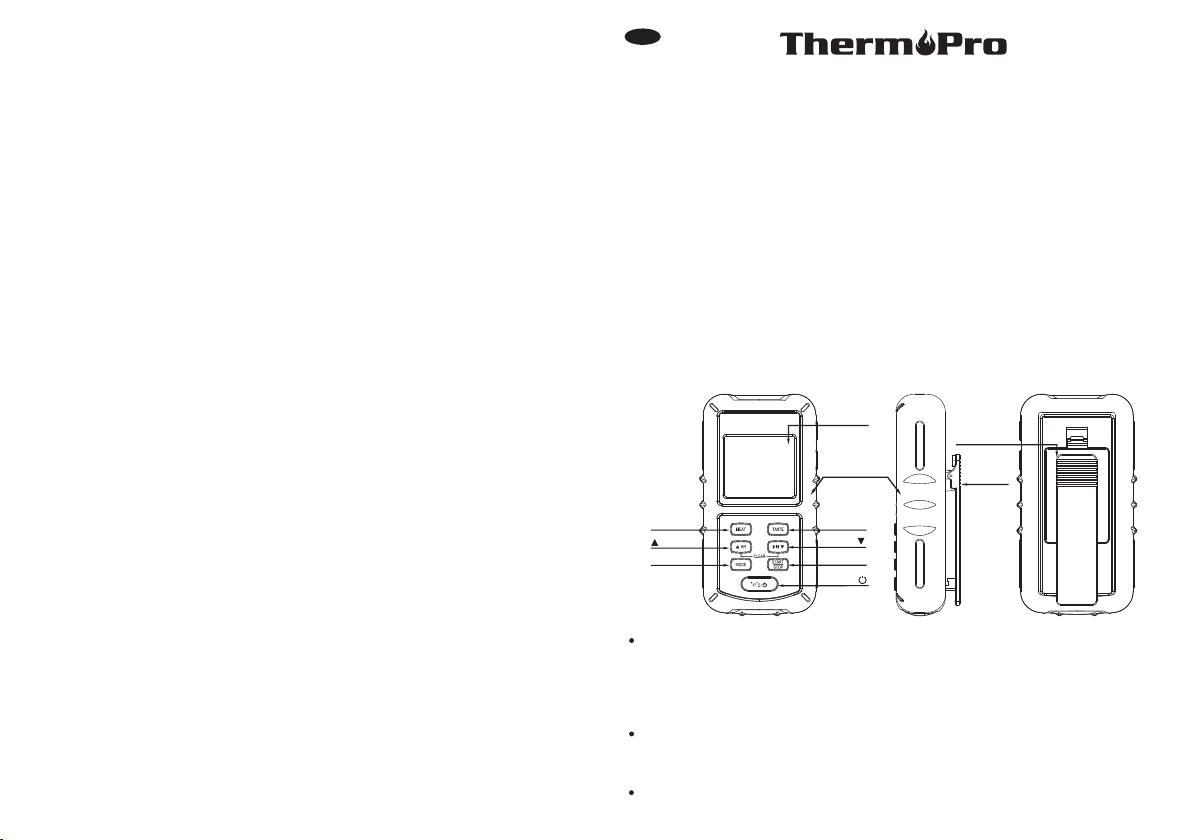
Receiver Features
MEAT
HR
MOD E
LCD d lspla y
Sof t rubbe r sleev e
TAST E
MIN
START /STOP
ºF/ ºC/
Bat tery
Com partm ent
Bel t Clip
LCD (Liquid Cryst al Disp lay) – Displays all i cons, t emperature and ti mer. The
backlight will flash Blue once the temper at ur e in creases by 10 ºF f rom when
co oking s tarts, then it will c hange t o Gre en when t he te mp eratu re is w it hin
15 º F of the set tempera tu re a nd t he n it will turn Red when it reaches the set
temperature. Se e LCD dia gram for detailed i nform ation.
Belt C lip/Stand – Battery compartment clip allows you to be mobile. Clip the
receiver unit to belt. Swing s out and allow you to stand the rece iver on tabletop
as well.
Battery compart ment – Ho lds 2 AAA batteries.
-1-
Buttons
1. MODE – Press to select thermometer or timer mode. Press and hold for 2 seconds
to enter Synchronization/Pairing mode.
2. HR – In timer mode, press once to set hour. Press and hold for 2 seconds, the
hours will increas e by 10 hours per second. In th ermometer mode, pr ess once
to increase the temperature value. Press and hold for 2 seconds, the temperature
value will increa se by 10 de grees per second.
3. F/ C / – Pre ss an d hol d for 2 seco nds t o tur n the r eceiv er ON or O FF. I n º º
th ermometer mod e, p re ss o nce to s elect tempera tu re r eadings in Celsius or
Fa hrenheit.
4. MIN – In timer mode, press once to set minutes. Press and hold for 2 seconds,
th e minutes will in cr ea se by 10 mi nu te s per second. I n th er mometer mode,
press once to decre ase the t emperature valu e. Press and hold for 2 second s,
the temperature v alue wi ll decrease by 10 deg rees pe r second.
5. M EAT – I n thermometer mode, press to se le ct m ea t type, PROG (program),
GBEEF (ground beef), GPOUL (ground poultry), BEEF, VEAL, CHCKE (chicken),
PORK, POULT (poultry), LAMB & FISH. In Timer mode, press to switch between
hour/minute tim er to a min ute/second time r and back.
6. START/STOP– In tim er mode , press to start or sto p the timer.
7. TA ST E – In thermome te r mo de , press to se le ct the meat t as te level, RARE,
ME D RARE, MEDIUM, M ED WELL an d WELL DON E.
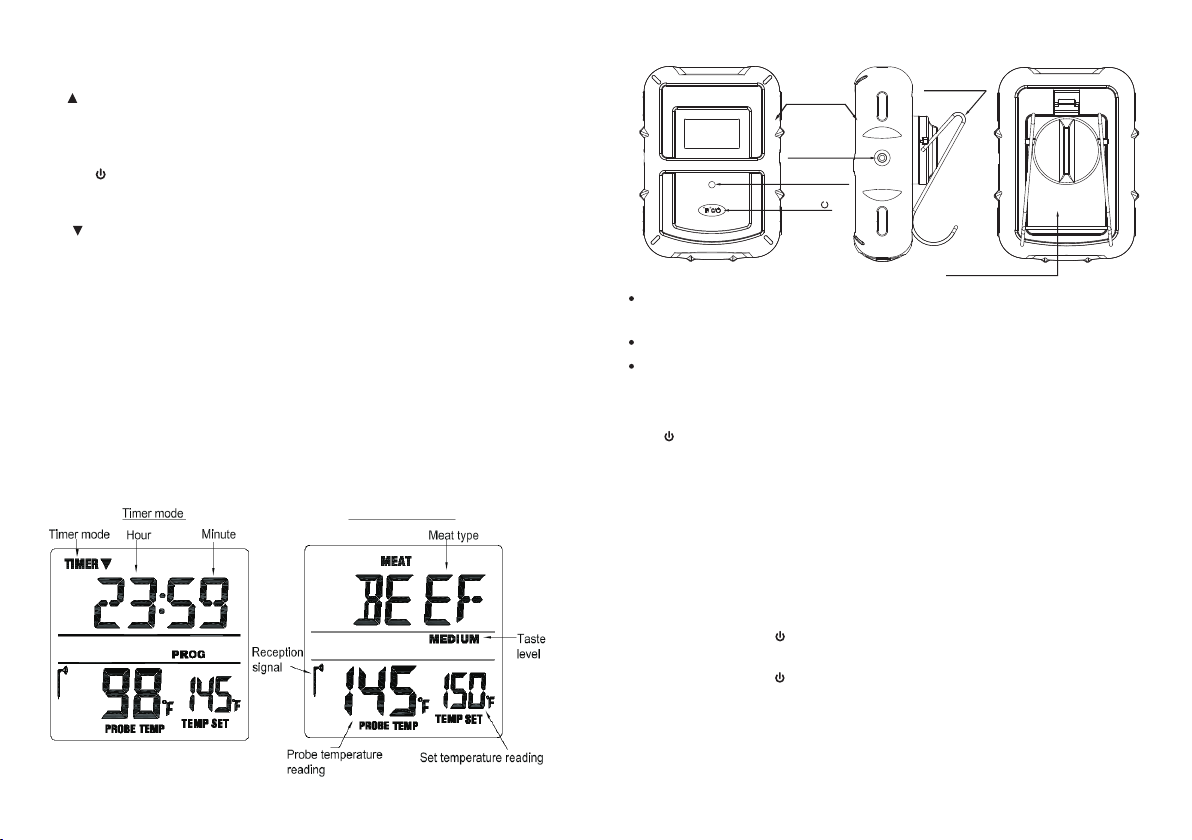
LCD
The rmome ter mod e
Transmitter Features
Sof t rubbe r
sle eve
Sen sor soc ket
hol e
TX in dicat ion led
ºF/ ºC/
Wire Stand – Allows you to stand the transmitter on tabletop or it can be reversed
and used as a hanger.
Battery Compart ment – ho lds 2 AAA batteries.
Sensor Socket Hol e: plug i n for stainless ste el prob e sensor.
Wire Stan d
Bat tery Co mpart ment
Buttons
– Press and hold for 2 seconds to turn the transmitter ON or OFF. Press once
ºF/ºC/
to select temperature readings in Celsius or Fahrenheit.
Installing Batteries
Open the batt ery comp artment of th e rec eiver an d ins ert two “AAA” batteri es wi th
correct p olarity. O pen the bat tery comp artment o f th e transmi tter and insert two
“AAA” batteries w ith cor rect polarity.
Turn On/Off Unit
Pr es s and hol d F/ C/ bu tton on t he receiver f or 2~3 second s to turn i t ON or
OF F.
Pr es s and hold F/ C/ b ut ton on th e tr ansmitter f or 2 ~3 seconds to turn it ON
or O FF.
º º
º º
Synchronize/Pair Transmitter and Receiver
The transmitter a nd rece iver need to be synch roniz ed or paired before u sing.
-2-
There are two ways to d o so:
-3-

Option 1:
a. Insert the stain less st eel probe into the pl ug in of the transmitter.
b. Open the battery compartment of transmitter and insert two “AAA” batteries. The
transmitter will show the current temperature on its LCD display and automatically
keep se nding t he temp er ature r ea ding to the re ceiver for sy nchroni za tion/
pairing.
c. Then open the battery compartment of receiver and insert two “AAA” batteries.
The re ce iv er w il l enter Synchronization mode which is i nd ic at ed b y fl as hi ng
Reception Signal icon on th e display. The synchronization mode will last for 60
seconds.
d. Wait for a moment until the temperature reading shows on the receiver display,
it m ea ns t he s yn ch ronization/Pair in g is com pl et e. Your profes si on al r em ote
cooking thermom eter is r eady for use.
Note: Th e tra nsm itter an d rec eiv er ar e only required to be synchronized/
paired once whenever batteries of the receiver or transmitter are replaced.
If the batteries ar e alrea dy installed in the r eceiv er and transmitte r, you can use
Option 2 to synchro nize/ pair them:
a. Insert the stain less st eel probe into the pl ug in of the transmitter.
b. Turn on the transmitter by pressing and holding F/ C/ button for 2~3 seconds. º º
The t ran smi tte r w ill sh ow th e c urr en t t emp era tu re on its LC D dis pla y a nd
a uto mati cal ly k eep se ndin g th e t e mpe rat ure rea ding to the re ceiv er for
synchronizati on/pa iring.
c. Turn on the receive r by pres sing and holding F/ C/ button fo r 2~3 seconds.º º
d. Press and hold Mode button for 2~3 seconds to enter the synchronization mode
which will last for 60 seconds.
e. Wait for a moment until the temperature reading shows on the receiver display,
it m ea ns t he s ynchronizat io n/Pairing is complete . Your profess io nal remote
cooking thermom eter is r eady for use.
Auto Off feature
The receiver will turn off automatically if it hasn't received the temperature signal
from the transmi tter for mo re than 30 minutes , A beep will sound for one m inute
before it shuts down. However, the Auto Off feature will be automatically disabled
if the timer is runni ng.
The transmitt er will turn off automatically if the temperature measured is alw ays
lower than 122 F or 5 0 C in 120 minutes.º º
-4-
Measure meat temperature to USDA doneness temperature
range
1. Press MODE to select thermometer mode. The upper display will show a sma ll
MEAT and a m eat typ e such as B EE F.
2. Press MEAT to se lect me at type . PROG (p rogram) , GBEEF ( ground beef),
GPO UL ( groun d pou ltry) , BEE F, VEA L, CH CK E ( ch ick en ), PO RK, P OULT
(poultr y), LAMB & FI SH.
3. Press TASTE to select the level of doneness for the meat type selected. RARE,
MED RARE, MEDIUM, MED WELL and WELL DONE.
Note: The temperature displayed to the right of the actual meat temperature PROBE
TEMP will show the preset te mperature TEMP SET according to USDA doneness
levels. Example : Beef wi ll be Well Done at 165 F.º
4. Once the temperature of meat reache s the p reset doneness level the receiver
will beep and the LCD b ack lig ht will turn red.
Measure meat temperature set to your specific taste
1. Press MODE to select thermometer mode. The upper display will show a
MEAT and a meat type such as BEEF.
2. Press HR or MIN to raise or lower the set temp erature. As you press HR or Min
the display changes to PROG (program). Holding the button will raise or lower
the temperatu re s et ting rapidl y. Pr essing MEAT wi ll r eturn you to the preset
USDA ranges.
3. On ce th e temperature of meat reaches the preset doneness level the receive r
wil l bee p and the LC D bac k lig ht wi ll turn red.
small
Procedure for typical use on an outdoor grill
The fol lowing ty pical e xample will go thr ough the steps to ha ve the Professio nal
Rem o te Coo king Th ermo mete r al ert you to whe n a bee f st eak is c ook ed t o
medium (USDA doneness level) and remind you to rotate hot dogs in 5 minutes.
1. Turn on the grill.
2. Follow the synch roniz ation/pairing p roced ure.
3. Place steak and ho t dogs on g rill rack.
4. Insert probe sensor into the center of thickest portion of the steak. Avoid
bone or heavy fat areas. Assume the meat temperature is 45 ºF.
5. P os ition the probe sensor wire so they will not come into c ontact with flames
and exit the gril l surface area wi thout being pin ched/cru shed by the grill cover.
-5-
touching

6. Stand the t ransmitt er away from h eat source o f grill. DO NO T put t ransmitt er on the
cl osed cover or und er t he c over. The tran sm itter is not wate rp roof. DO NOT us e in
the rain.
7. Press MEAT so BEE F is displayed.
8. Pres s TAST E so MEDI UM is dis playe d and 150 F will b e shown as the TEM P
SET.
9. Press MODE to chan ge to timer mode.
10. Press MIN 5 times to set for 5 minutes so that 0:05 is displayed. Press START
/STOP to start the countdown. Press MODE to go back to thermometer mode.
11. You may take the receiver up to 300 ft away from the outdoor grill. Go indoors
if desired.
12. When 5 minutes ar e up the re ceiver will beep fo r 60 seco nds.
13. When the tempera ture of probe in the steak re aches 55 F the LCD backli ght
will flash blue.
14. When the temperature of probe in the steak reaches 135 F the LCD backlight
will flash green.
15 . Whe n the temp er atu re of p robe in th e ste ak re ac hes 1 50 F MEDIU M the
recei ver w ill b ee p a nd th e LCD b ackli ght w il l f la sh re d.
16. Press STOP to t urn off the al ert.
17. Turn off grill. Remove the probe sensor from steak. Always wear a heat resistant
glove t o touch t he stainl es s steel p robe se ns or or w ir e durin g or ju st after
cooking . Do n ot touch wi th b are hands .
18. Clean the stainless steel probe and dry thoroughly after each and every use.
19. Turn off th e transmitter.
º
º
º
º
HELPFUL HINTS
If the re ce iv er an d/ or the tr an smitter d is play LL L or H HH in st ea d of th e probe
te mpe ra tur e, wa it fo r pro be to reac h r oo m t em per at ure . If LLL or HH H i s sti ll
dis pla yed it is lik ely the in tern a l p rob e w ire has sh ort ed o ut eit her thr ough
mo ist ure or he at da mag e.
Using the Timer
Count down
1. Press MODE to select timer mode. The upper display will show a small TIMER
and 0:00.
2. Pre ss HR and MI N b utt on to set th e ti mer. Pre ss START/S TOP bu tto n t o
s tar t c oun tdo wn. “ ” w ill bl ink for ev ery se con d .
-6-
3. To stop the countdown process, press START/STOP button. The “ ” becomes
solid.
4. Press HR & MIN butto ns toge ther to clear the set ting back to 0:00.
Not e: The mini mum setting fo r the timer is 1 minute. When the timer counts down below
1 ho ur 1:00 , th e display w ill chang e to 5 9'59” to in dicat e, 5 9 minutes 5 9 se conds . The
seconds will be shown cou nting down then. When the countdown reache s 0'00” the timer
start s counting up and it w ill beep fo r 60 seconds. Th e timer and “ ” w ill blink . Press
the START /STOP butto n to st op the beeping. W hen the count up re ach es 23:59:59 (59
se co nd s ar e not d is pl ay ed ) the d is pl ay w il l turn to 0 :0 0, t he unit beeps a nd “ ” wi ll
blink for 60 seco nds.
Count up
1. P ress MOD E to s ele ct ti me r m od e. T he u pper disp la y w il l s h ow a sm al l
T IMER and 0:00 .
2. Press START/STOP button to start count up. The “ ” will blink for every
3. To stop the count up process, press START/ STOP button. Th e “ ” becomes
so li d.
4. Press CLEAR butt on to cle ar the setting back t o 0:00.
second.
HELPFUL HINTS
Do not immerse the pr obe in wa ter while cleanin g.
Do not allow the probe or probe wire to come into contact with flames. If cooking
with grill cover closed, only use medium or low heat.
If t he p ro be b ec omes defective within 90 days warranty peri od ple as e re tu rn
defective probe to addres s be lo w al on g wi th r et urn address and we will send
you a new pro be no charg e.
If the temperature displayed seems to read too high or the temperature seems to
increase too quickly check to make sure the probe tip is not pokin g thr ough the
food to outside. Reposition the probe tip in the center of the thickest part of food.
Avo id touc hing bone or heavy fa t areas.
Cautions
Always w ear a he at res is ta nt g lo ve t o touc h the stainles s stee l probe sensor
or w ir e du ri ng o r just after cooki ng . Do not touch with bare hands.
Keep the stainles s steel p robe sensor and wir e away fr om children.
Not Intended for us ing by Pe rsons ages 12 and Und er.
Clean the stainless steel probe and dry thoroughly after each and every use.
Do not immerse the probe or wire in water. use a damp, soapy cloth to clean.
Do not use the receiv er or tra nsmitter in the rai n. They are no t waterproof.
-7-

Do n ot expose the plug of t he s ta in le ss steel probe or the p lu g in hole of the
transmitter to water or any liquid. This will result in a bad connection and faulty
readings.
Do not expose the rec eiver o r transmitter to di rect heat or surface.
Do not use stainles s steel p robe in microwave o ven.
Cleaning
Alway s wear he at resi stant g love to t ouch th e stain less st eel pro be sensor or
wire du ring or j ust aft er cook ing. Do n ot touc h with bare hands.
Keep the stainles s steel p robe sensor and wir e away fr om children.
Wa sh th e m et al probe ti p wit h h ot so apy w ate r a nd dr y t horou ghl y. D o not
im mer se th e p rob e in water wh ile c lea ning.
Wipe t he t ra nsmitter and receiver with damp cloth. Do not immerse either in
water.
FCC Statement
1. This device complies with Part 15 of the FCC Rules. Operation is subject to
following two conditions:
(1) This dev ice may not cause har mful interference.
(2) This dev ice must accept any i nterference rec eived , including inter ference
that may cause unde sired operation.
2. C ha nges or m od if ic at io ns not expres sl y ap proved by t he p arty responsible
fo r compliance co ul d void the us er 's authority to o pe ra te the equipm en t.
the
LIMITED 90 DAYS WARRANTY
Th er moPro w ar ra nts thi s product t o be fr ee of def ec ts in p ar ts , mater ia ls and
wo rk manship f or a pe ri od of 9 0 days, f ro m date of purchase .
Should any repairs or servicing under this warranty be required, contact Customer
Service by phone or email for instr uc ti ons on h ow t o pa ck a nd s hip the product
to Th ermoP ro.
This wa rranty gives you s pecif ic lega l rights and you may a lso hav e other rights
which v ary from state to st ate.
CUSTOMER SERVICE
Telephone: 1-877- 515-7 797 (US&CA only)
Email: service@ buyth ermopro.com
Hours: Wee kdays 9:00 AM- 5:0 0 PM EST
-8-
DE
Funk-Kochthermometer
Model Nr. TP-07
Bedienungsanleitung
Herzlichen Glüc kwuns ch zum Erwerb des Pro fi Funk -Kochthermome ters, einem
programmierba ren Fun kthermometer fü r das Koc hen. Mit dem Gerät we rden Sie
in der Lage sein die Ze it und di e Tempe ratur d es Essens dass Sie au f ihren Grill,
im Smoker oder in ihr em Back ofen zubereiten a us der Fe rne zu überwachen .
Einzelteile
–
1. 1 Empfängere inhei t.
2. 1 – Sendeeinheit .
3. 1 – abnehmbarer Ed elsta hl-Sondensens or.
4. 2 – 2*AAA Batterien .
Funktionen des Empfängers
LCD d lspla y
Sof t rubbe r sleev e
MEAT
HR
MOD E
TASTE
MIN
START /STOP
ºF/ ºC/
LCD (Flüssigk ristallanzeige) – Zeigt alle Icons, die Temperatur und de n Timer
an. Die Displaybe leuch tung wird Blau aufl eucht en wenn die Temperatur nach
dem Beginn des Kochens um 10 ºF stiegt. Sie wird in eine grüne Farbe wechseln
wenn die Tempe ratur 15 ºF innerha lb der ei ngestellten Temperatur ist un d sie
wird in ei ne ro te Farbe wech seln wen n die eing estellte Temperatur erreicht ist.
Schauen Sie auf das L CD-Bi ld um genauere Info rmati onen zu erhalten.
-9-
Bat terie gehäu se
Bel t Clip
 Loading...