

EN
Digital Food Thermometer
Model No. TP-06
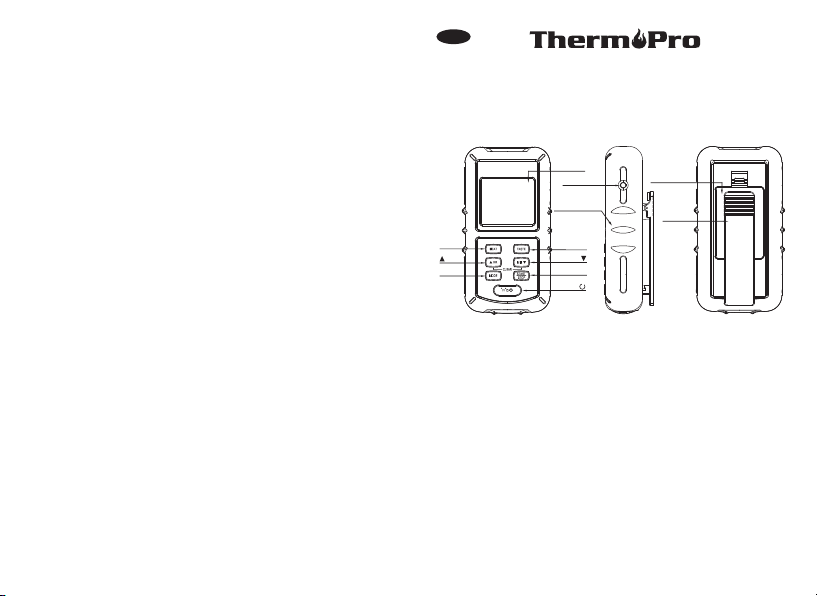
Key Definition
TP- 06
MEAT
MODE
LCD di splay
Sens or sock et
Soft r ubber s leeve
HR
TASTE
MIN
START/ STOP
º ºF/ C /
Batt ery
Comp artme nt
Belt C lip
LCD (Liquid Cr yst al Display) – Di spl ays all icons, temp era tur e
and t imer. The bac k light w ill flash Bl ue once t he temp eratu re
inc reases 10ºF, will change to Gree n whe n the temper atu re is
wi th in 15 ºF o f the s et temp er ature a nd w ill t ur n Red w he n it
re ac he s the set t em pera ture . See LCD d ia gr am for deta il ed
in fo rm at ion.
CLIP – Battery c ompartm ent clip.
Senso r socket - Pr obe cable o utlet hol e.
BATT ERY COMPARTMENT – Holds 2 AAA bat teries.
Buttons
1. MO DE – P ress to s el ect the rm omete r or t imer mo de .
2. HR – In timer mode, press to set hour. Press & hold for 2 seconds,
-1-

will incr ease 10 hou rs per seco nd. In the ho urs thermomete r
th e tem per at ure v alu e. Pr ess & mo de, p res s to inc re ase
for 2 se co nd s, t he t em pe ra tu re v alue hold will increase 10
degrees per secon d.
3. ON-OFF/ F- C – º º Press and hold it for 2 seconds to turn on/off
In t hermometer mo de p re ss t o select the un it . tempe rature
rea di ngs in Cels ius or Fahr enheit.
4. MI N – In time r mode, p ress to s et minu tes. Pr ess & hol d for
minutes will increase 10 mi nutes per secon d. 2 secon ds, th e
decrease the temperature value. In thermometer mode, press to
value will decrease Press & hold for 2 seconds, the temperature
10 de gr ees per sec ond.
5. M EAT – In t he rmomete r mode, p ress to s el ect m ea t type,
GBEEF (g ro un d be ef ), G PO UL ( gr ou nd PROG ( pr og ra m) ,
(c hi ck en ), PORK, PO ULT p ou lt ry ) , BEEF, VEAL, CH CK E
(poul try) , LAMB & F ISH. In Ti me r mode sw it ches
betwe en
hou r/ minute ti mer to a mi nu te/seco nd timer an d back.
6. START STOP– In timer mode, press to start or stop the timer.
7. TAST E – In th ermom ete r mode, sele ct the meat ta ste level,
RARE, MED RARE, MEDIUM, MED WE LL and WELL DONE.
Installing Batteries
Ope n th e battery c ompartm ent and ins ert two AAA bat teries
with co rrect pol arity.
Turn O n/ Of f Th e Un it
Pre ss a nd hold “ C/ F/ ” for 2 sec onds to tur n on/off the unit.º º
Measure meat temperature to USDA doneness
temperature range
1. Press MODE to select thermometer mode. The upper di splay
-2-
will show a small MEAT and a meat type such as BEEF.
2. Press M EAT to se lect meat type. P ROG ( program) , GBE EF
( gro und bee f), GPO UL (gr ound po ultr y) , B EEF, VEA L,
CHCKE (chicken ), PO RK, P OULT (poul try ) , LAM B & FISH.
3. P re ss TAST E to se le ct the le ve l of do ne ne ss for th e meat
ty pe se le cted. R ARE, ME D RAR E, ME DI UM, M ED WELL
an d WELL DONE .
Note : The temperature displayed to the right of the actual meat
tempe ra tu re tempe ra tu re PROBE T EM P will sh ow t he p reset
TE MP SE T a cco rdi ng to US DA Exa mpl e: do nen ess l eve ls.
Beef w il l be Wel l Done at 1 65 F.º
4. Onc e the te mperature of meat reaches the prese t doneness
leve l the un it will beep and the LCD backlight will tu rn red.
Measure meat temperature set to your specific taste
1. P r ess M O DE t o se lect t h ermo me ter m ode. The u p per
dis pla y w ill sh ow a s mal l M EAT an d a me at ty pe suc h as
BE EF.
2. P re ss HR or MI N to rais e or lower th e se t tempera tu re . As
you press HR or Min the display changes to PROG (program).
Hold ing th e button will raise or lower th e temp erature setting
rapidly. Pressing MEAT wi ll r et ur n yo u to t he pre se t US DA
ranges.
3. Once the temperature of mea t reaches the pr ese t doneness
level the unit will be ep and the LC D bac k light will tur n red.
Using the Tim er
Cou nt d own
1. P re ss MO DE t o sel ec t timer m ode. The up per dis pl ay wi ll
sh ow a sm al l TIMER a nd 0: 00 .
-3-

2. P res s HR an d MIN bu tt on to se t the t ime r. P re ss STA RT/
STO P but ton t o star t c oun tdo wn. “ ” wil l blin k f or ev ery
se con d.
3. To stop the co untdown process , press START /STO P button.
The “ ” beco mes so lid.
4. Press H R & MI N bu tt on s to ge th er t o cl ear th e se tt in g ba ck
to 0 :0 0.
Not e: Th e minimum se tting for th e timer is 1 minute . When the
timer counts down belo w 1 hour 1:00 the display will change to
59'59 ” di splay adv is ing 59 minu te s 59 s econds. T he second s
will be shown counting down then. When the countdown reaches
0'00” the timer starts counting up and it will beep for 60 seconds.
The timer and “ ” will blink. Pre ss the S TART/S TOP but ton
to st op b eep ing . Wh en the co unt up re ache s 23:5 9:5 9 (5 9
se co nds a re no t dis pl aye d) t he di spl ay wi ll t urn t o 0:0 0, th e
un it be ep s and “ ” wi ll bl in k for 6 0 sec on ds.
Cou nt u p
1. P re ss MO DE t o sel ec t timer m ode. The up per dis pl ay will
sho w a smal l TIM ER and 0: 00.
2. P re ss START/STOP button t o st art count u p. T he “ ” wi ll
bl in k for e ve ry seco nd .
3. To stop the count up process , press START/STOP button. The
“ ” becomes soli d.
4. Pr es s CLEAR but ton to clea r the setti ng back to 0: 00.
Procedure for typical use on an outdoor grill:
The fo llowing typi cal example will go through the steps to have
the Professional Cooking ,Thermometer alert you to when a beef
steak is co oked to med ium
you to rota te hot dogs in 5 minu tes .
(USDA done ness level) an d remind
-4-
1. Pl ea se correc t load 2*AA A batterie s.
2. Pl ac e steak and h ot dogs on gr ill rack.
3. In sert probe s ensor into t he ce nter of thic kest po rti on of the
ste ak . Avoid to uching bo ne or heavy f at areas. As sume the
mea t te mpera tu re is 45 F.º
4. Position the probe sensor wire so they will not come into contact
and exit the grill surface area without being pinched/ with flames
crushed by the grill cover.
5. Pr es s MEAT so BEEF is d is played.
6. Press TASTE so MEDIUM is displayed and 150 F will be shown
as the TEMP SET.
7. Pr es s MODE to c ha nge to ti me r mode.
8. Pr ess MIN 5 t im es t o s et for 5 m in utes so th at 0 :05 is
dis play ed. Pr ess START /ST OP to sta rt t he cou ntd own .
Pre ss M ODE to go bac k to t her mom eter mo de.
9. Wh en 5 m inutes ar e up the unit w ill beep fo r 60 second s.
10. W hen the t emperatu re of pro be in the stea k reach es 55 F
the L CD back ligh t will fl ash blu e.
11. When the temperature of probe in the steak reaches 135 F
the LCD back li ght will flash green.
12. When the temperature of pr obe in the steak reaches 150 F º
MED IUM the nit w ill bee p and the L CD back l ight will f lash
red.
13. Pre ss STOP to turn off the ale rt.
14. R emove t he prob e senso r from steak. Always w ear a hea t
to touch the sta inless stee l pro be se nso r or resistant glove
Do not touch with bare hands.wire during or just after cooking.
15 . Cl ea n the sta in le ss steel pr ob e and dry t ho ro ughl y after
ea ch a nd every us e.
º
º
º
-5-

HELPFUL HIN TS
If the unit display LLL or HHH instead of the probe temperature,
wait for probe to reach room temperature. If LLL or HHH is still
dis playe d it is l ikely t he in terna l probe wire h as shor ted out
either through moisture or heat damage.
Do not im merse the p robe in wat er while cl eaning.
Do not allow the probe or probe wire to come into contact with
flames. If cooking with grill cover closed, only use medium or
low h ea t.
If the probe becomes defective within 90 days warranty period
ple ase ret urn defect ive pro be to addres s below a long wi th
return address and we will send you new probe no charge.
If the temp erature displ ayed seems to read to o high o r the
temperature seems to increase too quickly check to make sure
the probe tip is not poking through the food to outside. Reposition
the p robe tip in th e center of th e thick est p art of fo od. Avoid
touching bone or heavy fat areas.
Cautions:
Always wear a heat resistant glove to touch the stainless steel
probe sensor or wire during or just after cooking. Do not touch
with bare hands.
Keep the stainless steel probe sensor and wire a wa y fr om
children.
Not Int ended for U se by Perso ns ages 12 an d Under.
Clean the stainless steel probe and dry thoroughly after each
and every use.
Do not immerse the probe or wire in water. Use a damp, soapy
cloth to Clean.
Do not use the rece iver o r transmitt er in th e ra in. They ar e
not water proof.
Do not expose the plug of the stainless steel probe or the plug
-6-
in hole of the transm itter to water or any liquid. This will result
in a bad connec tio n and f aulty reading s.
Do not ex pose the un it to direc t heat or sur face.
Do not us e stainle ss steel pr obe in micr owave ove n.
Cleaning
Always wear a heat resistant glove to touch the stainless steel
probe sensor or wire during or just after cooking. Do not touch
with bare hands.
Keep th e stainless s te el p robe sensor a nd w ir e away from
child re n.
Wash the metal probe tip with hot soapy water and dry thoroughly.
Do not immerse the probe in water while cleaning.
Wipe the tr an sm itter and rec eiver with damp c loth. Do not
immer se either in wate r.
LIMITED 90 DAYS WARRANTY
ThermoPro warrants thi s product to be free of defects in parts,
materials and work mans hip for a period of 90 days, from date
of purchase.
Should any repairs or servicing under this warranty be required,
contact Customer Service by phone or email for instructions on
how to pack and ship the product to ThermoPro.
CUSTO ME R SE RVICE
Telepho ne: 1-877 -5 15-7797 ( US &CA only)
Email : service @b uytherm op ro.com
Hours : Weekd ay s 9:00 AM- 5:0 0 PM E ST
This warranty gives you specific legal ri ghts and you may also
have other rights which vary from state to state.
-7-
 Loading...