

Thermopro TP-05 User Manual
Th in f oo ds(unde r1 /2 i nc h) a re v er y di ffi cu lt t o me as ur e pr op erly as they tend to
coo k t hro ugh fa st. A lw ays ins ert ti ps int o t hic kes t p art of f ood rea liz ing th in
se c ti ons w i ll be c ook ed fa ste r.
LIMITED 90 DAYS WARRANTY
The rmo Pro w arr ants this prod uct t o be free of de fec ts in parts, mat eri als and
wor kma nsh ip fo r a period of 9 0 days, from dat e of purchase.
Should any repairs or servicing under this warr anty be required , contact Customer
Servi ce by p hone or emai l for i nstru cti ons on ho w to pa ck and ship th e pro duct to
The rmo Pro .
EN
DIGITAL GR IL LI NG T HE RM OM ET ER F OR K
Model No. TP-05
INTRODUCTION
You r TH ER MO PRO THERM OM ET ER F ORK i s th e new es t an d most in no va ti ve
el ectro ni c fo od ther mo me ter tha t qu ic kly & accur at ely indic at es the done ne ss o f
co oked meat s, f is h an d po ultry dur in g th e co oking proce ss . The devic e in st antly
measures the temperature of the food through its copper sensory tip and electronically
sends t his rea din g to t he LC D displ ay.
CUSTOMER SERVICE
Telepho ne: 1-8 77-51 5-7 797 (US &CA only )
Email : servi ce@ bu yth ermop ro.co m
Hours : Wee kdays 9 :00 AM- 5:0 0 PM EST
Th is warr anty gi ve s you spe ci fic leg al righ ts a nd you ma y al so have o th er righ ts
wh ich v ar y from st at e to stat e.
-6-
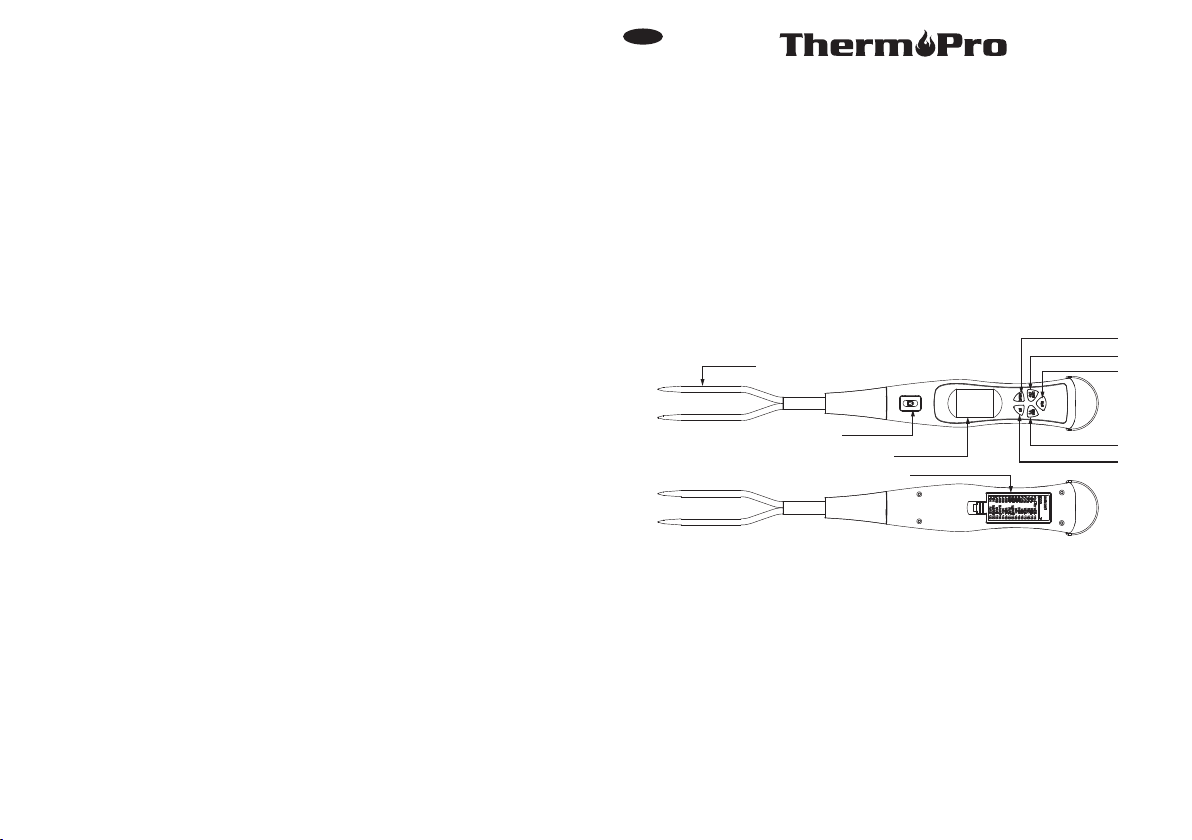
Key Definition
ON/A UTO Butt on
Fork Tips
Lock Button
LC D Sc re en
Battery Compartment
START/STO P Button
LIGHT Bu tto n
CLEA R F/`C Butt on
SET Button
Manual
1. Fork Tips: Insert Fork Tips into meat to receive intern al meat temperature.
2. ON/A UTO Butt on: P ress to powe r on th e unit. Once p owe red on, p res s the ON/
OFF button t o tog gle bet wee n Temp mo de an d Time r mode.
3. SET Button: In Temp mode, pr ess the button to set th e desired temperature. Press
the SET button once to increase the reading by 1 degree; press and hold to increase
the tem perature rapidly. In timer mode, press the SET button to increase the timer
by 1 minu te; press and hold to increase the minutes rapid ly.
4. START/STOP Button: When in Temp mode, the button has no fun cti on. In Time r
mod e, pr ess t he bu tto n to st art the Timer, pre ss ag ain t o sto p the t ime r.
-1-

5. CLEAR Butto n: In Temp mode, pr ess t he bu tto n to toggle th e uni t bet ween ℉/℃
Fahrenhei t and Celsius uni ts. In Timer mode, press the CL EAR button to res et the
pres et timer.
6. LIGHT Button : Press onc e to act ivate the backligh t LED, When no key operat ion,
the b ac kl igh t au to mat ic al ly tu rn o ff af te r 10 se co nd s.
7. LC D Scr een : Dis pla ys timer or temp era tur e dep end ing o n the mode selected.
8. L oc k Bu tt on : Pr es s an d ho ld t o de ta ch f or k ti ps f ro m th e re st o f the device . To
reinsert the fork tips, press and hold the lock button and slide them back into place.
9. Batt ery Com par tm ent : Holds t wo AAA batte ries to p ower th e uni t.
BUTTONS
ON/AU TO bu tton
- When unit is off, press the ON/AUTO button onc e to switch on the un it.
beep once.
- W he n u nit is i n n orm al op erat io n s, pr ess th e bu tto n, i t w il l t ogg le ON /AU TO
bet we en Temp . m od e a nd Tim er mo de . Def au lt mo de is Temp m od e. In T im er
m od e, th e i co n “ Ti mer ” wil l d is pla y.
-T he m ea s ur e d tem per atu re is di s pl a ye d o n t he LC D . Whe n t he te m pe r at u re
reach es t he pr ed ef ine d te mp era tu re , the c or re spo nd in g don en es s ind ic at or s
wi ll b e di sp layed. An d th e ba ck l ight will turn on autom at ic al ly.
The un it will
SET button
- In Temp mod e, p res s th e butto n to set th e de sired t emper ature s. The ic on “ SET ”
is sh own. The t emp era tur e reading to be set st arts to flash for 3 se conds. Before
the flashing ceases, press the SET button again to increase the reading by 1 degree
ea ch t im e th e bu tt on i s pr es se d; o r pr es s an d ho ld t o in cr ea se t he t em pe ra tu re
ra pid ly. When t he r eadin g excee ds the up pe r limit o f the ope ratin g te mpera ture,
it starts again from the lowe r limit in a cyclic fashi on (48.9℃-100℃ or 120℉-212℉).
the temper atu re measure d by un it will then b e dis played aft er th e fla shing .
- Wh en the detected t em pe ra tu re i s eq ua l to or h ig he r th an s et temperature, t he
rea di ng of th e det ec ted t emp er atu re wi ll fl as h t og eth er wi th se qu en t ia l b ee p
so un ds g en er at ed .T he v is ua l an d audi o indicati on s stop when the c on di tion i s
no longer valid. The bee p sounds only last for a maximum of 10 secon ds.
- In Time r mod e, p r es s the S ET bu tt on to in cr ea se th e t im er by 1 mi nu te. T he 4
di gits wi ll f lash fo r 3 se conds , Be fore the fl as hing ce as es, pre ss t he SET bu tton
aga in to i ncr eas e the read ing by minute each time th e but ton i s pre sse d; or press
-2-
. Pr es si ng a nd h olding the SET bu tt on an d ho ld t o in cr ea se t he m inutes rapi dl y
ex ce ed s th e up pe r li mi t of ( 24 :0 0) , it w il l th en s ta rt a ga in l imit i n cy clic f ashion
(0: 00 -24 :0 0) . W he n 0 '0 0" ap pe ars , Pre ss S TA RT /S TO P but to n t o ch ang e to
co unt u p.
-When t he time r is ru nn ing , the SET butt on cann ot bu use d.
START/STOP button
- In Temp m ode, th e butto n has no fu nct ion.
- In Tim er mo de, press the button to start th e tim er. The icon “Tim er” & “ :” wi ll fl ash ,
button again to stop the timer. Th e icon “Timer ” & “:” wil l sto p fla shing.Press the
- Whe n the timer is set to cou nt- up the format of MIN : SE C will switch to H R: MI N
the t ime r
- Whe n th e tim er i s s et t o c ou nt down. T he f orm at o f H R: M IN wi ll swit ch t o M IN :
ti me r c ou nt s s ho rt er th an 1 ho ur. Ma x ra nge i s 24h rs {2 4: 00} .SE C i f th e
cou nts l ong er than 1 hour. Max r ang e is 24hrs{24:00}.
CLEAR/( F or C)button° °
-In Temp mode, pre ss the button to toggle the unit between Fahr enhei t and Celsius.
-In Time r mode, p res s th e CLE AR butt on to res et th e prese t timer.
-When t he time r is ru nn ing t he CLEA R butto n can no t be us ed.
N0TE
-Ev ery bu tton pres sed pr oduces 1 beep sound to indica te rec ognitio n by the unit.
USING THE RAPID-READ THERMOMERER FORK with TIMER
Wi th t he unit i n th e temperature m od e gr as p th e Th er mometer F or k fi rm ly w it h
on e han d an d ins er t th e tip s (o nl y t he r ig ht co pp er tip ha s se nsor in i t) in to t he
ce nter of t he t hicke st p ortio n of t he food ( tr y to avoi d to uchin g bo ne or hea vy f at
areas ). H old in po sitio n for a few s ec onds an d watch t he LCD di sp lay a s th e unit
co mp utes the temper at ur e. T he t emperat ur e di sp la y wi ll g o to a ll d as hes “---.-”
an d t he i con s: “ RAW” , “ RA RE”, “M . R AR E” , “ ME D” , “ be ef WE LL ” and “ po ult ry
WE LL ” wi ll b e tu rn O N co nsecuti ve ly.
-3-
if
 Loading...