

Thermopro TP-04 User Manual
EN
Digital Food Thermometer
Model No. TP-04
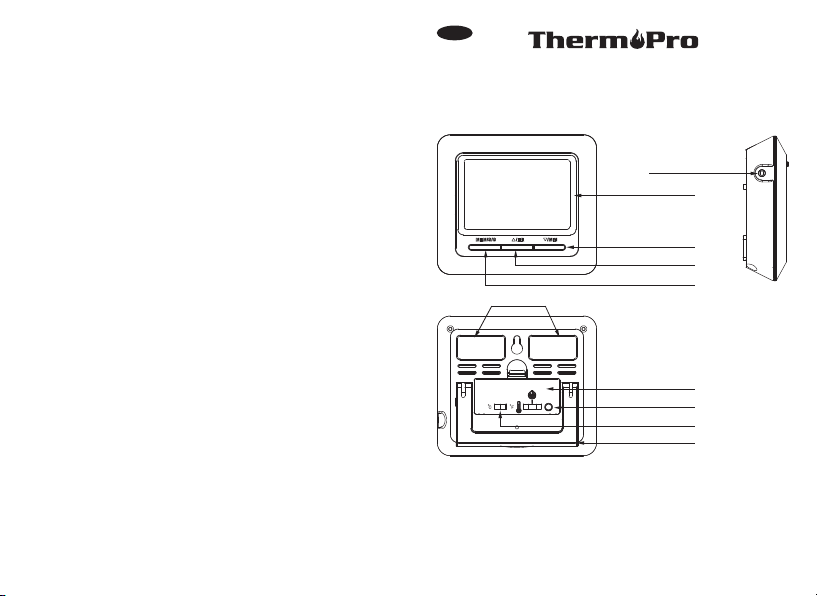
Key Definition
Tempe ratur e Probe S ocket
LCD S creen
Dow n Arr ow/ MIN B utton
Up Arrow/ HR Button
MEM S /S Butt on
Mag net
Bat tery Co mpart ment
Mod e Selec tor
˚F or ˚ C Selec tor
Fli p-out C ounte r Top St and
Keys Definition
1. Temperature Probe Socket: Insert temperature probe into this
socket to measure meat temperature.
2. LCD Screen: Displays meat temperature and set temperature
while in cook mod e. Displays co unt dow n timer whe n in timer
-1-

mode.
3. MEM|S/S Button: Press the MEM button while in cook mode to
enable the option to adjust quic k temperat ure settings. Pr ess
again to save selection. Press the S/S button when in timer mode
to begin the count-down timer. Press the S/S button to pause or
restart the timer. When the countdown timer hits 0:00 press the
S/S button to silence the unit.
4. Up Arro w/HR Butt on: Pr ess the up arrow to se lect food types
while in qu ick temperature setting. Pre ss th e up arrow to set
your desired cooking temperature while in manual temperature
setti ng. Press the HR button to set hours while in timer mode.
To clear time, press the HR and MIN buttons at the same time.
5. Down Arrow/ MIN Button: Press the down arrow to select food
types while in quick temperature setting. Press the down arrow
to set yo ur desire d cooking temperature while in the manual
temperature setting. Press the MIN button to set minutes while
in timer mode. To clear time, press the HR and MIN buttons at
the same time.
6. F or ˚C Selector: Move the switch towards ˚F or ˚C, depending
˚
on how you would like your temperature displayed.
7. M od e Se le ct or : Mo ve t he pos it io n of the selector to select
co ok m od e, t im er m ode or p ower o ff t he d evic e.
8. Flip -o ut Coun te r Top Stand : All ows user to p la ce devi ce on
count er f or easy v ie wing.
9. Magnet: Allows user to stick device to a metal surface. For example,
a refrigerator.
10 . Bat te ry Co mp artme nt: R em ove b atter y cov er to i nsert 1
AAA batt er y.
Note: This unit is designed to remotely monitor cooking progress.
Do not remove the probe during cooking. The internal temperature
will be displayed on the remote unit outside of the oven.
-2-
FEATUR ES AND SPECIFICATI ON S
Pro gr ammable a lert with p reset tem peratur es for spec ific
foo ds .
23-ho ur, 59-min ute count down time r.
Sta in less stee l tempera ture prob e with stee l mesh cabl e.
Tempera ture range of probe: 32˚F to 482˚F (0˚C to 250˚C).
Temperat ure tolera nce of in terna l food readi ng: +/- 1.8˚F
(+/ -1.0˚ C).
Tempe rature re adings in ˚ F or ˚C.
Fli p- out cou nt er top st an d and magne t.
Use s on e AAA battery ( include d).
BATT ERY INS TALLATION/SET UP
Sli de op en th e battery co mpartmen t doo r at th e back of the
unit.
Insert one (1) AAA battery according to the polarity markings.
Repla ce the batt ery compa rtment do or.
Remov e the print ed vinyl la bel from th e LCD scree n.
IMPORTAN T NO TE S/ WAR NI NG
Thi s pr oduct is no t for use in mi crowave o vens.
Keep ou t of reach of c hildren .
Do no t tou ch ho t probe or wire wit h bar e hands or just aft er
coo king. Alw ays wear a heat-r esi stant glov e.
Do not ex pose prob e di rectl y to f lame. Doi ng so will ca us e
wire to deterio rate.
When n ot i n use, slide th e mo de selector s wi tc h to t he off
positi on O to c on se rv e the battery.
Be sure to use a new, good quality alkaline battery and replace
-3-

it of ten . A weak ba tte ry will caus e the u nit to lose accur acy.
Always dispose of exha usted ba tte ries saf ely.
A food thermom eter can ass ist in the proper p reparati on of
food. How eve r, use of this electronic device doe s not guard
against unsafe food handling practices. Always follow proper
food preparation tech niqu es t o li mi t th e ri sk o f fo od b or ne
ill ness.
Th e sta inl es s ste el wi re pr ob e sho uld n ot be e xpo se d to
ov en t em per at ure s exc eed in g 572 ˚F (3 00˚C) .
If the t em perature exceeds o r fa ll s be lo w th e me as ur ab le
ranges , th e LC D screen will d is pl ay t he following lett er s:
HHH for temperatures above range and L L L for temperatures
below ra ng e.
OPERATIN G IN ST RU CT IO NS
Using t he Cookin g Therm ometer
Clean the stainle ss tem pe rature probe with hot water and
soap and rin se cle an. Do not sub merge the probe and cable
in w ater. The p ro be / ca bl e co nn ec ti on i s not wa terp ro of .
Plug the te mpe rat ure probe into the socket on the right side
of the main unit.
Make sure th e pr ob e ca bl e is f ree of k no ts . Ma ke sur e th e
sen sor plu g on the en d of th e cord is p lugge d into th e base
unit. (Note: if the probe is not plugged in properly or is crimped,
the disp lay w ill s how L LL. )
Slide t he s witch on the ba ck o f the base unit t o di splay the
tempe ra ture in ˚F o r ˚C.
Slide t he mode sel ector swi tch to the co ok positi on “ ”.
You wi ll s ee two t em pe ra tures on t he L CD d is play. On the
left actual temperat ure re ad in g as m ea su re d by t he is the
-4-
tem pe ratur e probe a nd o n the rig ht is the s et temper ature .
The default reading is 212˚F
Set your desired c ooking t emperature by ch oo sing Q ui ck
Tempe rature Se tting o r Manua l Tempera ture Se tting . (see
Section Quick Temperature Setting and Manual Temperature
Setting)
Insert the tip of the temperature probe at least 5 cm/2” into the
thickest part of the meat, but not near bone or gristle.
Place food into the oven. Before closing the oven door, make
sure there is enou gh slack in the steel mesh cable to prevent
the probe from being pulled out of the food when the oven door
is closed . Th e base unit must be p ositioned outsi de o f th e
oven on a stable surface and must be firmly connected to the
tempera ture probe.
To preve nt damage to the base u nit , it should not be placed
on a hot surface.
Wh en th e int ern al te mp eratu re of y our f oo d rea ches th e
te mp er at ure you h av e se t, an a ud ib le aler t wi ll soun d. To
st op th e ale rt, e ither s lid e the m ode s el ect or sw it ch to O
or di sc onn ect t he te mpe ra tur e p ro be fr om th e bas e uni t
an d the a lar m wil l sto p wit hi n 30 sec on ds.
Before removing the food from the oven, disconnect the steel
mesh cable from the base unit. Do not touch hot probe or wire
wit h bar e han ds du rin g or ju st af ter c ook ing. Always wear a
heat-resistant glove.
Quick Temperature Setting
Your digital cooking thermometer is programmed with preset temperatures
for various cooking levels; poultry (185˚F), beef well (170˚F), veal/pork
(170˚F), beef medium (160˚F), ham (160˚F) and beef rare/fish (145˚F).
Fol low these steps:
-5-
Press the MEM button.
Press “ ” or “ ” to select your food type.
Press MEM to confirm and lock in the setting.
NOTE: You can make manua l adjustments to the preset temper atures
by pressing “ ” or “ ”. Press and hold the button for fast setting.
PR ESE T TEM PER AT URE COO KING CHA RT:
PRESET
TYPE
HEADING
FISH
BEEF RARE
HAM
BEEF
MEDIUM
VEAL
PORK
BEEF WELL
POULTRY
Beef (roasts, steaks & chops) - Rare
Beef (roasts, steaks & chops) – Medium
Pork (roasts, steaks, chops, sausages) –
Veal (steaks, roasts, tenderized or non-
Pork (roasts, steaks, chops, sausages) –
Beef (roasts, steaks & chops) – Well
FOOD
TYPE
Fish
Egg dishes
Ham (Raw) – Note: Precooked
Ham (140˚F)
Medium (Pink)
Ground Meats (beef, veal, pork)
tenderized cuts) – Well Done
Well Done
Poultry (chicken, turkey) – Whole
Duck & Goose
RECOMMENDED
INTERNAL
TEMPERATURE
145˚F/63˚C
160˚F/71˚C
160˚F/71˚C
170˚F/77˚C
170˚F/77˚C
185˚F/85˚C
Manual Temperature Setting
For manua l sett ing, pres s “ ” or “ ” to s et your de sired
coo king tem perat ure.
-6-
Refer to the ‘Preset Temperature Cooking Chart’ for recommended
internal temperatures.
COUNTDOWN TIMER
Your c ountd ow n timer can o pe rate as a tim er o nly or it can be
used wh il e the cooki ng t hermome te r is in opera ti on.
Sli de th e mode selector s wit ch on the back of the base unit
to t he time r po siti on .
Pre ss H R to set th e ho urs and MIN t o set the m in utes.
Press S/S (start/stop) to start the countdown timer. The colon
between hours and minutes will flash.
When the time r gets to 0:00, the alar m will sound. Press S/S
to sil enc e the al arm . This unit has a timing me mor y and wi ll
aut omati cally disp lay he or igina l tim er sett ing when S/S i s
t
pressed to silence the alarm.
To clear the time, press the HR and MIN button s at the same
time. You can pause th e timer while it is runni ng by pressin g
S/S . Pr ess S/S a ga in to res ta rt the ti me r.
If you are using the timer and therm omet er at the same time,
slide the selector switch back to the cook positio n
you m ay
during the ti ming se ssion to view the cooking temperatures.
The timer will continue the cou ntdown.
CLEANING AND CARE
Unit is not wa terproof. Do not exp ose plug of probe or plug in hole to any liquid, which will result in a bad connection and
faulty readings.
The probe an d ca bl e ar e no t dish wa sh er s af e. T he y mu st
be hand wa sh ed u si ng h ot wat er a nd s oap. M ak e su re to
rinse and dr y th e 0probe thoroughly before storing.
-7-

Do n ot subm er ge the ba se unit i n water o r expos e to any
cor rosiv e cle aning m ateri als. Wi pe with d amp clo th.
LIMITED 90 DAYS WARRANTY
The rmo Pro w arr ants this product to be free of def ects in pa rts,
mat eri als and wo rkmanship for a pe riod of 90 d ays, fro m dat e
of purch ase .
Should any rep airs or servicing under this warra nty be required,
contact
Customer Service by phone or email for instr ucti ons on
how to pack and ship the prod uct to ThermoPro.
DE
Digital Lebensmittel-Thermometer
Modell Nr. TP-04
Tast en D ef in it io n
Tempe ratur fühle r Ans chlus s-Buc hse
LCD -Anze ige
CUSTO ME R SE RVICE
Telepho ne: 1-877 -515-77 97(USA & Can ada only)
Ema il : service @buythe rmopro. com
Hours : Weekd ays 9:00 AM- 5 :00 PM EST
Thi s war ranty g ive s you specif ic legal rig hts a nd you may als o
hav e oth er righ ts whi ch va ry from stat e to st ate.
-8-
Dow n Arr ow/ MIN Tas te
Up Arr ow/HR Tast e
ME| S/S-Tas te
Mag net
Bat terie fach
Mod us- Wahl schal ter
˚F or ˚ C- Wahls chalt er
Sta ndfuß
Bedientasten
1. Temperaturfühler Anschluss-Buchse: Stecken Temperaturfühler
in diese Buchse, um Fleisch Temperatur zu messen.
-9-
 Loading...