

ThermoPro TP-03A Instruction Manual

DIGITAL INSTANT READ THERMOMETER
INSTRUCTION MANUAL
Model No.: TP-03A
V20 17092 7 EN FR DE IT E S
Cook Like A Pro Every Time!
Instruction Manual Page 2
Manuel D'utilisational Page 7
Bedienungsanleitung Seite 13
Istruzioni per l’uso Pagina 19
Manual de instrucciones Página 25
EN
FR
DE
IT
ES
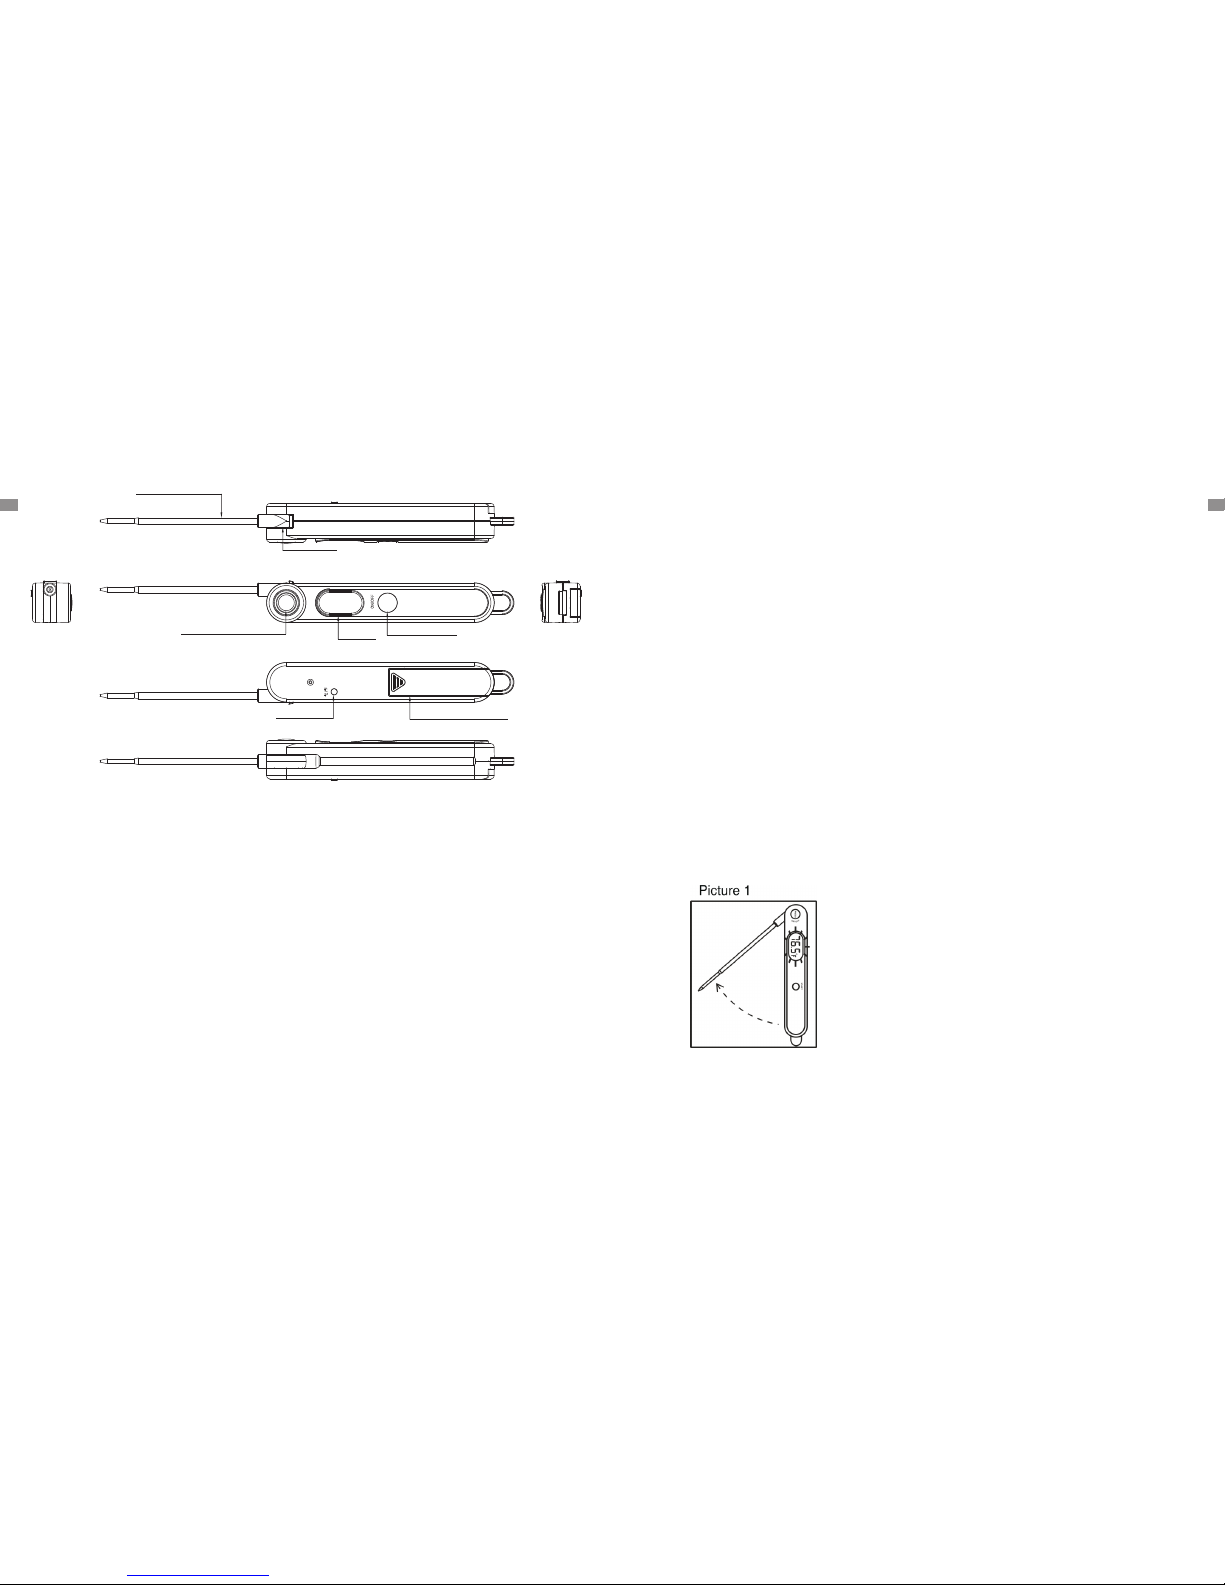
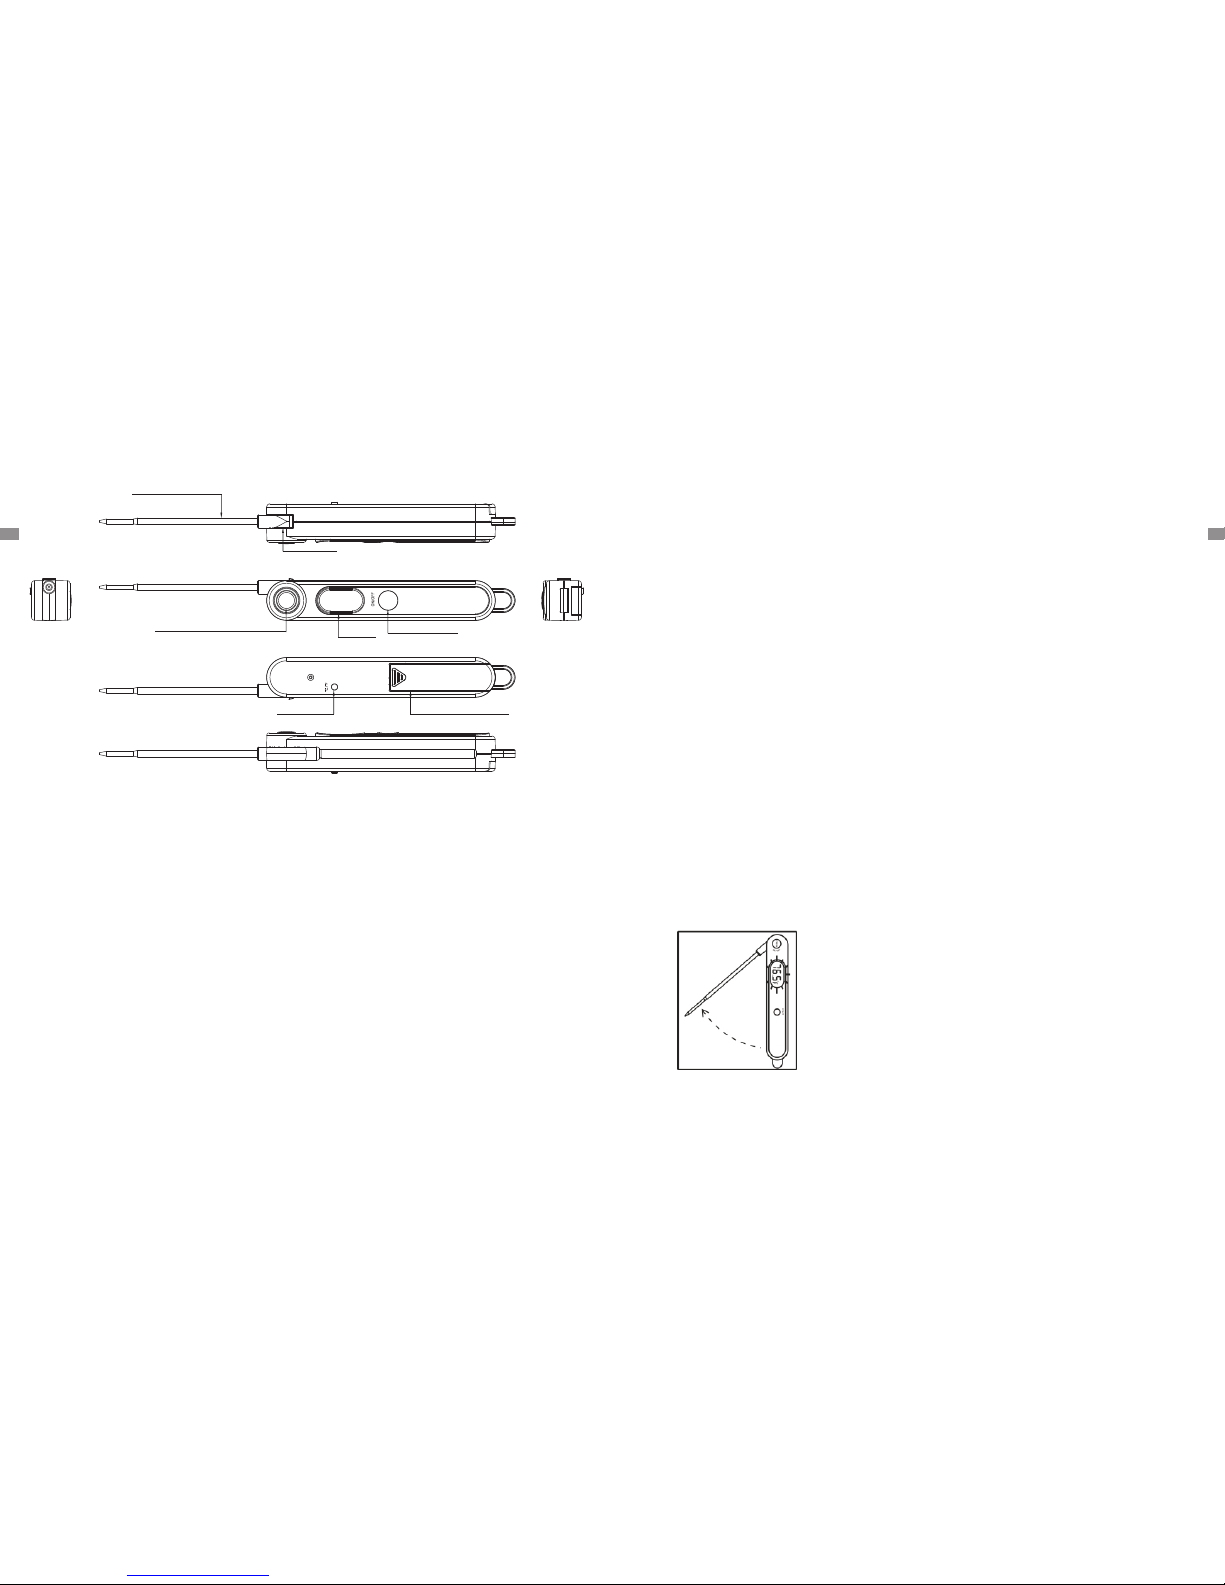
3. ON/OFF Button: Press on ce to turn ON/OFF the unit.
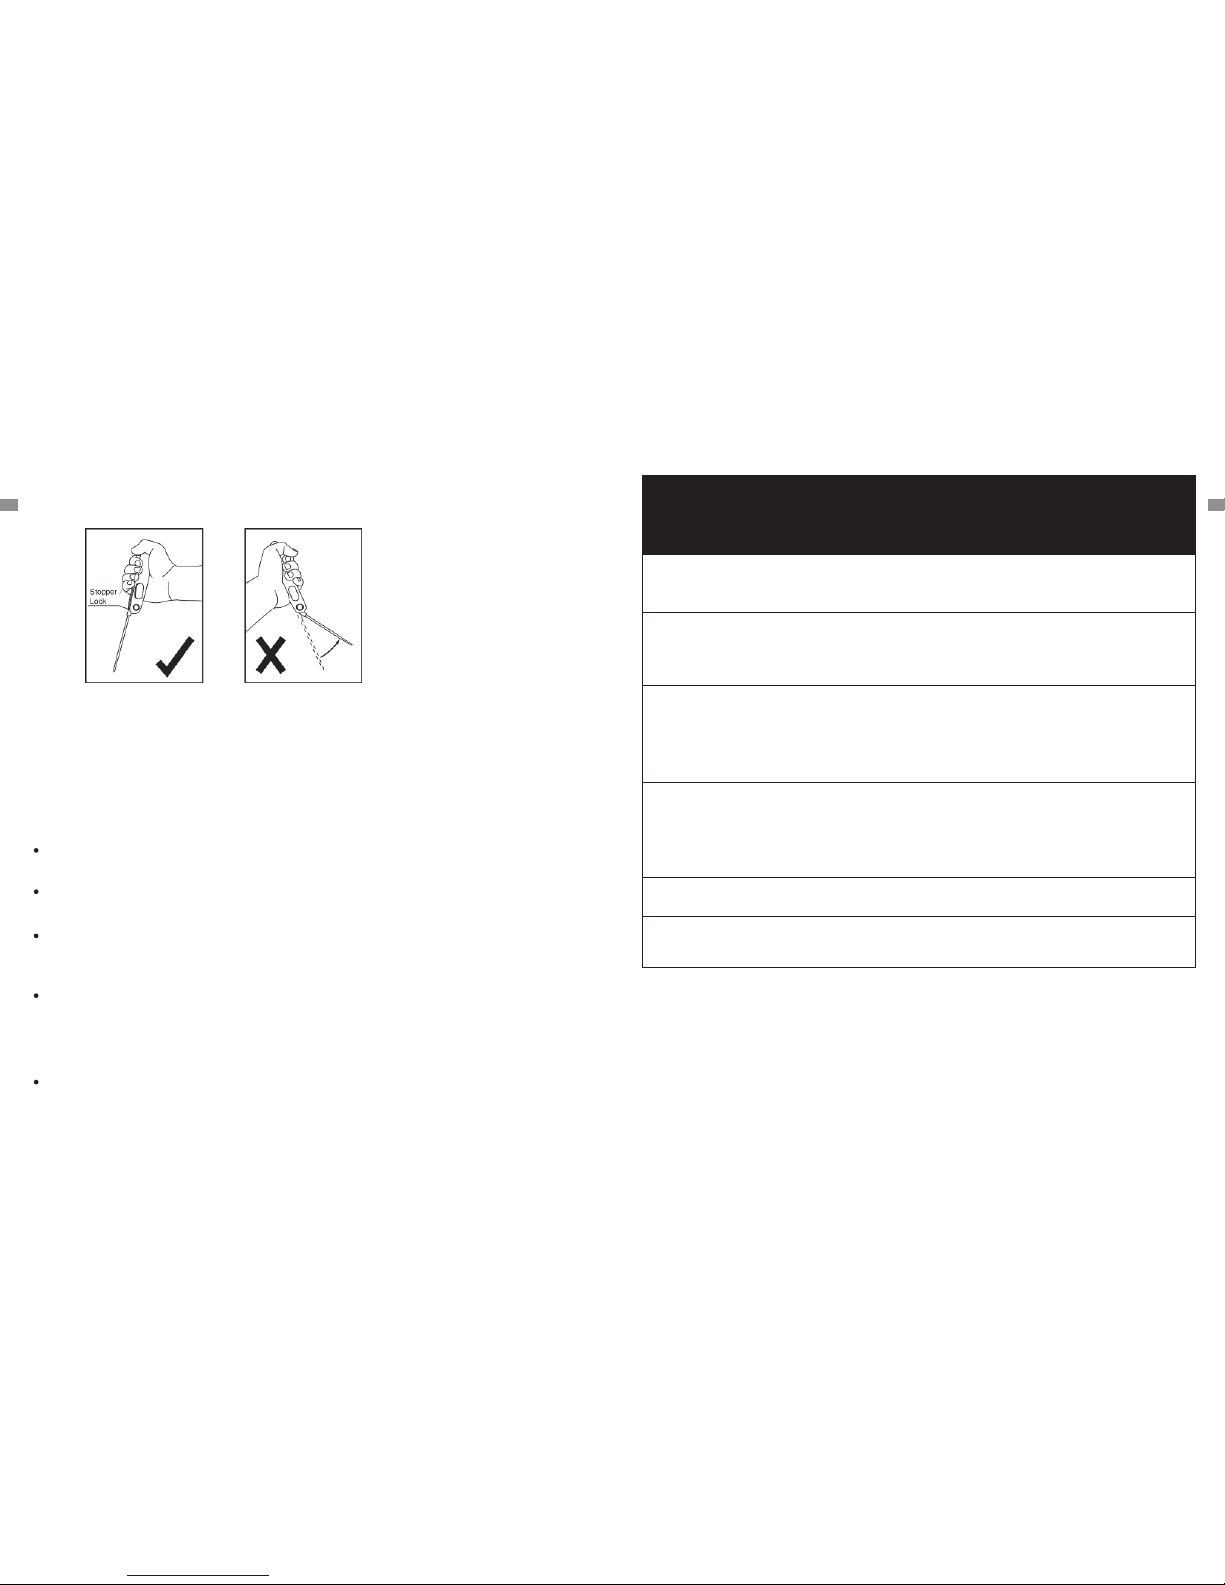
4. Stopper Lock: Holds the temperature probe in place when fully extended. Always
fully extend so the probe so it locks securely in place.
5. °C/°F Button: Press the °C/°F Button to select which temperature unit to display.
1. Automatic Bounce Button: Press the Bounce Button to automatically release the
probe.
2. Display: Displays the c urrent temperature.
MANUAL
PRODUCT
-2-
Dis play
ON/ OFF But ton
Stopp er Lock
°C/° F Button
Temp era ture Prob e
Bat tery Co mpart ment
Autom atic Boun ce Button
SPECIFICATIONS
-3-
1. Temperature range: -58°F ~ 572°F (-50°C ~ 300°C). If the temperature is below
-58°F(-50 °C) or above 572 °F (300 °C), LL.L or HH.H will show on the display.
2. Two Button s: ON/OFF and °C/°F.
3. 10-minute auto-off feature.
4. Resolution: 0.1 °C/°F.
5. Temperature Accuracy: ±0.9°F(±0.5°C) in range between 32 to 212°F (0 to 100°C).
6. Power supply: 1 X AAA 1.5V.
BEFORE FIRST USE
1. Insert o r Rep la ce Batt er y: Inse rt one AAA battery i n cor re ct pola ri ty (+) and
(-) a s indicat ed .
2. Clean stainless tip: wash tip with warm soapy sponge or cloth, then rinse and dry.
3. Do not immerse product bo dy in water.
4. PLEASE READ AND FOLLOW ALL INSTRUCTIONS.
5. The therm ometer is now ready to use.
TO MEASURE FOOD TEMPERATURE
1. Press the bounce button t o release the probe (Pictu re 1).
7. Battery Compartment : Holds one 1 AAA battery to power the unit.
6. Te mp erature Probe: Insert temper ature p robe in to me at to r ec eive in terna l
meat te mpera tu re.
2. Press ON/OFF button to tu rn on the thermometer.
3. Pr ess the °C /°F button on the back of the unit to select the temperature unit: °C
or °F. Please note, the temperature unit will keep the last temprature unit selection
ENEN
when you power on the th ermometer nex t time.
4. Insert the tip of probe into the food being coo ked (Picture 2). The t hermometer
will start to mea sure the internal food temp erature.
5. Wait until tem perature reading stabi lizes o n display.
6. Press ON/OFF button to turn off the thermometer. This thermometer also comes
with auto-off feature: it will automatically turn off if no button is pushed in 10
minutes.
HELPFUL HINTS
When meas uring multi ple or different foo ds and meats, i t may be desira ble to
cool the probe by rinsin g the tip with cold w ater betw een reading s.
It is recommended that you wipe the p robe ti p clean between readings. This is
especially important when tak ing rea dings from different foods and meats.
The thermo meter is des igned for temporary, hand held use. Do not leave in an
oven. Do not l eave inser ted in extremely hot foods or liquids (anything over
572°F) for m ore than 1 minute.
Always take your reading in the thickest available portion of meat. Thin portions
of meat are diff icult to measure b ecaus e they tend to cook th rough fast. Avo id
Picture 2
touching bone. If the tip touches the bone or heavy fat area of the meat, or if the
tip is not deep enough, tak e a second reading to ensur e accuracy.
Not intended for use by pers ons ages 12 or under.
PRESE T TE MPERATURE COOKING CHART
PRESET
TYPE
HEADING
FISH
BEEF RARE
HAM
BEEF
MEDIUM
VEAL
PORK
BEEF WELL
POULTRY
FOOD
TYPE
Fish
Beef (roasts, steaks & chops) - Rare
Egg dishes
Ham (Raw) – Note: Precooked
Ham (140˚F)
Beef (roasts, steaks & chops) – Medium
Pork (roasts, steaks, chops, sausages) –
Medium (Pink)
Ground Meats (beef, veal, pork)
Veal (steaks, roasts, tenderized or non-
tenderized cuts) – Well Done
Pork (roasts, steaks, chops, sausages) –
Well Done
Beef (roasts, steaks & chops) – Well
Poultry (chicken, turkey) – Whole
Duck & Goose
RECOMMENDED
INTERNAL
TEMPERATURE
145˚F/63˚C
160˚F/71˚C
160˚F/71˚C
170˚F/77˚C
170˚F/77˚C
165˚F/74˚C
-4-
-5-
ENEN

CUSTOMER SERVICE
Telephone: 1-877-515-7 797(USA & Canada only)
Email: service@buyth ermopro.com
Hours: Wee kdays 8:00 AM- 6:00 PM EST
Do not leave exposed to extreme high or low temperatures since this will damage
electronic parts and plastics.
Do not leave the thermomet er inserted in food during c ooking.
Remove battery if stored f or more than four months.
LIMITED ONE-YEAR WARRANTY
Th ermoP ro wa rrant s thi s pro du ct to be f ree o f def ects in pa rt s, ma teria ls an d
wo rkman ship for a peri od of o ne ye ar, from date of pu rchas e.
Should any repairs or servicing under this warranty be required, contact Customer
Service by phone or email fo r instructions on how to pac k and ship the product to
ThermoPro.
This warran ty g ives you spec ific legal righ ts a nd you may also hav e ot her rights
which vary fr om s tate to state.
CARE OF YOUR THERMOMETER
Do not touch the stainless p ortion of the thermomete r during or right after
measuring temperatur es since it will be hot.
Do not place the unit in dishwasher or immerse in any liquid. To clean, wipe the
probe tip with a damp soapy cloth or sponge and then dry.
THERMOMÈTRE NUMÉRIQUE À MESURE
INSTANTANÉE MANUEL D'UTILISATION
Model N°.: TP-03A
Cuisiner comme un chef en tout temps!
-6-
-7-
EN
FR
PRODUIT
Son de de te mpér atur e
Verrou butoi r
Bouton d' extension au tomatique
Écr an
Bou ton ON/ OFF
Bou ton °C/ °F
Com parti ment à pi le
1. Bouton d'extension automatique : Appuyer sur le bouton d'extension automatique
pour allonger automatiquement la sonde.
2. Écran: Aff iche la température actu elle.
3. Bouton ON/OFF: Appuyer une fois po ur allumer/éteindre l' appar eil.
4. Verrou butoir: Garde la sonde de température en place lorsqu'elle est entièrement
al longée. Toujours allonge r au m ax imum afin que la sonde soit cor re ctement
verrouillée.
5. Bouton °C/°F: Appuyer su r le bouton °C/°F pour sélec tionner l'unité de
température affichée.
6. S on de d e te mp érature: Insérer la sonde de température dans la viande pour
Image 1
SPÉCIFICATIONS
1. Amplitude de température: -58°F ~ 572°F(-50°C ~ 300°C). Si la température est
située à -58°F(-50°C) ou au-dessus de 572°F(300°C), LL.L ou HH.H sera affiché
à l'écran.
2. Deux boutons: ON/OFF et ° C/°F.
3. Extinction automati que après 10 minutes.
4. Résolution: 0,1 °C/°F.
5. Précision de la tempéra ture : ±0,9°F (±0,5°C) ent re 32 et 212°F (0 et 100°C).
6. Alimentation: 1 X AAA 1,5 V.
AVANT LA PREMIÈRE UTILISATION
1. Insérez une pile AAA en suivant la polarité (+) e t (-) ind iquée.
2. Nettoyez la pointe en aci er inoxydable : nettoyez l 'extrémité avec une épon ge
ou un chiffo n chaud et savonneux, puis r incez et séchez.
3. Ne pas plonger la coque de l' appareil dans l'eau.
4. VEUILLEZ LIRE ET SUIVRE LES INSTRUC TIONS.
5. Le thermomètre est déso rmais prêt.
POUR MESURER LES TEMPÉRATURE ALIMENTAIRE
1. Appuyez sur le bouton d'e xtension pour allonger l a sonde ( Image 1).
7. Compartiment à pile: Co ntient une pile AAA pour alime nter l' appareil.
ob te nir les te mpérature internes.
2. Appuyez sur le bouton ON/O FF pour allumer le thermom ètre.
3. Appuyez sur le bouton °C/°F à l'arrière de l'appareil pour sélectionner l'unité
-8-
-9-
FR FR
 Loading...