

Theben TR top2, TR top3, TR top2 Series, TR top3 Series, TR 610 top2 User Manual
...

Page | 2
Contents
1. Time switch overview .......................................................................................................................... 5
1.1. Type TR top2 (35 mm) overview: ............................................................................................... 5
1.2. Type TR top3 (35 mm) overview: ............................................................................................... 6
2. Definitions ............................................................................................................................................ 6
3. Display and operation.......................................................................................................................... 8
3.1. General ....................................................................................................................................... 8
3.2. Operation .................................................................................................................................... 9
4. Installation information ...................................................................................................................... 10
4.1. Information on the spring terminals .......................................................................................... 10
5. Information on the initial start-up ....................................................................................................... 11
6. Auto mode display ............................................................................................................................. 13
6.1. Explanation of the changing displays in the text line ................................................................ 13
6.2. Segment graph bar display ....................................................................................................... 14
6.3. Auto mode and manual / permanent switching ........................................................................ 14
7. Main menu ......................................................................................................................................... 15
8 Menu: PROGRAM ................................................................................................................................. 16
9 PROGRAM menu: SWITCHING TIMES ............................................................................................... 16
9.1. PROGRAM menu: Programming switching times ........................................................................ 16
9.2 PROGRAM menu: Querying switching times ........................................................................... 20
9.3 PROGRAM menu: Changing switching times .......................................................................... 23
9.4 PROGRAM menu: Deleting switching times ............................................................................ 25
9.5 PROGRAM menu: PULSE ....................................................................................................... 26
9.6 PROGRAM menu: CYCLE ....................................................................................................... 29
10.1 TIME/DATE menu: TIME .......................................................................................................... 33
10.2 TIME/DATE menu: DATE ......................................................................................................... 34
10.3 TIME/DATE menu: SU-WI ........................................................................................................ 35
10.4 TIME/DATE menu: WEEKDAY ................................................................................................ 37
10.5 TIME/DATE menu: DATE FORMAT ........................................................................................ 38
10.6 TIME/DATE menu: TIME FORMAT ......................................................................................... 39
11.1 MANUAL menu: PERMANENT ON/OFF ................................................................................. 40
11.2 MANUAL menu: MANUAL ON ................................................................................................. 41
11.3 MANUAL menu: TIMER (only for TR 611 top2, TR 622 top2) ................................................. 41
11.4 MANUAL menu: HOLIDAYS .................................................................................................... 42
11.5 MANUAL menu: RANDOM (only for TR 611 top2, TR 622 top2) ............................................ 44
12 Menu: OPTIONS .......................................................................................................................... 46
12.1 OPTIONS: OPERATING HOURS COUNTER ......................................................................... 46
12.1.1 OPTIONS menu: show operating hours ............................................................................... 47
12.1.2 OPTIONS menu: Deleting operating hours .......................................................................... 47
12.1.3 OPTIONS menu: Operating hours service ........................................................................... 48
12.2 OPTIONS: EXTERNAL INPUT (only for TR 611/622 top2) ..................................................... 49
12.2.1 INACTIVE (delivery status) ................................................................................................... 50
12.2.2 PUSH BUTTON - Functions ................................................................................................. 50
12.2.3 SWITCH - Functions ............................................................................................................. 51
12.2.4 External Input - Applications ................................................................................................. 52
12.2.5 External input - Technical information .................................................................................. 53
12.3 OPTIONS: LCD LIGHTING ...................................................................................................... 53
12.4 OPTIONS: LANGUAGE ........................................................................................................... 54
12.5 OPTIONS: PIN.......................................................................................................................... 54
12.6 OPTIONS: FACTORY SETTINGS ........................................................................................... 56
12.7 OPTIONS: INFO ....................................................................................................................... 57
12.8 Explanation of the priorities (from high to low): ........................................................................ 58
13 OBELISK top2 memory card ........................................................................................................ 59
13.1 OBELISK top2 memory card in the time switch cover ................................................................. 59
13.2 OBELISK copying functions ......................................................................................................... 59
13.3 OBELISK menu ........................................................................................................................ 60
13.4. START OBELISK PROGRAM .............................................................................................. 62
13.5. PC Software OBELISK top2 ................................................................................................. 62
12.6. Speech OBELISK ................................................................................................................. 63
13.7. What does the normal OBELISK program transfer? ................................................................ 64

Page | 3
BLE-Bluetooth OBELISK top3 .................................................................................................................. 64
top3 app ............................................................................................................................................... 66
Communication .................................................................................................................................... 66
Symbols in the app start menu............................................................................................................. 66
Other symbols in the app ..................................................................................................................... 66
App functions........................................................................................................................................ 66
Setting a project weekly program ...................................................................................................... 67
Creating a new project ........................................................................................................... 68
Editing existing projects on the mobile device .................................................................................. 69
Duplicating existing projects on the mobile device .................................................................. 70
Transferring an existing project from the mobile device to the time switch ........................... 70
Transferring an existing project from the time switch to the mobile device .......................... 70
Sending projects from the mobile device via e-mail ............................................................... 71
Importing/opening projects from an e-mail attachment ..................................................................... 71
Direct commands .............................................................................................................................. 71
Sending the time and date to the time switch ............................................................................ 72
Executing a manual switch command ........................................................................................ 72
Manual switching/Switching preselection .......................................................................................... 72
Permanent ON/OFF .......................................................................................................................... 72
Entering/deleting the holiday program .............................................................................................. 73
Reading out operating hours ............................................................................................................. 73
Settings – App interface .................................................................................................................. 73
Language ............................................................................................................................................. 74
Date format ........................................................................................................................................... 74
First day of the week ............................................................................................................................ 74
Vibration/System tones ........................................................................................................................ 75
Help ...................................................................................................................................................... 75
Info ....................................................................................................................................................... 75
Creating a new project (see also page 66) ................................................................................ 75
Programming switching times in the list view (see also page 66) ........................................................ 77
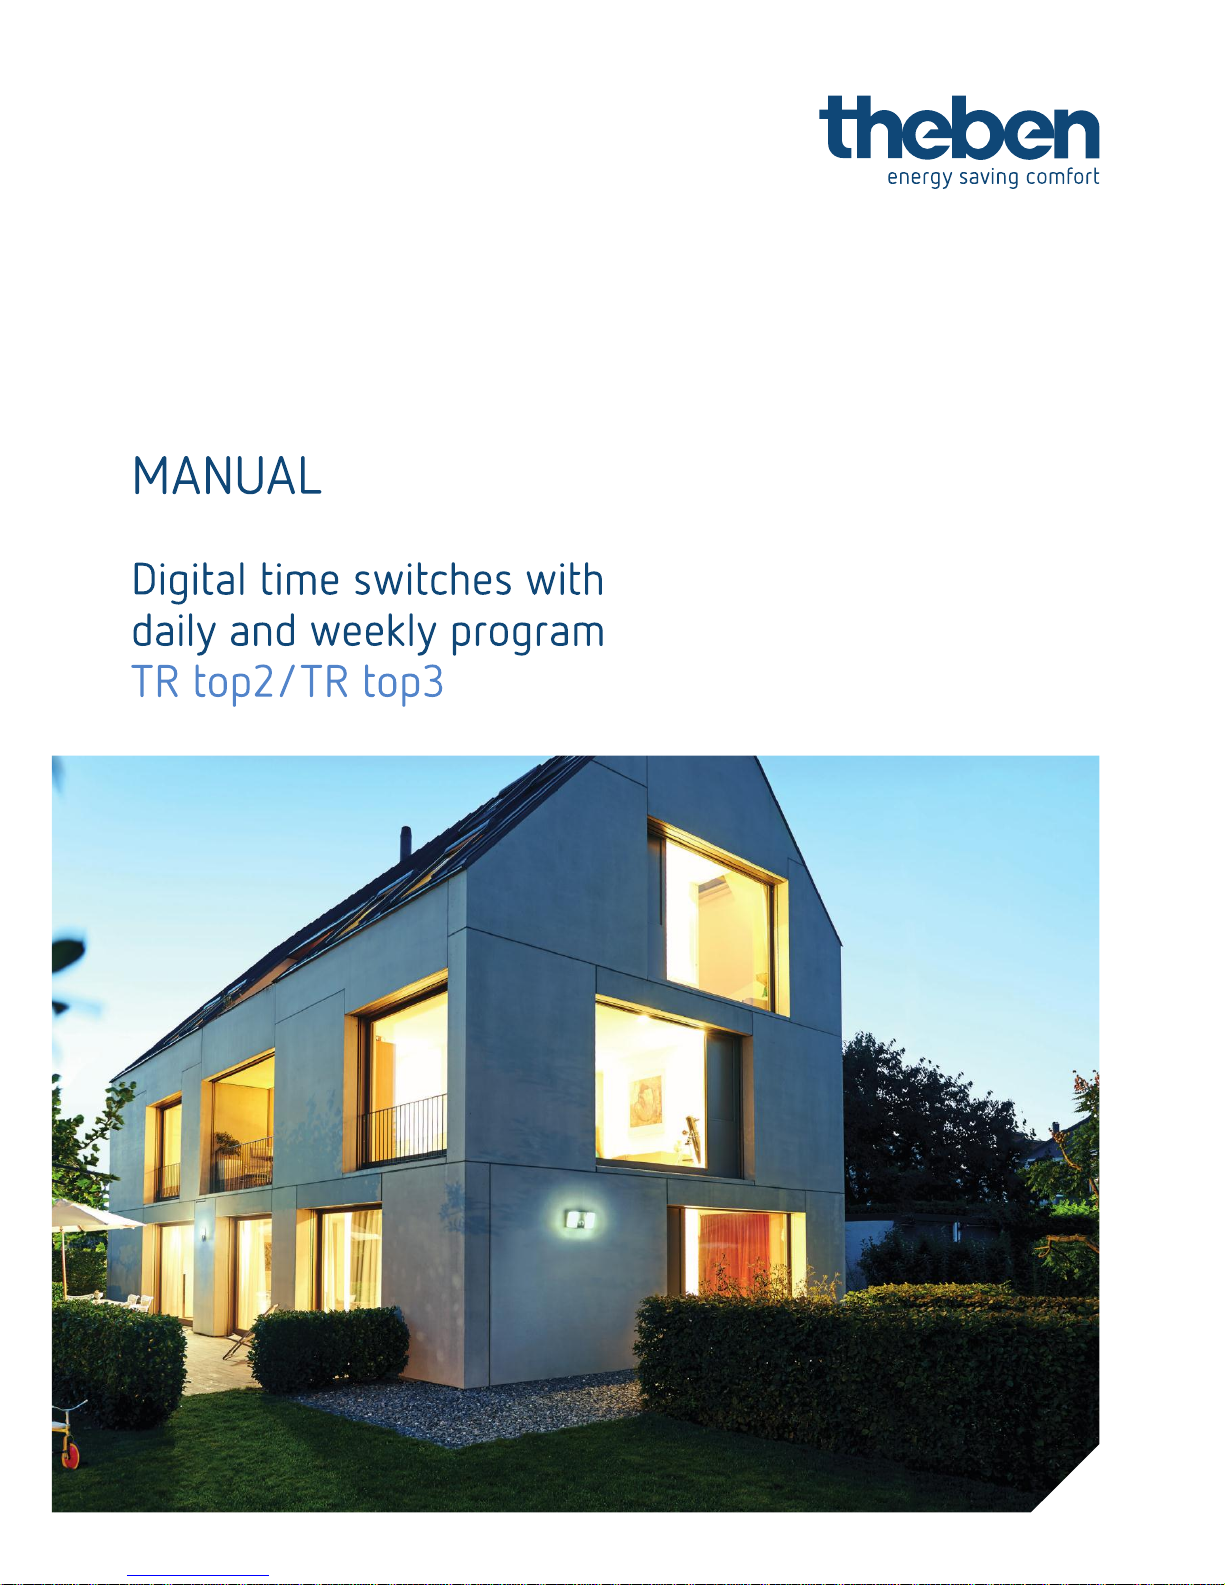
Copying switching times ............................................................................................................ 79
Page | 4
..................................................................................................... 80
Deleting switching times .............................................................................................................. 80
Programming switching times in the graphical view (optional) ............................................................ 81
Transferring switching times from the app to the time switch ................................................... 83
Transferring switching times from the time switch to the app ................................................... 86
If the transfer was successful, the view changes to edit mode and shows the switching times. ......... 87
Accessing the time switch directly ........................................................................................... 87
Example of app usage .............................................................................................................................. 88
14 General application examples ...................................................................................................... 91
15 Technical data .............................................................................................................................. 92
15.1 TROUBLESHOOTING ............................................................................................................. 92
Service address / hotline .......................................................................................................................... 93
Page | 5
1. Time switch overview
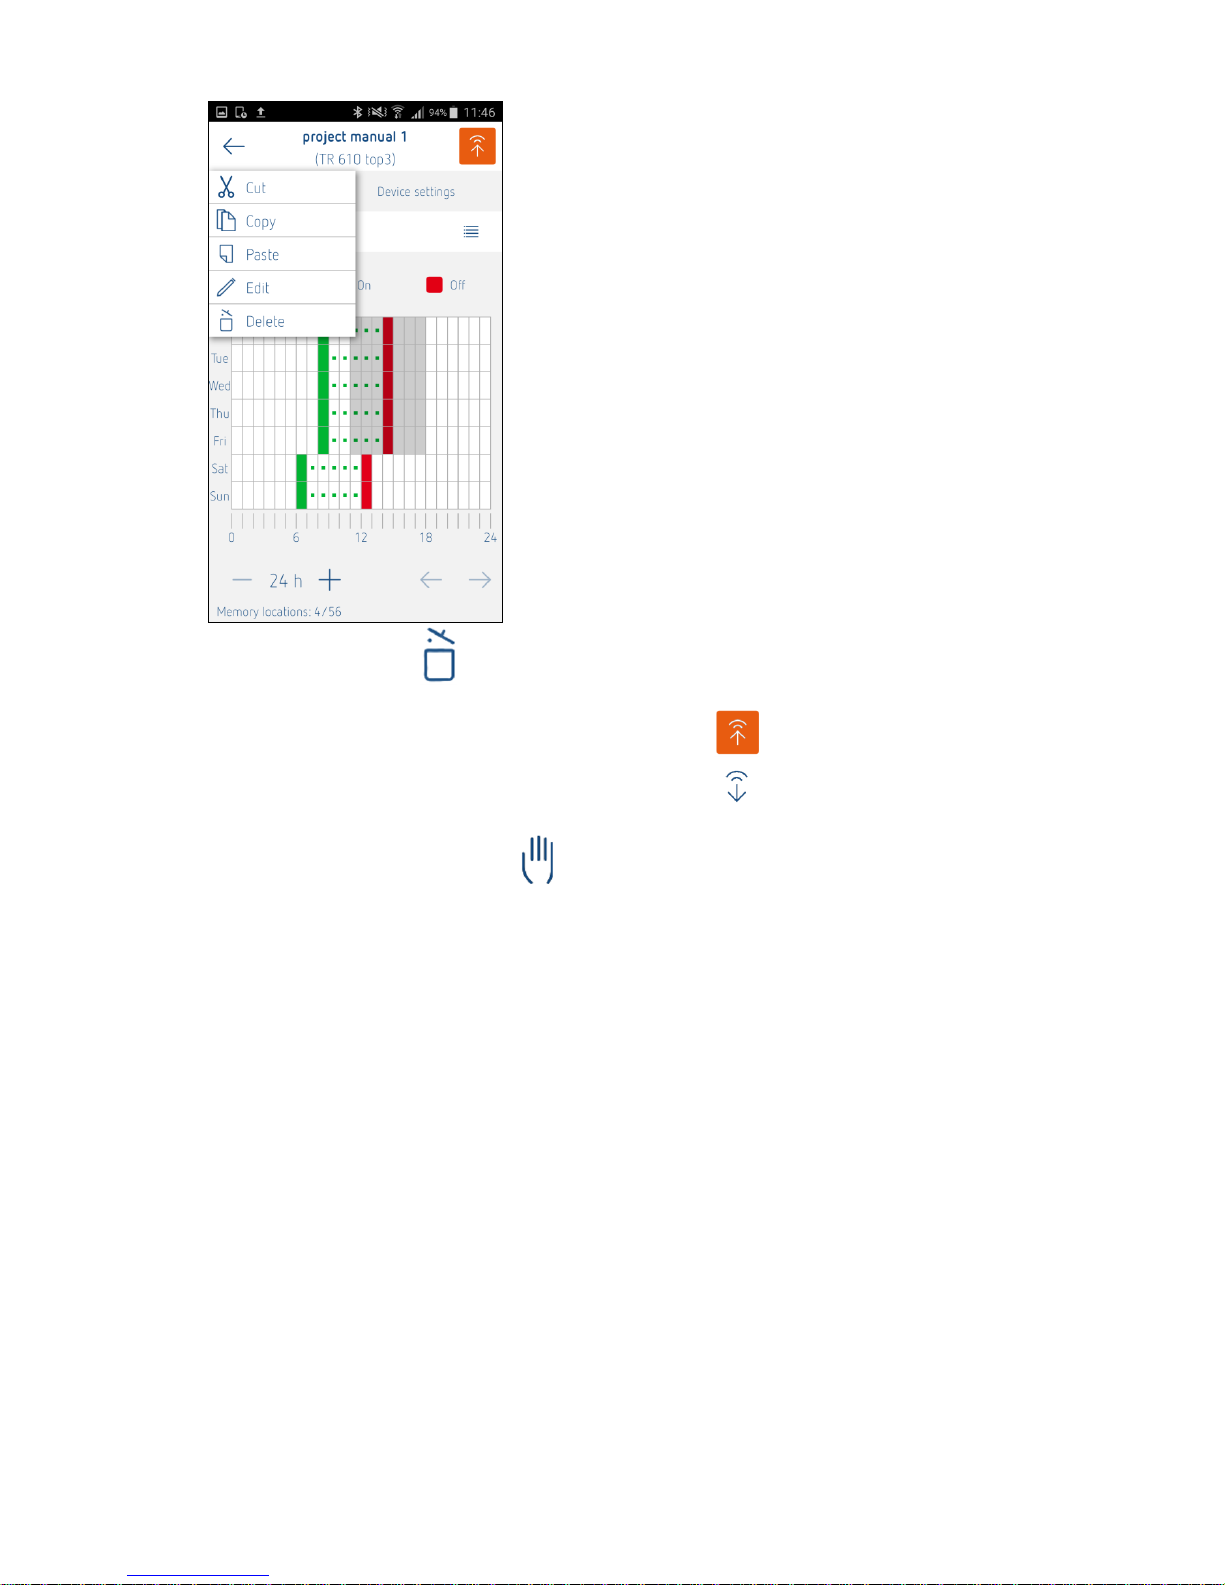
1.1. Type TR top2 (35 mm) overview:
TR 610 top2 TR 612 top2 TR 611 top2 TR 622 top2 TR 611 top2 RC
TR 610 top2/TR 612 top2 have a smaller operating scope than the
TR 611 top2/TR 622 top2:
Functions
TR 610 top2
TR 612 top2
TR 611 top2
TR 622 top2
TR 611 top2 RC
(DCF/GPS)
Number of channels
1 2 1 2 1
Switching time
Yes
Yes
Yes
Yes
Yes
Pulse
No
No
Yes
Yes
Yes
Cycle
No
No
Yes
Yes
Yes
Random
No
No
Yes
Yes
Yes
External input (number)
No
No
Yes (1)
Yes (2)
Yes (1)
Timer
No
No
Yes
Yes
Yes
RC antenna connection
No
No
No
No
Yes
Number of memory
locations
56
56
84
84
84
Page | 6
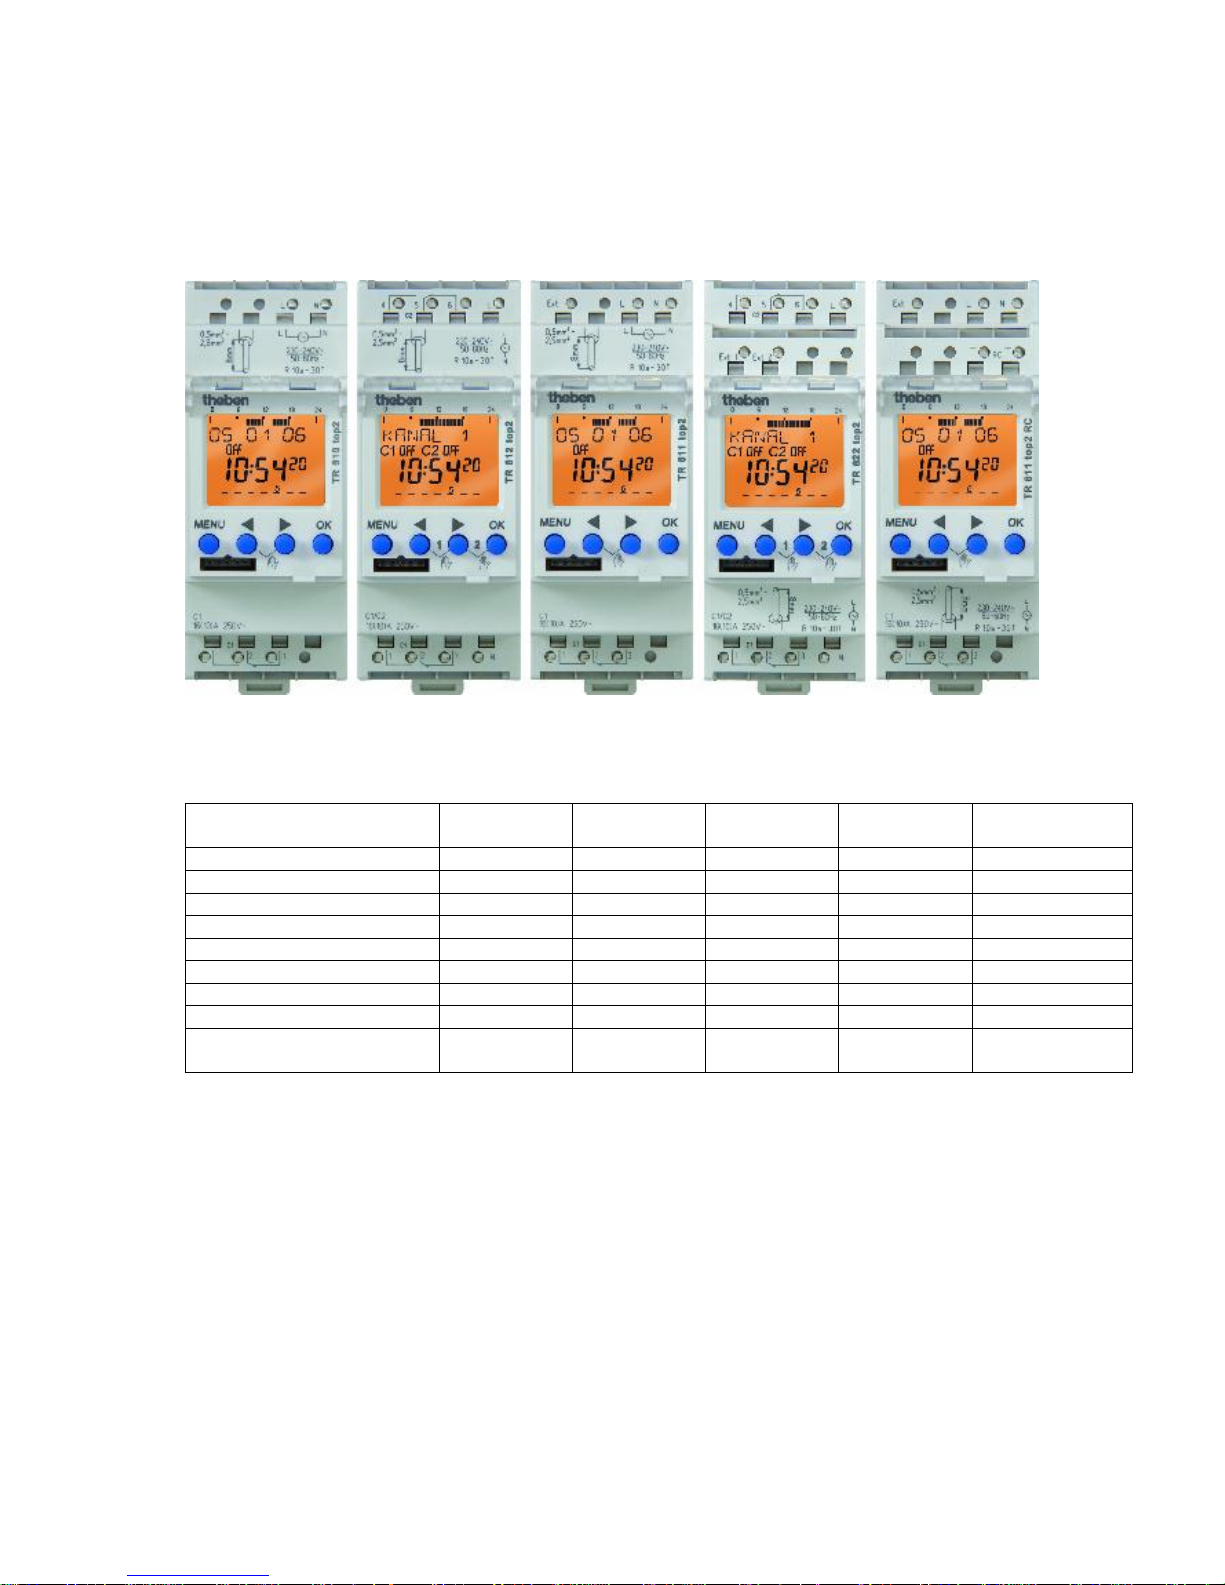
1.2. Type TR top3 (35 mm) overview:
TR 610 top3 TR 612 top3
Functions
TR 610 top3
TR 612 top3
Number of channels
1
2
Switching time
Yes
Yes
Pulse
No
No
Cycle
No
No
Random
No
No
External input (number)
No
No
Timer
No
No
RC antenna connection
No
No
Number of memory locations
56
56
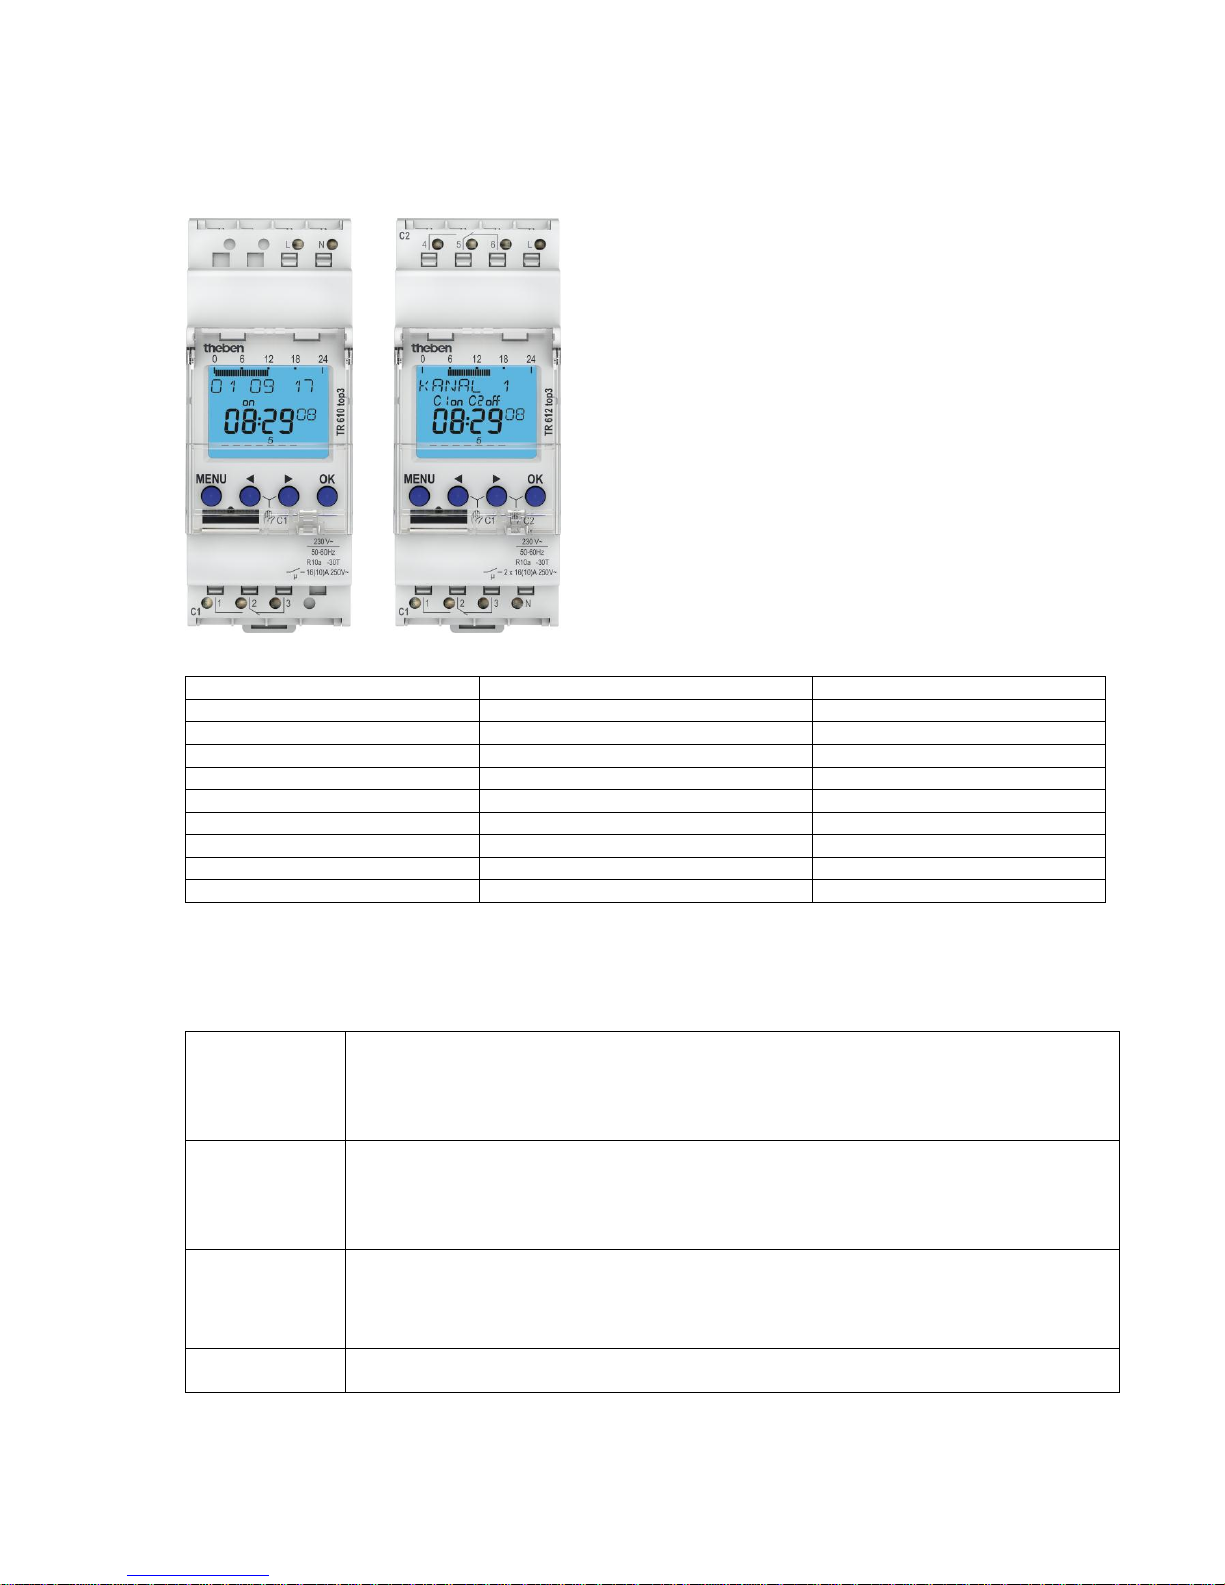
2. Definitions
Switching time
Switching default for the time switch comprised of the time (hours + minutes), the weekday
(Monday to Sunday) and the channel status (ON or OFF).
As from the programmed time and weekday the channel status is valid up until the next
switching time.
Pulse
In the time period limited switching default for the time switch comprised of the time (hours
+ minutes), the weekday (Monday to Sunday), the channel status (ON or OFF) and the
duration (minutes + seconds).
As from the time and weekday the channel status is valid for the set time period.
Cycle
A continuously repetitive sequence of channel ON and channel OFF. Start time and end
can be adjusted (hour + minute + weekday). The time period for ON (pulse duration) and
for OFF (pause duration) can also be set (hours + minutes + seconds).
Switching
command
Generic term for switching time, pulse, cycle

Page | 7
OBELISK top2/
OBELISK top3
Memory card which can be inserted in the time switch. The program can be copied onto
the memory card, transferred from the time switch as well as being able to read an
additional language in the time switch from the memory card.
BLE
OBELISK top3
The BLE OBELISK top3 function is now available for new devices from the SELEKTA top3
range. Devices can be programmed, generated and set really easily via BLE (Bluetooth
Low Energy). (This function is not available for the top2 range of devices.)
Crossing
Normally an OBELISK which, for example, was programmed for a TR 610 top2, can also
only be used in a TR 610 top2. The transfer, e.g. of the switching times of a TR 610 top2
to the second channel in a TR 622 top2 (crossing) can be performed using a diversion via
the OBELISK top2 PC software. In this case the OBELISK can be programmed
accordingly, see OBELISK menu item.
Auto mode
The time switch is in the standby automatic mode and performs the programmed
switching commands at the respective times.
Manual
switching
By pressing push buttons ◄ and ► at the same time the manual switching can be
activated in the auto mode. This is helpful if the time switch has to be switched on
unexpectedly without much warning. The manual switching shows a switching
preselection, i.e. the current switching status is overlapped up to the next programmed
switchover time period. By pressing both push buttons again the manual switching is
released again.
Permanent
switching
By pressing push buttons ◄ and ► for longer (> 3 seconds) the permanent switching can
be switched on. This is helpful if the time switch has to be switched on quickly and
unexpectedly. The permanent switching overlaps all stored switching times permanently
until releasing the permanent switching by pressing both push buttons again.
In the case of a multi-channel timer the respective push buttons are
pressed for manual switching or the permanent switching respectively
in the desired channel.
Zero cross
switching
Background:
Switch-on peak flows charge the relay in the time switches and the connected users.
Corrective measure:
The alternating voltage is monitored for the zero cross switching and the relay switch-on
delay is measured. The switch-on moment is accurately calculated by software to ensure
that the relay is connected exactly in the voltage zero crossing. No inrush current levels
occur.
There is no overheating, no contact welding and hardly any contact wear.
Reset
Reset is achieved by pressing all 4 push buttons at the same time. By resetting, all
configuration settings (time format, 24 hours or AM/PM, etc.) are maintained. Date and
time are however deleted. The selection "Keep program" or "Delete program" is available.
"Delete program" must be confirmed separately. With "Delete program" all switching
commands and the holiday program are deleted.
Priorities
The following priorities are valid for the programmed switching commands, i.e. if different
switching commands were programmed in the same time period, the switching
commands with higher priority will be performed: Cycle has the highest priority, followed
by pulses, the switching times have the lowest priority (also see page 58)
Page | 8
3. Display and operation
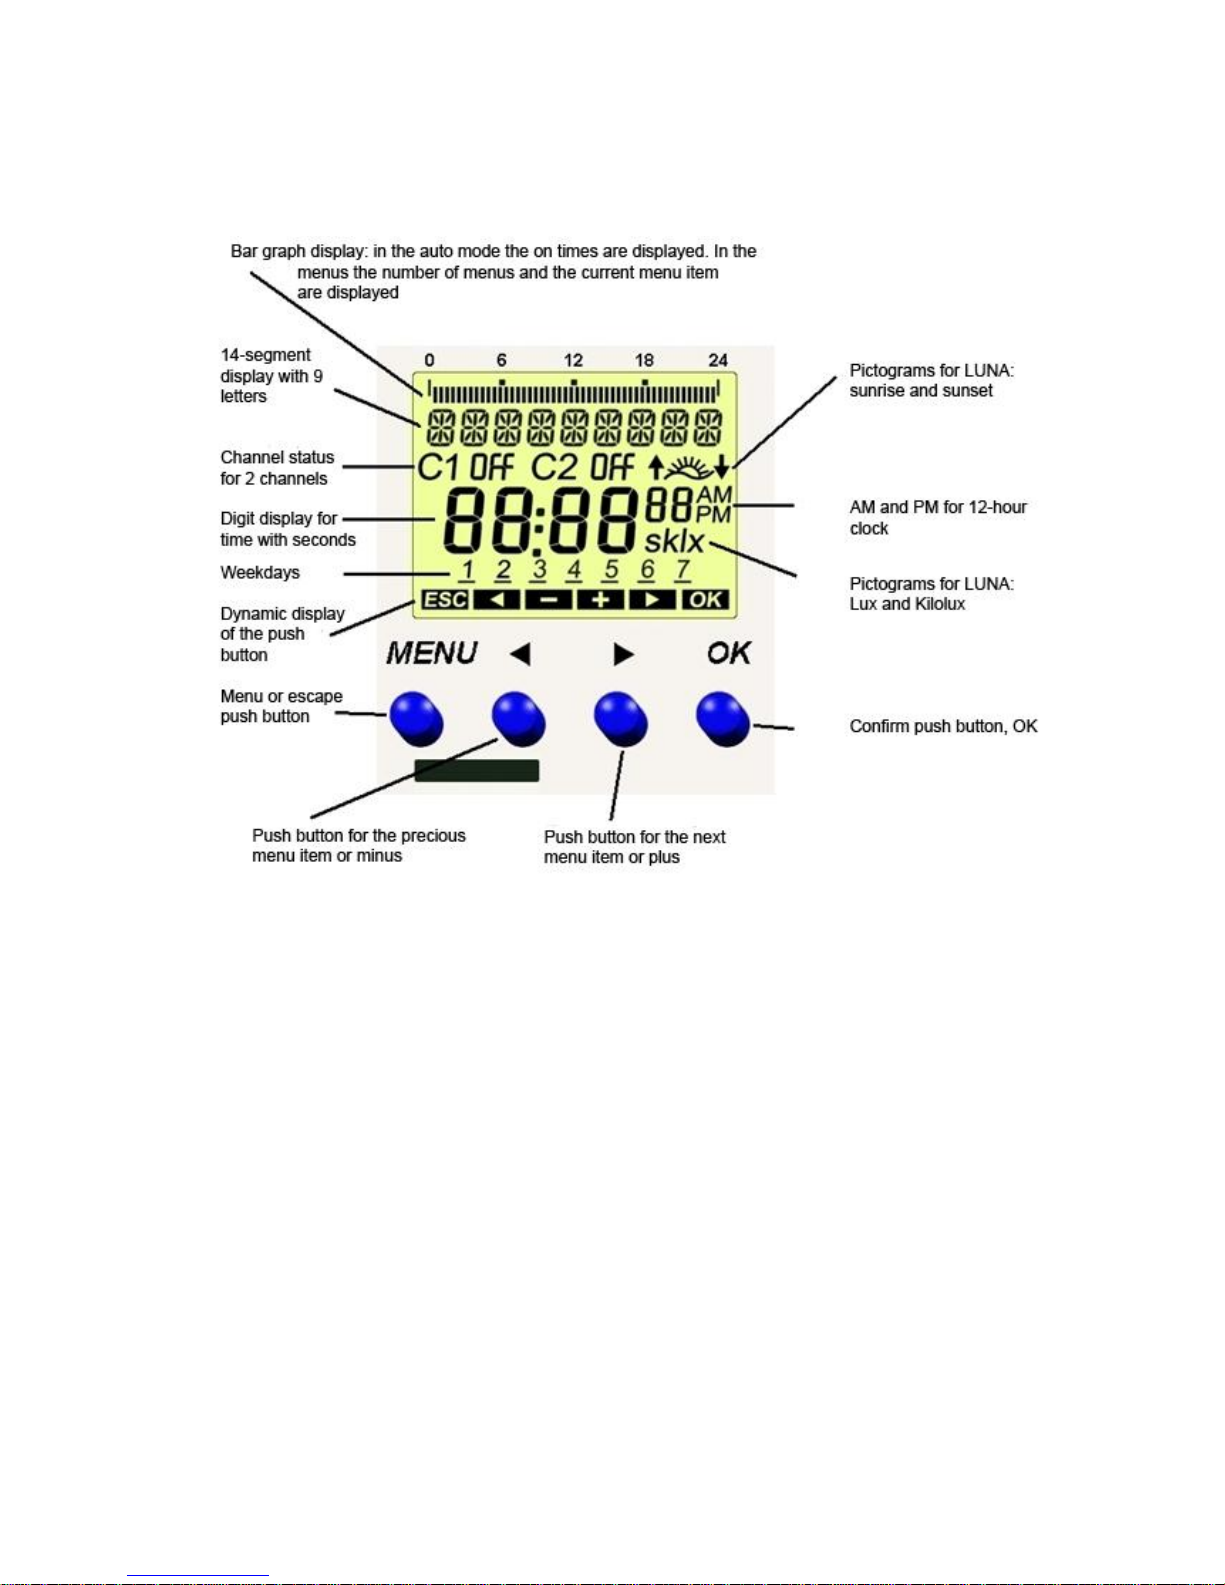
3.1. General
TR top2
Page | 9
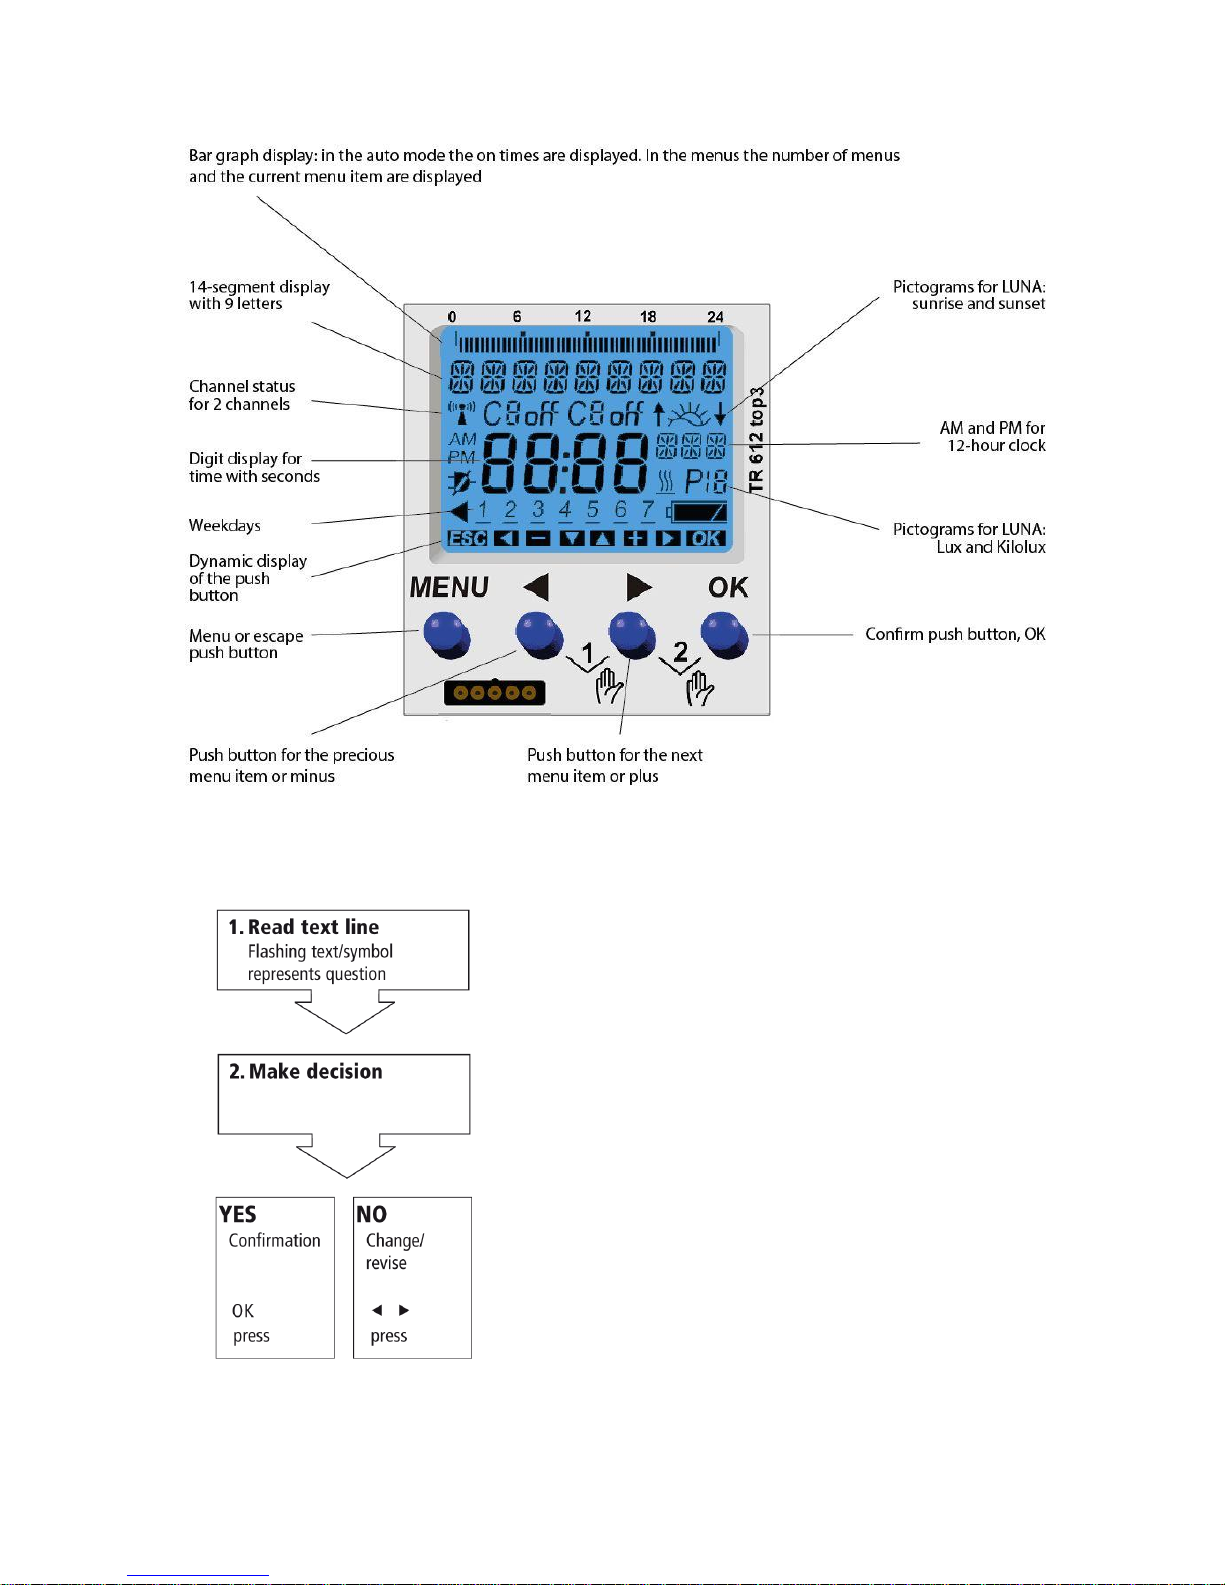
TR top3
3.2. Operation

Page | 10
4. Installation information
TR 611 top2/top3 TR 622 top2/top3
4.1. Information on the spring terminals
In the case of a cable the release lever for inserting the wire must be pressed downwards.
If the release does not work: Please bring the release lever all the way down (with force).
If the wire can still not be pulled out turn the wire by 90°.

Page | 11
5. Information on the initial start-up
The following instructions apply to the TR top2 as well as to the TR top3 serie.
The only aspects in which TR top3 devices differ from TR top2 devices are the display colour and, to a
minimal extent, the display layout:
top2 top3
When the time switch is removed from the packaging all important settings have already been made.
Individual settings can be performed by selecting and confirming.
GERMAN flashes. Confirm by pressing OK.
In the event of wishing to set another language press the arrow buttons until the language in question is
shown on the display. Proceed to confirm this language with the OK push button.
Confirm by pressing OK.
Note: By pressing the ESC push button, i.e. the menu button, it is possible to return to the previous
setting menu.
If the user has, for example, made a mistake and pressed the OK button too quickly, the menu button
enables returning to the previous selection item.
Either confirm with the OK push button or modify the year (flashing) with the arrow
buttons and then confirm by pressing OK.

Page | 12
Either confirm with the OK push button or modify the month (flashing) with the arrow
buttons and then confirm by pressing OK.
Either confirm with the OK push button or modify the day (flashing) with the arrow
buttons and then confirm by pressing OK.
Either confirm with the OK push button or modify the hours (flashing) with the arrow
buttons and then confirm by pressing OK.
Either confirm with the OK push button or modify the minutes (flashing) with the arrow
buttons and then confirm by pressing OK.
Either confirm with the OK push button or modify the changeover rule for the
automatic summer/winter time changeover with the arrow buttons and then confirm by
pressing OK.
The time switch is now in the auto mode.
Page | 13
6. Auto mode display
6.1. Explanation of the changing displays in the text line
(Change approx. every 12 seconds)
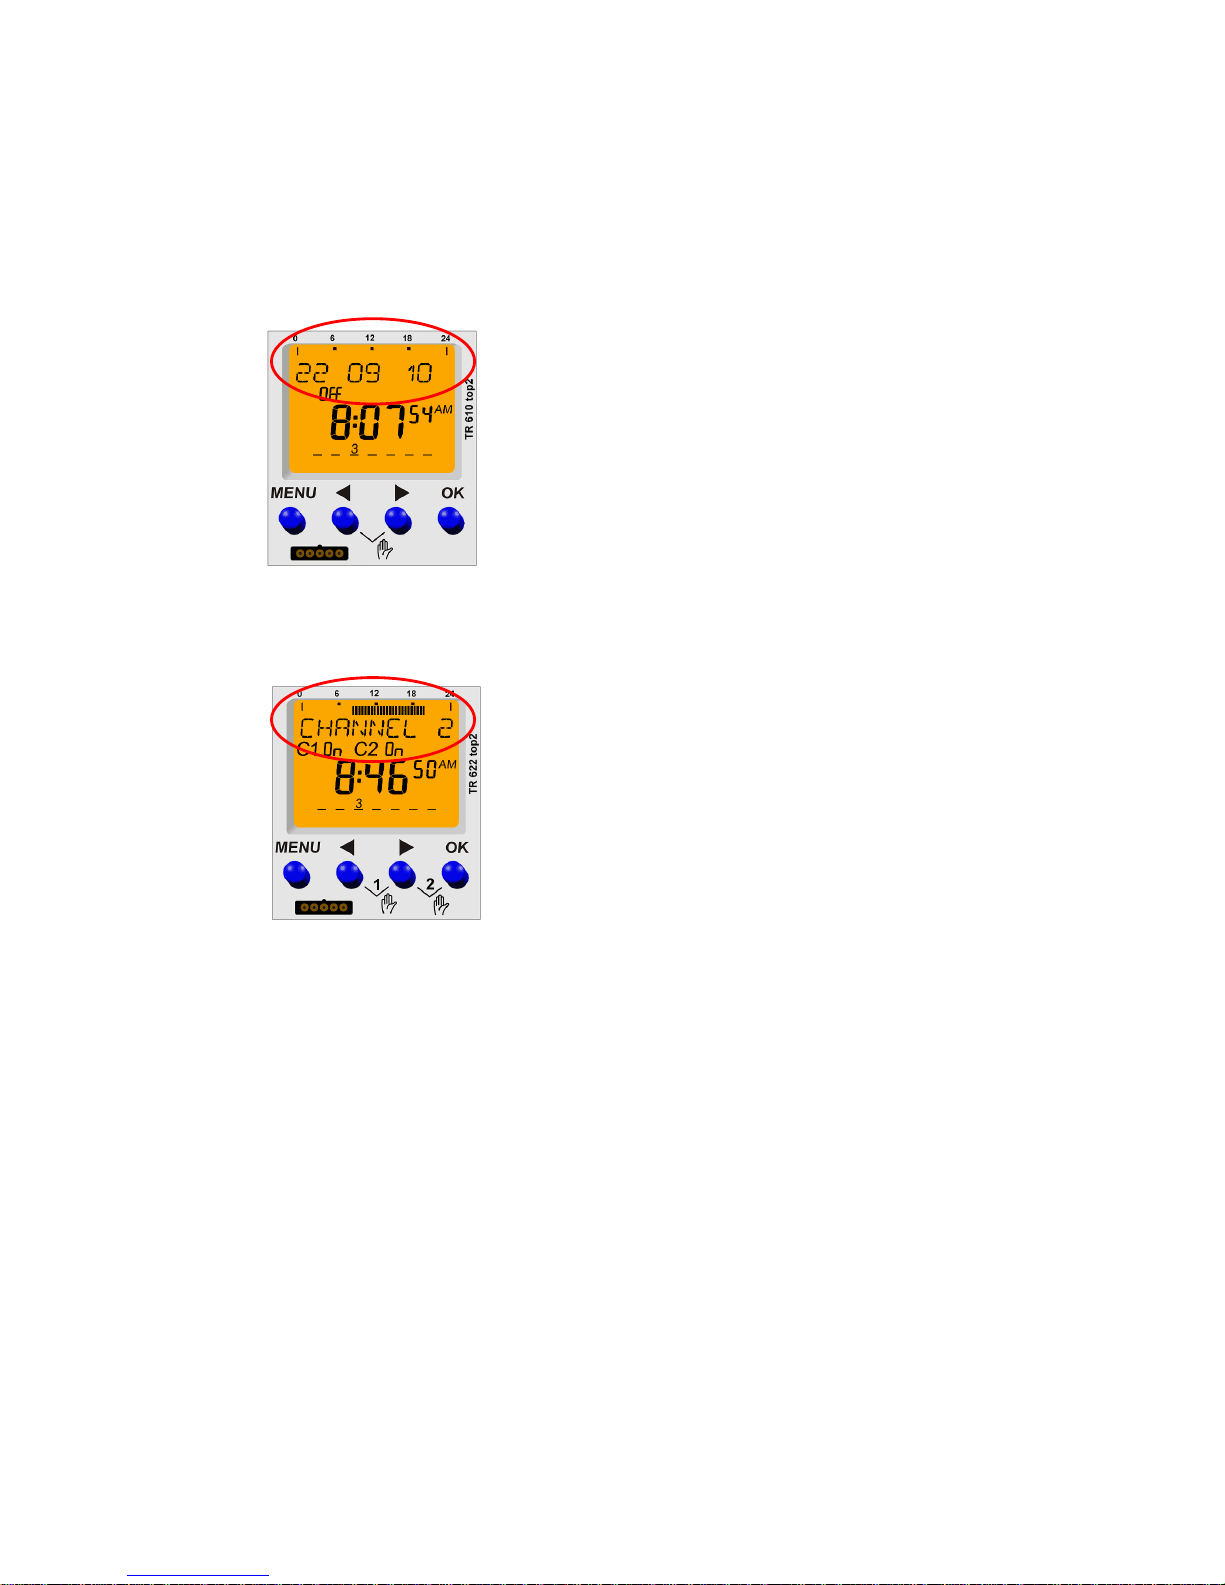
Change displays single channel time switch:
o
Base status: The text line displays the date and the bar
graph the switching times for the current day.
If there is no mains voltage after 12 seconds NO MAINS is
shown for 3 seconds.
If the manual switching or the permanent switching has
been activated, the relevant special fade-in appears in the
text line.
Change displays 2-channel time switch:
Base status: The channel number (CHANNEL 1) is shown
for 12 seconds and in the bar graph display the switching
times for the current day are displayed. The date is then
faded in for 3 seconds and the bar graph display is
deleted. After this there is a change to the next channel
(CHANNEL 2).
o
If there is no mains voltage NO MAINS is faded in for 3
seconds after both channels have been shown.
By pressing push buttons ◄ and ► the display
immediately changes to the other channel.
If the manual switching or the permanent switching has
been activated the relevant special fade-in appears in the
text line.
Example for the change displays:
No special fade-in
o Channel 1 Date No mains Channel 2 Date No mains Channel 1
with special fade-in (Channel 2 permanent switching activated)
o Channel 1 Date No mains C2 Duration Date No mains Channel 1

Page | 14
6.2. Segment graph bar display
horizontal top
Help lines for 24 hours at 0 and 24 hours
Help points at 6, 12 and 18 hours
48 segment bar graph displays, one line = 30 minutes
Each bar graph display shows the programming for a specific time segment:
o Graph bar display 1: From 00:00:00 hours to 00:29:59 hours
o Graph bar display 2: From 00:30:00 hours to 00:59:59 hours
o ….
o Graph bar display 47: From 23:00:00 hours to 23:29:59 hours
o Graph bar display 48: From 23:30:00 hours to 23:59:59 hours
For switching time and pulse the following is applicable:
o Graph bar ON means that the channel is on for at least 1 second within the time period.
o Graph bar OFF means that the channel is off for the entire period.
The following is applicable for cycle:
o Graph bar ON means that a cycle was programmed within the time period.
o This means that with cycle the actual channel status is not shown however only that a
cycle is active for the period.
The following priorities are also valid for the graph bar display: Cycle has the highest priority,
followed by pulse and then the switching times (switching times have the lowest priority).
6.3. Auto mode and manual / permanent switching
By pressing push buttons ◄ and ► at the same time the manual switching can be activated
(keep both push buttons pressed permanent switching)
Example:
Program: OFF
Press push buttons: Manual ON
Prolonged pressing of push buttons: Permanent ON
Prolonged pressing of push buttons: Permanent OFF
By pressing both buttons again the manual / permanent switching is deleted again.
Manual / permanent switching priorities
o Permanent switching is not deleted by other events.
o Manual switching is deleted again by a program switching command.
Page | 15
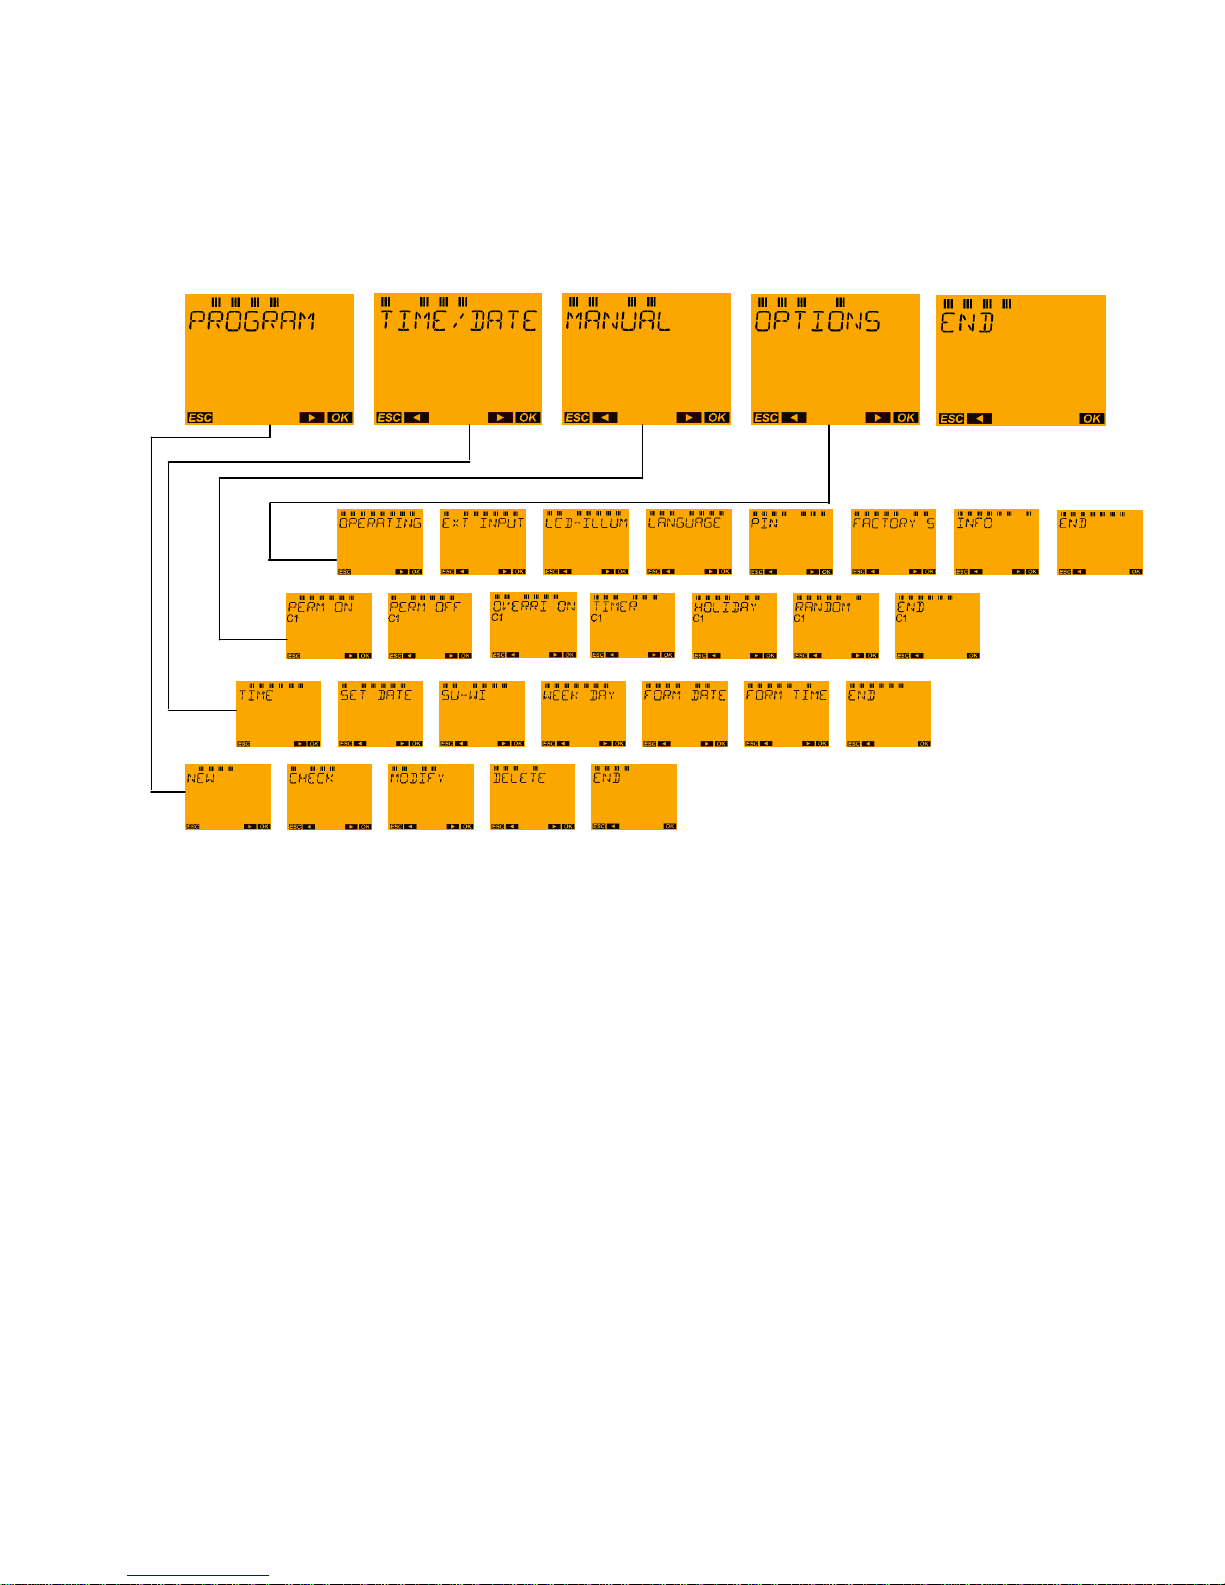
7. Main menu
Note: The TR top3 series has a blue display. However the funktions correspond with the TR top2 series.
(request the menu from the auto mode with the MENU push button)
Note: Some of the steps in the submenu are not required depending on the device type.
- If the END text display is confirmed with the OK push button the auto mode is always accessed.
- The inputs can be aborted using ESC (MENU push button) and access is gained to the last operating
level.
- If no push button is pressed for 70 seconds a return is made to the auto mode.
Page | 16
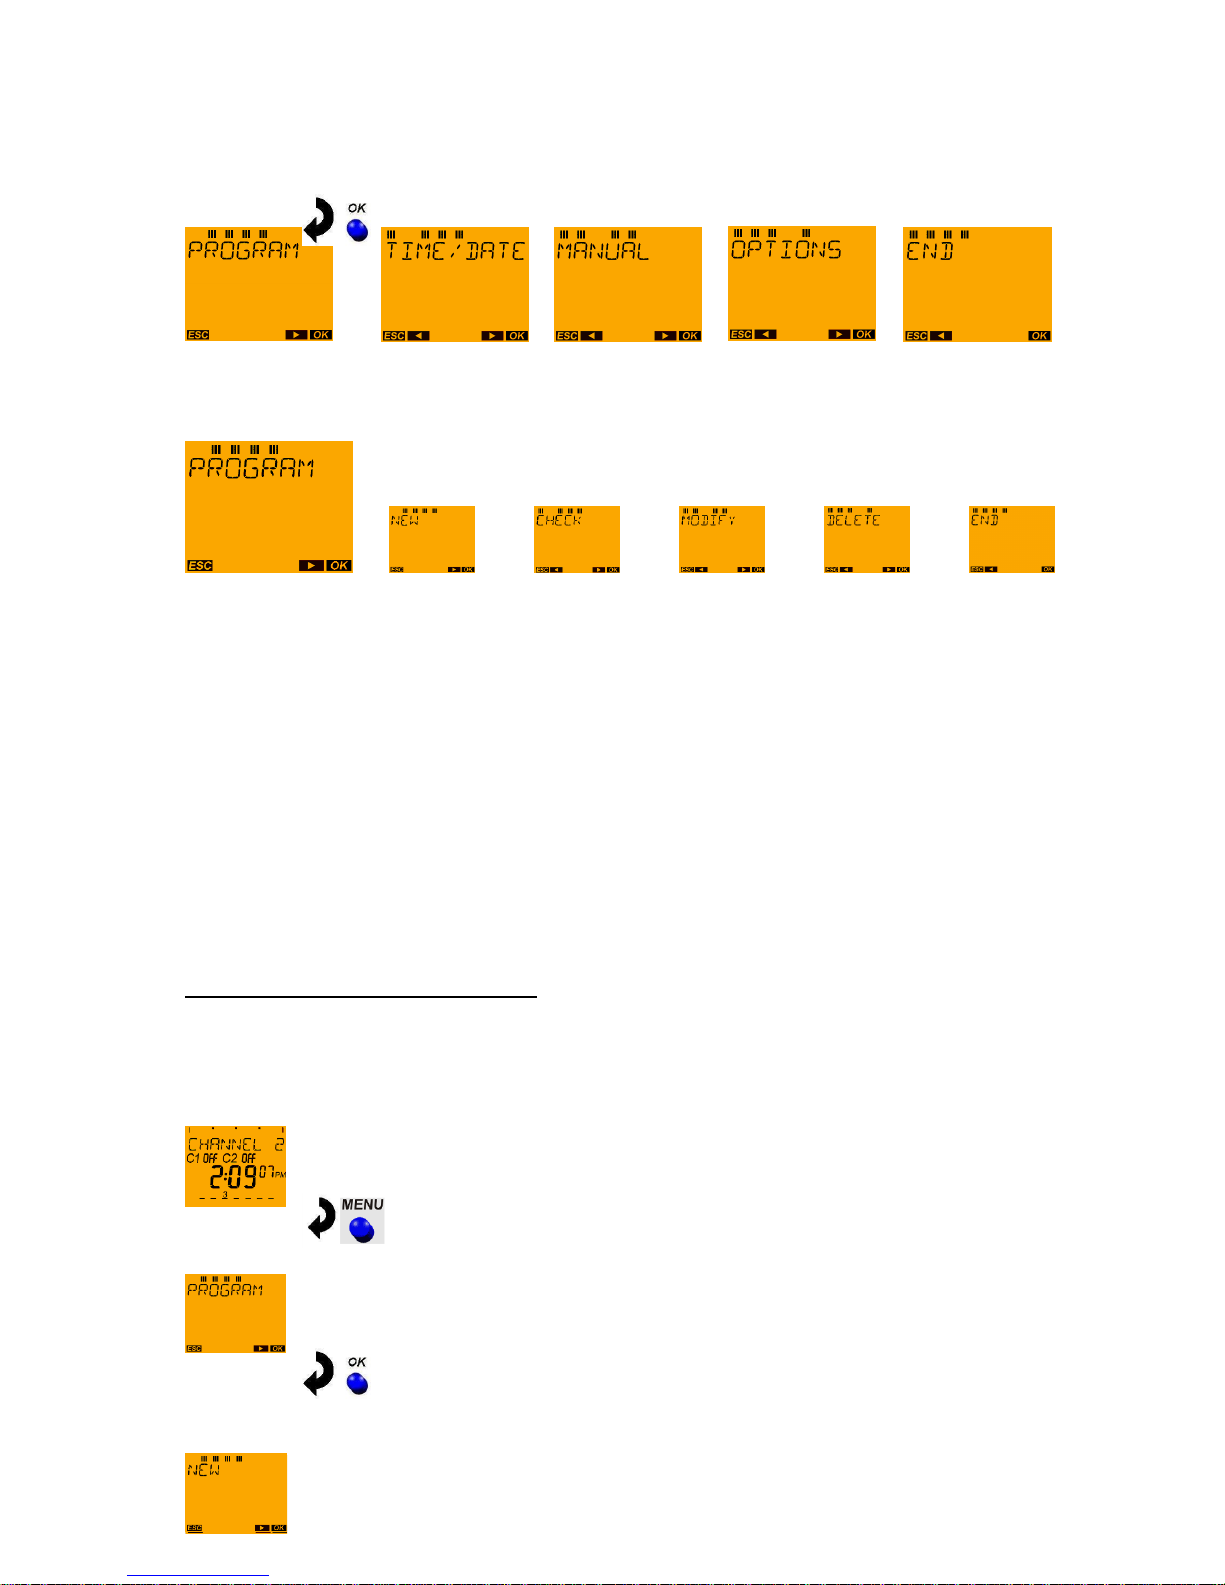
8 Menu: PROGRAM
With the MENU push button request the main menu from the auto mode:
Submenu PROGRAM:
NEW – QUERY – CHANGE – DELETE – END
In the devices TR 610 top2 and TR 612 top2 only switching times can be programmed.
In the devices TR 611 top2 and TR 622 top2 the switching commands pulse and cycle are also
available. After selecting NEW, the selection menu for the switching command type
SWITCHING TIME, PULSE or CYCLE is available.
9 PROGRAM menu: SWITCHING TIMES
9.1. PROGRAM menu: Programming switching times
Examples for switching times: Switch lighting on and off automatically at specific times, switch
ventilation on and off, activate and deactivate pumps, open and close roll-up doors etc.
Programming example for TR 622 top2:
With channel 1 the time switch should illuminate the window in a jewellery shop from Monday to Sunday
from 9:00 am to 6:30 pm.
Auto mode:
Press menu button. PROGRAM appears on the display.
Press OK button. NEW appears on the display.

Page | 17
Press OK button. SWITCHING TIME appears on the display.
(only in devices TR 611 top2, TR 622 top2 and TR 611 top2 RC).
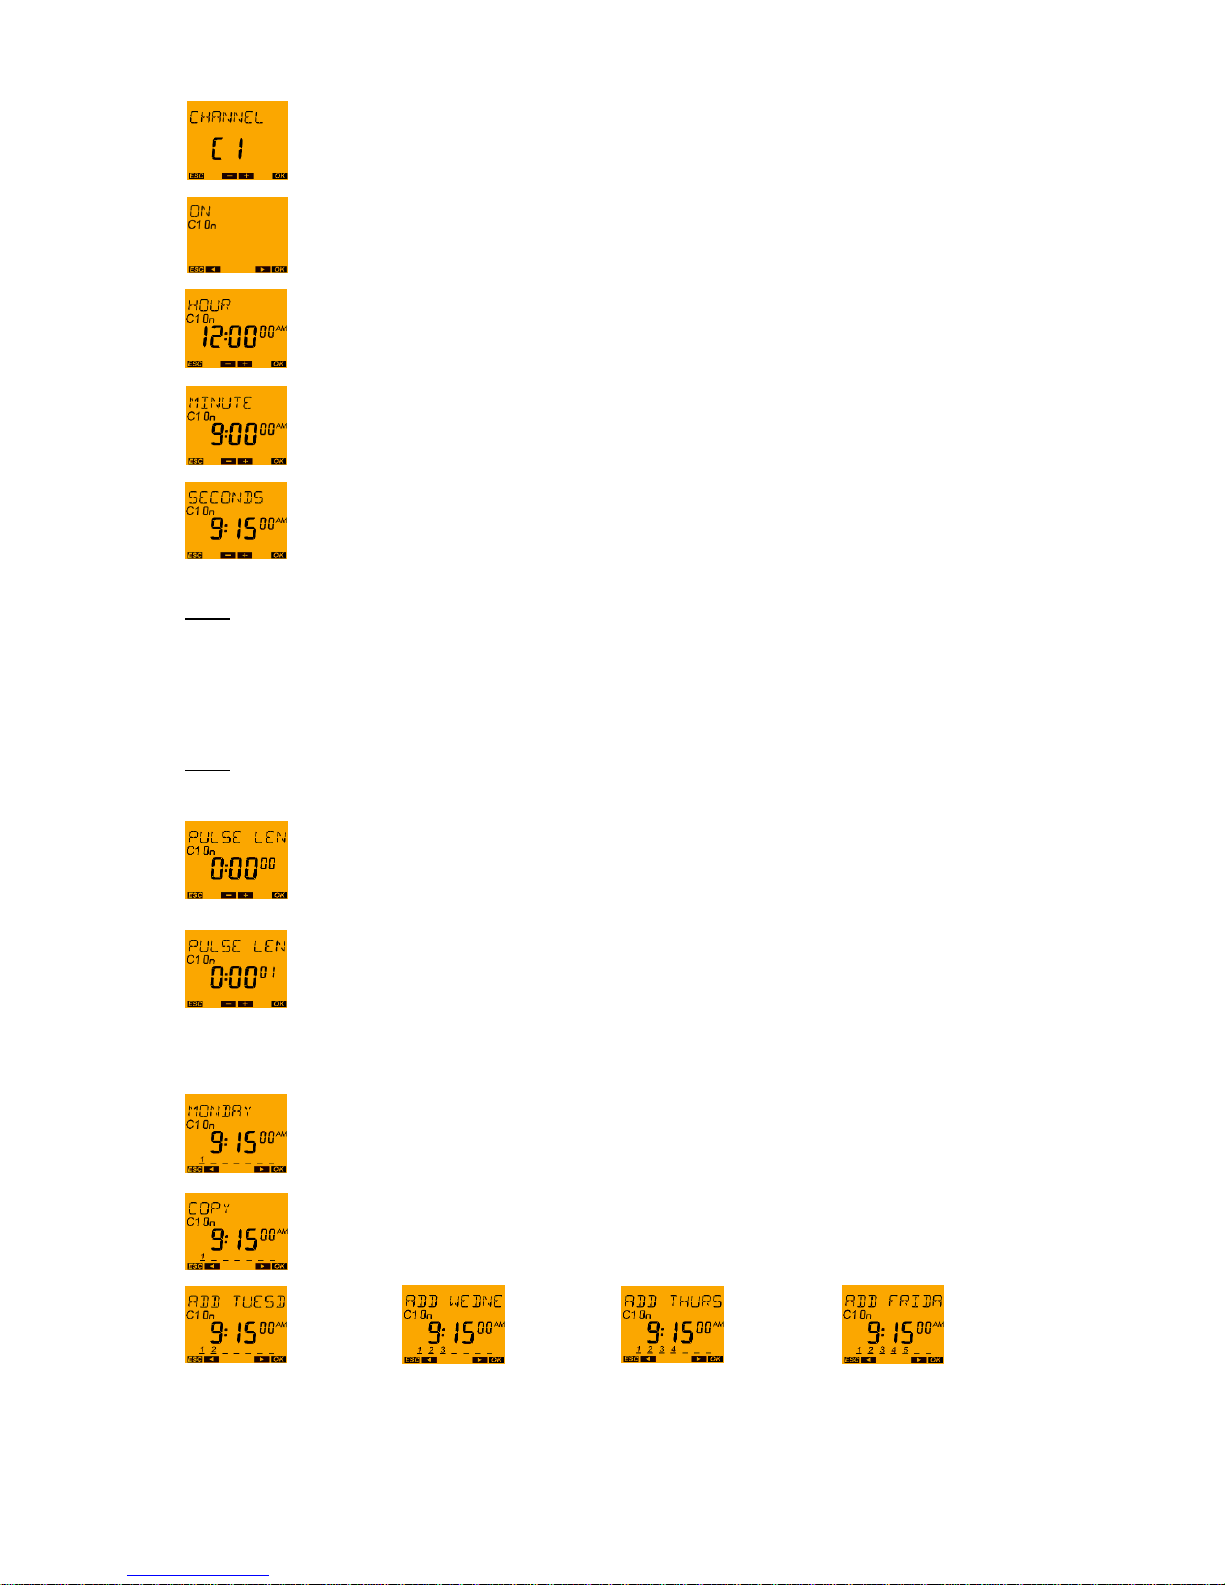
Press OK button. CHANNEL C1 appears on the display (only with the 2-channel devices).
Select channel 1 with arrow push buttons ◄ and ►.
Confirm channel 1 by pressing OK.
Note:
A brief fade-in now occurs which is only for the programming of the free memory locations
e.g. FREE 84 (if none of the 84 memory locations is occupied yet).
This fade-in can be prematurely ended by pressing the OK push button.
With the arrow push buttons ◄ and ► select channel status ON followed by confirmation
using the OK push button.
With arrow push buttons ◄ and ► set the HOUR for the switch-on (9:00 am)
and confirm with the OK push button.
With arrow push buttons ◄ and ► set the MINUTES for the switch-on (00 minutes)
and confirm with the OK push button.
Page | 18
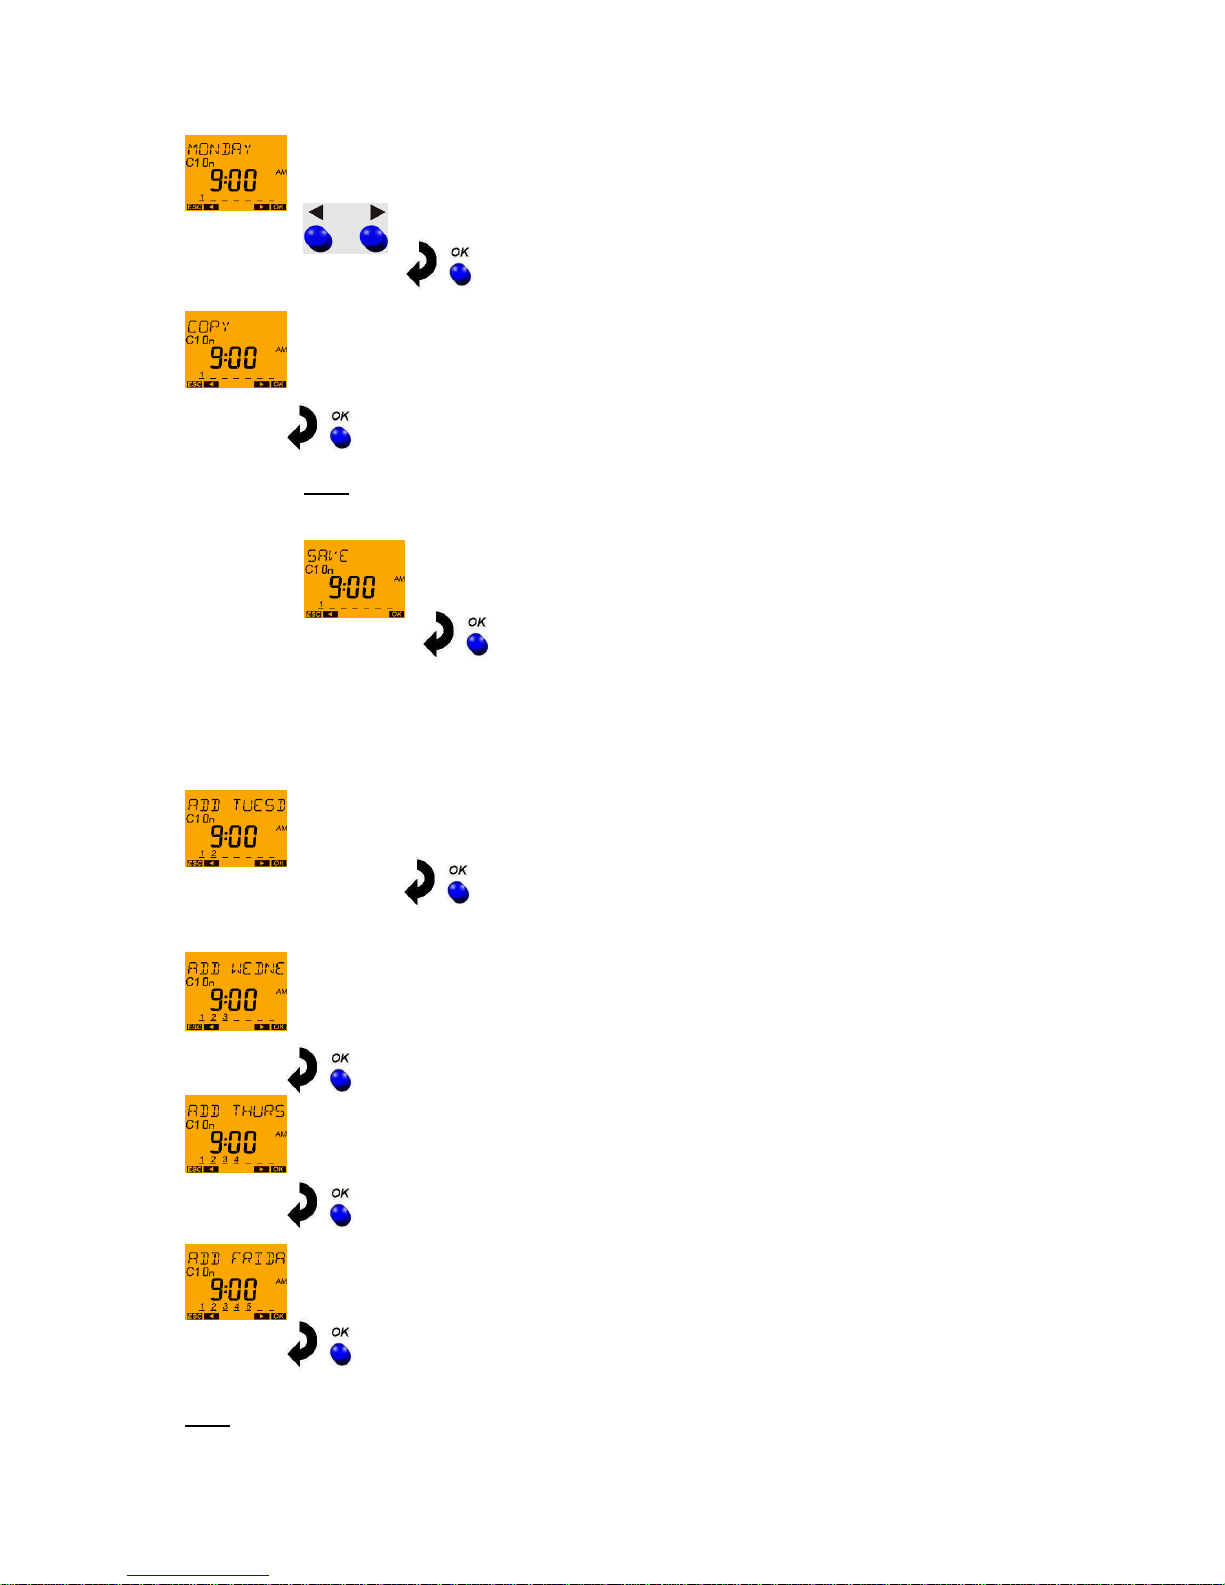
With the arrow push buttons ◄ and ► select the first weekday for the switching time
(Monday = Day 1) followed by confirmation with the OK push button.
In order to copy the switching time to other weekdays confirm the question COPY with the
OK push button.
Note:
With the push buttons ◄ and ► it is possible to change to SAVE if the switching time is
only to be performed on this weekday.
The switching time would be saved "individually" and a return to NEW would be made.
If COPY has been confirmed with the OK push button the next weekday is displayed PLUS
TUESDAY (in moving letters). In order to copy the switching time entered to this weekday confirm
using the OK push button. Otherwise change to another weekday using push buttons ◄ and ►.
The next weekday is displayed PLUS WEDNESDAY and this weekday can only be confirmed
using the OK push button as with the other weekdays.
Note:
With the push button ► weekdays can also be ignored.
Page | 19
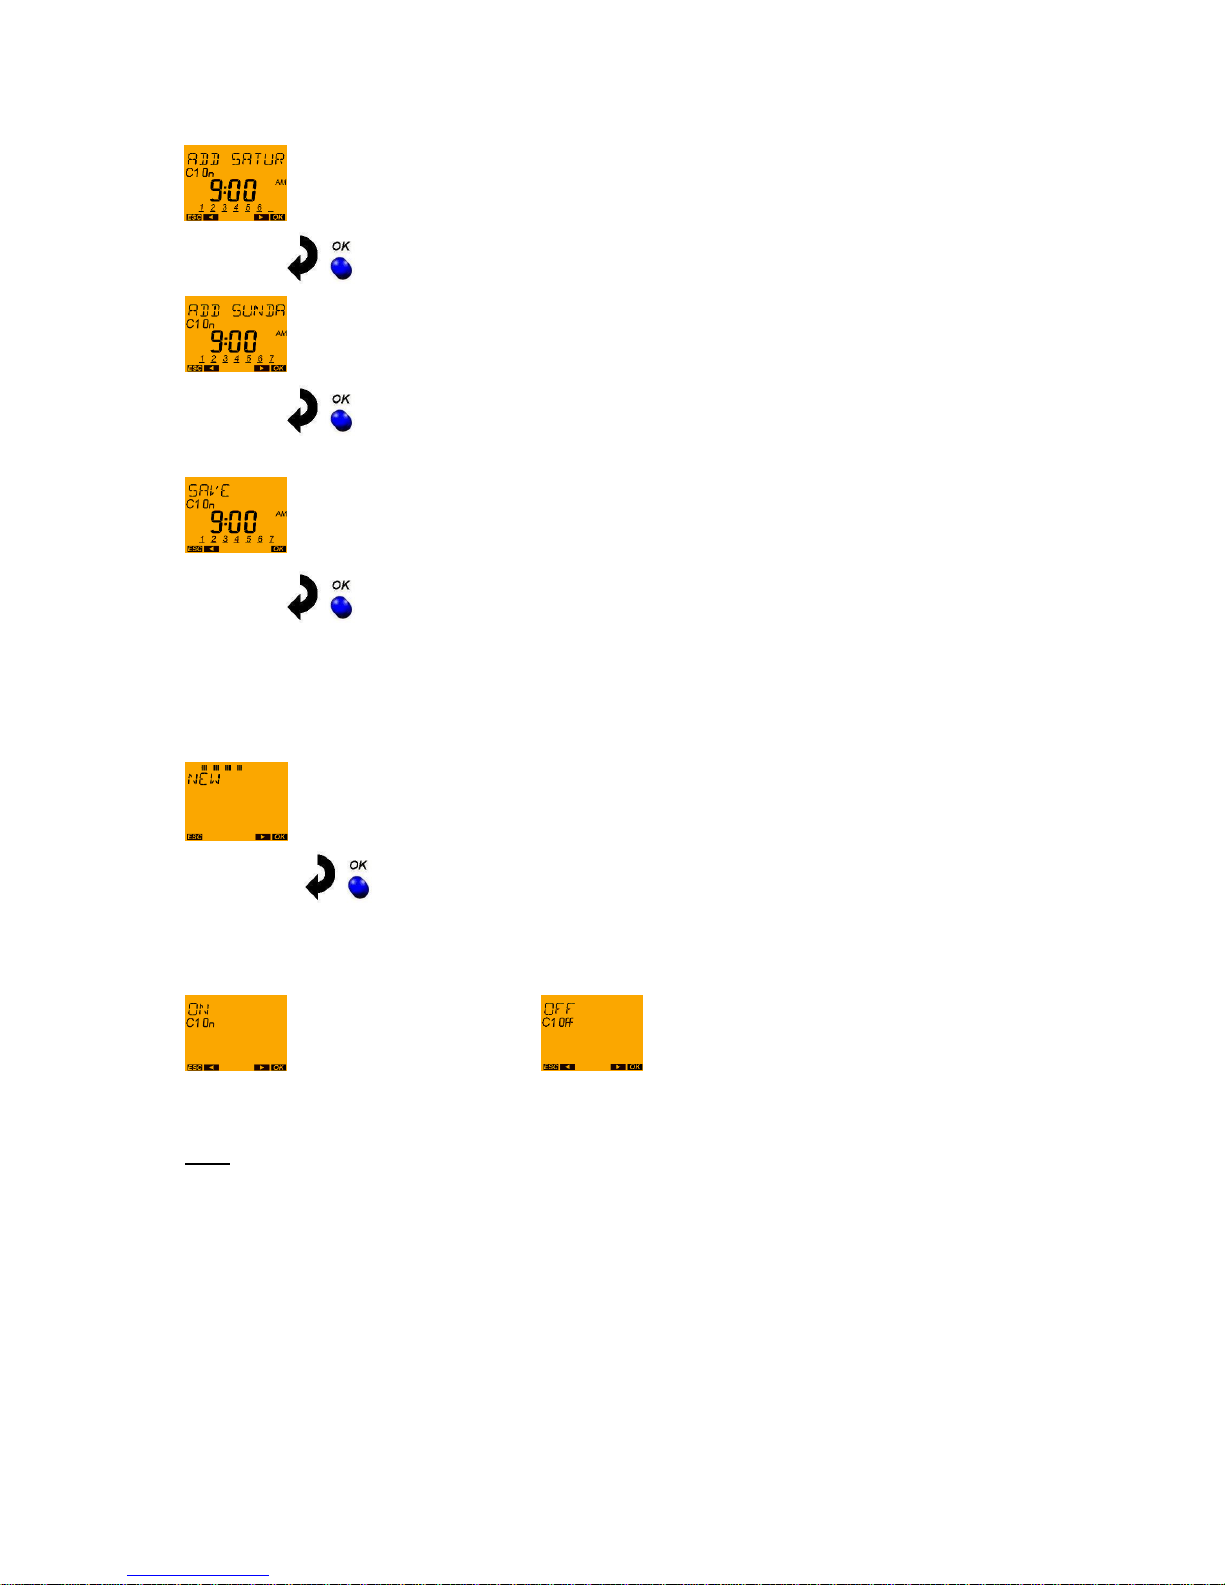
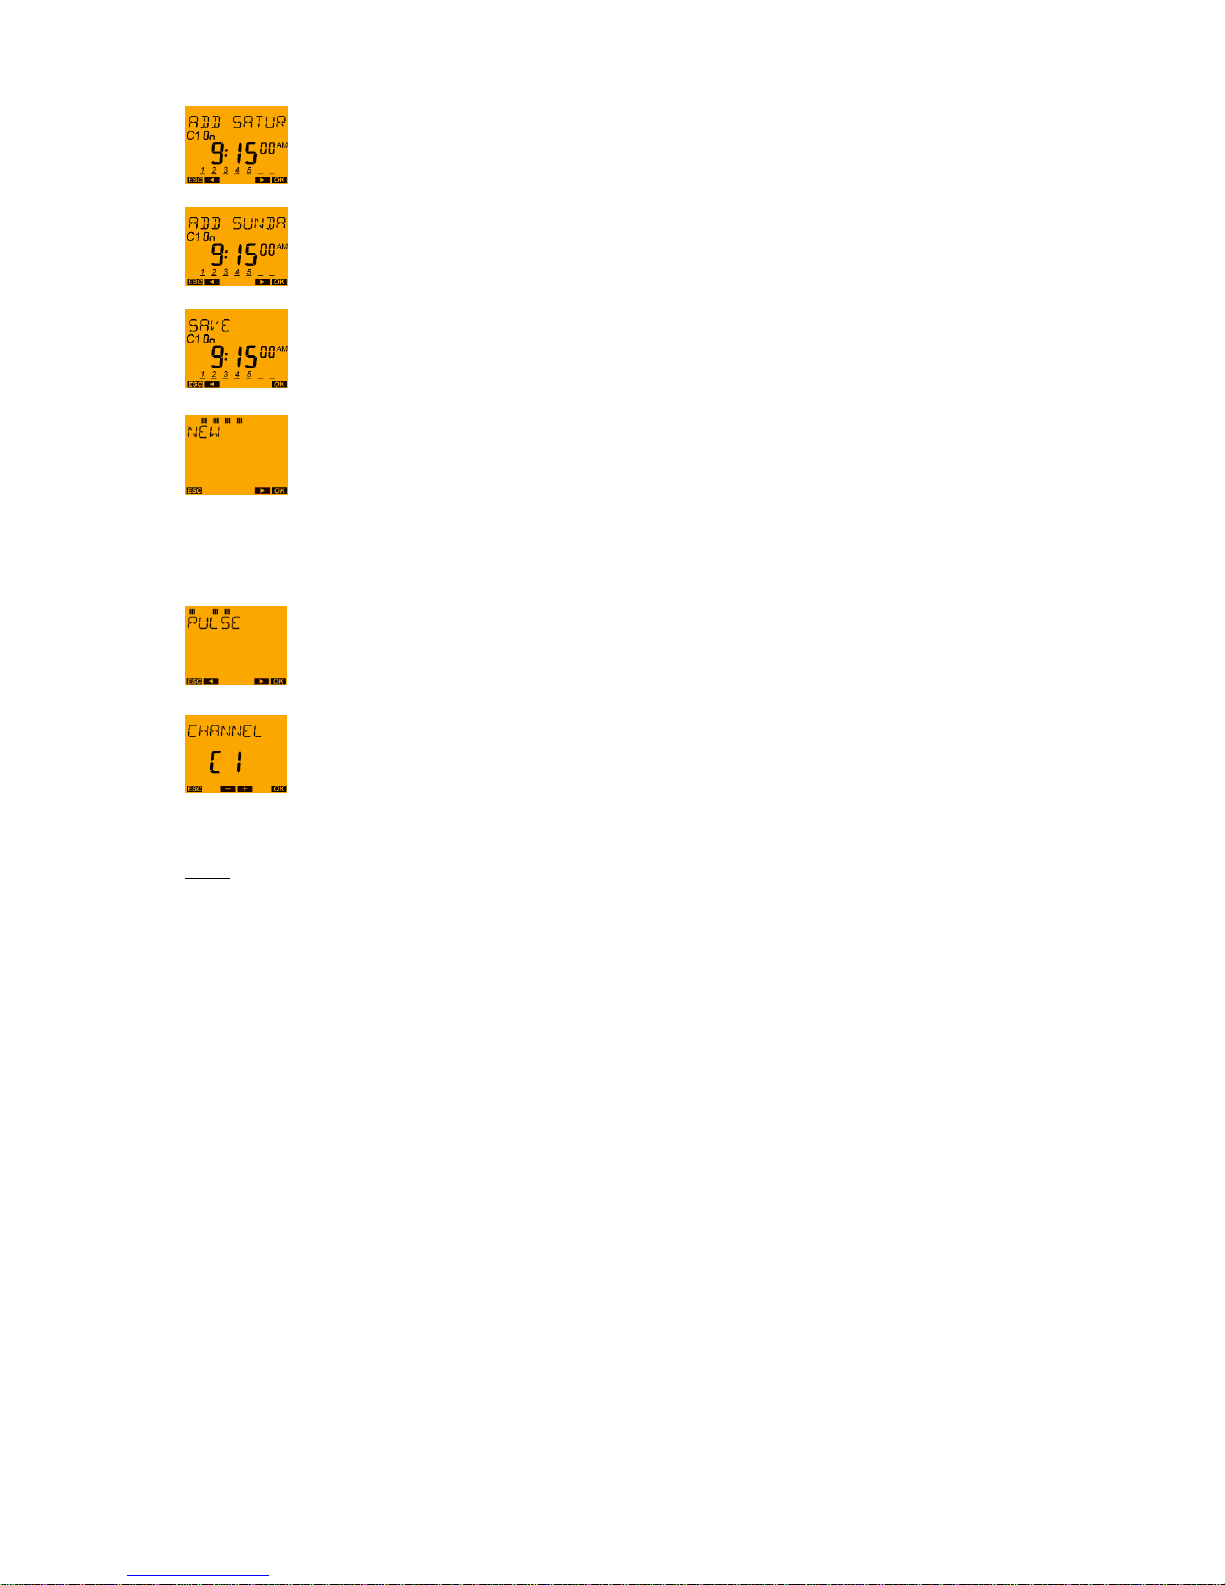
After the weekday SUNDAY, SAVE is offered again. The switch-on on Monday at 9:00
am has now been copied from Tuesday to Sunday. Confirm the programming by pressing
OK.
A return is now made to NEW.
The switch-off time still has to be entered. In the example: 6.30 pm
In order to enter the switch-off time, the input steps, as described above, must be
repeated i.e. confirm NEW by using the OK push button etc.
Instead of a switch-on (On) the push button ► must be selected for a switch-off (Off) and confirmed
using the OK push button.
Press push button ► and confirm with the OK push button.
Note:
Switching times which are entered separately, however which have different weekdays, are grouped
under one block (automatic block formation) and only occupy the one memory location.
Page | 20
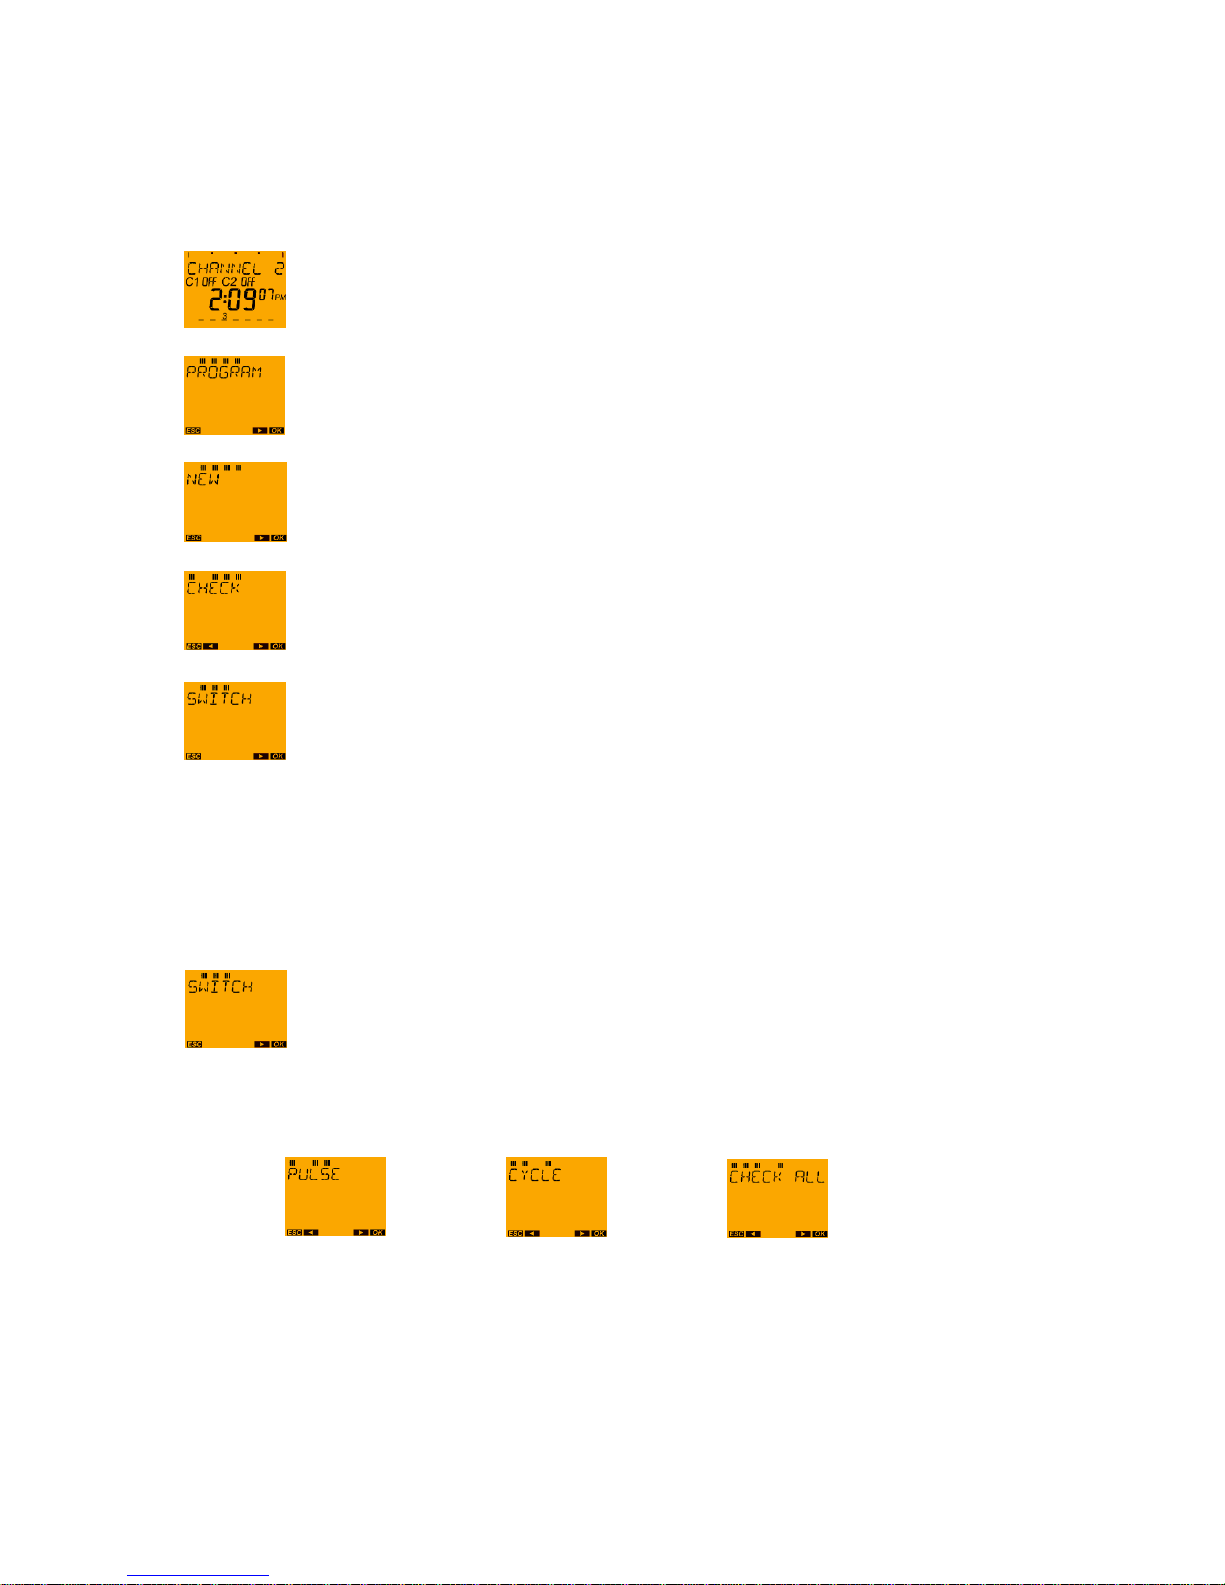
9.2 PROGRAM menu: Querying switching times
If it has to be verified whether the switching times have been correctly programmed all switching times
can be queried.
For example, if you wish to query the switching time for the previously programmed Friday:
With the MENU push button request the main menu from the auto mode.
Confirm the PROGRAM menu by pressing OK.
Press push button ►.
Press OK button.
Press OK button.
Now all programmed switching times are displayed classified on the time bar according to the time
sequence starting with the first weekday (e.g. Monday). If no switching times are saved EMPTY is faded
in.
In addition to the switching times in the devices TR 611 top2, TR 622 top2 and TR 611 top2 the
programmed pulses and the cycle programmes can also be queried separately. Moreover, using the
overall query ALL, all the switching times plus pulses plus cycle programs can be displayed.
Either confirm with the OK push button (if only the switching times are to be queried) or
continue to scroll with push buttons ◄ and ► until the desired query menu appears in the
display.
If the programmed pulse times, the cycle programmes or ALL are queried at the same time, press the
► push button as often as required until the corresponding display appears in the text line:
Push button ► Push button ► Push button ►
Select the respectively required query and confirm with the OK push button.
If there is to be no further query, however a return to the auto mode, press push button ► again:

Page | 21
If END is confirmed with the OK push button it is possible to return to the auto mode.
Note:
With the MENU push button it is possible to scroll back from all submenus into the auto
mode again (ESC = Escape function)
Example: Query channel 1 switch-on time for Tuesday
With the MENU push button request the main menu from the auto mode.
Confirm the PROGRAM menu by pressing OK.
Press push button ► OK push button.
Press OK button.
Press the OK push button (or select channel C2 with the ► push button).
The weekdays and the relevant switching times are now displayed one after the other.
With the push buttons ◄ and ► it is possible to scroll through the saved switching times on the time
bar:
etc.
The channel C1 switch-on occurs on
Tuesday at 9:00 am.
Page | 22
All programmed switching times are shown individually for each day. Should the switching occur on
several days at the same time, the complete weekday block and the respective weekday number
(Monday = 1, Tuesday = 2, etc.) flashes.
If no switching time has been programmed on a weekday this day is shown with the fade-in
-- : -- .
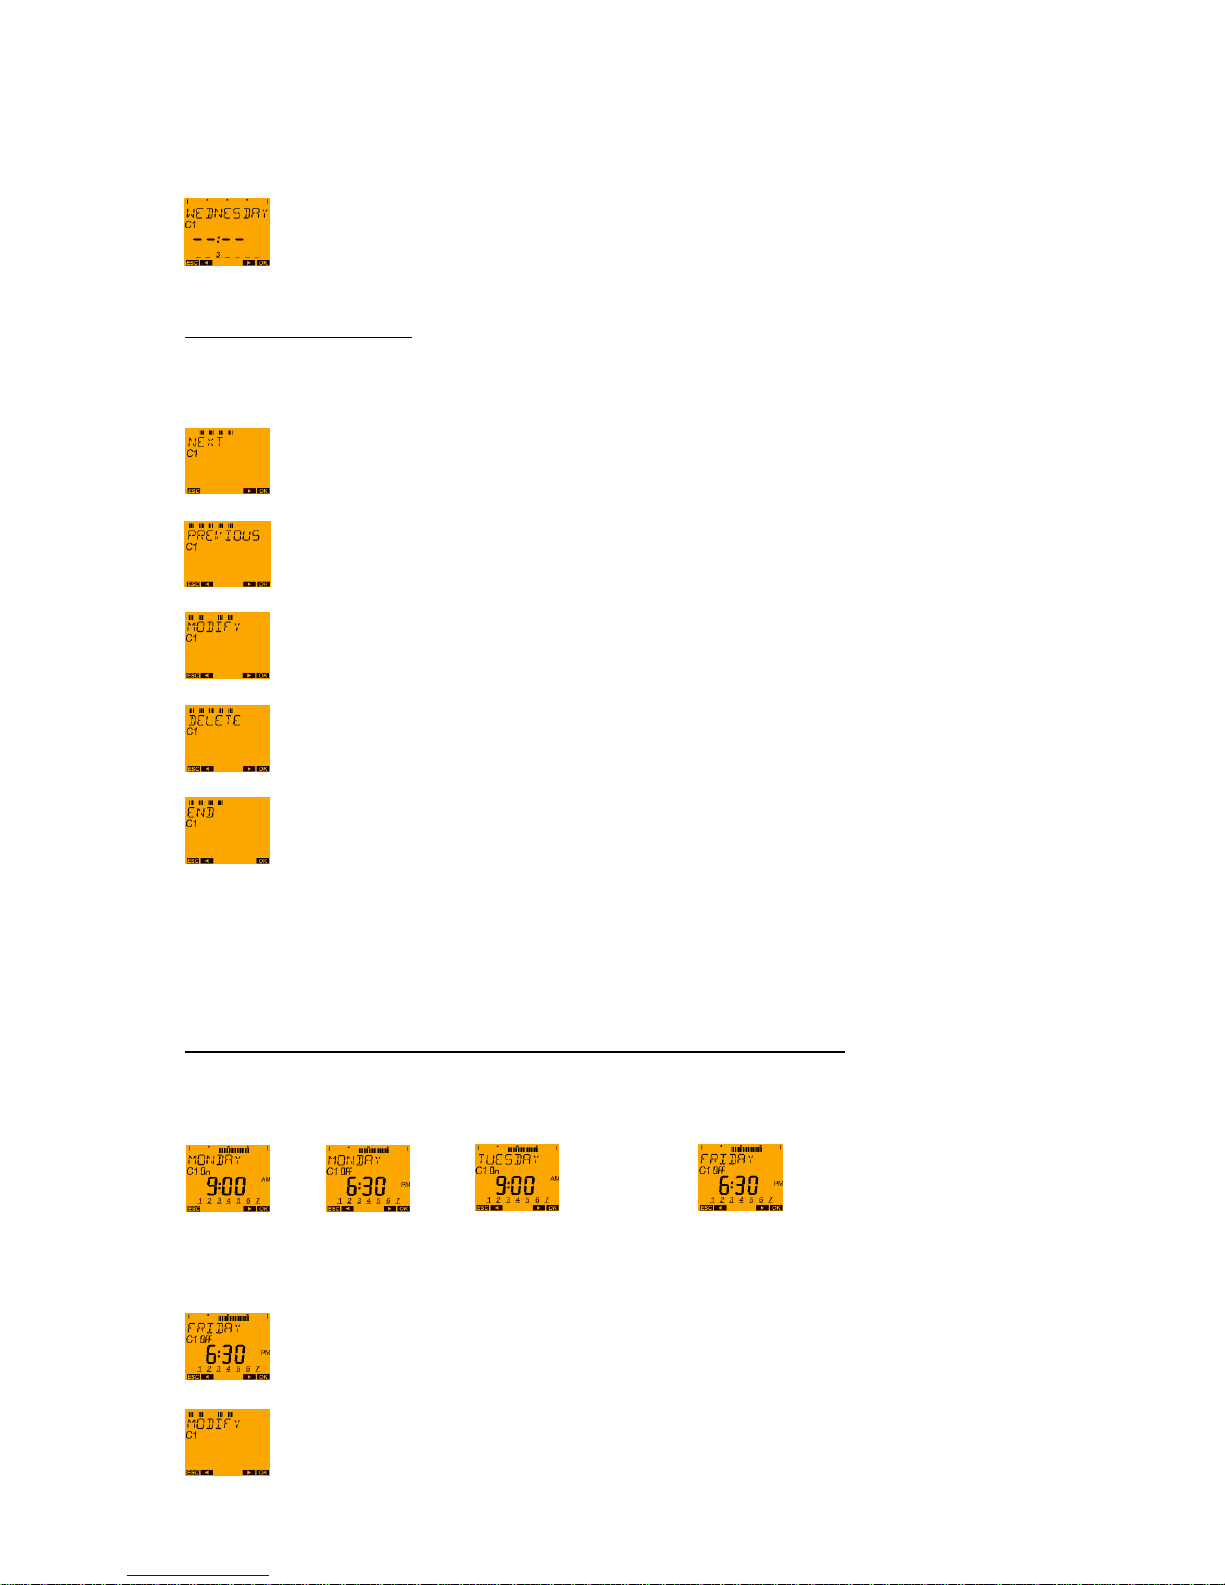
Submenu during the query:
If the OK push button is used during the query a submenu is activated:
NEXT push button OK: The next switching time is shown.
PREVIOUS push button OK: The last switching time to be shown is shown again.
CHANGE push button OK: The switching time shown can be changed.
DELETE push button OK: The switching time shown can be
deleted.
At END push button OK: The switching time query is ended.
*It can always be selected with the NEXT, PREVIOUS, MODIFY and DELETE arrow buttons. Confirm
with OK.
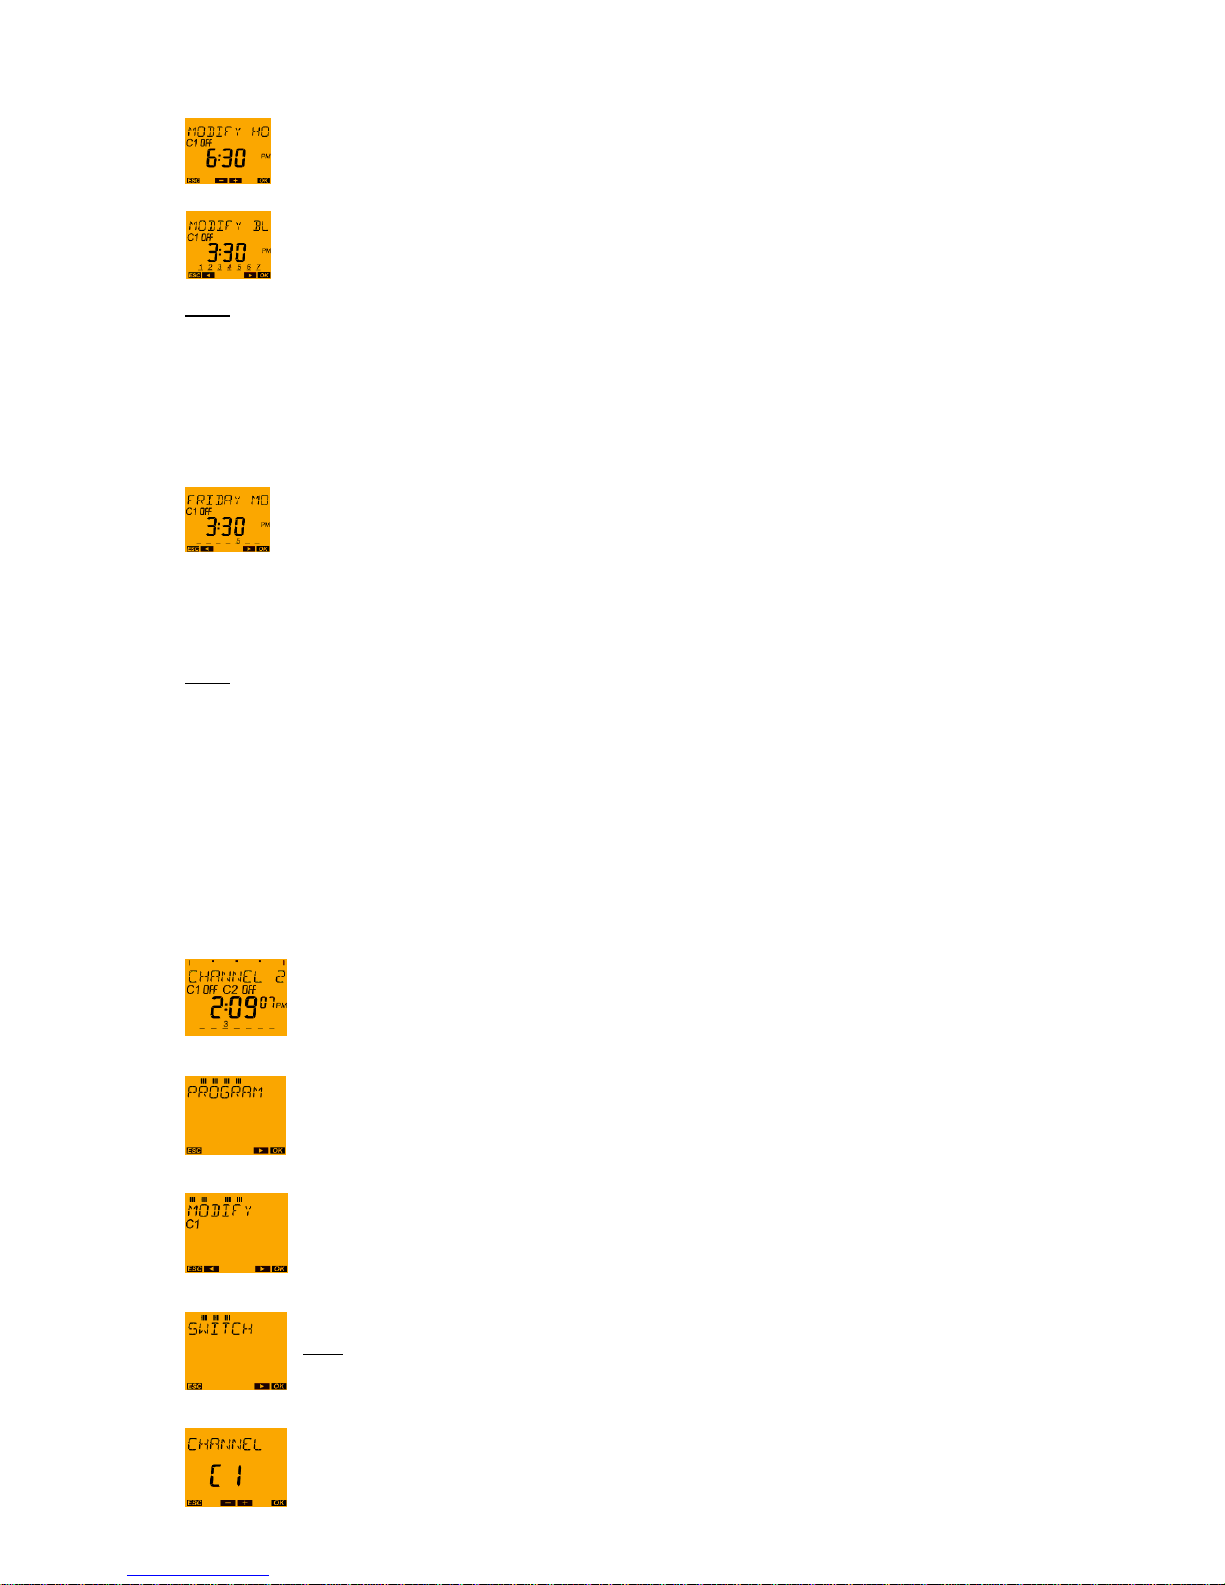
MENU/PROGRAM/OK/CHANNEL/NEW/ ►/CHECK/ ►/MODIFY/OK
Example: Changing the switch-off time on Friday from 6:30 pm to 3:30 pm
With the push buttons ◄ and ► on the time bar it is possible to scroll through the saved switching times
up to the switch-off time on Friday:
…………….
On Friday the switch-off takes place at 6:30 pm (as on other weekdays as well).
Request the query submenu using the OK push button and scroll to the menu item
CHANGE with the ► push button.
Press OK push button to start the change. The time can now be changed.
Page | 23
Changing the time to 3:30 pm (proceed to reset the hour from 18 with the ◄ push button to
15 and confirm the change with the OK push button).
The minutes do not have to be changed therefore confirm the 30 minutes with the OK push
button.
The text fade-in CHANGE BLOCK now takes place.
Note:
If the entire switch time block is to be changed, i.e. switched off on each weekday at 3:30 pm instead of
at 6:30 pm this must be confirmed by using the OK push button.
In the example only the switch-off on Friday should take place at 3:30 pm and on the other weekdays
switch-off should continue to be at 6:30 pm.
Therefore, change to text fade-in CHANGE FRIDAY using push button ► .
Confirm the change with the OK push button.
The change is saved and a return is made to the QUERY menu.
Now a new query of the switching times can be performed (OK push button). With the ► push button it
is possible to scroll to the END or with the MENU (ESC) push button the menu can be exited.
Note:
If no push button is pressed for more than 1 minute there is an automatic return to the auto mode.
9.3 PROGRAM menu: Changing switching times
It is possible to change switching times in the CHANGE submenu from the QUERY menu or directly in
the PROGRAM menu CHANGE.
Example: In the case of channel C1 the switch-off time on Wednesday is to be changed from
6:30 pm to 6:35 pm.
With the MENU push button request the main menu from the auto mode.
Confirm the PROGRAM menu by pressing OK. Press the ► push button twice.
Press the ► push button twice until CHANGE appears on the display and confirm with
OK.
OK push button (if a switching time is to be changed)
Note: With the ► push button it is possible to change from pulses or a
cycle program.
With the ► button select the desired channel and then press OK (only for the 2-channel
devices).

Page | 24
The first switching time to be saved is displayed.
With the ► push button scroll through the saved switching times until the switching time
to be changed is shown.
Press OK push button (to start the change).
Note:
On the weekday numbers it is possible to ascertain that the switch-off time at 6:30 pm to date from
Monday to Thursday (1 - 4) and on Saturday (6) and Sunday (7) is programmed. On Friday the switchoff time is not programmed to 6:30 pm (was changed in section 7.1.2 to 3:30 pm).
Press the OK push button (since the hour displayed - 18 - remains unchanged).
Press ► to adjust the minutes from 30 to 35. Then press the OK push button.
The moving letters MODIFY BLOCK appear.
Press push button ► (not the OK push button since not the whole switching time block
but only the switch-off time on Wednesday is to be changed).
The moving letters MODIFY WEDNESDAY appear.
Press OK button.
The return to the MODIFY menu now takes place.
Now other changes can be carried out (OK push button). With the ► push button it is
possible to scroll to the END or with the MENU (ESC) push button the menu can be
exited.
Page | 25
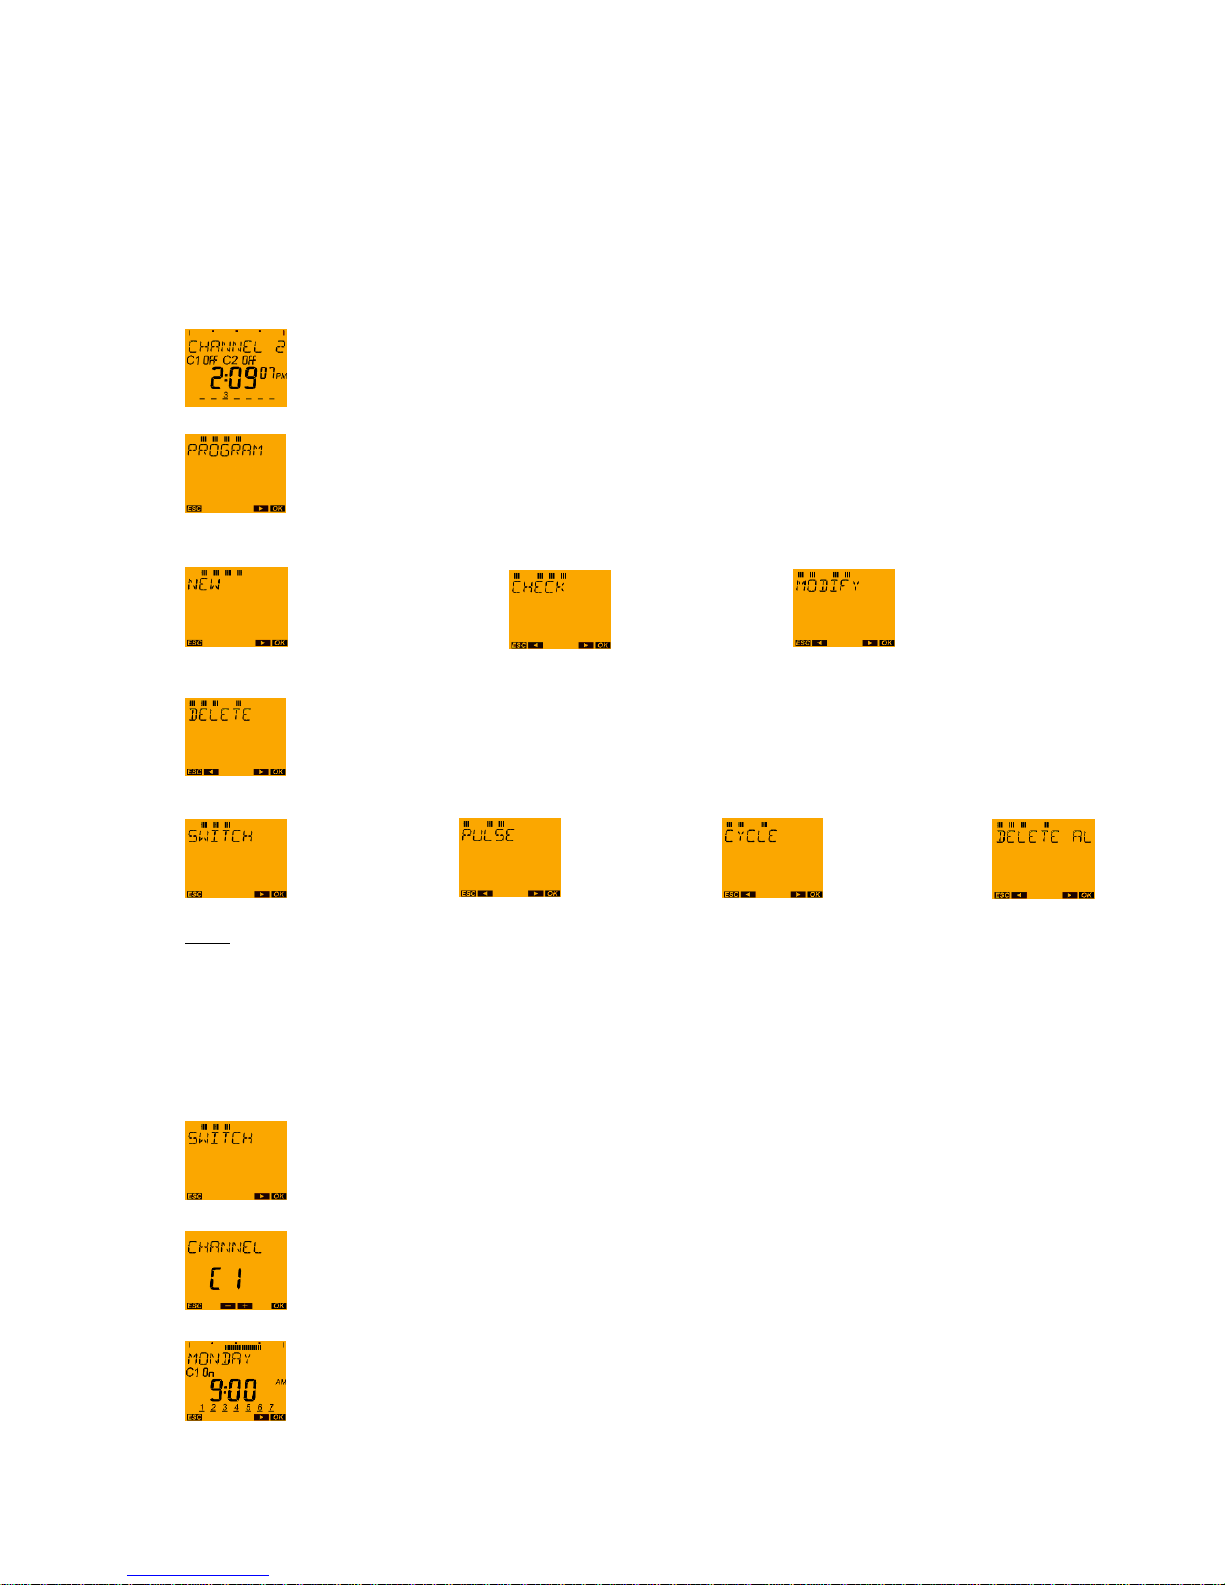
9.4 PROGRAM menu: Deleting switching times
In the PROGRAM menu the saved switching commands can be DELETED again.
Example: In channel C1, the switch-off time on Monday at 9:00 am should be deleted.
With the MENU push button request the main menu from the auto mode.
Confirm the PROGRAM menu by pressing the OK push button.
Press push button ► push button ► push button ►.
Press OK button.
Push button ► Push button ► Push button ►
Note:
In the DELETE submenu it is also possible to select what is to be deleted.
In addition to deleting the switching times, the pulses or the cycle programmes it is also possible to
select the menu item DELETE ALL. Here it is possible to jointly delete all saved switching commands
for the selected channel (i.e. switching times, pulses and cycle programs).
Select with push buttons ◄ and ►:
Press OK button.
With the ► button select the desired channel and then press OK (only for the 2-channel
devices).
The first switching time saved for the first weekday is displayed (switch-on Monday at
9:00 am):
Page | 26
The entire switching time block (switch-on at 9:00 am from Monday to Sunday) can be deleted:
DELETE BLOCK
Press push button ►.
It is now possible to remove Monday specifically from the block and delete it: DELETE MONDAY.
Press OK button.
The confirmation of the delete procedure is displayed briefly followed by an automatic return
to the DELETE menu.
Now other switching times can be deleted (OK push button). With the ► push button it is
possible to scroll to the END or with the MENU (ESC) push button the menu can be exited.
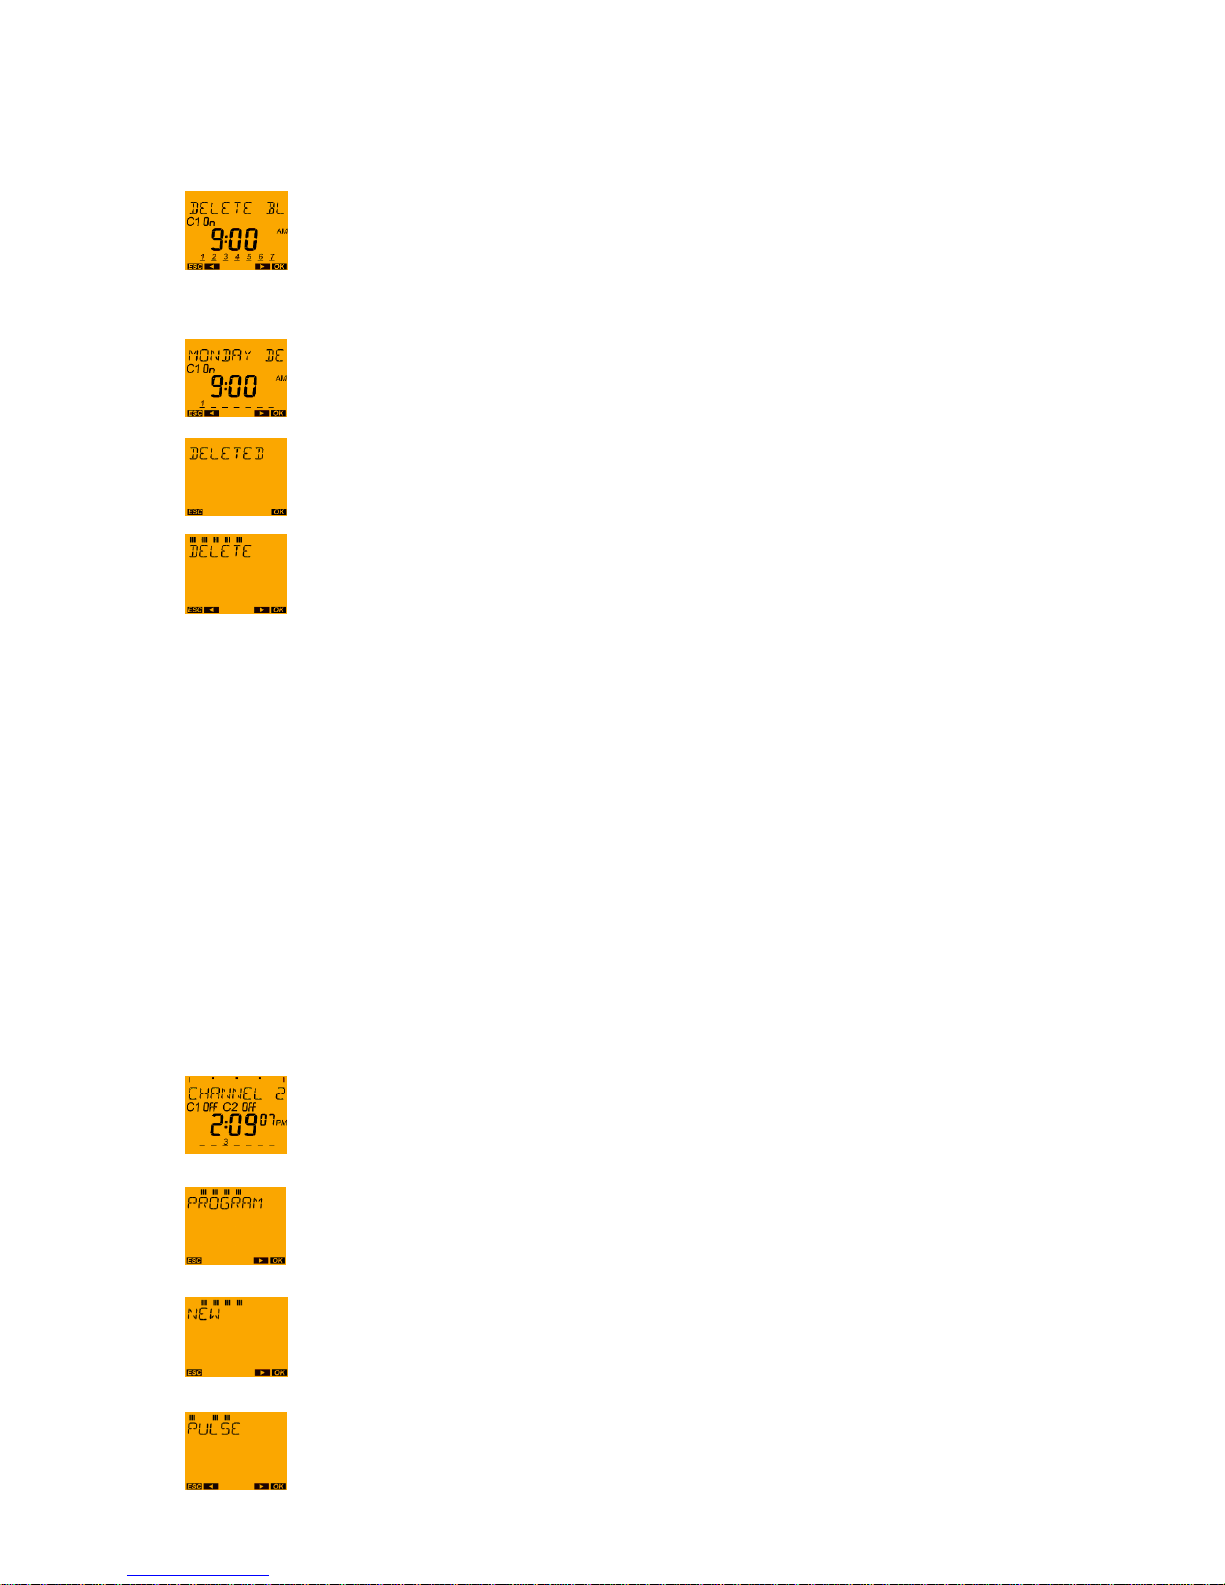
9.5 PROGRAM menu: PULSE
In addition to programming switching times in the case of devices TR 611 top2, TR 622 top2 and TR
611 top2 RC you can programme short pulses the switch-on duration of which is less than one minute
(shortest programmable pulse duration: 1 second).
Typical applications in this regard are pause rings.
Example: A pause ring should be heard for 3 seconds from Monday to Friday at 9:15 am to
indicate the start of the pause. At 9:30 am the ringing sign should ring for 5 seconds to indicate
the end of the pause.
The PULSE switching program required is as follows:
Monday – Friday a first switch-on pulse: Start of the pulse at 9:15 am, pulse duration: 3 seconds.
Monday – Friday a second switch-on pulse: Start of the pulse at 09:30:00, pulse duration: 5 seconds.
With the MENU push button request the main menu from the auto mode.
Confirm the PROGRAM menu by pressing the OK push button.
Press OK button.
Press push button ► until PULSE appears on the display and confirm with the OK push
button.
Page | 27
With the ► button select the desired channel and then press OK (only for the 2-channel
devices).
There is now a brief fade-in of the number of free memory locations,
e.g. FREE 81)
Press OK button.
With the ◄ and ► push buttons enter the hour for carrying out the ON pulse (9:00 am),
then press the OK push button.
With the ◄ and ► push buttons enter the minutes for carrying out the ON pulse (9:00 15
minutes), then press the OK push button.
With the ◄ and ► push buttons enter the seconds for carrying out the ON pulse (9:00 15
minutes 00 seconds), then press the OK push button.
Note:
Pulses do not have to start at the beginning of the minute however can be set to the exact second. The
pulse in the example could, as such, also be programmed to 9:15 30 i.e. it would be performed at 9:15
am and 30 seconds.
The pulse duration is then entered.
Note:
Here it is possible to select a duration of maximum 0:59 59, i.e. 59 minutes and 59 seconds.
Press the OK push button since the pulse in the example is only 3 seconds long and
therefore the pulse duration minutes are 00.
With the ◄ and ► push buttons enter the seconds of the pulse duration (3 seconds) and
then confirm with the OK push button.
Following this, the first weekday must be selected on which this ON pulse at 9:15 am with a duration of
3 seconds is to be performed.
Press OK button.
Press OK push button (since the pulse is not only to be carried out on Monday at 9:15 am).
Press OK Press OK Press OK Press OK
button button button button
After the pulse has been copied to Monday – Friday, the query is then made as to whether the pulse is
to be performed on Saturday as well.
Page | 28
Press ► (scroll to the right) instead of the OK push button since the pulse should not be
performed on a Saturday.
Press ► (scroll to the right) since the pulse should not be performed out on a Sunday
either.
Press OK push button since the selection of the weekdays has been completed (the
pulse should be performed on the weekdays Monday – Friday, however not on Saturday
and Sunday)
After saving, NEW appears on the display since other PULSES can now be programmed.
With the ► push button it is possible to scroll to the END or with the MENU (ESC) push
button the menu can be exited.
Press the OK push button since the pulse which indicates the end of the pause from Monday to Friday
at 9:30 am with a 5-second long ring it still to be programmed.
Press OK button.
Press the OK push button etc. (same procedure as for the programming of the
pulse above).
Note:
With the PULSE program function it is also possible to extend or shorten "normal" switching times in
order to set second-specific switching times which do not begin or end at the start of the minute.
Example: The connected load should be switched ON at 6:00:05 am - and switched OFF at 12:00:20
pm.
Procedure:
Proceed to programme the switching times ON at 6:00 am and OFF at 12:00 noon.
Then programme an OFF pulse at 6:00:00 am with a pulse duration of 5 seconds.
And finally programme an ON pulse at 12:00:00 noon with a pulse duration of 20 seconds.
 Loading...