

Theben TR 652 S, TR 651 S, TR 653 S Quick Start Manual
310 051 01
C
Digital Timers
TR 651 S 1-channel timer No. 651 0 001
english
TR 652 S 2-channel timer No. 652 0 001
TR 653 S 3-channel timer No. 653 0 001
1.0 Information
The devices TR 651 S – TR 653 S comes ready programmed with the current
time and with the relevant Greenwich mean time rule for automatic summer / winter timer adjustment.
Should you require a different time adjustment rule, or none at all, the new
rule can be selected from the table (chapter 18.2) and re-programmed as described
in chapter 18.3 to 18.6.
2.0 Application
Time switches switch on, off or over, electrical units time dependent on a day or
week cycle.Time switch TR 651 S,TR 652 S, TR 653 S, is suitable in dry spaces and
for assembly to the 35 mm top-hait rail (DIN EN 50022). If assembly kit 907 0 050
is used, the installation can be fitted to a wall.
3.0 Safety information
Electrical devices should only be connected and mounted by an electrical
specialist. The national specifications and applicable safety regulations
must be observed. Manipulations and modifications on the switch will be
result in loss of warranty.
6.0 Technical Data
Operating voltage: 240 V~ + 6 % / – 14 %
230 V~ ± 10 %
Mains frequence: TR 651 S/652 S 50 – 60 Hz
TR 653 S 50 Hz
Specified voltage range: TR 653 S 60 Hz
Own consumption: aprox.7 VA (TR 653 approx. 14 VA)
Contact rating:
TR 651 / 652 S 16 A, 250 V~, cos ϕ = 1
10 A, 250 V~, cos ϕ = 0,6
TR 653 S 10 A, 250 V~, cos ϕ = 1
6 A, 250 V~, cos ϕ = 0,6
(Kontakte,potentialfreii)
Kontaktmaterial: AgSnO
Time base: quartz
Memory locations: 140
Shortest possible switching interval: 1 minute
Impuls einstellbar: 1 – 59 Sek.
Switching accuracy: precise-to-the second
Running accuracy: ≤ ±1 sec. / deg at 20 °C
Power reserve: Lithium max. 8 years at 20 °C
Admissible ambient
temperature: –10 °C ... +50 °C (-10T50)
Class of protection: II acc. to EN 60 335-1 when mounted
Type of enclosure: IP 20 acc. to EN 60 529
Type: 1 BSTU acc. EN 60730-2-7
Interference suppression degree:
The time switches are in accordance with the European directives 73/23/EWG LowVoltage Directive) and 89/336/EWG (EMC-Directive).
If the time switches are used together with other devices in an installation, take care
that the complete installation does not cause a radio interference.
Despite elaborate safety precautions, exceptionally strong electrical fields may cause
interference with the microprocessor-controlled time switch.We therefore recommend that you observe the following points before installation:
• Suppress interference of inductive loads by means of an RC filter
• Use a separate line for the mains voltage suppply
• Do not install device in close proximity to sources of interference, e.g. transformers, contactors, PCs and TV sets.
• If interference occurs, we recommed that you carry out a RESET before putting
the device back into operation (press button v + C1 simultaneously).
Attention
This action deletes all stored switching times!
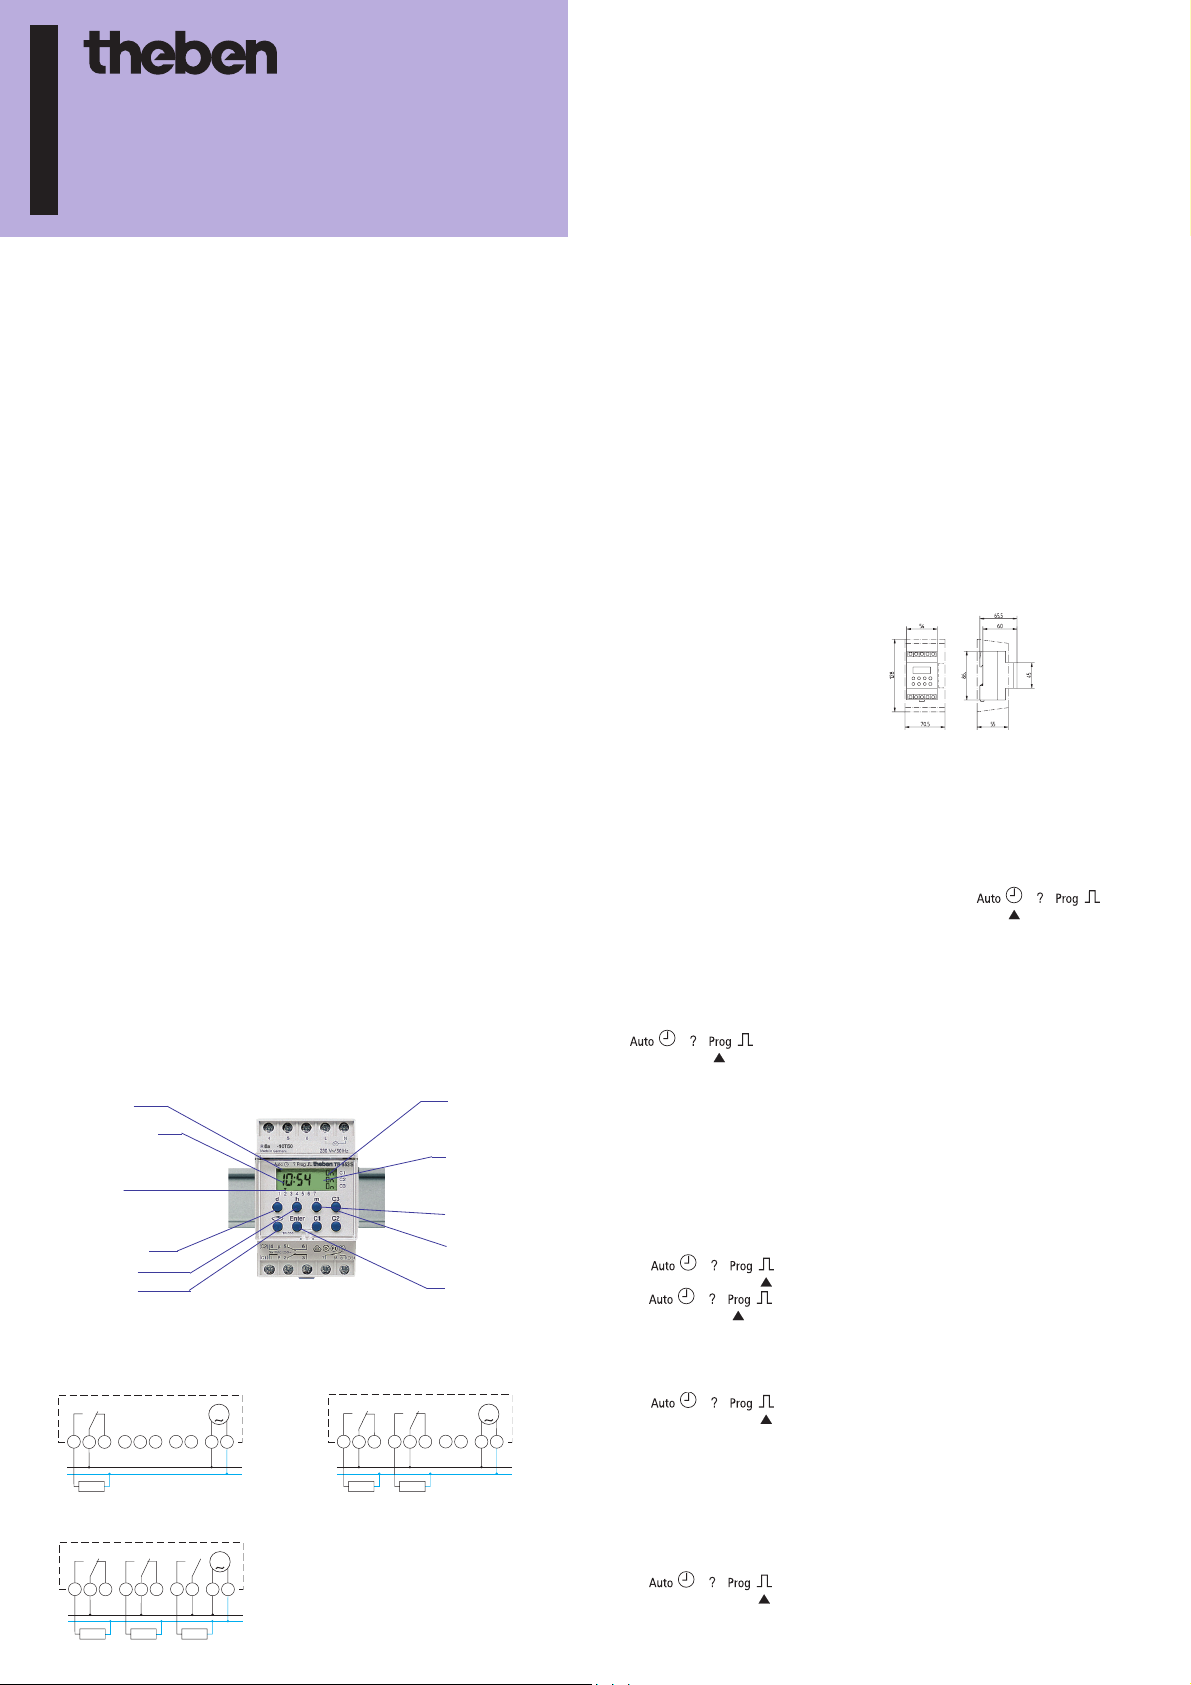
4.0 Features
– free block formation of the weekdays
– 140 memory locations
– holiday program, programmable 21 days in advance for max. 45 days
– Pulse program, 1 – 59 sec., switching times programmable precise to the second.
– 1 x switching e.g. for one time program override on holidays
program display
time / response time
day indication
e. g. 1 = Monday
2 = Tuesday
setting of weekday
setting of hours
program selector
switch
switch position of
the channels On, OFF
H = holiday program
1 x = one-time switch
setting of minutes
selection of channel
and ON / OFF
program entry /
recall
5.0 Electrical connection
Dimentioned drawing
7.0 Automatic reset
If no buttons are pressed for a certain length of time in the checking or programming mode, the display is automatically reset to automatic mode after approx.
40 sec. The device then assumes the switching status dictated by the program.
8.0 Setting / changing the current time
Should the time already set in the factory vary slightly, it can be corrected as
follows:
Press button vfor approx 1 sec. (see Cursor under ).
Change the controll-time with button h or m.
~
Store it by pressing the button ENTER.
9.0 Programming e. g. switch C1 Mo – Fr 8.00 (On)
press button v see Note: Using the 1 channel timer TR 651 S
~
Cursor in Pos. the key C is pressed instead of C1 or C2.
C1 (On) > Enter > d > Enter > d >
Enter > d > Enter > d > Enter > h ...
(8 h) > Enter.
e. g. switch C1 Mo – Fr 18.00 (OFF)
C1 > C1 (OFF) > Enter > d > Enter > d
> Enter > d > Enter > d > Enter > h ...
(18 h) > Enter.
Pressing the keys h or m for more than 2
seconds, a fast run – through is carried out.
10. One-time switching e. g. one time wednesday 9.45 switch C1 on.
One-time switch has priority
or
Enter (1x) > C1 (On) > d ... (3 = We) > Enter
> h ... (9 h) > m > (45 min.) > Enter.
TR 651 S TR 652 S
1
L
N
C 1 C 2
2
M
1
3
2
L
N
N
L
TR 653 S
C 1 C 2 C 3
1
456
3
2
L
N
M
7
8
N
L
3
456
11. Program switching e. g. Channel C2 thursday 7:15 switching-on
times Impuls 10 sec.
M
N
L
C2 (On) > 2 x d > Enter > h (7 h) >
m (15 min.) > Enter > m > (10 sec.) >
Enter.
Attention: If you want to program only the switching times of the pulse
program, you must program additional the daily OFF switching times.
12. Pulse program
Switching times can be prolonged by 1 – 59 sec. with an additional On rubbe
command.
C1 (On) > 1 x d (Tue) > Enter > h (7 h)
> Enter
C1 > C1 (OFF) > 1 x d (Tue) > Enter >
h (7 h) > Enter > m (25 sec.) > Enter.
12.1 Delayed switch-on:
Switch-on can be delayed by 1 – 59 seconds with an additional OFF pulse command, e.g. 35 sec. On at 7 AM or for time-offset switch-on of channels.
Interrupting switch-on phases:
Off pulse commands permit brief interruptions of switch-on phases.
13.0 Preselection e. g. C1 On / OFF C1 ... to be pressed
14.0 Permanent control: e. g. C2 permanent control ON/OFF/Autom.
15.0 Recall e. g. C2 recall starting from Monday.
e. g. C2 On / OFF C2 ... to be pressed
Counter-acting program commands annul the
switching preselection.
m keep pressing C2 > C2 > C2
• Point indicates permanent control of the
channel
...? (free memory locations are displayed)
v
C2 > d > Enter > Enter ... End
if necessary to switch-over to other channels by
pressing C1 or C3. Flashing arrows indicate
identical commands (block commands) on other
weekdays.
• On • OFF AUTO
18.3 See Captur 7.0 / setting / changing the current time
Select the required automatic adjustment from the selction table in chapter
18.2. First press the button v , and then button d.The set summer/win-
ter time adjustment rule will then appear in the LCD display (e.g. dat). To
change the automatic S/W adjustment, press the button C1 and then store the
setting via the Enter button.
You can then change the year using button d
Enter button.The current day can then be changed with button d and the
month with button m.Again, store by pressing the Enter button.
18.4 Changing the automatic summer / winter time adjustment
Programmation only possible, if no automatic summer / winter time adjustment as selected!
press h > Enter
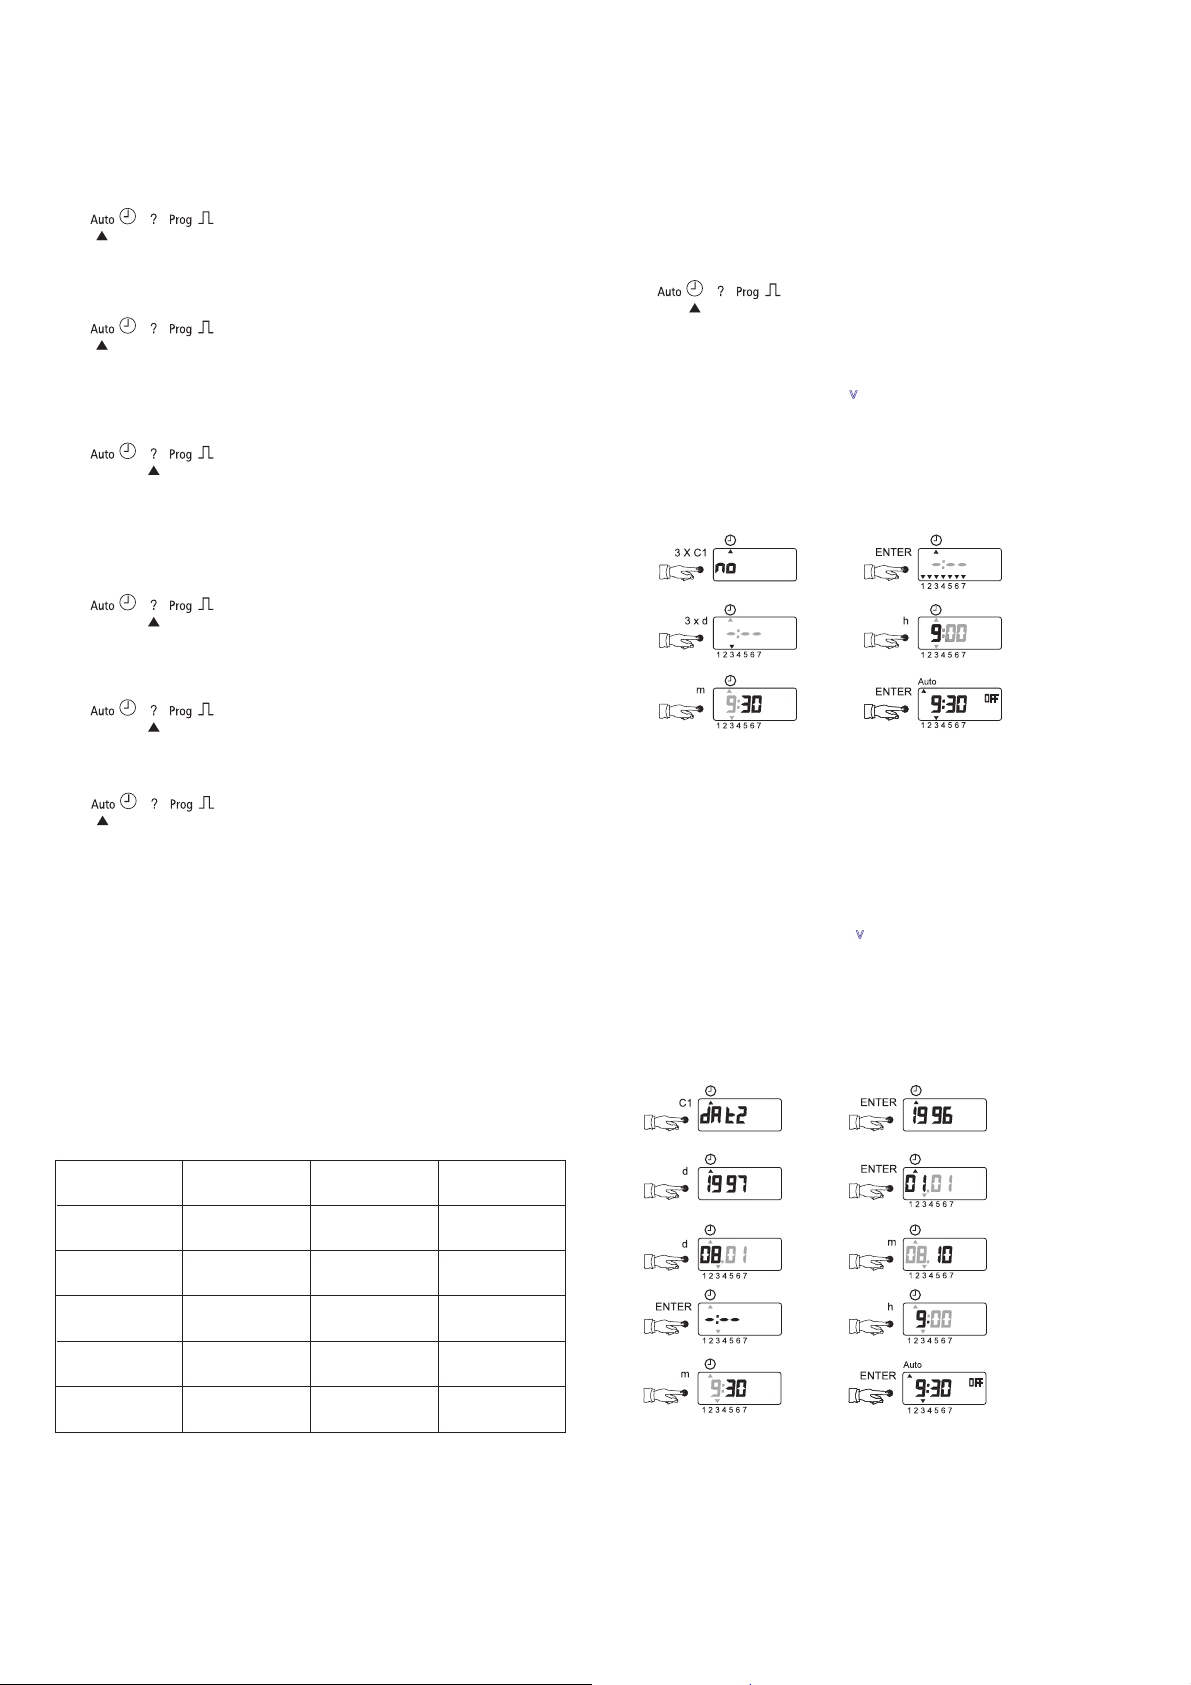
18.5 Initial start-up without automatic summer / winter time
adjustment with week program
At first: RESET = press buttons
Example TR 651 S:
Selected adjustment rule: no
Current day of the week: wednesday
Programing time: 9.30 AM
v
and store it by pressing the
+ C1 simultaneously
16.0 Clearance The indicated wrong switching command can
be cleared by simultaneously pressing the
keys h + m to be cleared
16.1 Total clearance of all d + h + m to be pressed simultaneously
switching commands
Attention!
This action deletes all stored switching times!
17.0 Holiday program e. g.: all channels to be switched-off after
3 days for a period of 14 days
Start and End respectively at 00 00 h.
h keep pres. d ... 3 (max. 21) > m .. 14
(max. 42).
Delete by pressing forward to 00 00.
18.0 Summer-/Wintertime adjustment
18.1 Checking the date
If (no) automatic summer/winter time adjustment has been selected (no),
the time can be corrected manually. First press the button v and the d button
d. Hold down both buttons for approx. 2 sec.The set summer/winter time adjust-
ment rule (e. g dat) will then appear in the LCD display. If you now press the Enter
button, the year will appear, followed by the date if pressed again.Press the Enter
button to return to the automatic program.
18.2 Selection table for automatic summer/winter time adjustment
18.6 Initial start-up with automatic summer / winter
time adjustment with week program
The button C1 can be used ot set the required time adjustment rule from the
table in chapter 18.2.
At first: RESET = press buttons
Example TR 651 S:
Selected adjustment rule: dat 2
Programing Date: 8. 10. 1997
Programing time: 9.30 AM
v
+ C1 simultaneously
Setting area
dat
up to 12/95
dat 1
from 1/96
dat 2
dat 3
no
Beginning of
summer time
in March
Last Sun.
in March
Last Sun.
in March
1st. Sun.
in April
No
adjustment
Beginning of
winter time
Last Sun.
in Sept.
Last Sun.
in Oct.
Last Sun.
in Oct.
Last Sun.
in Oct.
No
adjustment
Area
EULast Sun.
EU
GB
North
 Loading...