

TFC Group Famoso 601 User Manual [en, de, es, it]
famoso 601 rf Set
Daily programming
Tagesprogrammierung
Programación diaria
Programma giornialiero
Fig. 1
Fig. 2
Fig. 3
max. 2.5 mm
2
6
230 V
~
50 Hz
30
meters
Meter
metros
metri
Wireless connection
Drahtlose Funkverbindung
Conexión inalambrica
Collegamento senza fili
GB
D E
Fig. 3
Fig. 5
Fig. 4
Button
Taste
Tecla
Tasto
LED
Fig. 6
I
GB
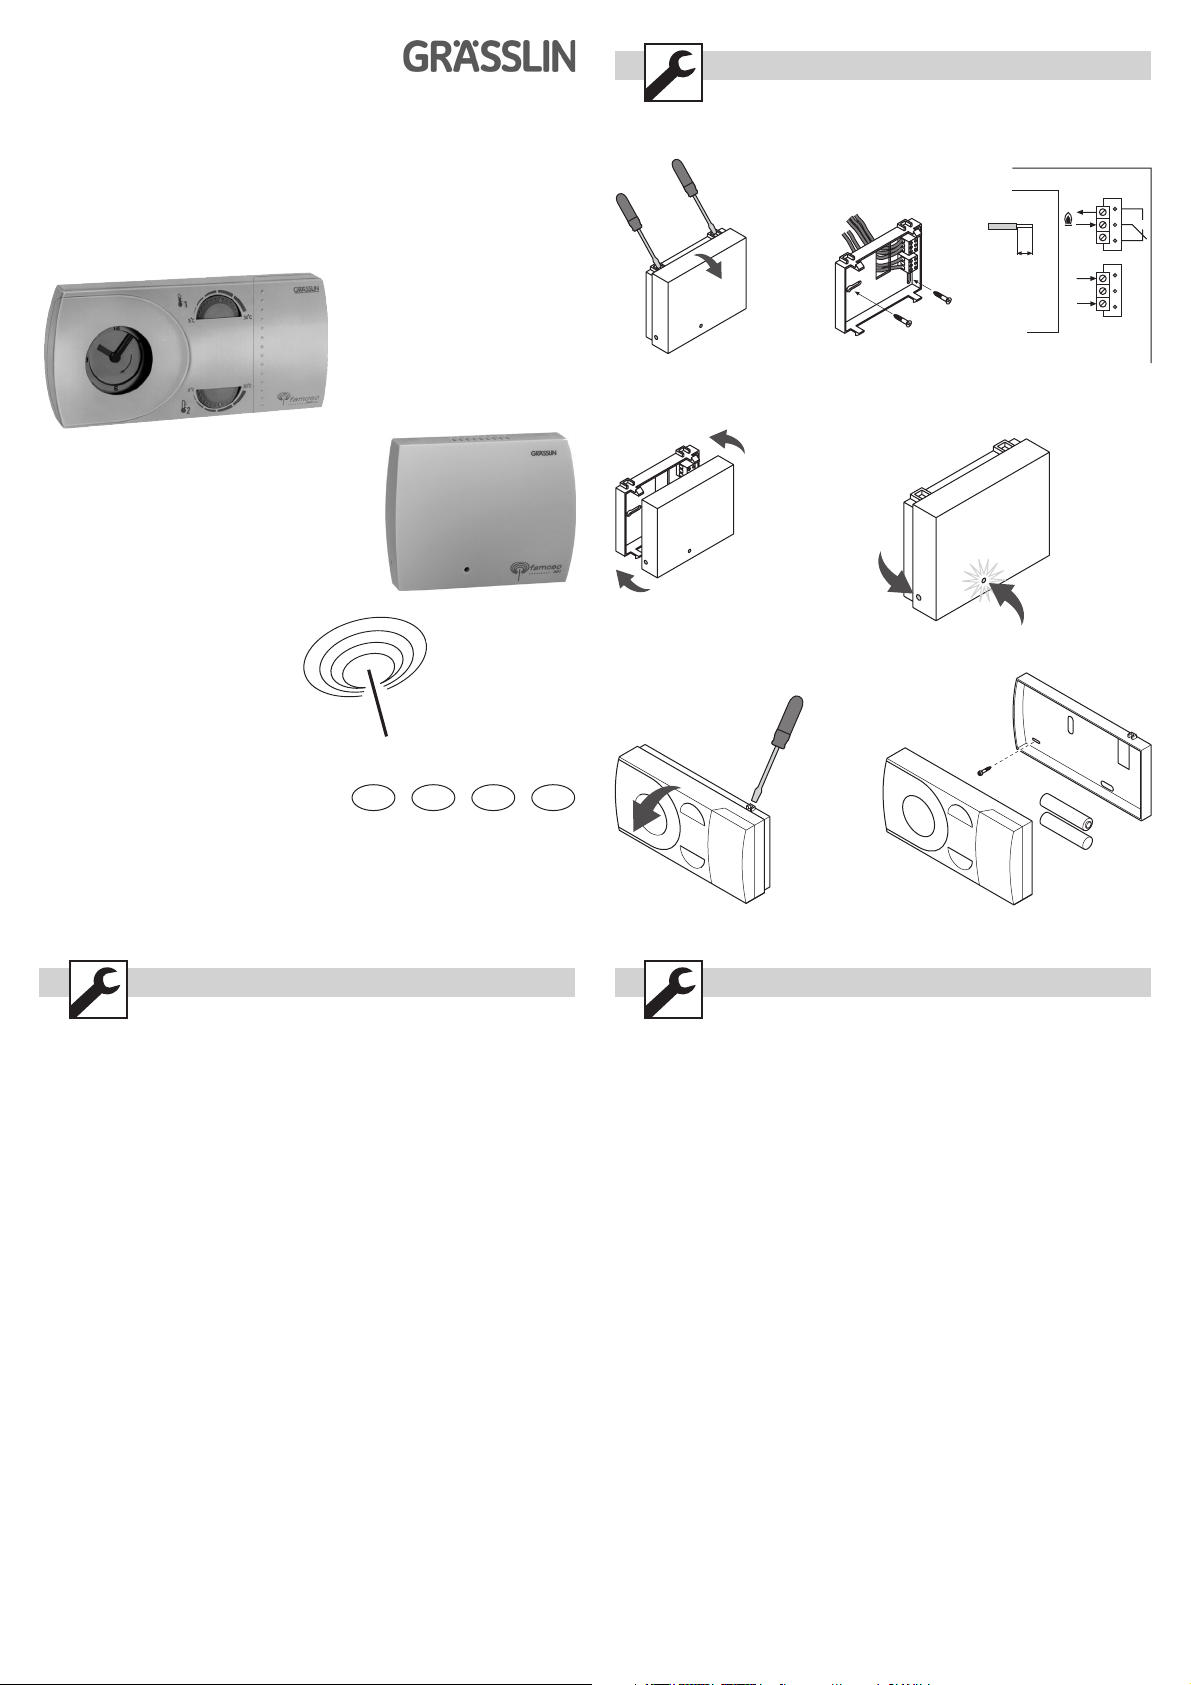
Commissionning process
1. Open receiver´s housing, fix the rear panel to the wall and make the electrical connections and close receiver´s
, as explained in (fig. 1, 2, 3, 4).
housing
2. Press and hold the black button on the receiver (fig.5) the LED light will flash immediatelly. When it flashes again 2
or 3 seconds later release the button. The receiver LED light will remainconstantly ON, to indicate that it is now
waiting for a corresponding signal from the Room Chronostat transmitter. The receiver will remain in this mode for
3 minutes.
3. Remove the rear panel (fig. 6) of the transmitter. Now correctly fit the batteries (2 x 1,5 V LR6/AA) into the trans mitter (fig.7). The transmitter will start sending signals and within 10-20 seconds the receiver will pick up a signal,
this will be confirmed by the receiver´s LED light going OFF. The transmitter and receiver are now “linked” so that
the reciever will switch ON and OFF according to the setting on the Room Chronostat Transmitter.
4. Secure the rear panel of the transmitter to a suitable wall in the living room or hall. Refit the transmitter in place
on the rear panel (fig. 7).
(fig. 5) Receiver´s LED status
If the LED is
If the LED is
If the LED is
If the LED is
D
Installationsbeschreibung
1. Öffnen Sie das Empfängergehäuse und montieren Sie die Trägerplatte auf die Wand. Stellen Sie die elektrischen
Verbindungen her und verschließen Sie das Empfängergehäuse wieder (siehe fig. 1, 2, 3, 4).
2. Halten Sie die schwarze Taste am Empfänger gedrückt (fig.5), die Leuchtdiode (LED) beginnt zu blinken. Wenn
nach 2 oder 3 Sekunden die Leuchtdiode (LED) nochmals blinkt , können Sie die Taste loslassen. Die Leuchtdiode
(LED) leuchtet nun ständig und signalisiert daß sie auf ein entsprechendes Signal des Raumthermostaten wartet .
Der
Raumthermostaten (Sender) muß der Vorgang wiederholt werden, so daß innerhalb der 3 Minuten die Kommuni kation hergestellt wird.
3. Entfernen Sie die Trägerplatte am Raumthermostaten (Sender) (fig. 6). Setzen Sie die Batterien ein (2 x 1,5 V LR6/AA)
(fig.7). Der Raumthermostat (Sender) sendet nun Funksignale und in den nächsten 10-20 Sekunden wird der
Empfänger ein Signal empfangen. Dies wird dadurch signalisiert , daß die Leuchtdiode (LED) am Empfänger nicht
mehr leuchtet. Sender und Empfänger sind nun miteinander verbunden und der Empfänger wird entsprechend
den Einstellungen am Raumthermostaten Ein- bzw. Ausschalten.
4. Montieren Sie die Trägerplatte des Raumthermostaten auf eine geeignete Innenwand in einem Raum ihrer Wahl
LED ist
LED ist
LED
LED
Off then the Room stat is Off.
On then the Room stat is On.
flashing once a second then the batteries in the Room stat are running out.
flashing 2 or 3 times a second then the batteries in the Room stat have run out .
Empfänger bleibt 3 Minuten in dieser Wartehaltung. Erfolgt in dieser Zeit keine Kommunikation mit dem
(z.B. Wohnzimmer). Verbinden Sie das Bedienteil des Raumthermostaten wieder mit der Trägerplatte (fig. 7).
(fig 5) LED Anzeigen des Empfängers
Aus, keine Heizanforderung vom Raumthermostaten.
An, es liegt eine Heizanforderung vom Raumthermostaten an.
blinkt im Sekundentakt, die Batterien im Raumthermostaten sind schwach.
blinkt 2-3 mal pro Sekunde, die Batterien im Raumthermostaten sind entladen.
E
Instrucciones de sincronización
1. Desmontar el receptor, fijar el panel trasero a la pared, realizar las conexiones eléctricas y volver a montar el
tal y como se muestra en (fig. 1, 2, 3, 4).
receptor
2. Mantener pulsado el botón negro del receptor (fig.5) el LED parpadeará inmediatamente. Cuando el LED parpadee
de nuevo, soltar el botón despues de 2 ó 3 segundos. Ahora el LED del receptor permanecerá encendido, para
indicar que esta listo para recibir una señal de radio del Transmisor (Cronotermostato de ambiente). El receptor
permanecerá
3. Desmontar el panel trasero del transmisor (fig. 6). Insertar las baterias (2x 1,5V LR6/AA) con la polaridad correcta
dentro del transmisor (fig.7). El transmisor empezará a enviar señales de radio y en unos 10-20 segundos el
receptor recogerá una señal valida, siendo el proceso confirmado por el LED del receptor, que se apagará. Ahora
el transmisor y el receptor estan “sincronizados” por lo que el receptor se encenderá/apagará de acuerdo al
programa del transmisor (Crono termostato de ambiente).
4. Instalar el panel trasero del transmisor en la pared adecuada del salón-comedor o hall. Volver a montar el
transmisor sobre su panel trasero (fig. 7).
(fig 5) Indicaciones del LED del receptor
Si el LED del receptor está
Si el LED del receptor está
Si el LED
Si el LED
I
Installazione
1. Aprire il ricevitore, fissare la parte posteriore alla parete facendo le connessioni elettriche e chiudere con la parte
frontale il riceviotre, come illustrato in (fig. 1, 2, 3, 4).
2. Digitando e mantenendo premuto il tasto nero sul ricevitore (fig.5) la luce LED si accenderà immediatamente.
Quando è ancora accesa2o3secondi dopo rilasciare la pressione sul tasto. La luce LED di ricezione rimarrà
costantemente accesa, ad indicare che adesso il ricevitore è pronto per ricevere un segnale di comando dal
trasmettitore (cronotermostato). Il ricevitore rimarrà in questà modalità per tre minuti.
3. Rimuovere la parte posteriore (fig. 6) del trasmettitore. Inserire correttamente le batterie (2 x 1,5V LR6/AA) nel
trasmettitore (fig.7). Il trasmettitore inizierà ad inviare segnali e dopo circa 10-20 secondi il ricevitore riceverà il
segnale, questo sarà confermato dallo spegnimento del LED del ricevitore. Il trasmettitore ed il ricevitore sono ora
“collegati” così che il ricevitore commuterà ON o OFF in accordo al programma del cronotermostato trasmettitore.
4. Fissare il pannello posteriore del trasmettitore su un appropriato muro della sala o soggiorno (fig. 7).
(fig 5)
Se il LED è
Se il LED è
Se il LED
Se il LED
en este estado durante 3 minutos.
apagado, el cronotermostato ambiente está apagado.
parpadea una vez por segundo, las baterias del cronotermostato se estan agotando.
parpadea 2-3 veces por segundo, las baterias del cronotermostato se han agotado.
Off allora lo stato del cronotermostato trasmettiore è Off.
On allora lo stato del cronotermostato trasmettitore è On.
lampeggia una volta al secondo allora le batterie del cronotermostato trasmettiore stanno per esaurirsi.
lampeggia 2 o 3 volte al secondo allora le batterie nel cronotermostato trasmettitore sono esaurite.
encendido, el cronotermostato ambiente está encendido.
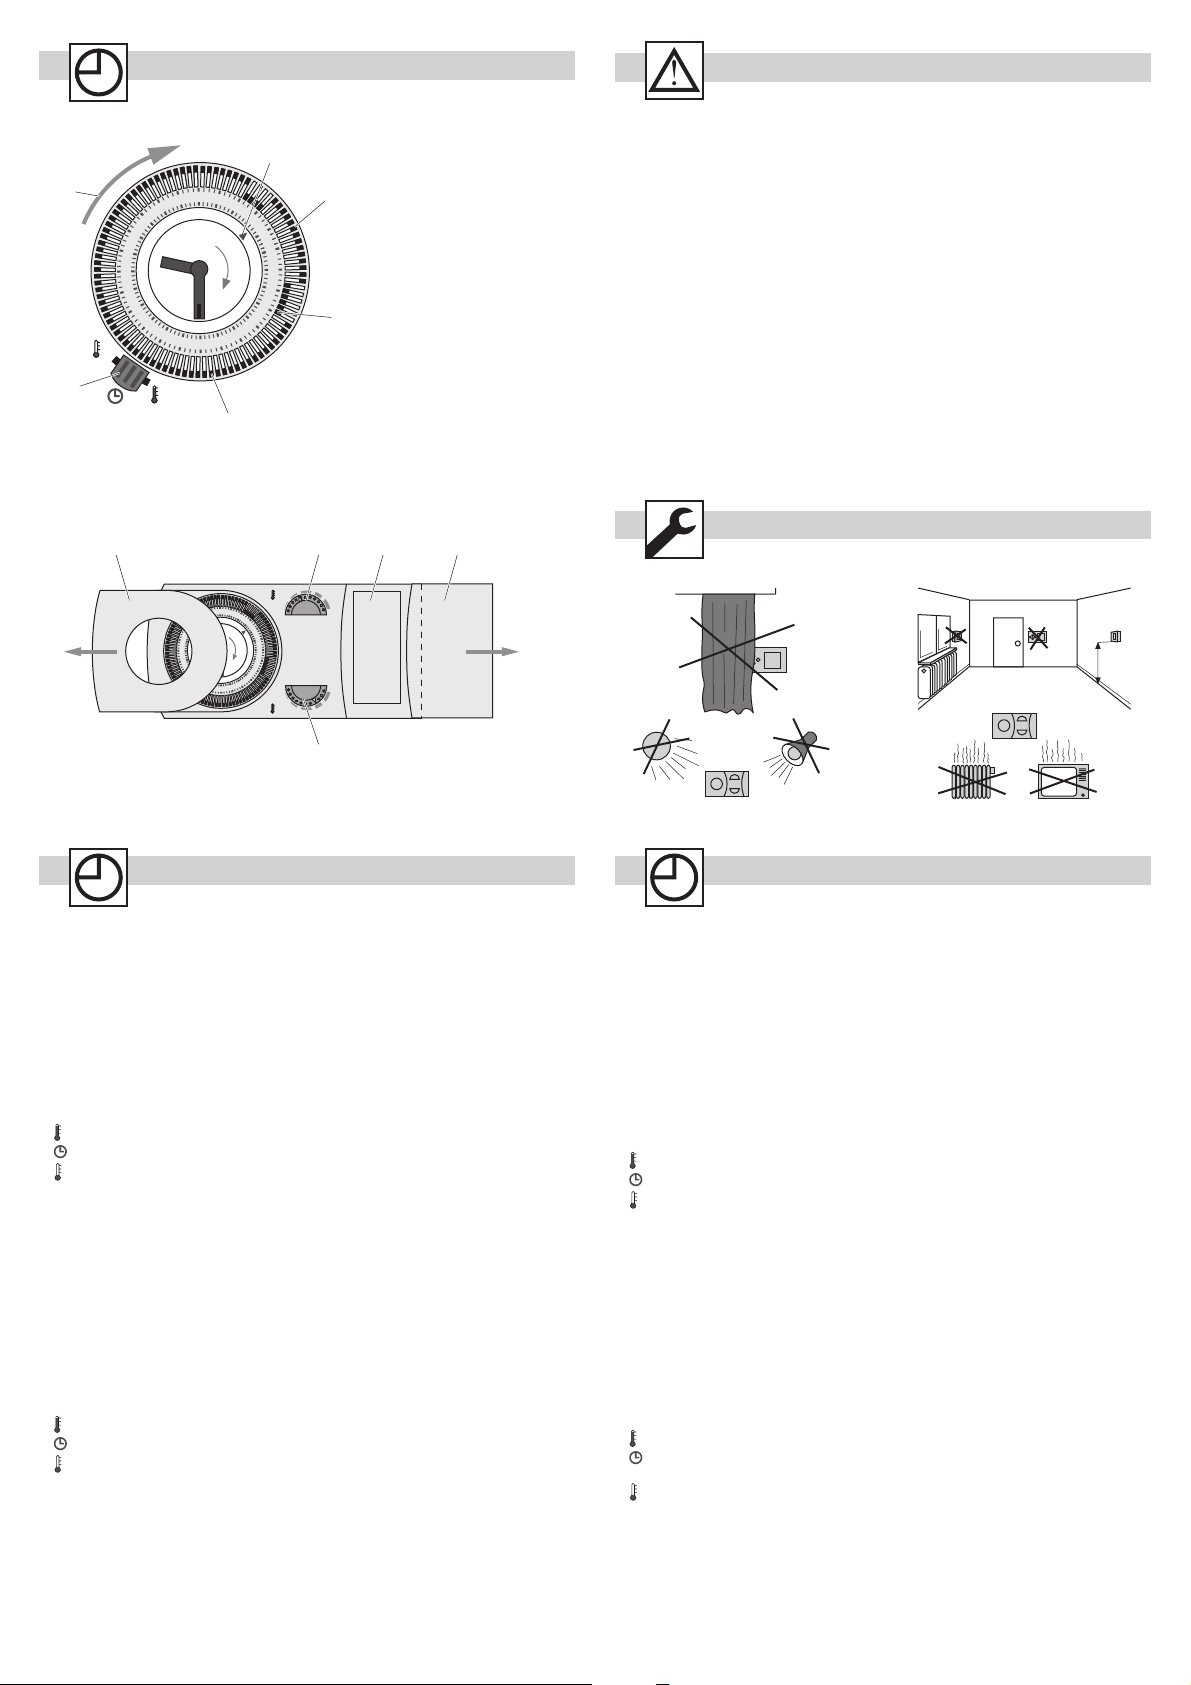
Fig. 8
1 Rotate to adjust time
2
1
6
7
8
1
2
4
2
2
3
4
5
3
2
12
2
2
1
2
0
39
9
0
1
6
1
1
2
1
17
16
15
14
13
2
6
1
5
3
19
18
4
Drehen zur Zeiteinstellung
Girar para ajustar la hora
Ruotare per impostare l’ora
2 Time Pointer
Uhrzeit Markierung
Indicador horario
Indicatore dell’ora
3 Tappets
Programm Einstellung
Segmentos de programación
Cavalieri
4 Day temperature set
Komfort Temperatur (Tag)
Ajuste de temp. de dia
Temperatura Giorno
5 Night temperature set
Abgesenkte Temperatur (Nacht)
Ajuste de temp. de noche
Temperatura Notte
6 Three position switch
Handschalter
Interruptor de 3 posiciones
Selettore a 3 posizioni
GB
Safety instructions
· Installation and mounting of electric appliances must be carried out only by skilled electricians.
· It is imperative to observe the generally applicable safety measures, such as: Before starting any work on the
appliance, switch off power supply and secure against switching on.
D
Sicherheitshinweise
· Einbau und Montage elektrischer Geräte dürfen nur durch eine Elektrofachkraft
(DIN VDE 0105 Teil 1) erfolgen.
· Allgemein gültige Sicherheitsvorkehrungen müssen beachtet werden z.B.: Vor Arbeiten am Gerät die Stromzufuhr
abschalten und vor Wiedereinschalten sichern.
E
Indicaciones de seguridad
· El montaje y la integración de los aparatos eléctricos sólo debe realizarlos un especialista (DIN VDE 0105 Parte 1).
· Hay que tomar las medidas de seguridad generales como p. ej.: Desconectar la alimentación de corriente antes
de realizar trabajos en el aparato y asegurarlo contra toda reconexión.
I
Avertenze per la sicurezza
· L’installazione ed il montaggio dei dispositivi elettrici possono venire eseguiti esclusivamente da un elettricista
specializzato.
· Devono essere osservate le generali precauzioni di sicurezza vigenti, ad es.: Prima di eseguire i lavori
sull’apparecchio disinserirlo ed assicurarlo contro reinserimento.
Fig. 9
A B
1
1
2
4
2
2
3
3
2
12
2
4
2
5
6
7
8
9
1
20
1
9
39
18
17
1
6
0
1
1
5
6
1
1
1
4
2
1
13
2
D E
30°C5°C
30°C5°C
C
GB
Setting the Room ChronoStat
· To set the Time: Slide the cover A (fig. 9) off the unit . Rotate the timer clock clockwise until the time is correct ,
fig. 8 (2).
· To set the Central heating DAY/NIGHT temperature Times: Move the tappets inwards for Day temperature times
and outwards for Night temperature times (each tappet represents 15 minutes).
· To set The Day Room Temperature: Rotate the room temperature dial B (fig. 9) until the desired room
temperature is selected. (comfort temperature value e.g. 22ºC)
· To set The Night Room Temperature: Rotate the room temperature dial C (fig. 9) until the desired room
temperature is selected. (low temperature value e.g. 15ºC). Never over Day temperature value.
· To set The Operating mode: Slide the three position selector switch 6, (fig. 9) to the desired position.
Day = Continuosly Day Temperature ON.
1
Auto = Central Heating Day/Night temperature times controlled by the tappets
2
Night = Continuosly Night Temperature ON.
· Quick Reference Guide: Slide cover E (fig.9) to find quick reference guide D (fig. 9)
D
Einstellung der Raumthermostatuhr
· Uhrzeiteinstellung: Entfernen Sie den Deckel A (fig. 9). Drehen Sie den Schaltkopf in Uhrzeigerrichtung solange bis
die Uhrzeit korrekt eingestellt ist , fig. 8 (2).
· Einstellung des Programms (Temperaturprofil): Nach Innen gerichtete Reiter entsprechen der Komfort-
temperatur, nach Außen liegende Reiter entsprechen der abgesenkten Temperatur (Jeder Reiter entspricht einer
Zeit von 15 Minuten)
· Einstellung der Komforttemperatur: Drehen Sie den Knopf B (fig. 9) bis die gewünschte Raumtemperatur einge-
stellt ist (Komforttemperatur z. B. 22ºC)
· Einstellung der Absenktemperatur: Drehen Sie den Knopf C (fig. 9) bis die gewünschte Raumtemperatur einge-
stellt ist (Absenktemperatur z. B. 15ºC). Die Absenktemperatur nicht über Komforttemperatur einstellen.
· Handschalter Funktionen: Stellen Sie den Handschalter 6, (fig.9) in die gewünschte Position:
Tag = Komforttemperatur dauerhaft eingestellt .
1
Auto = Automatikbetrieb, die Raumtemperatur wird je nach Ihrer Programmeinstellung geregelt
2
Nacht = Absenktemperatur dauerhaft eingestellt .
· Kurzbedienanleitung: Auf der Innenseite des Deckels E (fig.9) finden Sie die Kurzbedienanleitung D (fig.9)
1.5 m
E
Ajustar el Cronotermostato ambiente
· Ajuste de la hora: Deslizar la cubierta A (fig. 9). Girar el reloj en sentido horario hasta que la hora sea la correcta,
fig. 8 (2), haciendo un ajuste fino mediante el giro de la manecilla de minutos.
· Ajuste de tiempo para temperatura DIA/NOCHE: Moverlos segmentos hacia el interior para programar periodos
de temperatura de dia, y mover los segmentos hacia el exterior para programar periodos de temperatura de
noche (cada segmento representa 15 minutos).
· Ajuste Temperatura de Día (Comfort): Girar el dial de temperatura B (fig. 9) hasta ajustar la temperatura
deseada. (temperatura comfort ej. 22ºC)
· Ajuste Temperatura de Noche (Reducida): Girar el dial de temperatura C (fig. 9) hasta ajustar la temperatura
deseada. (temperatura reducida ej. 15ºC) Nunca superior a la temperatura de comfort .
· Ajuste del modo de funcionamiento: Seleccionar la posicion deseada en el mando selector de tres posiciones 6,
(fig.9).
Día = Temperatura de Dia (Comfort) seleccionada de forma continua.
1
Auto = Temperatura Día/Noche, segun programación realizada en el reloj.
2
Noche = Temperatura de Noche (reducida) seleccionada de forma continua.
· Guia de referencia rápida: Deslizar la cubierta E (fig.9) podrá ver la guia rápida de manejo D (fig.9)
I
Programmare il cronotermostato trasmettitore
· Per programmare l’ora: Spostare a sinistra il coperchio A (fig. 9). Ruotare in senso orario il disco orario finché
l’impostazione dell’ora è corretta.
· Per programmare la temperatura Giorno/Notte nel tempo: Muovere i cavalieri verso l’alto per impostare l’orario
con temperatura Giorno e verso il basso per la temperatura Notte (ciascun cavaliere rappresenta 15 minuti).
· Per programmare la temperatura Giorno: Ruotare il quadrante della temperatura B (fig. 9) fino alla desiderata
temperatura (per esempio temperatura di comfort 22ºC)
· Per programmare la temperatura Notte: Ruotare il quadrante della temperatura C (fig. 9) fino al valore di
temperatura desiderato (per esempio temperatura economica 15ºC)
· Per programmare il modo di funzionamento: Spostare il selettore a tre posizioni 6, (fig.8) sulla posizione desiderata:
Giorno = continuamente temperatura Giorno ON.
1
Auto = riscaldamento centrale con orario impostato a temperatura
Giorno/Notte in funzione della posizione dei cavalieri
2
Notte = Continuamente temperatura Notte ON.
· Veloce guida istruzione: Spostare il coperchio E (fig.9) per leggere le istruzioni base D (fig.9)
80.10.1149.7/06/01
 Loading...