

Texas Instruments TIPRESENTER - TV/Video Presenter For ViewScreen Teacher Calculators, LearningCheck Creator Reference Manual
Page 1

TI LearningCheck™ Creator
Reference Guide
Page 2

Important Information
Texas Instruments makes no warranty, either express or implied,
including but not limited to any implied warranties of merchantability
and fitness for a particular purpose, regarding any programs or book
materials and makes such materials available solely on an "as-is" basis. In
no event shall Texas Instruments be liable to anyone for special,
collateral, incidental, or consequential damages in connection with or
arising out of the purchase or use of these materials, and the sole and
exclusive liability of Texas Instruments, regardless of the form of action,
shall not exceed the purchase price of this product. Moreover, Texas
Instruments shall not be liable for any claim of any kind whatsoever
against the use of these materials by any other party.
Copyright © 2006 Texas Instruments Incorporated.
Microsoft® and Windows® are trademarks of their owners.
ii
Page 3

Important Information................................................................... ii
LearningCheck™ Creator
LearningCheck™ Creator Main Window ..................................... 2
Changing the preview panel view ......................................... 2
Creating a new document ............................................................ 4
Specifying document properties ................................................... 4
To change document properties ............................................ 5
Adding a new section ................................................................... 6
Adding questions .......................................................................... 7
Adding a question................................................................... 7
Adding specific question types...................................................... 8
Adding a new choices on image question............................. 8
Adding a new custom choices question ..................................... 10
Adding a new fill in the blank question.............................. 11
Creating a question with a numeric blank ................................ 13
Creating a question with a pull-down blank ...................... 13
Adding a new open response question ............................... 14
Adding a new sequencing question .................................... 15
Editing Presentation Sequence ............................................ 17
Adding a new standard choices question............................ 17
Adding a new text and image item..................................... 18
Saving a document....................................................................... 19
To save a new document ...................................................... 19
To save an existing document .............................................. 20
Related Topics........................................................................ 20
Adding questions from the Item Bank....................................... 21
To locate a question in the Item Bank ................................. 21
Adding Selected Items to Assessment.................................. 22
To close the Item Bank.......................................................... 23
Adding special characters to text ............................................... 24
To insert a character.............................................................. 24
Adding topics and keywords ...................................................... 26
To add topics or keywords to a question............................. 26
Opening existing documents................................................ 26
Editing a question................................................................. 28
Editing a document in a zipped file..................................... 28
Checking spelling for the document.................................... 29
Cutting, copying, and pasting questions or sections .......... 29
To cut a question, section or image ..................................... 29
To copy a question, section, or image ................................. 29
To paste a question or section.............................................. 30
To paste an image ................................................................. 30
To copy text from Microsoft® Word into a LearningCheck™
Creator question..................................................................... 30
iii
Page 4

Moving a section or a question ............................................ 31
To move a section..................................................................31
To move a question within a section....................................31
To move a question to another section ...............................31
Deleting a section or a question...........................................31
To delete a section.................................................................31
To delete a question..............................................................31
Renaming a section or a question........................................ 32
To rename a section or a question .......................................32
Deleting a document.............................................................32
To delete a document ...........................................................32
Saving with a new name.......................................................32
To save the current document with a new name................32
Creating a new folder ...........................................................33
To create a new folder ..........................................................33
Using Undo and Redo ...........................................................34
To undo an action..................................................................34
To redo an action...................................................................34
Printing a Report ..........................................................................34
To print a report ....................................................................34
Preview paper version of assignment .................................. 35
Working with Images ..................................................................36
Image toolbar ........................................................................36
Adding an image to a question............................................37
Scaling and cropping an image ............................................39
Adding a point or label................................................................ 40
Changing a point label..........................................................40
Deleting a point or label.......................................................41
Editing an image ...................................................................41
Sending a LearningCheck Creator item as a Quick Poll .............42
Sending documents to calculators...............................................44
Previewing a document................................................................44
To preview a document.........................................................44
Checking AppVar size................................................................... 46
Sending a LearningCheck document to a calculator..................46
To send a document to a calculator .....................................46
Sending a document to a classroom network ............................47
To send a document to a classroom network......................47
Troubleshooting LearningCheck Creator ....................................48
Legal Information
Texas Instruments Support and Service ....................................... 56
For general information .......................................................56
For technical support.............................................................56
For TI-Navigator™ technical questions ................................56
iv
Page 5

For product (hardware) service ............................................ 56
TI-Navigator™ 3.x License Agreement........................................ 57
Privacy Policy ................................................................................ 69
v
Page 6

vi
Page 7

LearningCheck™ Creator
Use LearningCheck™ Creator to create self-check opportunities or exams.
You can create review questions or practice tests that provide feedback
on correct and incorrect answers to allow students to test their own
knowledge. You can create quizzes and exams, send them to student
calculators, then upload completed material to your PC for evaluation
and grading.
You can use the LearningCheck™ Creator or TI Connect™ to transfer
LearningCheck files from a PC to a TI handheld device. The
LearningCheck™ App on the device then tracks the answers given and
displays results for the document.
LearningCheck™ Creator 1
Page 8

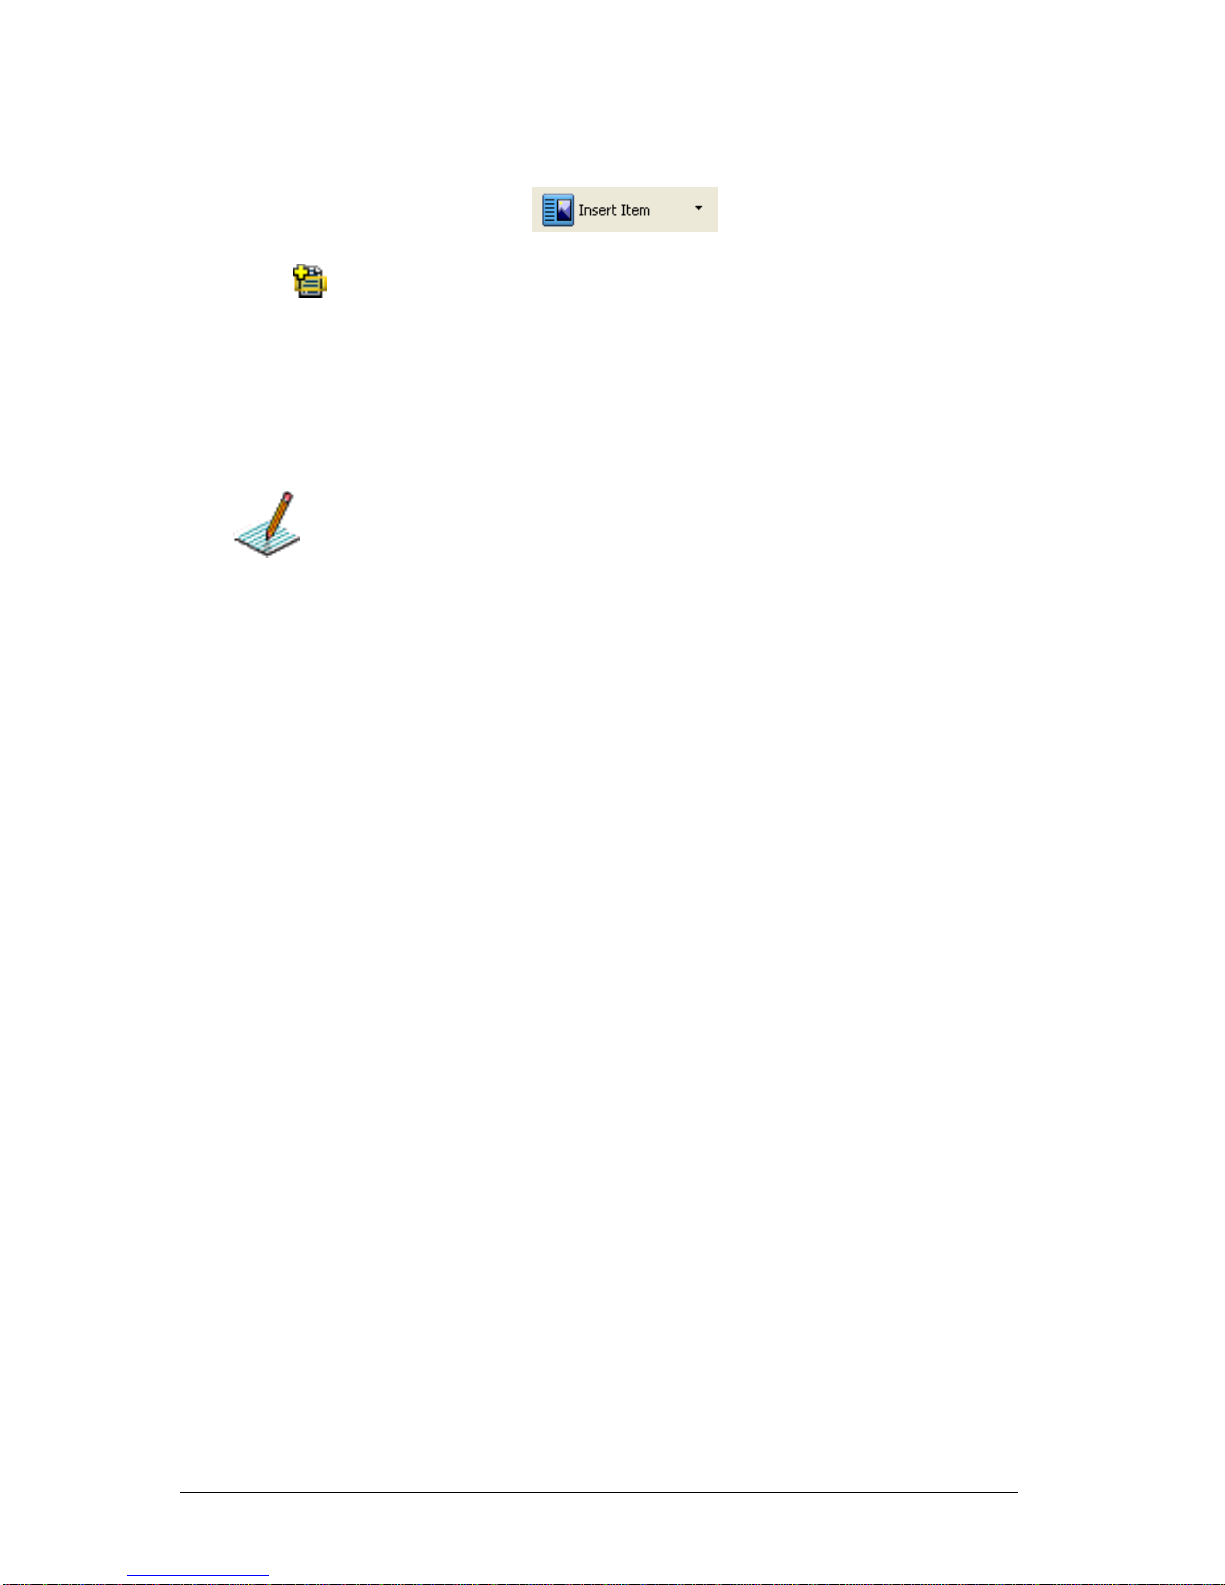
LearningCheck™ Creator Main Window
The LearningCheck™ Creator window consists of two areas: the Preview
panel and Content area.
Preview Panel – ldisplays outline or thumbnail images of sections and
questions; allows you to select a question type and create new questions.
Content Area – area for adding content to questions.
Preview
Content
Changing the preview panel view
You can view items in the default outline mode, which displays only item
titles, or you can view the item detail, which includes a thumbnail of the
question and answer.
f To switch to the detail view, select View > Item Detail.
2 LearningCheck™ Creator
Page 9

LearningCheck™ Creator 3
Page 10

Creating a new document
When you launch LearningCheck™ Creator, a blank document opens,
with the first section open in the Content area. You can add questions to
this document and save it to create a new document.
If you are working in a document, and want to create a new one (if, for
instance you want to copy questions from the open document to a new
one) do the following:
f Click File > New or click .
A new document opens, with the first section open in the Content
area.
Specifying document properties
Document properties allow you to store data with your documents that
can be used to specify certain properties for use on the device. Document
properties can also be used as search criteria when searching for
questions relating to particular topics or keywords. You can specify the
following properties for your LearningCheck documents:
Title
Properties
• Author Name
• Grade Level
• Document type
• Copyright information
Item defaults
• Default topic
• Default keywords
Device Options
•Device Name
• Memory Location (RAM or archive)
• Randomize question order
• Delete Answer file from device after collect
• Delete Assignment file from device after collect
4 LearningCheck™ Creator
Page 11
To change document properties
1. In the Preview panel, click .
The document properties page displays.
2. Type a name for the document in the Document Title box. This name
will display in the calculator's Assignment List.
3. Select a document type (Examination or Self-check) from the
document type dropdown.
4. If you want to add or change any other information about the
document, click the desired entry field and type the information in
the box.
You are now ready to create sections and questions for the
document.
LearningCheck™ Creator 5
Page 12
Adding a new section
To add a new section to the document
1. In the Preview pane, click .
2. Click Section.
LearningCheck™ Creator adds a new section.
3. Type a title for the new section in the Title box. (If you do not
designate a title, it is named Section.)
You can give the same title to more than one section.
You can rename the sections later if you prefer.
4. If you want to include a section description, type it in the Text area.
5. If you want to include an image, click Browse in the Image area, and
navigate to the location of the image file. Double-click the image file
name.
The image appears in the Image area of the dialog box. You can edit
the image using the toolbar below.
6 LearningCheck™ Creator
Page 13

Adding questions
You can include several types of questions in LearningCheck Creator
documents. To see the specifics of each question type, refer to the
following:
• Adding a new choices on image question
• Adding a new custom choices question
• Adding a new fill in the blank question
• Adding a new open response question
• Adding a new sequencing question
• Adding a new standard choices question
• Adding a new text and image item
• Adding questions from the Item Bank
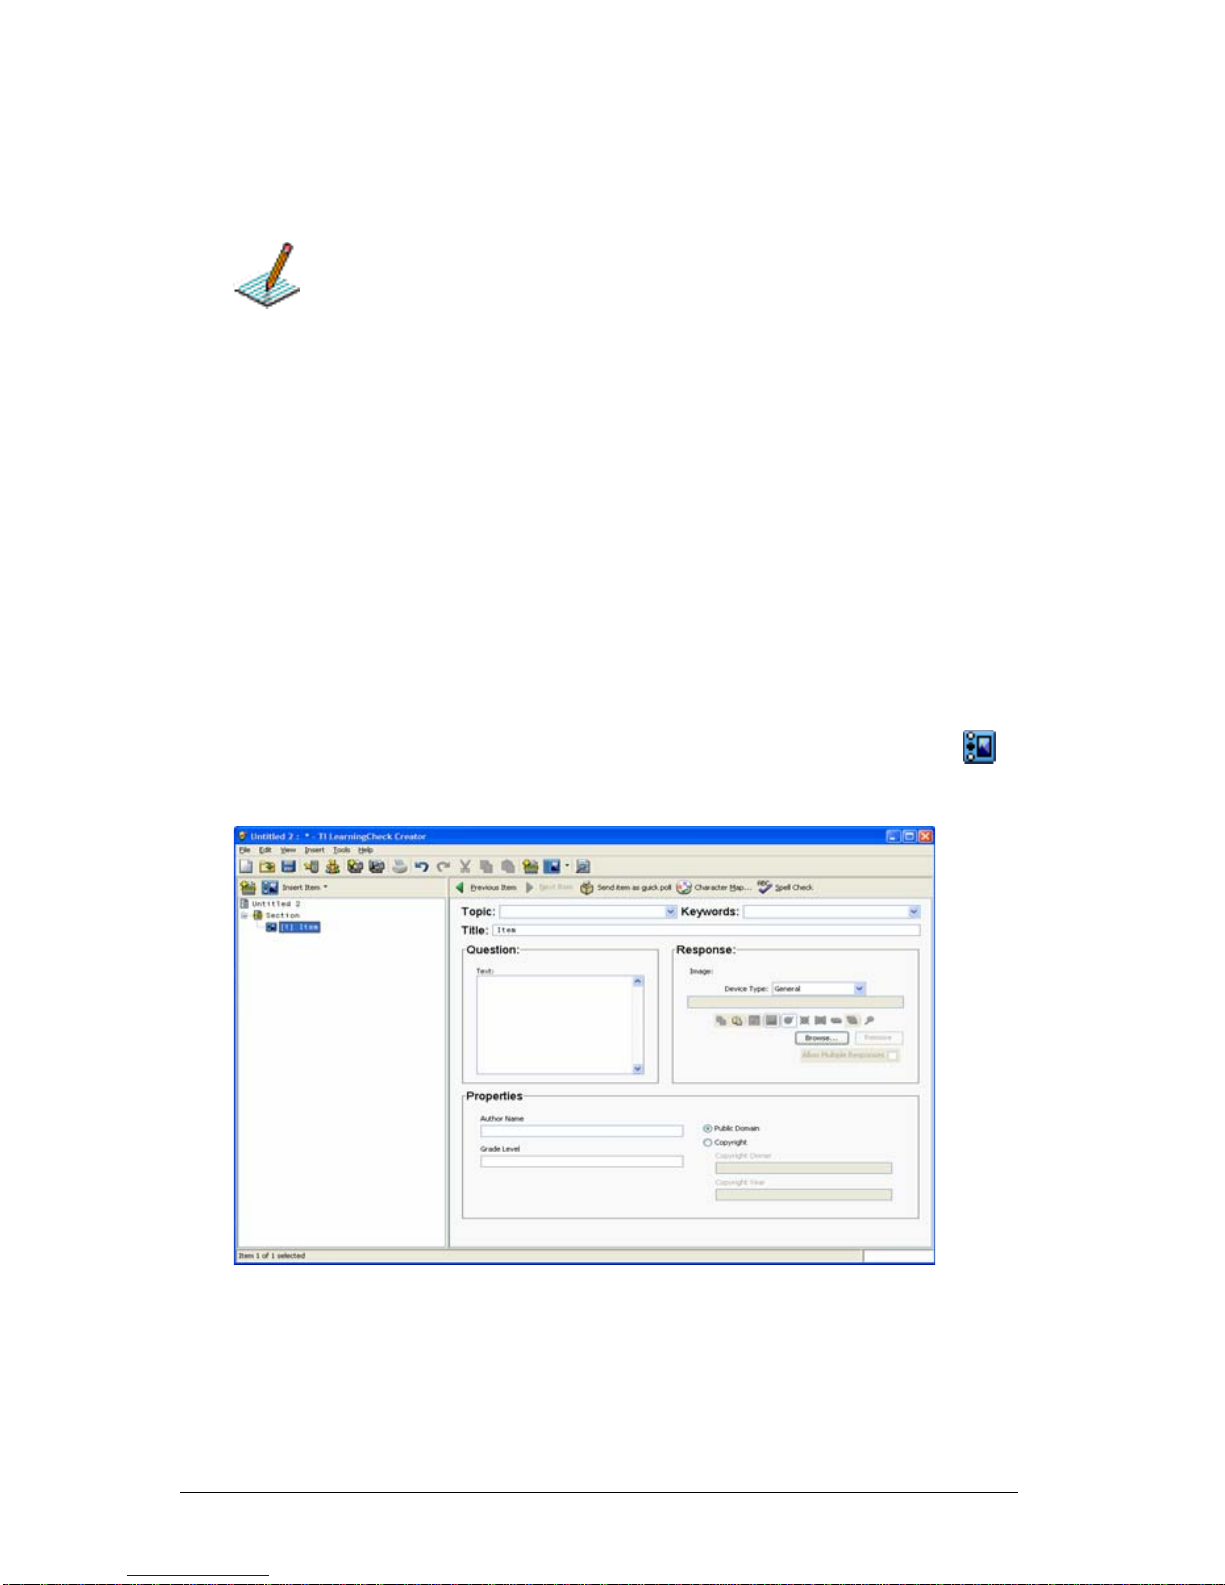
Adding a question
1. In the Preview pane, click the Insert Item drop-down button.
2. Click to select the type of question you want to add.
The content panel for the new question displays.
3. Type the topic of the question in the Topic field.
4. Type any keywords that relate to the question in the Keyword field.
Note: The Topic and Keyword information is used by the Item bank
to provide search criteria for finding questions. You must enter text
in these fields for the question to be searchable in the item bank.
LearningCheck™ Creator 7
Page 14
5. Type a title for the question in the Title box. (If you do not designate
a title, the default title is Item.)
If you do not name questions, they are numbered sequentially in the
document.
You can rename the questions later if you prefer.
6. Type the question text and complete the other fields as required.
Adding specific question types
Adding a new choices on image question
A choices on image question is one in which the student views an image
and selects the answer from one of the points on the image.
Example: The student might be presented an image of the state of Texas
and asked to identify which of three points on the image showed the
location of the capital city, Austin.
To add a new choices on image question to a section
1. In the Preview pane, click the Insert Item dropdown, and select
Choices on Image.
2. Type the topic of the question in the Topic field.
3. Type any keywords that relate to the question in the Keyword field.
Note: The Topic and Keyword information is used by the Item bank
to provide search criteria for finding questions. You must enter text
in these fields for the question to be searchable in the item bank.
8 LearningCheck™ Creator
Page 15
4. Type a title for the question in the Title box.
5. Type the question in Text box.
6. In the Response area, click Browse, navigate to the image and Insert
it into the template.
The image appears in the Image area of the dialog box.
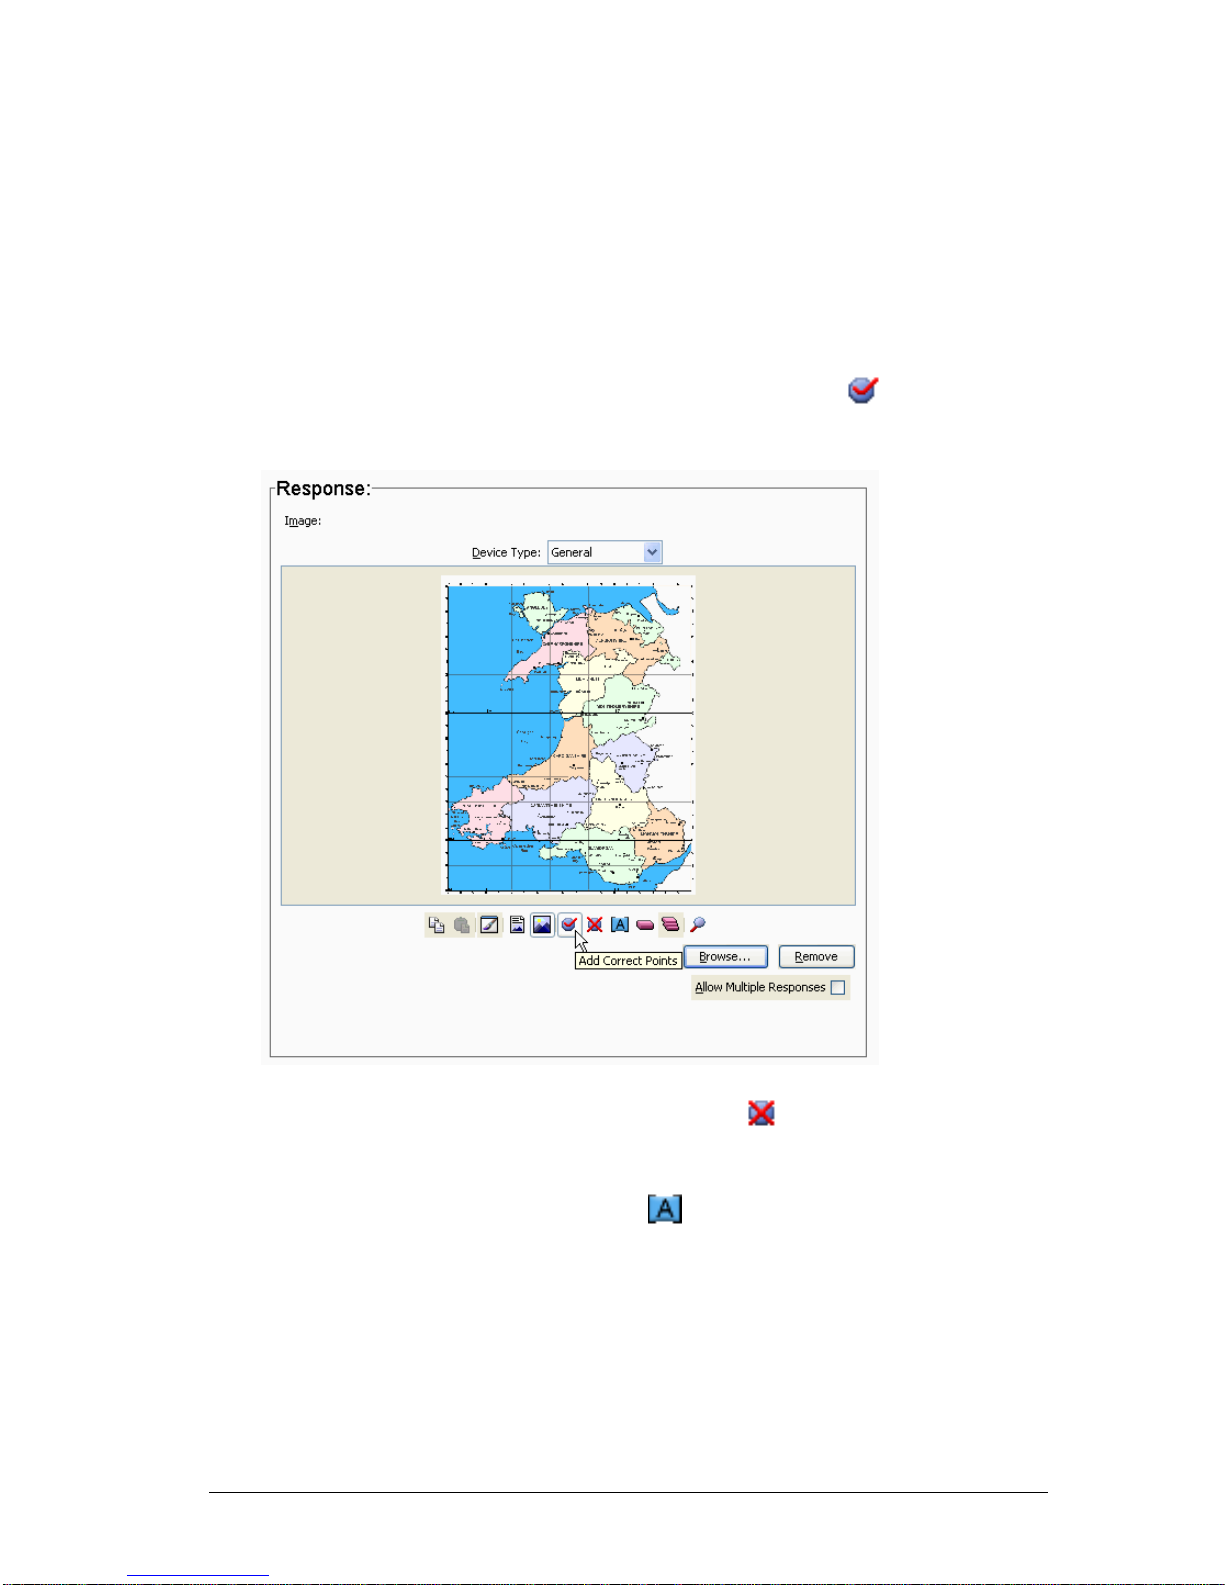
7. To add points to the image, click on the image toolbar, and move the
cursor to the point on the image. Click to add the point.
8. To add the correct answer point to the image, click on the image
toolbar, and then click the correct location on the image.
9. To create additional answer choices, click and then click other
locations on the image.
10. To apply labels to the points, click on the image toolbar and then
click on each point.
The points are labeled A, B, C, etc. in the order in which you
click on them.
a) To move a point (and its label) to a different place on the
image, click the point and drag it to the new place.
LearningCheck™ Creator 9
Page 16
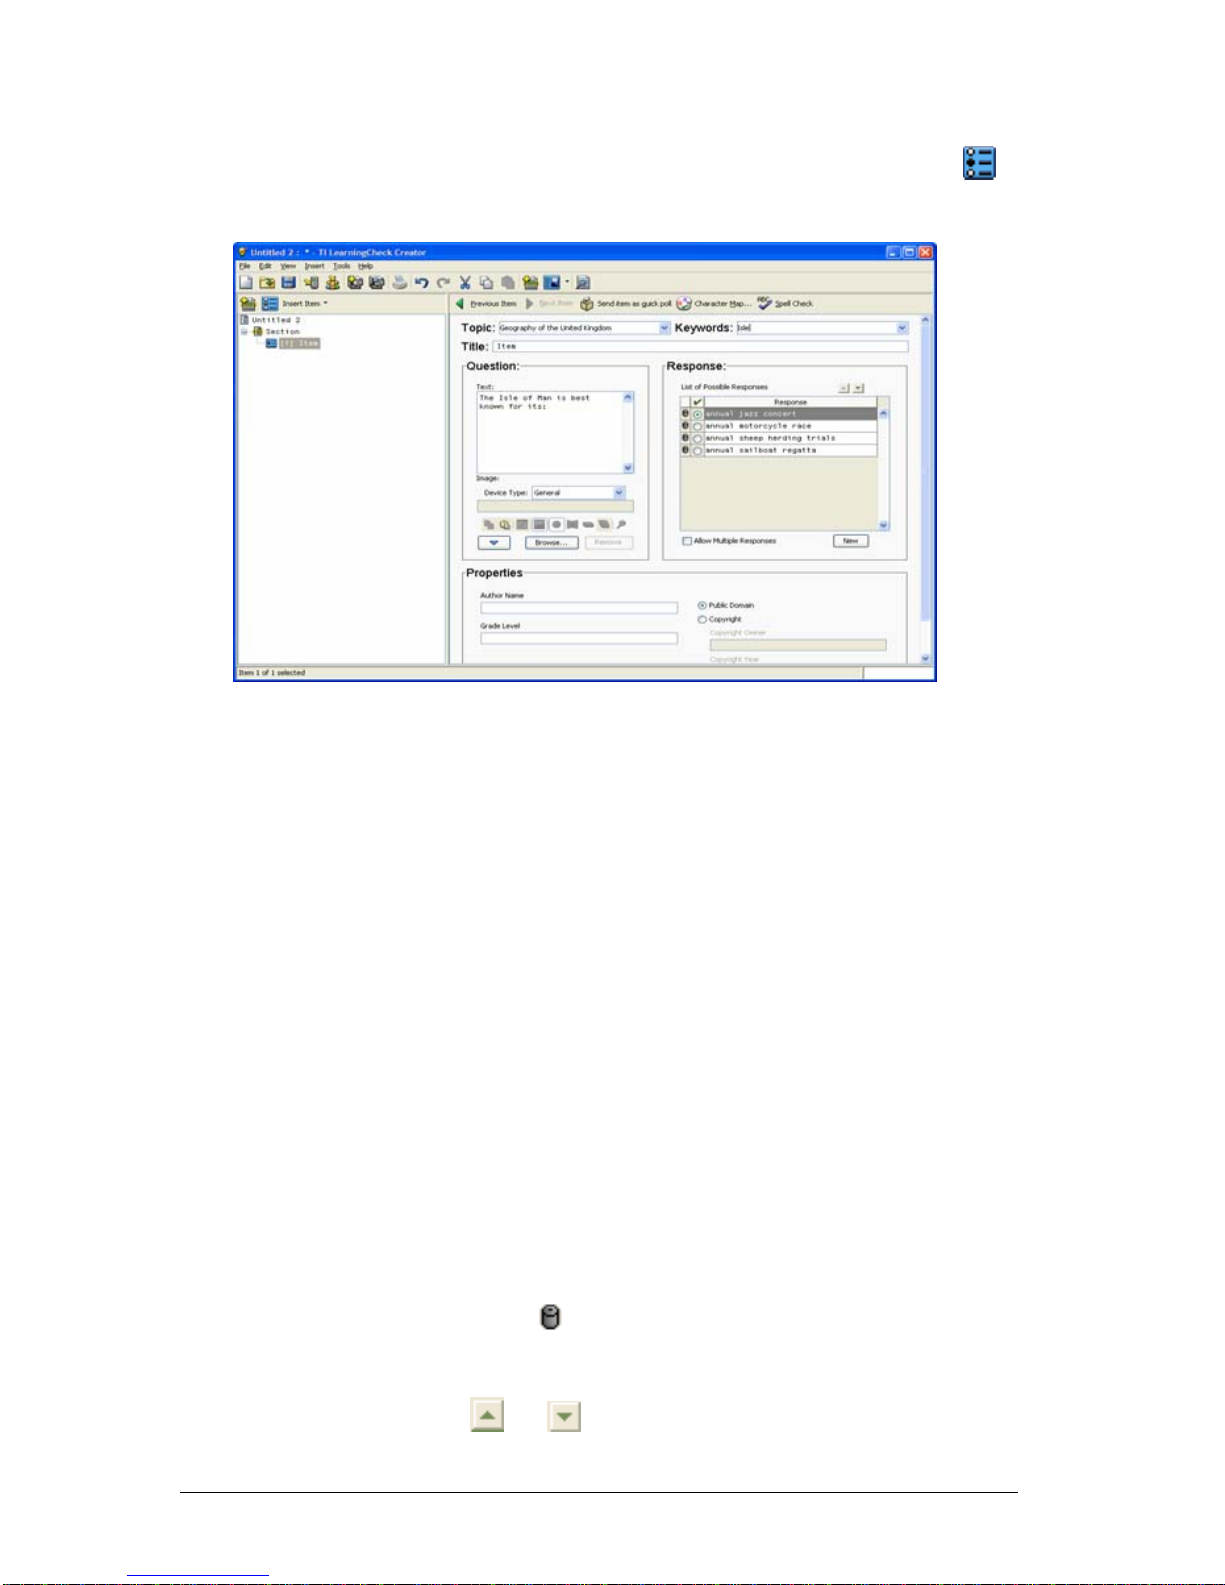
Adding a new custom choices question
1. In the Preview pane, click the Insert Item dropdown, and select
Custom Choices.
2. Type the topic of the question in the Topic field.
3. Type any keywords that relate to the question in the Keyword field.
Note: The Topic and Keyword information is used by the Item bank
to provide search criteria for finding questions. You must enter text
in these fields for the question to be searchable in the item bank.
4. Type a title for the question in the Title box.
5. Type the question in Text box.
6. If the question will include an image, insert the image into the
Image area.
The image appears in the Image area of the dialog box.
7. To create answer choices, click in the Response box and type the first
response.
8. To enter the second response, click New, and then type the response
in the next box.
9. Repeat to create additional responses.
10. To delete a response, click at the left of the response.
11. To change the order of the responses, select the response you wish to
move and then click or to move the response up or down in
the list.
10 LearningCheck™ Creator
Page 17
12. In the List of Possible Responses, click the button at the left of the
correct response. If this question has more than one correct
response, click the Allow Multiple Responses checkbox, and then
click the correct answers.
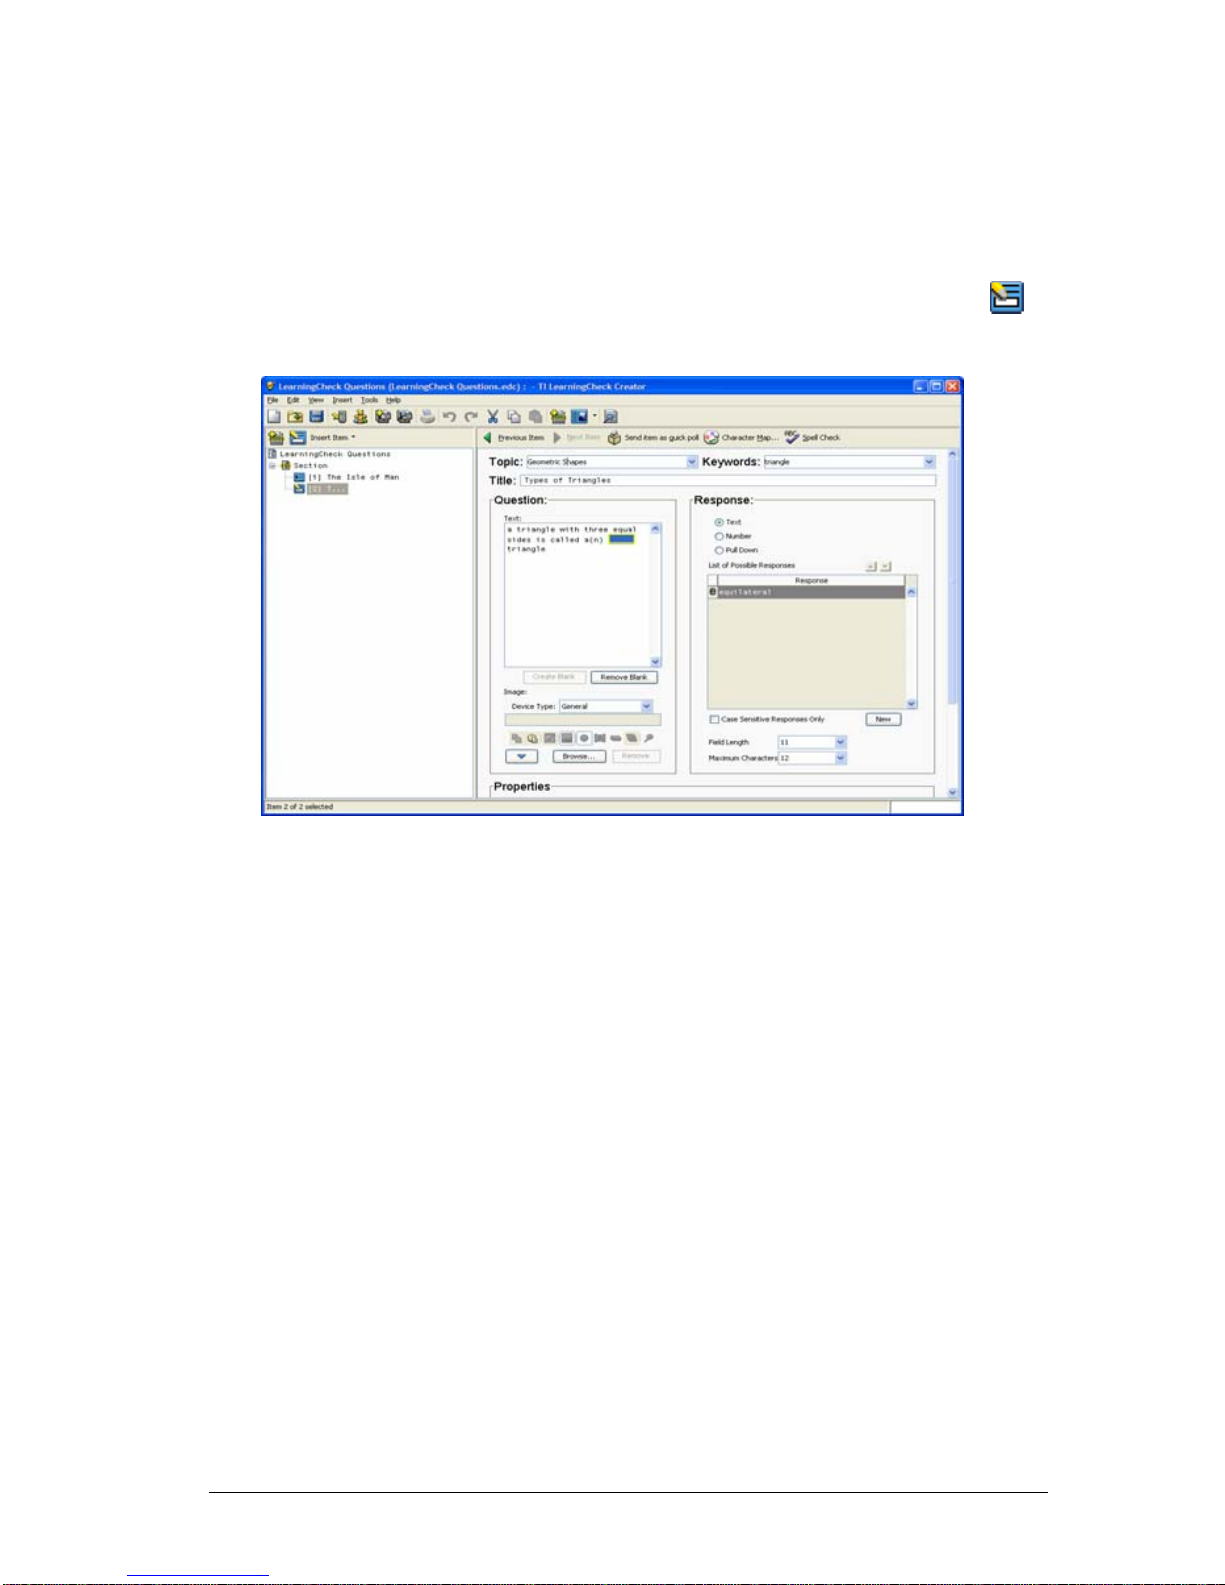
Adding a new fill in the blank question
1. In the Preview pane, click the Insert Item dropdown, and select
Fill in the Blank .
2. Type the topic of the question in the Topic field.
3. Type any keywords that relate to the question in the Keyword field.
Note: The Topic and Keyword information is used by the Item bank
to provide search criteria for finding questions. You must enter text
in these fields for the question to be searchable in the item bank.
4. Type a title for the question in the Title box.
5. Type the question in Text box.
6. Create the blank. There are two ways to do this:
a) Type the question, including the text that is in the blank
(the answer)—don't type a blank.
b) Select the text that will be in the blank.
c) Click Create Blank.
The LearningCheck™ Creator places the answer in the Question
Text box with a frame around it and displays the text in the List
of Possible Responses.
or
LearningCheck™ Creator 11
Page 18

d) Type the question leaving out the answer—don't type a
blank.
e) Click the place you wish to put the blank and then click
Create Blank.
f) Type the answer in the Response Text box.
The LearningCheck™ Creator places the answer in the Question
Text box with a frame around it and displays the text in the List
of Possible Responses.
7. To remove a blank, click the blank and then click Remove Blank.
8. Click the type of Response (Text, Number, or Pull Down).
For text responses, the Text button is automatically selected and the
number of characters contained in the word you placed in the blank
is automatically entered into Field Length and Maximum Characters.
For numeric responses, click the Number button.
To create a pull-down list of responses, click the Pull Down button.
If you want to make the blank longer so that the size of the
blank does not reveal the answer, change Field Length to a larger
number.
9. If the question will include an image, insert the image into the
Image area.
12 LearningCheck™ Creator
Page 19
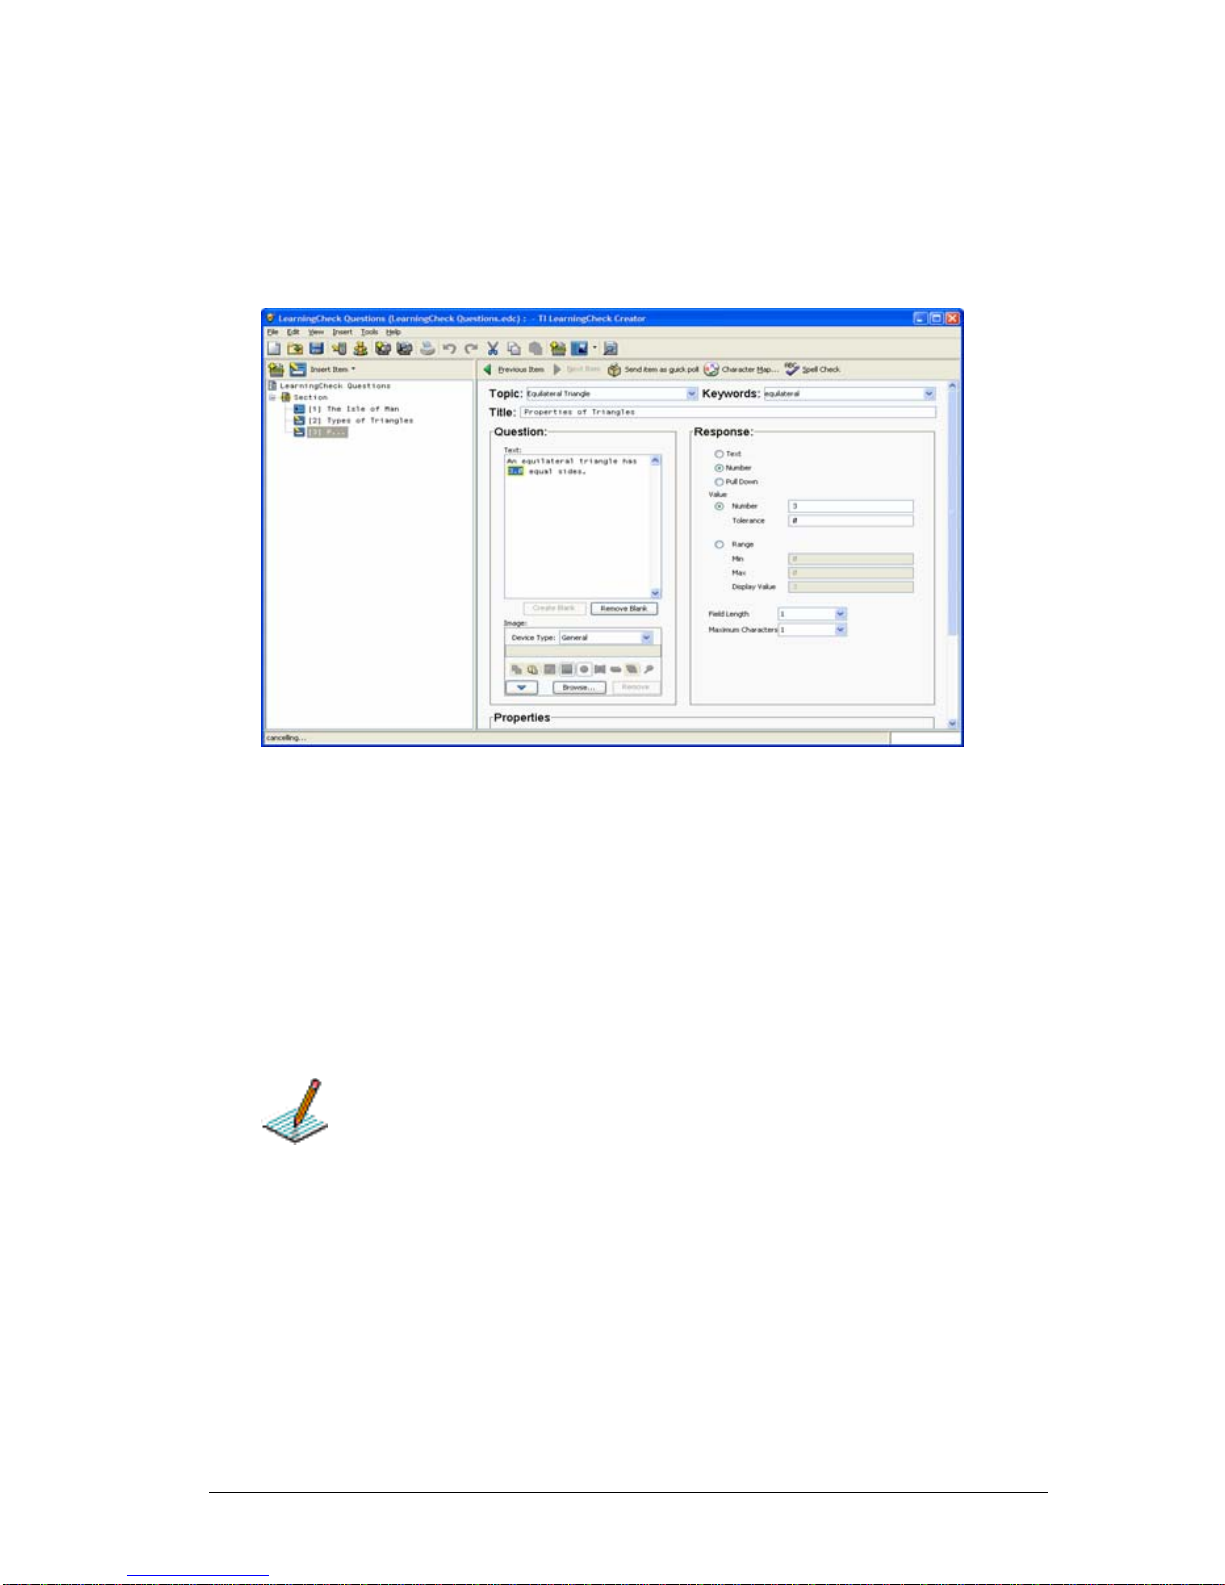
Creating a question with a numeric blank
1. Create a fill in the blank question and complete steps 1 through 4c.
2. In the Response area, click Number.
The lower portion of the dialog box changes to reveal boxes for
Number Tolerance and Range.
Toleranc e and Range are very similar, but your choice between these
two fields will probably be based on which one is easier to specify.
For example, if the question is "The value of pi is __" you might
specify 3.14159265 as the correct answer with a Tolerance of .01. If
the response to your question is a range of integers, then using
Range (25 to 27, for example) might be easier.
3. If more than one value is acceptable for the answer, enter a
Tolerance, or enter Range in the Minimum Value and Maximum
Value boxes.
If you want to make the blank longer so that the size of the
blank does not reveal the answer, change Field Length to a larger
number.
Creating a question with a pull-down blank
1. Create a fill in the blank question and complete steps 1 through 4c.
2. In the Response area, click Pull Down.
LearningCheck™ Creator 13
Page 20

The text you selected for the blank appears in the List of Possible
Responses.
3. To add additional responses to the pull-down list, click New, and
then type the response in the next box.
Note: To delete a response click at the left of the response.
4. In the List of Possible Responses, click the button at the left of the
correct response.
5. If this question includes multiple blanks and you want to use the
same list for more than one blank, make the list a default list. Click
Default List.
6. To use a previously created default list, create the blank and then
click Use Default List.
The list appears in the List of Possible Responses.
Adding a new open response question
1. In the Preview pane, click the Insert Item dropdown, and select
Open Response.
14 LearningCheck™ Creator
Page 21
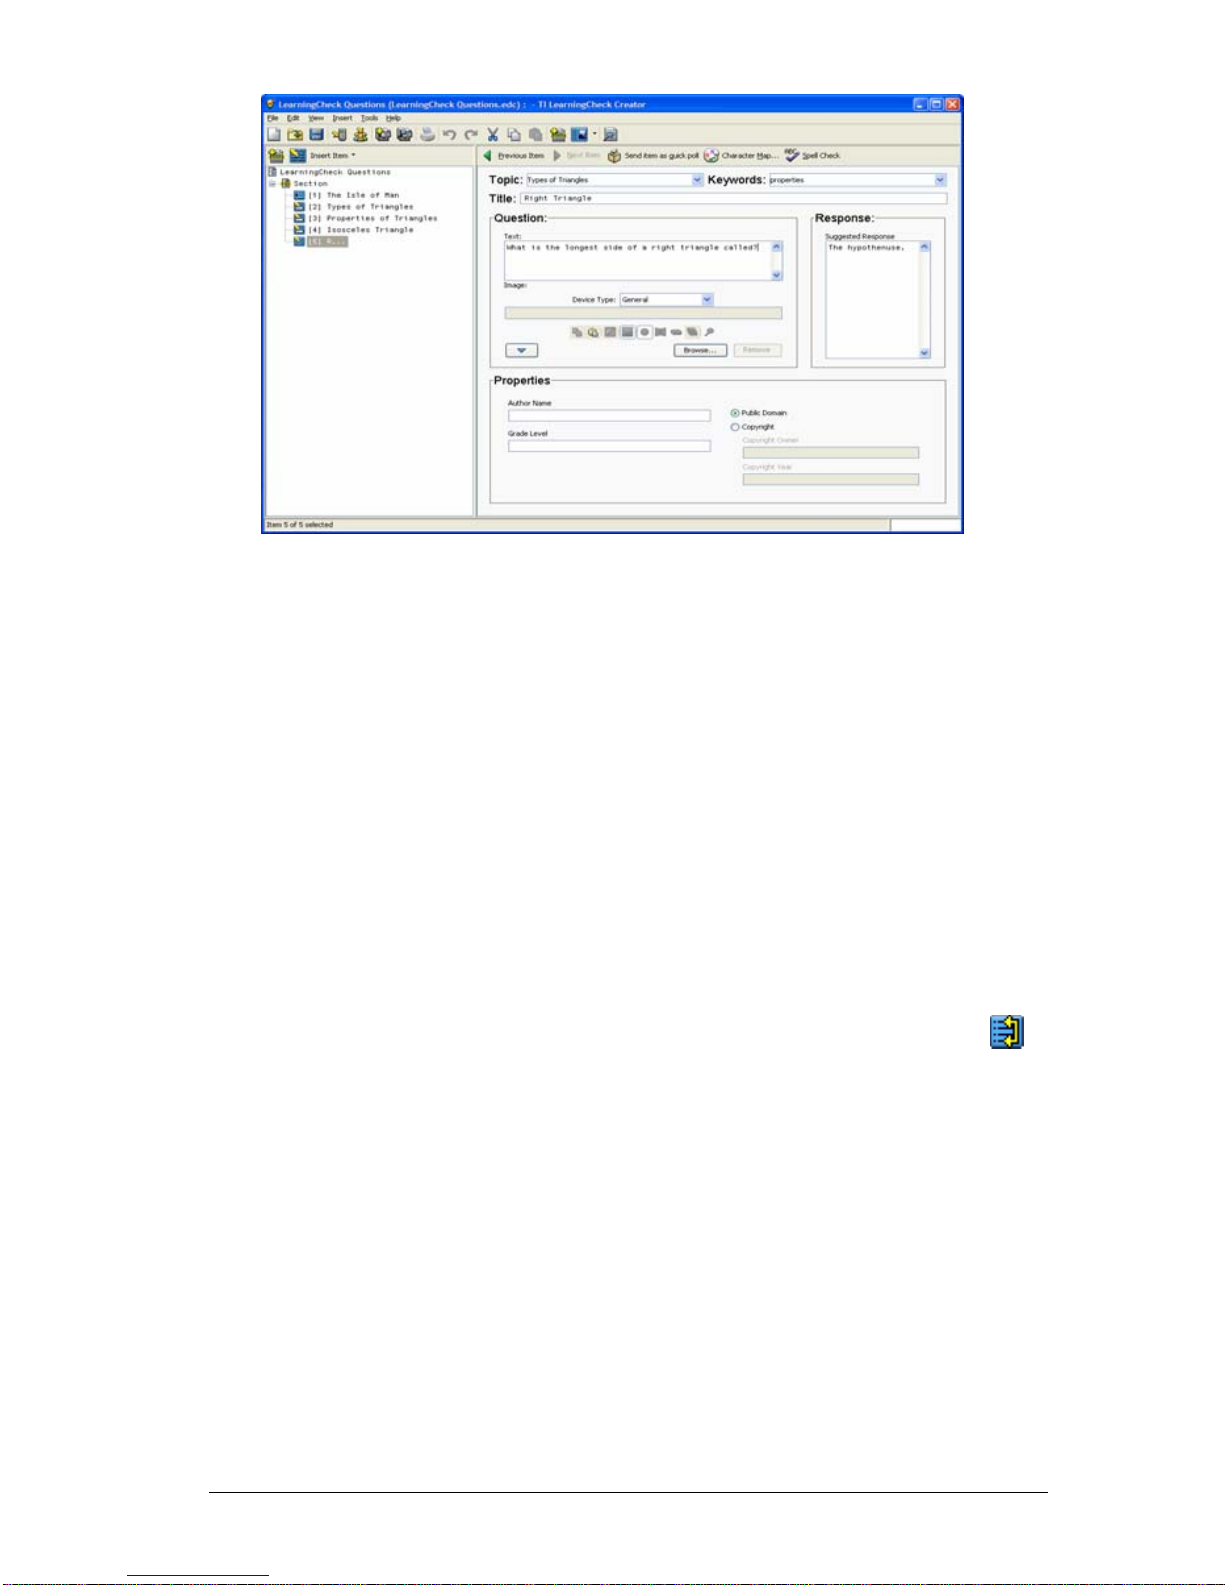
2. Type the topic of the question in the Topic field.
3. Type any keywords that relate to the question in the Keyword field.
Note: The Topic and Keyword information is used by the Item bank
to provide search criteria for finding questions. You must enter text
in these fields for the question to be searchable in the item bank.
4. Type a title for the question in the Title box.
5. Type the question in Text box.
6. If the question will include an image, insert or copy the image into
the Image area.
7. If you want to specify a Suggested Response, type it in the box.
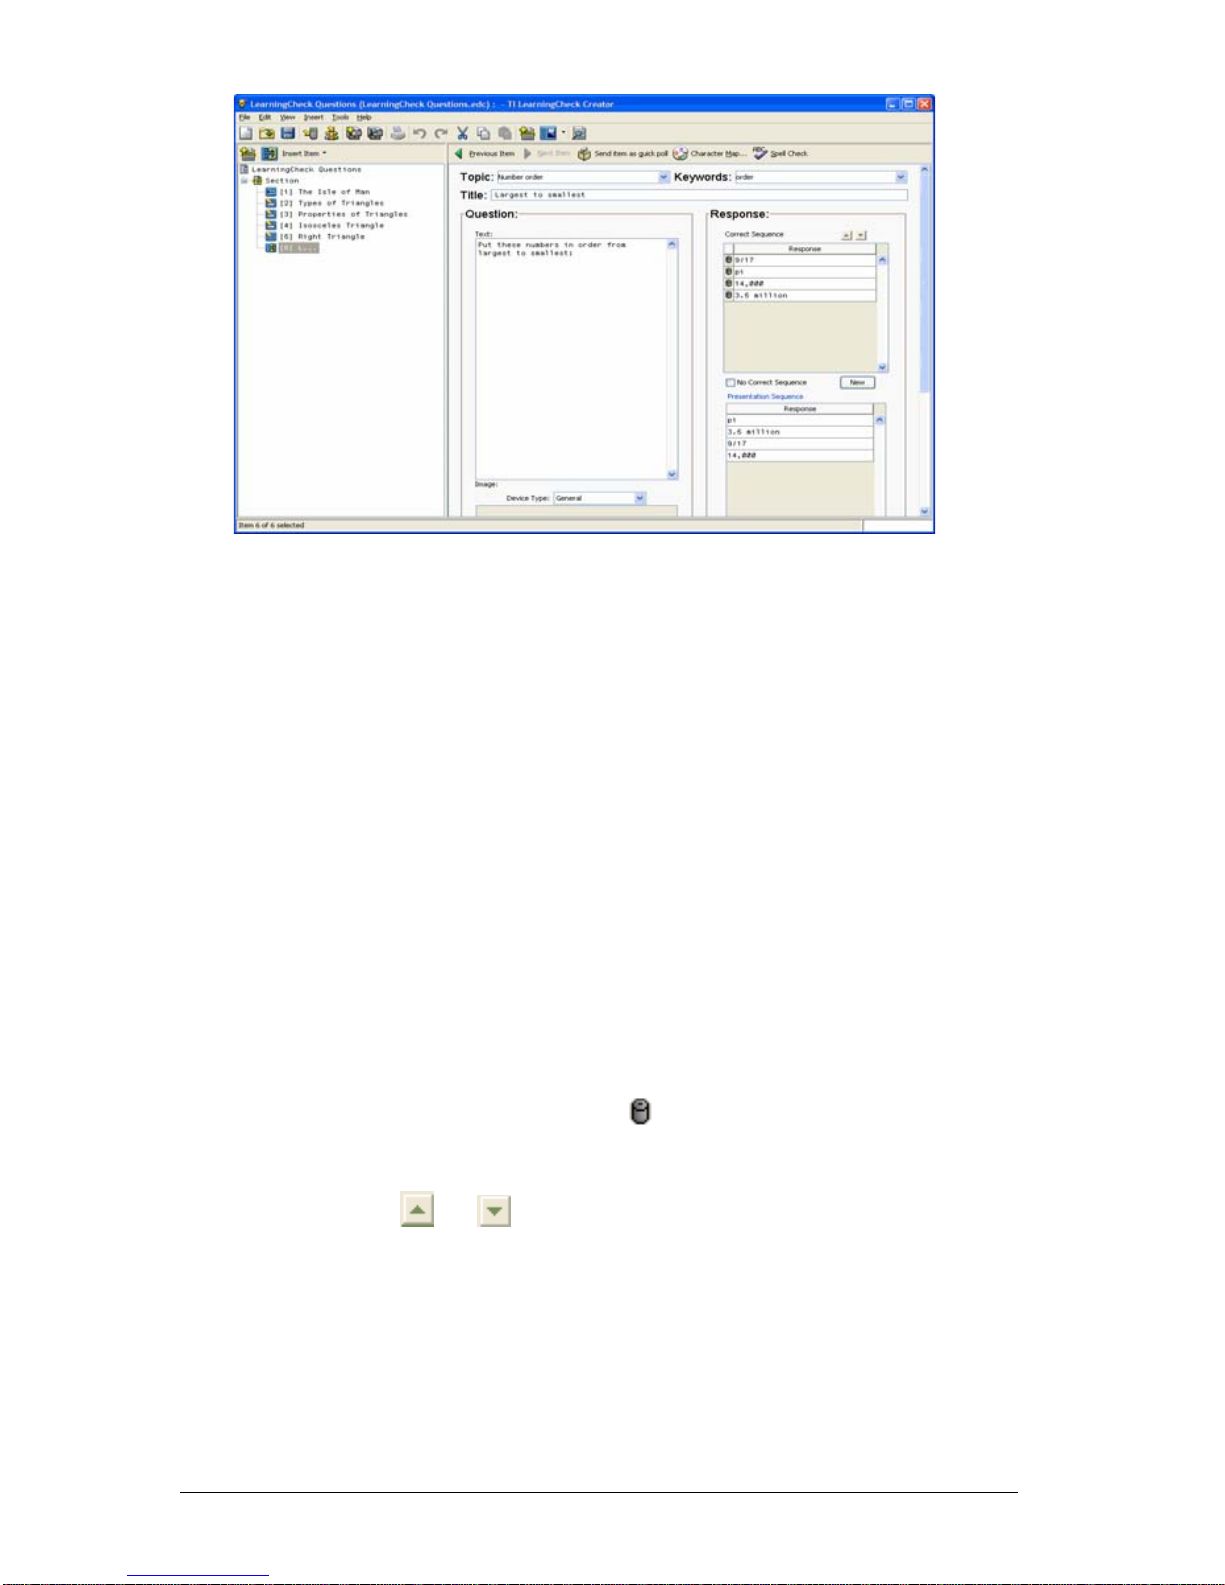
Adding a new sequencing question
1. In the Preview pane, click the Insert Item dropdown, and select
Sequencing.
LearningCheck™ Creator 15
Page 22
2. Type the topic of the question in the Topic field.
3. Type any keywords that relate to the question in the Keyword field.
Note: The Topic and Keyword information is used by the Item bank
to provide search criteria for finding questions. You must enter text
in these fields for the question to be searchable in the item bank.
4. Type a title for the question in the Title box.
5. Type the question in Text box.
6. If the question will include an image, insert or copy the image into
the Image area.
7. To create answer choices, click in the Response box and type the first
response.
8. To enter additional responses, click New, and then type the response
in the next box. (After you enter all of the responses, you will
indicate the correct sequence.)
Note: To remove a response, click at the left of the response.
9. To specify the correct sequence, click the response you wish to move
and then click or to move the response up or down the list.
Note: If more than one sequence is acceptable, click No Correct
Sequence.
10. Click Generate Presentation Sequence. The responses appear in
random order in the Presentation Sequence box.
16 LearningCheck™ Creator
Page 23
11. To change the presentation sequence, click the response you wish to
move and then click or to move the response up or down the
list.
Editing Presentation Sequence
When creating a sequencing question, you must click Generate
Presentation Sequence to copy the answers from the Correct Sequence
box into the Presentation Sequence box.
After the presentation sequence is generated:
• Clicking New adds a new response to the Correct Sequence box, but
you must click Generate Presentation Sequence to copy it into
the Presentation Sequence box.
• Clicking at the left of a response deletes the response from both
boxes.
• Correcting a response in the Correct Sequence box also corrects it in
the Presentation Sequence box (when you finish making the
change).
If you add an answer to the Correct Sequence box and then close the
question without generating the presentation sequence again, the
number of answers in the Correct Sequence box will be different from
the number of answers in the Presentation Sequence box. The
LearningCheck™ Creator will automatically update and reorder the
answers in the Presentation Sequence box.
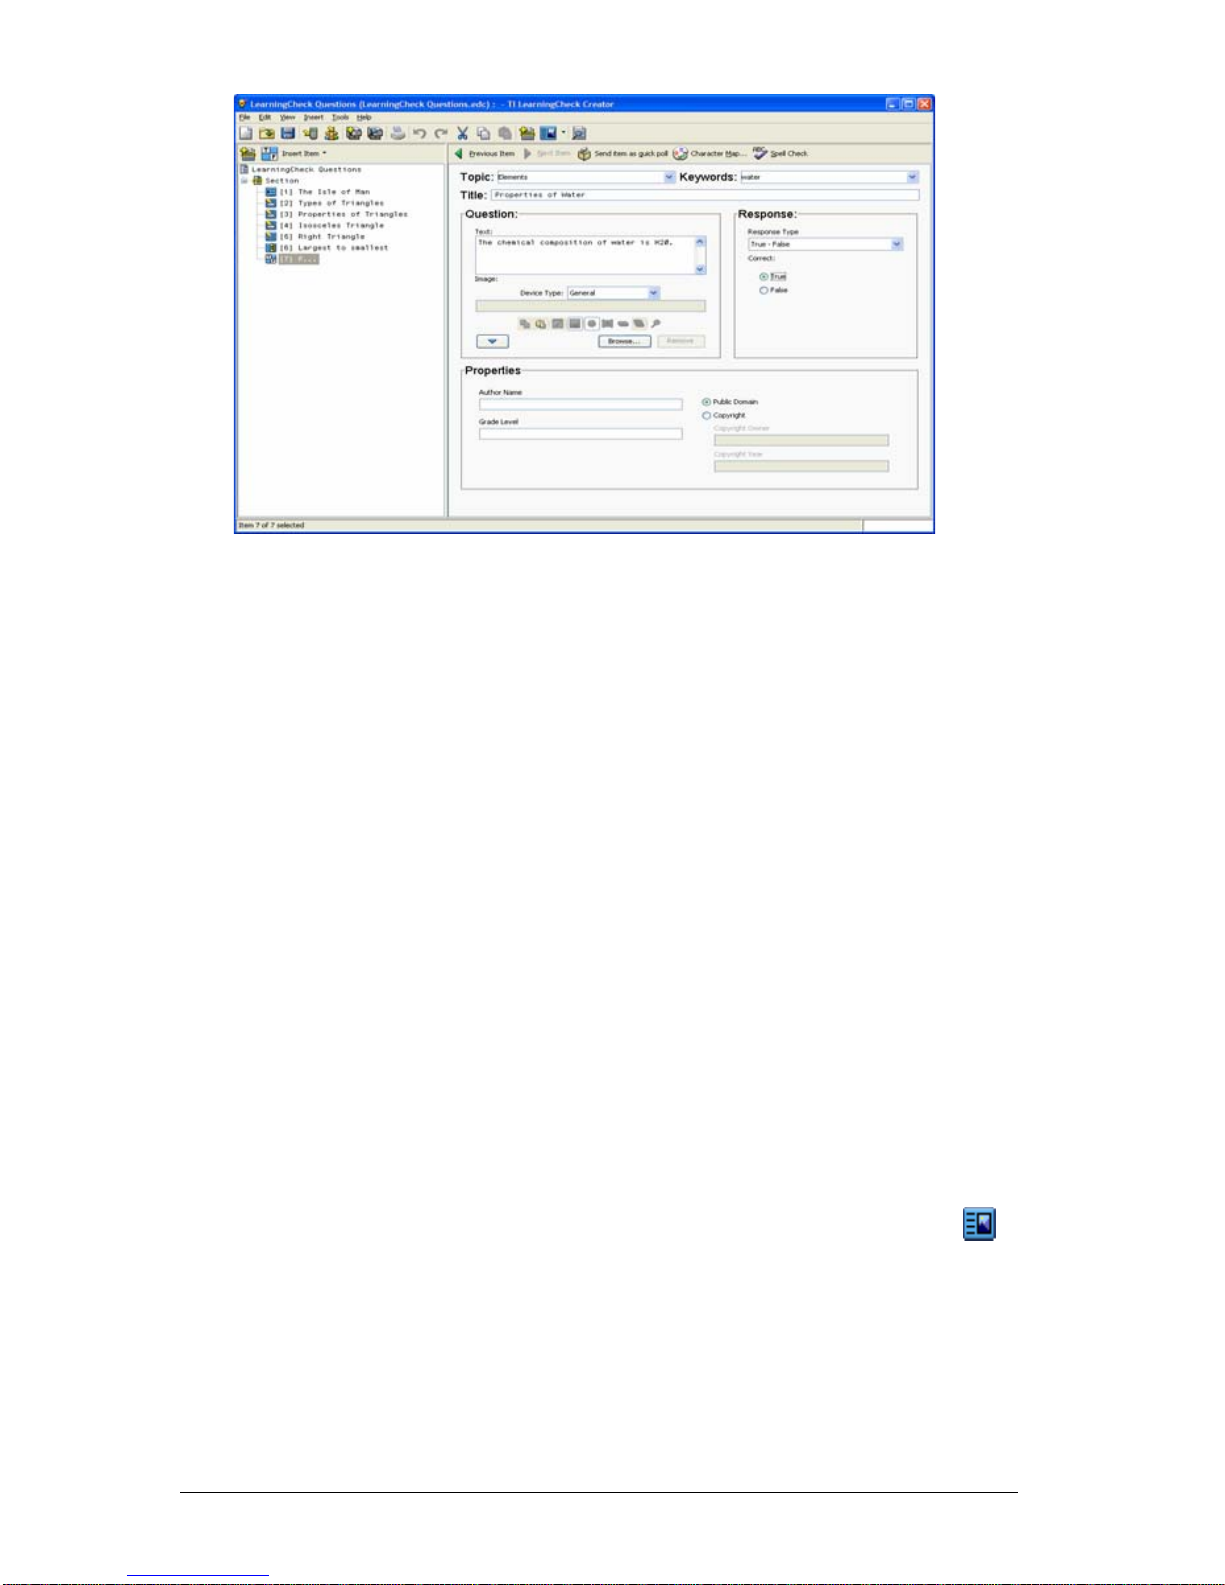
Adding a new standard choices question
The standard choices question includes the following question types:
• True-False
•Yes-No
•Right-Wrong
• Agree-Disagree
• Always-Sometimes-Never
• Strongly Disagree-Somewhat Disagree-Neutral-Somewhat AgreeStrongly Agree
To add a new standard choices question to a section
1. In the Preview pane, click the Insert Item dropdown, and select
Standard Choices.
LearningCheck™ Creator 17
Page 24
2. Type the topic of the question in the Topic field.
3. Type any keywords that relate to the question in the Keyword field.
Note: The Topic and Keyword information is used by the Item bank
to provide search criteria for finding questions. You must enter text
in these fields for the question to be searchable in the item bank.
4. Type a title for the question in the Title box.
5. Type the question in Text box.
6. If the question will include an image, insert or copy the image into
the Image area.
7. In the Response drop-down list, click the response type.
8. Click the button at the left of the correct response for the question.
Adding a new text and image item
The Text and Image item does not require a response, so you might use
this for such things as instructions or questions for essay or classroom
discussion.
To add a new text and image item to a section
1. In the Preview pane, click the Insert Item dropdown, and select
Text and Image.
18 LearningCheck™ Creator
Page 25
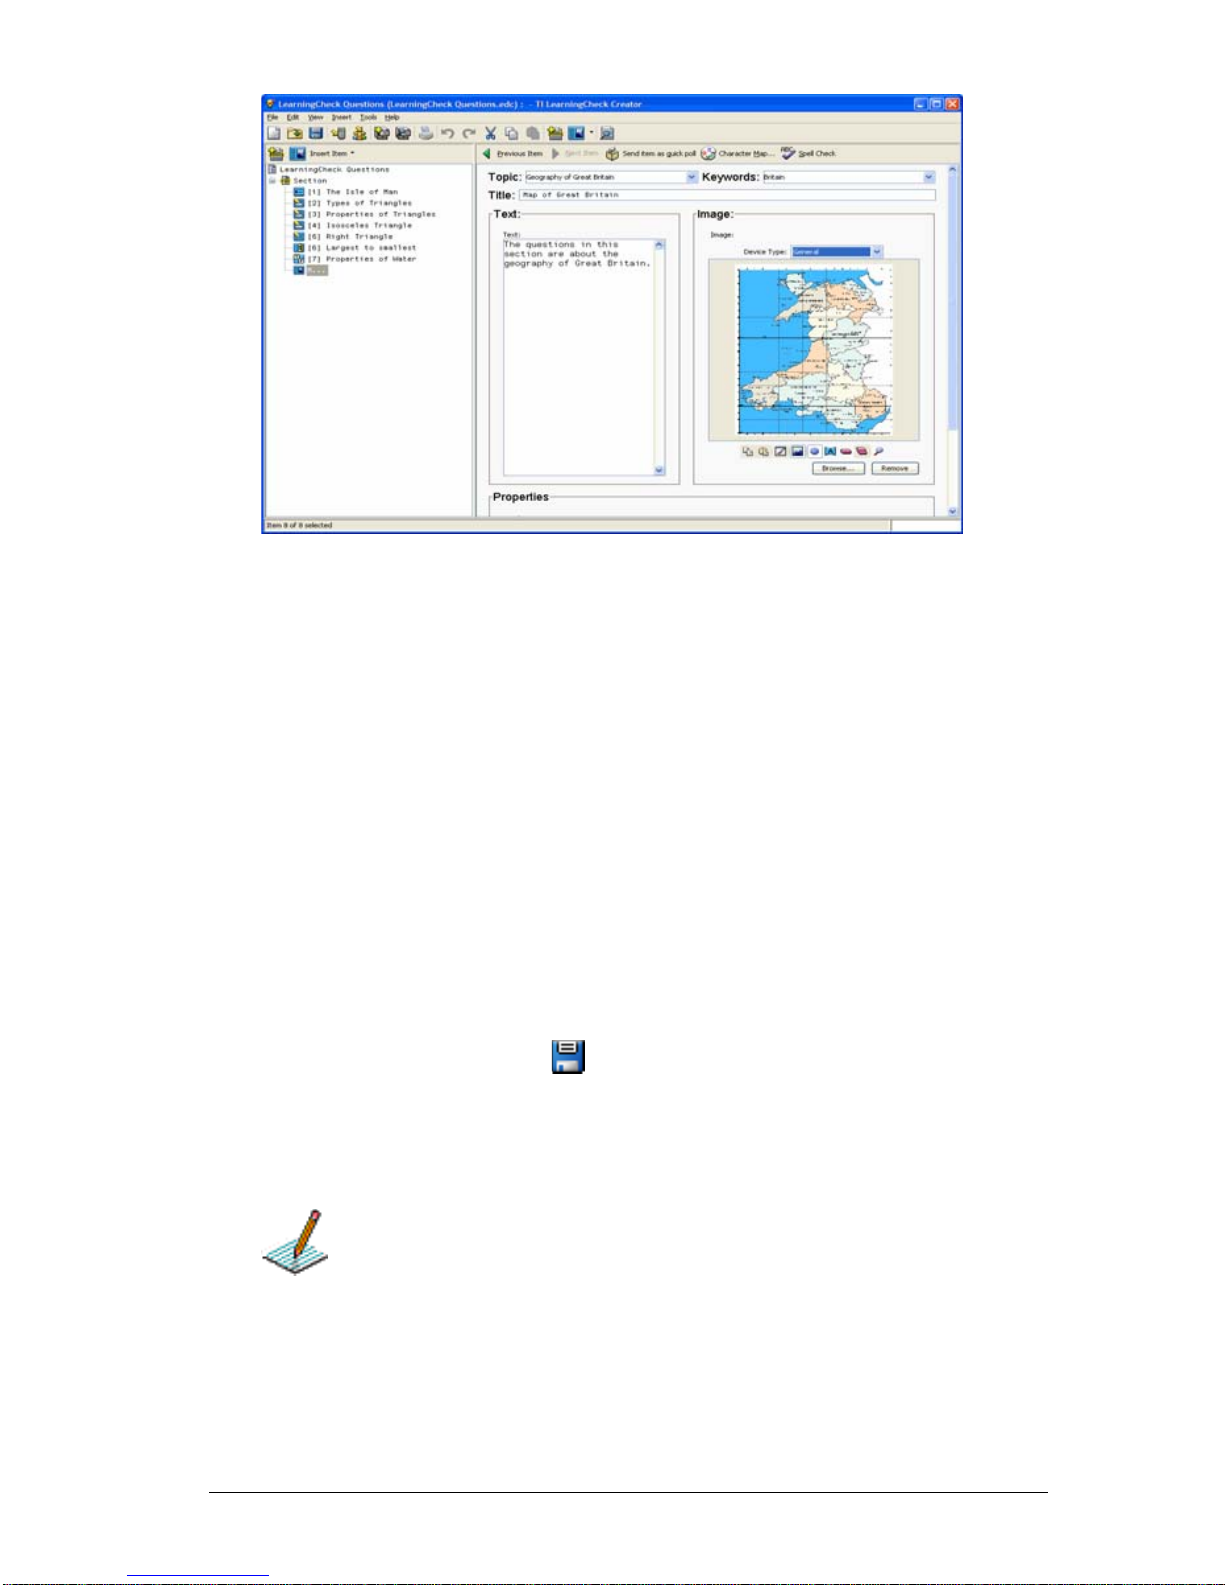
2. Type the topic of the question in the Topic field.
3. Type any keywords that relate to the question in the Keyword field.
Note: The Topic and Keyword information is used by the Item bank
to provide search criteria for finding questions. You must enter text
in these fields for the question to be searchable in the item bank.
4. Type a title for the question in the Title box.
5. Type the question in Text box.
6. If the item will include an image, insert or copy the image into the
Image area.
Saving a document
To save a new document
1. Click File > Save or click .
2. If you haven’t entered a title for the document, LearningCheck™
Creator prompts you to enter a title. (This title will display in the
handheld device's Assignment List.)
If you do not want to see this dialog box each time you save
an unnamed document, click Do not show this again.
• Type in a name for the document and click OK.
or
• Do not type in a name and click Cancel.
LearningCheck™ Creator 19
Page 26

The Save As dialog box opens.
3. Browse to the folder where you want to save the file.
LearningCheck™ Creator suggests a filename the same as the
document name (if you entered one).
4. Click Save to accept the suggested filename or type in a new
filename and click Save.
If you do not enter a title for the document but do enter a
name for the file, LearningCheck™ Creator changes the document
title to the same as the filename.
To save an existing document
f Click File > Save or click .
Related Topics
You can also save a document with a new name. (See “Saving with a new
name” on page 32.)
You can use Save As to create a new folder and save a document into it
at the same time. (See “Creating a new folder” on page 33.)
When you edit a document from a zipped file (.TIP, .TIG, .ZIP), you cannot
save the changes in the zipped file. You must save the document to a
different location. (See “Editing a document in a zipped file” on
page 28.)
20 LearningCheck™ Creator
Page 27

Adding questions from the Item Bank
The Item Bank stores questions from the LearningCheck documents you
create, so you can re-use them. The Item Bank builds a list of topics and
keywords based on the topics and keywords you assign to questions
when you create them. You can find questions from previous documents
using search criteria, and add them to your current document using the
Item Bank. The questions are not removed from the earlier document,
but are copied into the new document when you select and copy them
from the Item Bank.
To locate a question in the Item Bank
1. Click File > Open Item Bank or click .
The Explore Item Bank dialog box displays.
2. Use the Topic and Keywords dropdown menus to select terms to
use to search for the question you want to find.
3. If you know the type of question, click to select it in the Item Type
field.
4. If you know when the question was created, you can use the Date
Added dropdown to specify a date, and whether the question was
created before, after or on the date that you type in the field next to
the dropdown.
Note: Dates must be entered in the form of mm/dd/yy.
LearningCheck™ Creator 21
Concept Only
Page 28

5. Check the box next to only items with images to add that to the
search criteria.
6. Click to select whether the search should return items if some criteria
are met, or only if all criteria are met.
7. Click Search.
The Item Bank returns a list of the items which meet the conditions
you specified.
Note: If the search does not return any results, click Back to Search
and modify the criteria to try the search again.
Adding Selected Items to Assessment
1. Scroll through the list of questions to locate the one you wish to add
to your document.
2. Click Add selected items to assessment.
The item(s) is added to your document.
22 LearningCheck™ Creator
Page 29

REPLACE GRAPHIC
To close the Item Bank
f Click File > Close Item Bank or click .
The Item Bank closes. If more than one Item Bank is open, the Item
Bank that is in front closes.
LearningCheck™ Creator 23
Page 30

Adding special characters to text
The TI Character Map allows you to insert symbols, punctuation, math
symbols, special language characters, or TI-specific characters into text.
You can add special characters to LearningCheck™ Creator questions,
Class Analysis cells, and Transfer List application variable (AppVar) names.
To insert a character
1. Click to place the cursor in the text where you want to add the
character(s).
2. Click .
3. Select the Device (All, Common, TI-83 Plus, TI-84 Plus Family, TI-89
Family, TI-92 Plus, or Voyage™ 200) from the drop-down list.
4. Select the Character Set (All, Math, Punctuation, Symbol, Greek,
French, German, or Spanish) from the drop-down list.
5. Click Show US Keyboard Characters if you want to see all of the
letters and other characters from a standard U.S. keyboard
6. Click the character you want to add.
The character displays in the Characters To Copy box.
24 LearningCheck™ Creator
Page 31

7. Click Insert to place the character into the text, or click Copy to
copy the character to the clipboard, and then paste the character
into the text.
You can also select several characters and insert or copy them all at
the same time.
8. Click the Window Close button to close the window.
When added to LearningCheck™ Creator documents, characters
shown in gray on the character map may not display correctly on all
devices. For example, the square root symbol may display as _sqrt_, or a
character may look slightly different. Use Preview to see how the
character is displayed.
In addition, Unicode characters not in the character map can be inserted
into question text but will display as invalid characters
() on the
devices.
LearningCheck™ Creator 25
Page 32

Adding topics and keywords
Topics and Keywords are used to search for questions or documents on a
specific topic. You may add topics and keywords to any question or item.
When you add a topic or keyword to a question, that keyword is also
added to the List of Topics and Keywords for the section that includes the
question and the document that includes the question. (You cannot
enter keywords directly into a section or document list.)
To add topics or keywords to a question
1. Double-click the question title in the preview pane to open the
question.
2. Type the topic or keyword in the dropdown field, or use the
dropdown menu to select an existing topic or keyword.
Note: To enter multiple keywords, separate them with a comma.
3. When the topic and keywords have been added, click OK.
Opening existing documents
The LearningCheck™ Creator lets you open one or more .EDC
documents. In addition, you can open any .EDC file from Windows
Explorer by double-clicking the filename or icon.
You can also see the files in a zipped file (.TIP, .TIG, or .ZIP) and open a
document from the zipped file without first unzipping the file. (See
“Editing a document in a zipped file” on page 28.)
26 LearningCheck™ Creator
®
Page 33

To open an existing document
1. Click File > Open or click .
2. Select the document’s profile in the User Profile Selection dialog box.
If you always use the same profile and do not want to see this
dialog box each time you open a document, click Do not show this
again. The next time you open a document, the User Profile
Selection dialog box will not open. (However, this option is not
available if you are using the guest profile.)
3. If necessary, navigate to the folder that contains your documents.
• If you have set a default directory in your User Profile, the Open
dialog box shows the directory.
• If you have not set a default directory, the Open dialog box
shows the directory of the last document you opened.
4. Click the document name(s).
5. Click Open.
The document(s) opens.
You can also open any document created by LearningCheck™
Creator (an .EDC file) by double-clicking on the file icon.
Adding a new question
To add a new question (or item) to a section
1. Click to highlight the section name.
2. Insert the new question using one of the methods described below:
• Click Insert > Item and then click the question type and
template you want.
or
• Click the question template icon.
3. Double-click to open the question.
4. Complete the dialog box for the question type you created. For
additional information about specific items, click the appropriate
cross-reference listed below.
5. Click OK.
LearningCheck™ Creator 27
Page 34

Editing a question
To edit an existing question
1. Double-click the question to open it.
2. To change text, highlight the text you wish to change and type the
new text over it.
3. To delete text, highlight the text and press the Delete key on your
computer keyboard.
4. Click OK.
Editing a document in a zipped file
The LearningCheck™ Creator lets you see the files in a zipped file (.TIP,
.TIG, or .ZIP) and open a document from the zipped file. It is not
necessary to unzip the file before you open the document.
To open a document in a zipped file
1. Click File > Open or click .
2. In the Open dialog box, navigate to the folder that contains the file.
3. Click the filename.
4. Click Open.
The zipped file opens. You can see the documents in the zipped file.
5. Click the document name.
6. Click Open.
The document opens ready for editing in LearningCheck™ Creator.
You can also select and open images from the zipped file.
To save a document from a zipped file
When you edit a document from a zipped file, you cannot save the
changes in the zipped file. You must save the document to a different
location.
1. Click File > Save As or click .
2. In the Save As dialog box, navigate to the location where you want
to save the document.
3. Type a new name for the document in the File name box.
4. Click Save.
28 LearningCheck™ Creator
Page 35

Checking spelling for the document
You can check spelling for a question, a section, or an entire document.
To check spelling from the main window
1. In the Navigation pane or the Content pane, click the question,
section, or document.
2. Click Tools > Spell Check or click .
3. Respond to the spell check messages as necessary.
To check spelling with a question open
1. Click Tools > Spell Check or click .
2. To check only the Question tab, click Current Tab.
or
To spell check the Question, Properties, Hint & Feedback, Keywords,
and Copyright information, click All Tabs.
3. Respond to the spell check messages as necessary.
Cutting, copying, and pasting questions or sections
fIf you are accustomed to cutting, copying, and pasting in Windows®,
you will find the cut, copy, and paste functions in the LearningCheck™
Creator familiar. You can cut, copy, or paste a question, a section, or an
image.
In addition, you can open multiple documents in LearningCheck™
Creator and then copy and paste images from one document into
another.
To cut a question, section or image
1. Click the question, section, or image.
2. Click Edit > Cut or click .
To copy a question, section, or image
1. Click the question, section, or image.
LearningCheck™ Creator 29
Page 36

2. Click Edit > Copy or click .
To select multiple consecutive items for copying, hold Shift
while selecting. To select multiple items that are not consecutive,
hold Ctrl while selecting.
To paste a question or section
1. Click the question or section immediately above the location to
which you want to paste.
2. Click Edit > Paste or click .
To paste an image
1. Click the image area of the question into which you want to paste
the image.
2. Click Edit > Paste or click .
You can also use the standard keyboard shortcut keys for these
operations (Ctrl + X to cut, Ctrl + C to copy, or Ctrl + V to paste.
To copy text from Microsoft® Word into a LearningCheck™
Creator question
1. In the Microsoft® Word document, select the text that you want to
copy.
2. Click Edit > Copy or click .
3. Go to the LearningCheck™ Creator.
4. Open the question to which you want to paste text.
5. Click to place the cursor in the text box.
6. Click Edit > Paste or click .
There is a 64K limit on text pasted into a LearningCheck™ Creator
document.
30 LearningCheck™ Creator
Page 37

Moving a section or a question
You can use drag-and-drop to move one or more sections in your
LearningCheck™ Creator document. You can also move one or more
questions within a section or move them to a different section.
To move a section
1. In the Navigation pane, click the section to be moved.
To move more than one section at a time, Shift + click each section.
2. Drag the section up or down to place it in the new location. A
positioning line shows where the section will appear.
Sections that are moved will automatically renumber themselves.
To move a question within a section
1. Click the question to be moved.
To move more than one question at a time, Shift + click each
question.
2. Drag the question up or down to place it in the new location. A
positioning line shows where the question will appear.
Questions that are moved will automatically renumber themselves.
To move a question to another section
1. Click the question to be moved.
To move more than one question at a time, Shift + click each
question.
2. Drag the question left into the Navigation pane to place it in the
new section. A positioning line shows where the question will
appear.
Questions that are moved will automatically renumber themselves.
Deleting a section or a question
To delete a section
1. In the Navigation pane, select the section to be deleted.
2. Click Edit > Delete or click .
To delete a question
1. In the Navigation pane or the Content pane, select the question to
be deleted.
LearningCheck™ Creator 31
Page 38

2. Click Edit > Delete or click .
Renaming a section or a question
You may create documents using the default section and question titles
(Section 1 or Item 1), but you may find it easier to organize topics and
questions if you assign section and question names that describe the
topic.
To rename a section or a question
1. Right-click the section name or question name.
2. On the shortcut menu, click Rename.
3. Type the new name for the section or question.
4. Press Enter.
You can give identical titles to more than one question or section.
Deleting a document
You must delete a document using Windows® Explorer. The file that you
are deleting must not be open.
To delete a document
1. Open Windows® Explorer.
2. Navigate to the folder that contains the file.
3. Click the file.
4. Click Edit > Delete or click .
Saving with a new name
You can copy a document by saving it with a new name.
To save the current document with a new name
1. Click File > Save As or click . (For a new document, Save works
the same as Save As.)
2. In the Save As dialog box, navigate to the folder to which you want
to save the document and type a new name for that file.
3. Click Save.
You may want to save changes to the original document before
using Save As. Otherwise, changes are saved in the copy but not the
original.
32 LearningCheck™ Creator
Page 39

Creating a new folder
You can use Save As to create a new folder (and save a document into it
at the same time).
To create a new folder
1. Open the document you want to save.
2. Click File > Save As or click . (For a new document, Save works
the same as Save As.)
3. If you haven’t entered a title for the document, LearningCheck™
Creator prompts you to enter a title. (This title will display in the
handheld device's Assignment List.)
If you do not want to see this dialog box each time you save
an unnamed document, click Do not show this again.
• Type in a name for the document and click OK.
or
• Do not type in a name and click Cancel.
The Save As dialog box opens.
4. Browse to the folder where you want to save the file.
If you do not navigate to another location, the New Folder
will be created in the Document Directory location shown in your
User Profile General tab.
5. Click .
A folder named New Folder is created.
6. To rename the folder, click to select it and then click it again.
7. Type a new name for the folder and click Open.
8. LearningCheck™ Creator suggests a filename for the document that
is the same as the document name (if you entered one).
LearningCheck™ Creator 33
Page 40

9. Click Save to accept the suggested document filename or type in a
new filename and click Save.
If you do not enter a title for the document but do enter a
name for the file, LearningCheck™ Creator changes the document
title to the same as the filename.
Using Undo and Redo
If you have worked with other Windows® programs, you are probably
familiar with the Undo and Redo commands. Use Undo to undo the last
action, and Redo to reverse an Undo command.
With the LearningCheck™ Creator, the actions that you can undo
depend on whether you are working with text or objects. The number of
actions that you may undo is limited only by the memory available on
your computer.
To undo an action
f Click Edit > Undo or click .
To redo an action
f Click Edit > Redo or click .
Printing a Report
Use the Report Options dialog box to preview and print a document
report. Four types of reports are available:
• Answer Key prints the items, choices and correct answer.
• Assignment prints the items and choices.
To print a report
1. Click File > Print or click .
34 LearningCheck™ Creator
Page 41

2. Select the type of report you want to print.
3. Click Print.
Preview paper version of assignment
1. Click File > Print or click .
2. Select the type of report you want to preview.
3. Click Print Preview to see how the report will look.
4. Click to print the report.
or
Click Close to return to the Report Options window.
LearningCheck™ Creator 35
Page 42

Working with Images
This section describes basic procedures you will use to insert and edit
images in a document.
• Image toolbar
• Adding an image to a question
• Scaling and cropping an image
• Adding a point or label
• Changing a point or label
• Deleting a point or label
• Editing an image
Image toolbar
The Image toolbar appears below the Image area in each question
template.
The Image toolbar changes slightly depending on the type of question
and the actions you need to take, but all of the icons are shown in the
following table.
Icon Name
or
36 LearningCheck™ Creator
Expand or Collapse image area
Page 43

Icon Name
Copy Image to Clipboard
Paste Image from Clipboard
Edit Image
Position Image Above/Below Text
or
Scale/Crop Image for Display on
or
Device
Add Points to Image
Add Correct Points
Add Incorrect Points
Add Labels to Existing Points
Erase Existing Points/Labels
Clear all Points/Labels
Zoom Image In/Out for Preview
Adding an image to a question
The LearningCheck™ Creator supports the following graphic image
formats:
• Portable Network Graphics (.PNG)
• Windows bitmaps (.BMP) except compressed bitmaps
• Joint Photography Experts Group images (.JPEG)
• CompuServe graphics (.GIF)
• TI-83, TI-83 Plus, and TI-83 Plus Silver Edition images (.83i, .8xi, .PIC)
• TI-84 Plus and TI-84 Plus Silver Edition images (.83i, .8xi, .PIC)
• TI-89 Family, TI-92, TI-92 Plus, and Voyage™ 200 images (.89i, .92i,
.9xi, v2i)
LearningCheck™ Creator 37
Page 44

Other image file types may work in some instances, but are not
supported. When you browse for files (step 3 below), only supported
image types appear.
You can add an image into any of the LearningCheck™ Creator
templates by either inserting the image file or by copying and pasting
the image from another document.
To insert an image
You can insert an image file into a question, section, or document
template.
1. If the template window is not already open, double-click to open the
question or item.
2. In the Image area of the dialog box, click Browse.
3. Navigate to the folder where the image is stored, select the image,
and click Open.
The image opens in the Image area of the dialog box and activates
the image toolbar.
4. If necessary, click the image position icon to indicate whether the
image should be below the text or above the text.
• Places the image after the question text. This is the default
choice.
• Places the image before the question text
If you usually want the same image position, you can set it on
your User Profile General tab. However, you can always change the
image position in any question.
5. To add points and/or labels to the image, follow the instructions for
the specific type of question.
To copy and paste an image
You can paste an image from the clipboard or copy and paste an image
from any open document into a question, section, or document
template.
1. If the template window is not already open, double-click to open the
question or item.
2. Open the document from which you want to copy the image.
3. Click the image and then click Edit > Copy or click .
38 LearningCheck™ Creator
Page 45

4. Click the image area of the question into which you want to paste
the image.
5. Click Edit > Paste or click .
6. If necessary, click the image position icon to indicate whether the
image should be below the text or above the text.
• Places the image after the question text. This is the default
choice.
• Places the image before the question text
If you usually want the same image position, you can set it on
your User Profile General tab. However, you can always change the
image position in any question.
After you insert the image, you can place points and/or labels on the
image. You can also open MS Paint and edit the image.
Scaling and cropping an image
To scale and/or crop an image
1. Click the appropriate icon to scale the image or to scale the image
and then crop it to fit the device screen.
• Scales down the image (and any points and/or labels) to fit
the device screen. This is the default choice.
• Scales down the image and then crops it to fit the device
screen. To make sure the viewable area includes the part of the
image you want, preview the cropped image. (Cropping is
necessary only when using captured device screens as images.)
2. To preview the image for the intended device, select the Device Type
from the pulldown list (General, TI-83 Plus Family, TI-84 Plus Family,
TI-89 Family, TI-92 Plus, or Voyage™ 200).
Scaling and cropping apply only to the image sent to the
device. The image saved in the edc file remains the original size.
LearningCheck™ Creator 39
Page 46

Adding a point or label
You can add points to an image and label the points. The point tool lets
you create points on any image. However, for a choices on image
question, use the correct and incorrect point tools.
To add a point to an image
1. Open the question, section, or document that contains the image.
The image opens in the Image area of the dialog box.
2. On the image toolbar, click and then click the location of the
point on the image. Repeat to create additional points.
or
For a choices on image question, click and then click the correct
location on the image.
To create additional points, click and then click other locations
on the image.
3. To apply labels to the points, click and then click on each point.
The points are labeled A, B, C, and so on in the order in which you
click them.
4. To move a point (and its label) to a different place on the image,
click the point and drag it to the new location.
Changing a point label
You can change a point label by editing the label or by erasing and
recreating the label.
To edit a point label
1. On the image toolbar, click .
2. Click the point or the point label you wish to edit.
The label is highlighted.
3. Type a new label. Be sure to use uppercase letters.
4. Press Enter.
To erase a point label
1. On the image toolbar, click .
2. Click the label that you want to erase.
The label is removed. You can now add a new label.
40 LearningCheck™ Creator
Page 47

Deleting a point or label
You can delete a single point or label from an image or delete all the
points and labels at once.
To delete a single point on an image
1. On the image toolbar, click .
2. On the image, click the point that you want to delete.
To delete a single label on an image
1. On the image toolbar, click .
2. On the image, click the label that you want to delete.
To delete all points and labels on an image
f On the image toolbar, click .
The image remains, but all points and labels are erased.
Editing an image
The LearningCheck™ Creator allows you to open Microsoft® Paint and
edit the image in a question, section, or document template.
To open the image editor
f On the image toolbar, click .
Microsoft® Paint opens with the image file ready for editing.
To put the edited image back into the template
Saving the image in Microsoft® Paint does not change the image in the
template image area. You must select the edited image and then copy
and paste it into the question, section, or document template.
1. Click Edit > Select All.
2. Click Edit > Copy.
3. Click the image area into which you want to paste the image.
4. Click Edit > Paste or click .
To save the edited image
1. Click Edit > Select All.
2. Click File > Save.
LearningCheck™ Creator 41
Page 48

3. Type in a name for the image file and click OK.
Saving the image in Microsoft® Paint does not change the
image in the image area. You must copy and paste the edited image
into the question, section, or document template.
Sending a LearningCheck Creator item as a Quick
Poll
You can send a LearningCheck Creator question to your class as a Quick
Poll. The TI-Navigator network must be available, and the class must be
started.
1. Open the question you want to send as a Quick Poll.
2. Click
The question is sent to the class as a Quick Poll, and the Quick Poll
tool window opens on your computer.
Send item as Quick Poll.
42 LearningCheck™ Creator
Page 49

3. Click the Poll Summary tab to see student responses.
You can save this poll, and view the results just as you would any
Quick Poll item. For more information about Quick Poll items, see
The Quick Poll tool window and tabs.
LearningCheck™ Creator 43
Page 50

Sending documents to calculators
This section describes basic procedures you will use to send a document
to a calculator. You can send a document to a single device or you can
send a document to all the devices in a classroom network.
• Checking AppVar size
• Sending a document to a calculator
• Sending a document to a classroom network
Previewing a document
You can use the LearningCheck™ Creator preview to see how a question,
section, or document will look on a TI handheld device. The Preview
window display will look and behave like the TI handheld device that you
select.
You should save your document before previewing.
To preview a document
1. To view the entire document, click Tools > Preview > Preview All
or click .
or
To view selected questions or sections, click the questions or sections
and then click Tools > Preview > Preview Selected or click .
The question, section, or document opens in a window similar to the
device screen.
44 LearningCheck™ Creator
Page 51

2. Use the PC keyboard and your mouse to simulate viewing the
document on the device.
• To select from a list or menu, press or to highlight the
option you want, then click ENTER.
• To see the rest of a question or response that is too large for the
screen, press or to scroll through the text.
• To press a soft key (MENU, TAB, NEXT, BACK) press the
corresponding function key (F2, F3, F4, and so on) on your
computer keyboard.
3. When you finish previewing the document you can close the Preview
window, or, if you plan to preview additional documents, minimize
the window.
LearningCheck™ Creator 45
Page 52

Checking AppVar size
You can check the size of the application variable (AppVar) that will be
created from the document before you send it to a TI calculator or
classroom network.
To check AppVar size
1. Click Tools>AppVar Size or click .
2. Click the device name (TI-83 Plus Family, TI-84 Plus Family, TI-89
Family, TI-92 Plus, Voyage™ 200, or All Devices) in the menu.
The AppVar Size box opens showing the AppVar size for the device(s)
you chose.
3. When you finish viewing the information, click Close.
Sending a LearningCheck document to a
calculator
To send the document to a TI calculator (TI-83 Plus/TI-84 Plus Families, TI89 Family, TI-92 Plus, or Voyage™ 200 graphing handheld), you must
have TI Connect™ installed and you must have a TI Connectivity Cable.
To send a document to a calculator
1. Connect one end of the TI Connectivity Cable to the appropriate port
on your computer. (Connect a serial cable to the serial port; connect
a USB cable to the USB port.)
2. Connect the other end of the TI Connectivity Cable to the port on
the device.
3. In LearningCheck™ Creator, open the document that you wish to
send to the device.
4. Click File > Send To > Send to Device or click .
The Send to Device dialog box opens.
46 LearningCheck™ Creator
Page 53

5. Select whether the document should be sent to the RAM or archive
memory of the device, and select the document type.
6. Click Send.
7. The Select TI Device dialog opens, showing a list of the ports and the
devices that are connected.
8. Select the device you want and click OK.
Warning: Do not disconnect a TI Connectivity cable during a
transfer.
Sending a document to a classroom network
To send the document to a classroom network, your computer must be
connected to the classroom network.
To send a document to a classroom network
1. In the LearningCheck™ Creator, open the document that you wish
to send to the class.
2. Click File > Send To > Send to Class or click .
The Send to Class dialog box displays.
LearningCheck™ Creator 47
Page 54

3. Select the document type.
4. Select Randomize Question Order if you want students in the class
to receive the questions in a different order from one another.
5. Click Send.
The file is sent to the class.
Troubleshooting LearningCheck Creator
This section provides problem-solving information for the TI
LearningCheck™ Creator.
• Error messages
• Troubleshooting
• Frequently-asked questions
• System requirements
Error Messages
During the normal operation of the LearningCheck™ Creator software,
you may receive an information or error message. Some of the software
error messages and their possible remedies are given in this section.
Documents and images:
A document must contain at least 1 section. – You tried to delete
the only section in the document.
48 LearningCheck™ Creator
Page 55

Click OK to close the message box. Insert a new section in the
document, then delete the section you wish to remove.
File not found. – LearningCheck™ Creator cannot find the file you
wish to open.
Click OK to close the message box. Make sure the file name is spelled
correctly and that the correct directory is selected.
One or more points are partially or completely outside the
image. – One or more of the points and/or labels on the image cannot
be displayed on the handheld device window.
Click OK to close the message box. Move the points and/or labels
within the image.
There was an Internal Error with Appvar conversion.
LearningCheck Creator was unable to convert the document to an
Appvar. –
Click OK to close the message box. Save the document and exit
LearningCheck™ Creator. Then re-open LCC and try again.
Communication:
There was an error sending to the device. Please ensure a device
is present. – LearningCheck™ Creator cannot communicate with the
device.
Click OK to close the message box. Make sure the device is firmly
connected to the computer and try again.
There was an error sending to the class. – LearningCheck™ Creator
cannot communicate with the classroom network.
Click OK to close the message box. Make sure the network is ready
and re-send the document.
Unable to print report. – LearningCheck™ Creator cannot
communicate with the printer.
Click OK to close the message box. Make sure the printer is ready to
print and try again.
LearningCheck™ Creator 49
Page 56

Cannot send to device because TI Connect™ application is not
installed. Please reinstall TI Connect™. – You selected Send to
Device, but TI Connect™ was not installed or was incorrectly installed.
Click OK to close the message box. Install TI Connect™.
TI-Navigator™ <or TI Connect™> is not properly installed. Please
reinstall the application. – You selected Send to Class, but
TI-Navigator™ (or TI Connect™) was incorrectly installed.
Click OK to close the message box. Reinstall TI-Navigator™ (or TI
Connect™).
Troubleshooting
Problem: I am running Windows
®
95 and the
LearningCheck™ Creator will not launch.
If you are running Windows® 95 with 16 colors, the LearningCheck™
Creator will not launch. You will see an error message "You must be
running in 256 color mode or higher. You can change the color depth
from the Control Panel display icon." To correct the problem:
1. Click Start menu > Settings > Control Panel > Display.
2. On the Settings tab, change to High Color 16 bit or 256 Colors.
3. Click OK.
Problem: I cannot insert a new section in my document
because the Insert Section icon and menu option are
greyed out.
Select either the document or another section by clicking on it, then try
again. The Insert Section option is not available when a question is
selected.
Problem: How can I save my documents to my desktop?
To save a document to your desktop:
1. Click File > Save or click .
The Save As dialog box opens.
2. Click Desktop in the Save As dialog box.
3. Click Save to accept the suggested filename or type in a new
filename and click Save.
50 LearningCheck™ Creator
Page 57

To save all of your documents to your desktop, set your user profile to
show the Desktop as the Working Directory:
4. Open your user profile and go to the General tab.
5. In the Working Directory section, click beside the Document
Directory field.
6. Click Desktop, and then click Select.
All documents created with this profile will be saved as icons on your
desktop.
Frequently-Asked Questions
Q: Is the LearningCheck™ Creator replacing the
StudyCards™ Creator?
A: No. TI will continue to support StudyCards.
Q: Can I convert a StudyCards question set into a
LearningCheck document?
A: You cannot directly convert a StudyCards™ Creator question set into a
LearningCheck™ Creator document, but you can use Copy and Paste to
copy the questions and answers into a LearningCheck™ Creator
document. (See “Cutting, copying, and pasting questions or sections” on
page 29.)
Q: Can I use the same LearningCheck™ Creator document
on more than one handheld device?
A: Yes. A document created in the LearningCheck™ Creator can be made
into an application variable (AppVar) for any of the supported handheld
devices. (See “Sending a LearningCheck Creator item as a Quick Poll” on
page 42.)
Q: How much text can I copy into a Text box?
A: There is a 64K limit on text pasted into the LearningCheck™ Creator.
You should, however, consider the limitations of the device for which you
are writing.
LearningCheck™ Creator 51
Page 58

52 LearningCheck™ Creator
Page 59

Legal Information
This section contains important legal notices about this product. In it, you
can find important information, service and support information, and
the license agreement.
Texas Instruments Support and Service
For general information
Home Page: education.ti.com
KnowledgeBase and
e-mail inquiries:
Phone: (800) TI-CARES / (800) 842-2737
International
information:
education.ti.com/support
For U.S., Canada, Mexico, Puerto Rico, and
Virgin Islands only
education.ti.com/international
For technical support
KnowledgeBase and
support by e-mail:
Phone
(not toll-free):
education.ti.com/support
(972) 917-8324
For TI-Navigator™ technical questions
E-mail: ti-navigator@ti.com
Phone: (866) TI-NAVIGATOR / (866) 846-2844
For product (hardware) service
Customers in the U.S., Canada, Mexico, Puerto Rico and Virgin
Islands: Always contact Texas Instruments Customer Support before
returning a product for service.
All other customers: Refer to the leaflet enclosed with this product
(hardware) or contact your local Texas Instruments retailer/distributor.
Legal Information 56
Page 60

© 2004, 2005 Texas Instruments
TI-Navigator™ 3.x License Agreement
The programs referenced in the TI-Navigator™ 3.x License Agreement are licensed
under the terms contained in such Agreement. Additional licenses and files follow
the TI-Navigator™ 3.x License Agreement.
IMPORTANT - Read this agreement (“Agreement”) carefully before installing the
software program(s) contained on the CD(s). The software program(s) and
materials accompanying this package are licensed, not sold. Additional licenses
apply and are follow this license . By installing or otherwise using the software
program(s) contained on the CD(s ), you agree to be bound by the terms of this
license and all additional license that follow. If you do not agree with the terms of
this license or any of the additional licenses that follow, return this package with all
its contents to the place of purchase for a full refund.
The TI-Navigator™ 3.x license grants set forth below apply to the following TI software
programs
acx_core.o dbus kernel module charger kernel module switch kernel module
led kernel module C/K USB module ?HubMgmt.so
In the event other TI programs are included on the CD(s) and are covered by a separate TI
license, the TI-Navigator™ 3.x License shall take precedence over such other license.
The software program(s) contained on the CD(s) and any related documentation (collectively
referred to as the Program) are licensed, not sold, by Texas Instruments Incorporated (TI)
and/or any applicable licensors (collectively referred to as Licensor). Specific details of the
license granted are set forth below. For purposes of this Agreement, a site (“Site”) consists of
one entire physical campus of an educational institution accredited by an association
recognized by the U.S. Department of Education or the State Board of Education, or by their
equivalents in other countries.
Licensor grants you a non-exclusive, non-transferable license to install and use the Program on
all institution owned, leased or rented computers located at the Site for which the Program is
licensed. You may make one copy of the software for backup and archival purposes. You agree
to reproduce all copyright and proprietary notices shown in the software and on the media.
Except as expressly stated herein or in the documentation, you may not duplicate such
documentation. In cases where TI supplies the related documentation electronically you may
print one copy of such documentation for each computer on which the Program is installed.
Each member of the institution faculty may also use a copy of the Program on an additional
computer for the sole purpose of preparing course materials.
Page 61

84PLSE/IC/1L1/A© 2004, 2005 Texas Instruments
Additional Terms:
WARRANTY DISCLAIMER AND DAMAGES EXCLUSIONS AND
LIMITATIONS
Licensor does not warrant that the Program will be free from errors or will meet your specific
requirements. Any statements made concerning the utility of the Program are not to be
construed as express or implied warranties.
LICENSOR MAKES NO CONDITIONS OR WARRANTIES, EITHER EXPRESS OR
IMPLIED, INCLUDING BUT NOT LIMITED TO ANY IMPLIED CONDITIONS OR
WARRANTIES OF MERCHANTABILITY, FITNESS FOR A PARTICULAR PURPOSE,
OR NON-INFRINGEMENT REGARDING THE PROGRAM AND MAKES THE
PROGRAM AVAILABLE ON AN "AS IS" BASIS.
Although no warranty is given for the Program, the media, if the Program was delivered to you
on a diskette or CD, will be replaced if found to be defective during the first ninety (90) days of
use, when the package is returned postage prepaid to TI. THIS PARAGRAPH EXPRESSES
LICENSOR'S MAXIMUM LIABILITY AND YOUR SOLE AND EXCLUSIVE REMEDY FOR
DEFECTIVE MEDIA.
LICENSOR SHALL NOT BE RESPONSIBLE FOR ANY DAMAGES CAUSED BY THE
USE OF THE PROGRAM, OR SUFFERED OR INCURRED B Y YOU OR ANY OTHER
PARTY INCLUDING BUT NOT LIMITED TO SPECIAL, INDIRECT, INCIDENTAL OR
CONSEQUENTIAL DAMAGES, EVEN IF LICENSOR HAS BEEN ADVISED OF THE
POSSIBILITY OF SUCH DAMAGES. IN JURISDICTIONS WHICH ALLOW TEXAS
INSTRUMENTS TO LIMIT ITS LIABILITY, TI’S LIABILITY IS LIMITED TO THE
APPLICABLE LICENSE FEE PAID BY YOU.
Because some states do not allow the exclusion or limitation of incidental or consequential
damages or limitation on how long an implied warranty lasts, the above limitations or exclusions
may not apply to you.
GENERAL
This Agreement will immediately terminate if you fail to comply with its terms. Upon termination
of this Agreement, you agree to return or destroy the original package and all whole or partial
copies of the Program in your possession and so certify in writing to TI.
The export and re-export of United States original software and documentation is subject to the
Export Administration Act of 1969 as amended. Compliance with such regulations is your
responsibility. You agree that you do not intend to nor will you, directly or indirectly, export, reexport or transmit the Program or technical data to any country to which such export, re-export
or transmission is restricted by any applicable United States regulation or statute, without the
proper written consent or license, if required of the Bureau of Export Administration of the
United States Department of Commerce, or such other governmental entity as may have
jurisdiction over such export, re-export or transmission.
If the Program is provided to the U.S. Government pursuant to a solicitation issued on or after
December 1, 1995, the Program is provided with the commercial license rights and restrictions
described elsewhere herein. If the Program is provided to the U.S. Government pursuant to a
solicitation issued prior to December 1, 1995, the Program is provided with "Restricted Rights"
as provided for in FAR, 48 CFR 52.227-14 (JUNE 1987) or DFAR, 48 CFR 252.227-7013 (OCT
1988), as applicable.
Manufacturer is Texas Instruments Incorporated, 7800 Banner Drive, M/S 3962, Dallas, Texas
75251.
End of TI Proprietary Evaluation Agreeme nt. Additional files and licenses follow
the TI Proprietary Evaluation Agreement
Page 62

© 2004, 2005 Texas Instruments
The following program files are covered by the GPL. Additional files and licenses follow the
GPL.
uboot (bootloader) uboot additions & diagnostics linux kernel
MV Linux kernel additions Red Hat JFFS2 work base-files
base-passwd busybox tinylogin
ifupdown initscripts mtd
netbase resolvconf sysvinit
modutils dhcpcd wireless tools from MV
Page 63

84PLSE/IC/1L1/A© 2004, 2005 Texas Instruments
GPL follows:
GNU GENERAL PUBLIC LICENSE
Version 2, June 1991
Copyright (C) 1989, 1991 Free Software Foundation, Inc., 59 Temple Place, Suite 330, Boston,
MA 02111-1307 USA
Everyone is permitted to copy and distribute verbatim copies of this license document, but
changing it is not allowed.
Preamble
The licenses for most software are designed to take away your freedom to share and change it.
By contrast, the GNU General Public License is intended to guarantee your freedom to share
and change free software--to make sure the software is free for all its users. This General
Public License applies to most of the Free Software Foundation's software and to any other
program whose authors commit to using it. (Some other Free Software Foundation software is
covered by the GNU Library General Public License instead.) You can apply it to your
programs, too.
When we speak of free software, we are referring to freedom, not price. Our General Public
Licenses are designed to make sure that you have the freedom to distribute copies of free
software (and charge for this service if you wish), that you receive source code or can get it if
you want it, that you can change the software or use pieces of it in new free programs; and that
you know you can do these things.
To protect your rights, we need to make restrictions that forbid anyone to deny you these rights
or to ask you to surrender the rights. These restrictions translate to certain responsibilities for
you if you distribute copies of the software, or if you modify it.
For example, if you distribute copies of such a program, whether gratis or for a fee, you must
give the recipients all the rights that you have. You must make sure that they, too, receive or
can get the source code. And you must show them these terms so they know their rights.
We protect your rights with two steps: (1) copyright the software, and (2) offer y ou thi s licen se
which gives you legal permission to copy, distribute and/or modify the software.
Also, for each author's protection and ours, we want to make certain that everyone understands
that there is no warranty for this free software. If the so ftware is modified by someone else and
passed on, we want its recipients to know that what they have is not the original, so that any
problems introduced by others will not reflect on the original authors' reputations.
Finally, any free program is threatened constantly by software patents. We wish to avoid the
danger that redistributors of a free program will individually obtain patent licenses, in effect
making the program proprietary. To prevent this, we have made it clear that any patent must be
licensed for everyone's free use or not licensed at all.
The precise terms and conditions for copying, distribution and modification follow.
Page 64

© 2004, 2005 Texas Instruments
GNU GENERAL PUBLIC LICENSE
TERMS AND CONDITIONS FOR COPYING, DISTRIBUTION AND MODIFICATION
0. This License applies to any program or other work which contains a notice placed by the
copyright holder saying it may be distributed under the terms of this General Public License.
The "Program", below, refers to any such program or work, and a "work based on the Program"
means either the Program or any derivative work under copyright law: that is to say, a work
containing the Program or a portion of it, either verbatim or with modifications and/or translated
into another language. (Hereinafter, translation is included without limitation in the term
"modification".) Each licensee is addressed as "you".
Activities other than copying, distribution and modification are not covered by this License; they
are outside its scope. The act of running the Program is not restricted, and the output from the
Program is covered only if its contents constitute a work based on the Program (independent of
having been made by running the Program). Whether that is true depends on what the Program
does.
1. You may copy and distribute verbatim copies of the Program's source code as you receive it,
in any medium, provided that you conspicuously and appropriately publish on each copy an
appropriate copyright notice and disclaimer of warranty; keep intact all the notices that refer to
this License and to the absence of any warranty; and give any other recipients of the Program a
copy of this License along with the Program.
You may charge a fee for the physical act of transferring a copy, and you may at your option
offer warranty protection in exchange for a fee.
2. You may modify your copy or copies of the Program or any portion of it, thus forming a work
based on the Program, and copy and distribute such modifications or work under the terms of
Section 1 above, provided that you also meet all of these conditions:
a) You must cause the modified files to carry prominent notices stating that you changed the
files and the date of any change.
b) You must cause any work that you distribute or publish, that in whole or in part contains or
is derived from the Program or any part thereof, to be licensed as a whole at no charge to all
third parties under the terms of this License.
c) If the modified program normally reads commands interactively when run, you must cause
it, when started running for such interactive use in the most ordinary way, to print or display an
announcement including an appropriate copyright notice and a notice that there is no warranty
(or else, saying that you provide a warranty) and that users may redistribute the program under
these conditions, and telling the user how to view a copy of this License. (Exception: if the
Program itself is interactive but does not normally print such an announcement, your work
based on the Program is not required to print an announcement.)
These requirements apply to the modified work as a whole. If identifiable sections of that work
are not derived from the Program, and can be reasonably considered independent and separate
works in themselves, then this License, and its terms, do not apply to those sections when you
distribute them as separate works. But when you distribute the same sections as part of a
whole which is a work based on the Program, the distribution of the whole must be on the terms
of this License, whose permissions for other licensees extend to the entire whole, and thus to
each and every part regardless of who wrote it.
Thus, it is not the intent of this section to claim rights or contest your rights to work written
entirely by you; rather, the intent is to exercise the right to control the distribution of derivative or
collective works based on the Program.
In addition, mere aggregation of another work not based on the Program with the Program (or
with a work based on the Program) on a volume of a storage or distribution medium does not
bring the other work under the scope of this License.
3. You may copy and distribute the Program (or a work based on it, under Section 2) in object
code or executable form under the terms of Sections 1 and 2 above provided that you also do
one of the following:
Page 65

84PLSE/IC/1L1/A© 2004, 2005 Texas Instruments
a) Accompany it with the complete corresponding machine-readable source code, which
must be distributed under the terms of Sections 1 and 2 above on a medium customarily used
for software interchange; or,
b) Accompany it with a written offer, valid for at least three years, to give any third party, for a
charge no more than your cost of physically performing source distribution, a complete
machine-readable copy of the corresponding source code, to be distributed under the terms of
Sections 1 and 2 above on a medium customarily used for software interchange; or,
c) Accompany it with the information you received as to the offer to distribute corresponding
source code. (This alternative is allowed only for noncommercial distribution and only if you
received the program in object code or executable form with such an offer, in accord with
Subsection b above.)
The source code for a work means the preferred form of the work for making modifications to it.
For an executable work, complete source code mean s all the source code for all modules it
contains, plus any associated interface definition file s, plus the scripts used to control
compilation and installation of the executable. However, as a special exceptio n, the source
code distributed need not include anything that is normally distributed (in either source or binary
form) with the major components (compiler, kernel, and so on) of the operating system on which
the executable runs, unless that component itself accompanies the executable.
If distribution of executable or object code is made by offering access to copy from a designated
place, then offering equivalent access to copy the source code from the same place counts as
distribution of the source code, even though third parties are not compelled to copy the source
along with the object code.
4. You may not copy, modify, sublicense, or distribute the Program except as expressly
provided under this License. Any attempt otherwise to copy, modify, sublicense or distribute the
Program is void, and will automatically terminate your rights under this License. However,
parties who have received copies, or rights, from you under this License will not have their
licenses terminated so long as such parties remain in full compliance.
5. You are not required to accept this License, since you have not signed it. However, nothing
else grants you permission to modify or distribute the Prog ram or its derivative works. These
actions are prohibited by law if you do not accept this License. Therefore, by modifying or
distributing the Program (or any work based on the Program), you indicate your acceptance of
this License to do so, and all its terms and conditions for copying, distributing or modifying the
Program or works based on it.
6. Each time you redistribute the Program (or any work based on the Program), the recipient
automatically receives a license from the original licensor to copy, distribute or modify the
Program subject to these terms and conditions. You may not impose any further restrictions on
the recipients' exercise of the rights granted herein. You are not responsible for enforcing
compliance by third parties to this License.
7. If, as a consequence of a court judgment or allegation of patent infringement or for any other
reason (not limited to patent issues), conditions are imposed on you (whether by court order,
agreement or otherwise) that contradict the conditions of this License, they do not excuse you
from the conditions of this License. If you cannot distribute so as to satisfy simultaneously your
obligations under this License and any other pertinent obligations, then as a consequence you
may not distribute the Program at all. For example, if a patent license would not permit royaltyfree redistribution of the Program by all those who receive copies directly or indirectly through
you, then the only way you could satisfy both it and this License would be to refrain entirely from
distribution of the Program.
If any portion of this section is held invalid or unenforceable under any particular circumstance,
the balance of the section is intended to apply and the section as a whole is intended to apply in
other circumstances.
It is not the purpose of this section to induce you to infringe any patents or other property right
claims or to contest validity of any such claims; this section has the sole purpose of protecting
the integrity of the free software distribution system, which is implemented by public license
practices. Many people have made generous contributions to the wide range of software
distributed through that system in reliance on consistent applica tion of that system; it is up to the
Page 66

© 2004, 2005 Texas Instruments
author/donor to decide if he or she is willing to distribute software through any other system and
a licensee cannot impose that choice.
This section is intended to make thoroughly clear what is believed to be a consequence of the
rest of this License.
8. If the distribution and/or use of the Program is restricted in certain countries either by patents
or by copyrighted interfaces, the original copyright holder who places the Program under this
License may add an explicit geographical distribution limitation excluding those countries, so
that distribution is permitted only in or among countries not thus excluded. In such case, this
License incorporates the limitation as if written in the body of this License.
9. The Free Software Foundation may publish revised and/or new versions of the General
Public License from time to time. Such new versions will be similar in spirit to the present
version, but may differ in detail to address new problems or concerns.
Each version is given a distinguishing version number. If the Program specifies a version
number of this License which applies to it and "any later version", you have the option of
following the terms and conditions either of that version or of any later version published by the
Free Software Foundation. If the Program does not specify a version number of this License,
you may choose any version ever published by the Free Software Foundation.
10. If you wish to incorporate parts of the Program into other free programs whose distribution
conditions are different, write to the author to ask for permission. For software which is
copyrighted by the Free Software Foundation, write to the Free Software Foundation; we
sometimes make exceptions for this. Our decision will be guided by the two goals of preserving
the free status of all derivatives of our free software and of promoting the sharing and reuse of
software generally.
NO WARRANTY
11. BECAUSE THE PROGRAM IS LICENSED FREE OF CHARGE, THERE IS NO
WARRANTY FOR THE PROGRAM, TO THE EXTENT PERMITTED BY APPLICABLE LAW.
EXCEPT WHEN OTHERWISE STATED IN WRITING THE COPYRIGHT HOLDERS AND/OR
OTHER PARTIES PROVIDE THE PROGRAM "AS IS" WITHOUT WARRANTY OF ANY KIND,
EITHER EXPRESSED OR IMPLIED, INCLUDING, BUT NOT LIMITED TO, THE IMPLIED
WARRANTIES OF MERCHANTABILITY AND FITNESS FOR A PARTICULAR PURPOSE.
THE ENTIRE RISK AS TO THE QUALITY AND PERFORMANCE OF THE PROGRAM IS WITH
YOU. SHOULD THE PROGRAM PROVE DEFECTIVE, YOU ASSUME THE COST OF ALL
NECESSARY SERVICING, REPAIR OR CORRECTION.
12. IN NO EVENT UNLESS REQUIRED BY APPLICABLE LAW OR AGREED TO IN WRITING
WILL ANY COPYRIGHT HOLDER, OR ANY OTHER PARTY WHO MAY MODIFY AND/OR
REDISTRIBUTE THE PROGRAM AS PERMITTED ABOVE, BE LIABLE TO YOU FOR
DAMAGES, INCLUDING ANY GENERAL, SPECIAL, INCIDENTAL OR CONSEQUENTIAL
DAMAGES ARISING OUT OF THE USE OR INABILITY TO USE THE PROGRAM
(INCLUDING BUT NOT LIMITED TO LOSS OF DATA OR DATA BEING RENDERED
INACCURATE OR LOSSES SUSTAINED BY YOU OR THIRD PARTIES OR A FAILURE OF
THE PROGRAM TO OPERATE WITH ANY OTHER PROGRAMS), EVEN IF SUCH HOLDER
OR OTHER PARTY HAS BEEN ADVISED OF THE POSSIBILITY OF SUCH DAMAGES.
END OF TERMS AND CONDITIONS
How to Apply These Terms to Your New Programs
If you develop a new program, and you want it to be of the greatest possible use to the public,
the best way to achieve this is to make it free software which everyone can redistribute and
change under these terms.
To do so, attach the following notices to the program. It is safest to attach them to the start of
each source file to most effectively convey the exclusion of warranty; and each file should have
at least the "copyright" line and a pointer to where the full notice is found.
Page 67

84PLSE/IC/1L1/A© 2004, 2005 Texas Instruments
<one line to give the program's name and a brief idea of what it does.> Copyright (C) <year>
<name of author>
This program is free software; you can redistribute it and/or modify it under the terms of the
GNU General Public License as published by the Free Software Foundation; either version 2 of
the License, or (at your option) any later version.
This program is distributed in the hope that it will be useful, but WITHOUT ANY WARRANTY;
without even the implied warranty of MERCHANTABILITY or FITNESS FOR A PARTICULAR
PURPOSE. See the GNU General Public License for more details.
You should have received a copy of the GNU General Public License along with this program; if
not, write to the Free Software Foundation, Inc., 59 Temple Place, Suite 330, Boston, MA
02111-1307 USA
Also add information on how to contact you by electronic and paper mail.
If the program is interactive, make it output a short notice like this when it starts in an interactive
mode:
Gnomovision version 69, Copyright (C) year name of author Gnomovision comes with
ABSOLUTELY NO WARRANTY; for details type `show w'. This is free software, and you are
welcome to redistribute it under certain conditions; type `show c' for details.
The hypothetical commands `show w' and `show c' should show the appropriate parts of the
General Public License. Of course, the commands you use may be called something other than
`show w' and `show c'; they could even be mouse-clicks or menu items--whatever suits your
program.
You should also get your employer (if you work as a programmer) or your school, if any, to sign
a "copyright disclaimer" for the program, if necessary. Here is a sample; alter the names:
Yoyodyne, Inc., hereby disclaims all copyright interest in the program `Gnomovision' (which
makes passes at compilers) written by James Hacker.
<signature of Ty Coon>, 1 April 1989 Ty Coon, President of Vice
This General Public License does not permit incorporating your program into proprietary
programs. If your program is a subroutine library, you may consider it more useful to permit
linking proprietary applications with the library. If this is what you want to do, use the GNU
Library General Public License instead of this License.
End of GPL
The following program files are covered by the LGPL. Additional files and licenses follow the
LGPL.
glibc cajo.jar
LGPL follows:
Version 2.1, February 1999
Copyright (C) 1991, 1999 Free Software Foundation, Inc. 59 Temple Place, Suite 330, Boston,
MA 02111-1307 USA
Everyone is permitted to copy and distribute verbatim copies of this license document, but
changing it is not allowed.
[This is the first released version of the Lesser GPL. It also counts as the successor of the GNU
Library Public License, version 2, hence
the version number 2.1.]
Preamble
The licenses for most software are designed to take away your freedom to share and change it.
By contrast, the GNU General Public Licenses are intended to guarantee your freedom to share
and change free software--to make sure the software is free for all its users.
This license, the Lesser General Public License, applies to some specially designated software
packages--typically libraries--of the Free Software Foundation and other authors who decide to
Page 68

© 2004, 2005 Texas Instruments
use it. You can use it too, but we suggest you first think carefully about whether this license or
the ordinary General Public License is the better strategy to use in any particular case, based
on the explanations below.
When we speak of free software, we are referring to freedom of use, not price. Our General
Public Licenses are designed to make sure that you have the freedom to distribute copies of
free software (and charge for this service if you wish); that you receive source code or can get it
if you want it; that you can change the software and use pieces of it in new free programs; and
that you are informed that you can do these things.
To protect your rights, we need to make restrictions that forbid distributors to deny you these
rights or to ask you to surrender these rights. These restrictions translate to certain
responsibilities for you if you distribute copies of the library or if you modify it.
For example, if you distribute copies of the library, whether gratis or for a fee, you must give the
recipients all the rights that we gave you. You must make sure that they, too, receive or can get
the source code. If you link other code with the library, you must provide complete object files to
the recipients, so that they can relink them with the library after making changes to the library
and recompiling it. And you must show them these terms so they know their rights.
We protect your rights with a two-step method: (1) we copyright the library, and (2) we offer you
this license, which gives you legal permission to copy, distribute and/or modify the library.
To protect each distributor, we want to make it very clear that there is no warranty for the free
library. Also, if the library is modified by someone else and passed on, the recipients should
know that what they have is not the original version, so that the original author's reputation will
not be affected by problems that might be introduced by others.
Finally, software patents pose a constant threat to the existence of any free program. We wish
to make sure that a company cannot effectively restrict the users of a free program by obtaining
a restrictive license from a patent holder. Therefore, we insist that any patent license obtained
for a version of the library must be consistent with the full freedom of use specified in this
license.
Most GNU software, including some libraries, is covered by the ordinary GNU General Public
License. This license, the GNU Lesser General Public License, applies to certain designated
libraries, and is quite different from the ordinary General Public License. We use this license for
certain libraries in order to permit linking those libraries into non-free programs.
When a program is linked with a library, whether statically or using a shared library, the
combination of the two is legally speaking a combined work, a derivative of the original library.
The ordinary General Public License therefore permits such linking only if the entire combination
fits its criteria of freedom. The Lesser General Public License permits more lax criteria for linking
other code with the library.
We call this license the "Lesser" General Public License because it does Less to protect the
user's freedom than the ordinary General Public License. It also provides other free software
developers Less of an advantage over competing non-free programs. These disadvantages are
the reason we use the ordinary General Public License for many libraries. However, the Lesser
license provides advantages in certain special circumstan ces.
For example, on rare occasions, there may be a special need to encourage the widest possible
use of a certain library, so that it becomes a de-facto standard. To achieve this, non-free
programs must be allowed to use the library. A more frequent case is that a free library does the
same job as widely used non-free libraries. In this case, there is little to gain by limiting the free
library to free software only, so we use the Lesser General Public License.
In other cases, permission to use a particular library in non-free programs enables a greater
number of people to use a large body of free software. For example, permission to use the GNU
C Library in non-free programs enables many more people to use the whole GNU operating
system, as well as its variant, the GNU/Linux operating system.
Although the Lesser General Public License is Less protective of the users' freedom, it does
ensure that the user of a program that is linked with the Library has the freedom and the
wherewithal to run that program using a modified version of the Library.
Page 69

84PLSE/IC/1L1/A© 2004, 2005 Texas Instruments
The precise terms and conditions for copying, distribution and modification follow. Pay close
attention to the difference between a "work based on the library" and a "work that uses the
library". The former contains code derived from the library, whereas the latter must be combined
with the library in order to run.
TERMS AND CONDITIONS FOR COPYING, DISTRIBUTION AND MODIFICATION
0. This License Agreement applies to any software library or other program which contains a
notice placed by the copyright holder or other authorized party saying it may be distributed
under the terms of this Lesser General Public License (also called "this License"). Each licensee
is addressed as "you".
A "library" means a collection of software functions and/or data prepared so as to be
conveniently linked with application programs (which use some of those functions and data) to
form executables.
The "Library", below, refers to any such software library or work which has been distributed
under these terms. A "work based on the Library" means either the Library or any derivative
work under copyright law: that is to say, a work containing the Library or a portion of it, either
verbatim or with modifications and/or translated straightforwardly into another language.
(Hereinafter, translation is included without limitation in the term "modifi cation".)
"Source code" for a work means the preferred form of the work for making modifications to it.
For a library, complete source code means all the source code for all modules it contains, plus
any associated interface definition files, plus the scripts used to control compilation and
installation of the library.
Activities other than copying, distribution and modification are not covered by this License; they
are outside its scope. The act of running a program using the Library is not restricted, and
output from such a program is covered only if its contents constitute a work based on the Library
(independent of the use of the Library in a tool for writing it). Whether that is true depends on
what the Library does and what the program that uses the Library does.
1. You may copy and distribute verbatim copies of the Library's complete source code as you
receive it, in any medium, provided that you conspicuously and appropriately publish on each
copy an appropriate copyright notice and disclaimer of warranty; keep intact all the notices that
refer to this License and to the absence of any warranty; and distribute a copy of this License
along with the Library.
You may charge a fee for the physical act of transferring a copy, and you may at your option
offer warranty protection in exchange for a fee.
2. You may modify your copy or copies of the Library or any portion of it, thus forming a work
based on the Library, and copy and distribute such modifications or work under the terms of
Section 1 above, provided that you also meet all of these conditions:
a) The modified work must itself be a software library.
b) You must cause the files modified to carry prominent notices stating that you changed the
files and the date of any change.
c) You must cause the whole of the work to be licensed at no charge to all third parties under
the terms of this License.
d) If a facility in the modified Library refers to a function or a table of data to be supplied by an
application program that uses the facility, other than as an argument passed when the facility is
invoked, then you must make a good faith effort to ensure that, in the event an application does
not supply such function or table, the facility still operates, and performs whatever part of its
purpose remains meaningful.
(For example, a function in a library to compute square roots has a purpose that is entirely welldefined independent of the application. Therefore, Subsection 2d requires that any applicationsupplied function or table used by this function must be optional: if the application does not
supply it, the square root function must still compute square roots.)
These requirements apply to the modified work as a whole. If identifiable sections of that wo rk
are not derived from the Library, and can be reasonably considered independent and separate
works in themselves, then this License, and its terms, do not apply to those sections when you
Page 70

© 2004, 2005 Texas Instruments
distribute them as separate works. But when you distribute the same sections as part of a whole
which is a work based on the Library, the distribution of the whole must be on the terms of this
License, whose permissions for other licensees extend to the entire whole, and thus to each
and every part regardless of who wrote it.
Thus, it is not the intent of this section to claim rights or contest your rights to work written
entirely by you; rather, the intent is to exercise the right to control the distribution of derivative or
collective works based on the Library.
In addition, mere aggregation of another work not based on the Library with the Library (or with
a work based on the Library) on a volume of a storage or distribution medium does not bring the
other work under the scope of this License.
3. You may opt to apply the terms of the ordinary GNU General Public License instead of this
License to a given copy of the Library. To do this, you must alter all the notices that refer to this
License, so that they refer to the ordinary GNU General Public License, version 2, instead of to
this License. (If a newer version than version 2 of the ordinary GNU General Public License has
appeared, then you can specify that version instead if you wish.) Do not make any other change
in these notices.
Once this change is made in a given copy, it is irreversible for that copy, so the ordinary GNU
General Public License applies to all subsequent copies and derivative works made from that
copy.
This option is useful when you wish to copy part of the code of the Library into a program that is
not a library.
4. You may copy and distribute the Library (or a portion or derivative of it, under Section 2) in
object code or executable form under the terms of Sections 1 and 2 above provided that you
accompany it with the complete corresponding machine-readable source code, which must be
distributed under the terms of Sections 1 and 2 above on a medium customarily used for
software interchange.
If distribution of object code is made by offering access to copy from a designated place, then
offering equivalent access to copy the source code from the same place satisfies the
requirement to distribute the source code, even though third parties are not compelled to copy
the source along with the object code.
5. A program that contains no derivative of any portion of the Library, but is designed to work
with the Library by being compiled or linked with it, is called a "work that uses the Library". Such
a work, in isolation, is not a derivative work of the Library, and therefore falls outside the scope
of this Lice nse.
However, linking a "work that uses the Library" with the Library creates an executable that is a
derivative of the Library (because it contains portions of the Library), rather than a "work that
uses the library". The executable is therefore covered by this License. Section 6 states terms for
distribution of such executables.
When a "work that uses the Library" uses material from a header file that is part of the Library,
the object code for the work may be a derivative work of the Library even though the source
code is not. Whether this is true is especially significant if the work can be linked without the
Library, or if the work is itself a library. The threshold for this to be true is not precisely defined
by law.
If such an object file uses only numerical parameters, data structure layouts and accessors, and
small macros and small inline functions (ten lines or less in length), then the use of the object
file is unrestricted, regardless of whether it is legally a derivative work. (Executables containing
this object code plus portions of the Library will still fall under Section 6.)
Otherwise, if the work is a derivative of the Library, you may distribute the object code for the
work under the terms of Section 6. Any executables containing that work also fall under Section
6, whether or not they are linked directly with the Library itself.
6. As an exception to the Sections above, you may also combine or link a "work that uses the
Library" with the Library to produce a work containing portions of the Library, and distribute that
work under terms of your choice, provided that the terms permit modification of the work for the
customer's own use and reverse engineering for debugging such modifications.
Page 71

84PLSE/IC/1L1/A© 2004, 2005 Texas Instruments
You must give prominent notice with each copy of the work that the Library is used in it and that
the Library and its use are covered by this License. You must supply a copy of this License. If
the work during execution displays copyright notices, you must include the copyright notice for
the Library among them, as well as a reference directing the user to the copy of this License.
Also, you must do one of these things:
a) Accompany the work with the complete corresponding machine-re adable source code for the
Library including whatever changes were used in the work (which must be distributed under
Sections 1 and 2 above); and, if the work is an executable linked with the Library, with the
complete machine-readable "work that uses the Library", as object code and/or source code, so
that the user can modify the Library and then relink to produce a modified executable containing
the modified Library. (It is understood that the user who changes the contents of definitions files
in the Library will not necessarily be able to recompile the application to use the modified
definitions.)
b) Use a suitable shared library mechanism for linking with the Library. A suitable mechanism is
one that (1) uses at run time a copy of the library already present on the user's computer
system, rather than copying library functions into the executable, and (2) will operate properly
with a modified version of the library, if the user installs one, as long as the modified version is
interface-compatible with the version that the work was made with.
c) Accompany the work with a written offer, valid for at least three years, to give the same user
the materials specified in Subsection 6a, above, for a charge no more than the cost of
performing this distribution.
d) If distribution of the work is made by offering access to copy from a designated place, offer
equivalent access to copy the above specified materials from the same place.
e) Verify that the user has already received a copy of these materials or that you have already
sent this user a copy.
For an executable, the required form of the "work that uses the Library" must include any data
and utility programs needed for reproducing the executable from it. However, as a special
exception, the materials to be distributed need not include anything that is normally distributed
(in either source or binary form) with the major components (compiler, kernel, and so on) of the
operating system on which the executable runs, unless that component itself accompanies the
executable.
It may happen that this requirement contradicts the license restrictions of other proprietary
libraries that do not normally accompany the operating system. Such a contradiction means you
cannot use both them and the Library together in an executable that you distribute.
7. You may place library facilities that are a work based on the Library side-by-side in a single
library together with other library facilities not covered by this License, and distribute such a
combined library, provided that the separate distribution of the work based on the Library and of
the other library facilities is otherwise permitted, and provided that you do these two things:
a) Accompany the combined library with a copy of the same work based on the Library,
uncombined with any other library facilities. This must be distributed under the terms of the
Sections above.
b) Give prominent notice with the combined library of the fact that part of it is a work based on
the Library, and explaining where to find the accompanying uncombined form of the same work.
8. You may not copy, modify, sublicense, link with, or distribute the Library except as expressly
provided under this License. Any attempt otherwise to copy, modify, sublicense, link with, or
distribute the Library is void, and will automatically terminate your rights under this License.
However, parties who have received copies, or rights, from you under this License will not have
their licenses terminated so long as such parties remain in full compliance.
9. You are not required to accept this License, since you have not signed it. However, nothing
else grants you permission to modify or distribute the Library or its derivative works. These
actions are prohibited by law if you do not accept this License. Therefore, by modifying or
distributing the Library (or any work based on the Library), you indicate your acceptance of this
License to do so, and all its terms and conditions for copying, distributing or modifying the
Library or works based on it.
Page 72

© 2004, 2005 Texas Instruments
10. Each time you redistribute the Library (or any work based on the Library), the recipient
automatically receives a license from the original licensor to copy, distribute, link with or modify
the Library subject to these terms and conditions. You may not impose any further restrictions
on the recipients' exercise of the rights granted herein. You are not responsible for enforcing
compliance by third parties with this License.
11. If, as a consequence of a court judgment or allegation of patent infringement or for any other
reason (not limited to patent issues), conditions are imposed on you (whether by court order,
agreement or otherwise) that contradict the conditions of this License, they do not excuse you
from the conditions of this License. If you cannot distribute so as to satisfy simultaneously your
obligations under this License and any other pertinent obligations, then as a consequence you
may not distribute the Library at all. For example, if a patent license would not permit royaltyfree redistribution of the Library by all those who receive copies directly or indirectly through
you, then the only way you could satisfy both it and this License would be to refrain entirely from
distribution of the Library.
If any portion of this section is held invalid or unenforceable under any particular circumstance,
the balance of the section is intended to apply, and the section as a whole is intended to apply
in other circumstances.
It is not the purpose of this section to induce you to infringe any patents or other property right
claims or to contest validity of any such claims; this section has the sole purpose of protecting
the integrity of the free software distribution system which is implemented by public license
practices. Many people have made generous contributions to the wide range of software
distributed through that system in reliance on consistent applica tion of that system; it is up to the
author/donor to decide if he or she is willing to distribute software through any other system and
a licensee cannot impose that choice.
This section is intended to make thoroughly clear what is believed to be a consequence of the
rest of this License.
12. If the distribution and/or use of the Library is restricted in certain countries either by patents
or by copyrighted interfaces, the original copyright holder who places the Library under this
License may add an explicit geographical distribution limitation excluding those countries, so
that distribution is permitted only in or among countries not thus excluded. In such case, this
License incorporates the limitation as if written in the body of this License.
13. The Free Software Foundation may publish revised and/or new versions of the Lesser
General Public License from time to time. Such new versions will be similar in spirit to the
present version, but may differ in detail to address new problems or concerns.
Each version is given a distinguishing version number. If the Library specifies a version number
of this License which applies to it and "any later version", you have the option of following the
terms and conditions either of that version or of any later version published by the Free
Software Foundation. If the Library does not specify a license version number, you may choose
any version ever published by the Free Software Foundation.
14. If you wish to incorporate parts of the Library into other free programs whose distribution
conditions are incompatible with these, write to the author to ask for permission. For software
which is copyrighted by the Free Software Foundation, write to the Free Software Foundation;
we sometimes make exceptions for this. Our decision will be guided by the two goals of
preserving the free status of all derivatives of our free software and of promoting the sharing
and reuse of software generally.
NO WARRANTY
15. BECAUSE THE LIBRARY IS LICENSED FREE OF CHARGE, THERE IS NO WARRANTY
FOR THE LIBRARY, TO THE EXTENT PERMITTED BY APPLICABLE LAW. EXCEPT WHEN
OTHERWISE STATED IN WRITING THE COPYRIGHT HOLDERS AND/OR OTHER PARTIES
PROVIDE THE LIBRARY "AS IS" WITHOUT WARRANTY OF ANY KIND, EITHER
EXPRESSED OR IMPLIED, INCLUDING, BUT NOT LIMITED TO, THE IMPLIED
WARRANTIES OF MERCHANTABILITY AND FITNESS FOR A PARTICULAR PURPOSE. THE
ENTIRE RISK AS TO THE QUALITY AND PERFORMANCE OF THE LIBRARY IS WITH YOU.
SHOULD THE LIBRARY PROVE DEFECTIVE, YOU ASSUME THE COST OF ALL
NECESSARY SERVICING, REPAIR OR CORRECTION.
Page 73

84PLSE/IC/1L1/A© 2004, 2005 Texas Instruments
16. IN NO EVENT UNLESS REQUIRED BY APPLICABLE LAW OR AGREED TO IN WRITING
WILL ANY COPYRIGHT HOLDER, OR ANY OTHER PARTY WHO MAY MODIFY AND/OR
REDISTRIBUTE THE LIBRARY AS PERMITTED ABOVE, BE LIABLE TO YOU FOR
DAMAGES, INCLUDING ANY GENERAL, SPECIAL, INCIDENTAL OR CONSEQUENTIAL
DAMAGES ARISING OUT OF THE USE OR INABILITY TO USE THE LIBRARY (INCLUDING
BUT NOT LIMITED TO LOSS OF DATA OR DATA BEING RENDERED INACCURATE OR
LOSSES SUSTAINED BY YOU OR THIRD PARTIES OR A FAILURE OF THE LIBRARY TO
OPERATE WITH ANY OTHER SOFTWARE), EVEN IF SUCH HOLDER OR OTHER PARTY
HAS BEEN ADVISED OF THE POSSIBILITY OF SUCH DAMAGES.
END OF TERMS AND CONDITIONS
How to Apply These Terms to Your New Libraries
If you develop a new library, and you want it to be of the greatest possible use to the public, we
recommend making it free software that everyone can redistribute and change. You can do so
by permitting redistribution under these terms (or, alternatively, under the terms of the ordinary
General Public License).
To apply these terms, attach the following notices to the library. It is safest to attach them to the
start of each source file to most effectively convey the exclusion of warranty; and each file
should have at least the "copyright" line and a pointer to where the full notice is found.
one line to give the library's name and an idea of what it does.
Copyright (C) year name of author
This library is free software; you can redistribute it and/or modify it under the terms of the GNU
Lesser General Public License as published by the Free Software Foundation; either version 2.1
of the License, or (at your option) any later version.
This library is distributed in the hope that it will be useful, but WITHOUT ANY WARRANTY;
without even the implied warranty of MERCHANTABILITY or FITNESS FOR A PARTICULAR
PURPOSE. See the GNU Lesser General Public License for more details.
You should have received a copy of the GNU Lesser General Public License along with this
library; if not, write to the Free Software Foundation, Inc., 59 Temple Place, Suite 330, Boston,
MA 02111-1307 USA
Also add information on how to contact you by electronic and paper mail.
You should also get your employer (if you work as a programmer) or your school, if any, to sign
a "copyright disclaimer" for the library, if necessary. Here is a sample; alter the names:
Yoyodyne, Inc., hereby disclaims all copyright interest in the library `Frob' (a library for tweaking
knobs) written by James Random Hacker.
signature of Ty Coon, 1 April 1990
Ty Coon, President of Vice
That's all there is to it!
FSF & GNU inquiries & questions to gnu@gnu.org. Other ways to contact the FSF.
Copyright notice above.
Free Software Foundation, Inc., 59 Temple Place - Suite 330, Boston, MA 02111, USA
Updated: 27 Nov 2000 paulv
End of LGPL
Page 74

© 2004, 2005 Texas Instruments
The following program files are covered by the JPython Software License.
JPython
JPython Software License follows:
Copyright (c) 2000, Jython Developers
All rights reserved.
Redistribution and use in source and binary forms, with or without modification, are permitted
provided that the following conditions are met:
- Redistributions of source code must retain the above copyright notice, this list of conditions
and the following disclaimer.
- Redistributions in binary form must reproduce the above copyright notice, this list of conditions
and the following disclaimer in the documentation and/or other materials provided with the
distribution.
- Neither the name of the Jython Developers nor the names of its contributors may be used to
endorse or promote products derived from this software without specific prior written
permission.
THIS SOFTWARE IS PROVIDED BY THE COPYRIGHT HOLDERS AND CONTRIBUTORS
``AS IS'' AND ANY EXPRESS OR IMPLIED WARRANTIES, INCLUDING, BUT NOT
LIMITED TO, THE IMPLIED WARRANTIES OF MERCHANTABILITY AND FITNESS FOR
A PARTICULAR PURPOSE ARE DISCLAIMED. IN NO EVENT SHALL THE REGENTS OR
CONTRIBUTORS BE LIABLE FOR ANY DIRECT, INDIRECT, I NCI DENTAL, SPECIAL,
EXEMPLARY, OR CONSEQUENTIAL DAMAGES (INCLUDING, BUT NOT LIMITED TO,
PROCUREMENT OF SUBSTITUTE GOODS OR SERVICES; LOSS OF USE, DATA, OR
PROFITS; OR BUSINESS INTERRUPTION) HOWEVER CAUSED AND ON ANY THEORY
OF LIABILITY, WHETHER IN CONTRACT, STRICT LIABILITY, OR TORT (INCLUDING
NEGLIGENCE OR OTHERWISE) ARISING IN ANY WAY OUT OF THE USE OF THIS
SOFTWARE, EVEN IF ADVISED OF THE POSSIBILITY OF SUCH DAMAGE.
End of JPython Software License.
Page 75

TI LearningCheck 3.x License Agreement
By downloading/installing this software and/or documentation, you agree to abide by the
following provisions.
1 License: Subject to your payment of any applicable license fee, Texas Instruments Incorporated ("TI") grants you a license to copy
and use the software program(s) and documentation from the linked web page or CD ROM ("Licensed Materials"). In addition to the
copy resident on your computer, you may keep a copy on diskette or CD for backup / archive purposes.
2 Restrictions: You may not reverse-assemble or reverse-compile the software program portion of the Licensed Materials that are
provided in object code format. You may not sell, rent, or lease copies of the Licensed Materials.
3 Support: Support for the Licensed Materials is described in the documentation that accompanies the software. Abse nt such
documentation, support shall be provided by TI.
4 Copyright: The Licensed Materials and any accompanying documentation are copyrighted. If you make copies, do not delete the
copyright notice, trademark, or protective notices from the copies.
5 Warranty: TI warrants that it has the right to provide the Licensed Materials. TI does not warrant that the Licensed Materials will be
free from errors or will meet your specific requirements. The Licensed Materials are made available "AS IS" to you or any
subsequent user.
Although no warranty is given for the Licensed Material, the media (if any) will be replaced if found to be defective during the first
three (3) months of use, when the package is returned postage prepaid to TI. THIS PARAGRAPH EXPRESSES TI'S MAXIMUM
LIABILITY AND YOUR SOLE AND EXCLUSIVE REMEDY.
6 Limitations: Except as explicitly stated above, TI makes no warranty or condition, either express or implied, including but not
limited to any implied warranties of merchantability and fitness for a particular purpose, regarding the Licensed Materials.
In no event shall TI or its suppliers be liable for any indirect, incidental or consequential damages, loss of profits, loss of
use or data, or interruption of business, whether the alleged damages are labeled in tort, contract or indemnity.
Some states or jurisdictions do not allow the exclusion or limitation of incidental or consequential damages, so the above
limitation may not apply.
7 Additional terms: This Agreement will immediately terminate if you fail to comply with its terms. Upon termination of this Agreement,
you agree to return or destroy the original package and all whole or partial copies of the Program in your possession and so certify in
writing to TI.
The export and re-export of United States original software and documentation is subject to the Export Administration Act of 1969 as
amended. Compliance with such regulations is your responsibility. You agree that you do not intend to nor will you, directly or
indirectly, export, re-export or transmit the Program or technical data to any country to which such export, re-export or transmission is
restricted by any applicable United States regulation or statute, without the proper written consent or license, if required of the Bureau
of Export Administration of the United States Department of Commerce, or such other governmental entity as may have jurisdiction
over such export, re-export or transmission.
If the Program is provided to the U.S. Government pursuant to a solicitation issued on or after December 1, 1995, the Program is
provided with the commercial license rights and restrictions described elsewhere herein. If the Program is provided to the U.S.
Government pursuant to a solicitation issued prior to December 1, 1995, the Program is provided with "Restricted Rights" as provided
for in FAR, 48 CFR 52.227-14 (JUNE 1987) or DFAR, 48 CFR 252.227-7013 (OCT 1988), as applicable.
The following program files are covered by the MOZILLA PUBLIC LICENSE. Additional files and licenses follow the MOZILLA PUBLIC
LICENSE.
Fileblob.java
MOZILLA PUBLIC LICENSE follows:
MOZILLA PUBLIC LICENSE
Version 1.1
---------------
1. Definitions.
1.0.1. "Commercial Use" means distribution or otherwise making the Covered Code available to a third party.
1.1. "Contributor" means each entity that creates or contributes to the creation of Modifications.
1.2. "Contributor Version" means the combination of the Original Code, prior Modifications used by a Contributor, and the Modifications
made by that particular Contributor.
1.3. "Covered Code" means the Original Code or Modifications or the combination of the Original Code and Modifications, in each case
including portions thereof.
© 2004, 2005, 2006 Texas Instruments
Page 76

1.4. "Electronic Distribution Mechanism" means a mechanism generally accepted in the software development community for the
electronic transfer of data.
1.5. "Executable" means Covered Code in any form other than Source Code.
1.6. "Initial Developer" means the individual or entity identified as the Initial Developer in the Source Code notice required by Exhibit A.
1.7. "Larger Work" means a work which combines Covered Code or portions thereof with code not governed by the terms of this License.
1.8. "License" means this document.
1.8.1. "Licensable" means having the right to grant, to the maximum extent possible, whether at the time of the initial grant or
subsequently acquired, any and all of the rights conveyed herein.
1.9. "Modifications" means any addition to or deletion from the substance or structure of either the Original Code or any previous
Modifications. When Covered Code is released as a series of files, a Modification is:
A. Any addition to or deletion from the contents of a file containing Original Code or previous Modifications.
B. Any new file that contains any part of the Original Code or previous Modifications.
1.10. "Original Code" means Source Code of computer software code which is described in the Source Code notice required by Exhibit A
as Original Code, and which, at the time of its release under this License is not already Covered Code governed by this License.
1.10.1. "Patent Claims" means any patent claim(s), now owned or hereafter acquired, including without limitation, method, process, and
apparatus claims, in any patent Licensable by grantor.
1.11. "Source Code" means the preferred form of the Covered Code for making modifications to it, including all modules it contains, plus
any associated interface definition files, scripts used to control compilation and installation of an Executable, or source code differential
comparisons against either the Original Code or another well known, available Covered Code of the Contributor's choice. The Source
Code can be in a compressed or archival form, provided the appropriate decompression or de-archiving software is widely available
for no charge.
1.12. "You" (or "Your") means an individual or a legal entity exercising rights under, and complying with all of the terms of, this License
or a future version of this License issued under Section 6.1. For legal entities, "You" inclu des any entity which controls, is controlled
by, or is under common control with You. For purposes of this definition, "control" means (a) the power, direct or indirect, to cause the
direction or management of such entity, whether by contract or otherwise, or (b) ownership of more than fifty percent (50%) of the
outstanding shares or beneficial ownership of such entity.
2. Source Code License.
2.1. The Initial Developer Grant.
The Initial Developer hereby grants You a world-wide, royalty-free, non-exclusive license, subject to third party intellectual property
claims:
(a) under intellectual property rights (other than patent or trademark) Licensable by Initial Developer to use, reproduce, modify,
display, perform, sublicense and distribute the Original Code (or portions thereof) with or without Modifications, and/or as part of a Larger
Work; and
(b) under Patents Claims infringed by the making, using or selling of Original Code, to make, have made, use, practice, sell, and
offer for sale, and/or otherwise dispose of the Original Code (or portions thereof).
(c) the licenses granted in this Section 2.1(a) and (b) are effective on the date Initial Developer first distributes Original Code under
the terms of this License.
(d) Notwithstanding Section 2.1(b) above, no patent license is granted: 1) for code that You delete from the Original Code; 2)
separate from the Original Code; or 3) for infring ements caused by: i) the modification of the Original Code or ii) the combination of the
Original Code with other software or devices.
2.2. Contributor Grant.
Subject to third party intellectual property claims, each Contributor hereby grants You a world-wide, royalty-free, non-exclusive license
(a) under intellectual property rights (other than patent or trademark) Licensable by Contributor, to use, reproduce, modify,
display, perform, sublicense and distribute the Modifications created by such Contributor (or portions thereof) either on an unmodified
basis, with other Modifications, as Covered Code and/or as part of a Larger Work; and
(b) under Patent Claims infringed by the making, using, or selling of Modifications made by that Contributor either alone and/or in
combination with its Contributor Version (or portions of such combination), to make, use, sell, offer for sale, have made, and/or
otherwise dispose of: 1) Modifications made by that Contributor (or portions thereof); and 2) the combination of Modifications made
by that Contributor with its Contributor Version (or portions of such combination).
(c) the licenses granted in Sections 2.2(a) and 2.2(b) are effective on the date Contributor first makes Commercial Use of the
Covered Code.
(d) Notwithstanding Section 2.2(b) above, no patent license is granted: 1) for any code that Contributor has deleted from the
Contributor Version; 2) separate from the Contributor Version; 3) for infringements caused by: i) third party modifications of Contributor
Version or ii) the combination of Modifications made by that Contributor with other software (except as part of the Contributor Version)
or other devices; or 4) under Patent Claims infringed by Covered Code in the absence of Modifications made by that Contributor.
3. Distribution Obligations.
3.1. Application of License.
The Modifications which You create or to which You contribute are governed by the terms of this License, including without limitation
Section 2.2. The Source Code version of Covered Code may be distributed only under the terms of this License or a future version of this
License released under Section 6.1, and You must include a copy of this License with every copy of the Source Code You distribute. You
may not offer or impose any terms on any Source Code version that alters or restricts the applicable version of this License or the
recipients' rights hereunder. However, You may include an additional document offering the additional rights described in Section 3.5.
3.2. Availability of Source Code.
Any Modification which You create or to which You contribute must be made available in Source Code form under the terms of this
License either on the same media as an Executable version or via an accepted Electronic Distribution Mechanism to anyone to whom
you made an Executable version available; and if made available via Electronic Distribution Mechanism, must remain available for at
least twelve (12) months after the date it initially became available, or at least six (6) months after a subsequent version of that parti cular
84PLSE/IC/1L1/A
© 2004, 2005, 2006 Texas Instruments
84PLSE/IC/1L1/A
Page 77

Modification has been made available to such recipients. You are responsible for ensuring that the Source Code version remains
available even if the Electronic Distribution Mechanism is maintained by a third party.
3.3. Description of Modifications.
You must cause all Covered Code to which You contribute to contain a file documenting the changes You made to create that
Covered Code and the date of any change. You must include a prominent statement that the Modification is derived, directly or indirectly,
from Original Code provided by the Initial Developer and including the name of the Initial Developer in (a) the Source Code, and (b) in
any notice in an Executable version or related documentation in which You describe the origin or ownership of the Covered Code.
3.4. Intellectual Property Matters
(a) Third Party Claims.
If Contributor has knowledge that a license under a third party's intellectual property rights is required to exercise the rights granted
by such Contributor under Sections 2.1 or 2.2, Contributor must include a text file with the Source Code distribution titled "LEGAL"
which describes the claim and the party making the claim in sufficient detail that a recipient will know whom to contact. If
Contributor obtains such knowledge after the Modification is made available as described in Section 3.2, Contributor shall promptly
modify the LEGAL file in all copies Contributor makes available thereafter and shall take other steps (such as notifying appropriate
mailing lists or newsgroups) reasonably calculated to inform those who received the Covered Code that new knowledge has been
obtained.
(b) Contributor APIs.
If Contributor's Modifications include an application programming interface and Contributor has knowledge of patent licenses which
are reasonably necessary to implement that API, Contributor must also include this information in the LEGAL file.
(c) Representations.
Contributor represents that, except as disclosed pursuant to Section 3.4(a) above, Contributor believes that Contributor's
Modifications are Contributor's original creation(s) and/or Contributor has sufficient rights to grant the rights conveyed by this License.
3.5. Required Notices.
You must duplicate the notice in Exhibit A in each file of the Source Code. If it is not possible to put such notice in a particular Source
Code file due to its structure, then You must include such notice in a location (such as a relevant directory) where a user would be likely
to look for such a notice. If You created one or more Modification(s) You may add your name as a Contributor to the notice described in
Exhibit A. You must also duplicate this License in any documentation for the Source Code where You describe recipients' rights or
ownership rights relating to Covered Code. You may choose to offer, and to charge a fee for, warranty, support, indemnity or liability
obligations to one or more recipients of Covered Code. However, You may do so only on Your own behalf, and not on behalf of the Initial
Developer or any Contributor. You must make it absolutely clear than any such warranty, support, indemnity or liability obligation is
offered by You alone, and You hereby agree to indemnify the Initial Developer and every Contributor for any liability incurred by the Initial
Developer or such Contributor as a result of warranty, support, indemnity or liability terms You offer.
3.6. Distribution of Executable Versions.
You may distribute Covered Code in Executable form only if the requirements of Section 3.1-3.5 have been met for that Covered
Code, and if You include a notice stating that the Source Code version of the Covered Code is available under the terms of this License,
including a description of how and where You have fulfilled the obligations of Section 3.2. The notice must be conspicuously included in
any notice in an Executable version, related documentation or collateral in which You describe recipients' rights relating to the
Covered Code. You may distribute the Executable version of Covered Code or ownership rights under a license of Your choice, which
may contain terms different from this License, provided that You are in compliance with the terms of this License and that the license for
the Executable version does not attempt to limit or alter the recipient's rights in the Source Code version from the rights set forth in this
License. If You distribute the Executable version under a different license You must make it absolutely clear that any terms wh
from this License are offered by You alone, not by the Initial Developer or any Contributor. You hereby agree to indemnify the Initial
Developer and every Contributor for any liability incurred by the Initial Developer or such Contributor as a result of any such term s You
offer.
3.7. Larger Works.
You may create a Larger Work by combining Covered Code with other code not governed by the terms of this License and distribute
the Larger Work as a single product. In such a case, You must make sure the requirements of this License are fulfilled for the Covered
Code.
4. Inability to Comply Due to Statute or Regulation.
If it is impossible for You to comply with any of the terms of this License with respect to some or all of the Covered Code due to
statute, judicial order, or regulation then You must: (a) comply with the terms of this License to the maximum extent possible; and (b)
describe the limitations and the code they affect. Such description must be included in the LEGAL file described in Section 3.4 and must
be included with all distributions of the Source Code. Except to the extent prohibited by statute or regulation, such description must be
sufficiently detailed for a recipient of ordinary skill to be able to understand it.
5. Application of this License.
This License applies to code to which the Initial Developer has attached the notice in Exhibit A and to related Covered Code.
6. Versions of th e License.
6.1. New Versions.
Netscape Communications Corporation ("Netscape") may publish revised and/or new versions of the License from time to time. Each
version will be given a distinguishing version number.
6.2. Effect of New Versions.
Once Covered Code has been published under a particular version of the License, You may always continue to use it under the terms
of that version. You may also choose to use such Covered Code under the terms of any subsequent version of the License published by
Netscape. No one other than Netscape has the right to modify the terms applicable to Covered Code created under this License.
6.3. Derivative Works.
If You create or use a modified version of this License (which you may only do in order to apply it to code which is not already
Covered Code governed by this License), You must (a) rename Your license so that the phrases "Mozilla", "MOZILLAPL", "MOZPL",
"Netscape", "MPL", "NPL" or any confusingly similar phrase do not appear in your license (except to note that your license differs from
this License) and (b) otherwise make it clear that Your version of the license contains terms which differ from the Mozilla Public Lice nse
ich differ
© 2004, 2005, 2006 Texas Instruments
Page 78

and Netscape Public License. (Filling in the name of the Initial Developer, Original Code or Contributor in the notice described in Exhibit
A shall not of themselves be deemed to be modifications of this License.)
7. DISCLAIMER OF WARRANTY.
COVERED CODE IS PROVIDED UNDER THIS LICENSE ON AN "AS IS" BASIS, WITHOUT WARRANTY OF ANY KIND,
EITHER EXPRESSED OR IMPLIED, INCLUDING, WITHOUT LIMITATION, WARRANTIES THAT THE COVERED CODE IS FREE
OF DEFECTS, MERCHANTABLE, FIT FOR A PARTICULAR PURPOSE OR NON- INFRINGING. THE ENTIRE RISK AS TO THE
QUALITY AND PERFORMANCE OF THE COVERED CODE IS WITH YOU. SHOULD ANY COVERED CODE PROVE DEFECTIVE IN
ANY RESPECT, YOU (NOT THE INITIAL DEVELOPER OR ANY OTHER CONTRIBUTOR) ASSUME THE COST OF ANY
NECESSARY SERVICING, REPAIR OR CORRECTION. THIS DISCLAIMER OF WARRANTY CONSTITUTES AN ESSENTIAL PART
OF THIS LICENSE. NO USE OF ANY COVERED CODE IS AUTHORIZED HEREUNDER EXCEPT UNDER THIS DISCLAIMER.
8. TERMINATION.
8.1. This License and the rights granted hereunder will terminate automatically if You fail to comply with terms herein and fail to cure
such breach within 30 days of becoming aware of the breach. All sublicenses to the Covered Code which are properly granted shall
survive any termination of this License. Provisions which, by their nature, must remain in effect beyond the termination of this License
shall survive.
8.2. If You initiate litigation by asserting a patent infringement claim (excluding declatory judgment actions) against Initial Developer
or a Contributor (the Initial Developer or Contributor against whom You file such action is referred to as "Participant") alleging that:
(a) such Participant's Contributor Version directly or indirectly infringes any patent, then any and all rights granted by such Participant
to You under Sections 2.1 and/or 2.2 of this License shall, upon 60 days notice from Participant terminate prospectively, unless if within
60 days after receipt of notice You either: (i) agree in writing to pay Participant a mutually agreeable reasonable royalty for Your past and
future use of Modifications made by such Participant, or (ii) withdraw Your litigation claim with respect to the Contributor Version
against such Participant. If within 60 days of notice, a reasonable royalty and payment arrangement are not mutually agreed upon in
writing by the parties or the litigation claim is not withdrawn, the rights granted by Participant to You under Sections 2.1 and/or 2.2
automatically terminate at the expiration of the 60 day notice period specified above.
(b) any software, hardware, or device, other than such Participant's Contributor Version, directly or indirectly infringes any patent,
then any rights granted to You by such Participant under Sections 2.1(b) and 2.2(b) are revoked effective as of the date You first made,
used, sold, distributed, or had made, Modifications made by that Participant.
8.3. If You assert a patent infringement claim against Participant alleging that such Participant's Contributor Version directly or
indirectly infringes any patent where such claim is resolved (such as by license or settlement) prior to the initiation of patent infringement
litigation, then the reasonable value of the licenses granted by such Participant under Sections 2.1 or 2.2 shall be taken into account in
determining the amount or value of any payment or license.
8.4. In the event of termination under Sections 8.1 or 8.2 above, all end user license agreements (excluding distributors and
resellers) which have been validly granted by You or any distributor hereunder prior to termination shall survive termination.
9. LIMITATION OF LIABILITY.
UNDER NO CIRCUMSTANCES AND UNDER NO LEGAL THEORY, WHETHER TORT (INCLUDING NEGLIGENCE),
CONTRACT, OR OTHERWISE, SHALL YOU, THE INITIAL DEVELOPER, ANY OTHER CONTRIBUTOR, OR ANY DISTRIBUTOR
OF COVERED CODE, OR ANY SUPPLIER OF ANY OF SUCH PARTIES, BE LIABLE TO ANY PERSON FOR ANY INDIRECT,
SPECIAL, INCIDENTAL, OR CONSEQUENTIAL DAMAGES OF ANY CHARACTER INCLUDING, WITHOUT LIMITATION,
DAMAGES FOR LOSS OF GOODWILL, WORK STOPPAGE, COMPUTER FAILURE OR MALFUNCTION, OR ANY AND ALL OTHER
COMMERCIAL DAMAGES OR LOSSES, EVEN IF SUCH PARTY SHALL HAVE BEEN INFORMED OF THE POSSIBILITY OF SUCH
DAMAGES. THIS LIMITATION OF LIABILITY SHALL NOT APPLY TO LIABILITY FOR DEATH OR PERSONAL INJURY
RESULTING FROM SUCH PARTY'S NEGLIGENCE TO THE EXTENT APPLICABLE LAW PROHIBITS SUCH LIMITATION. SOME
JURISDICTIONS DO NOT ALLOW THE EXCLUSION OR LIMITATION OF INCIDENTAL OR CONSEQUENTIAL DAMAGES, SO
THIS EXCLUSION AND LIMITATION MAY NOT APPLY TO YOU.
10. U.S. GOVERNMENT END USERS.
The Covered Code is a "commercial item," as that term is defined in 48 C.F.R. 2.101 (Oct. 1995), consisting of "commercial computer
software" and "commercial computer software documentation," as such terms are used in 48 C.F.R. 12.212 (Sept. 1995). Consistent with
48 C.F.R. 12.212 and 48 C.F.R. 227.7202-1 through 227.7202-4 (June 1995), all U.S. Government End Users acquire Covered Code
with only those rights set forth herein.
11. MISCELLANEOUS.
This License represents the complete agreement concerning subject matter hereof. If any provision of this License is held to be
unenforceable, such provision shall be reformed only to the extent necessary to make it enforceable. This License shall be governed by
California law provisions (except to the extent applicable law, if any, provides otherwise), excluding its conflict-of-law provisions. With
respect to disput es in which at least one party is a citizen of, or an entity chartered or registered to do business in the United States of
America, any litigation relating to this License shall be subject to the jurisdiction of the Fede ral Courts of the Northern District of
California, with venue lying in Santa Clara County, California, with the losing party responsible for costs, including without limitation, court
costs and reasonable attorneys' fees and expenses. The application of the United Nations Convention on Contracts for the
International Sale of Goods is expressly excluded. Any law or regulation which provides that the language of a contract shall be
construed against the drafter shall not apply to this License.
12. RESPONSIBILITY FOR CLAIMS.
As between Initial Developer and the Contributors, each party is responsible for claims and damages arising, directly or indirectly, out
of its utilization of rights under this License and You agree to work with Initial Developer and Contributors to distribute such responsibility
on an equitable basis. Nothing herein is intended or shall be deemed to constitute any admission of liability.
13. MULTIPLE-LICENSED CODE.
Initial Developer may designate portions of the Covered Code as "Multiple-Licensed". "Multiple-Licensed" means that the Initial
Developer permits you to utilize portions of the Covered Code under Your choice of the NPL or the alternative licenses, if any, specified
by the Initial Developer in the file described in Exhibit A.
EXHIBIT A -Mozilla Public License.
``The contents of this file are subject to the Mozilla Public License Version 1.1 (the "License"); you may not use this file except in
compliance with the License. You may obtain a copy of the License at http://www.mozilla.org/MPL/
84PLSE/IC/1L1/A
© 2004, 2005, 2006 Texas Instruments
84PLSE/IC/1L1/A
Page 79

Software distributed under the License is distributed on an "AS IS" basis, WITHOUT WARRANTY OF ANY KIND, either express or
implied. See the License for the specific language governing rights and limitations under the License.
The Original Code is Fileblob.java.
The Initial Developer of the Original Code is Stefan Haustein.
Portions created by ______________________ are Copyright (C) ______
_______________________. All Rights Reserved.
Contributor(s): ______________________________________.
Alternatively, the contents of this file may be used under the terms of the _____ license (the "[___] License"), in which case the
provisions of [______] License are applicable instead of those above. If you wish to allow use of your version of this file only under the
terms of the [____] License and not to allow others to use your version of this file under the MPL, indicate your decision by deleting the
provisions above and replace them with the notice and other provisions required by the [___] License. If you do not delete the
provisions above, a recipient may use your version of this file under either the MPL or the [___] License."
[NOTE: The text of this Exhibit A may differ slightly from the text of the notices in the Source Code files of the Original Code. You
should use the text of this Exhibit A rather than the text found in the Original Code Source Code for Your Modifications.]
End of MOZILLA PUBLIC LICENSE
The following program files are covered by the APACHE LICENSE VERSION 2.0. Additional files and licenses follow the APACHE
LICENSE VERSION 2.0.
derby.jar
APACHE LICENSE VERSION 2.0 follows:
Apache License
Version 2.0, January 2004
http://www.apache.org/licenses/
TERMS AND CONDITIONS FOR USE, REPRODUCTION, AND DISTRIBUTION
1. Definitions.
"License" shall mean the terms and conditions for use, reproduction, and distribution as defined by Sections 1 through 9 of this
document.
"Licensor" shall mean the copyright owner or entity authorized by the copyright owner that is granting the License.
"Legal Entity" shall mean the union of the acting entity and all other entities that control, are controlled by, or are under common
control with that entity. For the purposes of this definition, "control" means (i) the power, direct or indirect, to cause the direction or
management of such entity, whether by contract or otherwise, or (ii) ownership of fifty percent (50%) or more of the outstanding shares,
or (iii) beneficial ownership of such entity.
"You" (or "Your") shall mean an individual or Legal Entity exercising permissions granted by this License.
"Source" form shall mean the preferred form for making modifications, including but not limited to software source code,
documentation source, and configuration files.
"Object" form shall mean any form resulting from mechanical transformation or translation of a Source form, including but not limited
to compiled object code, generated documentation, and conversions to other media types.
"Work" shall mean the work of authorship, whether in Source or Object form, made available under the License, as indicated by a
copyright notice that is included in or attached to the work (an example is provided in the Appendix below).
"Derivative Works" shall mean any work, whether in Source or Object form, that is based on (or derived from) the Work and for w h ich
the editorial revisions, annotations, elaborations, or other modifications represent, as a whole, an original work of authorship. For the
purposes of this License, Derivative Works shall not include works that remain separable from, or merely link (or bind by name) to the
interfaces of, the Work and Derivative Works thereof.
"Contribution" shall mean any work of authorship, including the original version of the Work and any modifications or additions to that
Work or Derivative Works thereof, that is intentionally submitted to Licensor for inclusion in the Work by the copyright owner or by an
individual or Legal Entity authorized to submit on behalf of the copyright owner. For the purposes of this definition, "submitted" means
any form of electronic, verbal, or written communication sent to the Licensor or its representatives, including but not limited to
communication on electronic mailing lists, source code control systems, and issue tracking systems that are managed by, or on behalf
of, the Licensor for the purpose of discussing and improving the Work, but excluding communication that is conspicuously marked or
otherwise designated in writing by the copyright owner as "Not a Contribution."
"Contributor" shall mean Licensor and any individual or Legal Entity on behalf of whom a Contribution has been received by Licensor
and subsequently incorporated within the Work.
2. Grant of Copyright License. Subject to the terms and conditions of this License, each Contributor hereby grants to You a perpetual,
worldwide, non-exclusive, no-charge, royalty-free, irrevocable copyright license to reproduce, prepare Derivative Works of, publicly
display, publicly perform, sublicense, and distribute the Work and such Derivative Works in Source or Object form.
3. Grant of Patent License. Subject to the terms and conditions of this License, each Contributor hereby grants to You a perpetual,
worldwide, non-exclusive, no-charge, royalty-free, irrevocable (except as stated in this section) patent license to make, have made,
use, offer to sell, sell, import, and otherwise transfer the Work, where such license applies only to those patent claims licensable by such
Contributor that are necessarily infringed by their Contribution(s) alone or by combination of their Contribution(s) with the W
such Contribution(s) was submitted. If You institute patent litigation against any entity (including a cross-claim or counterclaim in a
lawsuit) alleging that the Work or a Contribution incorporated within the Work constitutes direct or contributory patent infringement, then
any patent licenses granted to You under this License for that Work shall terminate as of the date such litigation is filed.
4. Redistribution. You may reproduce and distribute copies of the Work or Derivativ e Work s thereof in any medium, with or without
modifications, and in Source or Object form, provided that You meet the following conditions:
(a) You must give any other recipients of the Work or Derivative Works a copy of this License; and
(b) You must cause any modified files to carry prominent notices stating that You changed the files; and
ork to which
© 2004, 2005, 2006 Texas Instruments
Page 80

(c) You must retain, in the Source form of any Derivative Works that You distribute, all copyright, patent, trademark, and attribution
notices from the Source form of the Work, excluding those notices that do not pertain to any part of the Derivative Works; and
(d) If the Work includes a "NOTICE" text file as part of its distribution, then any Derivative Works that You distribute must include a
readable copy of the attribution notices contained within such NOTICE file, excluding those notices that do not pertain to any part
of the Derivative Works, in at least one of the following places: within a NOTICE text file distributed as part of the Derivative
Works; within the Source form or documentation, if provided along with the Derivative Works; or, within a display generated by the
Derivative Works, if and wherever such third-party notices normally appear. The contents of the NOTICE file are for informational
purposes only and do not modify the License. You may add Your own attribution notices within Derivative Works that You distribute,
alongside or as an addendum to the NOTICE text from the Work, provided that such additional attribution notices cannot be construed as
modifying the License.
You may add Your own copyright statement to Your modifications and may provide additional or different license terms and
conditions for use, reproduction, or distribution of Your modifications, or for any such Derivative Works as a whole, provided Your use,
reproduction, and distribution of the Work otherwise complies with the conditions stated in this License.
5. Submission of Contributions. Unless You explicitly state otherwise, any Contribution intentionally submitted for inclusion in the Work
by You to the Licensor shall be under the terms and conditions of this License, without any additional terms or condition s.
Notwithstanding the above, nothing herein shall supersede or modify the terms of any separate license agreement you may have
executed with Licensor regarding such Contributions.
6. Trademarks. This License does not grant permission to use the trade names, trademarks, service marks, or product names of the
Licensor, except as required for reasonable and customary use in describing the origin of the Work and reproducing the content of the
NOTICE file.
7. Disclaimer of Warranty. Unless required by applicable law or agreed to in writing, Licensor provides the Work (and each Contributor
provides its Contributions) on an "AS IS" BASIS, WITHOUT WARRANTIES OR CONDITIONS OF ANY KIND, either express or
implied, including, without limitation, any warranties or conditions of TITLE, NON-INFRINGEMENT, MERCHANTABILITY, or FITNESS
FOR A PARTICULAR PURPOSE. You are solely responsible for determining the appropriateness of using or redistributing the Work
and assume any risks associated with Your exercise of permissions under this License.
8. Limitation of Liability. In no event and under no legal theory, whether in tort (including negligence), contract, or otherwise, unless
required by applicable law (such as deliberate and grossly negligent acts) or agreed to in writing, shall any Contributor be liable to You
for damages, including any direct, indirect, special, incidental, or consequential damages of any character arising as a result of this
License or out of the use or inability to use the Work (including but not limited to damages for loss of goodwill, work stoppage, computer
failure or malfunction, or any and all other commercial damages or losses), even if such Contributor has been advised of the
possibility of such damages.
9. Accepting Warranty or Additional Liability. While redistributing the Work or Derivative Works thereof, You may choose to offer, and
charge a fee for, acceptance of support, warranty, indemnity, or other liability obligations and/or rights consistent with this License.
However, in accepting such obligations, You may act only on Your own behalf and on Your sole responsibility, not on behalf of any other
Contributor, and only if You agree to indemnify, defend, and hold each Contributor harmless for any liability incurred by, or claims
asserted against, such Contributor by reason of your accepting any such warranty or additional liability.
END OF TERMS AND CONDITIONS
APPENDIX: How to apply the Apache License to your work.
To apply the Apache License to your work, attach the following boilerplate notice, with the fields enclosed by brackets "
with your own identifying information. (Don't include the brackets!) The text should be enclosed in the appropriate comment syntax
for the file format. We also recommend that a file or class name and description of purpose be included on the same "printed page" as
the copyright notice for easier identification within third-party archives.
Copyright [yyyy] [name of copyright owner]
Licensed under the Apache License, Version 2.0 (the "License"); you may not use this file except in compliance with the License. You
may obtain a copy of the License at
http://www.apache.org/licenses/LICENSE-2.0
Unless required by applicable law or agreed to in writing, software distributed under the License is distributed on an "AS IS" BASIS,
WITHOUT WARRANTIES OR CONDITIONS OF ANY KIND, either express or implied. See the License for the specific language
governing permissions and limitations under the License.
End of Apache License
[]" replaced
© 2004, 2005, 2006 Texas Instruments
84PLSE/IC/1L1/A
84PLSE/IC/1L1/A
Page 81

The following program files are covered by the BERKELEY SOFTWARE DISTRIBUTION LICENSE.
Binding-1.0.3.jar
BERKELEY SOFTWARE DISTRIBUTION LICENSE follows:
Copyright (c) 2005, Karsten Lentzsch
All rights reserved.
Redistribution and use in source and binary forms, with or without modification, are permitted provided that the following conditions are
met:
Redistributions of source code must retain the above copyright notice, this list of conditions and the following disclaimer.
Redistributions in binary form must reproduce the above copyright notice, this list of conditions and the following disclaimer in the
documentation and/or other materials provided with the distribution.
Neither the name of the <ORGANIZATION> nor the names of its contributors may be used to endorse or promote products derived from
this software without specific prior written permission.
THIS SOFTWARE IS PROVIDED BY THE COPYRIGHT HOLDERS AND CONTRIBUTORS "AS IS" AND ANY EXPRESS OR IMPLIED
WARRANTIES, INCLUDING, BUT NOT LIMITED TO, THE IMPLIED WARRANTIES OF MERCHANTABILITY AND FITNESS FOR A
PARTICULAR PURPOSE ARE DISCLAIMED. IN NO EVENT SHALL THE COPYRIGHT OWNER OR CONTRIBUTORS BE LIABLE
FOR ANY DIRECT, INDIRECT, INCIDENTAL, SPECIAL, EXEMPLARY, OR CONSEQUENTIAL DAMAGES (INCLUDING, BUT NOT
LIMITED TO, PROCUREMENT OF SUBSTITUTE GOODS OR SERVICES; LOSS OF USE, DATA, OR PROFITS; OR BUSINESS
INTERRUPTION) HOWEVER CAUSED AND ON ANY THEORY OF LIABILITY, WHETHER IN CONTRACT, STRICT LIABILITY, OR
TORT (INCLUDING NEGLIGENCE OR OTHERWISE) ARISING IN ANY WAY OUT OF THE USE OF THIS SOFTWARE, EVEN IF
ADVISED OF THE POSSIBILITY OF SUCH DAMAGE.
End of BERKELEY SOFTWARE DISTRIBUTION LICENSE
© 2004, 2005, 2006 Texas Instruments
 Loading...