


SoundSystem
LT
High Resolution DVD / Games / Music
English Manual
Version 27.02.02

CE Declaration
We:
TerraTec Electronic GmbH, Herrenpfad 38, D-41334 Nettetal, Germany
hereby declare that the product:
SoundSystem DMX 6fire
to which this declaration refers is in compliance with the following standards or standardizing documents:
1.EN 55022 Class B
2.EN 55024
The following are the stipulated operating and environmental conditions for said compliance:
Residential, business and commercial environments and small-company environments.
This declaration is based on:
Test report(s) of the EMC testing laboratory
TerraTec® ProMedia, SoundSystem Gold, SoundSystem Maestro, SoundSystem Base 1, SoundSystem DMX, SoundSystemDMX XFire 1024, AudioSystem EWS®64, AudioSystem EWS88, AudioSystem EWX 24/96, XLerate, XLerate Pro, Base2PCI, TerraTec 128iPCI, TerraTec 512i digital, TerraTV+, TerraTV Radio+, TerraTValue, VideoSystem Cameo 600 DV, WaveSystem, TerraCAM USB, TerraCAM USB Pro, TerraCAM iLook, m3po, Phono PreAmp, MIDI Smart and MIDI Master Pro are trademarks registered by TerraTec® Electronic GmbH Nettetal, Germany.
In most cases, the designations used in this manual for software and hardware are also registered trademarks and are thus subject to the relevant regulations.
©TerraTec® Electronic GmbH, 1994-2002. All rights reserved (27.02.02).
Meticulous care has been exercised in the preparation of all text passages and illustrations in this User Guide. TerraTec Electronic GmbH and its authors, however, accept no liability, legal or otherwise, for any errors or the consequences of such errors. We reserve the right to technical modifications.
All text passages in this documentation are copyrighted. All rights reserved. No part of this documentation may be reproduced in any form whatsoever, by photography, microfilming or other process or rendered into a language/form usable by computers without the prior, written consent of the authors. All rights for use and propagation by presentation, radio and television are also reserved.
2 |
SoundSystem DMX 6fire (English) |

Contents |
|
Welcome! ................................................................................................................................ |
4 |
Multiple audio cards in a single system................................................................................ |
7 |
Connecting front modules/extensions.................................................................................. |
7 |
From opening the package to installation. ............................................................................... |
7 |
The connectors of the DMX 6fire PCI card ........................................................................... |
10 |
The connections of the front module. ................................................................................. |
11 |
The connections of the MXR module................................................................................... |
12 |
Installation—step by step................................................................................................... |
13 |
Installing the driver software. ............................................................................................. |
15 |
The connections and their uses. ............................................................................................ |
27 |
Overview. ........................................................................................................................... |
27 |
The software. ......................................................................................................................... |
32 |
The drivers. ........................................................................................................................ |
33 |
The DMX ControlPanel. ....................................................................................................... |
36 |
WaveLab Lite 2.0................................................................................................................ |
44 |
MusicMatch Jukebox. ......................................................................................................... |
45 |
Cyberlink PowerDVD 3.0 - 6 channel ................................................................................... |
45 |
Algorithmix Sound Laundry TerraTec Edition....................................................................... |
45 |
Emagic Logic Fun............................................................................................................... |
46 |
The HOTSTUFF folder. ......................................................................................................... |
47 |
Practice. ............................................................................................................................... |
48 |
Connecting and recording from a turntable........................................................................ |
48 |
How was that again?.............................................................................................................. |
50 |
RIAA filtering....................................................................................................................... |
50 |
Shielding............................................................................................................................ |
50 |
Recording........................................................................................................................... |
51 |
The recording's finished: now what?................................................................................... |
51 |
The digital interfaces of the DMX 6fire. ............................................................................... |
52 |
Stuff worth knowing. .......................................................................................................... |
54 |
Appendix. .............................................................................................................................. |
55 |
FAQ—frequently asked questions and their answers. ......................................................... |
55 |
SoundSystem DMX 6fire (English) |
3 |

Welcome!
We're pleased that you have chosen a TerraTec SoundSystem and would like to congratulate you on this decision. You've purchased a sophisticated product representing the state of the art of audio technology, and we're convinced that our product will prove extremely useful to you in the coming years and provide you with a great deal of entertainment.
This manual covers the SoundSystems DMX 6fire24/96 and DMX 6fire LT and their uses in great detail.
But first, here's a quick overview:
SoundSystem DMX 6fire24/96—PCI card with front module
|
SoundSystem DMX 6fire LT—PCI card with MRX module |
|
|
4 |
SoundSystem DMX 6fire (English) |

A broad range of connections. The SoundSystem DMX 6fire24/96 is the result of our many years of experience in the PC audio sector and reflects the continuous evolution of audio and multimedia software for the PC. The SoundSystem DMX 6fire 24/96 offers you a wide range of interconnection options with other audio devices such as hifi surround systems, turntables**, MiniDisc or CD players with analog or digital outputs, headphones* and microphones. For convenient access—and a visual highlight, of course—install the front module in your PC.
High-quality audio characteristics. The SoundSystem DMX 6fire provides extremely high quality for analog recording and playback of analog material. The card features modern 24-bit converter components with a sampling frequency of up to 96 kHz. As a result, the DMX 6fire achieves a S/N ratio of well over -100 dB(A) on its analog inputs and outputs!
Recording and playback of audio material at the purely digital level. The SoundSystem DMX 6fire LT provides an optical and the SoundSystem DMX 6fire 24/96 also a coaxial stereo input and output in 24-bit S/PDIF format. You can therefore transfer already digitized recordings from a CD, DAT or MiniDisc player (or recorder) to the PC without losses. You can also choose from all commonly-used sample rates and access settings related to copy protection and generation bit. The interface even supports the transfer of raw data such as Dolby AC3 signals.
Software à la carte. You'll soon come to appreciate the ControlPanel of your DMX 6fire. Its carefully thought-out user interface and intuitive control of all card settings will make your day-to-day work with the SoundSystem a breeze.
The selection of drivers leaves nothing to be desired. Our sophisticated driver architecture based on Microsoft's WDM technology guarantees the trouble-free deployment of the card in all modern Microsoft Windows operating systems. Musicians will also be pleased by its support for Steinberg's ASIO 2.0 interface, as well as WDM kernel streaming (e.g. Sonar ) for extremely low latency times, permitting software instruments to be played live.
And last but not least, we've included a number of software titles that will assist and entertain you. All programs were selected after extensive practical testing and the personal experience of our staff as valuable additions to round out your SoundSystem for a wide variety of applications.
* only valid in connection with SoundSystem DMX 6fire 24/96
SoundSystem DMX 6fire (English) |
5 |

We hope you enjoy your work with the SoundSystem DMX 6fire and would like to suggest that you browse this hopefully entertaining manual when you get the chance. In addition to the most vital information on the technology, we've outlined a number of typical applications wherever appropriate. We're convinced that even experienced users will profit from this guide. Don't miss the remarks in the margins marked with an exclamation point! They contain information such as summaries of the following sections, notes on important settings or tricks that can make your day-to-day audio work significantly easier.
Thanks for your attention—enjoy!
...your TerraTec Team
6 |
SoundSystem DMX 6fire (English) |

Multiple audio cards in a single system.
Multiple DMX 6fire SoundSystems can be simultaneously. The SoundSystem can also AudioSystem EWS and EWX series; EWS® synchronization of the cards, however.
installed in a single computer and used be used parallel to cards of the TerraTec Connect is not available for the internal
Using the DMX 6fire together with existing sound cards from other manufacturers generally does not pose any problems under Microsoft Windows operating systems.
Connecting front modules/extensions**.
Musicians will be pleased to hear that they can use the optionally available microWAVE PC synthesizer module, as well as other TerraTec “DigitalXtensions” with the PCI card—and take advantage of their full functionality. However, please note: Only one (1) module may be connected to the PCI card. Do not connect additional modules to the CN6 or CN10 connectors if you would like to use the module included in the package. This may damage the card and module(s)—and this is NOT COVERED BY THE WARRANTY!
When using the microWAVE PC, you can take advantage of the full functionality of the front module. Both MIDI ports are available, the internal wavetable connector can be used, and even the headphone output is available. The digital interfaces cannot be used with a sample rate of more than 48 kHz due to hardware restrictions, however. AC3/DTS output is also not available, since the interfaces are designed for S/PDIF signals. The DSP of the Waldorf synthesizer can only be clocked at 32, 44.1 or 48 kHz.
From opening the package to installation.
Before installing the sound card in your computer, please note the details of your computer's configuration. Also refer to the manual of your computer and other expansion cards for their settings.
Please observe the following instructions to ensure a trouble-free installation.
If difficulties arise nevertheless, please reread the relevant chapter in this manual carefully.
Please call our service hotline if you are still having problems. The phone numbers and hours of the hotline can be found in the Appendix of this documentation.
**Please note that microWAVE PC! as well as EWS64 extensions DXR and DXF will be supported only with driver version WDM 5.0.2000.120.
SoundSystem DMX 6fire (English) |
7 |

Start by making sure that nothing is missing.
The SoundSystem DMX 6fire 24/96 package should contain the following items: 1 TerraTec SoundSystem DMX 6fire 24/96 PCI sound card
1 DX6F front module
1 flat conductor cable to connect the PCI card and the front module 1 CD-ROM digital audio connector cable
2 adapter plugs, 6.3 mm stereo jack to 3.5 mm socket 1 installation and driver CD
1 manual
1 customer service card
1 TerraTec registration card with the serial number
1 Algorithmix registration and update card
The SoundSystem DMX 6fire LT package should contain the following items: 1 TerraTec SoundSystem DMX 6fire 24/96 PCI sound card
1 slot cover expansion module—MXR (MediaXtensionRear)
1 flat conductor cable to connect the PCI card and the front module 1 CD-ROM digital audio connector cable
1 installation and driver CD
1 manual
1 customer service card
1 TerraTec registration card with the serial number
1 Algorithmix registration and update card
Please return the registration card to us at the earliest possible opportunity or register online at http://www.terratec.net/register.htm. This is important for support and hotline services.
8 |
SoundSystem DMX 6fire (English) |

Note! Even if you're a seasoned pro, you should still at least skim the |
! |
“The software.” chapter starting on page 32. The information on |
|
drivers and the first sections on the ControlPanel are important for |
|
your overall understanding of the system. Thank you. |
Short and to the point for busy pros.
The SoundSystem DMX 6fire is a PCI card with busmastering support. Please choose a slot which is far away from the graphics card(s) or SCSI/RAID controllers—i.e. as far close to the “bottom” as possible in most installations. Also be sure to leave room for up to four audio cables that can be connected to the card.
The front module is connected to the card using the included flat conductor cable. This cable also supplies the front module with power. If possible, please install the module in a bay below the CD, ZIP drive or other devices due to the dangling cables.
You will need 1 IRQ. Installing multiple DMX 6fire cards is no problem—the cards will run in IRQ-sharing mode.
You will also need a number of free address ranges (generally no problem).
The driver installation under Windows (98SE to XP) follows the Microsoft guidelines. The drivers can be found on the included CD-ROM.
After installing the drivers, open the Device Manager and check for yellow exclamation marks. If you find any, please see the Appendix (page 55) for our suggested solutions.
The software installation will begin automatically once the drivers have been installed. You must install the ControlPanel. The full functionality of the SoundSystem cannot be controlled using the Windows Mixer.
The WDM audio drivers can be selected in the applications as usual. ASIO drivers are available in compatible programs; WDM kernel streaming is “not visible” (i.e. it is always available for applications and cannot be selected explicitly). The respective buffer sizes can be configured in the DMX ControlPanel (not to be confused with the Windows Control Panel).
So much for the summary. The following is a detailed, illustrated description of the installation.
SoundSystem DMX 6fire (English) |
9 |
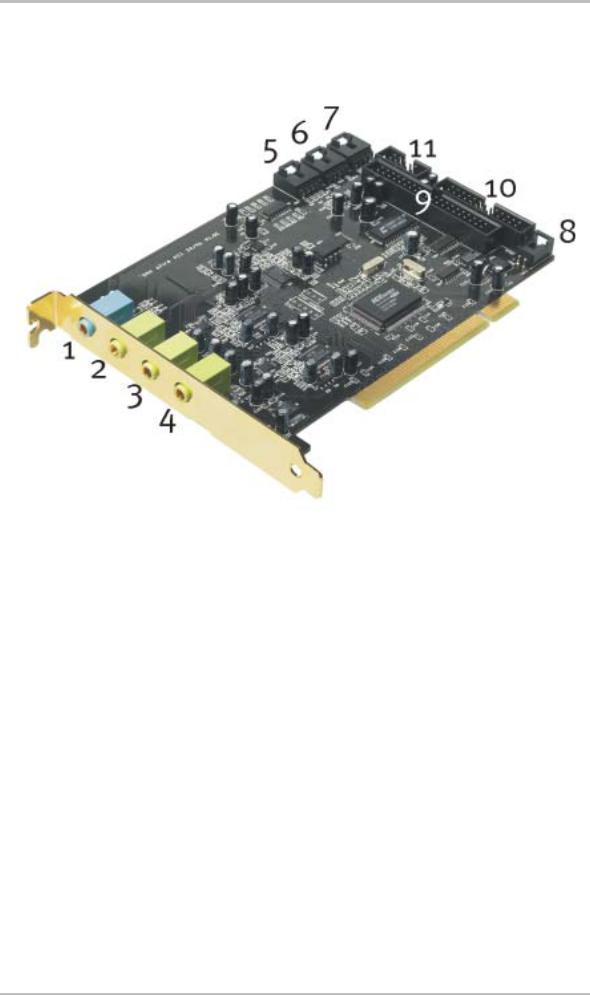
The connectors of the DMX 6fire PCI card
1.Analog stereo audio input (3.5 mm jack)
2.Analog stereo audio output “Front” (3.5 mm jack)
3.Analog stereo audio output “Rear” (3.5 mm jack)
4.Analog stereo audio output “Center-LFE”, Left = Center, Right = LFE/Subwoofer (for 3.5 mm mini-jack)
5.Onboard audio input (AUX, stereo)
6.Onboard CD-audio input 2 (stereo)
7.Onboard CD-audio input 1 (stereo)
8.Onboard CD-ROM digital audio input (TTL)
9.Multipin connector for included front module
10.Multipin connector for optional DigitalXtension F (DXF), DigitalXtension R (DXR) and DigitalXtension microWAVE PC (digital line)
11.Multipin connector for optional DigitalXtension F (DXF) and DigitalXtension microWAVE PC (analog line)
10 |
SoundSystem DMX 6fire (English) |
Note: The front module as part of SoundSystem DMX 6fire 24/96 or the MXR module as part of SoundSystem DMX 6fire LT cannot be operated in connection with an additional module! Do not connect additional modules to the CN6 or CN10 connectors if you would like to use the module included in the package. This may damage the card and module!
The connections of the front module.
1.Stereo audio input (RCA, with signal LED) for line devices such as cassette decks
2.Stereo audio input (RCA) for turntables with moving-magnet (MM, MD) pickups
3.Stereo analog output (RCA) for line devices, e.g. cassette decks
4.Mono microphone input (for 6.3 mm jack, adjustable sensitivity/gain; with peak LED)
5.Stereo headphone output (adjustable volume/level)
6.Digital audio input (coaxial, S/PDIF/AC3/DTS)
7.Digital audio output (coaxial, S/PDIF/AC3/DTS)
8.Digital audio input (optical, S/PDIF/AC3/DTS)
9.Digital audio output (optical, S/PDIF/AC3/DTS)
10.Input for external MIDI devices (5-pin, DIN)
11.Output for external MIDI devices (5-pin, DIN)
On the rear: Connection for flat conductor cable to PCI card
SoundSystem DMX 6fire (English) |
11 |
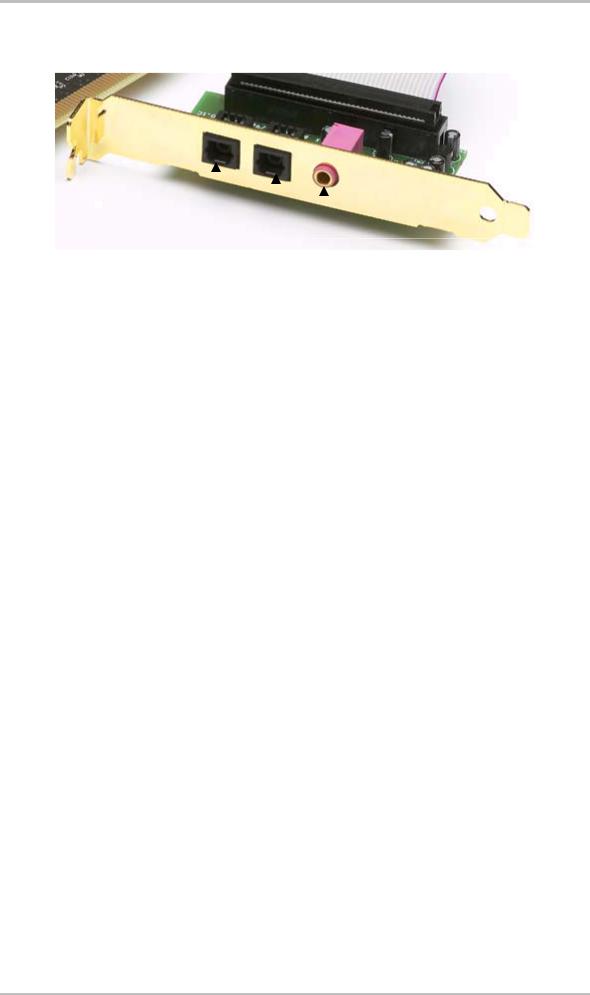
The connections of the MXR module.
|
|
|
|
|
|
|
|
|
|
|
|
|
|
|
|
|
|
1 |
2 |
3 |
|||
1.Digital audio input (optical, S/PDIF/AC3/DTS)
2.Digital audio output (optical, S/PDIF/AC3/DTS)
3.Mono microphone input (3.5 mm jack)
12 |
SoundSystem DMX 6fire (English) |

Installation—step by step.
Safety note. |
|
! |
|
|
|
Before opening the case, unplug the AC power cable from the wall |
|
|
socket as well as from the PC. |
|
|
|
|
|
Switch off your PC and all connected peripheral devices such as your printer and monitor. Leave the AC cable connected for the time being, so that your computer is still grounded.
Touch the metal chassis at the rear of the PC to ground yourself and discharge static. Now unplug the cord from the AC socket.
Remove the cover from the case of your PC.
Installing the PCI card.
Look for a free PCI expansion slot, remove the screw holding the slot blanking plate (if present) and remove the plate. Should it be necessary to break a plate out of the case, do so with great care to avoid injury.
To ensure the optimal function of your SoundSystem, look for an expansion slot that is not immediately next to an already-installed card. Some cards, such as video or SCSI/RAID adapters, can send out signals which can interfere with the sound card.
We also recommend a slot as close to the bottom of the computer as possible, as you can connect up to 4 audio cables directly to the card itself. Due to certain physical properties of our planet, it is very likely that these cables will dangle downward. ;-)
First remove the flat conductor cable, then the PCI card from its packaging. Pick it up by the edges with one hand while your other hand is resting on the metal of the PC case.
This will ensure that your body is completely discharged (no joke) via your computer without affecting the card. Please do not touch the components of the board.
Connect the flat conductor cable to the only suitable connector on the card. Connect any other required internal cables (e.g. to the CD drive) to the card. For further information on the various connections, please see page 10
Align the audio card so that the strip with the golden connector pins is located exactly over the PCI slot.
Insert the card into the slot. You might have to press the card firmly into the slot to make good contact. Take care to ensure that the contacts are precisely in line in order to avoid damaging the audio card or the motherboard in your PC.
Secure the card with the screw from the slot blanking plate (these screws are generally also included with PC cases).
SoundSystem DMX 6fire (English) |
13 |

Installing the front module.
Find a free 5¼" bay on the front of your PC. If possible, please install the module in a bay below the CD, ZIP drive or other devices due to the dangling cables. It may be necessary to break out the cover plate. Do this with great care to avoid injury.
Take the loose end of the flat conductor cable that you connected to the PCI card earlier and thread it from the inside of the PC through the open bay so that it extends out of the PC case. Connect the plug to the connectors on the rear of the module.
Slide the module into the bay and secure it with the included screws. Make sure that it is installed solidly, as the frequent plugging and unplugging of cables places higher mechanical loads on the module than those that act on a CD drive.
Finishing up.
Reinstall the cover of your PC case.
Connect your audio peripherals (hifi amp, active speakers, mixer, etc.) to the DMX 6fire. (also see chapter “The connections and their uses.” starting on page 27).
Reconnect the AC power cable as well as all other cables and turn your PC on. Make sure that your speakers or hifi system is set to low volume.
Start your computer. The installation of the driver software is the next step.
14 |
SoundSystem DMX 6fire (English) |

Installing the driver software.
The SoundSystem DMX 6fire is currently supplied with drivers for the Windows 98 SE, Windows ME, Windows 2000 and Windows XP operating systems. The card cannot be used under Windows 95 and Windows NT 4. You should therefore determine which operating system you are using before installing the card.
For information on your operating system and its version number, please check the System dialog in the Windows Control Panel.
Here you can see which Windows Service Pack version you are using, for example.
In the following driver installation descriptions, <CD> stands for the drive letter of the CD-ROM drive containing the driver CD of the SoundSystem DMX 6fire.
SoundSystem DMX 6fire (English) |
15 |
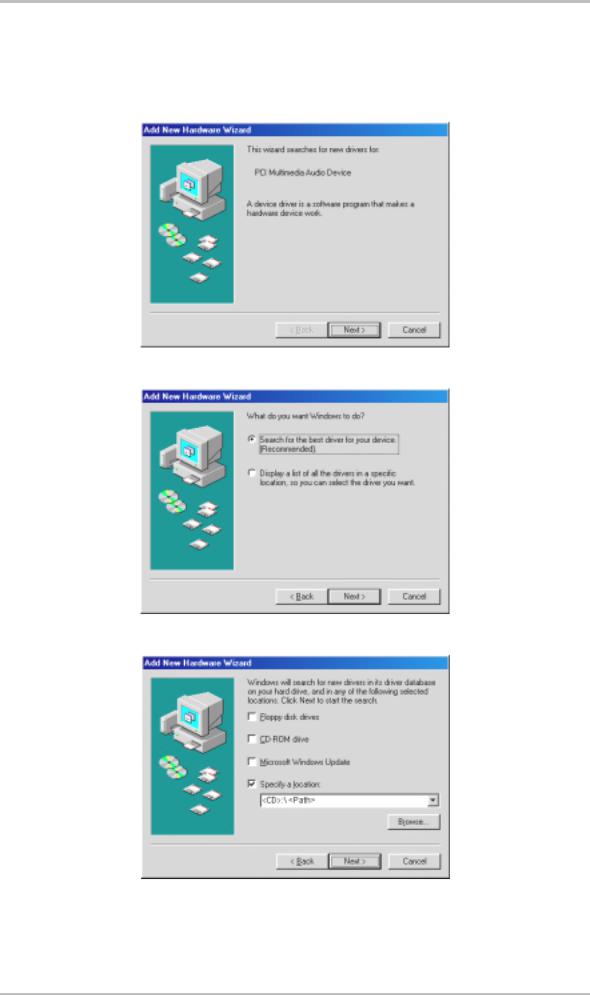
Driver installation under Windows 98 SE
After the SoundSystem DMX 6fire is installed, Windows 98SE recognizes the card as a new hardware component and displays the following window.
Click “Next”.
Select here the “Search for the best driver for my device (Recommended)” item and click “Next”.
Enter the path <CD>:\Driver_ControlPanel\Driver\ and click “OK.” Alternatively, you can also select the path to the best driver of your DMX 6fire using the mouse by clicking “Browse...”.
16 |
SoundSystem DMX 6fire (English) |

At the conclusion, click “Finish.”
Windows now performs the driver installation and acknowledges the process with several windows that can be viewed. Nothing else should be required at this time. If contrary to all expectations a request should appear for you to perform some action and you are not sure about it, then pressing the Enter key is generally a safe action.
If Windows requests a second driver file, please refer to the aforementioned directory on the DMX 6fire CD-ROM. It is also possible (e.g. if this is the first sound card installation in your system) that some additional Windows extensions have to be installed. Please have your Windows CD ready for this purpose.
After successful driver installation, the additional bundled software can be added easily using the autorun option.
<CD>:\autorun.exe
Follow the instructions on the screen to install the various bundled software programs. A particular bundled software can also easily be removed from your system. For this purpose, call up “Control Panel -> Software” and locate the programs to be removed. Select the various programs and click “Add/Remove Programs...”.
SoundSystem DMX 6fire (English) |
17 |
 Loading...