

Televes RSD - 7297 User Manual

Receptor Satélite Digital Instrucciones de uso
Digital Satellite Receiver User manual
“RSD - 7297”
© Copyright, Televés, S.A.

User Manual
“
RSD - 7297”
31
ENGLISH
ÍNDEX . . . . . . . . . . . . . . . . . . . . . . . . . . . . . . . . . . . . . . . . . . . . . . . . . . . . . . . . . . . . . . . . . . . . . . . . . . . . . . . Pág.
1.- Safety measures . . . . . . . . . . . . . . . . . . . . . . . . . . . . . . . . . . . . . . . . . . . . . . . . . . . . . . . . . . . . . . . . . . . . . . . . . . . . . . 32
2.- Before beginning . . . . . . . . . . . . . . . . . . . . . . . . . . . . . . . . . . . . . . . . . . . . . . . . . . . . . . . . . . . . . . . . . . . . . . . . . . . . . . 33
2.1.- Preface . . . . . . . . . . . . . . . . . . . . . . . . . . . . . . . . . . . . . . . . . . . . . . . . . . . . . . . . . . . . . . . . . . . . . . . . . . . . . 33
2.2.- General specifications . . . . . . . . . . . . . . . . . . . . . . . . . . . . . . . . . . . . . . . . . . . . . . . . . . . . . . . . . . . . . . . . . . 33
2.3.- Equipment . . . . . . . . . . . . . . . . . . . . . . . . . . . . . . . . . . . . . . . . . . . . . . . . . . . . . . . . . . . . . . . . . . . . . . . . . . . 33
3.- Description of panels and connections . . . . . . . . . . . . . . . . . . . . . . . . . . . . . . . . . . . . . . . . . . . . . . . . . . . . . . . . . . . . . 34
4.- Installation of equipment . . . . . . . . . . . . . . . . . . . . . . . . . . . . . . . . . . . . . . . . . . . . . . . . . . . . . . . . . . . . . . . . . . . . . . . 36
4.1.- Connections . . . . . . . . . . . . . . . . . . . . . . . . . . . . . . . . . . . . . . . . . . . . . . . . . . . . . . . . . . . . . . . . . . . . . . . . . 36
5.- Ready to begin . . . . . . . . . . . . . . . . . . . . . . . . . . . . . . . . . . . . . . . . . . . . . . . . . . . . . . . . . . . . . . . . . . . . . . . . . . . . . . . . 37
5.1.- How to start . . . . . . . . . . . . . . . . . . . . . . . . . . . . . . . . . . . . . . . . . . . . . . . . . . . . . . . . . . . . . . . . . . . . . . . . . . 37
5.2.- How to select TV or RADIO channels . . . . . . . . . . . . . . . . . . . . . . . . . . . . . . . . . . . . . . . . . . . . . . . . . . . . . . 37
5.3.- How to adjust the volume . . . . . . . . . . . . . . . . . . . . . . . . . . . . . . . . . . . . . . . . . . . . . . . . . . . . . . . . . . . . . . . 37
5.4.- Mute . . . . . . . . . . . . . . . . . . . . . . . . . . . . . . . . . . . . . . . . . . . . . . . . . . . . . . . . . . . . . . . . . . . . . . . . . . . . . . . 38
5.5.- Audio language . . . . . . . . . . . . . . . . . . . . . . . . . . . . . . . . . . . . . . . . . . . . . . . . . . . . . . . . . . . . . . . . . . . . . . . 38
5.6.- Recalling previous channel . . . . . . . . . . . . . . . . . . . . . . . . . . . . . . . . . . . . . . . . . . . . . . . . . . . . . . . . . . . . . . 38
5.7.- Recalling previous channel and auto-saving . . . . . . . . . . . . . . . . . . . . . . . . . . . . . . . . . . . . . . . . . . . . . . . . . 38
5.8.- Onscreen pause . . . . . . . . . . . . . . . . . . . . . . . . . . . . . . . . . . . . . . . . . . . . . . . . . . . . . . . . . . . . . . . . . . . . . . . 38
5.9.- Electronic Programming Guide (EPG) . . . . . . . . . . . . . . . . . . . . . . . . . . . . . . . . . . . . . . . . . . . . . . . . . . . . . . 39
5.10.- How to use the Favourite Channels List . . . . . . . . . . . . . . . . . . . . . . . . . . . . . . . . . . . . . . . . . . . . . . . . . . . 40
5.11.- Teletext function . . . . . . . . . . . . . . . . . . . . . . . . . . . . . . . . . . . . . . . . . . . . . . . . . . . . . . . . . . . . . . . . . . . . . 40
6.- Main Menu . . . . . . . . . . . . . . . . . . . . . . . . . . . . . . . . . . . . . . . . . . . . . . . . . . . . . . . . . . . . . . . . . . . . . . . . . . . . . . . . . . 41
7.- OSD menu language . . . . . . . . . . . . . . . . . . . . . . . . . . . . . . . . . . . . . . . . . . . . . . . . . . . . . . . . . . . . . . . . . . . . . . . . . . . 41
8.- Box Setup menu . . . . . . . . . . . . . . . . . . . . . . . . . . . . . . . . . . . . . . . . . . . . . . . . . . . . . . . . . . . . . . . . . . . . . . . . . . . . . . 42
8.1.- Channels setup . . . . . . . . . . . . . . . . . . . . . . . . . . . . . . . . . . . . . . . . . . . . . . . . . . . . . . . . . . . . . . . . . . . . . . . 42
8.2.- Changing the Password (PIN) . . . . . . . . . . . . . . . . . . . . . . . . . . . . . . . . . . . . . . . . . . . . . . . . . . . . . . . . . . . . 44
8.3.- Ajdusting the clock . . . . . . . . . . . . . . . . . . . . . . . . . . . . . . . . . . . . . . . . . . . . . . . . . . . . . . . . . . . . . . . . . . . . 44
8.4.- VCR timer . . . . . . . . . . . . . . . . . . . . . . . . . . . . . . . . . . . . . . . . . . . . . . . . . . . . . . . . . . . . . . . . . . . . . . . . . . . 45
8.5.- Factory values (Restore default values) . . . . . . . . . . . . . . . . . . . . . . . . . . . . . . . . . . . . . . . . . . . . . . . . . . . . . 46
8.6.- Audio selection . . . . . . . . . . . . . . . . . . . . . . . . . . . . . . . . . . . . . . . . . . . . . . . . . . . . . . . . . . . . . . . . . . . . . . . 46
8.7.- TV Format . . . . . . . . . . . . . . . . . . . . . . . . . . . . . . . . . . . . . . . . . . . . . . . . . . . . . . . . . . . . . . . . . . . . . . . . . . . 47
8.8.- Box Info . . . . . . . . . . . . . . . . . . . . . . . . . . . . . . . . . . . . . . . . . . . . . . . . . . . . . . . . . . . . . . . . . . . . . . . . . . . . . 47
9.- System Setup menu . . . . . . . . . . . . . . . . . . . . . . . . . . . . . . . . . . . . . . . . . . . . . . . . . . . . . . . . . . . . . . . . . . . . . . . . . . . . 48
9.1.- LNB Setup . . . . . . . . . . . . . . . . . . . . . . . . . . . . . . . . . . . . . . . . . . . . . . . . . . . . . . . . . . . . . . . . . . . . . . . . . . 48
9.2.- Dish Setup . . . . . . . . . . . . . . . . . . . . . . . . . . . . . . . . . . . . . . . . . . . . . . . . . . . . . . . . . . . . . . . . . . . . . . . . . . 49
9.3.- Satellite Setup . . . . . . . . . . . . . . . . . . . . . . . . . . . . . . . . . . . . . . . . . . . . . . . . . . . . . . . . . . . . . . . . . . . . . . . 50
9.4.- Transponder Setup . . . . . . . . . . . . . . . . . . . . . . . . . . . . . . . . . . . . . . . . . . . . . . . . . . . . . . . . . . . . . . . . . . . . 51
9.5.- DiSEqC 1.2 . . . . . . . . . . . . . . . . . . . . . . . . . . . . . . . . . . . . . . . . . . . . . . . . . . . . . . . . . . . . . . . . . . . . . . . . . . 52
9.6.- Code download (software) . . . . . . . . . . . . . . . . . . . . . . . . . . . . . . . . . . . . . . . . . . . . . . . . . . . . . . . . . . . . . . 54
10.- Automatic scan . . . . . . . . . . . . . . . . . . . . . . . . . . . . . . . . . . . . . . . . . . . . . . . . . . . . . . . . . . . . . . . . . . . . . . . . . . . . . . 55
Menu structure . . . . . . . . . . . . . . . . . . . . . . . . . . . . . . . . . . . . . . . . . . . . . . . . . . . . . . . . . . . . . . . . . . . . . . . . . . . . . . . . . . 56
Connector description . . . . . . . . . . . . . . . . . . . . . . . . . . . . . . . . . . . . . . . . . . . . . . . . . . . . . . . . . . . . . . . . . . . . . . . . . . . . 57
Technical specifications . . . . . . . . . . . . . . . . . . . . . . . . . . . . . . . . . . . . . . . . . . . . . . . . . . . . . . . . . . . . . . . . . . . . . . . . . . . 58
Guarantee . . . . . . . . . . . . . . . . . . . . . . . . . . . . . . . . . . . . . . . . . . . . . . . . . . . . . . . . . . . . . . . . . . . . . . . . . . . . . . . . . . 59
User Manual
“
RSD - 7297”
32
The Receiver you have just purchased has been manufactured to meet international safety standards.
We recommend that you carefully read the safety instructions below.
POWERING:
90 - 260 V~ 50/60 Hz.
OVERLOAD:
Do not overload the sockets, extenders or adapters to avoid a fire hazard or risk of electric shock.
LIQUIDS:
Take care not to spill any liquids over the Receiver, or splash it.
Avoid placing recipients or objects with liquids on or next to the Receiver.
SMALL OBJECTS:
Avoid placing small metallic objets close to the unit. These could accidentally enter through the ventilation slots and
cause serious damage.
CLEANLINESS:
Unplug the Receiver from the mains before cleaning it.
Use a slightly damp, soft cloth (no detergent) to clean the outside of the Receiver.
VENTILATION:
Place the Receiver in a well-ventilated area so that the slots are not blocked in any way.
Avoid exposure to the sun or to other sources of heat.
Do not place on top of other equipment.
CONNECTIONS:
Carry out the recommended connections only to avoid any possible damage.
LNB CONNECTIONS:
Switch the Receiver off before connecting or disconnecting the LNB.
IF YOU DO NOT DO THIS, YOU MAY DAMAGE THE LNB.
TV or VCR CONNECTIONS:
Switch the Receiver off before connecting or disconnecting the TV or VCR.
IF YOU DO NOT DO THIS, YOU MAY DAMAGE THE TV OR VCR.
LOCATION:
Place the Receiver inside where it is protected from the rain, lightning and direct sunlight.
Install the Receiver in a horizaontal position.
1.- Safety measures
WARNING
RISK ELECTRICAL SHOCK
DO NOT OPEN
TO REDUCE THE RISK OF ELECTRIC SHOCK, DO NOT TAKE THE COVER OFF.
NO PART OF THE RECEIVER CAN BE REPAIRED BY THE USER.
PLEASE CONSULT A QUALIFIED TECHNICIAN FOR ANY REPAIRS
This symbol indicates "dangerous voltage" - there is the risk of an electric shock.
This symbol indicates that there are some important instrutions for this particular
product.

User Manual
“
RSD - 7297”
33
ENGLISH
- High quality video and audio.
- User-friendly onscreen menu.
- Favourite channels list.
- Compatible DiSEqC 1.2 / USALS.
- Channel control via the “move”,
“lock”, “favourites”, "delete" and
“add”.
- Program information on the EPG
(Electronic Programming Guide).
- Teletext function
- Remote control.
- It offers various types of LNB switching, output modes and monitors.
- Transponders that have been preprogrammed to various satellites.
- Displays the transponder information.
- Scans for recently added transponders.
- Access control.
- Automatic support system
PAL/NTSC.
- Auto-saving of previous channel and
auto-return.
- 4 digit display.
- Timer.
- Software upgrade function.
- Clock.
A Digital Satellite Receiver is a product
that enables you to see a large variety
of channels that are supplied by a satellite. This User manual explains everything from how to install the Receiver to
the steps that need to be taken to
improve various different functions.
This manual also describes in detail a
series of functions that are only available in this Receiver, so that you can use
them properly.
Please be sure to read this manual so
that the Receiver is installed and used
correctly, and make sure to keep it in a
safe place for future reference.
2.1.- Preface
2.2.- General specifications
Check that all of the parts are in the
box:
1 - Satellite Receiver RSD-7297
1 - Remote control
2 - “AAA”, “LR03” or “AM-4” batteries
- - User manuals
2.3.- Equipment
2.- Before beginning ...

User Manual
“
RSD - 7297”
34
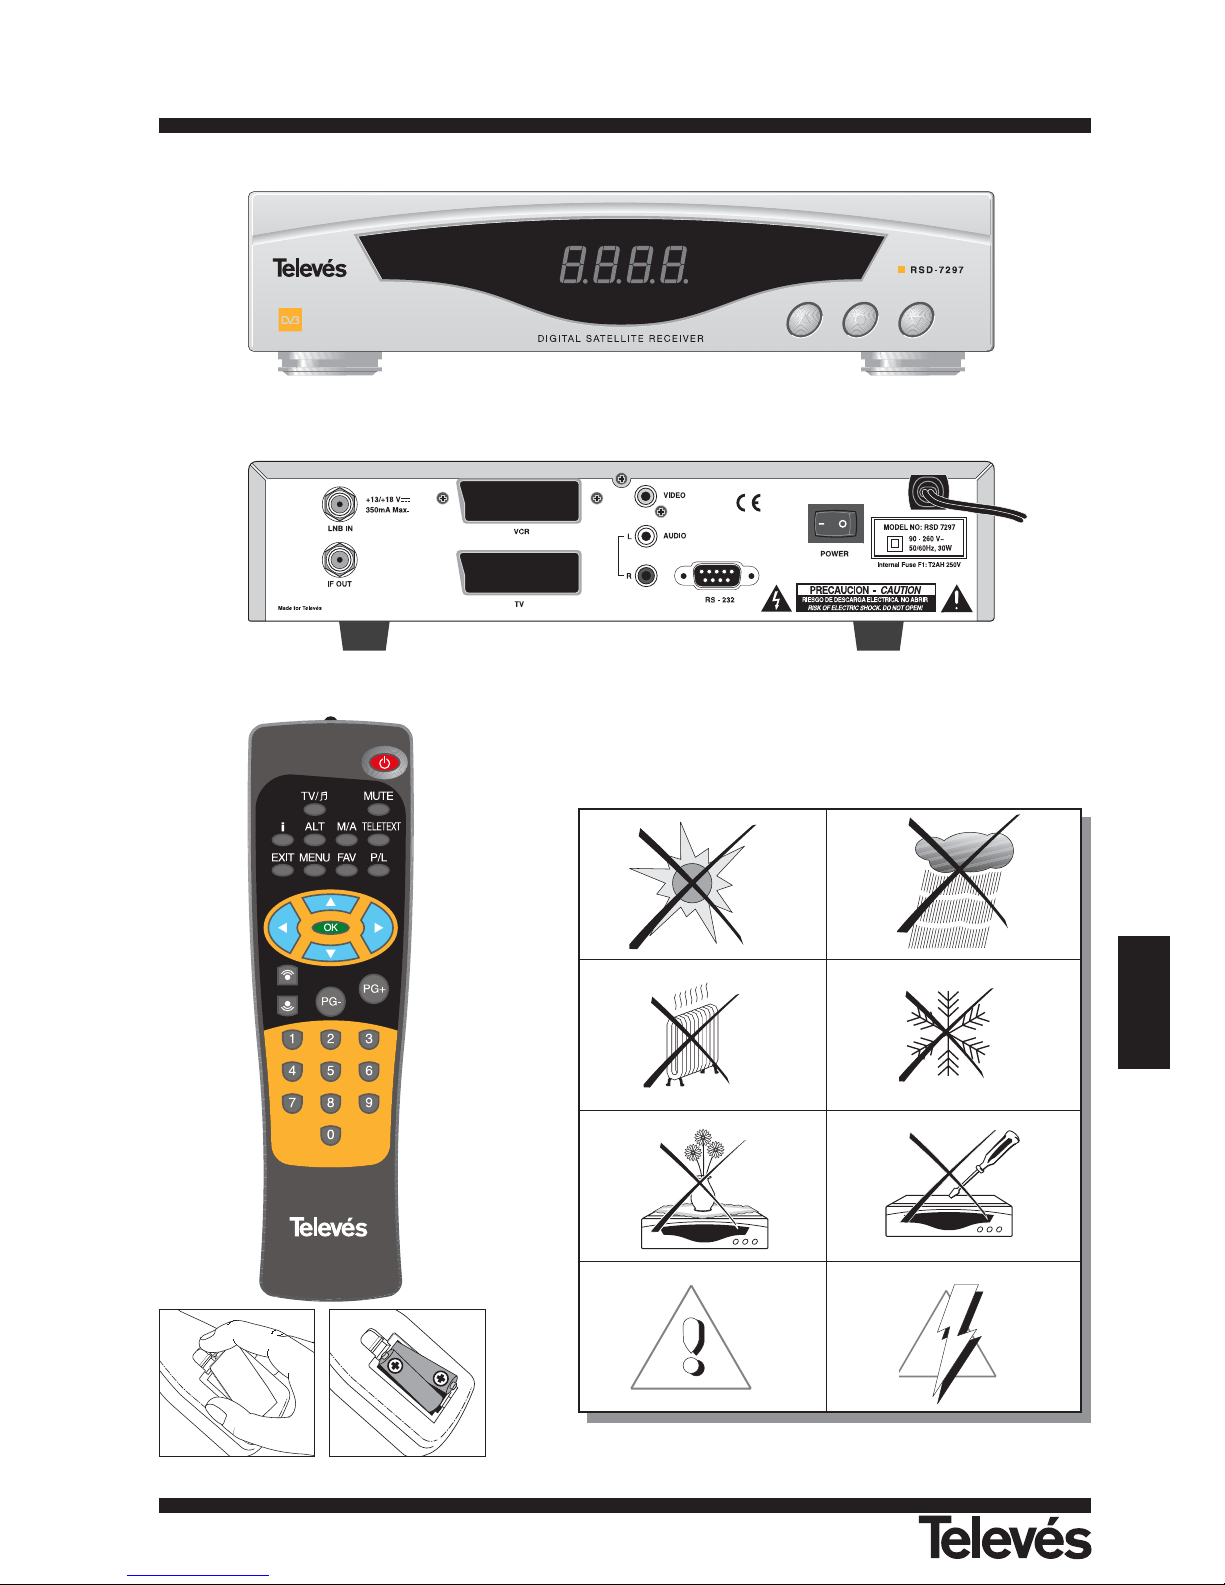
Button Function
It switches from normal operational mode to standby.
Goes up through the channels.
Goes down through the channels.
Display In normal mode, this displays the channel number; in STANDBY mode it displays the time.
Button Function
Switches between normal operational mode and standby.
Switches between TV or RADIO channels. Switches between TV list and Radio list.
MUTE Switches the sound off.
Displays information on the channel that you are watching.
If you press it again, the Electronic Programming Guide appears onscreen.
ALT Returns to the previous channel.
M/A Selects the different types of audio.
TELETEXT Activate the Teletext menu, if this is emitted.
EXIT Returns to the previous menu within the larger menus.
MENU Displays the main menu onscreen.
FAV Activates the favourite channel list.
P/L Activates a list with all of the locked channels.
, , , The cursors to move through the menu options.
OK
Executes the selected option in the menu and enters the value in any input mode or it displays the channel list while watching a program.
,
Increases or decreases the volume.
PG-/PG+ Goes up or down through the channel numbers.
0 ... 9 Selection of a channel to watch. Direct input of data in the menu.
Name Function
LNB IN Satellite antenna’s signal input.
IF OUT Satellite signal output to connect to another receiver.
TV To connect to the TV via a SCART connector.
VCR To connect to a VCR via a SCART connector.
VIDEO Video signal output.
AUDIO R Audio output (Right channel).
AUDIO L Audio output (Left channel).
RS232 Connection to a serial port or another receiver to update the software.
POWER ON/OFF switch.
Fig. 3 - Remote control
Fig. 2 - Rear Panel
Fig. 1 - Front Panel
3.- Description of panels and connections
User Manual
“
RSD - 7297”
35
ENGLISH
< -5°C
> 95 %
> 50°C
Fig. -1-
Fig. -2-
Fig. -3-
User Manual
“
RSD - 7297”
36
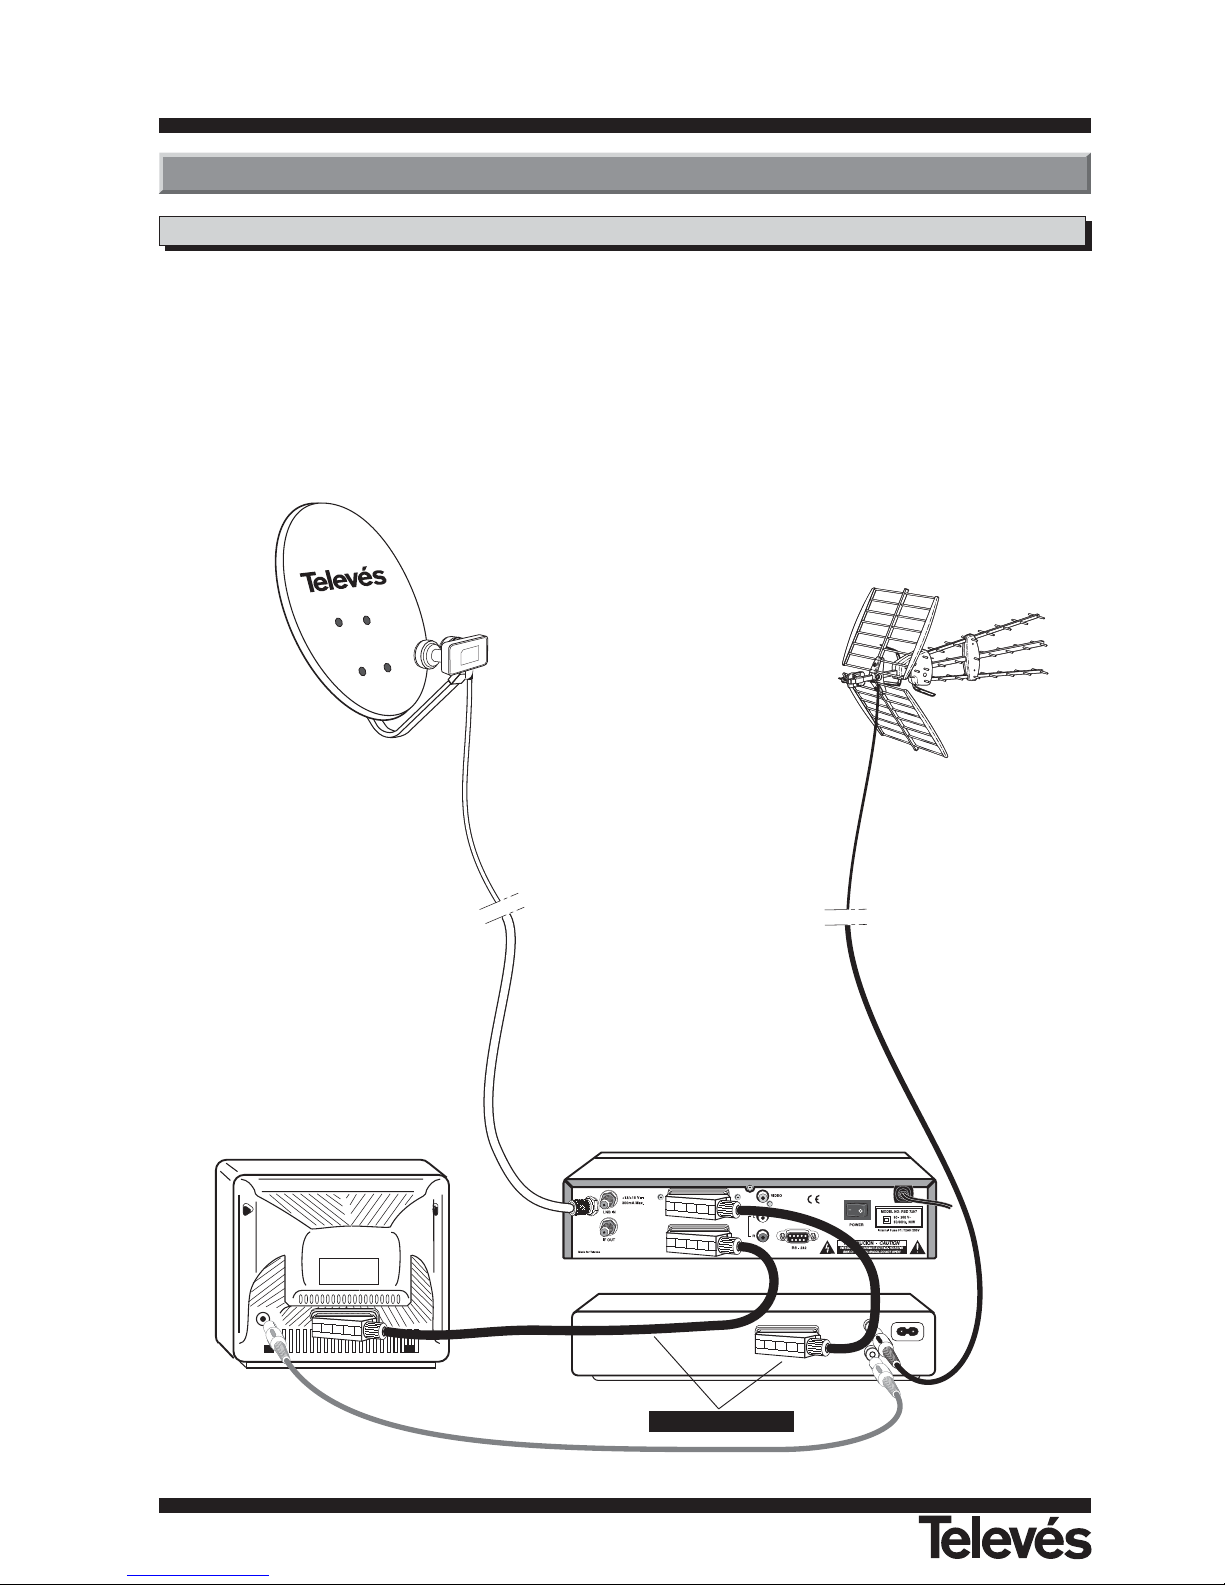
This section explains how to install the
satellite receiver. Please consult the
manual that comes with the equipment
to carry out the installation of the outdoor equipment such as the antenna.
If you want to add extra equipment,
please make sure that you read the
section of this manual that deals with
this type of installation.
1- Install the antenna and fix it so that it
is facing directly towards the satellite. After this, connect the antenna
cable to the satellite receiver.
2- Connect the satellite receiver tot he
TV and to the other equipment.
3- Set the receiver’s menu according to
the TV and the other equipment.
The receiver is now ready to use.
4.1.- Connections
Terrestrial reception
Satellite reception
VCR
RSD-7297
TV
4.- Installation of Equipment
(Recommended)
DO NOT PLUG THE
RECEIVER INTO THE
MAINS until all the
cables have been
correctly connected.
Note:
- All of the cables are
shielded.
User Manual
“
RSD - 7297”
37
ENGLISH
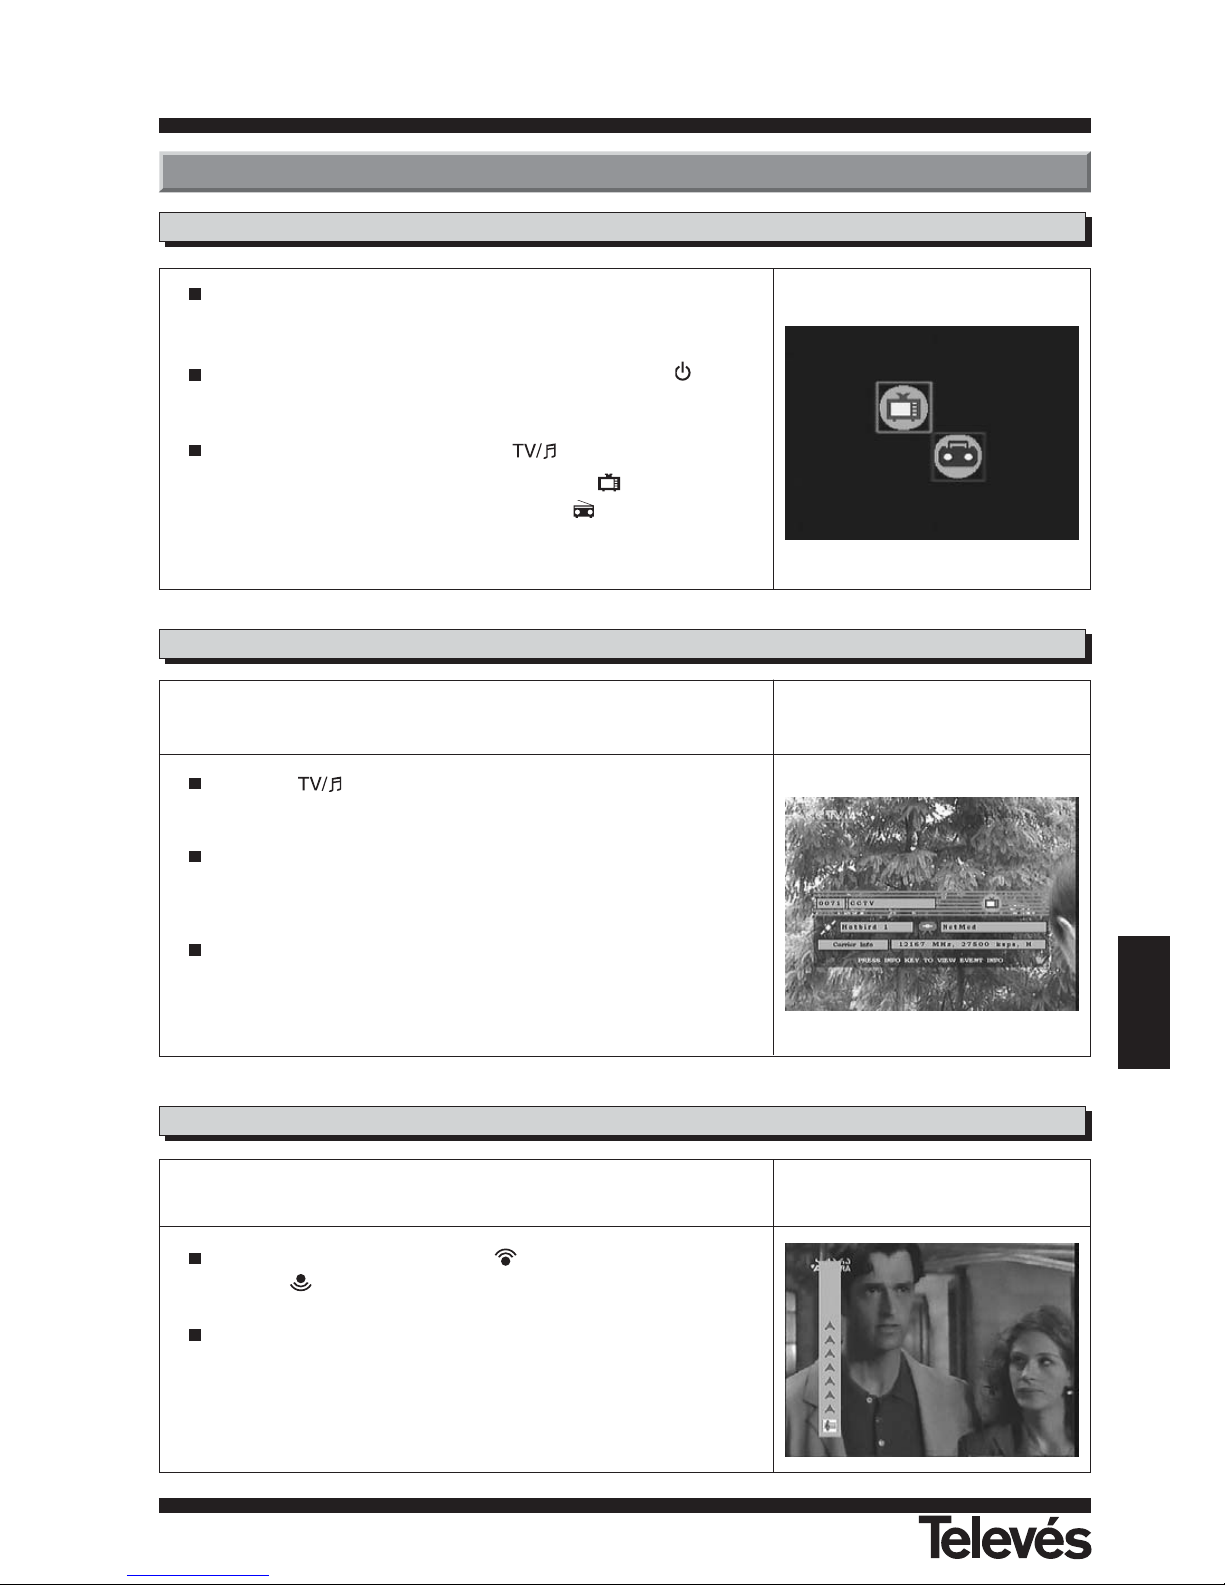
5.1.- How to start
5.- Ready to begin
Switch the TV on as well as all the additional equipment that may be
connected to the system.
Switch the satellite receiver on, by pressing the ON button ( )
on the
receiver or on the remote control.
Select the TV or Radio mode using the button.
The TV mode channels can be identified by the
symbol and the
Radio mode channels can be identified by the
button.
(The default mode is the TV mode).
The TV/Radio channels can be selected using both the remote control and
the buttons on the receiver.
Press the button to select the desired service mode (TV channels or radio channels).
When you can see the channel, press the PG+ button to select the following channel, or the PG- button to select the previous channel.
The selected channels will appear straight away with the corresponding
information at the bottom of the screen.
By pressing the i button, a window appears on the screen with information about the programme you are watching.
5.2.- How to select TV or RADIO channels
5.3.- How to adjust the volume
The volume can be adjusted using the remote control.
To increase the volume, press the button, and to decrease it,
press the button on thre remote control.
The volume levels can be seen on the indicator that appears
onscreen.

User Manual
“
RSD - 7297”
38
5.4.- Mute
Press the MUTE button to mute the sound.
To switch the sound back on again, pres the same button again.
The sound will return with the same volume as before.
To adjust the volume press the or buttons.
5.5.- Audio language
Some channels are transmitted in various audios. This depends on whether
this information is included in the signal that is sent to the Receiver.
In the case of TV channels, the different audios tend to correspond to the
different languages in which the channel is emited (for example, in the case
of “Euronews” - HOTBIRD, the Spanish language is received in the fifth
audio). As regards Radio programmes, each audio identifies a different radio
station (for example, the programme “Radio Esp” - ASTRA, contains 10
Spanish radio stations - 40 principales, M80, etc...-).
Press the M/A button to activate the menu that contains the different
transmission languages.
Select the desired audio from those available using the and
buttons and press OK.
To exit this menu, press EXIT.
If the flow of electricity is interrupted for any reason (the receiver is unplugged or the electricity supply interrupted),
when the receiver is connected once again to the current, the TV / RADIO channel that you were watching automatically appears onscreen with the Audio that was selected without having to press any buttons.
5.7.- Recalling previous channel and auto-saving
If you want to watch the channel that you were just previously watching but you cannot remember the channel
number, simplly press ALT.
5.6.- Recalling previous channel
If you wish to pause the image onscreen while watching a programme, press the 0 button. To return to the programme, press 0 again.
It is necessary to point out that when you pause an image onscreen, the programme that you were watching continues with its transmission as normal, so that during the time that the Pause is on, you will be missing the programme.
5.8.- Onscreen pause

User Manual
“
RSD - 7297”
39
ENGLISH
The RSD-7297 receives and stores information on the TV and Radio channels that are being watched. This includes detailed information on the time
schedule of the next programme. This guide is very easy to use, as it displays all the information in a single window onscreen.
The information provided by this guide consists of the channel number, the
channel name, the programme name and the date and time of emission
(when it starts and when it finishes).
Using the button you can change from the TV list to the Radio
list.
Press the i button while tuning the TV or Radio channels. The information window will appear with info on the channel that is selected at that
moment. Press the i button again while the information window is visible
and you will see the Electronic Programming Guide (EPG).
The EPG has three main sections. One of these is a list of the number
and name of the channels. With the or buttons, you can move
from one channel to another.
Immediately to the right, there is a small screen where you can see the
channel that you have selected in the list.
Finally, a window appears where you can see information on the programme that is on at the moment, as well as the starting and finishing
times.
By pressing the button, you can access a list with all of the programmes that are transmitted by that channel as well as their transmission
times. To move through them, use the or buttons. To return to the
channel list, press the button.
The information that appears in the guide comes with the signals transmitted by the service supplier. If a channel does not have any data for
the EPG, a message will appear onscreen indicating this.
Press the EXIT button to exit the EPG and access the selected channel.
5.9.- Electronic Program Guide (EPG)
Note:
- To receive the programme schedule correctly, you must first adjust the LOCAL TIME to the GMT (Greenwich Mean Time).
- The time that appears onscreen is provided by the supplier, so this information may be incorrect in certain channels.
 Loading...