


Table of contents
3
LED TV/
Телевизор цветного
изображения c
жидкокристаллическим
экраном
TF-LED32S60T2
Instruction manual
Руководство по
эксплуатации
Table of contents
Table of contents
Dear customer!
Thank you for purchasing our product. For safety, it is strongly recommended to read
this manual carefully before connecting, operating and/or adjusting the product and keep
the manual for reference in the future.
Table of contents
Before you start
Utilization of the product
Important safeguards
Installation
Base installation
Wall mounting
Connection
Outdoor antenna connection
Other connections
Operation
Control elements
Front panel
Back panel
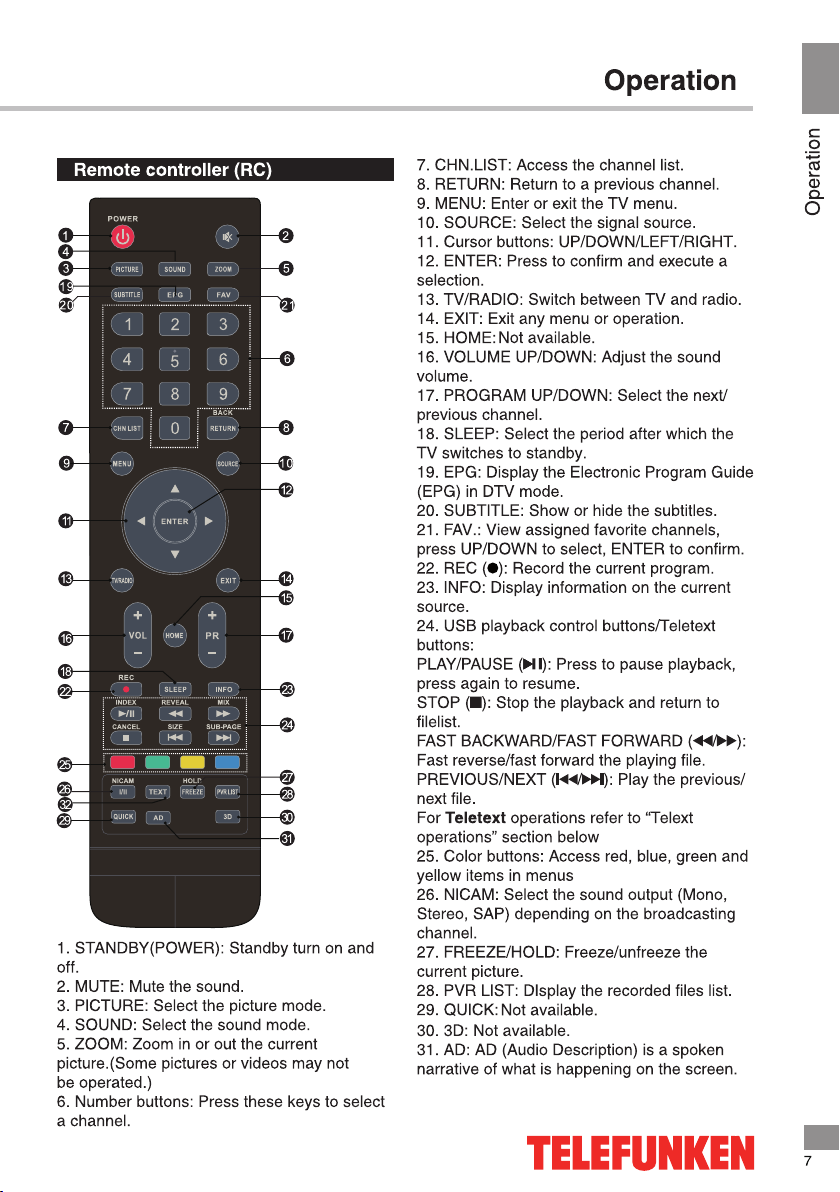
Remote controller
Changing the battery
General operations
Signal sources
Teletext operations
OSD operation
Picture
Sound
Time
Channel
Option
Lock
Personal Video Recording (PVR)
Electronic Program Guide (EPG)
CI Information
USB operation
General playback information
Operations of file playback
General information
Troubleshooting
Causes of interference
Accessories
Specifications
2
3
3
3
4
4
5
5
5
5
6
6
6
6
7
8
8
8
8
9
9
9
10
10
10
11
11
12
12
12
12
13
14
14
14
14
15
2

Before you start
Utilization of the product
If you want to dispose of this product, do not mix it with general household waste. There
is a separate collection system for used electronic products in accordance with legislation
that requires proper treatment, recovery and recycling.
Please contact your local authorities for the correct method of disposal. By doing so,
you will ensure that your disposed product undergoes the necessary treatment, recovery
and recycling and thus prevent potential negative effects on the environment and human
health.
Before you start
Important safeguards
• Please unplug the power cord from the AC
outlet and contact a service center for repair
if following occurs: any obvious abnormality
appears in the unit, such as smoky, peculiar
smell or strange sound; liquid has been spilled or
other objects have fallen into the unit; no picture
or sound; cover or panel is broken; although you
have operated the unit following the operating
instructions, it still cannot work normally.
• This unit can be connected to a power
supply outlet without the third ground contact
as well as with a ground contact.
• Always disconnect the power cord and
antenna during a thunderstorm.
• Do not fix the power cord with a metal nail.
• Unplug the power cord from the AC outlet;
also unplug the signal cables from the input
ports when the unit is unused for long periods
of time.
• When unplugging the plug, always hold the
wide slot, do not touch the metal part, and do
not destroy, twist, pull or heat the power cord.
• Please contact the service center
immediately if you found that the cable core is
bare or has been broken.
• Please replace the AC outlet if the metal
plug cannot be inserted into the power socket
completely or it cannot be fastened even when
it was pushed in, otherwise, any accidents of
shocks and fires could happen.
• Never touch the antenna or power plug
during a thunderstorm.
• Do not touch the power plug with wet
hands.
• Do not use any non-rated power socket
with numerous devices plugged into it. The
wire of non-designated capacity may cause fire
due to heat generation.
• All instructions must be read and
understood well before you operate the unit.
Heed all warnings and follow all instructions.
• Please use the accessories provided
by the manufacturer. Using inadequate
accessories may result in accidents.
• Please adjust the product through the
panel buttons or the remote controller, do
not remove the cover or attempt to service
the product by yourself. Do not disassemble
back cover and do not make maintenance by
yourself to avoid the electric shock.
• Excessive pressure on the panel may
damage the unit.
• Do not place the product on an unstable
cart, stand surface, tripod, bracket, or table.
The product may fall, causing serious accidents
as well as damage to the product.
• Please place the product on a flat surface
in a well-ventilated location. Keep it away
from open fire, direct sunlight, vibration, high
temperature and humidity.
• Do not place any vases, potted plants,
cups, medicines or any other liquid containing
objects on the unit. Spillages may cause fire,
electric shock or breakdown.
3

Before you start
Before you start
• Do not install the unit in locations with
a strong magnetic or current field as it may
cause malfunction. Picture deterioration due to
electromagnetic radiation in this environment is
also possible.
• Do not place any fire source such as
candles close or on this product. If tipped over
or fallen down, it may cause damage or fire.
• Do not place the unit into closed space
of TV for better ventilation; it can reduce the
product lifetime. Keep a space at least 10 cm
at above, left, and right of the TV.
• Please place all the signal cords behind
the rear panel.
• Do not overexert or touch the panel when
carrying the product. Do not transport the LED
TV with the display faced up or down.
• Do not transport the unit with the power
cord or the connection cable connected as it
may damage the power cord, connection cable
or connection terminal which may cause fire,
electric shock or breakdown.
• Make sure that 2 persons or more carry
the device heavier than 18 kg. Dropping or
tipping over the device may damage it.
• The temperature of the product’s body
becomes a little higher after a long period
of use. This indicates that heat exchange
is in normal working mode, thus please do
not let children or anyone who is sensitive to
temperature touch the unit.
All images provided herein are schematic
drawings of real objects and may differ
from their real life images.
WARNING
In order to avoid damage, make sure
to secure the unit on the wall
according to the wall mounting
instruction.
Installation
Base instalation:
B
Place the LED TV on a solid flat surface.
Use soft material to place over the front screen
to avoid any damage.
Align the stands with the holes in the lower
part of the TV cabinet and fix the assembly with
two T4x18 screws.
A
Wall mounting
For wall mounting the back panel of this
unit is equipped with 4 screw holes (spread
distance 100*100 mm). A VESA wall-mount
bracket should be used for wall mounting (the
bracket is not included and should be acquired
separately).
Due to construction peculiarities, it is not
recommended to mount TVs on walls using
swinging and tilting brackets. Such a mounting
may not be steady.
Manufacturer is not responsible for improper
mounting resulting in damage of the unit.
4
4
Connection
Installation
Installation
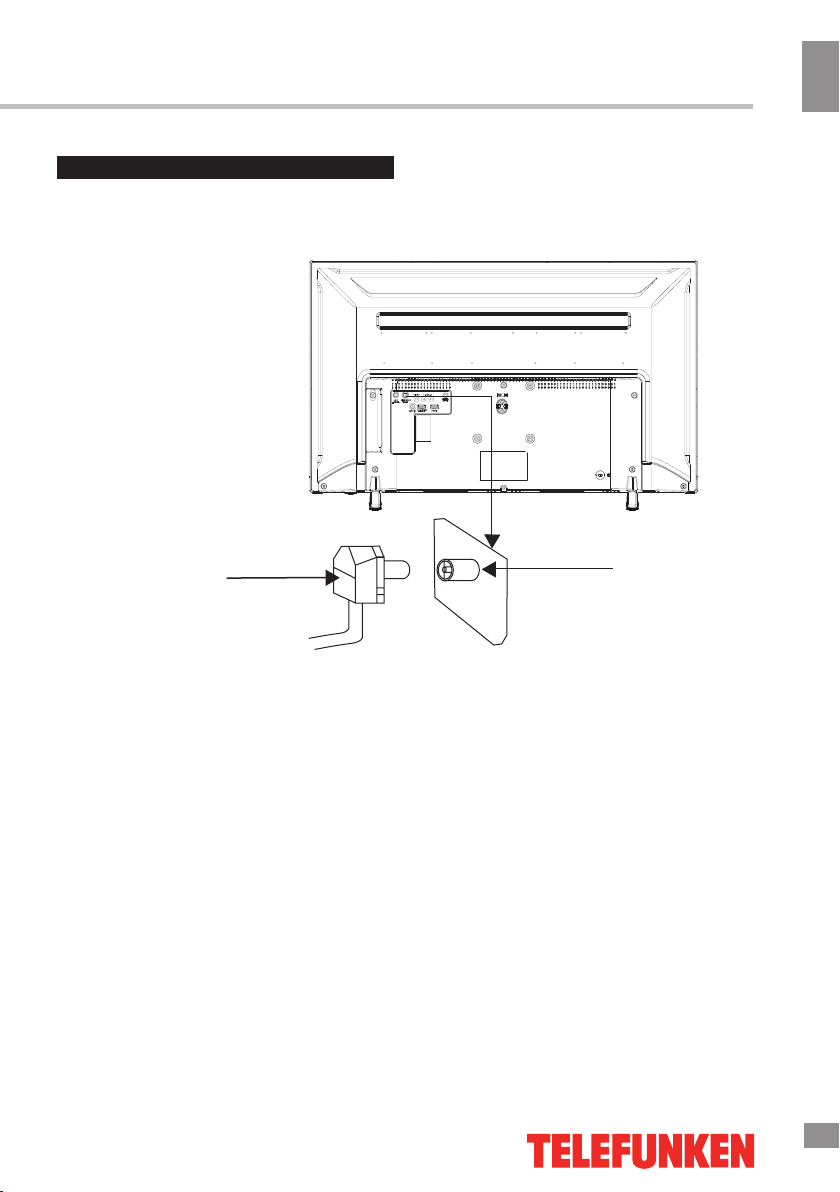
Antenna cable connector
75 Ohm co-axis cable
Outdoor Antenna Connection
Use 75Ω coaxial cable plug or 300-75Ω
impedance converter to plug in antenna input
terminal on the rear of the unit casing.
Other connections
• Connect audio and video sources
(Including DVD, VCDR, CAMCORDER,
etc.) to the AV input using .. AV cable
(not included).
• Plug the power cable in the electric outlet,
making sure the current voltage is supported.
• If the video source has a HDMI output
jack, you can connect the signal to the TV by
the HDMI cable (not included). Use the HDMI1(MHL) input to connect your smartphone via a
special cable to see the digital content on the
TV screen. Support of all devices with the MHL
function is not guaranteed.
TVRF antenna jack
• Connect your headphones or earphones
(not included) to the headphone socket of this
unit. When earphones are connected, the
sound output through the built-in speakers of
this unit is mute.
• PCMCIA slot is used for CI modules that
are obtained from your digital TV provider.
•
The service port is used for updating the TV
software by qualified technicians only.
5
5
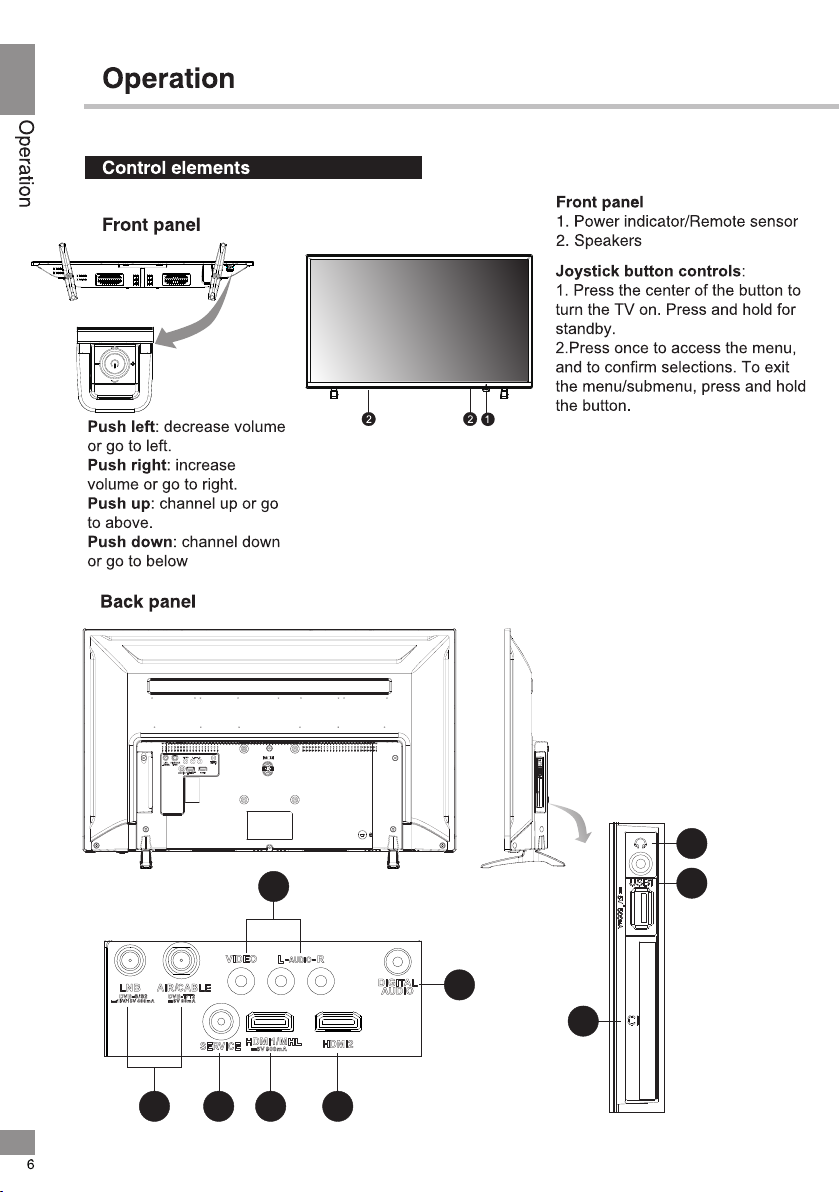
Back Panel
1.Antenna inputs
2.Service input
3.HDMI inputs
Digital audio output
4.
AV input
5.
Earphone output
6.
7.
USB port
8.CI card port
6
1 2
5
7
4
8
3
3

Operation
Operation
Changing the battery
1. Remove the battery compartment cover
on the back of the RC.
2. Insert two AAA batteries into the battery
compartment making sure that the correct
polarity is observed.
3. Put the cover back.
• The RC should be pointed at remote
sensor within 8 meters and within 30 degrees
at the left or the right side.
• Take the battery out of the RC if it is not
used for a long time.
• Do not mix new and used batteries or
different types of batteries. Weak batteries can
leak and severely damage the RC.
• Do not expose the RC to shock, liquids,
and do not place it in an area with high
humidity.
General operations
•
Press the central button on the unit or
POWER button on the RC to switch on the
power, the indication on the unit will light up.
Press POWER button again to switch off the
power, and the light will be in red color.
• Press VOL- button repeatedly to decrease
the volume; press VOL+ button repeatedly to
increase the volume.
• Press RETURN button on the RC to select
from the present channel and the previously
displayed channel.
• Press MUTE button to cut off sound, press
this button again or adjust volume to resume
sound.
• Press PR-/PR+ buttons to select previous
or next channels; or press number buttons to
enter a channel number directly.
• Press PICTURE button repeatedly to cycle
through available video picture modes.
• Press SOUND button repeatedly to cycle
through available sound modes.
• Press NICAM button in TV mode
repeatedly to switch between Stereo, Mono,
SAP sound modes (can be unavailable for
some channels).
• Press FREEZE button to freeze the picture
on or off.
• Press FAV button to show the favourite
channel list. Press UP/DOWN to select next
or previous favorite channel. Press ENTER to
confirm.
Signal sources
Press SOURCE button, then press DOWN/
UP cursor buttons on the RC or PR UP/PR
DOWN buttons on the panel to select a source
from avai
ATV - AV - HDMI - USB. Press ENTER button
on the RC or the central button on the panel to
confirm.
lable source list: DVBT - DVBC -
TELETEXT operations (option)
• Select the TV source mode. Then press
PR-/PR+ buttons to select TV channel in order
to pick up the picture signal of Teletext.
• Press PR-/PR+ buttons to select the
previous page or the next page.
• Teletext button functions are as follows:
HOLD: Press this button to stop the move
to the next page. Press this button again to
cancel operation.
INDEX: Press this button to go to the index
page.
CANCEL: Press this button to cancel the
teletext; press again to show the teletext.
REVEAL: Press this button to reveal the
concealed information. Press this button again
to conceal the information.
SUBPAGE: Press this button to select sub
page, then press Red/Green buttons to select
the desired subpage.
MIX: Press this button to mix the teletext
and current TV signal image (transparent
background).
RED/GREEN/YELLOW/BLUE buttons:
Press these 4 color buttons to access directly
to corresponding color page displayed at the
lower parts of teletext screen.
8
8

Picture Mode
Brightness
Contrast
Color
Tint
Sharpness
Color Temperature
Aspect Ratio
Noise Reduction
MPEG NR
•
Picture Mode: Dynamic/Standard/Mild/User.
•
Brightness
•
Contrast
•
Color
•
Tint: adjust the tone of color when your
system is in NTSC.
•
Sharpness
•
Color Temperature: Nature/User/Warm/
Cool.
•
Aspect Ratio: 16:9/4:3/Just Scan/Zoom1/
Zoom2.
• Noise Reduction: select between four
modes of digital noise reduction available: Off/
Low/Middle/High.
• MPEG Noise Reduction: eliminate digital
picture decoding noises: Off/Low/Middle/High
Sound Mode
Bass
Treble
Balance
Auto Volume
Surround Sound
AD Switch
• Sound Mode: Standard/Music/Movie/
Sports/User.
•
Bass: adjust the lower frequency of
the sound.
•
Treble: adjust the higher frequency of
the sound.
• Balance: adjust balance between left and
right speakers.
• Auto Volume: set the auto volume
correction on/off. It will level out the sound
volume when sudden changes in volume occur
during commercial breaks or channel change.
• Surround Sound: set the surround sound
effect on or off.
• AD Switch (in DTV mode): This is an
auxiliary audio function that provides an
additional audio track for visually challenged
persons. This function handles the Audio
Stream for the AD (Audio Description), when
it is sent along with the Main audio from
the broadcaster. Users can turn the Audio
Description On or Off and control the volume.

Time Zone
Auto Sync
Clock
Summer Time
Sleep Timer
Auto Sleep
• Time Zone: Select the desired time zone.
• Auto Sync: On/Off. Synchronize TV time
with the system when receiving DTV signal.
• Clock: Set the time and date. Only
available when Auto Sync is set to Off.
• Summer Time: Toggle the automatic
Summer/Winter time switching on and off.
• Sleep Timer: Set the auto off timer to
Off/10/20/30/60/90/120/180 or 240 minutes.
• Auto Sleep: Set the auto off timer when
no operations are performed to off/4 hours/6
hours/8 hours.
Auto Tuning
DTV Manual Tuning
ATV Manual Tuning
Programme Edit
Signal Information
CI Information
5V antenna power
• DTV Manual T
to select either D
VB-T or D
: Press SOURCE
uning
VB-C mode.
Press LEFT/RIGHT cursor buttons to select
channel number or input the frequency using
the number buttons. Press ENTER to start
searching. When the nearest available channel
is found, the search will stop and the channel
will be saved under the selected number. Press
MENU button to quit.
• ATV Manual Tuning:
Storage To: select channel number.
Sound System: select corresponding sound
system.
Search: press LEFT/RIGHT buttons; the
unit will search for next available channel
downward or upward and save it under the
current number.
Fine Tuning: perform fine adjustment of the
current frequency.
•
Programme Edit: this item allows you to sort
TV programs according to your preferences.
Follow the instruction on screen to use color
buttons on the RC to skip, rename and delete
programs, and add them to favorites by
pressing FAV.
• Signal Information: View the information
on the current DTV channel.
• CI Information: This function enables
you to watch some encrypted services (pay
services). Please insert a CI card into the
PCMCIA slot according to the arrow on the CI
card.
•
5V antenna power: This function is only
available in DVB-T mode, select On to supply
power to the TV's antenna, select Off to turn
this function off.
•
Auto Tuning: press ENTER and cursor
buttons to select the country and source type
for channels to start automatic search and
saving of available DVB-T, DVB-C and ATV
channels. You can pause the search at any
time by pressing the MENU or EXIT button.

OSD Language
Audio Languages
Subtitle Languages
TTX Language
TIME
HDMI CEC
PVR File System
Restore Default
SW Update(USB)
LOCK System
Set Password
Block Program
Parental Guidance
• OSD Language: select the language of
the OSD menu.
•
Audio Languages: select the language of
some DTV programs.
•
Subtitle Languages: select the language of
subtitles in DTV mode.
•
TTX Language: select the language of
the Teletext.
•
TIME: enter the Time setting menu
(see above)
•
HDMI CEC: turn the HDMI CEC function
on or off, automatic TV standby and see the list
of linked HDMI devices.
• PVR File System: Personal Video Record
setting. A USB storage device is required to
enable program recording.
• Restore Factory Default: Revert settings
to default factory values.
• Software Update (USB): Upgrade the
TV’s software using a USB storage device.
• Lock System: The feature can prevent
unauthorized operation of the TV set unless
entering a 4-digit password. When Lock
System is on and the system is locked,
you must input the system password when
changing certain parameters. Press the right
number buttons for the password. The default
password is 0000.
After a password correction has been
confirmed, please remember it for entering into
the Parental Guidance menu, all functions can
not be activated until the correct password is
entered.
• Set Password: Set the system password.
• Block Program: Block/unblock the
desired programs.
• Parental Guidance: Set the restriction
level of parental control.

Operation
Operation
forward the recording.
Please note the following about PVR:
• USB storage device must have the
capacity of at least 512 MB and support the
USB 2.0 standard. Some non-standard storage
devices may not be supported
• Try formatting the inserted storage device
when you have trouble recording.
• Do not disconnect the device while the
formatting is in progress. When you format
the device, all data on it is deleted. It may
be advisable to back up your files before
formatting.
• If the USB storage device has several
partitions, the PVR system can record the data
on any one of them.
Electronic Program Guide (EPG)
Press EPG button to display the Programme
Guide menu. This function gives you the
detailed information of the channel, indicating
the time of the program playing. From the
Programme Guide it is possible to check
the program information for the next eight
days (If the information is available from the
broadcaster). Press MENU/EXIT button to quit.
Time shift is a feature enabling you to record
a TV program while you are away to watch it
later at convenient time.
• Record: Press Red button to set the
parameters of recording, The unit is able to
do schedule recording when TV is turning on
or in standby mode. You can set up several
schedule recording. Different schedules should
not overlap. When recording starts in standby
mode, the front indicators will change color and
there will be no picture or sound from the unit.
You can press the POWER button to light up
the screen.
• Info: Press Green button to see the
detailed information of the current channel.
• Schedule: Press Yellow button to display
the schedule list.
• Remind: If you find the desired program
which will be shown in the future. Press Blue
button to book program.
CI Information
This function enables you to watch some
encrypted services (pay services). Please
insert a CI card into the PCMCIA slot according
to the arrow on the CI card.
• The function can only be available
when CI card is present.
• It is possible for you to change CI
(Common Interface) menu screen and service
by consulting your dealer.
• Please do not insert or pull out the CI card
when power on. During initialization of the CI
card, please don’t operate the TV.
• Do not insert or pull out the CI card
frequently so as to avoid any damages of the
TV and the CI card.
• If there is no picture and/or sound with the
CI+ CAM module inserted, please contact the
customer support of the service provider.
USB operation
General playback information
• Insert a USB drive into the USB port.
Select USB as the source. The screen will
show a USB playback window, in which
you can select Video, Music, Photo modes
by pressing LEFT/RIGHT cursor buttons
and OK button.
• USB file systems supported: FAT16, FAT32
; maximum capacity 1 TB. For correct and
satisfactory operation, licensed USB devices of
well-known brands should be used. Avoid using
USB devices of unknown brands. Playback of
some file formats cannot be supported.
• This unit supports playback of video files
with ASF, AVI, MKV, MPG extension, with
video codecs WMV9, H263, MPEG-4,
MPEGII and audio codecs WMA, MP3,
DD(AC3).
The above list of extensions and codecs
is for information only and is not a guarantee
that all files having the above extensions and
codecs sohuld be read by this unit.
12
12

Operation
• Some AVI files cannot be played due to
their parameters and recording conditions.
Video files with AVI extension exceeding 2 GB
in size may be played partially.
According to the USB 1.1/2.0 Standard,
usage of a USB device with power current
consumption exceeding 500 mA is not
recommended without supplementary power
supply. Failure to use supplementary power for
connected USB drives with power consumption
exceeding this value as well as defective
USB drives may cause mechanical or thermal
changes of elements of this unit as well as
failure of internal elements of the USB port.
Such damages are not warranty cases.
Warning: usage of external USB drives
containing BIN files in the root directory may
cause malfunction of the unit or damage to the
software.
General operations of file playback
• Press cursor buttons to select Return
option and press ENTER button if you want to
go back to the previous menu.
• In the content menu, press cursor buttons
to select folder, press ENTER button to enter it,
then press cursor buttons to select the file you
want to watch or to listen to. When highlighting
the file, the file information will appear on the
right and picture will be previewed in the center
(not available for music files). Press ENTER
button or button to play the selected file.
• While playback, press INFO button; the
bottom of the screen will show playback menu
in which you can select an operation by LEFT/
RIGHT cursor buttons on perform this operation by pressing ENTER button.
• While playback, press button to pause
or resume playback. Press button to stop
playback.
• When playing music files you can press
/ buttons to fast reverse or forward. You can
press / buttons to select the desired files
manually in normal condition.
• When playing photo files, you can press
/ buttons to page up or page down the
file.
• Press RETURN button to stop playback
and return to the previous menu screen.
Operation
13
13


PAL, SECAM, NTSC
B/G, DK, I, M
1000

General information
General information
14
16

Содержание
Уважаемый покупатель!
Благодарим Вас за покупку нашего изделия. Чтобы понять, как правильно и безопасно пользоваться приобретенным устройством, рекомендуется тщательно изучить
настоящее руководство перед подключением и эксплуатацией изделия. Сохраняйте
руководство для использования в будущем.
Содержание
Содержание
Перед началом эксплуатации
Утилизация изделия
Меры предосторожности
Установка
Установка на подставку
Крепление на стену
Подключение
Подключение внешней антенны
Прочие подключения
Управление устройством
Элементы управления
Передняя панель
Задняя панель
Пульт дистанционного управления
Установка батареек
Общие операции
Источники сигнала
Операции с телетекстом
Экранное меню
Изображение
Звук
Время
Канал
Опции
Блок
Запись цифровых программ (PVR)
Электронный телегид (EPG)
Интерфейс CI
Операции с USB
Общая информация
Воспроизведение файлов
Общая информация
Руководство по устранению
неисправностей
Источники помех
Комплект поставки
Технические характеристики
17
18
18
18
20
20
20
21
21
21
22
22
22
22
23
24
24
24
24
25
25
25
26
26
27
27
28
28
28
29
29
29
31
31
31
32
32
Перед покупкой рекомендуется провести
проверку оборудования:
- на отсутствие механических
повреждений конструкции, внешнего
оформления и упаковки, на
функционирование, на сохранность
пломб, на соответствие комплекта
поставки данным раздела
"Комплектность". Проведение проверки на
функционирование является
обязанностью продавца;
- на наличие гарантийного талона
- на правильность простановки в
гарантийном талоне даты продажи и
штампа продавца.
Рекомендуется сохранять товарный
(кассовый) чек, руководство по
эксплуатации с гарантийным талоном до
конца гарантийного срока эксплуатации.
15
17

Перед началом эксплуатации
Перед началом эксплуатации
Утилизация изделия
Если вы желаете утилизировать данное изделие, не выбрасывайте его вместе с
обычным бытовым мусором. Существует отдельная система сбора использованных
электронных изделий в соответствии с законодательством, которая предполагает
соответствующее обращение, возврат и переработку.
Обращайтесь в органы местного управления за инструкциями по правильной утилизации продукта. Тем самым Вы обеспечите утилизацию Вашего изделия с соблюдением обязательных процедур по обработке, утилизации и вторичной переработке
и, таким образом, предотвратите потенциальное негативное воздействие на окружающую среду и здоровье людей.
Меры предосторожности
• Пожалуйста, извлеките шнур питания из розетки и свяжитесь с сервисной
службой в следующих случаях: если в
устройстве имеются явные неисправности,
например, из него идет дым, чувствуется
специфический запах или слышен нехарактерный звук; если внутрь устройства
попала жидкость или посторонние предметы; если нет изображения или звука; если
поврежден корпус или панель; если Вы
пользуетесь устройством согласно инструкции, но оно не работает должным образом.
• Данное изделие может подключаться
к розетке питания как без заземляющего
третьего контакта, так и с заземляющим
третьим контактом.
• Во избежание поражения электрическим током защищайте шнур питания от
возможного нажатия на него или защемления, особенно рядом с разъемами.
• Не закрепляйте шнур питания метизами.
• Если Вы не пользуетесь устройством
длительное время или в случае грозы
обязательно отключайте шнур питания из
розетки, а также отключайте все сигнальные кабели от входных разъемов.
• При отключении вилки из розетки всег-
да держитесь за утолщение на вилке, не
касайтесь металлических частей, не тяните
за шнур и не ломайте и не перегибайте его,
не ремонтируйте, не перекручивайте и не
нагревайте.
• Немедленно свяжитесь с сервисным
центром, в случае если имеются какие-либо
неисправности шнура питания, в нем оголились жилы или он поврежден.
• Замените сетевую розетку, если в
нее невозможно вставить вилку или вилка
плохо закрепляется в розетке. Иначе могут
возникнуть неисправности или произойти
несчастные случаи или возгорания.
• Не прикасайтесь к проводам мокрыми
руками.
• Запрещается использование розетки, в
которую подключено несколько устройств.
Перегрузка такой розетки может привести
к пожару.
• Место подключения вилки шнура
питания к сети 220 В должно оставаться
легкодоступным.
• Перед работой с устройством необходимо полностью прочитать и понять все
инструкции. Необходимо соблюдать все предупреждения и следовать всем инструкциям,
приведенным в настоящем руководстве.
• Пожалуйста, используйте только рекомендованные производителем аксессуары.
16
18

Перед началом эксплуатации
Использование других аксессуаров может
привести к неисправностям.
• Пожалуйста, проводите все настройки
и регулировки только с помощью кнопок
на передней и боковой панелях или на
пульте дистанционного управления. Ни в
коем случае не снимайте заднюю панель
и не пытайтесь самостоятельно проводить
техническое обслуживание устройства,
так как существует опасность поражения
электрическим током, а также возможно
возникновение неисправностей.
• Не устанавливайте устройство на
непрочные или неровные поверхности,
тележки, стойки, треноги, кронштейны или
столы. Устройство может упасть, в результате чего могут возникнуть неисправности
или произойти несчастные случаи. Используйте только те приспособления, которые
рекомендованы производителем или
продавцом.
• Пожалуйста, устанавливайте устройство на горизонтальной поверхности в местах с хорошей вентиляцией. Не допускайте
воздействия на устройство вибрации, прямого солнечного света, высокой температуры, а также попадания пыли и влаги.
• Не ставьте на устройство вазы, сосуды
с жидкостью. Попадание жидкости внутрь
аппарата может привести к пожару или
поломке устройства.
• Не устанавливайте устройство в зоне
магнитных волн. Это может привести к
поломке устройства. В зоне электромагнитного излучения может наблюдаться
искажение изображения.
• Не устанавливайте вблизи устройства
источники открытого огня, например, свечи.
В случае их падения устройство может быть
повреждено или может произойти возгорание.
• Установка телевизора в замкнутое
пространство при эксплуатации может
сократить срок службы устройства; поэтому
необходимо обеспечить минимальную
дистанцию между LCD-телевизором и
внутренними границами приспособления
под аппарат для нормальной вентиляции
(минимум по 10 см свободного пространства со всех сторон).
• Располагайте кабели позади устройства. Не закрепляйте их метизами, не перегибайте, не ремонтируйте и не нагревайте.
• При перемещении телевизора не нажимайте и не касайтесь панели. Не переносите телевизор в положении, при котором
экран направлен вверх или вниз.
• Не перемещайте устройство при
подключенном проводе питания или других
подключенных проводах. Повреждение провода питания, подключенный провод или
подключенные устройства могут стать причиной пожара, электрошока или поломки.
• Если устройство тяжелее 18 кг, его
должны перемещать не менее 2 человек.
При падении устройство может повредиться.
• Слишком сильное нажатие на панель
может повредить устройство.
• При длительном использовании может
немного повыситься температура корпуса
устройства. Это явление свидетельствует о
теплоотдаче в нормальном рабочем режиме. Однако не позволяйте детям и людям с
повышенной температурной чувствительностью касаться устройства.
• Время выдержки телевизора при комнатной температуре до включения питания
после транспортирования или хранения
при пониженной температуре окружающей
среды должно быть не менее 5 часов.
Все иллюстрации, приведенные в настоящем руководстве, являются схематическими изображениями, которые
могут отличаться от реальных объектов.
Перед началом эксплуатации
17
19

Перед началом эксплуатации
Установка/Подключение
Установка
Установка на подставку
B
Выберите ровную плоскую горизонтальную поверхность, накройте ее мягкой тканью и разместите на ней корпус
телевизора экраном вниз. Cовместите
отверстия на подставках с отверстиями на
задней части корпуса телевизора и
зафиксируйте с помощью двух винтов
T4X18.
A
Крепление на стену
Для крепления на стену на задней панели телевизора имеются 4 отверстия (дистанция 100*100 мм). Для крепления следует
использовать настенный кронштейн стандарта VESA (в комплект поставки не входит
и приобретается отдельно).
Из-за особенностей конструкции, крепление на стену не рекомендуется осуществлять с помощью поворотных и наклонных
кронштейнов. Такое крепление может быть
ненадежным.
Производитель не несет ответственности
за неправильно выполненный монтаж, повлекший повреждение телевизора.
ПРЕДУПРЕЖДЕНИЕ
Во избежание повреждений надежно
закрепите аппарат на стене в
соответствии с требованиями
инструкции по установке.
ВНИМАНИЕ -
в электрическую сеть необходимо
ознакомиться с мерами электрической
и противопожарной безопасности,
приведенными в разделе "Меры
предосторожности" настоящего
Руководства по эксплуатации.
До включения аппаратуры
18
20

Подключение
Установка/Подключение
Перед началом эксплуатации
Штекер антенного кабеля
Антенный кабель 75 Ом
Подключение внешней антенны
Подсоедините антенну к соответствующему разъему. Используйте антенный кабель
75 Ом при подключении внешней антенны.
Прочие подключения
• Подсоедините источник аудио- и видеосигнала (DVD, VCDR и др.) к аудиовидеовходу
(AV) с помощью специального кабеля (в
комплект не входит).
• Разъем питания предназначен для подключения телевизора к сети электрического
питания.
• Если источник видеосигнала имеет
HDMI-выход, подключите его к HDMIвходу телевизора, используя специальный HDMI-кабель (в комплект не входит).
Разъем HDMI-1 поддерживает функцию
MHL, позволяющую выводить на экран
телевизора изображение со смартфонов
с функцией MHL. Требуется специальный
кабель (в комплект не входит). Не гарантируется совместимость со всеми мобильными устройствами, поддерживающими
функцию MHL.
Разъем для антенны
• Подсоедините наушники к разъему
для наушников (в комплект не входят). При
подсоединенных наушниках звук через
динамики телевизора не воспроизводится.
• Разъем PCMCIA используется для
подключения CI-модуля, приобретаемого у
поставщика услуг цифрового ТВ.
•
Сервисный порт служит для обновления ПО
телевизора. Только для специалистов.
•
Для подключения дополнительных
периферийных устройств используйте
только сертифицированные кабели и
переходники. Все соединения производите
только после отключения основного питания
телевизора от сети.
19
21

Управление устройством
Управление устройством
Элементы управления
Передняя панель
Влево: уменьшение
громкости / переход влево.
Вправо: увеличение
громкости / переход вправо.
Вверх: следующий канал /
переход вверх.
Вниз: предыдущий канал /
переход вниз
Задняя панель
Передняя панель
1. Индикатор питания/Датчик ПДУ
2. Динамики
Управление кнопкойджойстиком:
1. Нажмите центр кнопки для
включения ТВ. Нажмите и
удерживайте для перехода в
режим ожидания.
2. Нажмите кнопку для перехода к
выбору источника сигнала.
Задняя панель
1.Антенные разъемы
2.Сервисный вход
3.HDMI-входы
Цифровой аудиовыход
4.
Аудиовидеовход
5.
6.
Разъем для наушников
7.
USB-порт
8.Интерфейс CI
6
5
7
4
8
1 2
20
22
3
3

Управление устройством
Пульт дистанционного управления
1. STANDBY(POWER): Переход в режим
ожидания вкл/выкл.
2. MUTE: Выключить звук.
3. PICTURE: Выбор режима изображения.
4. SOUND: Выбор режима звука.
5. ZOOM: Приблизить изображение.
(Доступно не для всех каналов/файлов).
6. 0-9: Кнопки для выбора канала.
7. CHN.LIST: Доступ к списку каналов.
8. RETURN: Возврат к предыдущему
каналу.
9. MENU: Доступ к меню.
10. SOURCE: Выбор источника сигнала.
11. Кнопки курсора: ВВЕРХ/ВНИЗ/ВЛЕВО/
ВПРАВО.
12. ENTER: Подтверждение выбора.
13. TV/RADIO: Выбор между ТВ и радио.
14. EXIT: Выход из любого меню.
15.
HOME: Кнопка не используется.
16. VOLUME UP/DOWN: Регулировка уровня
громкости.
17. PROGRAM UP/DOWN: Выбор
следующего/предыдущего канала.
18. SLEEP: Выбор времени
автоматического отключения телевизора.
19. EPG: Доступ к электронному телегиду.
20. SUBTITLE: Отобразить/убрать субтитры.
21. FAV.: Просмотр списка избранных
каналов, нажимайте ВВЕРХ/ВНИЗ для
выбора, ENTER для подтверждения.
22. REC ( ): Запись текущей программы.
23. INFO.: Отображение информации о
текущем канале, файле и т.д.
24*. Кнопки управления воспроизведением:
PLAY/PAUSE ( ): Пауза/возобновление.
STOP ( ): Остановка.
FAST BACKWARD/FAST FORWARD ( / ):
Сканирование назад/вперед.
PREVIOUS/NEXT ( / ): Предыдущий/
следующий файл.
25. Цветные кнопки: Доступ к красным,
синим, желтым и зеленым элементам меню.
26. NICAM: Выбор аудиосигнала (Mono,
Stereo, SAP) в зависимости от канала.
27. FREEZE/HOLD: Стоп-кадр.
28. PVR LIST: Отображение списка
записанных файлов.
29.
QUICK: Кнопка
не используется.
30. 3D: кнопка не используется.
31. AD: Аудиоописание происходящего на
экране для людей с ослабленным зрением.
* Кнопки управления телетекстом описаны
в разделе «Операции с телетекстом» ниже.
Управление устройством
21
23

Управление устройством
24
Управление устройством
Установка батареек
1. Снимите крышку отсека для батареек
на задней части ПДУ.
2. Поместите батарейки в отсек для батареек с правильным соблюдением полярности.
3. Установите крышку отсека на место.
• Вставьте две батарейки AAA/1.5V в
отсек для батарей ПДУ. Мощность сигнала, необходимая для приемного датчика,
обеcпечивается на расстоянии до 8 метров
и в пределах 30 градусов влево и вправо.
• Не используйте одновременно новые и
использованные батарейки или батарей-
ки разных типов.
ВНИМАНИЕ!
При неправильной установке батарей
возможен взрыв.
Батареи заменять батареями того же
или аналогичного типа.
Общие операции
•
Нажмите
телевизора или POWER на ПДУ, чтобы
включить питание. Нажмите кнопку
POWER на ПДУ или нажмите и
удерживайте центральную кнопку на
панели, чтобы выключить питание и
перевести устройство в режим ожидания.
• Нажимайте кнопки VOL-/VOL+ для регу-
лирования уровня громкости звука.
• Нажмите кнопку RETURN на ПДУ для
переключения между текущим и предыдущим просматриваемыми каналами.
• Нажмите кнопку MUTE для отключения
звука. Для включения звука нажмите эту
кнопку повторно или регулируйте громкость.
• Выберите режим TV. Нажимайте кнопки PR-/PR+, чтобы выбрать предыдущий
или следующий канал. С помощью кнопок
с цифрами 0-9 можно непосредственно выбрать номер нужного канала.
•
Нажимайте кнопку PICTURE для выбо-
ра режима изображения.
•
Нажимайте кнопку SOUND для выбо-
ра режима звука.
центральную кнопку на панели
• Кнопка NICAM позволяет
переключаться между звуковыми
режимами Stereo, Mono, SAP (доступно не
для всех каналов).
• Нажмите кнопку FREEZE для включения стоп-кадра (только в режиме DTV).
•
Нажмите кнопку FAV для отображения
22
списка избранных каналов. Нажимайте
кнопки ВВЕРХ/ВНИЗ для выбора предыдущего или следующего канала. Нажмите ОК
для подтверждения.
Источники сигнала
Нажмите кнопку SOURCE, затем нажимайте кнопки курсора ВНИЗ/ВВЕРХ на ПДУ
или кнопки PR UP/PR DOWN на панели,
чтобы выбрать один из доступных источников сигнала: DVBT - DVBC - ATV -
- HDMI - USB. Нажмите кнопку ENTER на
ПДУ или центральную кнопку на панели для
подтверждения.
Операции с телетекстом (опция)
• Выберите режим TV. Затем с помощью
кнопок PR-/PR+ выберите телеканал, поддерживающий телетекст.
• Кнопки телетекста на ПДУ имеют следующие функции:
Кнопка HOLD: Нажмите, чтобы остановить переход к следующей странице.
Нажмите кнопку повторно, чтобы отменить
эту операцию.
Кнопка INDEX: нажмите для перехода к
странице индекса.
Кнопка CANCEL: нажмите для скрытия
телетекста, нажмите еще раз для отображения телетекста.
Кнопка REVEAL: Нажмите эту кнопку для
отображения скрытой информации.
Кнопка SUBPAGE: Нажмите эту кнопку для
выбора подстраницы. Введите номер подстраницы в формате 0001.
MIX: Нажмите эту кнопку для перехода к
смешанному отображению картинки ТВ и
телетекста (в виде полупрозрачного фона).
Красная/Зеленая/Желтая/Синяя кнопки:
Используйте четыре цветовых кнопки для
непосредственного перехода на страницу,
имеющую цветовой код, которая отображается в нижней части страницы телетекста.

Управление устройством
Экранное меню
1. Нажмите кнопку MENU, чтобы вызвать
экранное меню настройки.
2. Нажимайте кнопки курсора ВЛЕВО/
ВПРАВО на ПДУ или кнопки +/- на панели
для выбора нужной страницы меню.
3. Нажимайте кнопки курсора ВВЕРХ/
ВНИЗ на ПДУ или кнопки PR UP/DOWN
на панели, чтобы выбрать параметр для
настройки.
4. Нажмите кнопку ENTER на ПДУ или
центральную кнопку на панели для
подтверждения выбора.
5. Нажимайте кнопки курсора на ПДУ или
кнопки подбора на панели, чтобы
настроить выбранный параметр.
6. Нажмите кнопку MENU/EXIT, чтобы
выйти из меню.
Внешний вид меню может отличаться
от приведенных ниже изображений, которые служат только для наглядности.
Изображение
Режим изображения
Яркость
Контраст
Насыщенность
Оттенок
Резкость
Цветовой тон
Формат
Шумоподавление
Шумоподавление MPEG
Холодный/Теплый/Персональный.
•
Формат: 4:3/16:9/Увелич.1/Увелич.2/
• Шумоподавление: выберите
один из четырех режимов цифрового
шумоподавления: Выкл./Низкий/Средний/
Высокий.
• Шумоподавление MPEG: уровень
устранения цифровых шумов при
декодировании видеосигнала: Выкл./
Низкий/Средний/Высокий.
Звук
Режим звука
Низкие частоты
Высокие частоты
Баланс
Автогромкость
Объемный звук
Режим AD
ЗВУК
• Режим звука: Стандартный/Музыка/
Кино/Спорт/Персональный.
• Баланс: настройте баланс между
левыми и правыми динамиками.
Управление устройством
ИЗОБРАЖЕНИЕ
•
Режим изображения: Стандартный/
Мягкий/Персональный/Яркий.
• Контраст
• Яркость
•
Насыщенность
• Резкость
• Оттенок: настройка оттенка в режиме
NTSC.
•
Цветовой тон: Нормальный/
23
25

Управление устройством
Управление устройством
•
Автогромкость: включите/выключите
автоматическую регулировку уровня
звука. Функция позволит смягчить резкие
изменения громкости во время рекламных
роликов.
• Объемный звук: вкл/выкл эффект
объемного звучания.
•
Режим AD: Это вспомогательная
функция, представляющая собой аудиосопровождение изображения, предназначенное для людей с ослабленным зрением.
Дополнительная звуковая дорожка AD
(Audio Description) транслируется вместе с
основным звуком программы, и его можно
включать и отключать, а также регулировать его громкость.
Время
Часовой пояс
Cинхронизация
Часы
Летнее время
Таймер отключения
Автовыключение
ВРЕМЯ
•
Синхронизация: Вкл/Выкл.
Синхронизация системного времени во
время приема цифрового телесигнала.
• Часы: Настройка времени и даты.
Доступна только при отключении функции
автосинхронизации.
•
Таймер отключения: Задайте интер-
вал таймера автоотключения Выкл/10/20/30/60/90/120/180 или 240 минут.
•
Автовыключение: Настройка
автоотключения телевизора при отсутствии
каких-либо действий - выкл/4 часа/6
часов/8 часов.
• Часовой пояс
: Выберите часовой пояс.
• Летнее время: Включите/отключите
автоматический переход на летнее время и
обратно.
Канал
Автонастройка
Продвинутый поиск
Ручная настройка DTV
Ручная настройка ATV
Редактор программ
Информация о сигнале
Информация CI Питание
антенны 5В
КАНАЛ
• Автонастройка: используйте кнопки
курсора и кнопку ENTER для запуска
автоматического поиска и сохранения
всех доступных каналов цифрового и
аналогового телевидения и радио. Поиск
в любой момент можно приостановить
кнопками MENU или EXIT.
Продвинутый поиск: позволяет
•
настраивать прием сигнала с ТВспутников с помощью функции DVB-S/
S2, следуйте подсказкам на экране
для настройки и поиска каналов.
•
Ручная настройка DTV: Нажмите
кнопку SOURCE для выбора режима DVB-T
или DVB-C. Нажите кнопку курсора ВЛЕВО/
ВПРАВО для выбора номера канала или
с помощью кнопок с цифрами введите
частоту вручную. Нажмите кнопку ENTER
для начала поиска цифровых каналов.
Когда ближайший доступный канал будет
найден, поиск прекратится и найденный
канал будет сохранен под выбранным
номером или частотой. Нажмите кнопку
MENU для выхода.
24
26

Управление устройством
•
Ручная настройка ATV:
Сохранить как: выберите номер канала.
Система звука: выберите систему звука.
Система цвета: выберите систему цвета.
Текущий канал: настройка текущего канала
Поиск: нажмите кнопку курсора ВЛЕВО
или ВПРАВО для запуска поиска ближайшего доступного канала вниз или вверх по
диапазону и сохранения его под выбранным
номером.
Точная настройка: выполните точную
подстройку текущей частоты.
• Редактор программ: Редактирование
списка каналов. Следуйте инструкциям
на экране и используйте цветные кнопки
на ПДУ для пропуска, переименования и
удаления программ, а также кнопку FAV.
для внесения их в список избранных.
• Информация о сигнале: Отображение
информации о текущем цифровом канале.
• Информация CI: Данная функция
позволяет просматривать некоторые зашифрованные данные (эта услуга является
платной). Вставьте CI-карту в слот PCMCIA
в направлении, указанном стрелкой на
CI-карте.
• Система PVR: Настройки системы
PVR (Personal Video Record), позволяющей
записывать телепрограммы. Для записи
необходимо вставить USB-накопитель.
• Сброс настроек: Возврат настроек к
исходным заводским значениям.
•
HDMI-CEC: Управление функцией
HDMI-CEC и просмотр информации о
подключенных устройствах.
• Обновление ПО (USB): Обновление
программного обеспечения телевизора с
помощью USB-носителя.
Блок
Блок системы
Задать пароль
Блок программ
Родительский контроль
БЛОК
Управление устройством
Опции
Язык меню
Аудио языки
Язык субтитров
Язык телетекста
HDMI CEC
Система PVR
Сброс настроек
Обновление ПО (USB)
ОПЦИИ
• Язык OSD: Выберите язык экранного
меню.
• Язык аудио: Выберите язык
аудиодорожки в некоторых программах.
• Язык субтитров: Выберите язык
субтитров в некоторых программах.
• Блок системы: Данная функция
предотвращает использование некоторых
функций телевизора (автопоиск каналов,
ручная настройка, редактирование
программ и др.) без введения
четырехзначного пароля. Пароль по
умолчанию - 0000.
После смены пароля обязательно
запомните или запишите новый пароль, так
как доступ к заблокированным функциям
будет невозможен без ввода пароля.
• Задать пароль: Задайте системный
пароль.
• Блок программ: Блокирование/
разблокирование телепрограмм.
• Родительский контроль: Установка
уровня родительского контроля.
Экранное меню Вашего телевизора
может быть изменено без предварительного уведомления и, следовательно, отличаться от меню, представленного в настоящем
Руководстве.
27

Управление устройством
Управление устройством
Запись цифровых програм (PVR)
Вставьте USB-накопитель, система
автоматически создаст на нем папку, в
которой будут сохраняться файлы записи.
Запись начнется после нажатия кнопки REC
и завершится после заполнения памяти
или нажатия кнопки STOP. Нажмите EXIT
для выхода из режима записи. Нажмите
кнопку PVR LIST для отображения списка
записанных файлов. Здесь вы можете
просмотреть информацию о файле
(Зеленая кнопка), удалить его (Красная
кнопка) или воспроизвести (ENTER).
Обратите внимание:
• Запоминающее USB-устройство
должно иметь емкость как минимум 512
МБ и поддерживать стандарт USB 2.0.
Некоторые нестандартные устройства
могут не поддерживаться.
• Если вам не удается осуществить
запись на USB-носитель, отформатируйте
его.
• Во время форматирования не
отсоединяйте носитель от телевизора. При
форматировании носителя все записанные
на него файлы удаляются, поэтому, перед
форматированием сохраните важные
файлы на другом носителе.
• Если носитель разделен на несколько
частей, устройство автоматически выберет
ту из них, которая соответствует формату
PVR.
Электронный телегид (EPG)
Электронный телегид содержит
информацию о времени эфира
телевизионных передач. Нажмите кнопку
EPG для отображения меню функции
“Электронный телегид”. С помощью данной
функции вы можете получить подробную
информацию о канале, включая время
начала программ. В зависимости от
сервиса вещательной компании вам может
быть доступна информация о программах
на ближайшие 8 дней. Для выхода из меню
нажмите кнопку EXIT или MENU.
“Сдвиг по времени“ это функция,
позволяющая осуществлять запись
эфирных телепрограмм во время вашего
отсутствия у телевизора для просмотра в
удобное для вас время.
• Запись: Нажмите Красную кнопку для
настройки параметров записи. Устройство
может выполнять запрограммированную
запись, когда устройство включено или
находится в режиме ожидания. Программы
записи не должны накладываться друг на
друга во времени. Если запись началась,
когда устройство находится в режиме ожидания, индикатор питания поменяет цвет,
изображение и звук будут отсутствовать.
• Информация: Нажмите Зеленую кнопку для отображения подробной информации о текущем канале.
• Расписание: Нажмите Желтую кнопку
для отображения списка расписания запрограммированной записи.
• Напомнить: Чтобы отметить для записи
программу, которая будет транслироваться
в будущем, нажмите Синюю кнопку.
Интерфейс CI
Данная функция позволяет
просматривать некоторые зашифрованные
данные (эта услуга является платной).
Вставьте CI-карту в слот PCMCIA в
направлении, указанном стрелкой на CIкарте.
• Вы можете изменять вид меню и
услуги CI; для этого необходимо обратиться
к предоставителю услуг.
• Нельзя вставлять и извлекать CI-карту
из слота во время работы телевизора. Перед
операциями с картой выключите телевизор.
Не допускайте слишком частой загрузки и
извлечения CI-карты из слота телевизора.
• Если в телевизоре отсутствуют
видеоизображение и звук при
подключенном CI+ CAM, свяжитесь
с оператором клиентской службы
наземного/кабельного/спутникового
вещания.
28

Управление устройством
Операции c USB
Общая информация
• Вставьте USB-накопитель в USB-порт
данного устройства. Выберите источник
сигнала USB и нажмите кнопку ENTER. На
дисплее отобразится интерфейс воспроизведения файлов с USB, в котором Вы
можете выбрать с помощью кнопок курсора
ВЛЕВО/ВПРАВО и кнопки ENTER
воспроиз-ведение музыки, фото, видео.
• Поддержка USB: версия USB 2.0; файловые системы FAT16, FAT32; максимальный объем накопителя 1 ТБ. Корректная
работа устройства гарантирована только
при использовании лицензионных USBнакопителей известных производителей.
Воспроизведение некоторых форматов
аудио, видео и изображений может не поддерживаться.
• Данное устройство поддерживает
видеофайлы с расширением ASF, AVI,
MKV, MPG, с видеокодеками WMV9, H263,
MPEG-4, MPEGII и аудиокодеками WMA,
MP3, DD(AC3).
Приведенный выше список расширений и кодеков является только информативным и не является обязательством по
чтению всех файлов с указанными расширениями и кодеками.
• Воспроизведение некоторых AVIфайлов может оказаться невозможным в
зависимости от их конфигурации и параметров, а также условий записи. Видеофайлы
с расширением AVI объемом более 2 ГБ
могут воспроизводиться устройством не
полностью.
Согласно стандарту USB 1.1/2.0 использование USB-устройства с током потребления более 500 мА не рекомендуется без
использования дополнительного источника
питания. Подключение без дополнительного питания USB-носителей, потребляющих
ток, который превышает данное значение,
а также неисправных USB-носителей может
вызвать механические или термические
изменения элементов конструкции данного устройства, а также выход из строя
внутренних элементов защиты USB-порта.
Такие повреждения не являются гарантийным случаем.
Внимание: использование внешних USBустройств, содержащих файлы с расширением BIN в корневой директории, может
привести к сбоям в работе устройства или к
повреждению программного обеспечения.
Управление устройством
Воспроизведение файлов
• Для возврата на предыдущий уровень
меню выберите «Возврат» и нажмите кнопку ENTER.
• В меню содержимого нажимайте кнопки
курсора, чтобы выбрать папку или файл,
затем нажмите кнопку ENTER, чтобы войти в
выбранную папку. Тем же образом выберите
файл, который хотите просмотреть или прослушать. При выделении файла информация
об этом файле будет отображаться в правой
части экрана, а миниатюра изображения
будет показана в центре (недоступно для
аудиофайлов). Нажмите кнопку ENTER или
для воспроизведения файла.
• Во время воспроизведения нажмите
кнопку INFO; в нижней части экрана отобразится меню управления воспроизведением, в котором Вы можете выбирать операции с помощью кнопок курсора ВЛЕВО/
ВПРАВО и подтвердить выполнение этой
операции кнопкой ENTER.
• Во время воспроизведения нажмите
кнопку , чтобы установить воспроизведение на паузу или продолжить его. Нажмите
кнопку для остановки воспроизведения.
• При воспроизведении файлов с изображениями, видео- и аудиофайлов нажимайте
кнопку REPEAT для выбора режима повторного воспроизведения.
• При воспроизведении аудиофайлов
нажимайте кнопки / для ускоренного
29

Управление устройством
Управление устройством
воспроизведения назад или вперед. Для
выбора предыдущего или следующего
файла нажимайте кнопки / .
• При воспроизведении файлов с изображениями нажимайте кнопки / для
выбора предыдущего или следующего
файла.
• Нажмите кнопку EXIT, чтобы остановить воспроизведение и вернуться на
предыдущий уровень меню.
26
30

Общая информация
Руководство по устранению
неисправностей
Ниже приводится таблица, в которой описаны простые меры, способные помочь Вам
устранить большую часть проблем, могущих возникнуть при использовании данного
устройства. Если нижеуказанные меры не помогли, обратитесь в сервисный центр или к
ближайшему дилеру.
Неисправность Причина Решение
Изображение и
звук отсутствуют, индикатор
не светится
Изображение
и звук низкого
качества
Изображение
«заснеженное»
Синий фон
Звук отсутствует
ПДУ не работает
Шнур питания не подсоединен.
Контрастность, яркость, резкость,
цвет и громкость установлены
на минимальное значение или
телевизор находится в беззвучном
режиме.
Контрастность и цвет настроены
неверно.
Установлена неверная система
цвета.
Установлена неверная система
звука.
Сигнал низкого качества.
Отсутствует видео сигнал или
кабель плохо подсоединен/не
подсоединен.
Отсутствует аудио сигнал или
кабель плохо подсоединен/не
подсоединен.
Батарейки установлены неправильно или устарели.
Подсоедините шнур питания.
Установите нужное значение
контрастности, яркости, резкости, цвета и громкости.
Настройте контрастность и цвет.
Установите правильную систему
звука.
Используйте исправный и качественный кабель.
Подсоедините кабель должным
образом.
Подсоедините кабель должным
образом.
Установите правильную сигнальную систему.
Убедитесь, что полярность
соблюдена.
Замените батарейки на новые.
Общая информация
Источники помех
В Вашем телевизоре приняты все самые современные меры для устранения возможных
помех, тем не менее, изображение может искажаться под воздействием местных электромагнитных излучений. Лучше всего в подобных случаях попытаться перенести телевизор в
другое место и подвести к нему лучшую антенну.
• РАДИОЧАСТОТНЫЕ ПОМЕХИ
27
31

PAL, SECAM, NTSC
B/G, DK, I, M

TF-LED32S60T2_IM_01

Общая информация
Хранение и транспортировка
Упакованные изделия допускается транспортировать всеми видами транспорта в
условиях 5 ГОСТ 15150 при температуре не ниже минус 10 °С и при защите их от
прямого воздействия атмосферных осадков и механических повреждений.
Изделия следует хранить в условиях 1 по ГОСТ 15150 при отсутствии в воздухе
кислотных, щелочных и других агрессивных примесей. При транспортировании и
хранении упакованные изделия должны быть уложены в штабели, контейнеры или
стеллажи. Количество рядов в штабелях должно быть установлено в зависимости
от габаритных размеров и массы упакованных изделий и указано в ТУ на изделие
конкретной модели.
Данное устройство никаких ограничений для работы внутри жилых, коммерческих
и производственных помещений не имеет.
Безопасная утилизация
Ваше устройство спроектировано и изготовлено из высококачественных
материалов и компонентов, которые можно утилизировать и использовать
повторно. Если товар имеет символ с зачеркнутым мусорным ящиком на колесах,
это означает, что товар соответствует Европейской директиве 2002/96/ЕС.
Ознакомьтесь с местной системой раздельного сбора электрических и
электронных товаров. Соблюдайте местные правила. Утилизируйте старые
устройства отдельно от бытовых отходов. Правильная утилизация вашего товара
позволит предотвратить возможные отрицательные последствия для окружающей
среды и человеческого здоровья.
Общая информация
34

Уважаемый покупатель!
Благодарим Вас за покупку продукции торговой марки TELEFUNKEN и доверие к нашей компании. TELEFUNKEN гарантирует
высокое качество и надежную работу своей продукции при условии соблюдения технических требований, описанных в
руководстве по эксплуатации. Руководство на русском языке прилагается.
Срок службы изделия с товарным знаком TELEFUNKEN, при эксплуатации продукции в рамках бытовых нужд и соблюдении
правил пользования, приведенных в руководстве по эксплуатации, составляет 5 (пять) лет со дня передачи изделия
потребителю. Срок службы установлен в соответствии с действующим законодательством о защите прав потребителей.
Изготовитель обращает внимание потребителей, что при соблюдении данных условий срок службы изделия может значительно
превысить указанный изготовителем срок. Гарантия на аксессуары составляет 2 недели с момента покупки, далее гарантия
действует только на устройство.
Продукция сертифицирована на соответствие нормативным документам РФ (ГОСТ, СниП, Нормы и т.д.)
Адреса авторизованных сервисных центров
№ Город Название СЦ Адрес Телефон
1 Астрахань
2 Астрахань "ЭФИР" ул. Боевая, 72А (8512) 30-10-15
3 Барнаул "ДИОД" ул. Пролетарская, 113 (3852) 63-94-02
4 Барнаул "РЕМИКС" пр-т Комсомольский, 111 (3852) 24-06-03, 24-03-35
5 Белгород "ПРОКСИМА" пр-т Б. Хмельницкого, 137, кор. 3 (4722) 34-03-22
6 Брянск "ВЕГА-СЕРВИС" ул. Сталелитейная, 1 (4832) 52-21-09
7 Великий Новгород "ОРБИТА" ул. Кочетова, 23A
8 Владивосток "ВЛАДИНТЕРСЕРВИС" Океанский пр-т, 101А (423) 291-72-27, 291-74-47
9 Владимир "МАСТЕР-СЕРВИС" ул. Тракторная, 8
10 Волгоград
11 Волгоград СМТЕЛ ул. Краснознаменская, 8 (8442) 38-78-74
12 Вологда "ВОЛОГДА " ул. Новгородская, 7 (8172) 53-99-39, 53-99-69
13 Воронеж "ОРБИТА-СЕРВИС" ул. Донбасская, 1 (4732) 77-66-25
14 Воронеж
15 Димитровград "ЭЛКОМ СЕРВИС" ул. Октябрьская, 63 (84235) 2-86-59, 9-14-64
16 Евпатория "НК-ЦЕНТР ЕВПАТОРИЯ" пр-т Победы, 67 (06569) 77-44-7
17 Екатеринбург СОНИКО-ЕКТБ ул. Степана Разина, 109, оф. 123 (343) 269-29-48, 269-19-48
18 Екатеринбург
19 Жуковский "НАДЕЖДА" ул. Чкалова, 25 (498) 484-29-05
20 Иваново "СПЕКТР-СЕРВИС" ул. Дзержинского, 45/6 (4932) 33-51-85
21 Ижевск "РИТ-СЕРВИС" ул. М.Горького, 162
22 Иркутск "ТЕЛЕТОН" ул. Пискунова, 156 (3952) 42-66-27, 53-41-66
23 Йошкар-Ола "МИДАС" ул. Советская, 173 (8362) 45-73-68, 41-77-43
24 Казань "ВИТЯЗЬ" пр-т Х. Ямашева, 38 (843) 248-71-17
25 Казань ЭЛНЕТ ул. Серова, 51/11, помещение 2 (843) 240-64-94
26 Калининград "1000 МЕЛОЧЕЙ" Московский пр-т, 163
Каменск-
27
Уральский
28 Кемерово
29 Кинешма
30 Киров ЭКСПЕРТ -СЕРВИС Октябрьский пр-т, 116А (8322) 54-20-64, 54-69-56
31 Киров "ПОРТАЛ" ул. Московская, 9 (8332) 35-55-13
32 Киров " ТЕХНО КИТ" ул. Базовая, 17
Комсомольск-на-
33
Амуре
34 Кострома
35 Краснодар "ЛАРИНА" ул. Демуса, 14 (861) 260-09-00
36 Краснодар "ТВ-ЮГ" ул. Шевченко, 168, офис 26 (861) 239-06-21
37 Красноярск "ДОН-ТВ СЕРВИС" ул. Железнодорожников, 11 (3912) 21-94-82, 21-46-51
38 Красноярск "ЭЛЕКТРОАЛЬЯНС" ул. Спандаряна, 7 (3912) 93-54-33, 94-52-82
39 Курск "МАЯК+" ул. Студенческая, 36А (4712) 50-85-90
40 Липецк "ВЛАДОН" ул. Космонавтов, 66 (4742) 31-25-17
"ХАЙТЕК-СЕРВИСНЫЙ
ЦЕНТР"
ГИМ СЕРВИСНЫЙ
ЦЕ НТР
"ТРАНССЕРВИСВОРОНЕЖ"
"ТРАНССЕРВИСЕКАТЕРИНБУРГ"
"ТЕХНОЦЕНТРСЕРВИС" ул. Исетская, 33Б (3439) 39-95-20
"СЕРВИСНЫЙ ЦЕНТР
МАСТЕРЪ"
СПЕКТР-СЕРВИС
КИНЕШМА ООО
"Г АМБИТ" ул. Ленина, 76, корп.3 (4217) 27-50-91, 53-21-31
"КРИСТАЛЛ СЕРВИС
БЫ Т"
Россия
ул. Ташкентская, 13Б (8512) 63-12-00, 63-10-00
(8162) 61-12-00, 33-59-18,
33-20-03
(4922) 33-10-79, 33-31-52,
42-02-09
пр-т Ленина, 58
Ленинский пр-т, 160 (4732) 39-37-55, 39-37-53
ул. Гагарина, 5
ул. В.Волошиной, 4 (3842) 38-19-91, 38-19-43
ул.Карла Маркса, 8 (49331) 58-134
ул. Коммунаров, 5
(8442) 23-41-36, 23-05-94,
23-56-48
(343) 278-90-91, 278-90-92,
264-62-77
(3412) 43-07-52, 43-20-39,
43-85-07
(4012) 588-354, 760-477,
8-963-738-54-77
(8332) 70-34-54, 70-34-64,
70-34-14
(4942) 51-80-73, 30-01-07,
63-97-23

№ Город Название СЦ Адрес Телефон
Россия
41 Махачкала "РОСАМ" пр-т Шамиля, 20 (8722) 93-30-73
42 Москва "НАДЕЖДА" ул. Амундсена, 15 корп. 2 (499) 180-64-27
43 Москва "РУБИН" ул. Адмирала Макарова, 2 (925) 146-24-23
44 Москва КВАНТ-9 бул. Маршала Рокосовского, 3
45 Москва "МТЕХНИК" ул. Острякова, 6 (499) 157-22-52
46 Москва "ТЕЛЕМАСТЕР" Алтуфьевское шоссе, 79Д 8-916-170-00-09
47 Мурманск "ЭЛЕКТРОНИКА" пр-т Ледокольный, 5 (8152) 53-57-75
Набережные
48
Челны
49 Нал ьчик "АЛЬФА СЕРВИС" пр-т Ленина, 24
50 Нижний Новгород ИМПУЛЬС ул. Жукова, 24 (8314) 62-96-69
51 Нижний Новгород
52 Нижний Новгород "ИП ЗОРЬКИН А.Я." ул. Коновалова, 6 (831) 229-98-16
53 Новосибирск "АВТОМАСТЕР" ул. Владимирская, 2А (383) 220-70-01, 240-90-49
54 Омск "ВЕС-ТРЕЙД" ул. 5 Кордная, 1 (3812) 57-70-92
55 Омск "СИБТЕКС" ул. 24-я Линия, 59
56 Омск "СИБТЕКС" ул. Енисейская, 1
57 Орел "АРС" ул. Московская, 100 (4862) 55-15-06
58 Оренбург СЕРВИСБЫТТЕХНИКА ул. Лесозащитная, 18 (3532) 30-00-30, 30-00-66
59 Орск АЙС-СЕРВИС ул. Волкова, 2 (3537) 33-84-43, 35-13-18
60 Пенза "ПАРТНЕР-СЕРВИС" ул. Советская, 2 (8412) 56-45-07
61 Пермь "РТВ-СЕРВИС" ул. Мира, 55 (342) 220-08-48
62 Петрозаводск "АРНАУТ" пр-т Лесной, 51 (8142) 63-32-18
63 Псков "РЕМОНТ И СЕРВИС" ул. Труда, 11 (8112) 53-86-30, 53-86-50
64 Пятигорск "ПОЛИСЕРВИС" 1-ая Набережная, 32, корп. 4 (8793) 33-17-29
65 Ростов-на-Дону "СЕРВИС-РОСТОВ" пр-т Шолохова, 7 (863) 299-00-50
66 Ростов-на-Дону АБСОЛЮТ-СЕРВИС АСЦ ул. Тельмана, 73/94 (863) 299-30-60
67 Ряза нь "ПАЛ-СЕКАМЫЧ" ул. Татарская, 18 (4912) 21-01-49, 25-50-34
68 Самара
69 Санкт-Петербург "ПИОНЕР СЕРВИС" ул. Новолитовская, 5 (812) 327-24-62, 295-84-14
70 Санкт-Петербург "АЦ ПИОНЕР" Б.Сампсониевский пр-т, 62 (812) 320-09-30, 320-02-27
71 Саратов
72 Севастополь "ДИАДЕМА" ул. Пожарова, 26
73 Северодвинск "ИП ВАРЕНБУД" ул. Гагарина, 12 (8184) 58-72-21
74 Северодвинск "ИП ВАРЕНБУД" ул. Дзержинского, 1 (8184) 27-84-62
75 Симферополь "КРЫМТЕХНОСЕРВИС" ул. Луговая, 6Г (0652) 51-50-78
76 Симферополь "НК-ЦЕНТР" ул. Некрасова, 17/1 (0652) 52-27-71
77 Симферополь "ФОК СТРО Т" ул. Маяковского, 12
78 Ставрополь РЕМОНТ -СЕРВИС ул. Пирогова, 37 (8652) 55-17-48
79 Ставрополь "ТЕХНО-СЕРВИС" ул. 7-я Промышленная, 6 (8652) 39-30-30
80 Ставрополь "ТЕХНО-СЕРВИС" ул. Тухачевского, 11А (8652) 33-57-75
81 СтарыйОскол "ЭКСПРЕСС-СЕРВИС" мк. Олимпийский, 7 (4725) 42-41-00
82 Сыктывкар "ТЕХСЕРВИС" ул. Гаражная, 25 (8212) 291-220
83 Таганрог "КРИСТИ" ул. Фрунзе, 45 (8634) 38-30-48
84 Тамбов "РУБИН-СЕРВИС-Т" ул. Н. Вирты, 2А (
85 Тамбов "ВЕГА-ТАМБОВ СЕРВИС" ул. Киквидзе, 69 (4752) 73-94-01, 73-94-03
86 Тольятти "ИПРОС-СЕРВИС" ул. 40 лет Победы, 30 (8482) 53-76-43/44/45
87 Томск МАКС-СЕРВИС ул. Киевская, 101 (3822) 43-27-58, 43-35-89
88 Томск "ТЕХНОМАГ" ул. Котовского, 17 (3822) 213-776
89 Томск "ТЕХНОМАГ" ул. 1-я Рабочая, 3А (3822) 214-776, 215-776
90 Тула "ИП КРЫЛОВ И.Ю." ул. Руднева, 28 (4872) 35-53-99
91 Тюмень "ПУЛЬСА Р " ул. Республики, 169 (3452) 20-82-65, 75-95-08
92 Улан-Удэ "ЮФФА" ул. Жердева, 138 (3012) 41-92-99
93 Ульяновск "МАСТЕР-СЕРВИС" ул. Минаева, 42
94 Уфа "РЕГИОН" ул. Аксакова, 73 (347) 251-79-79
95 Уфа "РЕГИОН" ул. Пархоменко, 173 (347) 223-60-60
96 Уфа "РЕГИОН" ул. М.Рыльского, 14 (347) 236-63-63
97 Феодосия "НК-ЦЕНТР ФЕОДОСИЯ" Симферопольское шоссе, 44 (06562) 91-08-1
"ТРИО" пр-т Вахитова, 20 (8552) 59-77-13
БЫТОВАЯ АВТОМАТИКА
СЦ
"ТРАНССЕРВИССАМАРА"
"ТРАНССЕРВИССАРАТОВ"
ул. Ларина, 18А (831) 461-88-48
пр-т Карла Маркса, 39 (846) 336-33-33, 336-85-11
ул. 3-я Дачная
(499) 168-05-19, 168-47-15,
(495) 721-30-70
(8662) 42-04-30,
77-28-78
(3812) 36-70-44, 36-98-04,
36-91-04
(3812) 36-70-44, 36-98-04,
36-91-04
(8452) 35-11-80, 55-43-63,
55-43-39, 66-31-91
(0692) 55-56-43, 45-36-99,
45-39-35
(0652) 24-88-58, 52-05-65,
57-71-83
4752) 45-16-15
(8422) 32-07-33,
32-49-56

№ Город Название СЦ Адрес Телефон
98 Хабаровск
99 Чебоксары "ТЕЛЕРАДИОСЕРВИС" ул. Гагарина, 36 (8352) 63-20-98
100 Челябинск "РЕМБЫТТЕХНИКА" ул. Производственная, 8Б (351) 239-39-33
101 Челябинск "РЕМБЫТТЕХНИКА" ул. Артиллерийская, 102 (351) 771-18-11
102 Челябинск "ЭЛЕКТРО-Н" пр-т Победы, 302 (351) 741-01-51, 264-00-84
103 Ярославль
"НООС ПЕРСОНАЛЬНЫЕ
КОМПЬЮТЕРЫ"
"СЕРВИСНЫЙ ЦЕНТР
ВИРТ"
ул. Тихоокеанская, 165 (4212) 74-46-11, 74-45-90
ул. Республиканская, 3 стр. 5
(4852) 58-22-11
Белоруссия
Россия
№ Город Название СЦ Адрес Телефон
1 Гомель "ТЕХ НОСИ ТИ" ул. Советская, д. 119 375-232-57-15-48
2 Гомель "ТЕХ НОСИ ТИ" ул. Гагарина, д. 20 375-232-74-90-71
3 Брест "ЛЕБЕДЬ" ул. Гоголя, д. 82 375-162-21-38-87
4 Барановичи "БПВТИ ИМПУЛЬС" ул.Жукова, д. 12/1 375-296-47-12-34
5 Минск "РЕСУРС ПЛЮС" ул. Жилуновича, д. 11 375-17-296-03-03
6 Могилев "ЭЛСИ МОГИЛЁВ" ул.Якубовского, д. 23 375-222-28-00-88
Украина
№ Город Название СЦ Адрес Телефон
1 Чернигов "ЛАГРОС" пр-т Мира, 80 (0462) 67-78-99
2 Херсон "РАДИО" ул. Советская, 23 (0552) 22-57-30, 22-61-21
3 Николаев "ТСЦ АЛАДДИН" ул. Чкалова, 33 (0512) 47-83-48
4 Чернигов "ОТТО СЕРВИС" ул. М. Коцюбинского, 61 (0462) 67-84-92, 67-84-93
5 Северодонецк "СРТ" ул. Маяковского, 13 (06452) 4-30-30, 70-28-16
6 Северодонецк "ДОМ ТЕХНИКИ" ул. Курчатова, 19Б (06452) 2-78-53
7 Северодонецк "РЕМБЫТСЕРВИС" ул. Менделеева, 61 (06453) 5-03-43
8 Старобельск "ПРЕМЬЕР" ул. Коммунаров, 34 (06461) 2-12-31
9 Кременная "ПРЕМЬЕР" пл. Красная, 1 (06454) 3-17-90
10 Лисичанск "ПРЕМЬЕР" ул. Калинина, 115 (06451) 2-06-15
11 Марковка "МИР ЭЛЕКТРОНИКИ" ул. Гагарина, 9 (06464) 9-14-27
12 Троицкое "ПРЕМЬЕР" пр-т Победы, 54А (06456) 2-17-82
13 Кривой Рог "ДОМТЕХСЕРВИС" ул. Тынка, 24
14 Полтава "ПРОМЭЛЕКТРОНИКА" ул. Фрунзе, 66 (0532) 615-621
15 Хмельницкий "ТРИТО Н ЛТД" ул. Курчатова, 18 (0382) 78-37-73, 78-37-55
16 Львов "РОСИМПЭКС" ул. И. Шараневича, 28
17 Стаханов "АЛЬБИТ" ул. Кирова, 15 (06444) 4-02-89
18 Стаханов "БЫТРАДИОТЕХНИКА" ул.
19 Стаханов "ТЕЛЕАТЕЛЬЕ" пр-т Ленина, 39 (050) 296-89-88
20 Черкассы
21 Виноградов "ВЕКО" пл. Мира, 4 (03143) 2-32-75, 2-37-80
22 Винница "СПЕЦИАЛИСТ" ул. Порика, 1 (0432) 57-91-91, 50-91-91
23 Харьков "КОМТЕХ" ул. Бакулина, 12
24 Сумы "ЭЛЬФ" ул. Петропавловская, 86/1
25 Львов "АЛЬЯНС-СЕРВИС" ул. Подголоско, 15А (032) 244-53-44, 244-53-40
26 Черновцы "ЭЛЕКТРОСЕРВИС" ул. Л. Кобылицы, 105 (0372) 58-57-10
27 Донецк "ТЕХНОСЕРВИС" пр-т Павших коммунаров, 188
28 Запорожье "АЛЬФАТЕХНОЦЕНТР" ул. Дзержинского, 83
29 Алчевск "H I-FI" ул. Гагарина, 36 (06442) 4-89-50
30 Ровно ООО "МАЛТИТЕК" пр-т Мира, 11 (0362) 26-27-66
31 Харьков
32 Житомир "ЭКСПРЕСС-СЕРВИС" ул. Киевськая, 106
33 Львов "ШАНС" пр-т Красной Калины, 109 (032) 247-14-99
34 Кременчуг "ИНЭК-КРЕМЕНЬ" ул. Московская, 55/1
35 Кировоград "ИНЭК-СЕРВИС" пер. Будёного, 3 (0522) 22-06-21
36 Винница "ЛОТОС" ул.Келецкая, 61А (0432) 61-95-73
ООО "ФАБРИКА
БЫТОВОГО СЕРВИСА"
ЧФ
"НЕОПРИВАТСЕРВИС"
Б. Хмельницкого, 55 (06444) 4-22-18
ул. Ильина, 605
ул. Коцарская, 43 (057) 763-09-12
(0564) 64-69-53, 64-69-32,
64-61-73
(032) 239-55-77,
(032) 239-51-52
(0472) 383-124,
(063) 624-24-43
(057) 717-13-39,
702-16-20
(0542) 66-03-00, 65-03-40,
65-55-10, 21-59-63
(062) 344-03-05, 349-24-75,
345-06-07, 208-33-35
(061) 212-03-03
(многоканальный)
(0412) 41-41-91,
(0412) 41-27-97,
(098) 382-31-17
(05366) 5-31-32,
(0536) 77-66-28

№ Город Название СЦ Адрес Телефон
37 Днепропетровск "ЛОТОС" пр-т Кирова, 59 (0562) 35-04-09, 34-67-05
38 Запорожье "ЛОТОС" ул. Гоголя, 175 (061) 701-65-96, 787-50-51
39 Кировоград "ЛОТОС" ул.Короленко, 2 (0522) 35-79-23
40 Кривой Рог "ЛОТОС" ул. Косиора, 64/7 (0564) 40-07-79
41 Николаев "ЛОТОС" Внутриквартальный проезд, 2 (0512) 58-06-47
42 Павлоград "ЛОТОС" ул. Шевченко, 67 (05632) 6-15-54
43 Полтава "ЛОТОС" ул. Красина, 71А (0532) 61-16-06
44 Херсон "ЛОТОС" ул.Карбышева, 28А (0552) 43-40-33
45 Ивано-Франковск "МЕГАСТАЙЛ" ул. Независимости, 179Б (0342) 77-33-22, 72-27-22
46 Киев "РАВИС" ул. Героев Днепра, 2А
47 Одесса "ЮГ СЕРВИС ЦЕНТР" ул. Щеголева, 14 (048) 734-98-15
48 Мариуполь "ГЛОБАЛТЕК" ул. Варганова, 9
49 Вольногорск "ТИТАН" ул. Ленинского Комсомола, 62Б
50 Горловка "ТЕХНОГАРАНТ" ул. П. Беспощадного, 26
51 Луцк "СЕРВИС-МАСТЕР" пр-т Победы, 24 (0332) 78-56-25
52 Ивано-Франковск "БРИЗ ЛТД" ул. Новая, 19А (0342) 75-07-77, 55-95-25
53 Луганск "КОРСАК" ул. Коцюбинского, 27 (0642) 34-56-06, 58-11-80
54 Ужгород "IT СЕРВІС" ул. Перемоги, 3 оф. 3
(0800) 504-504,
(044) 412-42-19
(0629) 49-18-81,
(067) 597-56-15
(05653) 5-27-71,
(067) 431-46-46
(0624) 52-77-77,
(050) 870-00-77
(0312) 63-01-46,
(099) 041-78-50
Данная информация может быть изменена.
Украина
Более точные сведения о сервисных центрах в Вашем регионе доступны на сайте
В случае возникновения проблем с обращением в Ваш региональный сервисный центр просим направить Ваши замечания,
заполнив соответствующую форму в разделе «Обратная связь» на сайте компании.
Дизайн и технические характеристики могут быть изменены без предварительного уведомления.
www.telefunken-electronics.ru

ГАРАНТИЙНЫЙ ТАЛОН
Подпись продавца
Дата продажи
С условиями гарантийного обслуживания согласен, претензий по комплектности, внешнему виду
3
2
№
1
Подпись покупателя
Дата приема
Дата выдачи
и работоспособности не имею.
Модель
Дата производства
Серийный номер
Срок гарантии – 12 месяцев
Сведения о ремонте
Отметка СЦ
заказчика
Подпись
продавца
Печать

на сайте www.telefunken-electronics.ru и на QR-коде (верхний левый угол).
.
Адреса авторизованных сервисных центров приведены в Информации для потребителя,
6. Гарантия не сохраняется в случае: нарушений правил эксплуатации, механических повреждений, нарушений
7. Гарантийные обязательства производителя не распространяются на:
- повреждения (недостатки), вызванные воздействием компьютерных вирусов и аналогичных им программ,
установкой, сменой или удалением паролей (кодов) изделия, модификацией и/или переустановкой
предустановленного ПО изделия.
- условия эксплуатации изделия не для бытовых нужд и/или круглосуточного использования.
- нарушения в работе изделия, вызванные сторонними приложениями (мелодии, графические, видео и другие
файлы, Java и подобные им программы);
гарантийной пломбы, неправильного подключения изделия, попадания посторонних предметов внутрь.
- сменные элементы питания (батарейки, аккумуляторы), дополнительные аксессуары, входящие в комплект
поставки и подверженные естественному износу в процессе эксплуатации;
4. Потребитель имеет право предъявить изготовителю требования, предусмотренные законом
5. Потребитель обязан соблюдать правила безопасной эксплуатации и хранения изделия.
РФ «О защите прав потребителей» в течение гарантийного срока.
3. Условия гарантии не предусматривают периодическое техническое обслуживание,
установку и настройку изделия на дому у владельца.
1. Гарантийный срок 12 (двенадцать) месяцев со дня передачи изделия Потребителю.
2. Гарантийный ремонт производится в Авторизованных Сервисных Центрах.
Авторизованные
сервисные центры
УСЛОВИЯ ГАРАНТИИ:
 Loading...