

Teledyne 6712 Pocket Manual

6712 Sampler
This pocket guide is not intended to replace
the instruction manual. Read the instruction
manual thoroughly before operating the
sampler.
COPYRIGHT © 2001-2003 by
Teledyne Isco, Inc., 4700 Superior St.,
Lincoln, Nebraska, U.S.A. 68504
Phone: (402) 464-0231
Toll Free: (800) 228-4373
FAX: (402) 465-3022
Part #69-9003-589
Issued: January, 2001
Revision C, December 2003


6712 Sampler
Table of Contents
1. Programming
1.1 Getting Started . . . . . . . . . . . . . . . . . 1-3
1.2 Using Menus and Entering Numbers 1-4
1.2.1 Selecting Menu Options . . . . . 1-4
1.2.2 Entering Numbers . . . . . . . . . 1-4
1.2.3 Clock and Calendar Entry Screens
1.3 Quick View Screens . . . . . . . . . . . . . 1-11
1.4 Help Notes . . . . . . . . . . . . . . . . . . . . 1-13
1.5 Warning Messages . . . . . . . . . . . . . . 1-13
1.6 Changing to and from Extended and
1.7 Storage For Extended Programs . . . 1-14
1.8 Programming the Modules . . . . . . . 1-16
1.9 Programming SDI-12 Sondes . . . . . 1-17
1.10 Programming Examples . . . . . . . . . 1-19
2. Operation
2.1 Installation and Operation Checklist 2-1
2.2 Installing Distributor Arm . . . . . . . . 2-2
2.3 Installing Bottle Kits . . . . . . . . . . . . . 2-6
2.4 Positioning a Sampler . . . . . . . . . . . . 2-7
2.5 Connecting An External Instrument 2-8
. . . . . . . . . . . . . . . . . . . . . . . . . 1-9
1.3.1 Paging Through the Quick View
Screens . . . . . . . . . . . . . . . . . 1-12
1.3.2 Changing Settings in a Quick
View Screen . . . . . . . . . . . . . 1-12
Standard Screens . . . . . . . . . . . . . . . 1-14
1.9.1 Stored Programs . . . . . . . . . . 1-17
2.5.1 Flow Meter Connector . . . . . . 2-8
2.5.2 Rain Gauge Connector . . . . . . 2-9
i

6712 Sampler
2.6 Running Programs . . . . . . . . . . . . . . . 2-9
2.7 Interrupting a Running Program . . . 2-9
2.8 Run Time Screens . . . . . . . . . . . . . . 2-10
2.8.1 Module and SDI-12 Sonde
2.9 Error Messages . . . . . . . . . . . . . . . . 2-11
2.10 Recovering the Sampler . . . . . . . . . . 2-12
2.11 Viewing the Data . . . . . . . . . . . . . . . 2-13
2.12 Configuring Reports . . . . . . . . . . . . . 2-14
2.13 Grab Samples . . . . . . . . . . . . . . . . . . 2-15
2.14 Calibrating . . . . . . . . . . . . . . . . . . . . 2-17
Readings . . . . . . . . . . . . . . . . 2-11
2.9.1 Fatal Error . . . . . . . . . . . . . . 2-12
2.14.1 Calibration Tips . . . . . . . . . . 2-18
3. Reference
3.1 Replacing the Pump Tube . . . . . . . . . 3-1
3.1.1 Pump Tube Warning . . . . . . . 3-1
3.1.2 Checklist For Replacing Pump
3.2 Rinses and Retries . . . . . . . . . . . . . . . 3-5
3.3 Pacing . . . . . . . . . . . . . . . . . . . . . . . . . 3-5
3.4 Distribution . . . . . . . . . . . . . . . . . . . . 3-6
3.5 Sampler Enable . . . . . . . . . . . . . . . . 3-12
3.6 Start Times . . . . . . . . . . . . . . . . . . . . 3-13
3.7 Operating the Pump . . . . . . . . . . . . 3-17
3.8 Moving the Distributor Arm . . . . . . 3-18
Tube . . . . . . . . . . . . . . . . . . . . . 3-2
3.4.1 Sequential . . . . . . . . . . . . . . . . 3-6
3.4.2 Bottles Per Sample . . . . . . . . . 3-8
3.4.3 Samples Per Bottle . . . . . . . . 3-10
3.4.4 Composite . . . . . . . . . . . . . . . 3-12
3.4.5 Multiple Bottle Compositing 3-12
ii

6712 Sampler
Section 1 Programming
Before programming the 6712, you should
become familiar with its keys and how to use
the programming screens. A description of the
keys appears in Table 1-1.
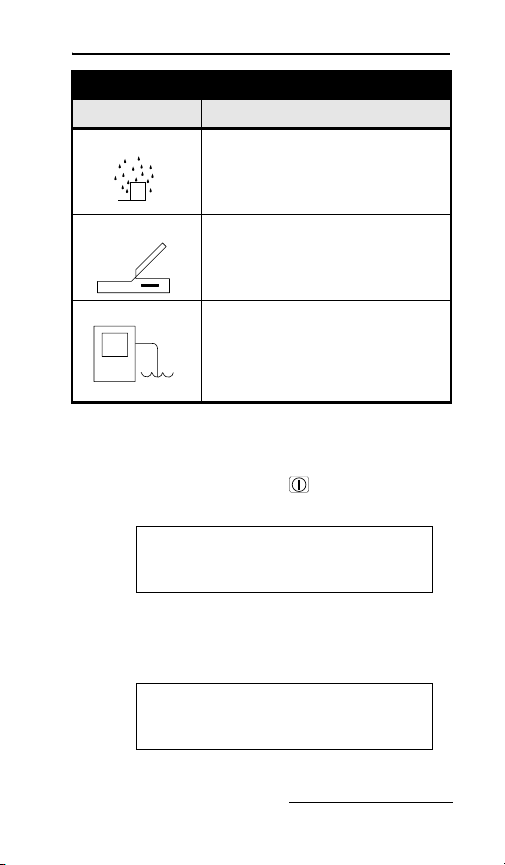
Table 1-1 Keypad and Connector Icons
Icon Function
On-Off Turns sampler on or off.
Stop Stops the pump, distributor, or a
running program.
In programming screens, returns
to a previous screen.
Enter Accepts a menu choice or
number entry and goes to next
screen.
Help In programming screens,
displays a brief help message.
1-1

6712 Sampler
Table 1-1 Keypad and Connector Icons
Icon Function
Down-Right Selects the menu option right or
below the current choice.
Up-Left Selects the menu option left or
Nu mbers Types a numbe r.
Decimal Point Types a decimal point.
Pump Reverse Press when at main menu to run
Pump Forward Press when at main menu to run
Power 12 volt power source
above the current choice.
pump.
pump.
1-2
Section 1 Programming
Table 1-1 Keypad and Connector Icons
Icon Function
Rain Gauge 674 Rain Gauge
Interrogator 581 RTD
Flow Meter 4200 Series Flow Meters
SDI-12 Sondes
Programmable Pins
(Pins C, H, and I)
IBM PC or compatible computer
running FLOWLINK or
SAMPLINK.
4100 Series Flow Logger
1640 Liquid Level Actuator
2100 Series Flow Modules
Non-Isco flow meters
1.1 Getting Started
Turn the sampler on by pressing the On/Off key.
It is labeled with this icon: . The start up
screen appears first.
6712 SAMPLER
STANDARD PROGRAMMING
For HELP at any
SCREEN PRESS ? KEY.
It remains on the display for about 8 seconds or
until you press a key. The main menu screen
appears next.
RUN
PROGRAM
VIEW REPORT
OTHER FUNCTIONS
1-3

6712 Sampler
1.2 Using Menus and Entering Numbers
A menu is a list of options. The main menu has
four options:
•Run
•View Report
•Program
• Other Functions
1.2.1 Selecting Menu Options
In menu screens, one menu option always
blinks.
•Press (Enter) when the blinking
option is the one you want; it will accept
your choice and go to the next screen.
The Enter key always accepts the blinking
option.
• Select a different option by pressing an
arrow key until the option you want
blinks. Then press Enter.
1.2.2 Entering Numbers
Press the number keys to type the number.
Then, press Enter. As soon as you press Enter,
the sampler saves your number and moves to
the next screen. In some screens, you can use
the (Decimal Point) key in a number.
Some screens display the range of acceptable
numbers between parentheses. If you enter a
number that is too low or high, the controller
1-4
Section 1 Programming
beeps and erases the entry. Type a new number
and continue.
Example 1-1 Programming
One Sample every 15 Minutes, One Sample
in Each Bottle Using Normal Programming
Style, no module attached.
6712 SAMPLER
1.
This screen disappears on its own after 8
seconds.
2.
The option PROGRAM will be blinking.
Press Enter.
3.
The option NO will be blinking. Press
Enter.
STANDARD PROGRAMMING
For HELP at any
SCREEN PRESS ? KEY.
RUN
PROGRAM
VIEW REPORT
OTHER FUNCTIONS
SITE DESCRIPTION:
“FACTORY “
CHANGE?
YES NO
1-5

6712 Sampler
Example 1-1 Programming
(Continued)
4.
NUMBER OF BOTTLES:
12481224
Select 24. Press Enter.
5.
BOTTLE VOLUME IS
1000 ml (300-30000)
Type the volume for the bottles in your kit.
For this example, 1000 is correct, so
simply press Enter.
6.
SUCTION LINE LENGTH
IS 10 ft
(3-99)
Type the length of the suction line, then
press Enter.
7.
TIME PACED
FLOW PACED
Select TIME PACED by pressing an
arrow until the option TIME PACED
blinks. Then, press Enter.
1-6
Section 1 Programming
Example 1-1 Programming
(Continued)
TIME BETWEEN
8.
Type 0 for hours and press ↵ (Enter).
Type 15 for minutes and press Enter.
9.
Select SEQUENTIAL by pressing an
arrow until the option SEQUENTIAL
blinks. Then, press Enter.
SAMPLE EVENTS
0 HOURS, 15 MINUTES
SEQUENTIAL
BOTTLES/SAMPLE
SAMPLES/BOTTLE
10.
RUN CONTINUOUSLY?
YES NO
Select NO. Press Enter after making your
choice.
11.
SAMPLE VOLUME:
200 ml (10-1000)
Type the volume of the sample you want
deposited in each bottle. Then, press
Enter.
1-7

6712 Sampler
Example 1-1 Programming
12.
13.
14.
15.
(Continued)
NO DELAY TO START
DELAYED START
CLOCK TIME
Select DELAYED START by pressing an
arrow until the option blinks. Then, press
Enter.
FIRST SAMPLE
AFTER A
5 MINUTE DELAY
(1-999)
Type the delay period you want between
the time you run the program and the
time the sampler takes the first sample.
Then, press Enter.
PROGRAMMING COMPLETE
RUN THIS PROGRAM
NOW?
YES NO
Select NO. Press Enter after making your
choice.
RUN
PROGRAM
VIEW REPORT
OTHER FUNCTIONS
Run the program by selecting RUN and
pressing Enter.
1-8

Section 1 Programming
1.2.3 Clock and Calendar Entry Screens
When setting the clock and calendar, use a 24
hour clock for times and the day-month-year
format for dates.
• To move without changing the setting,
press the arrow keys.
• Change the setting by typing a new
number. Press Enter to accept the new
setting.
For example, to enter 2:00 p.m. (2:00 p.m. is
14:00 on a 24-hour clock), type 14. Press Enter.
Type 0 (zero) for the minutes, and press ↵
(Enter). To enter a date, such as January 22,
2001, type: 22 ↵ 01 ↵ 01 ↵ .
1-9
6712 Sampler
Example 1-2 Setting the Clock and
Calendar
RUN
1.
Select OTHER FUNCTIONS.
2.
Select MAINTENANCE.
3.
Select SET CLOCK.
4.
Enter the time and date.
PROGRAM
VIEW REPORT
OTHER FUNCTIONS
MAINTENANCE
MANUAL FUNCTIONS
MODULE
SET CLOCK
PUMP TUBE ALARM
INTERNAL BATTERY
DIAGNOSTICS
ENTER TIME AND DATE:
HH:MM DD-MON-YY
14:00 22-JAN-01
1-10
SET CLOCK
5.
PUMP TUBE A.LARM
INTERNAL BATTERY
DIAGNOSTICS
Press Stop to return to the main menu.
Section 1 Programming
1.3 Quick View Screens
Quick view screens are a special type of menu
screen. They show the current program settings
and let you move quickly through the program.
You must change the programming style to
QUICK VIEW/CHANGE to see the quick view
screens.
Example 1-3 Changing the
Programming Style
RUN
1.
Select OTHER FUNCTIONS.
2.
Select PROGRAMMING STYLE.
3.
Select QUICK VIEW/CHANGE.
PROGRAM
VIEW REPORT
OTHER FUNCTIONS
MAINTENANCE
MANUAL FUNCTIONS
PROGRAMMING STYLE
PROGRAMMING STYLE
NORMAL
QUICK VIEW/CHANGE
1-11

6712 Sampler
1.3.1 Paging Through the Quick View Screens
The arrows in the corners of each quick view
screen are menu options that let you move from
one quick view screen to another.
• Select the reverse arrow to go to the
previous screen.
• Select the forward arrow to go to the next
screen.
• Press Stop to return to the main menu.
1.3.2 Changing Settings in a Quick View Screen
Although the quick view screens offer you a
quick way to see the program settings, they also
provide you with a way to change settings.
Using quick view screens to change settings is
sometimes a faster way to change a program
because you can go quickly to the setting or
settings that needs updating.
To chan ge the pr ogr am se ttings in a quick view
screen, press an arrow until the setting blinks.
Press Enter. The 6712 then displays the screen
used to change the setting.
When you change a setting, the sampler stores
the new settings and returns to the updated
quick view screen.
1-12

Section 1 Programming
1.4 Help Notes
To s ee a help not e:
1. Press the Help key.
2. When the note requires several screens, the
word “more” appears in the lower right
corner. Press Enter for the next note.
3. Move back and forth between screens by
pressing the arrow keys.
4. Press Stop at any time to return to the
programming screen.
Screens that are self explanatory or that
require extensive explanation have notes that
contain only references to the manual.
1.5 Warning Messages
Warning messages appear when the sampler
determines something is out of the ordinary.
For example, screen b appears when you type a
number in screen a that is larger than the
standard bottle volume.
a
b
BOTTLE VOLUME IS
3500 ml (300-30000)
WARNING!
STANDARD BOTTLE
VOLUME EXCEEDED!
The 6712 does accept nonstandard volumes. For
a list of recommended volumes, press the Help
key at screen b or refer to the manual.
1-13

6712 Sampler
The 6712 uses the bottle and sample volume
settings to determine the maximum number of
samples that can be deposited without
overfilling the bottles. Entering a volume that
exceeds the standard volume may cause the
sampler to overfill the bottle.
1.6 Changing to and from Extended and Standard Screens
At the main menu, type “6712.2” to show the
Extended Programming screens.
At the main menu type 6712.1 to show the
Standard Programming screens.
1.7 Storage For Extended Programs
The sampler stores five sampling programs:
one standard and four extended. Program
storage eliminates the need to reprogram the
sampler with frequently used settings.
1-14
Section 1 Programming
Example 1-4 Selecting a Stored
Extended Program
6712 SAMPLER,
1.
If “STANDARD PROGRAMMING”
appears on the second line of the start
up message, type 6712.2
menu.
2.
Select PROGRAM from the main menu.
3.
Select PROGRAM NAME: “EXTENDED
1" from the quick view menu.
EXTENDED PROGRAMMING
For HELP at any
SCREEN, PRESS ? KEY.
at the main
RUN “EXTENDED 1”
PROGRAM
VIEW REPORT
OTHER FUNCTIONS
PROGRAM NAME:
"EXTENDED 1"
SITE DESCRIPTION:
"______"
4.
SELECT NEW PROGRAM
CHANGE PROGRAM NAME
Select SELECT NEW PROGRAM to
change the program.
1-15
6712 Sampler
Example 1-4 Selecting a Stored
Extended Program (Continued)
“EXTENDED 1”
5.
Select the name of the extended program
you want to use.
6.
Select NO.
“EXTENDED 2”
“EXTENDED 3”
“EXTENDED 4”
•
•
•
PROGRAMMING COMPLETE
RUN THIS PROGRAM
NOW?
YES NO
RUN “EXTENDED 2”
PROGRAM
VIEW REPORT
OTHER FUNCTIONS
1.8 Programming the Modules
The module programming screens contain a
branch of setup screens that let you specify the
units of measure and the data storage interval.
Some module setup screens are available to you
even when no module or rain gauge is attached
to the sampler. When you attach a 700 Series
Module to the sampler, the sampler adds an
additional set of screens needed to program the
1-16
 Loading...